| Author |
Message |
 |
|
|
|
|
Advert
|
Forum adverts like this one are shown to any user who is not logged in. Join us by filling out a tiny 3 field form and you will get your own, free, dakka user account which gives a good range of benefits to you:
- No adverts like this in the forums anymore.
- Times and dates in your local timezone.
- Full tracking of what you have read so you can skip to your first unread post, easily see what has changed since you last logged in, and easily see what is new at a glance.
- Email notifications for threads you want to watch closely.
- Being a part of the oldest wargaming community on the net.
If you are already a member then feel free to login now. |
|
 |
2012/01/11 13:10:24
Subject: Re:Mordian Iron Guard IG P&M Blog (Image & Conversion Heavy)!! Now w/ Fenris IG & Space Wolves!
|
|

Doc Brown
|
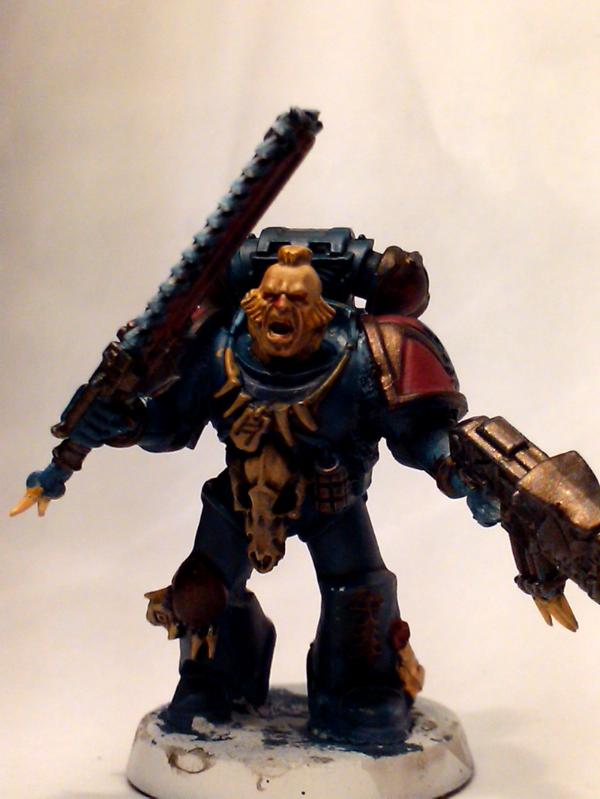
More work done on the 200 pt Kill Team worth of Space Wolves. Still working on the paint scheme:
Armor: Fenris Grey - I've been diluting this with water and applying layers of it, while I think its a great color, I'm not sold on it. I have some washes and think that will help to change my mind or at least cement the likely hood of painting an entire force in this scheme.
Accent: Tin Bitz - This is a good metallic, but I'm not sure if its right for this scheme, I think it blends in too much, how to make it pop?
Shoulder: Scab Red (Though last night I added a layer of Foundation Mechrite Red to the shoulders to try to help brighten up the red, I'll need to go back over the shoulder armor with Scab Red or even a Blood red, but I'm worried that might be too bright.
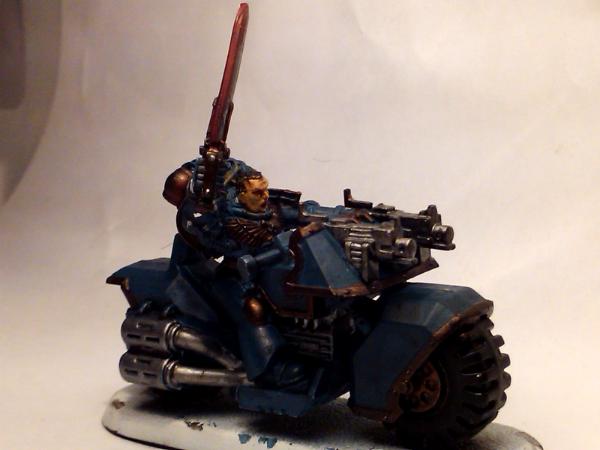
Still working out the colors on the weapons and other accents. Should I paint the front shield on the bike red? I'm thinking the bike might need more color.
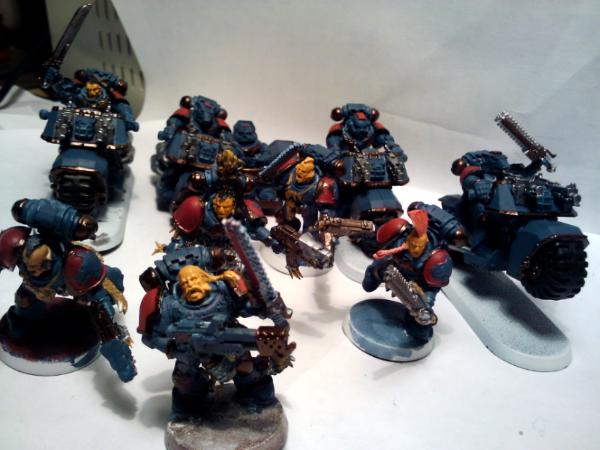
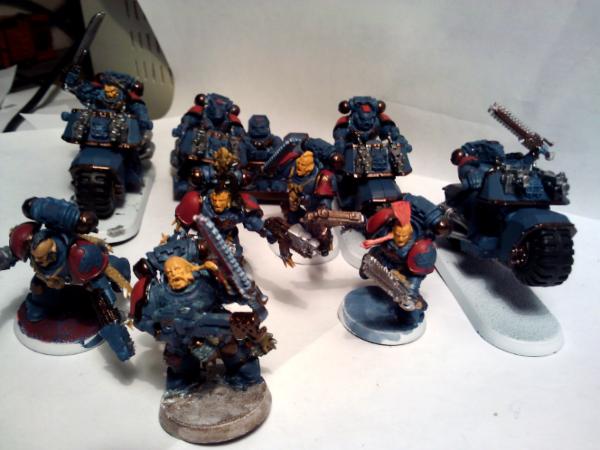
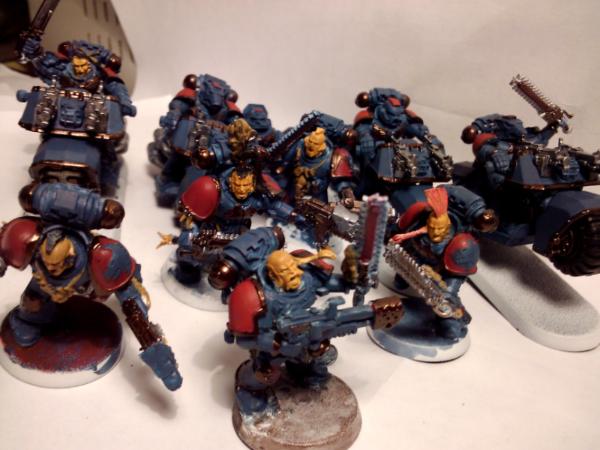
What do y'all think?
|
|
This message was edited 1 time. Last update was at 2012/01/11 18:06:27
Mordian Iron Guard, Red Ork Waaagh, Space Wolves, Dark Angels, Praetorians IG & Fenris IG, Saxons/Vikings Warhammer Ancients as well as some Warmachine/Hordes Cygnar, Khador, Mercenary, Menoth models and a Giant Cardstock Pirate Ship P&M Blog
Mordian Iron Guard IG Army Progress Image Gallery
Space Wolves Image Gallery
Warmachine / Hordes Houston, Texas
Warhammer 40k Houston, Texas
Warhammer Fantasy Facebook Houston, Texas
Warhammer Fantasy Yahoo Group Houston, Texas
|
|
|
 |
|
2012/01/11 16:39:36
Subject: Mordian Iron Guard IG P&M Blog (Image & Conversion Heavy)!! Now w/ Fenris IG & Space Wolves!
|
|
Secretive Dark Angels Veteran
|
I personally think that tin-bits doesn't give the highlights I want. Bolgun metal after a wash of badab black has a very interesting dirty texture look. After line highlighting it further with chainmail and a touch of mithril silver, the metal pops.
For tin bits, I don't know what other color can be used as highlights for it.
For the Fenris Grey, I think the base color is good, I would use a wash of Asurmen Blue and then layer it up leaving a ridge of the wash. Here is the tutorial that I use
http://redemptorsofgolinar.blogspot.com/2008/12/angel-of-absolution-stage-by-stage.html
The red shoulder pad looks cool if you layer it with a shade of lighter red. I always start with Mechrite foundation since it covers 100% in one coat, then scab or blood. Line highlight with Blazing Orange will make it pop.
Also, do you like those Space Wolves guys looking like Asian skin tone? :-p . If not, why not try a very pale color, like Elf Flesh? It works with the ice scheme.
|
|
|
|
|
2012/01/12 13:13:18
Subject: Mordian Iron Guard IG P&M Blog (Image & Conversion Heavy)!! Now w/ Fenris IG & Space Wolves!
|
|
Doc Brown
|
leohart wrote:I personally think that tin-bits doesn't give the highlights I want. Bolgun metal after a wash of badab black has a very interesting dirty texture look. After line highlighting it further with chainmail and a touch of mithril silver, the metal pops.
For tin bits, I don't know what other color can be used as highlights for it.
For the Fenris Grey, I think the base color is good, I would use a wash of Asurmen Blue and then layer it up leaving a ridge of the wash. Here is the tutorial that I use
http://redemptorsofgolinar.blogspot.com/2008/12/angel-of-absolution-stage-by-stage.html
The red shoulder pad looks cool if you layer it with a shade of lighter red. I always start with Mechrite foundation since it covers 100% in one coat, then scab or blood. Line highlight with Blazing Orange will make it pop.
Also, do you like those Space Wolves guys looking like Asian skin tone? :-p . If not, why not try a very pale color, like Elf Flesh? It works with the ice scheme.
Thanks Dat ( Leohart ) I know I can always rely on you for helpful links and good advice 
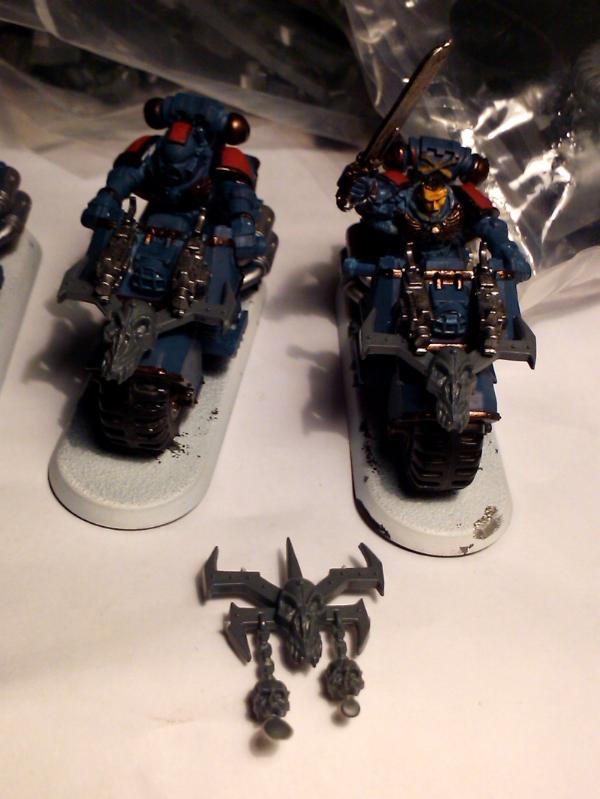
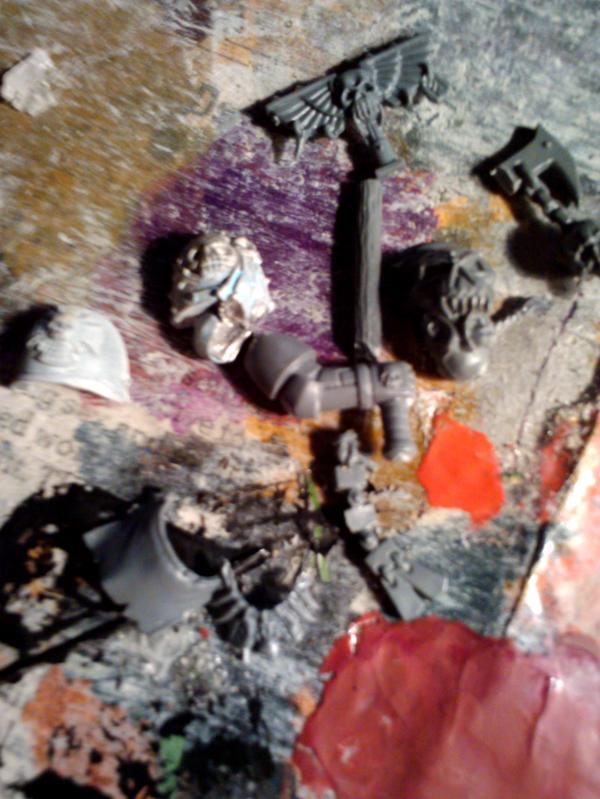
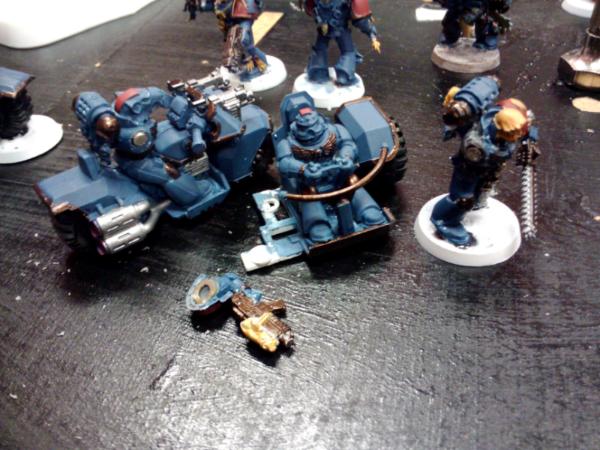
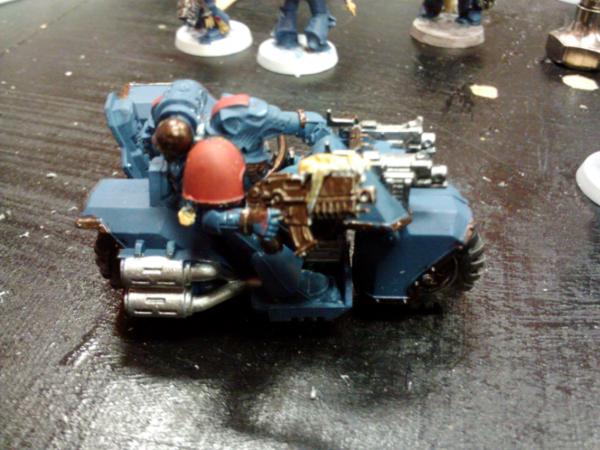
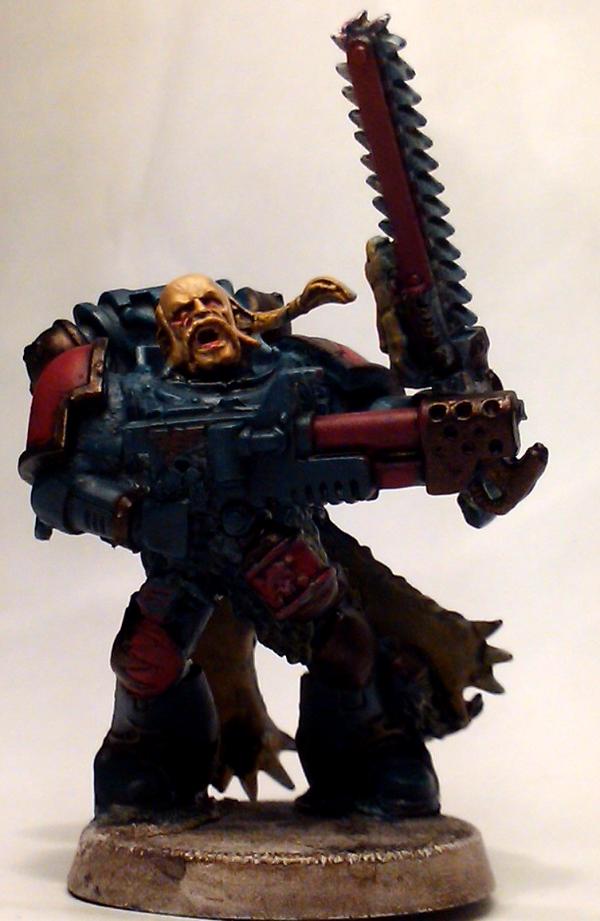
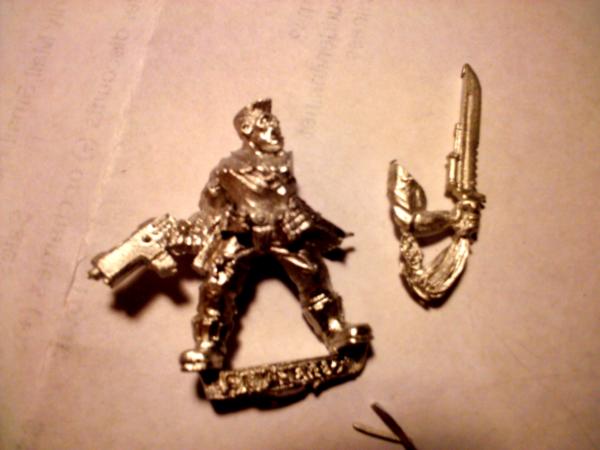
These guys are still a work in progress and I'm going to try some of those techniques, plus a few others. I found another conversion tutorial over here: http://www.bolterandchainsword.com/index.php?showtopic=118757
Which I'm going to try on a couple of my newer bikes along with adding some bitz from my chaos marauders to make the bikes a little more Space Wolf like.
Here is an example:
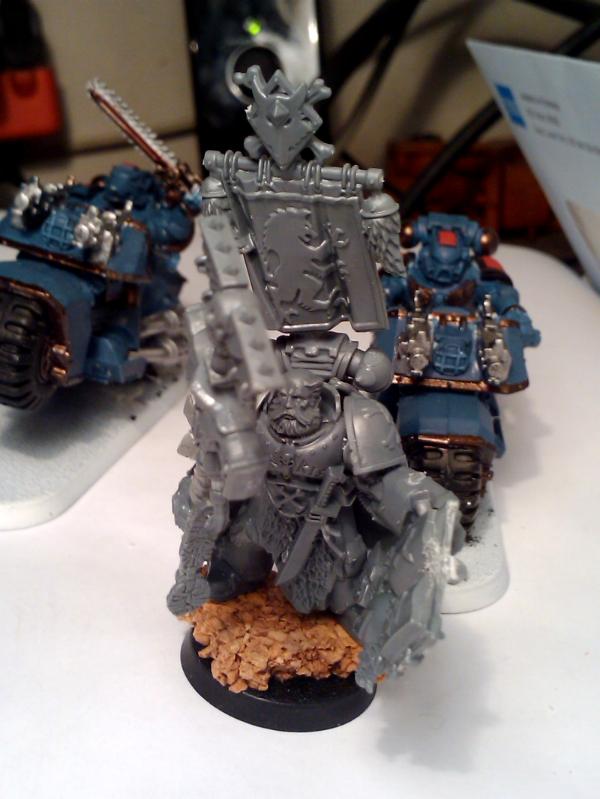
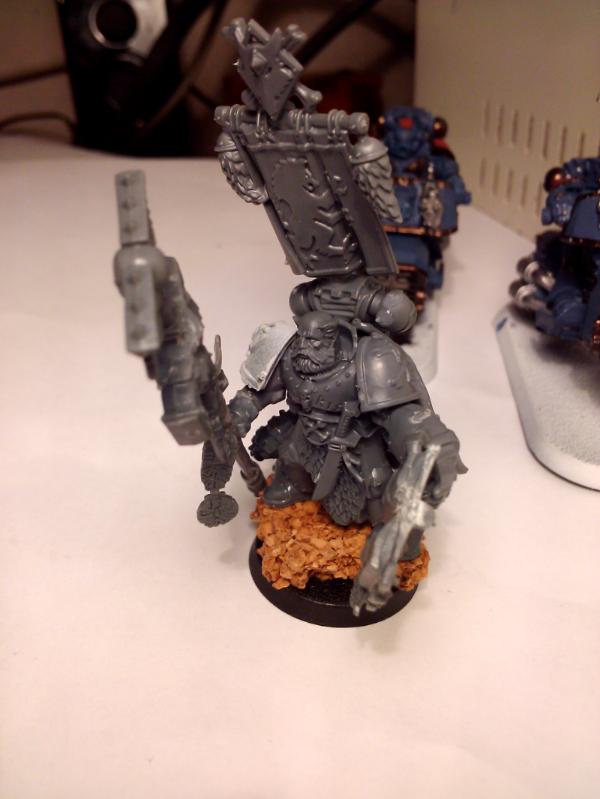
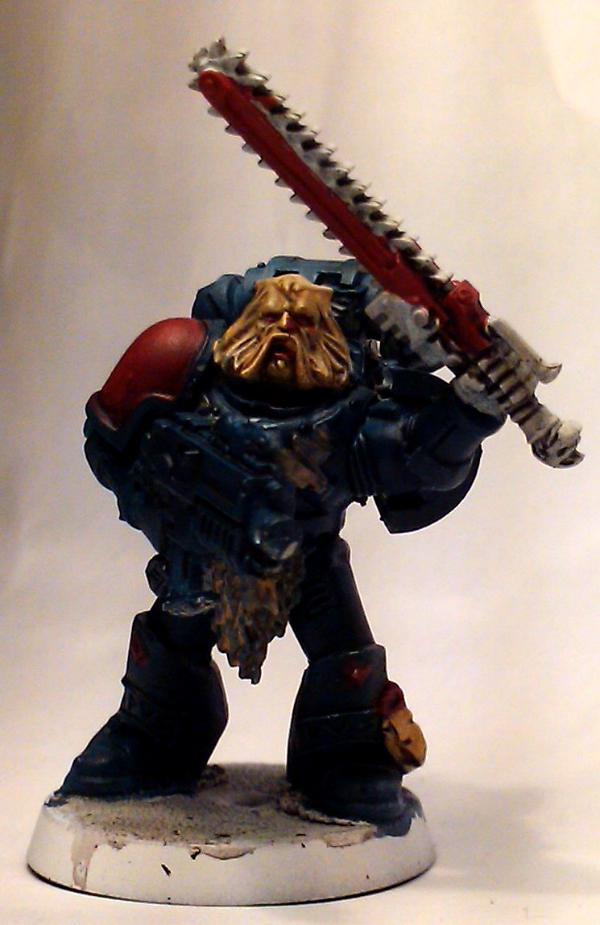
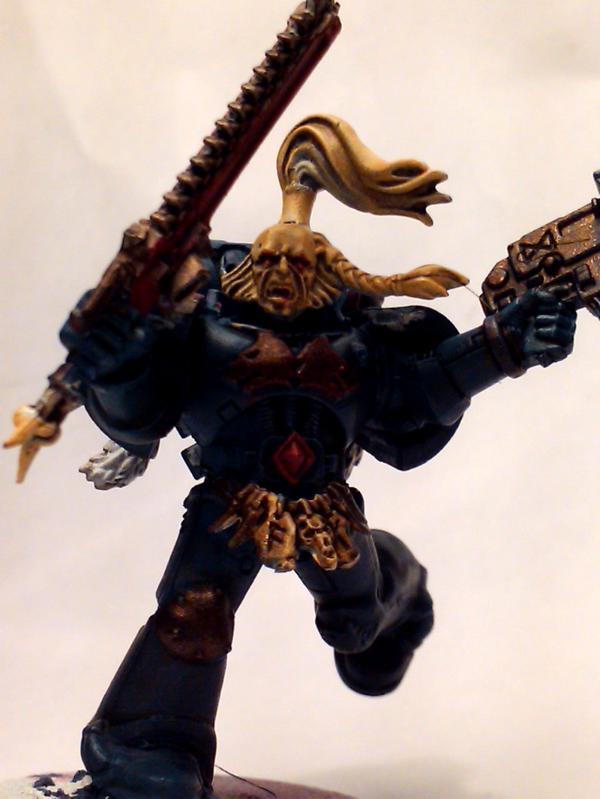
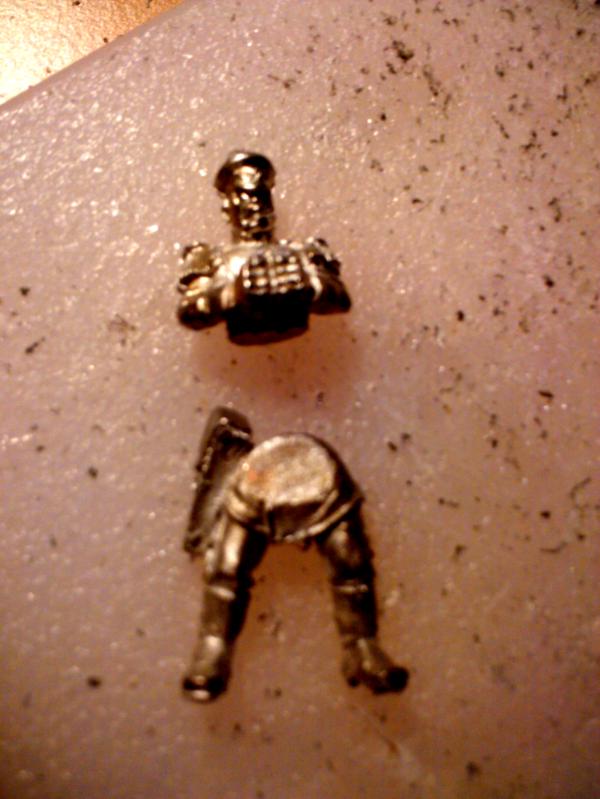
I'm also working on a Rune/Wolf Priest conversion and here are some bitz I've tossed together to try and figure it out:

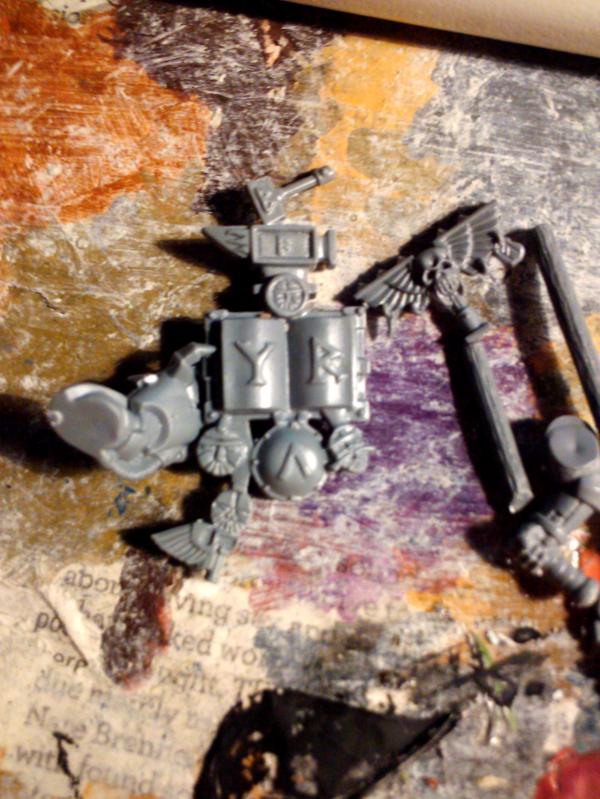
The torso of the model can be a normal SW Power Armored model, its the icons that really make the Rune/Wolf Priest.
|
Mordian Iron Guard, Red Ork Waaagh, Space Wolves, Dark Angels, Praetorians IG & Fenris IG, Saxons/Vikings Warhammer Ancients as well as some Warmachine/Hordes Cygnar, Khador, Mercenary, Menoth models and a Giant Cardstock Pirate Ship P&M Blog
Mordian Iron Guard IG Army Progress Image Gallery
Space Wolves Image Gallery
Warmachine / Hordes Houston, Texas
Warhammer 40k Houston, Texas
Warhammer Fantasy Facebook Houston, Texas
Warhammer Fantasy Yahoo Group Houston, Texas
|
|
|
|
|
2012/01/12 14:51:58
Subject: Mordian Iron Guard IG P&M Blog (Image & Conversion Heavy)!! Now w/ Fenris IG & Space Wolves!
|
|
Secretive Dark Angels Veteran
|
That link has some awesome conversion.
|
|
|
|
|
2012/01/12 22:34:50
Subject: Mordian Iron Guard IG P&M Blog (Image & Conversion Heavy)!! Now w/ Fenris IG & Space Wolves!
|
|
Doc Brown
|
leohart wrote:That link has some awesome conversion.
.
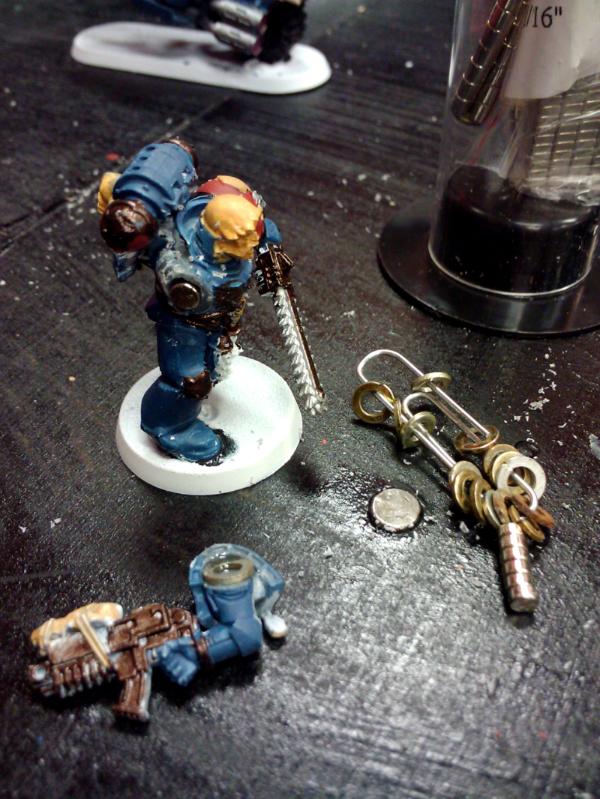
Yes, it does! Automatically Appended Next Post: Work work work... I feel I'm getting close on these Wolves.
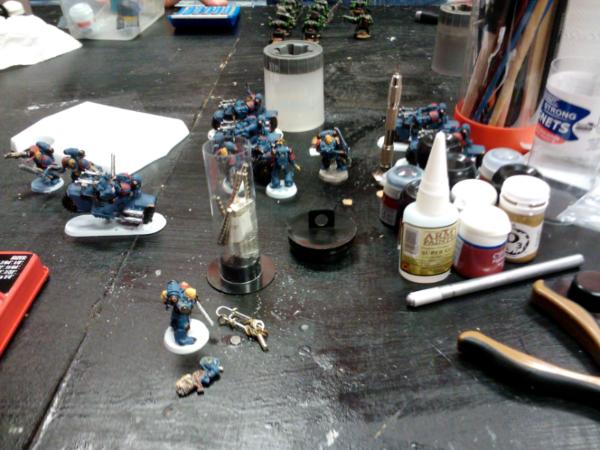
Magnetizing arm sockets is a good way to get versatile models. Drill it out with a small 1/8" drill bit by hand and the superglue a small magnet into the socket. Use a small bit of metal on the arm inside of the shoulder pad and bam, multipurpose model!
Oh and here's a little preview of my next project after the Mordian Iron Guard:
|
|
This message was edited 1 time. Last update was at 2012/01/13 07:35:55
Mordian Iron Guard, Red Ork Waaagh, Space Wolves, Dark Angels, Praetorians IG & Fenris IG, Saxons/Vikings Warhammer Ancients as well as some Warmachine/Hordes Cygnar, Khador, Mercenary, Menoth models and a Giant Cardstock Pirate Ship P&M Blog
Mordian Iron Guard IG Army Progress Image Gallery
Space Wolves Image Gallery
Warmachine / Hordes Houston, Texas
Warhammer 40k Houston, Texas
Warhammer Fantasy Facebook Houston, Texas
Warhammer Fantasy Yahoo Group Houston, Texas
|
|
|
|
|
2012/01/14 07:19:43
Subject: Re:P&M Blog: Current Project: SW Kill Team! On Hold: Mordian Iron Guard IG (Image & Conversion Heavy )
|
|
Doc Brown
|
I can't seem to focus on my projects, lots of stuff going on at home. Been a rough start to the New Year, last year wasn't so great with its ending either.
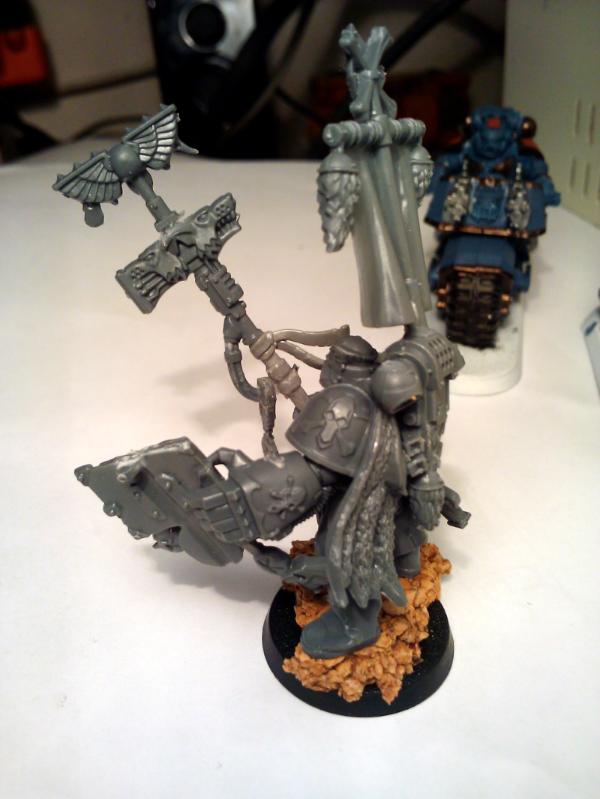
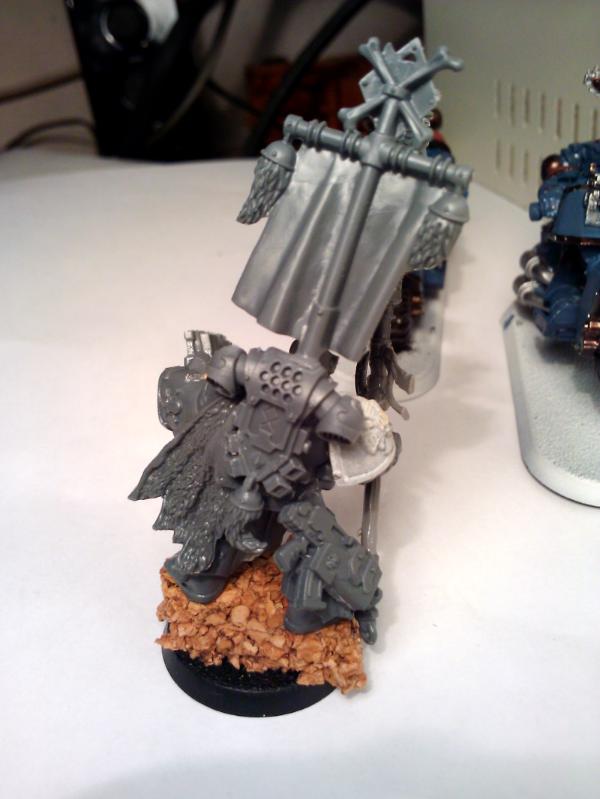
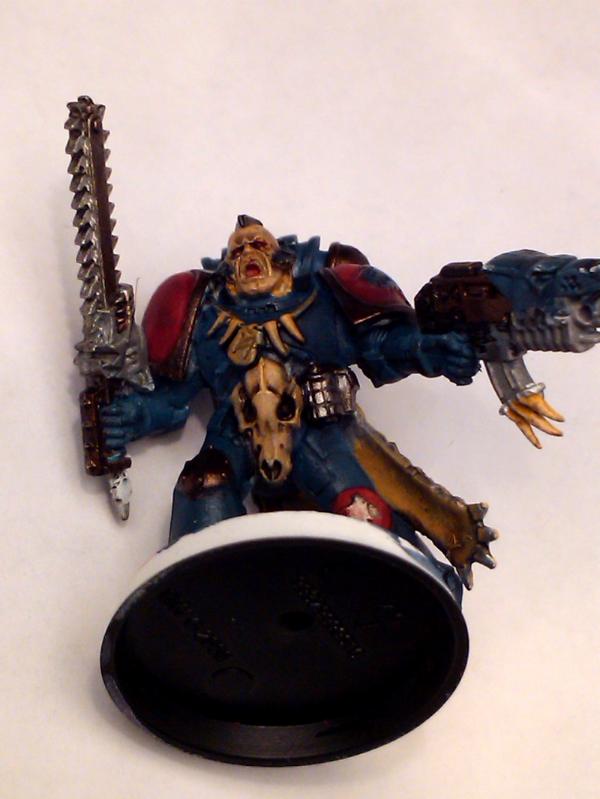
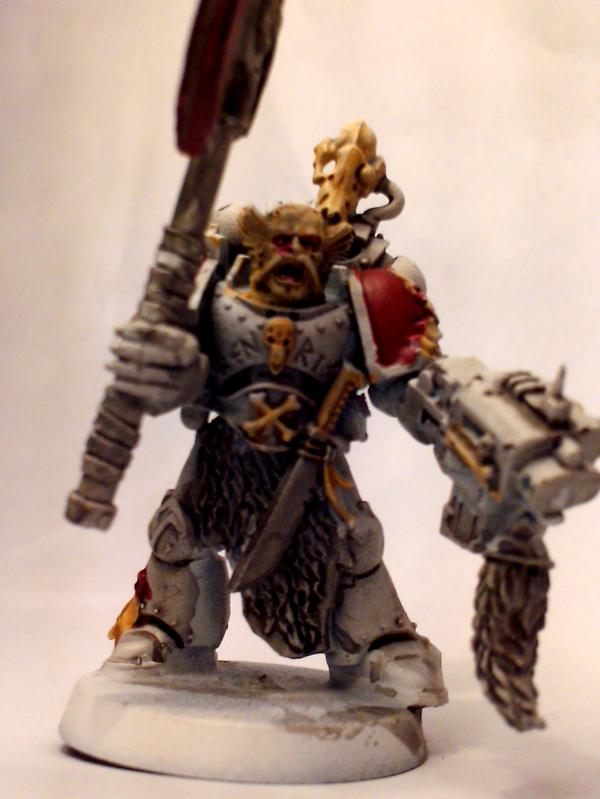
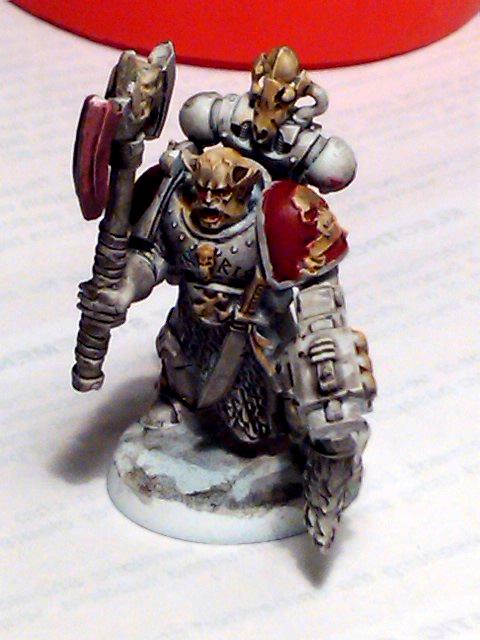
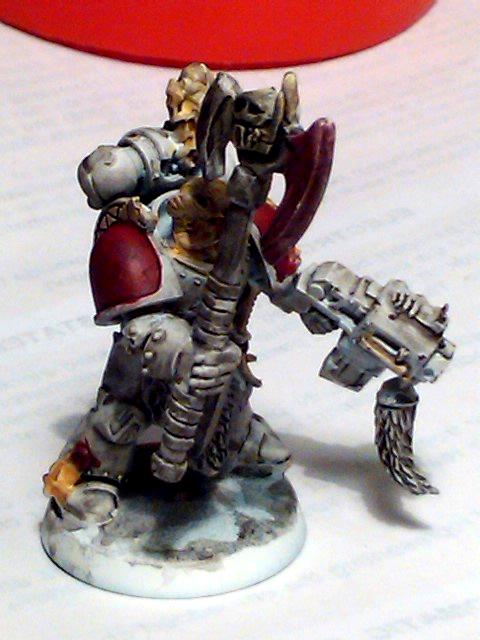
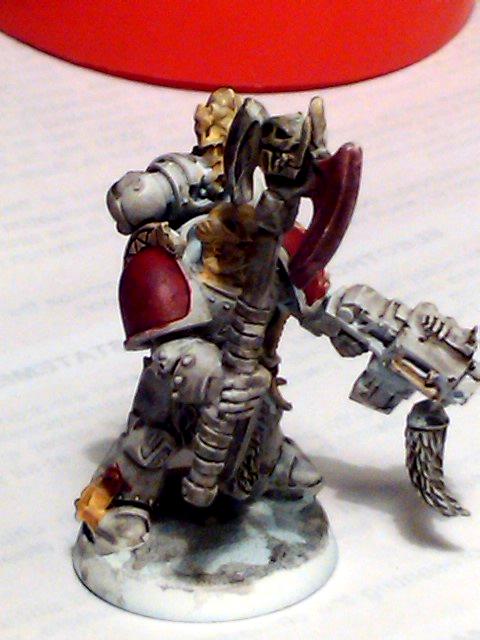
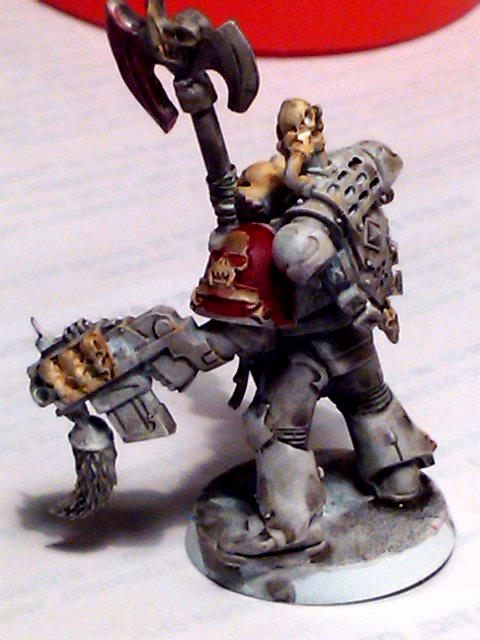
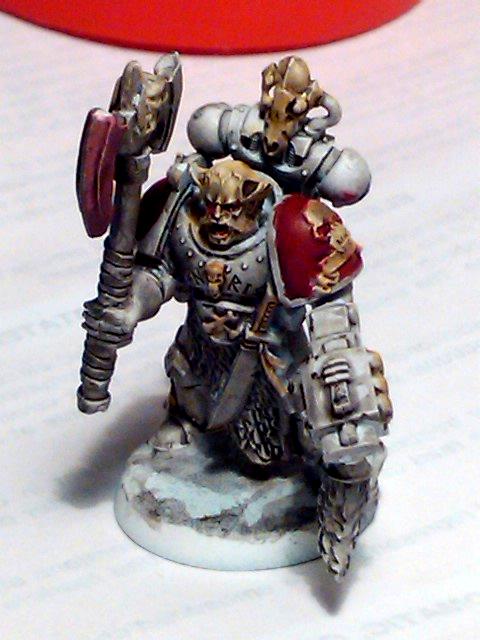
I'd been tossing around the idea of a Rune Priest or Wolf Priest conversion after seeing some on here as well as other places online. In my previous post you can see me lining up bitz to get an idea of how the staff / weapon would work out. Here is my Rune / Wolf Priest Conversion. I used a combination of Space wolf, Fantasy Dwarf and Chaos Marauder bitz to create this model. I might have gone a little overboard, but at least he'll be noticed on the battlefield!
I may use him as a Lone Wolf model as well, paint him up bright and shiny, lots of flash and highlights. This way opponents will target him first or at least he'll provide a good solid distraction.

I've recently acquired a large amount of models from ebay and trades and I'm still in negotiations to get my old models back from friends. I'm debating the paint scheme on the Space Wolf Kill Team and painting up some alternate miniatures to see how something different might work.
I've got a lot going on so I'm going to try to keep progressing with the Kill Team as it is the closest to being done and the Kill Team League is starting up soon.
As always, thoughts, suggestions, comments, criticisms, tips, tricks and what the eff's are always welcome. So post away!
|
Mordian Iron Guard, Red Ork Waaagh, Space Wolves, Dark Angels, Praetorians IG & Fenris IG, Saxons/Vikings Warhammer Ancients as well as some Warmachine/Hordes Cygnar, Khador, Mercenary, Menoth models and a Giant Cardstock Pirate Ship P&M Blog
Mordian Iron Guard IG Army Progress Image Gallery
Space Wolves Image Gallery
Warmachine / Hordes Houston, Texas
Warhammer 40k Houston, Texas
Warhammer Fantasy Facebook Houston, Texas
Warhammer Fantasy Yahoo Group Houston, Texas
|
|
|
|
|
2012/01/14 09:49:57
Subject: P&M Blog: Current Project: SW Kill Team! On Hold: Mordian Iron Guard IG (Image & Conversion Heavy )
|
|

Scarred Ultramarine Tyrannic War Veteran
|
That's one kitted out Rune Priest! He looks great, the rest of your kill team is looking rather fine too. The fantasy Dwarf bits on your SW are a really nice touch.
Keep up the good work!
|
|
This message was edited 1 time. Last update was at 2012/01/14 09:51:09
  "Whilst we stand, we fight. Whilst we fight, we prevail. Nothing shall stay our wrath" "Whilst we stand, we fight. Whilst we fight, we prevail. Nothing shall stay our wrath"
 Guilliman and the Ultramarines are like Manchester United, everyone hates them because they are so awesome! Guilliman and the Ultramarines are like Manchester United, everyone hates them because they are so awesome!
|
|
|
|
|
2012/01/14 14:12:15
Subject: P&M Blog: Current Project: SW Kill Team! On Hold: Mordian Iron Guard IG (Image & Conversion Heavy )
|
|
Secretive Dark Angels Veteran
|
Rune Priest looking great there. Let us make this Kill Team thing happen.
|
|
|
|
|
2012/01/14 14:18:38
Subject: P&M Blog: Current Project: SW Kill Team! On Hold: Mordian Iron Guard IG (Image & Conversion Heavy )
|
|
Decrepit Dakkanaut
|
Looks great! Not over-done at all! But the smart-ass in me means that I am obliged to point out the mold lines on the top of the winged skull 
|
|
This message was edited 2 times. Last update was at 2012/01/14 14:19:38
"dave you are the definition of old school..." -Viktor Von Domm    My P&M Blog : My P&M Blog :
It's great how just adding a little iconography, and rivets of course, can make something look distinctly 40K-adamsouza
"Ah yes, the sound of riveting.....Swear word after swear word and the clinking of thrown tools" "Nope. It sucks do it again..."- mxwllmdr
"It puts together more terrain, or else it gets the hose again...-dangledorf2.0
"This is the Imperium, there is no peace, there are only rivets" -Vitruvian XVII
"I think rivets are the perfect solution to almost every problem"- Rawson
More buildings for the Building God! -Shasolenzabi
  |
|
|
|
|
2012/01/14 15:07:09
Subject: P&M Blog: Current Project: SW Kill Team! On Hold: Mordian Iron Guard IG (Image & Conversion Heavy )
|
|

Rampaging Reaver Titan Princeps
|
Thats a nicely eecuted plastic priest although a bit ornate for my taste. The darker wolf schemes looking fine in my opinion although possibly boltgun metal might work better for the worky bits.
|
"But me no buts! Our comrades get hurt. Our friends die. Falkenburg is a knight who swore an oath to serve the church and to defend the weak. He'd be the first to tell you to stop puling and start planning. Because what we are doing-at risk to ourselves-is what we have sworn to do. The West relies on us. It is a risk we take with pride. It is an oath we honour. Even when some soft southern burgher mutters about us, we know the reason he sleeps soft and comfortable, why his wife is able to complain about the price of cabbages as her most serious problem and why his children dare to throw dung and yell "Knot" when we pass. It's because we are what we are. For all our faults we stand for law and light.
Von Gherens This Rough Magic Lackey, Flint & Freer
Mekagorkalicious -Monkeytroll
2017 Model Count-71
|
|
|
|
|
2012/01/15 07:34:06
Subject: P&M Blog: Current Project: SW Kill Team! On Hold: Mordian Iron Guard IG (Image & Conversion Heavy )
|
|
Doc Brown
|
Flying Pooo wrote:That's one kitted out Rune Priest! He looks great, the rest of your kill team is looking rather fine too. The fantasy Dwarf bits on your SW are a really nice touch. Keep up the good work!
Thank you Flying Pooo! I'm trying to maximize on the bitz/models I've got through the SW Battleforce and I think the Dwarf bitz fit rather nicely. I may tweak him a bit.
I'm still tossing around the color scheme, I think the tin bitz looks good, but I was thinking about going over it with Dwarf Bronze or Shining Gold to brighten it up a bit.
I've settled on Mechrite red with layers of Scab Red over it.
I've got the layering of Fenris Grey down, debating on a wash of Asurmen blue and/or Badab Black.
They're lots of little bits on the models that need colors as well, like fur, bone, teeth, etc. Trying out different things for that.
leohart wrote:Rune Priest looking great there. Let us make this Kill Team thing happen.
Thanks Leohart, we shall definitely need to get some games in. My schedule is crazy though, I'm working over night and then sleep through the day, I can only get out to a store in the afternoon/evening timeframe.
dsteingass wrote:Looks great! Not over-done at all! But the smart-ass in me means that I am obliged to point out the mold lines on the top of the winged skull
Thanks dsteingass! I wanted him to be a little over done and unique. I needed to use the cork board to raise the model up so the staff didn't look too long, haha.
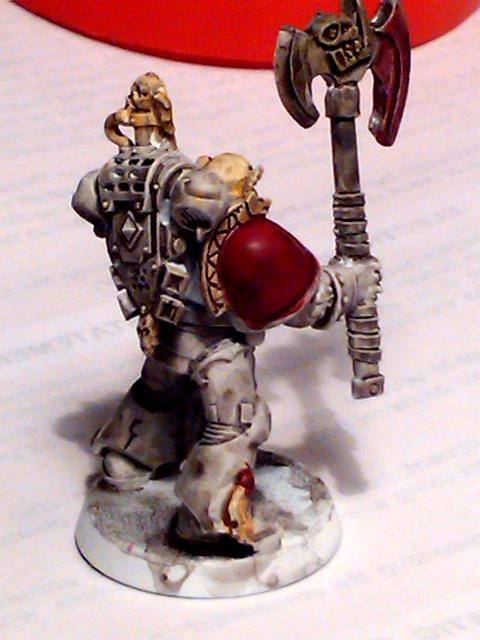
There are mold lines and other things I need to clean up on the model. You may not be able to see it, but the right forearm is actually two pieces pinned together. I wanted an open hand to hold the staff so I cut off the right forearm of a biker model and pinned it to an arm I had removed the Hammer from originally. I tried to get the wire to bend back under/around to the underside of the arm again, but it broke and I didn't want to try and pin it. Which led me to drill/pin that dwarf bit suspended in the handle. There are some other parts that need work. The book for example, I need to fix that up so its cleaner, though I may make it look battle damaged as well.
Llamahead wrote:Thats a nicely eecuted plastic priest although a bit ornate for my taste. The darker wolf schemes looking fine in my opinion although possibly boltgun metal might work better for the worky bits.
Thank you Lamahead, I was going for a bit over the top so he wouldn't be mistaken for a normal space wolf model and I was trying to cover two different types of SW Priest, the Rune / Wolf Priest model. I think he's just got that bit more over the top that will prove to be his best asset as a distraction/target.
Are you saying Boltgun Metal on the weapons rather than the tin bitz? Which "worky" bits are we talking about?
Thank you again all! I've begun working on some chopper bike conversions, but unfortunately the family dog decided that my plasticard tubes were his nice new chew toys.  Luckily, he didn't eat the bikes.
I'll have some more pics ready soon!
|
|
This message was edited 1 time. Last update was at 2012/01/15 12:51:44
Mordian Iron Guard, Red Ork Waaagh, Space Wolves, Dark Angels, Praetorians IG & Fenris IG, Saxons/Vikings Warhammer Ancients as well as some Warmachine/Hordes Cygnar, Khador, Mercenary, Menoth models and a Giant Cardstock Pirate Ship P&M Blog
Mordian Iron Guard IG Army Progress Image Gallery
Space Wolves Image Gallery
Warmachine / Hordes Houston, Texas
Warhammer 40k Houston, Texas
Warhammer Fantasy Facebook Houston, Texas
Warhammer Fantasy Yahoo Group Houston, Texas
|
|
|
|
|
2012/01/15 14:47:37
Subject: P&M Blog: Current Project: SW Kill Team! On Hold: Mordian Iron Guard IG (Image & Conversion Heavy )
|
|
Secretive Dark Angels Veteran
|
My bikes against your bikes.  We should have a racing game designed for them.
|
|
|
|
|
2012/01/15 15:40:07
Subject: P&M Blog: Current Project: SW Kill Team! On Hold: Mordian Iron Guard IG (Image & Conversion Heavy )
|
|
Doc Brown
|
leohart wrote:My bikes against your bikes. We should have a racing game designed for them.
I believe there are rules for a 40K racing game. They may have been designed with Orks in mind though. I think it was called Gorka Morka?
I'm sure there are rules out there somewhere.
In other news I spent some time last night painting more SW models and this morning I plucked foam from my Battlefoam P.A.C.K. 216. Which is supposed to hold 216 models, yet I think it falls far short of that mark.
Time to grab some shuteye! See y'all on the flipside of the lids!
|
Mordian Iron Guard, Red Ork Waaagh, Space Wolves, Dark Angels, Praetorians IG & Fenris IG, Saxons/Vikings Warhammer Ancients as well as some Warmachine/Hordes Cygnar, Khador, Mercenary, Menoth models and a Giant Cardstock Pirate Ship P&M Blog
Mordian Iron Guard IG Army Progress Image Gallery
Space Wolves Image Gallery
Warmachine / Hordes Houston, Texas
Warhammer 40k Houston, Texas
Warhammer Fantasy Facebook Houston, Texas
Warhammer Fantasy Yahoo Group Houston, Texas
|
|
|
|
|
2012/01/16 08:18:28
Subject: Re:P&M Blog: Current Project: SW Kill Team! On Hold: Mordian Iron Guard IG (Image & Conversion Heavy )
|
|
Doc Brown
|
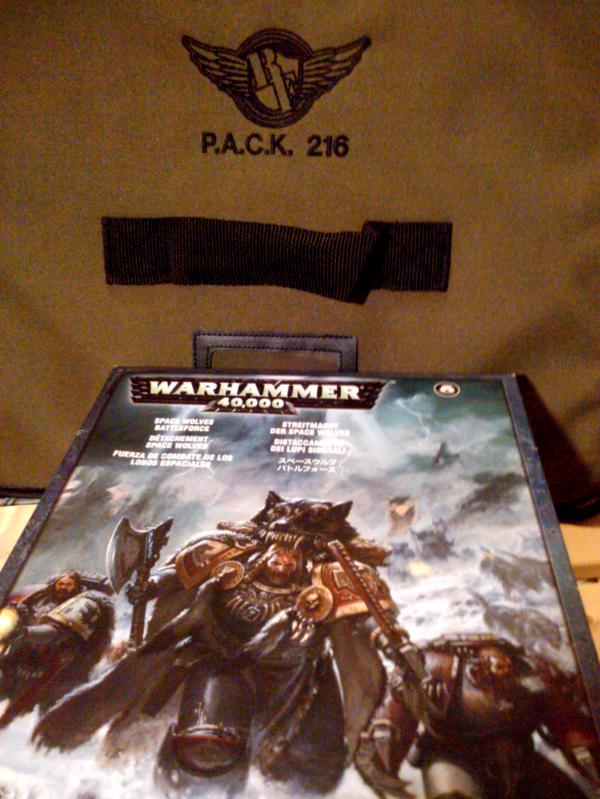
Got my Battle Foam Pack 216 out to set up to transport my Space Wolf Kill Team:
http://us.battlefoam.com/products/%28216%29-P.A.C.K.-216-Pluck-Foam-Load-Out.html
The P.A.C.K. (Personal Army Combat Kit) 216 can fit 4 inches (102 mm) of foam. Its rugged olive canvas exterior protects a hard plastic interior built for strength and durability. Its design includes a zipper on the bottom to allow for attachment to the P.A.C.K. 1520 XL. It was also designed for airport travel and meets all FAA regulations for carryon luggage.
This bag comes with 4 inches (102 mm) of pluck foam, which breaks down to 1x 1 inch (25 mm) tray and 1x 2 inch (51 mm) tray. The pluck foam pieces are 1/2 inch (13 mm) squares.
At times, pluck foam trays may require an exacto blade to cut through portions of the foam. Custom text is not available on this product.
Bag Dimensions - 16W x 12L x 4H" (406W x 305L x 102H mm)
Pluck foam isn't anything to be afraid of, though the custom foam is pretty dang awesome, You just have to line up the models and get an idea of what foam you want to pluck out. Keep the pluck foam in a big plastic bag, whats cool about pluck foam versus custom foam is that if my army changes, I can simply re-insert the plucked out foam apply superglue to the sides and its back to its original state of awesomeness.
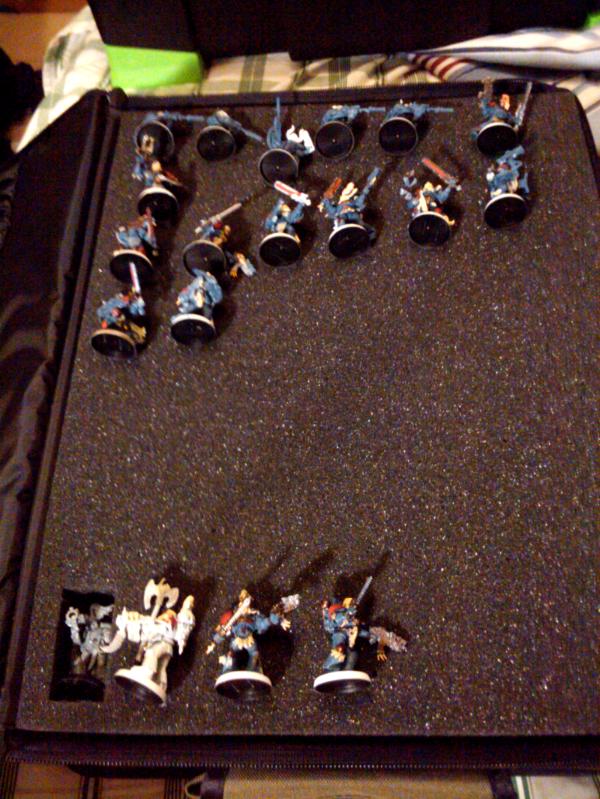
As you can see, the 1 inch (25 mm) tray foam can hold about 42 models in the setup I have put together. There is still an edge of pluck foam on the right side which can be removed for a slightly larger sized model. My Bikes won't fit into this layer unless I put them on their sides.
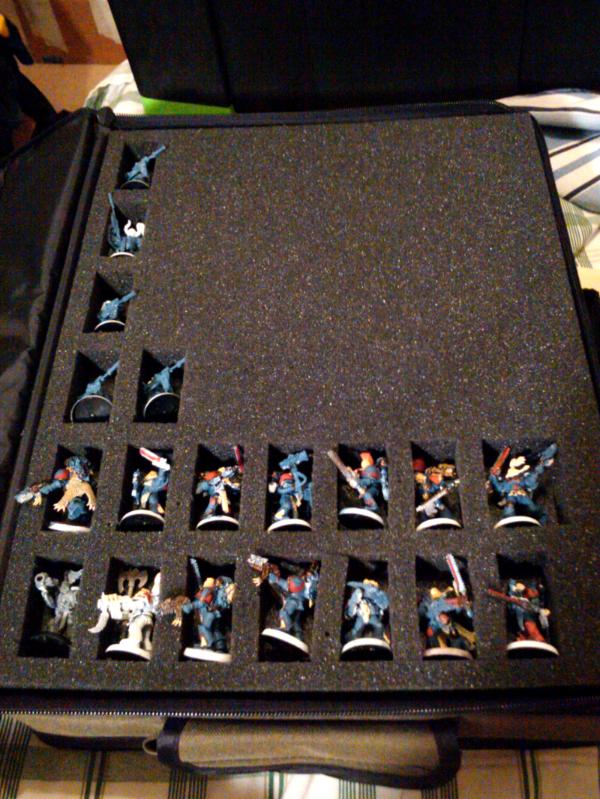
The 2 inch (51 mm) tray foam is (obviously) slightly thicker and deeper, yet not really deep enough for a bike model with an arm upraised with chainsword/Power sword. I'm going to have to lay him on his side which will take up valuable foam real estate. Line them up, then pluck out the foam.
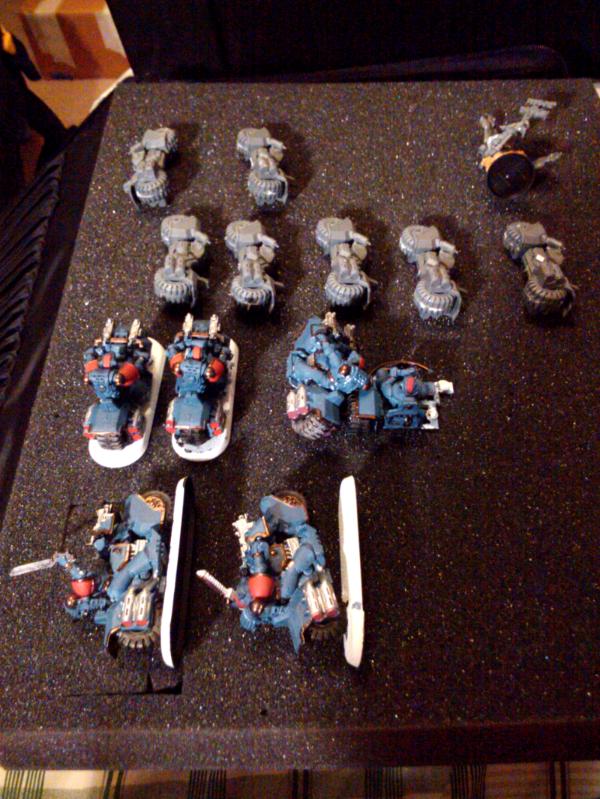
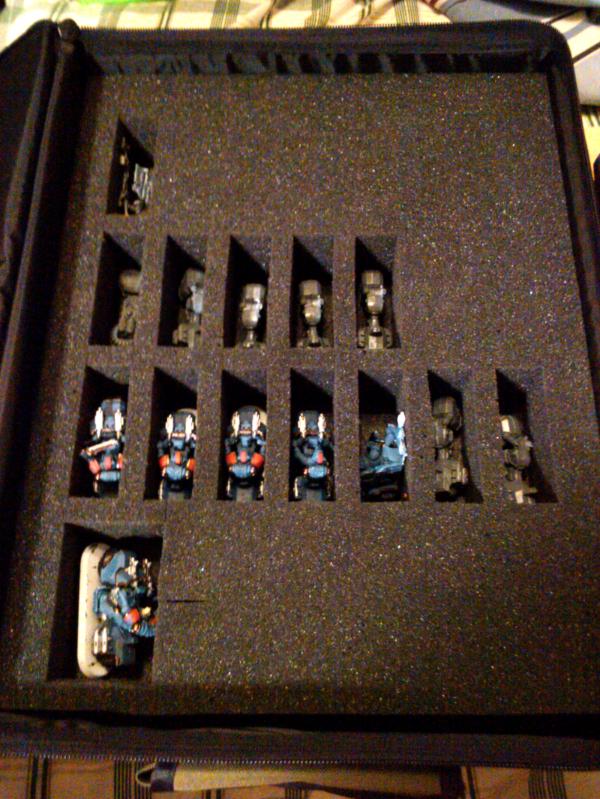
So its a good kit for a small force. I'd say this would be better for a standard small skirmish game army like Warmachine, Infinity or Malifaux, but not large scale games like 40K which require hundreds of models. This is a good addition piece to the other battlefoam bags as it has a zipper which will attach it to another bag, so if you need just a little more space and you have a battlefoam bag, then it would be good for that. Its a last piece type of bag though, meaning if you attach it to a larger bag, this is the last one that can go on the bag as it doesn't have a zipper on top of it.
My piece of advice is to never buy the small bag, your army will always grow and you'll be buying storage for awhile. Automatically Appended Next Post: Applied some more layers of Fenris Grey and Mechrite Red to my models last night. As well, I applied a layer of Asurmen Blue, but thought that turned the Fenris Grey too blue, so I hit it with a layer of Badab Black, let me know what you think!
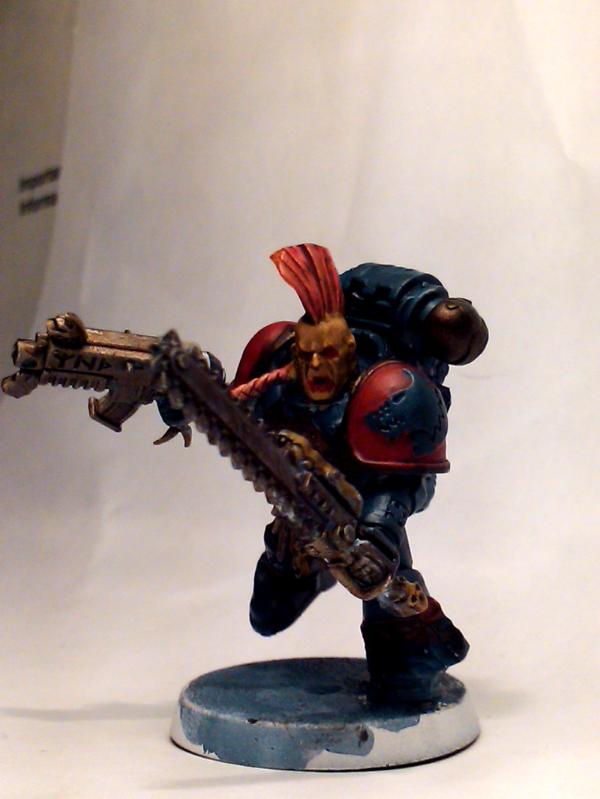

I kind of like this color pattern. This is simply P3 Primer with a Badab black wash over it and Mechrite Red on the shoulders as well as a P3 Khaki/Flesh tone color that is escaping me.
|
|
This message was edited 1 time. Last update was at 2012/01/16 16:09:59
Mordian Iron Guard, Red Ork Waaagh, Space Wolves, Dark Angels, Praetorians IG & Fenris IG, Saxons/Vikings Warhammer Ancients as well as some Warmachine/Hordes Cygnar, Khador, Mercenary, Menoth models and a Giant Cardstock Pirate Ship P&M Blog
Mordian Iron Guard IG Army Progress Image Gallery
Space Wolves Image Gallery
Warmachine / Hordes Houston, Texas
Warhammer 40k Houston, Texas
Warhammer Fantasy Facebook Houston, Texas
Warhammer Fantasy Yahoo Group Houston, Texas
|
|
|
|
|
2012/01/17 05:07:55
Subject: Re:P&M Blog: Current Project: SW Kill Team! On Hold: Mordian Iron Guard IG (Image & Conversion Heavy )
|
|
Doc Brown
|
Okay, here's a small update on the Mordian Iron Guard:
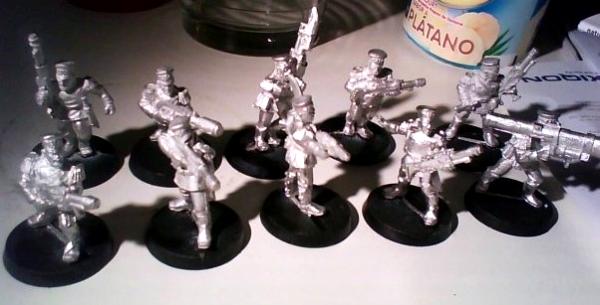
New Troops arrived and have been assembled:
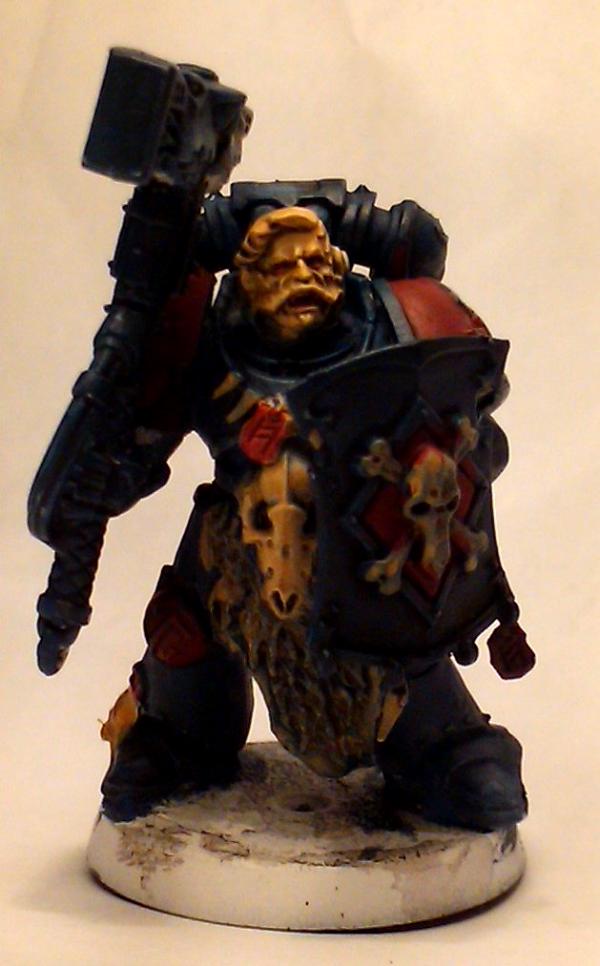
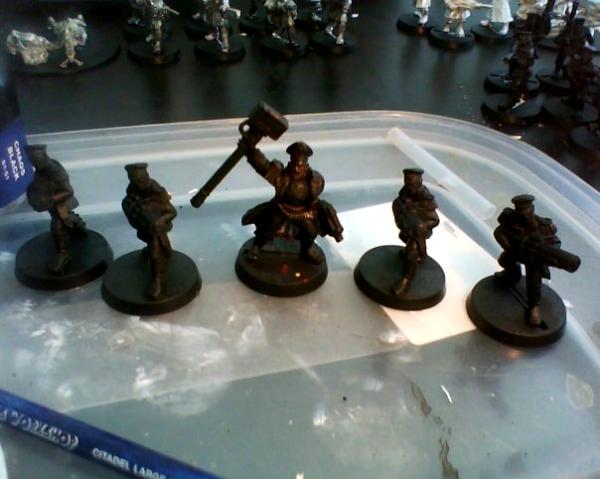
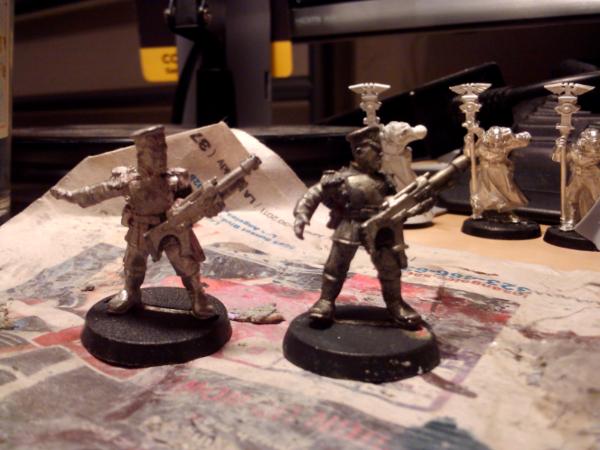
Small Command Squad Idea with a slight conversion on the Lieutenant model, turned his Chain sword into a Power Hammer! I'm also trying to prime with black and see how this color goes with the blue and yellow.
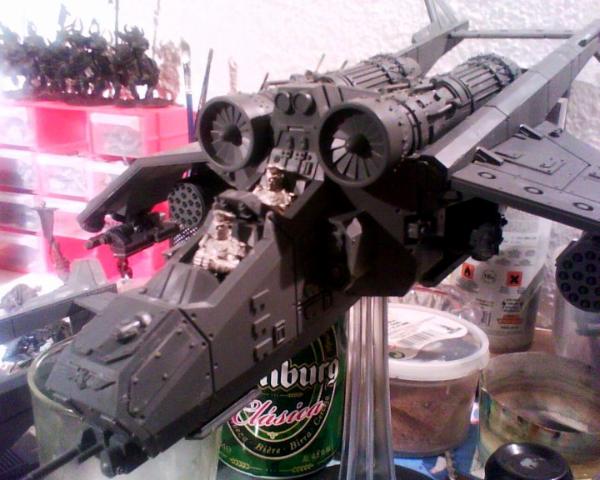
Last, but not least! Mordian Iron Guard Air Force! This is a simple conversion y'all have seen before. I've simply used the top torso from the Heavy Bolter weapons team seated gunner. What do you think?
|
Mordian Iron Guard, Red Ork Waaagh, Space Wolves, Dark Angels, Praetorians IG & Fenris IG, Saxons/Vikings Warhammer Ancients as well as some Warmachine/Hordes Cygnar, Khador, Mercenary, Menoth models and a Giant Cardstock Pirate Ship P&M Blog
Mordian Iron Guard IG Army Progress Image Gallery
Space Wolves Image Gallery
Warmachine / Hordes Houston, Texas
Warhammer 40k Houston, Texas
Warhammer Fantasy Facebook Houston, Texas
Warhammer Fantasy Yahoo Group Houston, Texas
|
|
|
|
|
2012/01/17 05:26:49
Subject: P&M Blog: Current Project: SW Kill Team! On Hold: Mordian Iron Guard IG (Image & Conversion Heavy )
|
|
Secretive Dark Angels Veteran
|
Looking awesome. All these metal models will be super heavy on the Battlefoam case.
|
|
|
|
|
2012/01/17 12:28:03
Subject: P&M Blog: Current Project: SW Kill Team! On Hold: Mordian Iron Guard IG (Image & Conversion Heavy )
|
|
Scarred Ultramarine Tyrannic War Veteran
|
That Lieutenant in the Command squad is rather awesome looking with his thunder hammer and all! I love all the conversions in your Mordian force they are mostly quite simple, but pure genius and they look great.
Awesome work man!
|
"Whilst we stand, we fight. Whilst we fight, we prevail. Nothing shall stay our wrath"
Guilliman and the Ultramarines are like Manchester United, everyone hates them because they are so awesome!
|
|
|
|
|
2012/01/17 12:36:53
Subject: P&M Blog: Current Project: SW Kill Team! On Hold: Mordian Iron Guard IG (Image & Conversion Heavy )
|
|
Doc Brown
|
leohart wrote:Looking awesome. All these metal models will be super heavy on the Battlefoam case.
Thanks! I uploaded/posted new pics last night / early this morning. I agree the Battlefoam case is going to be heavy, luckily the one I purchased comes with luggage wheels. Good thing I've got a truck as well!
I went by a RC Car/Plane hobby shop close to my house today and picked up some brass rod and plastic tube for my bike conversion idea. I'm Holding off on completing the bikes while I work out this newer conversion process. I need to look up whats good for cutting brass rod without bending it.
Lots of thoughts going on with my paint scheme. I hit a model, that I'd primed with P3 White, with a few basic colors, i.e. P3 Rucksack Tan and then Citadel Elf Flesh and Mechrite Red (shoulder armor). Then just on impulse I Washed the whole model with Citadel Badab Black and I'm really liking how it came out. Also, I'm liking how simple and easy it was to do and am seriously considering doing this for the rest of my force.
What are y'all's thoughts on this?
 Automatically Appended Next Post:
 Flying Pooo wrote:That Lieutenant in the Command squad is rather awesome looking with his thunder hammer and all! I love all the conversions in your Mordian force they are mostly quite simple, but pure genius and they look great.
Awesome work man!
Good morning Mr. Pooo! Thank you, the conversions do seem simple, but they're making big impacts! The torso from the heavy bolter team allows for so many possibilities when it comes to vehicles, I've got several legs left over though, lol.
The Hammer was simple and I wanted to change up the look of some of the Officer models and I have all these nice SW and other bitz lying around to give me ideas.
Do you have any suggestions for conversions? I may get back to painting these guys soon, but these dang Space Wolves keep pulling at me too.
Automatically Appended Next Post: 10000 Views! Amazing!!
Thank you everyone for stopping by and checking this little blog out!
|
|
This message was edited 2 times. Last update was at 2012/01/17 12:42:35
Mordian Iron Guard, Red Ork Waaagh, Space Wolves, Dark Angels, Praetorians IG & Fenris IG, Saxons/Vikings Warhammer Ancients as well as some Warmachine/Hordes Cygnar, Khador, Mercenary, Menoth models and a Giant Cardstock Pirate Ship P&M Blog
Mordian Iron Guard IG Army Progress Image Gallery
Space Wolves Image Gallery
Warmachine / Hordes Houston, Texas
Warhammer 40k Houston, Texas
Warhammer Fantasy Facebook Houston, Texas
Warhammer Fantasy Yahoo Group Houston, Texas
|
|
|
|
|
2012/01/17 13:08:43
Subject: P&M Blog: Current Project: SW Kill Team! On Hold: Mordian Iron Guard IG (Image & Conversion Heavy )
|
|
Scarred Ultramarine Tyrannic War Veteran
|
Good Morning? It's 12AM here! LOL. I Need to get to bed...
Anyway... I love the test SW mini! If you think it is easier to paint and you think your force will not look worse off because of it then I'd say use this paint scheme for the rest of your force. My only criticism is That you can see that the Badab Black has pooled in some places. When using washes It is actually better to thin them! Crazy I know they are already quite thin, but you will see it make a difference if you do water them down. Instead of one thick wash try a couple thin washes instead. I'd say around 1:1 Wash to water. That way you will get a lot less pooling and your minis will look sharper and cleaner.
As for Conversion suggestions...
Do you have a Sly Marbo yet ? Every IG army should have him as he is just a BEAST. I would like to see a Mordian counterpart. Maybe those spare gunner legs might make a nice crouch position...
The seed has hopefully now been planted...
|
|
This message was edited 2 times. Last update was at 2012/01/17 13:15:24
"Whilst we stand, we fight. Whilst we fight, we prevail. Nothing shall stay our wrath"
Guilliman and the Ultramarines are like Manchester United, everyone hates them because they are so awesome!
|
|
|
|
|
2012/01/17 15:10:17
Subject: P&M Blog: Current Project: SW Kill Team! On Hold: Mordian Iron Guard IG (Image & Conversion Heavy )
|
|
Doc Brown
|
Flying Pooo wrote:Good Morning? It's 12AM here! LOL. I Need to get to bed...
Anyway... I love the test SW mini! If you think it is easier to paint and you think your force will not look worse off because of it then I'd say use this paint scheme for the rest of your force. My only criticism is That you can see that the Badab Black has pooled in some places. When using washes It is actually better to thin them! Crazy I know they are already quite thin, but you will see it make a difference if you do water them down. Instead of one thick wash try a couple thin washes instead. I'd say around 1:1 Wash to water. That way you will get a lot less pooling and your minis will look sharper and cleaner.
As for Conversion suggestions...
Do you have a Sly Marbo yet ? Every IG army should have him as he is just a BEAST. I would like to see a Mordian counterpart. Maybe those spare gunner legs might make a nice crouch position...
The seed has hopefully now been planted...
12 AM IS MORNING! Hahaha, its almost 09:00 a.m. here, I need to get to bed, this nocturnal living is messing with my social life.
The test mini is easier! Its just the white primer and a wash of badab black! I did thin the wash a bit, but I haven't been doing it evenly, I think the pooled wash just gives the armor a dirty grey look, Wolves aren't meant to be shiny and clean... I do need to find some small bottles to mix my paints in and store easily. I'm also considering how easy painting vehicles would be if I went this route.
Ah Marbo.. Yes, I have an original Marbo model and had already discussed some conversion ideas. Wherein I was going to carve up two models to make 1 model from a Marbo & a Lieutenant.
The legs off the heavy bolter team are seated legs, they lay flat like if you were to sit on the floor with your legs stretched out in front of you:
http://www.games-workshop.com/gws/catalog/productDetail.jsp?catId=cat1490986&prodId=prod1130439
Hmelrose wrote:
Here are some .. Mordian Iron Guard Possibilities:
Marbo - I have these thoughts in my head of cutting his head and arms off and then doing something similar to a Mordian model and then converting them together to create a Mordian Marbo... I may have a conversion bug in my system.
Though I think I could probably do something with an Cadian Officer Chest, Catachan or Cadian officer legs & Arms and maybe a Cadian Officer or Tank Commander head.. Kind of give him the uniformed look with torn dress uniform.. He'd mostly be Cadian with Catachan arms.. or I just cut the head off a Mordian Model and cut the head off Marbo and then glue them together. I could salvage the Marbo body with a Catachan head easily enough.
I'd use the above model. Remove the head and place something that looks like a demo charge in his hand. What do you think?
|
|
This message was edited 1 time. Last update was at 2012/01/17 15:15:50
Mordian Iron Guard, Red Ork Waaagh, Space Wolves, Dark Angels, Praetorians IG & Fenris IG, Saxons/Vikings Warhammer Ancients as well as some Warmachine/Hordes Cygnar, Khador, Mercenary, Menoth models and a Giant Cardstock Pirate Ship P&M Blog
Mordian Iron Guard IG Army Progress Image Gallery
Space Wolves Image Gallery
Warmachine / Hordes Houston, Texas
Warhammer 40k Houston, Texas
Warhammer Fantasy Facebook Houston, Texas
Warhammer Fantasy Yahoo Group Houston, Texas
|
|
|
|
|
2012/01/17 16:31:24
Subject: P&M Blog: Current Project: SW Kill Team! On Hold: Mordian Iron Guard IG (Image & Conversion Heavy )
|
|
Secretive Dark Angels Veteran
|
More psykers, those guys are awesome.
|
|
|
|
|
2012/01/17 17:07:22
Subject: P&M Blog: Current Project: SW Kill Team! On Hold: Mordian Iron Guard IG (Image & Conversion Heavy )
|
|
Doc Brown
|
leohart wrote:More psykers, those guys are awesome.
Everything I've heard tells me they are! I think I have 10 to 12 Psyker models and one Primaris Psyker model sitting on my table waiting to be painted. There should be pics earlier in the blog or in the image gallery linked below.
|
Mordian Iron Guard, Red Ork Waaagh, Space Wolves, Dark Angels, Praetorians IG & Fenris IG, Saxons/Vikings Warhammer Ancients as well as some Warmachine/Hordes Cygnar, Khador, Mercenary, Menoth models and a Giant Cardstock Pirate Ship P&M Blog
Mordian Iron Guard IG Army Progress Image Gallery
Space Wolves Image Gallery
Warmachine / Hordes Houston, Texas
Warhammer 40k Houston, Texas
Warhammer Fantasy Facebook Houston, Texas
Warhammer Fantasy Yahoo Group Houston, Texas
|
|
|
|
|
2012/01/17 18:05:08
Subject: P&M Blog: Current Project: SW Kill Team! On Hold: Mordian Iron Guard IG (Image & Conversion Heavy )
|
|
Secretive Dark Angels Veteran
|
Yep. 9 psyker dudes casting Weaken Resolve making my squad Leadership 1. Then if I lose 25% of my squad in one shooting phase, I have to roll double 1s to stay. Otherwise, I will have to run (unless I have some special rules like Fearless or Stubborn).
Not fun at all. -_-.
|
|
|
|
|
2012/01/17 22:47:35
Subject: P&M Blog: Current Project: SW Kill Team! On Hold: Mordian Iron Guard IG (Image & Conversion Heavy )
|
|

Shroomin Brain Boy
|
wow... love that lieutenant is looking super cool with that hammer... very cool idea!
|
|
|
|
|
|
2012/01/18 05:52:28
Subject: P&M Blog: Current Project: SW Kill Team! On Hold: Mordian Iron Guard IG (Image & Conversion Heavy )
|
|
Doc Brown
|
leohart wrote:Yep. 9 psyker dudes casting Weaken Resolve making my squad Leadership 1. Then if I lose 25% of my squad in one shooting phase, I have to roll double 1s to stay. Otherwise, I will have to run (unless I have some special rules like Fearless or Stubborn).
Not fun at all. -_-.
Viktor von Domm wrote:wow... love that lieutenant is looking super cool with that hammer... very cool idea!
Yeah, Leohart Pyskers can be brutal, I almost took them all for my Kill Team for the league.. lol.
Thanks Viktor! I appreciate the compliment! I wanted him to look different than the other Officer models.  I'm happy with the way he came out.
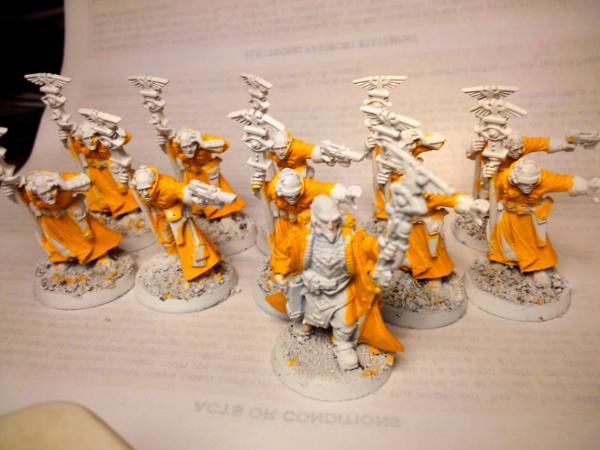
Automatically Appended Next Post: Since there was talk of the Psykers, I decided to pull them out:
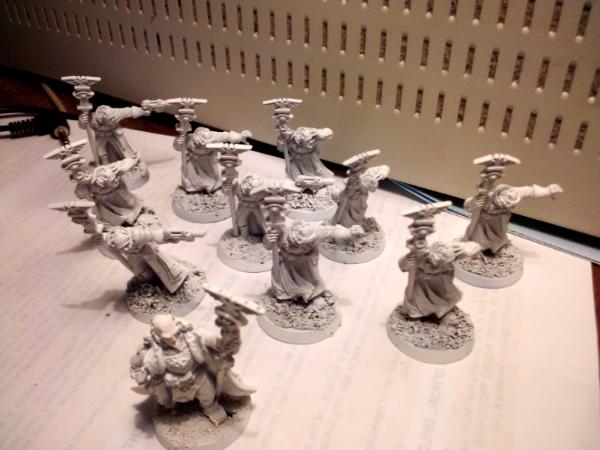
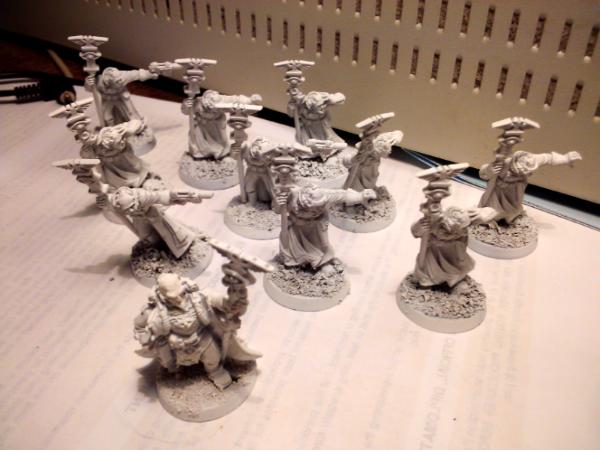
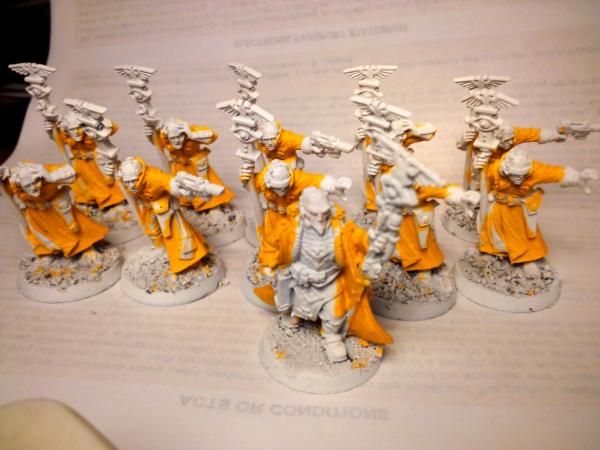
And, while I had them out, I decided to grab a little Citadel Golden Yellow and paint their coats up similar to an image of Doc Brown from Back to the Future
I've got some more pics of my work on a Space marine Bike conversion to a chopper motorcycle using brass rod to upload.
|
|
This message was edited 1 time. Last update was at 2012/01/18 08:37:08
Mordian Iron Guard, Red Ork Waaagh, Space Wolves, Dark Angels, Praetorians IG & Fenris IG, Saxons/Vikings Warhammer Ancients as well as some Warmachine/Hordes Cygnar, Khador, Mercenary, Menoth models and a Giant Cardstock Pirate Ship P&M Blog
Mordian Iron Guard IG Army Progress Image Gallery
Space Wolves Image Gallery
Warmachine / Hordes Houston, Texas
Warhammer 40k Houston, Texas
Warhammer Fantasy Facebook Houston, Texas
Warhammer Fantasy Yahoo Group Houston, Texas
|
|
|
|
|
2012/01/18 09:32:43
Subject: Re:P&M Blog: Current Project: SW Kill Team! On Hold: Mordian Iron Guard IG (Image & Conversion Heavy )
|
|
Doc Brown
|
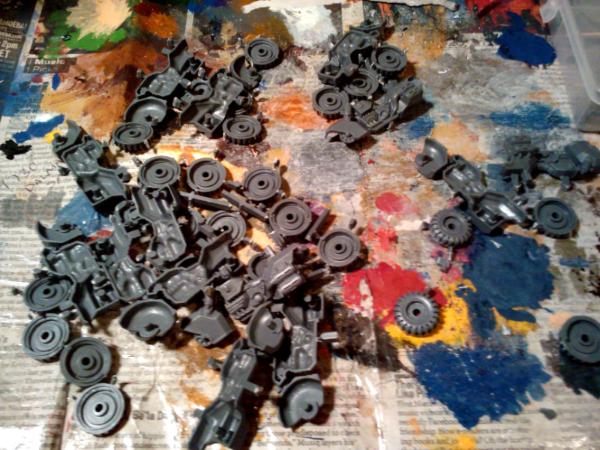
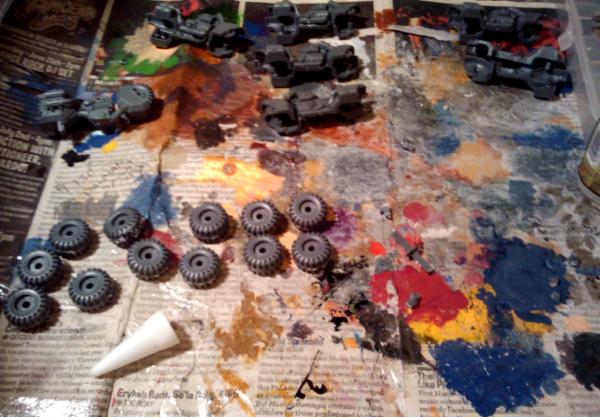
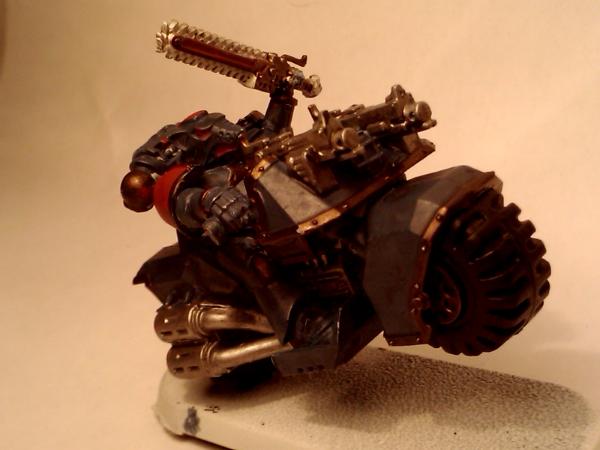
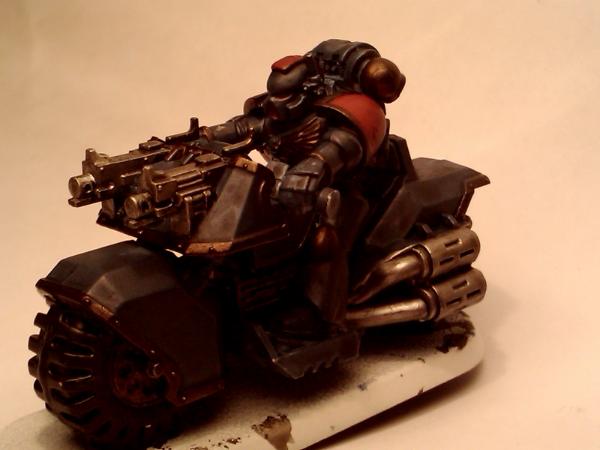
Here are my notes and pics on working with brass rod to create 'Chopper' version of a Space Marine Bike:
( I won't post all the pics, so I created a gallery and uploaded the images )
http://www.dakkadakka.com/gallery/images-50179-23047_Sm%20Bike%20Chopper%20Conversion.html
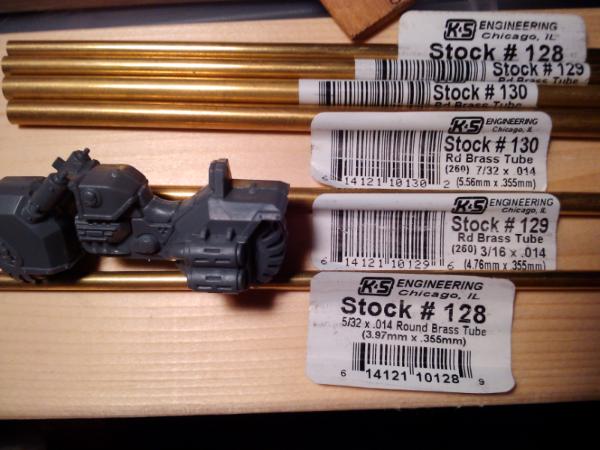
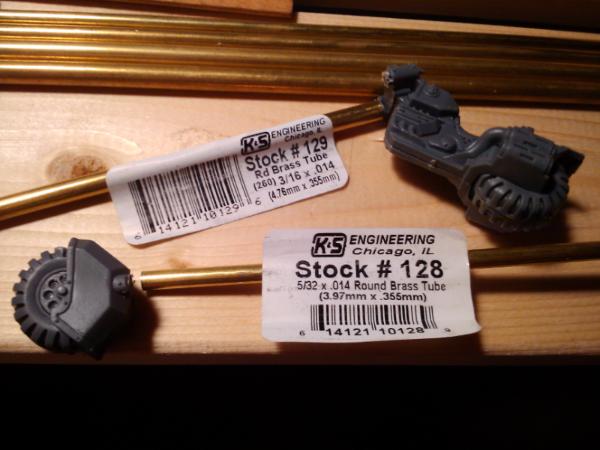
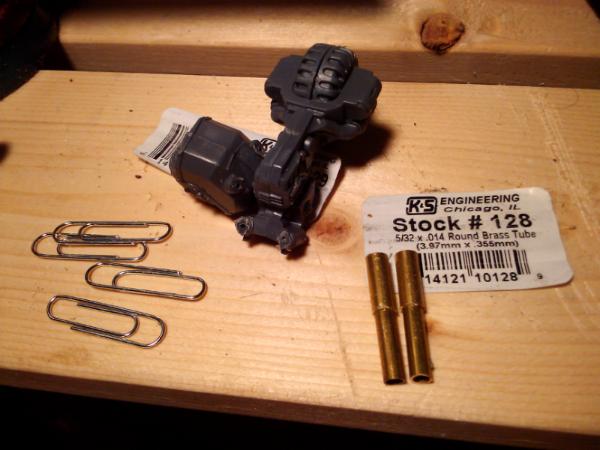
Here's what we're working with:

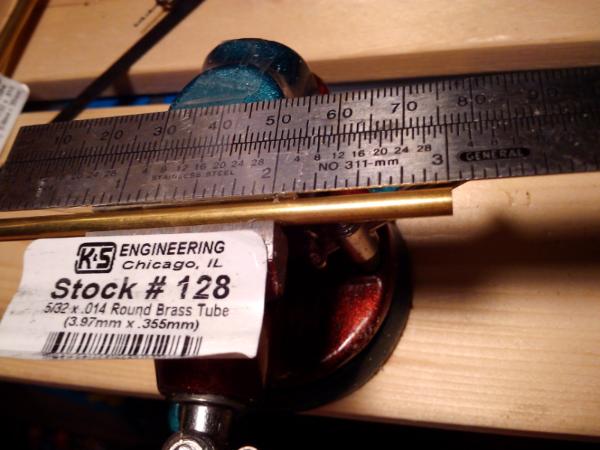
Close up shot of the brass pipe
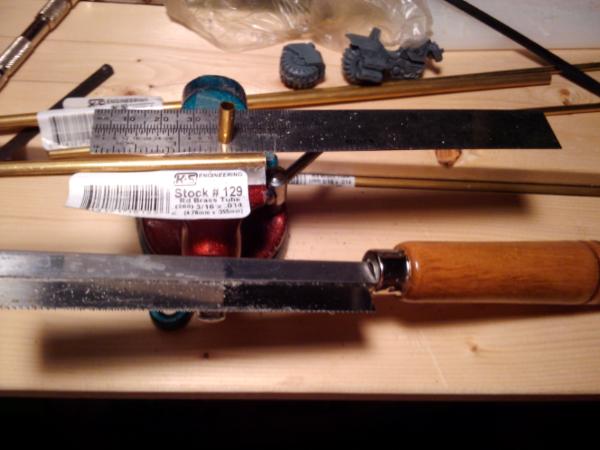
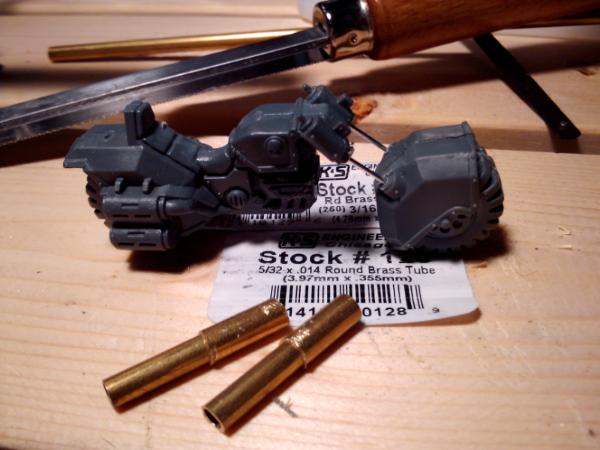
I used the hacksaw to cut just above the fender on the bikes front wheel. Watch the angle of the cut as you'll probably do what I did here and cut into the bike's body. Angle it and rotate the bike as you'll have to cut each portion of the front fork individually.
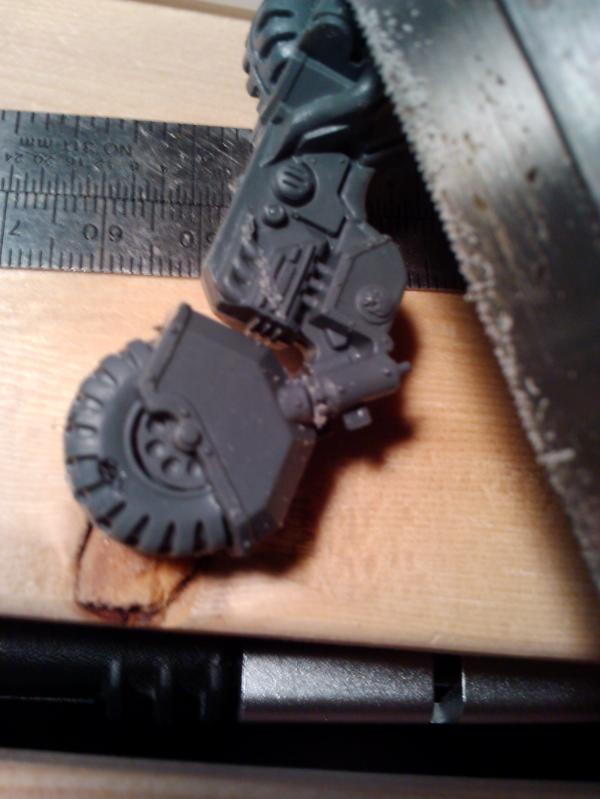
And, the front wheel cut off:
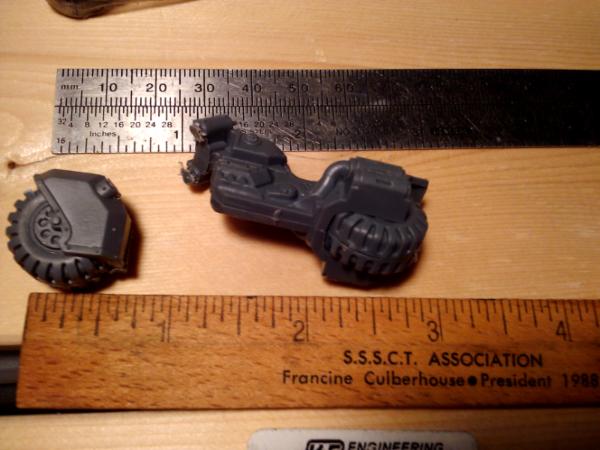
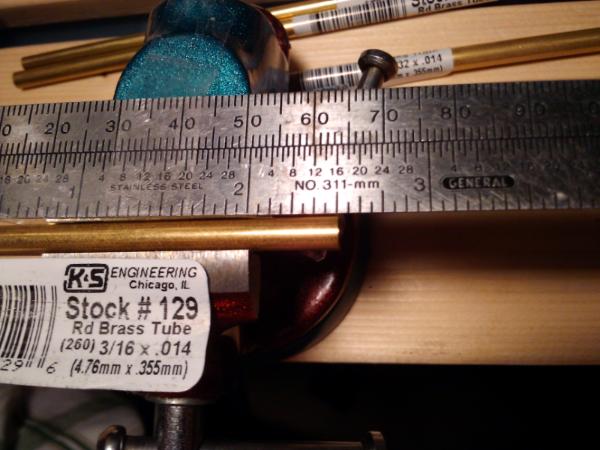
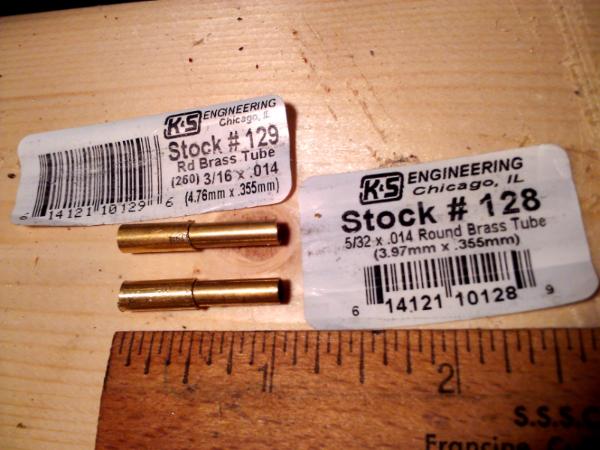
Lining up the brass tube to see which would work the best, looks like 129 for the top and 128 for the bottom, good thing these two sizes will slide into each other. Now to cut.
I used scotch tape to tape a small ruler to my vise to help me keep the length of pipe I cut the same. I measured out 0.5" for the 129 pipe and cut two pieces, this will be the top of the fork on the bike.
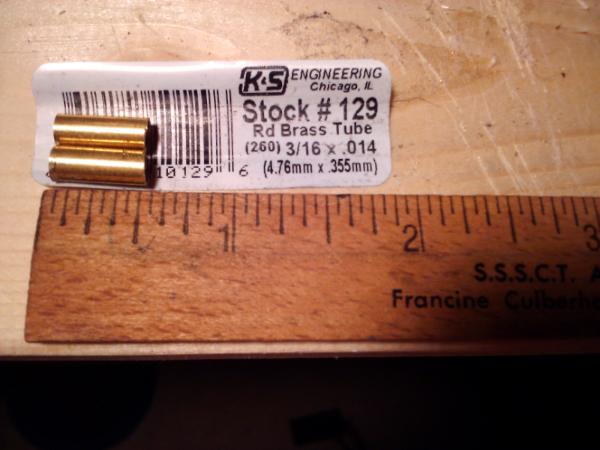
Here is the 128 Pipe, I decided since this was going to slide inside of the 129, then I'd cut it a bit longer for support purposes and to stretch out the front wheels further.
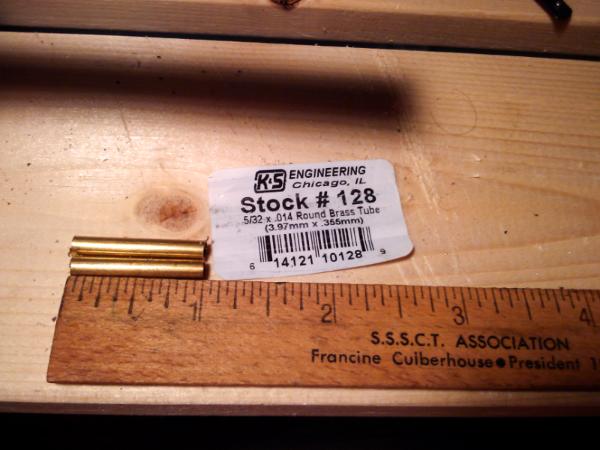
The two pipes pushed together:
Used my pin vise to drill out holes for pinning, this is also for additional support. I used paperclips for pinning, they're affordable and strong, yet easy to cut with a set of wire snips.
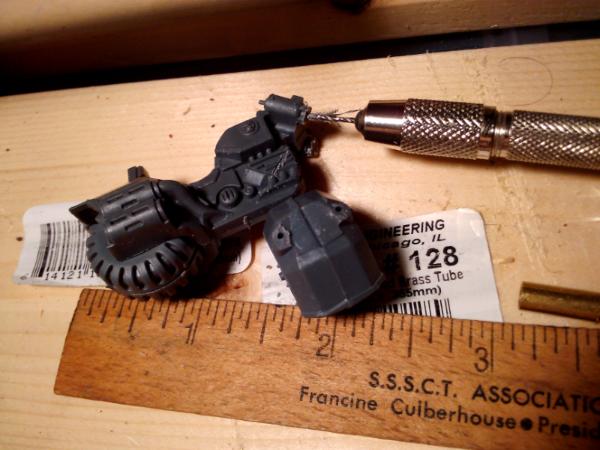
Quick shot with just the pinning in place:
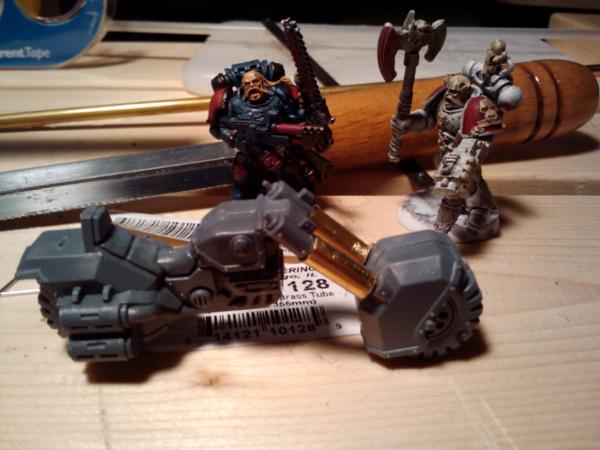
Shot with both pipes put together, I'm thinking they may be a little long, so I might cut the 129 down to 0.25" and the 128 to 0.5" lengths.
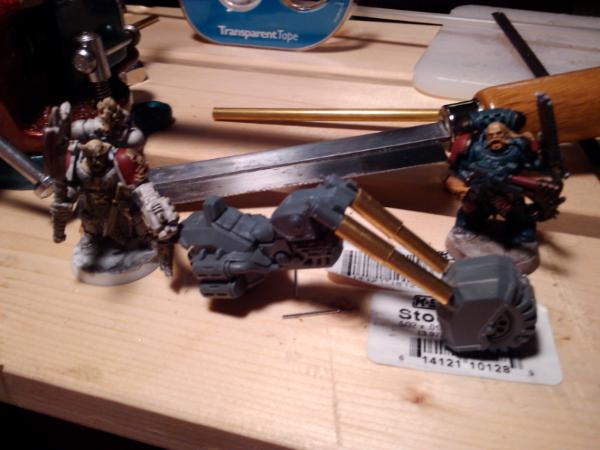
This is with just the 129 length at 0.5" long. The pipe would need to be filled and GS around it.
Last shot of my work area.
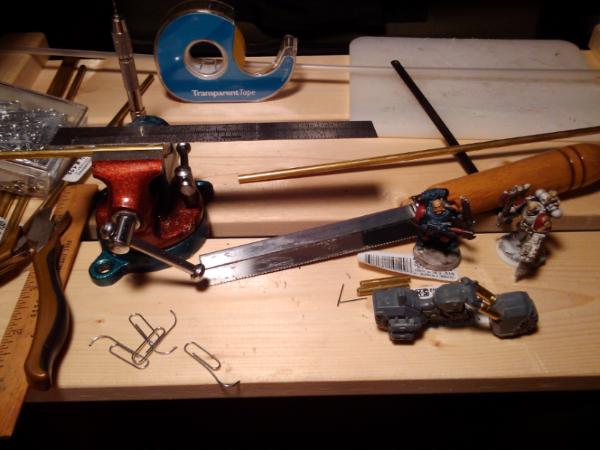
All in all, I'd have to say that I had a bit of a tough time working with the brass pipe and I'm not entirely sold on it. I'm going to try to locate some plasticard tube at a local train/hobby shop as I think that would be easier to work with. I think this is a good start to figuring out brass pipe though. More work will need to be done to the bike to make it more presentable.
The remaining pipe can be used to dress up my IG vehicles a bit. We shall see.
What do you think?
|
Mordian Iron Guard, Red Ork Waaagh, Space Wolves, Dark Angels, Praetorians IG & Fenris IG, Saxons/Vikings Warhammer Ancients as well as some Warmachine/Hordes Cygnar, Khador, Mercenary, Menoth models and a Giant Cardstock Pirate Ship P&M Blog
Mordian Iron Guard IG Army Progress Image Gallery
Space Wolves Image Gallery
Warmachine / Hordes Houston, Texas
Warhammer 40k Houston, Texas
Warhammer Fantasy Facebook Houston, Texas
Warhammer Fantasy Yahoo Group Houston, Texas
|
|
|
|
|
2012/01/18 10:01:24
Subject: Re:P&M Blog: Current Project: SW Kill Team! On Hold: Mordian Iron Guard IG (Image & Conversion Heavy )
|
|
Scarred Ultramarine Tyrannic War Veteran
|
So you already have thought about a Mordian marbo, awesome. Those Psykers look great too! I thought the gunner legs were crouching, that could have been something, but your ideas sound great! Also that chopper two thumbs up! Awesome work there. Brass rod is a little harder to work with than plastistruct type stuff but you did very well!
|
|
This message was edited 1 time. Last update was at 2012/01/18 10:13:51
"Whilst we stand, we fight. Whilst we fight, we prevail. Nothing shall stay our wrath"
Guilliman and the Ultramarines are like Manchester United, everyone hates them because they are so awesome!
|
|
|
|
|
2012/01/18 10:04:13
Subject: Re:P&M Blog: Current Project: SW Kill Team! On Hold: Mordian Iron Guard IG (Image & Conversion Heavy )
|
|
Doc Brown
|
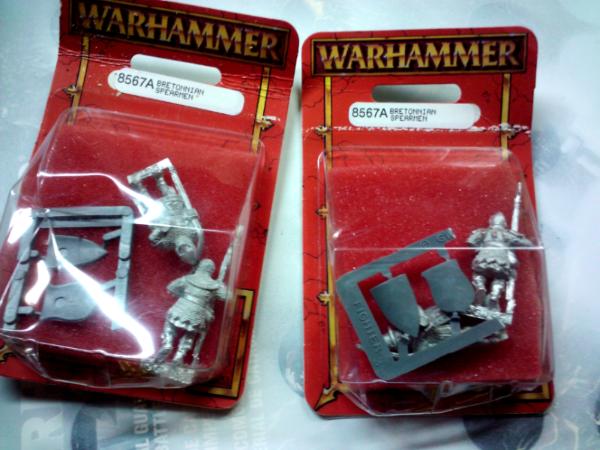
Oh and on a side note, I was digging through the garage today and came across some old Bretonnian Spearmen! Now, what to do with these guys? Try to sell/trade them or convert them into a four man squad for use in my ever evolving IG madness?
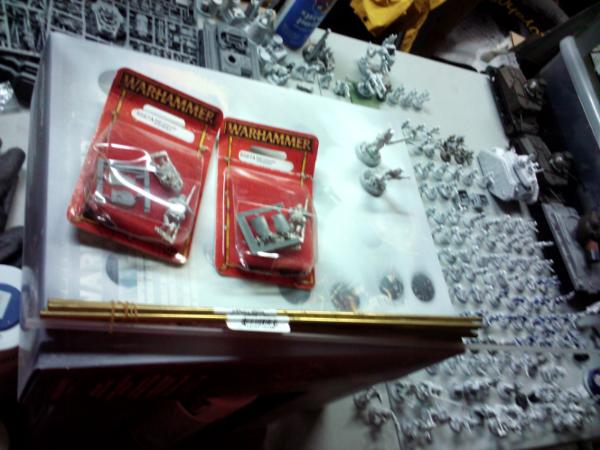
Oh yeah and before I lose the awesomeness that is this portable gaming table that folds up on itself! I'm going to post the link here:
http://privateerpressforums.com/showthread.php?90386-Pake-s-portable-gaming-board
Now I've been tooling around with some sketches on how to create a gaming table that would be good for both Warmachine and Warhammer 40K games. This portability just adds icing to the cake! The table would need to be 4' x 6' in length at minimum to accommodate both game sizes. I like the inclusion of rare earth magnets to help with sticking smaller pieces of terrain or buildings to the board when it is situated.
The only problem with this design is that the table would still require a table or playing surface to sit on( possibly some saw horses would work as well), but it would be pretty easy to do an outdoor version! you just need variable terrain in foam sizes, a lot of watered down PVA glue and some sand. Then you'd paint the table with the PVA glue mix, pour sand on it, let that dry, then paint more PVA glue on it in thicker coats. Afterwards, Spray Green and brown as desired. Rare Earth magnets could be used for Forests or boulders/hills.
You would still need a separate box for buildings and terrain as well as carrying cases for your army, so this after building it, would involve a significant day of gaming to make use of its awesomeness. Yet, having the ability to put the table up and out of the way and not have it look too bad would be a boon to many a gaming family.
|
Mordian Iron Guard, Red Ork Waaagh, Space Wolves, Dark Angels, Praetorians IG & Fenris IG, Saxons/Vikings Warhammer Ancients as well as some Warmachine/Hordes Cygnar, Khador, Mercenary, Menoth models and a Giant Cardstock Pirate Ship P&M Blog
Mordian Iron Guard IG Army Progress Image Gallery
Space Wolves Image Gallery
Warmachine / Hordes Houston, Texas
Warhammer 40k Houston, Texas
Warhammer Fantasy Facebook Houston, Texas
Warhammer Fantasy Yahoo Group Houston, Texas
|
|
|
|
|
2012/01/18 10:12:54
Subject: Re:P&M Blog: Current Project: SW Kill Team! On Hold: Mordian Iron Guard IG (Image & Conversion Heavy )
|
|
Scarred Ultramarine Tyrannic War Veteran
|
If your stuch deciding on what to do with the Bretonnian Spearmen you could always give them to me!
Joking aside, I don't know how you could use them in an IG force, maybe they regimental advisers or something? I'm sure you could come up with a crazy awesome conversion using them but if you can't I don't see why you cant sell them.
Also that board in the link is amazing. That makes me want to make one too!
|
"Whilst we stand, we fight. Whilst we fight, we prevail. Nothing shall stay our wrath"
Guilliman and the Ultramarines are like Manchester United, everyone hates them because they are so awesome!
|
|
|
|
|
2012/01/18 10:20:16
Subject: Re:P&M Blog: Current Project: SW Kill Team! On Hold: Mordian Iron Guard IG (Image & Conversion Heavy )
|
|
Doc Brown
|
Flying Pooo wrote:So you already have thought about a Mordian marbo, awesome.
I thought the gunner legs were crouching, that could have been something, but your ideas sound great!
Also that chopper two thumbs up! Awesome work there. Brass rod is a little harder to work with than plastistruct type stuff but you did very well!
Thanks! Yes, I've been trying to think of a way to incorporate as many named models into the Mordians as possible. Some like Creed were fairly easy conversions, but there isn't a lot of leeway with the metal models as can be seen by looking at them on GW's collectors page:
http://www.games-workshop.com/gws/catalog/armySubUnitCats.jsp?catId=cat1490651&rootCatGameStyle=
Thank you, the chopper is still a work in progress. Brass rod sucks, I can only use the hack saw on it. I'm going to do my best to find plasticard stryrene tubing tomorrow/later today. I may work the larger 130 pipe into the exhaust on the bikes at an angle to extend them up \
I also thought about drilling out two holes in the sides of the top of the seat and clipping a paperclip so that I could give that big elongated horseshoe back support look to it.
The work as always, progresses! Automatically Appended Next Post: Flying Pooo wrote:If your stuch deciding on what to do with the Bretonnian Spearmen you could always give them to me!
Joking aside, I don't know how you could use them in an IG force, maybe they regimental advisers or something? I'm sure you could come up with a crazy awesome conversion using them but if you can't I don't see why you cant sell them.
Also that board in the link is amazing. That makes me want to make one too!
Haha, sure come on by and pick them up! hahaha.. I could clip the spear tips and make them IG or SW Psykers/Priests with an Aquila mounted on the top of the spears, lol.
That board is amazing, Gamers are such awesome and creative people. It really is an unsung art form.
|
|
This message was edited 1 time. Last update was at 2012/01/18 10:22:57
Mordian Iron Guard, Red Ork Waaagh, Space Wolves, Dark Angels, Praetorians IG & Fenris IG, Saxons/Vikings Warhammer Ancients as well as some Warmachine/Hordes Cygnar, Khador, Mercenary, Menoth models and a Giant Cardstock Pirate Ship P&M Blog
Mordian Iron Guard IG Army Progress Image Gallery
Space Wolves Image Gallery
Warmachine / Hordes Houston, Texas
Warhammer 40k Houston, Texas
Warhammer Fantasy Facebook Houston, Texas
Warhammer Fantasy Yahoo Group Houston, Texas
|
|
|
|
|
|
|
|
