Forum adverts like this one are shown to any user who is not logged in. Join us by filling out a tiny 3 field form and you will get your own, free, dakka user account which gives a good range of benefits to you:
No adverts like this in the forums anymore.
Times and dates in your local timezone.
Full tracking of what you have read so you can skip to your first unread post, easily see what has changed since you last logged in, and easily see what is new at a glance.
Email notifications for threads you want to watch closely.
Being a part of the oldest wargaming community on the net.
If you are already a member then feel free to login now.
theCrowe wrote: I’ll jump in with a small 3D print that I got from Super Denny Bros on Etsy.
A nice little piece that should paint up quickly, not to take away from any of the incredible effort on display already just to be here and be part of something special.
Glad you are with us!
That is a supper clean print.
I have never dealt with 3D prints, how long does it take to de-sprue and clean-up a print like that?
I guess the English translation is Light Paper Clay Karugaru from a company called Padico. There are a few different varieties and companies that sell it here. Here is a pintrest link that kind of describes it...
I checked ali, ali does not have that particular one, but I found the Padico company store Wow they are alot of nifty stuff! Never heard of them before, thanks for sharing.
found it on amazon https://www.amazon.com/202-Karugaru-Clay-Slight-japan/dp/B009KG0VNQ Next time I will get air dry clay, will try this one for sure!
@Mothsniper - Agreed, it is definitely more of a fence. Your building looks like it's going to be massive when it's done, hopefully the casting goes well.
Looks much beefier already!
Automatically Appended Next Post:
endtransmission wrote: Just been playing around with a new pot of polyfilla and the multipurpose stuff may be smooth enough for the mold, but you would have to be really careful about pressing it into the mold properly as it purposefully doesn't flow.
Just had a look on eBay and dental plaster at the moment seems o be quite pricey. I think I paid about £8 for 3kg of plaster, which is still not all used up
That is a reasonable deal.
What would you say is cheapest casting material? plaster right?
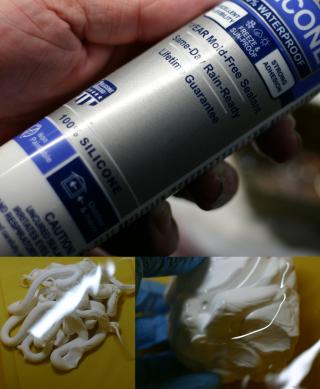
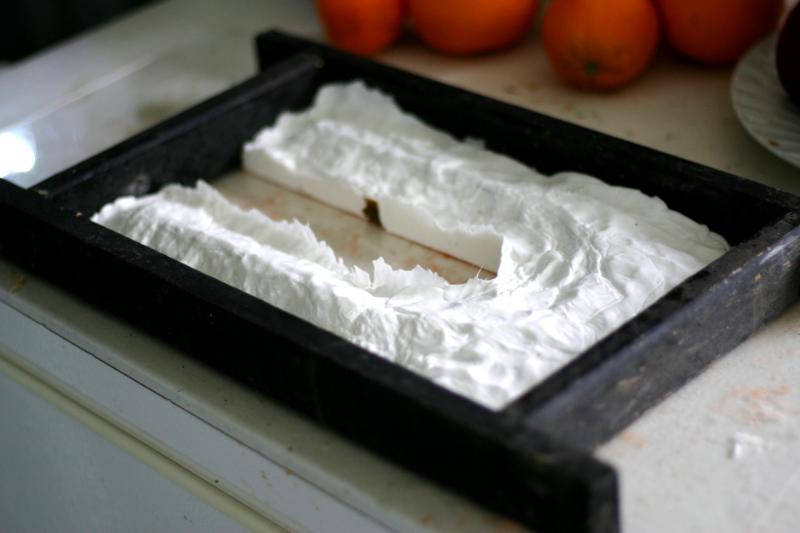
Automatically Appended Next Post: Never molded caulking before, so It is even more sticky than green-stuff, bagbalm does not help but soapy water does, like in tutorial videos.
Gloves proved to be quite useless, sticking to material too quickly.
Doing this on plexiglass turned out to be accidentally genius as it allowed to see through the back side during the application. SO I could see if caulking filled every gap or not.
Soapy water helped with the smell too, but not by much, will finish the rest outside.
This message was edited 5 times. Last update was at 2022/01/05 04:08:53
@Mothsniper- no idea. Super Denny Brothers did all the hard work producing it and it only cost me £3.50. It’s just a man-sized portal. Not very large but great quality. Still has some print grain as you’d expect but I’m not so bothered that I’m going to putty-wash it or anything.
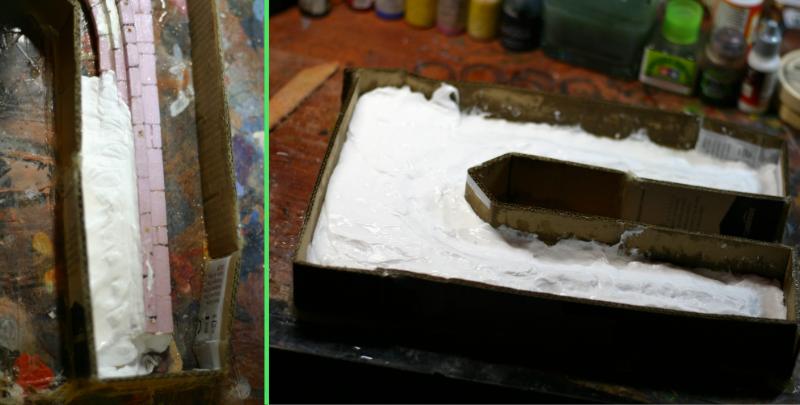
What was dumb is using cardboard for the sides, not only because it became soggy but because I cant level corners to cardboard uneven flimsy soggy edge.
Removed cardboard
Built frame that has a rigid edge and consistent height
Threw in some dirt as filler in attempt to use less caulking and flattened the corners. So the mold when flipped will stand like a table on 4 corners. Hopefully leveled-ish.
you'll want to have all of it supported wherever the plaster is going as the weight will bend the caulking and give you distorted arches. Plaster is heavy stuff, especially when wet
endtransmission wrote: you'll want to have all of it supported wherever the plaster is going as the weight will bend the caulking and give you distorted arches. Plaster is heavy stuff, especially when wet
You are probably right.
I will do a test and see... because building outside frame was ez, building interior lancet arch is a bit outside of my ability.
If mold sags with weight of sand, ill pour sand for weight test, then will have to get creative and building up small pillars with silicone around the lancet arch.
Good call!
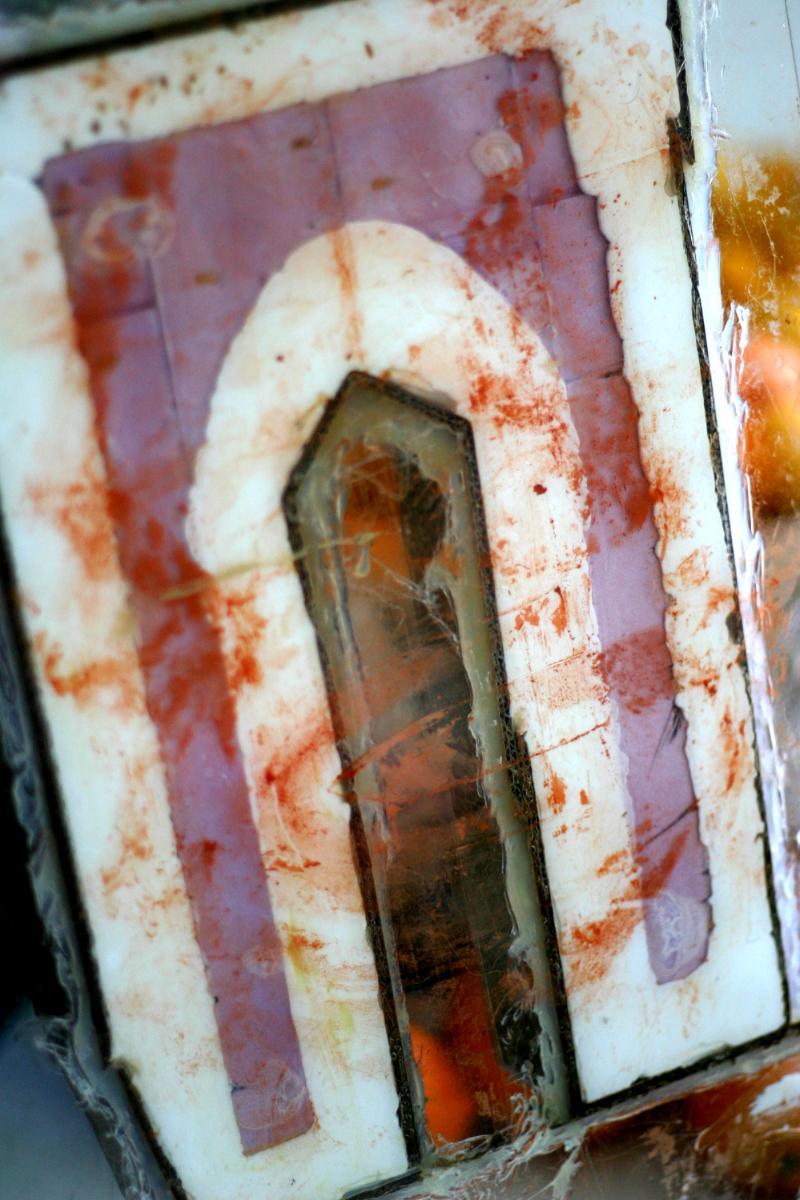
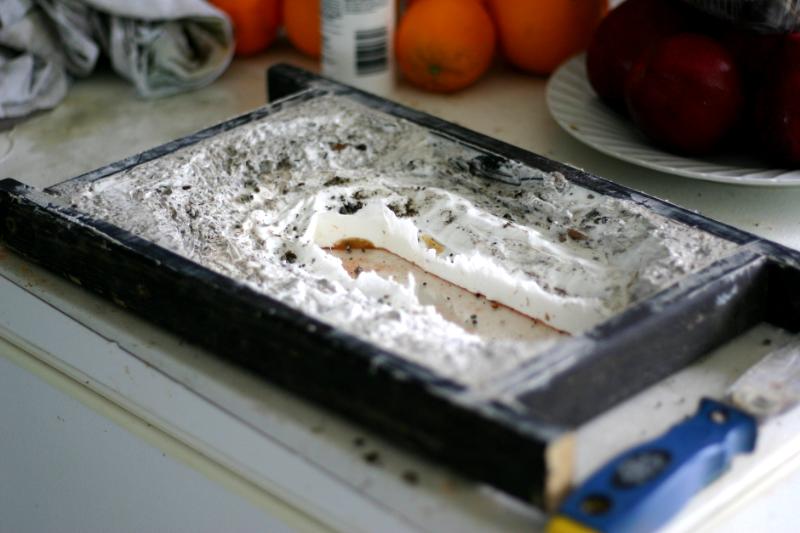
Automatically Appended Next Post: Ha, no weight test needed. Removed the matrix and it sagged by its own weight.
Will leave it overnight so silicone can cure from the inside too. Tomorrow will reassemble the frame jig and fill in extra supports.
This message was edited 1 time. Last update was at 2022/01/06 02:23:00
Quick question; if you use platicard in your builds is there a "standard" thickness which is easy to cut but still stiff enough to be used structurally? 2 mm & 4 mm are both too thick and still a pain to cut, and 0.75 mm seems unable to hold its own weight.
This message was edited 1 time. Last update was at 2022/01/06 16:23:47
Boringstuff wrote: Quick question; if you use platicard in your builds is there a "standard" thickness which is easy to cut but still stiff enough to be used structurally? 2 mm & 4 mm are both too thick and still a pain to cut, and 0.75 mm seems unable to hold its own weight.
Depends what you are cutting with, and depends what weight are you trying to support.
I have little experience with plasticard, I do have it and use it. For me it comes down to scoring both sides with a hobby knife and then break/snap the two halfs like you would with plexiglass
Never tried to cut anything but straight cuts and always assumed that there is a special tool for complex cuts.
Try scoring and snapping thick pieces
Quick search
Cutter
This guy glues 1mm plates together to get 2mm thick pieces
Automatically Appended Next Post: On side note about plasticcard.
Cheap substitute would be PVC Vertical Blind
Automatically Appended Next Post: _______________________________________________________________________________________________________
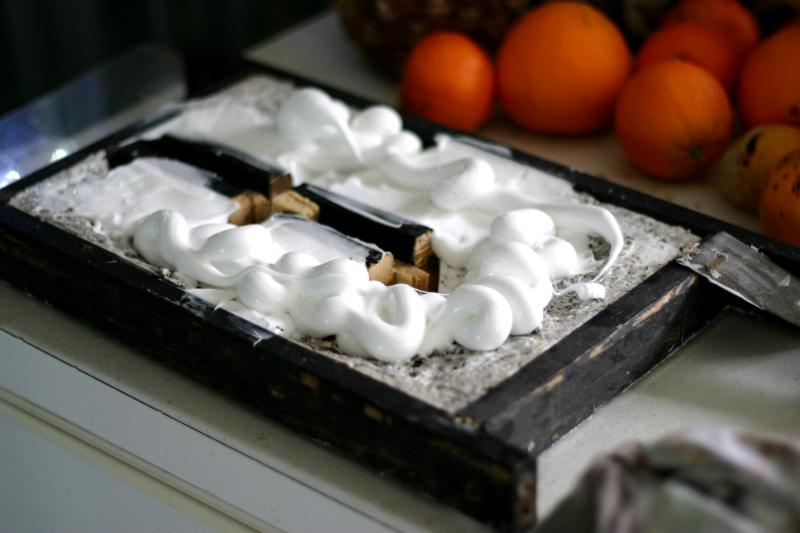
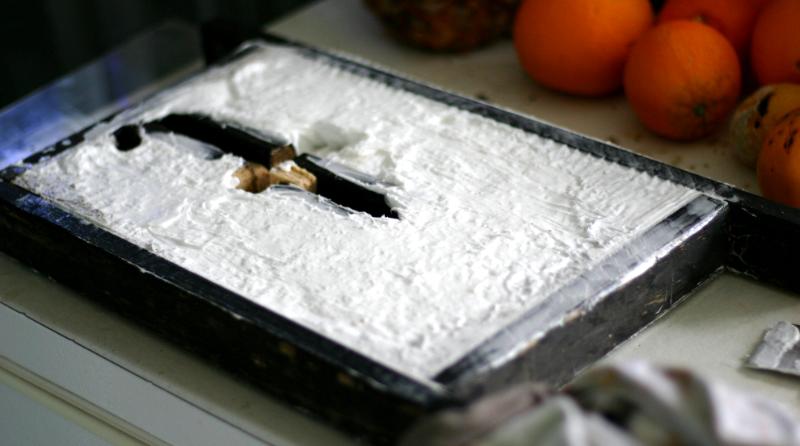
Luckyly I bought 5 tubes thinking that will probably only use 3
Last 2 went into building up the back because it does sag under its own weight.
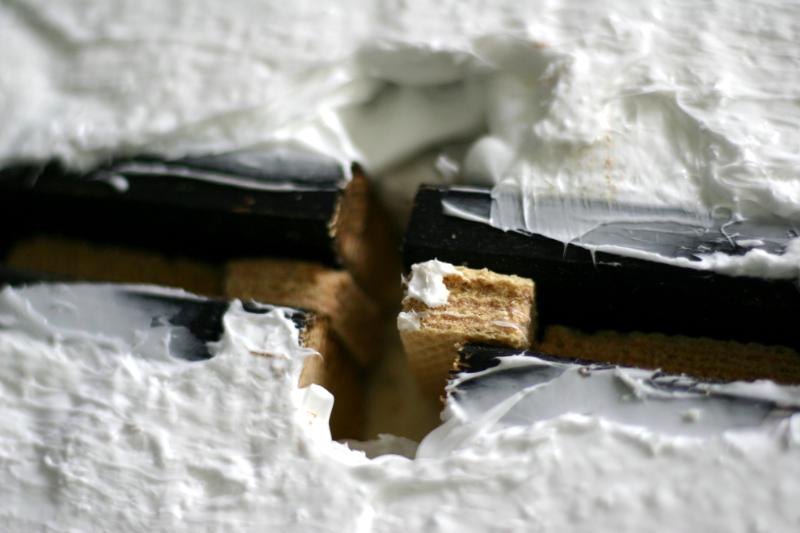
Pro tip - Stale Wafer Cookies shims !
This message was edited 6 times. Last update was at 2022/01/06 20:47:33
Boringstuff wrote: Quick question; if you use platicard in your builds is there a "standard" thickness which is easy to cut but still stiff enough to be used structurally? 2 mm & 4 mm are both too thick and still a pain to cut, and 0.75 mm seems unable to hold its own weight.
I use a lot of 1mm myself, but I guess the question is - what are you trying to do / support? I mean, you can get away with 0.25mm if you build a support frame underneath it with 2mm or thicker....
Mothsniper wrote:Depends what you are cutting with, and depends what weight are you trying to support.
I have little experience with plasticard, I do have it and use it. For me it comes down to scoring both sides with a hobby knife and then break/snap the two halfs like you would with plexiglass
Never tried to cut anything but straight cuts and always assumed that there is a special tool for complex cuts.
Try scoring and snapping thick pieces
Quick search
Cutter
This guy glues 1mm plates together to get 2mm thick pieces
On side note about plasticcard.
Cheap substitute would be PVC Vertical Blind
_______________________________________________________________________________________________________
Luckyly I bought 5 tubes thinking that will probably only use 3
Last 2 went into building up the back because it does sag under its own weight.
Pro tip - Stale Wafer Cookies shims !
You seem to be spot on with the scoring for thicker stuff - I was trialling that this morning and it's much easier that way than using a scalpel/stanley knife. Also, I found out the no curved cuts the hard way - I just ended up cutting a bunch of straight lines and sanding the corners instead.
Love the use of the stale biscuits, haha.
Arakasi wrote:I use a lot of 1mm myself, but I guess the question is - what are you trying to do / support? I mean, you can get away with 0.25mm if you build a support frame underneath it with 2mm or thicker....
Maybe I exaggerated slightly, the 0.75mm doesn't sag by itself and I do have supports for it - it just feels super flimsy. I actually just double checked the thickness and it is more like 0.6mm, including the patterned surface on that part.
Thanks for the advice, I think I'll get some 1 - 1.5 mm stuff and see how it goes.
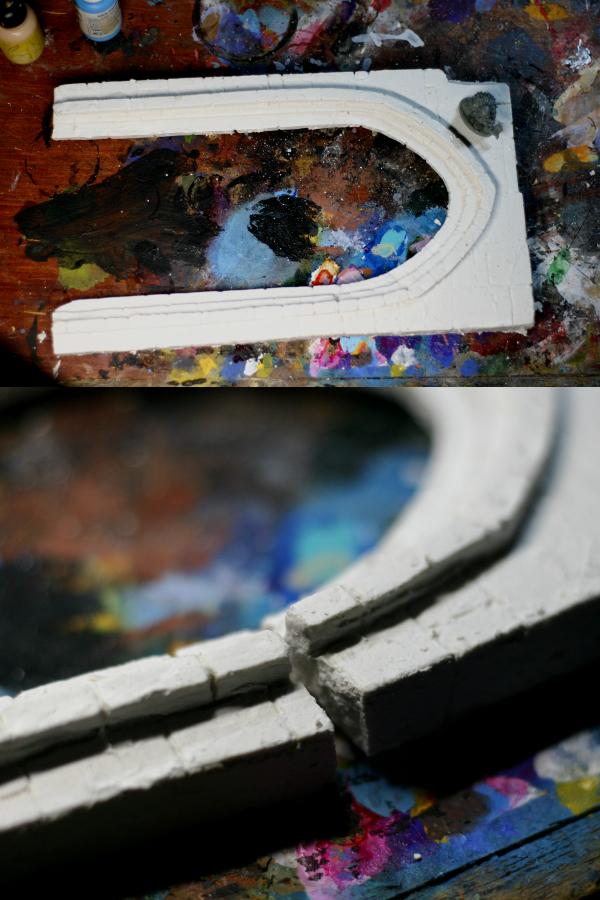
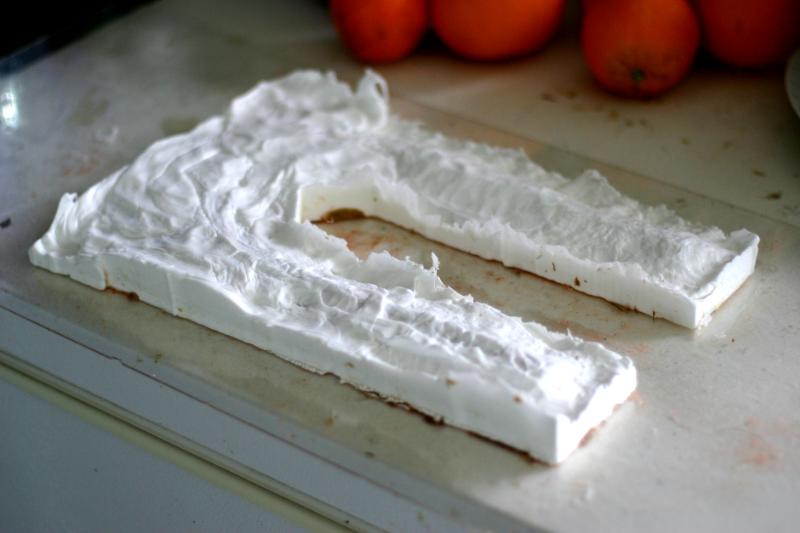
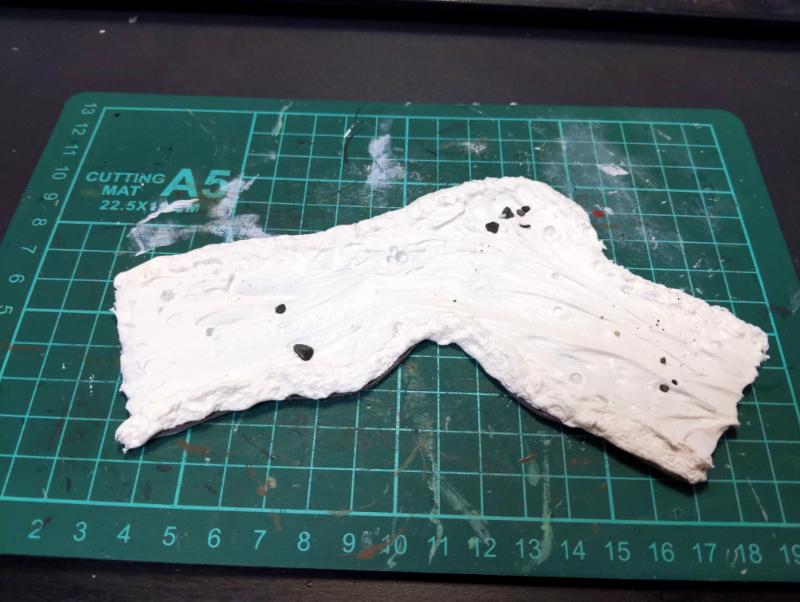
First cast!
Kinda meh... I'll see how it looks when painted.
The idea was to cast 2 halfs and glue them together into one arch. The backs might not be strait flat however...
From tutorial videos folks talk about using Joint Compound instead of plaster. Will try Joint Compound tomorrow because plaster is a bit brittle pricey and I am running out.
Boringstuff wrote: Quick question; if you use platicard in your builds is there a "standard" thickness which is easy to cut but still stiff enough to be used structurally? 2 mm & 4 mm are both too thick and still a pain to cut, and 0.75 mm seems unable to hold its own weight.
I use Styrene card for anything less than 1mm. For anything bigger than 1mm, I use foamed PVC (a.k.a. Palite, Celtec, Komatex, others), which behaves similarly but is less dense and therefore easier to cut at greater thicknesses. I use a lot of 3mm for bases for larger terrain pieces. I cut it with a steel ruler and a utility knife with a fresh blade. Score-and-snap works, or about three passes with a sharp blade. I bevel the edges with a grinding wheel on a Dremel tool, and it sands and takes primer and paint really well.
Awesome progress, and some great new entries, too! This is shaping up to be an amazing round.
@MacPhail - thanks for sharing, never heard of foamed PVC, will have to check it out!
Automatically Appended Next Post: _______________________________________________________________________
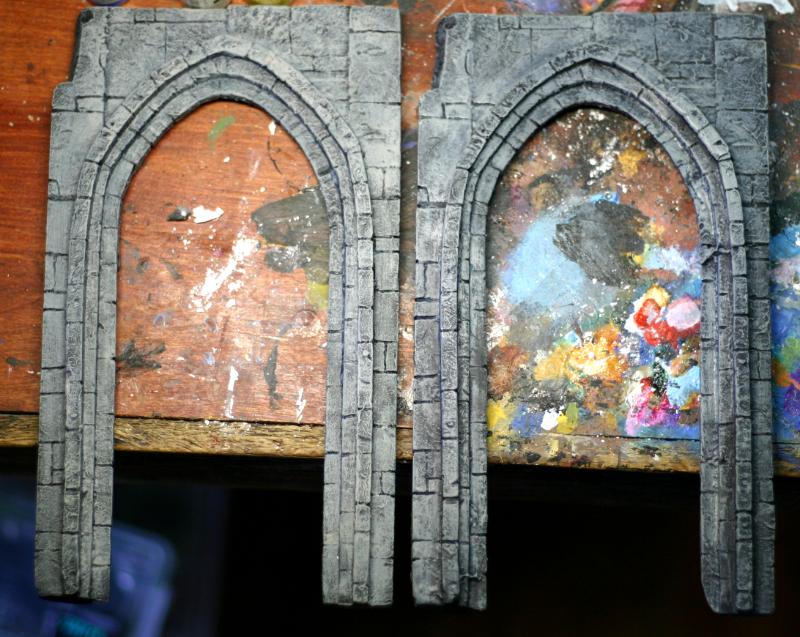
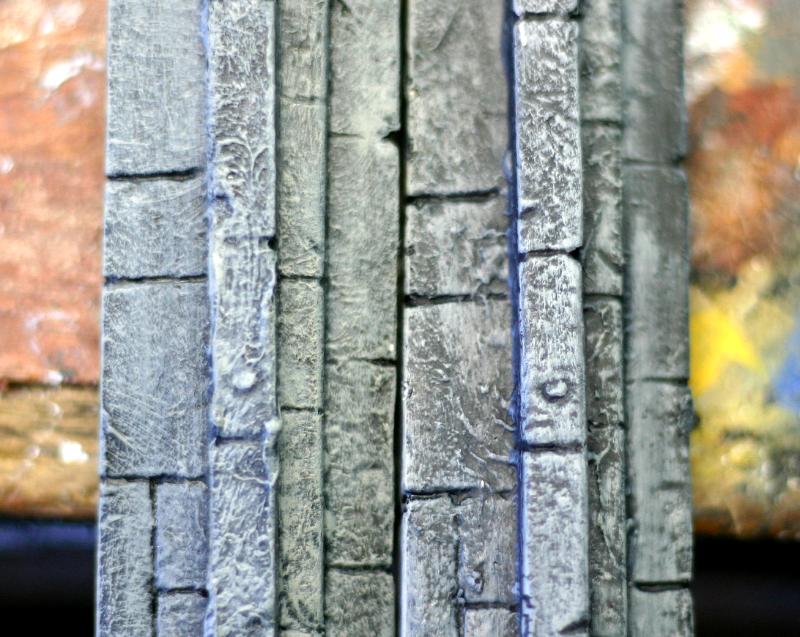
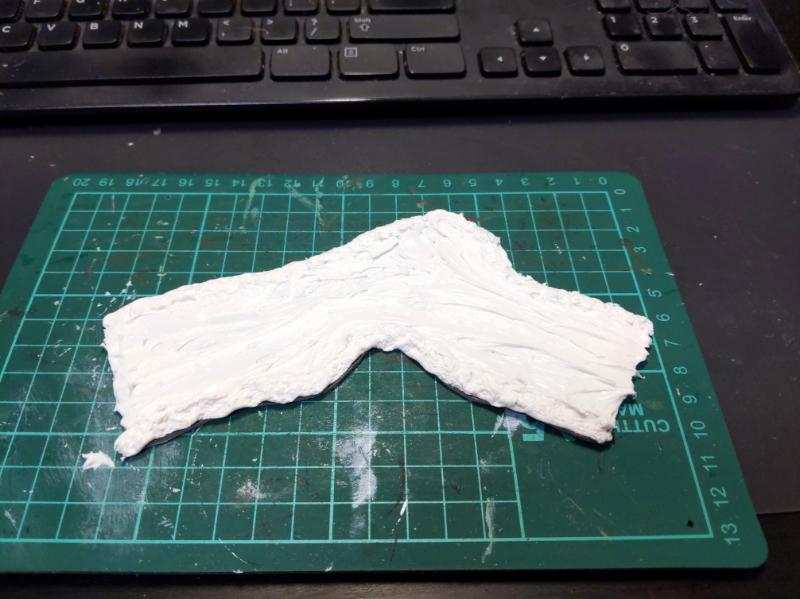
Rough dry-brush just to see how the first cast cameout
Quite impressed! The plan to cheap out on molding material by using caulking worked! About $30 spent
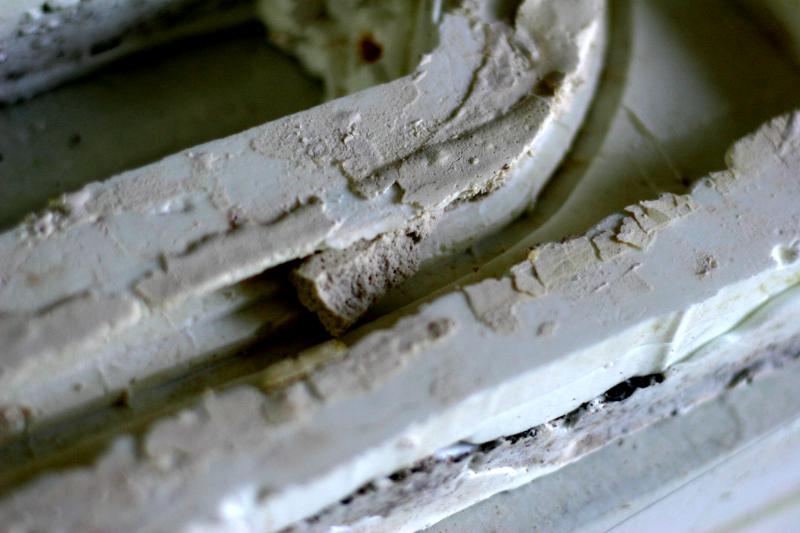
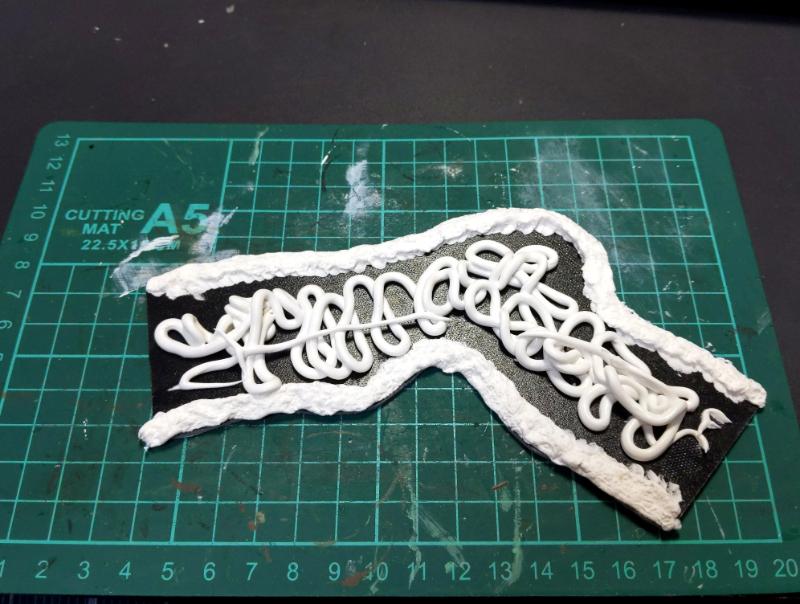
This is a first cast with plaster that was poured into the mold right after the silicone set, meaning that all small artifacts, tiny bit of extra water, and leftover (BagBalm) was still there when I poured. I took out plaster cast before it dried completely and it damaged the cast a bit, and I had to spray it black form a rattle-can , that must of clogged up some small detail. That had to be done because brush bristles would scrape of plaster and leave white scratches all over; At least with a film of paint spray paint I could dry brush the arch.
I expected the cast to look dull with less detail but it is not too bad at all!
Foam matrix is on left, plaster cast on right. ( Keep in mind that the foam matrix on the left was covered in pieces and flakes of silicone and bagbalm, I just painted over everything, so the original detail is not there)
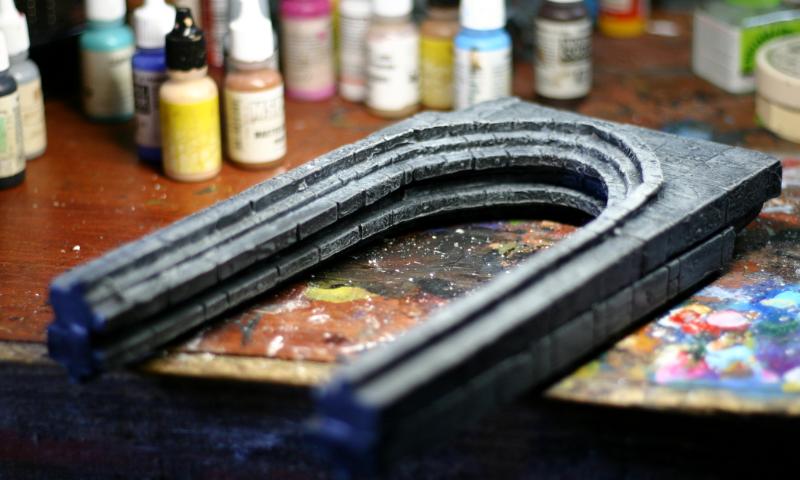
Glued both together with garilla glue
This message was edited 6 times. Last update was at 2022/01/08 21:56:34
boringstuff, I love the transformation of your defenses... definitely a big return on your investment.
Mothsniper, that arch turned out great! The three layers of depth look awesome.
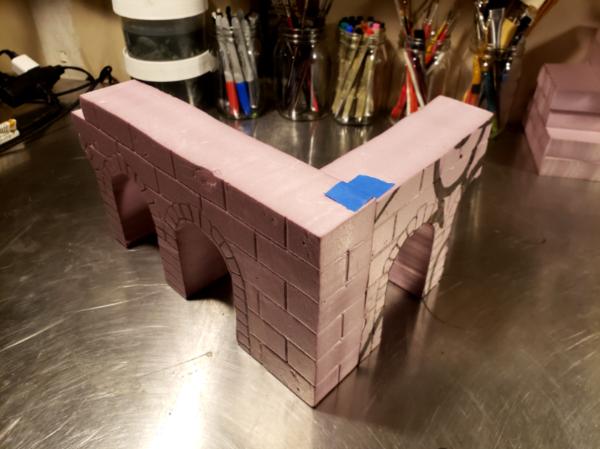
Mothsniper and I have dueling arches, and I have a rough cut of my first "L" with the 5" x 2" foam. I bungled a few of the blocks as I etched the ends because I didn't match the inside and outside block patterns, but I got the rhythm by the time I turned the outside corner. The next ones will hopefully go more quickly... I'm trying to force myself to not be too meticulous and focus on moving quickly, as I have a whole table's worth to do.
Ferrous695 welcome!
Cant wait to see what you had in mind for the overpass!
_________________________________
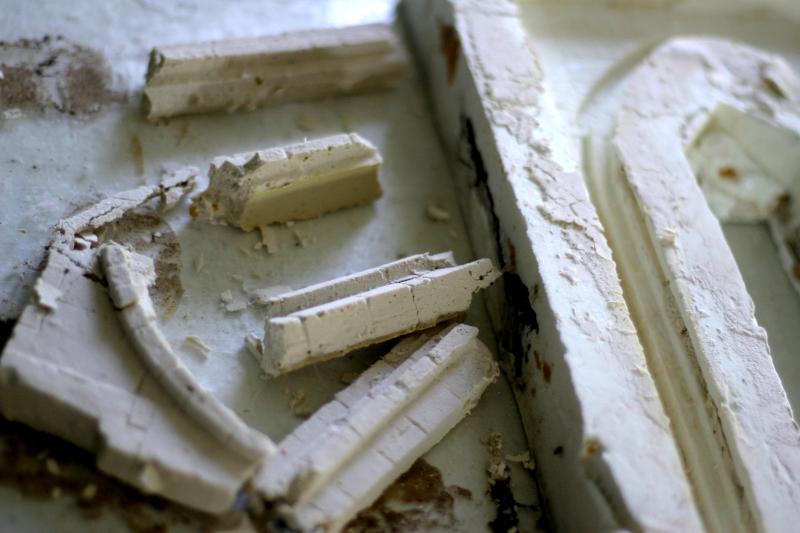
My progress was slow, lots of waiting for things to dry. I tried join compound. It mixed very well, poured beautifully but never dried after 3 days, so I took it apart and noticed that smaller pieces that are dry would crumble easily.
Big fail.
I even tried to mix 1/6 Woodglue with water into the joint compound for sturdiness but that did not help at all.
If I mixed more of the wood glue that would do the trick but then I am not saving any cost on the glue. Might as-well go back to plaster.
Next try I saw perfect cast material and will try that, suppose to be much stronger than plaster, but not as cheap.
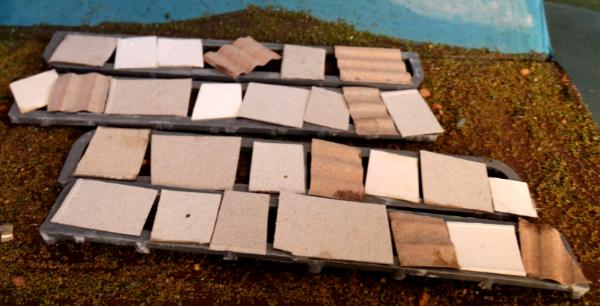
Might as well enter these I had loads of plans for more exciting projects but these need paints. Literally spue with cereal card added to make scrap walkways for skirmish games.
"But me no buts! Our comrades get hurt. Our friends die. Falkenburg is a knight who swore an oath to serve the church and to defend the weak. He'd be the first to tell you to stop puling and start planning. Because what we are doing-at risk to ourselves-is what we have sworn to do. The West relies on us. It is a risk we take with pride. It is an oath we honour. Even when some soft southern burgher mutters about us, we know the reason he sleeps soft and comfortable, why his wife is able to complain about the price of cabbages as her most serious problem and why his children dare to throw dung and yell "Knot" when we pass. It's because we are what we are. For all our faults we stand for law and light.
Von Gherens This Rough Magic Lackey, Flint & Freer
Mekagorkalicious -Monkeytroll
2017 Model Count-71
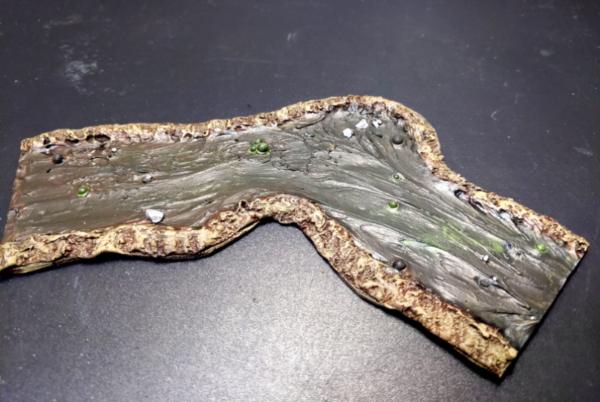
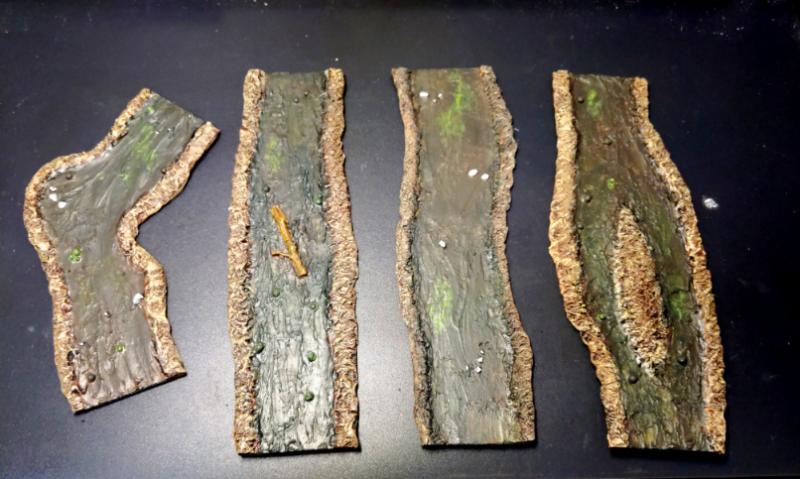
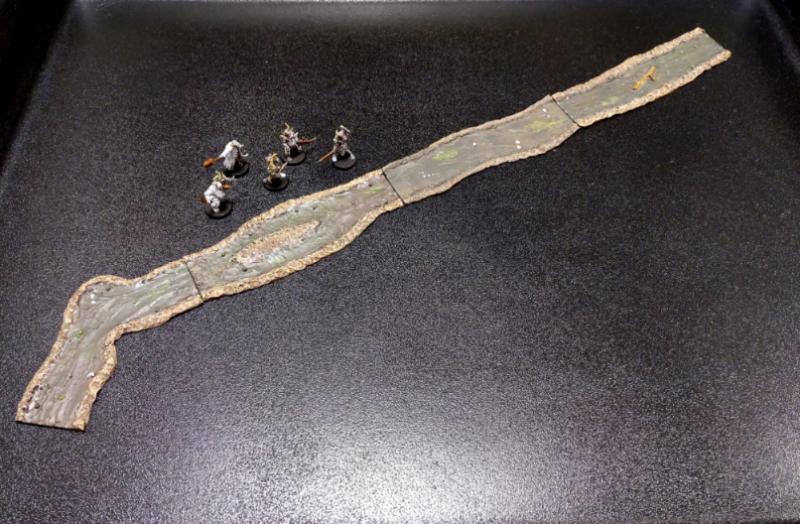
I've finally started to get some paint onto the river tiles... there is still a few layers of different blues and some modpodge to deal with before flock starts to appear... there are also another 10+ river tiles to paint before then as well as the bridge and main crossing point...
Automatically Appended Next Post:
Mothsniper wrote: Good progress guys!
My progress was slow, lots of waiting for things to dry. I tried join compound. It mixed very well, poured beautifully but never dried after 3 days, so I took it apart and noticed that smaller pieces that are dry would crumble easily.
Big fail.
Ooooh sorry you're having so much trouble casting these things... keep those broken bits for basing though, they will look great!
This message was edited 1 time. Last update was at 2022/01/13 19:50:49
Im feeling bad about just buying in my entry and painting it up (Which is probably against the rules) so I’m going to make an extended base/ stone circle to place it in.
Slab of foam at the ready.
I’ve a few odd bits I may adjust to be able to swap out the central feature for a stone table or a statue or something. I can’t be turning in a painted item with no scratch-built element surely.
Automatically Appended Next Post: It’s coming out a little more Indian sandstone paving at the garden centre than mystical arcane stone circle.
but I’ll press on and try and age it down a bit like the relentless grinding of the centuries at an abandoned garden centre.
This message was edited 1 time. Last update was at 2022/01/14 21:56:46
endtransmission wrote: I've finally started to get some paint onto the river tiles... there is still a few layers of different blues and some modpodge to deal with before flock starts to appear... there are also another 10+ river tiles to paint before then as well as the bridge and main crossing point...
Ooooh sorry you're having so much trouble casting these things... keep those broken bits for basing though, they will look great!
Dig that texture! Oh these are much smaller than I previously thought.
Btw, I can't keep those broken bits, joint compound does not dry hard and crumples easily.
Automatically Appended Next Post:
theCrowe wrote: Im feeling bad about just buying in my entry and painting it up (Which is probably against the rules) so I’m going to make an extended base/ stone circle to place it in.
[url=https://www.dakkadakka.com/gallery/1129364-.html]
but I’ll press on and try and age it down a bit like the relentless grinding of the centuries at an abandoned garden centre.
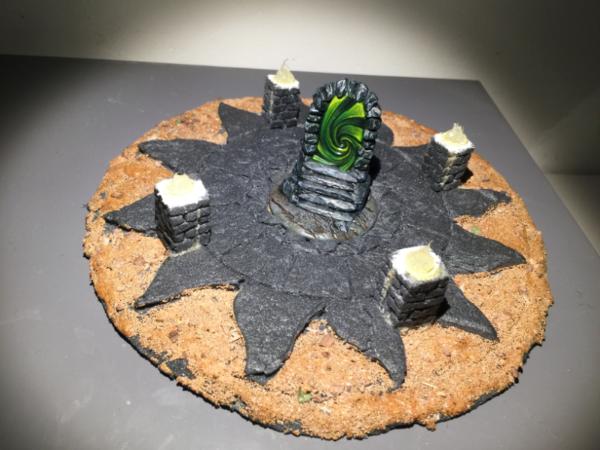
Man that portal is looking crispy!
And don't feel bad, any terrain things is within the new rules. But I do like that huge carved stone dais for the portal, just adds extra narrative.
This message was edited 1 time. Last update was at 2022/01/15 21:42:27
Dig that texture! Oh these are much smaller than I previously thought.
Btw, I can't keep those broken bits, joint compound does not dry hard and crumples easily.
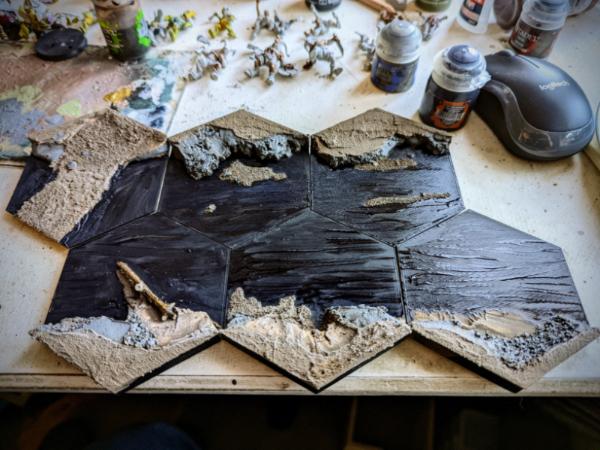
Each hex is about 8x10cm, which means there is a lot of flexibility in building the table layouts. There re some new examples that show scale on my blog Larger pieces are multiple hexes stuck together.
Shame about the broken bits not being usable, some of those look fantastic. It'd certainly be worth casting one in a more brittle plaster and smashing it up for basing
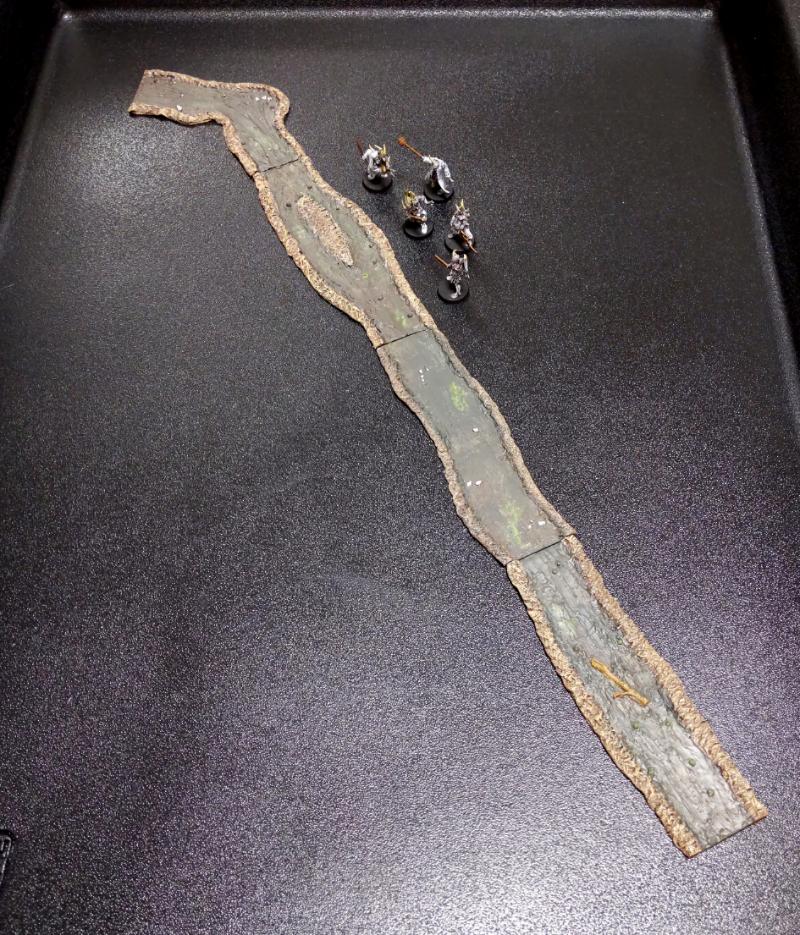
I have four stream sections finished. Now I need to design start and end pieces. I think the end piece will be easy to do, but I'm struggling with what I want to do for the start piece.
My river is just going to go straight across the board, so I'm not worrying about start/end points. I figure it can be just off the board edge if it needs to be that close to the source.
If you really want to do something you could create a small cave piece that has the water coming out of it
Everyone's entries are looking amazing! Really excited to see how some of these turn out.
Finished both smoothing (with sandpaper and then a thin layer of plaster) and then dirtying (just good ol' glue and dirt) up the overpasses, just realising I probably want to add just a few small details like hatches, loose panels or larger debris. I'll play around with it a bit, but I'm almost ready to prime it and get painting! I still need to build and paint the supports, but I'll do that separately methinks.
Just wanted to show a quick update of what I’ve been working on with this.
So now the portal sits within a stone circle flanked by stone pillars with little bowls of fire (hot glue) around it. The “fire” can be taken out of the bowls so I can set it up with unlit torches and a blank plate instead of the portal, because as any Zelda fan will tell you nothing says “there’s a secret portal here that will magically appear if you light these four oil lamps” quite like a magic stone circle with four unlit lamps and a mysteriously empty centre spot.
Spoiler:
But there’s so many more options that I’ve been working on some of which are a bit off theme or very tenuously theme-related but I just thought you’d maybe like to see.
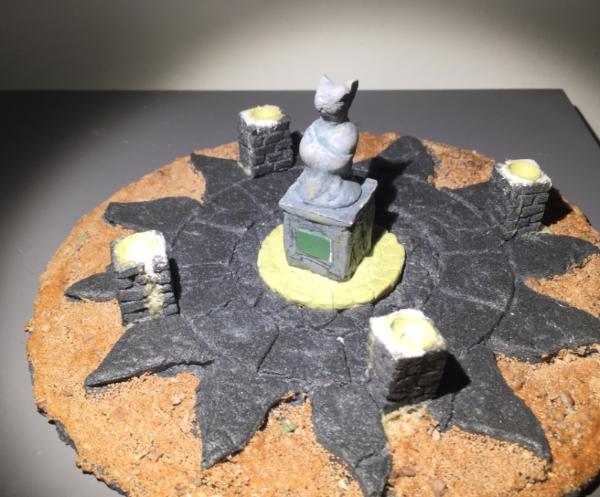
So I made these just before Christmas there from DAS clay.
A mouse statue, a sword in a stump, and a stone slab table for picnics or sacrifices.
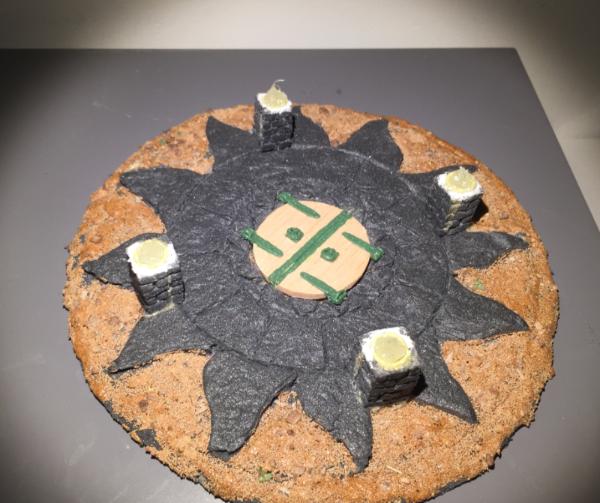
I rebased or altered them to fit the stone circle so I can swap them out. And then I made even more options just for the fun of it. So here’s the 6 other options. We have...
The holy shrine (of mousey godliness)
The unholy ring of magic summoning.
The sacrificial altar.
The vampire’s resting place, pop the lid and steak that sucker!
The tunnel entrance to the ghostly catacombs.
Or the grassy mound where the sword of the faerie king awaits a hero.
Some could be on-theme for crossing the threshold between worlds but not all of them. I thought a wishing well might also be a nice one or maybe a fountain.
Anyway, I’ll stop spamming up the thread now until i get some paint on it all.


 Imperial Knights: The Avengers Initiative
 Da Dark Angelz
 Arakasi vs Infinity