Forum adverts like this one are shown to any user who is not logged in. Join us by filling out a tiny 3 field form and you will get your own, free, dakka user account which gives a good range of benefits to you:
No adverts like this in the forums anymore.
Times and dates in your local timezone.
Full tracking of what you have read so you can skip to your first unread post, easily see what has changed since you last logged in, and easily see what is new at a glance.
Email notifications for threads you want to watch closely.
Being a part of the oldest wargaming community on the net.
If you are already a member then feel free to login now.
Hi there
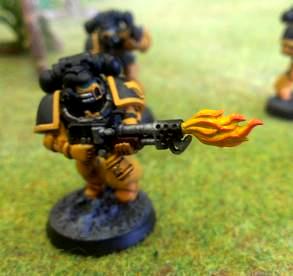
i am having some difficulty painting free hand fire. I have a good selection of reds, oranges , yellows and whites for doing this but was wondering if anybody had a sure fire( forgive the pun) easy technique for this? I have tried on a few practice models and they look gash, i want to use it in the leg section of some power armour , form the feet rising to under the knee joint. Any help would be amazing. Thanks
I think wet blending would be good for this, blending from darker reds at the base of the flames up through oranges, yellows, and finally whites at the very tip. I'm not much good at it myself, but I have seen some decent tutorials on you tube, try there.
Wet blending would be the ideal technique for fire, but it is possible to do well with layering, if wet blending gives you problems, the more layers and the greater the similarity between the layers the closer it gets to blending.
You can do fire as red to yellow or yellow to red. I think it's personal preference as to which is better.
What about your fire looks wrong to you?
Mastodon: @DrH@dice.camp
The army- ~2295 points (built).
* -=]_,=-eague Spruemeister General. * A (sprue) Hut tutorial * Dsteingass - Dr. H..You are a role model for Internet Morality! // inmygravenimage - Dr H is a model to us all Theophony - Sprue for the spruemeister, plastic for his plastic throne! // Shasolenzabi - Toilets, more complex than folks take time to think about!
Col. Kurtz wrote: I think wet blending would be good for this, blending from darker reds at the base of the flames up through oranges, yellows, and finally whites at the very tip. I'm not much good at it myself, but I have seen some decent tutorials on you tube, try there.
If you want to paint something to reflect actual flames, you will want to have white in the middle going to yellow then red.
I have a sergeant centurius model i am painting for a friend (see my other post about centurius) i have tried a few times and it just looks rubbish maybe taling a long time slowly building layer upon layer is the way. cheers will have alook on you tube as well
Use wet blending to get the colour transition. You can either use some thick paint of this, since it'll take longer to dry, or a drying retarder.
This should help.
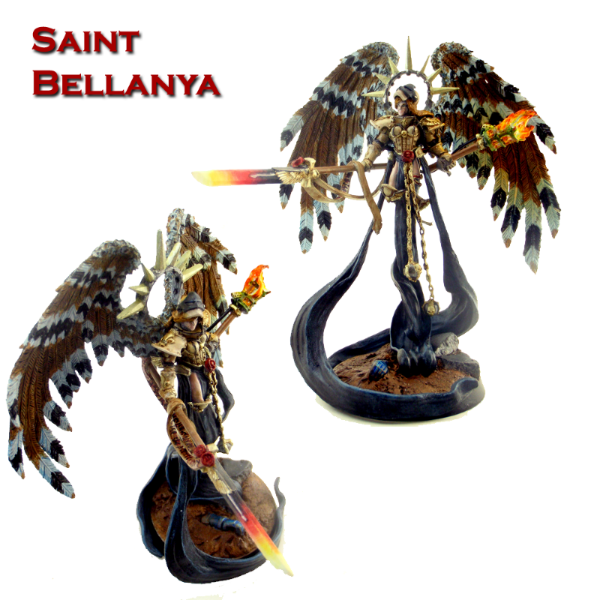
Another thing I've got to recommend is fluorescent paints. Vallejo makes a line of them, but there are several other manufacturers. It REALLY helps when trying to paint flames themselves, but I imagine they'd be great for freehand flames as well. I will note, however, that they have terrible coverage so you'll need a LOT of layers with them. I think it's worth it though, as they really make the flames pop because they're so bright. There are several tutorials out there for them, and some really fantastic examples. I did the torch on this one with fluorescents.
And again, if you want your freehand flames to be more realistic, they should start white (the 'hottest' color) at the middle/bottom and transition through yellow to orange to red (the 'coolest') at the very tips.
Go to your local shop and take a look through the Menoth book for Warmachine. They have some great painting tips for flames and make it look really easy. I've had very good success following those instructions.
See pics of my Orks, Tau, Emperor's Children, Necrons, Space Wolves, and Dark Eldar here:


 // inmygravenimage - Dr H is a model to us all


 Order of the Sable Heart
 Grave Knights
 House Rouen
 3,500+ point fully painted army of Unforgiven goodness