Forum adverts like this one are shown to any user who is not logged in. Join us by filling out a tiny 3 field form and you will get your own, free, dakka user account which gives a good range of benefits to you:
No adverts like this in the forums anymore.
Times and dates in your local timezone.
Full tracking of what you have read so you can skip to your first unread post, easily see what has changed since you last logged in, and easily see what is new at a glance.
Email notifications for threads you want to watch closely.
Being a part of the oldest wargaming community on the net.
If you are already a member then feel free to login now.
Welcome to Captain Waffle's Shipyard, where I log my miniature table-top gaming/hobby projects. The log features Warhammer 40k/Age of Sigmar (lots of Elves, but others too) and historicals/historically inspired projects. Also, 3D printer stuff. I sometimes jump around a bit with what I'm doing, but I always commit to getting things done in proper order. See the above spoiler for navigation to prominent posts. As always, comments and criticism welcome, enjoy the hobby, and take your time with it.
Original First Post
Introduction Hello Dakkanoughts. Welcome to my shipyard - be it land, sea, or up in the cosmos. I've long held dear miniature painting, crafting, and wargaming, but I only recently was able to seriously pick it up again.
Over fifteen years ago I started playing Warhammer 40k with a brother. He learned of it from some of his friends. He'd send his Thousand Sons against my Craftworld Eldar nearly every evening. I hated his tanks, and he hated my Wraithlord. I still have all those old miniatures, and I've acquired (mostly through gifts) many more over the nearly two decades since. Life hit me hard at a point, so I had to set aside spending resources on playing wargames and purchasing new items. But I kept all the models tucked away in boxes and retained all the hobby supplies.
Over those years I painted in my spare time. People I knew would see me paint and would give me old models they had, or knew someone wanted to get rid of, or just as a gift. About a year and a half ago I was finally able to start wargaming again. I've expanded the collections I have, I've played quite a few games of 7th and 8th WH40k, and more than a few of Age of Sigmar. This hobby log will showcase some of what I've done over the past fifteen-plus years, and will note what I'm up to now in wargames.
I have twenty Craftworld Eldar Guardian Defenders undergoing a repaint. I have three heavy-weapon grav platforms, two that need some touch-ups and one that I found on ebay for next to nothing.Whoever had it managed to glue it together with the bits literally upside down/backwards. Some clipping, saw work, and filing and the platform was good as new. Why three platforms and only twenty Guardians? Because I have around 35 Guardians that I somehow acquired over the years. Also, weapons options. Magnetizing is a pain when I hardly play WYSIWYG.
The color scheme is sort of my own design. I played Alaitoc before it became cool with the 8th edition Craftworlds Codex. Some of my older models even have the traditional blue, bone, yellow colors. I changed the scheme around to replace the yellow with grey (mostly), added in some green, and kept some of the other colors here and there. I value history in objects, so I'm rarely keen on stripping and repainting models unless I really need to - and I've stripped these guardians three or four times over the years as I developed my paintng skills. When I began WH40k long ago all I had was one of the old Farseers, an old Warithlord, ten Guardien Defenders, and three Dark Reapers. I painted them as Ulthwe. Then, over time I stripped them and painted some as Saim Hann, then Biel-Tan, then as pseudo Alaitoc, and now they will be set as my not-Alaitoc. Some of my models show the wear, and I try to work around that.
Perhaps one day I'll come up with my own Craftworld, and maybe I'll name some characters. I do like to think of them as a raggedy group. They've seen some things and have to retrofit equipment and vehicles and such. Sort of a living with what little they have craftworld, probably related to Exodites. Colors have a loose theme. Style depends upon the historical use. I'll take ideas, if anyone has any.
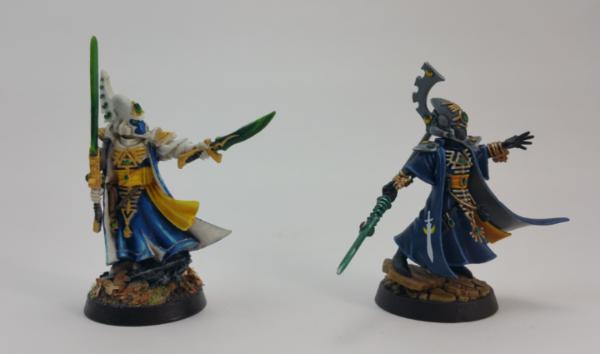
These two Farseers exhibit some old and some recent work. The Farseer on the left I acquired many years ago - maybe ten? It was a test paint for a pseudo-Alaitoc Craftworld. The right Farseer was painted a little under a year ago and fits my set-in-stone Craftworld force. More images in my gallery.
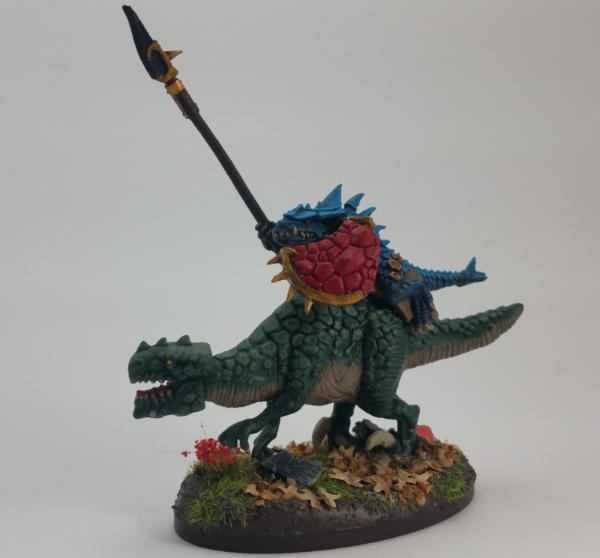
I have a soft spot for medieval fantasy. The interest is all over - and I tend to prefer Elves. However, I also find lizards cool. Maybe it's because I grew up in the hills and mountains of north-central USA and met a lot of tiny lizards here and there. This guy I had sitting around for a decade or so completely unpainted. I rebased him for Age of Sigmar and gave him a nice paintjob around two years ago. He was sort of a quick test paint to get back into things seriously, and I wanted to see how quickly I could get him done while looking good. Lots of drybrushing, but it works on lizards. Another image in my gallery. Someday I hope to have a Seraphon army. I have the old, all-metal Lord Kroak with a few metal royal guard. I've poked myself so many times on those spears just by moving them around.
I intend to update this whenever I make enough progress that warrants an update, or if something really interesting comes up. Should be about once each week. I have plenty of other miniatures to work on, and plenty already done to varying degree. They can show how I've developed over time.
For Age of Sigmar/Warhammer Fantasy I have: Spire of Dawn (High Elves, Skaven), lots of High Elves from all the subgroups, all my Sylvaneth are currently done but I have plenty of Wanderers/Wood Elves, lots of Goblins from the old Battle for Skull Pass set (a brother was given the Dwarves and we sometimes wargame), a few Seraphon/Lizardmen, and some odd bits here and there.
For Warhammer 40k I have: a lot of Eldar (perhaps half of them finished), around 850 points of Harlequins (many from the Death Masque set that I split with a friend), a tiny 500 point army of Imperial Guard/Astra Militarum, about 700 points of Sisters of Battle, around 1,200 points of Thousand Sons with some Tzeentch demons, and odd bits about.
I also sometimes paint something up for a brother or friend. I'll showcase those sometime when I can. More to come next time. Slow and steady wins the race (or at least keeps you even keeled). Discussion, critique, and ideas are certainly welcome.
This message was edited 100 times. Last update was at 2021/09/18 03:04:41
Thank you both for the kind words. I do have an odd assortment of stuff, and I'll eventually get images of them all uploaded and showcased. Perhaps I'll do that a few times a week. The new Farseer sculpt is a great one and it was fun to paint and to have on the table, usually dooming things.
I don't like how... dark? the images came out, though. I have a home-made light box to diffuse the light, but the models lose some definition, I think. I spent an hour this evening fiddling with the lighting and the light box and eventually set aside the diffusing parchment. The result appears to have a slightly brighter definition, but now has a light haze due to the lack of light diffusion. I don't know which to prefer.
I can't help the shadowy bands that softly appear on the images. I have LED "natural" light bulbs in my desk lamps. The painting is much better than it is with other bulbs, I've found, but the phone cameras pick up the waves from the LEDs.
Here's a better image of some of my WIP Guardian Defenders and their heavy weapon grav platforms. My previous image of them does not reveal much.
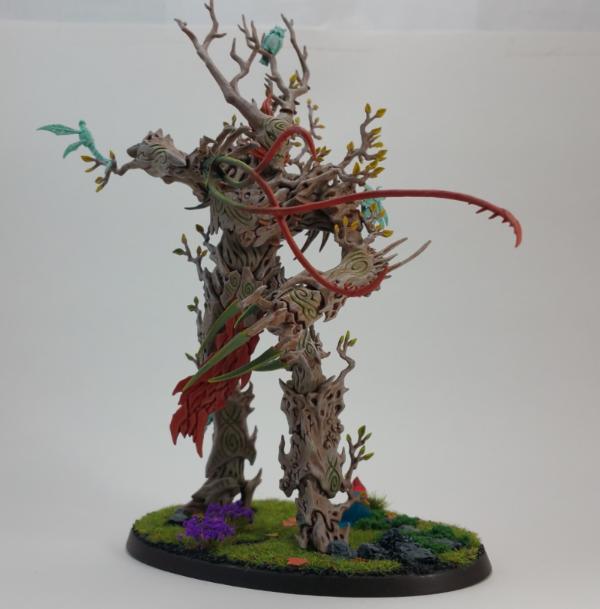
Finally, here's my Sylvaneth Treelord. My Sylvaneth, and most of my miniatures, are autumn-themed in some fashion. The little spites are a neato addition to the Sylvaneth/Wanderers/Wood Elf lore, and I try to add them whenever I can. In the lore they are forest spirits that can take many physical manifestations, so I like to paint them as spirits. I just base them white, coat them with Nihilakh Oxide, then highlight with ulthuan grey and white. More images in my gallery.
As always, C&C welcome.
This message was edited 1 time. Last update was at 2018/06/12 04:50:51
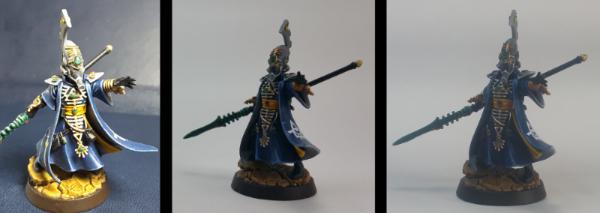
The trick with these "natural" LEDs appears to be as low-tech as possible. Quite the opposite of the Eldar predilections. Note the comparisons here:
The first image was taken without a light box and with only two lamps. One lamp was placed far to the left facing almost horizontal and slightly downward. The diffused light from one direction causes a glare, but because only one nearby source is diffused the color seems to come out more and the details shown better. The second lamp had some parchment taped in front of it to diffuse the light better and was positioned facing the front of the miniature and slightly downward. I also changed the background to black/navy blue which I think brings the color out better.
The second image was taken in a standard home-made light box setup (three lamps with diffusing parchment, one above, one on right facing in, one on left facing in). The light evenly hits the miniature, but is also dulled and detail/color is lost. Also, the camera is able to pick up the LED light waves due to the diffusion and white background.
The third image is like the second, but with the diffusing parchment removed. The detail and color are slightly more brought out, but the undiffused light particles hit each other from all directions creating a haze effect. Similar to the second image, the LED light waves are softly present.
The first image might be the way I go from now on, but it really depends on the model. The change in backdrop from white to black/blue certainly did wonders with the color. Perhaps I just need stronger bulbs in the lamps to make the other methods work.
Now that you've read through my experiments, here's a few older models I have painted up. The first is my converted Autarch Skyrunner. Too cheap to purchase the actual model? Why not make one from old parts! I really like the old (now Index) Autarch rules where you could give nearly anything to an Autarch. Really had the "walker of many paths" backstory to them. This guy is a combination of the old Eldar jetbike "sergeant" model, two Dire Avenger Exarch arms, and the lance part of a Bright Lance. It looks silly, but that's part of the old school charm. Too bad the Autarch Skyrunner can't actually have a shuriken cannon mounted on the jetbike. More in my gallery.
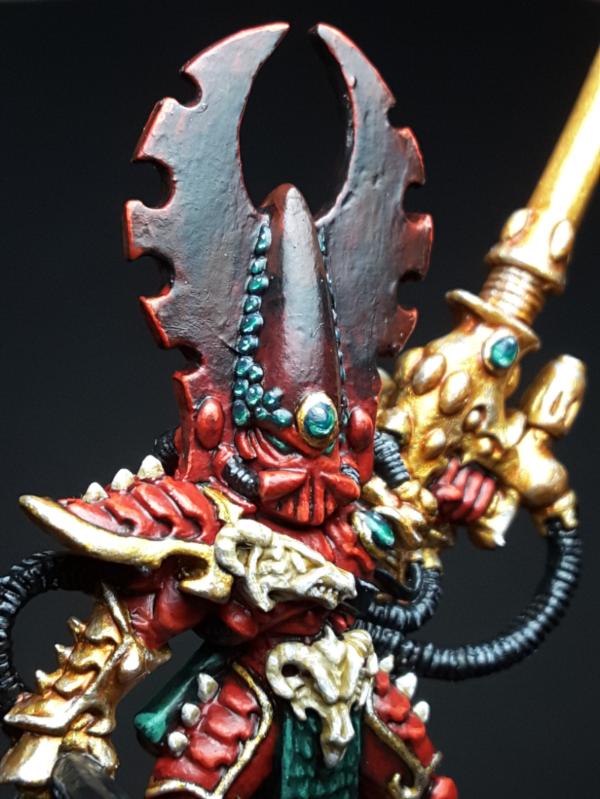
For a color variety, here's the Phoenix Lord Fuegan, "The Burning Lance", with a few Fire Dragon Aspect Warriors of the Red Wyrm Shrine. The image seems somewhat saturated, but I took it as it was. I tried to stay true to the original Fuegan color scheme, and spent some time on the gems all over his helmet. Most of my Eldar models are the old metals ones, and some have seen some wear. The paint can cover that to a point, but I think the pits and depressions in the metal add to the history of Fuegan. As always, more in my gallery.
Here's a close-up of Fuegan's helmet:
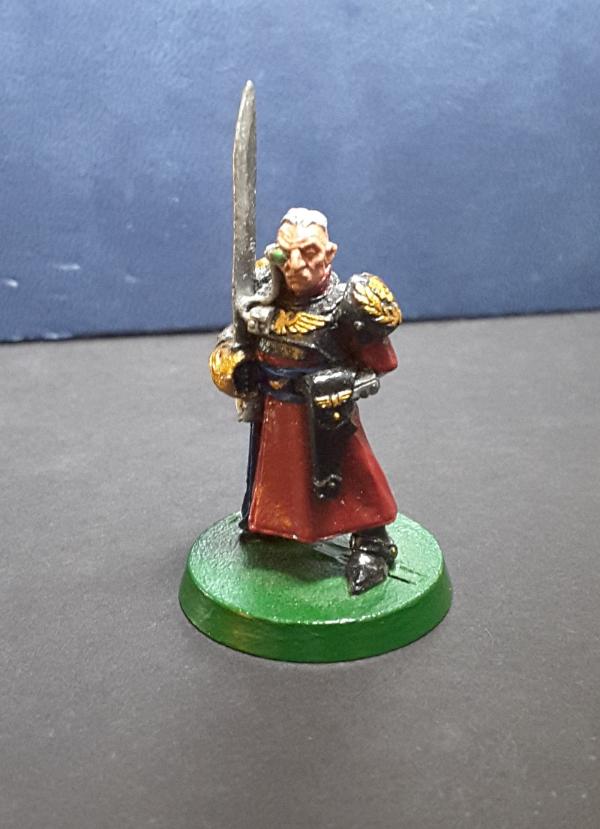
For something in need of work, an old Imperial Guard/Astra Militarum Lord Commander from my small IG force. I painted this guy when I was around 15 years old. That was a long time ago. Never chipped once even though I used to keep him in a plastic bag with a bunch of other Guard. I'll give that one up to the thick gloss varnish I apparently used back then.
I have just barely enough IG models to make a basic, exactly 500 point infantry force. Everything is on foot and it has one heavy weapon team and one Armored Sentinel. I usually run it with my small, roughly 700 points of Sisters of Battle/Adeptus Sororitas. They both need a decent paintjob, though, which will be a project for the near future. Sometimes I tire of painting elves. Even though this guy is painted, he most likely will get a repaint. I'm not sold on the red/black scheme. Once I figure out what my Sisters will be I'll have my IG suit accordingly. I might go with a green/white/gold/black scheme. I'll paint up some tests soon.
Finally, I like to add in some of my medieval fantasy stuff. Here's a High Elf Prince on horseback.
I painted part of this guy around 13 years ago, then kept all the bits in bags as I had moved around a lot. A couple years ago, as I was slowly getting back into the hobby, I dug this guy out and completed him. The color scheme is sorta standard for High Elves, which I like, but on his cloak I added some model putty to form a lion pelt. My goal was always to have a White Lions of Chrace themed High Elf army. I have a unit of White Lions that I'll show sometime, and a lot of other High Elves, but it's not themed as I'd want it to be yet. More images in my gallery.
As always, C&C welcome. Especially on Sister of Battle color schemes and ideas. There's not much out there apart from the standard black/red.
This message was edited 2 times. Last update was at 2018/06/13 01:47:13
Getting decent pics is always a challenge. No answer for it but to snap a bunch and tweak settings to figure out what works with the gear you have.
Nice work on all the gems. That’s a lot of tiny detail.
Building another bike autach is on my to-do list, but the lack of parts is a big problem. I’m spoiled by all the plastic kits marines get that can be mixed to make cool HQs. Eldar need a lot more plastic if they want to get anywhere near that level.
High Elf looks great.
I know I’ve seen green Sisters before. Here is at least one example Just because the classic colors are black/white/red doesn’t mean they all need to be. I painted a blue one once to use as a character in an RPG. But also a zillion in a more traditional scheme for a friend’s army.
Nice range of pieces on display. Always a challenge finding a photography style that works for you.
Love that old IG commander. What a classic sculpt! Would love to see you strip and redo that old fella. He deserves a revamp.
Though I note you're not a fan of that sort of thing.
I like your Jet bike. Nice blue camo pattern. I've been sitting on a squad of converted Harlies on bikes for probbably about seven years now and never got round to painting them up. I just can't face those large flat surfaces on the bike front ends because I know it'll have to be a real delicate pattern paint job to match my Harlequin troopers. Got a lozenge theme going on but a lozenge-based camo pattern might work well.
This message was edited 1 time. Last update was at 2018/06/13 21:10:56
Nevelon wrote:...
Nice work on all the gems. That’s a lot of tiny detail.
Building another bike autach is on my to-do list, but the lack of parts is a big problem. I’m spoiled by all the plastic kits marines get that can be mixed to make cool HQs. Eldar need a lot more plastic if they want to get anywhere near that level.
...
I know I’ve seen green Sisters before. Here is at least one example...
Gem painting is one of the reasons I enjoy painting elves. I find the detail soothing, and the finished light effects fascinating. My main Farseer, the one in all those previous images, is covered in gems of all colors on purpose. I discovered that yellow and amber gems don't capture and reflect light as other colors do, so I painted those gems differently. Thanks for the compliment, it is a point of pride and joy for me.
Most of my Eldar are in metal, and I purposefully search out the metal models on Ebay and such as I don't like the resin. I don't really purchase much these days for Eldar, though. I'm hoping that GW, someday, comes out with more plastic in the line. I notice from your gallery and hobby log that plenty of your models are the old metal ones as well. Holding out in hopes of plastic too, eh? Great webway terrain, by the way.
I've seen those Sisters before, a few years ago. I forgot about them. I think I'd flip the colors and make the green primary, white secondary, and reserve the gold and black for trim/details. I'll paint up some tests in the coming weeks.
Sinful Hero wrote:I love the treelord. I hadn’t thought of using the Nihillakh Oxide for spirits- I may have to steal that idea. Looks really good.
Nihilakh Oxide has a bluish-green effect to it. It's great for ethereal looks when placed over a brighter color. The final effect depends greatly upon the underlayer, and what you can do to highlight it is completely limited by that under layer. I once attempted to highlight with blues over white-covered with the Oxide. Looked terrible. Thanks for the compliment on the Treelord. I took a look at your hobby log. What would you use the Oxide method on? I'd like to see more of your stuff.
theCrowe wrote:Love that old IG commander. What a classic sculpt! Would love to see you strip and redo that old fella. He deserves a revamp.
Though I note you're not a fan of that sort of thing.
I like your Jet bike. Nice blue camo pattern. I've been sitting on a squad of converted Harlies on bikes for probbably about seven years now and never got round to painting them up. I just can't face those large flat surfaces on the bike front ends because I know it'll have to be a real delicate pattern paint job to match my Harlequin troopers. Got a lozenge theme going on but a lozenge-based camo pattern might work well.
When I test paint my Sisters in the next weeks I'll paint a few Guardsmen alongside. The commander will have his deserved repaint. When I make an army I find that, after test paints, getting the HQ done first really sets the tone for the rest and it all falls in place. He'll be one of the first to be done. Sometimes, history is best honored by digging into it a bit more and finding previously unseen things, like a better paintjob.
The camo pattern is present on a few of my Eldar. I don't carry it across them all as it can obscure too much detail. For example, Wraithlord one of three has the camo pattern and I think it hides a bit much. Better suited for vehicles.
Why is the left arm of the Wraithlord bearing two guns, completely removing the potential to punch? I dunno, ask my much younger self why that decision was made. Rule of cool, perhaps. The camo pattern is much better on these oldschool jetbikes (Windriders):
I have six of the modern Windrider models, and a recently completely Farseer/Warlock Skyrunner. I'll showcase those another time, when the Windriders are painted.
I'm also currently struggling with patterns on my Harlequins. I don't have an airbrush, so stencils are out, and I really don't want to freehand all those designs. I have a few Harlequin grav models finished and varnished, just waiting for some sort of design on them. At least I can use them in a fully painted state, which is my initial goal with any model. Touch-ups and additions can always be made at a later time. I'll show them in the future. I don't want to overload a single post.
Thanks for your comments, theCrowe. I enjoyed reading your Eldar stories earlier today. Really put my mindset into that of the Eldar, and High Elves for that matter. Always loved Warhammer's elvish lore.
Sinful Hero wrote:I love the treelord. I hadn’t thought of using the Nihillakh Oxide for spirits- I may have to steal that idea. Looks really good.
Nihilakh Oxide has a bluish-green effect to it. It's great for ethereal looks when placed over a brighter color. The final effect depends greatly upon the underlayer, and what you can do to highlight it is completely limited by that under layer. I once attempted to highlight with blues over white-covered with the Oxide. Looked terrible. Thanks for the compliment on the Treelord. I took a look at your hobby log. What would you use the Oxide method on? I'd like to see more of your stuff.
My main use for it would be the standard rusting bronze and whatnot, but I also have a massive backlog of Reaper Bones from several kickstarters that I just have no current interest in completing. But if I can knock out a few of the ghosts and spectres real quick that’s more I can throw in my completed pile. What would you recommend for the undercoat if not white? A similar light blue to the Oxide? Also, do you just slather the model on the oxide, or is it more like you would paint a traditional layer?
Sinful Hero wrote: What would you recommend for the undercoat if not white? A similar light blue to the Oxide? Also, do you just slather the model on the oxide, or is it more like you would paint a traditional layer?
I've only ever tried it on brighter colors, and I know it works over a light blue. Alternatively, you cab mix a little of another color in (just a little) to alter the Oxide. However, if you mix too much in the chemical properties of the Oxide are changed and it won't flow the same. It's really your call on the affect you want, and it's straightforward to test on some bits.
Take the Oxide straight from the pot and paint it on in a smooth layer. Don't slather it, but don't go for the usual really thin coats. It acts like a wash, but isn't. Be brave with it! It's all plastic and acrylic, so no worries. You need only one coat of the Oxide, quick and easy.
Also, keep an eye out for the new AoS Nighthaunt themed paints. Dunno when they'll be released, but soon. Advertised to work exactly like the Oxide method. The info on them are 3/4th down the Soul Wars announcement page: https://www.warhammer-community.com/2018/06/05/soul-wars-announced/
Thanks for the tips CaptainWaffle. I don’t pay much attention to AoS, but those new technical paints may be perfect for knocking those minis out quick.
Ahoy Dakka! One week past and what do I have to show for it? Plenty! But, how does a Captain like myself keep his work on course when he has twenty Guardian Defenders and a heavy weapon grav platform in the yard? Perhaps pick a smaller project? Nay! Simply make progress, then take a break to make related progress elsewhere!
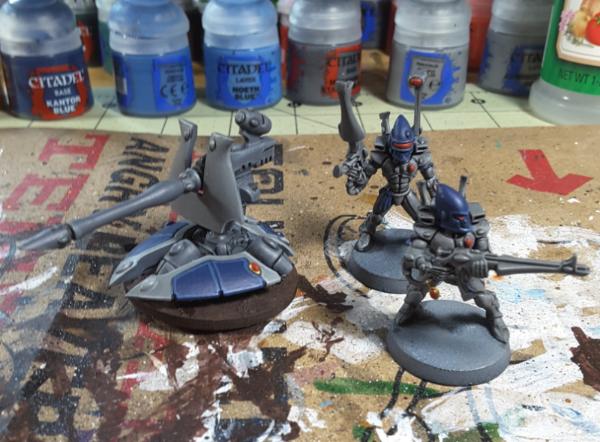
Behold! The fearsome Craftworld Somethingoranother Warlock!
I really need to get a Craftworld name figured out. Something to do with going off the beaten path (like the old Alaitoc fluff, but with less shenanigans and more Aspect Warriors and Exodites). This is an old 1991? Jes Goodwin RT Warlock model that I had laying around. The item can be seen in the lower right here: http://www.solegends.com/citcat1991a/cat1991ap093eldaravatrwarlks-01.htm. The model was in production for a few years, though, and I didn't catch the year on the tab before I glued it in. I just know it was 199.... I have a few other older Warlocks around as well, and I'll get to them in time.
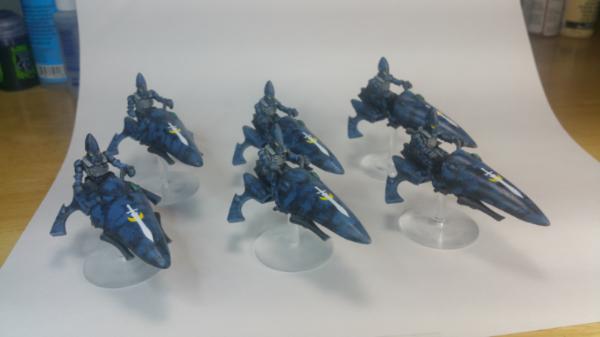
Don't worry, I'm still working on the Guardian Defenders. All twenty are blocked in, shaded, highlighted, and have a few details done. Every one of them is at the detail stage. The helmets were line-highlighted, but I took to drybrush the rest of the bodies for expediency. I know, I hear you cry. "But CaptainWaffle! Eldar are sleek and glorious to behold! You can't drybrush them!" Fear not, for I progressively built from darker to lighter grays, which was very fast because gray goes on well. It almost looks like I did the highlights with an airbrush (but, sadly, I don't own one of those). Take a look:
I never liked making the weapons a different color from the main armor. It doesn't make sense to me. The older Eldar codexes have a lot more example images and suggestions and they have some shots of Guardians with weapon colors matching a main color. Looks a lot more elegant, methinks. The heavy weapon platform is all line-highlighted, though. No drybrush there.
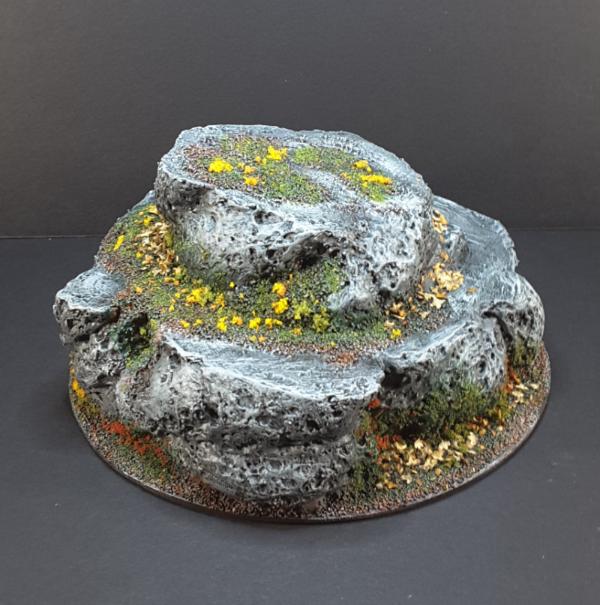
I also took to crafting a small rock/meteor terrain item. I need more terrain, and will be working on larger pieces in the near future. Here's a WIP shot, and when it's done I'll have a step-guide with images:
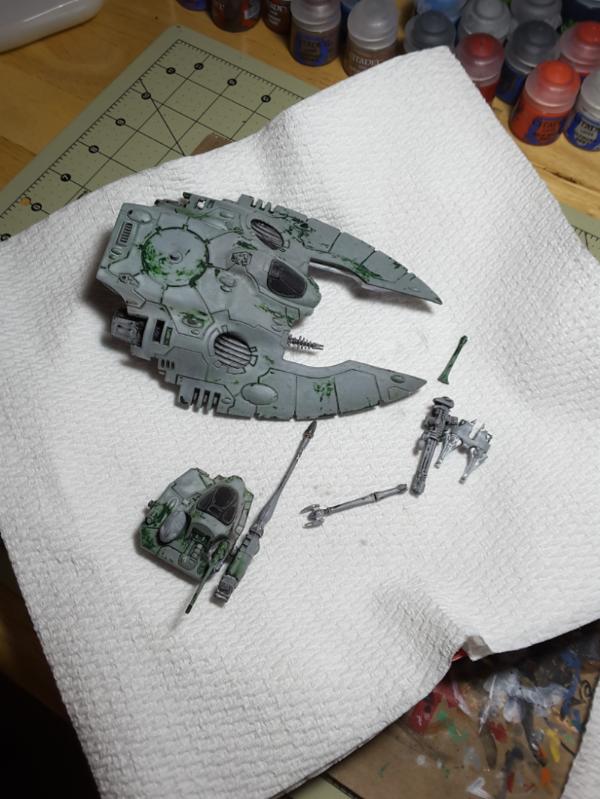
I have an old Falcon (from back when they were 'Falcon Grav Tanks"). In fact, this was the very first Falcon I ever owned. I think I picked it up over 15 years ago from some hobby store that had it on massive discount. It's been through so many snapped parts, paintjobs, repaintjobs, cleanings, then more snapped parts and repaintjobs. The thing is a mess and I'd like to do it justice. Over the previous three weeks I've had it in a tub of Super Clean, from which I would periodically retrieve it and give it a good scrub. I cannot get all the paint off, and I think this will make recovering it difficult. The paint on there is from when it was a Biel-Tan vehicle, long ago. If anyone has any suggestions I'd love to hear them.
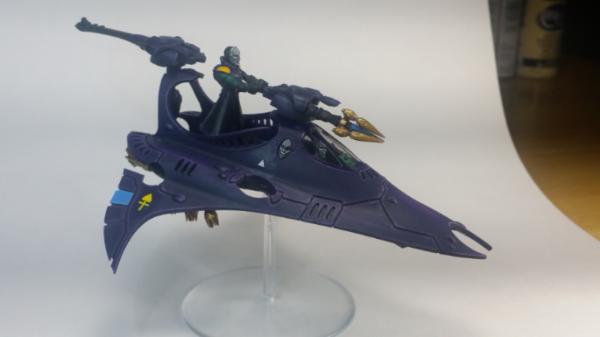
Ignore the blackout windows. In my youth I became lazy when painting the tank and "cheated". I didn't do so with this Vyper, however, still in its old glory from 8+ years ago, back when I really did have it as Alaitoc (again, before it was cool):
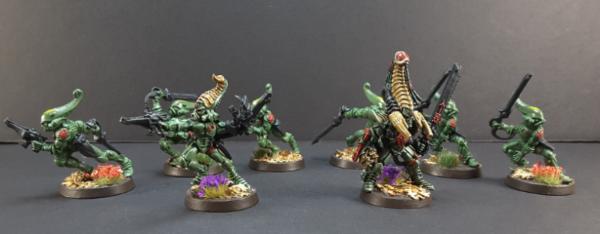
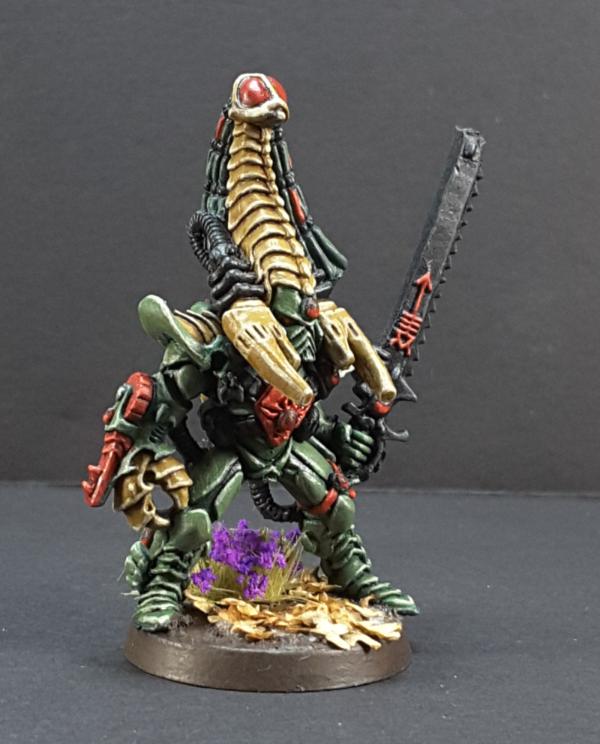
I've always ran my Eldar army lists with plenty of Aspect Warriors. I tend towards the dreaded Footdar. The intricate playstyle required is what interests me, as well as the elvish Warhammer lore. Standing back and shooting everything is boring. I prefer to engage at all avenues, when appropriate. Even though these Striking Scorpions are somewhat niche on the battlefield, their lore as the silent, and tough death are fascinating. These are Striking Scorpion Aspect Warriors of the Ebon Claw Shrine:
The 3rd Edition Striking Scorpions leave a lot to be desired. I really like the current sculpts, but I'd rather not touch that resin. At least Karandras, The Shadow Hunter, Phoenix Lord of the Striking Scorpions fixes the aesthetics:
The power of the Scorpions is not necessarily in their stats. They're really not that special, although they do tend to hold out and hit hard against the right targets. Their power is in the confusion and uncertainty it instills in your opponent. You're not just playing on the table, but also in the mind. The power of the Scorpions is also no good against cats. The tip of Karandras's chainsword was mangled by a playful kitten a year ago. Ho hum.
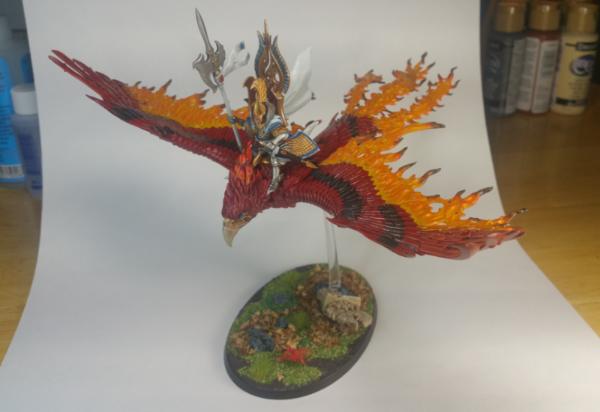
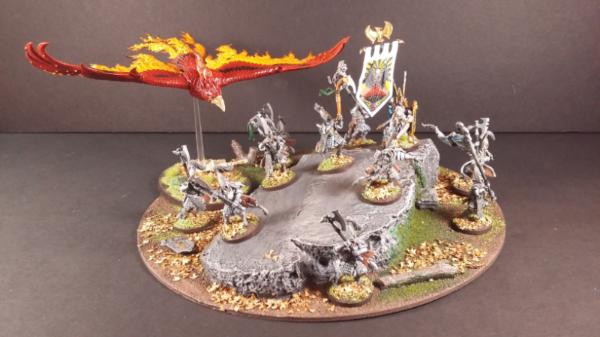
Finally, some Fantasy/AoS. Here's a Flamespyre Phoenix with Anointed that my wife purhased for me. She loves the Phoenix, and I enjoy High Elves. This was a thrill to paint, and I hear they're kinda powerful on the table too:
As always, there are more images of everything in my gallery. After I finish the Guardians I'll take a break from Elves to do some test paint on my Sisters of Battle/IG army. C&C whole-heartedly desired.
This message was edited 3 times. Last update was at 2018/06/20 20:06:39
Rock/Meteorite terrain piece finished. Here are the steps:
First, gather your basic supplies. There is no set-in-stone way to build terrain, but you always need a few things. I used a wooden oval from a hobby store (Hobby Lobby for me), some bits of cork that you can get by tearing up wine bottle stoppers or from any number of online sellers, some wood glue/Elmer's glue, and your basic array of hobby tools (knives, tweezers, etc.). Most importantly, you need something to represent the rock. An actual rock could work, but they can increase the weight of the terrain piece and can be difficult to affix to the base. They can also be a pain to store as the rock might be shifted around and smashes things.
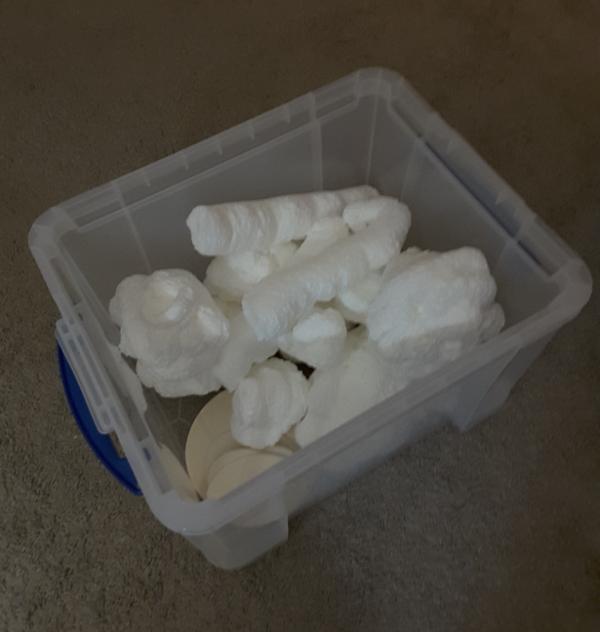
Instead, use spray foam insulator/sealer. I used Loctite brand "TITE FOAM" that I picked up for a couple dollars from my local construction/hardware store. Follow the directions on the can to prepare the foam. Have an area ready (I used a 4'x4' table) to spray on, and cover it with sheets of baking paper. I tested this with both waxed baking paper and "parchment" baking paper, and the foam kinda stuck to the waxed paper in places, but came right off the parchment. Your call. Spray the foam in rough shapes/sizes as you desire and wait for it to cure. Should be an hour to a few hours. I left mine overnight. Remember that the foam expands to twice its initial size, and perhaps even more. Wear tossable gloves for this, as the foam will stick to your hands and most other things before it cures.
I didn't take any photos of the foam spraying, but I do have an image of the result stored away. This is all from a single spray can:
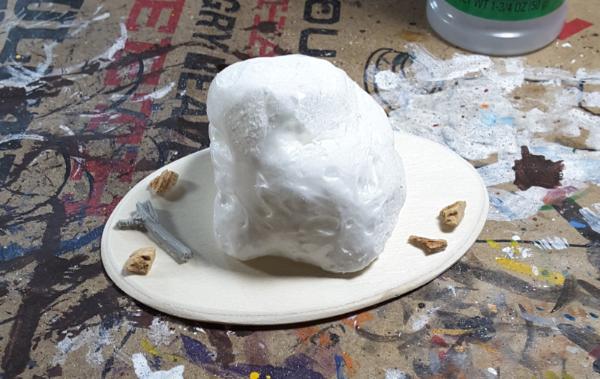
Don't be alarmed at any shape oddities. You can cut the foam with a knife as much as your heart desires. Keep any scrap for later projects as filler or smaller objects. I did a small bit of terrain for this tutorial, and I was happy when I had a small boulder/meteroite shape. Cut one side to have a flat area, and sand it with coarse sandpaper as desired. Affix that side to your base with wood glue/your glue of choice, and add some other small bits as you wish:
The fallen tree but I used is a resin piece from Basecrafts. You could use twigs or whatever that you pick for no cost, but then you have to clean it and wait for it to dry and it might not match your aesthetic well so you'd paint it with dubious results. It's great when it works out, otherwise a cheap bit of molded resin/plastic works too. The shredded cork is from GreenStuffWorld, as I prefer to keep my wine stoppers in their rough shape for other purposes.
Next, get some ballast on it. You can get this stuff from anywhere, even your backyard if you feel like sifting and cleaning it. It's just sand/rock material. The stuff you can purchase from a hobby store/online has all that done for you, though, and you can find them in all sorts of sizes. I have a container with a mix of sizes, from fine (almost sand), to medium, to coarse. I find the coarse grit balast to be too large for most projects, but I used it in the mix here because this is meant to be a more rocky/meteorite piece. Lay down a layer of your white/wood glue and pour the balast on. Press it in a little if you want, and wait for it to dry. It should say on the glue bottle how long that is, but usually 30 minutes to an hour.
Get some white/wood glue on a plate/cleanable surface and thin it out with some water. Slather that on the foam and any cork/wood bits. This creates a surface that will take paint far better than the foam/cork would. It also protects the foam from any spray can paints you might use, as the aerosol eats most foams. I didn't use spray paint in this project. I also didn't take a photo of this step. It's thinned glue on foam, what more do you want?
Block in your base colors. I use cheap, $2 large bottle craft acrylic paint for terrain. Paint it on as you would painting a model, same concepts. To get the balast painted you could spray/brush on some primer first, but I don't always bother. Make the paint really thin, almost like a wash, and slather the balast with the paint. It will flow between all the grit. I used a burnt red for the balast, GW Dryad Bark for the wood, and craft paint dark gray for the stones. I also painted the rough rim to match my other terrain/model bases. Apologies for the unfocused image.
Get to shading and highlighting. I used GW Agrax Earthshade for the balast and the wood. The balast got two-three washes until I was happy with it. The rocks and some areas on the balast close to them were washed with GW Nuln Oil. Just go for it until you're happy, and catch those recesses. You can always fix mistakes, and you might see some in the next image that are resolved later. Highlight by drybrushing to keep it natural-looking. On the rocks I used a medium gray heavy drybrush, then a light light gray drybrush. The wood was drybrushed with GW Gorthor Brown, then lightly drybrushed with GW Sylvaneth Bark. The balast was drybrushed with a cheap off-white, bone-colored acrylic craft paint.
Now we get to the details. These are defnitely your choice. I used GW Athonian Camoshade to give a slight green shade to low areas on the main rock and in some recessed areas, then threw a little more GW Nuln Oil on some of those areas to get some variation. My goal was to create a mossy look. I love Autumn, and I'm from central-north United States where I'm surrounded by raw nature and the cold. I love it, and that's what I try to recreate on my table, so moss and dried leaves it is. Once the shade is dry, brush on some thinned out matte varnish to seal the entire piece, or spray it on.
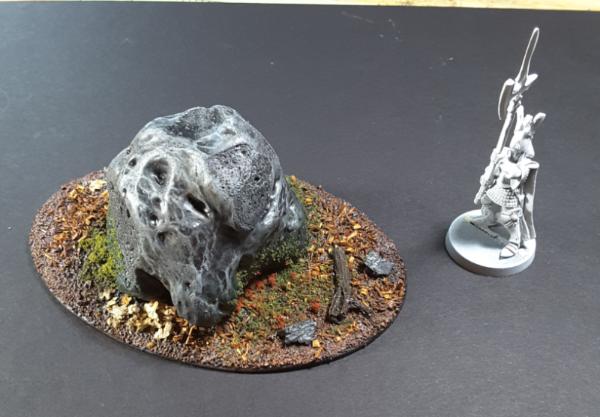
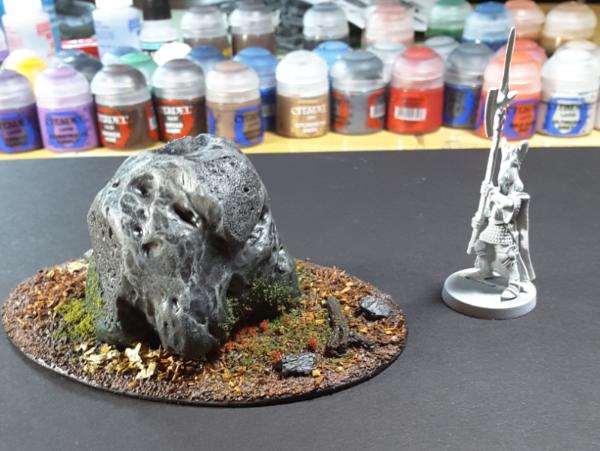
Finally, add extras of your choosing. The autumn scatter from Basecraft was affixed with white glue first. Then, I emphasized the the mossy look with various turf from Basecraft and GreenStuffWorld, with thinned white glue brushed on to affix it all. Again, you can make this stuff yourself, but you'd have to wreck a blender by chopping up sponges, mixing in paints, and getting inconsistent results. If you want to, all power to you. Finally, I glued on some "leaf litter" from the vendors to imitate fallen autumn leaves. Again, you can make leaf litter yourself. Here's a great tutorial from Reaper Miniatures. But again, this takes time and can lead to inconsistent results. A tub of leaf litter costs a couple dollars and will last a very long time. Here are a few images to show the final result in different lighting and angles. The old High Elf Phoenix Guard is for scale.
You can mix some rubbing alcohol, water, and white glue in a spray bottle to add a cover layer of glue to make certain the extra stay stuck, but I don't think it's necessary. C&C welcome. Take joy in your work.
Bright lance HW platform is finished.The Guardian Defenders are nearing completion. I always struggle with how to base HW platforms. They sit so low to the ground that it's too easy to overload the base with visuals and it can be difficult to get anything meaningful under there. But, it looks terrible if there's little or nothing there.I might go back to it and add some moss or something.
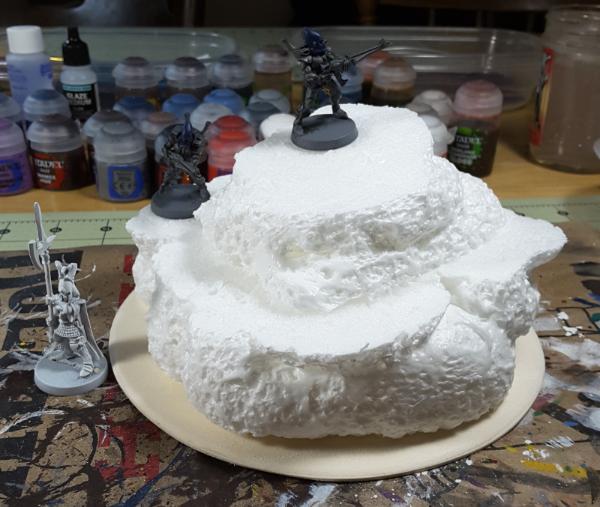
One of my goals is to create a collection of outdoor terrain for my autumn-themed table. I've come to learn that natural terrain doesn't take much effort or hands-on time, but it can take some time to finish. Most steps involve waiting for something to dry for 30 minutes to an hour, or overnight. This allows one to build, paint, do house chores, or spend time with the wife in between quick five-ten minute terrain work periods. Since I finished my rock/meteorite thing, and I have plenty of that sprayed foam ready to use, I began work on a medium-sized hill in between painting Guardians and watching The Lord of the Rings with the wife:
It's a decent size, able to block LoS or have a unit (or two) positioned on top of it. I usually wargame with close family and friends on a 4'x4' table, and this isn't too large for it, nor too small to matter. After the glue dried on the layers I got to spackling the surfaces. This gives it a sturdy finish to support miniatures being placed on it, and evens it out a bit so it's ready for the balast and other bits. Spray foam tends to leave holes behind, and spackle fills those right up. This stuff goes on pink and dries white, and I'll sand it after it dries overnight:
A little work here and there, slow and steady with purpose, and it all will come out great. C&C always welcome. Take joy in your work.
The weekend was spent watching The Lord of the Rings and The Hobbit with my wife, as well as working on the hill and completing the Guardian Defender unit. What a relaxing time.
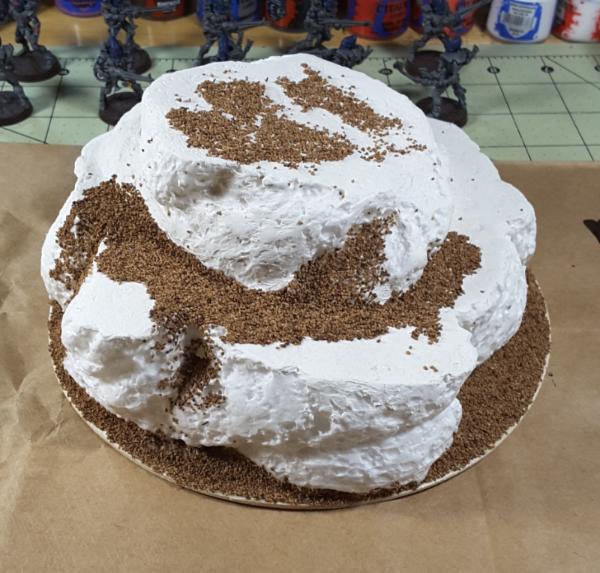
The hill was finished using the same method as my rock/meteorite, detailed in a previous post. Ballast was affixed, and the foam coated in watered-down white glue...
...then the entire hill was painted. Shades were applied both to create depth and the appearance of moss. Spray varnish sealed it. Apologies for the fuzzy image.
The hill was completed with various flock and such to create moss, foliage, and other autumn aesthetics.
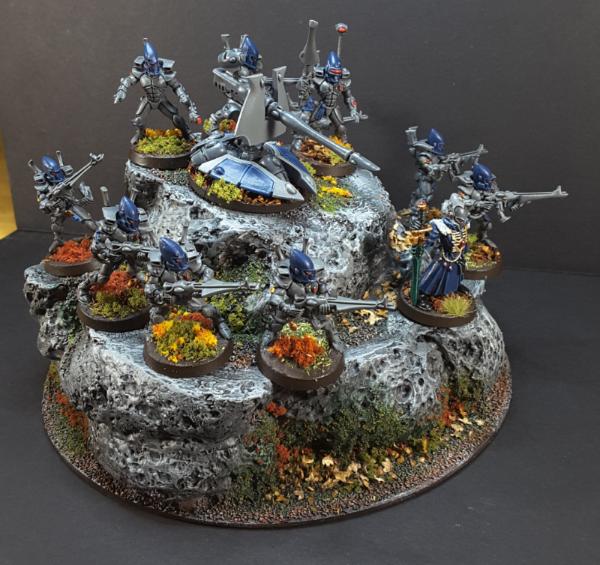
Just in time to showcase the completed unit. Guardian Defenders of Craftworld Somethingoranother with a Bright Lance lead by a Warlock take up watch upon a hill:
Too much or too little on the foliage? You decide. The hill can hold ten-plus 25mm bases (probably 12 or 13) at a time. The lower ledges are narrow and would prove difficult to place larger bases upon. That means that I'll need more terrain. Always more projects, otherwise it wouldn't be a hobby. Take joy in it.
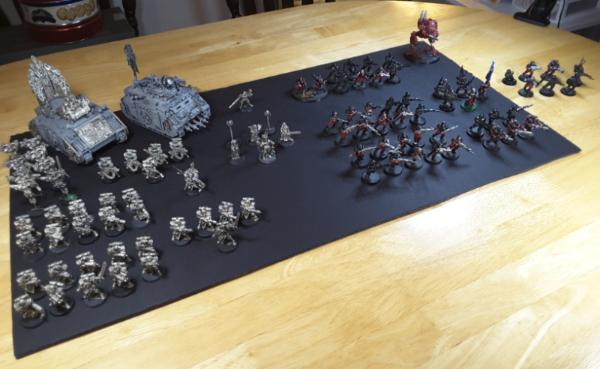
The next project is to test color schemes on the Sister of Battle and accompanying Imperial Guard. Here's an army shot of everything I have relating to them, equaling around 1,000 points-worth (probably a bit more than that).
After that, I'll pick away at them and my other things. I got some metal Eldar Swooping Hawks that have my eye, along with Baharroth. C&C always welcome.
Paint tests for the Sisters and accompanying IG have concluded. I took a liking to the green/deep red with natural brown colors of Rohan from the LotR films that my wife and I recently watched. I already wanted a green SoB army, I just hadn't sorted the colors before watching the films again over the week. The wife also took a liking to Middle-Earth (she had never seen them before, a shame that had to be addressed) and wants me to get into the GW Middle-Earth games. I hear they're coming out with a rebranding and new box set or somesuch anytime now, so perhaps you'll see some of that on here over the next months.
Color scheme tests used mostly GW paints. I used Scalecolor white primer to get some quick white on them (and prime). The reddish-brown is Vallejo Model Color "Hull Red", which I did not like at all. Perhaps GW Doombull Brown or something would've been better, but even then I think the use of a reddish-brown is far better suited to more medieval and natural subjects like leather. Both GW Waaagh! Flesh and Caliban Green were tested, and I found the Waagh! worked best on the IG and Caliban worked best on the SoB. The red I ended up with was GW Mephiston Red with two layers of GW Nuln Oil washed over it. Black is just GW Abbadon Black. I hear other black paints are better, but I don't have much to offer locally and rarely order online. One day I'll try other paints.
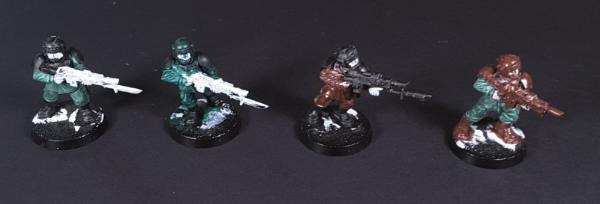
The tests were mostly underwhelming, but you never know until you try:
Doesn't that Hull Red look terrible in this context? The IG gear most likely will be black as I really can't bring myself to paint it anything else. It's standard soldier gear provided by the Imperium to legions upon legions of average humans - why would it be anything other than black unless a specific environment calls for otherwise? Anyway, the final selections stood out immediately to me, and were the last I tested:
The actual paint jobs will be much more clean that these. Don't spend too much time on color tests or you'll go loopy.
While testing the Imperium armies I was frequently bothered by the state of my painted Wraithlord. Remember that guy from this post? Goodness, what was young CaptainWaffle thinking back then?! I carefully took my tools to it, and after some prying, clipping, cutting, filing, and gluing I repainted him. Now he makes a lot more sense, and I have a good color scheme for ghost-type weapons:
Doesn't he look so much better? I need to improve my blending skills, but I think it's a decent start. Next on the workspace is a bunch of Wraithguard that I need to finish, then perhaps some Wraithblades...
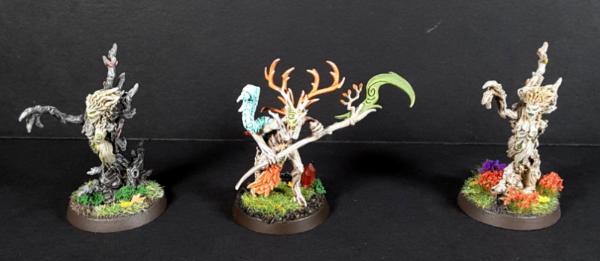
Finally, here's more Sylvaneth to scratch the Fantasy itch. My lighting needs work. As always, C&C welcome, especially on the Imperium tests.
Thanks for the compliment EldanariPrince. Sometimes I worry that my use of contrast isn't developed enough and that I overdo things like basing. It's all a learning process.
Time for something different: historicals. I'm burned out of fantasy and future-fiction... for now. Well, mostly I'm burned out of Warhammer and its high prices. After reading Maniac_nmt's Gesta Normannorum hobby log my Nordic heritage and long enjoyment of history was set ablaze. I've always wanted to build historical armies and engage in those wargames. Might at well pursue what is interesting. It is a hobby, after all, not a job. I can get back to the Elves and bolters anytime.
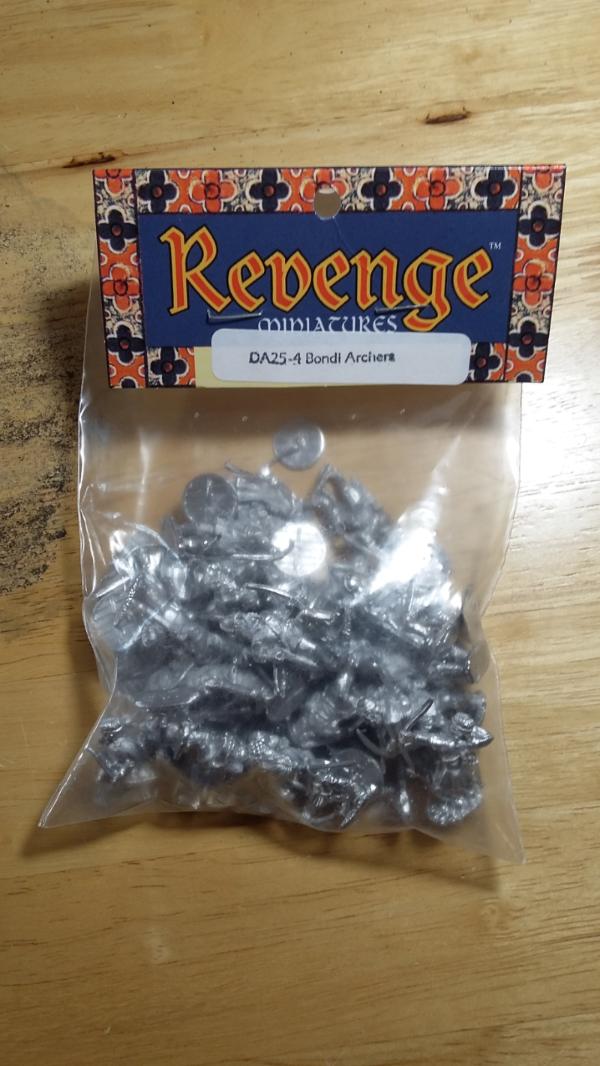
My goal is to have a few SAGA armies over time, the beauty of which is that the miniatures can be used for much more than SAGA and can often be used in multiple SAGA armies. Cool stuff and thrifty. I have the Viking and Anglo-Saxon/Dane 4-point plastic starter armies from Gripping Beast in the mail, as well as a shieldmaiden banner set from Footsore to add to my warlord bases. On a whim, and because it was a cheap find at a random store, I also picked up a bag of 29 Old Glory 25mm Bondi/Levi archers.
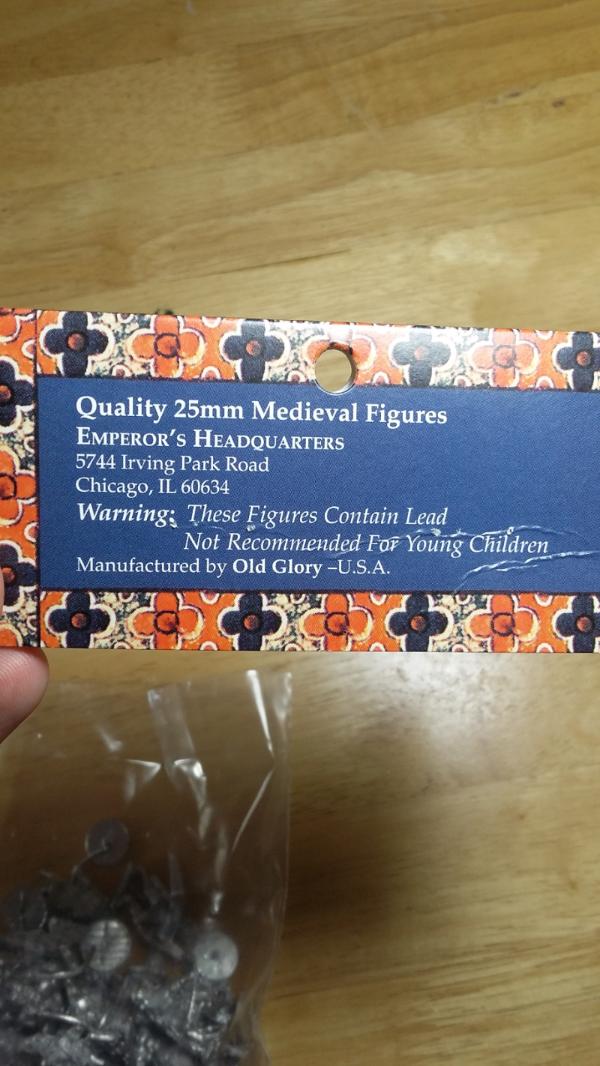
Ah, old lead miniatures.
There's even a lead warning on the back.
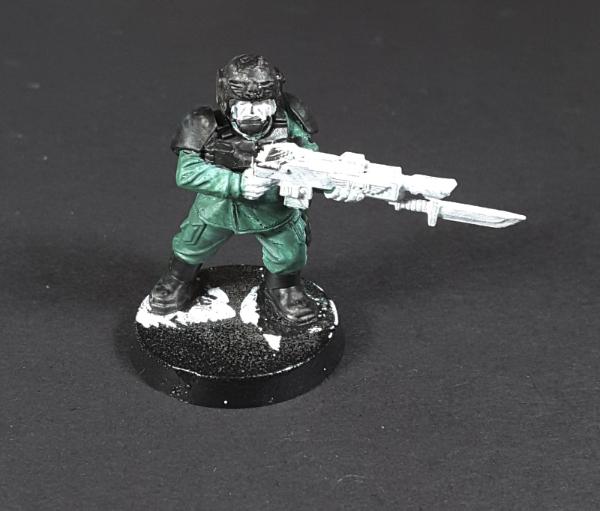
I am not all that pleased with the miniatures. They certainly are not the pinnacle of miniature modeling. Also, they are so soft that they bend very easily. Finally, the mold line removal and other cleanup work was a hefty chore. Since they're 25mm they sit slightly lower than 28mm miniatures, but throw them on a slightly taller base and they fit right in with 28mm miniatures. It was a cheap find while I wait for the proper miniatures to arrive.
A quick bit of paint and "brush-on" dip and they'll be decent basic levi/bondi or some other Nordic/Germanic low-level troop. The terrain WIP bit will be an A-frame storage structure over earthworks. After the white glue dries I'll throw some spackle on it and inside to make a pounded-earth floor. I'll also have a good idea of what the measurements for the A-frame will be once the earthworks are leveled. As always, C&C welcome. Enjoy the hobby and take it easy.
This message was edited 2 times. Last update was at 2018/07/12 02:19:57
Let the gamer ADD shine! I’m all about working on what interests you in the moment. Personally, I haven’t indulged in any historical gaming, unless you count Flames of War...which is basically 15mm 40K set in WWII.
Welcome back to the hobby CaptainWaffle, I look forward to seeing your progress on your current project.
Fango wrote: Let the gamer ADD shine! I’m all about working on what interests you in the moment. Personally, I haven’t indulged in any historical gaming, unless you count Flames of War...which is basically 15mm 40K set in WWII.
Welcome back to the hobby CaptainWaffle, I look forward to seeing your progress on your current project.
Thanks for the encouragement! The key to any hobby is to remember that it's a hobby. Get things done, but whatever you're currently doing make certain it's interesting and enjoyable to you. In the moment, I'm finding historicals more enjoyable tham science fiction. I'll bounce back to the rest another time.
I'd consider Flames of War a historical game, from what I've seen of it. There aren't any crazy aliens and such in it.
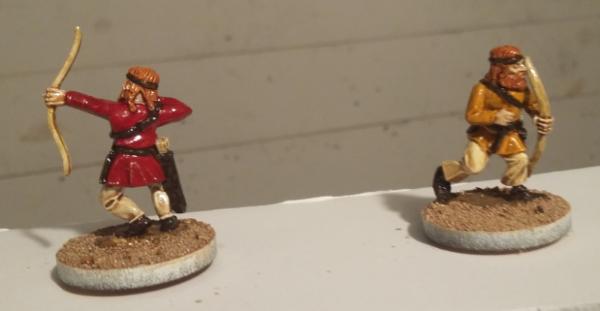
Progress has been slow going. I've been picking away at 24 Old Glory Warrior/Levi archers, and it's painful. The detail is decent, and the painting is actually easy. It's the mold lines and flash that's killing me, and having to work around the oddities. In some ways, the miniatures have grown on me. They do have some great beards. But in others they are such a pain, and unless something about Old Glory changes I won't purchase them again.
Here's two that have been "brush" dipped using Minwax, just so I can see how it'll look.
I always feel I must apologize for the fuzziness. Sometimes my hands are too shaky. Other times they're steady as a rock.:
This old guy is my favorite of the bunch:
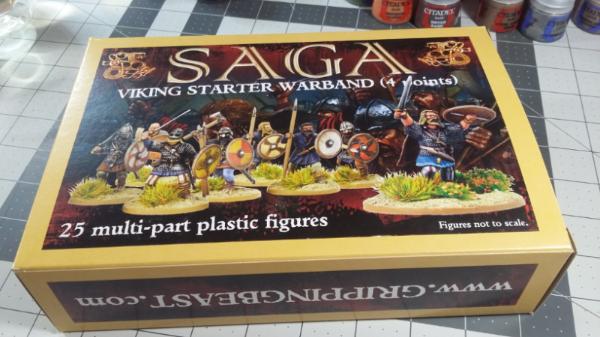
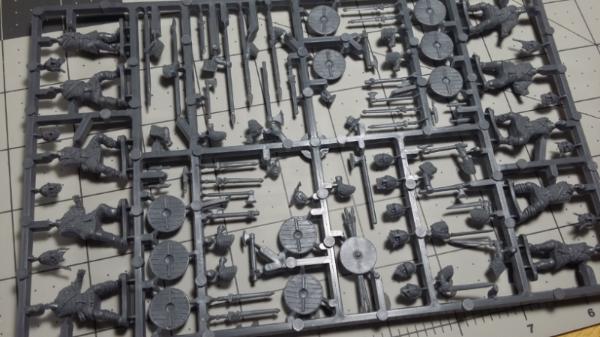
I did receive the Gripping Beast 4 point SAGA army Viking and Anglo-Saxon/Dane starter boxes today. I thought I might review them here. The boxes are typical cardboard and both come with very similar sprues. Viking set:
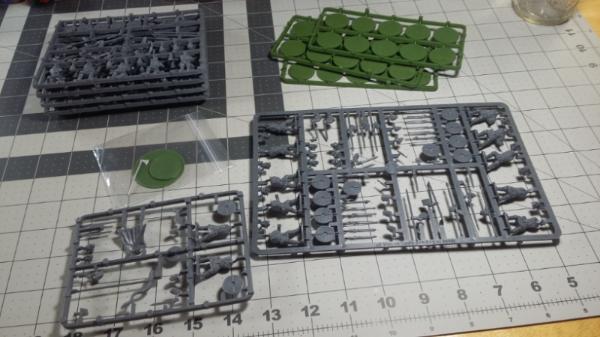
Anglo-Saxon/Dane set:
Both sets have the same exact four-sprue-set of warrior/levis. Heads and all are exactly the same. Each sprue creates five whole warriors/levi. That's a lot of extra bodies across the two sets just from these:
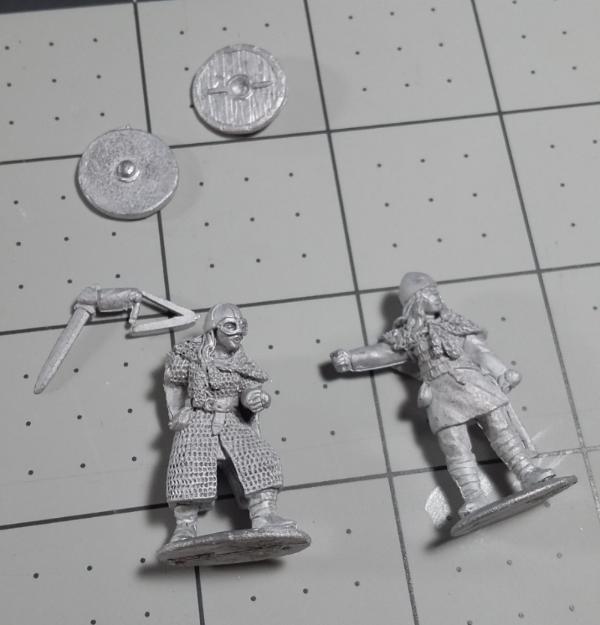
Where the sets differ are in their warlord and hearthguard sprues. The Viking set has a suitable sword-and-shield setup (although I might swap an axe in) with fur cloak and rugged beardy heads (AS THEY SHOULD). There's also an extra body for a hornblower:
The Anglo-Saxon/Dane warlord sprue has everything to make a weapon+shield or Dane-axe weilding warlord, along with a banner-bearer. Note that the cloak on this one is very plain, and the Dane-axe is a metal addition in the warlord's base bag:
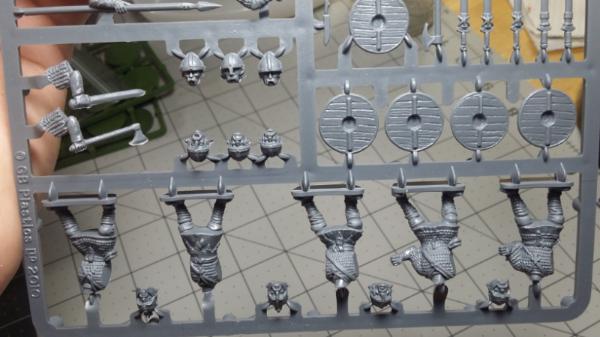
The hearthguard sprues are quite identical across the two box sets, but the Viking set has more axes whereas the Anglo set has more swords and spears. Also, the heads differ as the Vikings have more, well, Norse-looking heads while the Anglo hearthguard seem to all cower behind Roman-looking helmets with pathetic ear-flaps.
Viking hearthguard sprue:
Anglo hearthguard sprue:
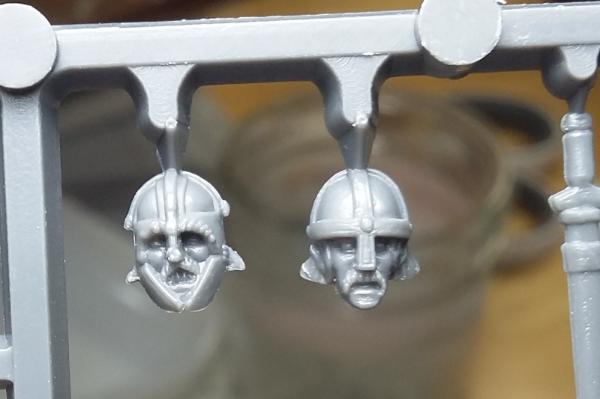
The glorious Viking heads:
The cowardly Anglo-Saxon/Dane earflaps:
I jest, of course. In reality, although certain regions had dominant styles, trade and looting made these variations common across much of Europe at the time. Notice the mold lines. They are hit and miss across the sprues, with some needing little to no work and others needing a lot. However, it's quite comparable to, say, GW castings at a far less price. I purchased both sets for a total of $36, straight from Gripping Beast in the UK. What a deal for over 50 miniatures!
The SAGA rules claim that Viking and related shields were rimmed with iron. I know from studies that this was exceptionally rare. Shields had some care put into them, but were largely self-crafted and tossable equipment that would really only defend against so much before breaking. That iron would have been put to better use elsewhere. Also, the archaeological record supports common use of leather-bound/edged shields, not iron. I might file down the iron rivets on the shields where they are and paint them as leather-rimmed. There is some archaological evidence that the leather was kept in place by iron, though, rather than always the common sinnew. I'll see what I think when it comes.
Work is still progressing on the A-frame storage structure. Not much to post on it right now, though. 24 oddly molded archers takes some time. As always, more images in my gallery and C&C welcome. Enjoy the hobby and give it its own time.
Edit: Goodness, I forgot to showcase some of my older work. I split a Death Masque box with a friend over a year ago. I kept the Harlequins. Did you know that some crafty magnet work on the Starweaver allows it to become a Voidweaver too? And that the "riders" on the Starweaver can be adjusted and modeled on their own bases and added to the troupes in the Death Masque box to get more for your money? It's true! Anyway, here are the non-foot Harlequin units from the Death Masque box set, the Starweaver/Voidweaver and the two Skyweavers:
This message was edited 2 times. Last update was at 2018/07/17 04:25:16
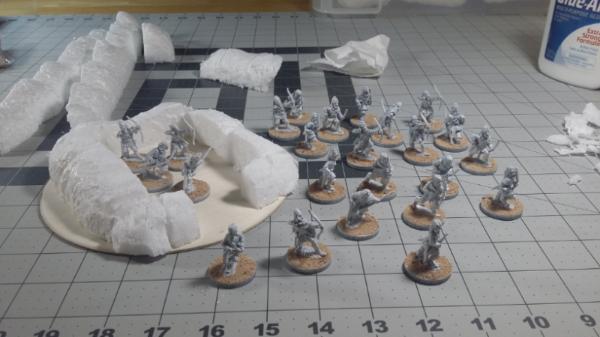
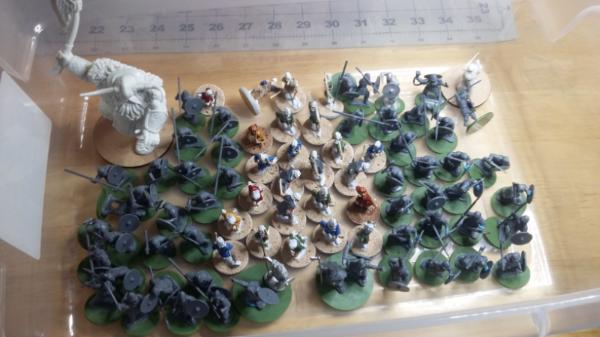
Captain Waffle is back in port. What has he been up to for over a month on the waters? Much with work and family. And some hobby time. Both boxes of SAGA Viking/Anglo-Saxon/Anglo-Dane starter armies were built:
That's at least 50 miniatures. All of the shields are blu-tacked on so they and the bodies can be easily painted while still used in games. The archers haven't received much attention over the previous month because I prioritize getting new models ready to use.
What's the big guy in the back? That's Reaper Miniatures' Frost Giant Warrior. Not to be confused with their Frost Giant Bodygaurd, which is also a very nice model. He fits with the Norsemen in a more fantasy way and makes the historicals fit in with, say, Osprey Publishing's Dragon Rampant. Also, it's a cool model that I wanted to paint the moment I saw it on the shelf at my local store for $13. He's also quite big:
There's a "Highland Heroine" from Reaper in there as well for a future Scotish/whatnot army. She's somewhat fantasy-ish, but not so much it's immediately noticeable. She also stands a little taller than the other guys, but that's just natural variety. Same case as the frost giant: I saw her at the shop for $3 and knew I'd paint her.
Some of these historicals were a pain. I wanted to make a unit of Dane-ax hearthguard for the Anglo-Danes, but the box set doesn't come with any Dane-axes. The amount of work to repose and build a Dane-axe might be doable, but none of the arms suit it. Then I discovered that the Viking starter pack has a single Dane-ax on the hearthguard sprue, even though the SAGA II rules for Vikings doesn't allow great weapons. Besides, it was just one with a single arm set that works with it. That was a lot of time and effort to make four Dane-ax hearthguard that ended up with nothing. Good thing those starter packs come with so many extra bodies. I still have enough leftover for a few more units of warriors/levy and hearthguard. Also, the mold lines were mostly easy to work with or not there, which is a plus.
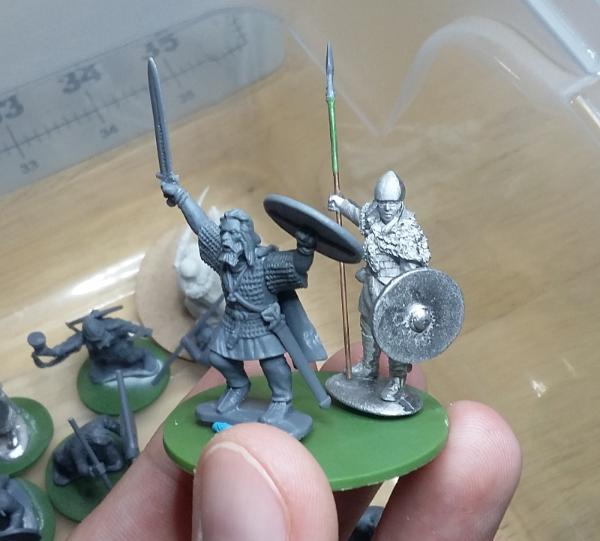
The Footsore Miniature Viking Valkyries are beautiful metal models, and I added one to my Viking warlord as a banner bearer. There's plenty of recorded evidence to suggest that Norse women fought (although nowhere near as often as men), and records for what might be considered Valkyries (in a not-supernatural sense, warrior women of some reknown). Whatever the case, they fit in moderation, and I like to think of the warlord base as me and my wife, who loves it:
The Valkyries were also a pain, though. The models are beautiful, but the mold lines were terrible. You can easily see them right fromt the box. Beware that you might need to put some work into these ladies if you purchase the product:
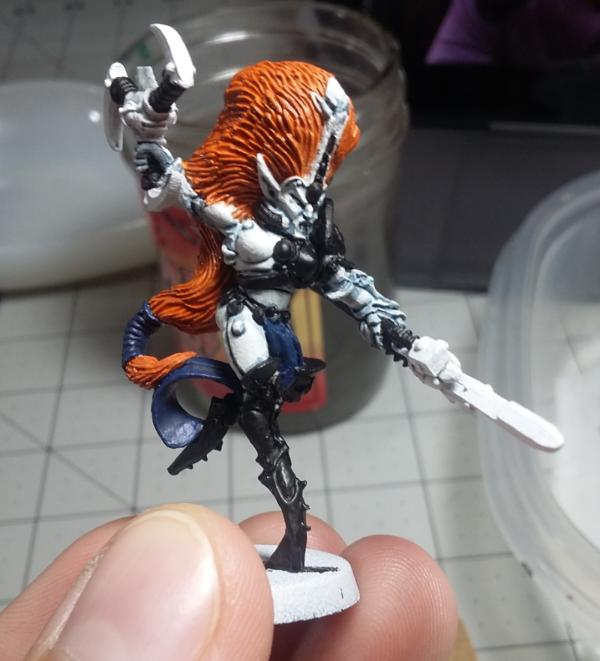
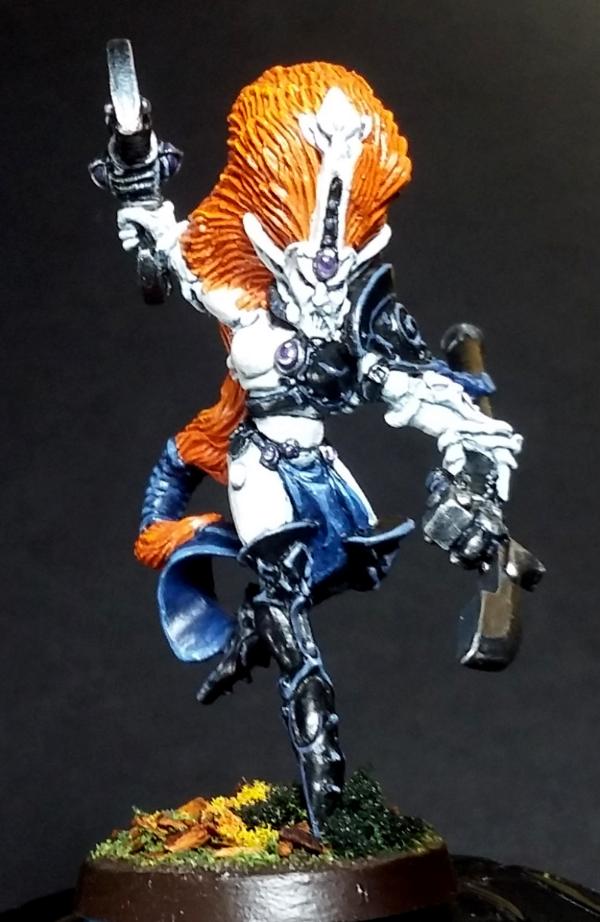
After building all those historicals (and not-so-historicals) I needed to get back to my Elves. One of my goals is to have every Phoenix Lord painted, but I must have a related unit for that Aspect ready first. I have the Howling Banshees finished, but not Jain Zar. I'm sticking with the white armor, but with my Craftworld colors mixed in and matching the orange of my Howling Banshee's hair. I never liked the standard Jain Zar paint scheme, too dull. A WIP from this evening:
The model certainly shows its age. Jain Zar could use an update, but plenty of Eldar stuff could. It has an old-school charm to it, though, and I enjoy it. C&C always welcome. Take joy in your hobby, giving it its own time in moderation so you can truly appreciate it.
insaniak wrote: Ah, Jain Zar... I remember being blown away by that model that first time I saw it. Crikey, she's top-heavy, though...
I like your take on her. Nice contrasts.
Thanks for the compliments. I managed to fit some bits of thick wire under the base to even out the weight a bit. She's still top-heavy, but only slightly now rather than entirely! I'll have to come up with some similar method when I get to Baharroth.
Here she is finished. Jain Zar, the Storm of Silence, Phoenix Lord of the Howling Banshee Aspect Warriors:
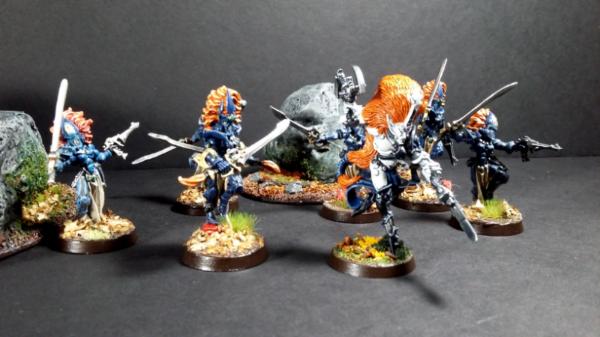
All I have is my simple phone, but someday I'll have a proper image-capturing device! The model quality is not the best at all. There are some areas where the mold was poor (such as the face on the headdress, it really is flattened from purchase). It's how I bought it a decade or more ago. The lighting doesn't do it justice, the white is really Ulthuan Gray and related paints shaded with blue shade and highlighted with white. Looks a lot better in-person. A group shot with my Howling Banshees of some particular shrine or another. I don't like the Howling Banshee's standard colors, so I made up a shrine (only the color scheme):
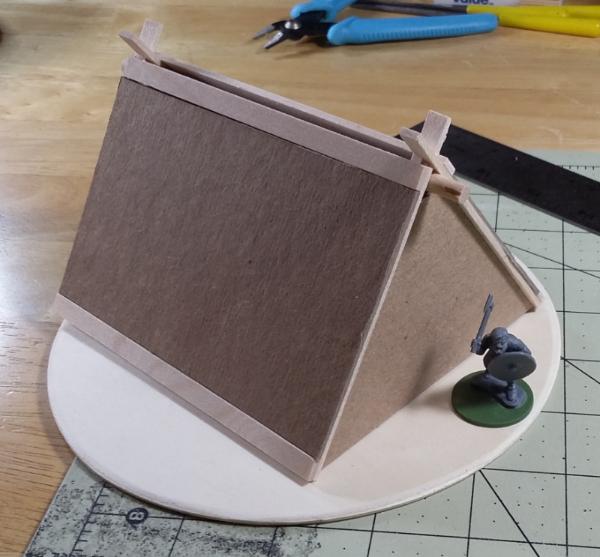
I've made progress on an old ancient/medieval A-frame structure. Simple stuff made from craft wood and chipboard. The plan is to add panelling to the front and back, a door, then use faux fur in layered strips to make the appearance of straw/hay/whatever over the roofing. A 28mm Viking warrior stands to give perspective:
It's a good idea to have a terrain project in the background. Gets the eyes off painting tiny details and results in something usable that adds depth and nice aesthetics to a board. Up next, the Harvester of Souls, Maugan Ra, to join my tiny three-elf squad of Dark Reapers of the Jade Scythe Shrine:
As always, more images in my gallery (see my signature). C&C welcome. Enjoy the hobby and take your time with it.
It's been a busy terrain month, with a lot of family business over the next few weeks. We'll see what I can get done. But, what has the captain been up to in the yard?
I finished the scratch-build A-frame. It works for historicals and could pass as a far off ag-world/frozen world for WH40k (since worlds in WH40k are entirely of one weather type). The door turned out a little large, but could be something like a barn/work shed, and could also work as a Space Wolf thrown together shelter:
I have a simple 3D printer that family gave to me last Christmas. I need to do work on the machine to get it to print better, but I have printed a bunch of barricades/walls and bunkers with it, including a missile silo with computer perfect for objectives. Those are now all painted in a simple manner and ready for the table. I got the files from SnowMan77's designs free on Thingverse:
They're perfect for the size of WH40k miniatures, as this Blood Angel attests:
The turrets aren't done yet. They are designed to rotate:
As always, hills are important and continue in development. Adding line of site blocking terrain that are thematic, natural, and can give a height advantage gives so much to the games. You do houserule these things to enhance the game, right? Trees as well! I have a bucketful of trees on their own bases. These can be used as scatter terrain, and can also be used on area terrain discs to create area cover or somesuch (also in development):
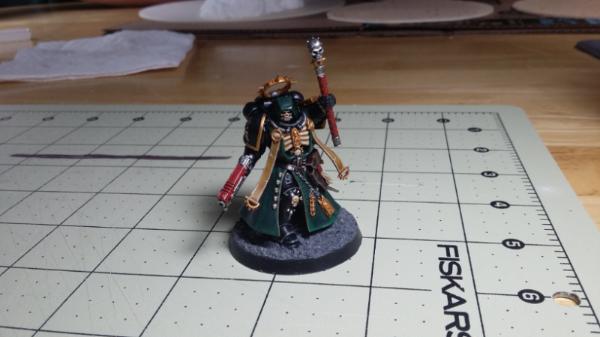
For a finished model, this is a Dark Angel Primaris Chaplain that I painted for one of my brothers as a gift. It's a decent model, although I think the cloak is a little too... flowing? The model seems like it's designed to be spinning to a target, but I never thought it captured that motion well:
Finally, I've been finishing a 3D printed Hogwarts Castle music box (with a mechanism I got online with Hedwig's Theme and a varnished wood base) for my wife, and been putting together a host of Swooping Hawks Aspect Warriors (in metal, never "finecast") for use against a friend's IG. More on those another time. Thanks for reading, more images in my gallery, and as always C&C welcome.
This message was edited 1 time. Last update was at 2018/09/22 04:11:26
Very nice work! I've been eyeballing 3D printers for awhile now, but the price is still a bit much for me. But you're doing some really great things with yours- very inspiring!
"He fears his fate too much, or his desserts are small, who will not put it to a single touch; to win- or lose- it all."
Montrose Toast
2018/09/29 17:57:08
Subject: CaptainWaffle's Shipyard - 9/29/2018 Hills, Trees, and Elvish Things
Thanks for the compliment, Meer_Cat. There's definitely a learning curve for 3D printers, and I haven't figured it all out yet. I used to eye designs and wonder how I might scratch-build them myself, never actually considering putting the funds down for a printer. They are expensive! But getting one as a Christmas gift from the entire family put the funding consideration aside.
What they gifted me is a Monoprice MP Select Mini 3D Printer v2. It's a simple, low-cost 3D printer with a simple structure and software. The unique thing about this "low-end" printer is that its hardware is really top-notch stuff. The software is the limitation, but it can be worked around to get access to the high dexterity of the hardware. I just haven't done it yet. The printer also, notably, is very open in its design. I need to create a sturdy box with ventilation to protect it while it prints. I think the reason it's priced like a low-end printer is because all that quality-of-life and ease of access to the hardware doesn't ship standard with it. This requires the user to do more work to get the thing operating at a high level. But, unlike other low-priced printers this one actually can reach those high-end work levels. There are plenty of guides online detailing how to get the thing to operate better, I just haven't done it yet. It takes a deal of time and patience to modify and calibrate it.
All that said, with what I've printed so far the printer has more than paid for itself based on what I would have had to pay using one of those print-on-demand services. What a nice Christmas gift!
The area terrain with moveable trees are complete. I might add some grass, leaves, or shrubs to the tree bases, but a simple highlighted dirt base works well for directly beneath a tree. Here I've posed the selection of area terrain and trees with some of my Eldar. My photo options are still limited by my basically functional phone camera. The better half just got a nice phone with a superb camera, but she, understandably, always carries that with her. Someday! A Wraithlord and unit of Warp Spider Aspect Warriors of the Shade Gate Shrine march their path through a forested area:
I made a total of four of those area terrain items, each a little different, and a bucketful of various trees. There has to be over 50 of those things. They're just simple hobby trees that you can get from many producers. Most of mine are from Woodland Scenics because that's what my local arts and crafts store supplies.
The hill/rock has also been finished. I used the same rough hill/rock method that I used previously. I've been improving it to hide obvious foam-cuts and to fix air pockets that the expanding foam creates. The height gets up to an inch and-a-half, which can hide foot units behind it quite well. Here it's presented with a unit of High Elf White Lions charging over it, emboldend by a High Elf Prince and supported by a Flamespyre Phoenix. This is the same phoenix that I previously presented in this hobby log. The Anointed rider is magnetized so I can store it all more easily:
That camera really makes them blend in to the rock.
Current projects are still the Hogwarts castle music box for my wife, Maugan Ra, and a unit of seven Swooping Hawks (including Exarch) and Baharroth. I had three metal Swooping Hawks from an old blister. Not the old Rogue Trader style, which do look good, but the current style. What is that, 3rd edition? Not wanting to deal with "Finecast" resin I searched online for a while until a few months ago when I spotted someone selling four hawks and an exarch of the current style all in metal, for $20. I pulled that trigger very quickly. Baharroth is also metal, but I don't think they cast him in resin even now. Those hawks are far to spindly to be in resin, their wings just snap to bits from what I've read. I'm not certain what shrine I'm going to paint the hawks in, probably the Ashen Sky (see the 7th edition codex) as I don't want the baby blue hawks of the standard shrine. We'll see when I get to them.
Thanks for reading. More images in the gallery (see my signature). As always, C&C welcome.
This message was edited 1 time. Last update was at 2018/09/29 19:33:52
The terrain pieces and the Eldar look terrific- very well done! I loved the phoenix before and it was nice to see her again. And thanks for the info on the 3d printer- lots to think about (and winter is coming.....)!
"He fears his fate too much, or his desserts are small, who will not put it to a single touch; to win- or lose- it all."
Montrose Toast
2018/10/08 04:56:03
Subject: Re:CaptainWaffle's Shipyard - 10/7/2018 Spooky Maugan Ra and Swooping Hawk WIPs
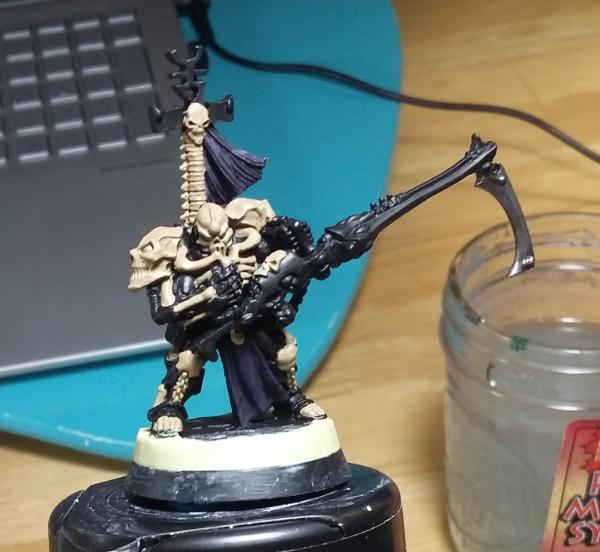
I'm participating in this month's unofficial painting challenge over in the painting and modeling section, which has a spooky theme to fit this month. I mostly lucked out in the coincidence that I started Maugan Ra at the same time, and he's aptly spooky. I decided to raise him a bit so he doesn't look so much like he's short and broad, and to keep his feet from hanging off the edge of those tiny Eldar bases. I didn't want to cut him off the base as he's resin and seems to rely on the tab connected to his feet. So, I glued him to a 30mm base and wrapped the gap with putty. I also got to work getting the base colors in. Bone over black is rough stuff, even if the bone is GW's base Zandri Dust. I have shaky hands, but lots of patience to get clean lines, so I need to go back to clean this up. Maugan Ra has gone from this to this so far:
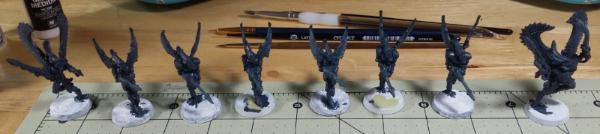
As I wait for parts of the Reaper of Souls to dry, I've been blocking in base colors for the Swooping Hawks and Baharroth. I made the mistake of priming them in white before I decided exactly how they were to be painted. Painting GW's Dark Reaper over white is requiring at least three layers on each of these guys. They're going to be Swooping Hawks of the Ashen Sky Shrine, which also looks somewhat like Baharroth's lore color scheme. The Hawks won't be so bright as the regular Ashen Sky theme, though. I want to keep their mesh armor closer to Dark Reaper and Baharroth rather than the sub-mesh being black/dark reaper and the plates being a brighter gray. Here's the line of them in progress:
Just a quick update during a busy month for me. Steady as she goes. Take enjoyment in your work. C&C always welcome.


 Ultramarines, 3rd Co. and friends, 16k+
  4k
4k  4k Points
 Competition Index
 ~5000 pts
 ~5000 pts
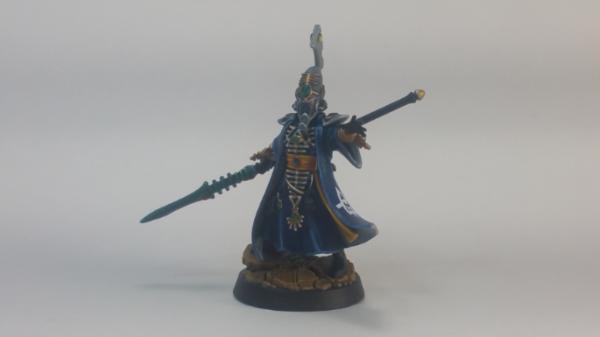


 (less)