| Author |
Message |
 |
|
|
|
|
Advert
|
Forum adverts like this one are shown to any user who is not logged in. Join us by filling out a tiny 3 field form and you will get your own, free, dakka user account which gives a good range of benefits to you:
- No adverts like this in the forums anymore.
- Times and dates in your local timezone.
- Full tracking of what you have read so you can skip to your first unread post, easily see what has changed since you last logged in, and easily see what is new at a glance.
- Email notifications for threads you want to watch closely.
- Being a part of the oldest wargaming community on the net.
If you are already a member then feel free to login now. |
|
 |
2018/07/22 07:06:44
Subject: The -=]_=- Terrain Competition Thread -=]_=- LoER Terrain Contest #26 "Hold the line!"
|
|

Regular Dakkanaut
|
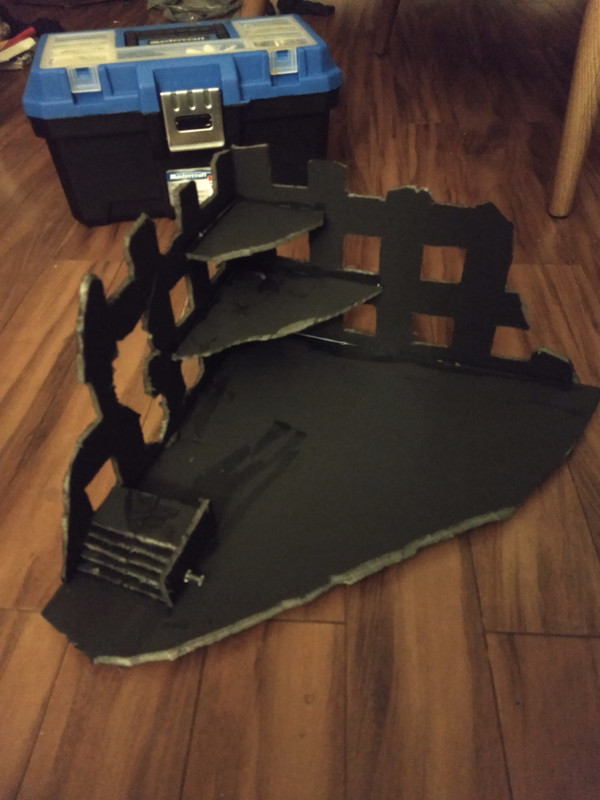
And here's the start of mine. It's actually my first attempt to build my own terrain. W
I plan on putting in some sandbags and more details.
 online upload pictures online upload pictures

Basically adding more details and a ramp once I figure out placement unless I can get my hands on a pulley and cable some place.
Next I need to make a sniper bolter and as stated before some sandbags.
|
|
This message was edited 3 times. Last update was at 2018/07/23 06:33:59
|
|
|
 |
|
2018/07/23 15:20:54
Subject: Re:The -=]_=- Terrain Competition Thread -=]_=- LoER Terrain Contest #26 "Hold the line!"
|
|

Kinebrach-Knobbling Xeno Interrogator
|
Some lovely work on here folks, keep it up!
Quick progress update from me, still need to work out how to mount the hauling wheel (hoping it will actually function!) and replace the string with chain. Then more texturing, tidying and greebles before the paint job.
|
|
|
|
|
|
2018/07/23 22:07:46
Subject: The -=]_=- Terrain Competition Thread -=]_=- LoER Terrain Contest #26 "Hold the line!"
|
|
Regular Dakkanaut
|
And here's an update.
 Automatically Appended Next Post: Automatically Appended Next Post: 
|
|
This message was edited 1 time. Last update was at 2018/07/23 22:09:57
|
|
|
|
|
2018/07/23 22:11:49
Subject: Re:The -=]_=- Terrain Competition Thread -=]_=- LoER Terrain Contest #26 "Hold the line!"
|
|
Gargantuan Great Squiggoth
|
|
|
|
|
|
|
2018/07/23 22:13:38
Subject: The -=]_=- Terrain Competition Thread -=]_=- LoER Terrain Contest #26 "Hold the line!"
|
|
Regular Dakkanaut
|
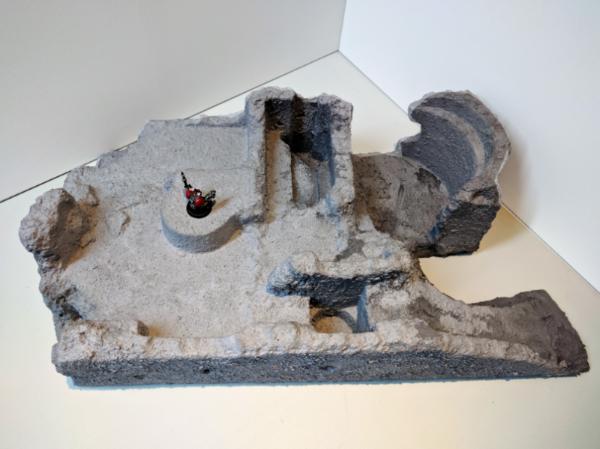
I added some matchsticks to the windows to add more noise to the model.
I'm not sure yet how to make sandbags cheaply, but I'm sure I can figure it out. Automatically Appended Next Post:  Automatically Appended Next Post: Automatically Appended Next Post:  Automatically Appended Next Post: Automatically Appended Next Post: Here I added some extra collapsed flooring. I wasn't enthusiastic about the ramp at first but after some effort it's shaping up.
On the top level there's some ammunition and a melta bomb for the sniper lookout.
I'm planning to add some piping to the wall to attach a climbing line to reach the main floor. And some sandbags on the windows to add some protection for the sniper lookout. Originally I was thinking about a wall of sandbags but. After looking at the bunker image in this thread. It's probably more practical to enforce the Windows by stacking bags under them and on the cill..
Automatically Appended Next Post: I honestly have to say that form board ruins are fun to make. This whole thing cost less than 5$ so far minus the bits I had lying around.
Hope you guys are enjoying the pics.
|
|
This message was edited 4 times. Last update was at 2018/07/24 00:35:19
|
|
|
|
|
2018/07/24 02:54:35
Subject: The -=]_=- Terrain Competition Thread -=]_=- LoER Terrain Contest #26 "Hold the line!"
|
|
Gargantuan Great Squiggoth
|
Very much enjoying all the updates guys, And foamcore is a great material.
Cheap sandbags, basically get hold of the cheapest putty/clay you can get your mits on and roll a sausage shape, then cut it using something blunt, a little fiddling and sandbags galore. I have even used poster tak before, you can "set" it with a coat of superglue.
|
|
|
|
|
|
2018/07/24 11:50:34
Subject: Re:The -=]_=- Terrain Competition Thread -=]_=- LoER Terrain Contest #26 "Hold the line!"
|
|

Nasty Nob
|
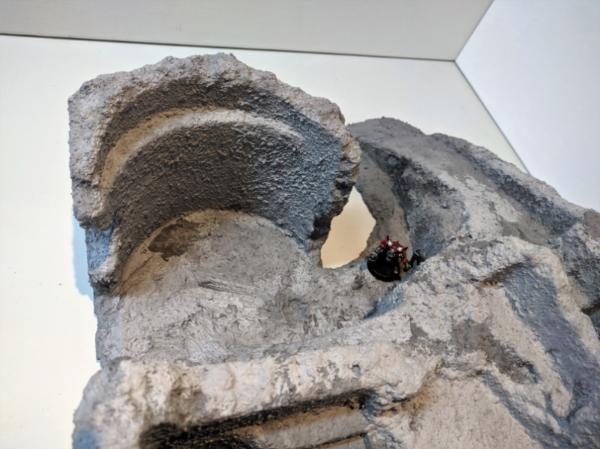
I've made some progress on my entry.

Because there's no paint yet and it's kind of hard to see pure white styrafoam, here's a color-inverted image to show detail and texture:

As I was cutting away at the styrafoam I accidentally broke off a couple of pieces that I thought were interesting and wanted to keep. Go go glue and pins!
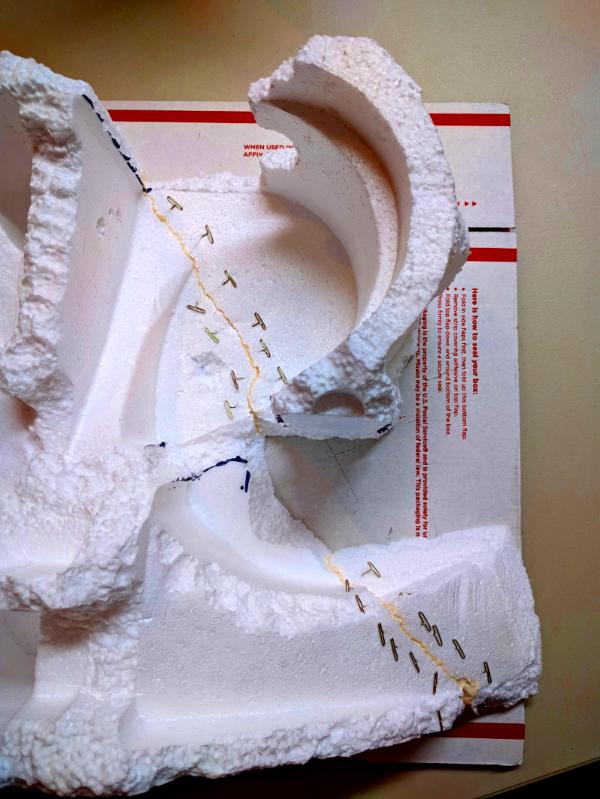
The pins will be removed once the glue has dried. I'm thinking that I might want to insert some tooth picks or bamboo skewers into the foam to help give it some structural integrity. Might want to give the thing a base too. Thoughts?
(cross-posted to my P&M blog, along with some other stuff if you're curious.  )
|
|
|
|
|
|
2018/07/24 22:31:56
Subject: The -=]_=- Terrain Competition Thread -=]_=- LoER Terrain Contest #26 "Hold the line!"
|
|
Regular Dakkanaut
|
And borrowed from the competition.. sandbags....
|
|
|
|
|
2018/07/24 23:24:43
Subject: Re:The -=]_=- Terrain Competition Thread -=]_=- LoER Terrain Contest #26 "Hold the line!"
|
|
Mastering Non-Metallic Metal
|
Great work people. 
Orsino wrote:...Has anyone made an Ozymandias joke yet?
Great work, looking forward to seeing it painted.
No, you're the first with that one, although Superman, a Slaaneshi champion and Trump have been mentioned. Thanks.
I've now started on the barricade.
Large, rusty metal sheet held up with I-beams,
An Imperial-looking wall section (to get some battle damage),
And some wood in-between that's been properly damaged (with scattered pieces of wood all over).
And I added a temporary shrine for the head: A wooden box with a tabletop thrown on (that you may notice the wall section is leaning on).
Dire Avenger for scale.

|
     Mastodon: @DrH@dice.camp Mastodon: @DrH@dice.camp
The army-                   ~2295 points (built). ~2295 points (built).
 
* -=]_,=-eague Spruemeister General. * A (sprue) Hut tutorial *
Dsteingass - Dr. H..You are a role model for Internet Morality! // inmygravenimage - Dr H is a model to us all 
Theophony - Sprue for the spruemeister, plastic for his plastic throne! // Shasolenzabi - Toilets, more complex than folks take time to think about! |
|
|
|
|
2018/07/25 19:29:09
Subject: Re:The -=]_=- Terrain Competition Thread -=]_=- LoER Terrain Contest #26 "Hold the line!"
|
|
Fixture of Dakka
|
I seem to recall Putin and Duke Nukem too........ 
All looking good guys, interested to see what occurs with that winching chain Apollinaire.
You figured out the sandbags just fine Allfather.
Have a bit more painting progress, but pics were on my camera rather than phone, so need to transfer them before I can upload any. Currently pawing through various tubes, tips and cartons to find inspiration for the mobike flesh-vats.
|
|
|
|
|
|
2018/07/29 19:23:25
Subject: Re:The -=]_=- Terrain Competition Thread -=]_=- LoER Terrain Contest #26 "Hold the line!"
|
|
Mastering Non-Metallic Metal
|
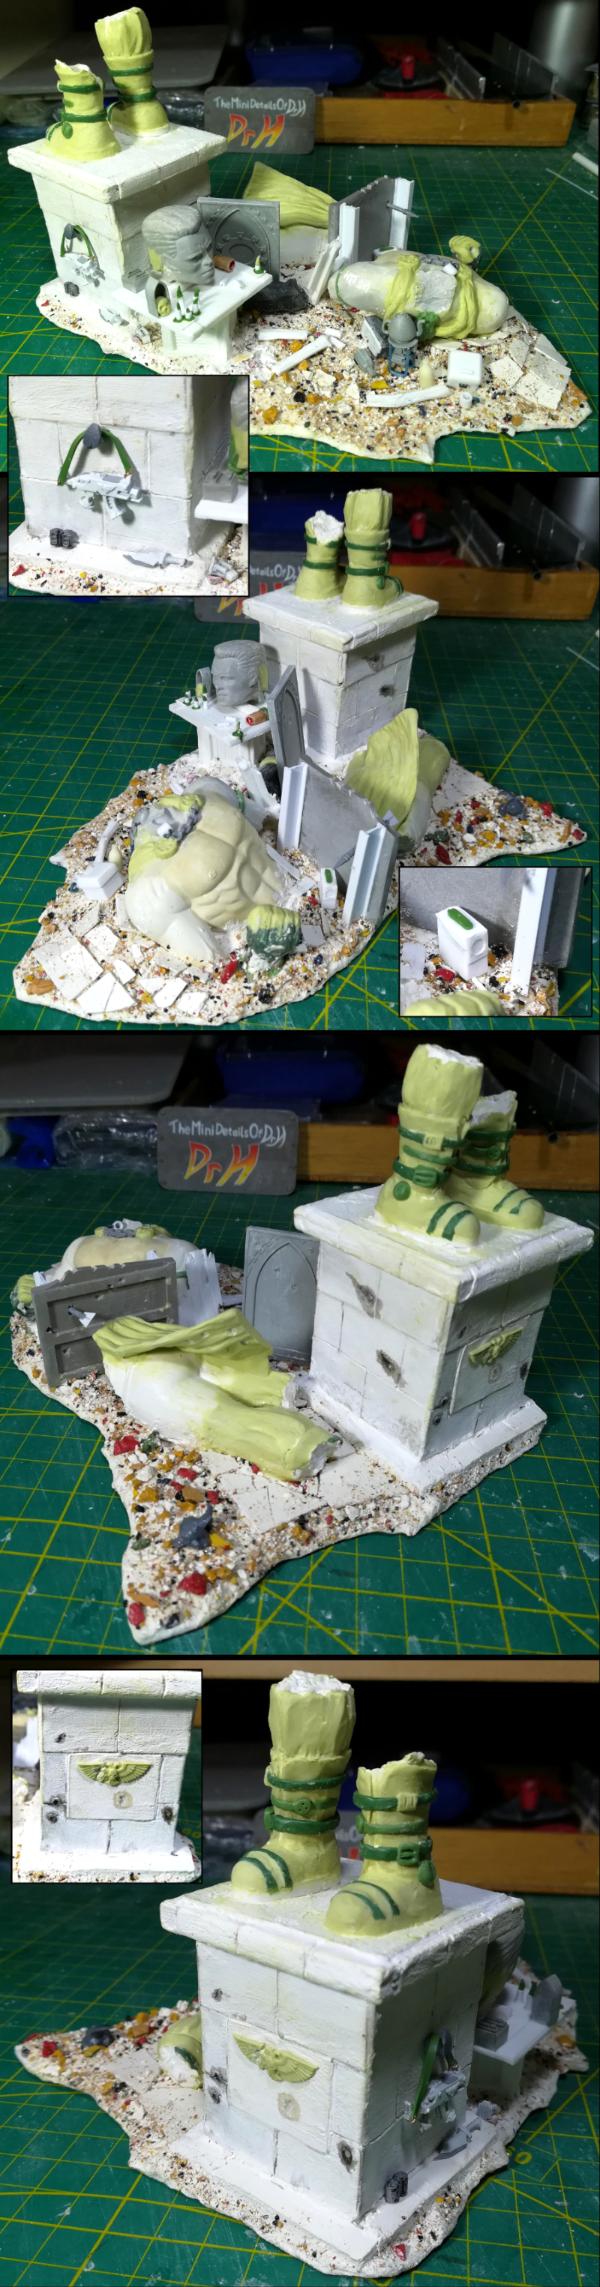
And the smaller details have begun.
Used a piece of "wood" to support the head, but mounted it at a slight angle to show that it is just resting in place as a heavy lump of rock.
Around the head I've added some candles, some of which have been knocked over when the barricade was damaged.
Just lengths of plastic rod, some with GS flames, and the knocked over ones with a piece of wire drilled into the tops.
I had to press-mould the skull for the gothic thing (another OMN item), as the ones I have were too bit to fit in. So moulded the face and then gently pushed it into the hole while it was still soft.
GS strap for the gun, but possibly not the final position; not glued in place as it'll be a bit fragile to be placed there, even if it fits there so well. May well make a dedicated mount for it somewhere else.
Found a use for OMN's teapot and used a piece of a OMN lamp (previously chopped up for another project) to make a hotplate. Just added a couple of bent wires for legs.
And a couple of bottles for flavour.
And a battery pack to power it.
Wire to be added...
And I added a spike that has penetrated the barricade as the first step of the battle damage.
Actually drilled a hole an poked it through as the simplest way to add it.

Much more to do...
|
Mastodon: @DrH@dice.camp
The army- ~2295 points (built).
* -=]_,=-eague Spruemeister General. * A (sprue) Hut tutorial *
Dsteingass - Dr. H..You are a role model for Internet Morality! // inmygravenimage - Dr H is a model to us all
Theophony - Sprue for the spruemeister, plastic for his plastic throne! // Shasolenzabi - Toilets, more complex than folks take time to think about! |
|
|
|
|
2018/07/31 01:37:36
Subject: Re:The -=]_=- Terrain Competition Thread -=]_=- LoER Terrain Contest #26 "Hold the line!"
|
|
[DCM]
Boom! Leman Russ Commander
|
Man- so much win here- I'm taking notes of all the things I want to try out; every single one of you has shown something that I've not tried before! 
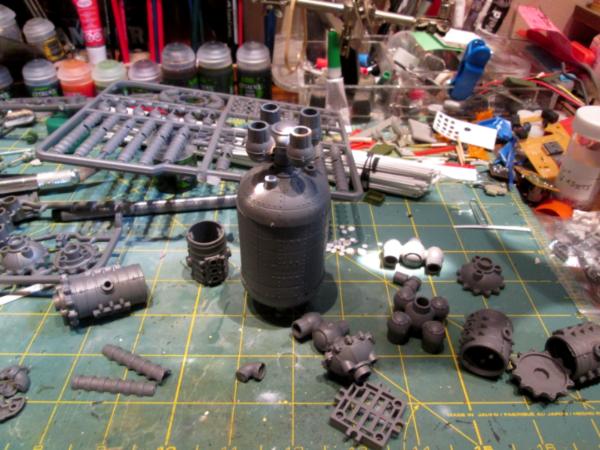
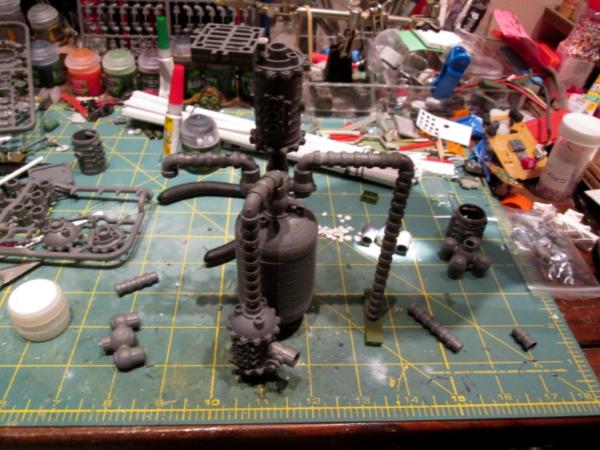
So here's the start of my defensive piece for the Riveters' contest. As originally envisioned, it'll be a piece of Industrial or Necromunda terrain: a Promethium Works or chemicals plant that's a strategic goal and tactical target, therefor reinforced and hardened as best as the defenders can with limited skills, resources and inclination (if they're gangers).
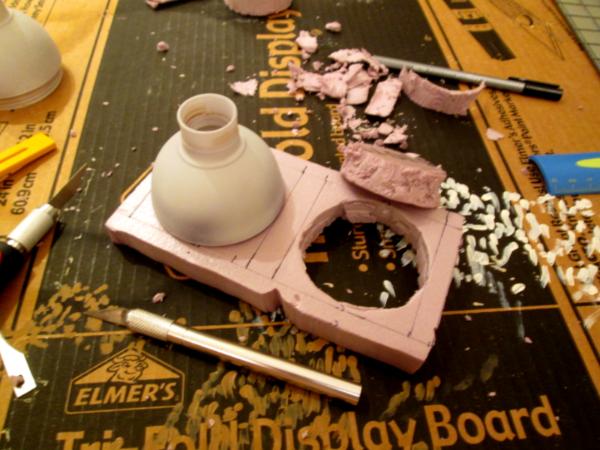
As always, the best basing material (for cheap) that I've come across so far are these clipboards from the Dollar Tree (everything's one dollar in them):
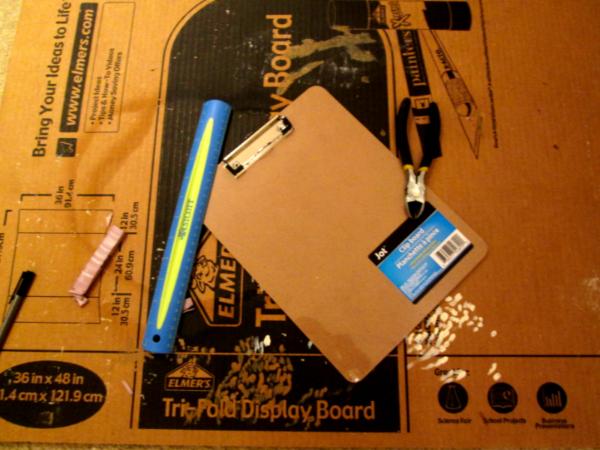
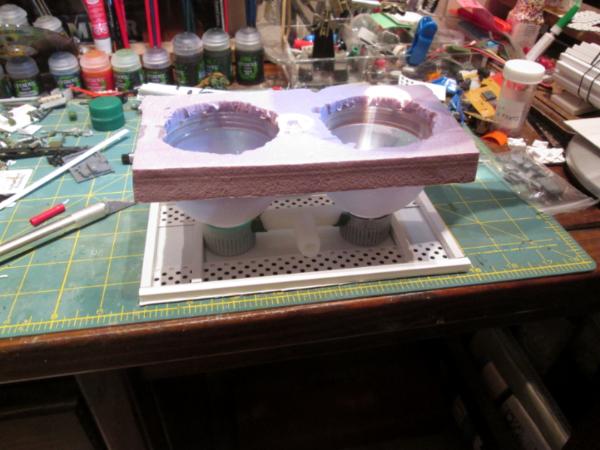
I trimmed it to length to get rid of the clip whilst I was at the farm this last weekend and then scored the grooves to simulate pavement edges with my radial arm saw. Basecoated it medium grey (spray can) and then hit it with a lighter grey to simulate weathering and make it a little different grey from the pipes and tanks and things- the fiber was thirsty and sucked some othe light grey in and made for some neat weathering already- I'll hit it with washes and some 'chemical staining' later. I also cut a piece of pink insulating foam to size for a base for the promethium tanks with my hot foam cutter:

Next carved out the seats for the promethium tanks (combination of my micrometer accurate circle cutter and centimeters accurate hacking with a hobby knife), the 'tanks' are the top parts of two plastic drinks bottles:
Next, added a cross-connecting fitting from the local hardware store, from their 'spare parts' table:
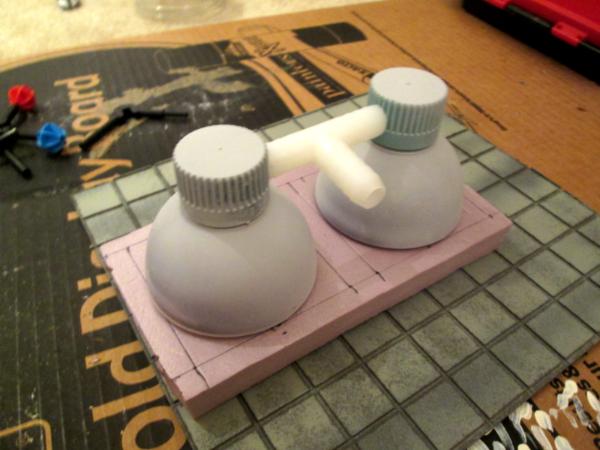
And then started in on some greenstuff work both to anchor the cross-connect in place and to look like pipe weld bands or something (heavy emphasis on the 'or something'). I'll add some rivets to everything and some more effects- I have a couple of new tricks I want to try, and at least one old one:
So, with this first real session of getting some actual work done, I'm fairly pleased: I've worked with insulating foam and greenstuff, am trying a piece of terrain different to anything I've done before and trying to meet a deadline- all good goals. And if I like how it comes out,, an excuse to get some ganger figures to 'occupy' the station!
More follows soonest.
|
"He fears his fate too much, or his desserts are small, who will not put it to a single touch; to win- or lose- it all."
Montrose Toast

|
|
|
|
|
2018/07/31 20:45:27
Subject: Re:The -=]_=- Terrain Competition Thread -=]_=- LoER Terrain Contest #26 "Hold the line!"
|
|
Fixture of Dakka
|
Good start Meer_Cat. There plans for a walkway across the top of the tanks?
And finally got round to uploading photos from my compact, although I probably should have done some colour correction to them first, they're not quite the right shades.
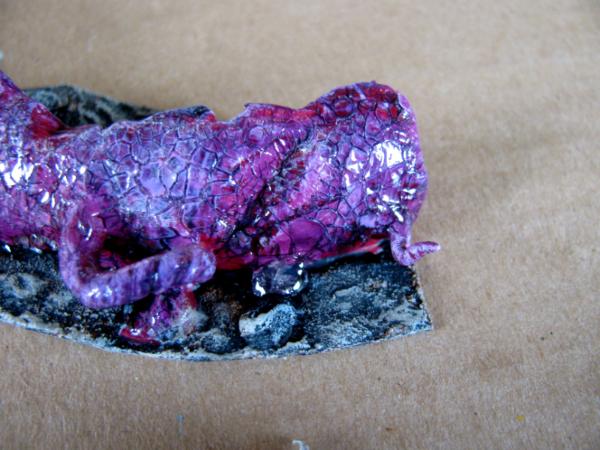
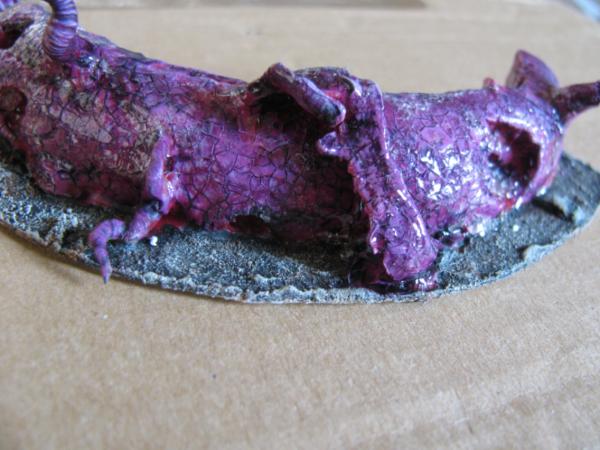
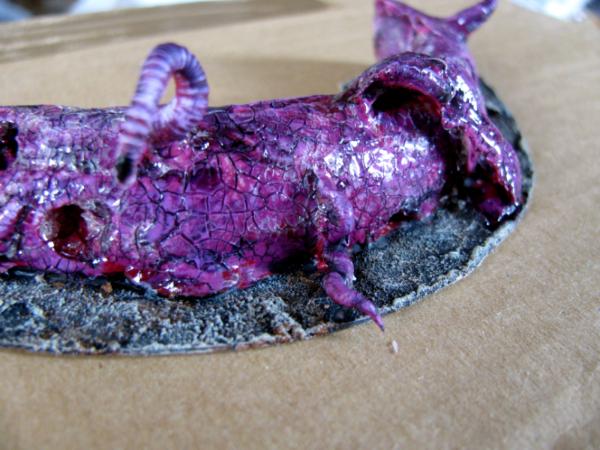

This is after the first layer of crackle has dried, and a wash of nightshade applied.
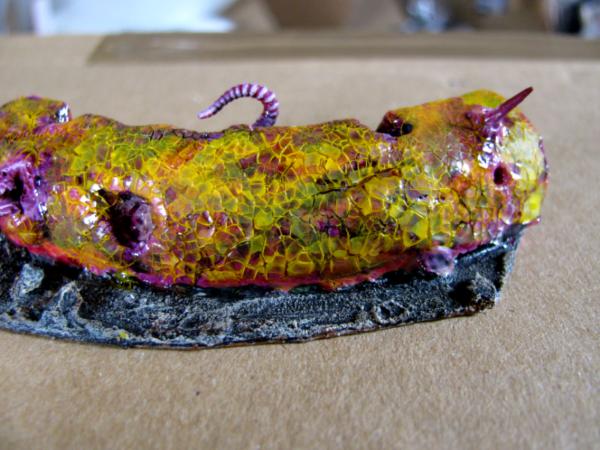
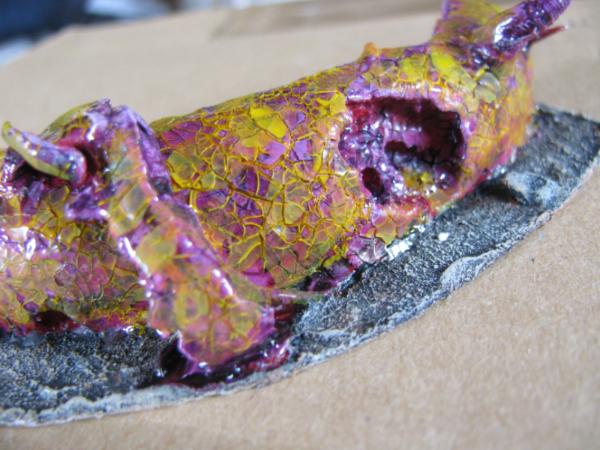
This after a second layer of crackle and a yellow wash. Wasn't acting in quite the same way as I recall from the moebius strip experiments. For now I'm putting that down to possibly using different inks. I'm wondering if I was using my W&N calligraphy inks back then.....I didn't this time because I have also found that they're not as water-resistant as some, and can blend with other layers, so I use them less now. I had to fiddle with different mixes to actually get the ink to flow and fill the cracks in the way I wanted, but even then had to apply overly heavy layers which, as you can see, have coloured everything.....previously I was getting good results with the ink just flowing through the network of cracks and filling them. My final blend here was a mix of GW washes and vallejo inks, with just a splash of Averland Sunset.
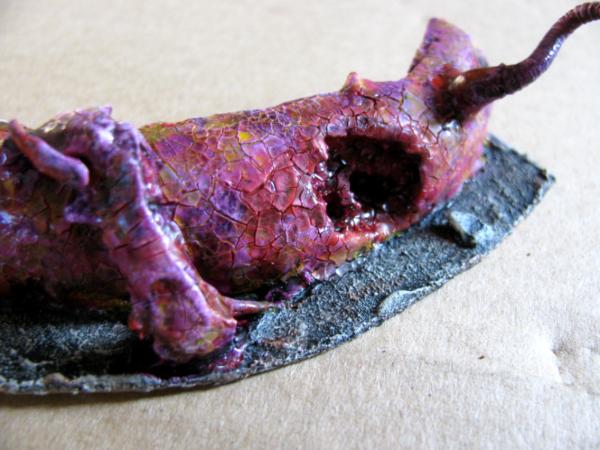

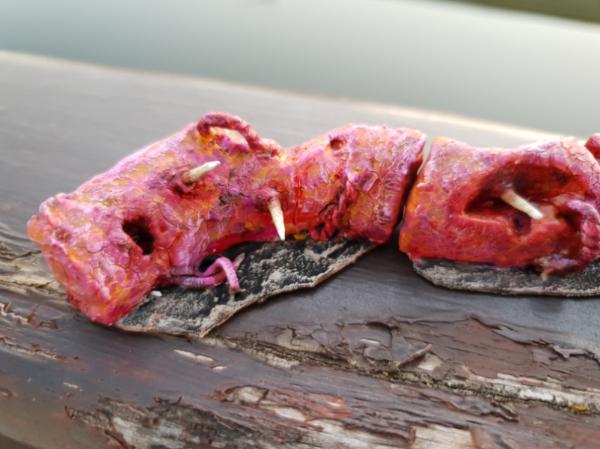
Hit it all with a couple of drybrushes of my fleshtones to bring it back close to my plan, and made a start on some red washes in places. Again I had to mix inks, washes and paint to get the flow I wanted. You can see in places that the yellow didn't take in all the cracks....not so much a bad thing as just a different thing - it's not what I wanted, but the effect is still that of damaged, oozing flesh.
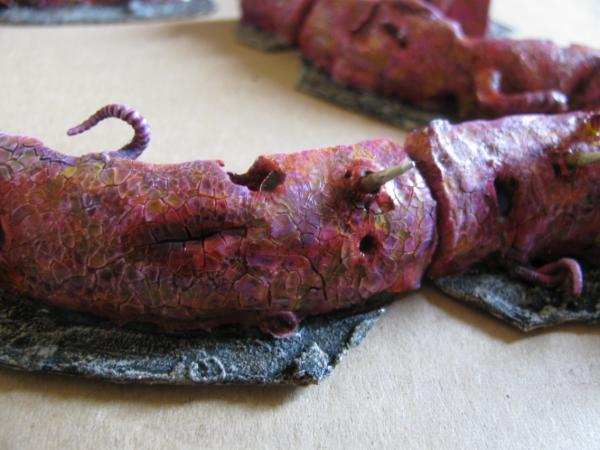
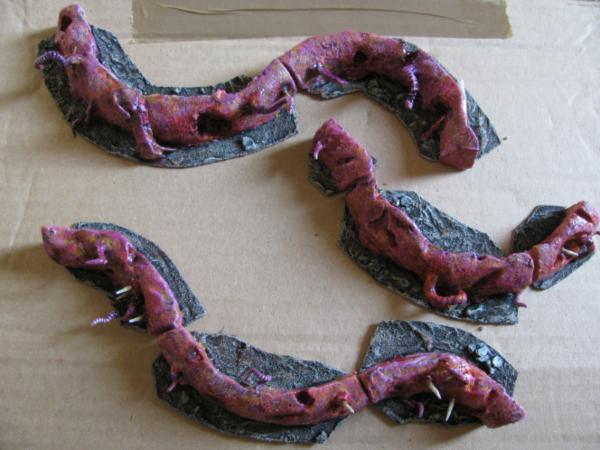
Looking at the general effect. I'm not sure how effective the magnetising of the ends actually would be in a gaming scenario, I just figured it might give a bit more robustness to the overall layout, not convinced it was really worthwhile, but hey-ho
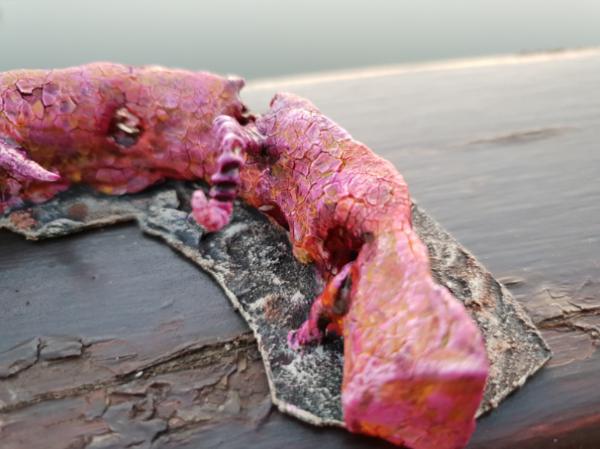
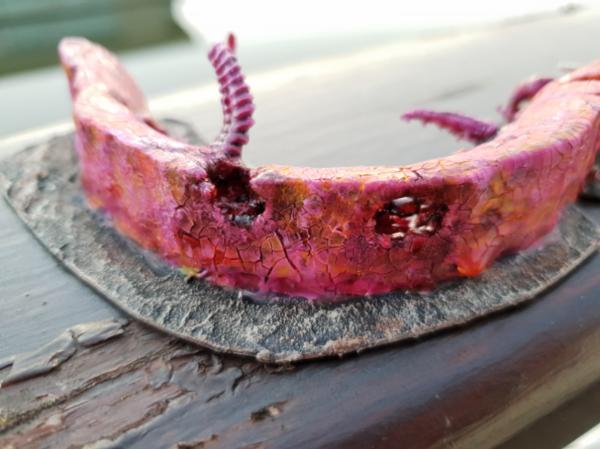
And some shots in the evening light which show a better colour. (Benefit of working in polystyrene on a boat is that the piece floats if it falls off the railing when being photographed........ ) Also show how the yellow has more tinged the entire thing than filled the cracks as intended. I'm definitely going to have to play more and make notes on how various inks/washes/paints act with the crackle......
The various tentacles will ge some subtle washes of colour on top - I was originally planning for them to be multi-coloured, but in the end figured they work better as being really the same as the main bulk....this is chaotic, but manufactured more than magical.....
Still figuring out flesh vats to be sources of the walls, but if I fail in that I at least have a modular set of walls to enter....
|
|
|
|
|
|
2018/08/01 00:29:19
Subject: Re:The -=]_=- Terrain Competition Thread -=]_=- LoER Terrain Contest #26 "Hold the line!"
|
|
[DCM]
Boom! Leman Russ Commander
|
Hey Monkeytroll! Those are some truly disgusting barricades- and I mean that in the best possible way! I think in the end, the magnets will be seen to have been a good idea: either to help make your system flexible, or to make it more robust, as you mentioned, or both.
You betcha there's going to be a walkway across the top- defenders need elevation to fire down into the attackers, stands to reason!
I've a couple of pictures now, and hope to have some real progress to show tomorrow (maybe later tonight, if the bug holds)- almost to the point now where I can start painting (other than priming/basecoating)!
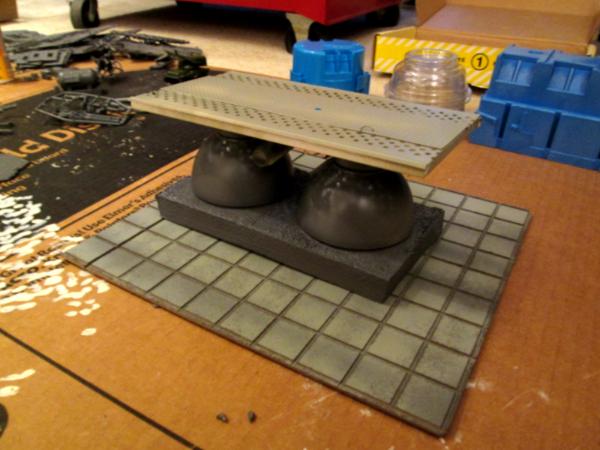
So far tonight, here's the 'fighting platform' that forms the upper deck of the promethium tank farm (it's gluing up here):

This will also have smaller tanks (a great kit from Tehnolog/Robogear) mounted up here, and railing and improvised fighting positions upon other gangers from which to snope with (ha! I love me some bad grammar!). You can see the 'two bottle cap' glued up method for making barrels in the foreground.
Here's a couple more cross struts glued in (the tanks are inverted here to get the right spacing). After everything is painted properly, I'll use greenstuff or JB Weld t permanently fasten the tanks to the struts:
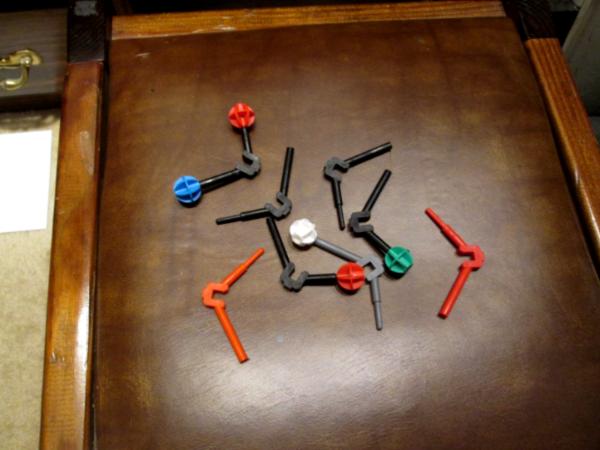
Finally, these widgets are part of a set I found at Goodwill for modeling atomic structures- the angles can all interlace and the different colored balls represent protons, nuetrons and electrons. I reckon to use the angle pieces to fashion more struts for supporting the upper deck. I have enough, I think I'll try using some others to make a different piece of terrain, like an elevated walkway (I have a metric crap-ton of these things):
Once the deck is dried and primered, I can start thinking about building the improvised barricades and hardened firing points- I was afraid at first I wouldn't have much call to put rivets in, but there's going to be lots of opportunity. More follows soonest! 
|
"He fears his fate too much, or his desserts are small, who will not put it to a single touch; to win- or lose- it all."
Montrose Toast
|
|
|
|
|
2018/08/01 11:10:01
Subject: Re:The -=]_=- Terrain Competition Thread -=]_=- LoER Terrain Contest #26 "Hold the line!"
|
|
Nasty Nob
|
Dr H, you're putting a lot of detail into that piece! Love the tea pot.
monkeytroll, that's a really nice cracle effect. May I ask what brand the crackle paint is that you're using?
Meer_Cat, looking good. What do you use to glue the bottle caps together to make barrels? When I try that with superglue they don't seem to be very strong and sometimes break apart on me. Are you using JB Weld for those too?
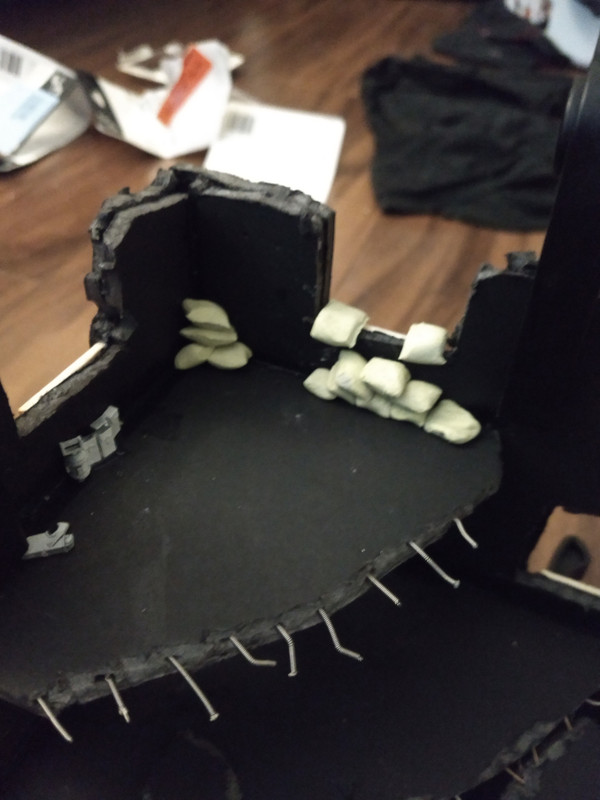
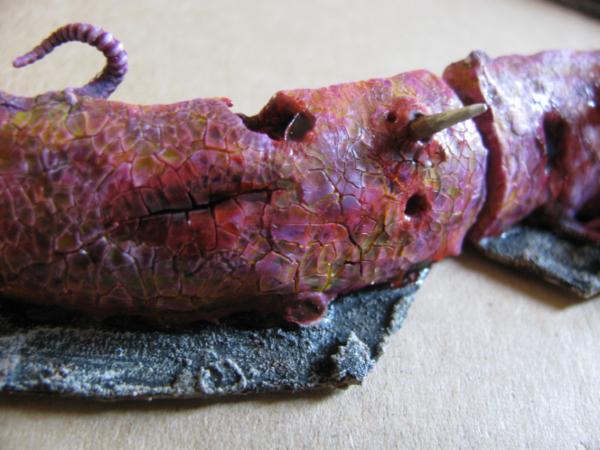
Progress update from me:
Shaping and texturing is done. The stone texture is a mix of drywall compound (spackle), plaster of paris, sand, and wood glue. I added a few drops of black paint for contrast with the white styrafoam.
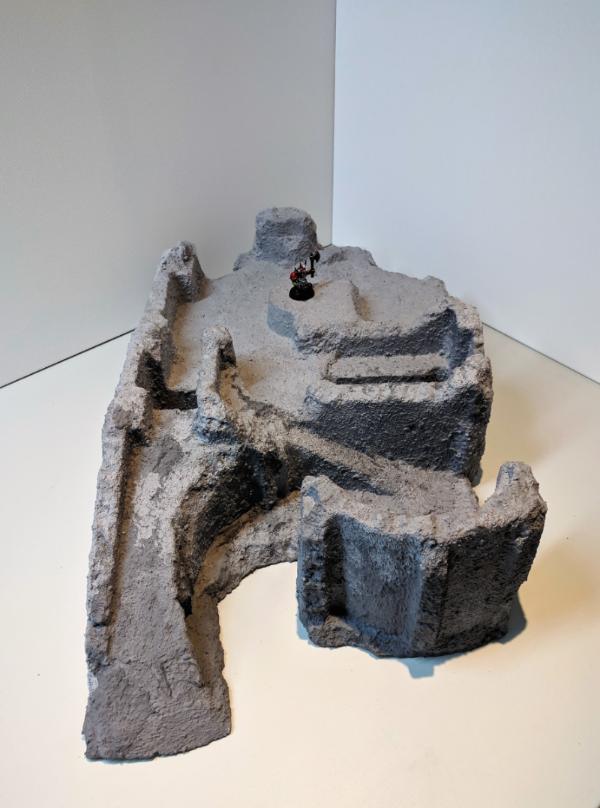


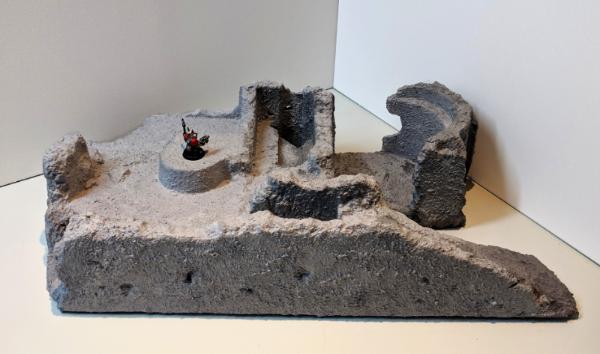

I'm satisfied with how the texturing turned out. The overall piece is a little bare on details. If I have time I'll add some accessories for the interior. Wires, pipes, a few doodads, etc.
Next steps: priming and painting!
|
|
|
|
|
|
2018/08/01 11:11:04
Subject: The -=]_=- Terrain Competition Thread -=]_=- LoER Terrain Contest #26 "Hold the line!"
|
|
Decrepit Dakkanaut
|
These are really coming together gang! Loving lurking on this one.
|
Theophony"... and there's strippers in terminator armor and lovecraftian shenanigans afoot."
Solar_Lion: "Man this sums up your blog nicely."
Anpu-adom: "being Geek is about Love. Some love broadly. Some love deeply. And then there are people like Graven. |
|
|
|
|
2018/08/01 16:17:02
Subject: Re:The -=]_=- Terrain Competition Thread -=]_=- LoER Terrain Contest #26 "Hold the line!"
|
|
Mastering Non-Metallic Metal
|
Nice progress people.
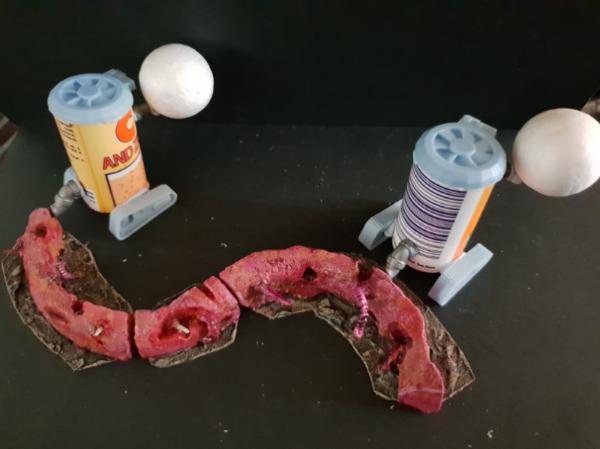
Liking those meat-icades MT, very effective paintwork. 
I've added a few more little details to mine;
A scroll for the shrine,
Some mugs,
A box (tea making things...?)
An ammo box,
Kill markings on the statue's shoulder,
Hung the gun up,
Grenades, knife and spare magazine,
Imperial eagle,
And ... Battle damage.
I have a flag to make and then it may be on to painting as most of the ideas I have left are to be done during or after painting.
|
Mastodon: @DrH@dice.camp
The army- ~2295 points (built).
* -=]_,=-eague Spruemeister General. * A (sprue) Hut tutorial *
Dsteingass - Dr. H..You are a role model for Internet Morality! // inmygravenimage - Dr H is a model to us all
Theophony - Sprue for the spruemeister, plastic for his plastic throne! // Shasolenzabi - Toilets, more complex than folks take time to think about! |
|
|
|
|
2018/08/02 00:21:03
Subject: Re:The -=]_=- Terrain Competition Thread -=]_=- LoER Terrain Contest #26 "Hold the line!"
|
|
[DCM]
Boom! Leman Russ Commander
|
Hey Cleatus- I really like how the fortress ruins are coming along- you've a good eye to have spotted that piece of terrain lurking in a styro packing bit! Michelangelo (I think) said one time that he looked at the stone and saw the statue- he then only had to remove everything that wasn't the statue and he was done. I see that here, with what you're doing. Carry on!
I used Gorilla Glue (Gel) on some bottle caps, and cheap dollar store super glue gel on some others; I've flexed them a little and so far they stay together, but I wouldn't want to test them further than that! If they do pop apart, then I'll use either greenstuff or JB Weld for sure- that'll fix 'em forever!
For three days in a row now I've kept myself on task, so here's tonight's forward progress (with more a bit later, I needed time to get the superglue scale off my fingers and for some of the more delicate connections to set up, so am blogging for a few minutes).
I started out working on the 'cracking tower' that will sit on the upper deck. This is a Russian kit, and I found it on eBay from the same guys that carry Tehnolog and Robogear. If I remember right, it cost me US$6- if you can still find these, I highly recommend you grab 'em while you can- there is so much you can do with the pieces. Not just buildings- I see potential for vehicles too. Here's at the start:
And here's where we are at the moment:
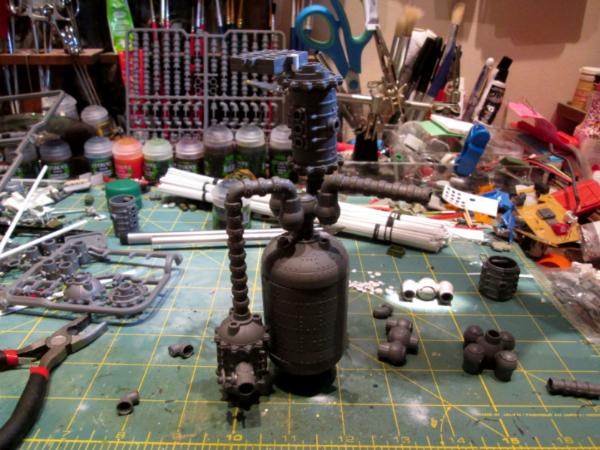
That little platform at the top, where normally the waste gas flare off vent would be located, is where a sniper can perch- good sight lines and will have some armor sheeting welded on around the edges.
Also got the main structure base coated (love me some spray can paint- gotta get an airbrush one day, I reckon):
Once all this is in place, the really fun part starts when I get to use all my junk to fashion 'hasty barricades' around the whole perimeter: crates, barrels, traffic guides, jersey walls, etc. Think Mad Max and the original (real) Road Warrior movies. Too easy.
More follows soonest! 
|
|
This message was edited 1 time. Last update was at 2018/08/02 00:24:09
"He fears his fate too much, or his desserts are small, who will not put it to a single touch; to win- or lose- it all."
Montrose Toast
|
|
|
|
|
2018/08/02 12:03:28
Subject: Re:The -=]_=- Terrain Competition Thread -=]_=- LoER Terrain Contest #26 "Hold the line!"
|
|
Fixture of Dakka
|
The Chemical Plant kit has loads of useful bits, I just pulled one of mine out last night to look for useful parts to use in the flesh-vats.
SuperDukePutinTrumpMandias of Slaanesh looking good Doc...
That packaging has a great shape Cleatus - the crackle I use is from the Tim Holtz Distress line....the clear is the Clear Candy Crackle if I recall correctly. I have used a variety of colours from the range at different times, and have always been pleased with the results they give.
|
|
|
|
|
|
2018/08/03 00:21:08
Subject: Re:The -=]_=- Terrain Competition Thread -=]_=- LoER Terrain Contest #26 "Hold the line!"
|
|
[DCM]
Boom! Leman Russ Commander
|
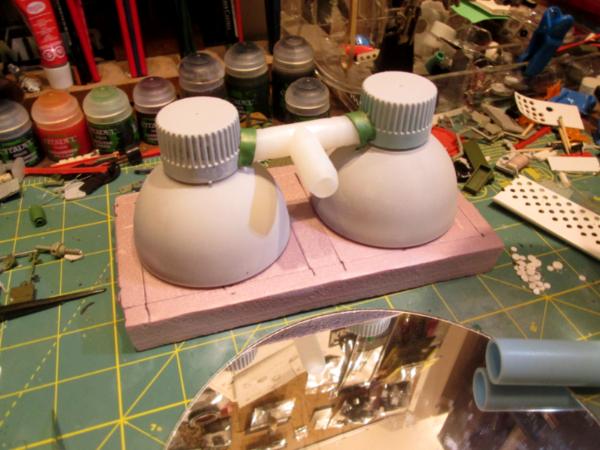
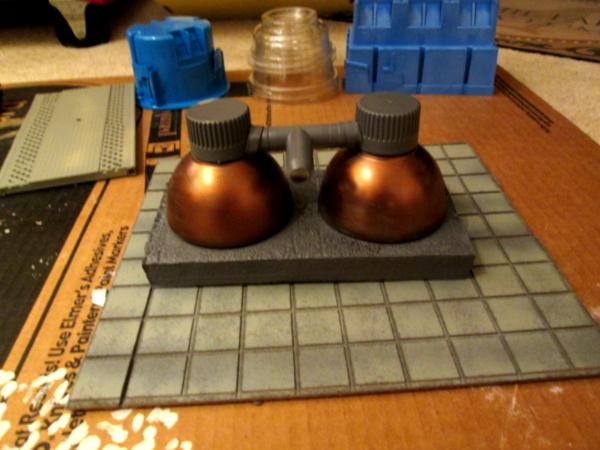
Small increments forward tonight, not a lot of time to work:
Got the start of the base coat on the promethium tanks- these get another wash of lightened copper and then grunge applied on top, plus that greeny, grainy gunk that Cam's so good at doing to form a patina on the copper/bronze bits:
A little more work on the cracking tower:
And this is the company that makes the atomic modeling kit (I think it must be for bio-chemistry), someone had indicated an interest:
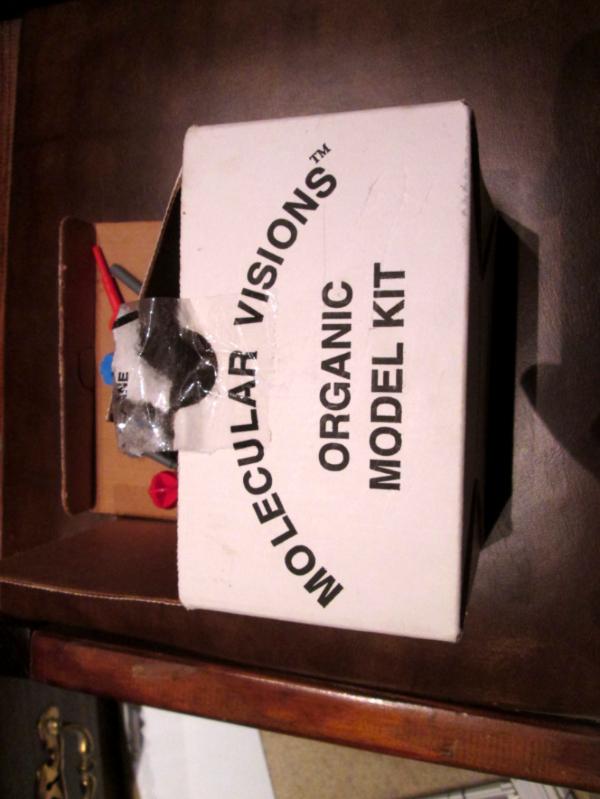
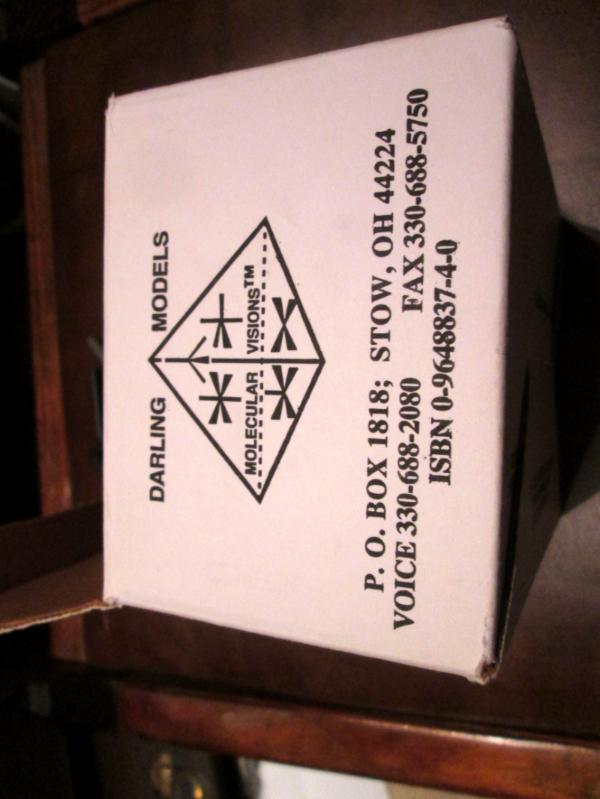
That's it for tonight, not a lot, but wanted to show I'm still in the fight. I won't get a chance to work on it again until Monday, unfortunately, but will get myself back on task then.
More follows soonest!
|
"He fears his fate too much, or his desserts are small, who will not put it to a single touch; to win- or lose- it all."
Montrose Toast
|
|
|
|
|
2018/08/03 05:11:14
Subject: Re:The -=]_=- Terrain Competition Thread -=]_=- LoER Terrain Contest #26 "Hold the line!"
|
|
Grumpy Longbeard
|
That Bio Chemistry set looks like by Russian toy company called "TEHNOLOG"
http://empirefantasy.ru/katalog/sooruzheniya-robogear.html
http://empire-fan.ru/products/category/3189221
http://empire-fan.ru/products/category/3404307
I remember they had that chem set few years back, along with nifty artillery and other structures sets.
It is a toy company, the figures are made from polyethylene variants I think, and are a kin to good looking army men.
Plus, it is in RUbls currency, so very very cheap!
I wanted to get that chem set me self, but the delivery was a killer, now I do not see it on those sites.
I cant wait to see what you can make with it!!!
 Meer_Cat wrote: Meer_Cat wrote:Small increments forward tonight, not a lot of time to work:
Got the start of the base coat on the promethium tanks- these get another wash of lightened copper and then grunge applied on top, plus that greeny, grainy gunk that Cam's so good at doing to form a patina on the copper/bronze bits:
A little more work on the cracking tower:
And this is the company that makes the atomic modeling kit (I think it must be for bio-chemistry), someone had indicated an interest:
That's it for tonight, not a lot, but wanted to show I'm still in the fight. I won't get a chance to work on it again until Monday, unfortunately, but will get myself back on task then.
More follows soonest!
|
|
|
|
|
|
2018/08/03 16:45:44
Subject: Re:The -=]_=- Terrain Competition Thread -=]_=- LoER Terrain Contest #26 "Hold the line!"
|
|
Nasty Nob
|
Ooooh nice update. Nice to see WIP photos. I really must spend some time with my piece this weekend.
|
|
|
|
|
|
2018/08/03 17:20:31
Subject: Re:The -=]_=- Terrain Competition Thread -=]_=- LoER Terrain Contest #26 "Hold the line!"
|
|
Mastering Non-Metallic Metal
|
Good work, MCat.
Nice find on the molecular model bits. I have a different style of kit from my undergrad days, never used it for chemistry as I've always been good a visualising molecules from a drawing. Mine has also been earmarked for modelling.
I've now built the flag for my piece.
Paper base laid over the pole to get the shape I want,
Cloth over that to get the texture,
Tweaked and tattered to finish.
and it's removable.
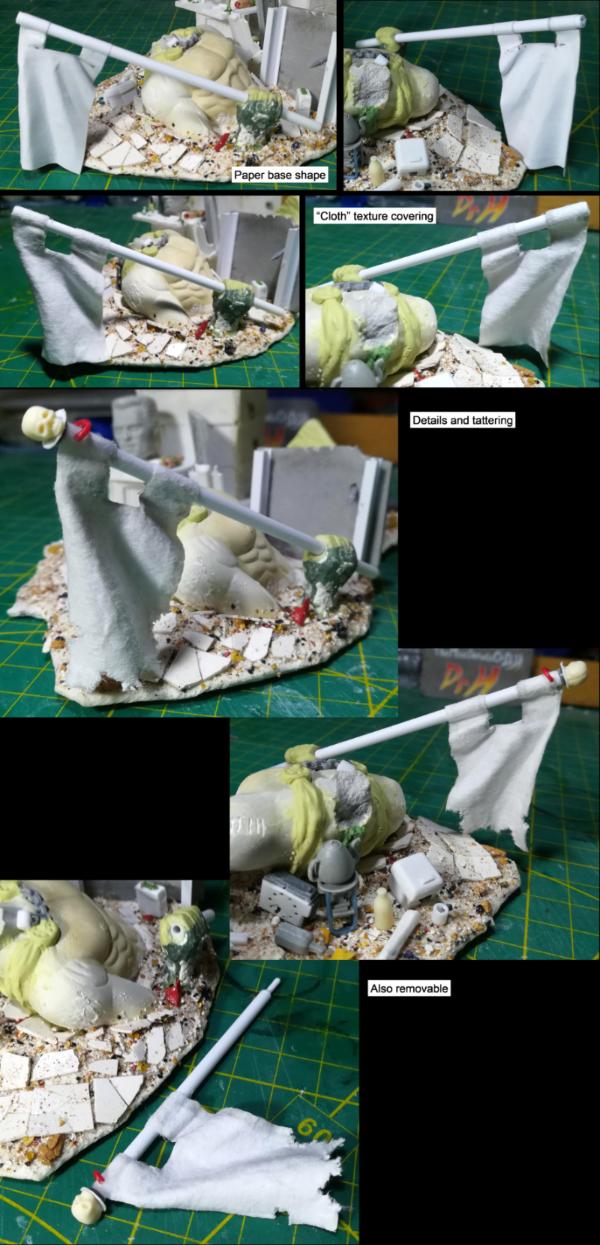
True, that flag might have looked odd on the standing statue, but I think it's fine as it is here.
|
Mastodon: @DrH@dice.camp
The army- ~2295 points (built).
* -=]_,=-eague Spruemeister General. * A (sprue) Hut tutorial *
Dsteingass - Dr. H..You are a role model for Internet Morality! // inmygravenimage - Dr H is a model to us all
Theophony - Sprue for the spruemeister, plastic for his plastic throne! // Shasolenzabi - Toilets, more complex than folks take time to think about! |
|
|
|
|
2018/08/03 20:27:58
Subject: Re:The -=]_=- Terrain Competition Thread -=]_=- LoER Terrain Contest #26 "Hold the line!"
|
|
Fixture of Dakka
|
Nice work on the flag. Any ideas on a design as yet, or waiting till you start the colouring?
Good start to colour there Meer_Cat.
Started to physically play with ideas for the flesh vats now.
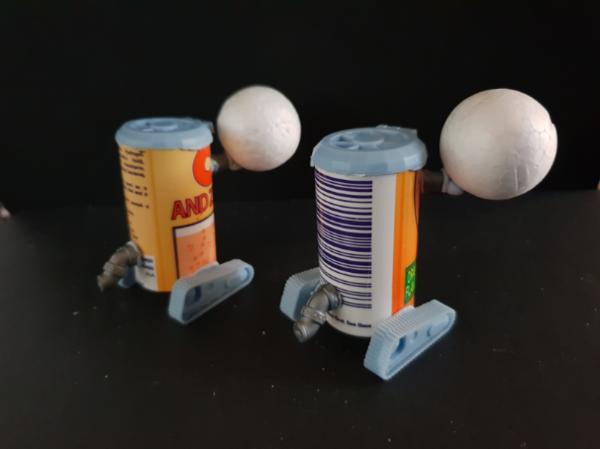
First one I tried. Chopped up a tube of vit-C tablets, added fans to the top, additional vat off the rear, tracks, and the extrusion nozzle. Quite like these, maybe a tad small.
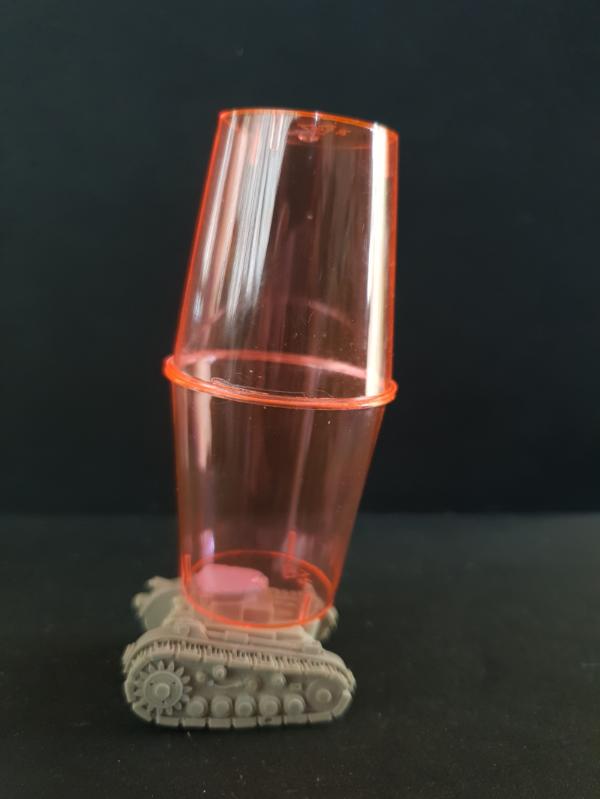
Second version used a couple of party shot glasses, again with fan, additional containment vessel, tracks and nozzle.
A variation with two nozzles either side. This was one of the first extrusion ideas I had, albeit with tall narrow apertures rather than cylindrical pipes.
The second version is a bit bigger, and although this is chaos, with pressurised vats holding warp-tainted ingredients, that still feels a little better to me.
It may be that I use both....I did originally conceive the idea of a couple of secondary flesh-tanks with a larger control vat, so may push in that direction a bit.....
So onto locomotion. I had thought of walkers that settled down before extrusion processes began, which looked cool in my little mind-movies, but didn't seem to get as a static model. Sure that idea will find use somewhere though.
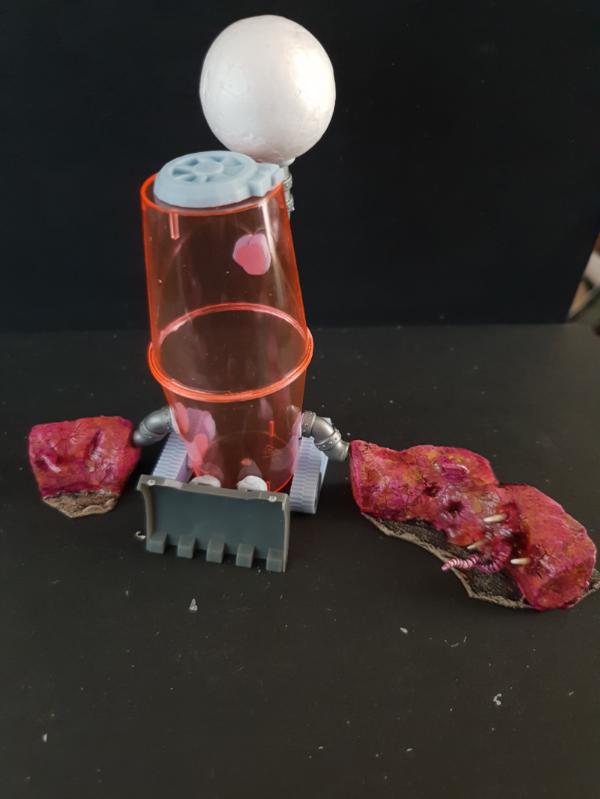
A track unit set completely under the main vat. Logically makes sense, feels a little ungainly (which isn't always a bad thing, but....) That could just be because I haven't found the right unit though.
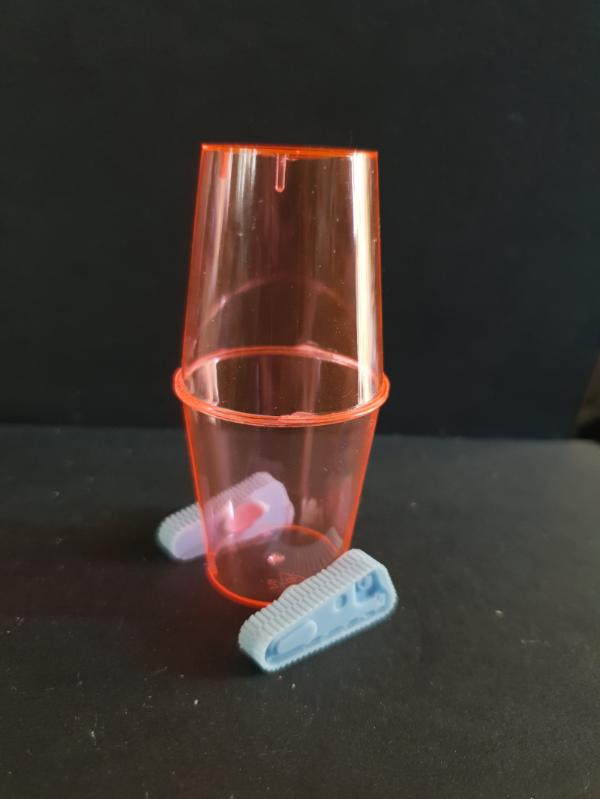
Tracks built around the main tank. This feels better to me, and also brings the whole thing slightly lower, which makes sense as it's a fairly tall narrow shape.
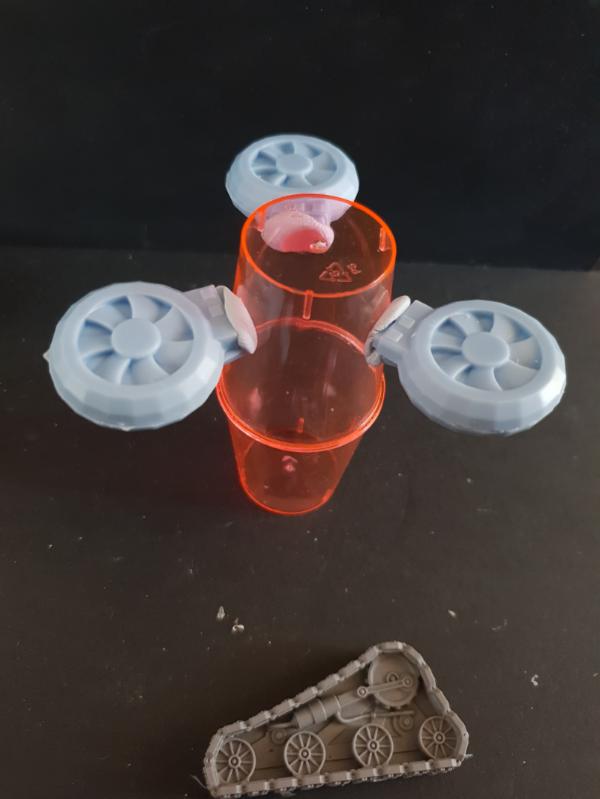
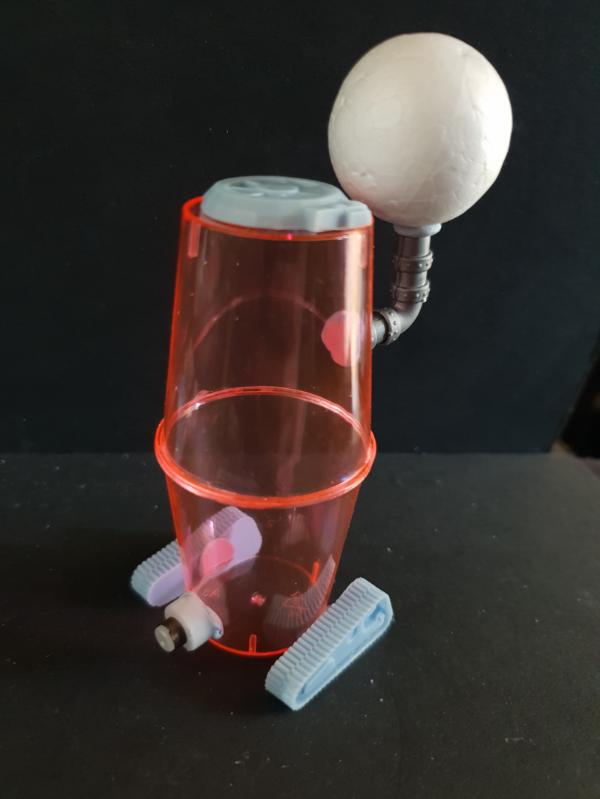
Flying version. Makes a lot of sense, flies in, drops into position, more mobile than the tracks, so good for rapid deployment of defenses. Would have to switch out the secondary vat for this style, and figure out a landing gear type affair, but has potential.
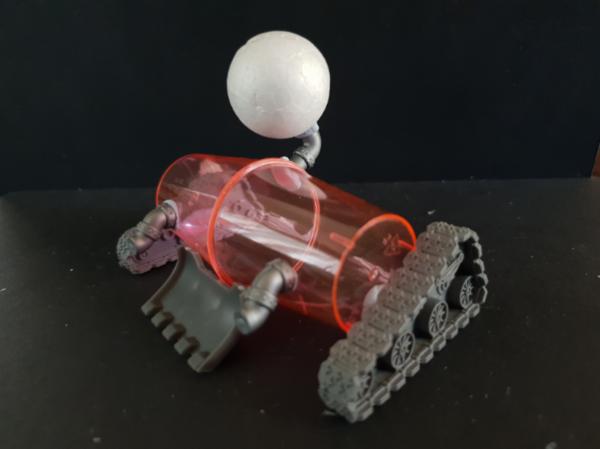
Low rider. Presents smaller target profile than all the others, which seems sensible when you consider this is a defensive mechanism. Not feeling it as much as the others though.
And toying with potentials for a control vat, but nothing really there yet.
|
|
|
|
|
|
2018/08/04 01:56:14
Subject: The -=]_=- Terrain Competition Thread -=]_=- LoER Terrain Contest #26 "Hold the line!"
|
|
Liche Priest Hierophant
|
Heh. Hey Dr. H... "Can you hear the people sing?"
|
GENERATION 8: The first time you see this, copy and paste it into your sig and add 1 to the number after generation. Consider it a social experiment.
If yer an Ork, why dont ya WAAAGH!!
M.A.V.- if you liked ChromeHounds, drop by the site and give it a go. Or check out my M.A.V. Oneshots videos on YouTube! |
|
|
|
|
2018/08/04 14:16:36
Subject: The -=]_=- Terrain Competition Thread -=]_=- LoER Terrain Contest #26 "Hold the line!"
|
|
Decrepit Dakkanaut
|
I love the fans. It has a classic blight drone vibe.
|
Theophony"... and there's strippers in terminator armor and lovecraftian shenanigans afoot."
Solar_Lion: "Man this sums up your blog nicely."
Anpu-adom: "being Geek is about Love. Some love broadly. Some love deeply. And then there are people like Graven. |
|
|
|
|
2018/08/04 19:22:29
Subject: Re:The -=]_=- Terrain Competition Thread -=]_=- LoER Terrain Contest #26 "Hold the line!"
|
|
[DCM]
Boom! Leman Russ Commander
|
Thank you for the kind words, Mothsniper- I look forward to seeing how it comes out too! I have a vague idea in mind, or rather a rough structure, but the details kind of develop as they get built, so it's always a bit of a surprise to me also, what the final looks like. The Athena Command and Control Vehicle is a perfect example- roughly what I had in mind when I started, no idea it would look exactly like it does.
Hey Doc! At the time I took organic chemistry at the Academy, either they didn't have sets like these, or they were too expensive; we did one prject where we had to show double valance bonds within a molecule and we used toothpicks, pipe cleaners (the real ones not these fuzzy things that are awash in the hobby stores today- you kids get off my lawn!) and florists' styrofoam balls. I see lots of things to try with them, just need to finish the LOER project and then move forward.
Monkeytroll: Phenomenal investment in trying out all your variations- kudus on the artistic investment! Of the features you've illustrated, I like the flying one (with three rotors) the best- the landing carriage or gear will really make that design pop. The others are very good as well, but if you go with treads, I like the one with the full undercarriage, rather than the one with the track units attached at the sides. All are good however- inventive, outside the box designs!
Thank you all for the WIP shots of your projects-I'm learning a lot!
|
"He fears his fate too much, or his desserts are small, who will not put it to a single touch; to win- or lose- it all."
Montrose Toast
|
|
|
|
|
2018/08/05 21:58:20
Subject: Re:The -=]_=- Terrain Competition Thread -=]_=- LoER Terrain Contest #26 "Hold the line!"
|
|
Kinebrach-Knobbling Xeno Interrogator
|
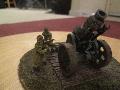
Some fantastic work on here, really enjoying all your WIPs! Slow progress here but managed a mockup of the wheel and haulage mechanism at last. C&C always appreciated.
|
|
|
|
|
|
2018/08/05 22:39:03
Subject: Re:The -=]_=- Terrain Competition Thread -=]_=- LoER Terrain Contest #26 "Hold the line!"
|
|
Fixture of Dakka
|
Looks good. I 'm assuming there's some kind of pulley or runner for the role where it comes up to the walkway?
You mentioned it would be functional, so is there a locking mechanism on the main wheel?
|
|
|
|
|
|
2018/08/05 23:13:00
Subject: Re:The -=]_=- Terrain Competition Thread -=]_=- LoER Terrain Contest #26 "Hold the line!"
|
|
Krazed Killa Kan
|
Looks cool Apollinaire! Will this be joining the other cool Necromunda terrain you've made?
|
|
|
|
|
|
|
|


