Forum adverts like this one are shown to any user who is not logged in. Join us by filling out a tiny 3 field form and you will get your own, free, dakka user account which gives a good range of benefits to you:
No adverts like this in the forums anymore.
Times and dates in your local timezone.
Full tracking of what you have read so you can skip to your first unread post, easily see what has changed since you last logged in, and easily see what is new at a glance.
Email notifications for threads you want to watch closely.
Being a part of the oldest wargaming community on the net.
If you are already a member then feel free to login now.
2020/04/19 21:11:50
Subject: 40k Agri World Renegades & CSM - Redesigning the Chaos Raptor: Part 2...
Thank you all for your coments, it is much appreciated! I am glad to hear people enjoyed my explanantions; it's the sort of thing I like to read from other people but I am alway afraid of being oververbose and boring!!!
amazingturtles wrote:That is some really impressive work! I like the bouncy boots, and also like that you call them that.
It would be a better world if "Bouncy Boots" was a piece of wargear listed in a GW codex... maybe one day...
tinfoil wrote:What's particularly impressive is that, unlike (I assume) GW sculptors, you are working at "real" 28 mm scale. Mind-boggling, really.
Thank you! It is very nice to be able to 'steal' from sculptors working in CAD though! It's definitely a good little cheat to cut off the really fine details from GW minis to enhance soomething created in-scale. Bits like the little numbers on the thigh armour on the Raptor (from the Arco flagellants) or various tiny icons cut from shoulder pads and the like would be very difficult or impossible to make in a timely manner in that scale. Having such a rescourse of amazingly detailed little bits that are CAD-designed or originally sculpted on a larger scale is a really good resource.
Vermis wrote:Also, your sculpted surfaces and details (styrene as well as putty) are excellent. I'd be very interested to check out any complete sculpts you do, if they don't exist already. Looks like you already have a good handle on pose, proportion and finish. Only other thing is the rough bulk, and that's a doddle in comparison!
Saw some of your sculpts in your gallery and they are very impressive! The compliment means a lot [: I've never made a complete sculpt - it's something I keep wanting to do but haven't found the right project yet. It's just so convenient to use plastic minis as a base to quickly get the bulk etc nailed down. I spend enough time on each mini so saving time where I can feels like something I should be doing - but now I am just making excuses
Not Online!!! wrote:Raptors accordingly to the fluff are trying often to impersonate daemons and they share their models with warptalons.
For that they fit excedingly well, HOWEVER, and this is why i kinda agree with you, the mixture is in some cases a bit wierdly in the ehhhhhhh territoriy atleast for me. As in, i believe that they could've gone with a better mixture personally. $ Also flying stands,.. as you said gw isn't great with them and the most recent exemple with the new marine autocannon jump troops comes to mind imediatly.
The idea of impersonating demons wasn't one I was familiar wiht and is definitely an interesting concept to explore. I am sketching out some things for the unit champion who will be a little more ornate, so that's something that might fit really well into that guy hmm hmmmm.....
Their track record for flying stand minis certainly isn't great, but it's not neccessarily that they need to be off the grund, just moving clearly in a direction. I'll try to illustrate that point better with a future Raptor.
This message was edited 1 time. Last update was at 2020/04/19 21:13:04
2020/04/19 23:57:56
Subject: 40k Agri World Renegades & CSM - Redesigning the Chaos Raptor: Part 2...
I definitely feel you on Raptor Legs. I ended up using them to represent Marines standing on low walls, rocks, etc, by repositioning the feet to be flat and cutting off the silly spikes.
Marneus Calgar is referred to as "one of the Imperium's greatest tacticians" and he treats the Codex like it's the War Bible. If the Codex is garbage, then how bad is everyone else?
Hello!!!!! Hope all is well with you all!! Another update from me...
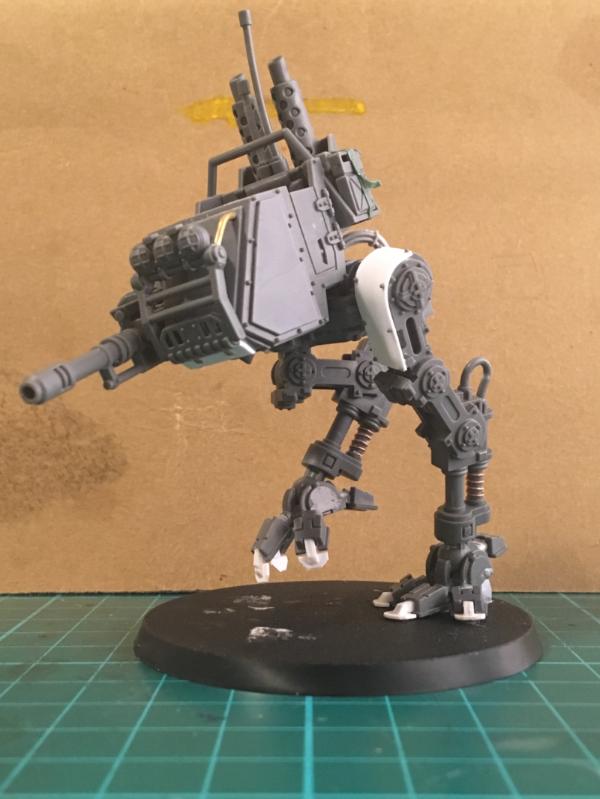
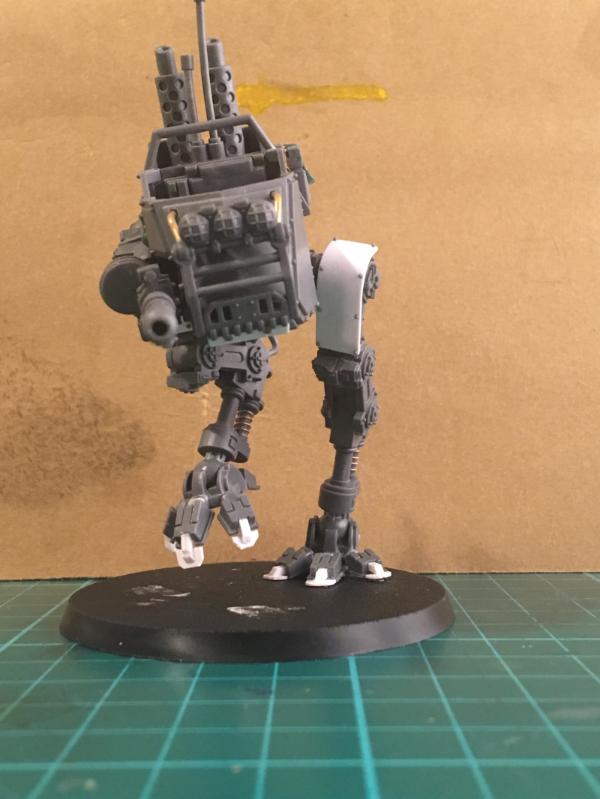
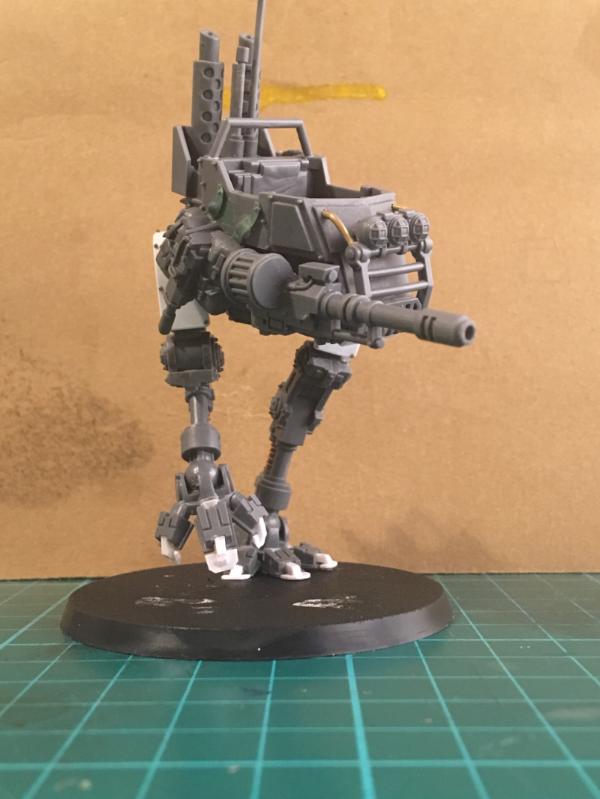
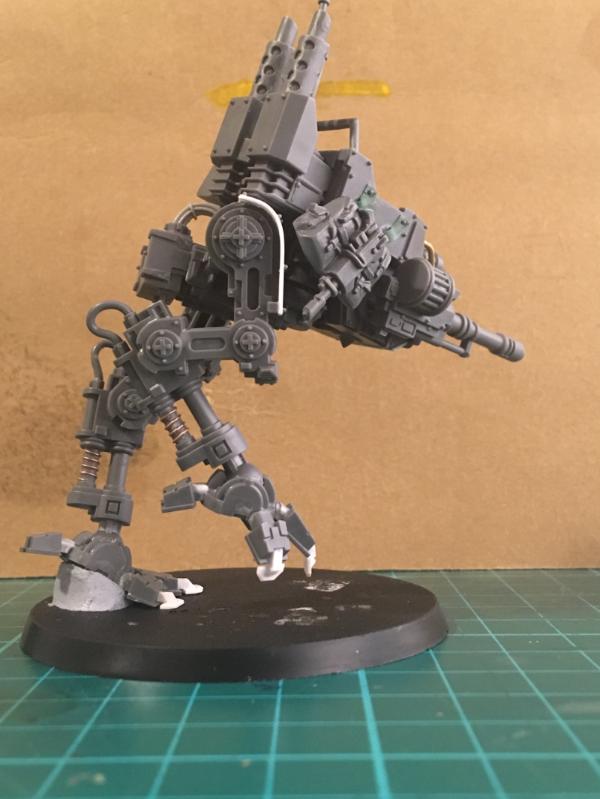
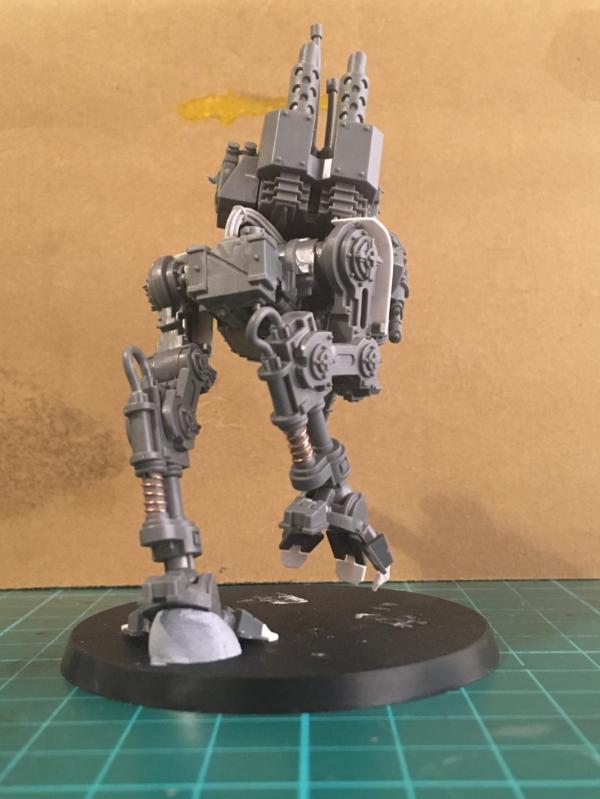
Sentinel
First up something from a little while ago - a Sentinel. The intention is for this vehicle to form a fast moving outrider group wiht the Raptors and possibly some Bikers, but I will save elaborating more on that for now...
I really like the Sentinel kit, so I didn't want to change anything too drastic here. I added a few details to help it feel a little more rugged. I bulked out the upper legs and tweaked the main chassis a bit too, but no major reworks. The posability of the base kit is also pretty decent, so again there wasn't much work that needed to be done; modifying the toes to have some articulation was probably the most major change, and needs neatening up. It's a lot of fun trying to convey motion in a vehicle like this, imagining its mechanical gait and the way it would run was a challenge, but I think I like the way it turned out. The driver is WIP and part of yet another lengthy bit of discussion that will be saved for later.
That's it for anything conrete in this update; the rest is just a lot of sketchy stuff and rambling:
Raptors:
Spoiler:
Yikes I set myself another big challenge on this one. I am at a WIP stage with another standard chainsword/ pistol guy but I am also trying to bash a Champion concept into submission. The basic concept comes from this sketch, by Dan Morison (@DarkMechanic on twitter):
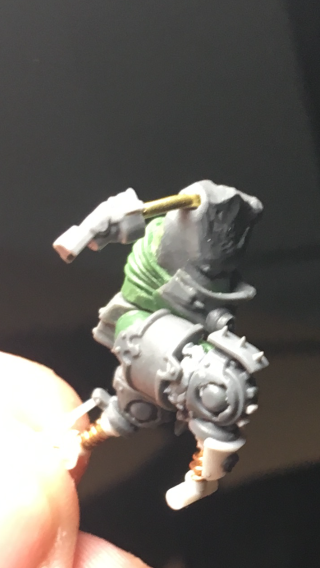
It's supposed to be some kind of sci fi vampire thing but for me it will be a space marine. I very much like his wretched, skinny frame and oversized jump pack thing. Definitely want to go for lightning claws for the Champ's weapon too, since it harkens back to the Raptor minis and old Chaos Lord with Jump Pack that were around when I first got into the hobby as a kid; it just always seem right for me for a Raptor Champion to have a pair of lighting claws.
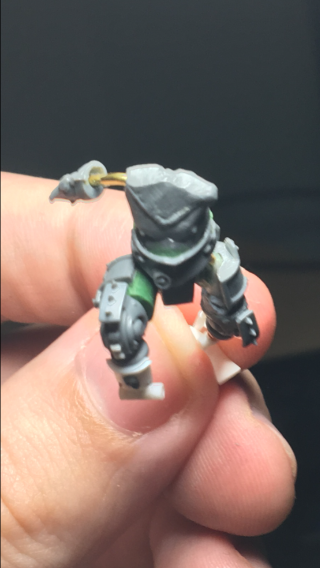
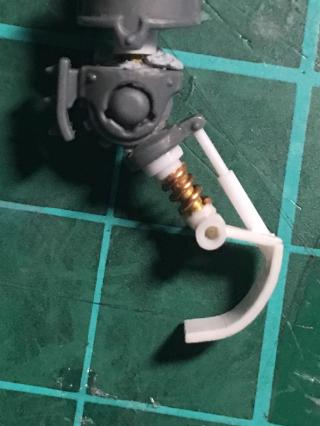
I have made some headroom on this mini, it doesn't look like much at the moment, but a lot of the really difficult parts have been done; the pose is pretty much blocked in, got the proportions looking right (by 'right' I mean 'how I want them to be' - this guy is going to be a little freaky so his proportions aren't really normal), got the legs mostly sorted too (going with full-on prosthetics with this guy):
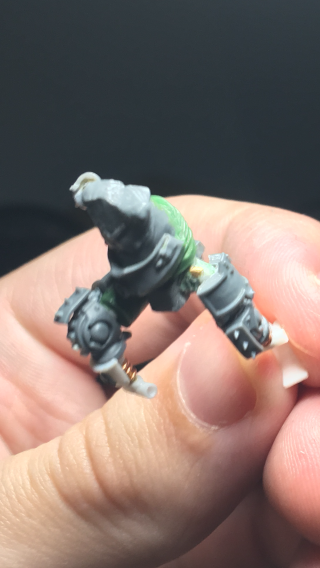
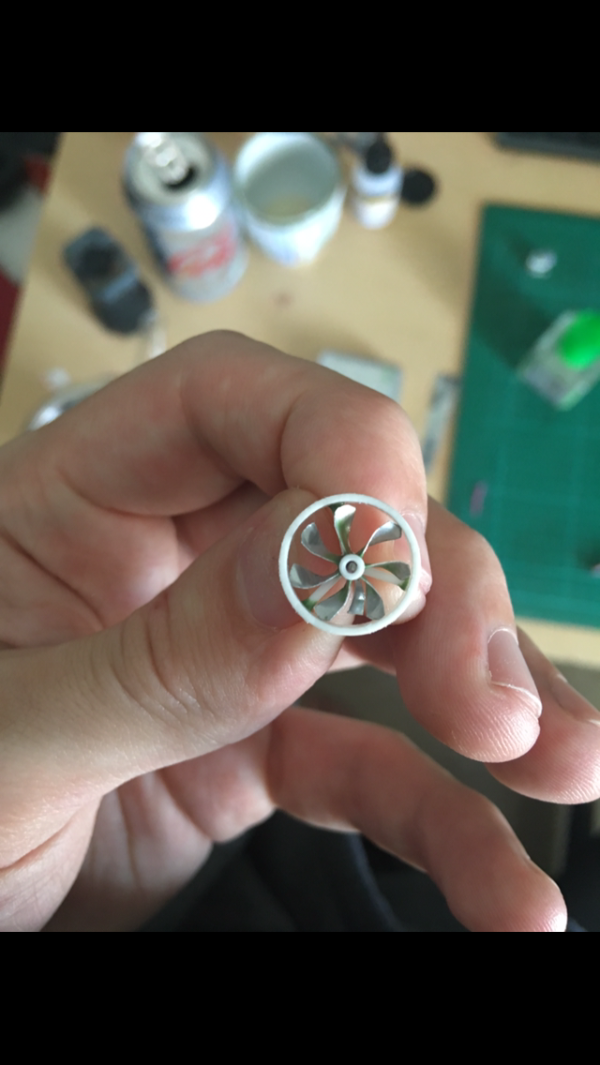
Lots of work to do for sure, but he's been a bastard to get to this point. Next up is getting the arms and shoulders built/ sculpted. I've also spent time working on the jump pack, with pretty limited success:
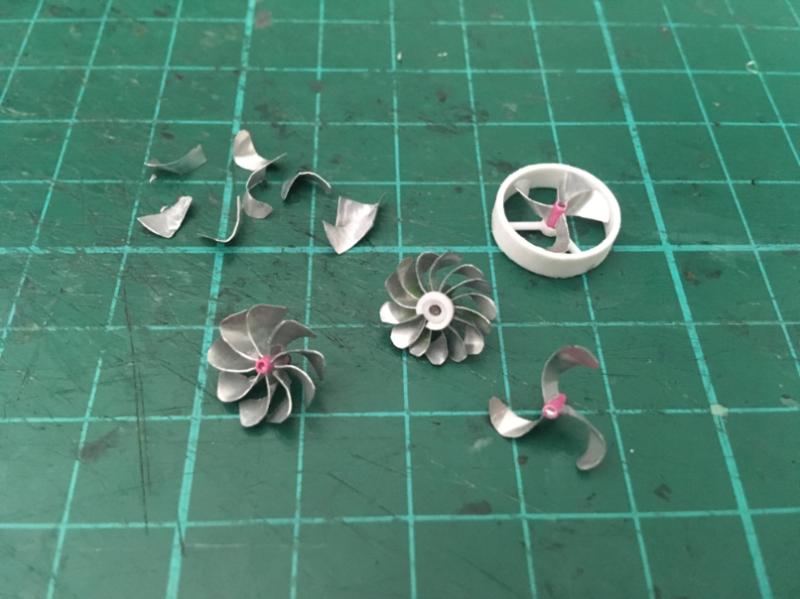
A first attempt, and not too shabby. Unfortunately far to sparse with the blades, and I want them to be thicker. Turns out it's very difficult to do that while keeping the profile of the turbine low. I felt like all I did for a week was try to cut and bend tiny pieces of soda can into turbine blades....
I'm waiting a while for the frustration of these failed endeavors to burn off before I attempt this again; a common tactic of mine!
Leman Russ:
Spoiler:
So I've been down a bit of scale model tank rabbit hole over the last few months - not in terms of my own modelling, rather looking at other peoples' work. It has gotten me to seriously reconsider how I want to model my vehicles - the Leman Russ in particular since I have one!! There's a lot of talk online about how the Russ isn't 'realistic', and whilst I don't expect my sci-fi wargame set 38,000 years in the future to be real I do at least want it to be plausible.
You can argue about the proportions and shape of the 40k tanks all day long, but ultimately it's a pointless discussion in my eyes; there's only so much in that regard you can change without losing the identity of the original. That's the biggest issue I see with most Leman Russ 'realism' conversions - they use chimera hulls, scratch-building, model kit tank hulls etc. and in the process totally change the iconic shape of the tank. And the Leman Russ is ICONIC for sure; the design is ancient and very ingrained in 40k's image.
I think the FW Mars Alpha kit does a good job of tweaking little elements to make the tank look better subtly; the slight slimming and repositioning of the turret is a great change whilst keeping it looking 'right'. I plan on having a few more tanks, but I don't plan on spending £70 on one again, so I'll be adopting those changes onto any future plastic kits I buy. So, what else needs changing? Well it's only one thing, but it's a huge one: the tracks.
The tracks (and the side panels they mount on) take up a massive amount of space on the vehicle, and there's a lot wrong with them in terms of 'realism'. For those not aware of the problem:
The red line is the bottom the tracks, and the blue line is the bottom of the armour panel. That means the gap between the two lines is the maximum amount of suspension the tank can have ...so it wouldn't be able to drive over a pebble without getting stuck. Here's a real tank (a Sherman):
No big armour plate on the side means there's a huge distance the suspension can move before bottoming out, which is obviously extremely important for something that is supposed to be an all-terrain vehicle. Instead of there being side armour panels, the limiting factor here is the bottom of the tank's main hull, which you can see on the Russ here:
The ground clearance of the hull is totally fine, so it's just the tracks that need changing, right?
WRONG. I've been reading about how tank tracks work and now I'm going to tell YOU.
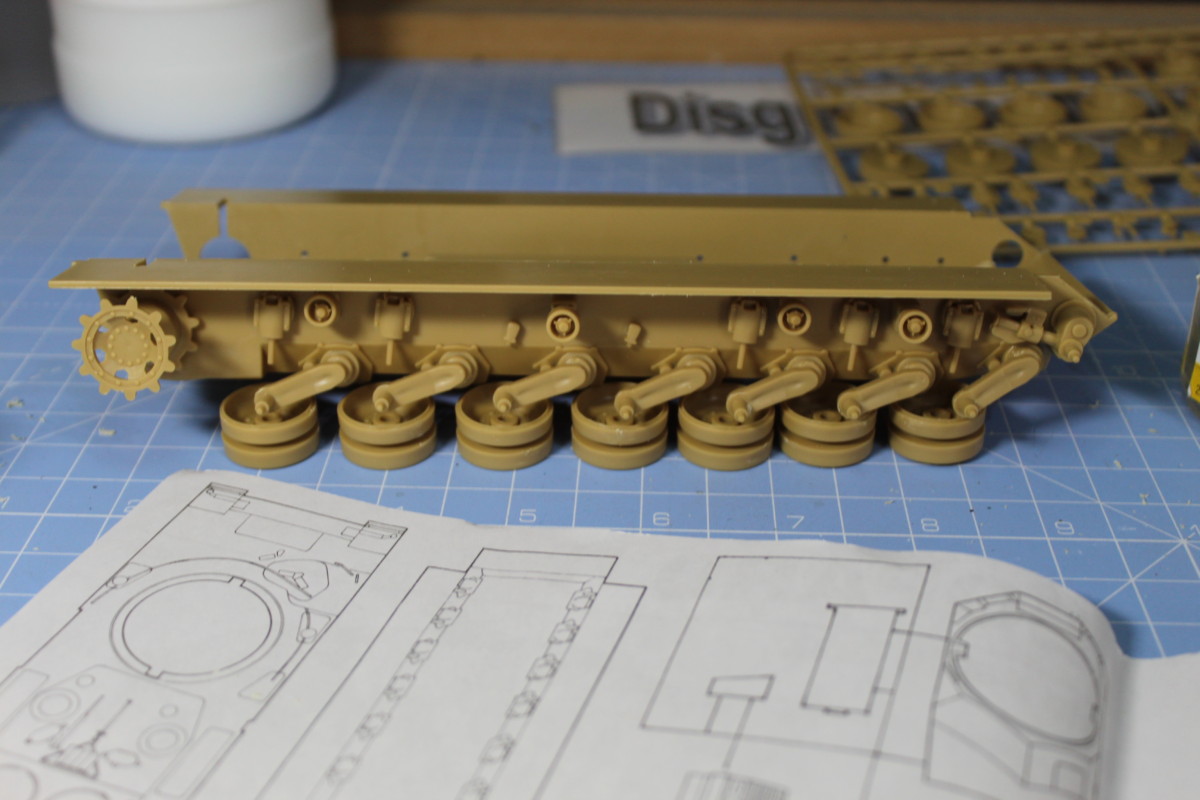
That front wheel is the drive sprocket, which is powered; it is rotated by the engine and turns the tracks. The rear wheel is the idler wheel, which acts as a pulley of sorts, and isn't powered but helps the tracks rotate. All those wheels in the middle are road wheels; they are the bits that actually support the weight of the vehicle, and are not powered. The little wheels up top are return rollers, and just support the track as it moves across the top part of the tank.
Wow! Fascinating! But what the feth does any of that matter?
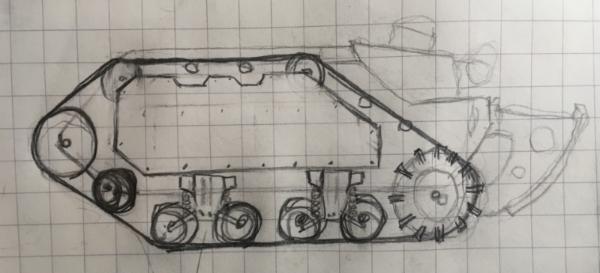
Well look at THIS. It's the wheel layout for the Leman russ (can be seen in the detailing on the outer amour on the current kit, and also in the old kit which actually had wheels):
Some tanks have the front wheel powered, and some the rear one. The Leman russ is pretty clearly intended to be powered from the rear, given the position of the wheels and engine. WHICH MEANS - that big wheel at the back is the drive sprocket. IT'S TOUCHING THE GROUND!!! I believe in certain other application it's not impossible for the drive sprocket to touch the ground, but as far as I am aware that is not the case in any existing tanks. The drive sprocket isn't intended to bear any weight, so it doens't have any suspension. This brings us back to the first point; the tank needs space for the suspension to move, and if the rear wheel is totally static then the suspension can't work. So the solution?
Easy. Gotta lift the drive wheel off the ground. It's also important to note here that I've resized the wheel too; I want to keep the profile of the tracks as similar as possible to the original, so shrinking the wheel means the angle of the rear track portion can stay the same.
...So why are the wheel so imprtant anway?
Because tank wheels look gnarly as feth. They look clunky, utilitarian, brutal, low tech. Perfect for the weird, anachronistic 40k universe. And back the scale model thing; armour modellers do rerally cool things with weathering tank wheels and tracks. I definitely want the wheels to be a prominent part of my Leman Russ models. Here's a rough sketch, done before I decided how to tackle the drive sprocket issue:
Lots is subject to change, but it's the rough look. Still a nice big area of armour plating where sponsons can be mounted, but also with plenty of space around it to show off the wheels. In particular at the bottom, where I want there to be lots of visible suspension stuff. Again, trying to make it look more low-tech and clunky.
I wonder if anyone read all of that... Phew.... Next update I should have some actual modelling to show!
That's it for now folks! Thanks for reading and let me know your thoughts; particularly if anyone has any input on the Russ or Raptor! [:
This message was edited 2 times. Last update was at 2020/05/10 20:47:22
2020/05/11 01:22:48
Subject: 40k Agri World Renegades & CSM - Sentinel + notes about Raptors and Leman Russes
Almost wondering if you could do something to imply the sprocket was in front, with the rear one just an idler, possibly with some weird cricket leg spring or something to make it easier on yourself, but either way, will be interesting to see. Possible suggestion for more wheels if you need them is lego-the midsize technic wheel and tire sets have a nice sprokety pattern to one side and decent size.
2020/05/11 06:59:08
Subject: 40k Agri World Renegades & CSM - Sentinel + notes about Raptors and Leman Russes
In front sprocket would probaby make everything easier - and could still be driven by the engine in the back (like any rear wheel drive car, but around the other way).
With the sprocket at the back, and moved up, isn't it now the limiter of your clearance? You might have to lose that last road wheel in this setup as well - can't see it having much room to travel with the sprocket above it.
I'd also look to keep most of the armour plating - just raise the bottom to the new clearance level - but that's just me. I can fully appreciate wanting to show off all of that cog goodness - but presumably the armour plating is there to protect those cogs rather than give you clearance conniptions .
If you'd posted those concepts in the opposite order, I'd have said about the tank wheels "fun thoughts, but nobody actually builds stuff like that" and then got to your soda-can turbine and said, "holy crap, it might be possible!"
The Sentinel pose is top notch too... now I'm off to start over at the beginning of your blog.
Vejut wrote:Almost wondering if you could do something to imply the sprocket was in front, with the rear one just an idler, possibly with some weird cricket leg spring or something to make it easier on yourself, but either way, will be interesting to see. Possible suggestion for more wheels if you need them is lego-the midsize technic wheel and tire sets have a nice sprokety pattern to one side and decent size.
Lego is a very good idea! I do need to source a good sprocket wheel and it's looking to be pretty expensive to pick up a model kit one...
Arakasi wrote:In front sprocket would probaby make everything easier - and could still be driven by the engine in the back (like any rear wheel drive car, but around the other way).
With the sprocket at the back, and moved up, isn't it now the limiter of your clearance? You might have to lose that last road wheel in this setup as well - can't see it having much room to travel with the sprocket above it.
In regards to both comments about the sprocket being at the front; it's definitely an option. In terms of the final positioning of the rear wheel, that's something I'll address once I've finished the suspension for the road wheels, since that's the hardest part and also gives me the actual amount of suspension travel the tank will have - as long as there's enough space for the suspension I build to bottom out then it'll all be good.
Having suspension on the rear wheel is somehting I thought about, but I think it'd be really difficult to make look good, because the wheel is in that tight little corner of the tracks. That means the suspension can't be mounted above, and having the suspension come from the side/ diagonal will likely interfere with the suspension for the road wheels. Lot of little details and issues to wrap my head around! hopefull it'll all become clear when there's a bit more actually built.
Arakasi wrote:I'd also look to keep most of the armour plating - just raise the bottom to the new clearance level - but that's just me. I can fully appreciate wanting to show off all of that cog goodness - but presumably the armour plating is there to protect those cogs rather than give you clearance conniptions .
I can alway use the excuse "it's a chaos army" to explain away any missing armour plates
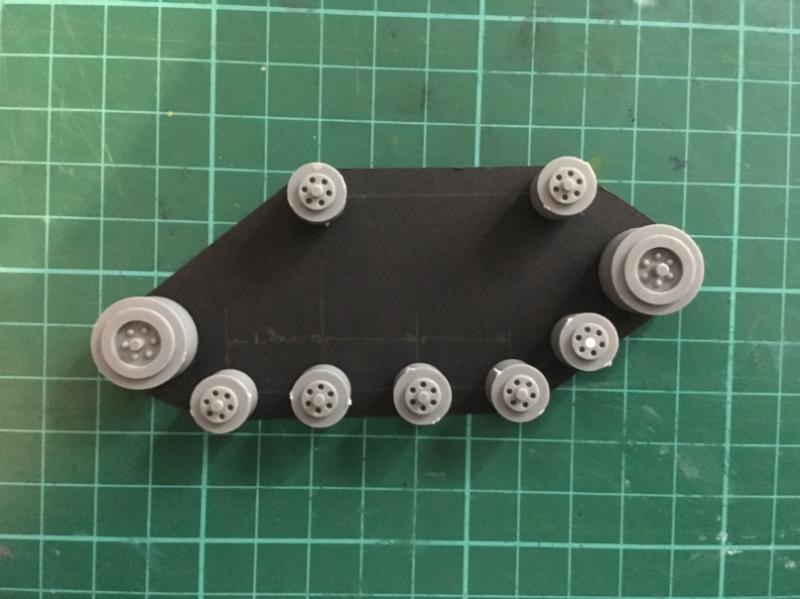
So I have spent the last couple of mornings and evenings trying to nail down layout of the road wheels and the suspension design. I picked up some of the old GW Leman Russ wheels from ebay a month or so ago so I can lay it out pretty easily. I won't be using the big GW wheels as they have so little detail, but the small ones should be good:
As people have mentioned already, that rear wheel might need tweaking. The 4/5 road wheels along the bottom though I am set on the position of. Next up is how to mount them; there's a variety of different designs of tank suspensions out there, the simplest being:
(not my image)
Making that would be a relatively simple project, but it's made difficult once again by the weird shape of the Leman Russ. Each of those individual suspension arms mounts behind the wheel, which create big issue when you get to the front road wheel along the flat the bottom of the track; there's another wheel right where the suspension needs to mount. This style of suspension is also pretty low-profile, which I am sure is a desirable thing in real tank design, but damnit where's the fun in that?!
After a lot of searching, I settled on the suspension 'bogie' design used on the Sherman tank:
It mounts above the wheels, which is perfect, and also has pretty seriously chunky look to it. I spent quite a while working out how the hell to make such a thing until I stumbled upon a very useful image:
Spoiler:
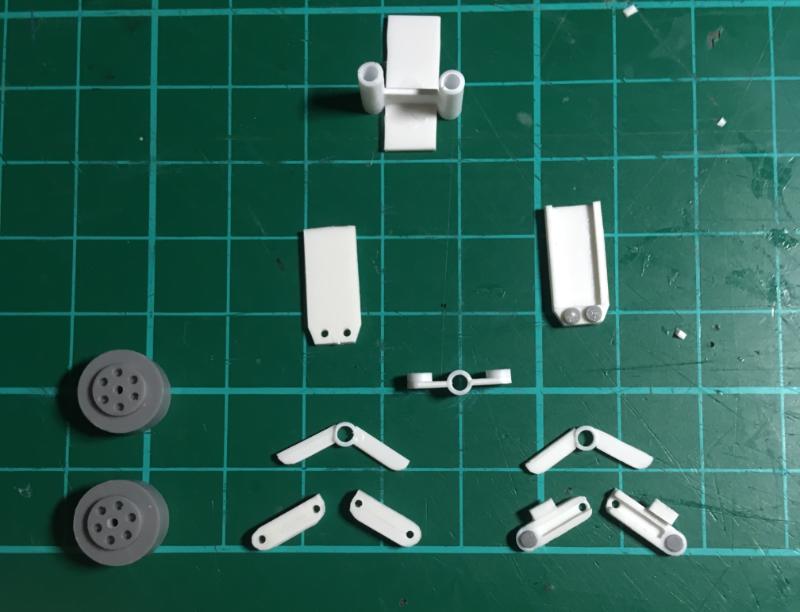
After a long time picking apart how that all works and getting frustated with getting things scaled right and not looking awful I had my own - much less impressive - group of parts:
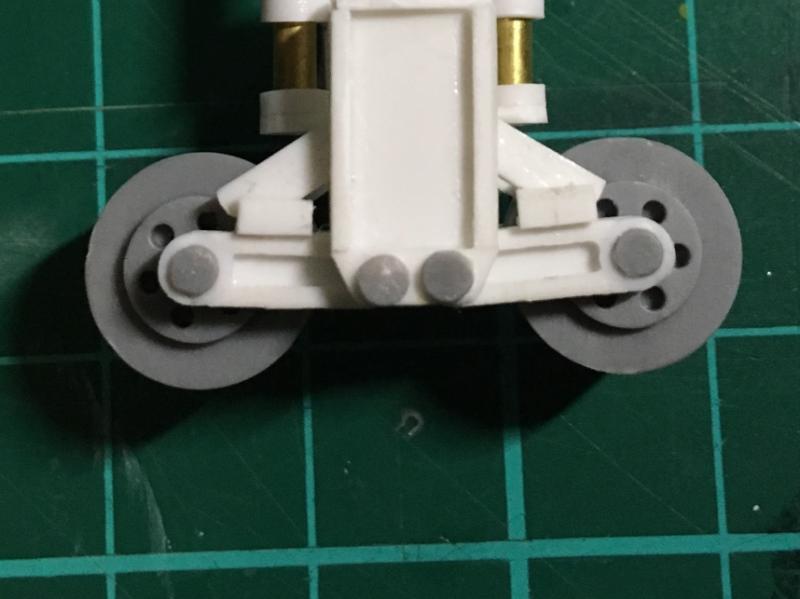
Add a few brass roads, some realisations that some parts where made wrong, some swearing, some more swearing, and far too much time and...
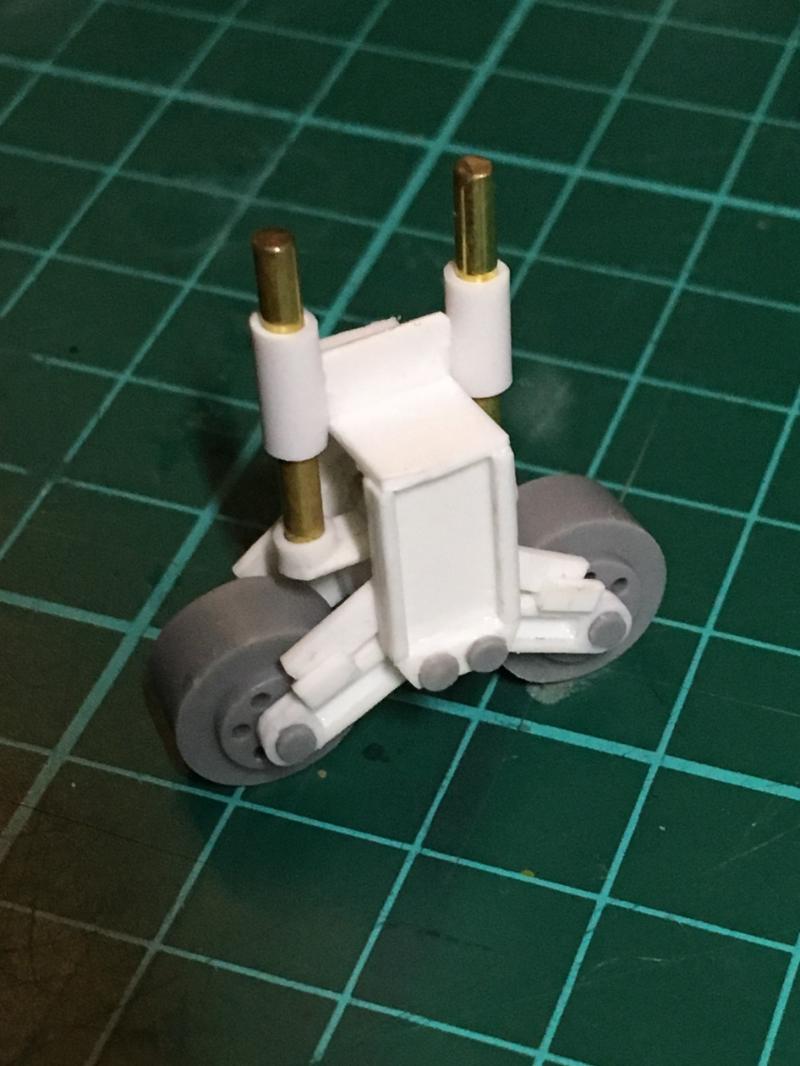
Something that looks alright came out the other side! Very susprised to be honest, and also optimistic that the other 3 I have to make won't be such a nightmare. The top part of the assembly won't be visible, so don't worry about how awful that bit looks. I opted to beef up the actual suspension springs a little and position them somewhere where they'll be more visible. I'll mount some coiled copper wire around the brass rods once I know how I want the suspension to be sitting. Speaking of which, it's all fully articulated and - as far as I can tell - moves like the real thing:
I was already thinking of adding bases to my vehicles, and now I definitely have to so I can have this tank driving over some kind of rough terrain and actually make use of the work this took!
Thanks for reading folks, hopefully next time I check in I'll have all 4 suspension bogies done and I can actually attach them to a vehicle...
This message was edited 3 times. Last update was at 2020/05/13 00:36:57
2020/05/13 00:42:17
Subject: 40k Agri World Renegades & CSM - Functional Leman Russ Suspension; a hideous scratchbuild
Crazy mad! Question - would it be easier to cast some of these parts rather than attempting to make extra copies? It would (hopefully) allow to keep the same consistency. Suggestion - instead of coiled copper wire (which I absolutely have faith you can do) - have you thought about using actual springs?


 Imperial Knights: The Avengers Initiative
 Da Dark Angelz
 Arakasi vs Infinity
 .
.