| Author |
Message |
 |
|
|
|
|
Advert
|
Forum adverts like this one are shown to any user who is not logged in. Join us by filling out a tiny 3 field form and you will get your own, free, dakka user account which gives a good range of benefits to you:
- No adverts like this in the forums anymore.
- Times and dates in your local timezone.
- Full tracking of what you have read so you can skip to your first unread post, easily see what has changed since you last logged in, and easily see what is new at a glance.
- Email notifications for threads you want to watch closely.
- Being a part of the oldest wargaming community on the net.
If you are already a member then feel free to login now. |
|
 |
2013/06/30 03:10:43
Subject: Re:The Mars Warlord Titan Project
|
|

Fresh-Faced New User
Queensland, Australia
|
Fiorehellheart your styrene work is absolutely stunning! You're one of those lucky few blessed with "the knack" for styrene 
The CAD work is certainly a massive help with designing something of this scale - doing things without it would certainly entail a lot more uncertainty (and likely rework). Being more of a Mars style fan than Lucious when it comes to Warhounds, I really love the design you've come up with for your Warlord.
The head and its interior layout is great. Having the Princeps at the front makes sense (I can't believe you did a paper mock-up of his tank too!). Are you planning to have a hatch in the bulkhead behind the Moderati/Steersman?
My only negative comment is that on the pictures so far the handing on the leg armour seems a little too thin. What thickness of styrene sheet are you using for it?
Are you still contemplating casting parts of this? If so, when it comes time go and check out www.resinaddict.com for lots for wargaming related casting information
|
|
|
|
 |
|
2013/07/01 15:48:35
Subject: The Mars Warlord Titan Project
|
|

Regular Dakkanaut
|
No problem mwnciboo, nice joke, I hadn't heard it before.
Thanks Mangazoc, I flattered by your blog post about my work too. Yea I'd like to be able to cast things up once I'm done, but I think that the initial cost of doing that would be too much for me to try anytime soon. Once I've finished I might try to take a few preorders and get casting started based on some deposits from people that want them. Your forum is down for me, but I'd be interested to see what casting knowledge you can share.
Paper is one of my favorite materials to build in, it's easy, but it's also reallyversatile. I even have a full paper mock up of the titan from at least 3 years ago that I no longer have templates for, I've avoided posting it because it's very different, although only in subtle ways, to the current one. That and I'd get spammed asking for pictures. I'll probably have to go ahead and post a picture now though.
What do you mean by the 'handing'? Do you mean the edging on the armour pieces? It's a half a millimeter thick plasticard on top. I wondered if it was a bit thin when I started but I've already done it on most the parts, and swapping wuold be a big job. Automatically Appended Next Post: I bought primer as I said, started using it to get some idea of how the finished parts appear. It's useful in trying to smooth out parts. I tested it on my spacehulk room.

I also did the plating on the inside of the thigh and shin armour. Same deal as the part I've already done, with detail on the thigh like on the front shin plate.
The biggest change since the last update is that I decided to change a few parts. Having ordered some pingpong balls to create a balljoint for the ankle, I decided to re-build the base of the foot along with the ankle joint. I also plan to rebuild the connectors for the circular ankle parts. The old ones were quite flimsy. I also decided to rebuild the hexagonal part on the main shin leg structure, to give it a slot for the armour connectors to fit into. I'm finding it difficult to align them now, and think that making the positions very rigidly fixed should help anybody else that builds it, and myself in having the leg able to disassemble. The parts I'm replacing are shown. To rebuild the foot base I went with thicker plasticard, using some 1mm thick sheets. Much sturdier which helped with the shape, I might have to go back on what I'd previously thought and start using thicker sheets again. To do the beveled edge, I covered the part in milliput and smoothed it down. I struggled the first time i used milliput, too much water made it a sloppy mess, but now I've got the hang so this went much better than I'd expected. It should only take a small amount of sanding to finish the part.
As usual, I appreciate and questions or criticisms.
-Rory
|
|
This message was edited 1 time. Last update was at 2013/07/01 19:12:04
|
|
|
|
|
2013/07/03 02:06:53
Subject: Re:The Mars Warlord Titan Project
|
|
Fresh-Faced New User
Queensland, Australia
|
Hey Rory,
Oh you found the blog post eh? Haha yeah I was obviously pretty impressed when I first ran across this project of yours
The Resin Addict forum is back up and running now (it was switched off while I was doing a server move). Even if you can't take on the casting yourself I should be able ot hook you up with someone local who can do it. Like you say, doing a few pre-orders would be the way to go.
Sorry for the typo, I meant banding. 0.5mm does sound too thin for something of that scale - I would have gone with 1mm. I wonder how much work it would be to laminate another strip to 0.5mm on top? That's the kind of little detail that would bug me if it were my project 
What primer did you use? Indeed it's great to have parts in a nice, uniform colour - and it's much easier to get a feel for the form and detail when it's not all white styrene!
Milliput is my putty of choice for these kind of applications. Like you say, with too much water it turns to sludge, but once you know how to use it it's great to work with. I tend to just do my Milliput forms really roughly and then sand/file/carve/chisel it to the final shape (I can't tell if that's what you did or not).
Keep up the awesome work!
|
|
|
|
|
|
2013/08/15 02:59:19
Subject: Re:The Mars Warlord Titan Project
|
|
Regular Dakkanaut
|
I have been lazy over the past month in regards to posting, but I have at least not been lazy on the titan. I was racing to get as much done for last tuesday as possible, for an apoc game in my local GW. The game wasnt great as we had to many points and not enough time, so I didnt get to do much with it, but the presence of a deadline really helped me move on the models progress.
On the model the entirety of the legs is cast parts. The crotch/waist section connecting the legs isnt, but from the cylinders at the top of the thigh and down it is all cast in resin. Over the past few weeks I've been doing lots of casting, making lots of mistakes and learning a lot. I'll come back with another post soon showing the molds I've made and the casting process. I'll try to give the tips that I've learnt, and will also give some advice to doing this cost effectively, importantly I'll also talk about where I'm planning to improve so that I can get this model to a sellable point.
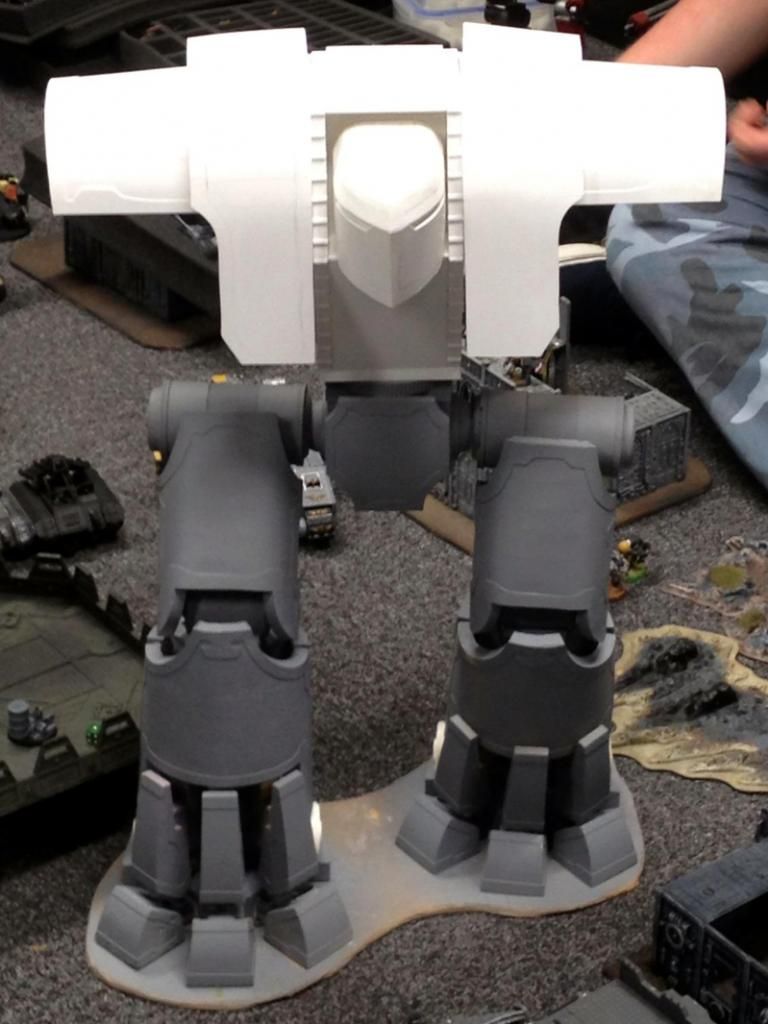
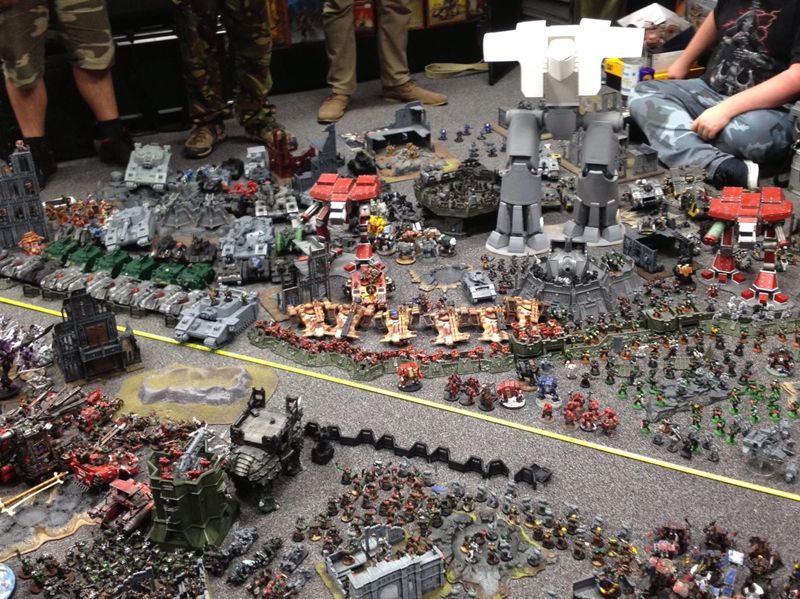
Also of note is that I need more money to continue making the molds, to which end I will be selling a titan soon. First I need to build the arms and guns, so the majority of the model will be cast except for the central body, which will be the plasticard one pictured above. When I built this is was a quick build over a few days, the legs are currently held together with hot glue and no pins, soon to change.Whilst the body works great assembled, it is too warped to mold make with, even if I can take it apart without too much damage. I will be making another 'master' for the body parts when I have some money to be able to cast them. If anybody would like to own a warlord titan, then send me a PM and we can figure something out, the sooner the better as then I can guns you want first and get it to you sooner. Automatically Appended Next Post: @magazoc, Sorry I never replied to this, kept on meaning too, but I have a habit of not updating and saving the small updates of each day for another update, which just continues without me posting.
Your forum is really helpful, remind me to make an account on there to add some of my own experiences casting. The next stage I think for me will be pressure casting and currently I'm just waiting to get a decently priced and sized pot and compressor.
The edging is just the 0.5mm which I want to stick with for now, as it's like that on the legs, I think it would be a surprising amount of work to go over the edging now. What I plan to do is eventually update the armour and make it tihnner, once the current molds degrade. I need to cut weight down and want to make the parts much smoother, and may try out a 1mm edging if I do. I think I'll also add some forgeworld style half dome rivets when I re-do the masters too.
The milliput work was all done whilst wet, to get a good clean edge I used the wetted edge of a fresh, sharp razor, that just gave a very smooth surface when dragged over at the right angle. I will need to use milliut to do repairs to miscast parts on the one I plan to sell, and will probably do what you suggest with the rough over use then sanding down, just seems easier.
|
|
This message was edited 1 time. Last update was at 2013/08/15 03:06:37
|
|
|
|
|
2013/08/15 06:58:56
Subject: The Mars Warlord Titan Project
|
|
Lieutenant Colonel
|
APOC is terrible unless you limit the points. Everything descends into Chaos, people get bored 5 hrs and it almost always ends in a draw.
I think the Sweet spot is about 4000-5000 pts with 2-3 Super Heavies only. Any bigger it gets unwieldy.
The other thing I've found is that you have to limit the numbers of players (like 3 vs 3) or every man and his dog comes out of the woodwork to get involved and it ruins it.
Have extra players as Marshalls helps to resolve combats and move units more quickly.
|
Collecting Forge World 30k????? If you prefix any Thread Subject line on 30k or Pre-heresy or Horus Heresy with [30K] we can convince LEGO and the Admin team to create a 30K mini board if we can show there is enough interest! |
|
|
|
|
2013/08/15 07:56:59
Subject: Re:The Mars Warlord Titan Project
|
|

Contagious Dreadnought of Nurgle
|
 fiorehellheart wrote: fiorehellheart wrote:I have been lazy over the past month in regards to posting, but I have at least not been lazy on the titan. I was racing to get as much done for last tuesday as possible, for an apoc game in my local GW. The game wasnt great as we had to many points and not enough time, so I didnt get to do much with it, but the presence of a deadline really helped me move on the models progress. On the model the entirety of the legs is cast parts. The crotch/waist section connecting the legs isnt, but from the cylinders at the top of the thigh and down it is all cast in resin. Over the past few weeks I've been doing lots of casting, making lots of mistakes and learning a lot. I'll come back with another post soon showing the molds I've made and the casting process. I'll try to give the tips that I've learnt, and will also give some advice to doing this cost effectively, importantly I'll also talk about where I'm planning to improve so that I can get this model to a sellable point. Also of note is that I need more money to continue making the molds, to which end I will be selling a titan soon. First I need to build the arms and guns, so the majority of the model will be cast except for the central body, which will be the plasticard one pictured above. When I built this is was a quick build over a few days, the legs are currently held together with hot glue and no pins, soon to change.Whilst the body works great assembled, it is too warped to mold make with, even if I can take it apart without too much damage. I will be making another 'master' for the body parts when I have some money to be able to cast them. If anybody would like to own a warlord titan, then send me a PM and we can figure something out, the sooner the better as then I can guns you want first and get it to you sooner. Automatically Appended Next Post: @magazoc, Sorry I never replied to this, kept on meaning too, but I have a habit of not updating and saving the small updates of each day for another update, which just continues without me posting. Your forum is really helpful, remind me to make an account on there to add some of my own experiences casting. The next stage I think for me will be pressure casting and currently I'm just waiting to get a decently priced and sized pot and compressor. The edging is just the 0.5mm which I want to stick with for now, as it's like that on the legs, I think it would be a surprising amount of work to go over the edging now. What I plan to do is eventually update the armour and make it tihnner, once the current molds degrade. I need to cut weight down and want to make the parts much smoother, and may try out a 1mm edging if I do. I think I'll also add some forgeworld style half dome rivets when I re-do the masters too. The milliput work was all done whilst wet, to get a good clean edge I used the wetted edge of a fresh, sharp razor, that just gave a very smooth surface when dragged over at the right angle. I will need to use milliut to do repairs to miscast parts on the one I plan to sell, and will probably do what you suggest with the rough over use then sanding down, just seems easier.
Once you add some fittings the Harbor freight Paint pressure pot can make a decent Pressure vessel for casting... Just inspect it carefully for poor welds and paint slop into the threads of the sockets in the lid where fittings go. also you will want to replace the stock clamp bolts with somthing you can tighten with an allen wrench.
|
|
This message was edited 1 time. Last update was at 2013/08/15 07:57:22
Link to my Index Thread here on dakka


Find me on Twitter Sam Butler @Rivet_Zone
Winner "Best 40k Table" Daboyz GT 2010,2011
"Sic Vis Pachem Parabellum" - Publius Flavius Vegetius Renatus
Veni, Vidi discessi.-Galorn. |
|
|
|
|
2013/08/15 13:17:44
Subject: The Mars Warlord Titan Project
|
|
Rampaging Reaver Titan Princeps
|
That looks amazing!! Im very impressed with how its gone so far.
|
|
|
|
|
2013/08/18 02:18:41
Subject: Re:The Mars Warlord Titan Project
|
|
Regular Dakkanaut
|
Thanks Vitruvian, It's nice to get a complete picture of it now things are going together, rather than just a few separated pieces of a leg.
simple casting tutorial/guide.
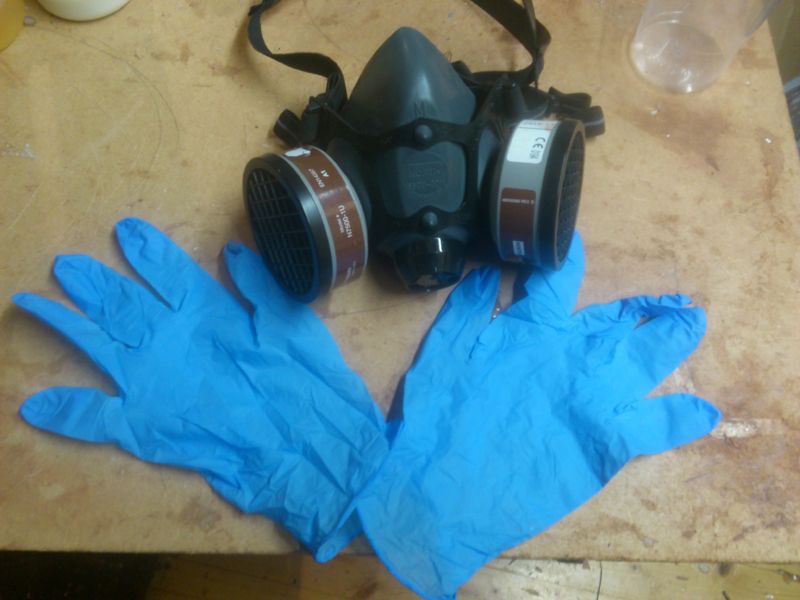
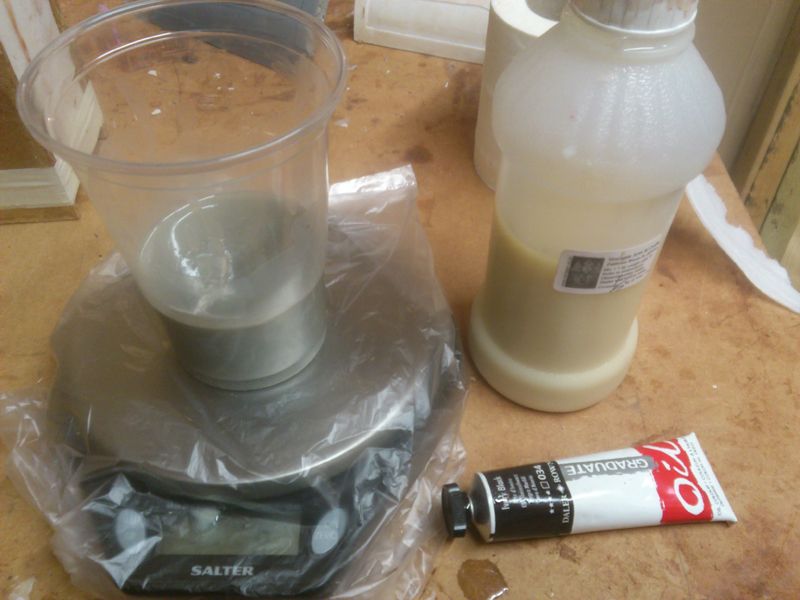
The first thing you want to do is make sure that you are safe. A respirator mask is a must if you work in a small area, and even with ventilation its nicer without fumes. The gloves are also a must. The liquid resin can stain your hands, and is not something you want to be passing into food. Gloves make the clean up much easier and are cheap. I use a nitrile variety as I can also use them with silicone. The resin isnt too fussy, but silicone will be inhibited from curing by a latex glove.
For supplies you will need the resin itself, which comes in two parts, some are equal mass mix, some are equal volume so check carefully. The resin I use is a casting polyurethane resin, the lower viscosity the better. Some resins are polyester which smells much worse, and is more brittle. I made a mistake and got lots of this resin and it is effectively useless for casting. I also made a mistake at first in getting a filled urethane resin. This was thicker so lost a lot of detail, with bubbles in rivets and so on, and weighed 50% more. Low weight, Low viscosity is good. Another detail to watch out for is work time. A quickset resin will allow you to do many casts in quick succession, but you have to be really quick or else it will thicken and catch bubbles. Without pressure casting (the next step up), the best results should come from longer working time materials that release air after time. To mix resin I use disposable cups of differing sizes depending on the part to be cast. My mixing sticks are just kids craft lollipop/Popsicle sticks, although most quantities of this resin mix with a few simple swills/swashes of the cup. I mainly use mine to mix in the colour.
You will also need the mold itself, along with some tape/clamps and some wooden pieces to hold the mold closed and aligned.
The first step is putting the mold together to be poured. You can see here that there is an aligning channel around the edge of the part. It's not as well defined as I would like, but I can improve. Any good mold with have either been cut open in such a way that it locks together securely, or will have lots of registration keys to hold the two halves in place. Some people choose to add a 'release agent' to the molds before casting. It isn't completely necessary for casting resin, although I believe that companies like forgeworld use one that also acts to extend the lifetime of the mold. Silicone just doesnt stick to resin so it definitely isnt just a release agent. It's nothing an amateur should really worry about at first though.
The wooden boards are used to hold the mold together and are taped up with a small amount of pressure. Too little and it may leak, or you will get mold lines/leaks. If it's too tight and you can warp the shape. I did this on the mold for one of the hip joints at first, and ended up with an oval, not circular, tube.

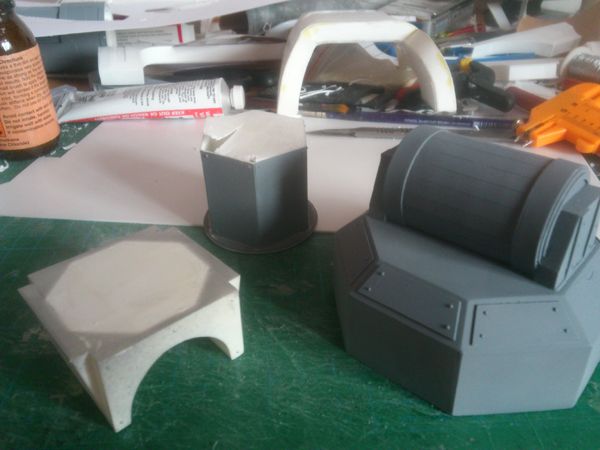
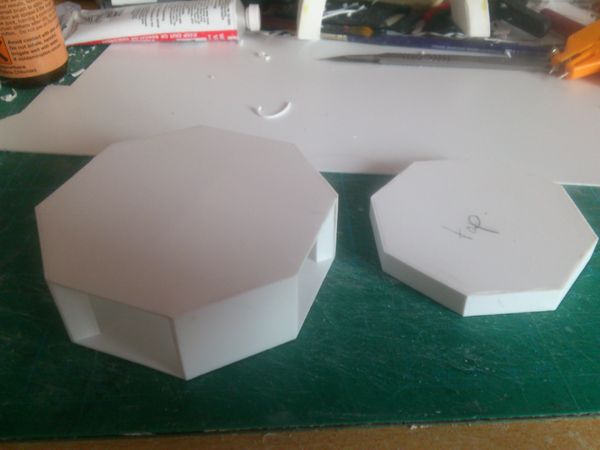
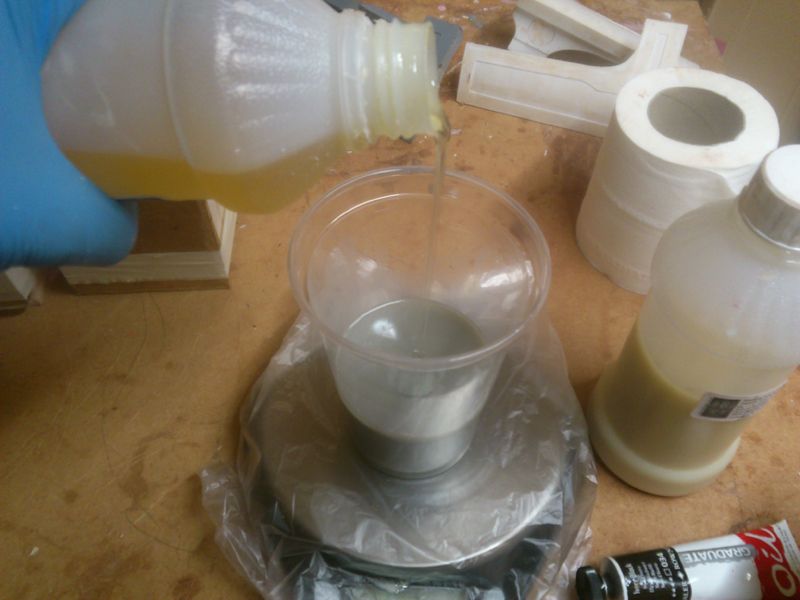
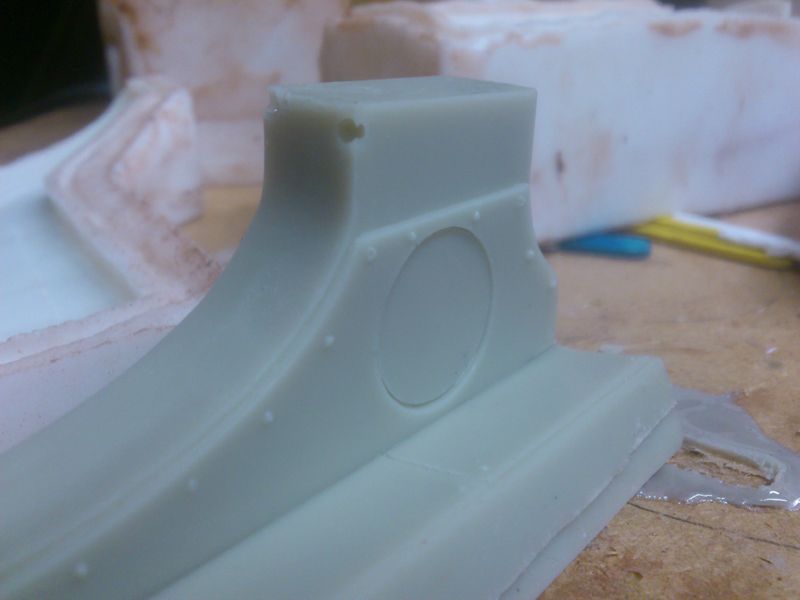
The parts that I'm choosing to mold are the rear armour pieces. The masters are pictured below, along with the weighing of a pair that I have already cast up. With any mold the first cast will be difficult to judge the volume, but for any subsequent cast I can just do an equal mass as one that's been cast already, and record that number for future reference. This pair weighs 246g, so I chose to mix 260g just to be safe. Because the resin is in two equal mass parts, that means I just need 130g each, or A and B .
To add a little colour I mix in some of the oil paint to the whitish half of the resin. I mix into the pre-weighed out cup until I get a grey I'm happy with, which will only slightly yellow because of the resin used. The paint is important. An acrylic or other water based paint will ruin resin, because of the water. Oil paints are safe, as are specially designed resin colour compounds. Once I have the grey I want, I add the other half of the resin. You can measure this into another cup first, then pour both parts together into another cup or one of the cups, which mixes them well and quickly, or just measure straight into the single cup. After a little extra mixing, only 30 secs at most, you need to pour into the model. The sooner it is poured, the better the detail because bubbles will flow easier. With silicone the height of the pour is important to remove bubbles, but for resin it is no different, so pour as rapid as you like. Tapping the table or mold as you pour can also help dislodge air bubbles, and pouring at an angle so air bubbles are directed to a vent is helpful. If you have an open mold on the bottom, a simple spray of wax release agent, used for making 2 part molds, can lower the surface tension and pop bubbled for a smooth surface. You can also use a piece of acrylic on the top to squeeze excess resin off for a flat base.
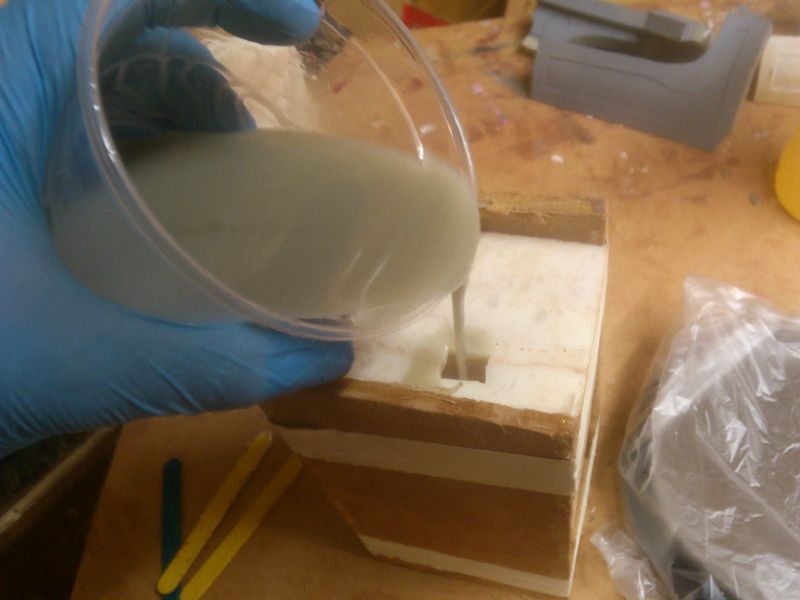
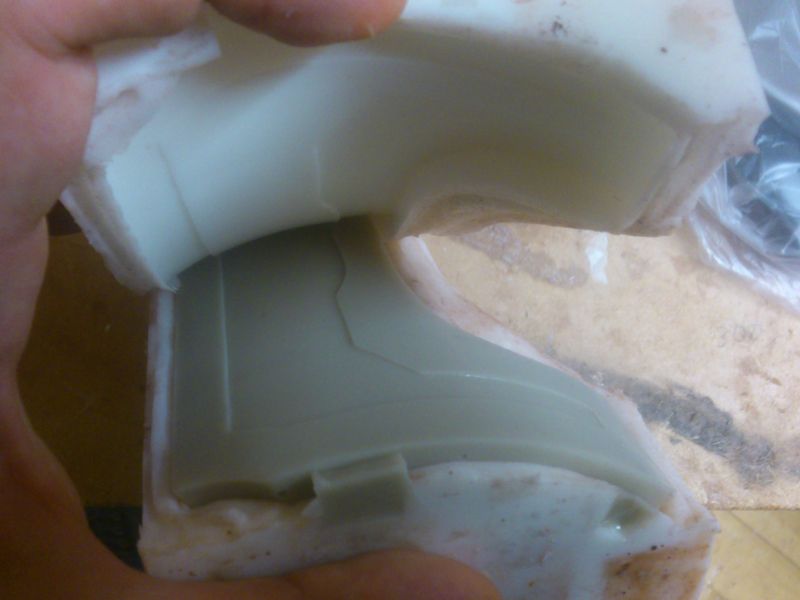
After waiting half an hour for my resin, it has set and is ready to be demolded. You should be careful of any vents that can snap and chip of a part or edge on the model, but otherwise you can just pull the part out. You can see how the cast isn't quite perfect. It's difficult to manage a perfect cast under atmospheric pressure, because the resin also releases gas as well as trapped air. When companies do resin casting it is usually done under pressure, which can be 50-60 for hobbyists and higher in prototyping companies, or industry. I don't know how high a pressure forgeworld uses, but the reason they have such large gates/sprue, is so they can just quickly pour and put under pressure really quickly. The increased pressure crushes any bubbles in the mold down so that they become microscopic, and I think they diffuse through the part more evenly. For any clear cast parts it must be done under pressure, as otherwise the bubbles make it look cloudy. I'm guessing this is part of why things like the canopies and clear parts are so brittle in model kits.
You can also see a problem caused by the mold being badly made. As I said before, the aligning ridge wasn't well defined enough, which means that the part has slipped and the edge isn't even. When making molds I try to put any mold line either out of sight, or in an easily removable place. These should be easy to fix, but on the next mold I'll be able to account for this. There is also a comparison of the masters (white) second casts from the mold(grey primer) and the newly molded parts (olive grey).
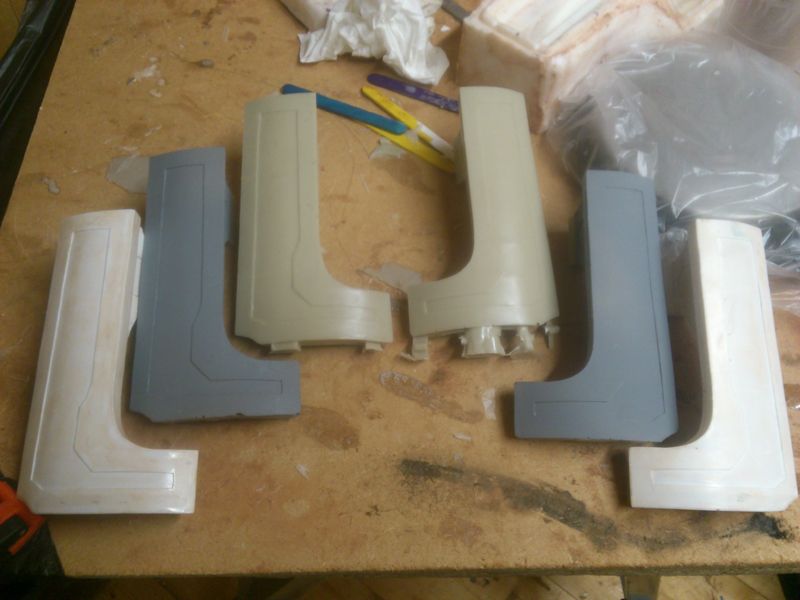
So, I've learnt a lot about mold making and casting in the past few weeks. Much of which has been trial and error. One example of which is the resin which I had been using. Not having much money, when I bought my first resin I failed to realise that it was a dense filler resin, and as such is much more viscous than I needed. I ordered a few kilos of the stuff though so wasted £70... The choice that I should have gone with was either a more expensive resin from the same supplier, or the one that I actually use now, which is a much cheaper resin from maragon art supplies. Aside from dropping the cost, the material has a much lower density, meaning I also get more volume for the already better value cost per mass. I found out when testing that the filler resin was 50% heavier than the resin I now use. This changed the predicted weight of the legs from more than 7 -8 kilos down to 'just' 5-6. I'll be able to test this when I finish casting the next leg. The one in the pictures from the apocalypse battle is an amalgamation of everything I had up to then cast, in both resins.
Another area that I've learnt in is the mold making. I tried various methods to create two part molds and only after some trial and error, and reading on the resin addict forum, that two part mold arent really necessary. I also want to stop using clay, before now the clay fills the lower half whilst the upper part is poured, and then the clay is removed and the lower half filled. I'm going to experiment using alginate, the same stuff that a teeth mold is made in, to pour a cheap lower half, before making the other half. This will stop me from getting 'dirty' mold and save time on cleaning clay from molds, that really clings on. When I make a new toe mold I'll update again, in a few days time.
|
|
|
|
|
|
2013/08/18 03:44:11
Subject: The Mars Warlord Titan Project
|
|
Stalwart Veteran Guard Sergeant
|
Subscribin'
|
"'Finished' is an unfulfilling endeavor that leaves a vast emptiness that can only be filled by the start of another project. I dread the finish." -The_Blackadder
Check out the Table Top Generals Podcast at www.ttgpodcast.podbean.com and on iTunes! |
|
|
|
|
2013/08/18 08:59:07
Subject: The Mars Warlord Titan Project
|
|
Hurr! Ogryn Bone 'Ead!
|
Please, Please, Please could you give me a link to the online store where you got the casting stuff, cheers.
|
You know what they say kids, drive it like its a rental.
|
|
|
|
|
2013/08/18 15:16:27
Subject: The Mars Warlord Titan Project
|
|
Regular Dakkanaut
|
http://www.maragon.co.uk/arts-and-crafts.html#Init, There you go. Forgot to put it in. Really cheap materialls. Whilst I think that there is a drop in quality as a result, the silicone isn't as good as I'd like, if you don't have much money it's a life saver.
If I ever get to selling copies of this, provided people actually want them, then I plan to remake the molds in better quality material and cast with more expensive resin. For a cheap starter though the maragon stuff is great.
|
|
|
|
|
|
2013/08/18 15:24:52
Subject: The Mars Warlord Titan Project
|
|
Hollerin' Herda with Squighound Pack
|
Great work. one idea i have if you do start to try to sell them though is to make the arms and shoulder weapons interchangable (maybe magnitized or a snap on peice) also if you do start selling them make sure ot let us know lol i know more then a few people who would e intrested in buying them.
|
|
|
|
|
2013/08/20 08:38:37
Subject: The Mars Warlord Titan Project
|
|
Hurr! Ogryn Bone 'Ead!
|
Thank you very much!
|
You know what they say kids, drive it like its a rental.
|
|
|
|
|
2013/08/23 22:21:30
Subject: The Mars Warlord Titan Project
|
|
Regular Dakkanaut
|
Thanks, wazrokk, my next post should show how I'll make it modular.
I'm currently waiting for the delivery of more new plasticard, and haven't been up to much model work. I'm getting around to showing my intended arm attachment though and how I intend to keep it solid and strong, and hopefully, kind of lightweight.
Firstly just a picture of how I intend the final part to appear. The armour plates are red/gold, but all of the other parts are coloured individually. Each different colour is a seperate cast piece.
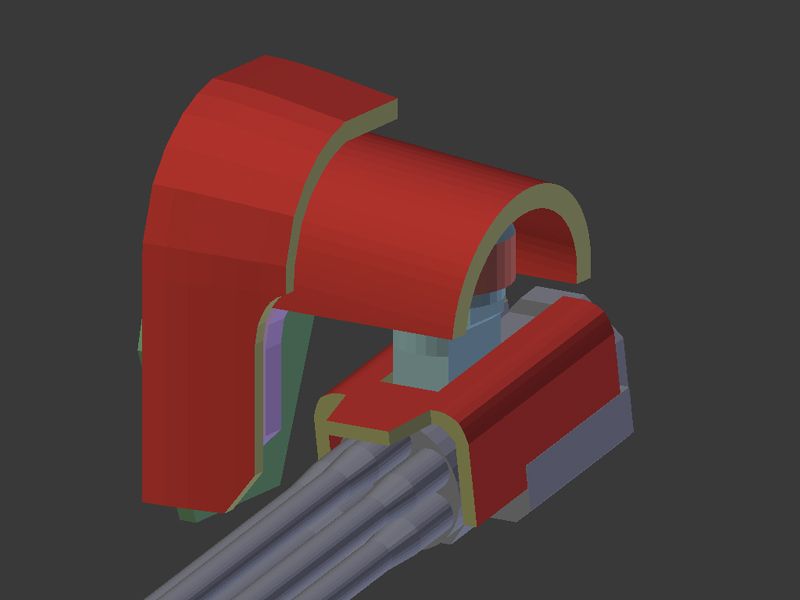
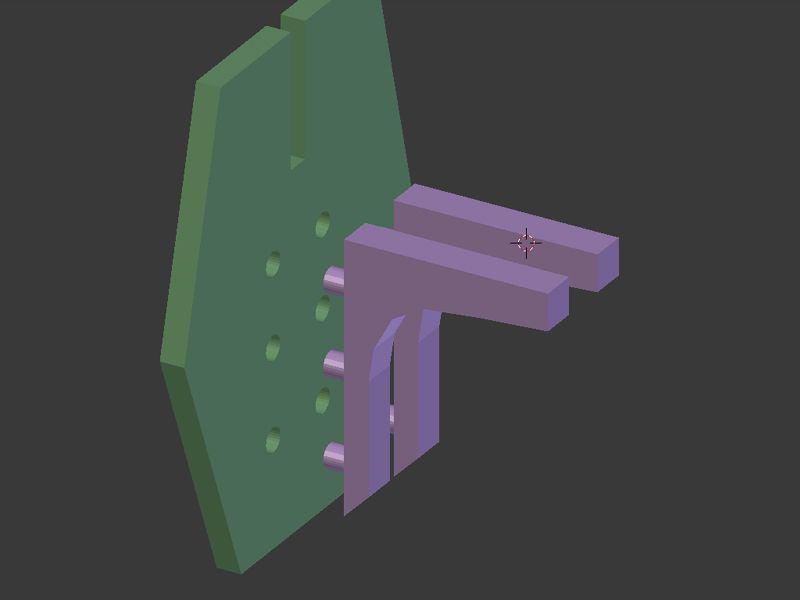
Without the armour you can see the final appearance of the shoulders. I wanted the double arch pieces in purple since I've seen the reaver. But they are much bigger in proportion. The paler red piece is the main part of the arm. To have modular guns I intend for the carapace on the gun, red/gold, to slide off from the body, in grey. This will reveal a recessed area on each side and a hole, through which a screw and bolt can be used to secure the hinge. If done right it should be a close enough tolerance and flexible enough wall to apply enough pressure with the bolt to secure it in position with friction. The carapace would probably be secured with magnets to the body itself
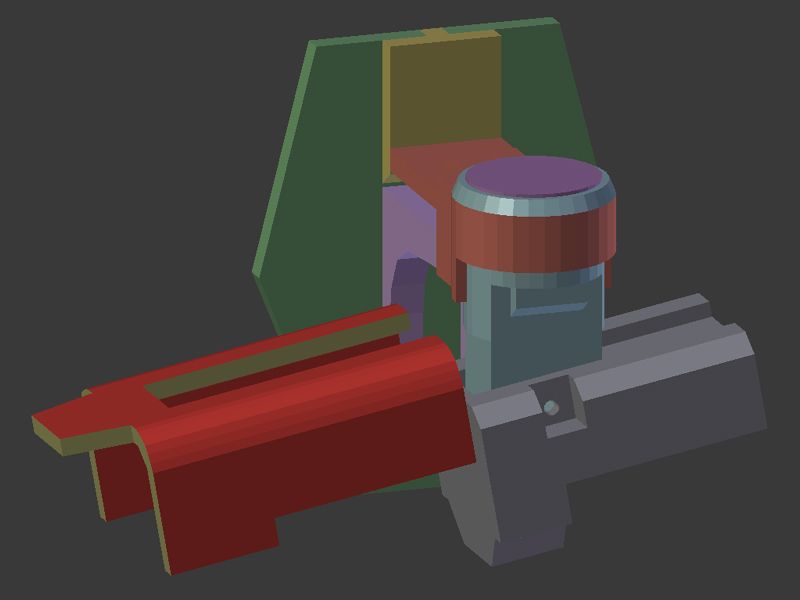
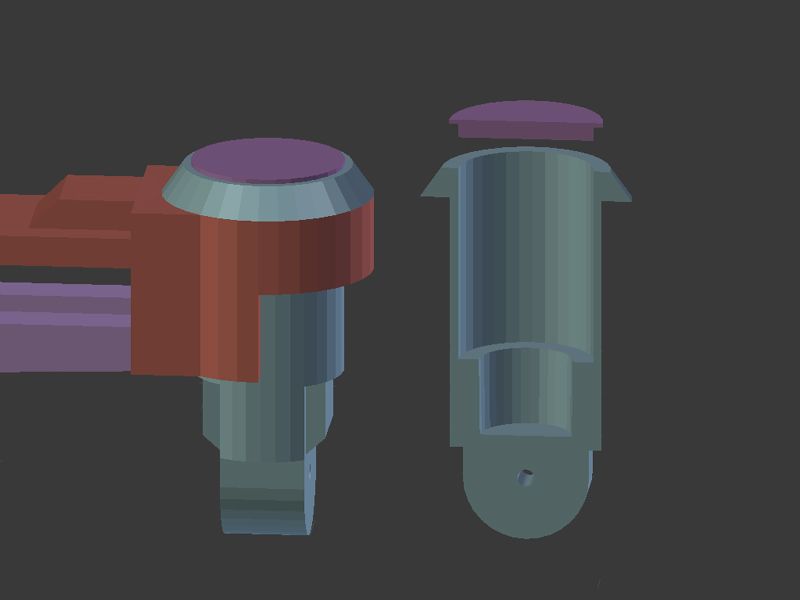
The male part of the hinge, in blue, slots into the grey part and will also be cast with a hole for the 'axle' to go through. It is designed to all fit the internal radius of the 'tube' section of the red piece. So that it can be slid in and left unglued, allowing rotation. To add more strength I may need more of a lip at the top than shown. The part is quite large in volume, so to reduce weight I plan to make it hollow, as shown, using a cap to finish it off.
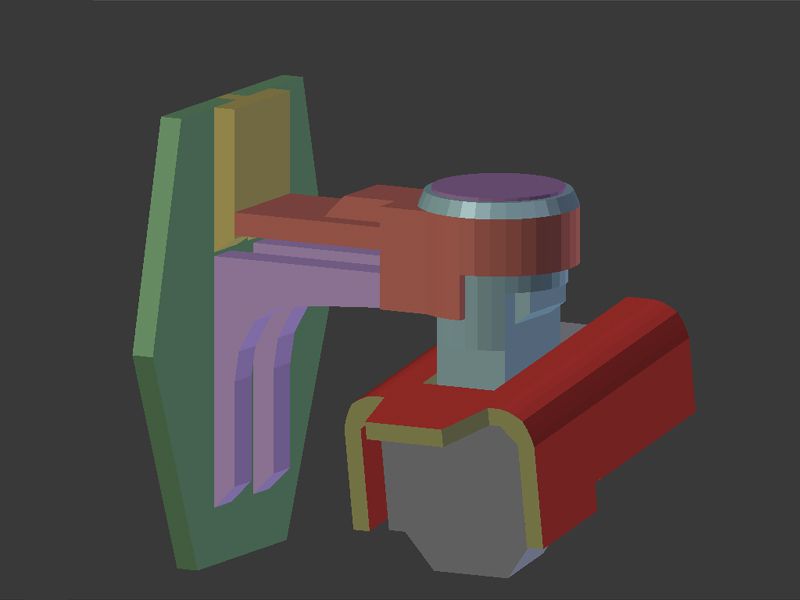
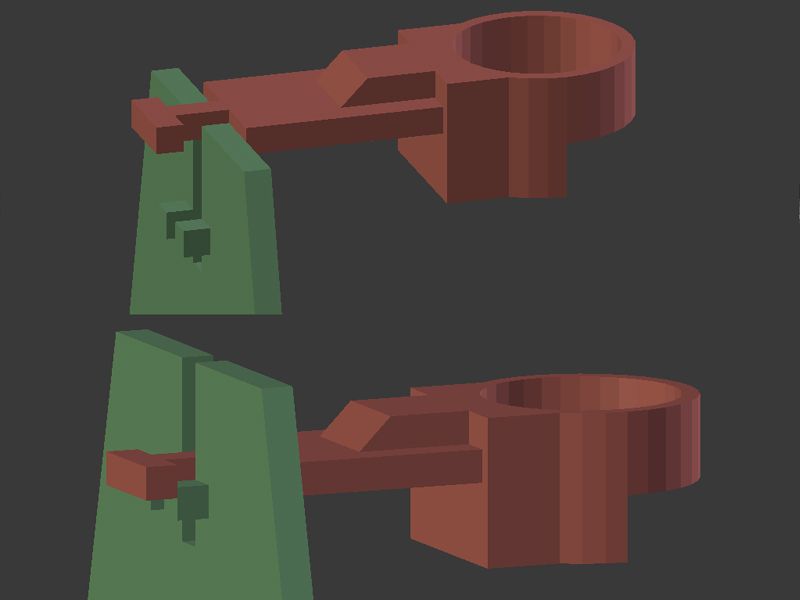
The red, yellow, and purple parts attach to the green body side in a specific order, to make sure that the part is strong enough. Unless I'm mistaken, from my design of the two lower arches, purple, and the top flat part, red, the force of weight will compress the two purple parts into the body, and tension the red part. I wanted to avoid a flat surface contact between the red and green as the only way to pin it would be perpendicular to the green plate. As pinning wouldnt really help that way, I thought that the red part should key into the body with a T piece on the inside. This can then be pinned parallel to the green plate into a part of that jutting inside too. Both parts are then forced into the green panel, the red is pushing out from the T, and the purple pushing in. If it's not clear the next pictures show the step by step process of assembling the shoulder.
Firstly the red part slides down a groove, with the end of the T fitting over then under the jutting parts. Once this is in place it can be pinned vertically.
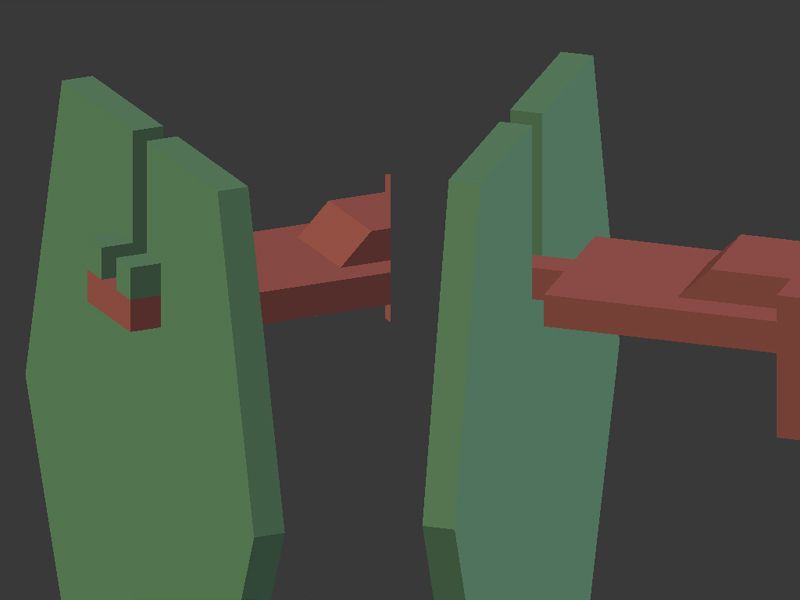
A gap is left on what is the outside of the face and the vertical groove is still open. The yellow part then slides down into the gap, securing the three parts together The yellow piece will also be used to position the shoulder armour plates central.
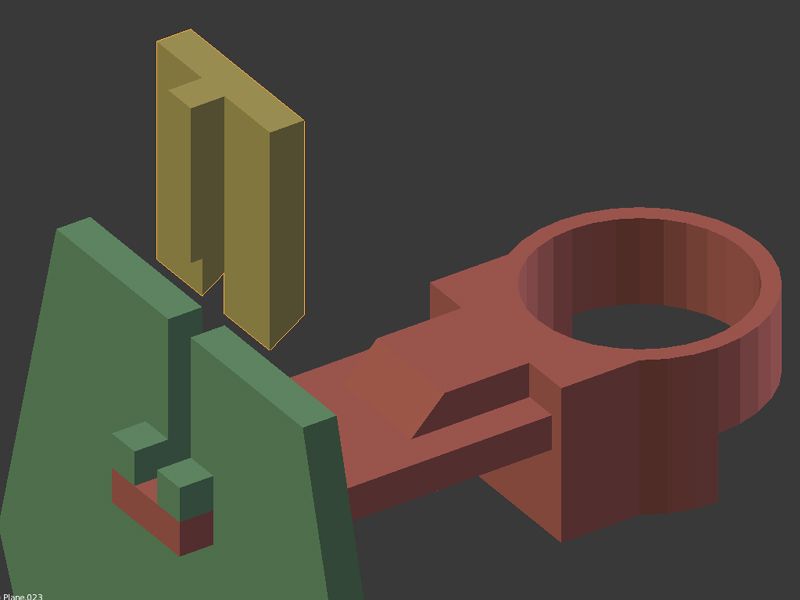

To give extra strength to the purple parts, I also plan to make some sockets for the pieces to align into.
Thinking through those plans whilst writing this has given me a few clearer ideas. I think I'm going to simplify the way that it assembles, moving the pinnable part of the green body beneath the red part, hence removing the gap. I also plan to make it symmetrical for both sides of the body, so that I can just do the one master part. Next update should come when I begin to build, although I may tease some slight painting on the model that I tried out. I want to tie it into my warhounds and am testing colours currently.
|
|
|
|
|
|
2013/08/27 11:28:42
Subject: The Mars Warlord Titan Project
|
|
Mekboy Hammerin' Somethin'
|
Photo's not working... this makes me a sad panda!
|
|
|
|
|
|
2013/08/28 12:28:28
Subject: The Mars Warlord Titan Project
|
|
Regular Dakkanaut
|
Photo's have been fixed, I think i'll transfer some of the photos over to the dakka dakka gallery soon so that I don't have to worry about bandwidth, does anybody know if it's okay for me to use the images from dakka in my thread on warseer?
|
|
|
|
|
|
2013/09/02 20:51:27
Subject: Re:The Mars Warlord Titan Project
|
|
Fresh-Faced New User
Queensland, Australia
|
Dammit my thread subscription has failed me and I missed these updates :(
It's looking great man! Your casting is really impressive (it must be a nice, low viscosity resin you found to have such a small number of bubbles) and I'm glad you found the RA forums to be helpful.
LOVE the weapon mount design! Seriously a mechanical engineering career is calling!
|
|
|
|
|
|
2013/09/07 14:15:04
Subject: Re:The Mars Warlord Titan Project
|
|
Regular Dakkanaut
|
Thanks Mangazoc, It's the stuff from maragon arts, their fastcast resin. It's nice although I don't know the viscosity of it precisely. I intend to try the smooth on stuff eventually but if that's even nice than this I'll be pleased. Yea, I really need to improve on my keys between mold halves, or skill at cutting them apart. I have the curved scalpel blades, but haven't yet managed to make really really good keying. The mount design is probably going to be massively simplified. I've thought about it more and It'll probably just be a single part slotting in rather than a locking mechanism. I think I will try to make it removable so the body can be transported more easily though.
As usual I've been neglecting my forum absence for a short while. Nothing much has really been going on in terms of progress, although I am still trying to figure out how much it would cost me to send the substandard parts of my titan casts out for terrain. I have started a bit of work on the toes once again. I've been through several versions, and after a fair few modifications the previous master that I had used was fairly battered, and I though that I could do it better again.
I'm making the part hollow this time, to reduce on weight, and have started using pieces of 3mm square tube to give an even part width of about 5mm all round the model. Practicing and finding this quite an easy and surprisingly strong part, I'd really like to go back and re-do all of the previous parts to a 5mm thickness. I'm confident that the resin is strong enough at that thickness although I am able to add extra bracing if necessary. I'd like to get the body completed first though.
Another reason that I'm rebuilding the toe is that I don't have the mold for it anymore and needed to make a new one. It was something I didn't rush to do in time for the apocalypse game as I had 6 toes cast up. This is the progress that I made last night.
The progress before I remembered to take some pictures, just making the basic outlined shape so far. The method of construction is to build the shell then add an internal thickness to it from the outside in. That way any later mistakes won't affect the visible parts.
The comparison of old and new came out weird, they are the same size from the side, only the new one is a little less wide. I think perspective just came out funny here.


The process of adding the inside parts is fairly easy, although I did have to add a small bit of plasticard strip to seal up a gap. I also forgot to photograph the side that is rested on the bottom, but it was done so that the whole part has a uniform wall.
Other than that, It went together well. For the bottom I decided to have a grip so that it can be seen from the side of the model. I cut a hole and then glued it on, before removing the inside of the sheet further.
If there's any questions, ask or pm 
-Rory
|
|
This message was edited 1 time. Last update was at 2013/09/07 14:41:06
|
|
|
|
|
2013/09/23 00:34:04
Subject: The Mars Warlord Titan Project
|
|
Fresh-Faced New User
Queensland, Australia
|
Nice to see more updates, Rory!
Making hollow pieces is definitely the way to go - both with regards to cost and weight. I reckon the wall thickness should be good
|
|
|
|
|
|
2014/01/05 18:26:51
Subject: The Mars Warlord Titan Project
|
|
Oozing Plague Marine Terminator
|
Dude,, you still working on this? I assume you are back at Uni.....
|
|
This message was edited 2 times. Last update was at 2014/01/05 18:27:58
You are waaaaay beyond crazy my friend -DSteingass
Yes, everything that changes the entire fething world is overrated..... - DSteingass
...yep... some of the dakka chaps here sure made the joints of my jaw quite loose..Viktor Von Domm
...they put Space Marines in tin cans and drop them from orbit, I don't think fuel consumption or aerodynamics is a concern - DSteingass
I think once again my motormouth has brought me into deep... - Viktor Von Domm
he knows no pain...nor fear, he is a riveteer - Viktor Von Domm
We don't do generic, mainstream, normal, or anything of the sort! ^^ - Shrike
You build fething Titans Henry Ford style Max!! - DSteingass
 |
|
|
|
|
2014/01/17 08:36:50
Subject: The Mars Warlord Titan Project
|
|

Fresh-Faced New User
|
Rory... OMG....
what you have done my friend ....
the whole community is fuzzy in anticipation your Project ...
I'm incredibly surprised that you actively build a Titan.
I'll send you a p.m.
|
No one can remember when we do good when we do bad no one can forget. |
|
|
|
|
2015/01/08 16:35:10
Subject: Re:The Mars Warlord Titan Project
|
|
Regular Dakkanaut
|
Well, It's been a year. I thought it might be time to have an update/explain why this projects gone for so long without any news. I am currently at Uni, in my 3rd of 4 years. Because of living in student accommodation the project is on hold as a physical model, largely due to lack of time, and space to do work on it. Also because It's difficult to transport in and out of accomodation at the end of term. I also didn't get much done over summer last year either because of being busy doing travelling around europe for a month and working.
However the project isnt entirely dead. I'm still attempting to work on this every now and then, and think about it plenty. There's always more stuff that I can improve on the design of this thing, and parts that I still haven't even come close to finishing. In particular the shoulder mounted weapons were never even started.
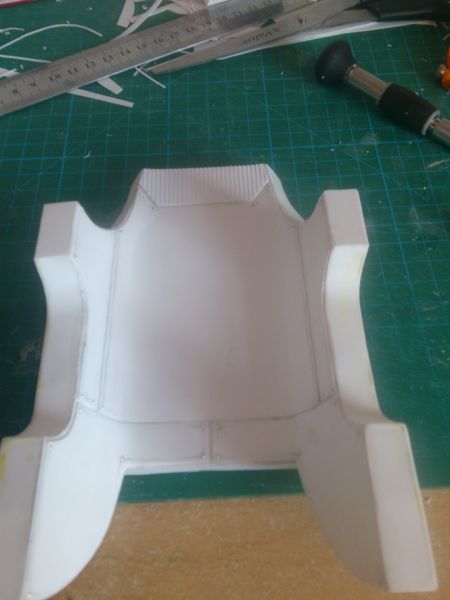
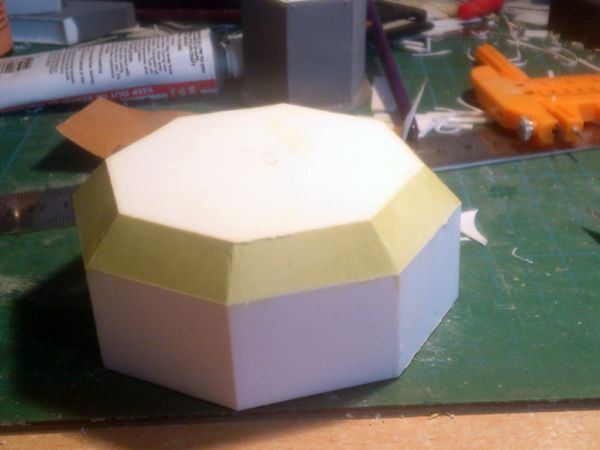
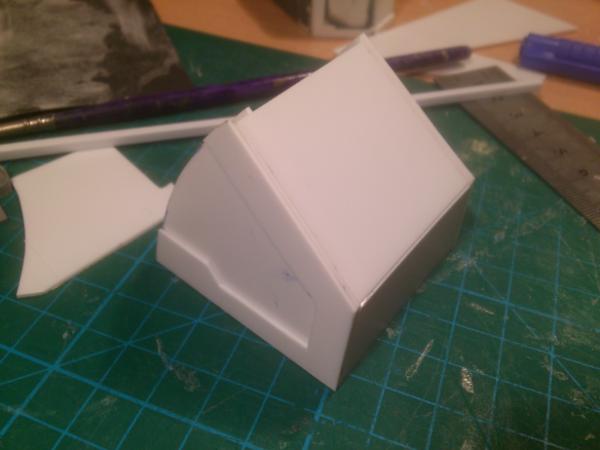
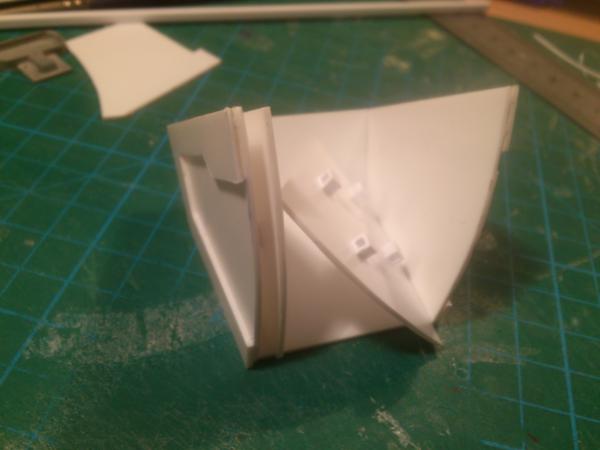
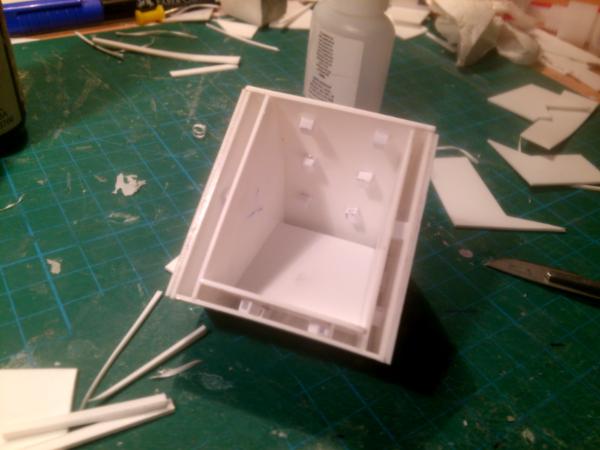
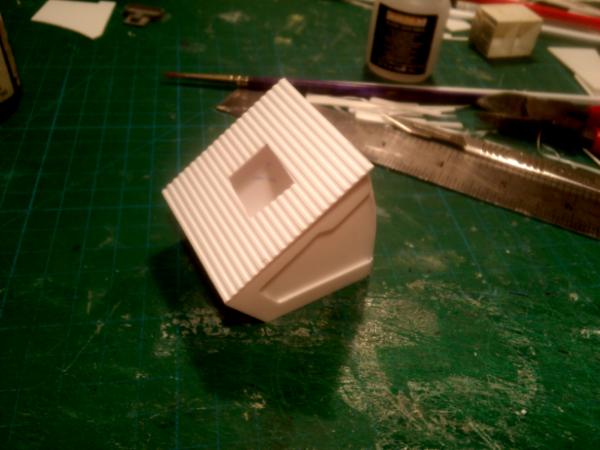
So, Instead of making the model in plastic, which as I said I don't have the room to work on, I've been making a mock up out of paper. I have an old mock up that I made prior to this project log, such a long time ago, and I loved that, so I am currently trying to make a complete set of templates for the warlord titan. I'll post some of what I have built so far.
I'm also considering a really simple set of templates, the warhammer scale one I'm making is fairly complex, which I might be up for releasing so that others can build my warlord too. I've done this in the past, but those templates were really badly made, and the titans they build were less nice designs than my current one.
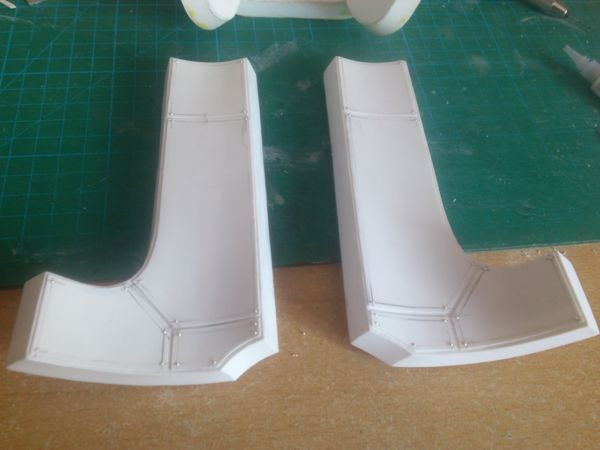
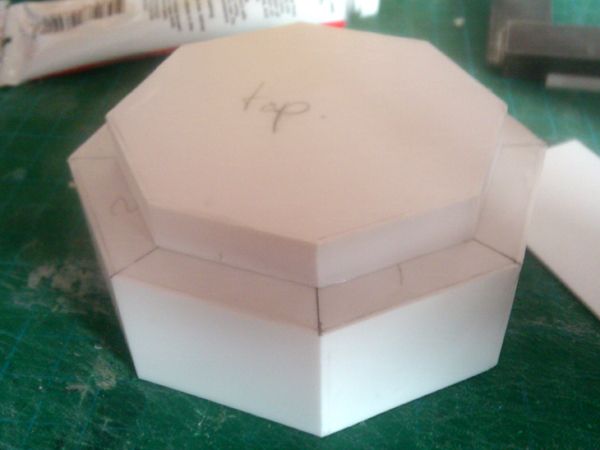
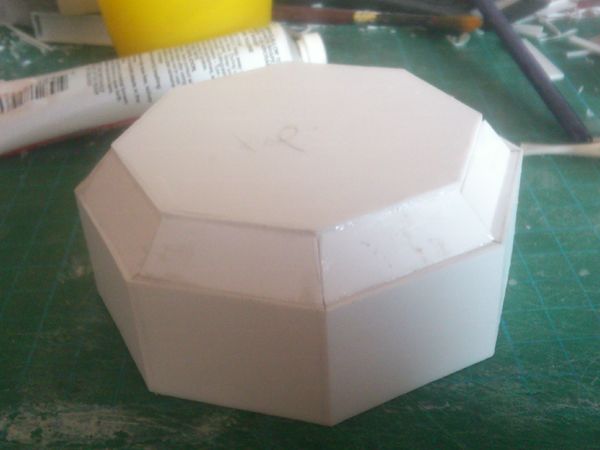
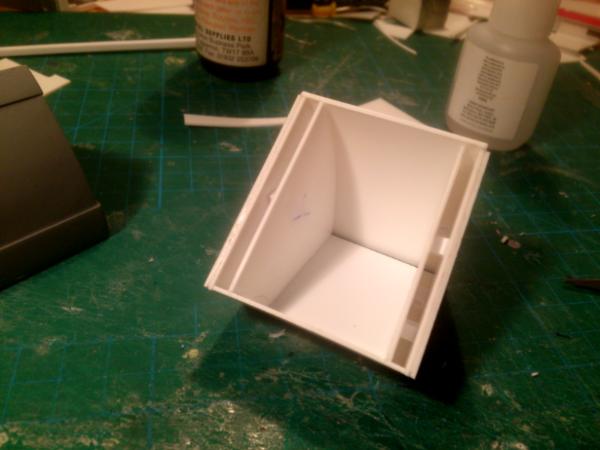
This is the current progress (Also, this must be the twentieth time I've built the foot of this thing...)


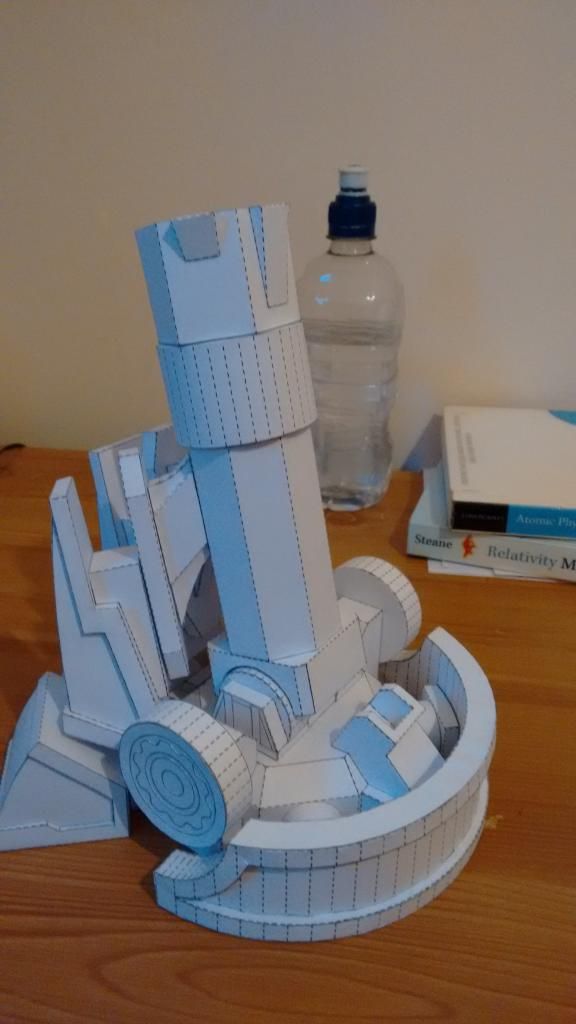
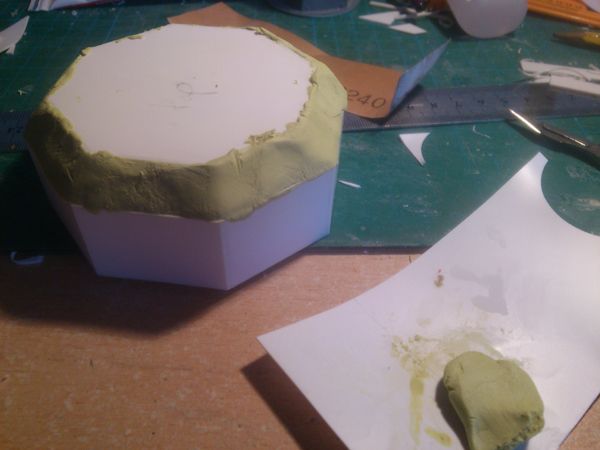
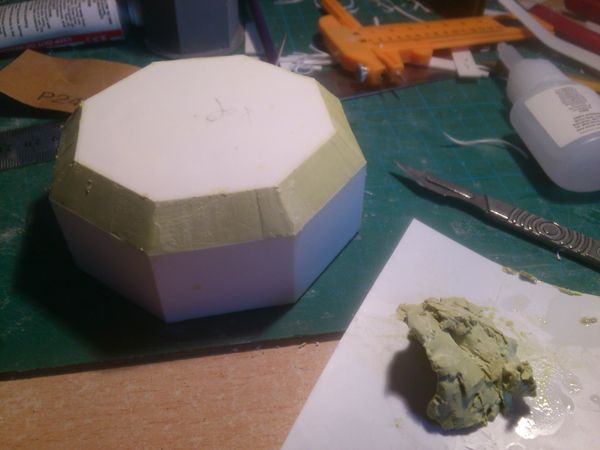
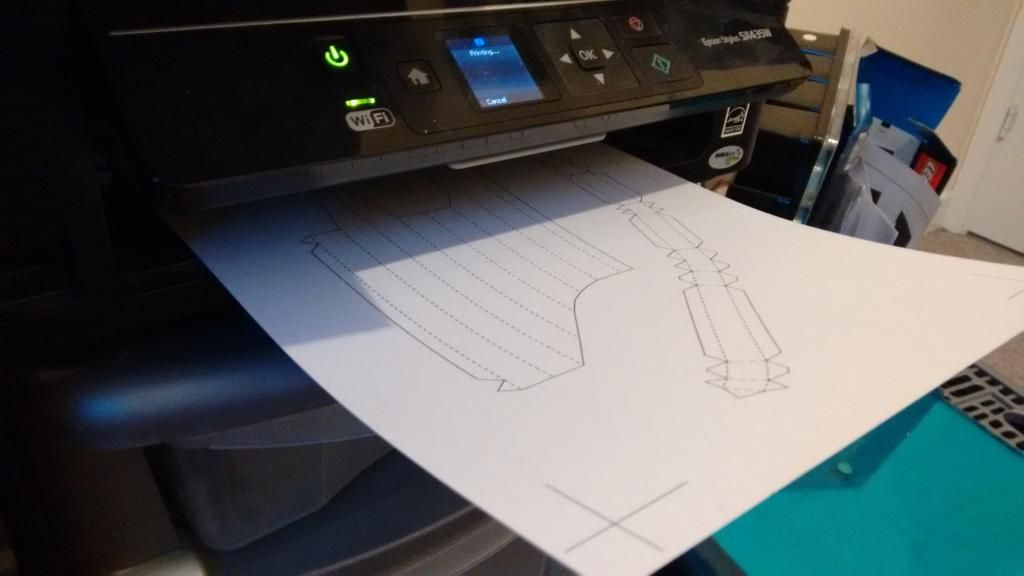
And the next parts are for the calf armour, which is just printing off now, and shows what the templates look like.
|
|
|
|
|
|
2015/01/08 18:56:27
Subject: The Mars Warlord Titan Project
|
|

Did Fulgrim Just Behead Ferrus?
|
Holy crap...that's probably the coolest paper project I've ever seen!
|
|
|
|
|
|
2015/01/09 10:37:29
Subject: Re:The Mars Warlord Titan Project
|
|
Regular Dakkanaut
|
|
|
|
|
|
|
2015/01/09 11:28:54
Subject: The Mars Warlord Titan Project
|
|
Towering Hierophant Bio-Titan
Somewhere In Time And Space
|
Loving this so much. Seems pepakura was meant to be for this build. Will you be hardening it all with resin and bondo?
|
|
|
|
|
|
2015/01/09 17:00:37
Subject: Re:The Mars Warlord Titan Project
|
|
Regular Dakkanaut
|
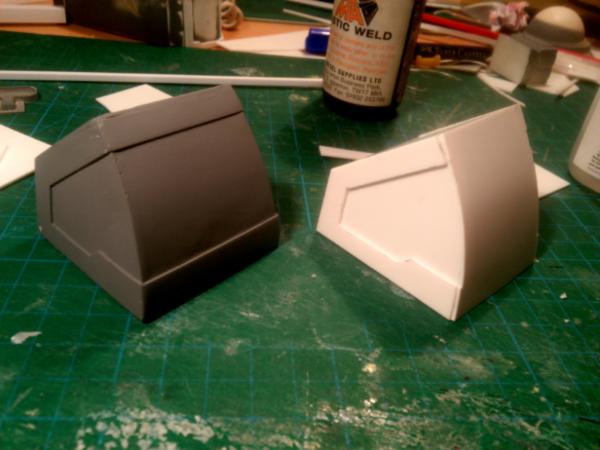
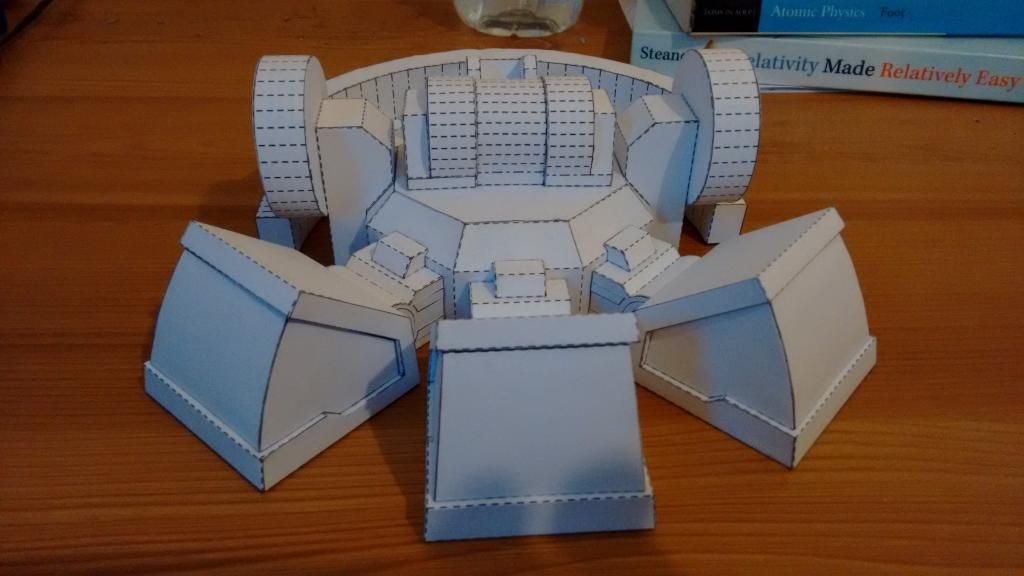
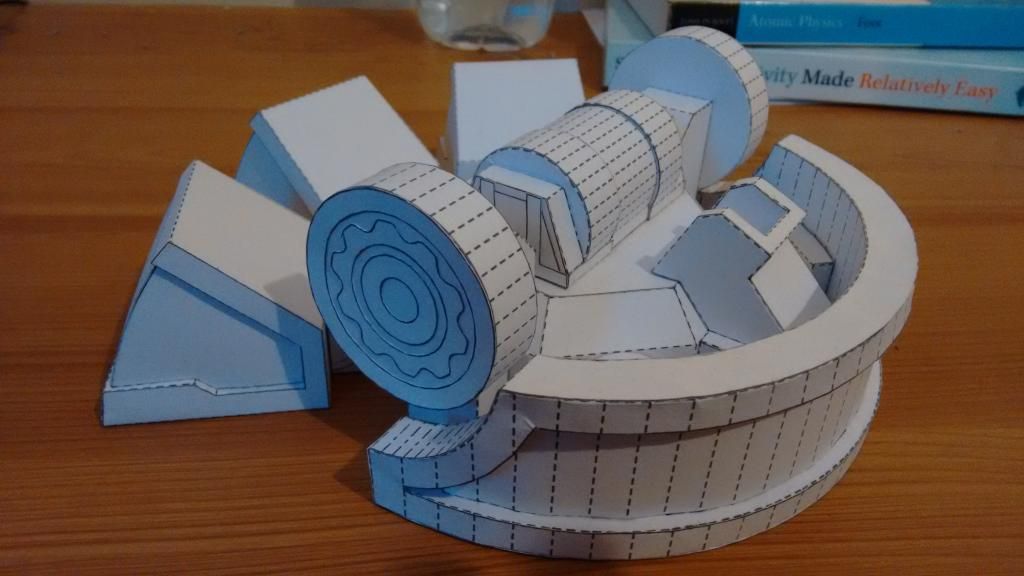
Thanks. It won't be hardened, It's just an elaborate mock up really. I enjoy making things out of paper, and making things in general. I wanted something to do before I start term, it's also great distraction from revision, and this felt like something I could do so that I'm able to work on the my titan, without actually having to built the complicated plastic model. I just don't have the space/time/money at the moment to make anything that's going to be cast up for the titan.
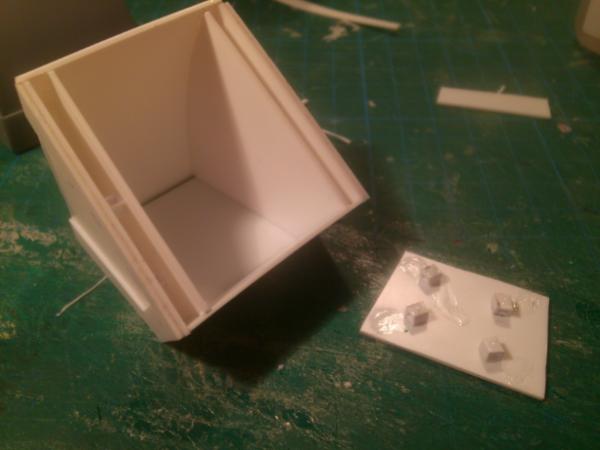
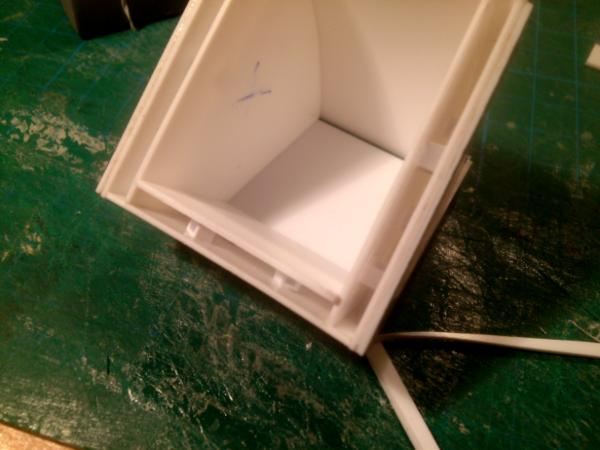
So, I finished building the paper parts of the armour. Attaching them went fairly well, although I realized that in remaking the parts to make the paper version, I actually increased the radius of the leg armour. it was only by a small amount, a couple of millimetres, but just enough that it's actually meant that the armour clips on the back a little. The model still looks good, but the back 2 parts of the calf armour are slightly bent inwards as a result. I'll fix that when I build the second of the legs later on.


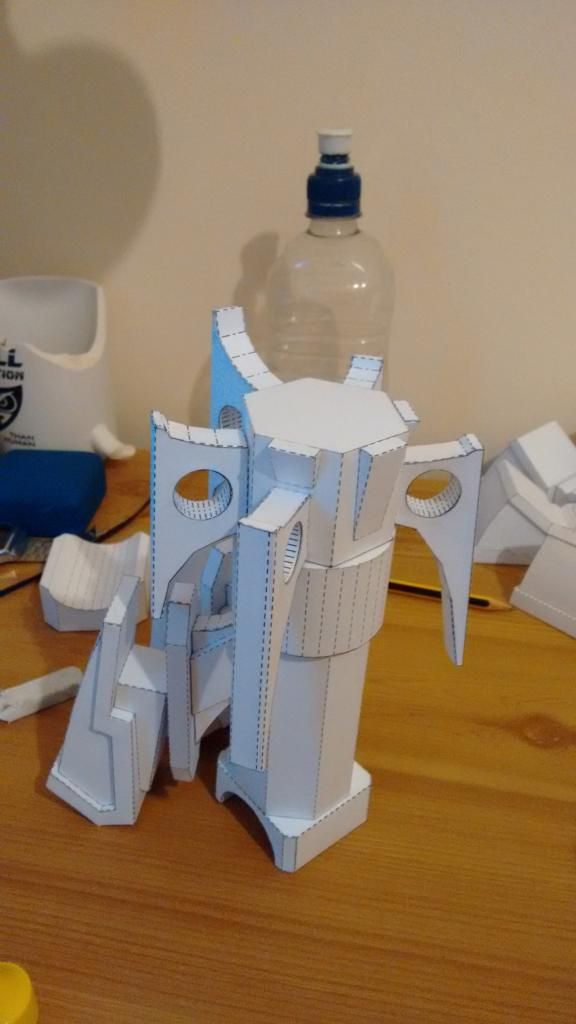
Next I have to fix up the file for the leg armoured parts, and also do the files for the piston on the back. That will finish off the foot/calf and I will move onwards and upwards, with the thigh pieces.
|
|
|
|
|
|
2015/01/09 17:21:08
Subject: Re:The Mars Warlord Titan Project
|
|
Jealous that Horus is Warmaster
|
please please please when you finish can I buy one from you how much do you intend to sell them for.
Also could you do some additional weapon patterns.
Automatically Appended Next Post:
At first I didn't see it then I spotted the kerbal space program mug virtual high five.
|
|
This message was edited 1 time. Last update was at 2015/01/09 17:22:37
|
|
|
|
|
2015/01/09 17:23:05
Subject: The Mars Warlord Titan Project
|
|
Towering Hierophant Bio-Titan
Somewhere In Time And Space
|
Wow. Just wow. Wish I had skills like that...
Btw, does the ankle have left and right rotation as well as the front to back it already has? Also does it have the ability to swivel? I ask as a logical question due to how ankles really work.
|
|
|
|
|
|
2015/01/09 18:09:23
Subject: The Mars Warlord Titan Project
|
|
Regular Dakkanaut
|
Haha, thanks e.earnshaw, that mugs a recent christmas present, and I love it. Well timed too, as the other mug which is visible in a couple of these photos was broken just after I got it. That ones a reference to the bladerunner fictional tyrell corporation.
Currently doubt I'll get around to selling a physical model, simply don't have the time for it over the foreseeable future. If I complete this thing, ever, it won't be for a while. The paper templates though I am thinking about giving away/selling, depends if I want to put the work in to make them more of a product.
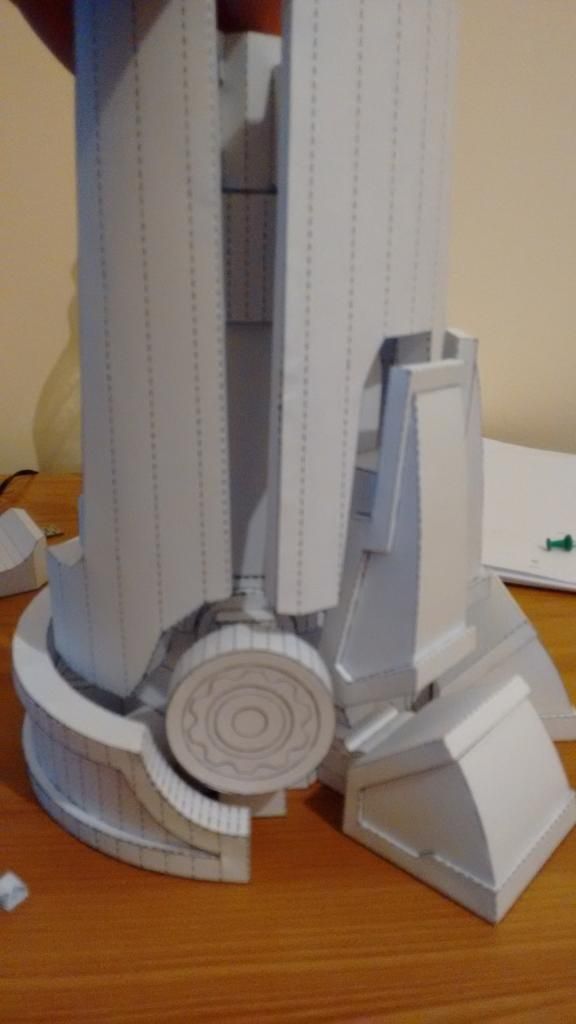
@AnUnearthlyChilde, This model doesn't, it's simply a cylinder on the base of the foot, and corresponding half pipe on the top part of the leg. I did that because spheres are difficult for paper, and also difficult to make strong. The cylinder is really easy to reinforce.
On my titan model that I built earlier in the thread, it had an actual ball joint for the ankle, and also one at the hip, (made from ping pong balls) which is what I would like to do, but did this because it's easier.
|
|
This message was edited 1 time. Last update was at 2015/01/09 18:14:16
|
|
|
|
|
2015/01/09 19:01:26
Subject: The Mars Warlord Titan Project
|
|
Towering Hierophant Bio-Titan
Somewhere In Time And Space
|
fiorehellheart wrote:@AnUnearthlyChilde, This model doesn't, it's simply a cylinder on the base of the foot, and corresponding half pipe on the top part of the leg. I did that because spheres are difficult for paper, and also difficult to make strong. The cylinder is really easy to reinforce.
On my titan model that I built earlier in the thread, it had an actual ball joint for the ankle, and also one at the hip, (made from ping pong balls) which is what I would like to do, but did this because it's easier.
Fair enough, though't I'd ask lol. So would that mean when it comes to the final piece that you'll do a combination of the two?
Sorry for all the questions, I'm just curious as I've been away from dakka for about two years lol.
|
|
|
|
|
|
|
|


 "This is why I hate the novels. They squash our imagination and creativity and create way to many fluff lawyers. To many "you can't do that because Fluffy Kitty novel says Captain Ichypants lost his pointer finger in the battle of Dogtown"."


