| Author |
Message |
 |
|
|
|
|
Advert
|
Forum adverts like this one are shown to any user who is not logged in. Join us by filling out a tiny 3 field form and you will get your own, free, dakka user account which gives a good range of benefits to you:
- No adverts like this in the forums anymore.
- Times and dates in your local timezone.
- Full tracking of what you have read so you can skip to your first unread post, easily see what has changed since you last logged in, and easily see what is new at a glance.
- Email notifications for threads you want to watch closely.
- Being a part of the oldest wargaming community on the net.
If you are already a member then feel free to login now. |
|
 |
2017/03/05 23:37:32
Subject: Re:I Paint This... And That
|
|

Utilizing Careful Highlighting
|
 Shrapnelsmile wrote: Shrapnelsmile wrote: Guildenstern wrote: Guildenstern wrote:Thanks Dr H!
Doing stage two of weathering: adding earth (weathering powder) Thinking I will need to go and apply more directly to a few areas, as whilst the ram came out very well, it doesn't quite match the rest of the vehicle.
First time trying a bit of an oil wash, so I'm waiting for it to dry (impatiently). Then I'm going to go back through and do details etc. Also need to finish the guns and such.
What weathering powder do you use for the dirt effect, and how do you apply it? Looks great.
Thanks!
I mainly use Forge world but I do have some from Secret weapon miniatures - both work really well!
I did two things in this case, to get it to look like that:
first thing, was add isopropyl (sp) to a small amount of weathering powder. It makes a wash that dries quickly (as the alcohol evaporates) but leaves behind a more powdery effect than say a technical paint.
You can do this successively till you get the effect you want.
The second thing I did to get the really really really dirty look, was just using a dry brush, dip it into the weathering powder and carefully 'paint' it on - you'll likely also be kind of tapping it on, it's more a stippling motion than a true painting motion. The brush is just to carry the powder.
Again you can do this again and again til you get the look you want.
I don't recommend doing it a LOT for a model that's for gaming - you have to carefully seal those and it can come off. It'd be more for display. Depending on how much you put on of course.
To seal all that in, as best I could, I used secret weapon miniatures pigment fixer. It's basically just mineral spirits, so you can buy it directly if you like, I got it in a set of theirs and quite like it.
I should note, some pigment loss is simply inevitable that stuff is *FINE*. Also, wear a mask, did I mention it was fine? Unless you want to experiment with interesting colours coming out your nose 
Also, I've not used them but MIG makes some great weathering stuff from what I understand.
And thank you, Cam, as well 
|
|
|
|
 |
|
2017/03/06 20:08:36
Subject: Munitorium Crates
|
|
Utilizing Careful Highlighting
|
Just did another set of Munitorum crates

They're really a cool set! I've started some light weathering on them, but it doesn't show up very well in pics. I am tempted to get another set just to play with heavy weathering as well. Plus they're just great terrain!
|
|
|
|
|
|
2017/03/07 18:44:42
Subject: Re:I Paint This... And That
|
|
Utilizing Careful Highlighting
|
|
|
|
|
|
|
2017/03/10 06:32:03
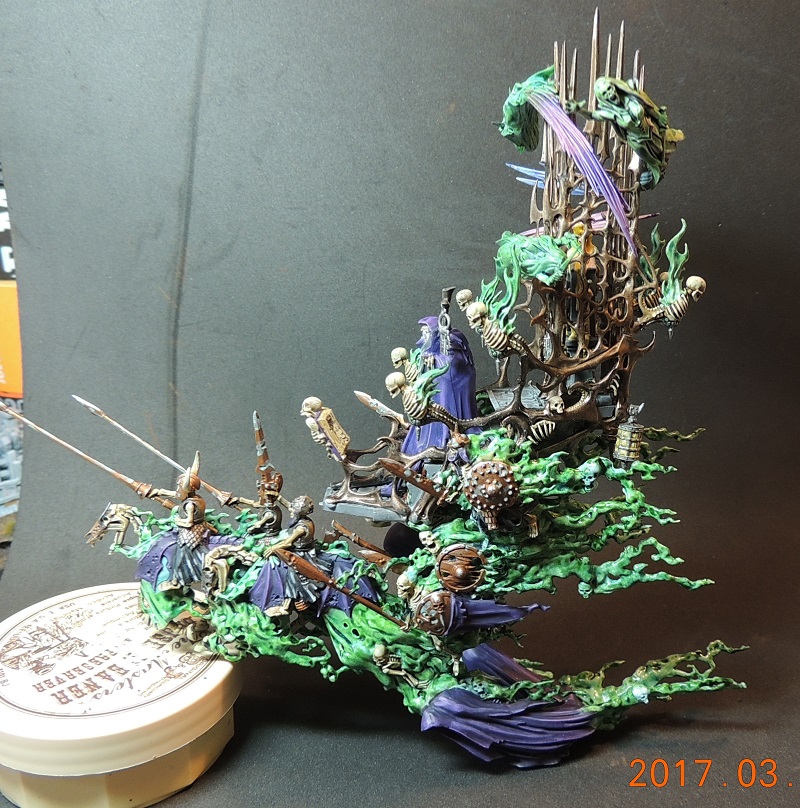
Subject: Mortis Engine
|
|
Utilizing Careful Highlighting
|
|
|
|
|
|
|
2017/03/10 06:47:21
Subject: I Paint This... And That
|
|

Pious Palatine
|
Nice job on the Mortis Engine, it's such a groovy model.
EDC
|
|
|
|
|
2017/03/10 12:15:10
Subject: I Paint This... And That
|
|
Gargantuan Great Squiggoth
|
Stunningly beautiful work, love the model and your work is bringing the best out of it.
|
|
|
|
|
|
2017/03/11 01:36:44
Subject: Re:I Paint This... And That
|
|
Utilizing Careful Highlighting
|
Thanks guys! hoping to get a game in this weekend as well, depending on boy's schedule
I found the base! And I'm working on my SMs for the monthly dakka contest, and a reaper fig for a partner exchange...
But now I'm trying to decide what ot do for myself:
More grots?
More boyz?
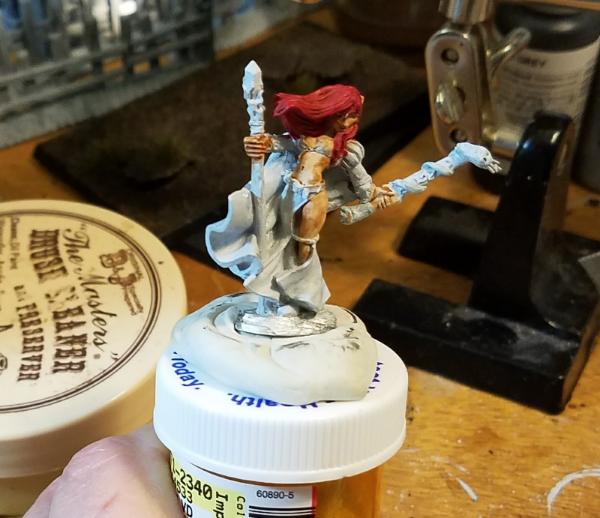
I need both, and I've been falling behind a bit tbh, getting distracted by other armies and my terrain lol Automatically Appended Next Post: WIP on my reaper exchange mini - it's a conversion of Alastriel, based on my partner's wishes. She had a sword in her left hand first, but it's supposed to be a wand/mace type thing. So I cut it off a good bit, turned the hand and made the wand with a snake on it (yes, that's supposed to be a snake)
|
|
This message was edited 1 time. Last update was at 2017/03/11 04:14:14
|
|
|
|
|
2017/03/18 01:14:16
Subject: Re:I Paint This... And That
|
|
Utilizing Careful Highlighting
|
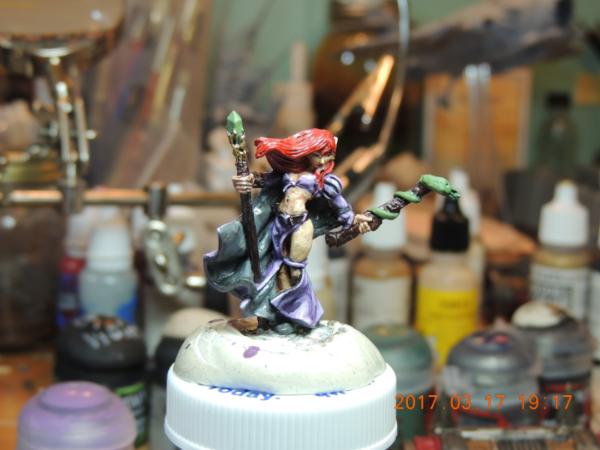
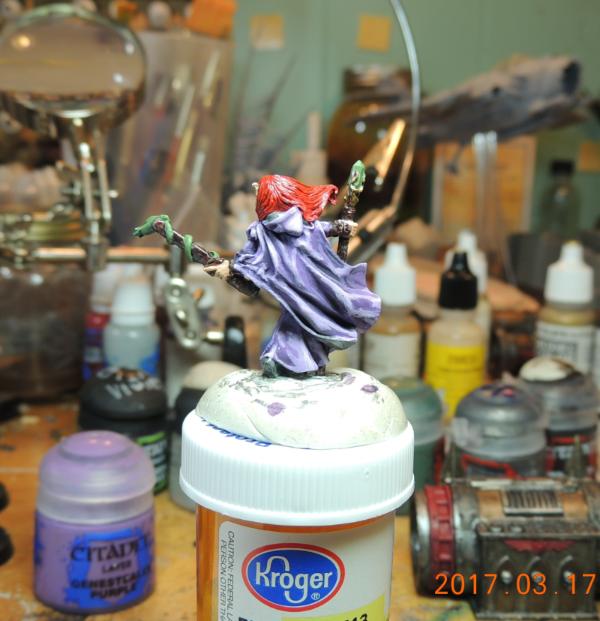
Did some more work on Alastriel, mostly on her cloak
|
|
This message was edited 1 time. Last update was at 2017/03/18 01:16:03
|
|
|
|
|
2017/03/19 22:40:05
Subject: Promethium Pipes finished
|
|
Utilizing Careful Highlighting
|
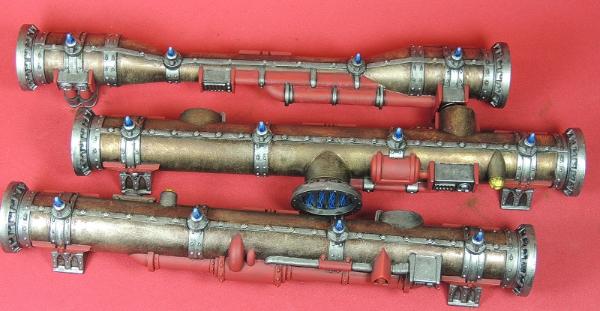
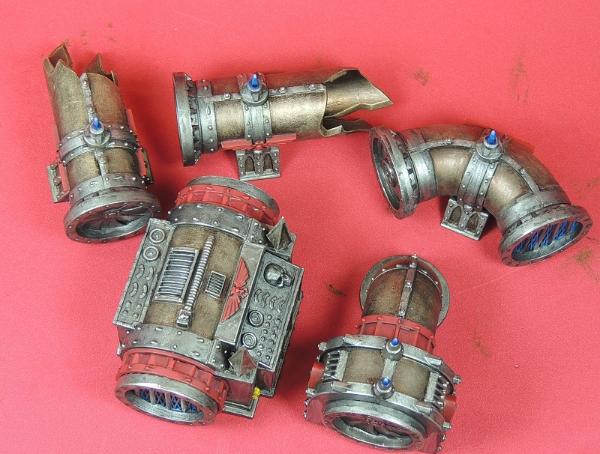
Did a set of these for our Terrain needs, we're pretty lacking in actual non-fantasy stuffs (though these will work for that as well). Lovely little kit, but the rivets are a bit tedious
|
|
|
|
|
|
2017/03/19 23:01:12
Subject: I Paint This... And That
|
|
Mastering Non-Metallic Metal
|
Nice work on all the greeny purpley things. 
Nice pipes too. Good inspiration for a certain terrain contest. 
|
     Mastodon: @DrH@dice.camp Mastodon: @DrH@dice.camp
The army-                   ~2295 points (built). ~2295 points (built).
 
* -=]_,=-eague Spruemeister General. * A (sprue) Hut tutorial *
Dsteingass - Dr. H..You are a role model for Internet Morality! // inmygravenimage - Dr H is a model to us all 
Theophony - Sprue for the spruemeister, plastic for his plastic throne! // Shasolenzabi - Toilets, more complex than folks take time to think about! |
|
|
|
|
2017/03/19 23:03:22
Subject: Re:I Paint This... And That
|
|
Gargantuan Great Squiggoth
|
Rivets ! Tedious! I beg your pardon!
Very nice work they look beautiful. You could try scratching some extra bits together for the set, for the next round of the comp 
Nice work on the pole dancer, she looks great, great colour work.
|
|
|
|
|
|
2017/03/24 15:50:15
Subject: Re:I Paint This... And That
|
|
Utilizing Careful Highlighting
|
 Camkierhi wrote: Camkierhi wrote:Rivets ! Tedious! I beg your pardon!
Very nice work they look beautiful. You could try scratching some extra bits together for the set, for the next round of the comp
Nice work on the pole dancer, she looks great, great colour work.
Snickers! yeah, I like making rivets... painting, not so much.
And it was hilarious about the comp actually. Just in time!
I got my hubby and sons together for the first time ever, to help me in my hobbying: they ate three canisters of Pringles so I could have the tubes. It was a tough job but they did it well. lmao
And I'm working on a bit of Necron Terrain, to match my son's necrons:
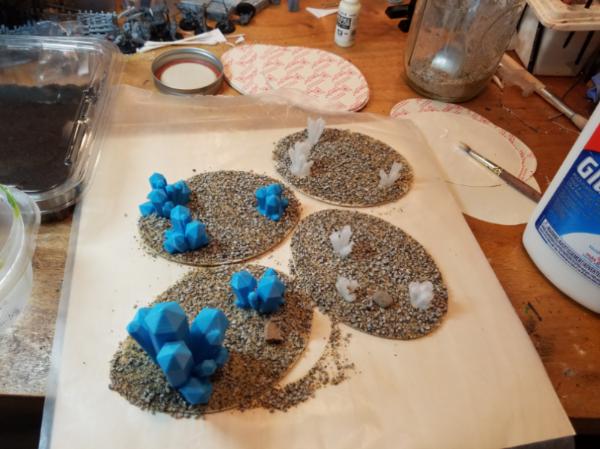
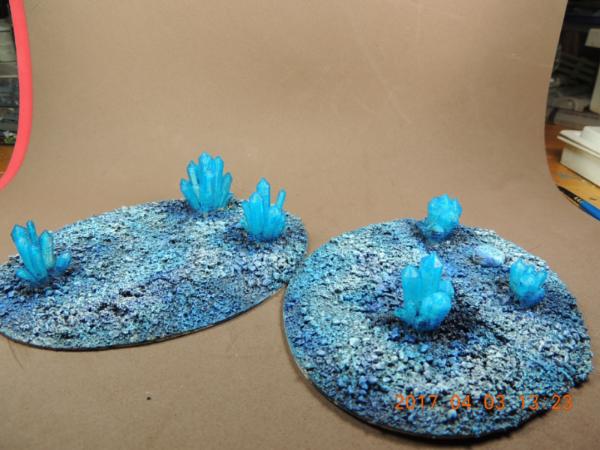
The crystals are from Horizon 3D on ebay (fairly cheap 3d printed terrain bits); the cover stuffs is coffee grounds, sand and various rocks; the base is a piece from a sewing kit.
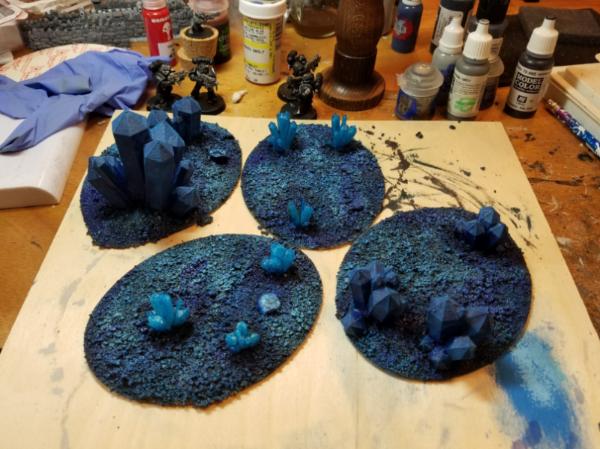
Here's the almost done stage, with the dark purple/blue wash applied to areas, a couple layers of blue paint and a lot of watered down PVA. Most of the time for this project is waiting for the glue to dry. I've done two rounds of it, to make sure the material lays down to paint well, and it's taken overnight each time, so it's best to do this sort of project whilst working on other things. Which is how I do most of my terrain, really.
Anyway, next stage is going to be a light blue/white drybrush to make it pop, and match my son's bases.
**edit** oh I meant to mention, I am using Student grade acrylic paints (the kind that come in sets for painting pictures). I do most of my terrain in it, or craft acrylics, including washes. So hopefully the colours will match up ok with how I did my son's bases. I'm kind of estimating here.
|
|
This message was edited 1 time. Last update was at 2017/03/24 15:51:59
|
|
|
|
|
2017/04/01 21:26:58
Subject: Re:I Paint This... And That
|
|
Utilizing Careful Highlighting
|


Just a quick update, just got back from a trip so no time for hobbying. Plus I picked up a stupid summer cold >< grr. Anyway, Iron Hands begins! I've not decided on a base theme yet, I've already done the whole broken urban thing for my Luna Wolves so I want something different. I may go more like a starship theme, I've not decided.
|
|
|
|
|
|
2017/04/03 05:07:45
Subject: converted warbike
|
|
Utilizing Careful Highlighting
|
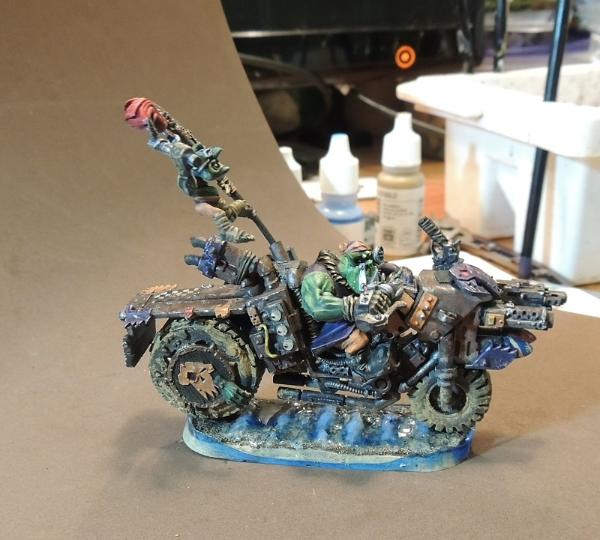
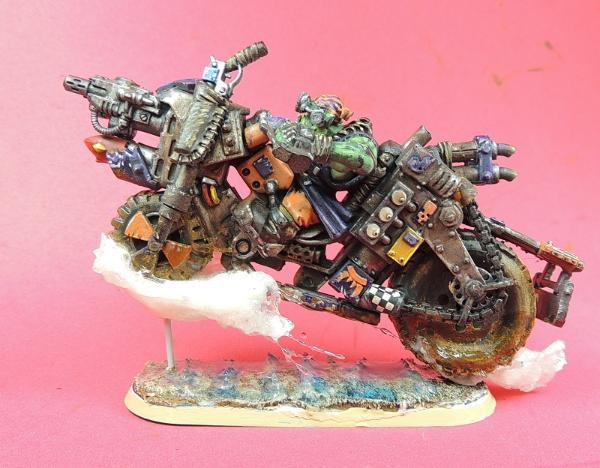
Took the guide from Sperian on MWG on how to convert a deffkopta to a bike and came up with this beast: (head and wheel are from Kromlech, head's just tacked on atm so it looks funny)

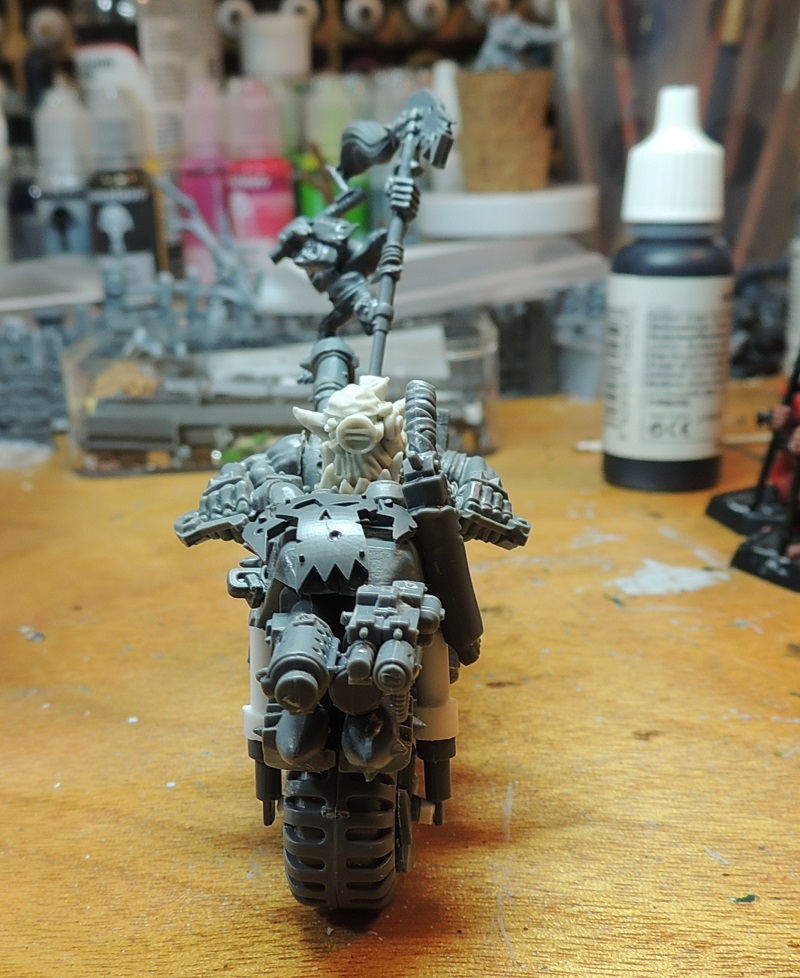
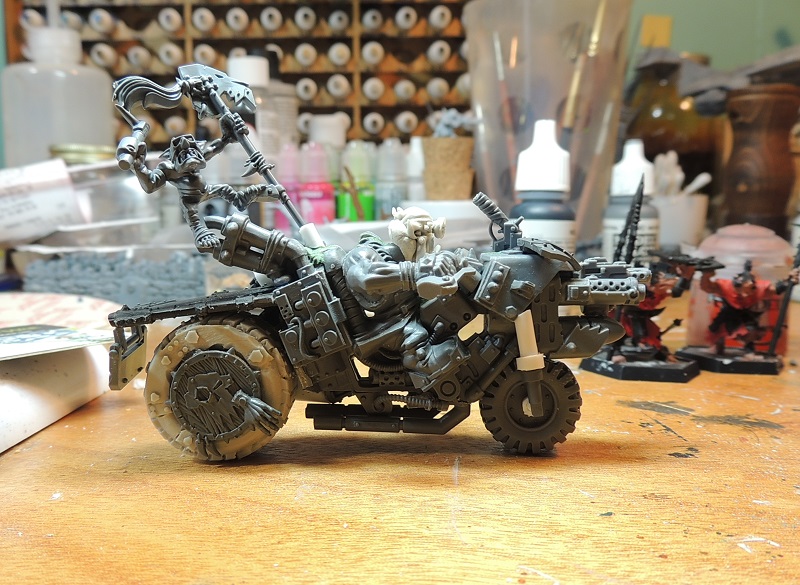

Need to let GS dry so I can sand it, fill more gaps prolly, remove moldlines I"ve missed etc etc. But it won't get any paint til after I finish my son's Terrorgheist.
|
|
|
|
|
|
2017/04/03 05:46:36
Subject: I Paint This... And That
|
|
Pious Palatine
|
That's an awesome Ork Biker!
EDC
|
|
|
|
|
2017/04/03 17:54:09
Subject: Re:I Paint This... And That
|
|
Utilizing Careful Highlighting
|
thanks! I'm really liking the look of the conversion. And if you guys haven't ever checked it out, you really really should take a look at Sperians WIP thread on MWG, he has the most awesome stuffs!
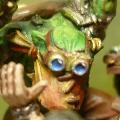
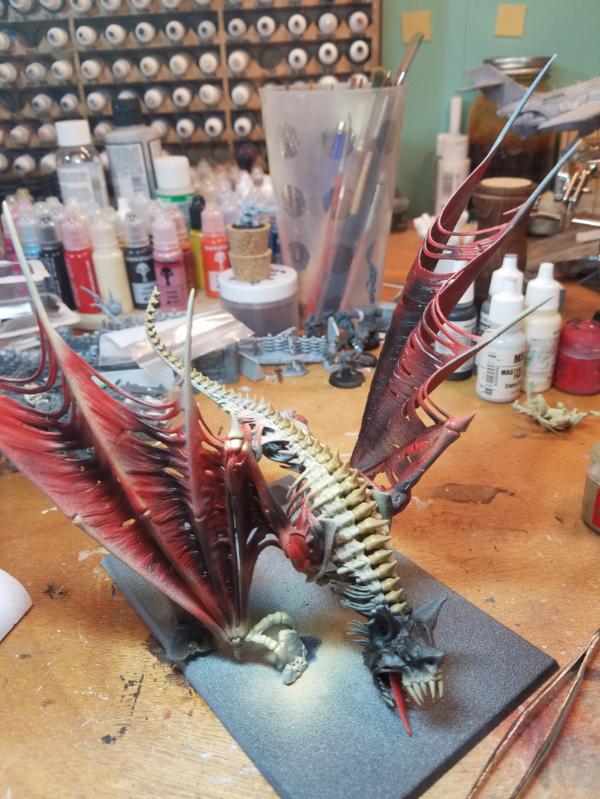
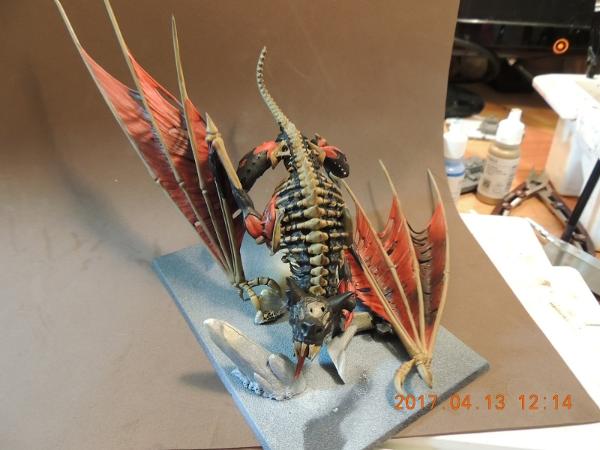
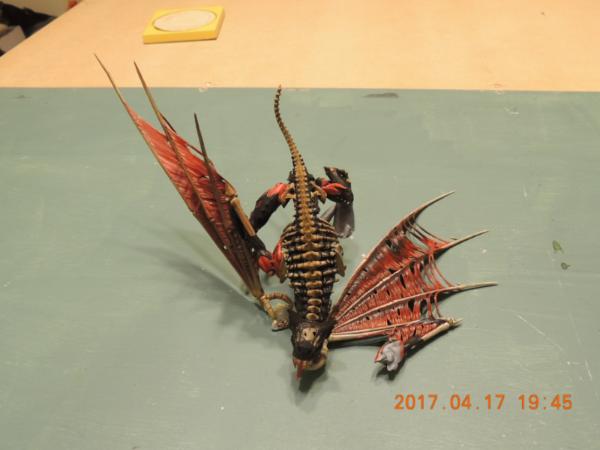
Also, just starting in on this guy for my son - he wants it to be red (wings) with black, necrotic flesh. I have no idea how to pull that off. I swear my son loves giving me challenges!

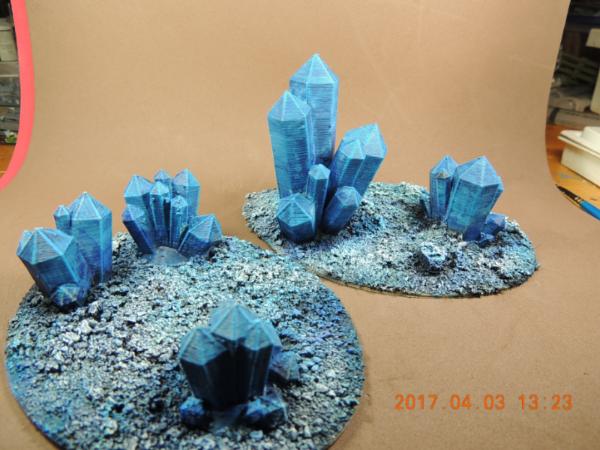
Forgot:
finished the scatter terrain for my son's Necron themed table (still on the drawing board)
|
|
This message was edited 1 time. Last update was at 2017/04/03 18:12:18
|
|
|
|
|
2017/04/03 21:10:21
Subject: I Paint This... And That
|
|
Gargantuan Great Squiggoth
|
All great stuff, the ork bike is brilliant.
As a suggestion for the flesh, maybe try working the opposite way around to normal but a pale grey to a mostly black "highlight", could add a little green in the grey end. Just an idea.
|
|
|
|
|
|
2017/04/05 17:04:53
Subject: Re:I Paint This... And That
|
|
Utilizing Careful Highlighting
|
Oooh that sounds interesting...
I dunno wtf I'm doing atm (evinced by messing with airbrush first pass, first time) \
Also re: bases for my Iron Hands - I'm thinking I may use window screen to make sections of "grating" and cover it by either plasticard strips or some sprue, or both, wth lots o rivets etc. Kinda to go with the starship flooring theme
|
|
|
|
|
|
2017/04/10 17:43:27
Subject: Adventures in Base Making
|
|
Utilizing Careful Highlighting
|
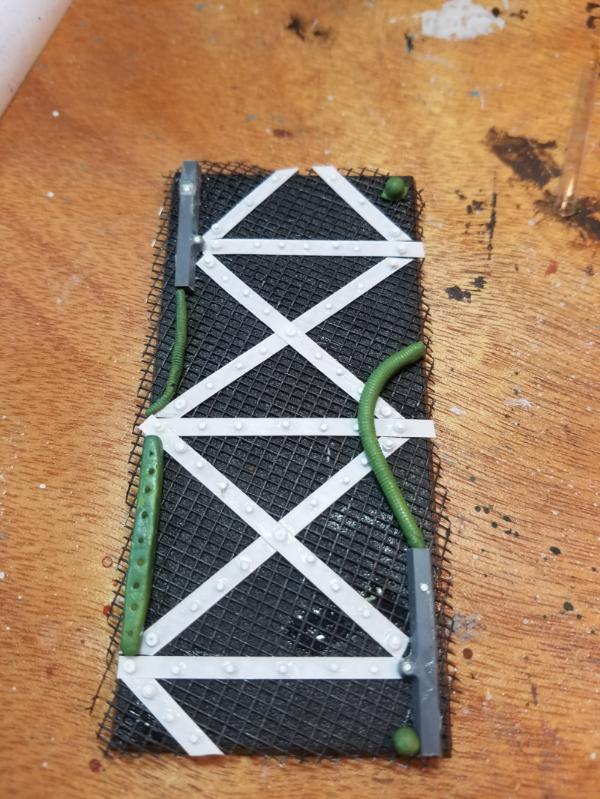
So here's the original base I made from a spare rectangular one (so I could get different sides/orientations and make different bases). I used window screening for the grid, some sprue and greensstuff. As well as quite a few bits of cut up styrene rod (for the rivets)

This was one of the first attempts I did to make molds, but the milliput didn't give me quite the detail I wanted
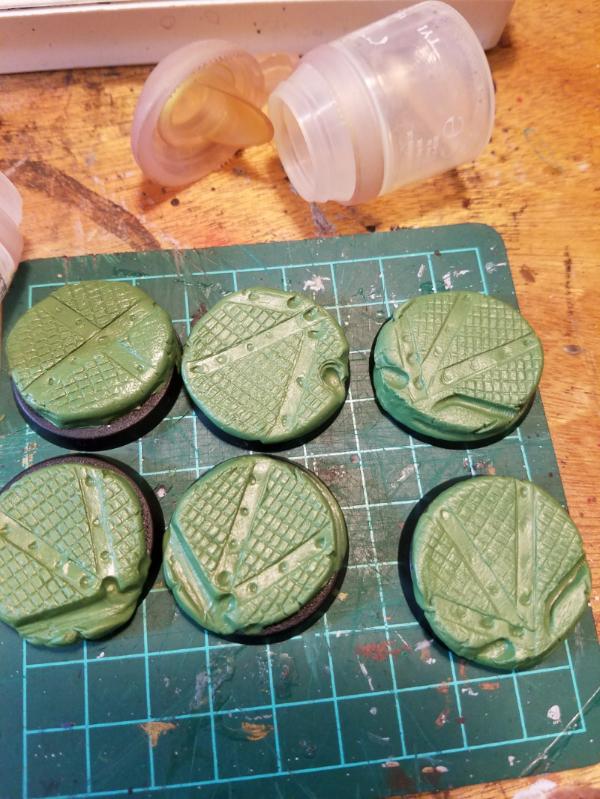
So, I tried some Greenstuff instead, which worked better but was quite a lot of it, so probably not really economical for a huge bunch.
I'm going to be getting more Milliput (since I ran out) to make the actual bases from, using the above like stamps and see how it works out.
I also tried doing some resin casting with a mold, but that's quite tricky. I found I was getting a whole lot of bubbles in the end result so I need to set up a better vibration table (instead of just banging on a board with sponges like I do with plaster)
|
|
|
|
|
|
2017/04/10 19:10:01
Subject: I Paint This... And That
|
|
Gargantuan Great Squiggoth
|
Excellent work those bases look really great.
On the casting you could try using talc as a flow agent/mould release, I use baby talc and get excellent results.
Also why not use plaster, its a base after all, does not need to be flexible and if you use dental plaster it will be plenty tough enough.
|
|
|
|
|
|
2017/04/10 21:41:46
Subject: I Paint This... And That
|
|
Mastering Non-Metallic Metal
|
If you are looking at making moulds like this often (or even not that often), have a look for Oyumaru (also known as instant mold, but cheaper). I have declared my love for that stuff on numerous occasions.
It's reusable silicone mould material. All you need is hot water. GS / milliput won't stick to it with a little water. It captures really fine details (like fingerprints kind of fine detail). And it's reusable. It can be cut with a knife (for smaller moulds or to modify moulds). It can be stuck together (after cutting or to make larger moulds).
For this kind of thing, it's perfect.
Nice work though.
Gems and dragon-thing are good too.
|
Mastodon: @DrH@dice.camp
The army- ~2295 points (built).
* -=]_,=-eague Spruemeister General. * A (sprue) Hut tutorial *
Dsteingass - Dr. H..You are a role model for Internet Morality! // inmygravenimage - Dr H is a model to us all
Theophony - Sprue for the spruemeister, plastic for his plastic throne! // Shasolenzabi - Toilets, more complex than folks take time to think about! |
|
|
|
|
2017/04/13 18:33:17
Subject: Re:I Paint This... And That
|
|
Utilizing Careful Highlighting
|
thanks Dr H & Cam - some really good points, I'm trying a lot of things. Curiousity atm is mainly why, though I have used plaster before (lots of hirst arts stuffs). I've been reading up on about how many good impressions each material can do. I'll tell you too I have a lot more respect for people who work in resin etc!
Anyway, my latest projects on that front are waiting more materials (I ran out lol) so I'll keep you all updated =D
I did do some shots of my other projects WIP (not very good lighting atm tho)
First is my deffkopta warbike conversion - almost done painting, just need to finish base and fix it to it.
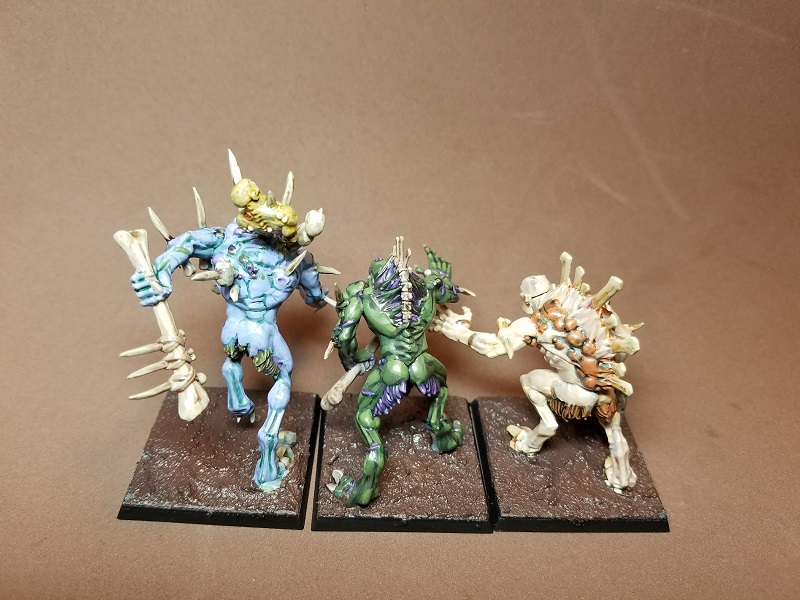
Then I chose some minis off my shelf o shame (they've been carrying my warlord's litter for forever, least I could do is paint them!):
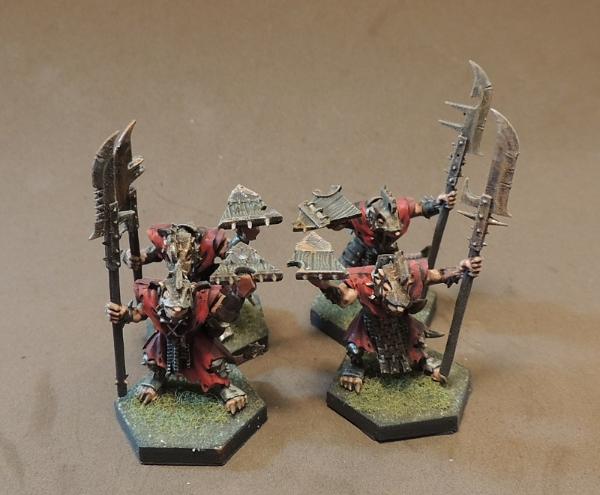
And not a lot of work but a WIP on my son's Terrorgheist, mostly did the bone:
|
|
|
|
|
|
2017/04/14 23:23:15
Subject: Re:I Paint This... And That
|
|
Utilizing Careful Highlighting
|
|
|
|
|
|
|
2017/04/15 07:30:14
Subject: I Paint This... And That
|
|
Gargantuan Great Squiggoth
|
Fantastic work, really vibrant and smooth. Great work all around, the skaven look really nice, but the best is obviously the Ork.
|
|
|
|
|
|
2017/04/18 18:50:00
Subject: Re:I Paint This... And That
|
|
Utilizing Careful Highlighting
|
^_^ Thanks Cam =D
Doing a little update of my many projects:
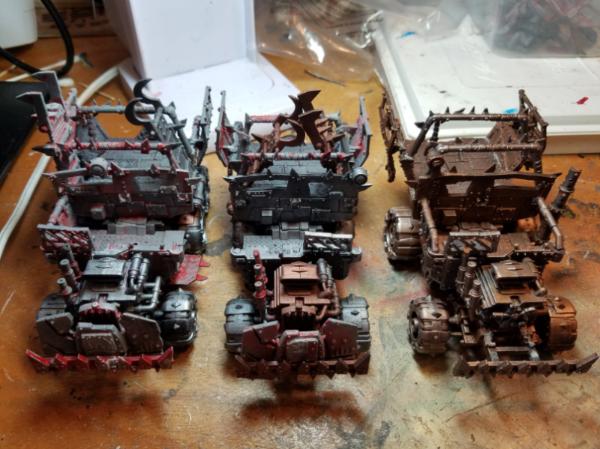
Some trukks I need to finish (purchased off Ebay so they're in process of refurbishing)
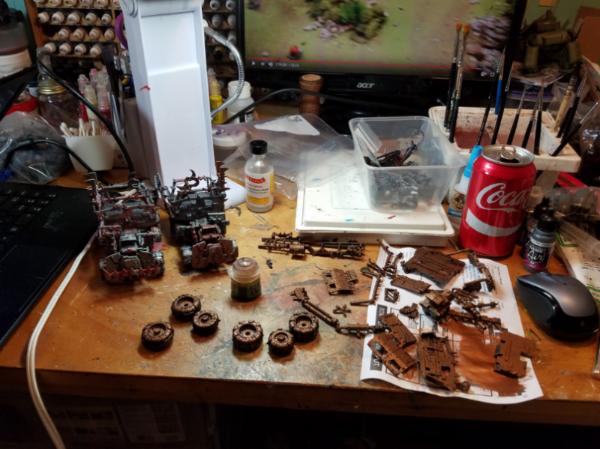
All assembled, minus a few bits that need fixing, and the right one is basecoated.
More WIP on my son's Terrorgheist, the wings are done. Working on all the bones and then just need to decide how to do the black and do some final touch ups on the face. After that I can probably finish the base and actually attach it to the base lol
|
|
|
|
|
|
2017/04/18 19:00:17
Subject: I Paint This... And That
|
|
Fixture of Dakka
|
The Terrorgheist is coming along really nicely.
|
|
|
|
|
|
2017/04/21 05:09:41
Subject: Re:I Paint This... And That
|
|
Utilizing Careful Highlighting
|
Thanks GiraffeX! I had to take a break though lol I'm on the bone atm, just finishing the spine, and then the skin and... almost done!
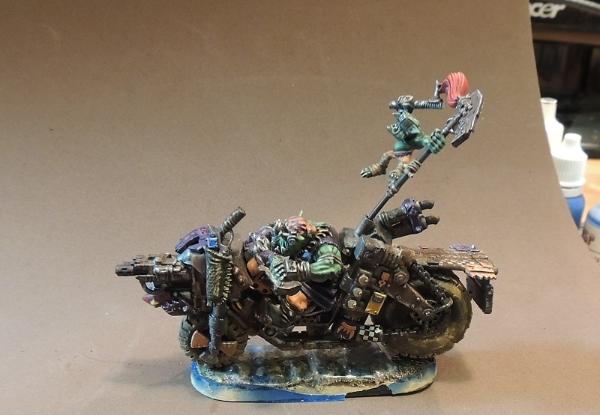
Meanwhile I finished painting my deffkopta warbike conversion (forgot to put the boss pole in the pics sigh):
|
|
|
|
|
|
2017/04/21 05:50:41
Subject: I Paint This... And That
|
|
Pious Palatine
|
Cool bike conversion. Progress on the Terrorgheist looks great too.
EDC
|
|
|
|
|
2017/04/21 13:08:39
Subject: I Paint This... And That
|
|
Mastering Non-Metallic Metal
|
Nice work, Guilden'. Like the water-work on the bike's base/splashes.
|
Mastodon: @DrH@dice.camp
The army- ~2295 points (built).
* -=]_,=-eague Spruemeister General. * A (sprue) Hut tutorial *
Dsteingass - Dr. H..You are a role model for Internet Morality! // inmygravenimage - Dr H is a model to us all
Theophony - Sprue for the spruemeister, plastic for his plastic throne! // Shasolenzabi - Toilets, more complex than folks take time to think about! |
|
|
|
|
2017/04/21 13:25:23
Subject: Re:I Paint This... And That
|
|

Warning From Magnus? Not Listening!
|
The only thing better would be pink rims on the back tire. Well done!
|
|
|
|
|
|
|
|