| Author |
Message |
 |
|
|
|
|
Advert
|
Forum adverts like this one are shown to any user who is not logged in. Join us by filling out a tiny 3 field form and you will get your own, free, dakka user account which gives a good range of benefits to you:
- No adverts like this in the forums anymore.
- Times and dates in your local timezone.
- Full tracking of what you have read so you can skip to your first unread post, easily see what has changed since you last logged in, and easily see what is new at a glance.
- Email notifications for threads you want to watch closely.
- Being a part of the oldest wargaming community on the net.
If you are already a member then feel free to login now. |
|
 |
2016/01/30 09:38:55
Subject: Custom multi-level city terrain (1/29: walkway railings!)
|
|

Omnious Orc Shaman
A long time ago in a galaxy far, far, away...
|
Glorious work, simply glorious. Next update please...
|
|
|
|
 |
|
2016/01/31 00:10:37
Subject: Custom multi-level city terrain (1/29: walkway railings!)
|
|
Wicked Warp Spider
|
Great looking terrain! Can I ask what you made the floor of those walkways from? The black mesh stuff.
|
 Eldar Corsairs: 4000 pts Eldar Corsairs: 4000 pts
 Imperial Guard: 4000 pts Imperial Guard: 4000 pts
 Corregidor 700 pts Corregidor 700 pts
 Acontecimento 400 pts Acontecimento 400 pts |
|
|
|
|
2016/01/31 16:50:51
Subject: Re:Custom multi-level city terrain (1/29: walkway railings!)
|
|

Dakka Veteran
|
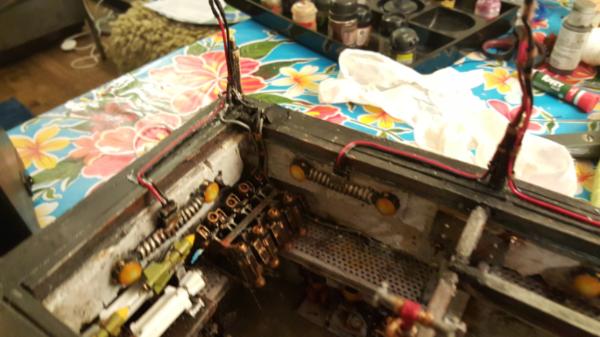
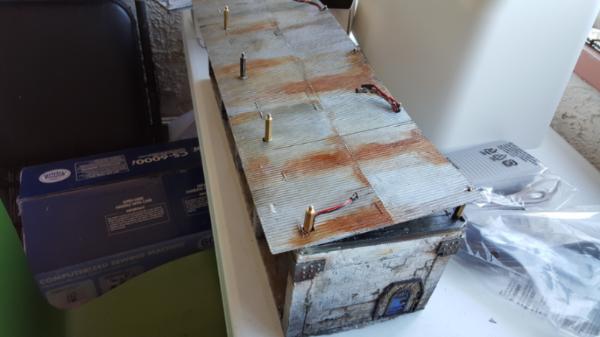
Oof, slow day yesterday. Not as much progress as I would have liked but it was all about wiring.
This was getting to the halfway point, getting the wires neater and such
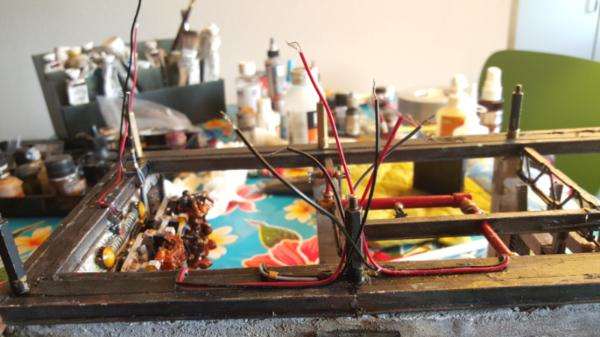
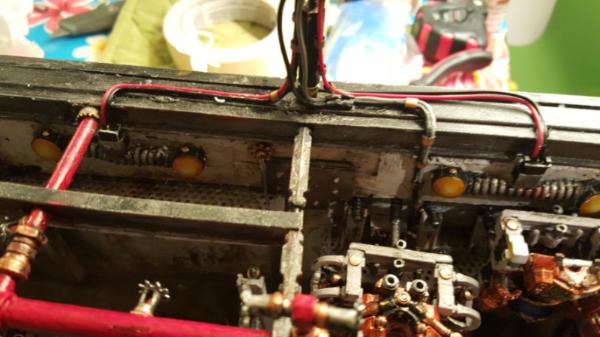
And then getting them clean, glued, and headers attached to the ends was th eother half.
|
|
|
|
|
|
2016/02/02 21:32:32
Subject: Re:Custom multi-level city terrain (2/1: roof painted up
|
|
Dakka Veteran
|
Lotta painting work focusing on the roof:
First up we have the underlying roof:
I may go back and localize some of the streaks a bit more, so that there arnt as many big ones, btu for now it works pretty well and i have to make ti to LVO lol.
Next up we have the scaffolding. Now first I started with the same grey I've been using for the internals. Unfortunately i apparently hit a patch of white or something In my custom mix so it got.. a lot whiter than I wanted.
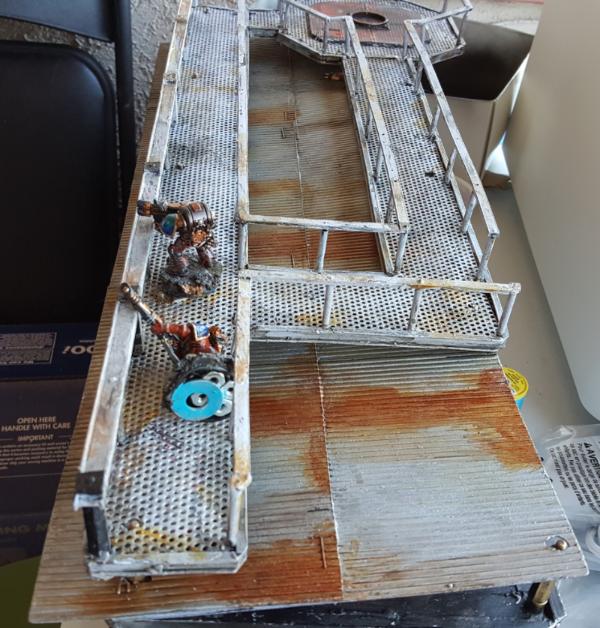
After some adjustments I darkened it down and reddened it up a bit and.. its beter? its really hard to tell from these pictures alas but oh well
.
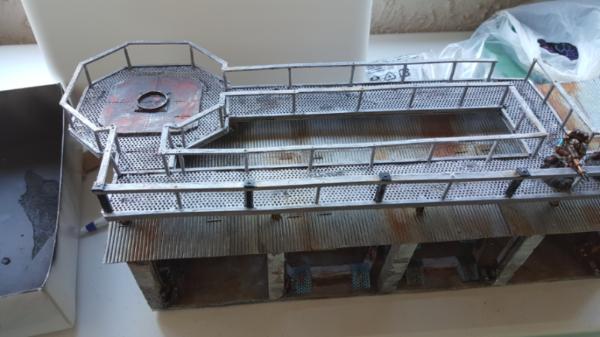
It definitely stll needs a little something something. It's now just kinda boring, which isnt bad. the lightness will contrast well with my minis and so forth, but it just needs a touch of color. I think the answer will be some extra hero detailing (spotlights and so forth on the rails, with their associated cabling), but we'll see.
|
|
|
|
|
|
2016/02/02 23:13:53
Subject: Re:Custom multi-level city terrain (2/1: roof painted up
|
|
Posts with Authority
Boston-area [Watertown] Massachusetts
|
Safety posters. 
|
Falling down is the same as being hit by a planet — "I paint to the 20 foot rule, it saves a lot of time." -- Me
ddogwood wrote:People who feel the need to cheat at Warhammer deserve pity, not anger. I mean, how pathetic does your life have to be to make you feel like you need to cheat at your toy army soldiers game?
 |
|
|
|
|
2016/02/03 00:08:34
Subject: Re:Custom multi-level city terrain (2/1: roof painted up
|
|
Dakka Veteran
|
what do you mean? I have been tinkering with the idea of printing out mini posters before but where would that go on the fence? might look a bit wierd draped over the railings.
|
|
|
|
|
|
2016/02/03 12:18:58
Subject: Custom multi-level city terrain (2/1: roof painted up
|
|
Omnious Orc Shaman
A long time ago in a galaxy far, far, away...
|
Hazard stripes, bright yellow railings (weathered of course...). For signage, you could go with 'this way' type arrows painted on the walkways or metal signs hanging off the railings...
|
|
|
|
|
|
2016/02/03 13:39:07
Subject: Re:Custom multi-level city terrain (2/1: roof painted up
|
|
Posts with Authority
Boston-area [Watertown] Massachusetts
|
On the back wall outside, and some small splashes of color on the pillars to the bays. Maybe safety striping.
|
Falling down is the same as being hit by a planet — "I paint to the 20 foot rule, it saves a lot of time." -- Me
ddogwood wrote:People who feel the need to cheat at Warhammer deserve pity, not anger. I mean, how pathetic does your life have to be to make you feel like you need to cheat at your toy army soldiers game?
|
|
|
|
|
2016/02/03 20:40:07
Subject: Custom multi-level city terrain (2/1: roof painted up
|
|
Wicked Warp Spider
|
I would really like to know where you get the materials for that scaffolding/how you make it!
|
Eldar Corsairs: 4000 pts
Imperial Guard: 4000 pts
Corregidor 700 pts
Acontecimento 400 pts |
|
|
|
|
2016/02/04 05:09:05
Subject: Re:Custom multi-level city terrain (2/1: roof painted up
|
|
Dakka Veteran
|
I'll give a better breakdown in a bit but in brief:
The posts are made from brass tubing that i cut (painful process, but not too bad)
The railing is from plastic.
the mesh is from speaker mesh that I found at a scrapyard.
Pictures to follow in a bit! Right now I'm prepping for LVO so some of my tutorial stuff has gone by the wayside. I promise that next week you willg et a more thorough explanation of it all.
|
|
|
|
|
|
2016/02/04 05:24:19
Subject: Custom multi-level city terrain (2/1: roof painted up
|
|
Ragin' Ork Dreadnought
|
This project is coming along brilliantly. Really great work.
|
|
|
|
|
|
2016/02/06 18:18:12
Subject: Custom multi-level city terrain (2/1: roof painted up
|
|
Wicked Warp Spider
|
Speaker mesh - bloody interesting! Good scavenging, that.
|
Eldar Corsairs: 4000 pts
Imperial Guard: 4000 pts
Corregidor 700 pts
Acontecimento 400 pts |
|
|
|
|
2016/02/06 18:48:00
Subject: Custom multi-level city terrain (2/1: roof painted up
|
|
Longtime Dakkanaut
|
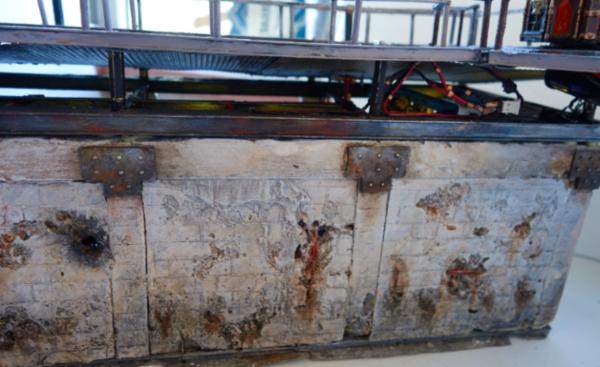
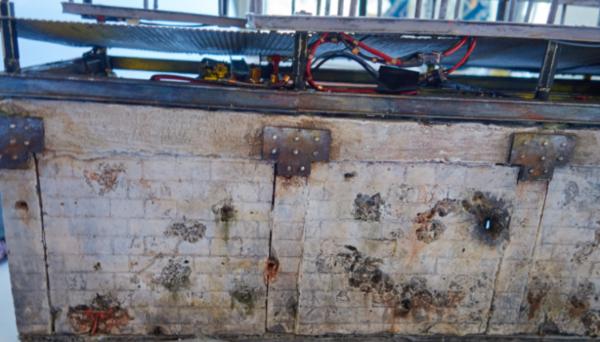
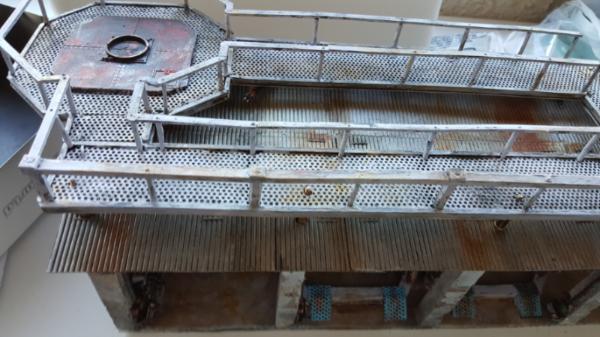
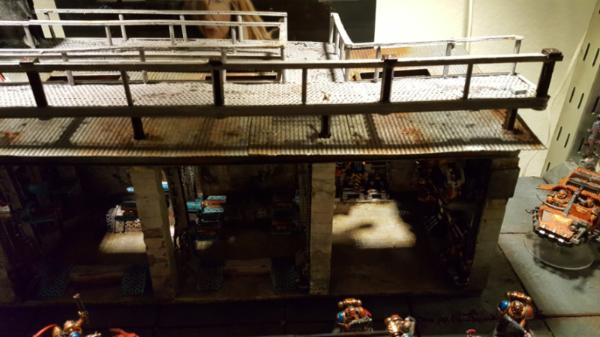
That brickwork is stunning, complemented with the lighting it looks uncannily real. Also liking the the weathering on the corrugated iron roofing. Overall i love the density of detail you've created so much to enjoy, like a really well made level in a computer game. I shall be keeping my eye on this 
|
Mary Sue wrote: Perkustin is even more awesome than me!
|
|
|
|
|
2016/02/06 19:08:49
Subject: Custom multi-level city terrain (2/1: roof painted up
|
|
Regular Dakkanaut
|
The quality of workmanship and detail here is stunning, top stuff all nicely finished
|
|
This message was edited 1 time. Last update was at 2016/02/06 19:09:17
|
|
|
|
|
2016/02/15 16:56:45
Subject: Re:Custom multi-level city terrain (2/15: post LVO thoughts!
|
|
Dakka Veteran
|
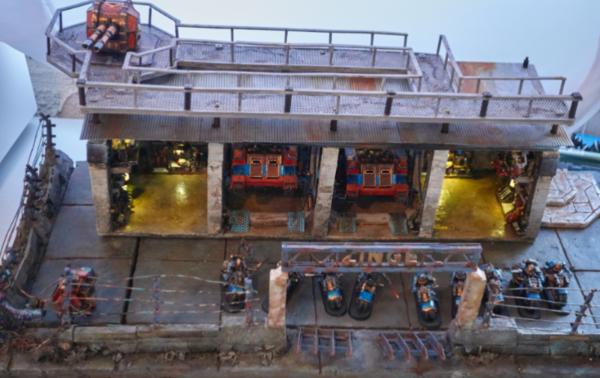
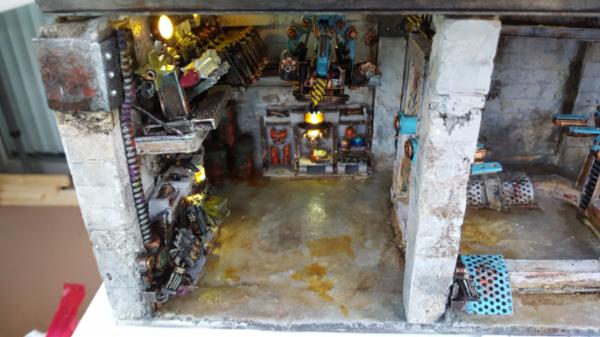
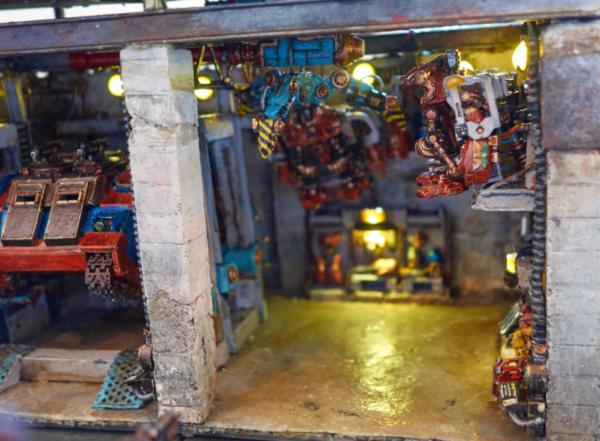
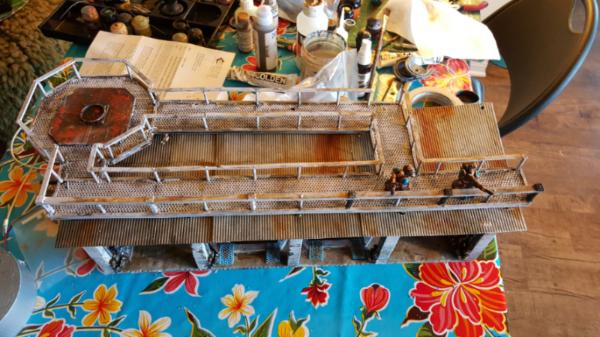
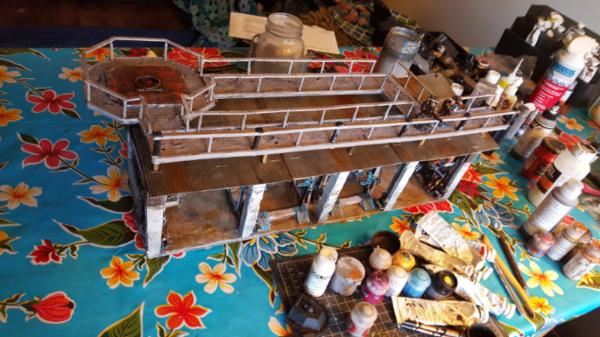
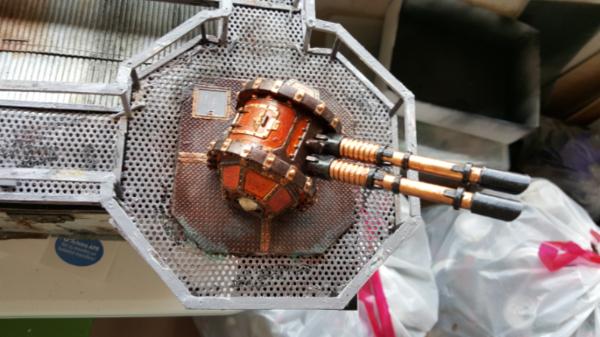
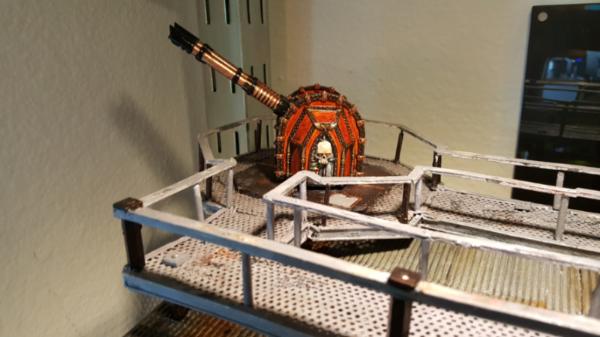
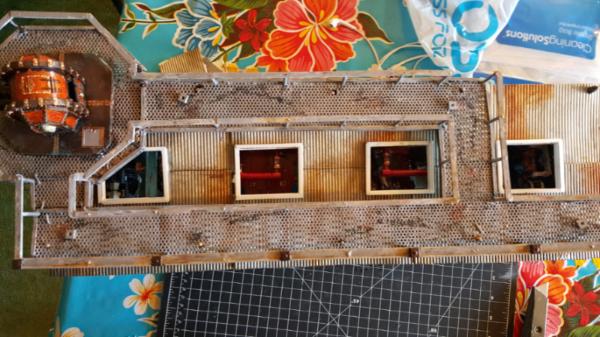
Aloha! so its been a bit but i needed a break.
ANyhoo LVO came and went and it was fun! everything was on display and people seemed to enjoy it. Also the lights lasted a fair bit too and is still kicking, so it looks like I can get at least 3.5 or so hours out of a set of batteries, more than I was hoping.
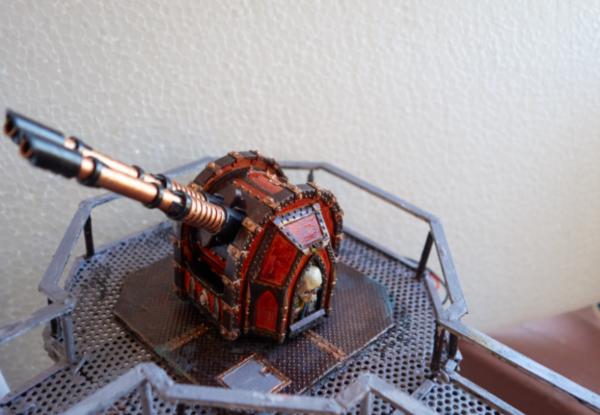
I plan to have pretty pictures of everything all together in a bit, but for now the last major piece you guys havent seen eyt, the gun!
First I painted it more like the rest of my terrain, marble/cream with tin bitz
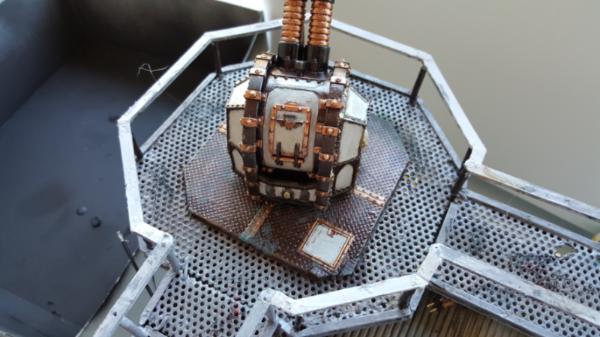
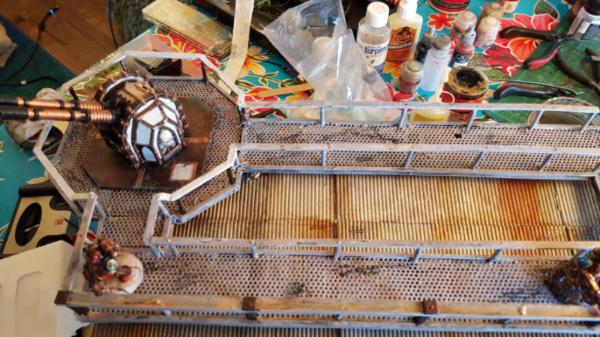
It was very pretty but as someone pointed out it didnt exactly match the rest of the army, and that particular scheme was no where else n the display tile. So while it might match the main board, there was no way to know that. So i made it orange nad. its still pretty! Id love to put in a dash of blue somewhere but i'll worry aboiut that later.
|
|
|
|
|
|
2016/02/21 00:49:27
Subject: Re:Custom multi-level city terrain (2/20: walkway tutorial
|
|
Dakka Veteran
|
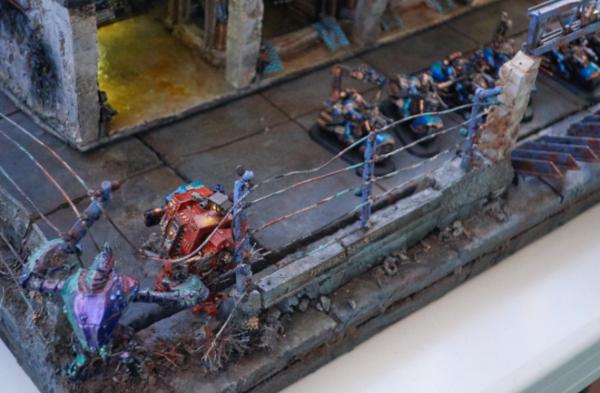
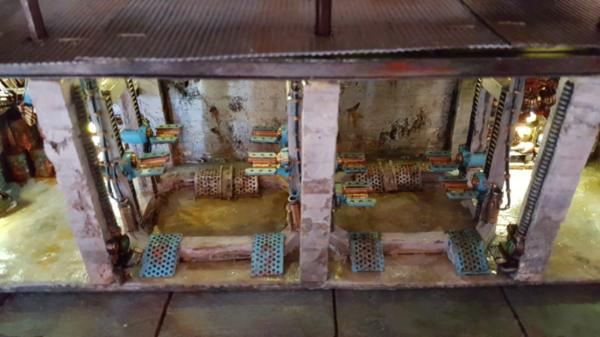
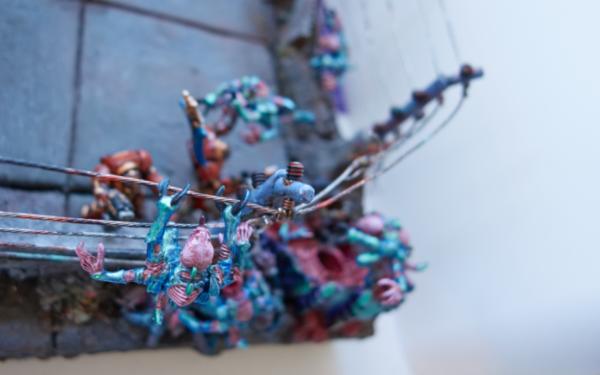
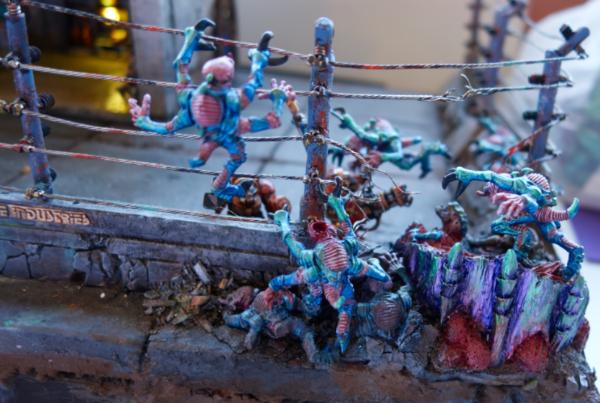
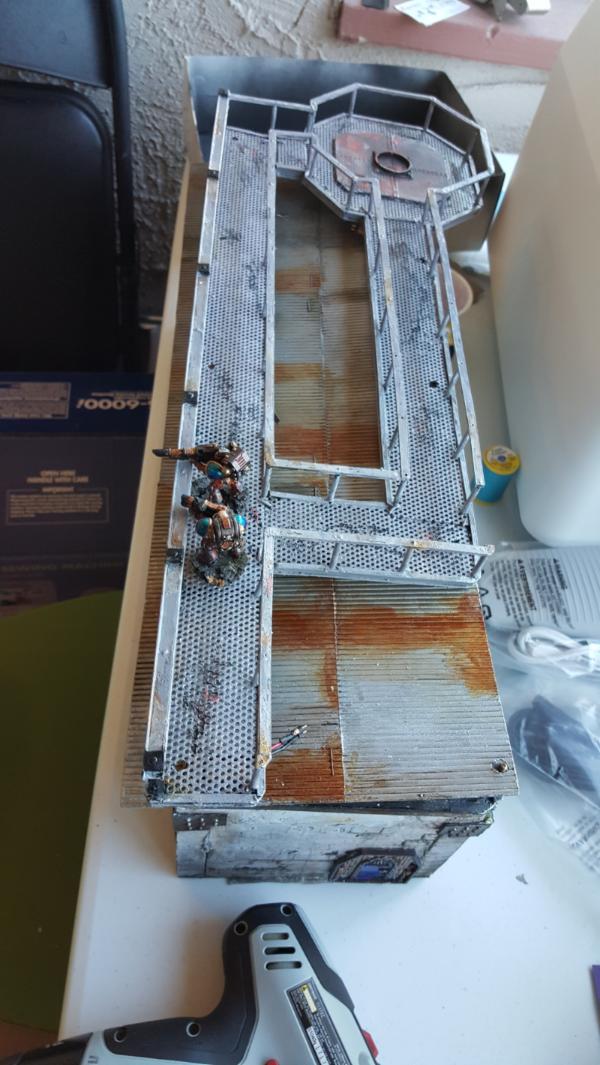
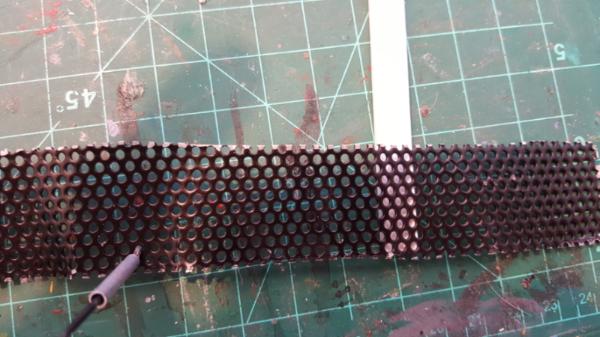
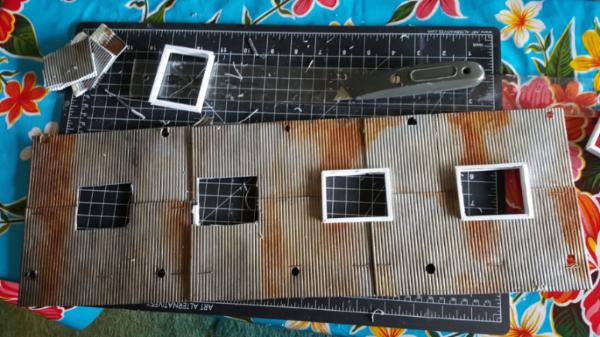
As promised here is a more in-depth walkway tutorial.
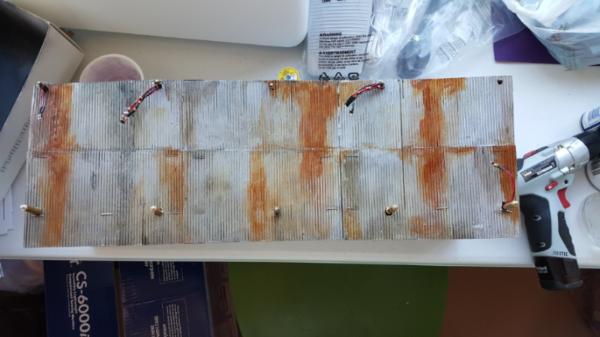
We start with the speaker grill. I found mine at an electronic scrapyard, you're going to want the grill for bigger speakers because the spacing then more matches what you'd expect. It's pretty cheap (like 5 bucks per grille) and each grill is something like 20x30 inches. MOre than enough for what you'll need for walkways.
Cutting it down takes metal snips, no way around that. for long cuts it's actually easier to snip as far as you can on each end, and then bend it in the middle back and forth to cause it to stress-fail. As long as you have those initial cuts it'll fail nice and straight.
Ususally you end up with something like this:
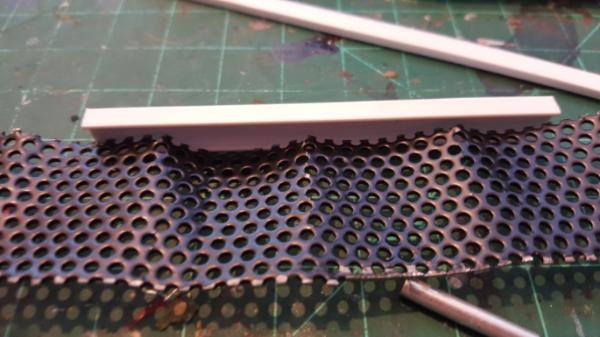
A bit wobbly but walkway width. Best fix for that is find a nice isolated spot on the sidewalk and hammer the crap out of it. It wont end up perfectly flat but it'll be close, and then you use ibeams as pictured to give it a nice finishing edge and also hide any remaining irregularities in your edges.
Downside is that gluing the ibeam to to the edge of the mesh is.. well tough.
So what you do is take more ibeam plastic (or really any straight bit you want that has some thicknetss) and add bottom support struts under your walkway:
that way you have attach points to glue your ibeam too.
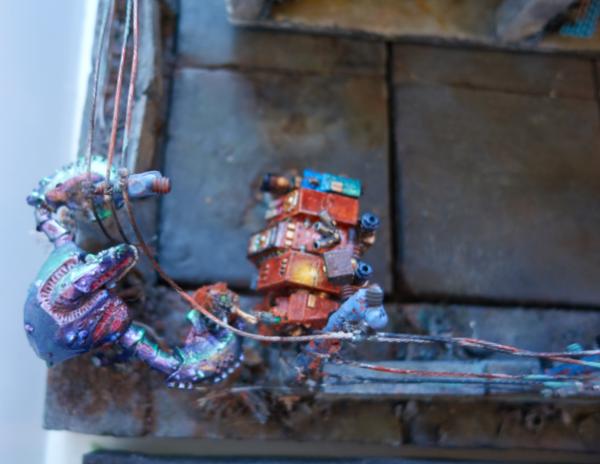
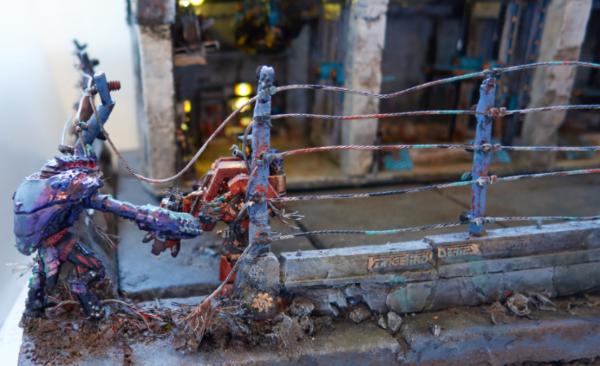
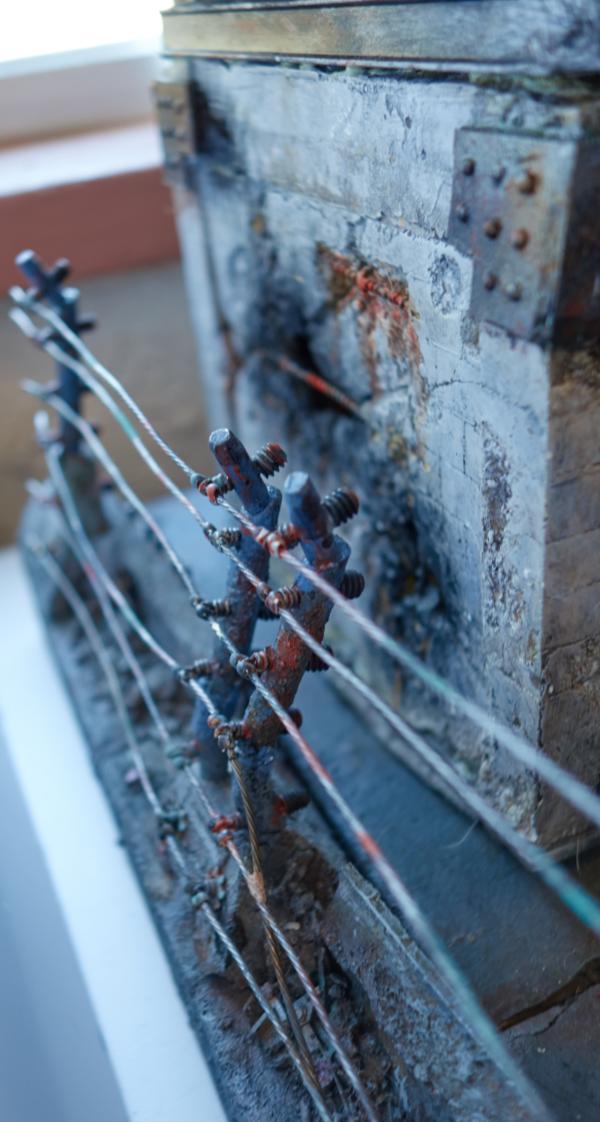
Next up is the posts for the fence .
This is a bit time consuming but wellll worth it. The problem is twofold:
A: not a lot of surface area to attach a post too
B: superglue doesnt really bond particularly strongly to the metal.
So you need to use wire, sturdy wire. I use steel wire for everything and it really came in handy here.
The first way I tried was just make an L of wire, stick in a hole in the walkway and glue the length of the horizontal part to the mesh. Of course if you torque the wire at all perpendicular to that L (where it has no real tensile strength) it immediatly breaks and you get a loosey goosey wire which falls out.
Plan B is what i ended up with:
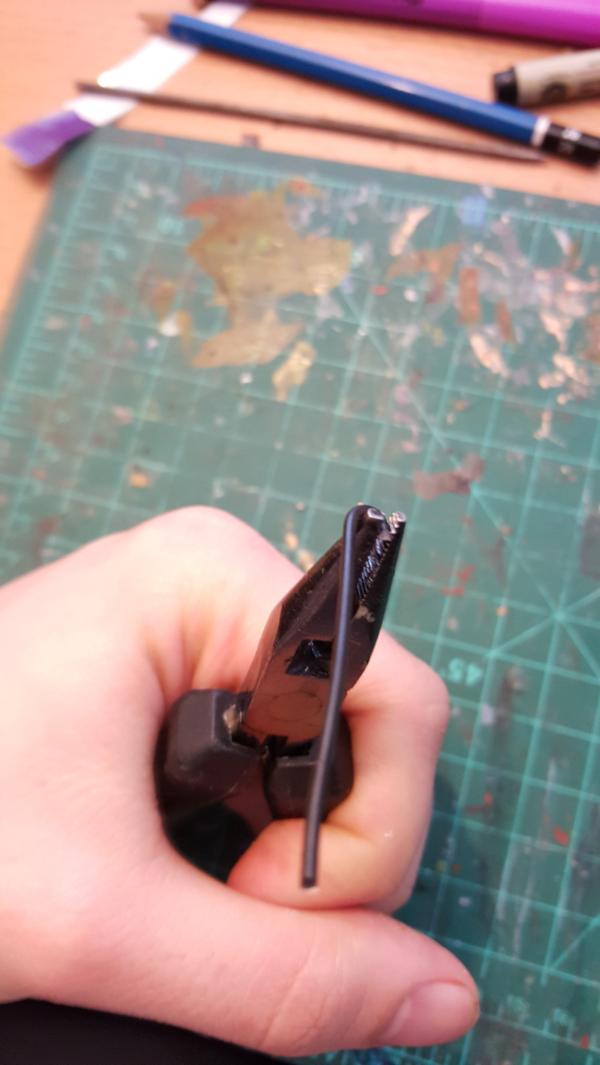
you make a small loop in the wire and loop it into 2 holes and use that to make tension/keep the post stiff.
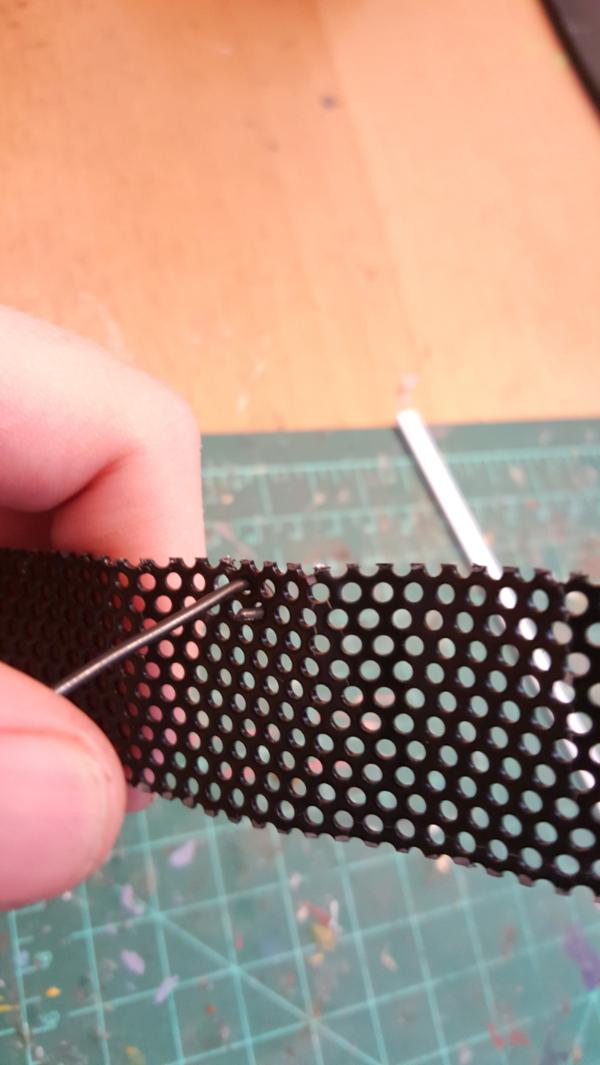
The downside is you get a littl ebump on the underside of your walkway but since it'll be regular it works out just fine.
Then just thread your posts (ie: tubes) on top and you're good to go. In my case i went with metal brass tubes that I cut with a little tube cutter like so:
http://www.amazon.com/K-Engineering-296-Tubing-Cutter/dp/B000BQPYYK
which cuts very cleanly. It took a bit but the fence posts are suppppper durable.
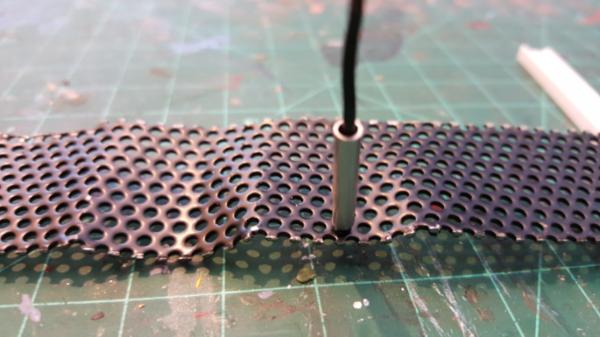
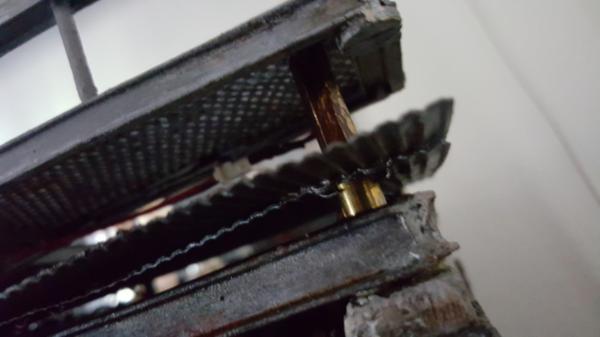
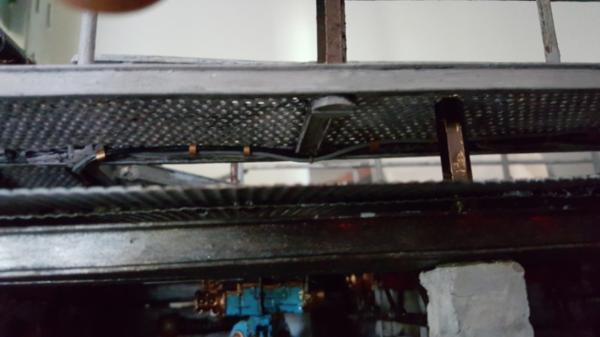
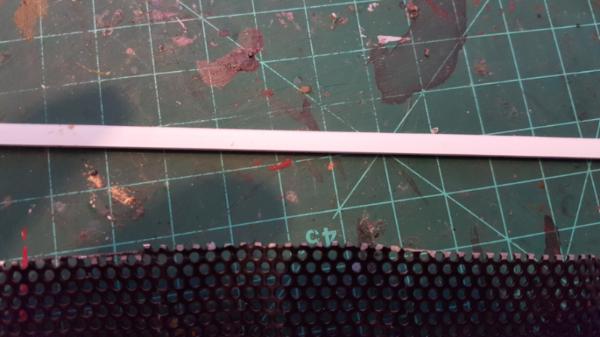
For the top you just get straight plastic in the size you want, and cut it along the lengths. The best part is that since you already have wires at each post you can just drill and pin it into place!
|
|
|
|
|
|
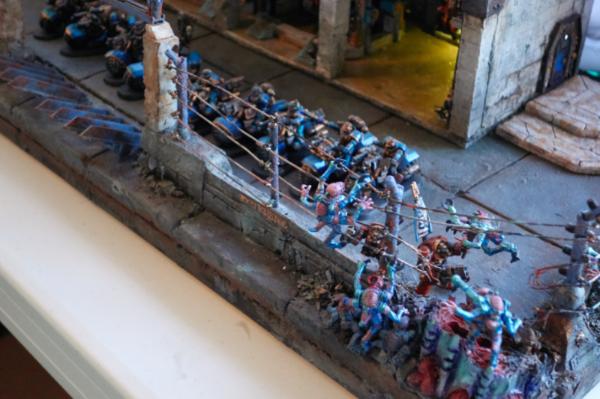
2016/02/25 00:38:34
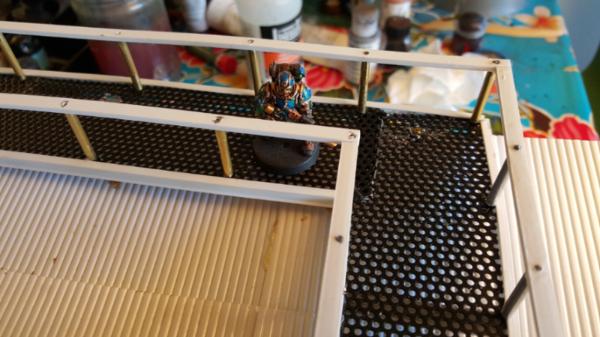
Subject: Re:Custom multi-level city terrain (2/24: decent pictures of it all together!
|
|
Dakka Veteran
|
|
|
|
|
|
|
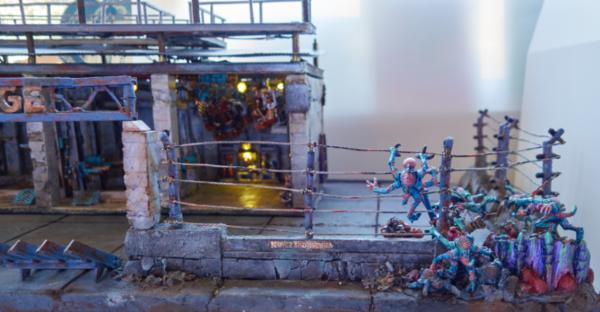
2016/04/15 22:07:16
Subject: Re:Custom multi-level city terrain (4/15: skylights)
|
|
Dakka Veteran
|
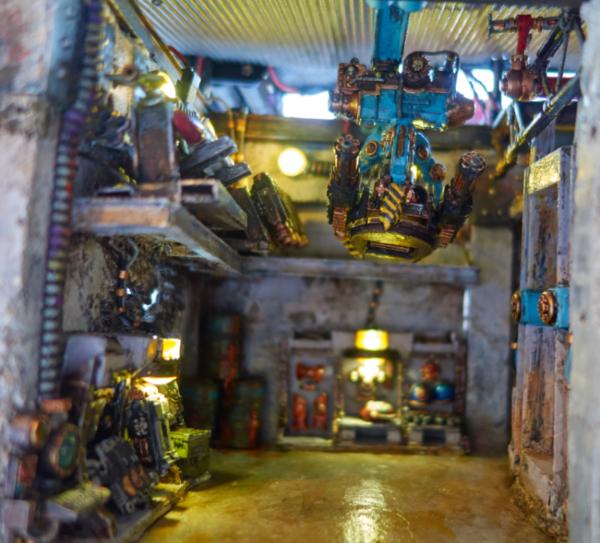
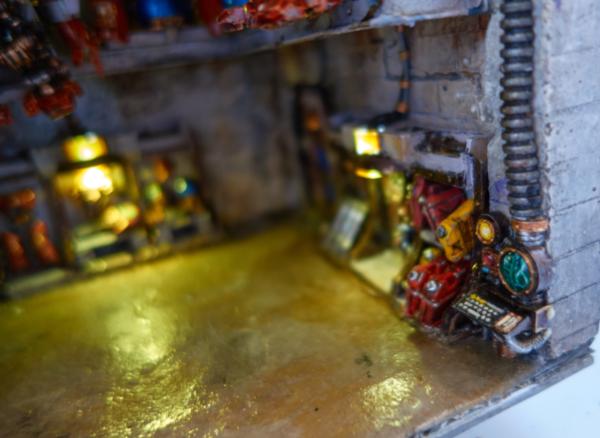
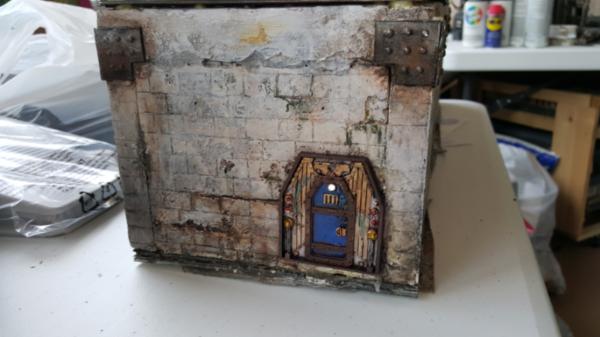
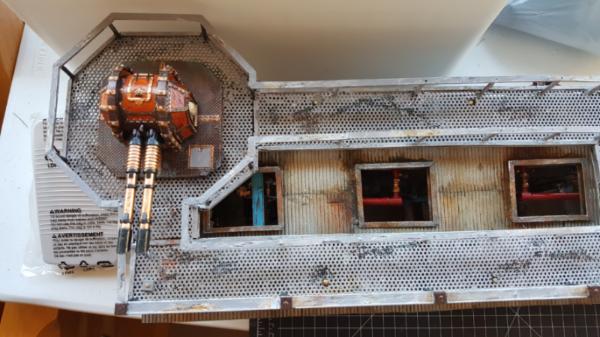
Heya! So Ihavent had a whole lot of time to work on new shiny things but I've managed to sneak in a couple of blocks to slowly work on a few things.
First up was something thats been bugging me, the interior of the garage was hard to see. Especially seeing it at LVO/any sort of setting with strong overhead lighting the LEDs werent quite cutting it.
So i figured i'd add some skylights. Its simple, gives more windows to look in, and makes it clearer why you cant just walk on the roof. Pretty straightforward process too:
First make the frame out of an ibeam:
cutting the holes actually took a bit longer than i thought. Since the frame is an ibeam it's not as simple as just the interior or the exterior edge of the square, you sorta have to try and build in the middle of both. So there was a lot of trial and error to get the squares the right size.
Unfortunately doing so (i started with the interior perimeter and then would cut out as needed to get it to fit) meant that my holes didnt quite center up with the trailing. But.. oh well.
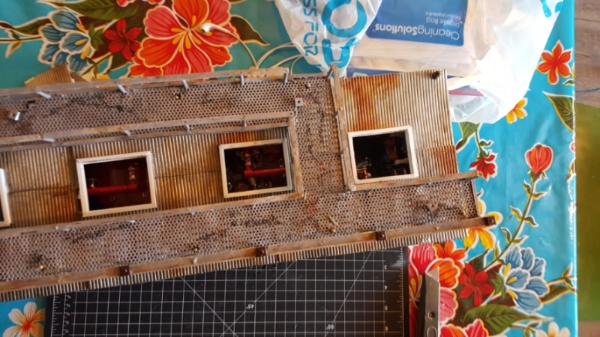
and yeah! almost there already. Ill have painted pics tomm but it definitely helps.
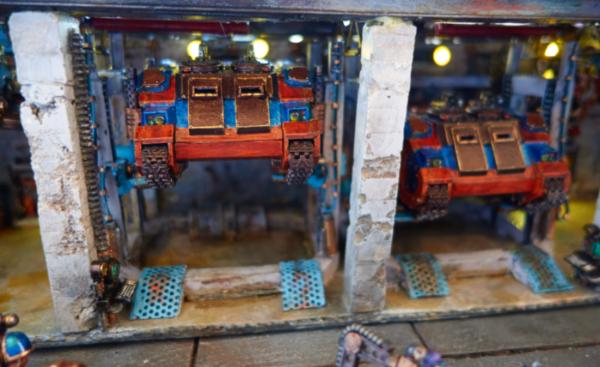
Secondarily its time to think about.. expanding. So seeing all the adepticon tiles i was jealous of the fact that they are all huge! 2x2 tiles at least! I want that, my tile is definitely a touch cramped. But i cant really expand easily. Sure i have another shelf ready to go but no way of holding both at the same time. So its time to make a cart! this part is tricky because.. well i may have to weld it (not something i know how to do), but it will be worth it. Design wise at least it's fairly straightforward...
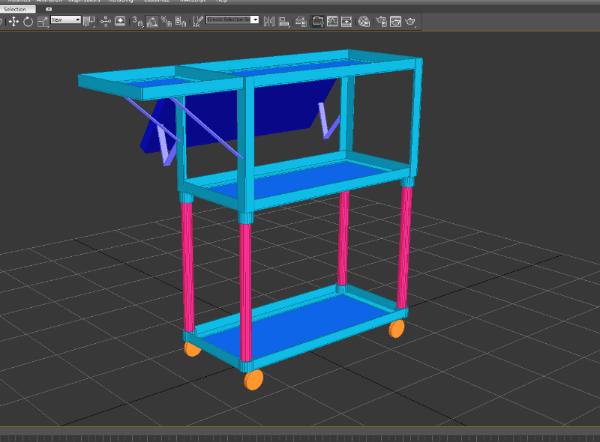
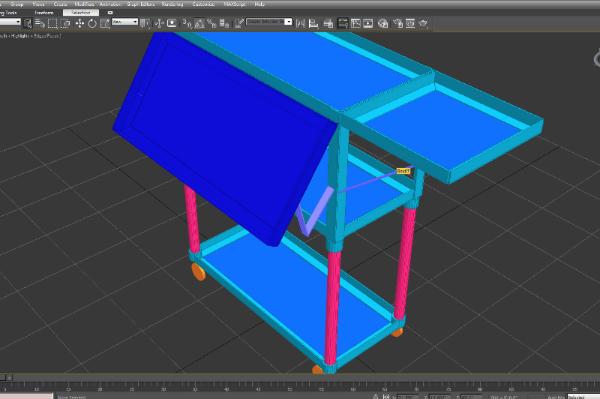
the idea is that the top two shelves are one piece, so they could hold both tiles in my car. ANd then the poles/bottom pop off so this cart is transportable. Should be pretty doable again aside from the potential requirement of welding (i want this to be very very sturdy. I expect almost 100 points of jsut terrain/army, let alone people leaning on it on accident).
|
|
|
|
|
|
2016/04/15 22:19:55
Subject: Custom multi-level city terrain (4/15: skylights)
|
|
Ancient Venerable Dreadnought
|
Such a cool project. The attention to the small details is awesome.
|
|
|
|
|
|
2016/04/18 03:45:17
Subject: Re:Custom multi-level city terrain (4/15: skylights)
|
|
Dakka Veteran
|
Thanks!
With skylights!
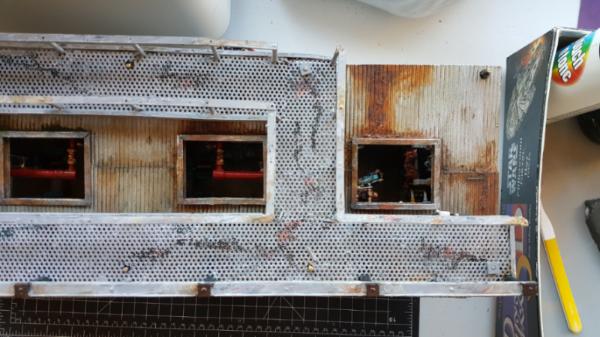
Very dramatic:
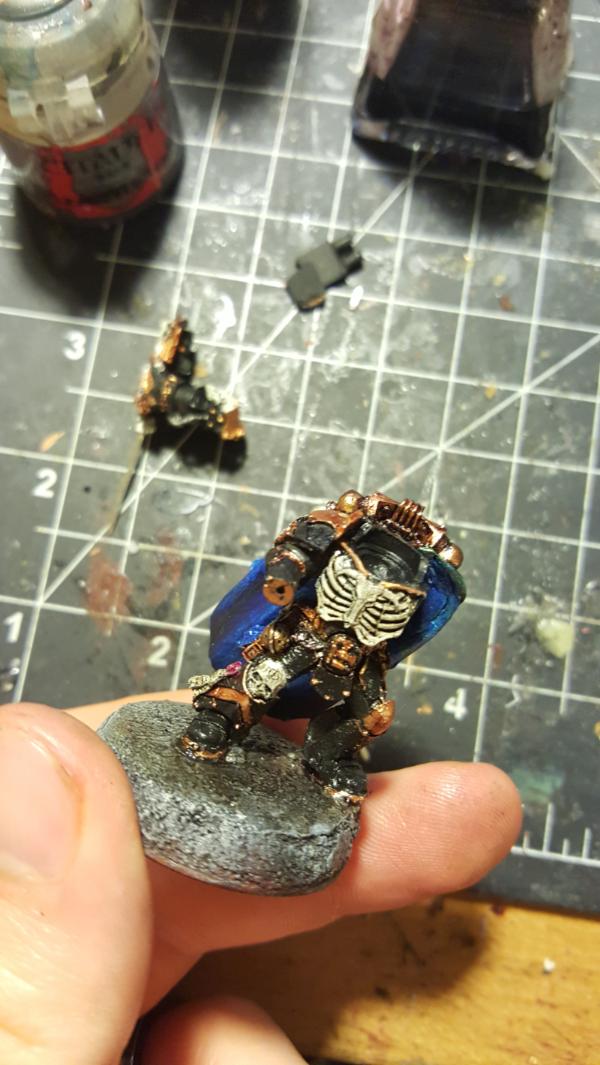
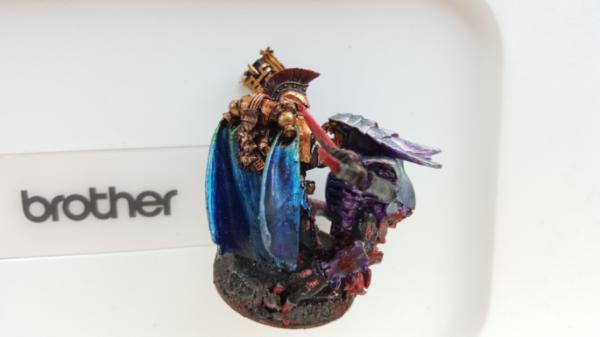
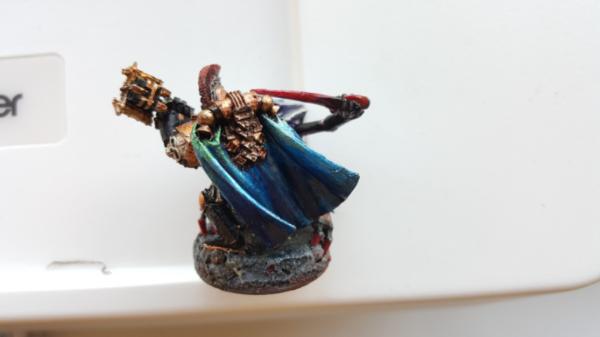
Now for something different! So as mentioned i currently run a BC, and as part of that I needed a chaplain. I didnt have one already so I figured i'd use this guy:
http://warhammer40k.wikia.com/wiki/Ivanus_Enkomi
It's a pretty model and pretty pose. But, of course, I want him fighting a tyranid, because that sthe theme of my army and it looks cool. Unfortunately because I'm a dumb dumb I didnt really take many picture so fthis process so I'll just have to explain it post and show some of the scrapes.
First, WIP of the figure:
|
|
|
|
|
|
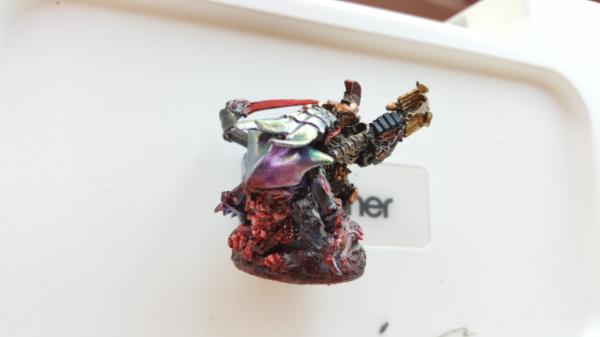
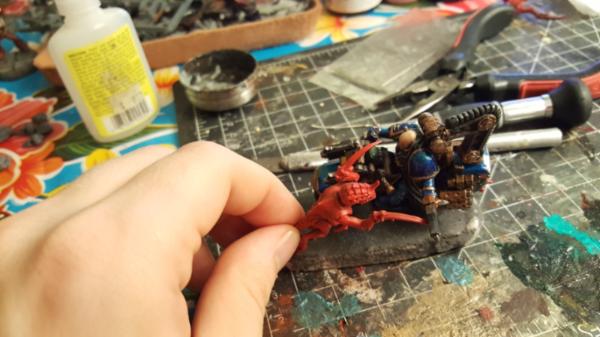
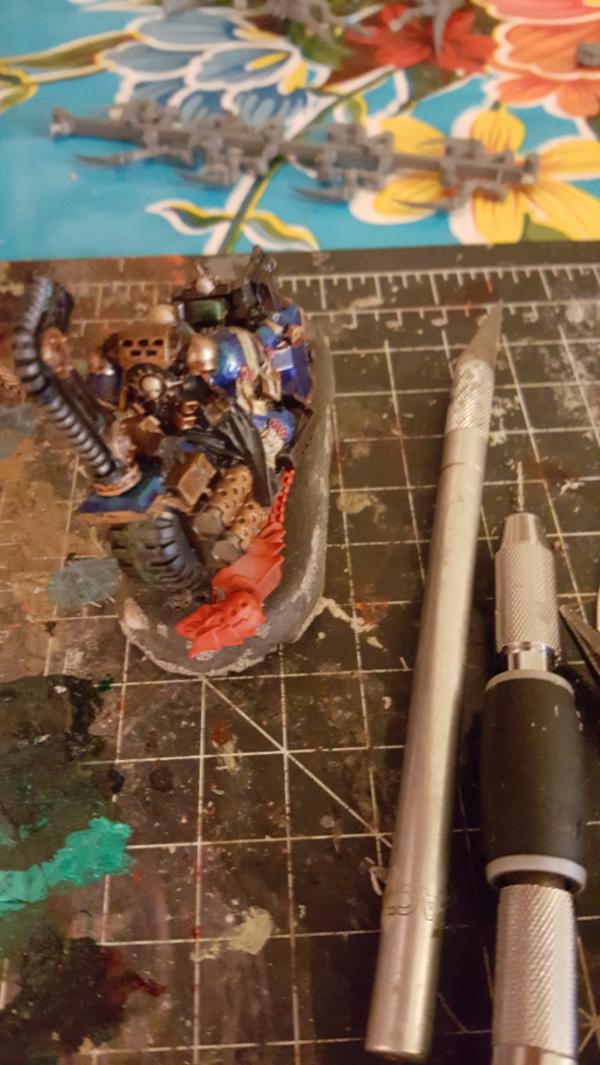
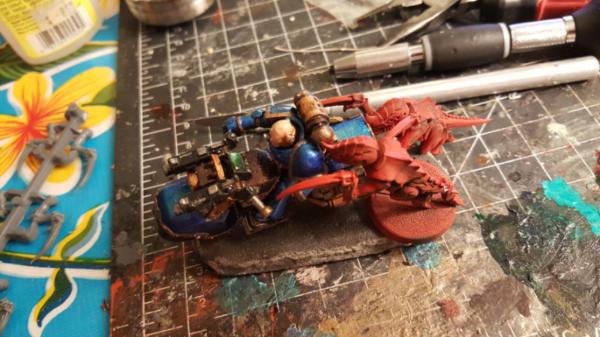
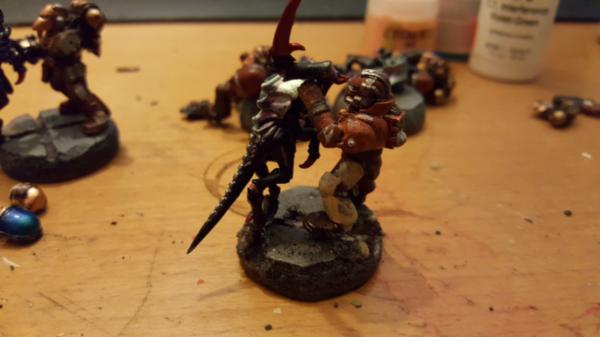
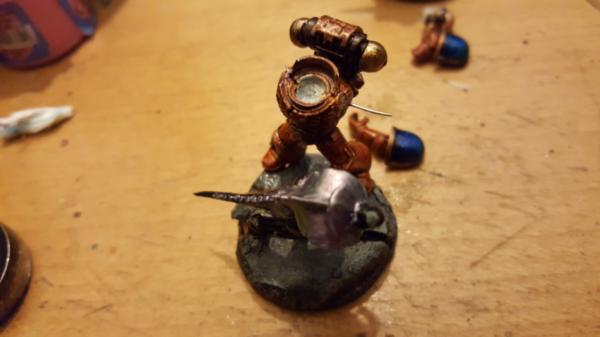
2016/04/23 21:04:16
Subject: Re:Custom multi-level city terrain (4/23: ivanus enkomi vs nid warrior)
|
|
Dakka Veteran
|
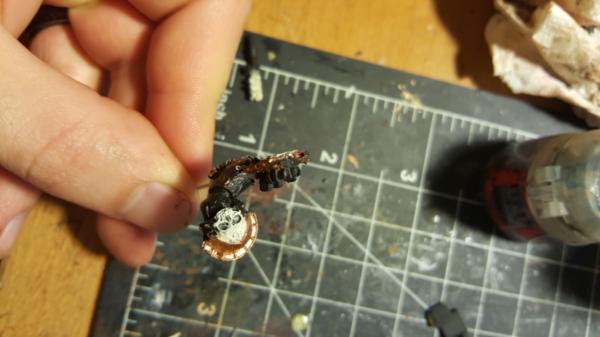
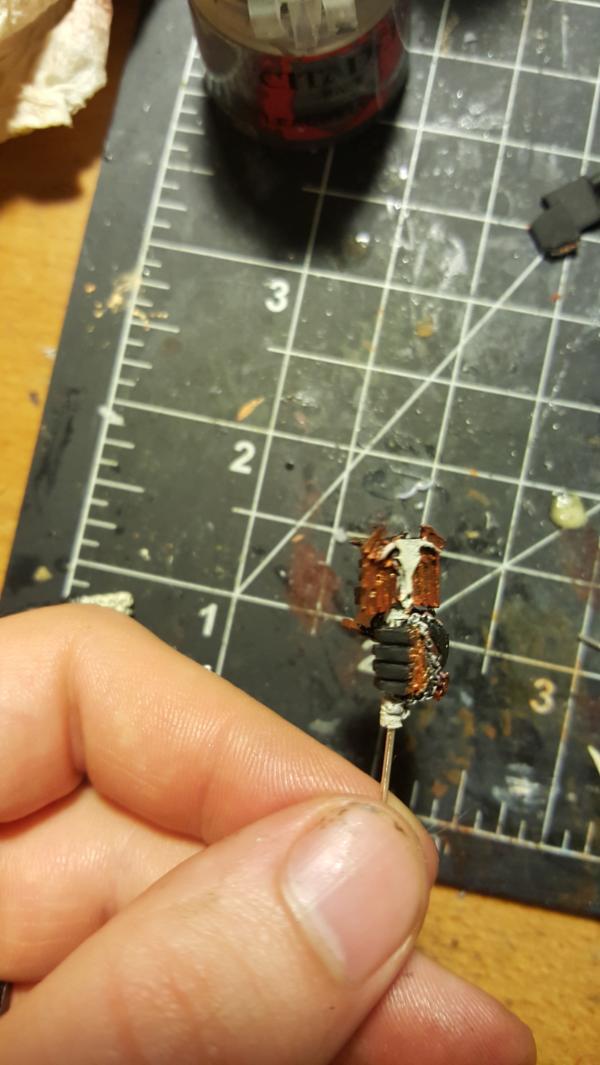
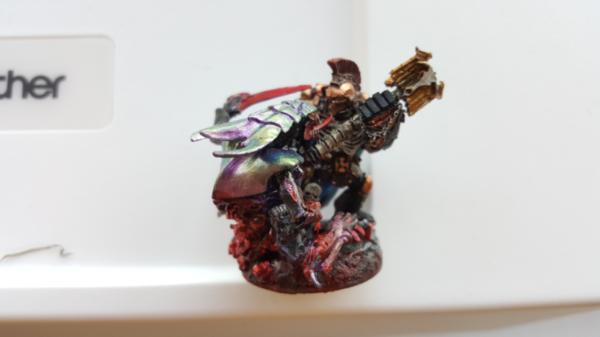
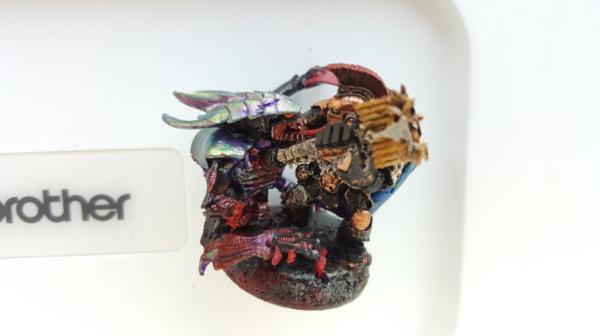
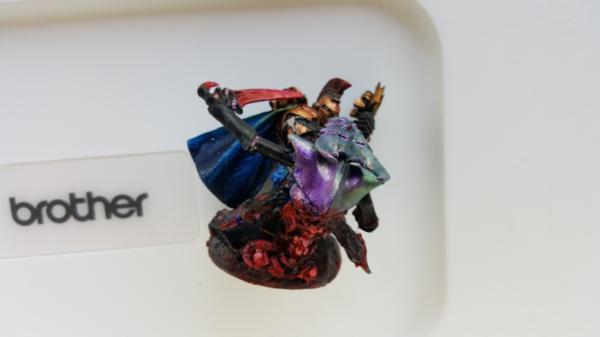
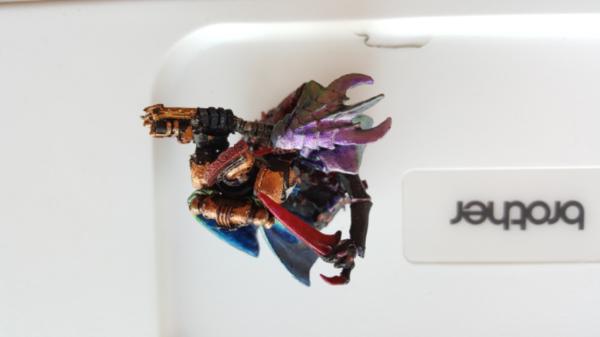
So, finished model time!
Now remember that in the original pose he's stabbing down. But since he's a chaplain/named character, I wanted to have him fighting something a bit bigger than just a gaunt. Broadly speaking there is something of hierarchy in these fights.
Scouts are fighting rippers/skyslashers/etc.
Marines are fighting rippers/gaunts/ganging up on something bigger (or standing on the corpse of something bigger)
captains/chaplains/etc are fighting big guys. Lictors, warriors, raveners, neurothropes. Something that would be a relatively even contest and.. fit on their somewhat bigger base to boot.
so that meant he had to be fighting someone warrior like. But how to do it? I figure he's fighting HALF a warrior, more sepcifically the torso. think of this as the warrior thats taken 2.5 wounds and barely holding on trying to take something down with it. So that means we need some guts and innards! time for green stuff experimentation (im noti very good at green stuff)
First i upgrade one of my tools to get a sculping pokey stick, very handy, and then i made myself a spinal column. I wanted it bound to wire for strength and to make bending it into shape easier later. I also wanted some guts and so used the handy tentacle maker for that.
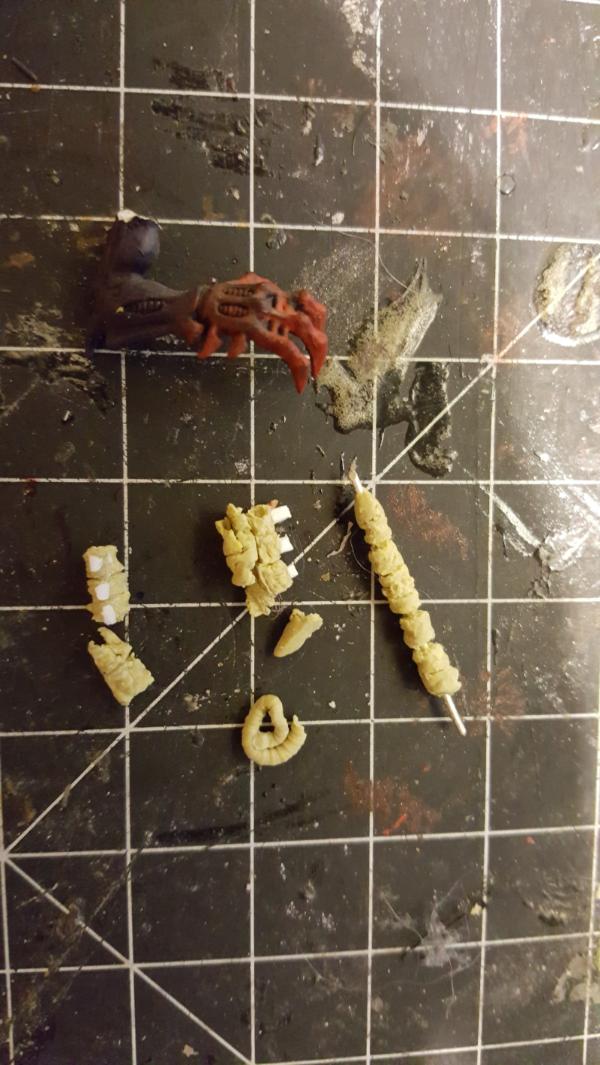
For blood i acquired and am now in love with all things tamiya clear, more specificalyl smoke and tamiya clear red! it COAGULATES!@ and is lovely and thick and amazing.
And.. the finished thing! cause i suck at taking pictures in progress sometimes when i get really focused.
 Automatically Appended Next Post: Automatically Appended Next Post: 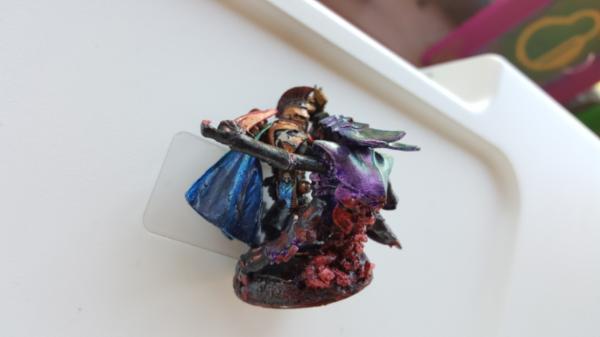
|
|
This message was edited 1 time. Last update was at 2016/04/24 00:32:16
|
|
|
|
|
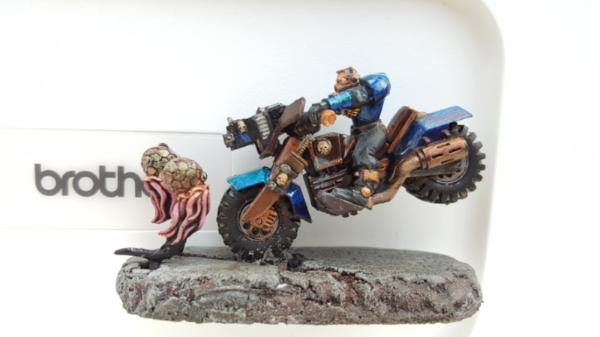
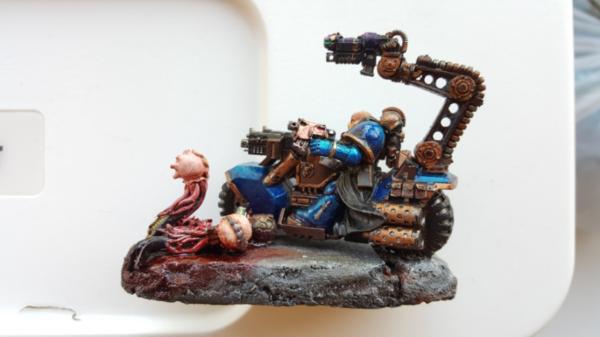
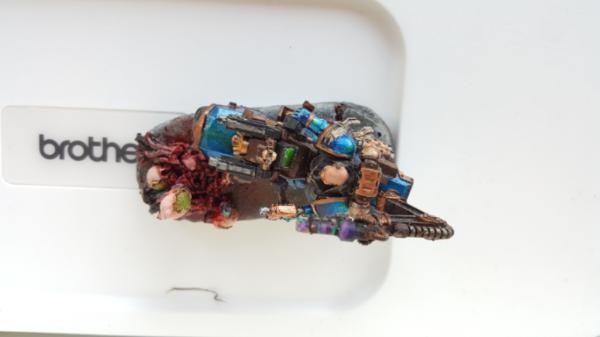
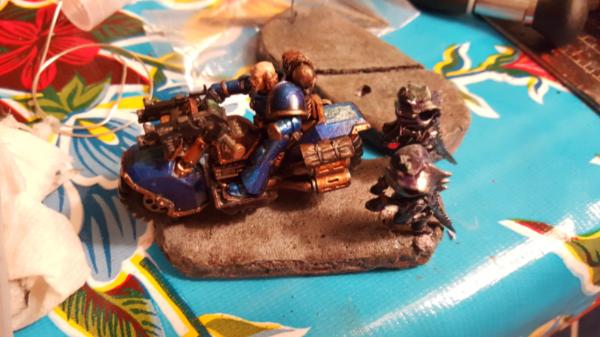
2016/04/24 17:50:30
Subject: Re:Custom multi-level city terrain (4/24: bike vs spore mine bases)
|
|
Dakka Veteran
|
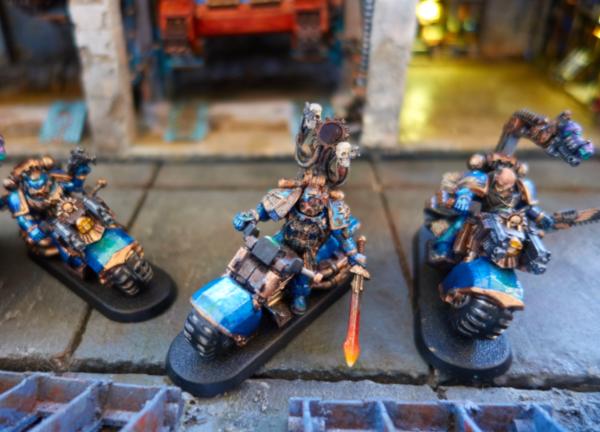
Now lets do some bike bases!
This first set is bikes vs spore mines.
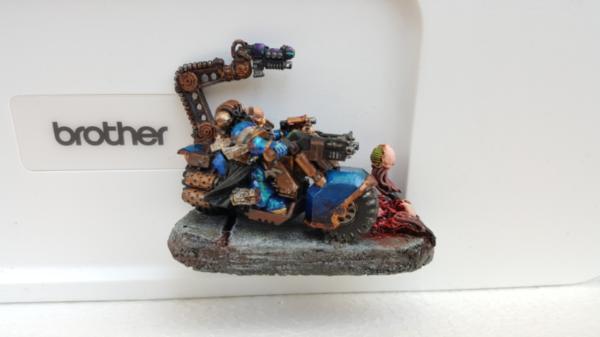
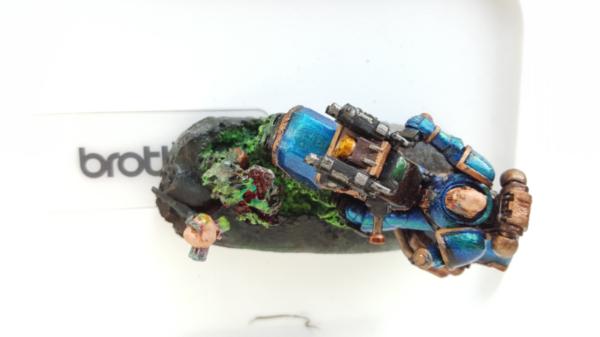
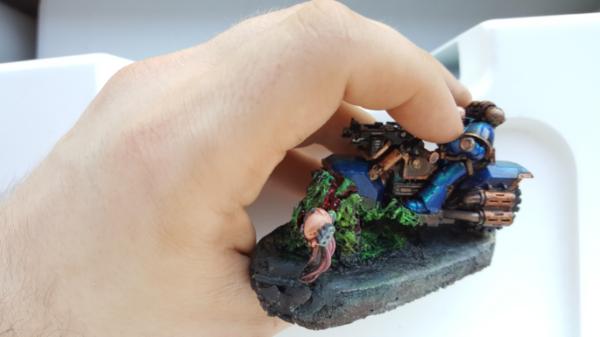
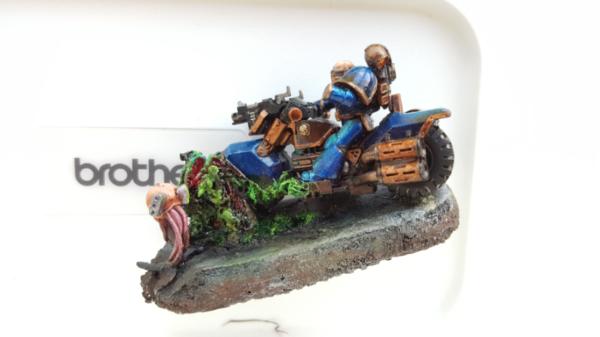
1st we have Bike vs exploded acid mine. The idea is to have the bike in the vicinity of an acid mine that went off, and a poor (melting) marine in the way that blocked most of the blast.
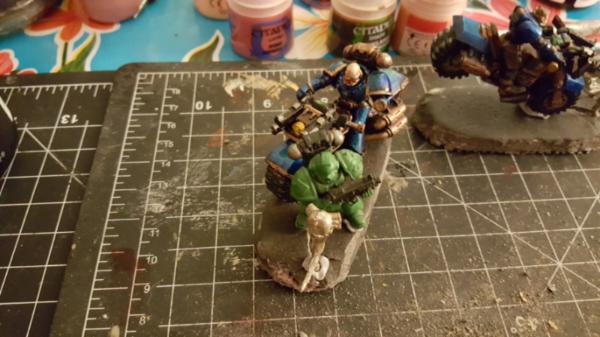
for the marine I started with one of my spare snap together DA marines i have lying around and ripped him in half. I then took a crappy soldering iron cranked all the way up and went to town on him. THe soldering iron went through him like butter and its a lot of fun melting him with it. not gonna lie:
However this first attempt actuall wasnt really satisfactory, he wasnt melted enough! it looks more like pocked marks, not full on Indiana Jones dissolving. So after i attached him to the base i decided to add some more melting. It helps just sticking the soldering iron into the plastic and let it sit there, just makes thing start to oose a bit more.
Next up we have the "OH CRAP" scout bike in training who isnt quite wise yet. He's about to hit 2 exploding mines. Will he stop in timeee...?
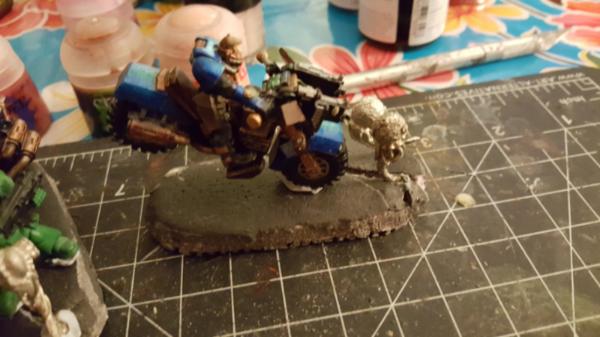
Finally we have the sarge who is getting too old for this crap .Now I had 7 mines total which leaves 4 for him.. and he's already killed three. I plan on having a nice guts pile that you can see the beginnings of, and I want to cut off his arm and replace it with an aimed bolt pistol as he's about to tak eout the last mine.

|
|
This message was edited 1 time. Last update was at 2016/04/24 17:50:51
|
|
|
|
|
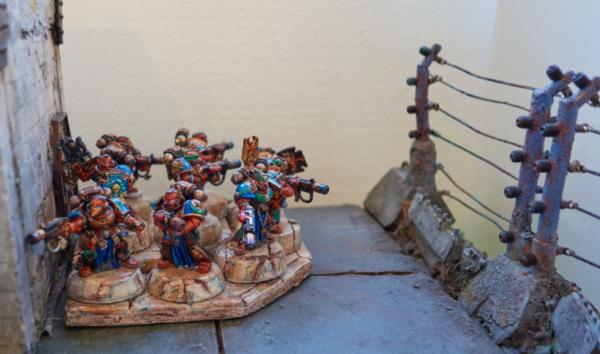
2016/04/25 22:49:03
Subject: Re:Custom multi-level city terrain (4/25: bike vs spore mine bases done!)
|
|
Dakka Veteran
|
|
|
|
|
|
|
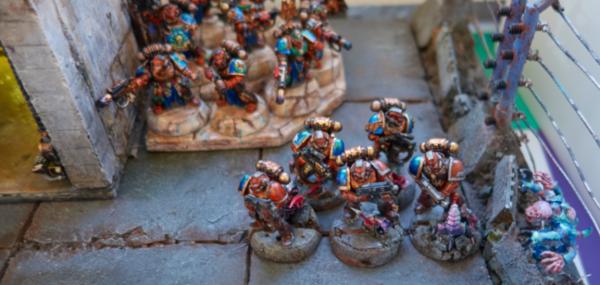
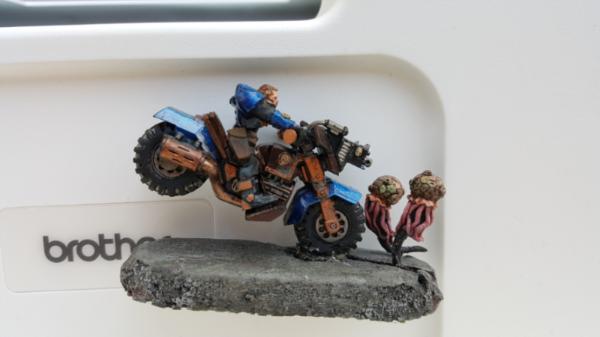
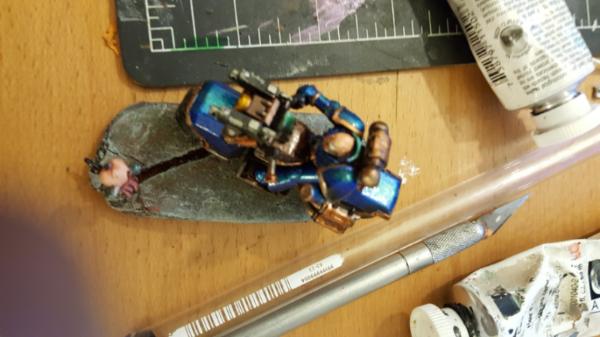
2016/04/28 18:47:32
Subject: Re:Custom multi-level city terrain (4/28: bike vs hormagaunt bases)
|
|
Dakka Veteran
|
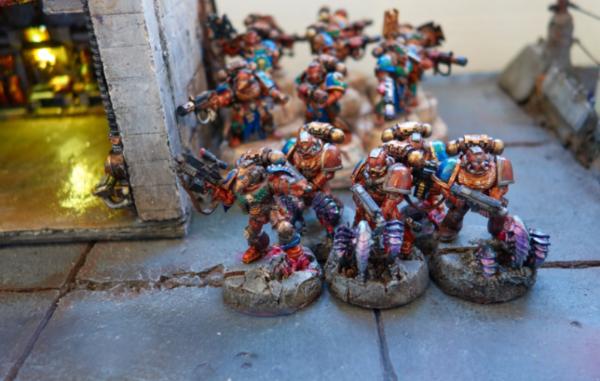
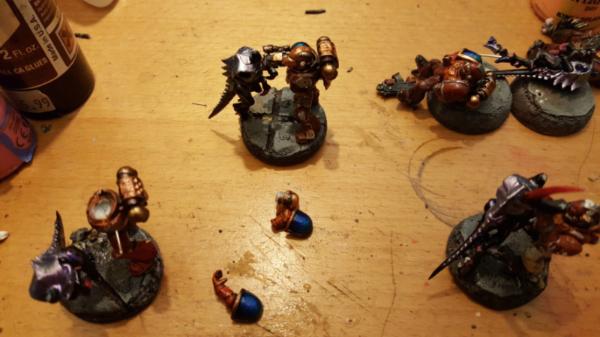
Next up, bikes vs gaunts!
We have the sarge chainswording down one guy:
while also standing on the corpse of another:
and we have 2 closing in:
Irognically enough i have to expand my nid collection for this! In both of these cases i need... nids on sprue. These bases, while larger, are tight for having both nids AND a bike on, so i need full articulation to get this pose just right, so a brand new box of gaunts it is!
I also havent yet figured out the third base and what i wnat, but, its a start.
|
|
|
|
|
|
2016/04/29 09:55:43
Subject: Re:Custom multi-level city terrain (4/28: bike vs hormagaunt bases)
|
|
Stalwart Space Marine
|
Absolutely fantastic work there mate I'm blown away by the level of detail!
Your use of colours is mind blowing at how realistic it makes everything! Any chance of a list of paints that you use? I've started my own board recently and would love to have a cracking at this kind of wear and tear
|
|
|
|
|
|
2016/04/29 20:33:28
Subject: Re:Custom multi-level city terrain (4/28: bike vs hormagaunt bases)
|
|
Dakka Veteran
|
Oh geez uh, most of the paints are mentioend throughout the post but from memory lets see:
http://www.goldenpaints.com/explorer
Metals/colors where possibly:
golden acrylic fluid paint. It doesnt pslit liek GW paint, its professional artist paint, and its still way cheaper.
an example (ALWAYS BUY FLUID. same consistency as GW paint that way)
http://www.goldenpaints.com/products/colors/iridescent-colors/heavy-body-iridescent-colors/iridescent-copper-light--fine
My favorite dark basecoat metal, has a fun texture:
http://www.goldenpaints.com/products/colors/iridescent-colors/heavy-body-iridescent-colors/micaceous-iron-oxide
Washes:
a mixture of places, but lately my devlan mud standin is.. golden acrylic again! more specifically:
raw umber high flow. Pretty much the perfect mud color.
http://www.goldenpaints.com/products/colors/high-flow/raw-umber
also the transparent oxides (red, brown, yellow), are PERFECT for light staining. Just a little shade or yelloe/red/brown.
http://www.goldenpaints.com/products/colors/high-flow/transparent-yellow-iron-oxide
Blood/Ooze/slime:
Tamiya clear red
Tamiya Smoke
Tamiya Green
Paint Chips:
ill update once i remember the name, its a specific middle layer fluid.
|
|
This message was edited 1 time. Last update was at 2016/04/29 20:36:40
|
|
|
|
|
2016/04/29 20:48:13
Subject: Custom multi-level city terrain (4/28: bike vs hormagaunt bases)
|
|
Savage Khorne Berserker Biker
|
Oh wow, there is nothing about this I don't love. The colours are so rich, and the modelling is so intricate! Thank you for bringing this into my life!
|
|
|
|
|
|
2016/04/30 00:01:33
Subject: Re:Custom multi-level city terrain (4/28: bike vs hormagaunt bases)
|
|
Stalwart Space Marine
|
Thanks very much for taking the them to put in all the links, much appreciated! 
Keep up the amazing work mate I'll definitely be following this thread with interest
|
|
|
|
|
|
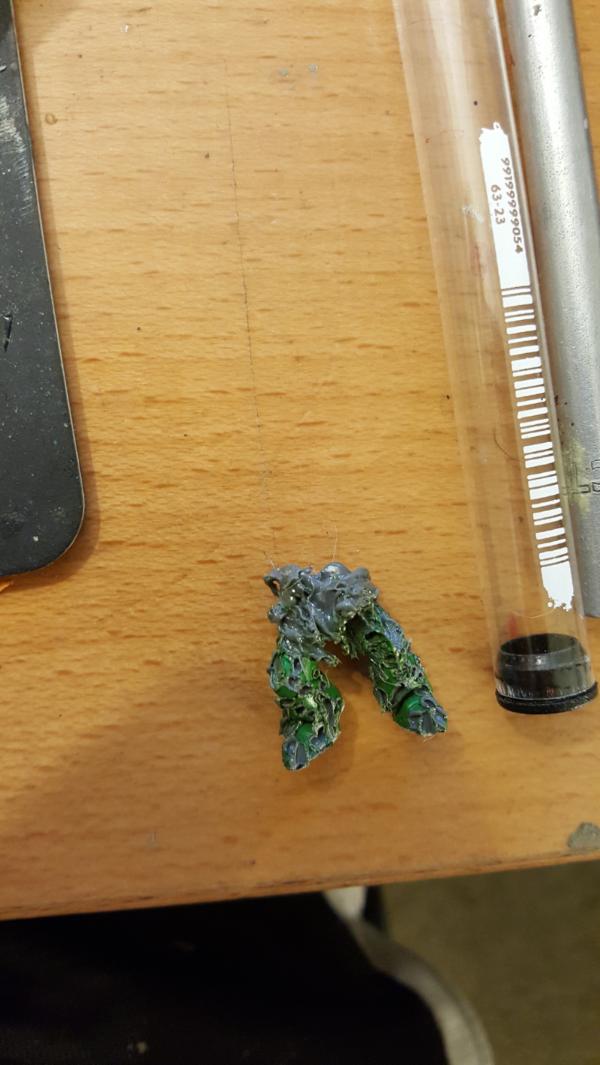
2016/05/01 15:16:31
Subject: Re:Custom multi-level city terrain (4/28: bike vs hormagaunt bases)
|
|
Dakka Veteran
|
Thanks all and No problemo about the links!
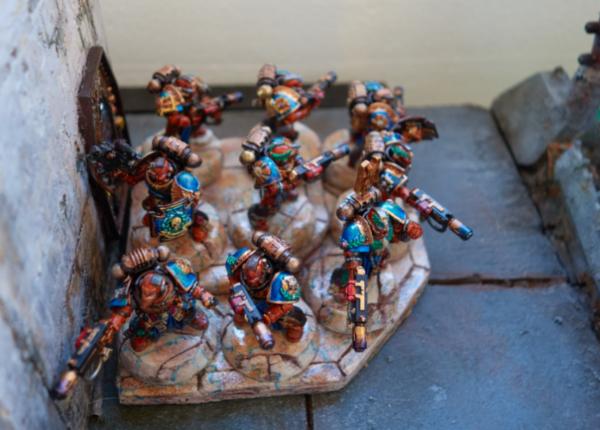
Anyhoo, painting wise work continues on! Now to try and be smart about this i decided to paint the gaunts on the sprue, and even remembered to drill in the feet BEFORE htey were all painted.
This was a very good thing because drilling into those teeny little feet was.. monstrous. The bit slipped quite often, and even after I attempted to leave ltitle stubs of plastic to give me better entry points. Generally just unpleasent all around.
I also decided to primer them grey, even though the bulk of their bodies is black, to help make sure i see all the details. It.. maybe worked? i dunno, i later did the arms as black and its unclear which method was faster, they both involved a lot of repainting as painting pink the crevaces/fleshy bits is always messy.
Once a body was done I would go ahed and install it in a relevent base, even before I installed the marine! that way I wouldnt have to keep touching gaunt body, and because it didnt really reduce optiojs, it just helped finalize the pose but let me be able to still move around the head as needed and figure out the arms.
|
|
|
|
|
|
2016/05/05 22:37:11
Subject: Re:Custom multi-level city terrain (4/28: bike vs hormagaunt bases)
|
|
Dakka Veteran
|
So the bike bases area ctually done, i just didnt take any pictures because i.. ran out of time.
So in the meantime here is whats next. gaunts vs marines! I figure this is what i use for the last 5 bases that dont have something, and it should work pretty well for a nice CC action. Downside is.. ugh the marines had some flash lines still, and i had to break them apart to get pins in there and figure out poses, so there is a LOT of cleanup work. ugh.
|
|
|
|
|
|
|
|