| Author |
Message |
 |
|
|
|
|
Advert
|
Forum adverts like this one are shown to any user who is not logged in. Join us by filling out a tiny 3 field form and you will get your own, free, dakka user account which gives a good range of benefits to you:
- No adverts like this in the forums anymore.
- Times and dates in your local timezone.
- Full tracking of what you have read so you can skip to your first unread post, easily see what has changed since you last logged in, and easily see what is new at a glance.
- Email notifications for threads you want to watch closely.
- Being a part of the oldest wargaming community on the net.
If you are already a member then feel free to login now. |
|
 |
2010/12/28 18:54:00
Subject: STOMPA TIME!
|
|

Revving Ravenwing Biker
|
Hey all.
Apparently I was a very good boy this year, because I got a Stompa (and a large haul of other Ork and SM kits) for xmas. I will be posting WIP pics of my Stompa from out of the box to built and then onto painting, which will be quite an undertaking because the Stompa is roughly the size of a baby and has more bitz than a lego kit haha. If anyone has any advice or comments as I embark on the biggest 40k undertaking I have ever done, please don't hesitate. I intend this stompa project to be purely for fun and not a super high-quality model. Something I can bust out when my friends and i need a good laugh. Also, this thread is intended to help any newbies through some steps of assembling such a huge model, or to let people interested in getting a Stompa see what they are in for. So, let's begin.
So here's the Stompa box. This thing is massive!
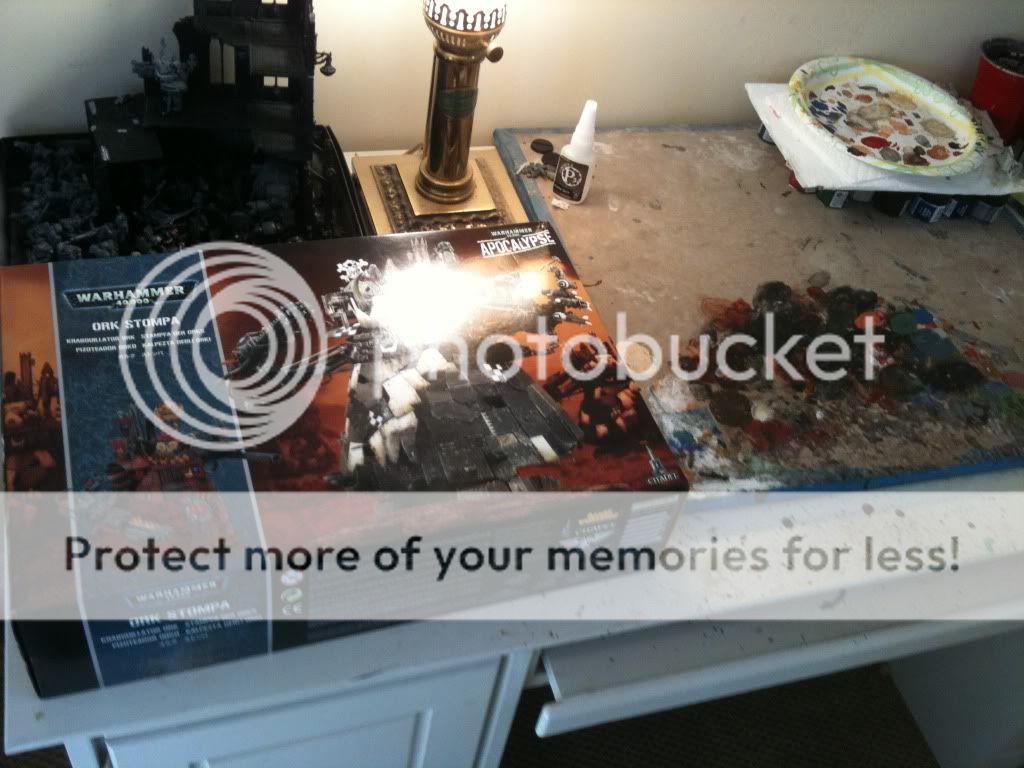
Which of course means, that there are some MASSIVE pieces as well. Here's the 'bottom' of the Stompa.

I generally assemble my vehicles in segments, in order to paint them more easily and not get overwhelmed by such a huge model at once. In this case I have the head, body, feet, chainsaw arm, gun arm, rockets, giant bosspoles, and 'crew members' ( misc grots and the Ork Stompa Driver) all seperate. I can spray them piecemeal or all at once, and then paint them all separately and glue them together. Makes it much more manageable and gets a better result (so I have found). Also, this motivates me to get it done because until it's all painted, I can't play with it because it's in pieces.
Here is the gun! MMMMMM that's A LOT OF DAKKA!


Chainsaw Arm

Here's the Stompa body completed. The head is on a swivel joint so it just rests on top and is not glued. In fact, I may not even glue the head on so I can get easier storage if I need it, or remove it to represent the stompa is destroyed. (the commander and grot are not glued either).

Here's a close-up of the stompa commander on the head. I may do a bit of conversion and add some wires attached to his hands and back of his head, plugged into the Stompa as if he's controlling it like a puppet. I guess you could say, it's similar to the Amp Suits (mech walker things) in Avatar. I will glue the stompa to have his chainsword arm raised and the gun pointed where the commander is pointing.
Opinions?

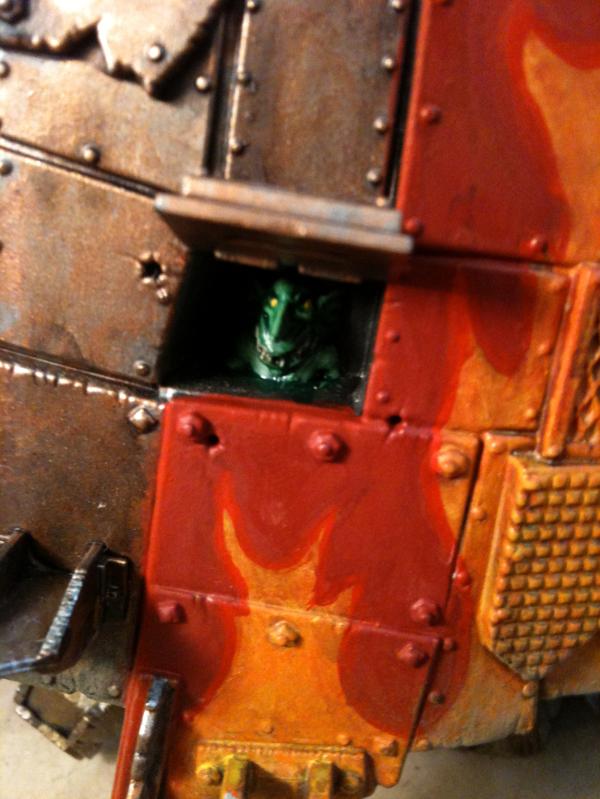
And, my personal favorite bit included, the hilarious little grot in the crow's nest... of course, struggling with technology.

So that's that. For now. I will be working on the Stompa today, and maybe even get it finished up with all it's bits and sprayed black for a primer coat. Wish me luck!
-WAAAAAGH!
|
|
|
|
 |
|
2011/01/02 00:45:07
Subject: Re:STOMPA TIME!
|
|
Nigel Stillman
|
Looks pretty schweet.
Can't wait to blow it up. ; )
|
|
|
|
|
2011/01/02 00:59:58
Subject: Re:STOMPA TIME!
|
|

Annoyed Blood Angel Devastator
|
The Stompa model is so nice. I don't play Orks but I will seriously have to think about getting one. Keep the work going!
|
 2000+ pts 2000+ pts
 2000+ pts 2000+ pts |
|
|
|
|
2011/01/02 01:20:03
Subject: Re:STOMPA TIME!
|
|

Pulsating Possessed Chaos Marine
Did you guys know Canada has a friggin desert?
|
Thread might actually make me consider getting the stompa or not. Good luck with him!
|
You're not playing the game like I play it...why aren't you playing the game like I play it?! O_O |
|
|
|
|
2011/01/07 19:48:51
Subject: Re:STOMPA TIME!
|
|
Revving Ravenwing Biker
|
UPDATE
I have the Stompa all sprayed up in black primer and I have completed the feet. I must say, not bad for a pair of robo-feet of stompy doom! I am experimenting a bit with the layers of metal, rust, dirt, grime, oil, more dirt, possibly blood, etc that constitutes an Orky vehicle.


If anyone is interested, here's the process I used:
METAL
-A nice even coat of boltgun metal. It doesn't ahve to be super detailed or anything or as high-quality as drybrushing because most of it will be covered by metallics and dirt.
-Stipple and layer on blobs of dwarf bronze. This constitutes the 'rust' effect, as well as gives a two-toned metal look. There are more metals out there than just shiny silvery grey hehe. The bigger the blobs, the better, as it gives the metal an uneven look when drybrushed and washed.
-Once all the metals have dried, coat the entire thing in a wash of devlan mud/gryphonne sepia (whichever you prefer). Also, if you still have the old inks (like I do) feel free to add some of those in there as well. They give a very heavily pigmented and glossy look to the metal once in t done. This can sometimes look like grease and oil build-up.
-Make sure the ink/wash is dry and then cover the whole thing in badaab black ink. Really let it seep into the recesses. This will add to the 'grease' effect and tone the brighter bronze color down to a more natural dull metal color.
-Drubrush the edges very lightly with boltgun metal so that they barely stand out. If a little bit gets down and streaks along the flat parts of the metal that's OK. They are Orks afterall.
DIRT
-Add a light layer of scorched brown to the bottoms of the feet, along the sides of the toes, and in any other recesses where dirt may accumulate. (50/50 water and scorched brown will make it easy to cover large areas of the feet and give a more liquidy mud effect.
-Continue to add layers of scorched brown until you have achieved the desired effect of a darker mud color. The darker it is, the more it will stand out and the heavier the dirt content in on the feet.
-Using an older brush with frayed bristles, make streaks of snakebite leather rising from the edges of the feet up to the tips of the toes. If done correctly, this will look like streaks of splattered dirt/mud that start off thick at the base and taper off to a point near the top of the toes and sides of feet.
-Do the same process as above with a khaki color (or the color of the gameboard you use), as this represents the freshest layer of dirt and mud on the model. The tips of these streaks should end just below those of the snakebite leather dirt color.
FINISHING TOUCHES
-Once everything is dry, you can go back and drybrush boltgun metal onto areas of the model where chipping would occur in addition to any areas where you want a more silvery look to contrast with the mud.
-Paint a thin line of boltgun metal along thicker edges, like the tops of the toes, the little bumps along the toes, and the panels that jut out from the 'ankle' area.
-If anything is too bright, use some drybrushed scroched brown, snakebite, or khaki to dull the brightness. Also, more washes can never hurt either.
It's a bit of 'do it till it looks right,' process.
I have also begun to undergo the arduous process of drybrushing/layering on the metallic colors to the stompa's body (there's a LOT of metal plates). I want each plate to look somewhat different from the ones around it so some get a very light drybrush, others a heavy drybrushi, and others get a good chunky lathering of boltgun metal, making them more shiny and bumpy.

-WAAGH!
|
|
|
|
|
|
2011/01/07 20:07:49
Subject: Re:STOMPA TIME!
|
|
Regular Dakkanaut
|
Those rusty feet are cool, may try your painting process out, I like the variations on the metal body panels too, keep up the good work, will be interesting to see how it turns out. 
|
|
|
|
|
|
2011/01/14 01:16:42
Subject: Re:STOMPA TIME!
|
|
Nigel Stillman
|
I saw your progress on the Stompa last night when I was yoinking a couple of the old plastic Terminators, it's coming along really well. Keep up the good work! : )
|
|
|
|
|
2011/01/18 23:44:31
Subject: Re:STOMPA TIME!
|
|
Revving Ravenwing Biker
|
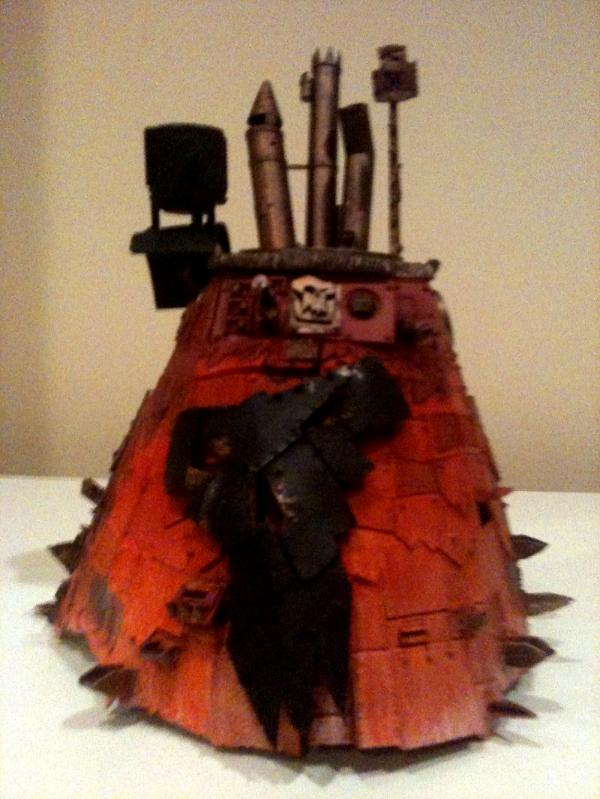
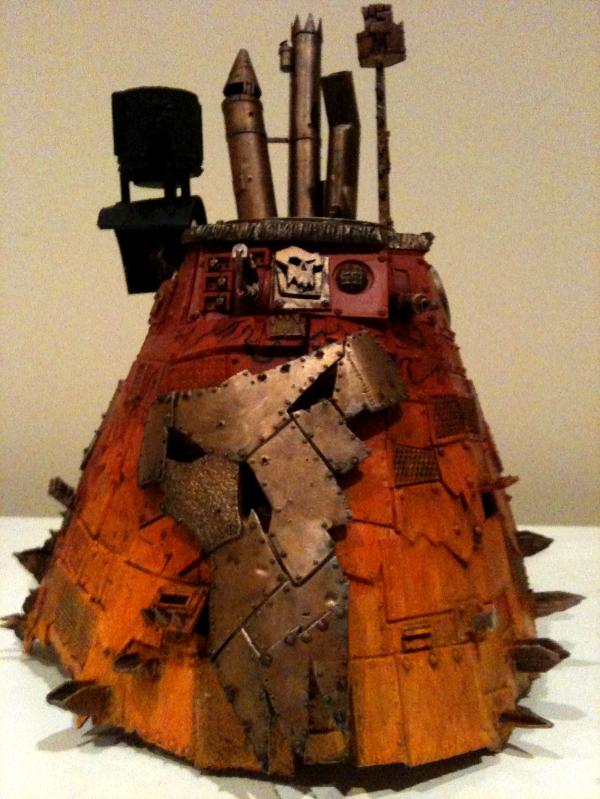
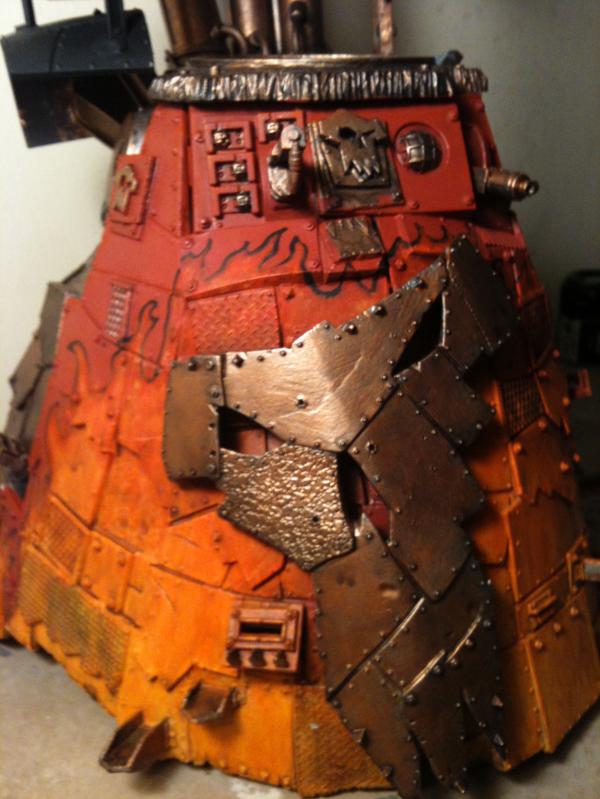
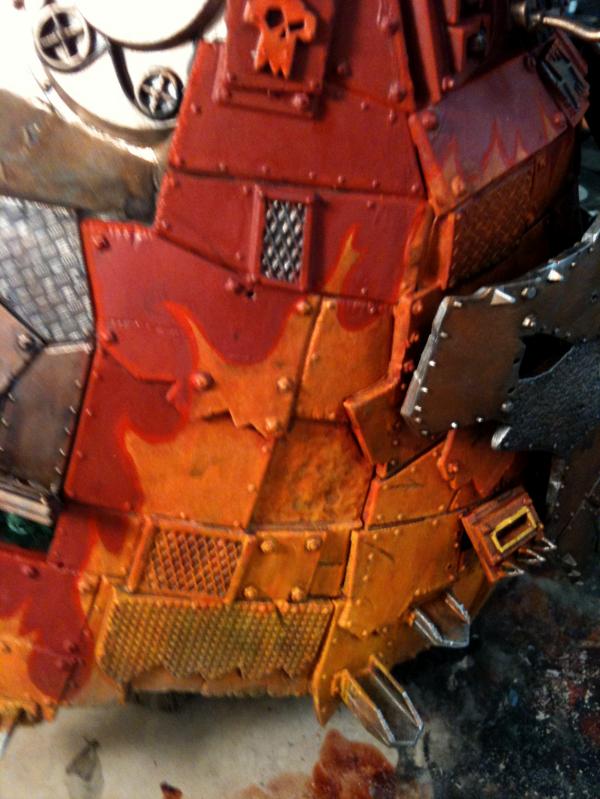
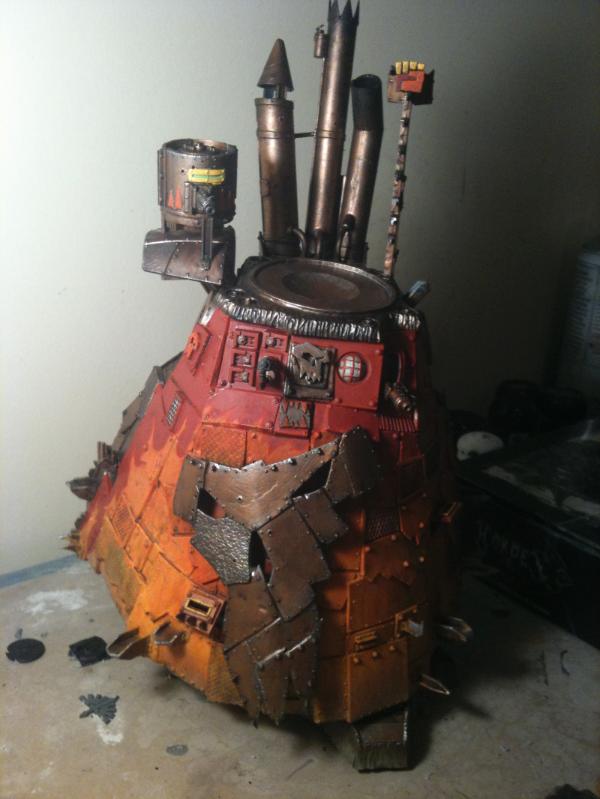
Hey all! I have made a good deal of progress on the Stompa but alas, I must leave it behind and go to college. In fact, I am there now. So this will be the last post for a while! I have finished most of the effects of the metal and have decided to go with a mechrite red/red front color and an orange and yellow flame decal up the entire model, bordering the 'death face' on the tummy. The 'death face' will most likely be orange, yellow and red as well. OR I may decide on a solid color such as a mix of yellow and orange and give it a weathered look. I may also go with a sort of "red tiger" pattern on the face in either blood red or blazing orange, using yellow as the black stripes instead. It may blend in too much with the fire. We will see.
In the end I will make the rusted metal look more like the feet, with patches of dirt and grime, flakes of chipped metal, and some more grease marks. The red will be highlighted and wet blended from a red gore color in the deep recesses to a blood red edge on the raised areas. This will give the effect of weathered paint that is bleached by the sun. of course, devlan mud (devlan miracle as we refer to it) and a black/grey wash will also help to add to the weathering effect. Here is the progress thus far, and for a while.
Front

Back

Side

I intend to paint most of the 'spikes' with blazing orange or blood red and make them look heavily worn. Some may also be a lighter metal color to represent that they are new additions to the stompa. Who knows, some may be left as they are or covered in red ink and gore effects. Any thought?
Also, I will most likely choose to use the mechrite red, blood red, red gore, blazing orange, and black to make caution stripes and checkered patterns on various panels in the rear, sides, and on the shoulder guards. Thoughts?
Also, if anyone has any comments or advice on easy ways to accomplish the wet-blend weathered paint effect that would be very helpful. Also, alternate flame designs or pages demonstrating large freehand Ork decals could be very helpful.
I know it's a lot to take in, but any and all comments are welcome! Thank you all!
-VardenV2
|
|
This message was edited 1 time. Last update was at 2011/06/20 00:47:39
|
|
|
|
|
2011/05/24 18:22:18
Subject: Re:STOMPA TIME!
|
|
Revving Ravenwing Biker
|
So I started some more work on the Stompa FINALLY! Been away at college for quite some time and now that I am bored at home, I have nothing but time. I did my first attempt at some very Orkish wet-blending. Here are the results. I wanted the front to look like faded flames. Here are my first attempts. It's not done yet, but here's what I got thus far. Comments and questions are always appreciated.
-WAAGH!
|
|
|
|
|
|
2011/06/03 04:48:11
Subject: Re:STOMPA TIME!
|
|
Revving Ravenwing Biker
|
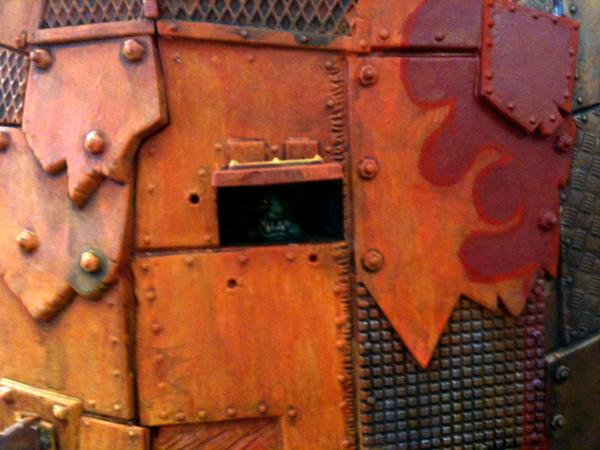
I have made a good deal of progress on the Stompa's belly flames. Once the whole process is completed, I will give a list of steps that I followed to accomplish the task. I wish I had taken a few step-by-step photos so I can show the process better, but a lot of it is just "do it till it's done." I don't have the best camera or light source to use but here's the best pics I got.
Here's the flames almost done.
The next step will be to phase out the dark lines that I used to make sure my flames stayed in the correct areas.
Any comments or questions are appreciated. Hopefully he'll be done soon, although i did slice my finger pretty bad so painting may be a no-go for a few days.
-Waagh!
|
|
|
|
|
|
2011/06/11 04:46:08
Subject: STOMPA TIME!
|
|
Squishy Oil Squig
Tucson, AZ, US
|
i'm diggin that paint job! keep up the good work. i haven't seen the stompa model in person yet, so i really appreciate the space marine next to the bitz for scale!
|
FER DA EMPRAH |
|
|
|
|
2011/06/13 06:36:15
Subject: STOMPA TIME!
|
|
Revving Ravenwing Biker
|
More pics shortly! I should get back to work on the Stompa tomorrow (my thumb has healed from my idiotic knife accident).
|
|
|
|
|
|
2011/06/13 07:20:30
Subject: STOMPA TIME!
|
|

Sneaky Sniper Drone
australia
|
Awsome, great flame work. i'd hate to see that chew threw my army.
|
"if you're still alive your not fighting hard enough!"  |
|
|
|
|
2011/06/13 09:41:16
Subject: STOMPA TIME!
|
|
Avatar of the Bloody-Handed God
Inside your mind, corrupting the pathways
|
Looking very cool so far. Is there much internal detail in this kit? Or is it essentially an empy shell?
|
|
|
|
|
|
2011/06/13 21:12:41
Subject: STOMPA TIME!
|
|
Revving Ravenwing Biker
|
SilverMK2 wrote:Looking very cool so far. Is there much internal detail in this kit? Or is it essentially an empy shell?
Unfortunately (or fortunately if you do not like painting) there is no way to open up the stompa. It is essentially a big football shaped (and sized) empty shell with a flat base and top and a few long side pieces. There are a few hatches where little grots poke their heads out, flip off enemies, make googly faces etc. but this is about as "internal" as it gets. Most of the detail is in the model itself and has so many pieces that I am glad there are no internal compartments. All the little gubbinz that it comes with are more than enough to keep the visuals interesting and dynamic in my opinion.
-WAAGH!
|
|
|
|
|
|
2011/06/13 21:36:49
Subject: STOMPA TIME!
|
|
Frenzied Juggernaut
|
Is has no arms!
|
37,500 pts Daemon Army of the Gods
 
35,000 pts - X - Iron Tenth
 
15,000pts - Firehawks

7,000 pts - Nighthaunt

Dkok - 1850
 |
|
|
|
|
2011/06/13 21:49:47
Subject: STOMPA TIME!
|
|
Revving Ravenwing Biker
|
xSoulgrinderx wrote:Is has no arms!
Haha, yes I am aware of that. I decided to paint major parts separately so I do not get mentally overwhelmed with things to paint. I wanted to focus on the body and then work on the arms individually to keep myself motivated and see my progress. When I see a mass of black it is demoralizing as I paint for hours and still see that most of it is unpainted haha. It's for my own sanity.
I plan on painting in this order:
Feet (complete)
Body (70%)
Head
Sword Arm
Gun Arm
Tidbitz
Pose and Glue
-Waagh!
|
|
|
|
|
|
2011/06/20 00:33:41
Subject: Re:STOMPA TIME!
|
|
Revving Ravenwing Biker
|
Hello all!
I FINALLY got to work on my Stompa more. I completed the flames, removed the black guide lines and added in red instead. I did highlighting on the metal, brybrushed the bottom with dirt tracks, and painted in the grots and other little decals. I also attached the feet so now he stands up correctly! Here are a few pics.
And from the back
A better look at the flames
And the silly little grots.
The next step is to finish up the lights on the chest part and maybe add a little soot around the big exhaust pipes on top. I am not sure what color to make the lights. Some feedbackwould be appreciated. I was thinking a VERY light blue, and VERY light green (scorpion green and yellow mixed) or just a traditional yellowy white searchlight color.
I hope everyone enjoys my painting style. I try and make my orks look a little bit cartoony and fun... I mean... they are orks afterall!
Comments and questions are always welcome!
-WAAGH!
|
|
This message was edited 1 time. Last update was at 2011/06/20 00:37:43
|
|
|
|
|
2011/06/20 02:36:47
Subject: STOMPA TIME!
|
|
Growlin' Guntrukk Driver with Killacannon
|
Diggin the stompa so far. Those flames are well done. Love the grot lookin gout the window.
|
|
|
|
|
|
2011/06/20 05:52:37
Subject: STOMPA TIME!
|
|
Sneaky Sniper Drone
australia
|
Awsome so far, I like the sound of blue and green lights, it will stand out againt the red fames.
|
"if you're still alive your not fighting hard enough!" |
|
|
|
|
2011/06/20 06:01:55
Subject: STOMPA TIME!
|
|
Revving Ravenwing Biker
|
OK thanks everyone! I think I will end up doing blue lights, as I plan on doing some scorpion green wires etc on the gun and chainsword arm to look like glowing energy etc. I just want the blue to avid looking like the SM plasma glow and more like a sort of blacklight or blue flashlight glow.
Any suggestion?
|
|
This message was edited 1 time. Last update was at 2011/06/20 06:02:14
|
|
|
|
|
2011/06/22 00:31:08
Subject: STOMPA TIME!
|
|
Frenzied Juggernaut
|
Add lots of blood. Thats my suggestion!
|
37,500 pts Daemon Army of the Gods
35,000 pts - X - Iron Tenth
15,000pts - Firehawks
7,000 pts - Nighthaunt
Dkok - 1850
|
|
|
|
|
2011/06/22 05:04:21
Subject: STOMPA TIME!
|
|
Revving Ravenwing Biker
|
xSoulgrinderx wrote:Add lots of blood. Thats my suggestion!
Spoken like a true chaos player haha
-WAAGH!
|
|
|
|
|
|
2011/06/24 04:24:27
Subject: Re:STOMPA TIME!
|
|
Revving Ravenwing Biker
|
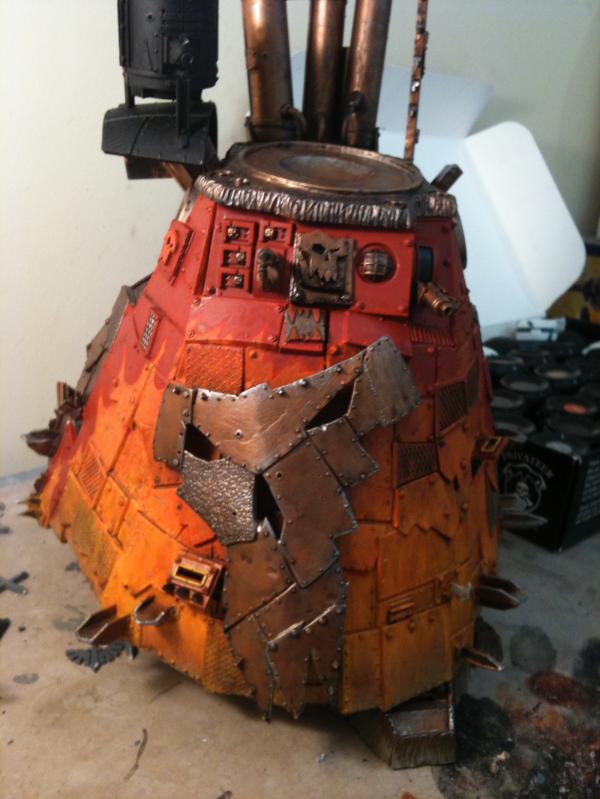
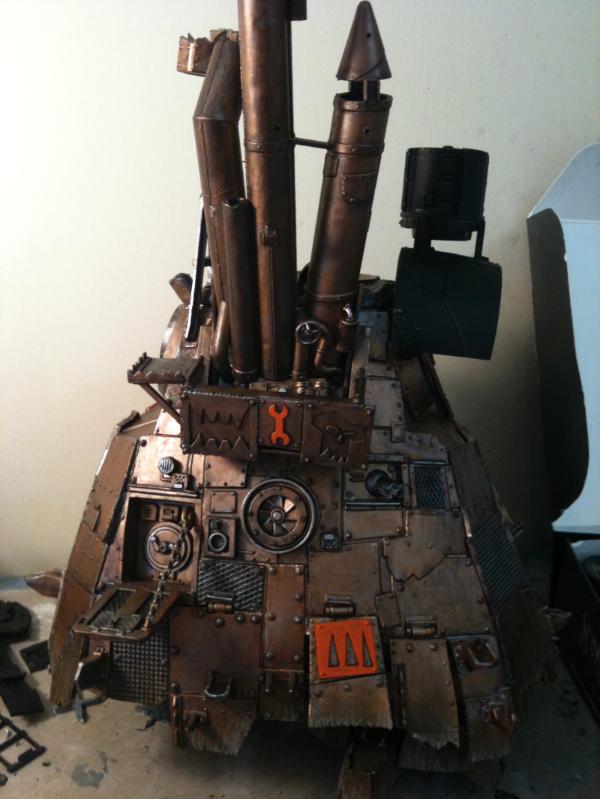
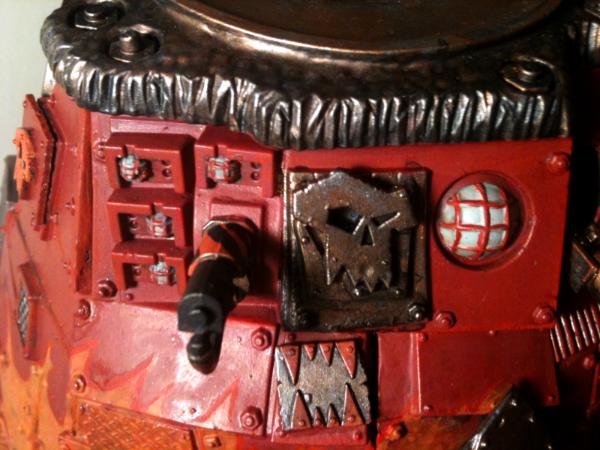
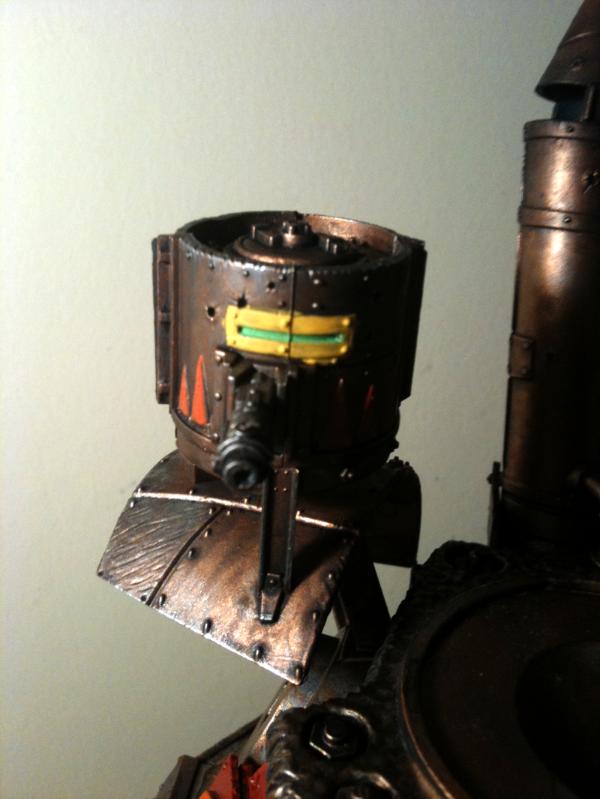
At last the Stompa's body is completed! I added lights and details to the guns. I also finished painting the little grot turret on the shoulder guard/platform.
Here it is in all its glory!
Light and flamer
Grot Turret
Decoration
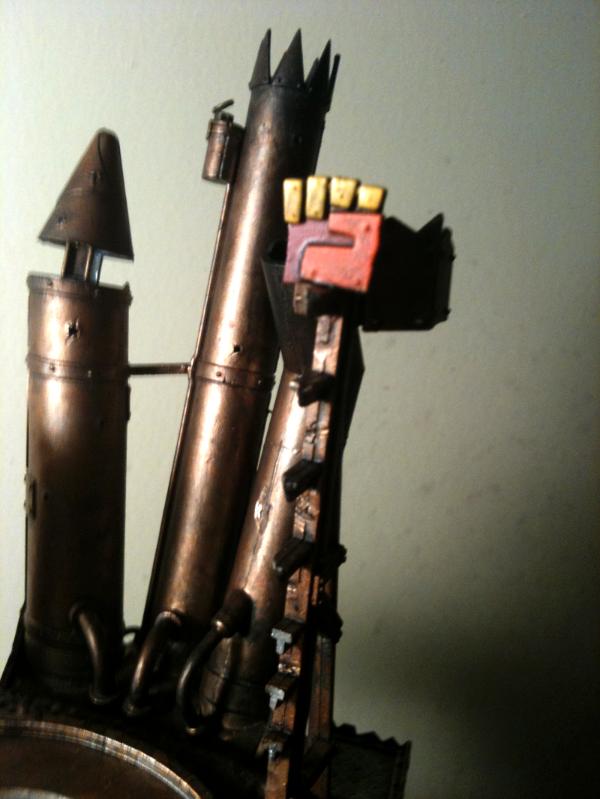
Next step is to paint up the head and get it secured. I may d what I do with a lot of my 'ball joint' models and put a little dab of green stuff to be sticky. It tacs the head in place but allows it to spin and be removed for cinematic reasons.
Anywho, I am glad to finally be done with the big part of the Stompa and can now focus on the smaller pieces  Comments are always appreciated.
-WAAGH!
|
|
|
|
|
|
2011/06/24 08:14:31
Subject: STOMPA TIME!
|
|
Ragin' Ork Dreadnought
|
Pity about the mold lines  Otherwise, looking really good. You drilled the Grot Turrent barrel but not the flamer?
|
|
|
|
|
|
2011/06/24 18:16:20
Subject: STOMPA TIME!
|
|
Revving Ravenwing Biker
|
Arakasi wrote:Pity about the mold lines Otherwise, looking really good. You drilled the Grot Turrent barrel but not the flamer?
Yeah I did what I could about the mold lines but w/e. They are orks afterall it doesn't ahve to be perfect haha. I decided not to do the flaer just because i didn't want to mess it up and then be left with NO flamer. Plus the end is all black anyway so I dunno how well you would even see it. I don't have a drill-bit because I think it's a waste of money for the minimal use it will get. I just use the tip of my hobby knife and drill out a little hole so that it's deep enugh that you can't really see the back. I am not the BEST at those little detail things. Usually my style is to just have it painted on and LOOK painted. I like my models to look fun and painted, not hyper real. But that's just me.
-WAAAGH!!
|
|
|
|
|
|
2011/06/26 09:41:21
Subject: STOMPA TIME!
|
|
Growlin' Guntrukk Driver with Killacannon
|
Like the color of your metal. And I feel yea mold line can be a bitch some times. I never seem to beable to get them all. Even if I look over the model multiple times I always seem to miss some.
|
|
|
|
|
|
2011/06/26 19:45:02
Subject: STOMPA TIME!
|
|
Revving Ravenwing Biker
|
schank23 wrote:Like the color of your metal. And I feel yea mold line can be a bitch some times. I never seem to beable to get them all. Even if I look over the model multiple times I always seem to miss some.
Thanks I use a kind of unorthodox scheme but it works for me! I believe earlier I mentioned how I do it, but it is basically this.
Primer Black
Layer on boltgun metal (not too picky)
Dab/stipple/blob on brazen brass or dwarf bronze (or whatever color tint you want the metal to have). BY using different methods of applying this color you can get some ridges and texture to the metal to make it look more rusted and greasy/oily when you add washes or inks and drybrush etc.
Wash the whole area with Gryphon Sepia.
Wash it again with Devlan Mud or Badaab Black (depending on how dark you want it) You can also use the OLD inks to make it look shiny and oily. Sometimes I do it on hinges or oozing pieces etc.
Go over the edges with a drybrush of boltgun metal. Or you can edge highlight with boltgun metal.
If you want to paint the armor then I usually paint OVER the metal. That way if you miss a spot or want a spotty look it is metal underneath and not primer black. You shoud then was the color with devlan or sepia so it looks worn and dull.
-WAAGH!!
|
|
|
|
|
|
2011/06/28 06:17:46
Subject: STOMPA TIME!
|
|
Sneaky Sniper Drone
australia
|
Nice grot turret there.
|
"if you're still alive your not fighting hard enough!" |
|
|
|
|
2011/07/09 05:17:34
Subject: STOMPA TIME!
|
|
Revving Ravenwing Biker
|
A really awesome guy at my GW let me use his drill bit and magnets so I got a chance to magnetize the Stompa's chainsword arm today! Hurrah! I also finished all the metal on the stompa head. Hopefully I will have pics up soon!
|
|
|
|
|
|
|
|


 Da Dark Angelz
 Arakasi vs Infinity