| Author |
Message |
 |
|
|
|
|
Advert
|
Forum adverts like this one are shown to any user who is not logged in. Join us by filling out a tiny 3 field form and you will get your own, free, dakka user account which gives a good range of benefits to you:
- No adverts like this in the forums anymore.
- Times and dates in your local timezone.
- Full tracking of what you have read so you can skip to your first unread post, easily see what has changed since you last logged in, and easily see what is new at a glance.
- Email notifications for threads you want to watch closely.
- Being a part of the oldest wargaming community on the net.
If you are already a member then feel free to login now. |
|
 |
2011/09/19 10:32:02
Subject: BUILDING CAVE TERRAIN - Added film stills!
|
|

Dispassionate Imperial Judge
|
Ok, so, here's the plan.
For work, I have to do a bit of filming in front of some natural-looking rock. Closeups of hands brushing down cave walls, tracing cave paintings etc. Due to time, we're going to have to do this in front of some fake 'natural rock' wall, in my studio. Which I'm probably going to have to build. We're probably going to need 2 8x4ft sheets, and I have about two days this week to build and paint it.
So I thought I'd get a double use out of this and turn it into a gaming table afterwards! Massive moonscape/rocky moulded terrain boards anyone? YES.
However, I don't know what I'm doing. As far as I can tell from the internet, my plan should be as follows.
- Go to a builders merchant. Buy two 8x4 sheets of hardboard (backing) and two 8x4 sheets of 3" polystyrene.
- Affix polystyrene to hardboard
- Cut polystyrene into rocky cave look with knives/saw. Possibly hot wire cutter.
- Paint base colours
- Drybrush lighter colours.
- Spraypaints to finish
QUESTIONS
1. How do you make a hot wire cutter? It will need to be BIG. Do I really have time to do this?
2. Affixing polystyrene to hardboard - with what? PVA Glue? Is there anything that dries quicker?
3. TILE GROUT. What is the best thing to go for - pre-mixed or just the solids? I need this to dry overnight, really. Also, everything on the Wickes website has customer reviews citing excessive shrinkage. I imagine this would be a problem on a large scale like this. Anyone recommend anything else? ( UK products)
4. TILE GROUT. How do i spread/work with it?
4. Spraypaints. I know they'll usually melt poly, but surely after a coat of tile grouts and regular paint they'll be fine?
5. Regular paint. What should I use. Again, it would be great if it was something that dried in a couple of hours.
Thanks!!!  Automatically Appended Next Post:
Natural looking rock references...


|
|
This message was edited 5 times. Last update was at 2011/11/24 14:32:38
|
|
|
 |
|
2011/09/19 11:41:09
Subject: Re:MASSIVE TERRAIN HELP - Anyone know how to use tile grout?
|
|
Fresh-Faced New User
|
I've had a gander with poly shaping and modelling on rock backgrounds, this is a really good method I've found although unexperimented this method with grout.
http://www.youtube.com/watch?v=Fk0ahajh71c
For polystyrene Loft Insulation Board seems to be a good way to go.
And attaching polystyerene big sheets which have been grouted - sealant will be your best bet or "No More Nails"
Unibond ready mixed Floor grout & Adhesive is a good way to go as well.
Spray paint should be fine once 1-2 layers of grout have firmly dried.
And acrylics would be your best bit as they dry quickly, firmly and plastic.
|
|
This message was edited 1 time. Last update was at 2011/09/19 11:41:27
|
|
|
|
|
2011/09/19 12:07:36
Subject: MASSIVE TERRAIN HELP - Anyone know how to use tile grout?
|
|
Dispassionate Imperial Judge
|
That's good. I like the idea with the drill/wire attachment. Seems a great time-saving thing. Might a test of this on the white poly I'll be using.
A set designer friend of mine suggested using Wickes 'Ready Mixed Textured Coating' - http://www.wickes.co.uk/invt/220999 - apparently it dries more solid than the tile grout and less shiny and plasticy...
|
|
|
|
|
|
2011/09/19 12:11:02
Subject: Re:MASSIVE TERRAIN HELP - Anyone know how to use tile grout?
|
|
Fresh-Faced New User
|
That is a good variant and it's £10-15 cheaper too 
|
|
|
|
|
2011/09/19 13:34:21
Subject: MASSIVE TERRAIN HELP - Anyone know how to use tile grout?
|
|
Wrathful Warlord Titan Commander
|
Ian,
Apologies for the Wall o’ Text but you asked for it and I’m bored at work!
Your basic plan seems sound but I would suggest a few additions/changes.
Backing - You many find that just the back board on it own may have some flex in it and any movement will debond your foam, especially when moving about and when set on its edge (presuming that you have it standing vertically?).
Obviously the thicker you have it the less flex it will have but the more heavy it will become. That being the case and since you are looking at having it as a table then frame the back of the board (just some 1” x 2” soft wood screwed to the edges and across the mid a quarter points) to give it some rigidity and lessen the weight by allowing a thinner board to be used. This will also stand you in good stead when it's a table.
Foam - It's not clear on what you are planning to use but don't use the white "ball" polystyrene ala TV packaging. Get the blue or pink roofing insulation. This is often sold under the tradename of Roofmate and is made by Dow. Its so much easier to use but not necessarily available at every builders merchants. Not cheap but this will help with your search: http://new.panelsystems.co.uk/newsc/index.pl?c=RoofmateSLA&p=492&a=i There should be no shortage of places in East London to get this.
Also don’t for get that you are going to have exposed edges of foam. You should protect these or you might find that you damage your finishes during movement. Obviously a hard side would be best but even some tape will help.
Finally a thought to possible accidents and damage if you are going to have this standing/leaning against a wall there is a small chance that it might slip fall and damage the surface, so hook it back and/or wedge the standing edge so that it can’t happen. Simple measure to avoid you wasting two days work, just for it to blow over and shatter in a breeze.
Tools - I don't think that wire cutter (and don't think I would build one!) will be necessary as I don't really see a need for sharp cuts or edges in what you are planning. A normal saw will be sufficient for cutting the sheets to size. Alternatively a serrated bread type knife will do the trick and maybe a little neater to boot. Additionally very sharp knives for any detailed cutting/shaping/edging. Have a few because foam can blunt knives surprisingly quickly.
Glue – Don’t use PVA it will not set as it needs air to go off. There will be plenty in the Builders merchants. Gripfill is a decent one and will hold anything but check to see if it sets quickly enough for you and/or chemical content. No more nails may also do the trick. Some may not be compatible with foams but these should be a minority but check.
Grout - For grout I would get a bag of generic un-made stuff. That way you have the option of both wet application and sprinkling it dry over wet surfaces for texture. It will also keep for an age like this, premixed wont.
As you note it can shrink. I an currently using it for FoW bases mixed with PVA and paint but have found that some bases have hairline cracks in the surface not a big issue and easily covered by paint. As you point out grout can be shiny but another plus to grout is that it comes in different colours which might counteract this.
Grout is good as it dries very hard and also wears well but it does take some time to dry, 6-8 hours so effectively overnight. This may not suit your time frame, there are wall fillers that may also do the same job and dry quicker.
One drawback to grout is that it is not necessarily the most adhesive substance while wet but if you work horizontally this shouldn’t be a problem. Once dry it isn’t shifting.
As for application, you can do what you want. If you mix it with water and PVA you can brush it on in even reasonably thick pastes. If you keep it thick you can trowel it on if needs be but you might find that your surfaces are rather smooth/manmade?
Now I think of it another alternative are the hard dental/modelling plasters like Ultracal. This will dry in minutes and is as hard as grout. Look at the Hirsts Arts moulds website, their FaQ lists lots of alternatives or pop to the 4D modelshop near Tower Hill, they should have it or something similar.
Spraypaints – As you say once the foam is sealed you can spray it as much as you want.
Paints - Be warned though some paints especially textured ones can be as harmful to foam as sprays. Having painted my house in textured paint I can also say that you may find that the size of the grain and the amount of it may not give you the texture you require, look for examples of the finished texture if you can, they can also be quite shiny. Regular paint with play sand may be better and allow you to control the level of texture.
I would suggest egg shell emulsion (being very matt and water based) will be your best bet for a usable tin of paint.
I would also suggest that you may want to use an airbrush as this would assist you detailing no end.
The TLR answer is that there is a couple of great examples of how the FW chaps do their tables in the Modelling Masterclass book, can you lay you hands on a copy?
|
How do you promote your Hobby? - Legoburner "I run some crappy wargaming website " |
|
|
|
|
2011/09/19 16:11:11
Subject: MASSIVE TERRAIN HELP - Anyone know how to use tile grout?
|
|

Preacher of the Emperor
|
I've done some fake rock creation for a few events at kids' summer camps and whatnot. Our standards probably weren't nearly as high as what's needed for convincing film, but I often used the white ball-type foam, and found it made for decent rocks in a pinch. All we ever did was carve, smooth it by rubbing your hands over the edges a bunch of times, then painting/drybrushing with big tubs of discount house paints.
One one project we did try spray painting, and it worked surprisingly well. Yes, it will melt styrofoam. But 'melting' doesn't mean it'll completely obliterate your project. If used lightly, it can give a pretty interesting and hard-to-recreate texture. I'd advise trying it out on a scrap piece first to see if you like it, before dismissing it out of hand.
|
|
|
|
|
|
2011/09/19 20:16:27
Subject: MASSIVE TERRAIN HELP - Anyone know how to use tile grout?
|
|
Fixture of Dakka
|
Affix polystyrene to wood with liquid nails caulk, it'll never come back off.
You build a wire foam cutter by attaching the opposite poles of a dc power source to a chromium wire. Batteries, train power supplies and similar work. You can make them any size from small handheld to a large bow of about a meter.
For what you are doing steak knives are fine.
Premixed dry bags of sanded grout are best, you can mix to a chosen viscosity. For set work wire over newsprint with a green coat is a better base than foam, but heavier product. For foam use watered PvA glue and playground sand paint the glue and sift the sand over the board. Spray the watered PVA over the finished product, apply a good base coat as much to seal the board as color it and then detail.
|
 Avatar 720 wrote: Avatar 720 wrote:You see, to Auston, everyone is a Death Star; there's only one way you can take it and that's through a small gap at the back.
Come check out my Blood Angels,Crimson Fists, and coming soon Eldar
http://www.dakkadakka.com/dakkaforum/posts/list/391013.page
I have conceded that the Eldar page I started in P&M is their legitimate home. Free Candy! Updated 10/19.
http://www.dakkadakka.com/dakkaforum/posts/list/391553.page
Powder Burns wrote:what they need to make is a fullsize leatherman, like 14" long folded, with a bone saw, notches for bowstring, signaling flare, electrical hand crank generator, bolt cutters..
|
|
|
|
|
2011/09/19 20:17:38
Subject: MASSIVE TERRAIN HELP - Anyone know how to use tile grout?
|
|
Hurr! Ogryn Bone 'Ead!
|
on a side note the propelent in spray cans melts the styrofoam and makes it melt together making the tiny balls melt into each other and actually makes the whole thing more rigid and much more pleasing texture a friend of mine used this technique for he's board and he even decided not to fill over it afterwards as it set to a nice 'rocky' finish
as sugested if you can lay your hands on a bit try it out
but for your project i sugest the BLUE roofing insulation i find it more better to work with then the pink and yellow types and for bonding use contact adhesive apply to both surfaces leave a while then press together (as per instrustions on tin). buy this in the tins and spread it on with any thing a piece of card will do (only need to do the edges and a few lines in the center)
also this or any adhesive wont melt your foam during bonding to the hard board as your foam comes sandwich between an insolating layer
for cutting the foam fastest way prob is a bread knife it also gives a pretty cool effect
Automatically Appended Next Post:
p.s forgot to say it applying sand or any other substence to the foam after cutting you will need to seal it first as the water down pva will just soak away
|
|
This message was edited 1 time. Last update was at 2011/09/19 20:19:29
Chibi Bodge-Battle wrote:
Bedtime Horlicks malty drink: ON
Comfy Slippers: ON
and relax...
Only Slightly Crazy wrote: GO CROGGY GO!
Underhand wrote:
The answer is never the Devildog.
|
|
|
|
|
2011/09/20 11:04:00
Subject: MASSIVE TERRAIN HELP - Anyone know how to use tile grout?
|
|
Dispassionate Imperial Judge
|
notprop wrote:LOADS OF USEFUL STUFF
THANKS! Load of useful stuff there. I'll look into some of those more useful fixtures. I've had a look for blue foam, but it seems pretty hard to get hold of in less-than-wholesale amounts. 4D modelshop sell it, but at ridiculous prices. I have a few leads, but I've also got my hands on some free stuff, that may or may not work (see below). I'll give up the hot wire, and pick up a few more bread knives, and eggshell emulsion should be standard from Wickes tomorrow morning... Zefig wrote:One one project we did try spray painting, and it worked surprisingly well. Yes, it will melt styrofoam. But 'melting' doesn't mean it'll completely obliterate your project. If used lightly, it can give a pretty interesting and hard-to-recreate texture. I'd advise trying it out on a scrap piece first to see if you like it, before dismissing it out of hand.
I've 'accidentally' melted polystyrene before, mostly with glue, but I'll have a go. My main worry is it weakening beneath the surface. croggy wrote:but for your project i sugest the BLUE roofing insulation i find it more better to work with then the pink and yellow types and for bonding use contact adhesive apply to both surfaces leave a while then press together (as per instrustions on tin). buy this in the tins and spread it on with any thing a piece of card will do (only need to do the edges and a few lines in the center)
also this or any adhesive wont melt your foam during bonding to the hard board as your foam comes sandwich between an insulating layer
for cutting the foam fastest way prob is a bread knife it also gives a pretty cool effect
Thanks! Bread knives on the list, blue foam on my search... unless... -------------------------------------------------------------------------------- SO, another set designer friend just donated this. Apparently it's been lying around their studio for ages. But we don't know what it is!! It was from an old-school film modelmaker who left it behind when he moved out. Now, I've never actually used blue or pink foam so I'm not sure how it compares, but this stuff a hell of a lot finer than white polystyrene. It's pale yellow, and hard, and sort of crumbles when broken. It reminds me a bit of that green stuff florists use, but much less crumbly. Does anyone know what foam I've got? I can still go and get white/blue stuff tomorrow, but obviously if this is useable then that would save a bit of cash... 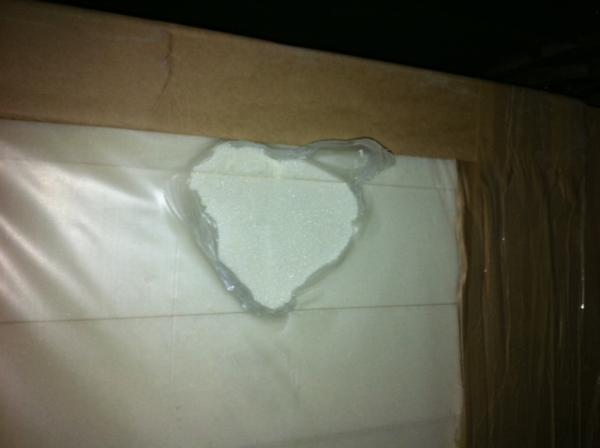 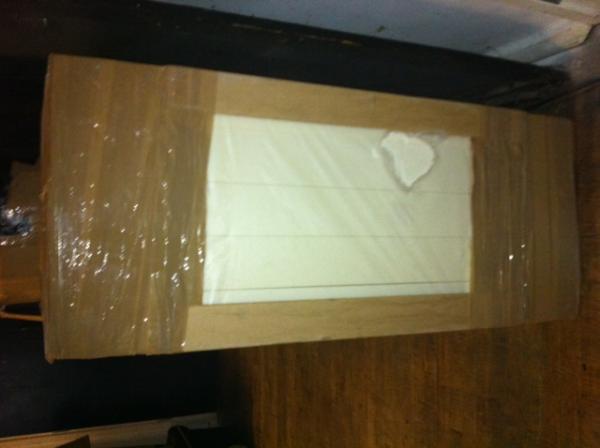 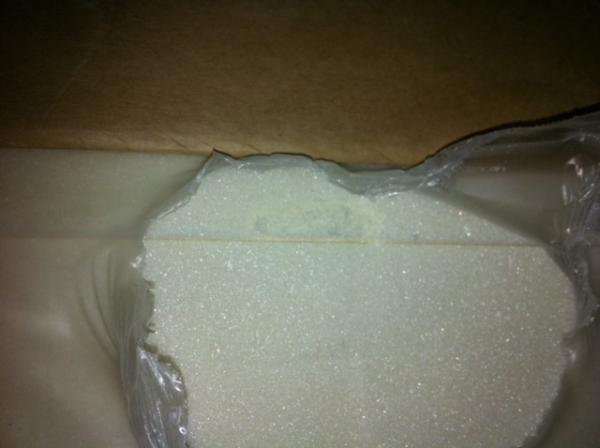
|
|
This message was edited 1 time. Last update was at 2011/09/20 11:04:28
|
|
|
|
|
2011/09/20 13:19:12
Subject: BUILDING CAVE TERRAIN - Anyone know what sort of styrofoam this is?
|
|
Wrathful Warlord Titan Commander
|
I can't really make it out, but many many years ago I nicked some yellow roofing insulation board from school (what can I say, I was a naughty boy!) while they were redoing their rooves with the intent of making tables. I seem to remember it making a very fine dust when cut but it was also quite itchy when you got it on your hands. Horrible stuff, it was but really chedar yellow so it doesn't look like what you have there. Either way if you are not sure, best to wear gloves and a filter mask and clear up all your dust/cuttings and dispose of in a sealed bag. No matter what it is it will be fine once it is sealed. I also should have posted this from the good people of antenticitis workshop. They give allot of info re the various types of foam and working with it. There is also allot of information that will help you to find alternative sources. http://www.antenocitisworkshop.com/news/2010/11/blue-foam-pink-foam-foamboard-and-styrofoam
|
|
This message was edited 1 time. Last update was at 2011/09/20 13:20:14
How do you promote your Hobby? - Legoburner "I run some crappy wargaming website " |
|
|
|
|
2011/09/20 22:47:53
Subject: BUILDING CAVE TERRAIN - Anyone know what sort of styrofoam this is?
|
|

Anti-Armour Swiss Guard
|
Looks like an expanded polyurethane foam (they are also used as insulation board in some areas). It's often yellow, but it can also come in white.
For a natural looking "rock" wall carved from foam, my personal preference is a product called "Foamular Foamex XPS" (Foamular is the company).
It can be chipped and will create a realistic looking rock face - it was used to create the miniature Mustafar sets for SW ep3 (the lava planet) - the guys went through a truckload of it.
I don't know if similar is available internationally.
|
I'm OVER 50 (and so far over everyone's BS, too).
Old enough to know better, young enough to not give a ****.
That is not dead which can eternal lie ...
... and yet, with strange aeons, even death may die.
|
|
|
|
|
2011/09/20 22:53:01
Subject: BUILDING CAVE TERRAIN - Anyone know what sort of styrofoam this is?
|
|
Battleship Captain
|
chromedog wrote:Looks like an expanded polyurethane foam (they are also used as insulation board in some areas). It's often yellow, but it can also come in white.
For a natural looking "rock" wall carved from foam, my personal preference is a product called "Foamular Foamex XPS" (Foamular is the company).
It can be chipped and will create a realistic looking rock face - it was used to create the miniature Mustafar sets for SW ep3 (the lava planet) - the guys went through a truckload of it.
I don't know if similar is available internationally.
That is florists polystyrene, It could be used for a cave, but wouldn't look all that realistic, as this is more suited for baseboards and craters. Automatically Appended Next Post: also, Spackiling should be pre-mixed as it is easier to use, for paint you need to use rollers and overbrushing, light grey and terra cotta
|
|
This message was edited 1 time. Last update was at 2011/09/20 22:55:21
|
|
|
|
|
2011/09/21 03:18:19
Subject: Re:BUILDING CAVE TERRAIN - Anyone know what sort of styrofoam this is?
|
|
Lead-Footed Trukkboy Driver
Youngwood, PA
|
Don't know if it is available over there but Durham's Water Putty is a pretty good alternative to grout. It is mixed with water so you can control the consistency pretty easily and doesn't shrink. It hardens pretty quickly and gets pretty hard as well. I'm currently using it to make a stone floor for a blood bowl pitch and I'm impressed with its ease of use.
As far as applying it I use a small paint scraper for larger areas and just use my fingers for smaller areas. it can also be smoothed out with a wet finger when it is starting to harden.
|
|
|
|
|
2011/09/21 18:51:23
Subject: BUILDING CAVE TERRAIN - Anyone know what sort of styrofoam this is?
|
|
Dispassionate Imperial Judge
|
Ok! Progress! We've built our cave wall! All started with a trip to Wickes this morning. We laid down our two sheets of hardboard and the tools. 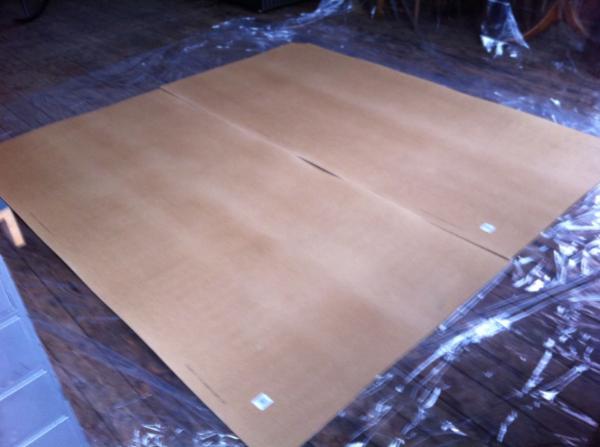 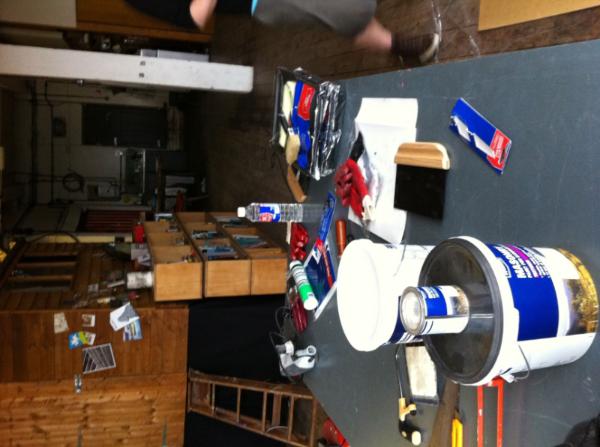 Then stuck down the foam with adhesive paste and cut some to make a 6x6' square, all covered in dust masks and pvc gloves, of course, and with a hoover on standby. 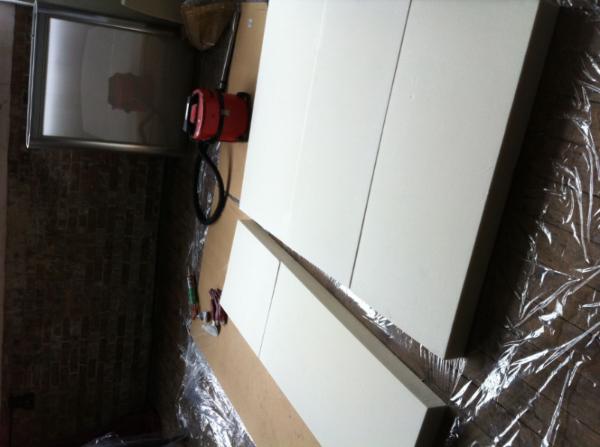 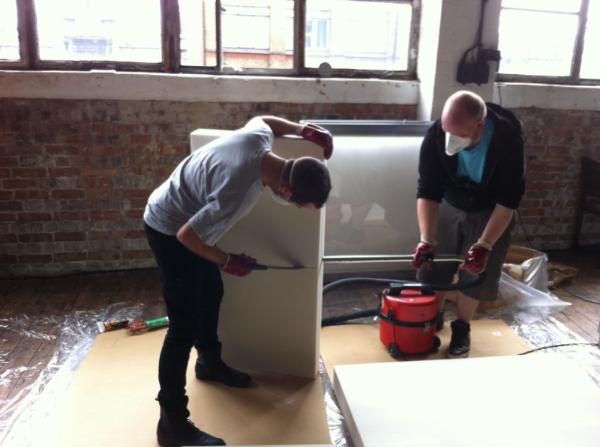 We then went at the carving. We found that the craft knives gave the cleanest cut, but Plasterboard saws were the perfect balance of speed and destruction. They leave behind a very rough surface, but we found that just rubbing our hands over it very vigorously with our pvc gloves on gave us a really good texture.  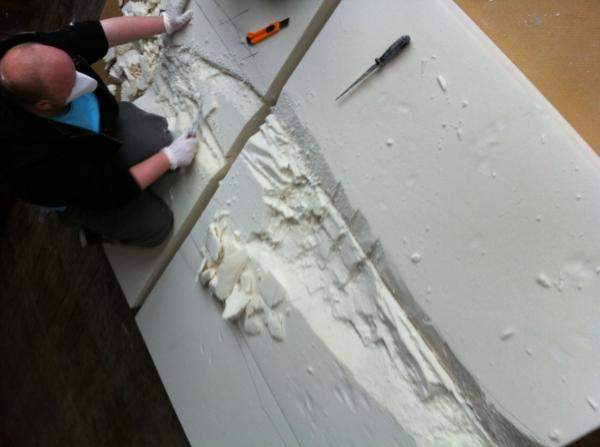 Et Voila! This took us about two hours, and we decided to have some crumpets and tea and go off to a rehearsal of the show. 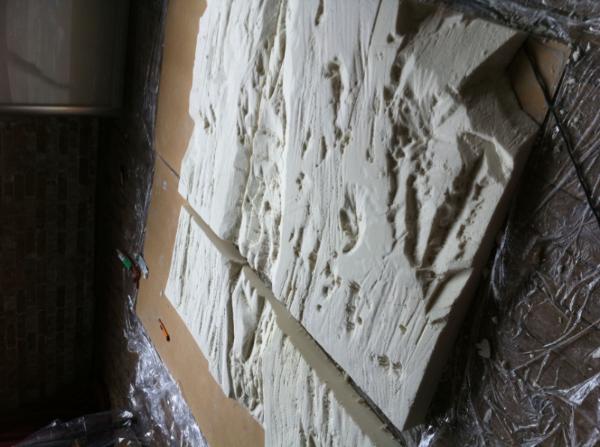  When we got back, we gave the whole thing a thin layer of Wickes Instant Texture (which is basically artex/grout). Tried to keep this really thin, so we didn't lose any of the relief we'd rubbed in. We just wanted to seal the whole thing so no more foam dust could escape. Took us about an hour and a half. We sealed the sides as well. 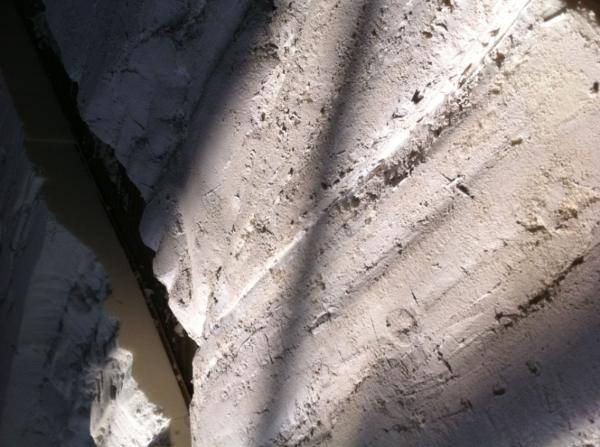 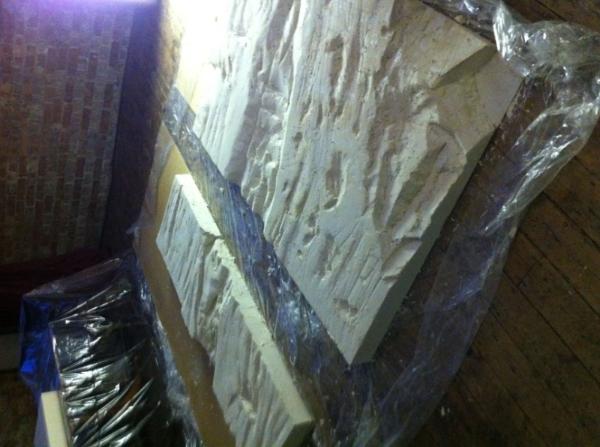 Now it's the evening, we're leaving this out overnight, and we'll start painting tomorrow!
|
|
This message was edited 1 time. Last update was at 2011/09/22 06:40:17
|
|
|
|
|
2011/09/21 22:22:58
Subject: Re:BUILDING CAVE TERRAIN - Wall made, painting tomorrow!
|
|
Battleship Captain
|
that looks really good
|
|
|
|
|
|
2011/09/23 21:26:40
Subject: BUILDING CAVE TERRAIN - Wall made, painting tomorrow!
|
|
Hurr! Ogryn Bone 'Ead!
|
awesome job man very nice indeed
|
Chibi Bodge-Battle wrote:
Bedtime Horlicks malty drink: ON
Comfy Slippers: ON
and relax...
Only Slightly Crazy wrote: GO CROGGY GO!
Underhand wrote:
The answer is never the Devildog.
|
|
|
|
|
2011/09/24 11:22:22
Subject: Re:BUILDING CAVE TERRAIN - Wall made, painting tomorrow!
|
|
Longtime Dakkanaut
|
yeah,
Looking good dude!
Panic...
|
|
|
|
|
|
2011/09/24 12:44:13
Subject: BUILDING CAVE TERRAIN - Wall made, painting tomorrow!
|
|

Hardened Veteran Guardsman
|
Woooooooo, I know that's for a cave wall but the possibilities for tabletop terrain are endless.
Awesome advice and awesome pictures.
|
|
|
|
|
2011/09/24 14:15:41
Subject: BUILDING CAVE TERRAIN - Wall made, painting tomorrow!
|
|
Longtime Dakkanaut
The ruins of the Palace of Thorns
|
Interesting... weeeery interesting.
|
|
|
|
|
|
2011/09/24 18:49:29
Subject: BUILDING CAVE TERRAIN - Wall made, painting tomorrow!
|
|
Dispassionate Imperial Judge
|
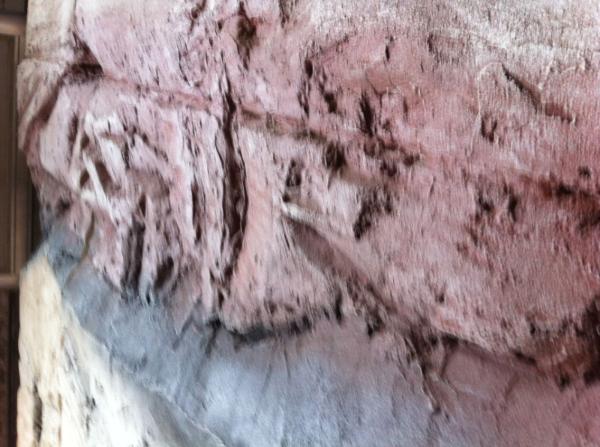
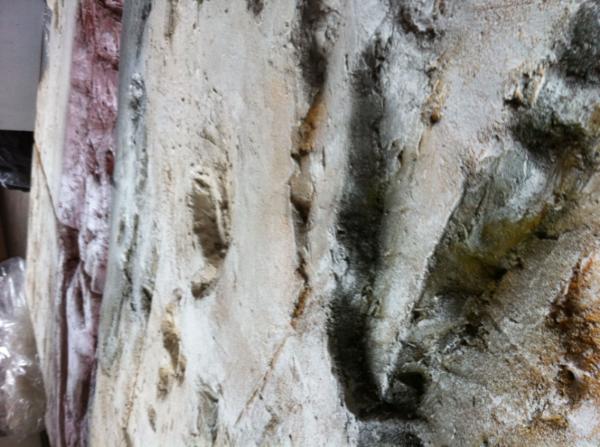
Thanks Guys. So, the next day we started the painting. First, spraying it various vaguely rocky but mostly REALLY BRIGHT colours.
We then started the process of blending and drybrushing it back to sandstone using block brushes.
(I wish I knew how to turn these the right way up. There's even an UPSIDE DOWN one below!)
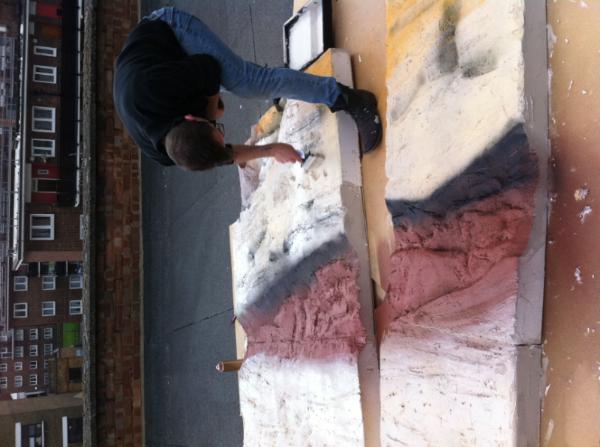
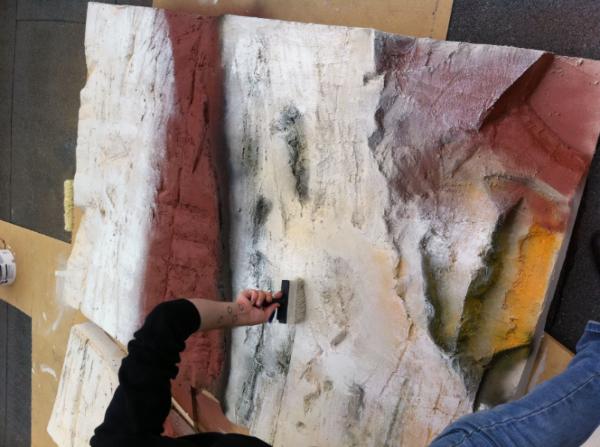
By the end of the day this is what we had achieved!
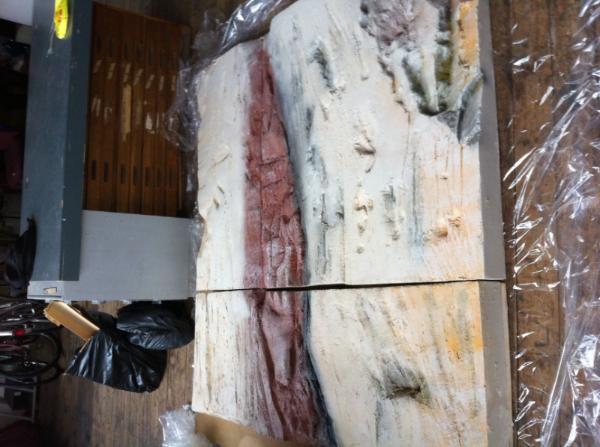
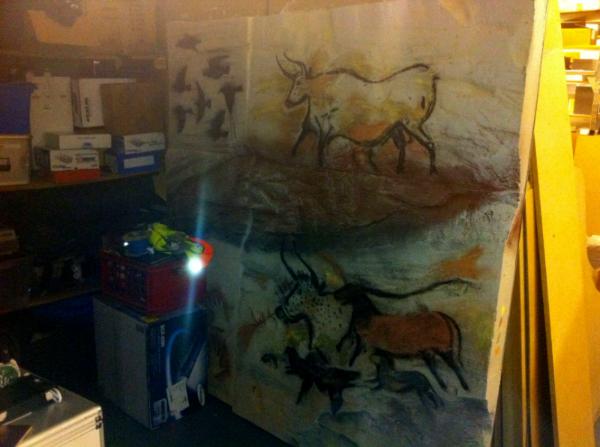
Then we got a scenic painter to come in and paint some cave animals all over it. Here's me posing in a cave. Nice, huh?

Anyway, we did the shoot today. I'll post up some pics as soon as I've looked through the files. When I get back from the show, I'll start the process of converting this into a game table - I think a change of baseboard to 3mm ply is in order, and I'll need to dull down the brighter colours and remove the cave paintintgs!!
|
|
|
|
|
|
2011/09/24 18:57:10
Subject: Re:BUILDING CAVE TERRAIN - Wall made, painting tomorrow!
|
|
Battleship Captain
|
looks good
|
|
|
|
|
|
2011/09/25 09:27:32
Subject: BUILDING CAVE TERRAIN - Wall made, painting tomorrow!
|
|
Wrathful Warlord Titan Commander
|
Nicely done Ian.
Will we see the finished photos of presumably scantily clad cave girls posing by the finished wall?
|
How do you promote your Hobby? - Legoburner "I run some crappy wargaming website " |
|
|
|
|
2011/09/25 11:32:59
Subject: BUILDING CAVE TERRAIN - Wall made, painting tomorrow!
|
|
Longtime Dakkanaut
|
yeah,
Looking good dude... so quick!
I look forward to seeing the video.
Have you considered what colour of game board this could be?
Mars red... although grey will work with your terrain.
Panic...
|
|
|
|
|
|
2011/09/25 14:43:26
Subject: BUILDING CAVE TERRAIN - Wall made, painting tomorrow!
|
|
Hurr! Ogryn Bone 'Ead!
|
absolutely awesome job dude
|
Chibi Bodge-Battle wrote:
Bedtime Horlicks malty drink: ON
Comfy Slippers: ON
and relax...
Only Slightly Crazy wrote: GO CROGGY GO!
Underhand wrote:
The answer is never the Devildog.
|
|
|
|
|
2011/09/26 19:13:59
Subject: BUILDING CAVE TERRAIN - Wall made, painting tomorrow!
|
|
Dispassionate Imperial Judge
|
Panic wrote:yeah,
Looking good dude... so quick!
I look forward to seeing the video.
Have you considered what colour of game board this could be?
Mars red... although grey will work with your terrain.
Well, I was thinking of making this my main/only game board. I haven't really got space for two sets of terrain. The texture of this is MUCH better than the flat grey one, so I thought I might retexture some of my existing stuff (hills and trenches to start with) and make it all 'sandstoney' and artexed - using the colour most of the wall currently is. The hardboard backing isn't so great, so I may use the current grey plywood as a new base.
I thought this actually might go really well with my Arbites bases - thought of constructing some simple bombed out buildings from foamboard, where the walls are grey and the floors are the same tiled effect as the Arbites bases (using moulded plastic from 4D modelshop).
notprop wrote:Nicely done Ian.
Will we see the finished photos of presumably scantily clad cave girls posing by the finished wall?
NEW ARMY.
|
|
|
|
|
|
2011/09/26 19:40:14
Subject: BUILDING CAVE TERRAIN - Wall made, painting tomorrow!
|
|
Mekboy Hammerin' Somethin'
|
I have worked with that stuff before (or at least something that looked rediculously identical) and I can tel you that stuff cost a fortune..................... probably £300-400 quid right there... I think it's called lablite or something but i will check with my mate who still works as a modelmaker. also I remember the surface being kinda fragile, the stuff i used which looks identical didn't melt when superglued so you could presumably coat it in some sort of lay up resin (the kind they use for fibre glass but without the glass fibre) to make the surface stronger... nice looking board overall.
|
|
|
|
|
|
2011/10/01 15:37:52
Subject: Re:BUILDING CAVE TERRAIN - Wall made, painting tomorrow!
|
|
Longtime Dakkanaut
|
yeah,
Are you going to show us any of the video?
Panic
|
|
|
|
|
|
2011/11/24 14:34:32
Subject: BUILDING CAVE TERRAIN - Added film stills!
|
|
Dispassionate Imperial Judge
|
|
|
|
|
|
|
2011/11/24 14:49:49
Subject: BUILDING CAVE TERRAIN - Added film stills!
|
|
Wicked Canoptek Wraith
Where you least expect me
|
ArbitorIan wrote:Ok, so, here's the plan.
For work, I have to do a bit of filming in front of some natural-looking rock. Closeups of hands brushing down cave walls, tracing cave paintings etc. Due to time, we're going to have to do this in front of some fake 'natural rock' wall, in my studio. Which I'm probably going to have to build. We're probably going to need 2 8x4ft sheets, and I have about two days this week to build and paint it.
So I thought I'd get a double use out of this and turn it into a gaming table afterwards! Massive moonscape/rocky moulded terrain boards anyone? YES.
However, I don't know what I'm doing. As far as I can tell from the internet, my plan should be as follows.
- Go to a builders merchant. Buy two 8x4 sheets of hardboard (backing) and two 8x4 sheets of 3" polystyrene.
- Affix polystyrene to hardboard
- Cut polystyrene into rocky cave look with knives/saw. Possibly hot wire cutter.
- Paint base colours
- Drybrush lighter colours.
- Spraypaints to finish
QUESTIONS
1. How do you make a hot wire cutter? It will need to be BIG. Do I really have time to do this?
2. Affixing polystyrene to hardboard - with what? PVA Glue? Is there anything that dries quicker?
3. TILE GROUT. What is the best thing to go for - pre-mixed or just the solids? I need this to dry overnight, really. Also, everything on the Wickes website has customer reviews citing excessive shrinkage. I imagine this would be a problem on a large scale like this. Anyone recommend anything else? ( UK products)
4. TILE GROUT. How do i spread/work with it?
4. Spraypaints. I know they'll usually melt poly, but surely after a coat of tile grouts and regular paint they'll be fine?
5. Regular paint. What should I use. Again, it would be great if it was something that dried in a couple of hours.
Thanks!!!
Automatically Appended Next Post:
Natural looking rock references...
|
|
|
|
|
|
|
|

 Order of the Sable Heart
 Grave Knights
 House Rouen