| Author |
Message |
 |
|
|
|
|
Advert
|
Forum adverts like this one are shown to any user who is not logged in. Join us by filling out a tiny 3 field form and you will get your own, free, dakka user account which gives a good range of benefits to you:
- No adverts like this in the forums anymore.
- Times and dates in your local timezone.
- Full tracking of what you have read so you can skip to your first unread post, easily see what has changed since you last logged in, and easily see what is new at a glance.
- Email notifications for threads you want to watch closely.
- Being a part of the oldest wargaming community on the net.
If you are already a member then feel free to login now. |
|
 |
2012/08/06 20:51:20
Subject: n0t_u's Painting Blog - 6/8/2012 - Soulburner - Gem & Lens Mini-Tutorial
|
|

Shroomin Brain Boy
|
that gem looks really ace! and thanks for such a good and indepth step by step tut on gem making!!!
|
|
|
|
 |
|
2012/08/07 07:46:03
Subject: Re:n0t_u's Painting Blog - 18/7/2012 - Summoning Circle Completed
|
|

Quick-fingered Warlord Moderatus
|
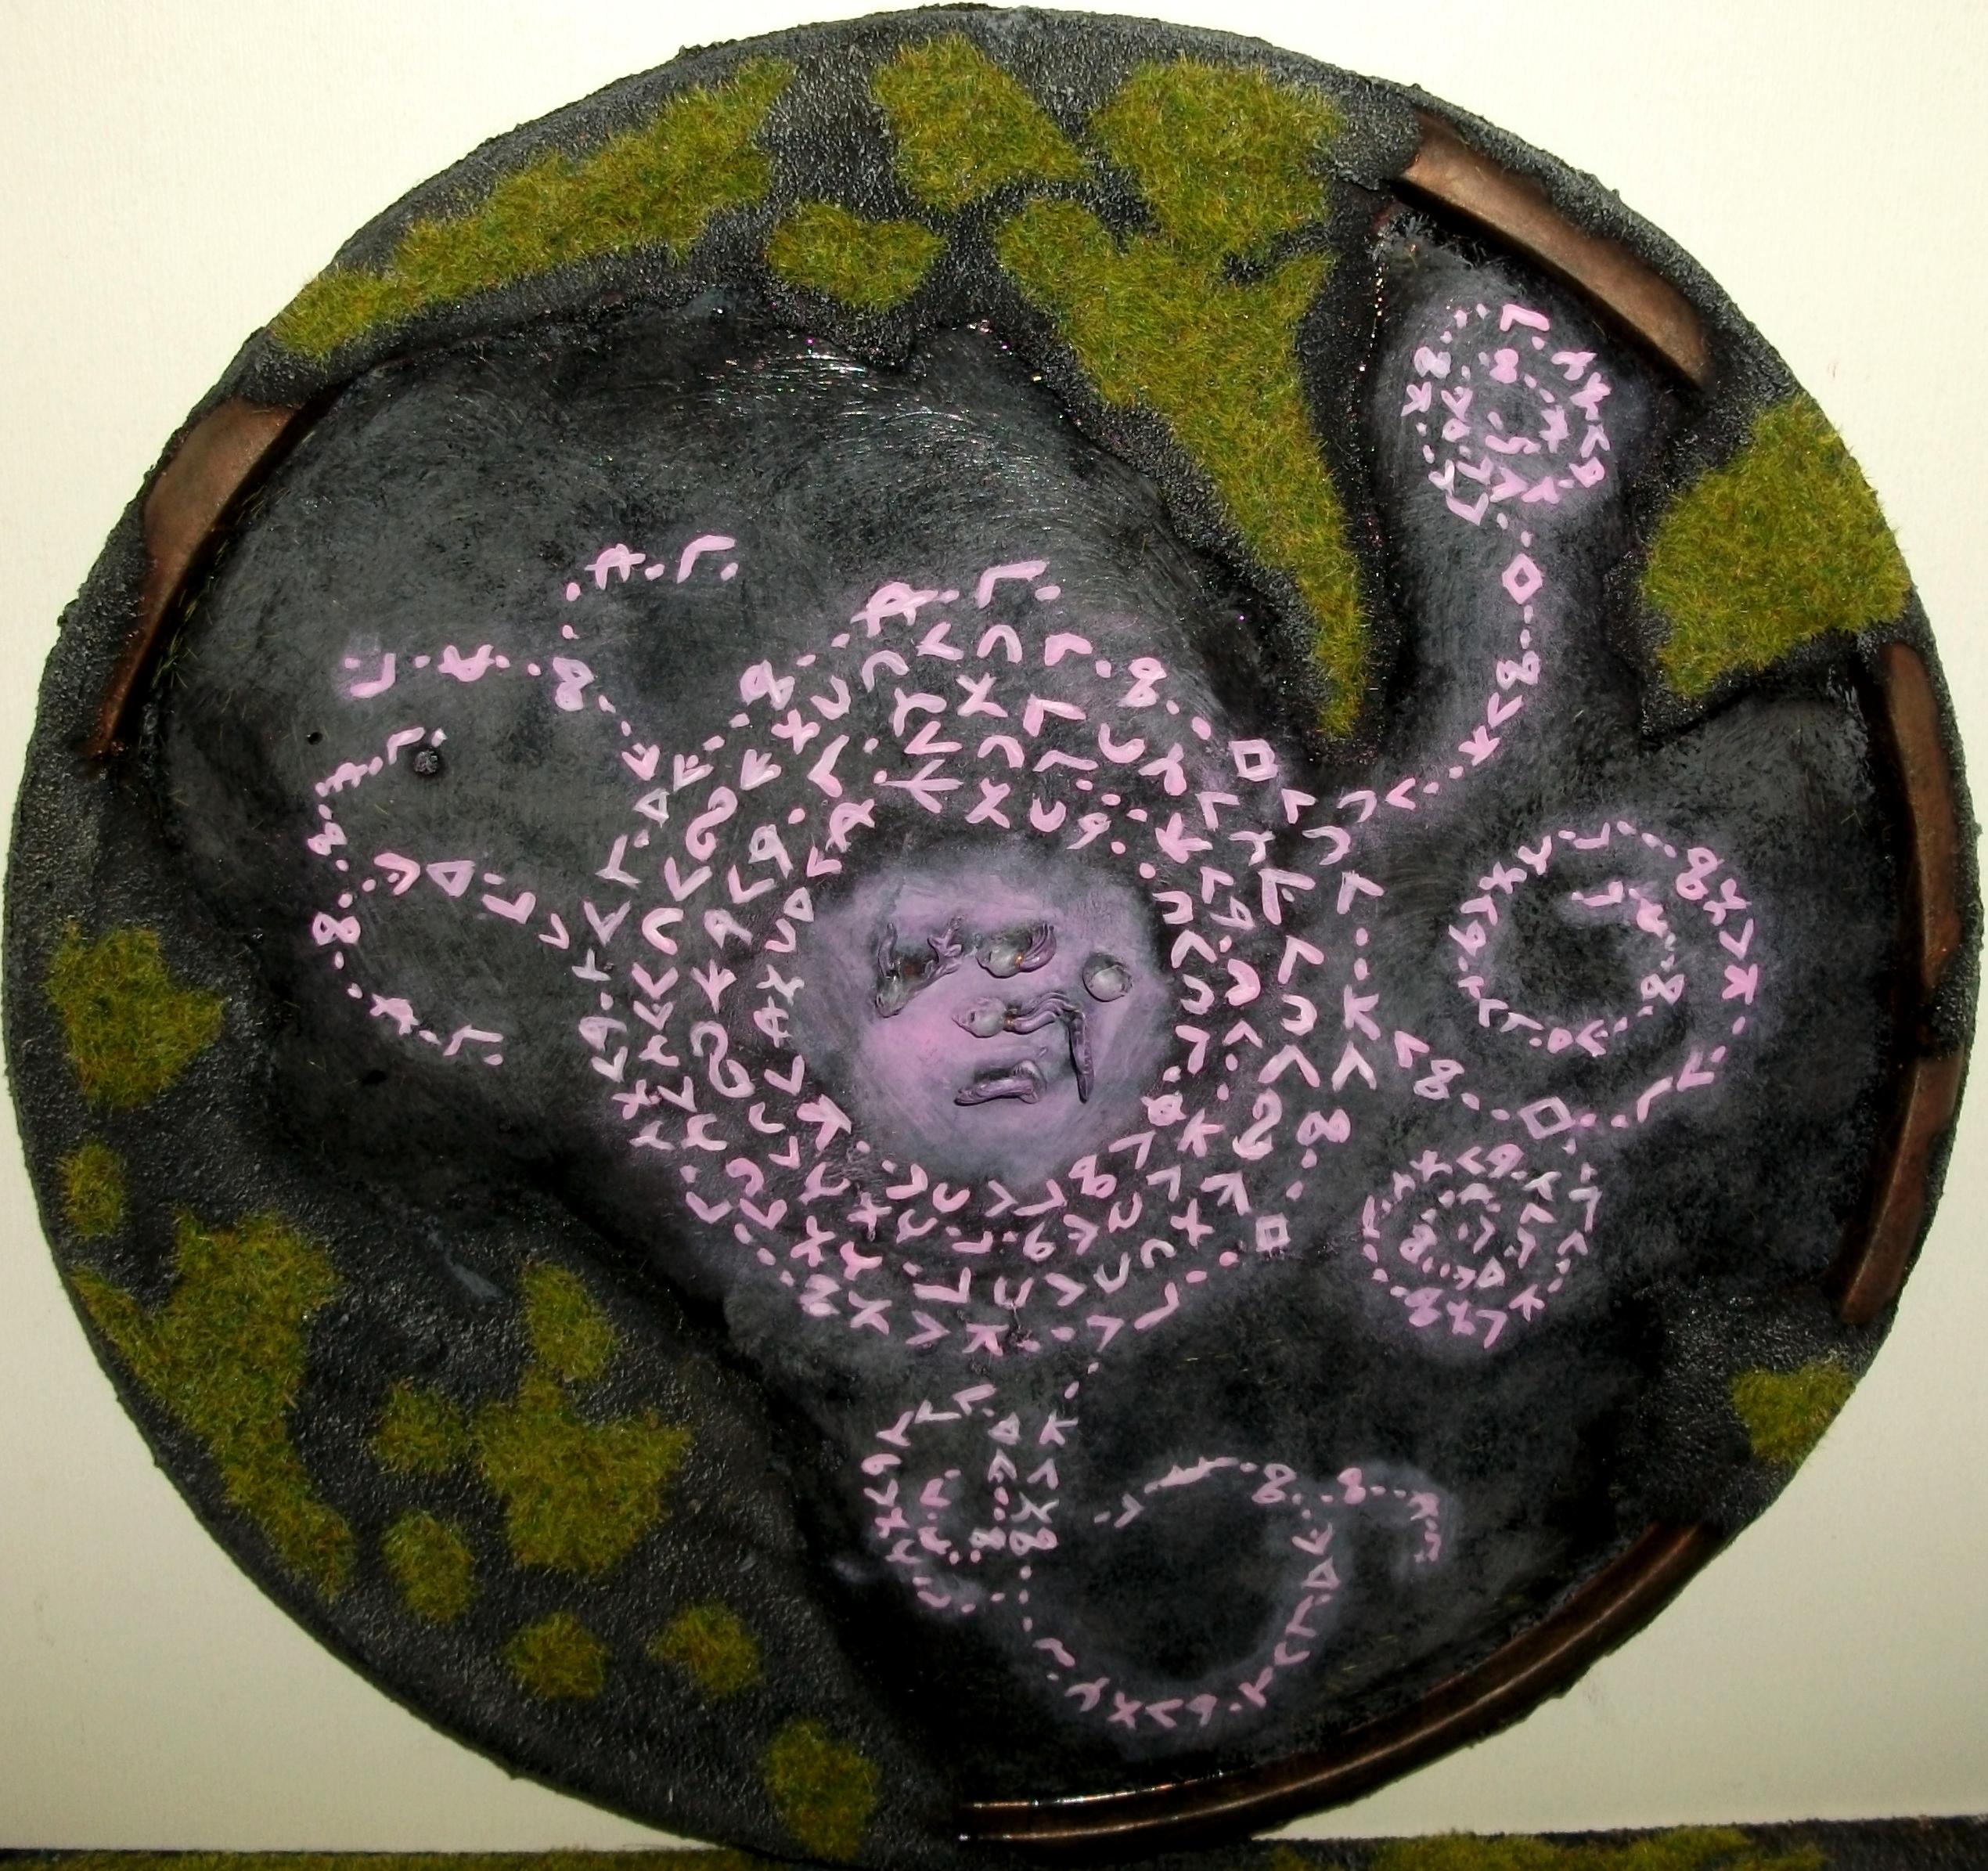
n0t_u wrote:Done now, which means a fair few pictures for this update.
It's about 10-10.5" across. Which means its diameter is about 1" smaller than the actual skyshield, but that creates more of a disadvantage than an advantage. That's not even counting the flaps which grant it an additional 1.5". Fair trade off for being ground level I suppose. Still not sure if that's another disadvantage or not, but I wasn't really thinking that way when I started it. 
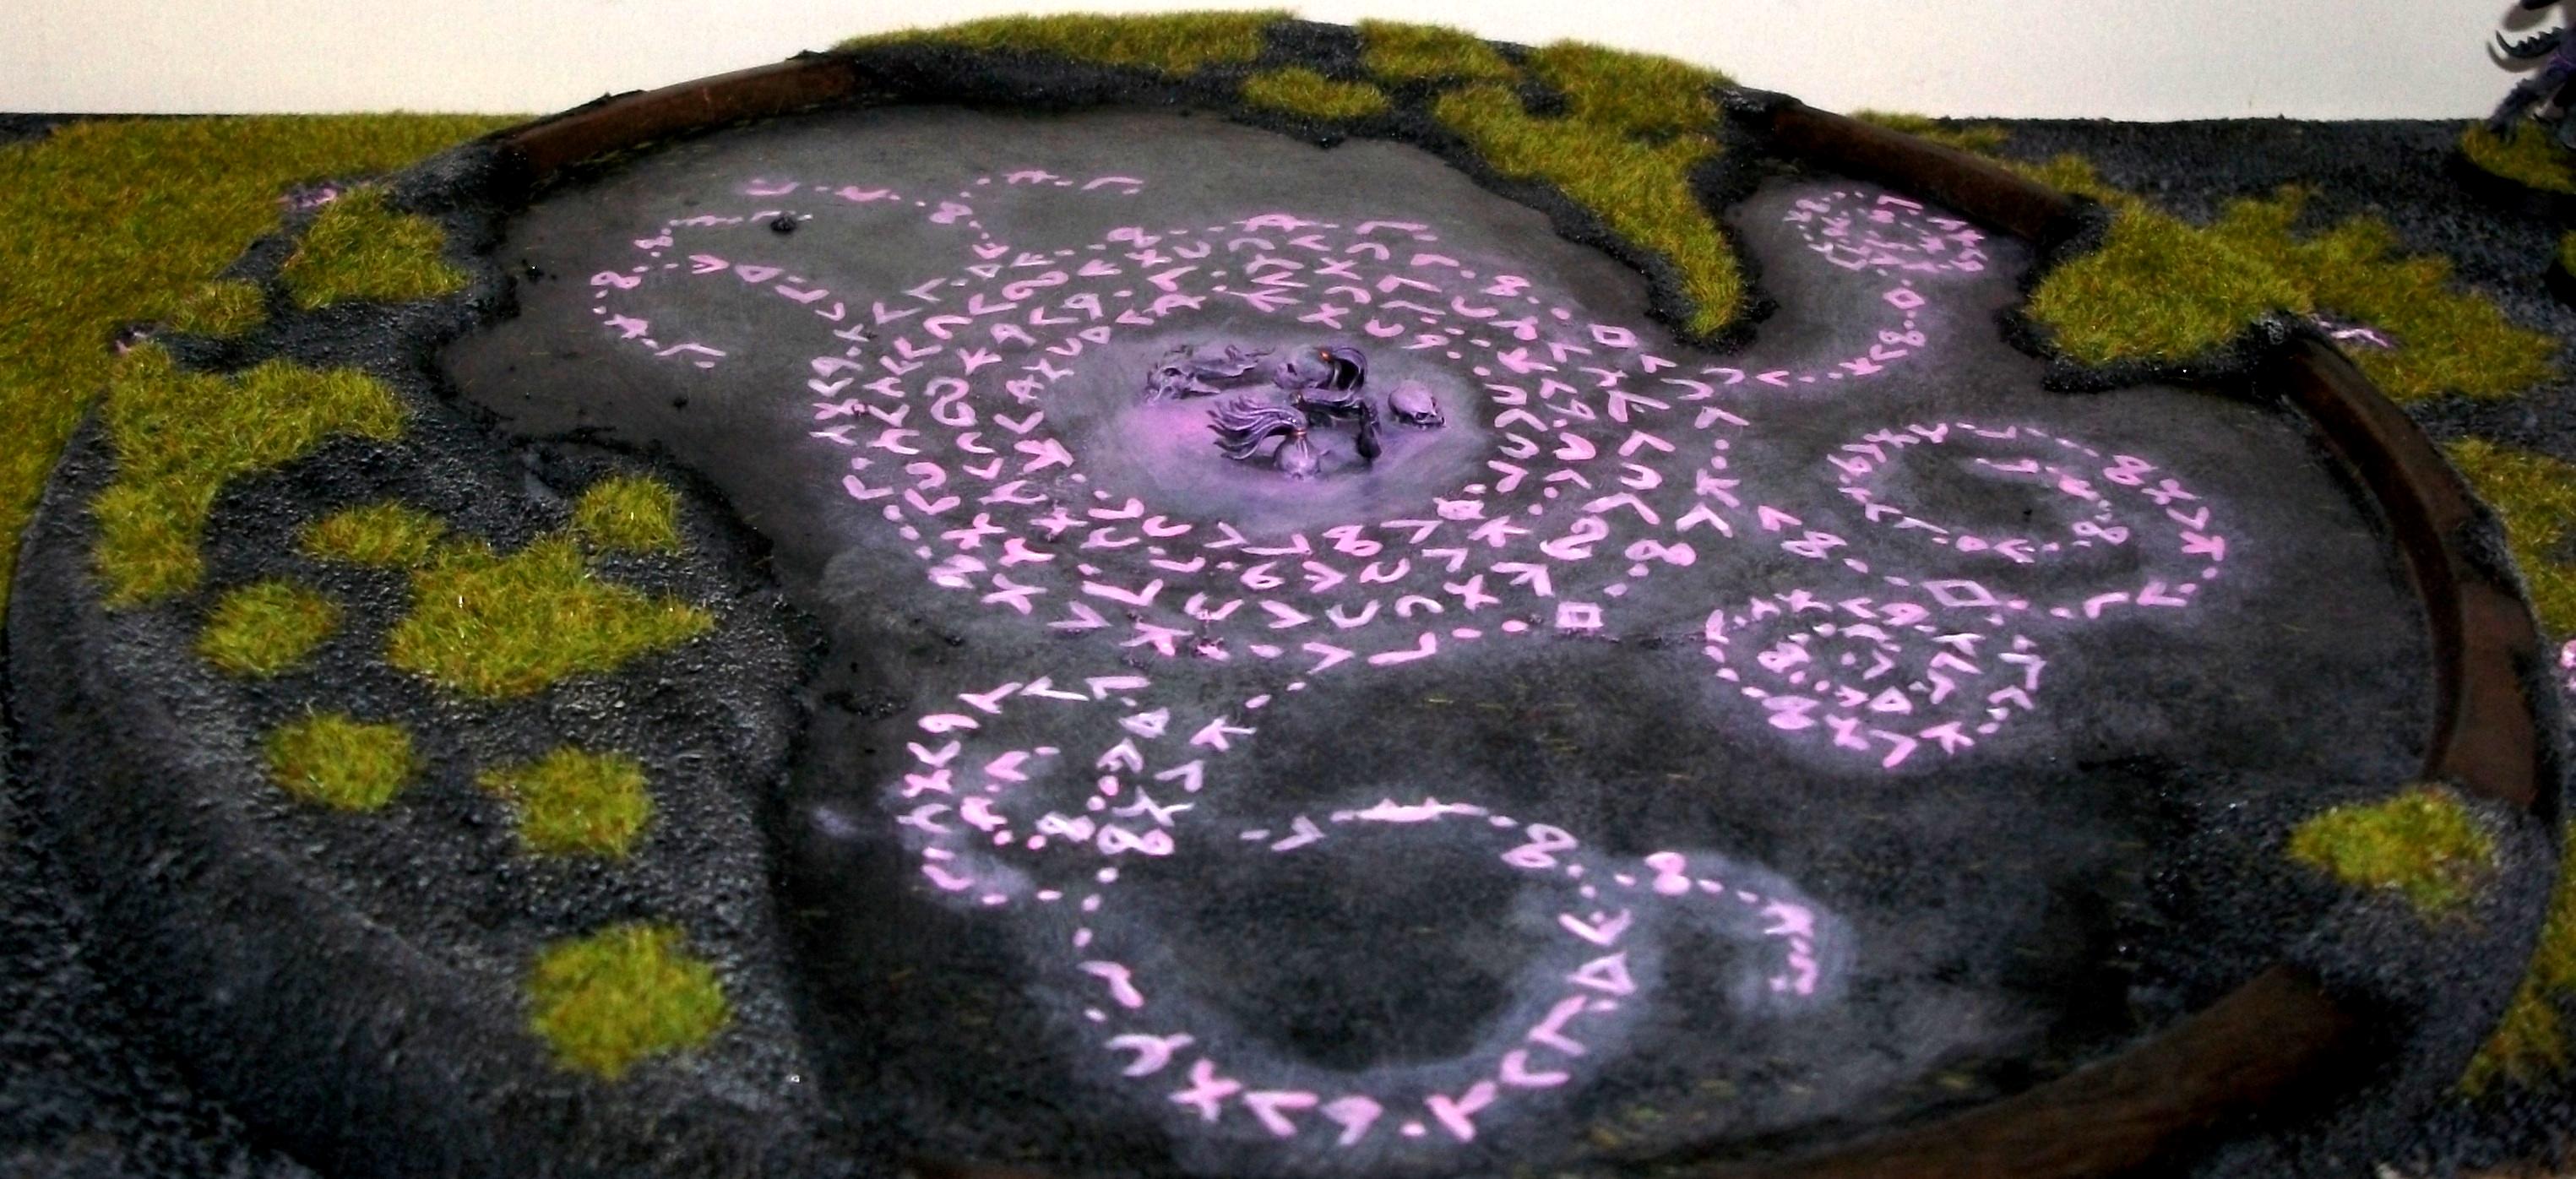
Surprisingly is not as crowded as you'd think in the end. This being a full Daemonette squad.
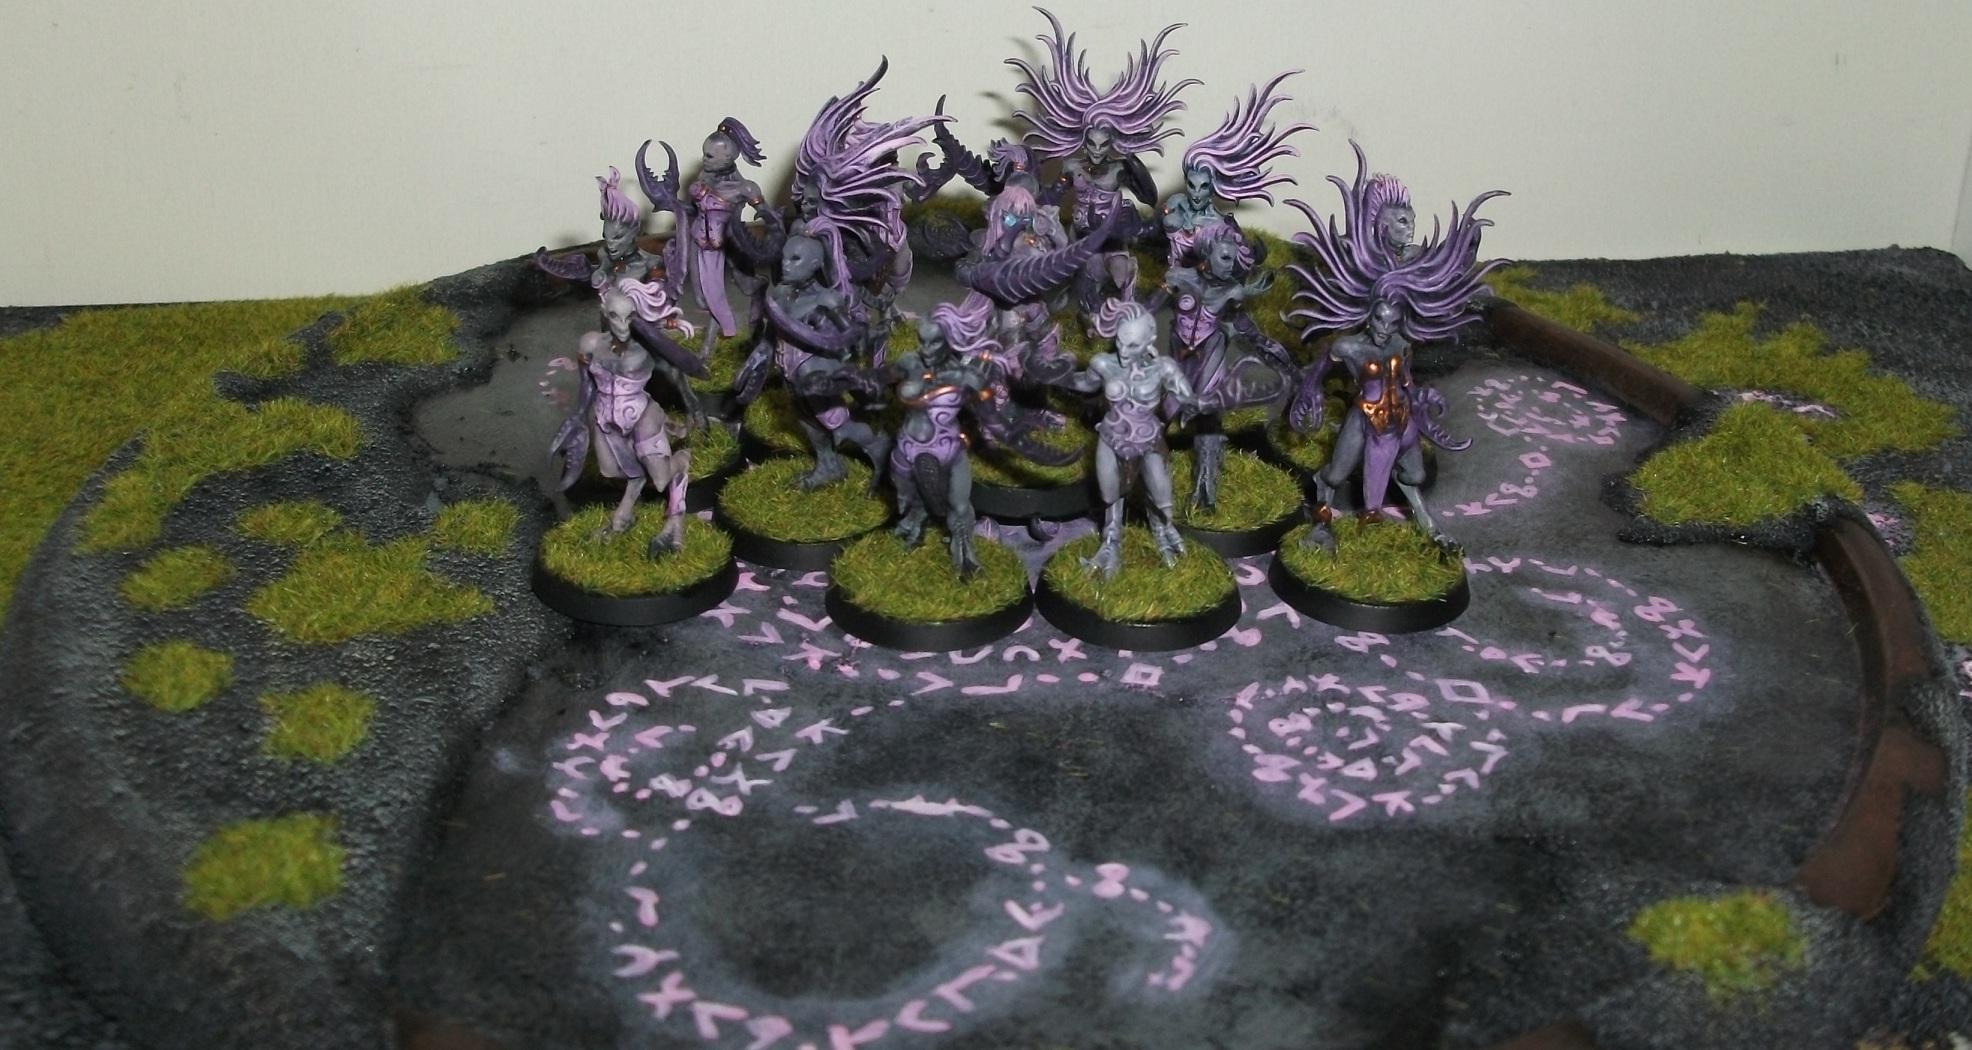
Then even enough room for a second.
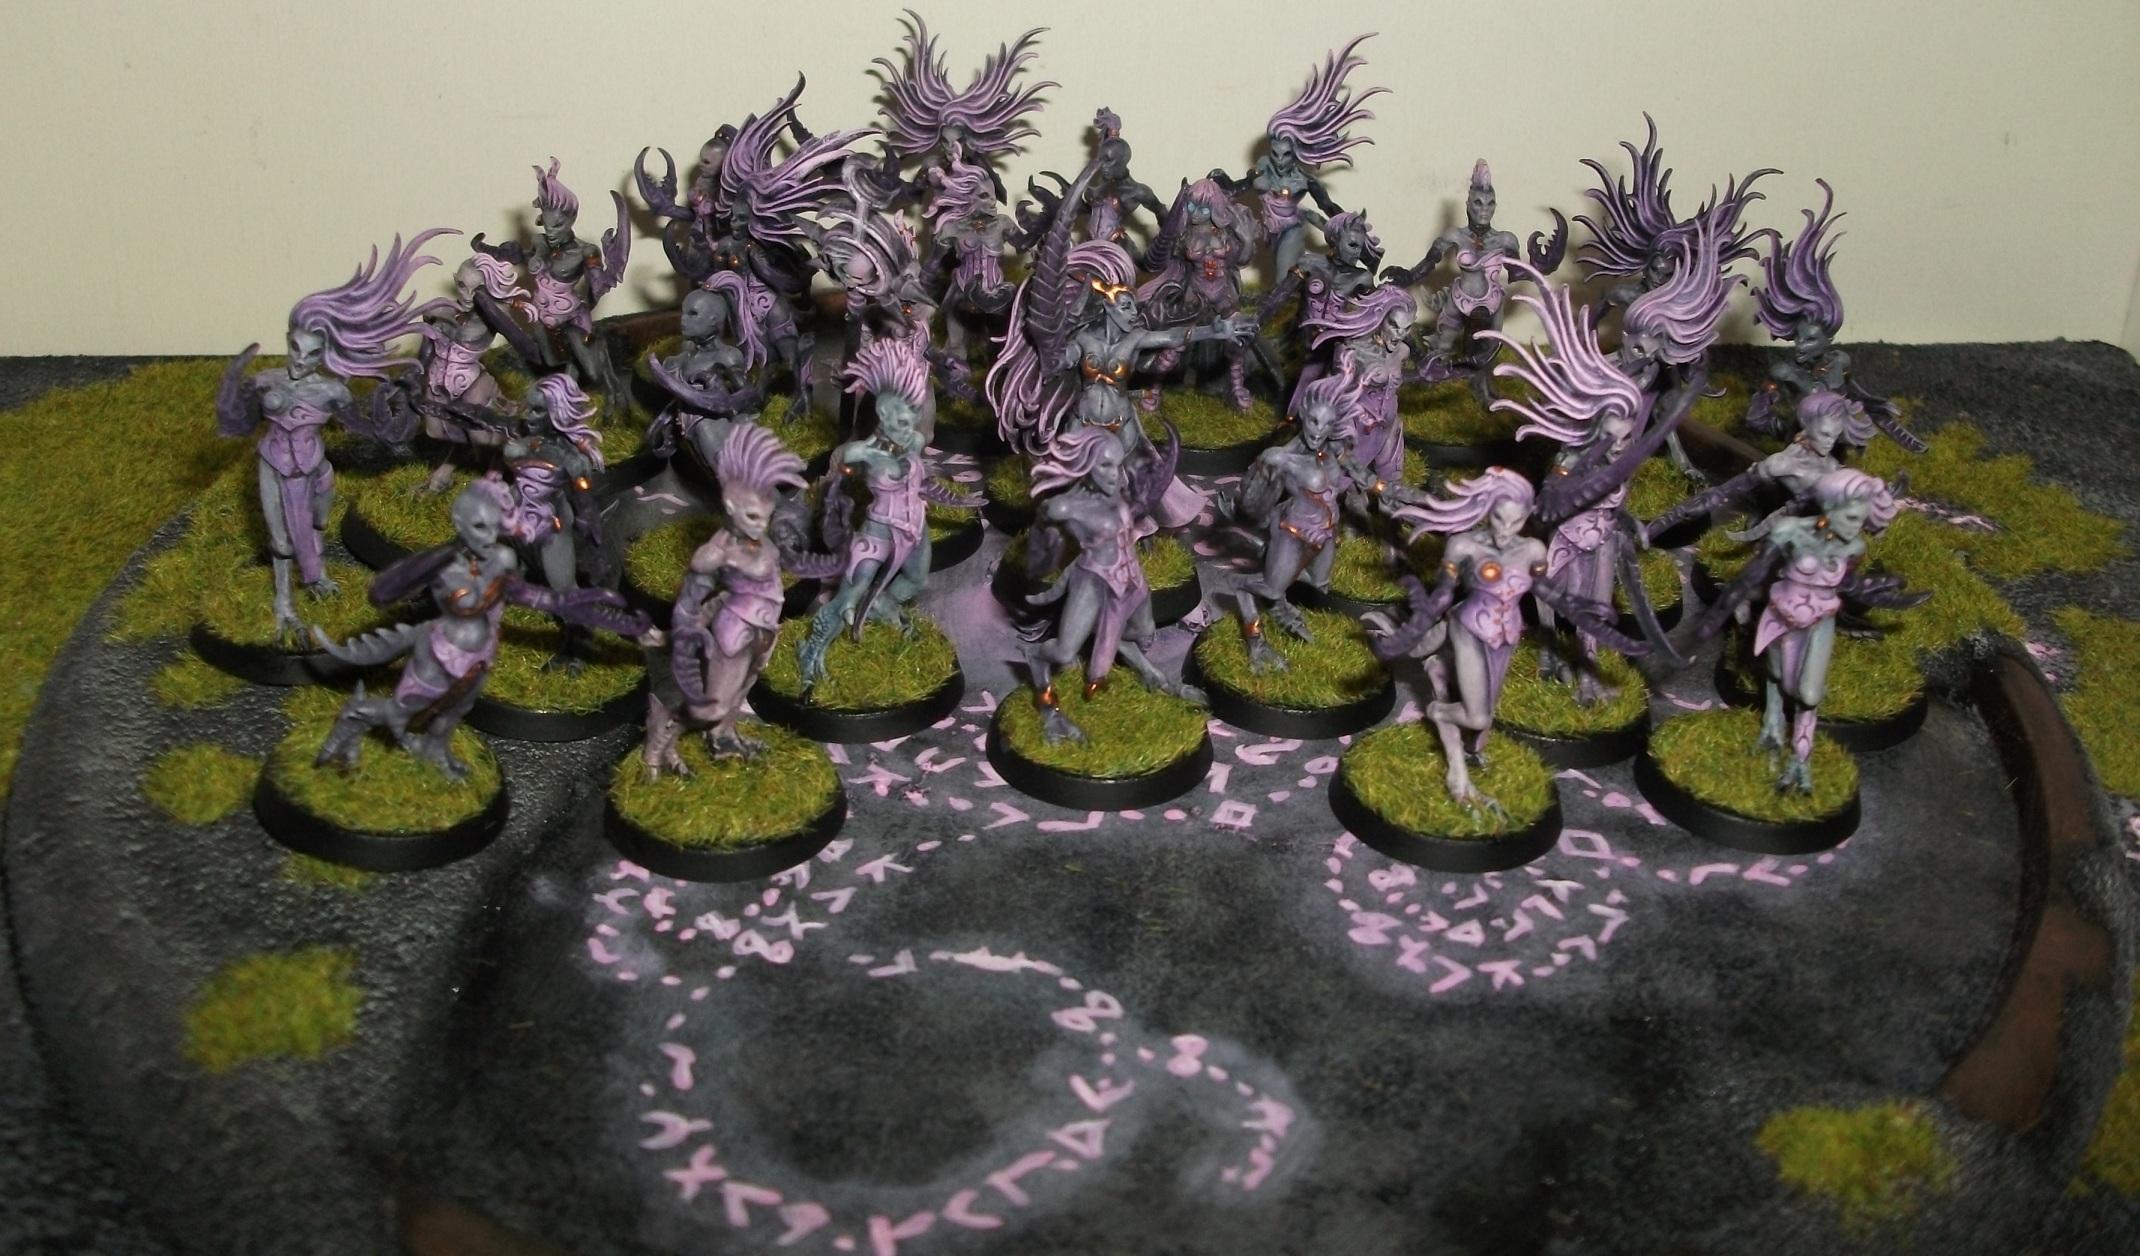
It only starts to look crowded once I spread them out a bit more and throw in Iluni.
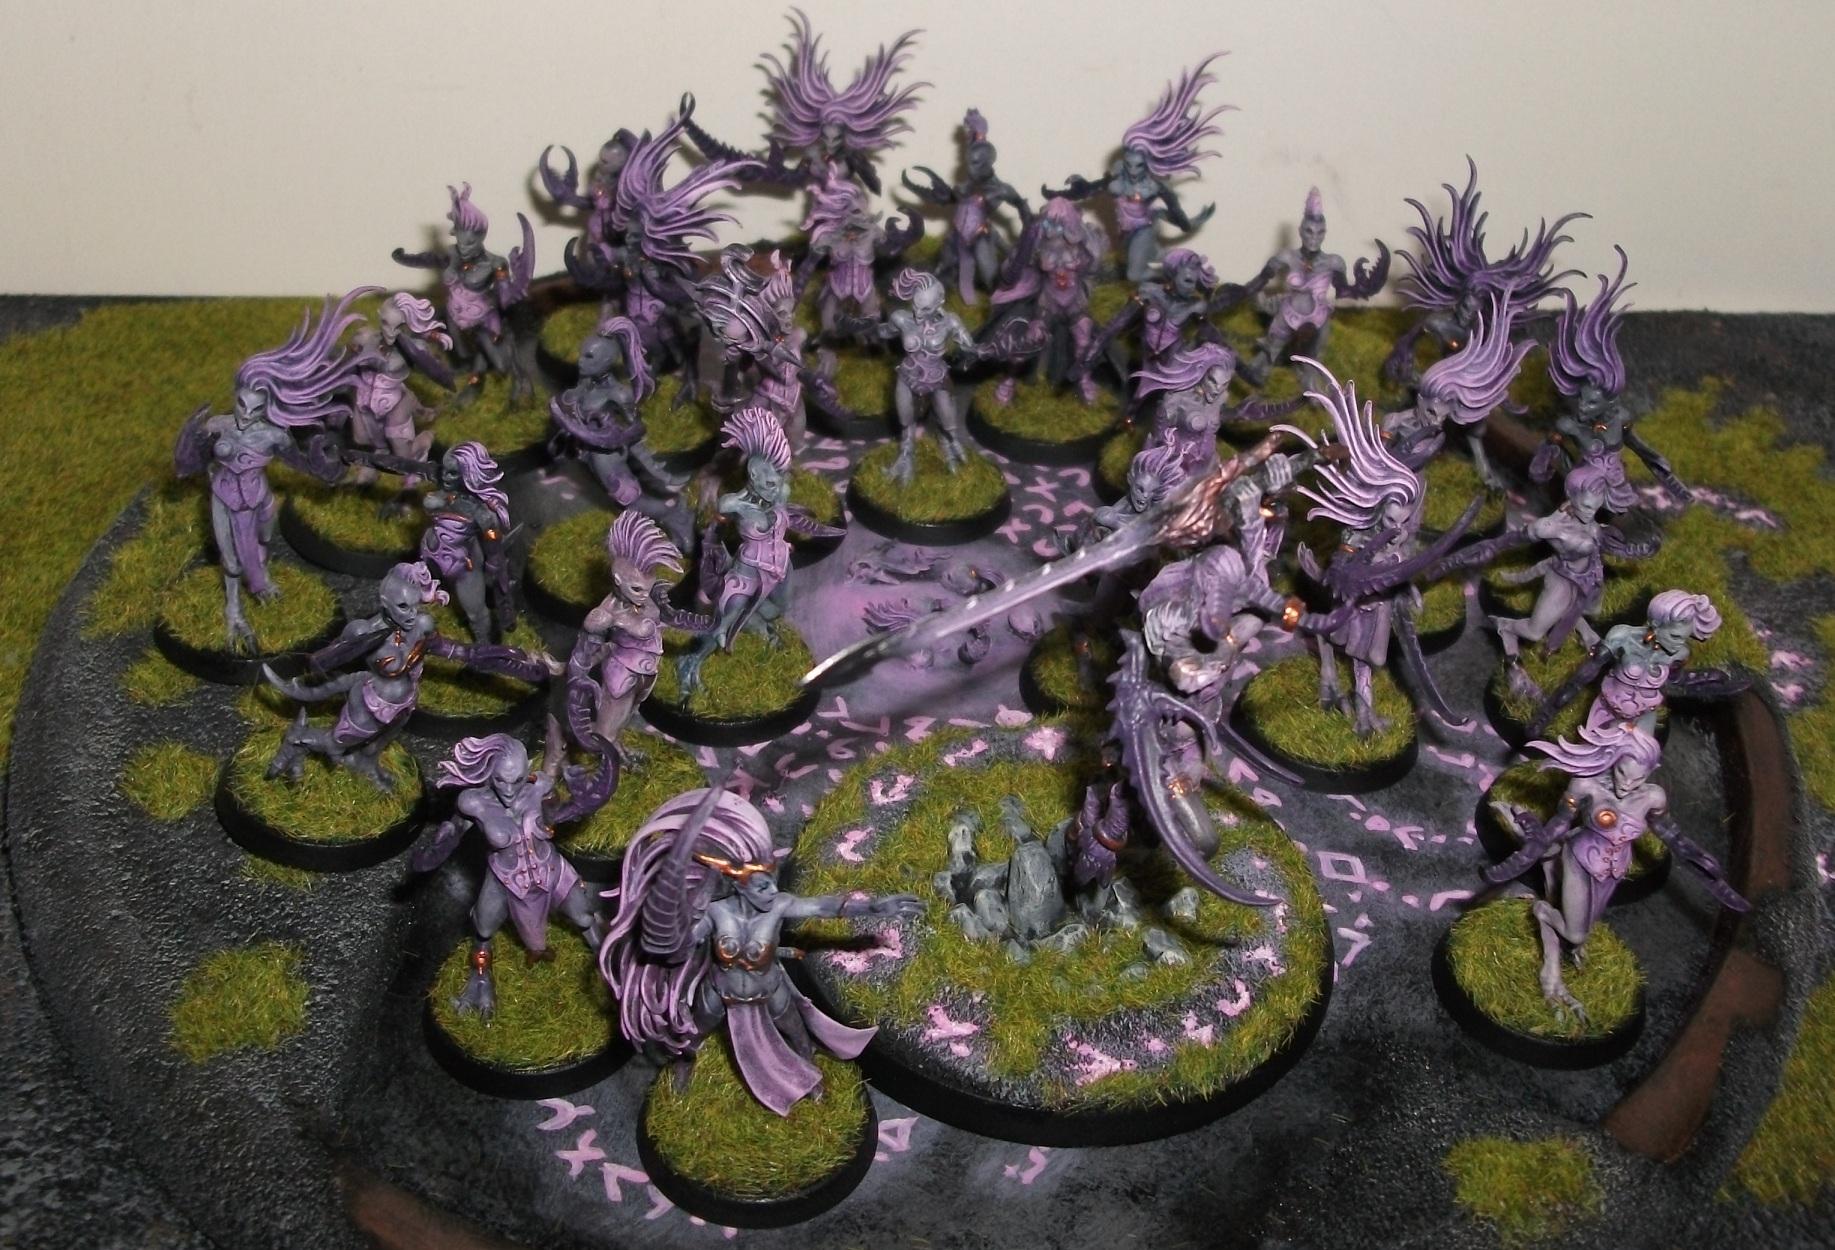
A keen eye would have noticed that there are 30 Daemonettes when I had so far only done 28. I painted one on the side while this project dried. Then another for a speed painting challenge.
The normal, or normal enough.
Then this one in about 45-50 minutes not including drying time.
I just saw the page with the summoning circle. Very awesome idea you have going there, not_U!
|
Lord Judicator Valdrakh of the Atun Dynasty (6th Ed: W:3, L:4, D:0)
 H.B.M.C. wrote: H.B.M.C. wrote:Well GW were mostly responsible for the Berlin Wall, so it's natural for some people to harbour resentment towards them.
|
|
|
|
|
2012/08/09 05:38:35
Subject: Re:n0t_u's Painting Blog - 9/8/2012 - Finally The SoB Tutorial Begins.
|
|

Lady of the Lake
|
Thanks. 
Hopefully it isn't the last good idea.
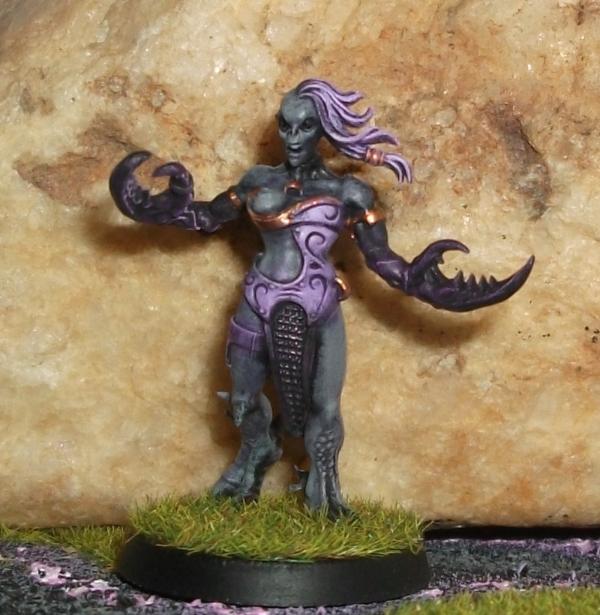
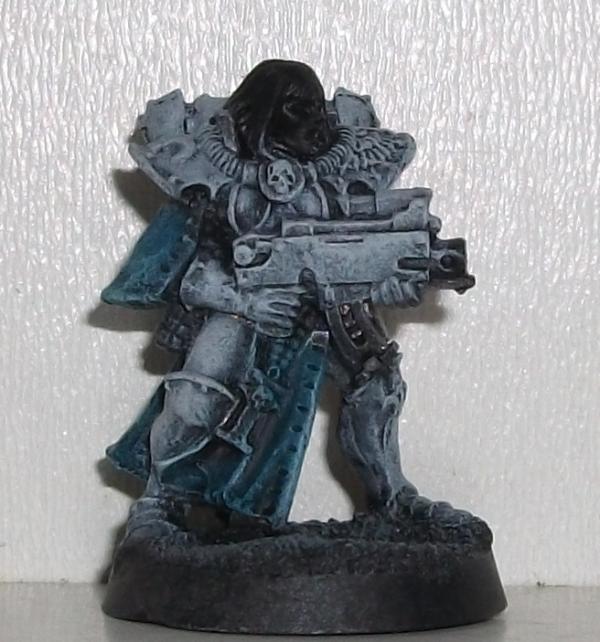
Finally started that SoB tutorial. Not much in the way to start off with as usual though, but did get me thinking. If GW would just bother to update them I wouldn't actually have any Daemons. I still want to build up the SoB, but when I get to working it out, Daemons just seem to win in the end because you can just get so much more for the same price. Probably would have started them eventually anyway though. I guess I also get to paint pinks and purples this way, usually a colour you don't get to use much.
Onto the tutorial.
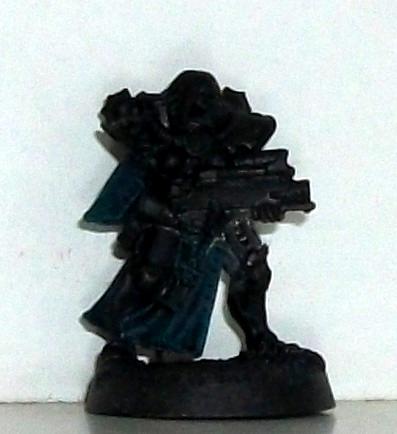
Start off with a black basecoat. Daring, for painting mostly white perhaps.
First colour you're after is the turquoise. After trial and error it just seemed to make the process a bit faster and easier to clean this way than doing the grey needed for the white first. This also stops the turquoise from getting in between the grey layers and tinting the white in spots without some work needed to fix. Also it allows you to highlight the cloth and give it that slight slik/ethereal look as you paint the white.
You're looking to do thin layers, drybrushing can work I guess. Try to imagine the light falling down on it and leave the shadows bare at the moment. Where the turquoise goes at the moment will eventually become the brightest part of the cloth as the layers build up upon it.

Each layer will progressively sneak into the shadows, however the deepest recesses should remain blank. Sort of messes with it to start and stop to take pictures as well.
It's easier to just start and continue until you are done with the turquoise. Allows each layer to blend together better giving a smoother gradient.
Working from such dark colours also may seem tricky for something as bright as white, but I think it gives full control over shading from the start. You could try grey, however you'd need to go back to the cloth and paint it black then fix up the grey wherever the turquoise hits it. It was the main problem I had with it when I used to prime them white; the armour came out nice but it made everything else much more annoying. I've also not come up with the hair colour for this yet, any suggestions?
|
|
|
|
|
|
2012/08/09 08:54:37
Subject: n0t_u's Painting Blog - 9/8/2012 - Finally The SoB Tutorial Begins.
|
|

The Hammer of Witches
|
Hooray I looked at all of it - I may have even read a significant percentage of it. I enjoyed the demonettes and I was amused by the tentacles. Looking forward to more tenticles and cute snake-horse pokemon fiends.
|
|
This message was edited 1 time. Last update was at 2012/08/09 08:55:51
|
|
|
|
|
2012/08/10 05:54:13
Subject: Re:n0t_u's Painting Blog - 10/8/2012 - The SoB Tutorial Continues
|
|
Lady of the Lake
|
Hopefully there will be a bunch more to come then.
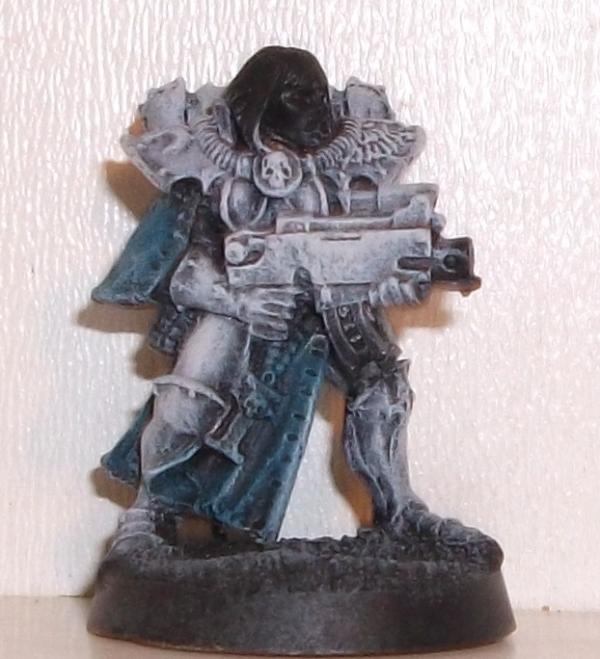
The cloth gets a third coat of turquoise. Still looks a little dark at this point, but these first few images had to be autoadjusted so you could see it better. Either way the colour should be somewhat solid by now, the recesses still allowing the black underneath to come through. In places more or less it'd just be black tinted turquoise.
It'll become brighter during the white stage anyway.
Next up is to get a somewhat solid layer of grey, Codex Grey here, onto the armour segments. Don't worry if it hits the decoration on the shoulders as you can fix that up later anyway. As this will be a standard rank and file they'll be white anyway. I generally just make the armour progressively more ornate to distinguish the veterans from the initiates; and the army could use a few more initiates as it stands.
Now begins the fun of turning that grey into white. I use a somewhat ratty brush for this and tend to actually drybrush white over the grey until it finally looks right to me. Could get the same results from screwing around with very thin layers feathering up to the highlight. But, I guess if I were to do that I'd save it more for characters. I tend to try to justify it by saying it gives me nice control over shading and is quick.
This being the result of the first pass.
The exact same technique used for the turquoise is then used on the cloth again, but with white.
|
|
|
|
|
|
2012/08/11 07:33:38
Subject: Re:n0t_u's Painting Blog - 11/8/2012 - The SoB Tutorial Continues Part 3
|
|
Lady of the Lake
|
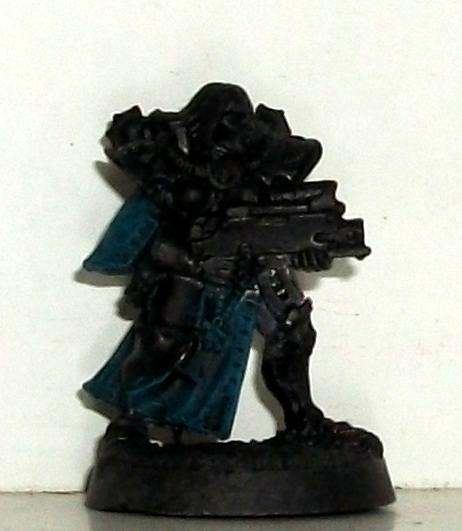
Continuing with a second pass over the armour.
Then a final third.
Keep in mind a perfect white isn't needed as you'd want an off white in order to still highlight it. I guess the white is also coming out a bit dirty for this one.
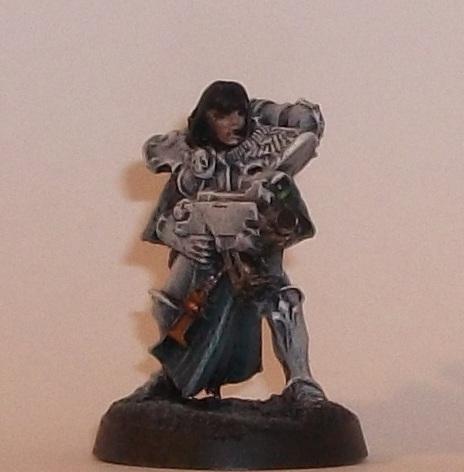
Next the white is done for now. Base the flesh with Deneb Stone, you want to thin it a little and I tend to use a small brush for everything in this step. When the flesh basecoat dries, highlight along the top of the cheeks, nose and where ever else the light hits on the face with more Deneb Stone. The added coverage will make it a tiny bit brighter than the rest.
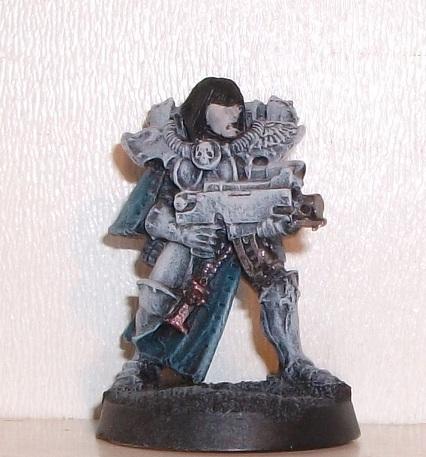
The gold/brass is based with Tin Bitz, while the metal is just simply Boltgun Metal. As the first hair colour suggestion I got was black/blue and that's what I'm going to go with, the hair is tidied up with Chaos Black. You could leave it the flat primer, but I just like the tiny bit of gloss it has to it over the pure flatness of the primer. It also gets rid of where the white or grey hit as well as tidy up next to the face carefully. It is at this point that if you wanted to just go with standard table top quality you could leave it.
Also I plan on doing the eyes the hard way. I'll put up a little mini tutorial to go with that as well for both ways I do them. When it comes to the lens though, I'll just reference back to that over one, but quote it for convenience.
|
|
|
|
|
|
2012/08/11 19:35:42
Subject: n0t_u's Painting Blog - 11/8/2012 - The SoB Tutorial Continues Part 3
|
|
Shroomin Brain Boy
|
always a pleasure to see you doing a complete different scheme after the whole demon theme...
|
|
|
|
|
|
2012/08/12 10:31:33
Subject: Re:n0t_u's Painting Blog - 12/8/2012 - The SoB Tutorial Continues Part 4
|
|
Lady of the Lake
|
Though people seem to like them more anyway.
If the SoB pan out to be true, there may be a bunch more of them to replace these Daemons. Though I do have a character idea floating around for the masque, also making it my first foray into Finecast because if I'm going to do something new, may as well do it crazy.
I also started taking the pictures a little differently, throwing in a piece of paper as well. I kind of know what to do, but a little bit lazy to do it all.
From now on pretty much all the work will be done with a small brush, I use the GW fine detail one just because it was easy to find...
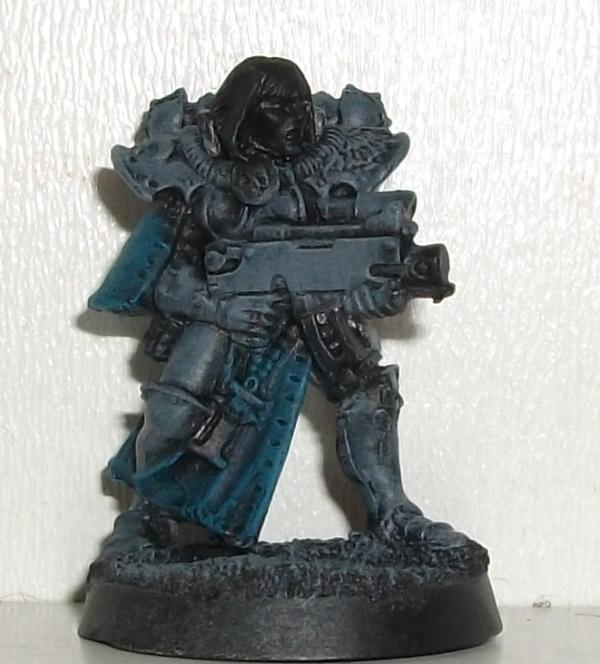
Anyway the flesh is washed simply with Ogryn Flesh, try to get it to pool on the underside of the cheek and along the brow just under the hair line. You're after tinting the Deneb Stone more than adding tons of defintion at this point; it's easy to take it in small steps than to try and do it all at the same time.
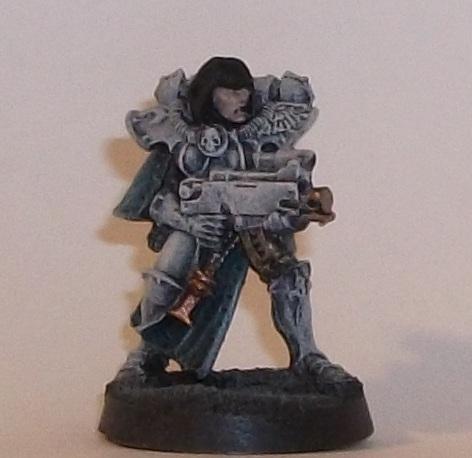
The Tin Bitz gets a layer of Dwarf Bronze over it, nothing too special. It's hard to see, but the hair gets a light drybrush of Regal Blue in order to help tint it so as to make the blue highlight later on not look so out of place. No need to apply it to the undersides of the hair though, it still needs to look black after all. The lower lip receives an additional Ogryn Flesh wash.
The entire end of the barrel is painted black; if it were plastic I'd drill it out instead though. The skin gets another wash focusing more on shading than covering everything, but should more or less be applied the same as the previous step.
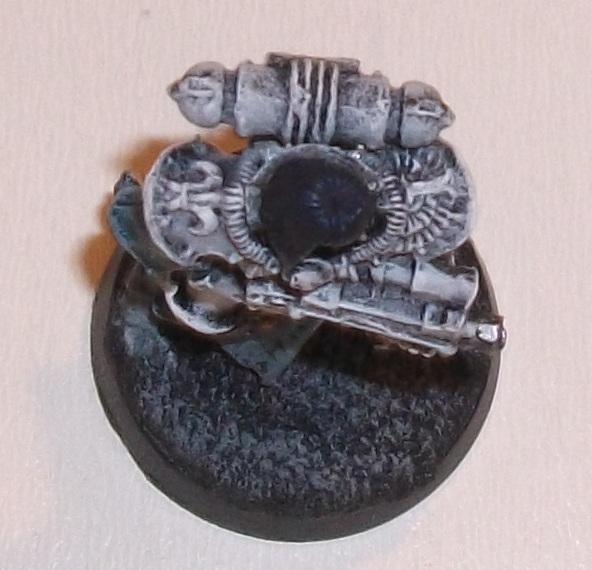
The lens is painted with the mini tutorial I did a little bit before all of this.
n0t_u wrote:The arrow represents the direction light flows.
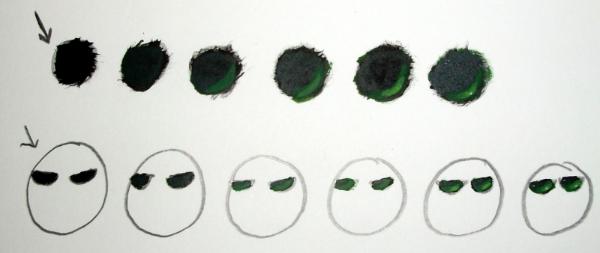
1. Start off with a black base. I usually prefer to leave these until right before the highlights as you can use it to clean up the edges, but you're also far enough along not to mess up the lens.
2. Depending on the colour you're going with you want to use a pretty dark shade of it. Here I used Dark Angels Green. More or less you're looking to tint the entire lens so allow the black to sort of show through still.
3. Next you're grabbing the colour which will be the darkest colour created by the light flowing through the gem/lens. In this case it is Snot Green. Along the edge opposite from the point the light hits you're looking to make a crescent. Somewhat covering that entire edge.
4. Grab the next colour up, Goblin Green in this case, then repeat the previous step; staying within the previous crescent. Each time you're looking to scale it down by about half or so.
5. Next colour up again, Scorpion Green in this case, then repeat the previous step. If this is the brightest colour you're looking to use for the lens, make it more or less a dot around the middle of the last crescent you did.
6. Finally add a really small dot of white in the middle of the dot from the previous step, then directly opposite where the light would hit.
At this point you can add a second dot in the same corner as the light source, but it is optional. Gloss varnish can also be applied to the gem or lens, however that is also entirely optional; I tend to save it just for gems. For lenses you're looking to do more or less the same technique, however you're looking to cover the entire bottom half of the lens in step 3. Then instead of long crescents you're looking to do shorter fat ones. When it comes to them on helmets it also helps to keep in mind the position of the helmet to the lens; if it has a ridge it may not put much light across it unless they're looking up.
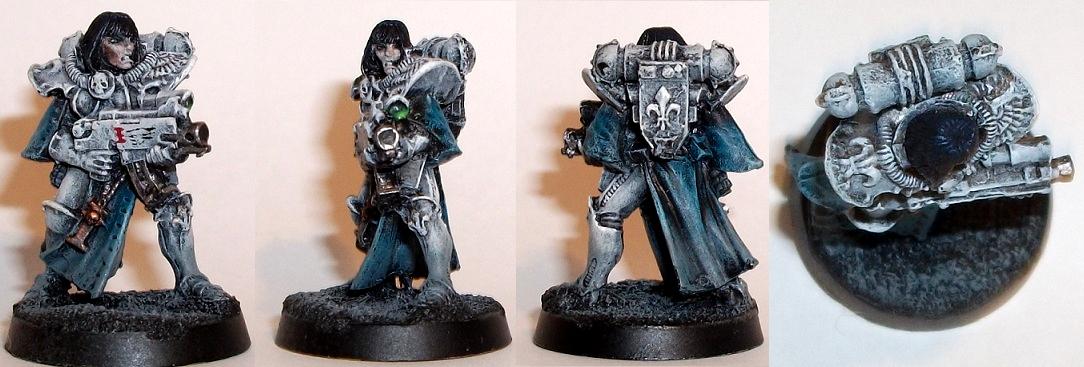
Finally the armour is highlighted with pure white along the raised edges. The eye sockets are also painted black and, due to the sculpt on this one, this more or less completes the left eye which will use its position and shading to work for it more than trying to work on it too much. The hair receives another light drybrush of Regal Blue focusing more on the top of the head instead this time.
The face gets a light drybrush of white, which kind of makes the eyes look creepy at this point.
This stage is also mostly about Badab Black.
The teeth are carefully painted white, if you mess this up and cover the edges wrecking the shading you can take advantage of at this point you can simply wash them with Badab Black then retry with the white.
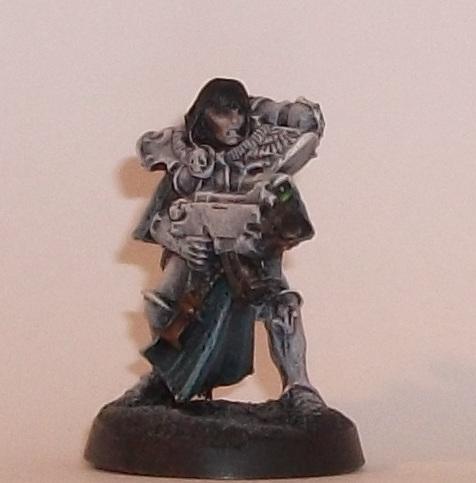
Badab Black is applied to the underside of the cheek to build definition, then the fun starts. Still using a small brush begin to shade the white using Badab Black. This is done by looking at what would cast a shadow and then carefully applying it only there. Sort of hard to explain, but think of it as reverse highlighting. There is no real set spot to aim for, instead you sort of get a feeling for it. Spaces like the edge of the tabbard at the front against the leg to separate them more, under the ridge on the knees, under the cables on the clavicle, between the fingers, between the plates on the feet, the Fleur de lys on the knee, separating the wings on the left pauldron. All the metal is also washed Badab Black at this point, to get it ready for highlighting. The hair is also washed Badab Black to blend the blue in a little more despite it already being hard to see. Black is probably one of the harder colours to paint in my opinion; hard to get it that nice pure black and not look flat.
|
|
|
|
|
|
2012/08/12 20:14:22
Subject: n0t_u's Painting Blog - 12/8/2012 - The SoB Tutorial Continues Part 4
|
|
Shroomin Brain Boy
|
the armor reminds me by the way of alabaster...which is a good thing as it has a virgin ring to it... fitting for the sisters....
|
|
|
|
|
|
2012/08/13 08:17:07
Subject: Re:n0t_u's Painting Blog - 13/8/2012 - The SoB Tutorial Continues Part 5
|
|
Lady of the Lake
|
Next up is the eyes. Starting off with a little eye tutorial. 
There are two different ways I do them, the first is the easiest and if you want to get troops done fast but still do the eyes it seems to be the best way to go. The second I've only done twice before this and seems to be a fair amount of screwing around so probably better off for characters. Both start off more or less the same way. I feel doing it this way helps to avoid the surprised look unless I want it.
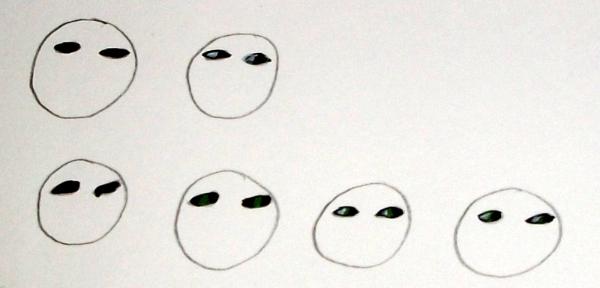
First Method
1. Paint the eyes black. If you want to get an eye liner effect paint a little bit outside of the eyes at the same time. An important thing to remember is that you must be careful to not get any paint anywhere besides the eyeball after this point. If you do you can fix it up with a little highlighting, but in cases with eye liner it can be a little tricky. Don't worry too much if you have to redo the eye though if you do go with the eye liner as it easiest to fix that way.
2. Put a dot of white into the corner of the eye, to make them look forward though requires more effort as you put the dot on both ends then clean up the pupil later with black.
Second Method
1. Same as the first method.
2. Put the eye colour in the middle of the eye, this seems to be the same no matter the direction the eye is looking. You generally want a bright colour as well with the green used here as Goblin Green. Don't want to go too bright though unless you want glowing eyes, but too dark and you're essentially just doing the first method though making it harder for no reason.
3. Apply the white the same as with the first method. Take up a little of the colour, but not all of it, to clean the edge of it a little.
4. Clean up the pupil with black when done.
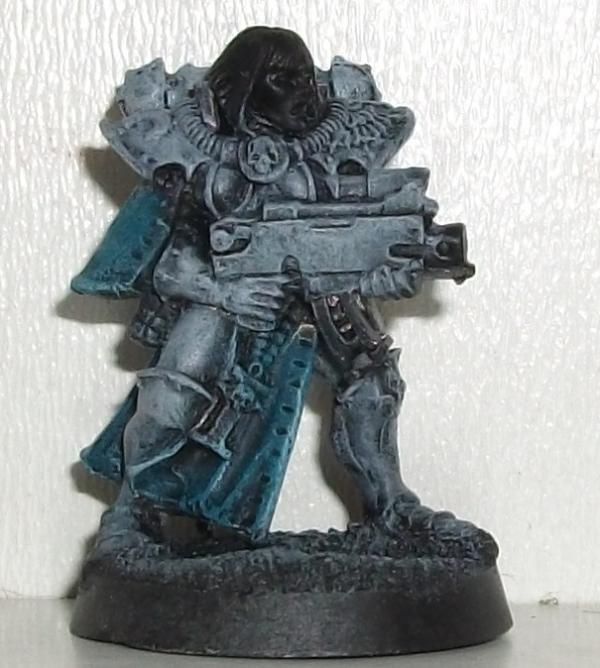
The metal is highlighted with Boltgun Metal again, by using the side of the brush at the end of the barrel you can highlight both the side and the end at the same time. With the end painted black this easily gets the barrel hole painted. The Dwarf Bronze is highlighted with normal Dwarf Bronze along the raised side.
Time for weathering. Not much to do with this, just drybrush some Codex Grey along the shins and feet and lower tabbard to give the impression of dust gathering. This is of course with the ash basing scheme I use with these.
The hair is cleaned up then a small halo of regal blue is painted near the top, followed by a thinner one of enchanted blue and finally and really fine one of white.
|
|
|
|
|
|
2012/08/14 04:12:44
Subject: Re:n0t_u's Painting Blog - 14/8/2012 - The SoB Tutorial Completed
|
|
Lady of the Lake
|
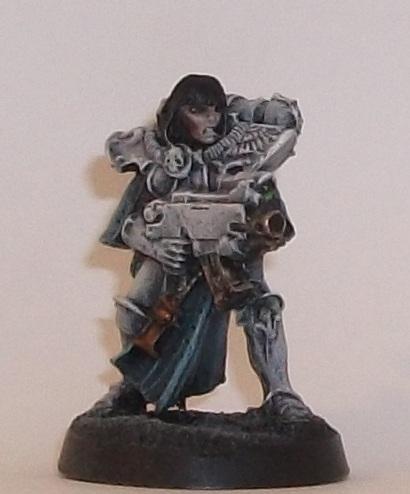
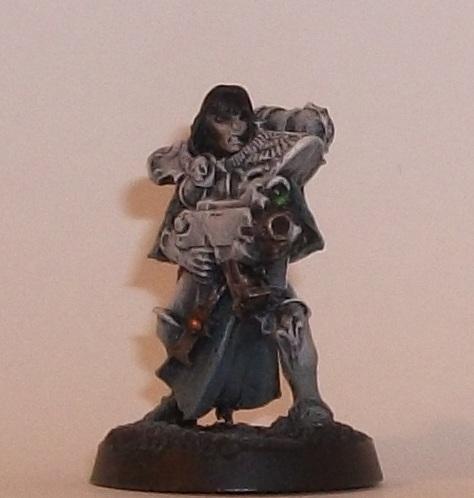
Lastly to complete the model make sure you get a fine tip on a small brush. I use Red Gore to first add a larger capital letter to start off any writing on these SoB, then follow next to it with some light squiggles done with black ink. Black paint could probably work, but you want to thin it a decent amount to make it fine.
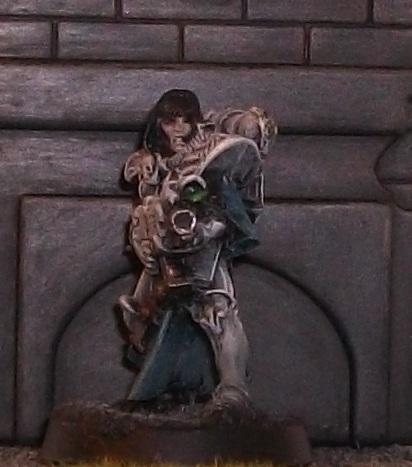

In the end the eyes and hair aren't that noticeable...
Edit: While getting a picture to show the hair got a brighter one overall as that backdrop seemed to make it a bit dark.
|
|
This message was edited 1 time. Last update was at 2012/08/14 04:39:11
|
|
|
|
|
2012/08/16 12:33:54
Subject: n0t_u's Painting Blog - 14/8/2012 - The SoB Tutorial Completed
|
|
Shroomin Brain Boy
|
now that´s what i like to call a very good progress in picture taking!!!! and the SOB looks awesome too... the face and the angry look in hger face... very well done...
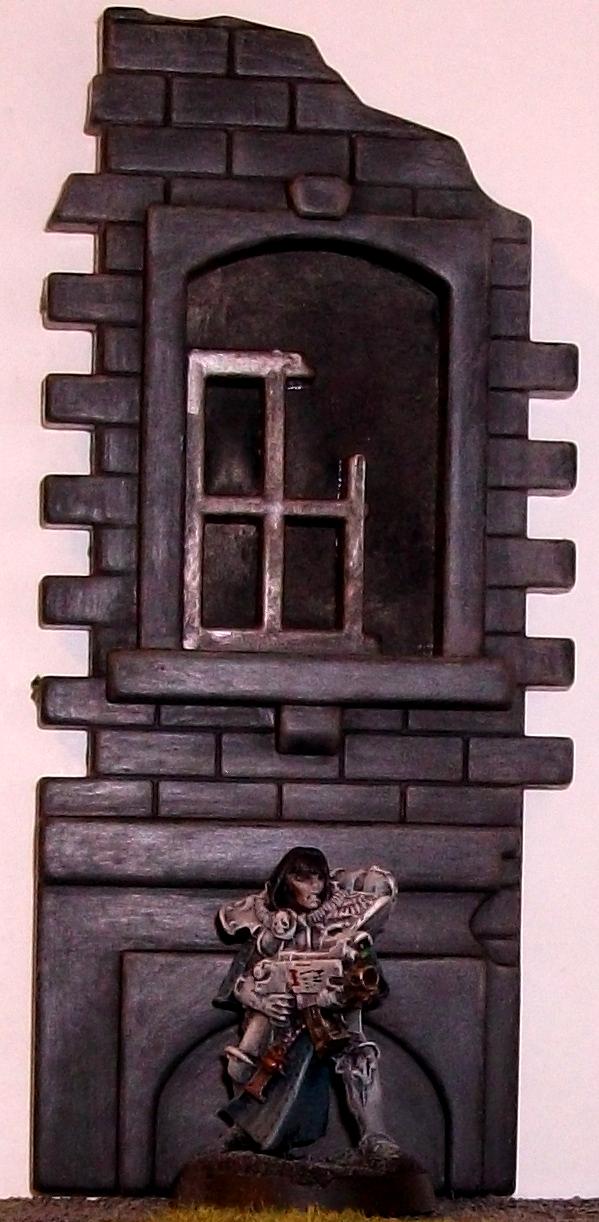
also...the backdrop of the athmospheric pics looks interesting... what is it?
|
|
|
|
|
|
2012/08/16 13:06:47
Subject: Re:n0t_u's Painting Blog - 14/8/2012 - The SoB Tutorial Completed
|
|
Lady of the Lake
|
Got some small wall segments ages ago from somewhere. Sort of small and don't look like they could make a complete building and all identical. On the plus side they can plug into each other.
Window is clear so I painted a piece of paper black and put it in place with bluetac. Could only find a couple pieces though.
|
|
|
|
|
|
2012/08/16 20:04:57
Subject: n0t_u's Painting Blog - 14/8/2012 - The SoB Tutorial Completed
|
|
Shroomin Brain Boy
|
well for the use of a nice background they do extraordinary well...!!!
|
|
|
|
|
|
2012/08/17 08:33:25
Subject: Re:n0t_u's Painting Blog - 17/8/2012 - Horror, Finecast and Teasing
|
|
Lady of the Lake
|
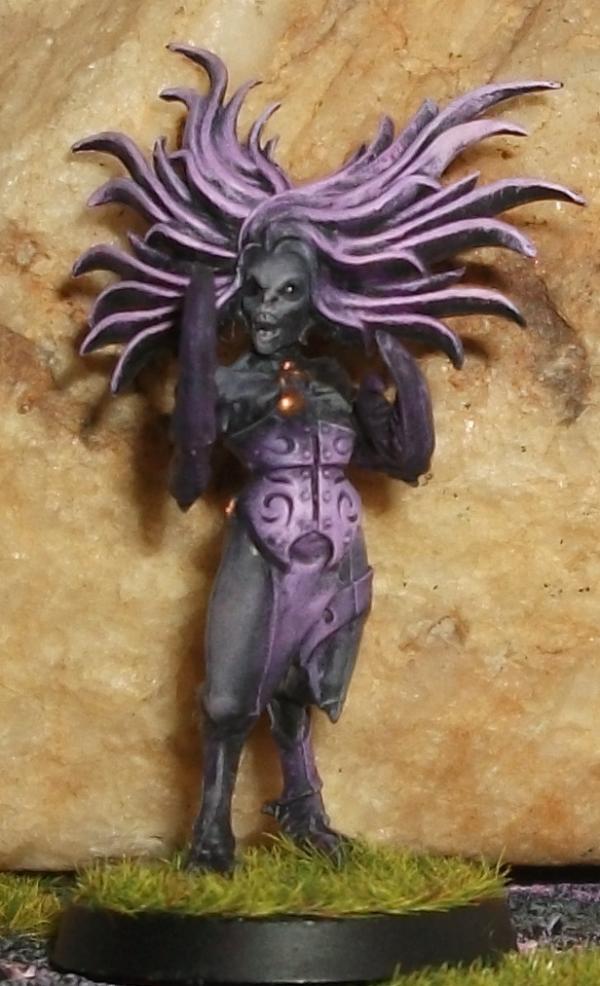
Well worked on a horror a little yesterday and finished it off today. Start of the second squad, meaning only five to go.
But, more importantly lightning bolt time.
A bit stronger than the last one, but I kind of like it.
Also got around to finally getting my first Finecast model. Sort of teasers for the next project, which will have interesting and fitting titles of course.
I was also surprised, I mean I still got faults, but a lot less than I expected. In fact I didn't see any until I looked over it a couple of times. Their 360 view thing on their site seems to be pretty helpful as well when looking for flaws.

The most noticeable flaws are the hair curls on the left side of the face and one side of the collar, yet they are not all that noticeable anyway and the collar one even kind of fits with the rest of the holes that are actually meant to be there. Took pictures of both sides because at first it looks like she only has three fingers around the sword, then you flip it over and see where the index finger is resting on the guard.
Now for the rest of the teaser.
|
|
|
|
|
|
2012/08/17 10:02:04
Subject: Re:n0t_u's Painting Blog - 17/8/2012 - Horror, Finecast and Teasing
|
|
Liche Priest Hierophant
|
Ooh, nice, a chariot.
And for the finecast, I actually haven't gotten any bad casts, in fact, only 1 person I know irl actually got a bad model, which was replaced straight away.
|
|
|
|
|
2012/08/17 10:08:19
Subject: n0t_u's Painting Blog - 17/8/2012 - Horror, Finecast and Teasing
|
|
Longtime Dakkanaut
|
Has anyone seen one of those Isabellas where the downward points on the top of her corset (the 'tips' of the bat wings) aren't bubbled off?
|
|
|
|
|
|
2012/08/17 11:31:50
Subject: n0t_u's Painting Blog - 17/8/2012 - Horror, Finecast and Teasing
|
|
Lady of the Lake
|
Seems to be more or less alright on my one or at least consistent enough for me not to notice.
Funnily enough, as I got my brother to pick it up for me, another one of them apparently had a large goatee made of flash.
|
|
|
|
|
|
2012/08/18 05:56:45
Subject: Re:n0t_u's Painting Blog - 18/8/2012 - We can dance if we want to...
|
|
Lady of the Lake
|
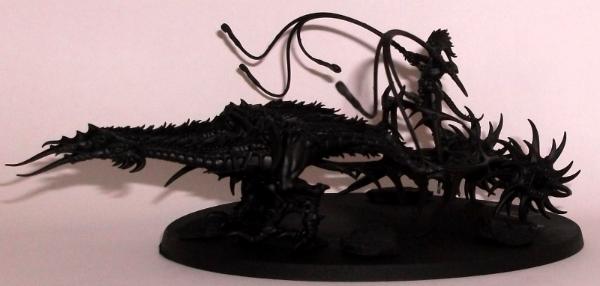
Chariot is built more or less now. Skipped a step which makes it look better in my opinion.
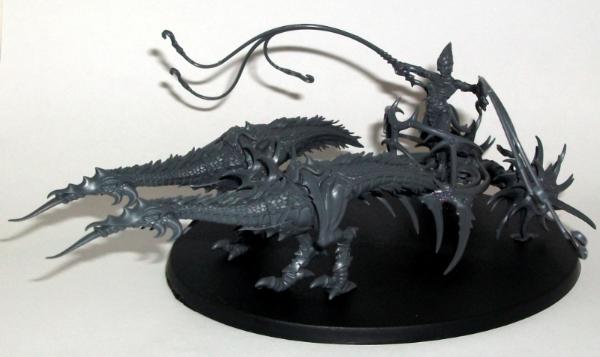
Which was ignoring that little back platform entirely.
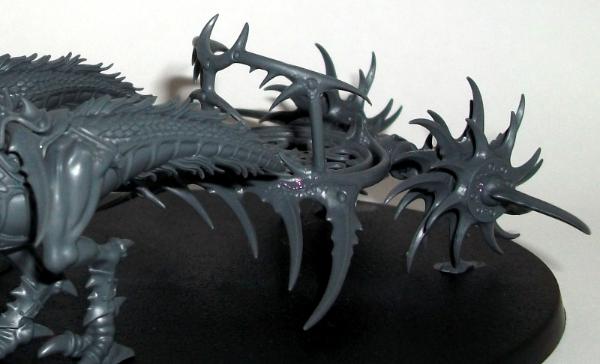
The platform has four holes I drilled around the middle of it to hold the riders in place, only need one but I wanted it to blend in and appear to be part of the design. Not to mention those whips.
They'll probably break at least once during transport, but they will make Dark Eldar a bit jealous.
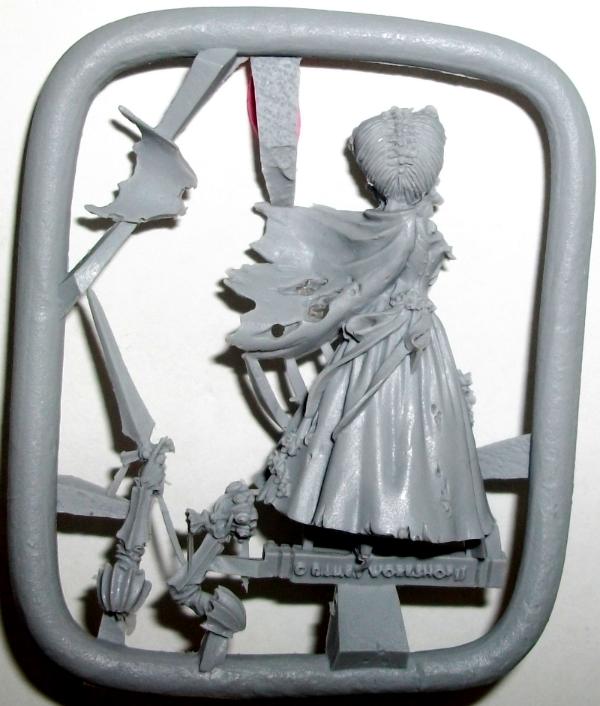
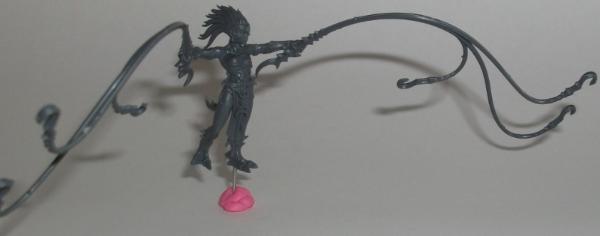
And finally the reason for the title and why I got Isabella at the same time as the chariot.
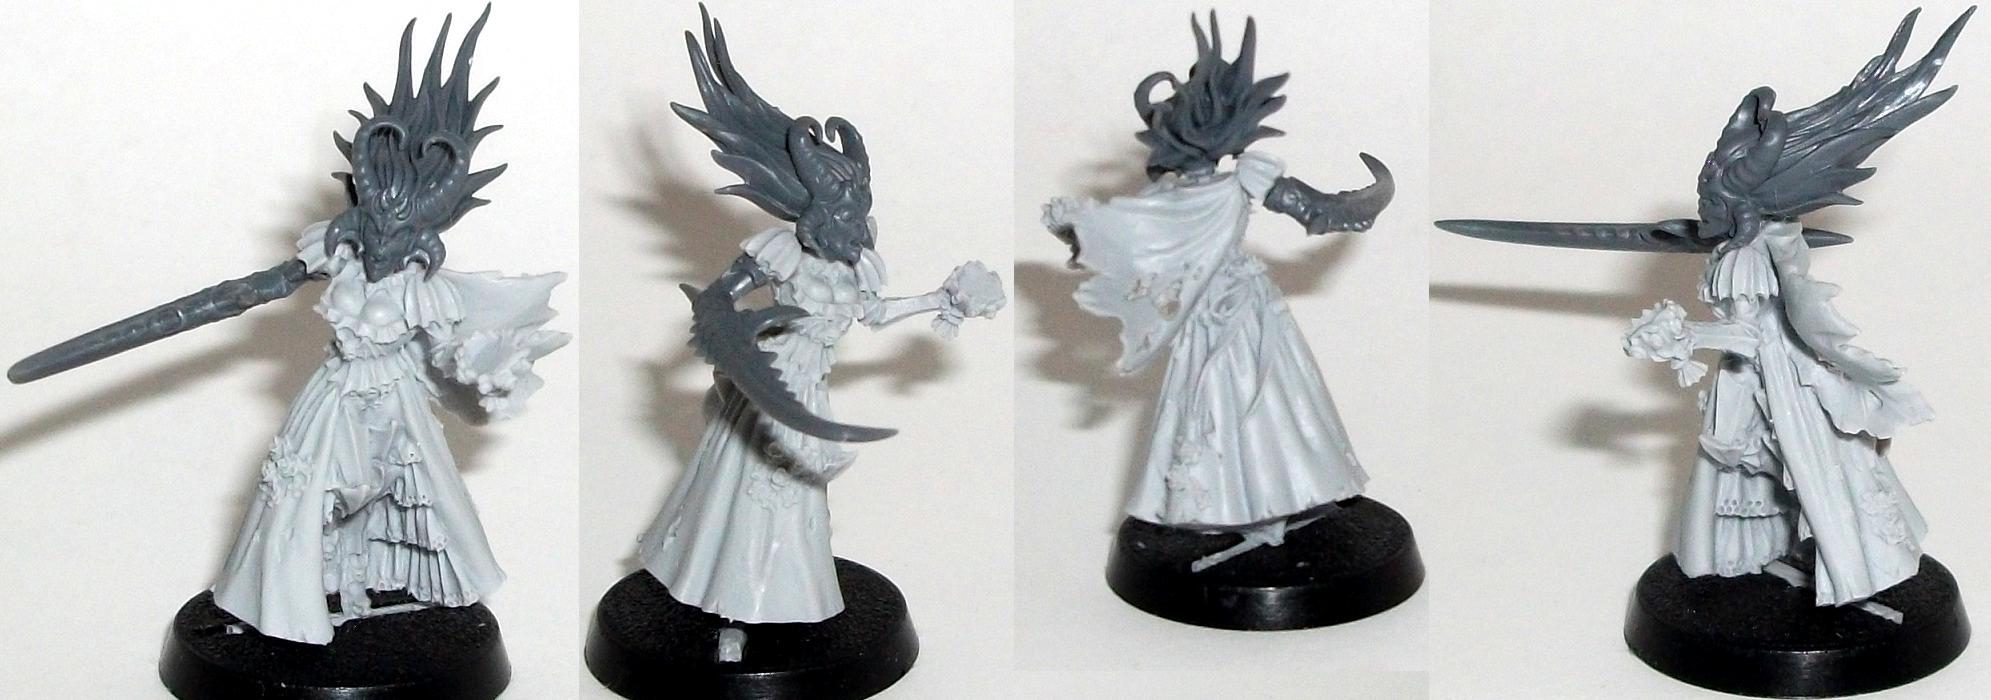
I was quite surprised at how much easier it was to cut through compared to plastic. Would have likely saved a fair amount of time, but did mean I needed to be a little careful. This was also actually the project I meant to do next instead of the chariot as well, but I couldn't resist building it in the end.
At first though I was going to convert both arms, but started to like the look of the chalice with it. Needed the shoulders anyway. Also despite hearing they don't need it everything was pinned.
|
|
|
|
|
|
2012/08/18 06:35:37
Subject: Re:n0t_u's Painting Blog - 18/8/2012 - We can dance if we want to...
|
|
Liche Priest Hierophant
|
Um, what?
What is the Isabella/Daemoneete meant to be?
Chariot looks nice, btw, and I agree it looks better without the back platform
|
|
|
|
|
2012/08/18 06:38:35
Subject: n0t_u's Painting Blog - 18/8/2012 - We can dance if we want to...
|
|
Lady of the Lake
|
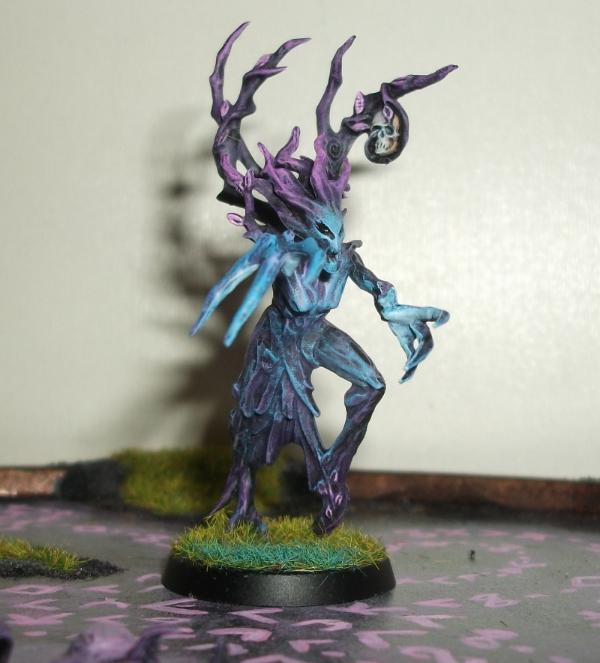
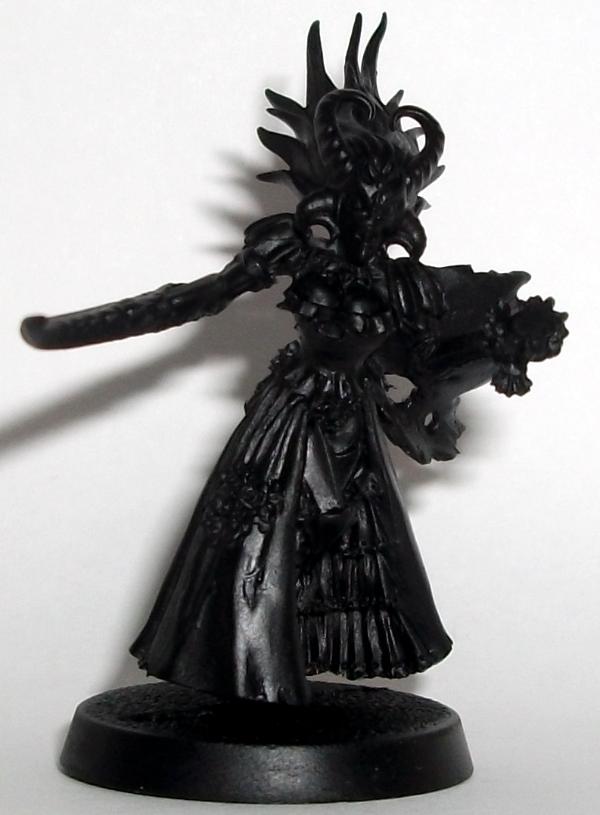
The Masque. Forgot to mention it.
|
|
|
|
|
|
2012/08/18 06:40:03
Subject: Re:n0t_u's Painting Blog - 18/8/2012 - We can dance if we want to...
|
|
Liche Priest Hierophant
|
Ah.
That's actually a nice idea, looks better than the current model for her
|
|
|
|
|
2012/08/19 09:43:04
Subject: Re:n0t_u's Painting Blog - 19/8/2012 - Rocks, Primed!
|
|
Lady of the Lake
|
Thanks.
Got some wood chips and worked on the bases a bit, needed a way to make the bigger base of the chariot a little more interesting and still fit in with the base theme for the rest of the army. Also primed everything, figure its easier than prime one thing work through it and then prime the next.
Masque got the bat on the corset carefully cut and filed off.
Also had leftover parts from the chariot for another Daemonette, though fancy. Along with the woodchip rocks I figured it was time to make a proper herald. The first two while different, just don't look that slight touch more needed to be a herald to me. More or less they seem like squad leaders to me, may start giving them Transfixing Gaze to add more reason to it.
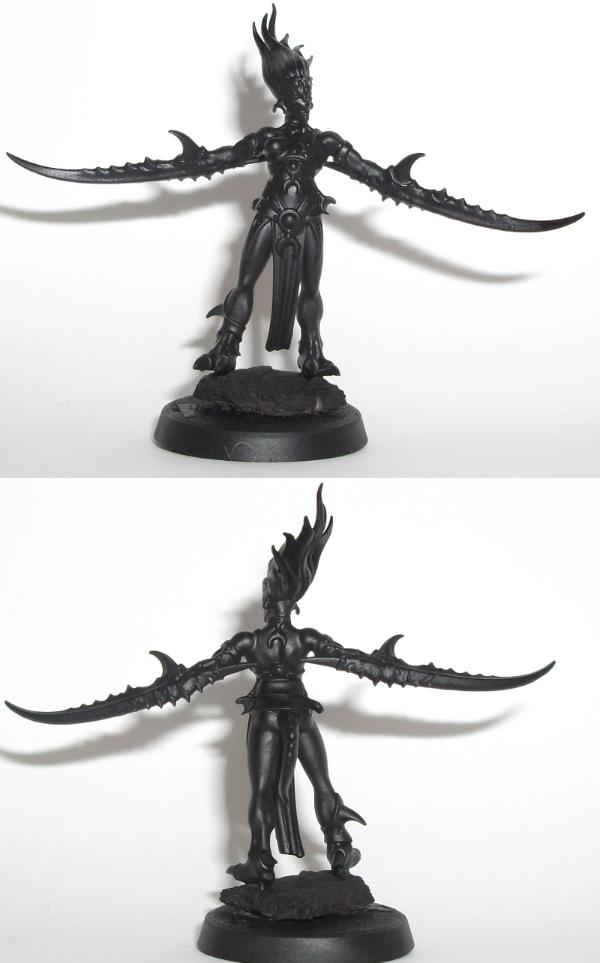
Has a couple of gems on it to paint which is nice. Though still want to add another KoS to the force the Masque, like normal heralds, sort of only takes up half a HQ slot. Meaning I sort of get 3 HQs this way. Though when I eventually get to 2000 it means I'll need to either add a second KoS to draw some fire from Iluni (perhaps retire one of the "heralds" for it) or 1-2 heralds. Daemonettes don't usually get characters though so this opens them up to the new challenge thing. Of course I'll be able to detach the herald from the squad should I see something like an IG squad with a sergeant looking to come and abuse it. Provided I see it coming during my own movement phase of course.
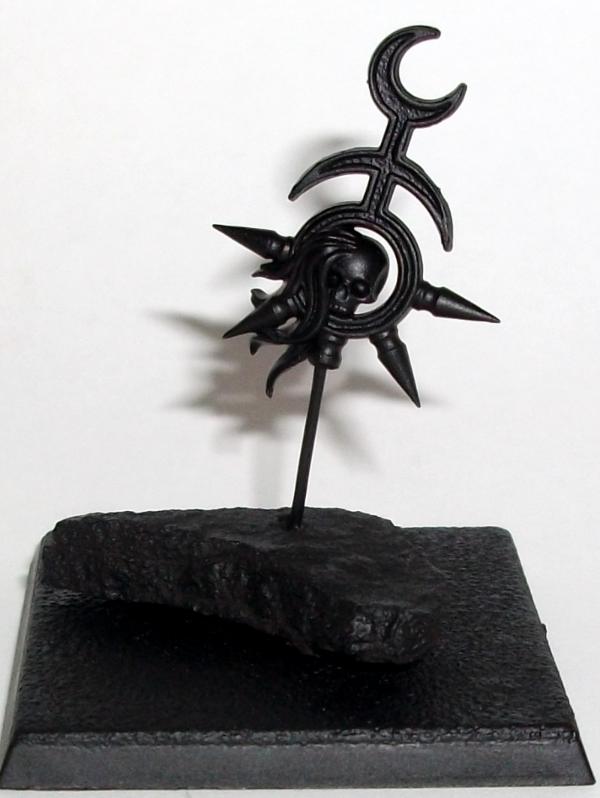
Lastly a decent sized wood chip meant an objective marker finally.
Have a ton of square bases to try and get through from where I brought a pack of them ages ago for the Puppets of Tzeentch. Of course as well from how all Daemons come with both. Perhaps one day I'll get around to using them and make something like a building and use them for the floor tiles.
Now to just figure out which of them all to paint first.
|
|
|
|
|
|
2012/08/19 12:39:17
Subject: n0t_u's Painting Blog - 19/8/2012 - Rocks, Primed!
|
|
Shroomin Brain Boy
|
i am out for half a weekend and you come up with something like that???! cool... tho i would have thought you would have worked with the real isabellas head... but i see why you didn´t^^
and the chariot...well emons can go agricultural as anything^^
|
|
|
|
|
|
2012/08/19 13:50:43
Subject: n0t_u's Painting Blog - 19/8/2012 - Rocks, Primed!
|
|
Lady of the Lake
|
Guess I just work fast.
I think I'll start with the Masque, still sort of have ideas floating around for the chariot. Kind of tempted to make it sort of gold and have it fade to dark purple for the "daemonette claws" is has over it and for the platform I was thinking a shiny black. Sort of also in a way to protect it from putting in the rider and removing them because of the wire. It does sort of have rivets though, thinking on it the only thing that doesn't is the objective marker. Thinking on the chariot they will be gems, probably green.
|
|
|
|
|
|
2012/08/19 13:57:32
Subject: n0t_u's Painting Blog - 19/8/2012 - Rocks, Primed!
|
|
Shroomin Brain Boy
|
Kind of tempted to make it sort of gold and have it fade to dark purple for the "daemonette claws" is has over it and for the platform I was thinking a shiny black
sounds interesting
|
|
|
|
|
|
2012/08/20 06:16:04
Subject: n0t_u's Painting Blog - 19/8/2012 - Rocks, Primed!
|
|
Quick-fingered Warlord Moderatus
|
Cool Masque conversion! I must say, this is really tempting me to get a Finecast model finally, though still a bit hesitant.
|
Lord Judicator Valdrakh of the Atun Dynasty (6th Ed: W:3, L:4, D:0)
H.B.M.C. wrote:Well GW were mostly responsible for the Berlin Wall, so it's natural for some people to harbour resentment towards them.
|
|
|
|
|
2012/08/21 06:57:29
Subject: Re:n0t_u's Painting Blog - 21/8/2012 - We can leave your friends behind, cause your friends don't dance
|
|
Lady of the Lake
|
Well Masque is good enough now. Took a bit longer than the normal Daemonettes of course, the gems were also a little annoying. Did the skin a little differently as well, mostly relying on a small brush to add the highlights for a change instead of the usual dusting from drybrushing. Also no idea on how to paint the liquid so just sort of went with it as I went along.  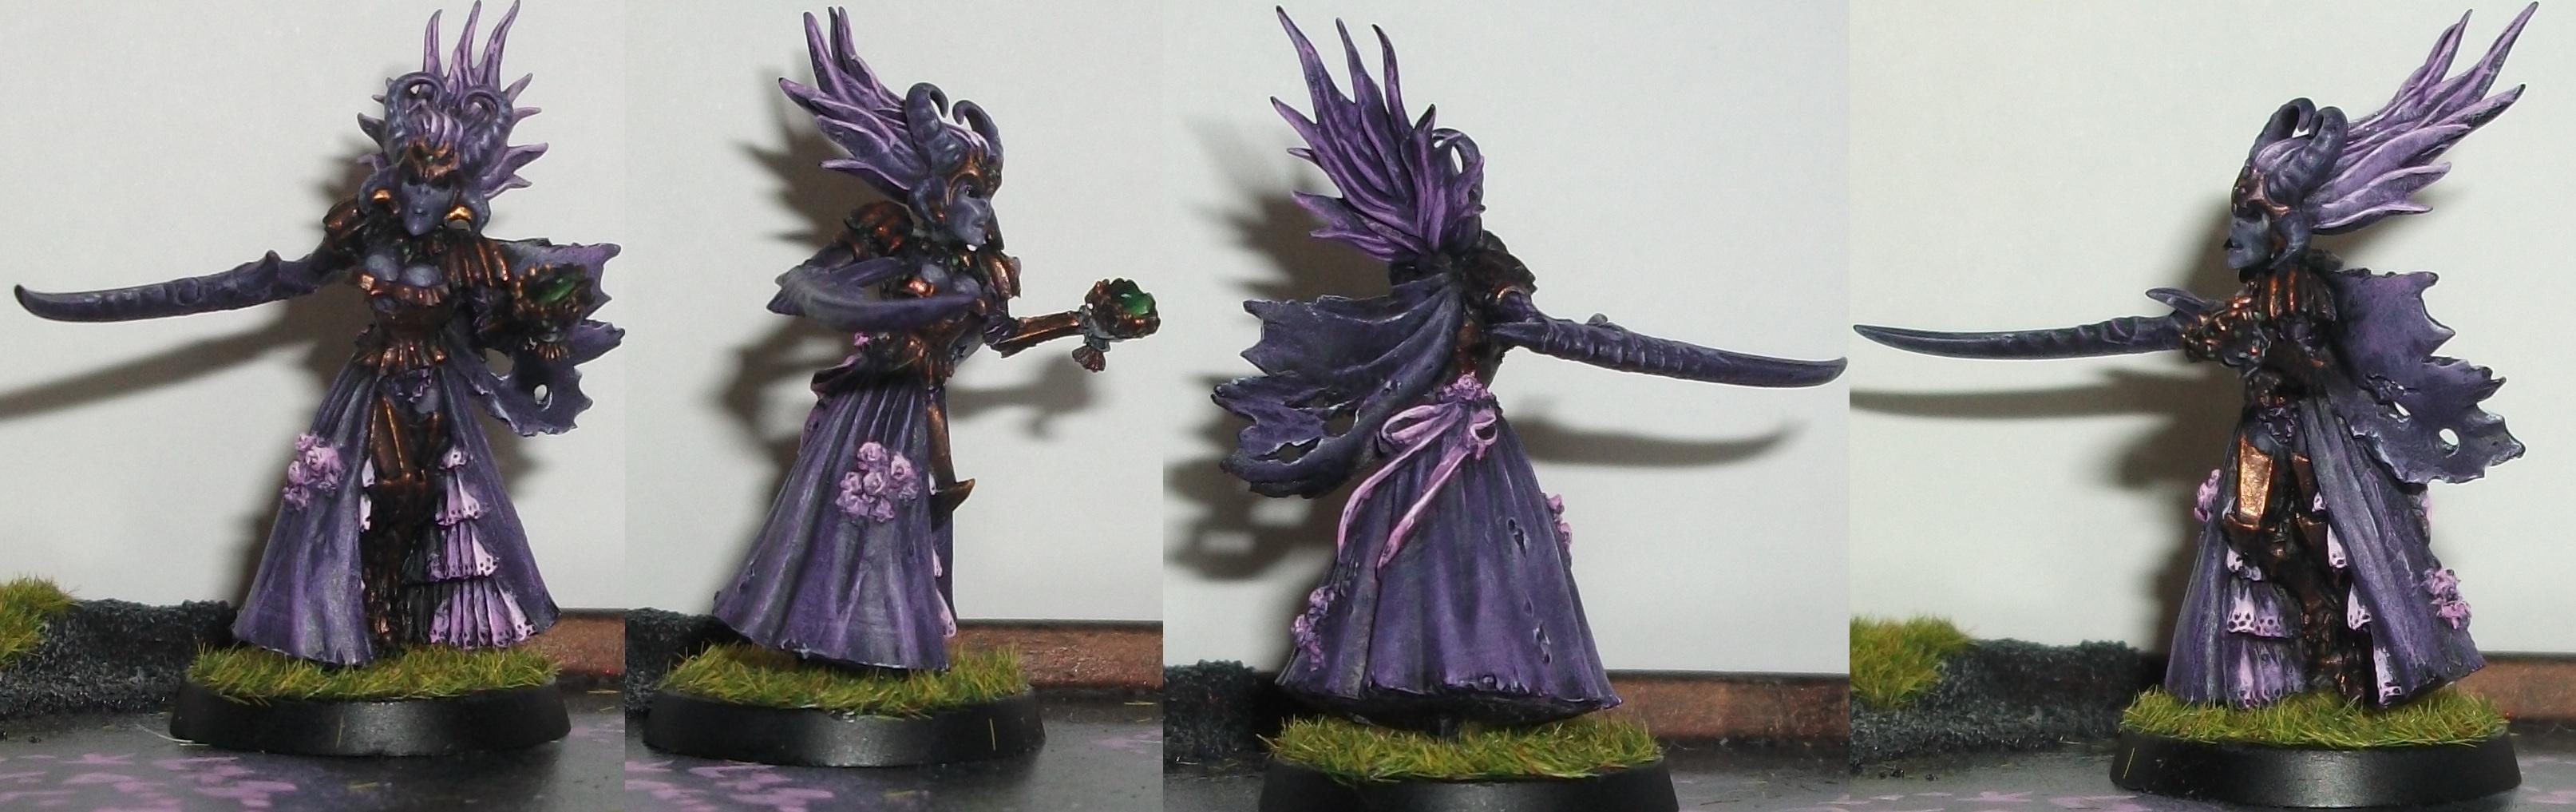 Surprisingly the most annoying/hardest part was the flowers for some reason. Just kept not liking how they turned out so worked on them a little more. Then repeated a couple of times.
|
|
This message was edited 1 time. Last update was at 2012/08/21 06:59:50
|
|
|
|
|
2012/08/21 08:09:31
Subject: Re:n0t_u's Painting Blog - 21/8/2012 - We can leave your friends behind, cause your friends don't dance
|
|
Liche Priest Hierophant
|
Wow, the Masque looks really nice
|
|
|
|
|
2012/08/21 20:52:01
Subject: n0t_u's Painting Blog - 21/8/2012 - We can leave your friends behind, cause your friends don't dance
|
|
Shroomin Brain Boy
|
i am not stretching myself here one bit when i say: that is your best work so far!!! the masque... looks stunning... i was quite unsure if this conversion would be able to get me to like it... but you proven me totally wrong mate... the armor looks really good and i just love the skin... but the best part is the gem... that one looks verrrry good!!!
the whole combo scheme you should defiantly do again... victorian/classic and demonic mix...
|
|
|
|
|
|
|
|

