Forum adverts like this one are shown to any user who is not logged in. Join us by filling out a tiny 3 field form and you will get your own, free, dakka user account which gives a good range of benefits to you:
No adverts like this in the forums anymore.
Times and dates in your local timezone.
Full tracking of what you have read so you can skip to your first unread post, easily see what has changed since you last logged in, and easily see what is new at a glance.
Email notifications for threads you want to watch closely.
Being a part of the oldest wargaming community on the net.
If you are already a member then feel free to login now.
2019/01/05 21:40:04
Subject: Insaniak's workbench - now working on New Old Necrons!
After ten years of meandering aimlessly about from project to project over just shy of 50 pages, I decided it was time to retire my previous blog and start with a clean page on which I can meander aimlessly about from project to project once more without the distraction of a whole bunch of unfinished 10 year old projects that have taken on a life of their own and are now hiding in the laundry telling each other stories about how the creator will one day return and anoint the worthy with sacred pigment ...
I'm largely focused on Maelstrom's Edge these days, so a lot of what I am working on will obviously be related to that, but I also have a bunch of 40K projects in various stages of completion that I'd like to get finished off even if I have no intention of playing that game again, and a couple of boxes full of assorted minis from a whole slew of manufacturers that I've collected over the years just because I liked them and wanted to do something with them. So to kick things off, here's what I am currently working on:
Wazdakka! It seems appropriate to kick the new thread off with the same miniature that started the last one. Although you could probably replace 'appropriate' with 'kind of sad'... But there it is. This was a conversion started a little over 10 years ago, back when Wazdakka had rules. Before the Dark Times...
Somewhere in the intervening time, he appears to have lost his power claw. I have a vague recollection of putting it somewhere safe to reattach it when I had time, so it's probably lost for good. So still to do - find or rebuild the power claw, rework the right arm a little to fix the dodgy musculature, finish sculpting detail around his waist, and finish off the detailing on the bike's guns. And paint it, obviously. But I felt that now that I'm no longer playing 40K, and he no longer has rules, it was the right time to get him finished!
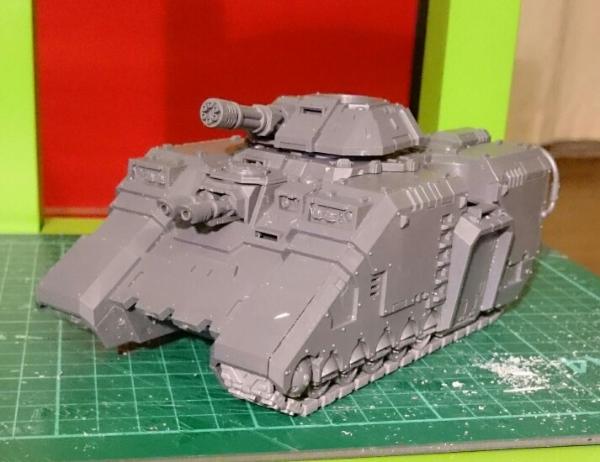
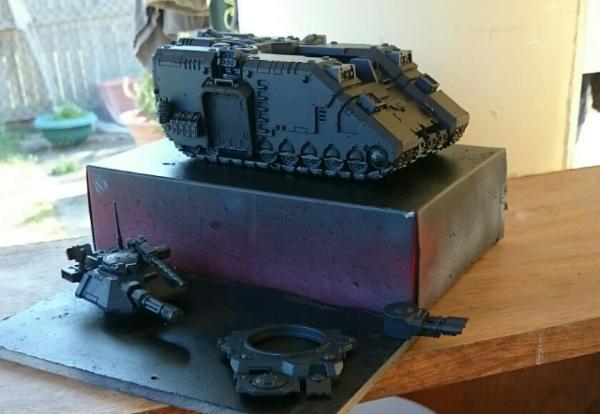
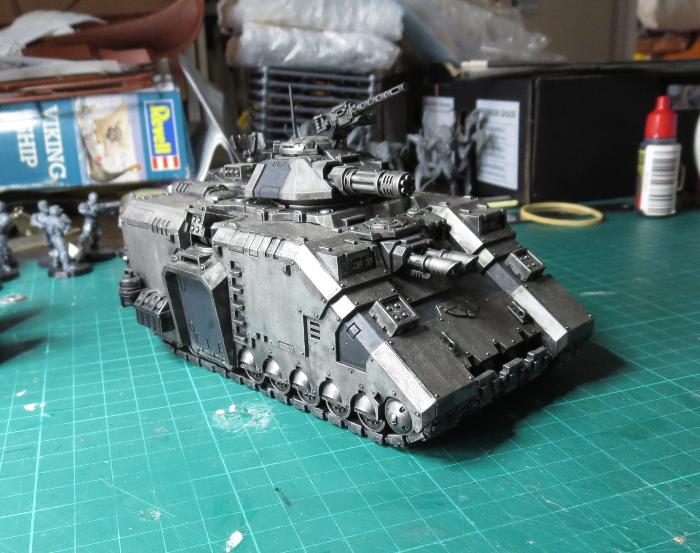
Terra Firma Pattern Repulsor A conversion I started back when the Repulsor kit was released, as I really didn't like it as a grav tank. I got busy halfway through painting it, so it's been sitting unfinished in the cabinet since then.
Mostly just detailing work to go at this point. It's being added to my Iron Wolves (Space Wolf) army.
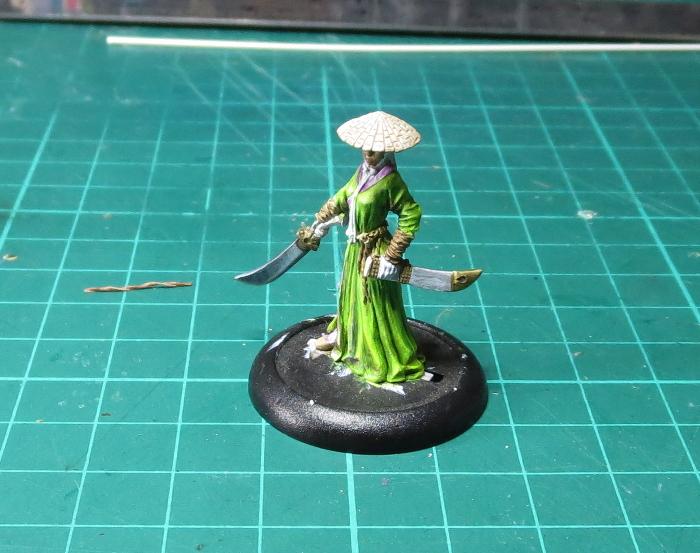
Yi Ling, from Guild of Harmony One of the afore-mentioned miniatures picked up just because I liked it. This is a mini from the (apparently now OOP) Guild of Harmony range, sculpted by Sebastian Archer. Bought a long time ago and left sitting in my to-paint pile until I felt I could do her justice.
Still a lot of work to do.
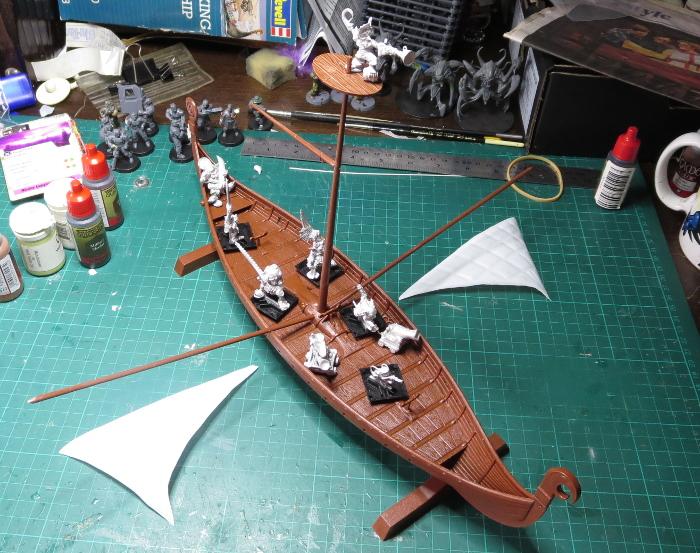
As-yet Un-named Goblin Pirate Boat 1:50 scale Revell Viking Ship, bought for me by my wife a few years back, after I had been trying to convince her that we should replace our car with a long boat (it seemed like a good idea at the time), and being converted for a crew of OOP Rackham pirate goblins bought back when Rackham went out of business.
A couple of minor details still to add (like a railing of some kind on the crow's nest) and then paint and rigging (which I will leave until after painting to make getting a brush in there easier).
And finally (for now):
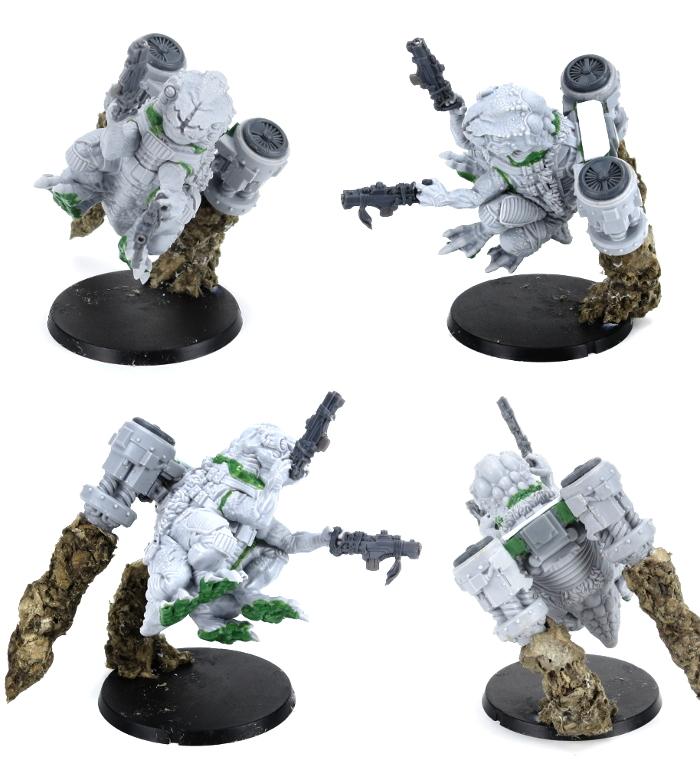
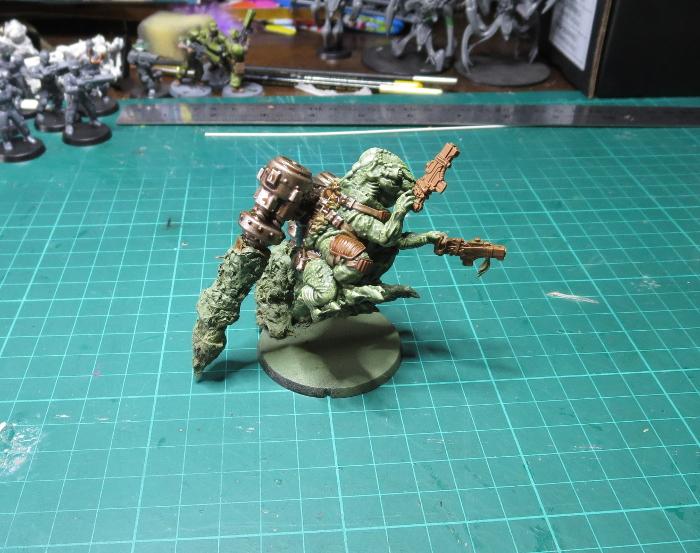
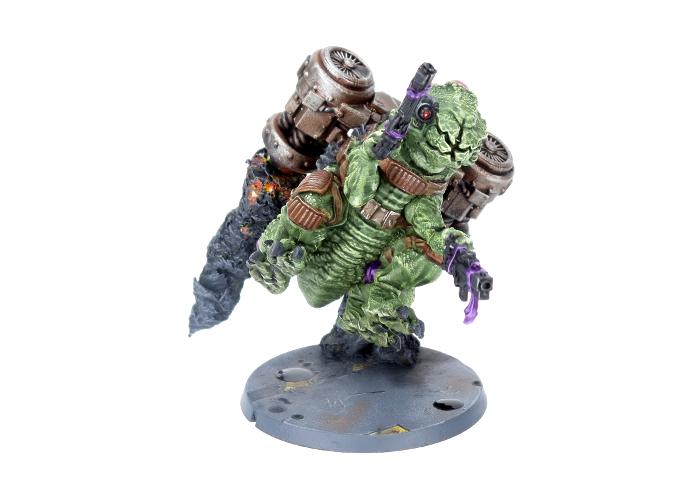
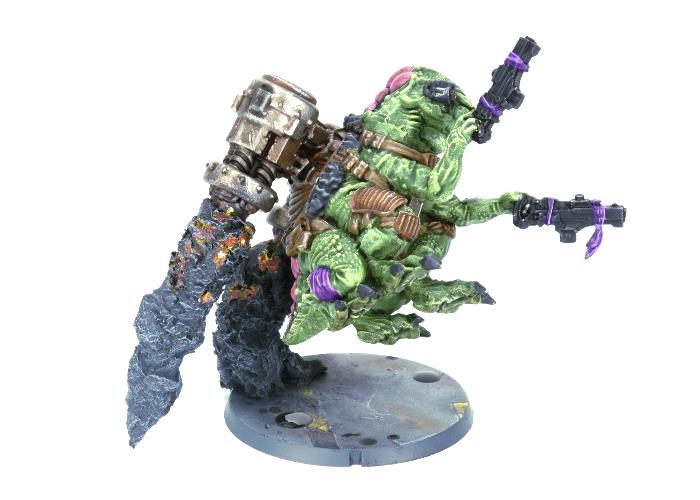
Jet Pa'ku Converted Pa'ku artillery model from Maelstrom's Edge. Converted the giant artillery weapon to a jetpack because, really, why wouldn't you?
Jet plumes added with shredded cardboard soaked in PVA glue. Rather experimental, but we'll see how they turn out...
As a completely out-there experiment, I'm going to try to keep the number of things I'm working on to a manageable number, and wherever possible finish something off completely before starting the next (which sounds like crazy talk, but seems like the only way to get the to-be-painted mountain down to a sensible level). We'll see how that goes...
This message was edited 45 times. Last update was at 2024/10/01 10:07:37
2019/01/05 22:52:25
Subject: What's on insaniak's workbench 2 - The Empire Reloaded the Future Next GenerationS (The Sequel)
Woohoo! Glad to be on the first page of the new blog. I always found your Maelstrom's Edge terrain inspiring, so it'll be good to be able to follow along with your miniature endeavours as well.
I saw the Pa'ku conversion in one of the Medge rumour threads, and straight away fell in love. I think it's great that you're able to show what players can do with the medge kits and a bit of time and effort.
just recently got back into the hobby myself - I played Orks in 3rd and always wanted to convert myself a Wazzdakka but never got around to it. Sad to hear that he no longer has rules, but excited to see him get a bit of love.
t z you are k
2019/01/05 23:32:51
Subject: Re:What's on insaniak's workbench 2 - The Empire Reloaded the Future Next GenerationS (The Sequel)
Whew- I'm glad the Inter-regnum was short and sweet- glad to see what's first up on the workbench this time! Love the Yi Ling figure- nice sense of balance and grace to it, marvelous.
"He fears his fate too much, or his desserts are small, who will not put it to a single touch; to win- or lose- it all."
Montrose Toast
2019/01/05 23:55:14
Subject: Re:What's on insaniak's workbench 2 - The Empire Reloaded the Future Next GenerationS (The Sequel)
Good luck with the dual themes of minimum projects and finishing old before new
Not seen the terra firma repulsor before, I like that (obviously that was in my wilderness years, as I recall being shocked when I saw a marine grav-tank in someone's thread)
Subbing because flying Pa’ku and tracked grav vehicle .
LOL, Theo your mind is an amazing place, never change.-camkierhi 9/19/13
I cant believe theo is right.. damn. -comradepanda 9/26/13
None of the strange ideas we had about you involved your sexual orientation..........-Monkeytroll 12/10/13
I'd put you on ignore for that comment, if I could...Alpharius 2/11/14
2019/01/10 16:06:22
Subject: What's on insaniak's workbench 2 - The Empire Reloaded the Future Next GenerationS (The Sequel)
All I can see is a bunch of finger pointing on who let one rip
LOL, Theo your mind is an amazing place, never change.-camkierhi 9/19/13
I cant believe theo is right.. damn. -comradepanda 9/26/13
None of the strange ideas we had about you involved your sexual orientation..........-Monkeytroll 12/10/13
I'd put you on ignore for that comment, if I could...Alpharius 2/11/14
2019/01/14 21:03:59
Subject: What's on insaniak's workbench 2 - The Empire Reloaded the Future Next GenerationS (The Sequel)
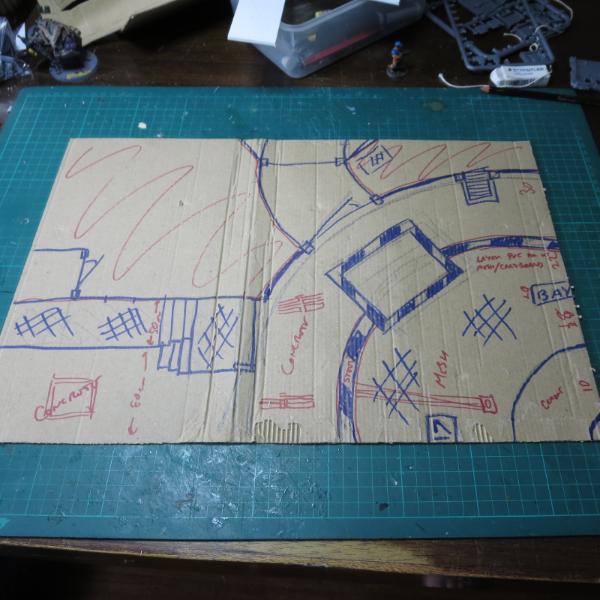
This week, I'm kicking off something a little different for the new year. It's a bigger project than normal, so I'll be spacing it out over a couple of articles, with the aim being to build a detailed display board to use as a backdrop for photographing miniatures. I wanted something that would have plenty of open areas for placing miniatures, and a few different contrasting areas to allow some variety in backdrops with just the one piece. And so 'Landing Pad 16' was born:
Normally when I'm building terrain, I have a rough idea in my head of what I'm going to build, and I just wing it from that. Because this one was a little more complicated, I started by sketching out a rough design, and then translated that into a 1:1 plan on a sheet of cardboard.
For the bulk of the structure, I chose to use foamed PVC sheet. This is a lightweight, but strong plastic material that is easy to cut and shape, and takes extremely well to superglue, which allows it to be used to build solid, detailed structures.
I took my plan and drew up a neater version on the PVC, and then used an exacto knife and steel ruler to cut it out.
I had a slight measuring mishap when scribing some panel lines on the floor piece. Rather than starting over, I just flipped the floor over, making the build a mirror image of my original design. The floor was layered, to allow for some depth in the detailing. With the floor marking out the basic shape for the structure, I could start adding the walls, shaping the PVC to the outline of the building.
The foamed PVC is quite flexible, but I added a curve to the landing pad wall by heating the PVC in boiling water, curving it around a biscuit tin and letting it cool. This wasn't super-effective, but gave it enough of a lasting curve to let it bend more easily to the required shape. Having the natural bend in there means that the PVC isn't trying to spring back as hard against the glue line, giving a more solid joint.
As with all of my Maelstrom's Edge buildings so far, detailing on this one is added courtesy of the Maelstrom's Edge terrain sprue. I created two hexagonal windows for the landing bay freight access corridor by gluing together pairs of trapezoid windows along their long edges.
As I built up the structure, the plan changed a little from the original sketch. I added extra access between the two sides of the board, and brought the detail on the 'reverse' side down from the roof to a first-level courtyard.
The courtyard needed some depth to allow for some staggered model positioning, so I added a couple of descending platforms on the rear, using layers of PVC to create the steps between levels.
I had planned for a groove to run around the top of the landing pad wall, which would theoretically serve as a runner for a retractable roof - I'm not building the roof, but wanted it to be implied for completeness. For the roof groove to have depth, this needed to protrude into the back facing of the wall, so I built up a box structure using layers of PVC.
The doors on the terrain sprue have detail on both sides, but as they're intended to be used on external structures they only have the framework on the one side. I created a double sided doorway by removing the frame from the rest of the door using a razor saw. On a second door, I cut the door itself out leaving the frame intact, so I could have an open doorway for the freight access.
However carefully you cut and glue, you wind up with some gaps and rough edges. I used some putty to fill in wherever necessary, and once set used some fine sandpaper to smooth it down.
To give the walls some structural detail, I built up a recurring pattern using the support struts from the terrain sprue, and glued this on along the top and bottom of each wall. For curved walls, I carefully bent the strut to shape before gluing it in place.
Rather than having bare cement floors everywhere, I added tiles to the courtyard area using textured plasticard. By cutting out squares of tiles in a regular pattern, I inserted some decorative areas of smaller tiles - these will be painted up with the Epirian Foundation logo.
Using ladders from the terrain sprue, and posts cut from sections of the sprue itself, I added a handrail around the courtyard.
I left the handrail open in a couple of places, to allow some avenues for displaying models and show where the terrain would theoretically continue past the confines of the display board. I did extend the rail part of the way down the stairs, by cutting a piece of 2mm plasticard in a pattern matching the rungs of the ladder.
Down the other end of the board, behind the landing pad, I built some nice, hefty pipes using the large pipe fitting from the terrain sprue and some 13mm garden drip irrigation fittings.
I scattered some smaller pipes around the place using the small pipe fitting, some plastic tubing, and some more scrap sprue from the terrain sprue.
With all of that done, this side of the board is more or less done. There is still a little more gap filling and sanding to be done, and probably some more small details to add here and there. I'll need to add some sort of trim around the bottom edge to neaten everything up, but that will wait until the other side is finished so I can make it consistent.
Stay tuned for part two, detailing the landing pad side of the board!
You can pick them up the Maelstrom's Edge terrain sprue, along with the rest of the Maelstrom's Edge model range from the webstore here.
As always, feel free to pop along and share your work, or ask any Maelstrom's Edge- or hobby-related questions on the Comm Guild Facebook page!
For other Maelstrom's Edge modeling articles, including tutorials and walkthroughs of a wide range of different building and miniature projects, check out the article roundup here.
2019/01/22 06:58:56
Subject: What's on insaniak's workbench 2 - The Empire Reloaded the Future Next GenerationS (The Sequel)
I'm champing at the bit to get some paint on it... Other side is about 90 percent finished, so should hopefully be able to start painting by the end of the week.
2019/01/22 23:45:56
Subject: What's on insaniak's workbench 2 - The Empire Reloaded the Future Next GenerationS (The Sequel)


 Finished Forge World Elysian Army
  Finished Tau Sept Cadre
  Alaitoc Eldar Warhost
  Finished Order of Our Martyred Lady - Sisters of Battle
  Finished Necromundian Imperial Guard Regiment


 .
.