dsteingass wrote:Oh yeah! They are just kind of expensive. Whatever you do, don't go too cheap. I have heard that the neo by Iwata is the best china knock-off airbrush out there. And you can get parts at Hobby LObby. But if you go to Michaels'- do not question getting the Badger 150, the manual sucks, but it is a great General Purpose ab. The Badger renegade Krome that I ordererd is a detail ab, meant for very small lines. This must be why airbrush holders always hold 2- I guess it is pretty common for hobbyists and pros to have two abs.
Great food, great day, great pile of goodies to show for it too.
That SHE bought me. You are the first person ever to think I'm rich Vik, but with her around, I'd definitely say I'm Richer than most guys I know
Excellent advice! I'll have to check out the badger ( http://www.badgerairbrush.com/Badger_150.asp ) at Michaels as soon as possible! I might just do some shopping around online and see what I can get cheap. I've got a big air compressor in the garage, so I think that might be too much, but we shall see! Online prices seem fairly reasonable when doing a google search for Badger 150, bout $120 or less for the kit. http://www.michaels.com/ has a 25% off coupon on their website.
Congrats on having someone who shares your hobbies and interests with you, that is awesome! Those pics of the GW grand opening are awesome, I'll admit to being spoiled as I've been to GW stores from Houston to Los Angeles and many game stores the world over, but they're all unique and awesome!
I can't wait to see what you do with those new models! Lots of options for converting Finecast stuff, but its all very soft plastic, so be careful!
capn...that isg is so priceless...and mx...i feel honored!
as for the recent work dave...that is your true modus operandi! making it like you are used to...and it already looks stunning... i saw long ago a tutorial of making such tools from scratch... guess i have to look again for these...there was even one where one made a tool for cutting 45° angles in materials so in essence doing a milling look for foamboard...
Awww it is nice that you have a lady who shares interests with you - very important. Gotta have a partner who respects the hobby. Mine spends more on his XBox360 than I do on minis anyway
I think you are right - having a hobby is so much cheaper and more fulfilling than living the corporate sponsored dream of mortgages, yearly holidays, overpriced products etc. Live cheap and buy lead! Your minis will probably be worth more in years to come but your starbucks coffee will be long digested.
As always looking forward to seeing what you can do with your materiel's!
I know a lot of people who have had problems with Finecast- I've already built/primed a few, and have had no problems with them so far. I got lucky I suppose.
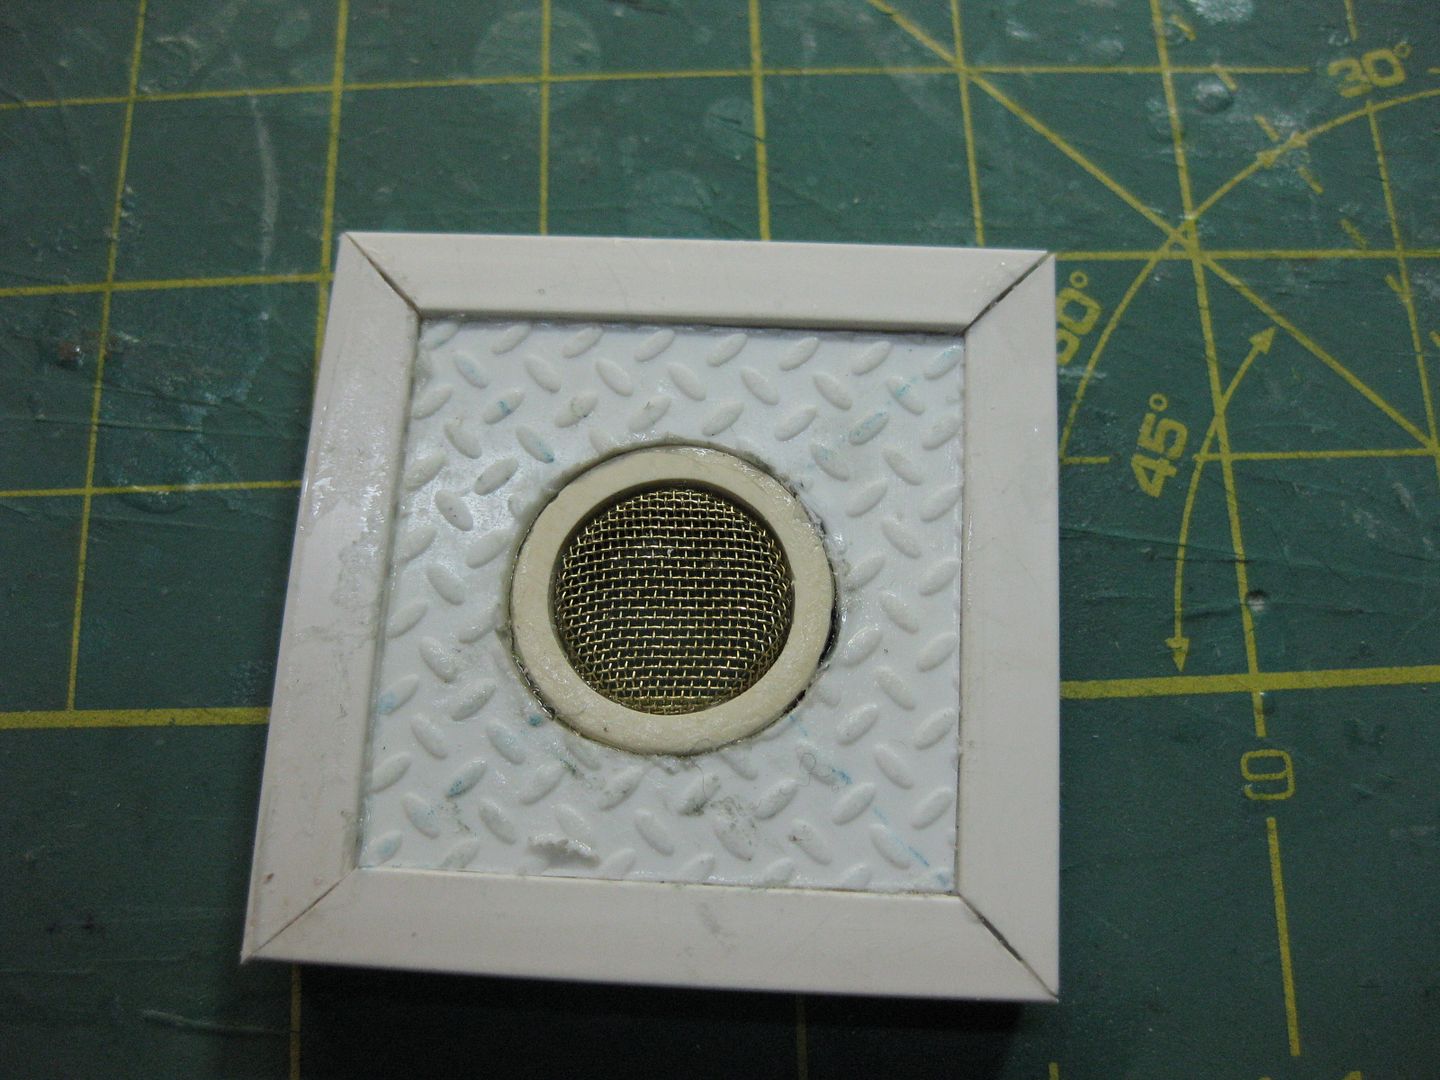
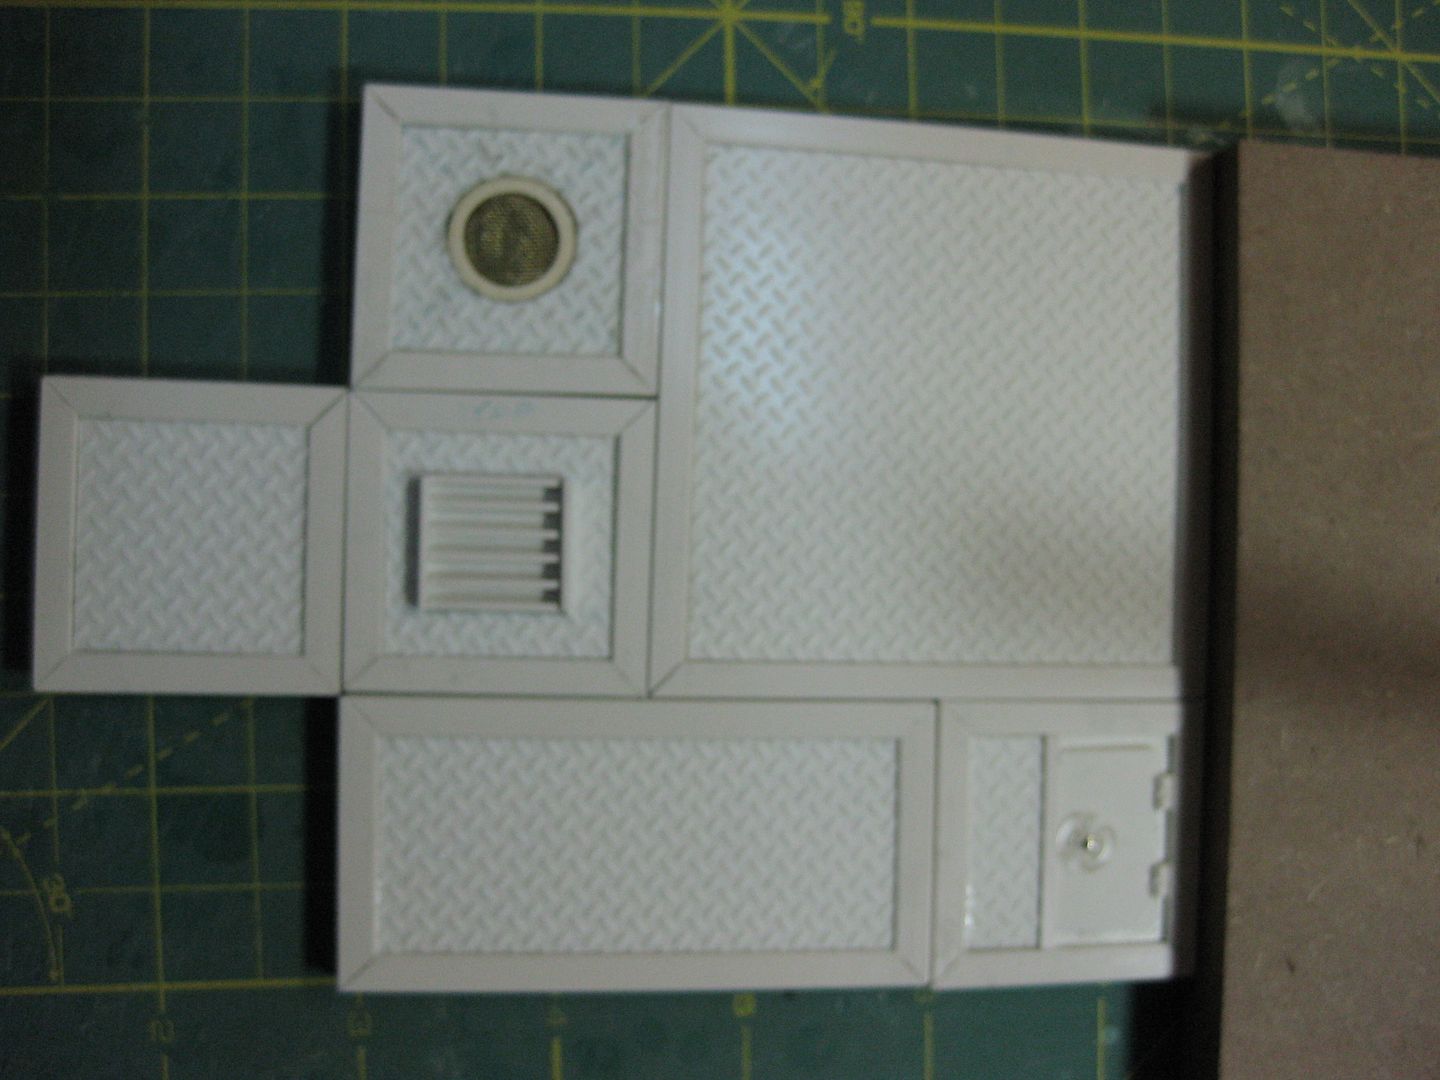
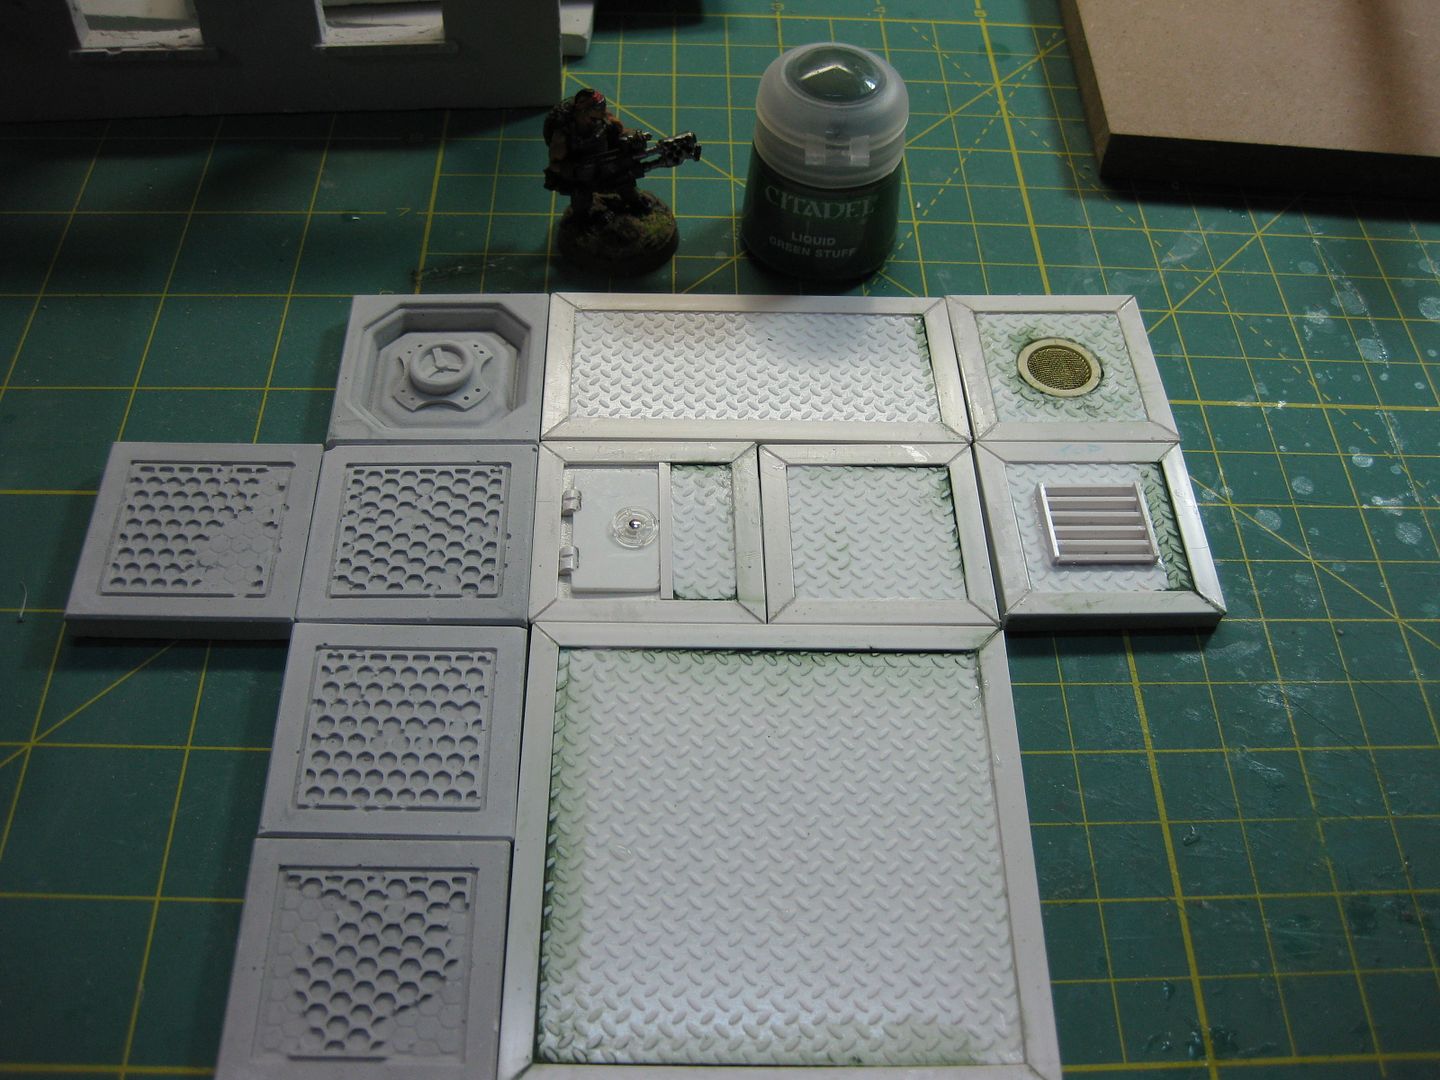
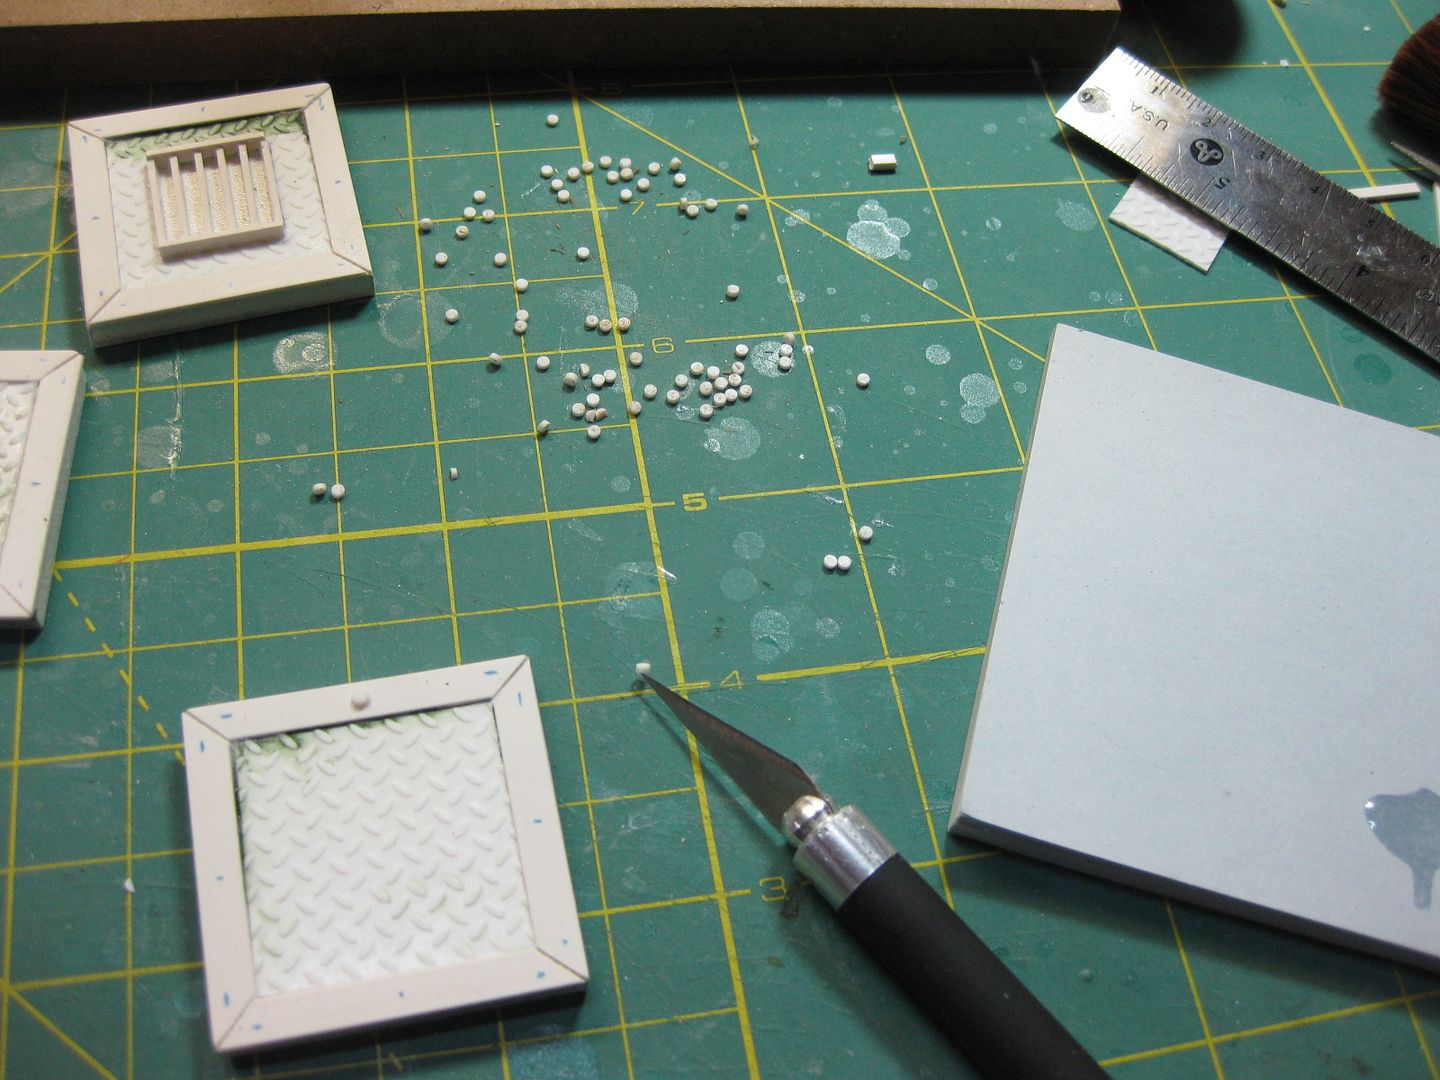
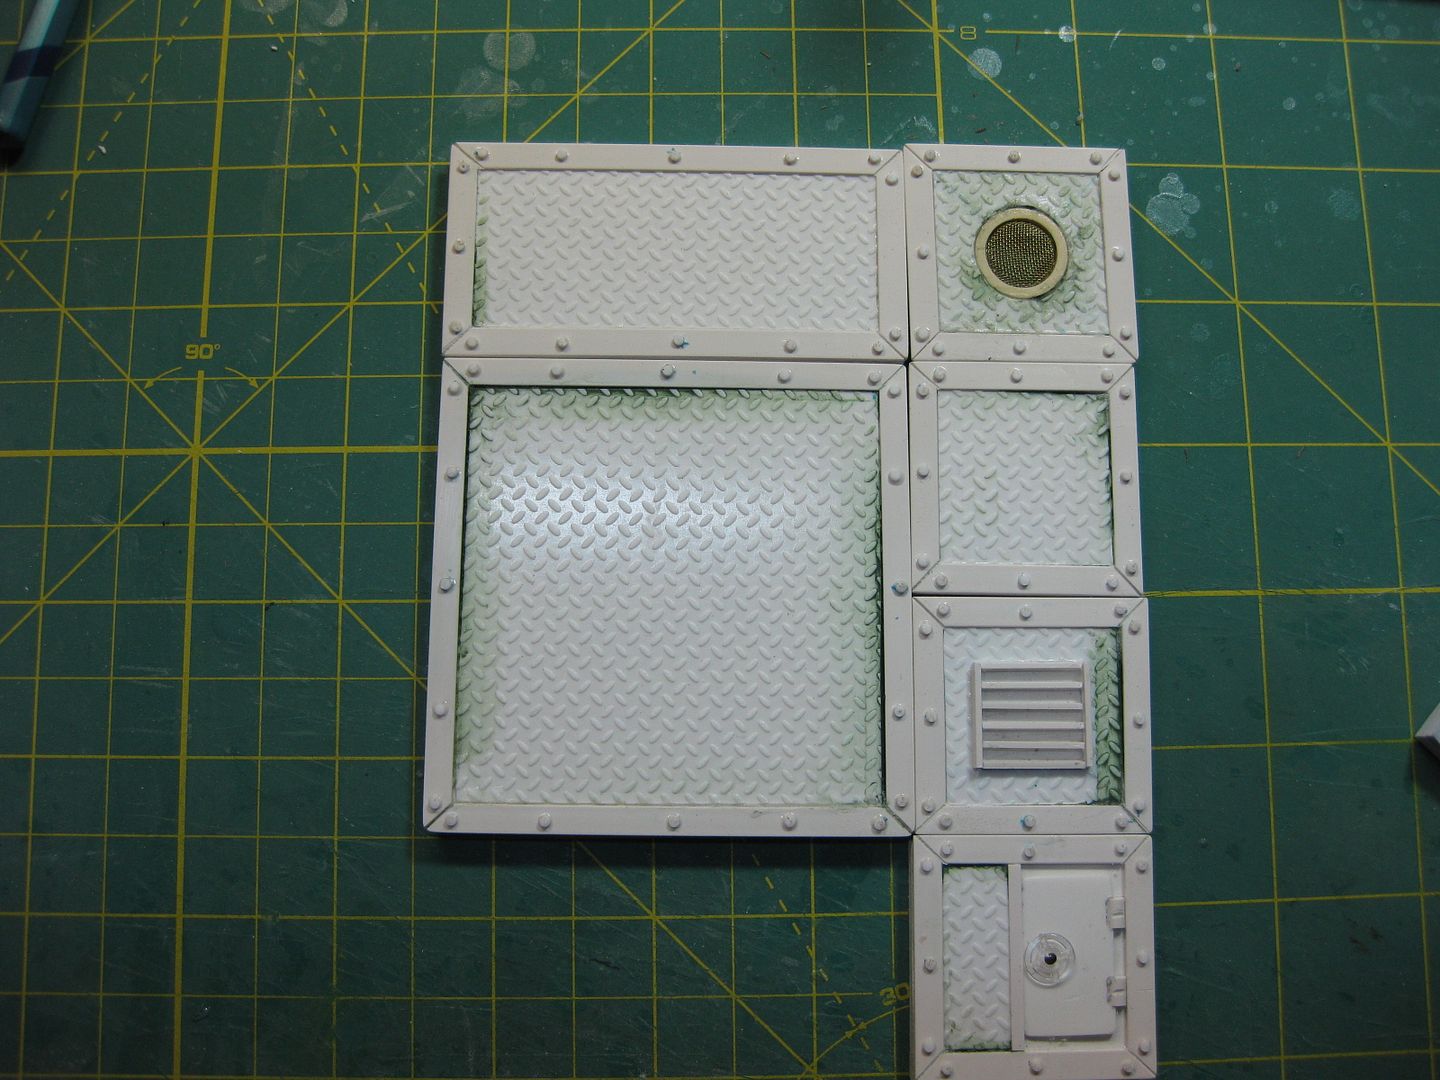
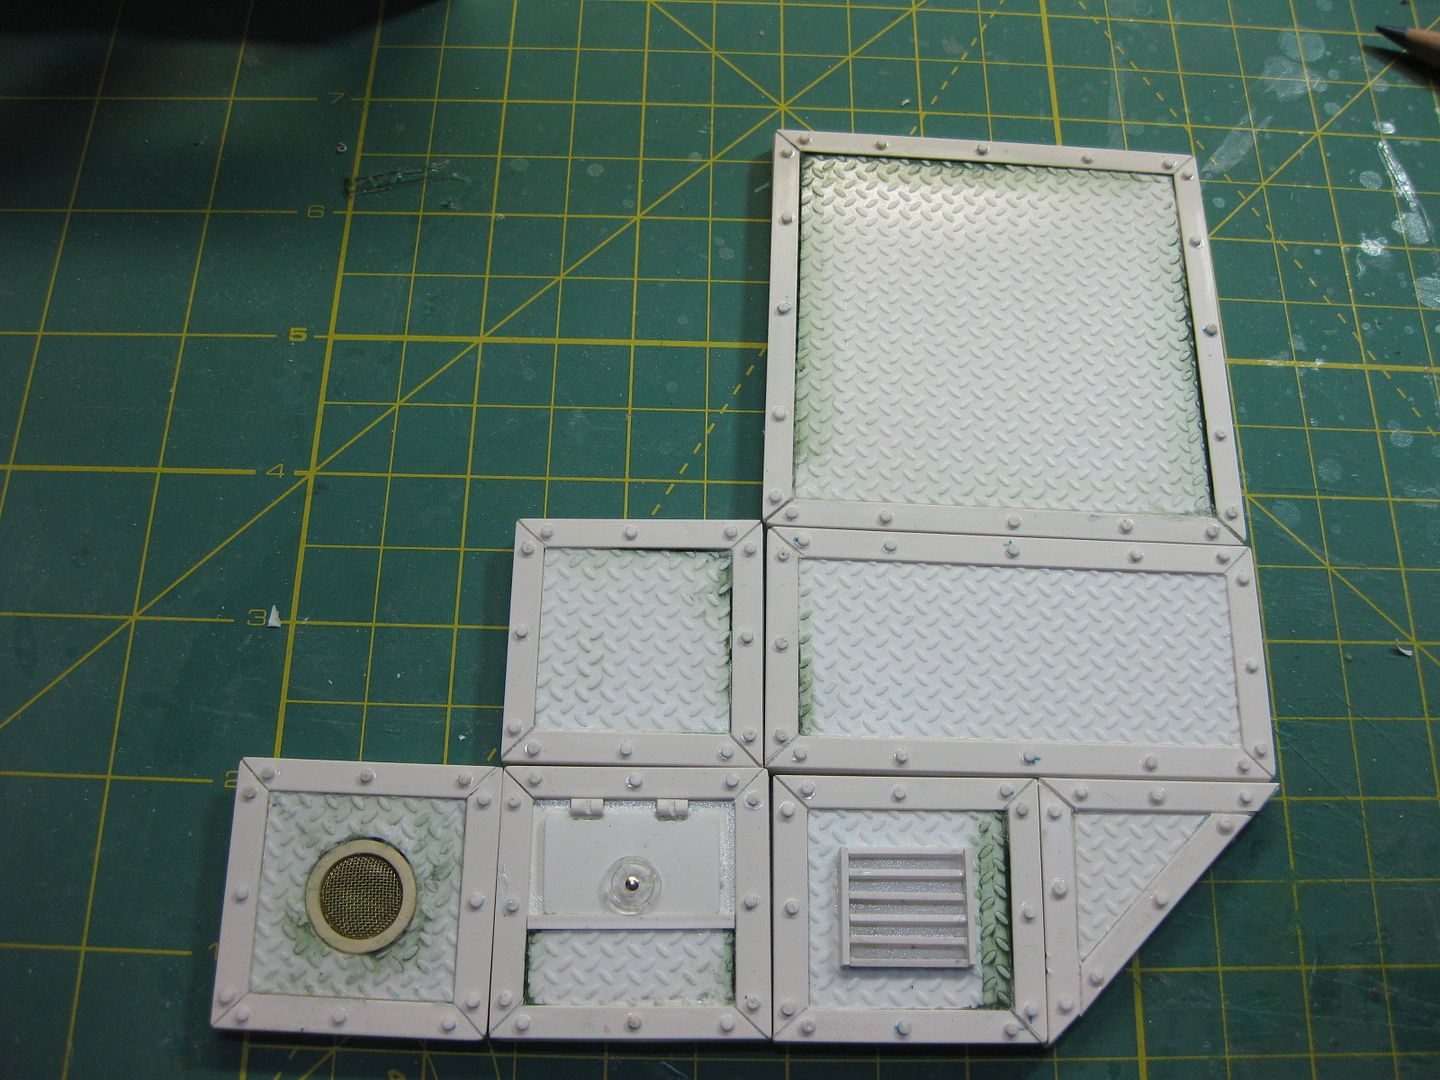
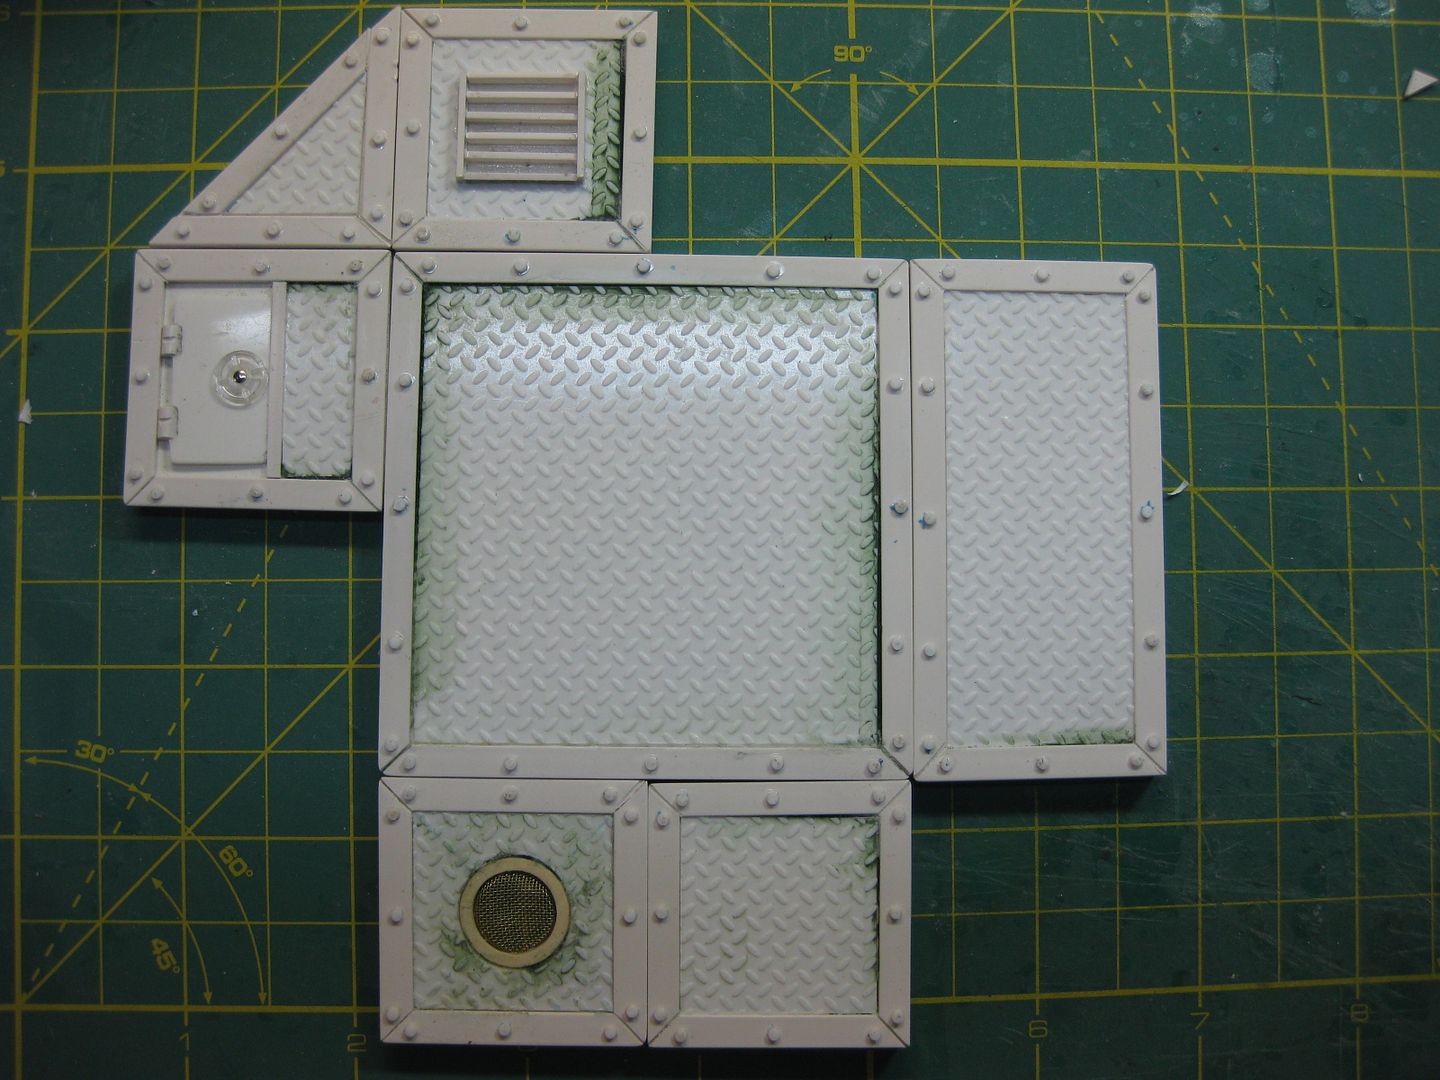
I was intending them to look like seperate plates actually, iEach tile will be riveted around the edge. I was contemplating using a saw to widen the 45 degree cracks uniformly.
You think I should fill them? Yes, I will def fill the diamond plate bitz tho.
Automatically Appended Next Post: I need to know before I can go any furthur.
Looking great here! Sorry if this is repetitive, but I missed what these are for (I got the fact that you will be casting them, I just don't know why )
very, very good work mate... that will be a new area...fisrt there was hirst arts... now will be daves munda casts...if you stay around 15- 20 bucks ...then you will be a rich man!!!
HAHAHA THanks Vik! But I'm just the design studio, Galorn is the production manager. I'm anxious to get his mold in the mail and cast some up! He builds them with the best stuff there is for mold-making.
Automatically Appended Next Post: FRESH Rivets....
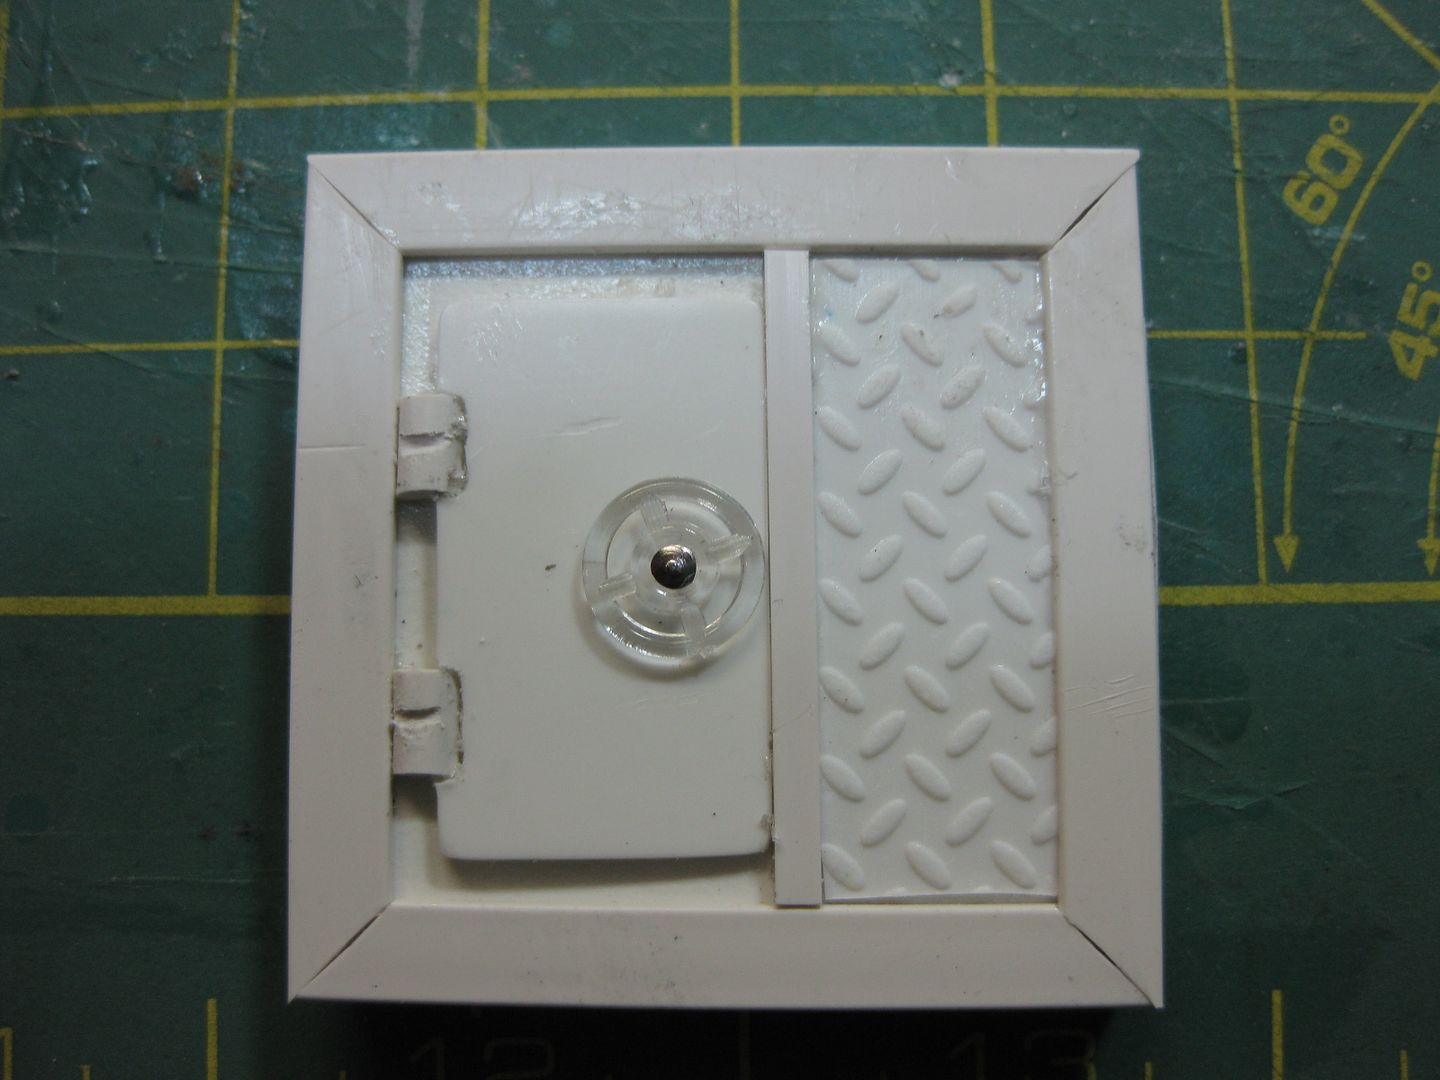
Galorn is very good. You have an amazing eye for what looks good, though, too Dave. I really like the snap fitting that you are using for a hatch spinner. Is there a brand name for that?
THanks Max, I don't think there is a brand, it's just a sprue of them I found in the sewing section of Wal-Mart many moons ago. THe metal snaps look better, but they would cause an undercut and that's not easy to cast.
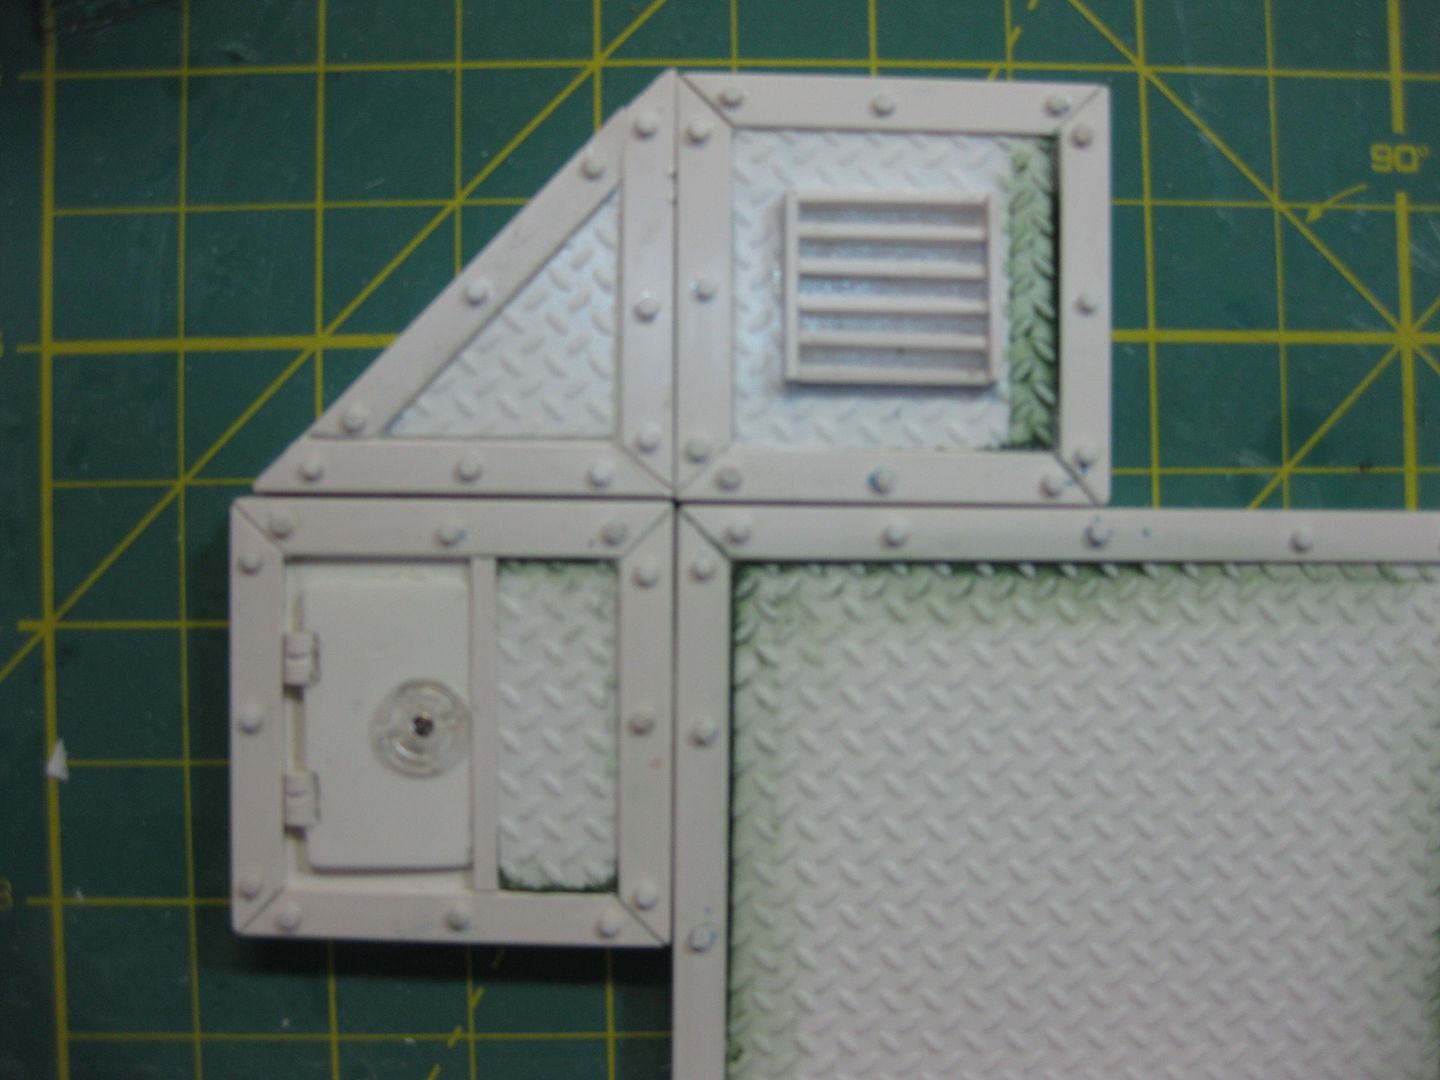
Automatically Appended Next Post: Here, I thought that this little triangle piece could be a useful addition to the set.
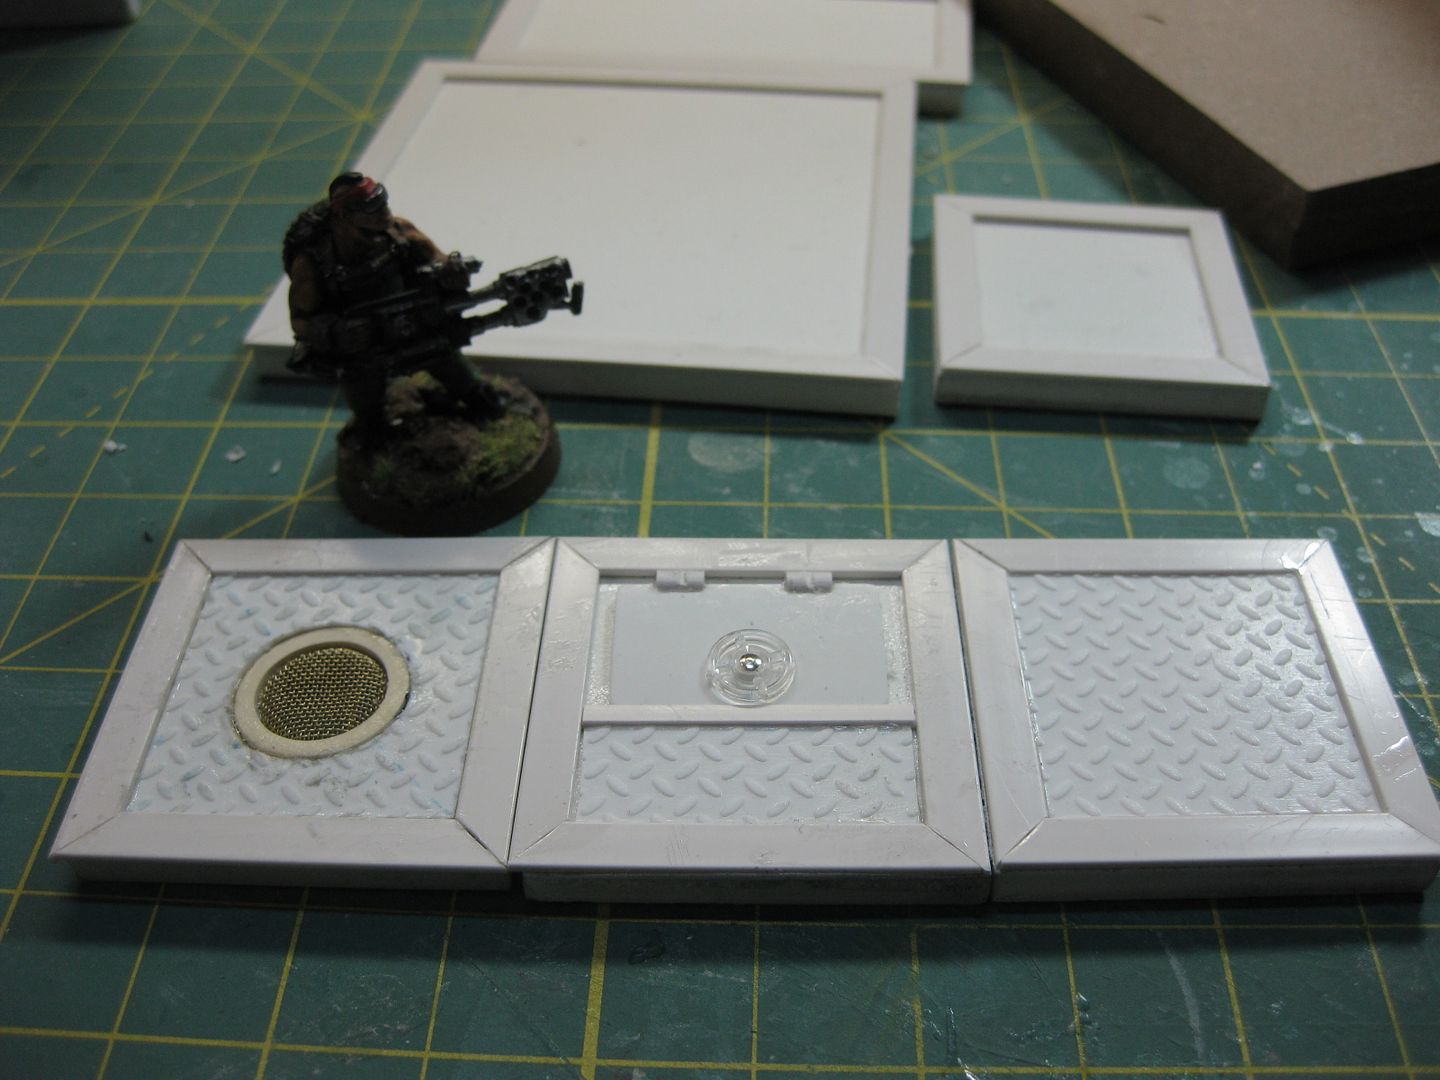
Automatically Appended Next Post: Yep, the more I look at the versatility here, the more I like it. Simply casting each of these tiles twice, gives a lot of possibilities.
Automatically Appended Next Post: I know my blog only shows up there if I host a pic on the gallery- they won't put most of mine up b/c I use Photobucket.
They Look AMAZING. They should mold/cast up no problem too the only one Im a little worried about is the drain. It should be fine tho, especially as it looks like you "sealed" it with liquid GS.
Nice.
Automatically Appended Next Post:
Viktor von Domm wrote:very, very good work mate... that will be a new area...fisrt there was hirst arts... now will be daves munda casts...if you stay around 15- 20 bucks ...then you will be a rich man!!!
Hmm not a bad idea... I'd be up for it. Dave you?
dsteingass wrote:HAHAHA THanks Vik! But I'm just the design studio, Galorn is the production manager. I'm anxious to get his mold in the mail and cast some up! He builds them with the best stuff there is for mold-making.
Automatically Appended Next Post: FRESH Rivets....
dave... about that new triangle piece... that is a wonderful addition... but if this ever hits a moldmaking process...i have a very stong suggestion to make... as a kind of future customer... you should at least put four of these triangled pieces in one mold...because for a structure i can see that being very useful...four would reduce the time to cast and would not overproduce stuff you might not need... or possibly one seperate mold for these even... i think there is nothing more frustrating to cast four times one piece and lots of others if you are specifically looking for to make only this... did i made myself clear?
and galrorn... that sounds very good you beeing interested in the moldmaking... i think this is something that needs expierience and then you could really all fly with the stuff!
(and i keep my gob shut for the current football discussion... i only now the basic shape of that ball, after that every thing becomes hazy...^^)
Get to work already! I like all the options presented, but second the idea of multi purpose/ multi tile molds, but also know that if you make it, then I'd be interested in it!
Thanks guys! but My GF is from New Jersey, and huge Giants fan..nuff said? I was born and raised a Cleveland Browns fan and I disowned them a few years ago, I'm more of a College FB fan.
So you can stick your Ravens you know where LOL
Good idea Vik, but That is the thing with the Hirst molds, you have to buy the basic tile mold, then have to buy another mold for the accessory or odd bits.
Say, would Galorn be at all interested in a couple of torsos to make molds of? I'm thinking beerbelly amongst others, but I can easily build a few more. Maybe even produce a kind of Munda goodies set? Some torsos, weapons, terrain...
Anyways, looking good on the flooring there Dave!
I think that Patriots flag would look good on a SM shoulderpad... Patriots chapter anyone
MauS wrote:Say, would Galorn be at all interested in a couple of torsos to make molds of? I'm thinking beerbelly amongst others, but I can easily build a few more. Maybe even produce a kind of Munda goodies set? Some torsos, weapons, terrain...
Anyways, looking good on the flooring there Dave!
I think that Patriots flag would look good on a SM shoulderpad... Patriots chapter anyone
Interested yes... I'd give it a shot making the torso mold.
Automatically Appended Next Post:
mxwllmdr wrote:I know it's your thread, Dave, but seriously? The Giants? Really?
Wow. I must do this at the risk of being unfriended on the Dakka's:
Ironically I have a friend near by named "Dave" and also from NJ, who is a rabid Giants fan.
Thanks Nereus2! New user? Just quit lurking? WELCOME!
Yeah, from what I've read, making a 2-part mold is a lot more difficult than a 1-part mold. This will be a learning experience for me. I am anxious to cast my own creations mostly to see the little nuances that I need to think about when making the next masters. You have to keep the molding process in mind when making the masters, it's a different thought process, but I like that kind of cause/effect thinking personally.
today i had some chocolate mold (don´t laugh) in my hands... they had a very cobblestone feel to them... if i am not mistaken then this mold making process is in essence like making new molds for "chocolate bars"...or am i wrong here?
Viktor von Domm wrote:today i had some chocolate mold (don´t laugh) in my hands... they had a very cobblestone feel to them... if i am not mistaken then this mold making process is in essence like making new molds for "chocolate bars"...or am i wrong here?
Pretty much the same thing Vik. It is just that usually a silicone or RTV mold allows you to cast finer details and is flexible for removing the casts. The vacu-formed plastic for chocolate molds works the same way, except if you flex the vacu-formed plastic to remove your chocoalte, you buckle and dent your mold. But yes, it is the same concept, pouring into a one-sided mold, gravity makes one side of the mold flat where the liquid levels off.
mxwllmdr wrote:I think Galorn needs to do a VERY detailed utorial on mold making. I have tried to learn this in the past and there is something that I am missing....
Check the blog in my sig. I have 3 tutorials about mold making and casting
actually i use the new theme and never had any probs... tho sometimes i accidentially hit the tab and i start scrolling through the themes...then i am confused... but after realizing my error everything is good again...^^
there are good things and bad ones... but since about half a year dakka is on my favorite list i can always jump again to a new subed list and this is always fresh then... for some reason tho, when i surf on my wifes laptop on dakka, dakka always throws me out... cookies and everything are allowed and i stay on as this i put after logging in in... but it seems that the explorer does some weird stuff to dakka...
Never too old for good toys. I'll be 36 this year and the wife and I have about 1000 sqft basement dedicated to our geekdom. Speaking of which I am in Atlanta for business this week a quick google search says that not only is my favorite silicon and resin supplier here yay no shipping but also a lego store and tower games. It's gonna be a good trip.
for me all kits had way too few minis anyway.... as i am after i built a kit makeing up new models form the big boxes i have i always like to actually play stories...battles and such things with the minis... and for these you had to have more than a few minis...
best thing currently... my oldest son begun to sort every mini... he has now three sorting boxes worth of torso, legs heads, hats and equip... and he combines these with such a nice creativity... they don´t look like accidents... more of a cool new schemes that are totally convincing... maybe i take some pics tomorrow...
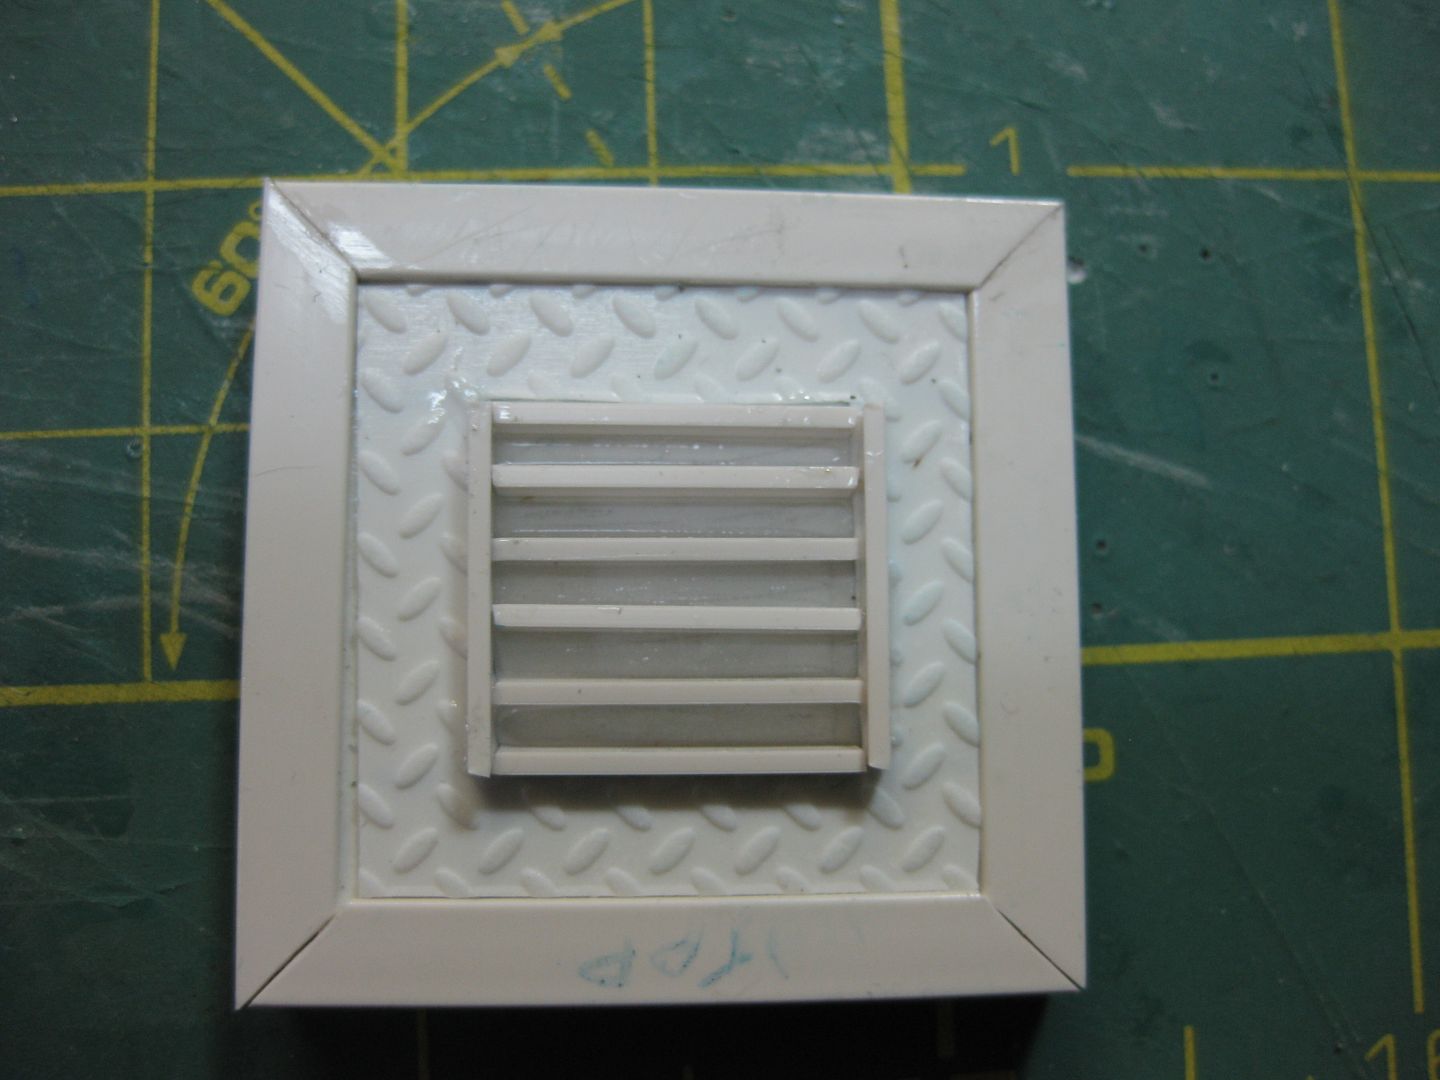
what about my loot suggestion??? the safe? or you could get into weapon production again... you could dream up a nice tesla weapon or better still a steampunk flamer... now that is something i need later on^^ as for the tesla gun, would love to see a conversion of a lasgun to tesla...that would make my guardsmen way more steampunkier...heck i could declare those then as stormtroopers... tesla=hotshot lasgun
oh i own that one too... exactly the same one... but i am not that fond of it... i have even a vice for it to sit secure while sawing... but it is not the very best miterbox... but these can be baught quite cheap... the long cuts for PC are what makes me think...these and the angled cuts...
Automatically Appended Next Post: i also have these rulers with the rolling blades... and a cutter for paper even... those guillotine like ones... in fact quite similar to the micromark suggestion of yours... but it is rather unprecise and not really something to cut PC with...
i onw one with a sort of rubbery underside to avoid too much sliding...... i have in fact quite a big range of tools... it sometimes lacks the talent to use them^^
anyway... bedtime ahead...in fact 3 hors overtime already... ouch this will be a short one...^^
stairs...tricky but oh so needed... if done right they could be such a nice terrain piece... making a like...four steps modular staircase... that would be cool... that way you had the freedom to make long or short stairs... the whole base size issue is the only thing that makes it not so easy... after all a termy should be able to climb.... but then again...why should a metal monster like a terminator be able to climbe mere stairs for only frail humans...??^^
It probably involves rivets riveting rivets made of rivets...
lol... do i smell a believer here?^^
buttresses sounds a good idea dave...
same goes for smaller fence like walls...or for that matter fences... what about lamps?
If i knew what a "Balsaleistenschneider" was i might comment but my German sucks, infact so does my French and Spanish. I barely get by with English lol.
Good stuff hmel! I've seen a lot of those already. As for the pipes, they are some great ideas, and they are flat on the bottom, that means a single-sided mold was used.
However, it IS already done. Do I want to redo something that is already commercially available?
Maus- good stuff, especially the riveted beams- could match the buttresses architecturally??
dsteingass wrote:Good stuff hmel! I've seen a lot of those already. As for the pipes, they are some great ideas, and they are flat on the bottom, that means a single-sided mold was used.
However, it IS already done. Do I want to redo something that is already commercially available?
Maus- good stuff, especially the riveted beams- could match the buttresses architecturally??
those pipes are Hirst arts castings (I have the mold) one of the problems I've encountered with them is unless they're resin cast I guess the flat "support beam" portion and the pipe flanges chip and or trap bubbles like a bastard.
dsteingass wrote:Bah, that's too unoriginal for my personal tastes
Haha, I tried!
Are we talking just imperial city / necromunda style terrain? You could do Chapter specific wall tiles which could double as vehicle upgrade/symbol pieces.
I suggest you start with Space wolves and make me a space wolf terrain piece, i.e. The Fang or Some Wolf Icon walls, this would be easy to do for each of the Chapters.
Or if you're just doing variations on floor tiles, how about some unique bases? You could do SW bases with raised wolf heads on them..lol, then I could paint it and dust it with snow after I mount the mini.
Wings, unique backpacks, weapons, wheels to turn a rhino into a wheeled vehicle, ones that would fit into the same area the tracks do, but don't raise the profile of the rhino too much. New turret systems or pillar mounts for unused turrets similar to the imperial guard heavy bolter turret or the aegis defense system.
But seriously. We're talking buildings, cross braces, pillars/supports, ladders, a slide, girders, beams, supports, a trash pile, a loot pile...etc..
Perhaps...Although there seem to be many companies already doing chapter-specific aftermarket SM stuff, in addition to the already excellent FW stuff. Also, I am not personally interested in Marine stuff, so my motivation isn't really there. I'm more interested in creating a quasi-generic set of sci-fi terrain elements that can be infinitely arranged and adapted to any background. Once you plop a Space Wolf icon on a wall, then your market for potential buyers is instantly limited IMHO. Some of the Hirst stuff is too generic IMHO as well, or at least lacking in rivets, which we have scientifically proven here that rivets make everything better
Girders are on my mind heavily, since girder-shaped plastic is relatively expensive and not always readily available to people who want it. So you say "just rivet up some plastic I-beam and have it molded!" - well, that presents problems with the mold-making process. A one-part mold would necessitate one side being flat. To get it right, and deal with the undercuts it would need to be a 2-part mold. Anything thinner than 1/4" will be hard to cast in the currently available materials I have (permastone), however the beauty of a RTV mold is that you can also use resin in the same mold, which will have higher tensile strength and allow finer details to not only be cast, but have greater strength. It's a learning process, but one that forces me to think in new ways when thinking about design.
The diamond-plate floor tiles are a good start, depending on how the mold comes out will determine the next step in that series of architectural elements. I expect there to be nuances that I do not yet understand, but I am anxious to learn from them.
I gotta say, though, I buy from Evergreen Scale Models and i don't find the economy packs of their tubing and rod and Ibeams to be that expensive. check out the link.
Automatically Appended Next Post: Although, I find the idea of modular terrain to be very intriguingly fun and cool. Like Space hulk on a different scale and with a different atmosphere......
dsteingass wrote:Bah, that's too unoriginal for my personal tastes
Haha, I tried!
Are we talking just imperial city / necromunda style terrain? You could do Chapter specific wall tiles which could double as vehicle upgrade/symbol pieces.
I suggest you start with Space wolves and make me a space wolf terrain piece, i.e. The Fang or Some Wolf Icon walls, this would be easy to do for each of the Chapters.
Or if you're just doing variations on floor tiles, how about some unique bases? You could do SW bases with raised wolf heads on them..lol, then I could paint it and dust it with snow after I mount the mini.
Wings, unique backpacks, weapons, wheels to turn a rhino into a wheeled vehicle, ones that would fit into the same area the tracks do, but don't raise the profile of the rhino too much. New turret systems or pillar mounts for unused turrets similar to the imperial guard heavy bolter turret or the aegis defense system.
But seriously. We're talking buildings, cross braces, pillars/supports, ladders, a slide, girders, beams, supports, a trash pile, a loot pile...etc..
Lots to think about!
The chapter specific iconography would be a MAJOR no no as a commercial enterprise (at least until we see how the GW lawsuit Vs Chapterhouse shakes out). Sundry objective markers tho... possible. Structures similar to what elevated highways are held up by (jersey barriers, and suchlike) would also be a possibility.
mxwllmdr wrote:I gotta say, though, I buy from Evergreen Scale Models and i don't find the economy packs of their tubing and rod and Ibeams to be that expensive. check out the link.
Automatically Appended Next Post: Although, I find the idea of modular terrain to be very intriguingly fun and cool. Like Space hulk on a different scale and with a different atmosphere......
hey, on redoing things already made.. i dont know about you, but if i can buy all my terrain needs from one place.. then i would be happier and i would spend more money! although im sure you can make some serious bank by doing your bulkheads (i know i'd buy some) since it is harder to come by nowadays (at least for me)
ha, i remember a long long time ago, when i was back in junior high, in european history, and we where learning about the architecture of notre dame, some kid looked at that word and pronounced it butt reasses.. ahhh those where the days, oh and if you dont sig that, than i dont know what could be more perfect!
hmm, that seems about a year or 2 off of when that was.... any ways i do like your butt reasses though, i think they have the proper feeling to be able to put them on a normal building, and not just a chapel (as shown in your pic)
Automatically Appended Next Post: btw, i completely forgot who gave you that mold for your buildings.. because i want to see if i can buy one off of him
danke sir dave! and fyi i hope the giants lose!(and i hope that the patriots lose too) although for the sake of the plasticard... i will have to say good luck.. although having wes and gonkowski on my fantasy team sure helped out
Rogue Wolves wrote:hehe.. he was thanking me for the comment, and reminding me of your name!
See I knew I had missed something. He is still welcome (for helping me out by making a master that I can use in commercial endeavors) and you are awesome for pointing out what I missed. So Thanks. (I'm serious BTW not sarcastic, at least not in this comment anyway)
pff lucky.. i'd rather be back on the ol' east coast.. although being here in la area has helped with jobs, so far i got to work on all of those tennis open comercials (us,french,aussie,wimboldton)
Aye up dst , lots of cool stuff happening in this ere part of town.
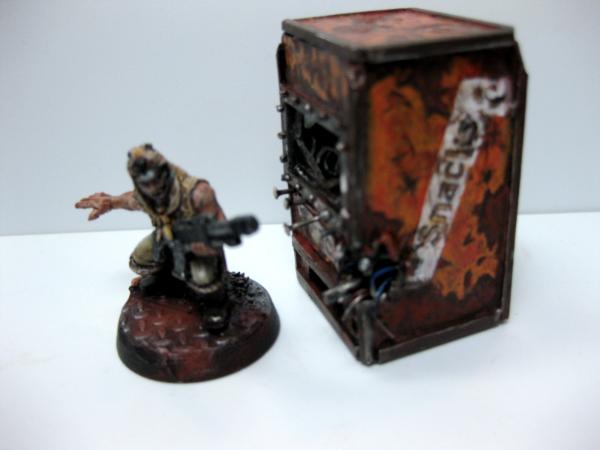
Nice work on the custom tiles and on the mold stuff, but especially on the snack machine , that is great man , weathering is really good.
at galorn... just looked up your sig...love that quote! i knew it before but is now my second faored latin quote... my favorite will for ever be: "quis custodiet ipsos custodes" who watches the watchmen...
the butresses look good tho not on that buildings segments... needs a totally differnt setting... arched windows and such things... also...goes without saying...: rivtes^^
Viktor von Domm wrote:
the butresses look good tho not on that buildings segments... needs a totally differnt setting... arched windows and such things... also...goes without saying...: rivtes^^
Really? hmmmm. that is not what I wanted to hear..
well... the shape of those walls remind me more of the poor made sector of my city.... this quick built massbuildings...
Automatically Appended Next Post: and on these butresses would look like a banana on a bike.... totally cool all for them selves but not in combination...
oh i see....hmmm... that changes a bit my thoughts... i thought for now that you wanted to go for a more bicked up butress look.... now with the steely and riveted look.... your idea is redeemed^^
Automatically Appended Next Post: actually it is a shopped pic i guess.... but in essence tat is how they built those crappy houses...
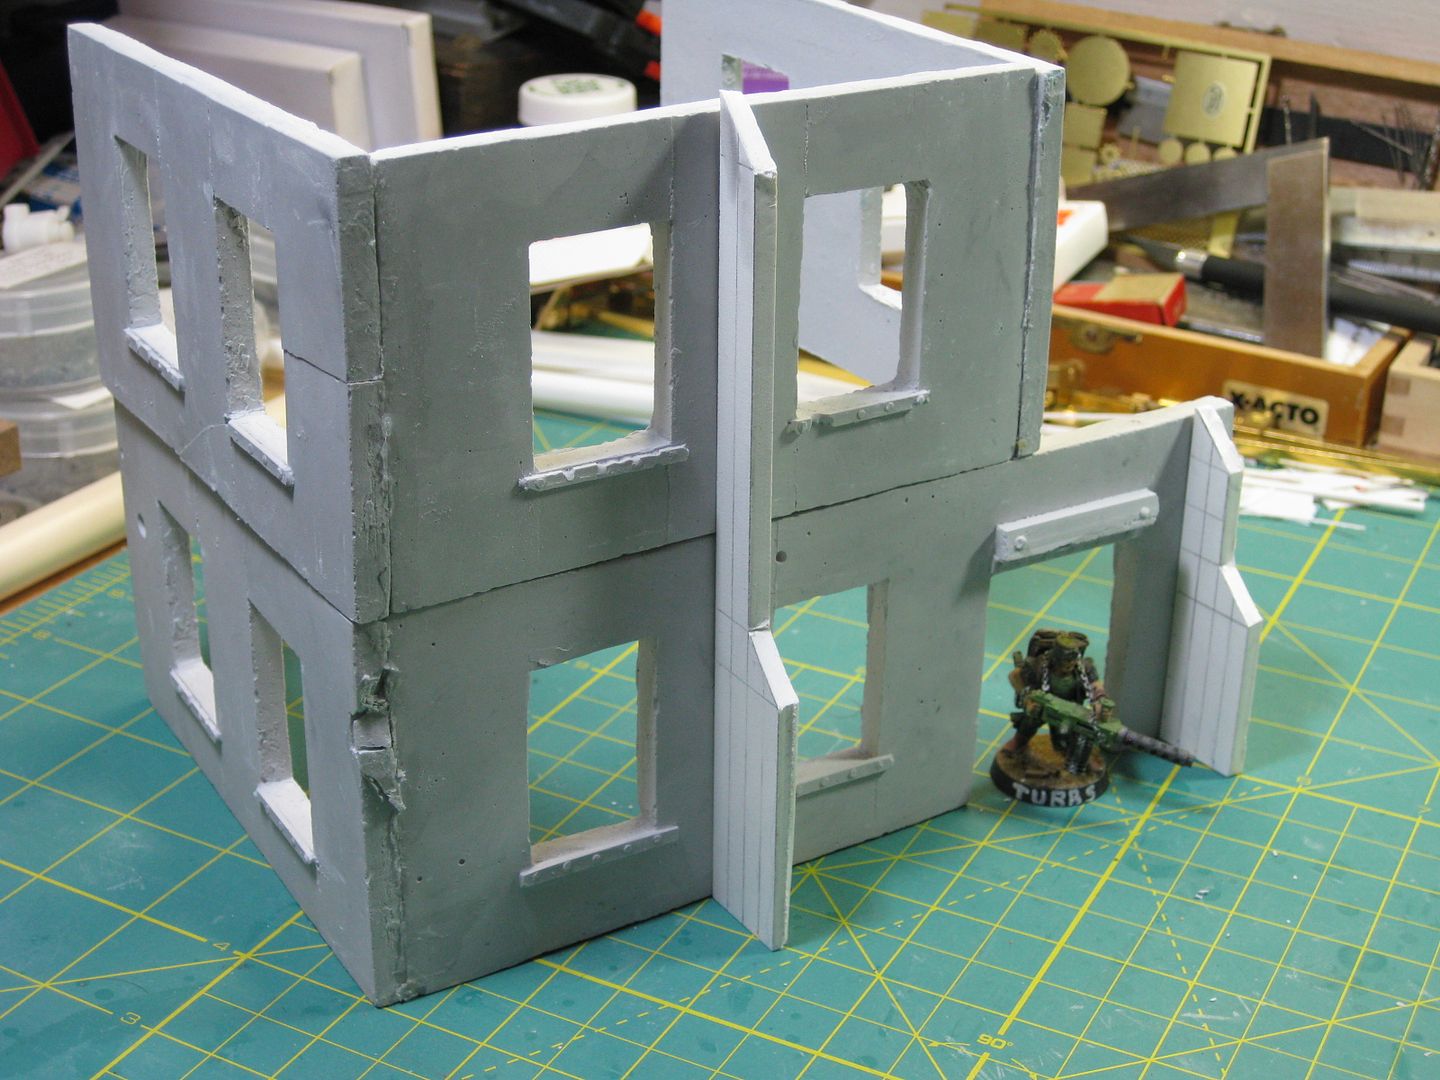
Well, no...you are right, Galorn designed these to be ruins with a more generic look, less grimdark. These walls are perfect for 28mm Stalingrad ruins through modern era, and even into any sci-fi table.
well.... i have to jump over my own shadow here now... for the need of your terrain...gothic... my own tastes and preferrences would be more victorian...and i don´t see a possible middle gear here^^
It doesn't have to be all grimdark, Industrial is pretty universal architecture style that is easily imagined too. ALthough I have to admit, Victorian Industrial has a lot of red brick, pig iron, and rivets, which are super cool IMHO
hmmm... music in my ears^^ yeah...i grew up in such a part of my hometown... alll victorian /jugendstil buildings... i really loved the brickwork look....red bricks...brass and rivets and good and well treated wood.... that is such a fine look!
well.... monkey...being that thoughtful and expeirienced guy that he usually is... he got it up all wrong this time... i am not and never was and probably never will be a cat man... cats you can safely stick up your jumper for all that i care....sorry mates... but cats are no animals i want in my flat anymore... however tiny they might be....
I always imagined that the Habs were just huge apartment buildings made from pre-fab building materials. I think the gothic arches would look out of place in combination with the industrial towers you already made.
Besides, why go through all the trouble to do all that brick/stone work when those damn kids are just gunna shoot up and spraypaint over it...
i already have my patton in it! daaaave get to the designing, without you knowing i signed your name on a document saying you would be the one to build it!
aannd.. BAM heres where the movie begins... now we will skip ahead to where i kidnap your precious plasticard, and those awsome brass clamps. now either you make the terrain or we replay the whole Taken movie.. but let me warn you, you are definatly not QuiGon......
Going back to building the moulds could you not produce separate window moulds to fit the space with alternative design's allowing for a more generic building mould to be produced, then varying styles or period window tiles could be added after.
Just a thought ……… also you could produce a mould of window decor so you can add over the top of the first mould to give depth and design variation.
i like LDD ´s idea to make seperate "inlets" for the window frames... might be tricky to make them fit properly but that would be a most unique idea and would give plenty of variation ideas.... one mold for the basic wallshape...and then additional ones for different settings to match different building ideas...
I think it would be much easier to just make a whole new wall master than to get casted window inserts to fit properly. It would probably take the same amount of RTV to make the mold for the inserts as it would to just mold a new wall master. I dunno. Galorn? your opinion please?
dsteingass wrote:I think it would be much easier to just make a whole new wall master than to get casted window inserts to fit properly. It would probably take the same amount of RTV to make the mold for the inserts as it would to just mold a new wall master. I dunno. Galorn? your opinion please?
Similar amount of RTV sillicone yes.
But its also easier to make a single wall blank (like I did) and then make inserts that fit any window holes.
That's what I did for my walls anyway, and yeah getting the initial window spaces, and the inserts to be interchangeable was a little tricky. It helped that I constructed the master for my walls out of strips of a known width arranged vertically, squared to the top and bottom, with a known distance between the top and bottom that formed the window void. I then used Bondo to gap fill then I sanded everything flat. (the "pour seam" in the final panel is due to me clutzing and cracking the master and not taking the time to redo the whole process, including detailing. I was able to glue the sections back together relatively closely, but not perfectly (as you can see in the final mold) it works for that particular panel, and as such falls into the "happy accident" area of model making. the adhesive I used was Zapagap brand Cyanoacrylic (super glue) glue
mxwllmdr wrote:Yep, looking forward to getting into the molding thing. So many ideas...... So little time......
Can't wait to see what you come up with...
I'll do the same deal I did with stien... Make me some tiles/sections, I'll mold em, and send you a Mold of em (if they mold up OK) If you give me the ok to sell the mold I'll split my profits with you 50/50
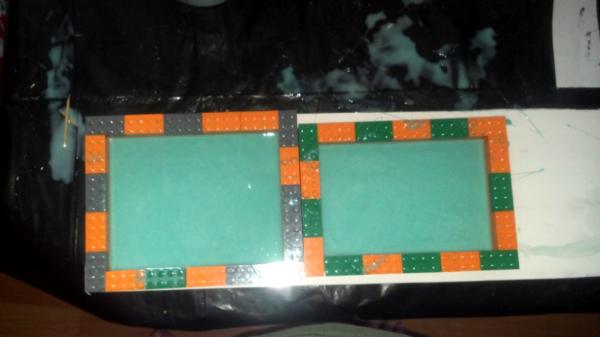
The masters arrived this morning, I'll be creating the mold in a few moments actually.
WOOT! LEGO Molds! Do your stuff! This is exciting!
Speaking of....
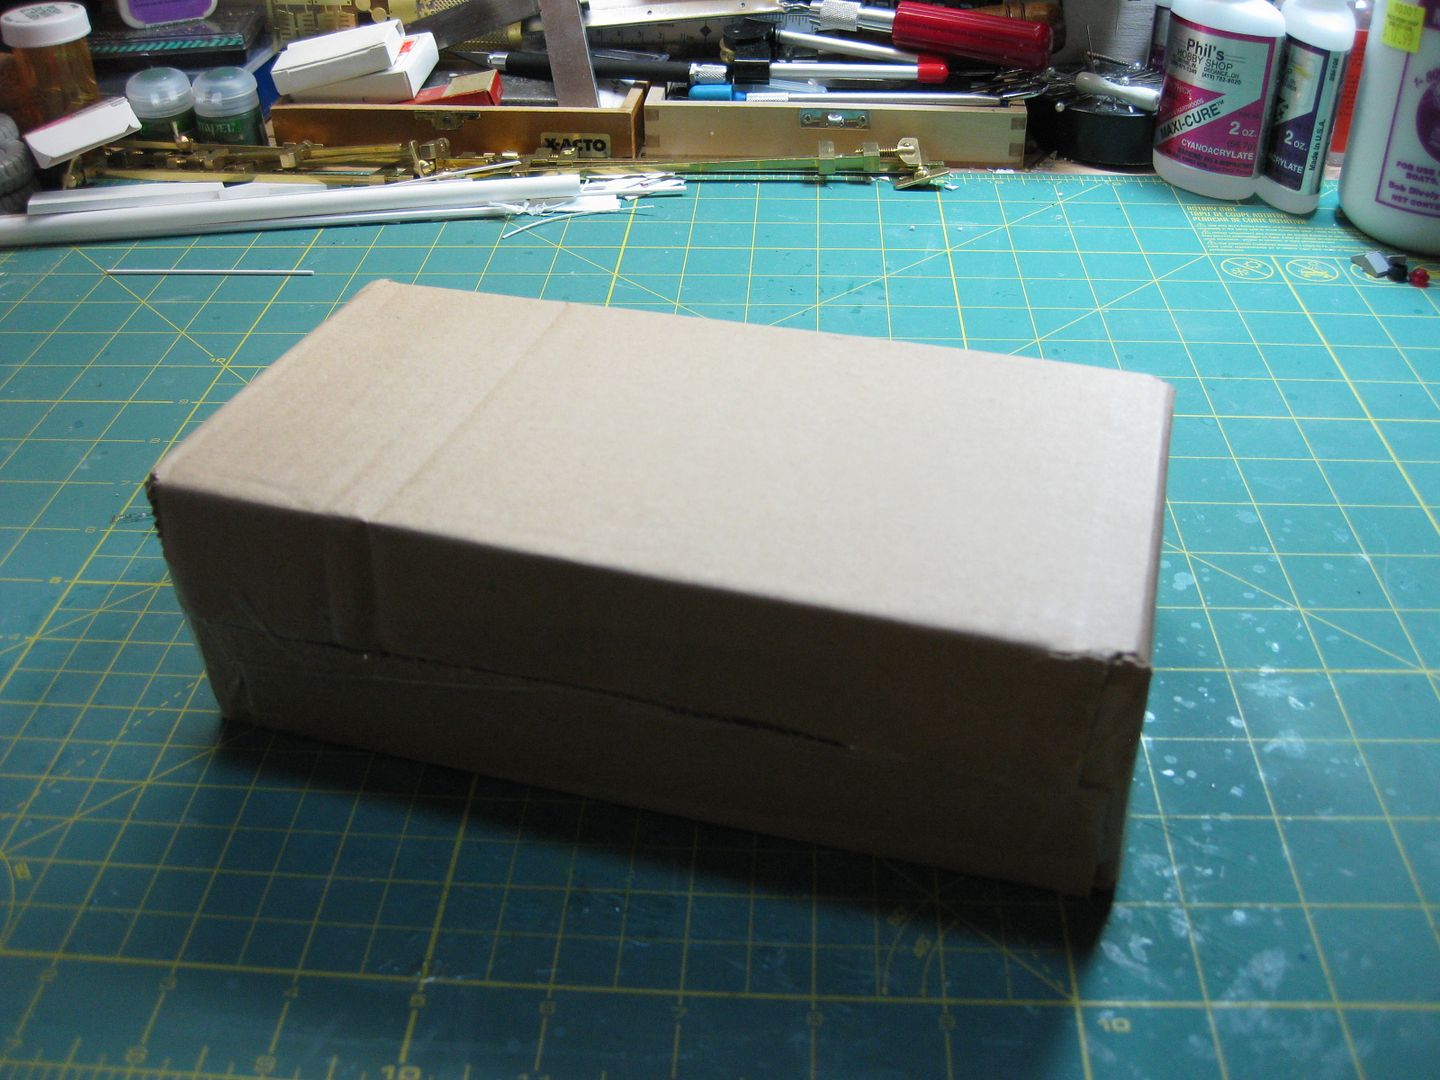
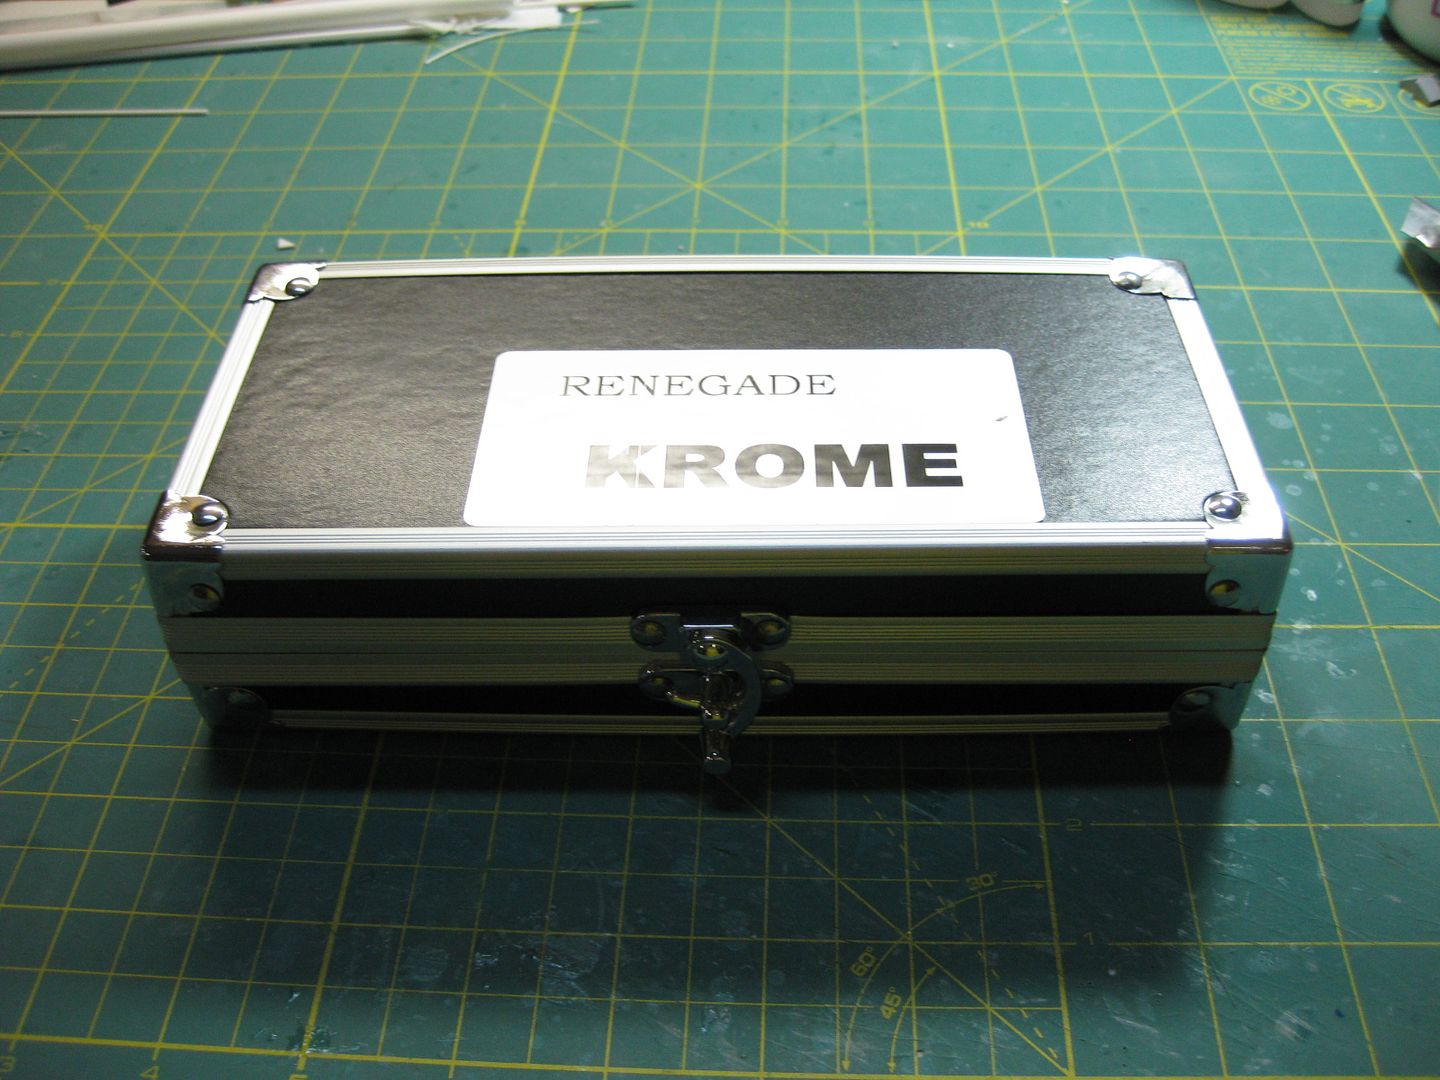
I get home from work, and look what is on the doorstep!
A Box, from AK Interactive....
Inside the box?...another box.
Inside that box.....the RIVETED, Weapons-Grade BOX!
(Insert angelic chorus sound here)
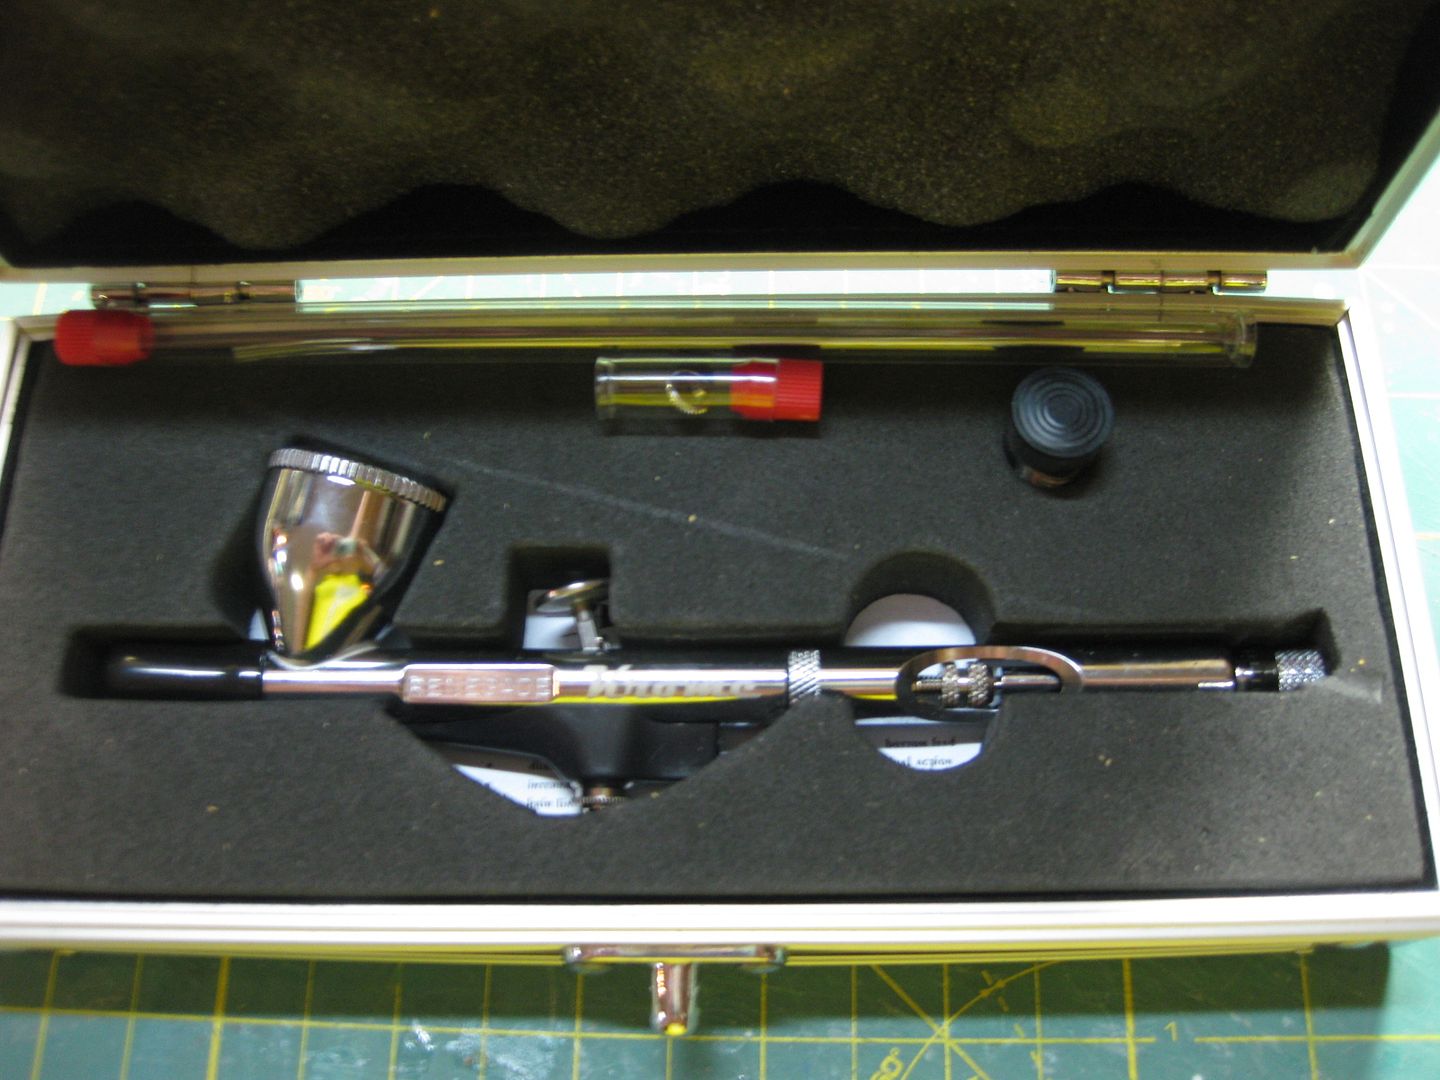
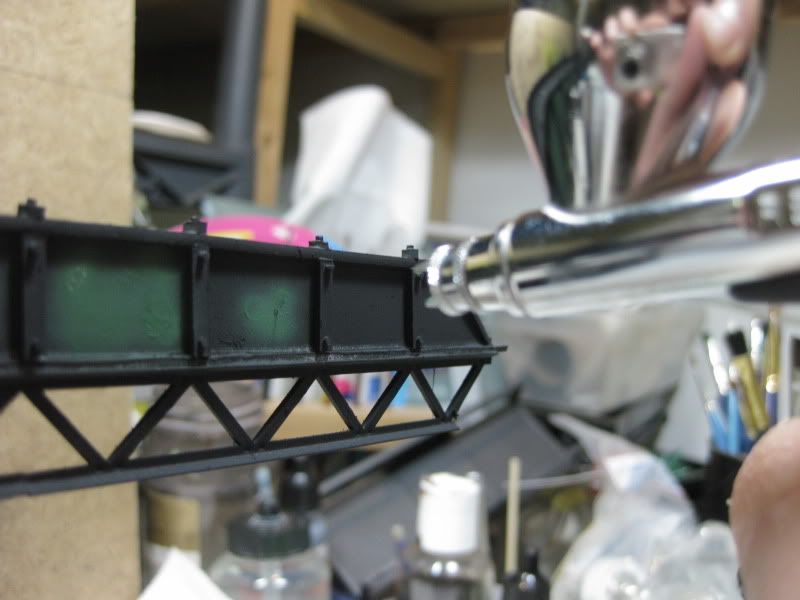
It's the Badger Renegade Krome detail airbrush!
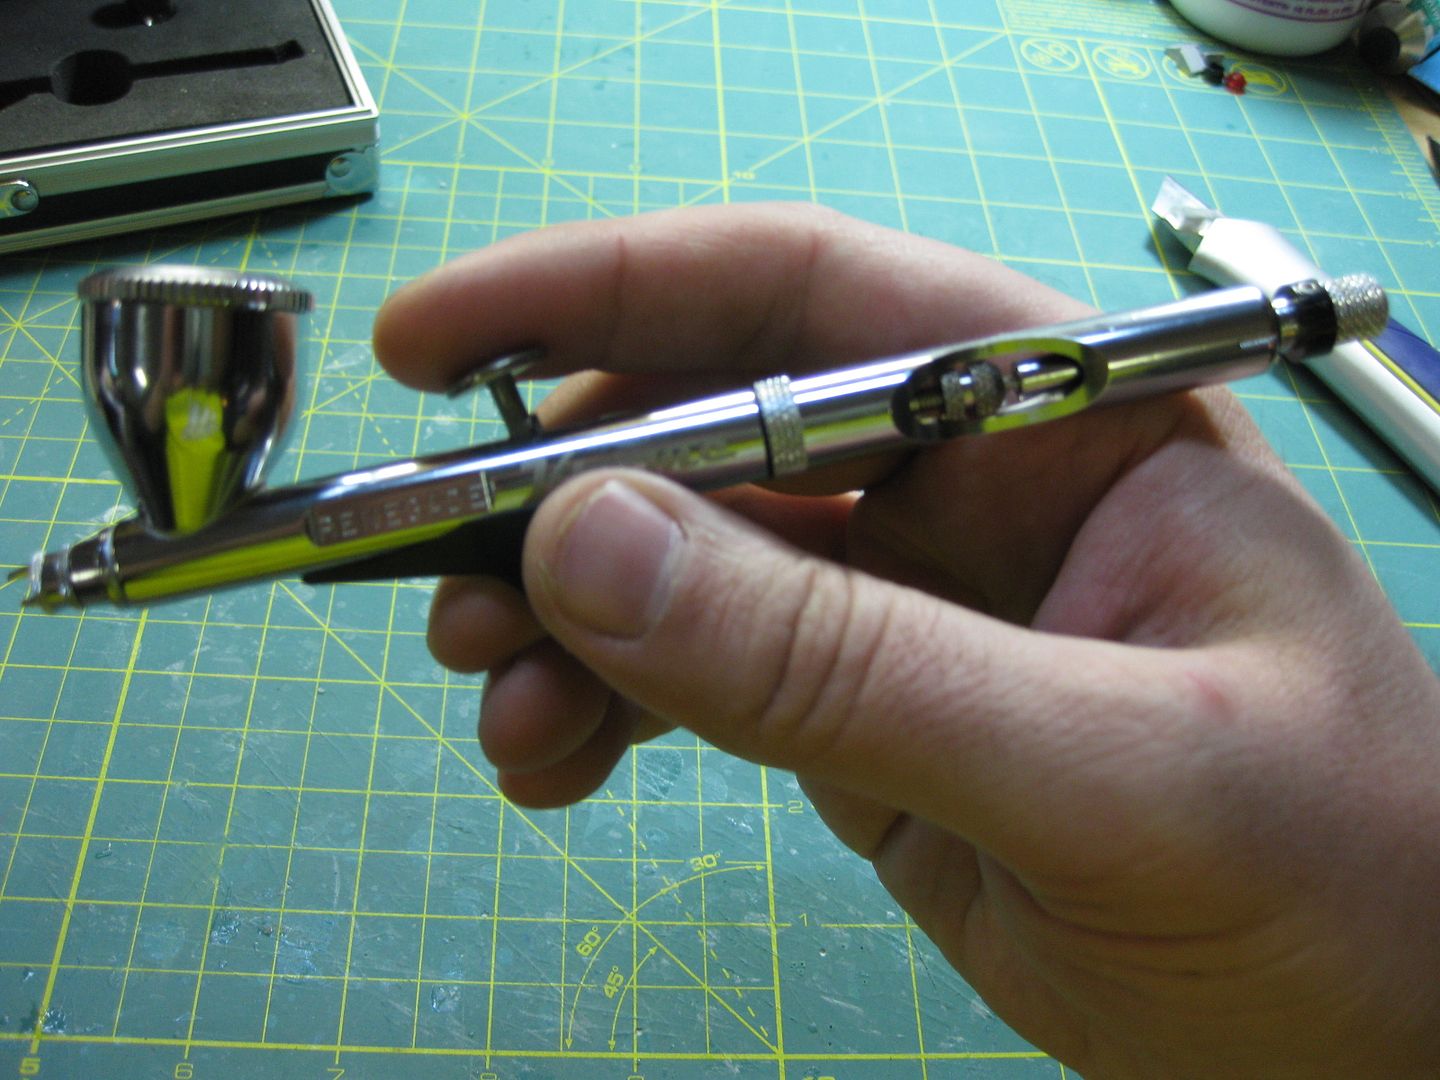
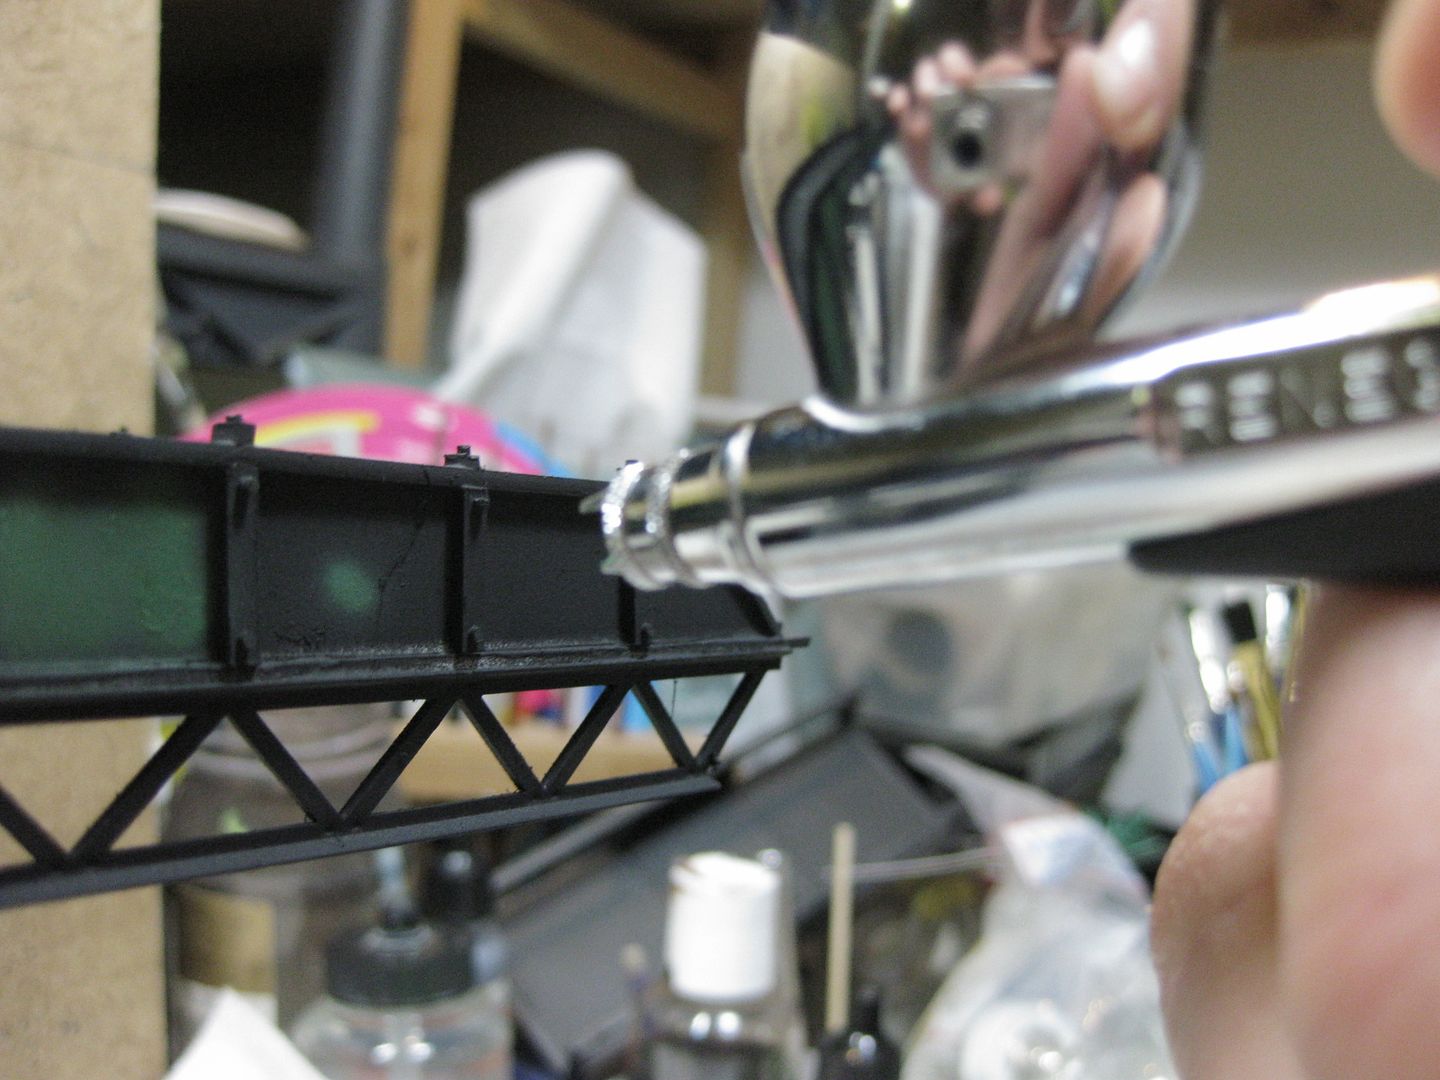
Look at how tiny that needle is!
one tiny bend can ruin it!
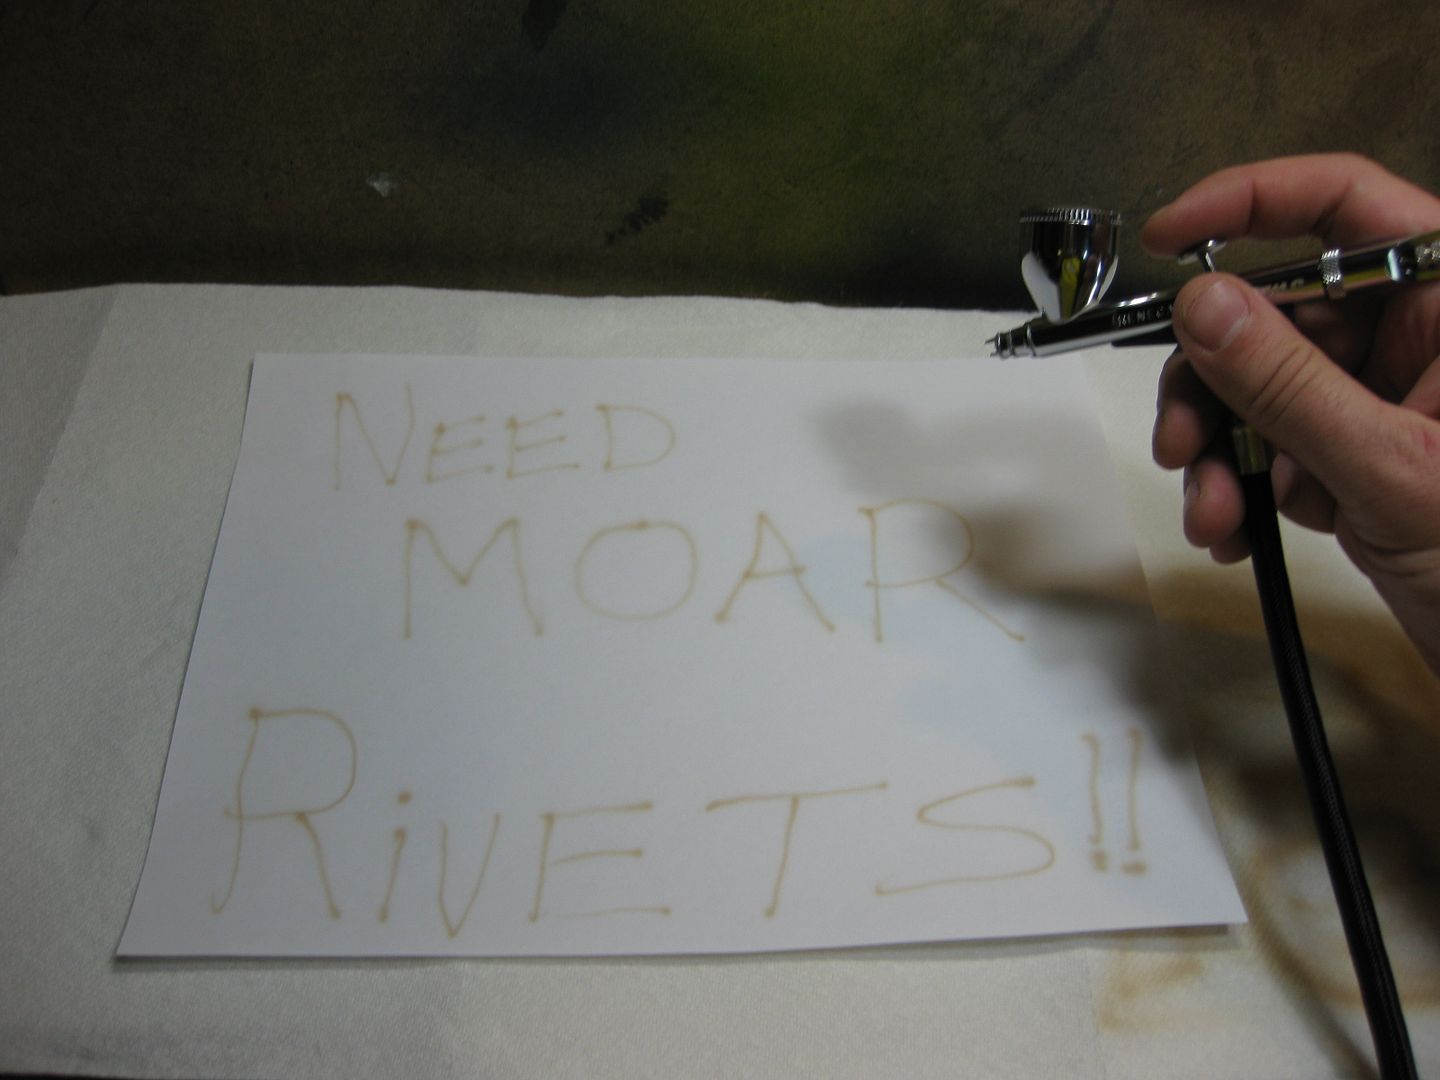
Automatically Appended Next Post: My first try, no practice!
OMG this thing actually DOES what I want it to do!
And it can make even finer lines, once I find the sweet spots on the air pressure and trigger This one has the needle limiter, which lets me set the trigger so that it won't go past the sweet spot either.
..not to mention it actually FEELS like it belongs in your hand
thats why there are some mighty looking protectors on either side, eh?
wow... you are now fully loaded... armed and kicking....
i read the sticker on the upper side... "priority" mail... makes your opening that much more special...as if "Q" has sent you this one^^...so what will be your first victim?^^
Automatically Appended Next Post: needs more rivets.... that is priceless... and it would make such a nice avatar... not that i then miss your snack machine... but rivtes are rivtes.... nothing sees one better through the week...
This turned out looking more like the logo for the
League of Extraordinary Polka-dot wearers
But you get the idea.
Yep Vik! And it also came with a different nozzle cover also, one that does not have the protectors, for getting really close to your work. But that scares me a bit.
Noo Cap'n, that'll work great for nice, smooth basecoats, camoflage, and any other general purpose painting. Paasche is a great brand, don't knock it till you try it! With a bigger needle, you don't have to use as thin of paints as with a small needle.
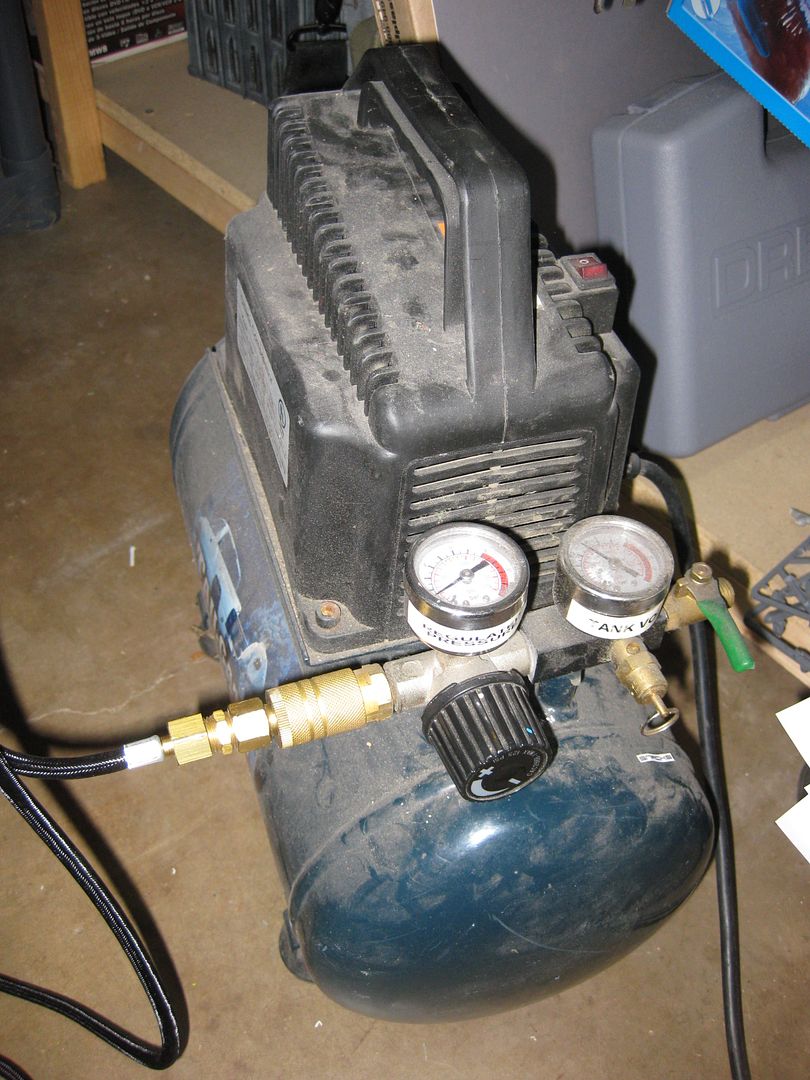
I use an el-cheapo air compressor, it's noisy as hell, but it works. It's pressure regulator/gauge doesn't read very accurately, but you'll never need more than 20 PSI max with an AB.
Rogue Wolves wrote:aannd.. BAM heres where the movie begins... now we will skip ahead to where i kidnap your precious plasticard, and those awsome brass clamps. now either you make the terrain or we replay the whole Taken movie.. but let me warn you, you are definatly not QuiGon......
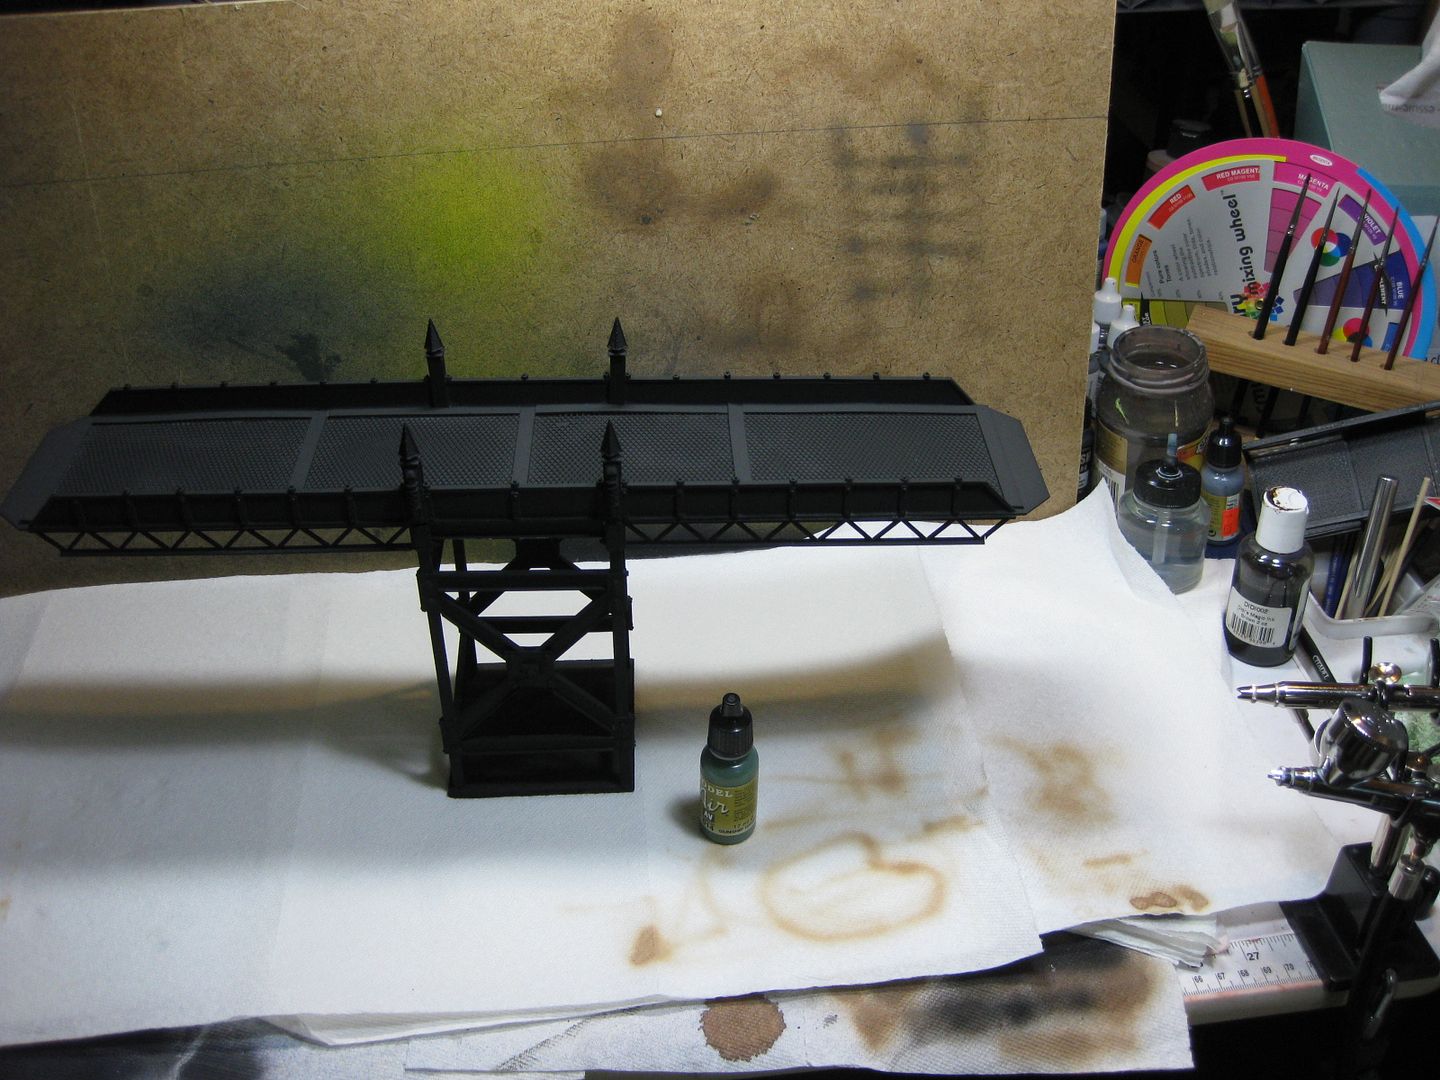
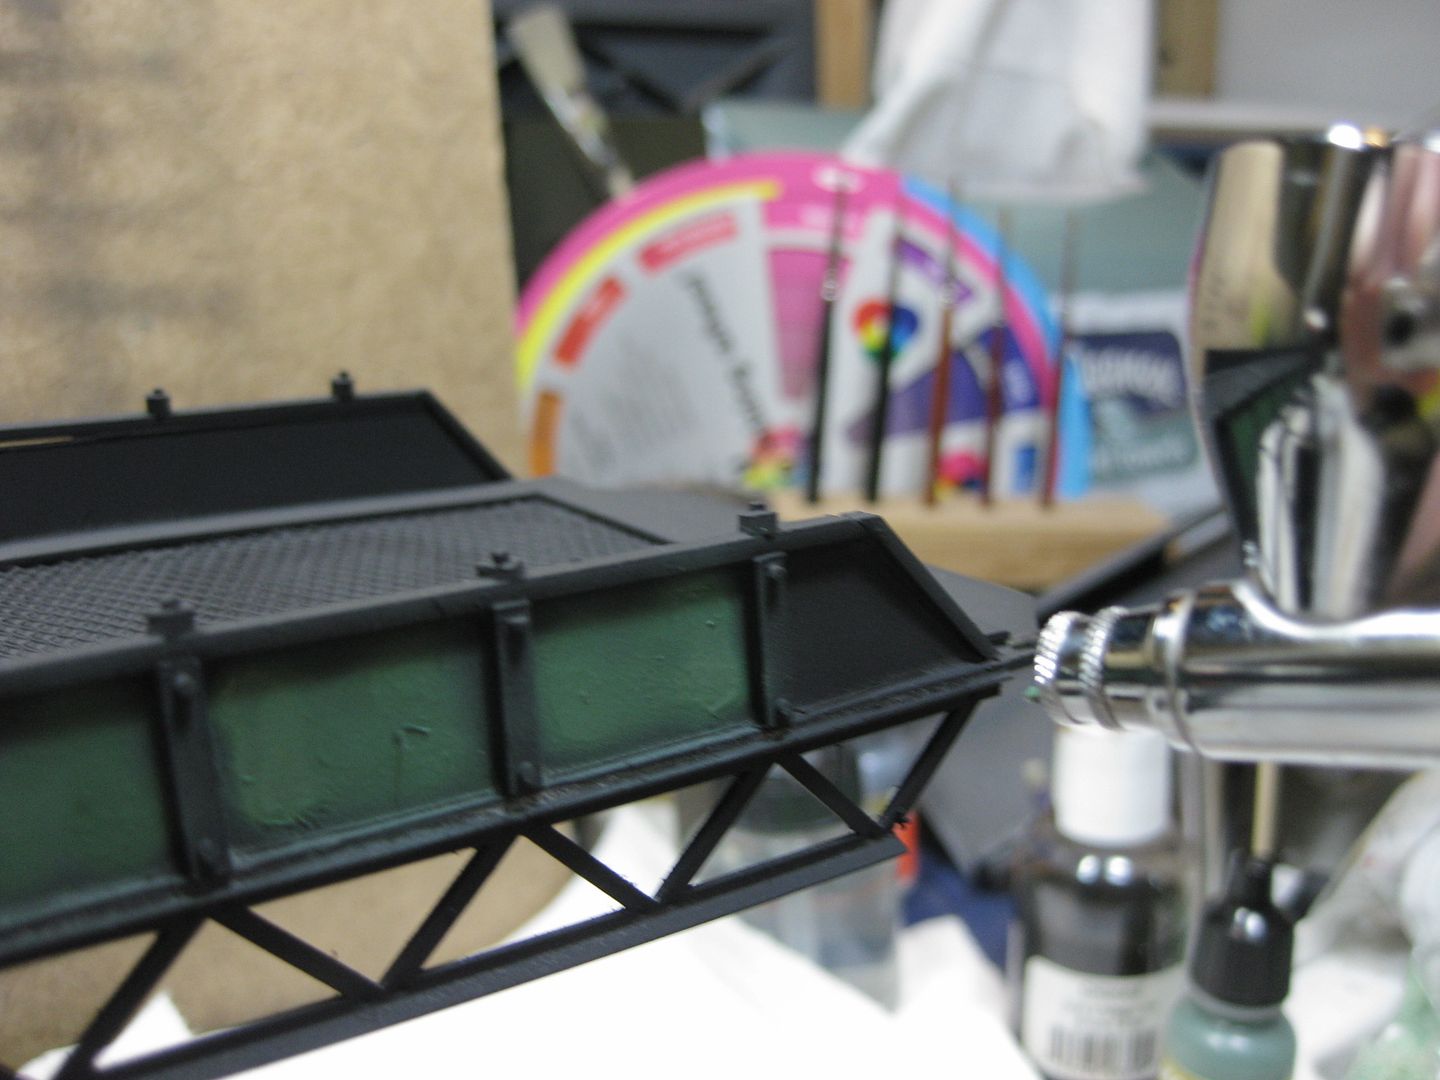
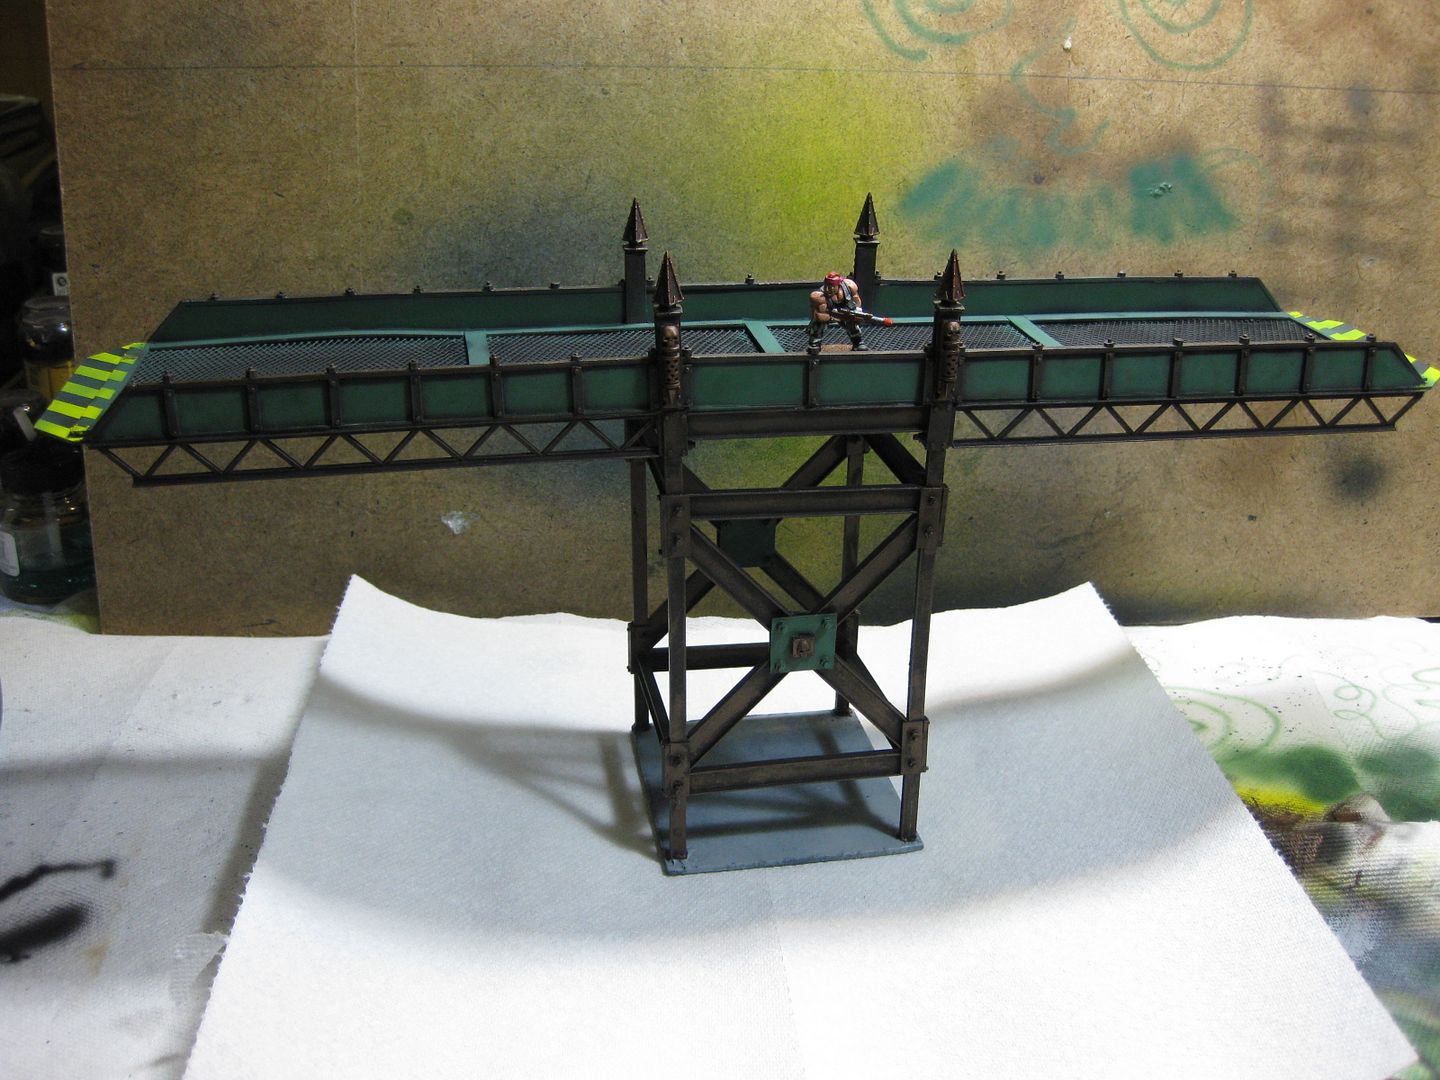
So, to FULLY test this gift from Q, I chose...
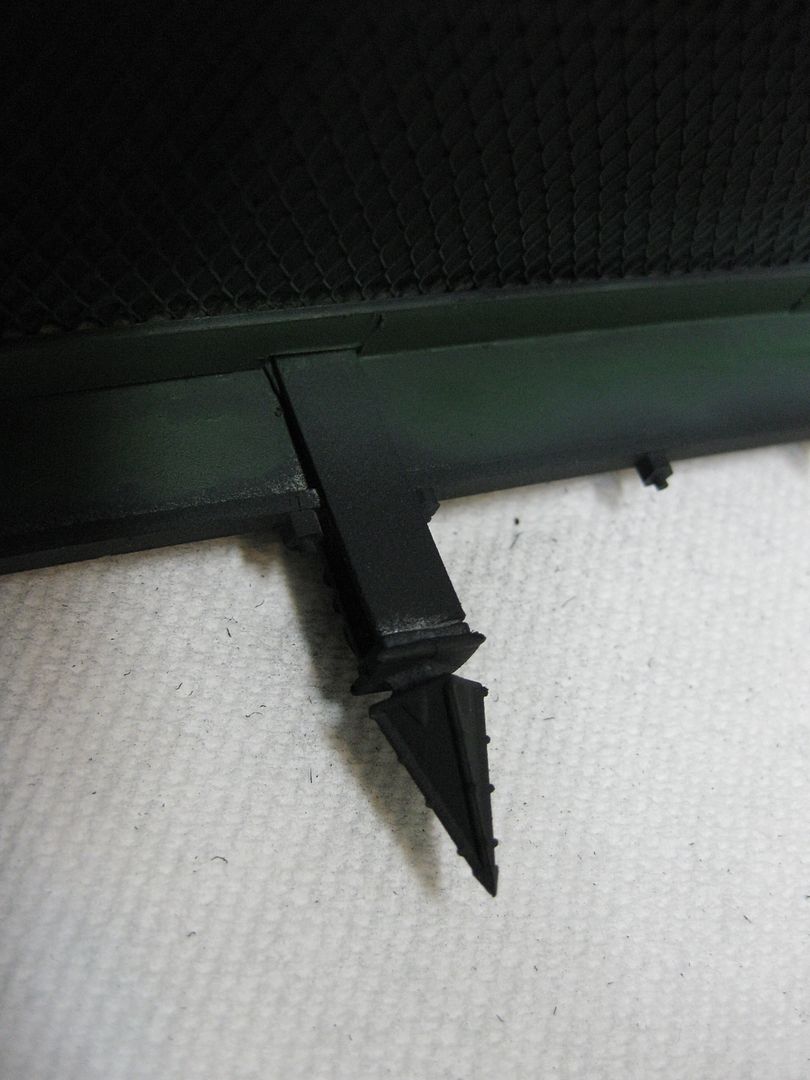
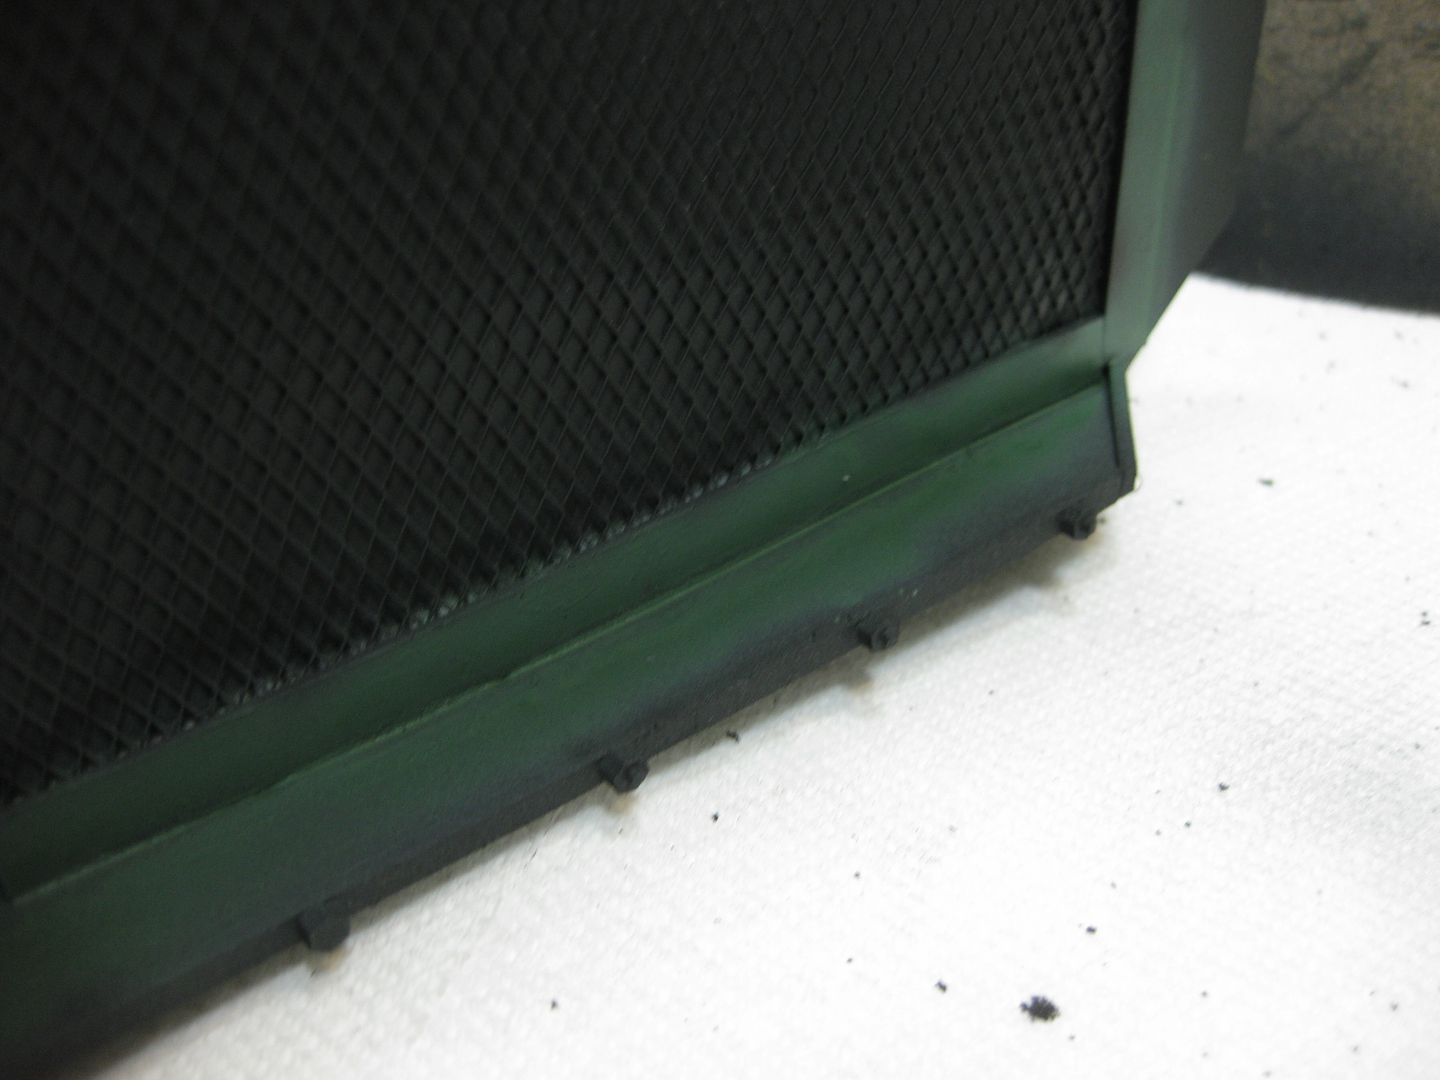
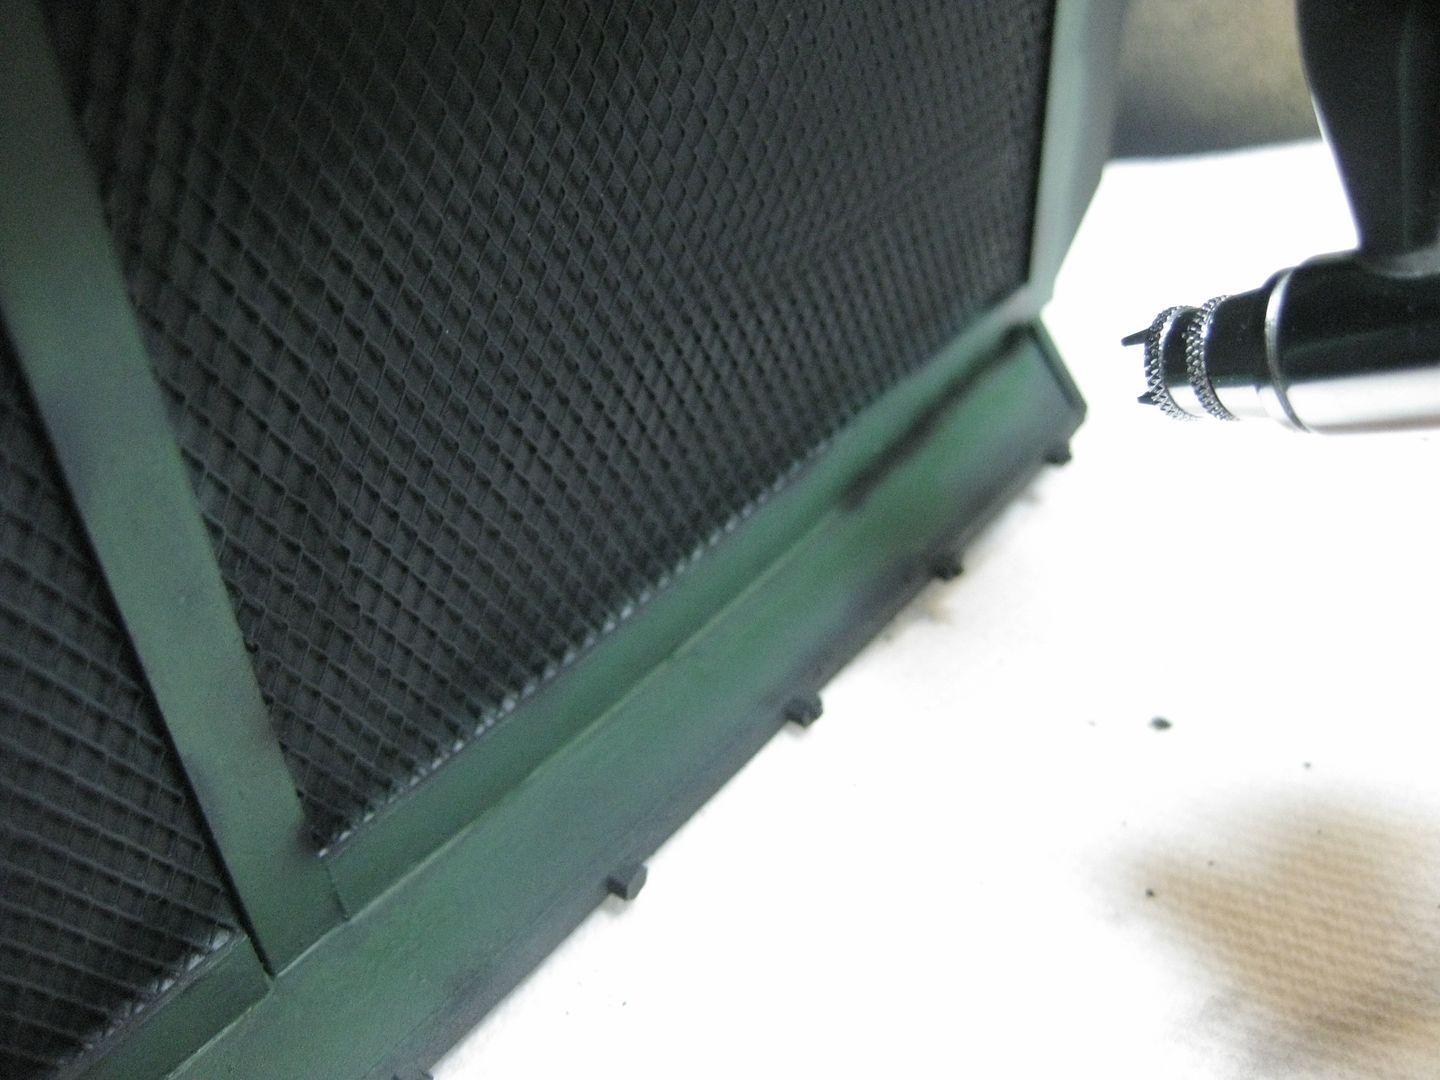
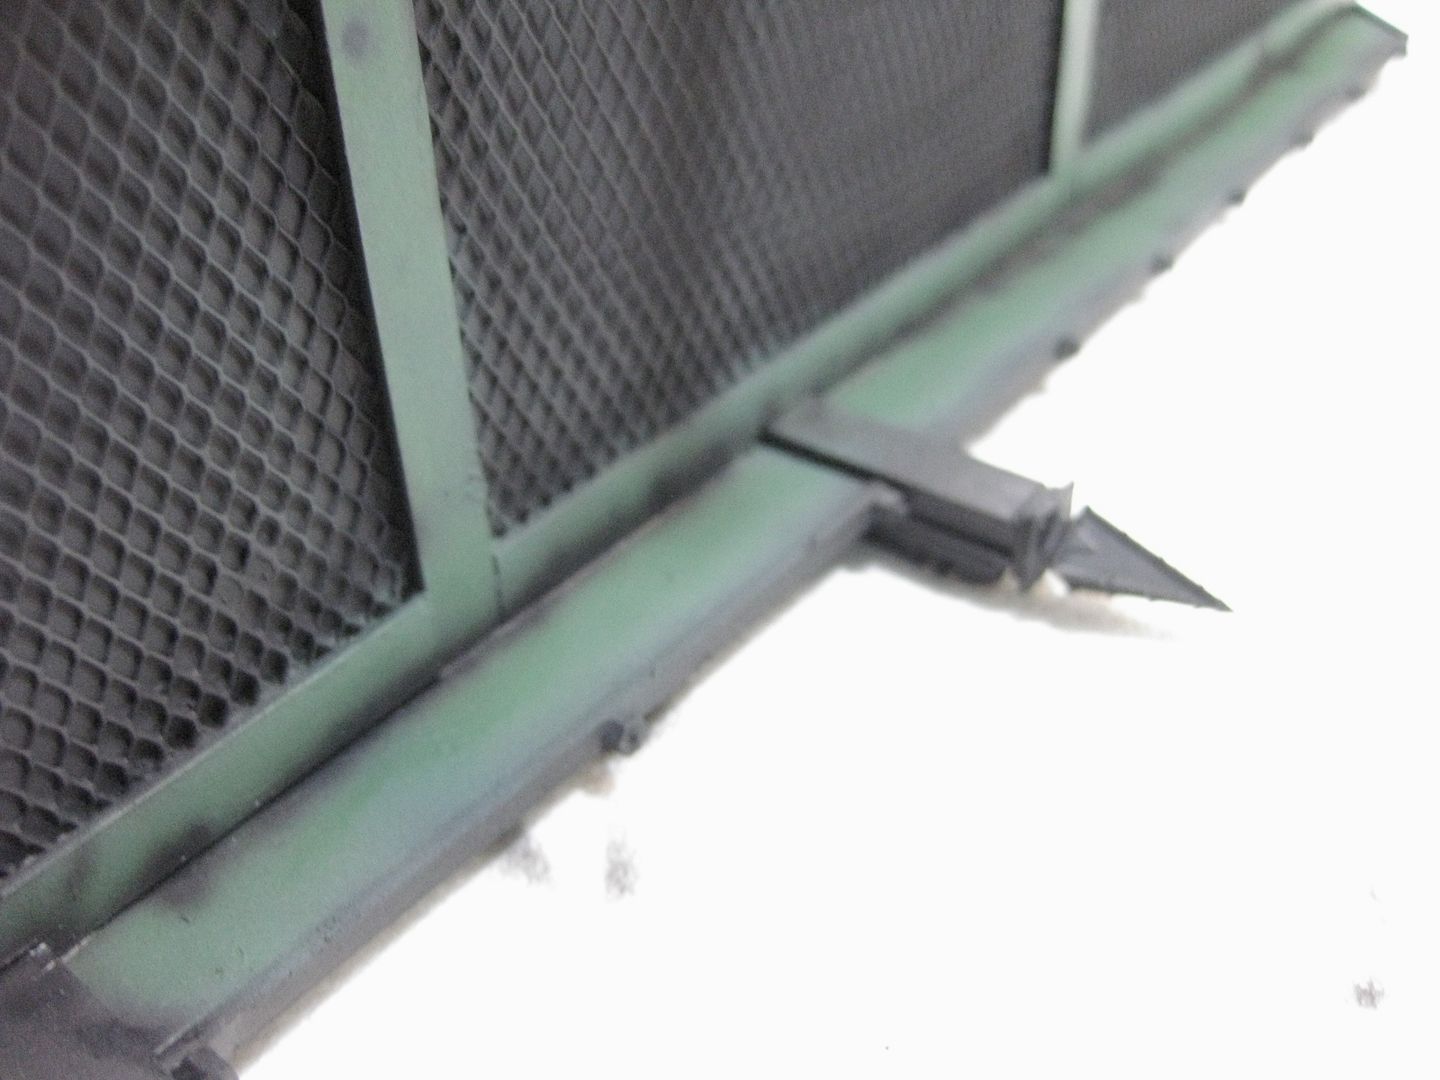
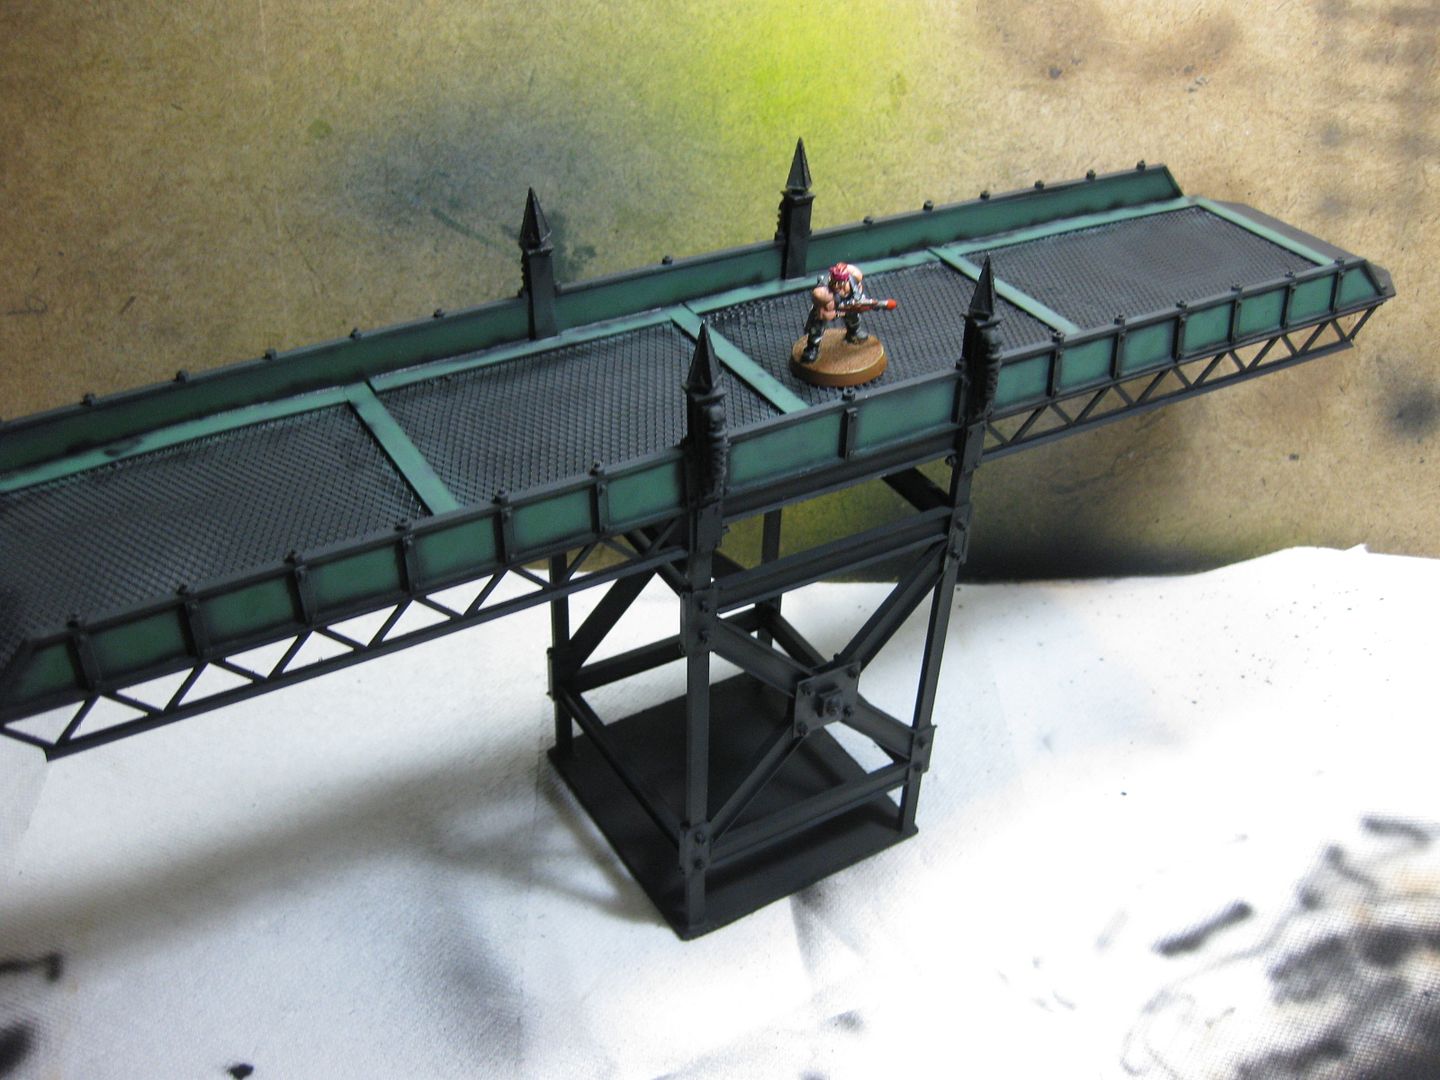
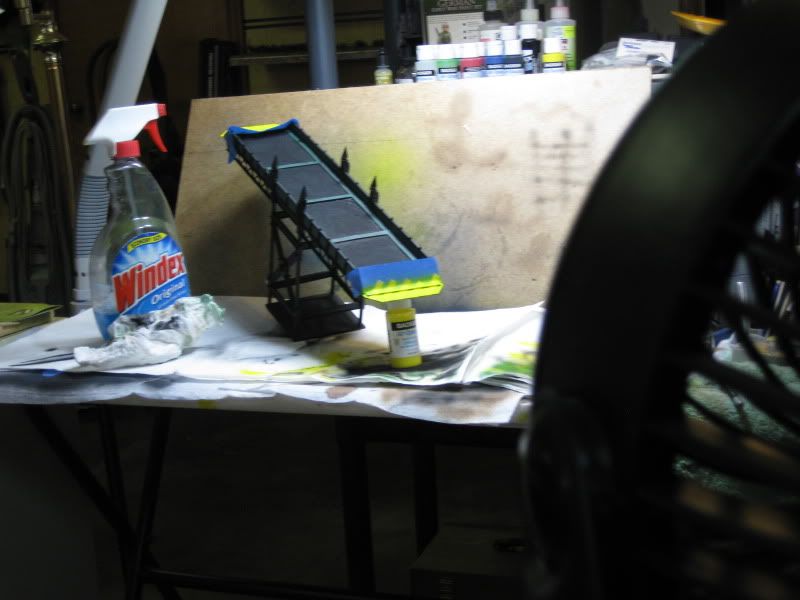
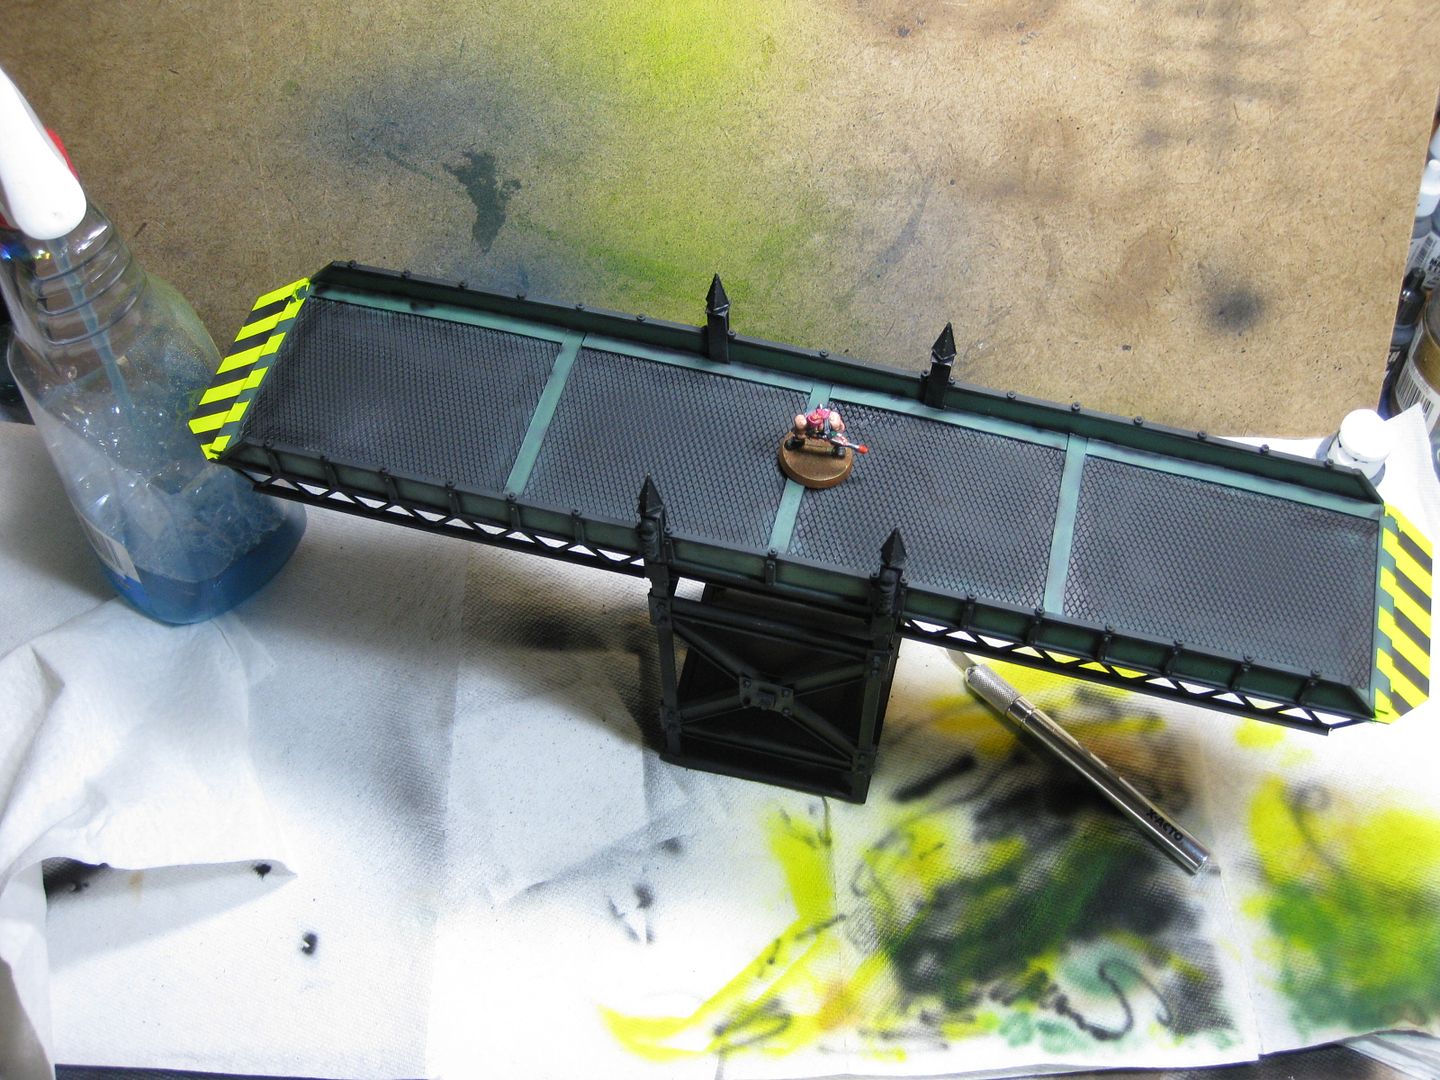
The reinforced walkway. ANd the Vallejo Air Gunship Green.
That stringy thing is about to aid in the weathering process later on
I cannot begin to convey how completely impressed and awesome feeling I am right now after using this tool. When you place your finger on the trigger and push an pull and find the sweet spot for the size of spray you want, set the limiter, and I SWEAR....A Neural link opens to your brain and it is thought-controlled. You feel like the Princeps of a Titan, the thing is wired to your will!
Just an El-Cheapo brand noisy $60 5-gallon tank. It runs maybe once an hour, because it has a moisture trap that works at the tank level (the brass grenade pin-looking bit), and spitting water out lowers the tank pressure a bit, other than the noise, and inaccurate regulator gague, I have no complaints with it.
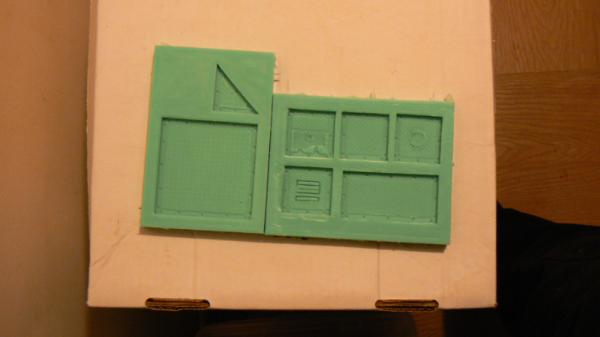
Molds have cured. a few minor issues (bleed under in a few spots, adhesive failure upon demolding.) all relatively easily corrected. (re-glue parts that popped off when I extracted the mold, trim off bleed under then seal the master)
here are the freshly decanted molds.
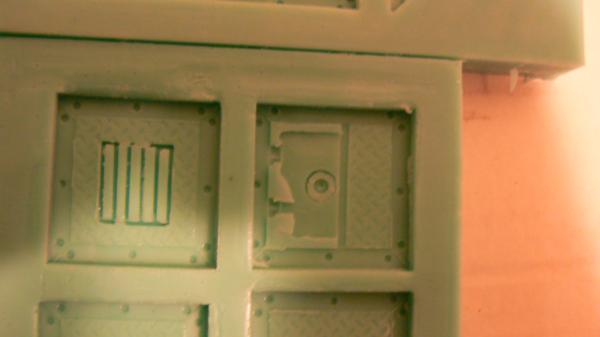
Closeup of some bleed under...
On the whole very satisfactory first pour. I'll tweak a few things then make another pour tomorrow.
Nice buy on the airbrush the fine line on that is bitching …… cant believe the level of control you have on that and no overspray must invest must invest ……. that will cut down your painting time for sure plus you have started that walk way which must be finished now
$119 a steal at that price dam you and all your toys ……. nothing better than having that parcel turn up on your doorstep like Christmas
As for the window mould I would build a basic frame (for gap size) then build detail around that so you always have the same overall size to fit the gap on the basic building section, plus you can alter other details around the window by making a detail mould brick or stone style ledges arches ect that can be stuck on to the building section as well (parts that are protruding from the building) its just an idea
As I remember I think it was Langley miniatures (railway miniatures) did a similar thing with some flat back factory and shop buildings, a basic design and you added what you wanted to them.
The first pours look pretty decent so far some minor faults with a little adjustment should be fine……. reminds me of my old Linka moulds now where are they
Galorn the molds are looking awesome! Do you think the blank space next to the triangle piece can have another triangle piece there in the final mold? It looks to me that the bleed under the vent piece might just be able to be cleaned up with a knife? I did that with the wall mold you sent me, and the riveted window sills casted up nicely.
MAx, that's unpossible where my painting bench is unfortunately, just enough room under there for my legs/ass and the trash can for spraying cleaner, not a floor tripod, and not enough room on the bench for a tabletop tripod. I was rather impressed that I got those shots as-it-is
That is unacceptable, Dave. A man of your ingenuity can make something as simple as that happen. Get it together man, you have high quiality photos to snap.....
Don't try to frighten us with your sorcerer's ways, Lord mxwllmdr. Your sad devotion to that ancient religion has not helped you conjure up the stolen data tapes, or given you clairvoyance enough to find the Rebel's hidden fortress..."
dsteingass wrote:Galorn the molds are looking awesome! Do you think the blank space next to the triangle piece can have another triangle piece there in the final mold? It looks to me that the bleed under the vent piece might just be able to be cleaned up with a knife? I did that with the wall mold you sent me, and the riveted window sills casted up nicely.
MAx, that's unpossible where my painting bench is unfortunately, just enough room under there for my legs/ass and the trash can for spraying cleaner, not a floor tripod, and not enough room on the bench for a tabletop tripod. I was rather impressed that I got those shots as-it-is
That would require a little jiggering as I currently don't have a second piece to glue into the master.... I intend to add another triange in if it casts well enough.
mxwllmdr wrote:I am not the droid you are looking for, Dave......
Automatically Appended Next Post: And, I can't allow that, Dave.....
Automatically Appended Next Post: Name that movie quote....
The work week was especially exhausting, so I did nada last night. But after a long winter's nap, I awoke and began to play again.
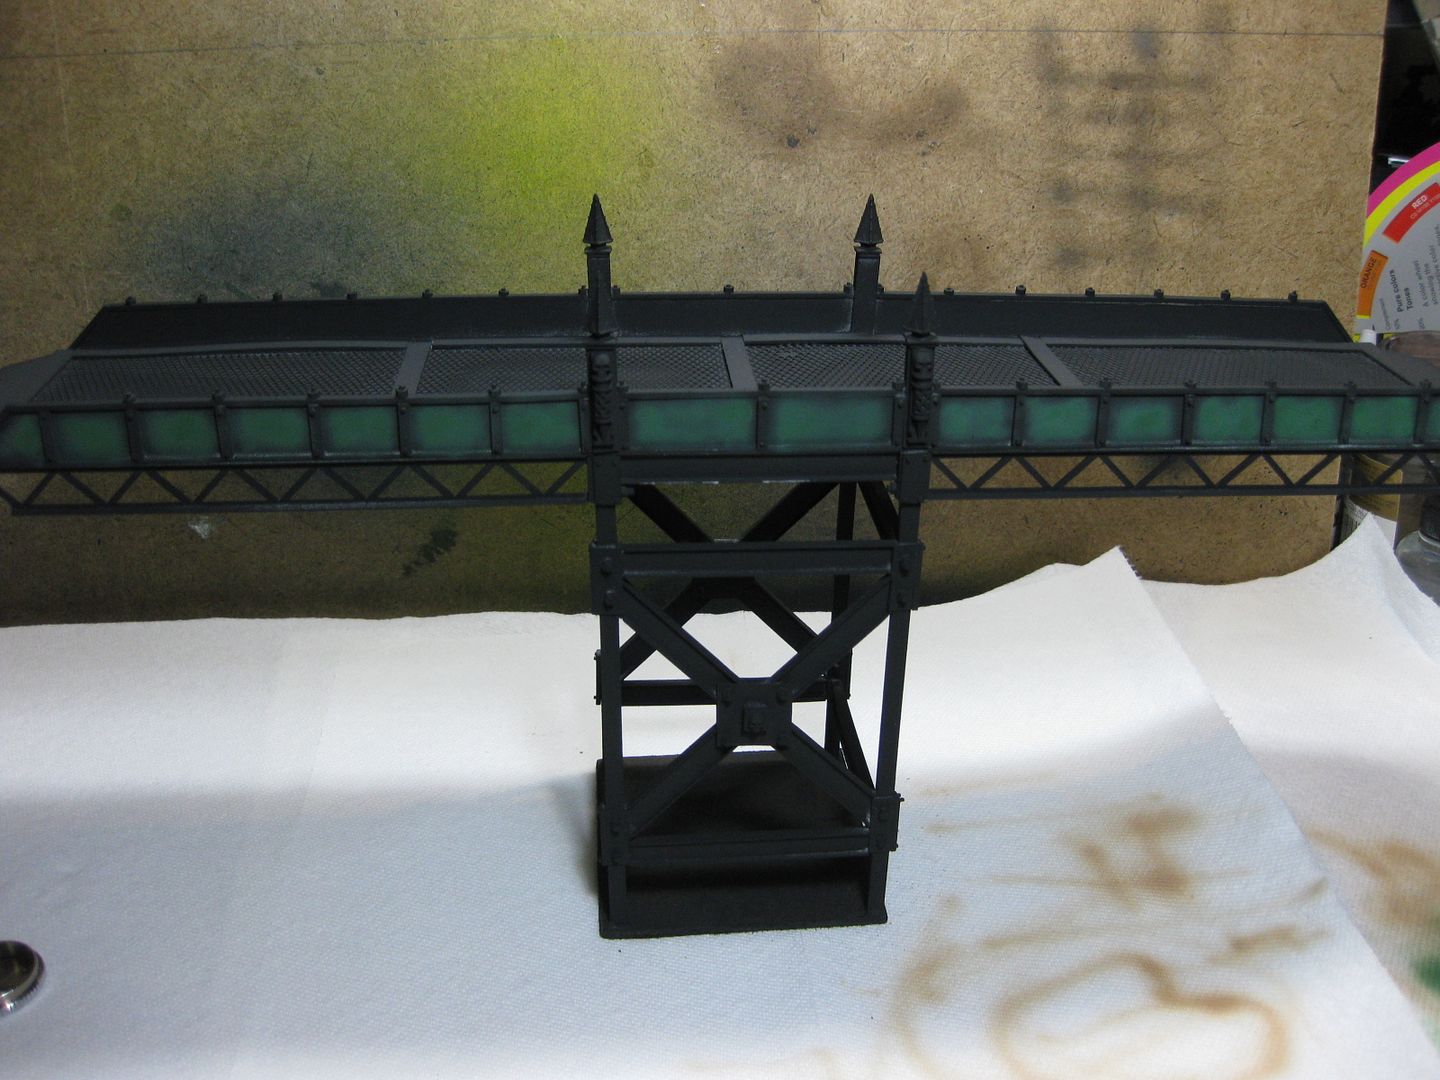
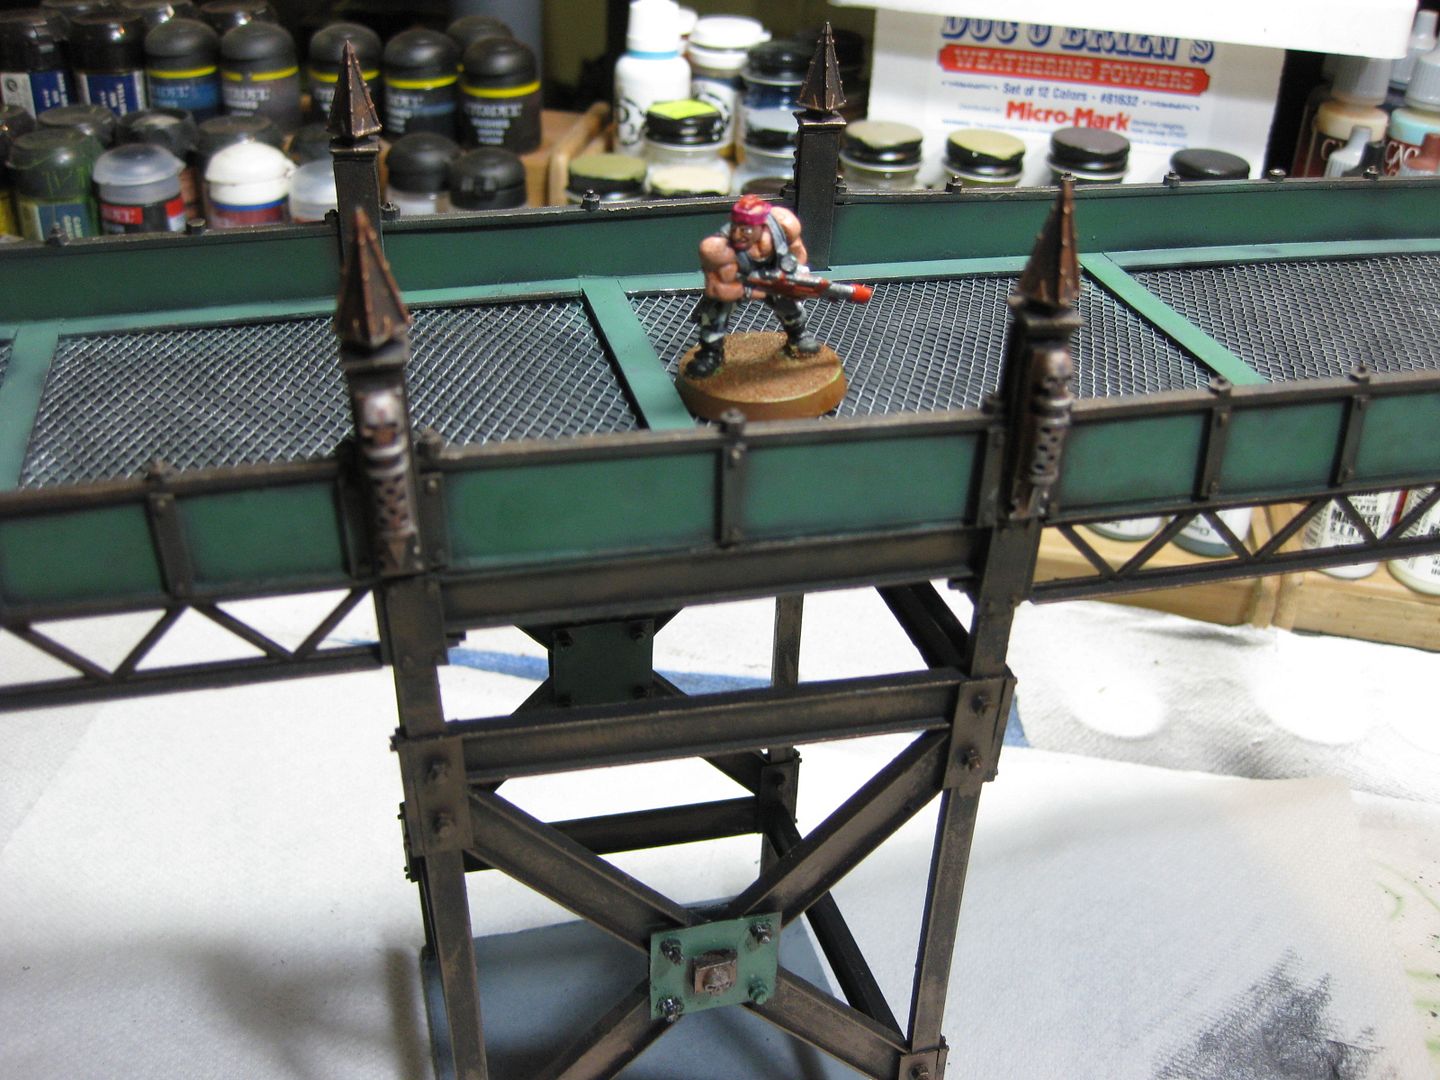
This time, touching up the black with the airbrush.
See the green overspray on the ornamental spiky bit posts and white spots where the primer didn't quite get?
Well, they clean up nicely IMHO I also decided to try adding some shadow between the deck and side plates too
Looking back now, I probably should've used a wash or ink for this instead, since my aim needs work oops Oh well, it'll force me to work with the green again..maybe, we shall see
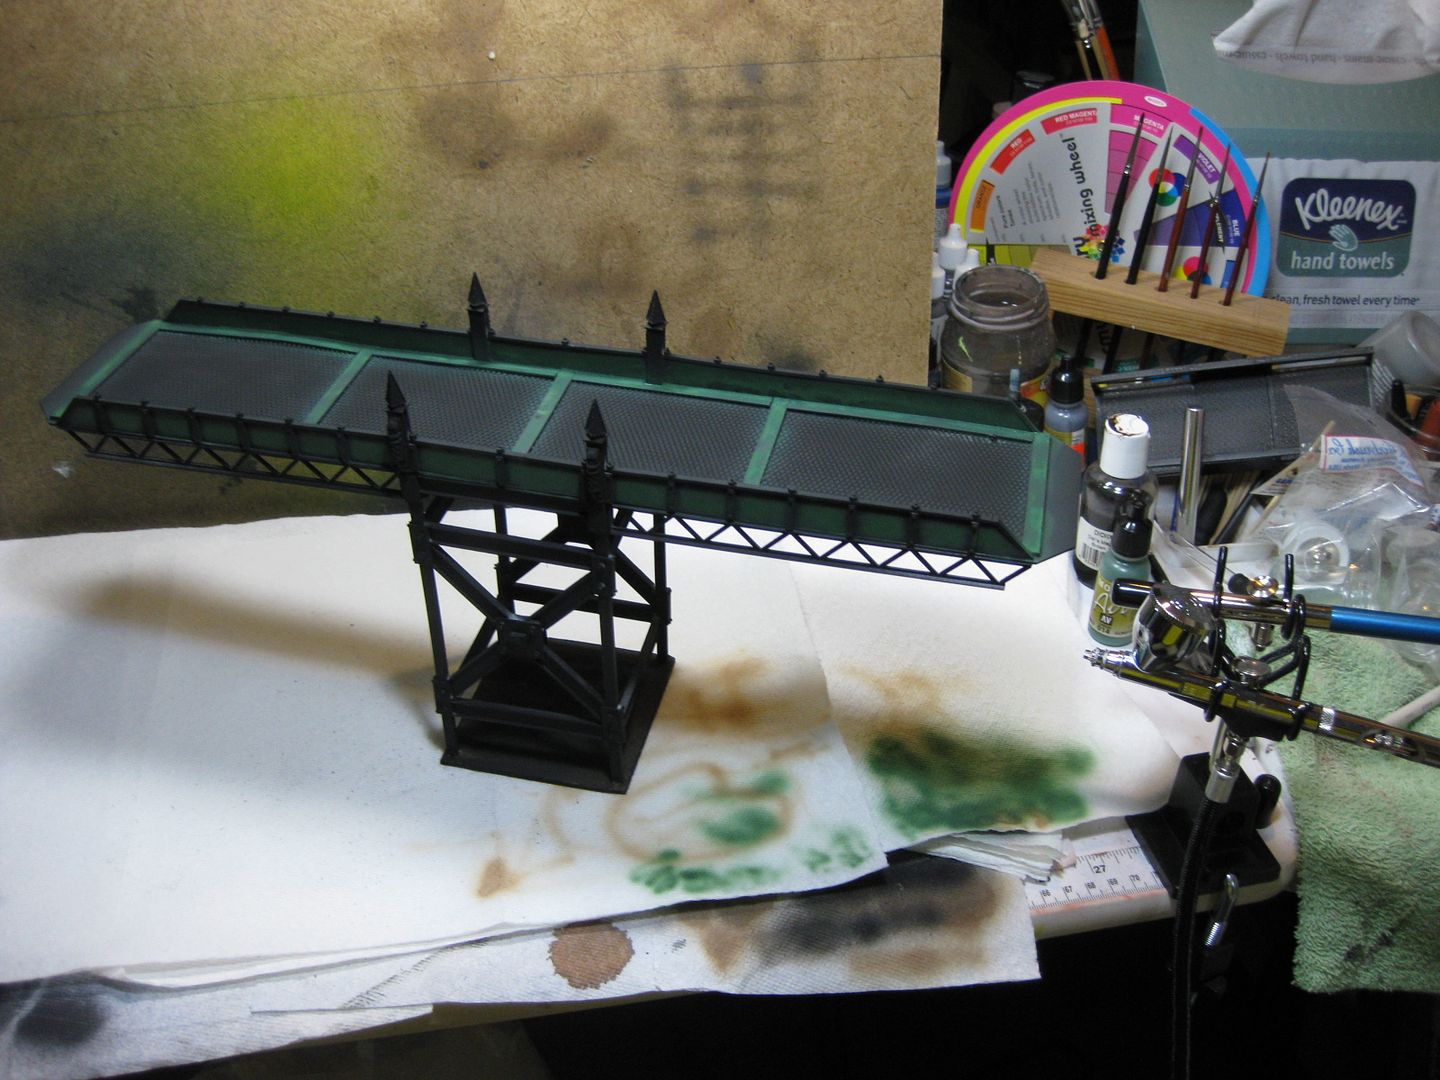
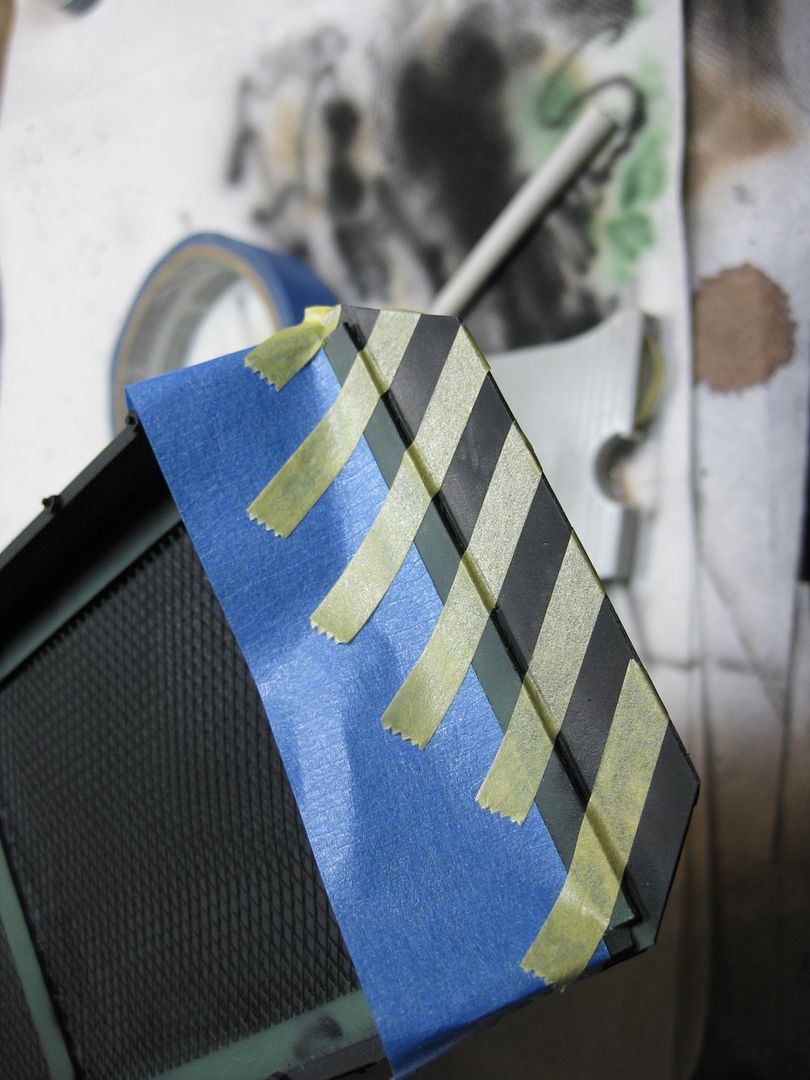
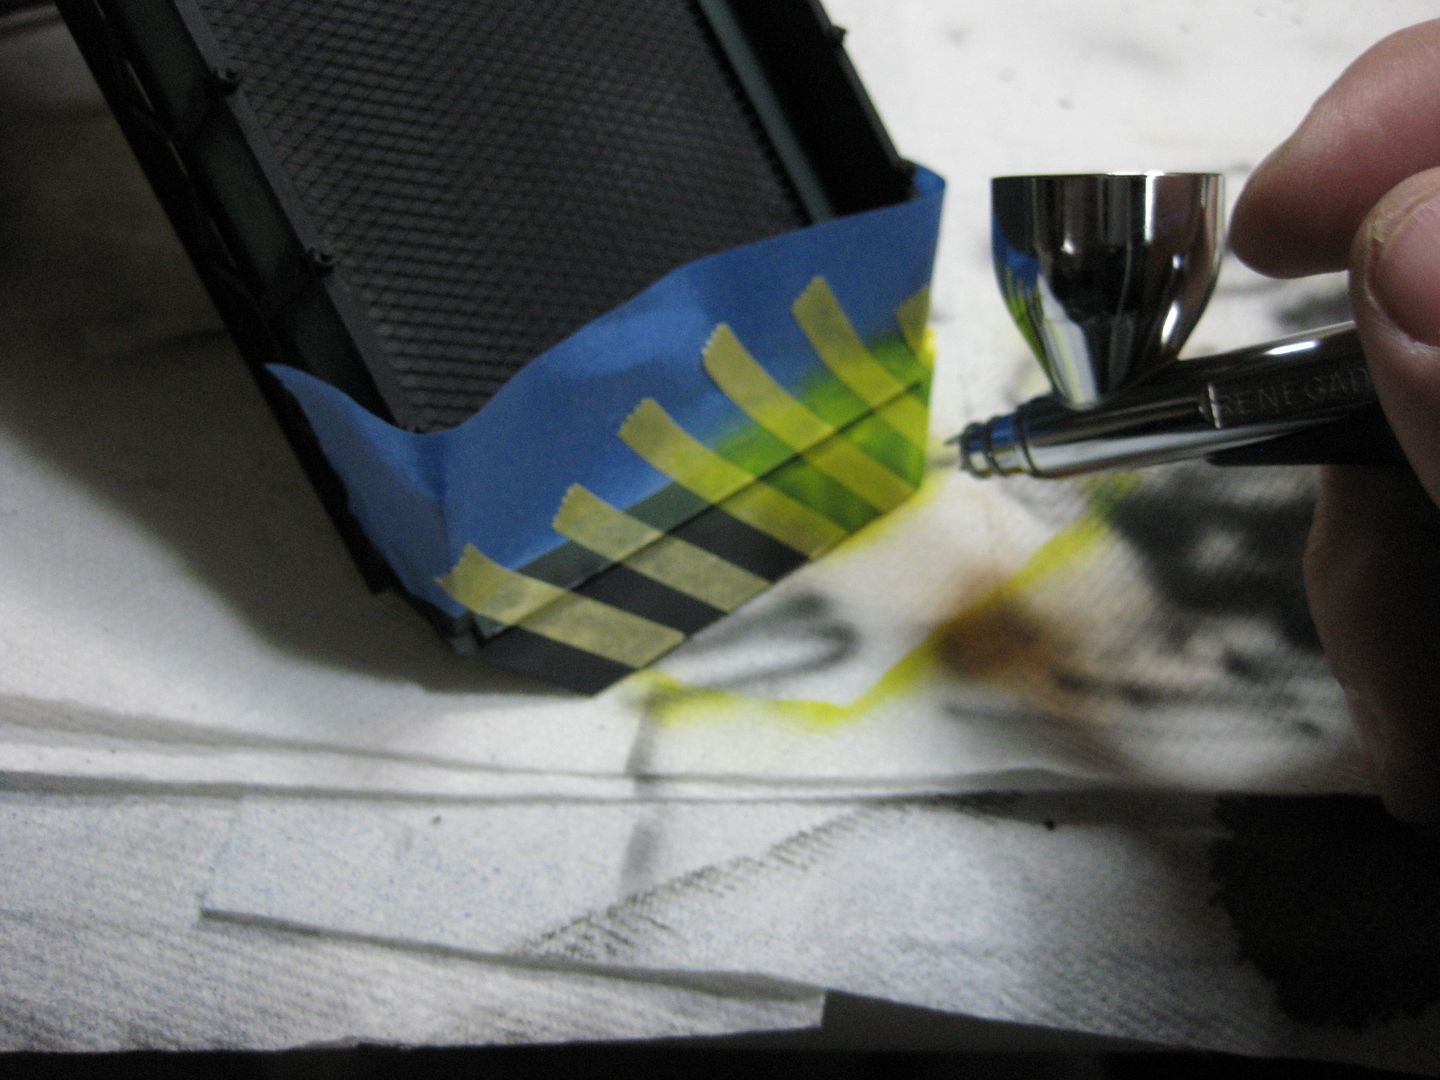
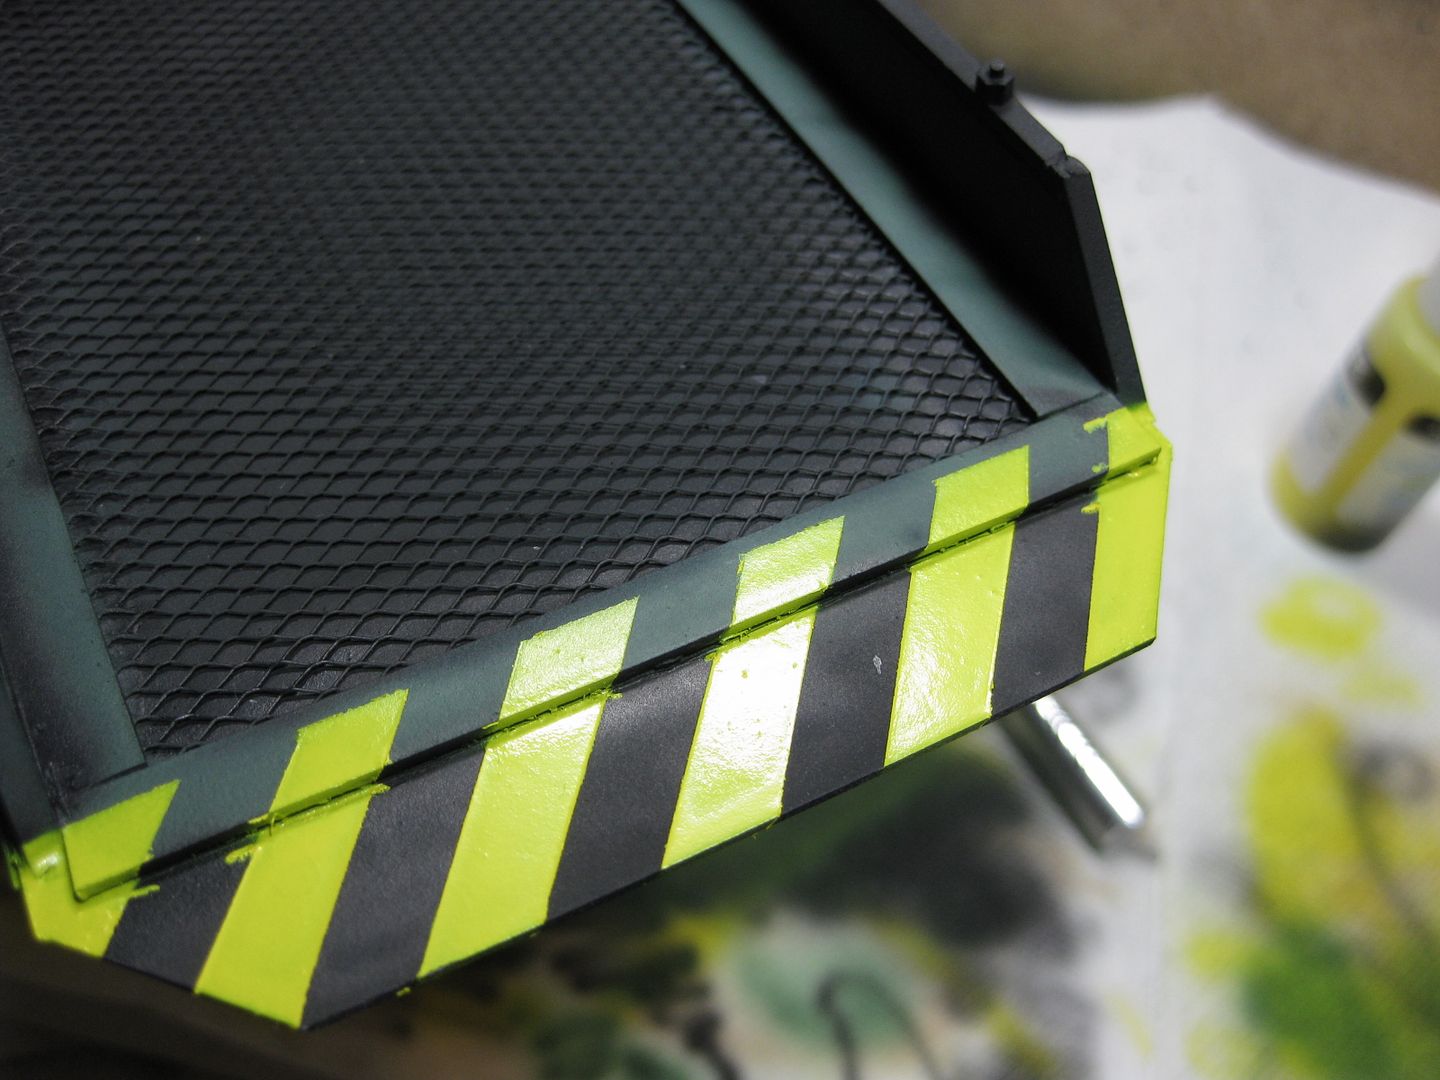
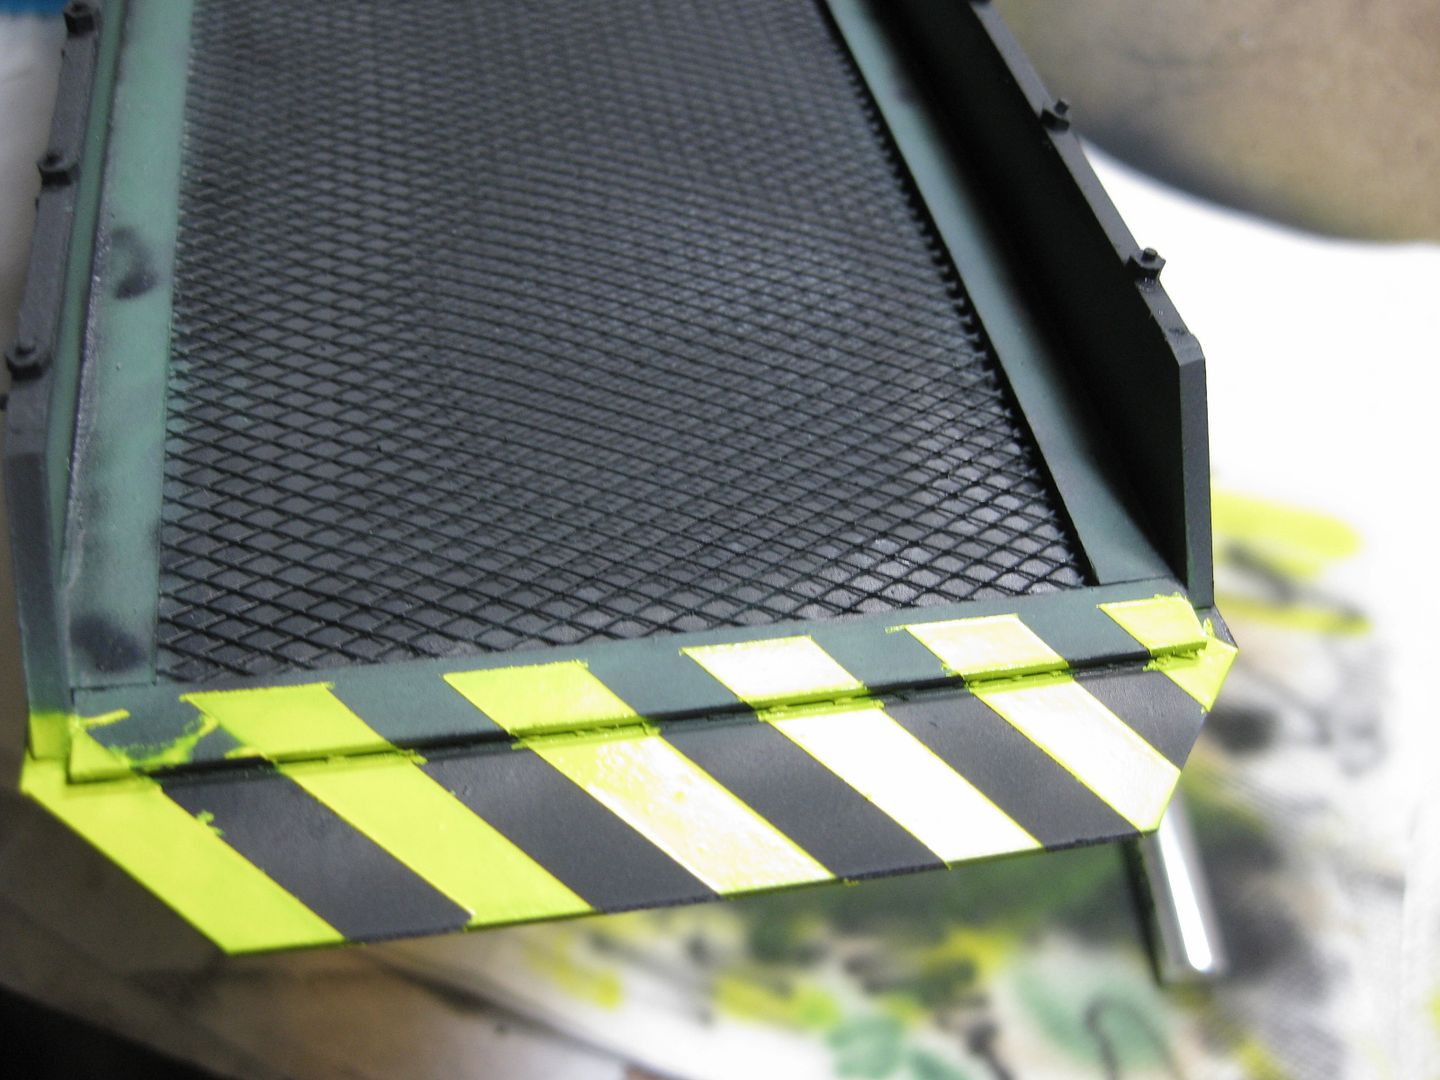
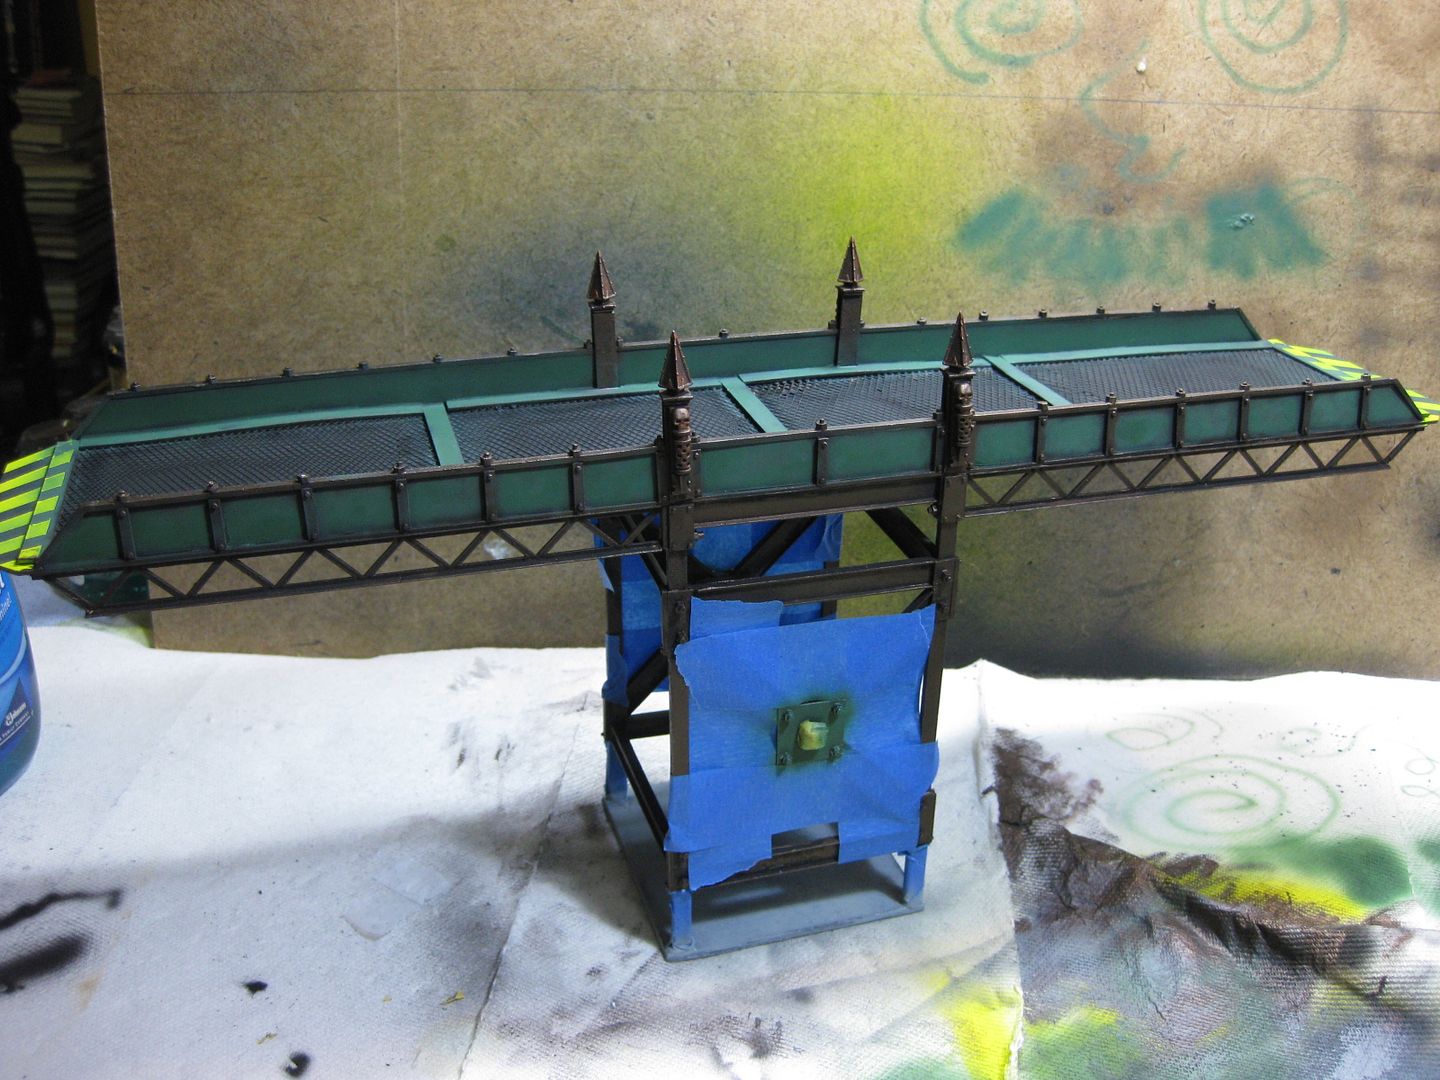
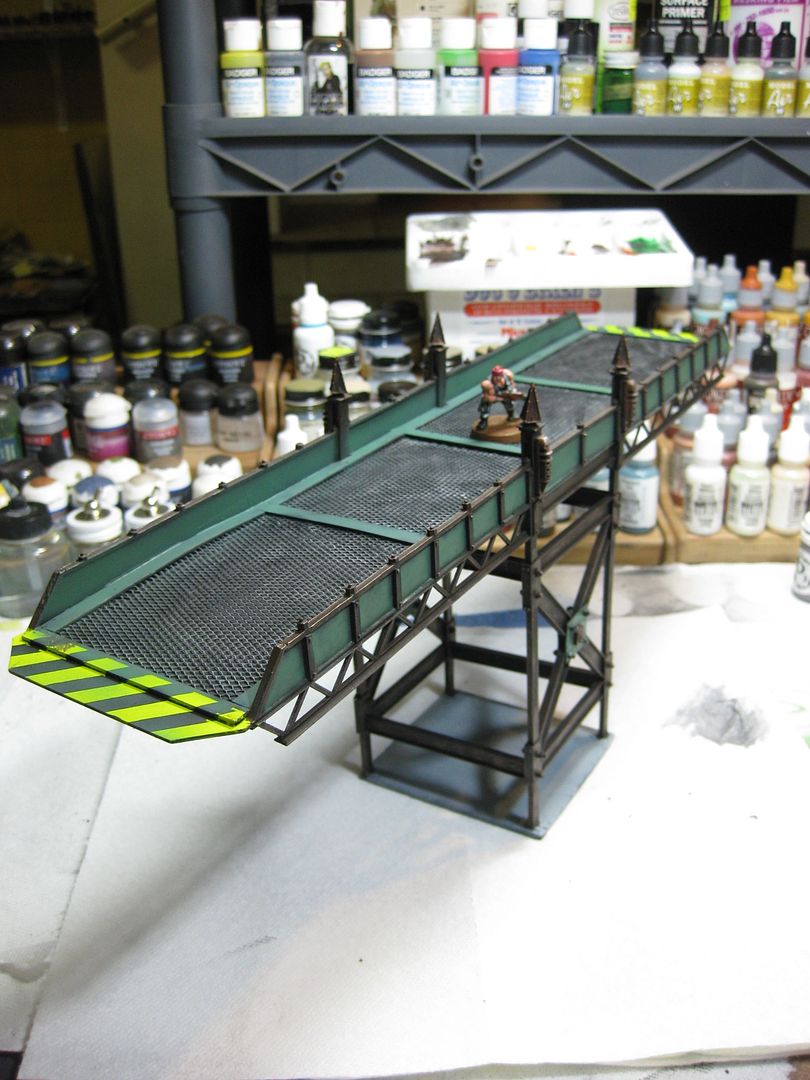
Now onto masking more hazard stripes. But I think i'll try the new 6mm tape this time, and do the yellow stripes over the black, the way I am used to doing it with a brush.
How goes it with the molds?
Automatically Appended Next Post: the 6mm tape
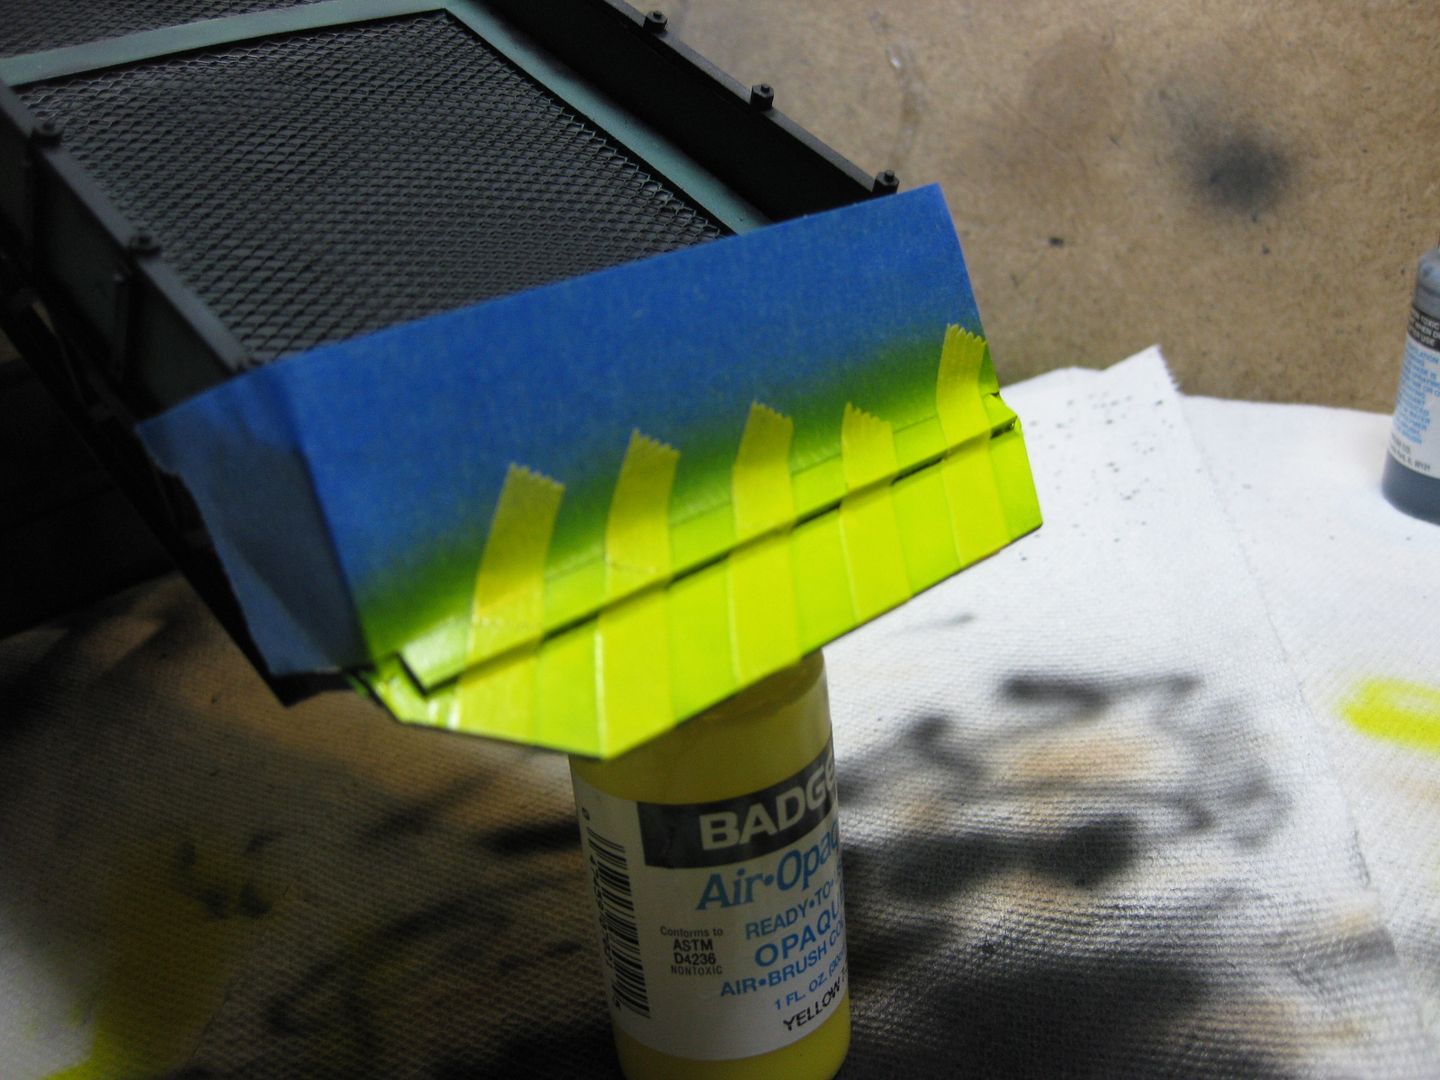
1st coat- I like the look of the yellow after a few coats over black
The work week was especially exhausting, so I did nada last night. But after a long winter's nap, I awoke and began to play again.
This time, touching up the black with the airbrush.
See the green overspray on the ornamental spiky bit posts and white spots where the primer didn't quite get?
Well, they clean up nicely IMHO I also decided to try adding some shadow between the deck and side plates too
Looking back now, I probably should've used a wash or ink for this instead, since my aim needs work oops Oh well, it'll force me to work with the green again..maybe, we shall see
Now onto masking more hazard stripes. But I think i'll try the new 6mm tape this time, and do the yellow stripes over the black, the way I am used to doing it with a brush.
How goes it with the molds?
Automatically Appended Next Post: the 6mm tape
1st coat- I like the look of the yellow after a few coats over black
The molds came out fairly well. I have to do a modest re configure of my workspace to cast a triangle to add to the master... or otherwise come up with something. I can send you the first pull molds monday If you would like, otherwise I'tll be a little bit as I need to really get back to work on a crapton of terrain I'm building for use at Templecon.
That is looking pretty fine I like the overspray it gives that realistic look to it IMO hell you want to see the lines around here your lucky if it is a line
wow...that is what i miss out on when yesterday i had to go early to bed due to some major headaches...
boy...shaky hands...but that is adjustable by the lil screw on the backside of your neck...justa turn clockwise and the shaking will be gone...
gotta second rawsons statement to the green... looks very good and convincingly been out in the bleeding sunshine for years...
and the hazard stripes are really looking way better now with that tinier tape in use!
as for metalics done with AB... well that would make me hesitant as well... metalics are way thicker and sometimes clumpy...so no telling what might happen to your very thin needle if you used those two ingredients together...
@VIk Yeah, I'm afraid th little metal flakes will clog up the little needle area. I got some more airbrush paint colors today, but didnt even find AB metallics, so I will assume that it isn't recommended. Missed you being away for a day Vik!
@Tortured, thanks man! But you know I'm not done with it yet, more to do.
@LDD THanks, I guess it didn't turn out too bad eh?
Pretty sure vallejo do paints specifically for ab, including metals, Vallejo Air iirc.
Also, you can use acrylic thinners to thin metal paints. Perhaps talk to MajorTom11 or Eggroll (both ab afficionados) to get tips of how to spray metal paints. Im sure theyd be more than happy to help out.
wow... thanks... was very akward not being on here... and boy had i wade through some heavy pages for my backlog... that is what you get for being sick for a day... lots of stuff to read through...
i bet i would kick myself if i tried metalics with an aribrush and then get it all clogged up...better your brushwork for these still...after alll one doesn´t want to loose groundcontact because of all that airbrush induced chest swelling^^
today we went to the hobby and art shop...the one that sells the foam core...we, that is me, went for some more plastic rods and i showed young felix what is on store for the next week...showed him that overpriced chopper for referrence...he was impressed ...as was me^^... got me some tubes and also some 1x2mm sheats of PC as well as a nice and tiny L-profil rod... i think rivettos buddies will have some nice clawlike fingers...^^
Looks great dstein You're really starting to get comfortable with the air-brush, this means we expect at least double the amount of product in this thread from now on
Yeah Vit, the owner of the store I bought the Vallejo Model Air paints from printed me a 3 page list of all the colors in case I wanted to order some. I'll have to take a look at it. I know they can be thinned, but I probably want to use my Badger 150 for those, larger needle.
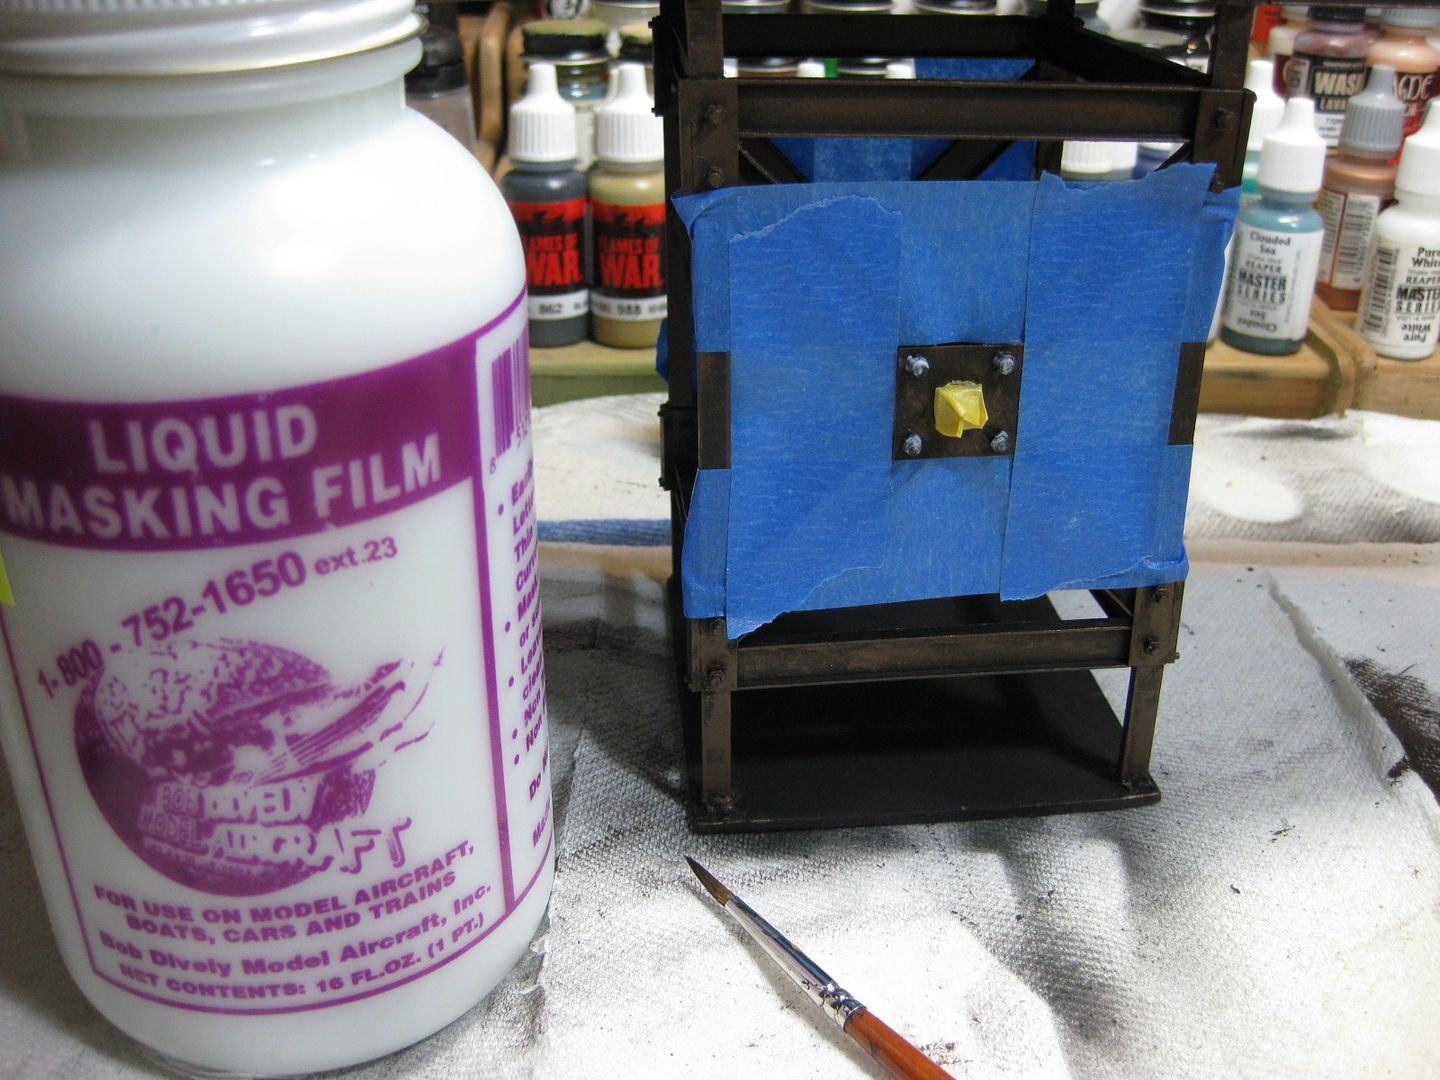
what is this liquide tape made of? i suppose it is some kind of latex milk? later on you can just peel it off?...interresting.... i saw someone using marmite and other stuff like salt and so on for waethering...which in essence is all a way to maks off some areas...
ohoh.... pease accept my total excuse for this absolute lack of thinking before posting... now i see what i have shoveld me a big grave.... of course i know them... wasn´t born behind the moon... where can i put my face...
Assuming the masking liquid is a latex-type like maskol, one trick is to paint something like a small sliver of tape or the end of a thick thread into the mask. You can then pull on that to start the peeling process when it's time to remove.
I am awake now so get out of bed you lazy git donut and crack on lol, this is coming together nicely I like monkeytrolsl idea with the tape just a sharp blade cut and next you know detail sliced off tape would be safer by the sound of it.
Really looking forward to the group shot but guess I will just have to wait for that one, I have to say that walk way is looking dam fine nice work on the structure even looks like a kit rather than a scratch build great job…..
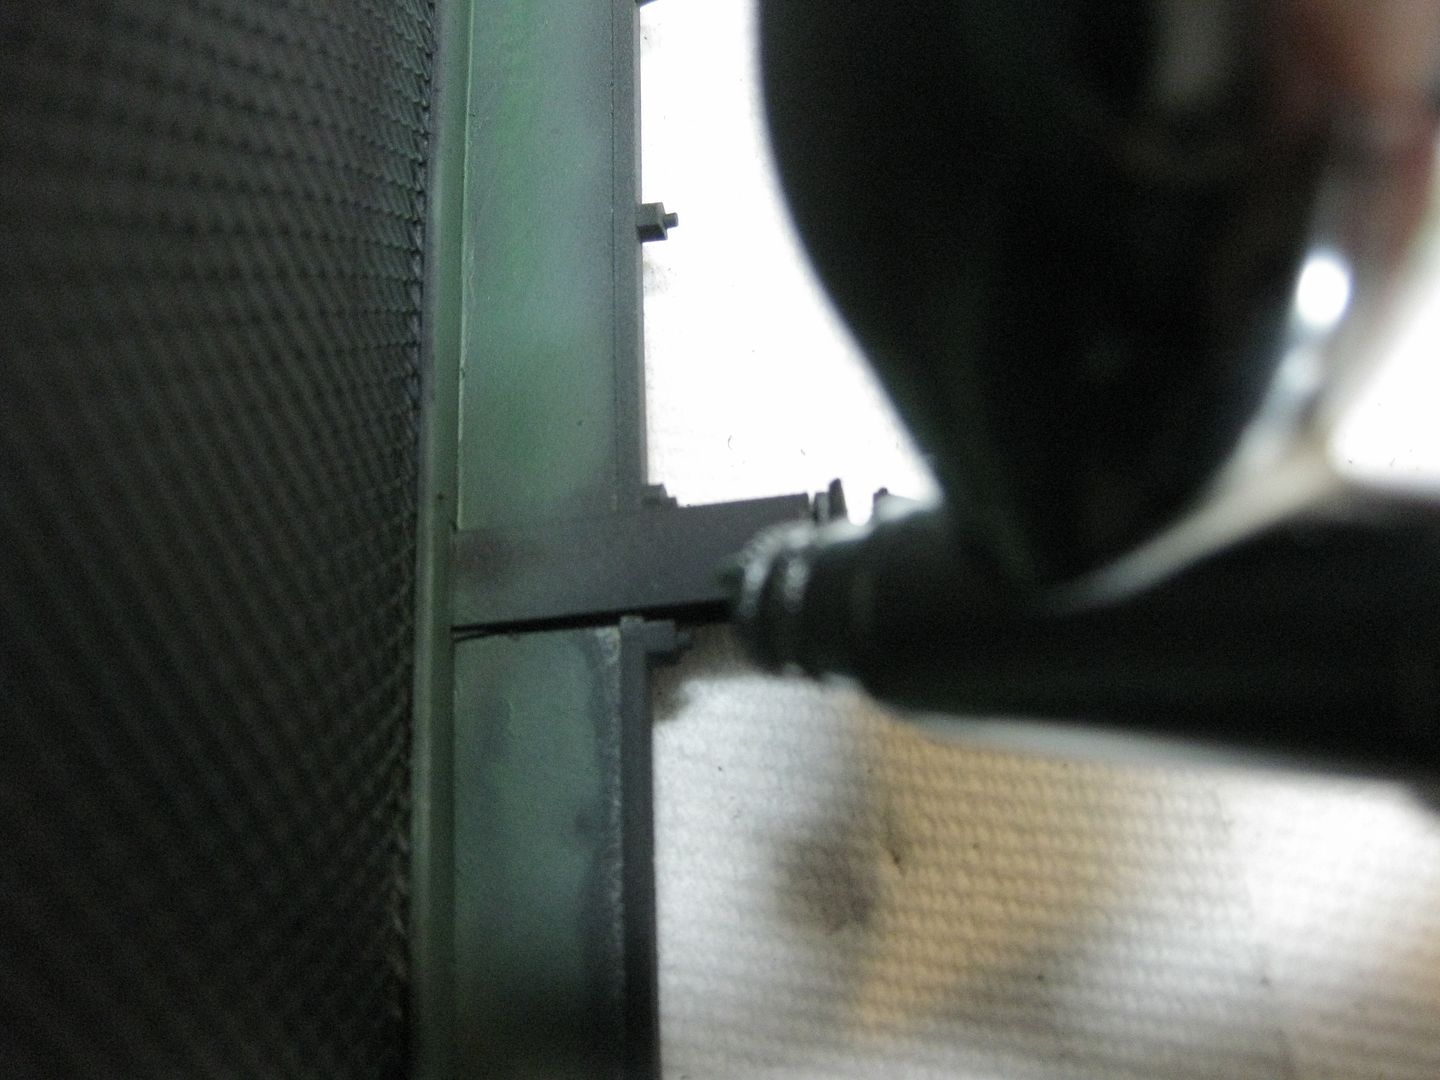
i don´t want to be a jerk here...but i spotted a lil flaw on the walkway... on the left side...there is a bit of the framework bumpy...where the connection between the wall and the granny grating is... that horizontal piece of PC... just saying...
and i too think that monkeys idea is a strike of genius...
and i get the feeling that you are online 24/7... every freaking time i see you on^^ seems you are either trying to kill yourself with cider and donouts or this is the elixir of life...hmmm...needs some tests i guess...after all in my favorites comix certain accidential mixtures too gave super powers...
1. I always have my Dakka window open
2. Cider and nutty cake donuts are awesome
3. Yes that plastic strip is a bit loose/warped
4. weathering will happen
dsteingass wrote:1. I always have my Dakka window open
2. Cider and nutty cake donuts are awesome
3. Yes that plastic strip is a bit loose/warped
4. weathering will happen
lol... will you do something about the loose strip or will you use it as a means to aply weathering... as we are all making no fresh from the factory pieces...any faults can always used for weathering^^ pretty clever
and me, i have always my window for dakka open as long as i am sitting in front of the pc...even when i am gaming it is still on... i switch from gae to dakka every five minutes...am i obsessed?...who could possibly say so...dedicated...more likley^^
I dunno. I'm really not that worried about it to tell you the truth. When you glue aluminum mesh between two sheets of plastic, it's hard to get the glue to hold both plastics very well without getting CA everywhere.
hmmm... i wonder...you did tell me to use the dust from sanding and sawing as a sort of cement ... maybe this methoode could used willingly? as in making a bit bigger sawdust or scrappings and fill them after soaking them in plastic glue? just a side thought....
No, it does not move, that peice is glued solid to the side panels. I'm just not going to ruin my paintjob at this point vik. That is the only camera angle where it is even visible.
I'd like to say it was a genius idea I came up with on the spur of the moment, but it was how I was taught to use maskol back in the 80's Not that I ever really got on with the stuff back then, but it's certainly the way to do it without accidentally gouging a hole in your precious work - that leaves you having to repair AND repaint.
Yeak, all my cutting on these bolts has done is cause me to cut/scrape the bolts, one even fell off and I had to glue. I will assume this stuf is probably better for larger areas, But i'll def use the thread idea in the future.
Automatically Appended Next Post: so..I guess it is time to pose another action shot yes?
dsteingass wrote:1. I always have my Dakka window open
I get an email on the blackberry everytime someone posts in a subscribed thread. SOmetimes my phone sits and dings for, like twenty minutes straight and when I get a chance to check there are forty or fifty new posts. MOst of them in one of Daves threads.... LOL
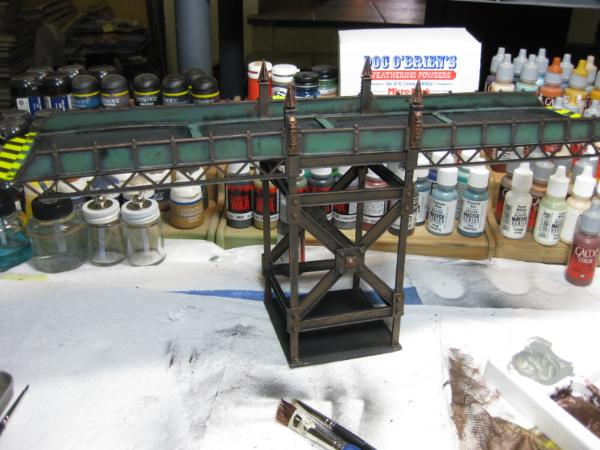
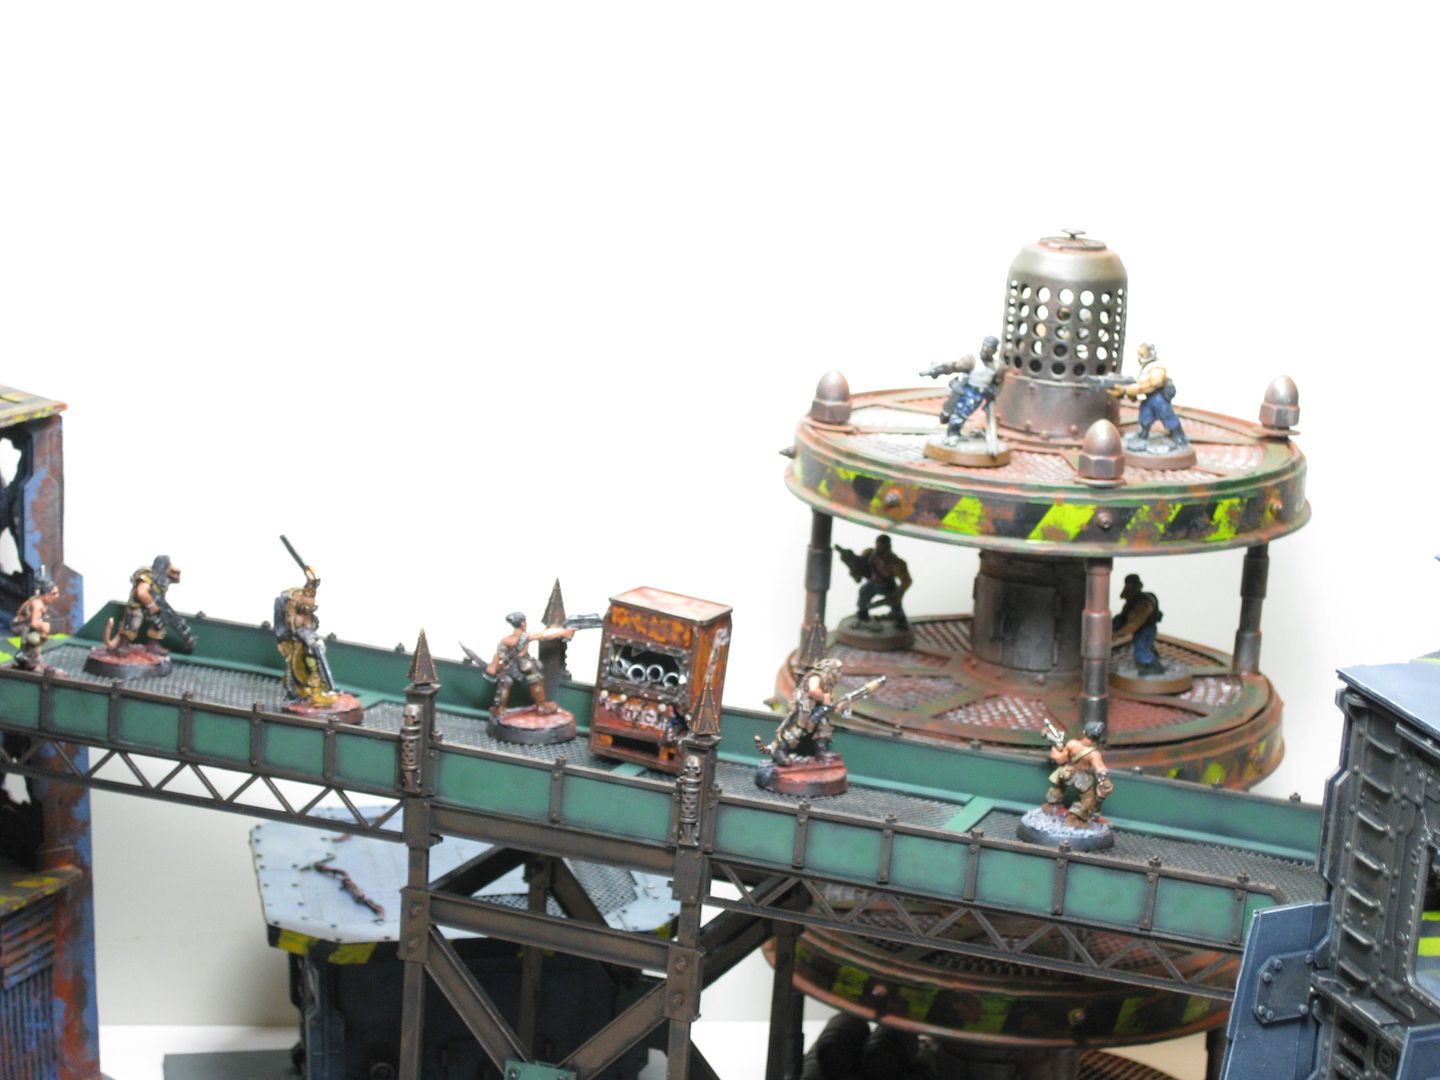
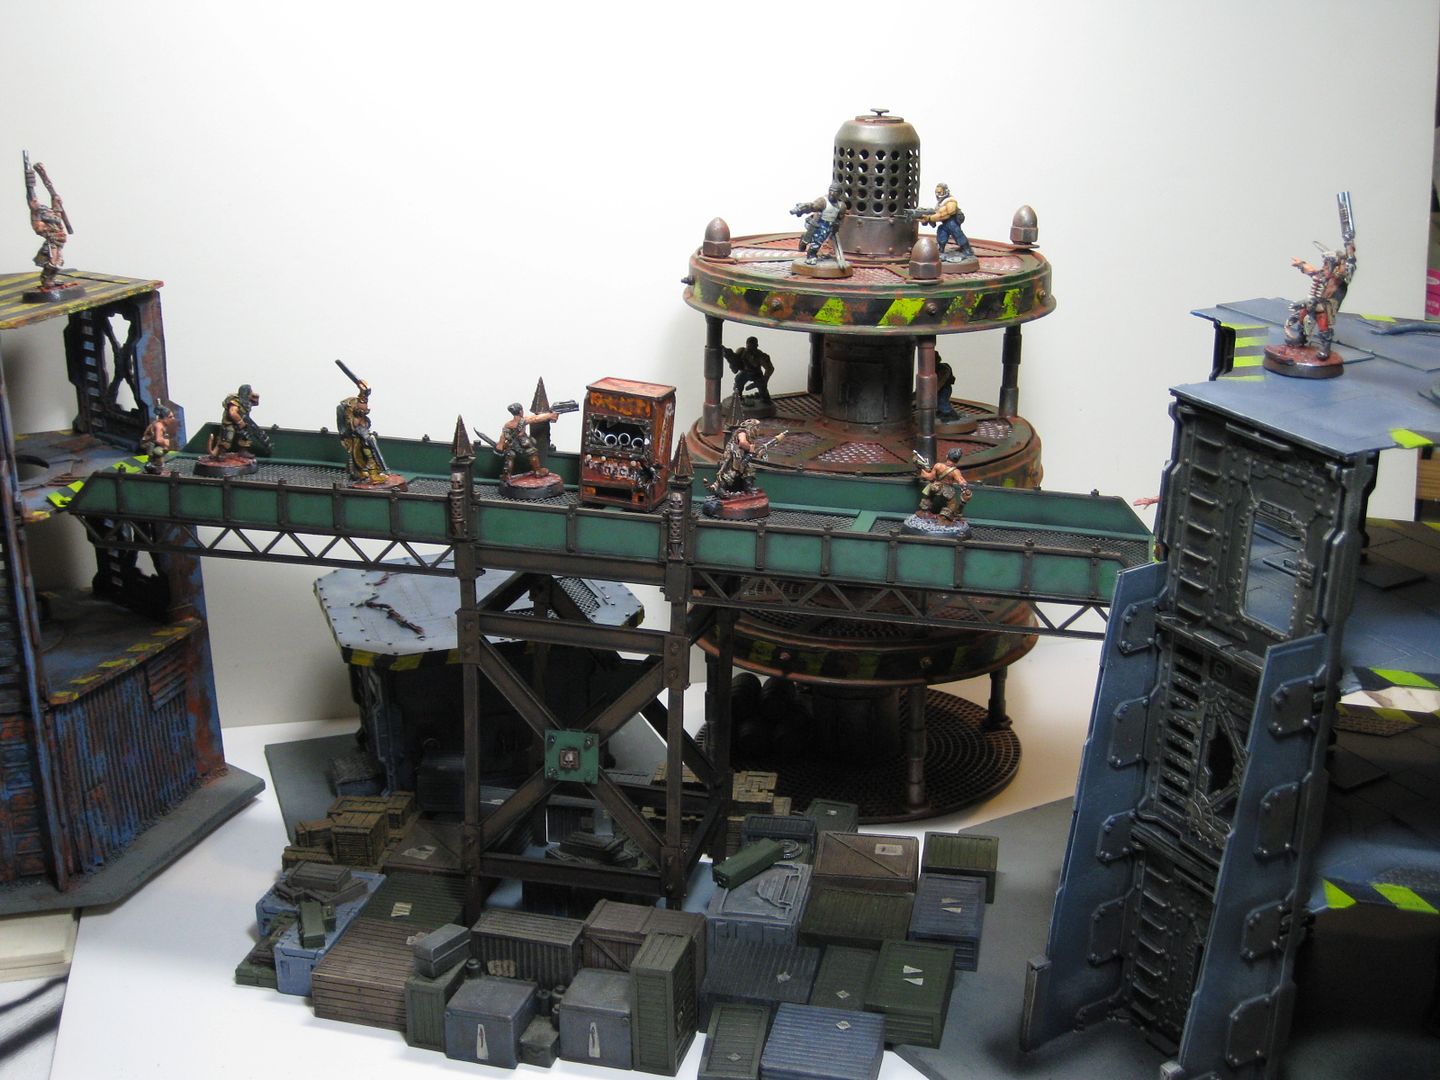
Automatically Appended Next Post: THat looks fantastic, Dave. I really love the open air Coruscant kinda feel that is going on over there....
How far doen the City Spire would a scene like this appear?


 well those giants wont be in the bowl and be cheat agains by the pats! (eagles had that)

 fficial&prmd=imvnsfd&source=lnms&tbm=isch&ei=bI8eT7zVBsLs2AWo1P2xDw&