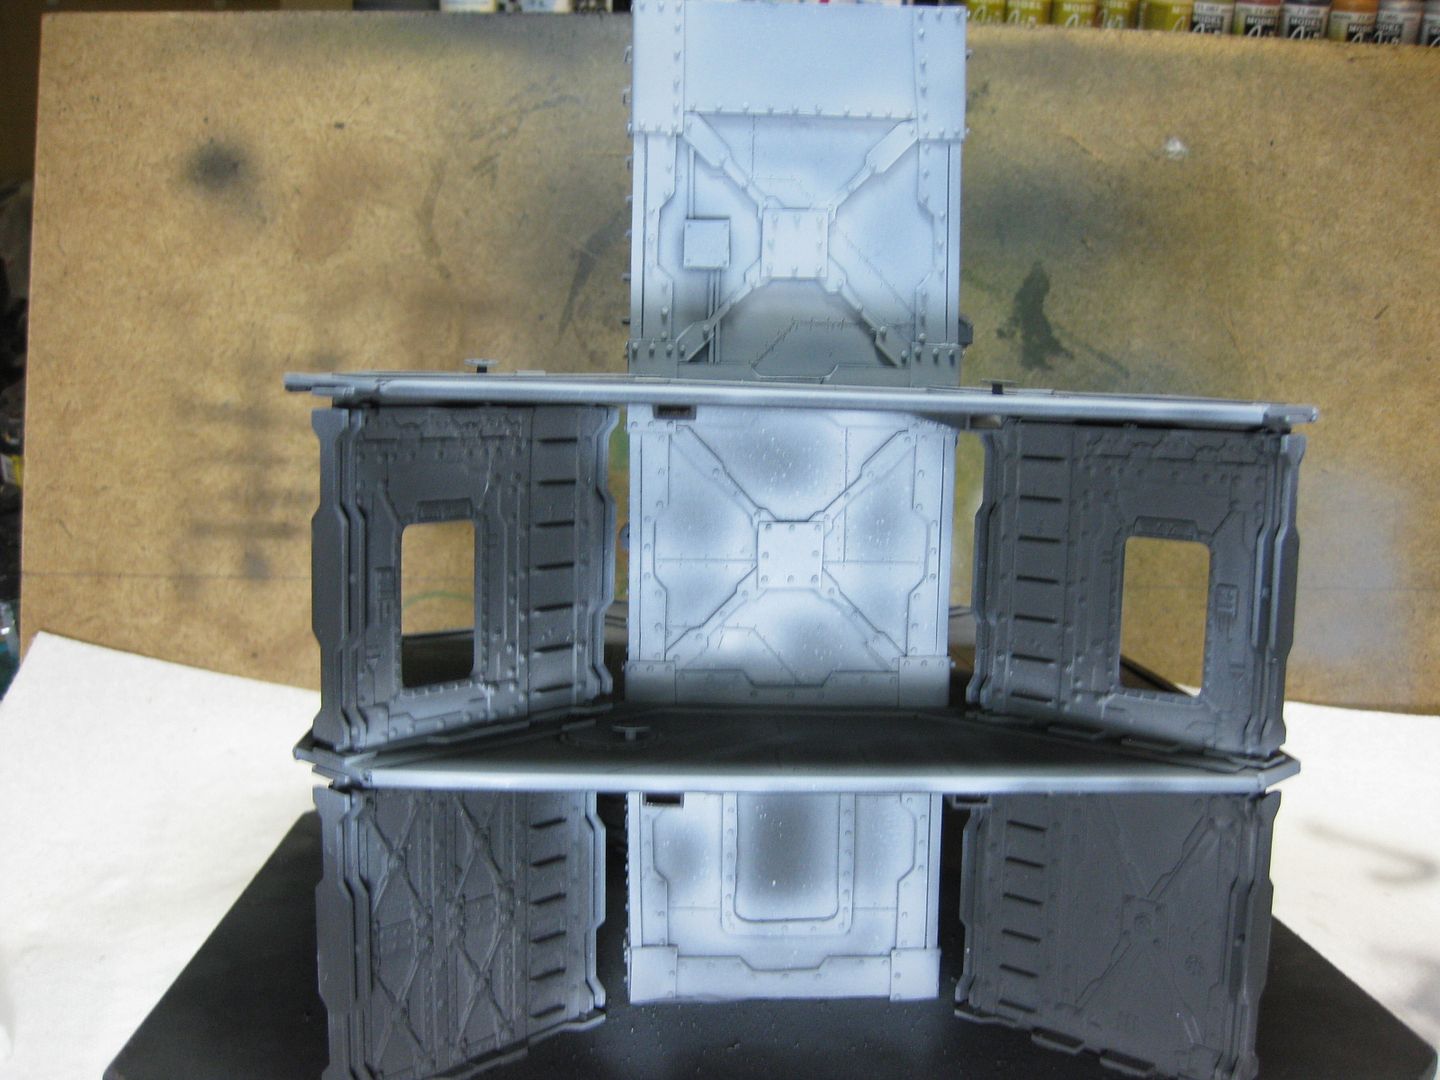
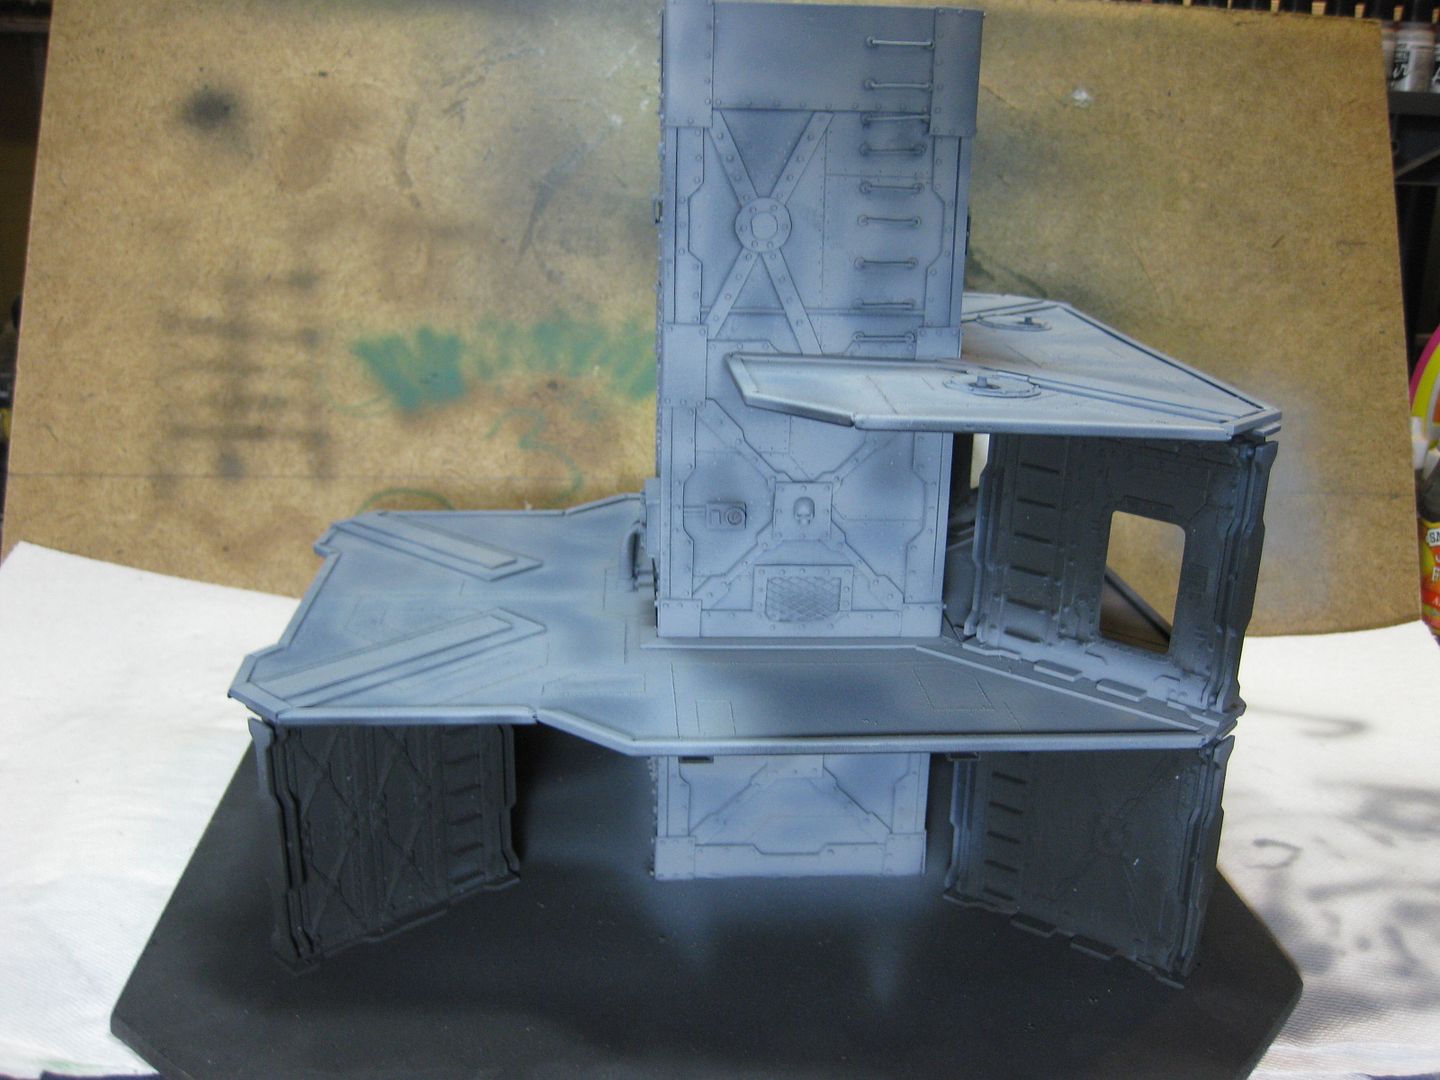
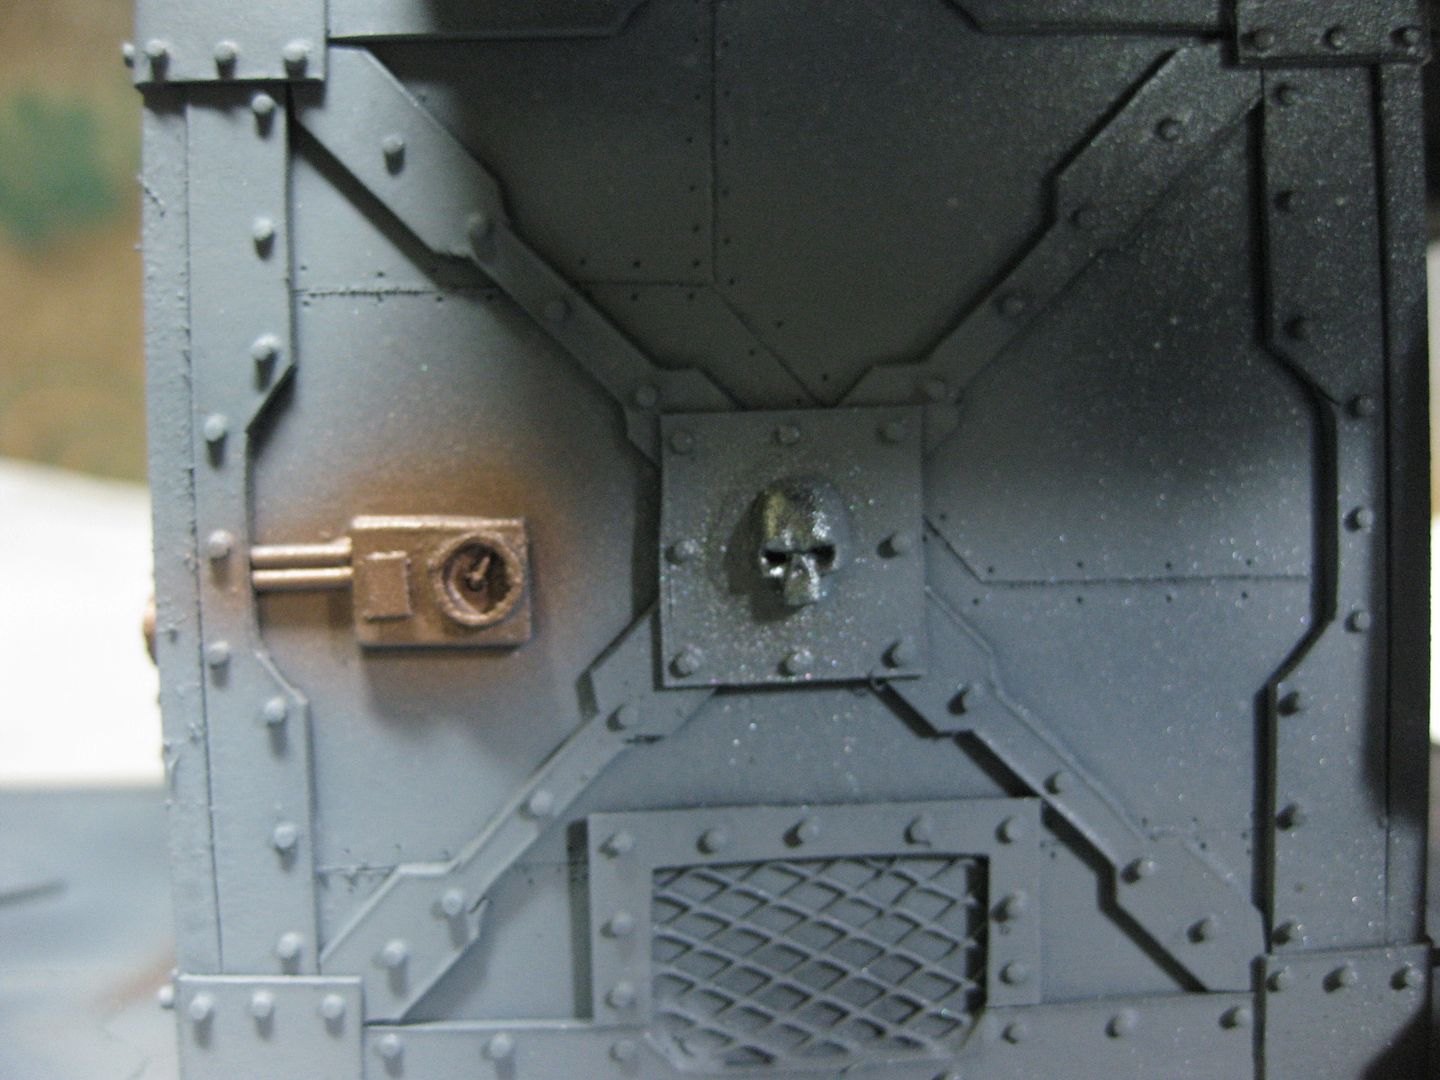
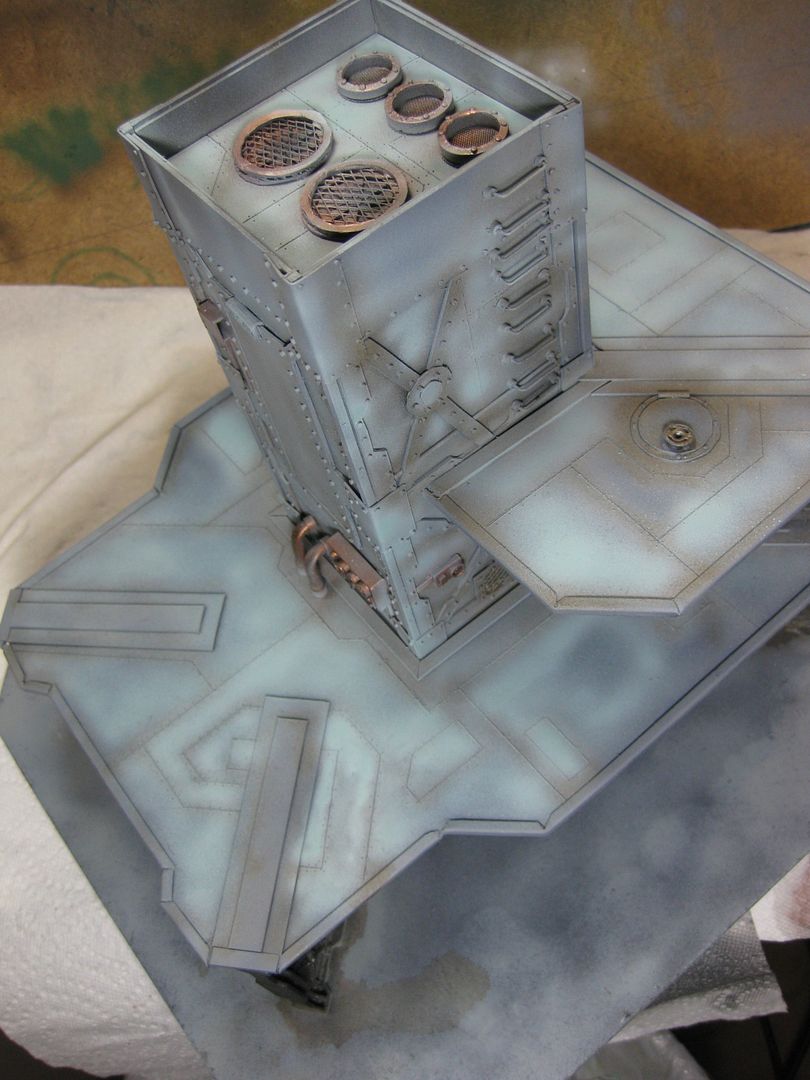
i would vote for one of those signs there dave! (oh and btw im quite suprised (although very pleased) that this latest buliding wasnt painted blue and white.. if you know what i mean)
Least we now know the brains of the operation (ladders on wrong ) lol no seriously these are looking great and I think the green works extremely well …… I have to ask the top ladder section did you create the curve or does it come part of the set
I guess the airbrush has paid for it self now then worth the investment indeed ……..
3 seconds you say I am trying to find something with plenty of rivets to start my thread and I just don't have anything worthy ……… I am running out of excuses here
Automatically Appended Next Post: @ mxwllmdr thanks for joining the pressure group nothing like pier pressure ……..
Sorry LDD, Just trying a little "tough love" on ya. It's just reminding me of (gits IIRC) thread, he gave the clue that it was "painted black" and then there were 5 pages of people guessing what he was working on. I mean i'm all for suspense, but....
Yes me to …… tough love well it goes back to when I was 4 a lonely child I was mother used to leave me alone for hours my father worked away my toys were my only friend and errr …… no its to much "cough splutter" tear roles down my cheek
What the feth I am just to lazy to start …… however you lot have inspired me to start and to finish some projects from way back so maybe I will start a thread
Any way stop the blabbering and get back to work Dave this underworld aint going to build it self you know
yeah, yeah... sorry youth and all that stuff... bin there bougt the ticket...took the beating...didn´t get enough grub, got tossed in the dark cellar...had to drown the cat... we all went through this at one time or the other... so get that damn thread up man! or i am commin´to git ye!...
*shakes fist*
heck...i even saw a coupla threads that started without ANY pics up front... *shudders in wonderment* that is something of an option...and you always show us you have words in endless uply... by the way...would love to see a post of your´s with just some added ",,,," for spicing up some punctuations...^^ i know i am by far the one to ask for these too^^ but heck...sometimes i have to reread your posts about three times to get to the meaning^^
Sorry, guess we have all been through the rough times then, however I have started a thread it aint' much but it's a start, sorry about the "punctuation" I will try to do better.
However I do believe that the use of ………. is over punctuation LOL .
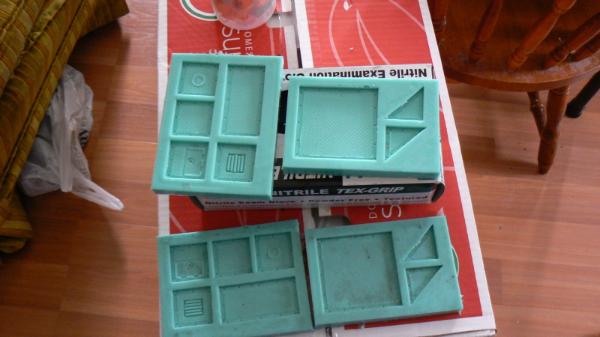
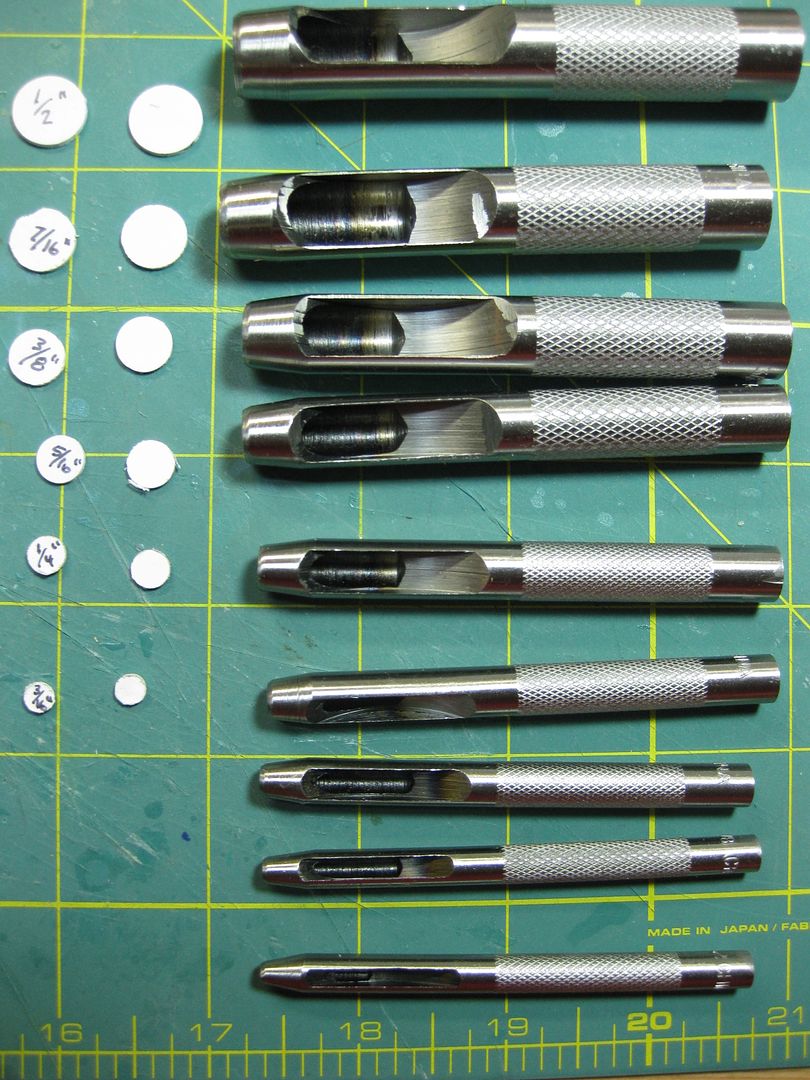
Automatically Appended Next Post: The picture you requested is here : The large black one is the hole punch, the purple colour ones are a small hole punch and a double small hole punch and the yellow one is a star shape (thought it would be good for a grot red army, it was not though )
Here is the link to where Gitsplittas “my next project is in black” starts.
Oo LDD has a thread, I must rush over there and subscribe
Automatically Appended Next Post: And this seems to have turned into a show and tell thread, so i thougth i would take a picture of my Hole Punch here at work, decorated with a red zigzag to make it punch holes faster
LDD has now faced his fear, and proved he is not a taxman or a NARC and started his own thread, so it is a bit Moot now. But thank you for being a valuable instrument Gits
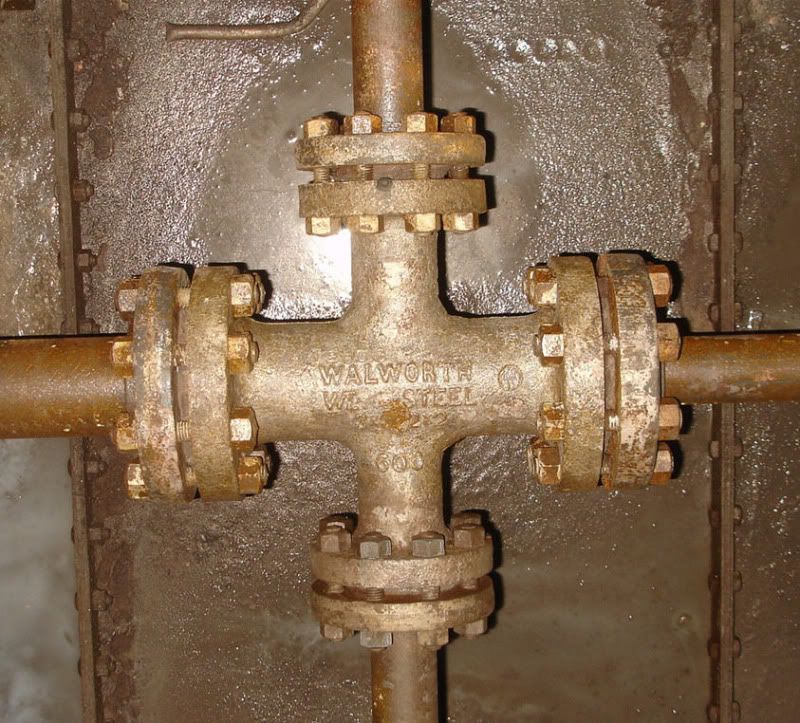
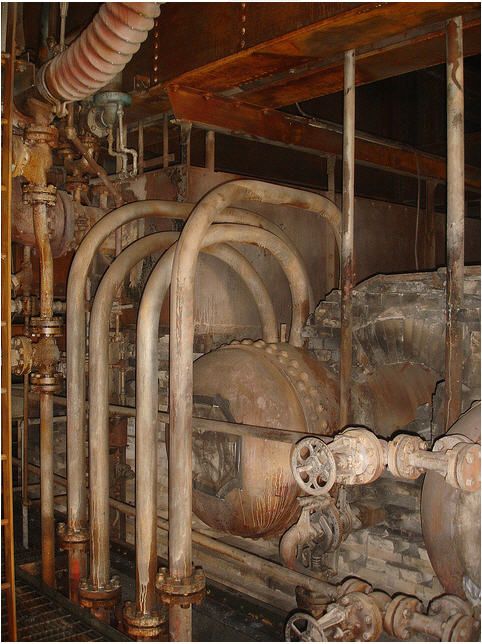
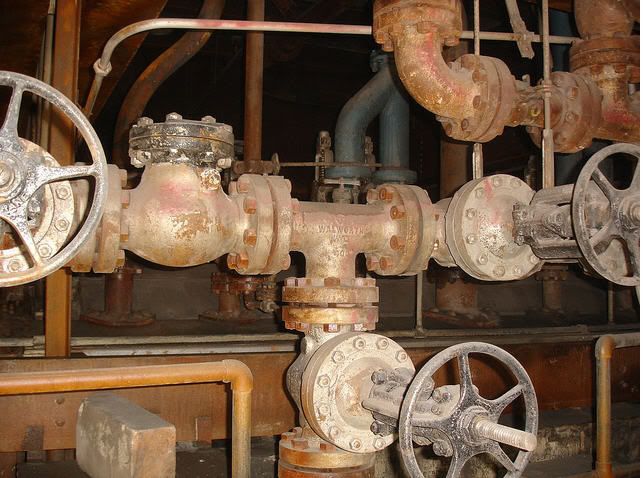
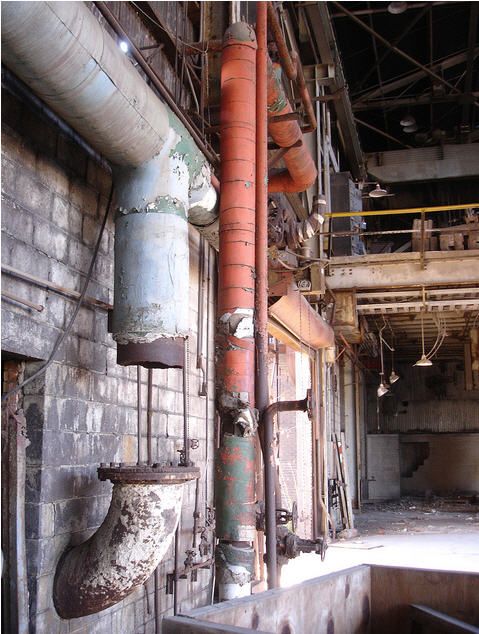
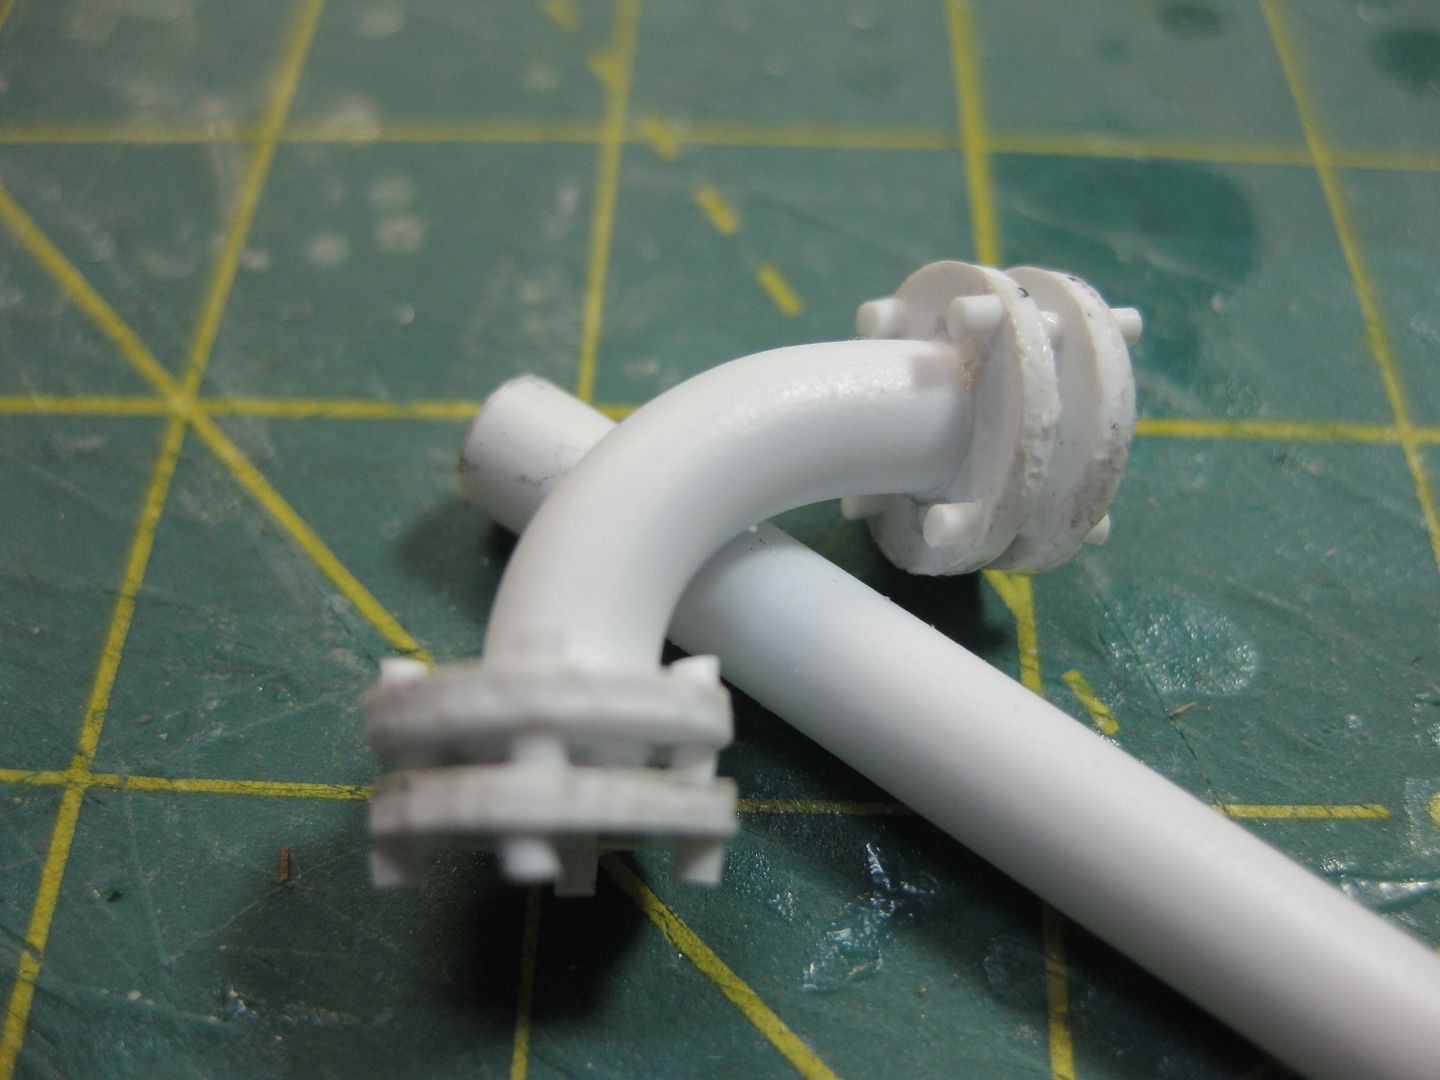
I have been thinking about pipes and overhead pipe clusters to be used as walkways.
Armorcast sells some excellent Resin overhead pipe walkways, but I need to spend about $100 to have enough and in both heights (1 and two storeys).
http://armorcast.com/store/index.php?cPath=120_55
Alternatively, I have built an order online from Plastruct, including all sorts of pipe fittings, valves, etc. Which I ca use to build my own overhead walkway system.
http://www.plastruct.com/picat/TUBING_FITTINGS_9.pdf
However, the price will ultimately be about the same $100 if I am to get enough of those fittings. But I will still have to custom make each one.
Either option does not really give me the types of piping I really want though.
I want pipe fittings with flanges where they are riveted or bolted together.
The plastruct fittings are all smooth connections, but flanges are available, but un-riveted and kind of expensive for nothing more than sliced tubes really.
Been thinking along those lines myself recently. For small diameter pipes I was thinking of hole-punching some plasticard for the flanges. My circle cutter's not great at smallish diameters so medium pipes are an issue.
But you'd expect a variety of pipe-work in the underhive, so a few armorcast and non-flanged pipes are still good
I gotta go with Vik's tophat solution, too, Dave. It would be a pain in the butt, however, and I am not sure about making molds of them. They would probably require two part molds. But remember, ultimately, if you want it done right you gotta do it yourself......
i like the idea you are about to make into a reality... and to be frank... do it your way... you shown us wonders already... i am in no way doubting this project to have any possible option of failure... and i think with the right suplies you will see this through... you have the talent and the tools...it will be an enourmous task, but you are just the man for that! if you have to think twice about that...just take a look at your table...there you see the plastic proof... no further point in arguing about an already decided path...!
the crosssection like you pictured could proove a bit tricky...but there are million ways around that problem...and half of them wouldn´t even involve GS...so...cool idea...
make it happen!
Automatically Appended Next Post: oh and LDD...i go and hunt down your thread just the next minute...
and that big holepunch...yummmmmmmyyy!!! i think i need a new tool...
and mordain...lol...that holepunch is extra special^^
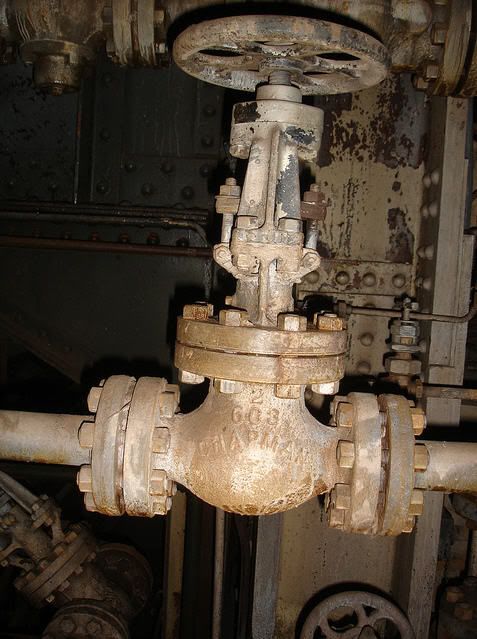
dsteingass wrote:Well, I didn't mean that cross-pipe in-particular, It was the cool-looking bolted flanges on the pipes that I was using the picture to illustrate.
Hirst arts has a "pipeline" mold set that has some of what you're looking for. If you make up a master I'm game for making it into molds...
I thought you could only do 1-part molds? If you can do 2-part molds, that's enough to make up my mind
Automatically Appended Next Post: edit: I looked at the hirst pipeline mold, not exactly, but I could easily make those, it's just that the measrements would be crucial so that the pipes lined up.
dsteingass wrote:I thought you could only do 1-part molds? If you can do 2-part molds, that's enough to make up my mind
Automatically Appended Next Post: edit: I looked at the hirst pipeline mold, not exactly, but I could easily make those, it's just that the measrements would be crucial so that the pipes lined up.
I've never made 2 part molds... I'm willing to give them a try however. (I'd just need to pick up some "mold release" agent to prevent the two halves from bonding to each other.
Yes, they are pretty cool, have you checked out the other stuff he does might be of use to you.
He does some larger ends for like piping and supports that look pretty cool, I think I have a picture some where of them in use, will have a look if your interested.
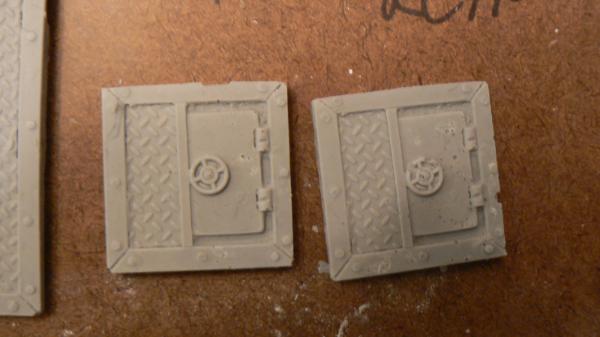
I had a thought the other day, I came across an old Verlinden plaster eastern ruin scene piece which got me thinking, if you were doing building moulds like Galron's have you thought of doing some with large shutter doors.
It was on this model piece and I thought it work really well in a hive world.
Depending on the piece you may want to use a one piece split mold. Basically you pour the entire mold at once and then gently cut one side near the pour gate to remove the master and casts.
I would post a pic but my examples might violate an IP or 2. for pipes with fittings and such it would probably be a good option.
theunicorn wrote:Depending on the piece you may want to use a one piece split mold. Basically you pour the entire mold at once and then gently cut one side near the pour gate to remove the master and casts.
I would post a pic but my examples might violate an IP or 2. for pipes with fittings and such it would probably be a good option.
How easy is this to do, surely if you cut the mould there is a chance of distorting it, so when you come to use it and apply pressure to hold it in place, would this not create the possibility of none alignment ?
Its just when you see 2 part moulds they have guide points to line up the 2 halves, this will not have any so surely the chance of movement would be possible, ending with a distorted cast ?
Most resin companies use this method. when you cut the side if you cut in a S shape it helps to align and reduce flash/mold lines. I see good results using the technique.
theunicorn wrote:Most resin companies use this method. when you cut the side if you cut in a S shape it helps to align and reduce flash/mold lines. I see good results using the technique.
No I just wandered as I have done some small scale moulding, and wondered how well this would work 2 part moulds are a real pain to do
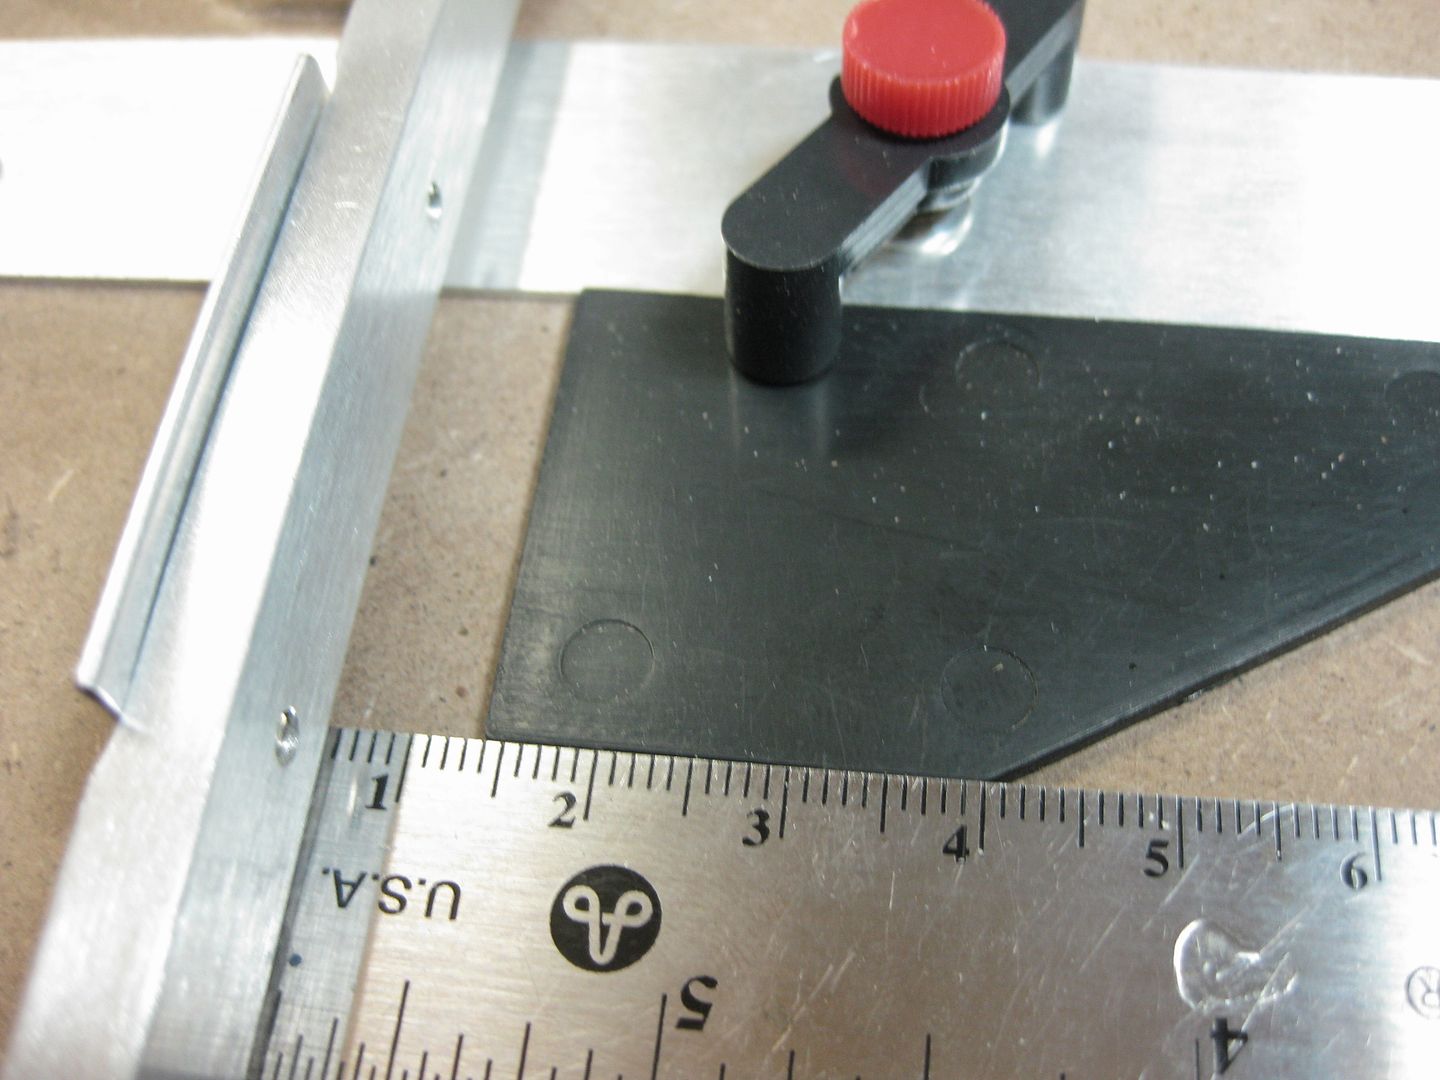
Resourceful good fined and great execution job is a gooden, however I fined that some one so high in the house of riveters not to have 10 mm tube is beyond believe, take a thousand lashes and repent for your sins ……
Have you got a scale shot ? just to give us some size reference
Offending IP violation is not visible but the pour gate is still in this mold. This is a 28mm head mold it captured all of the detail on the tentacles and skull ridges.
I will be visiting Phil's Hobby Shop promptly tomorrow after work to take care of that little problem
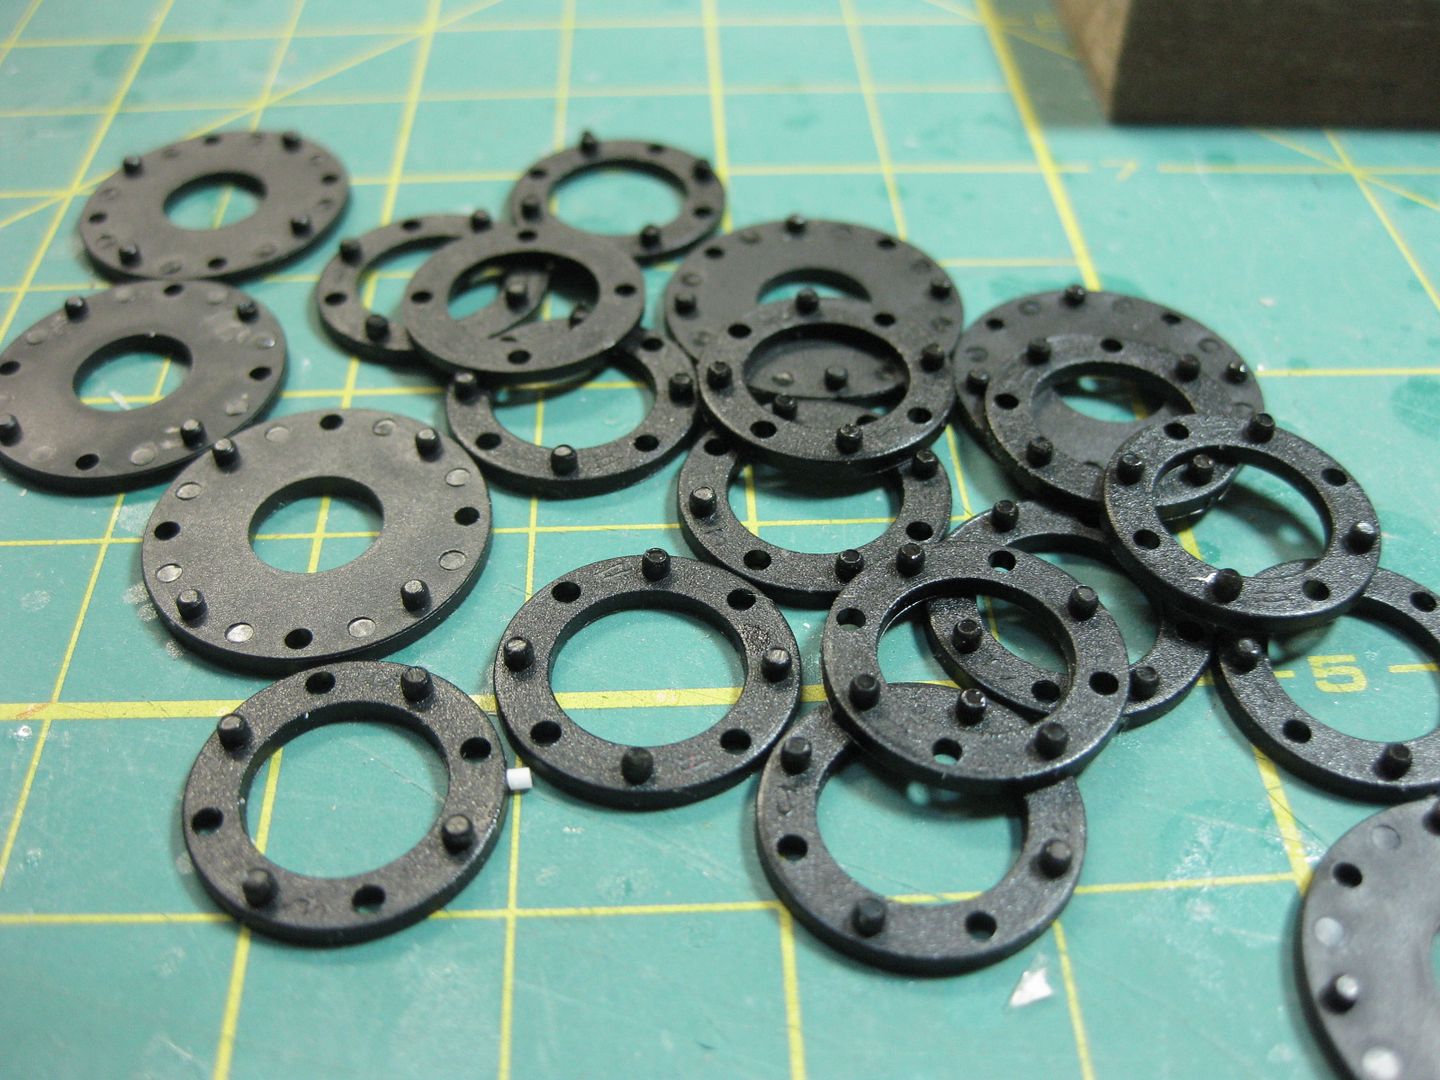
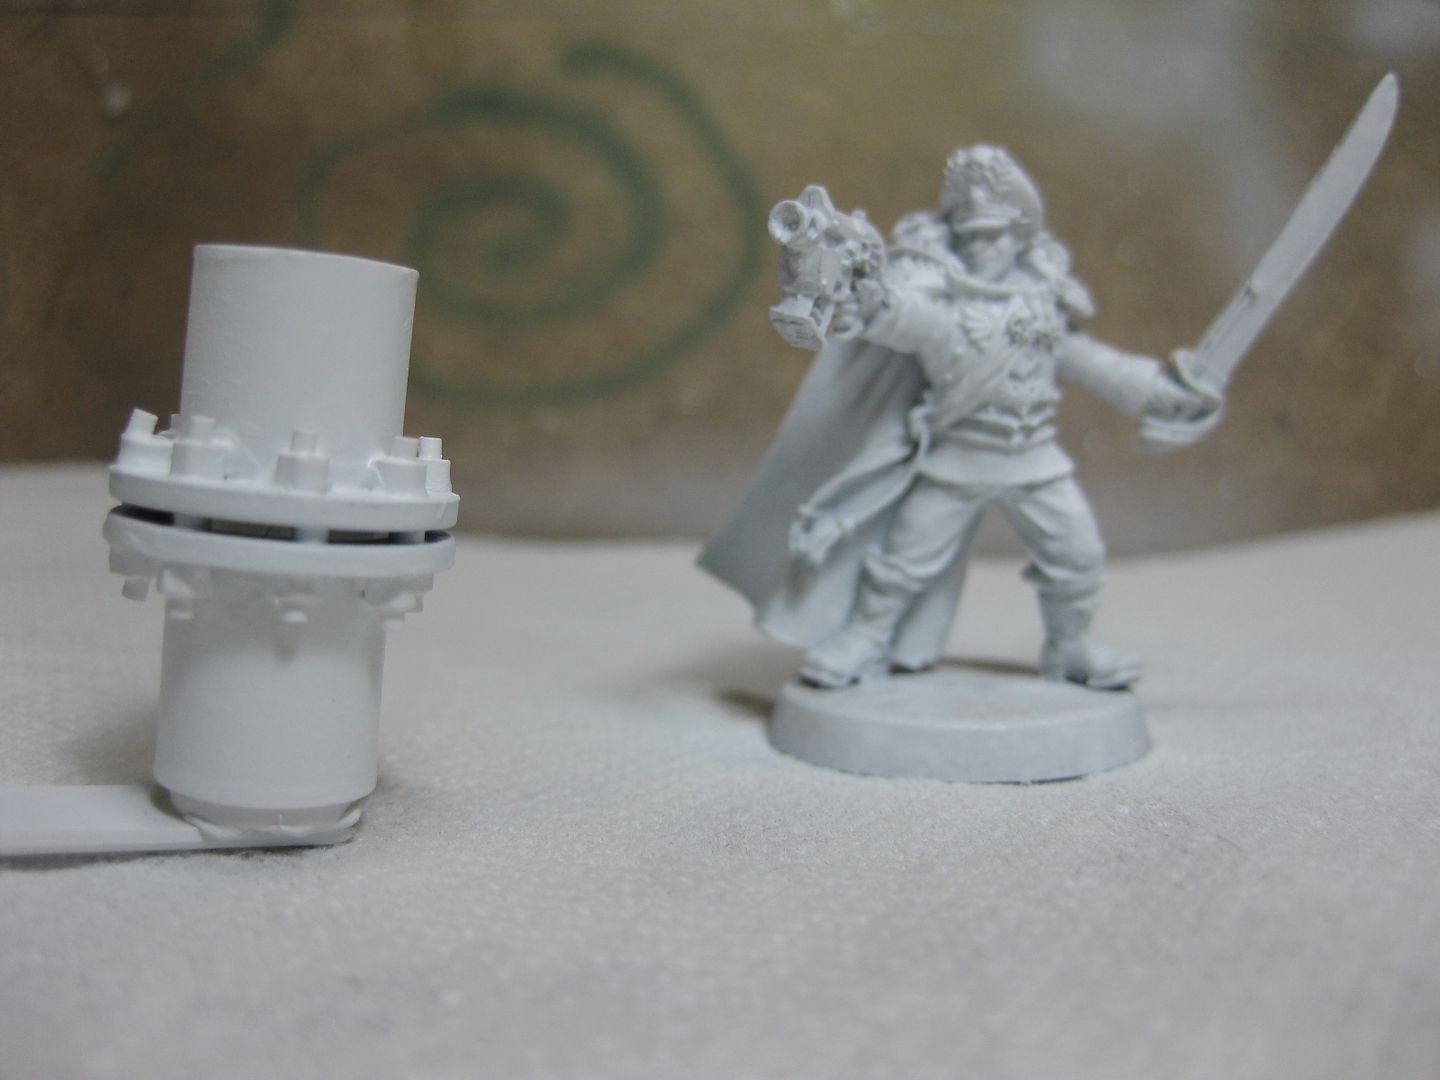
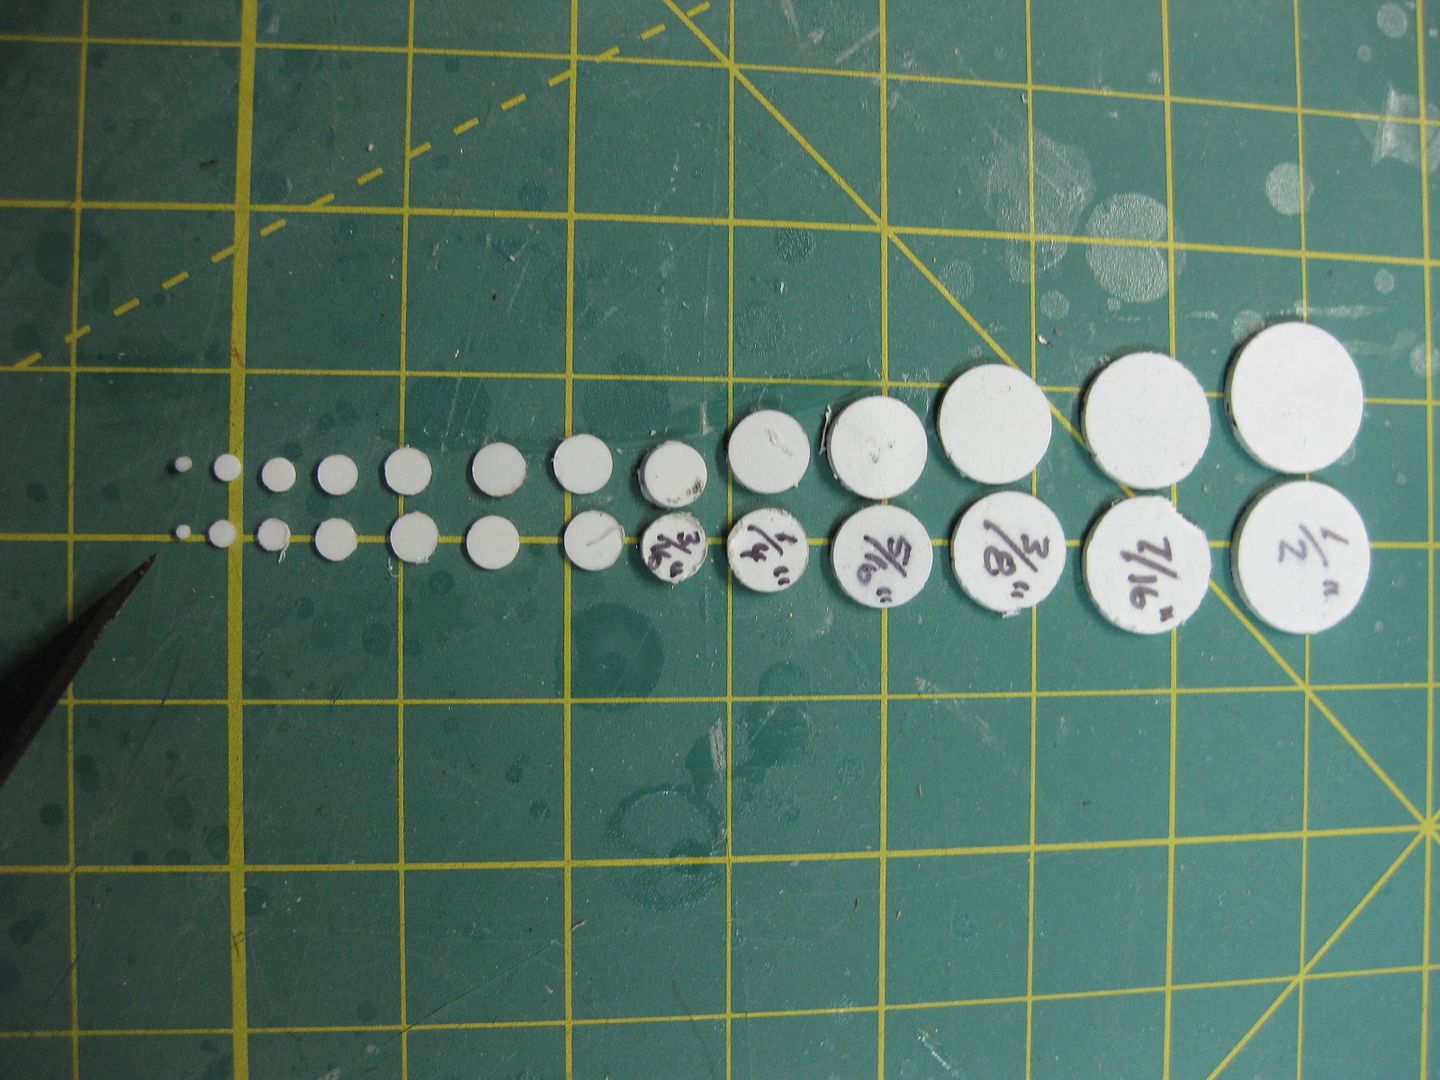
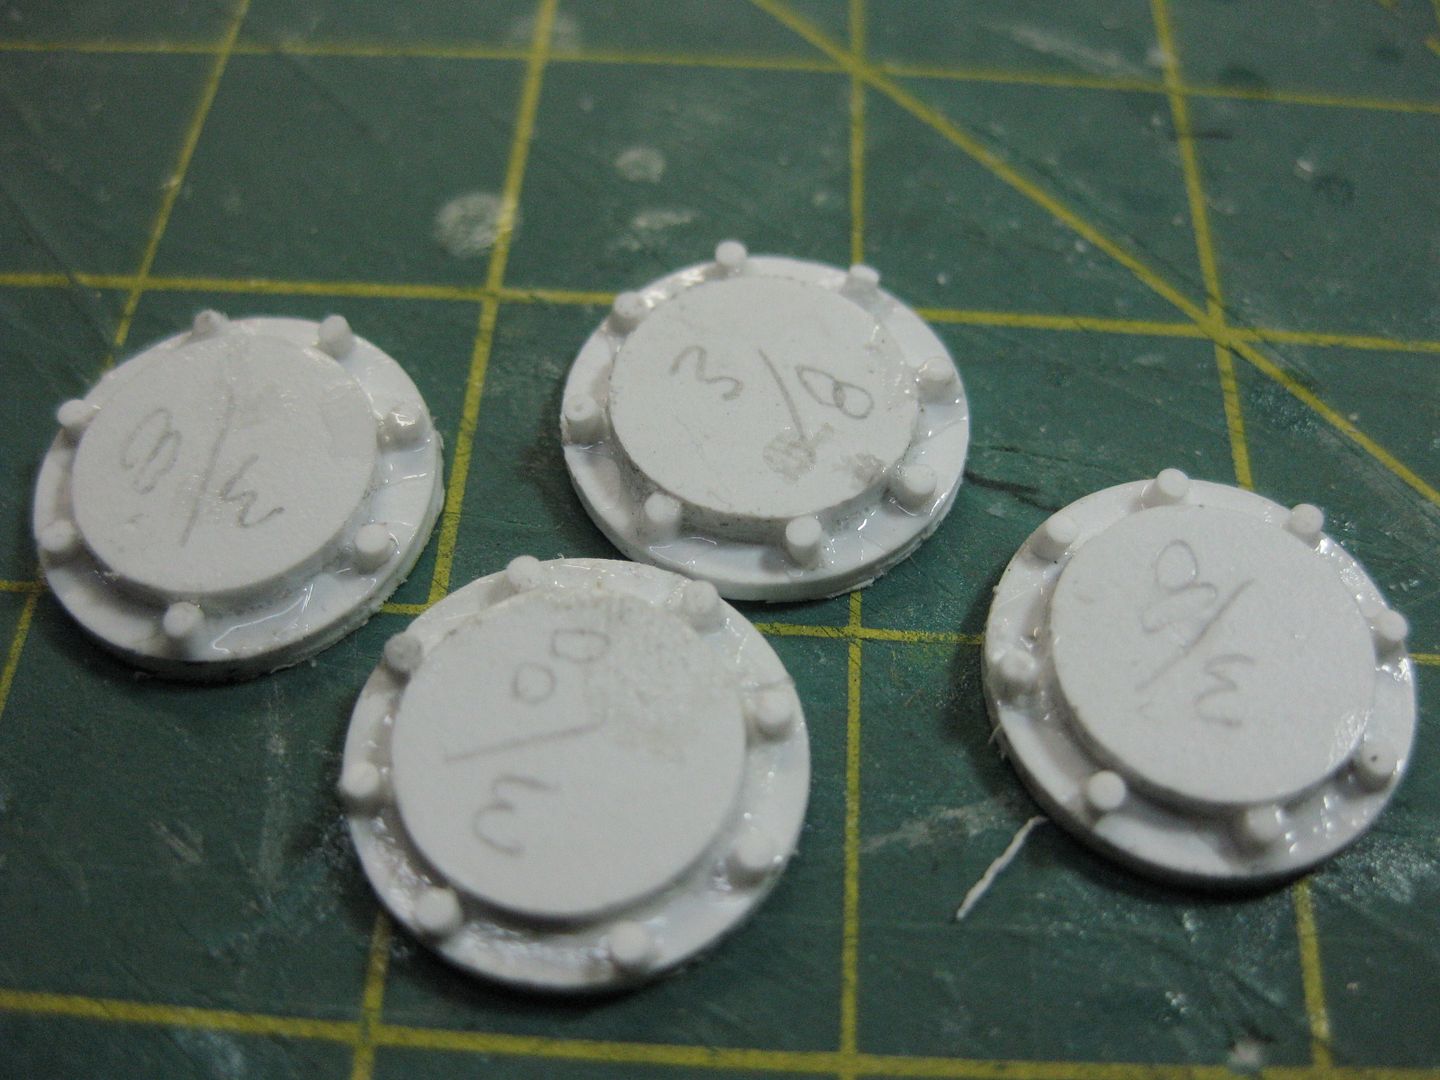
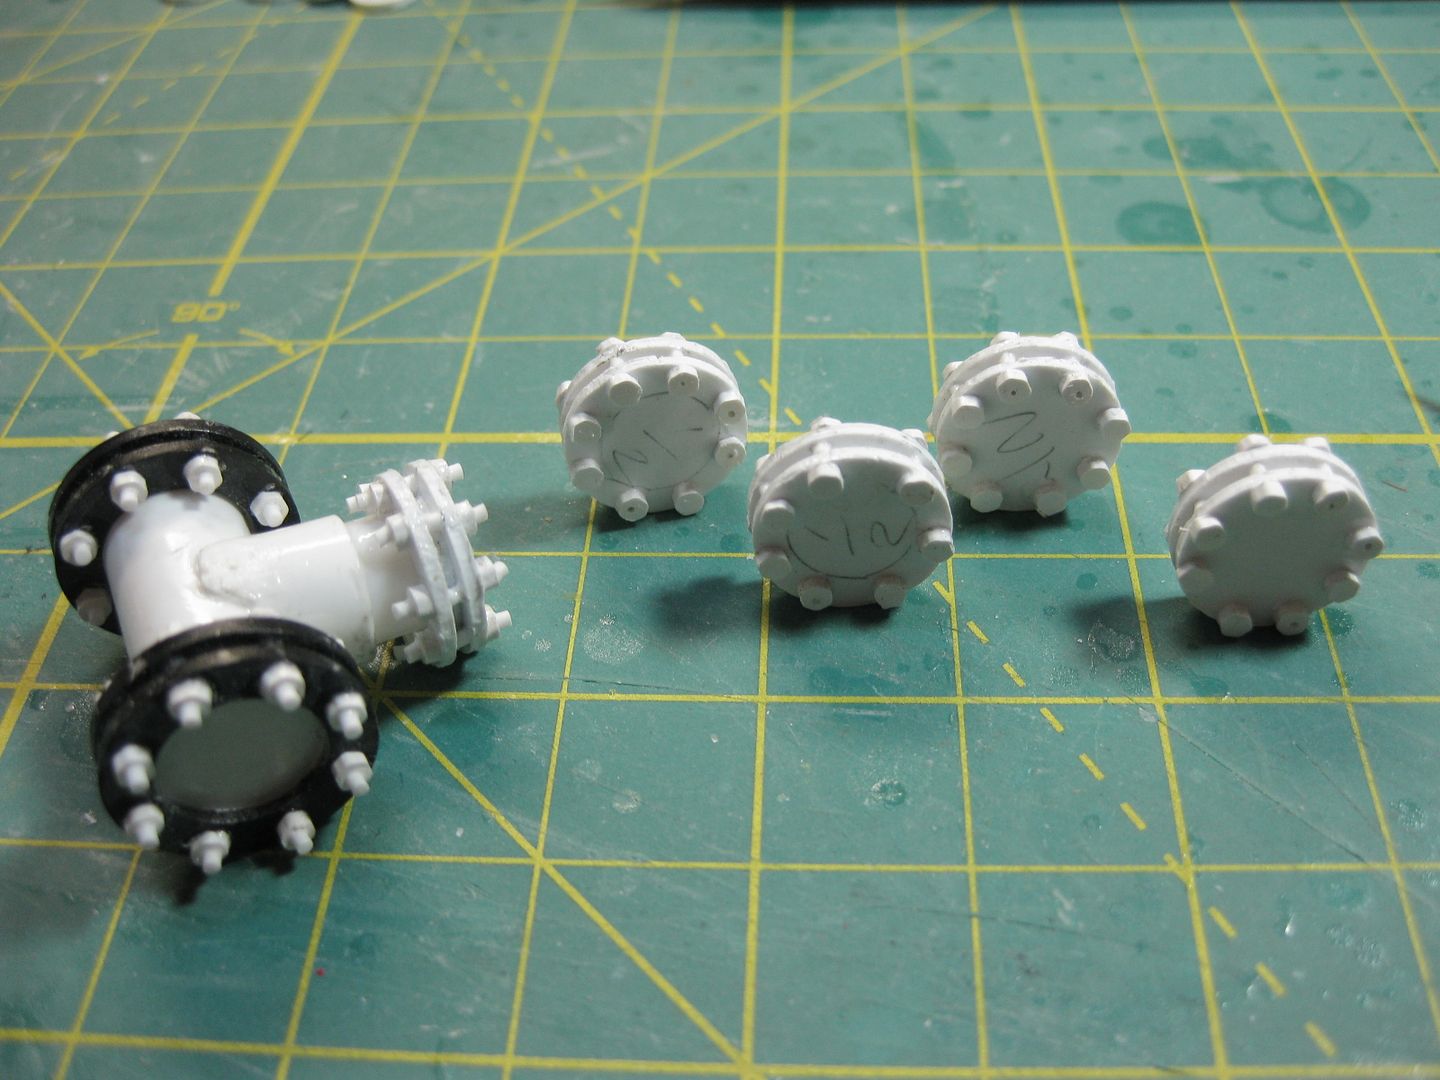
I have .5, 1, 2, 3, 3.2, 4, 5, 6, 6.3, 6.5, 7,7.1, 8. 8.7, 9mm styrene, and 15mm PVC tubes, but no 10mm (but probably some decimal sizes smaller somewhere that I missed However, this is what size these free flange bitz are on the inside diameter, 10mm.
I see you have achieved the desired look you were after successfully …… genius
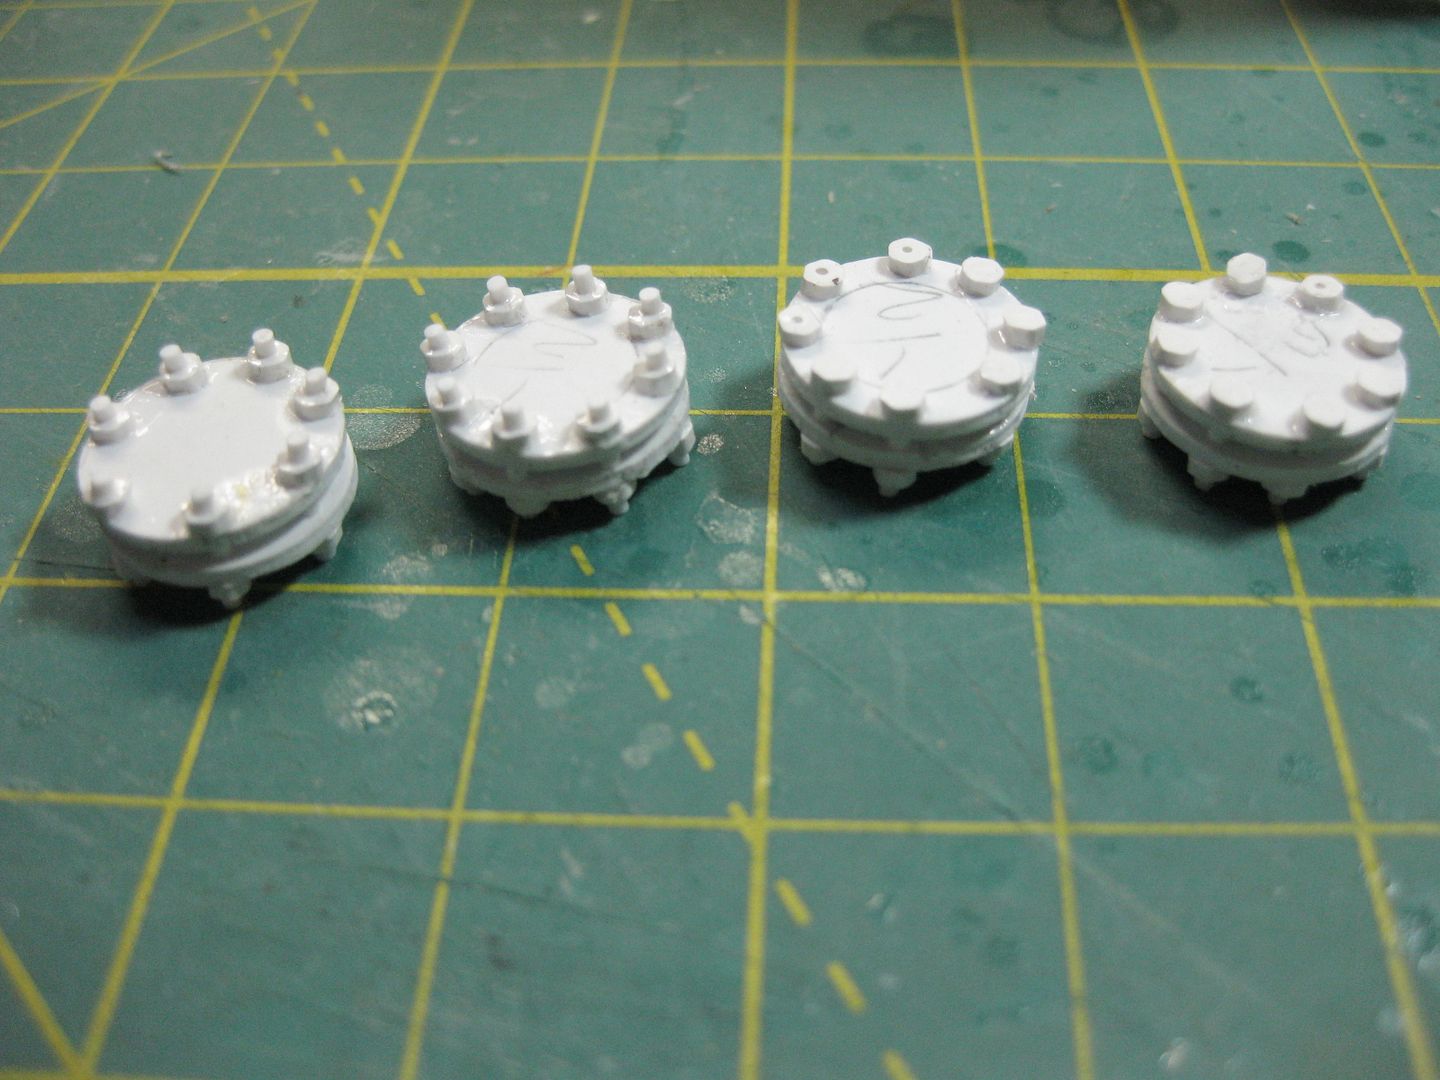
Thanks for the scale shot it is kind of the size I thought it would be, these should work well and look the nut's, have you drawn or worked out a design for the make up of these yet ……. or you still just spinning the ideas around.
now that is wonderful how quickly you tested this new idea...and i have to say...perfect look...the rivets could look a bit shorter...true but the general look is very good... that will be so freaking cool once you have a mass of these done...are those rings/spacers easy to come by for you? i expect you will need millions of these...
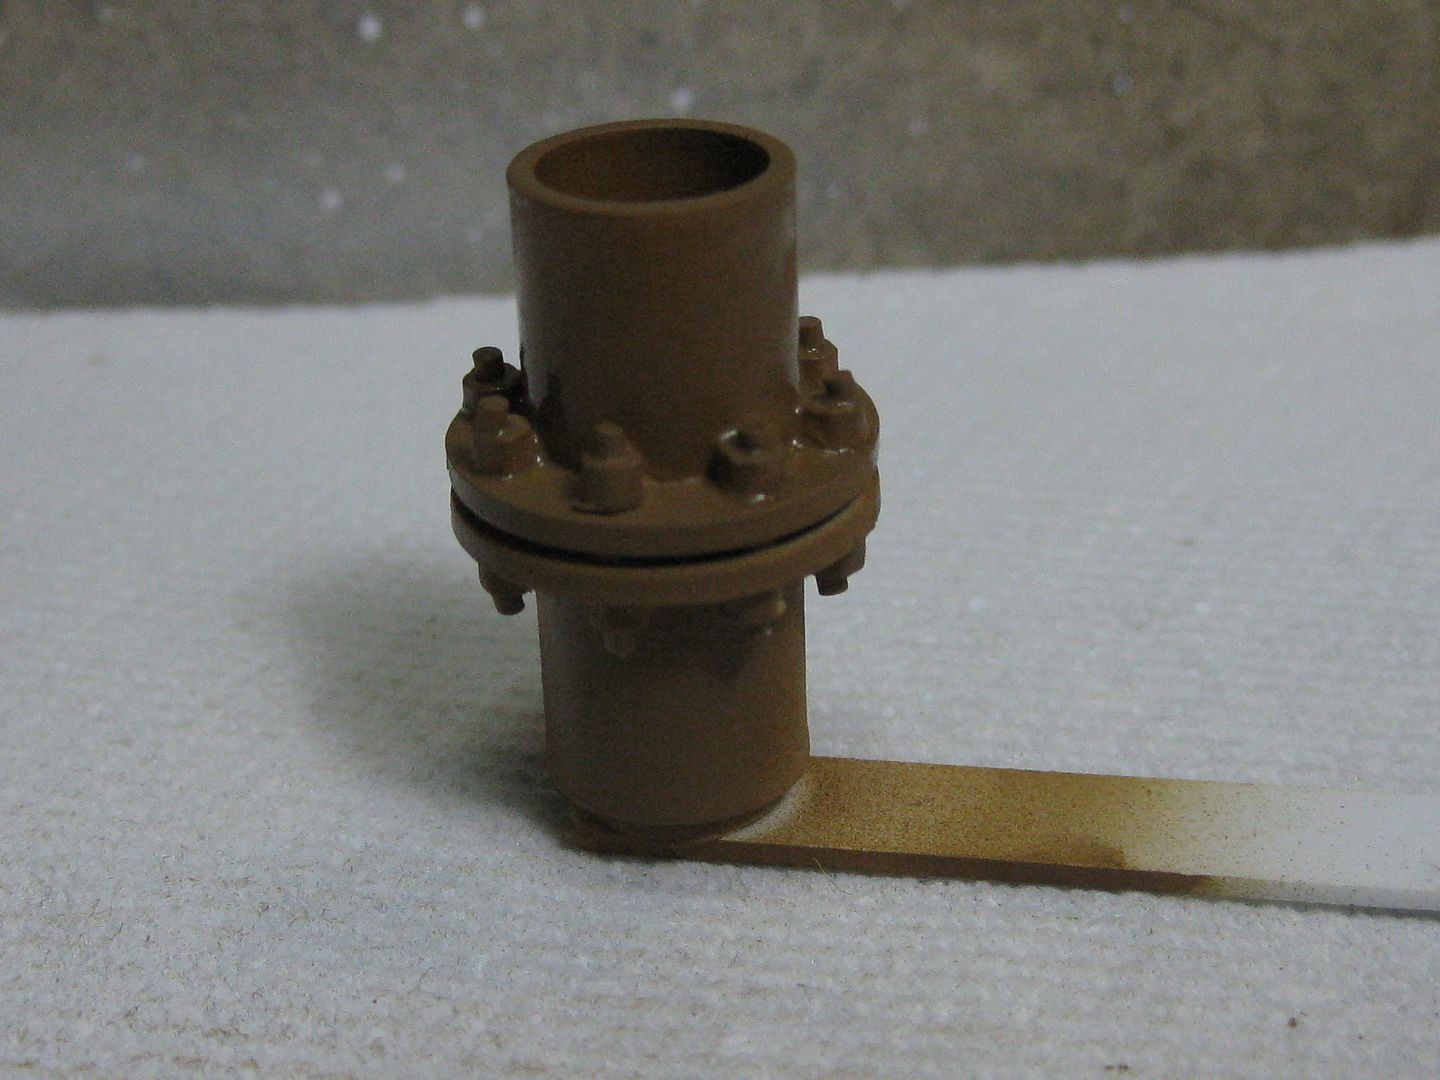
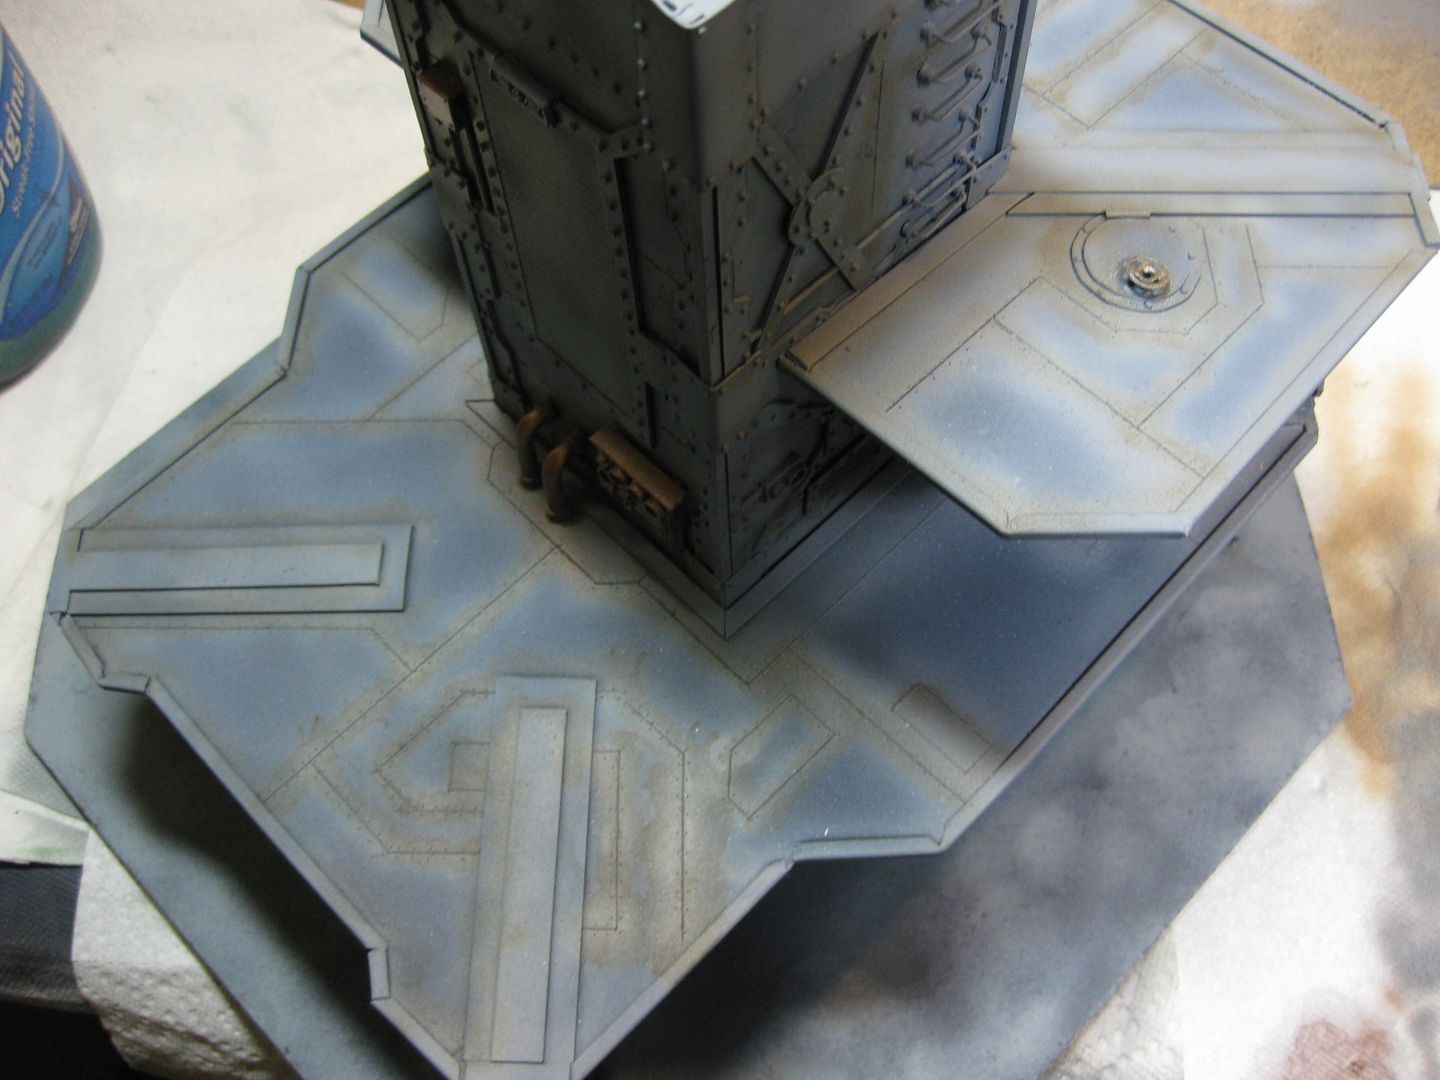
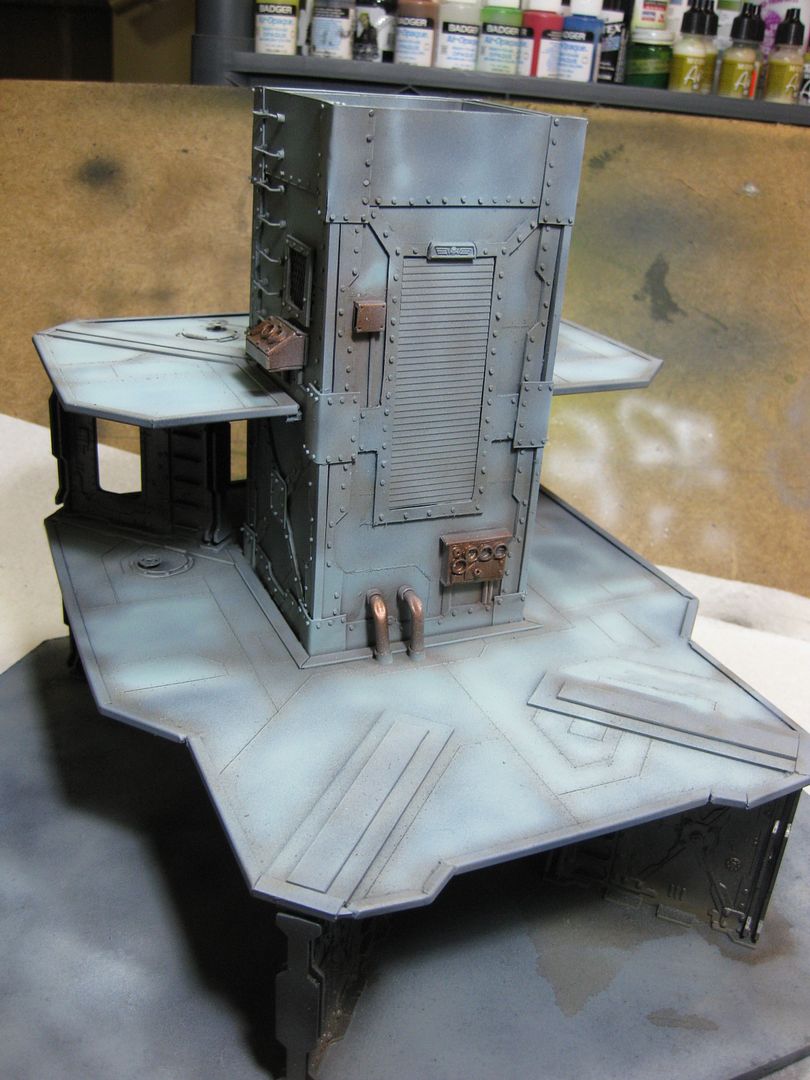
That primer worked marvellously, good flat even coat better than GW white undercoat gak .
With the base coat colour looks perfect I think its spot on, I would cast these up for sure hell I would buy a a mould of these for my Orks , got ideas bouncing around all ready
You going to try some different angles in this method and some triple ended pipes these could be a winner
Well since I work for a pipefitting company, this is relevant to my interests
In my (limited) experience (I'm only an apprentice at the moment). Fittings; such as elbows, tees etc. would usually be welded to the ends of pipe. Flanges are usually used to shorten individual spools to allow for easier installation. Valves are usually flanged as well. But having a every fitting with 2 flanged ends might look odd...
That said, there are exceptions to those rules, each job is different after all, but I don't see flanges being used excessively in the underhive, as they are generally used where things might need replacing (Valves are a good example here) as the joints are much more prone to leaking than a fully welded pipe.
What you've done so far looks fantastic! But I don't think every fitting should have a flange on it. Use them sparingly.
Maybe I came across the wrong way there, I never said they shouldn't be used; in fact, I absolutely love what you've done there, it looks VERY realistic.
I just don't think that EVERY fitting should have a flange on every end.
EDIT: Actually, I'm thinking about it whilst I'm in work (I'm thinking about pipes, it's all good )
How are you planning on integrating this pipework with what you have already, making new walkways on top of pipes? Around or above new walkways? Or as standalone items that can be woven in and out of your buildings?
Also remember that pipes need to be supported somehow. Especially when they're full of stuff, and, in the underhive, they're more likely to be full of poo than anything else
Tibbsy wrote:Maybe I came across the wrong way there, I never said they shouldn't be used; in fact, I absolutely love what you've done there, it looks VERY realistic.
I just don't think that EVERY fitting should have a flange on every end.
EDIT: Actually, I'm thinking about it whilst I'm in work (I'm thinking about pipes, it's all good )
How are you planning on integrating this pipework with what you have already, making new walkways on top of pipes? Around or above new walkways? Or as standalone items that can be woven in and out of your buildings?
Also remember that pipes need to be supported somehow. Especially when they're full of stuff, and, in the underhive, they're more likely to be full of poo than anything else
Sorry I may have come across sounding a bit of a dick (after reading back what I said ) I think you are correct with what you said (after all it's your profession or at least will be) so you are correct and wise as to what the layout of such systems are and how they should look.
I was only meaning to say that some times if something is not right but looks cool that works as well.
Automatically Appended Next Post: Dave is the primer expensive and what other colours does it come in
I used to work in a food canning factory, so everything was often replaced, expecially where we pumped stuff like gravy and soup, so flanged pipes were everywhere. Besides, this is the underhive, one can only speculate what this equipment was once used for, that is the beauty of only needing to abide by the rule of cool.
lone dirty dog wrote:
Sorry I may have come across sounding a bit of a dick (after reading back what I said ) I think you are correct with what you said (after all it's your profession or at least will be) so you are correct and wise as to what the layout of such systems are and how they should look.
I was only meaning to say that some times if something is not right but looks cool that works as well.
Automatically Appended Next Post: Dave is the primer expensive and what other colours does it come in
You didn't sound like a dick mate, don't worry about that
I suppose it would look cool having so many flanges, I just think it would be a bit odd, and by having less flanges, you can save on materials, which means you can have more pipes
EDIT: Aha, it seems I got ninja'd by the man himself!
Good point on that, like I said, there are exceptions, and it seems food canning is one of them
BTW, I don't know if you mentioned it before: Where did you get those plastic rings? And how readily available are they?
I also work in the food industry, and still do and thinking about it we have loads of those fittings every where …… which to validate your point it everything leaks ………. LOL …….
dsteingass wrote:I must concentrate my funds/energy on the building, the mold-making wizardry is not for a mere Muggle like me.
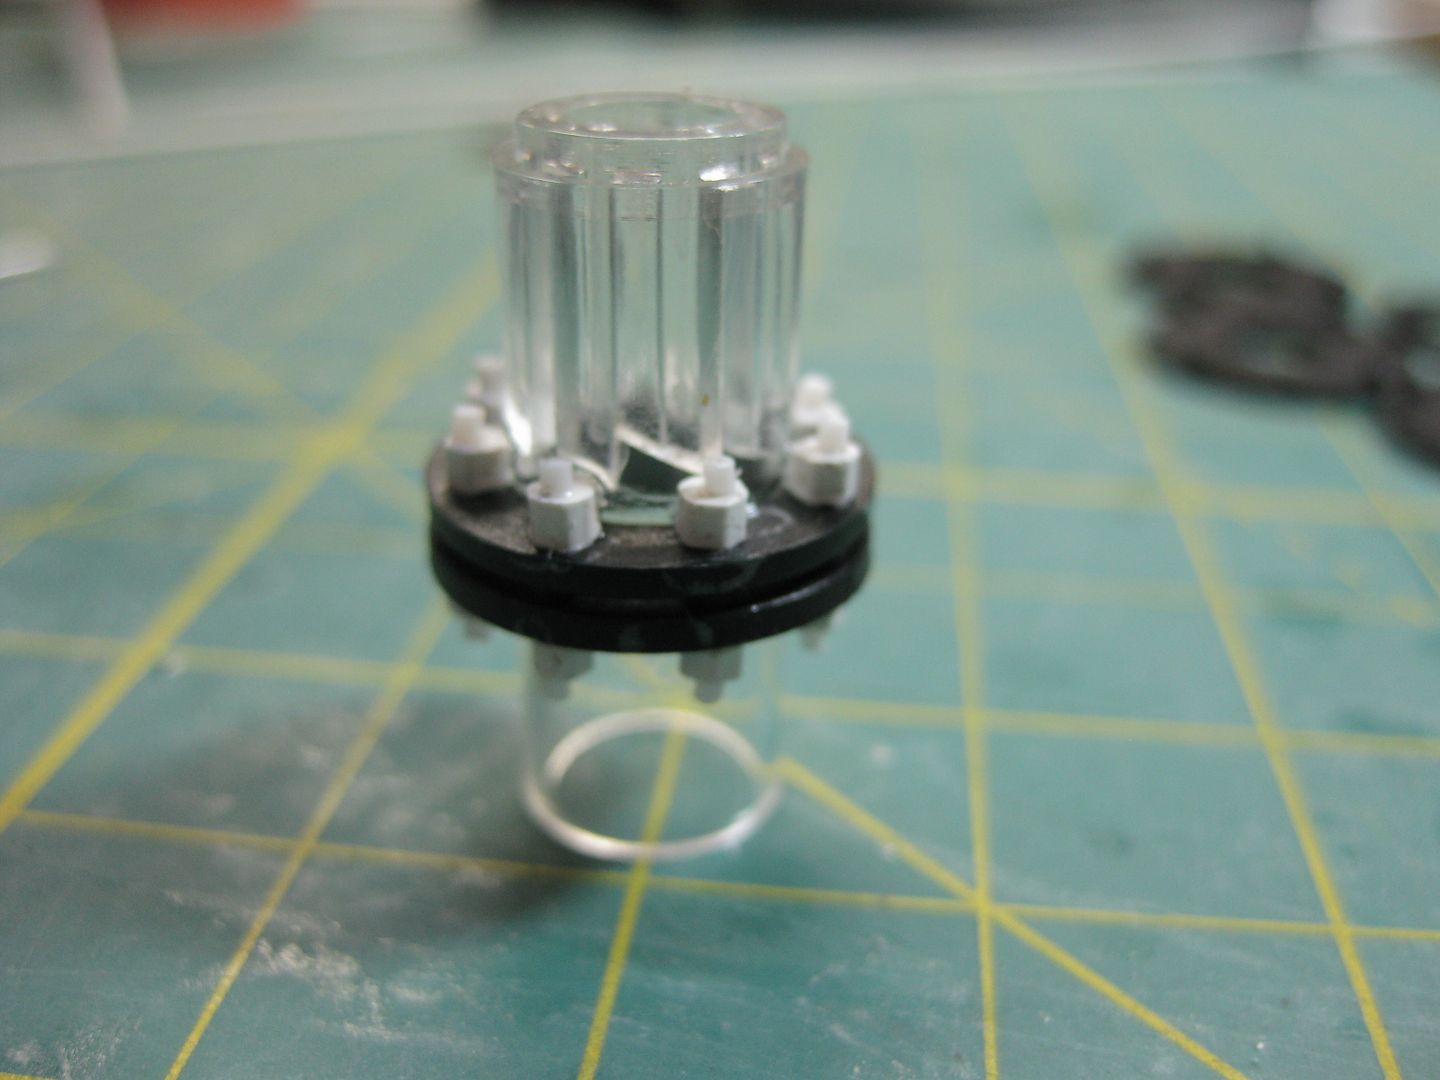
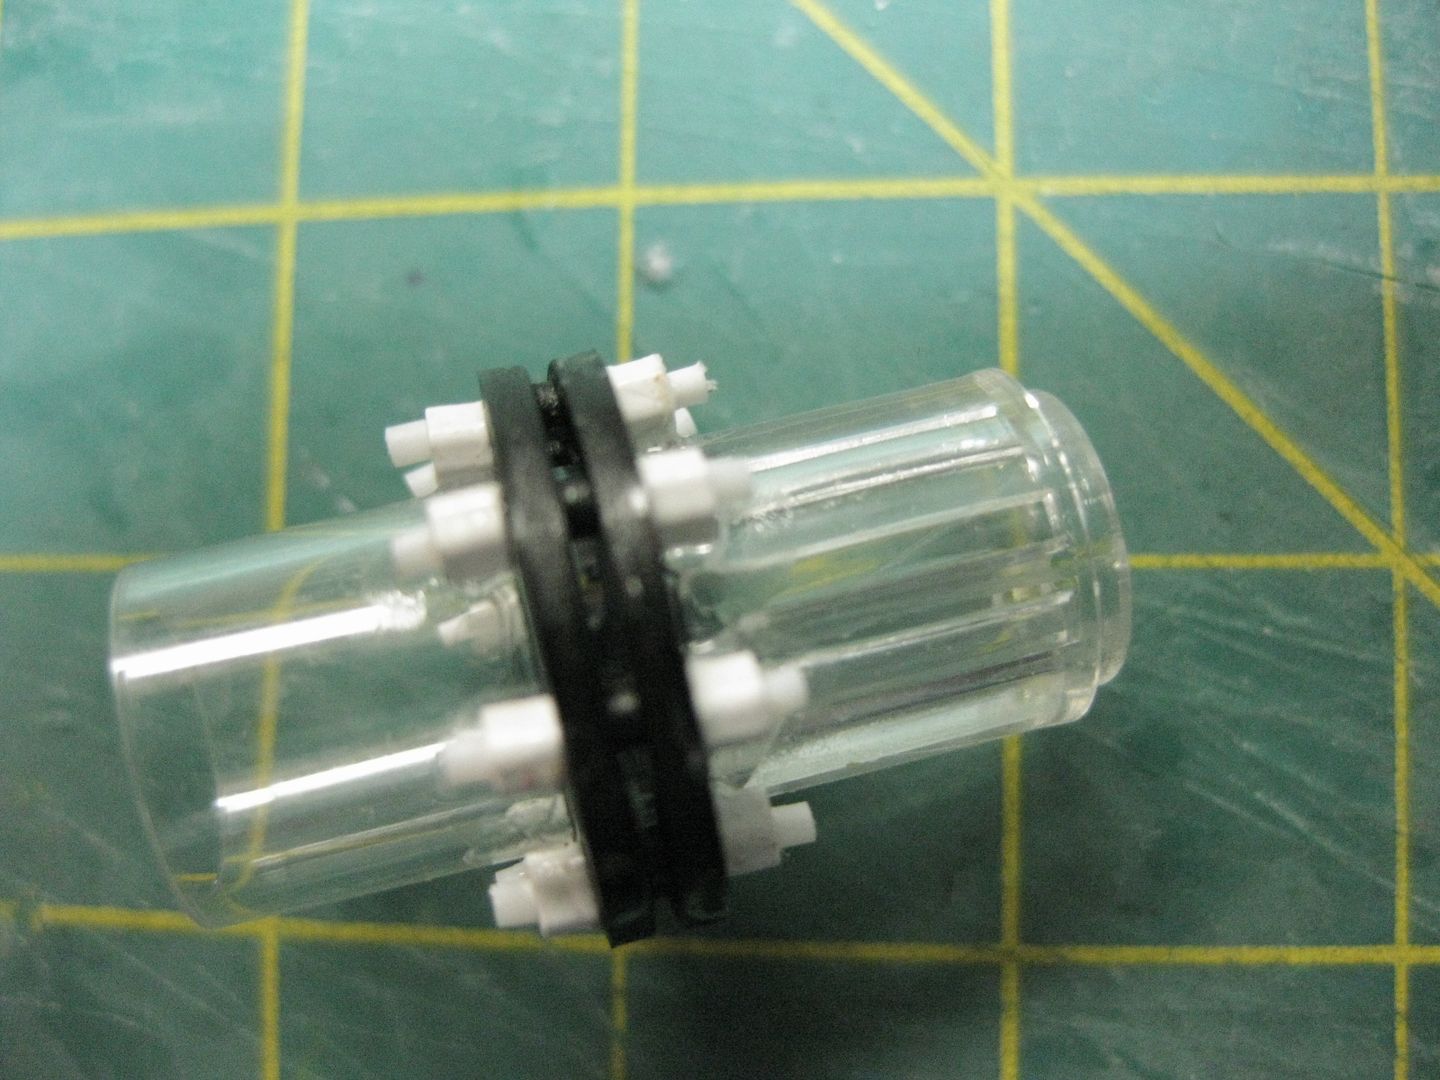
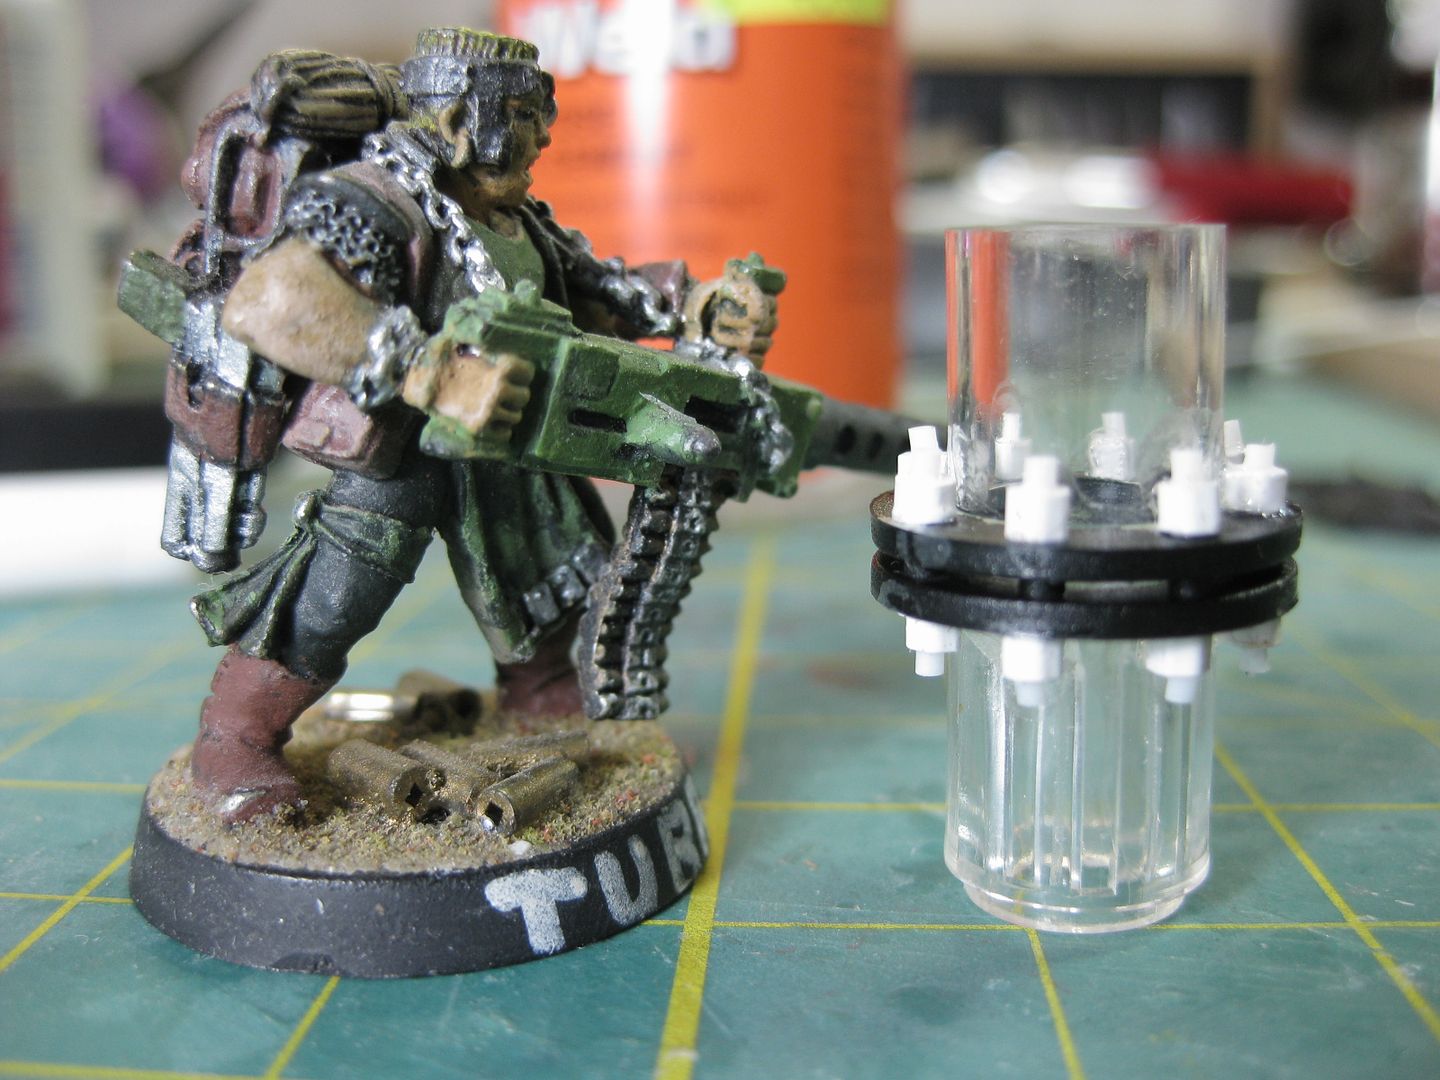
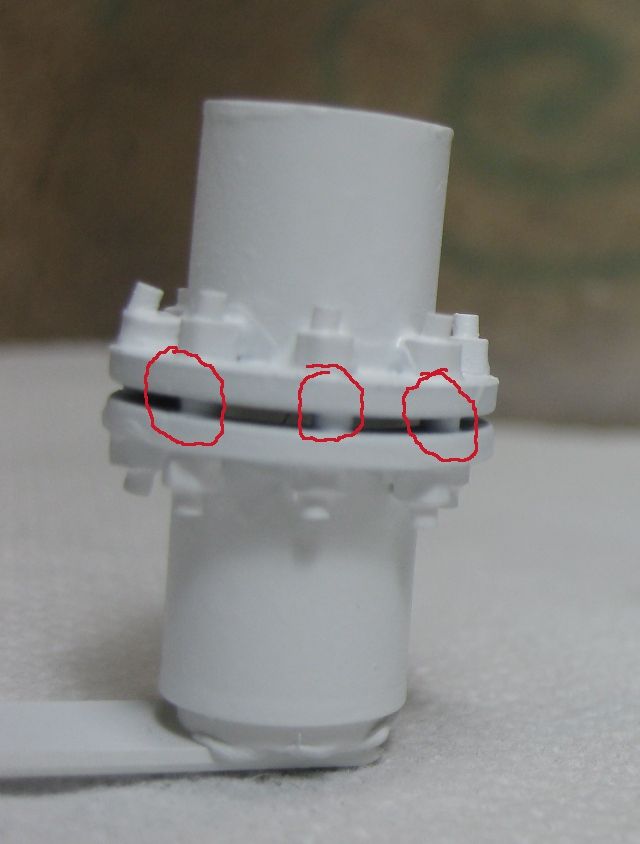
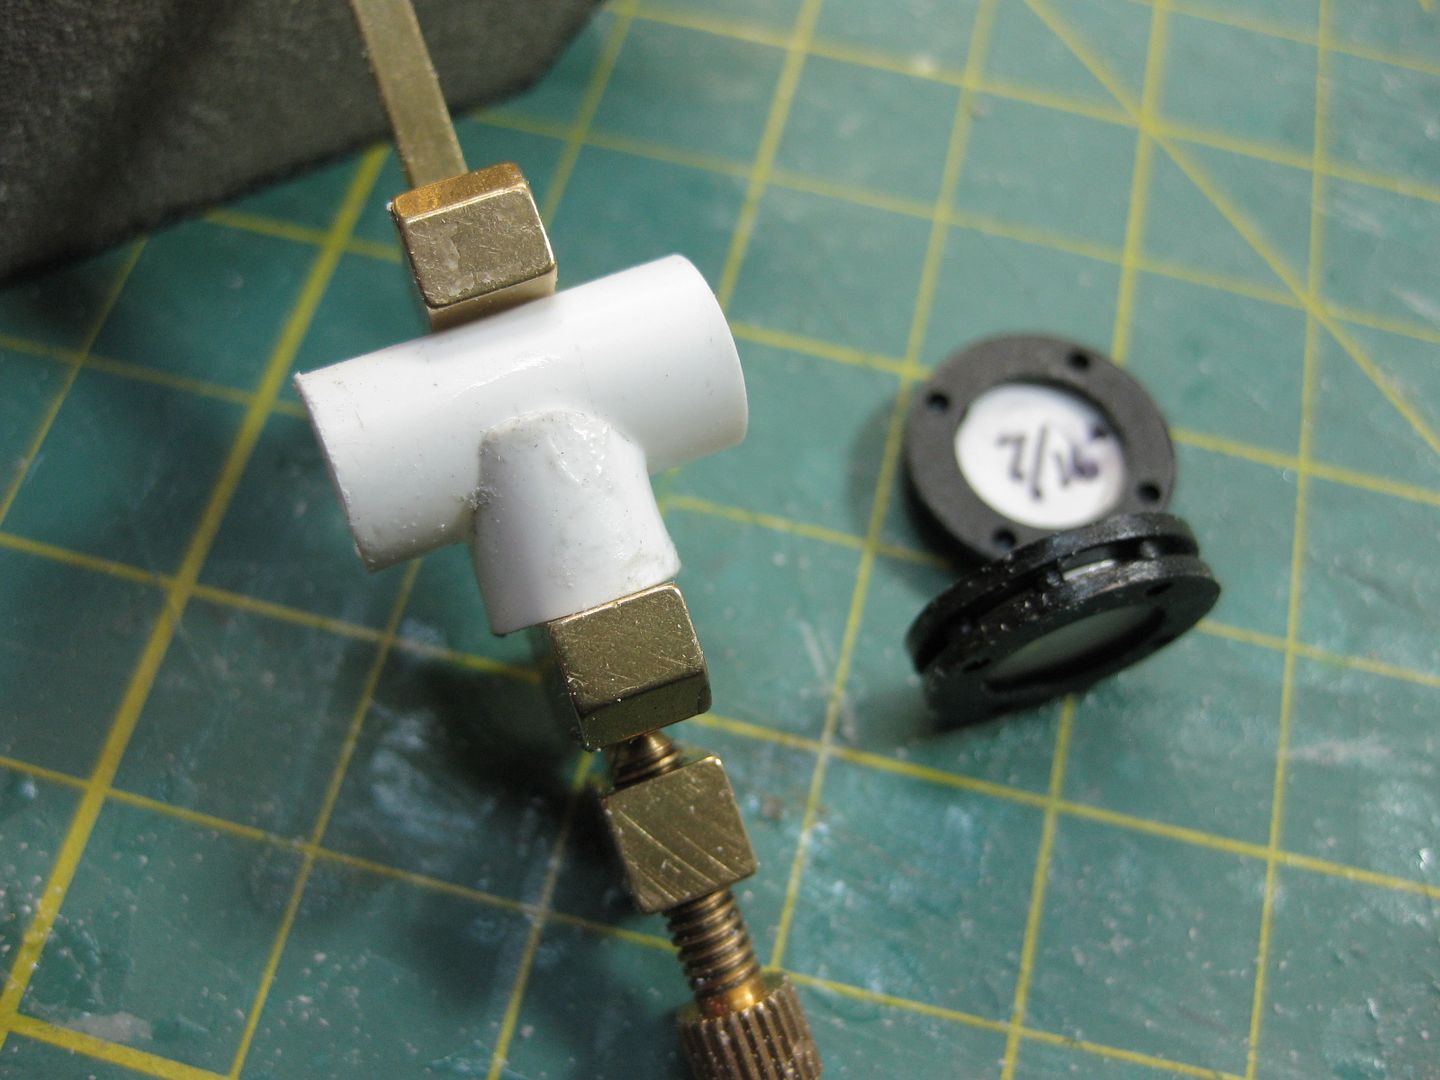
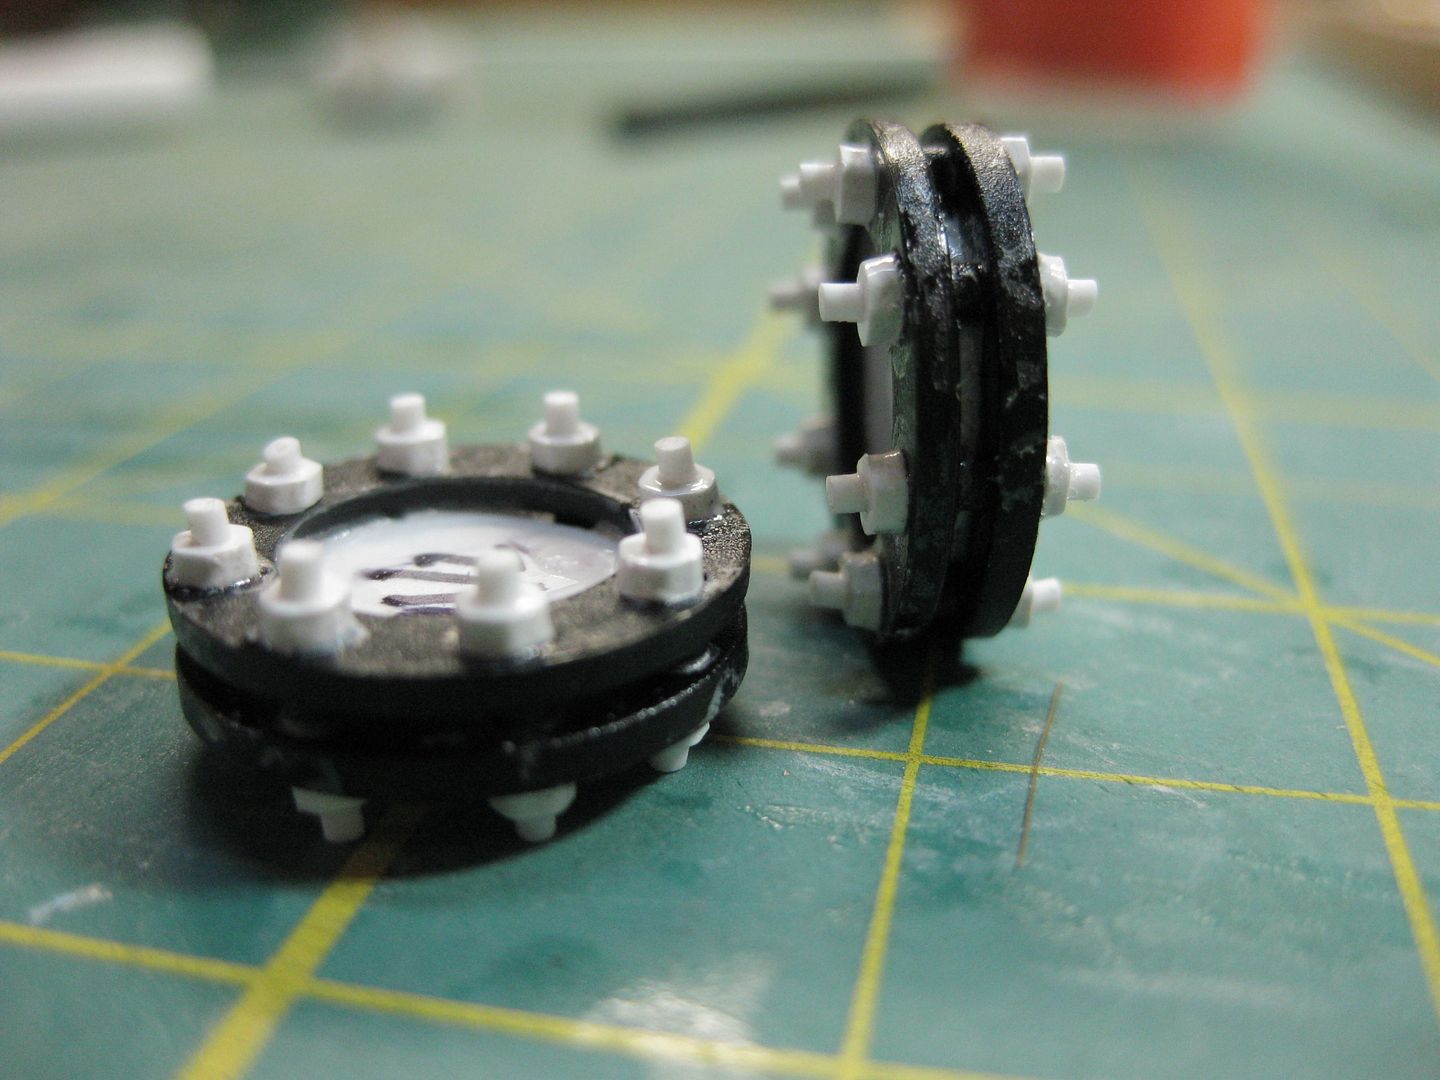
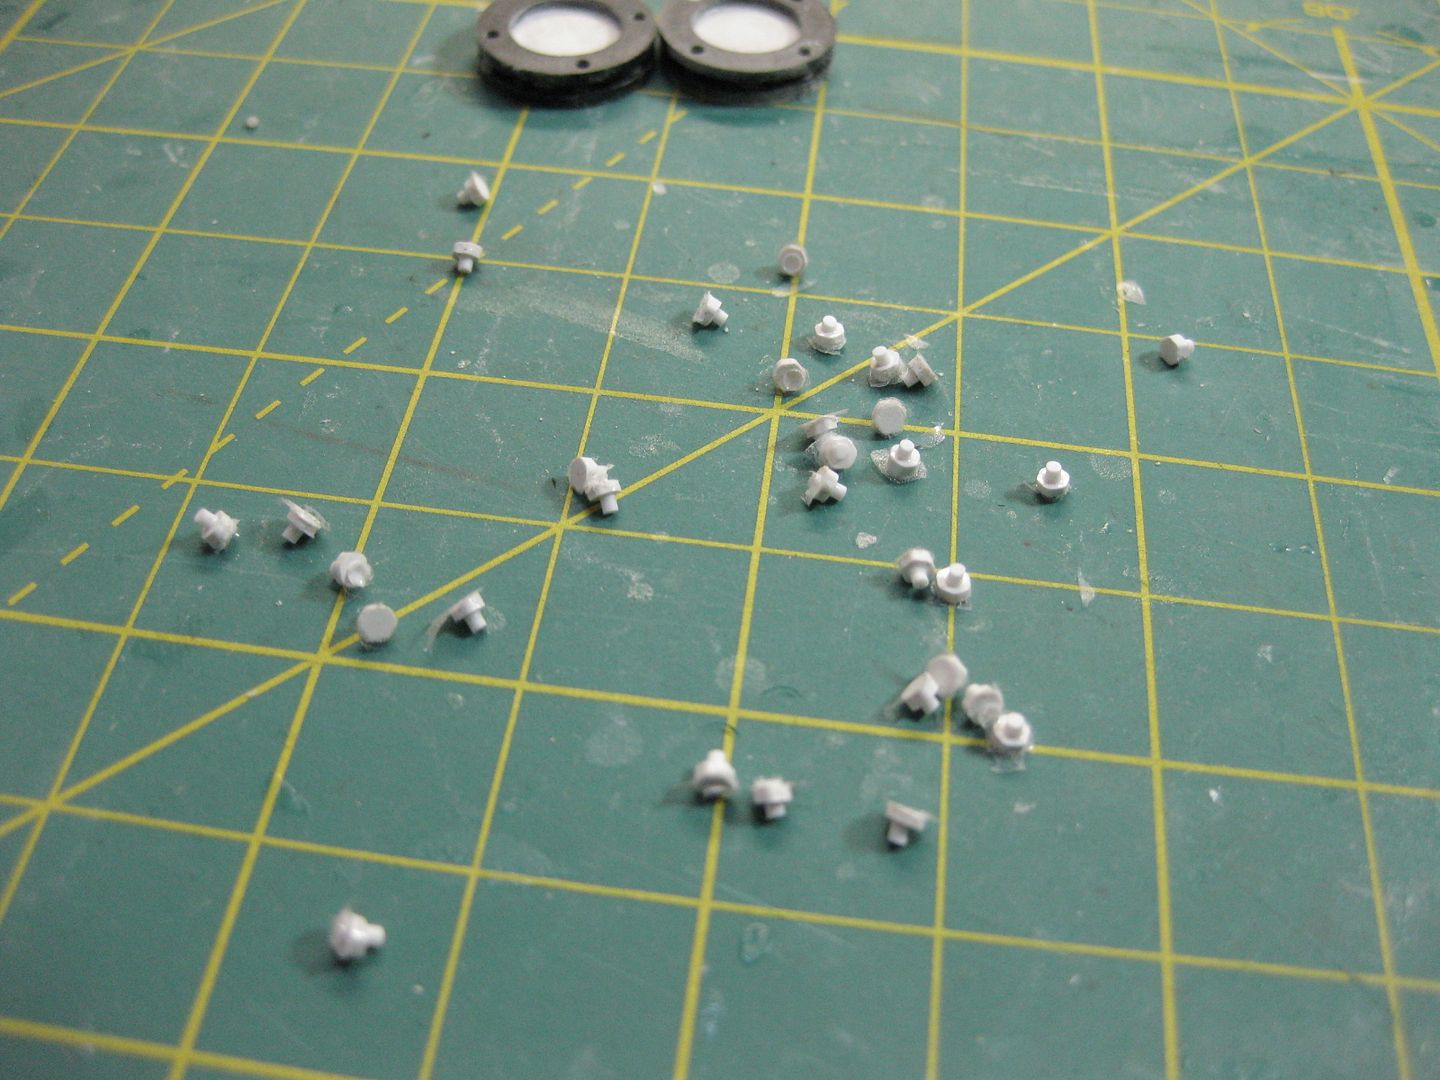
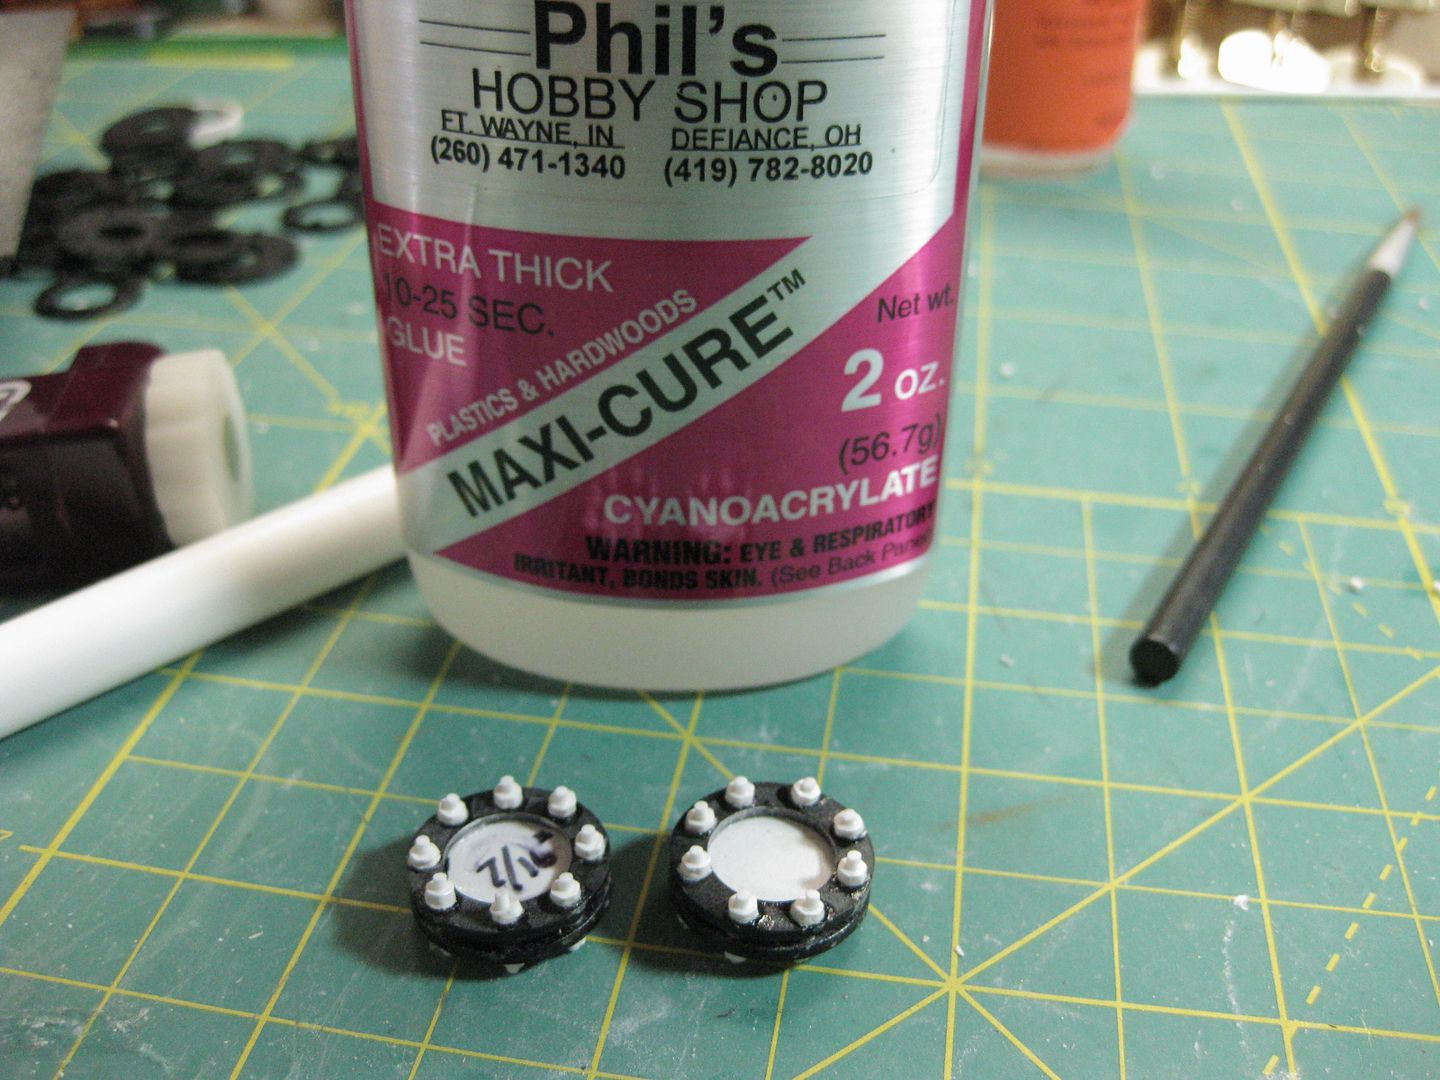
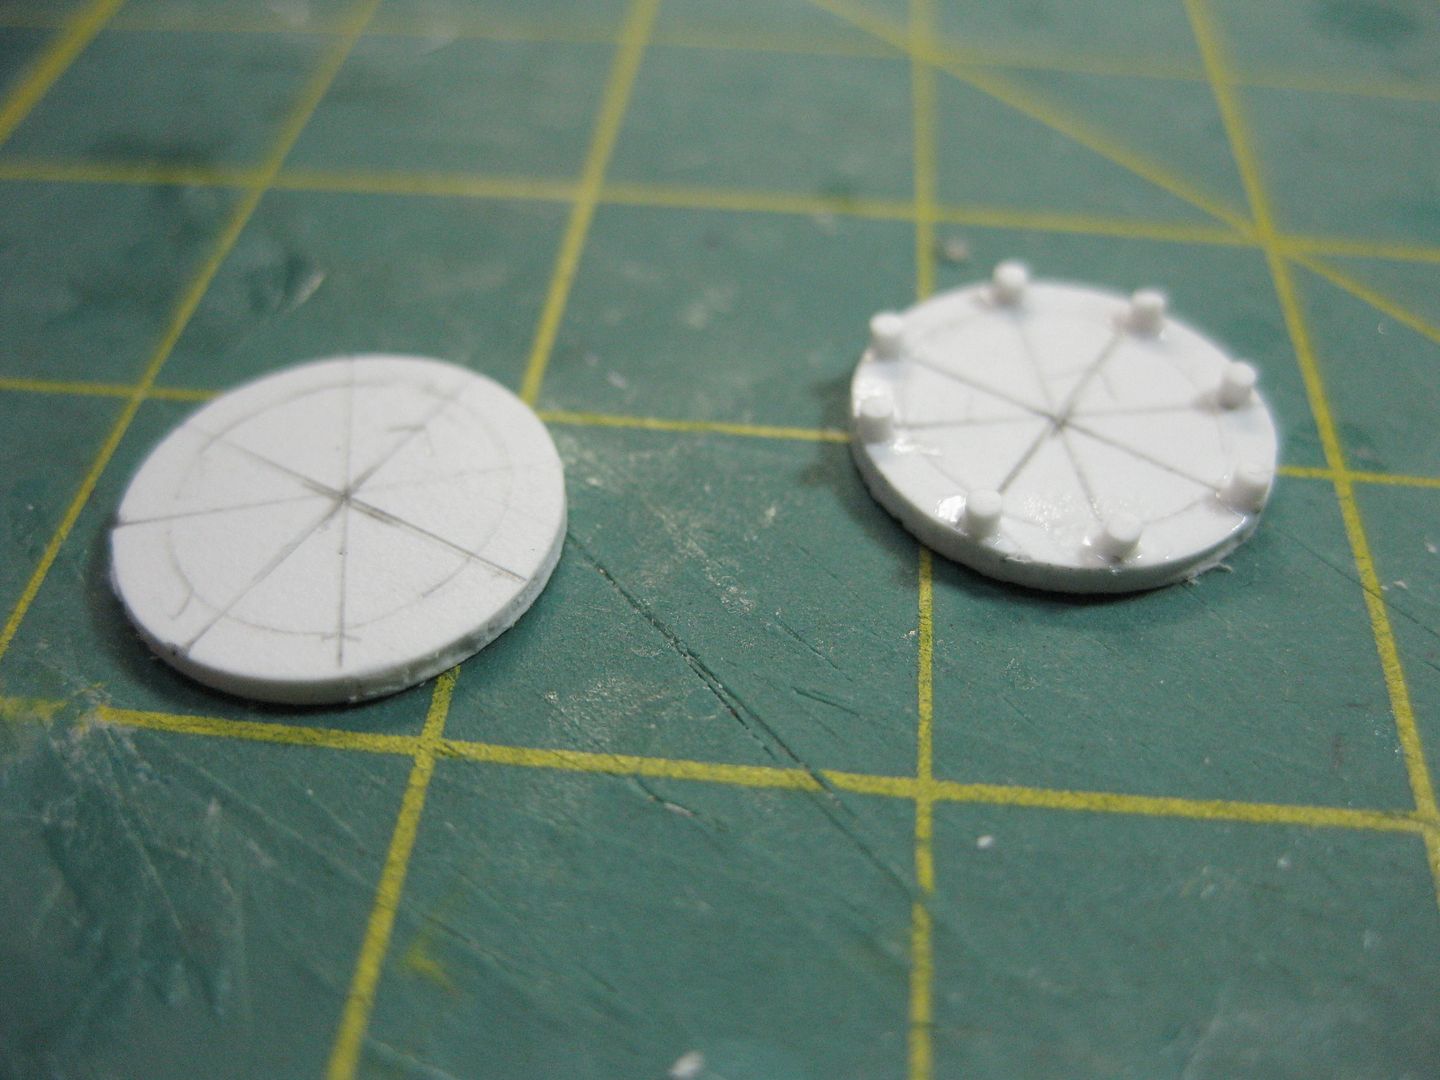
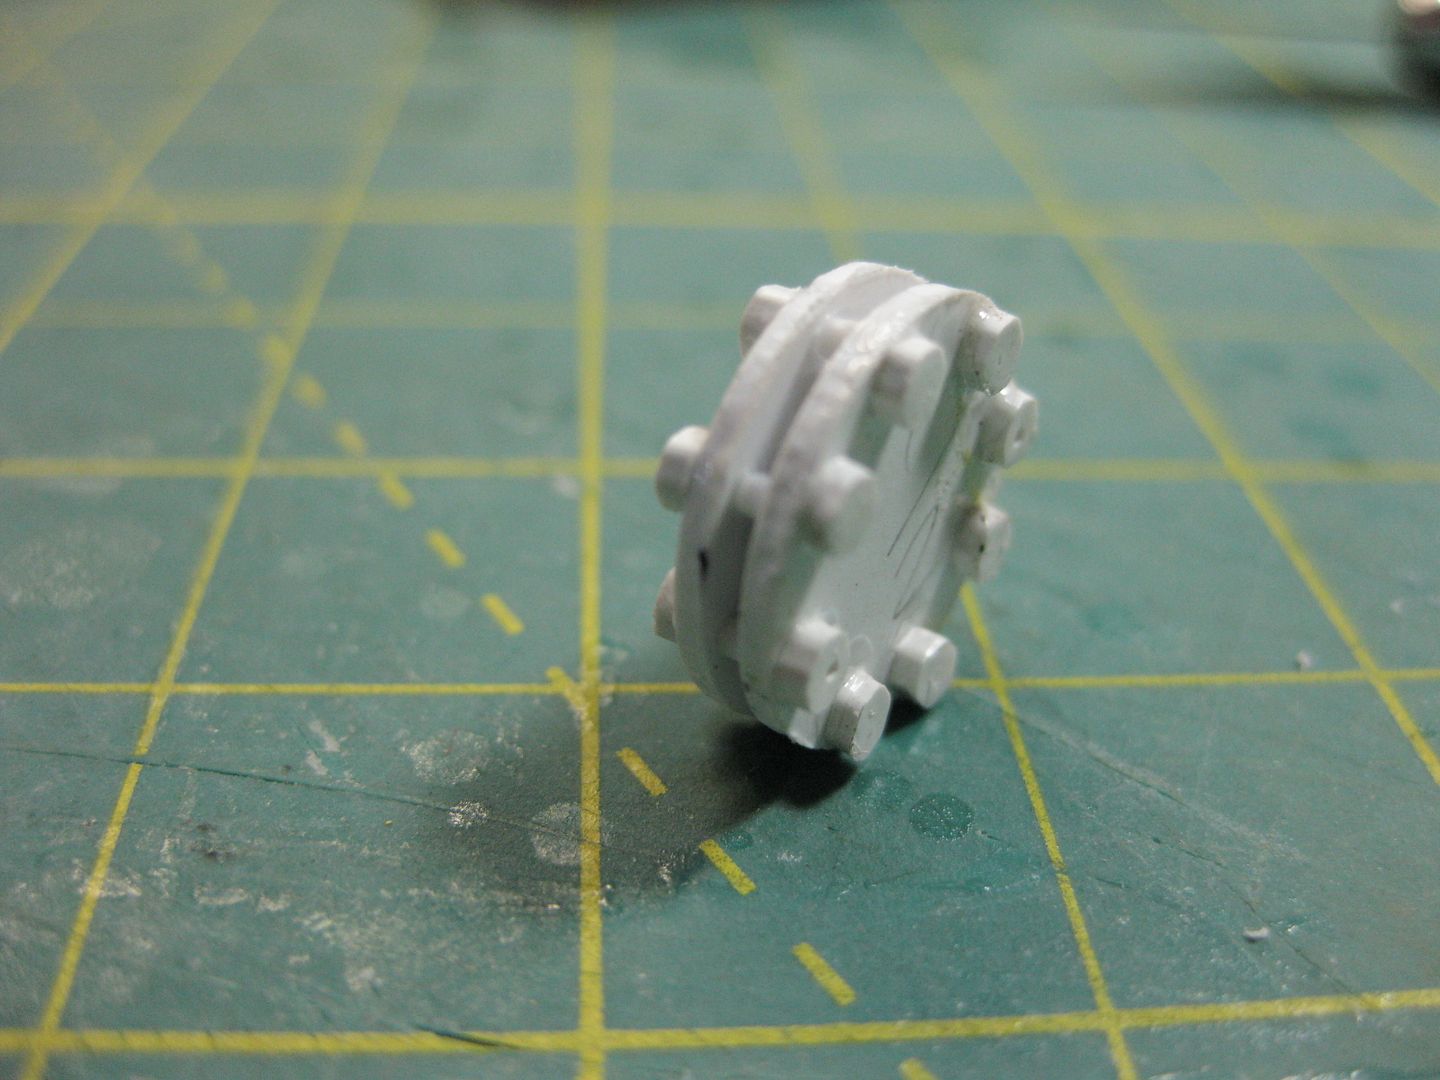
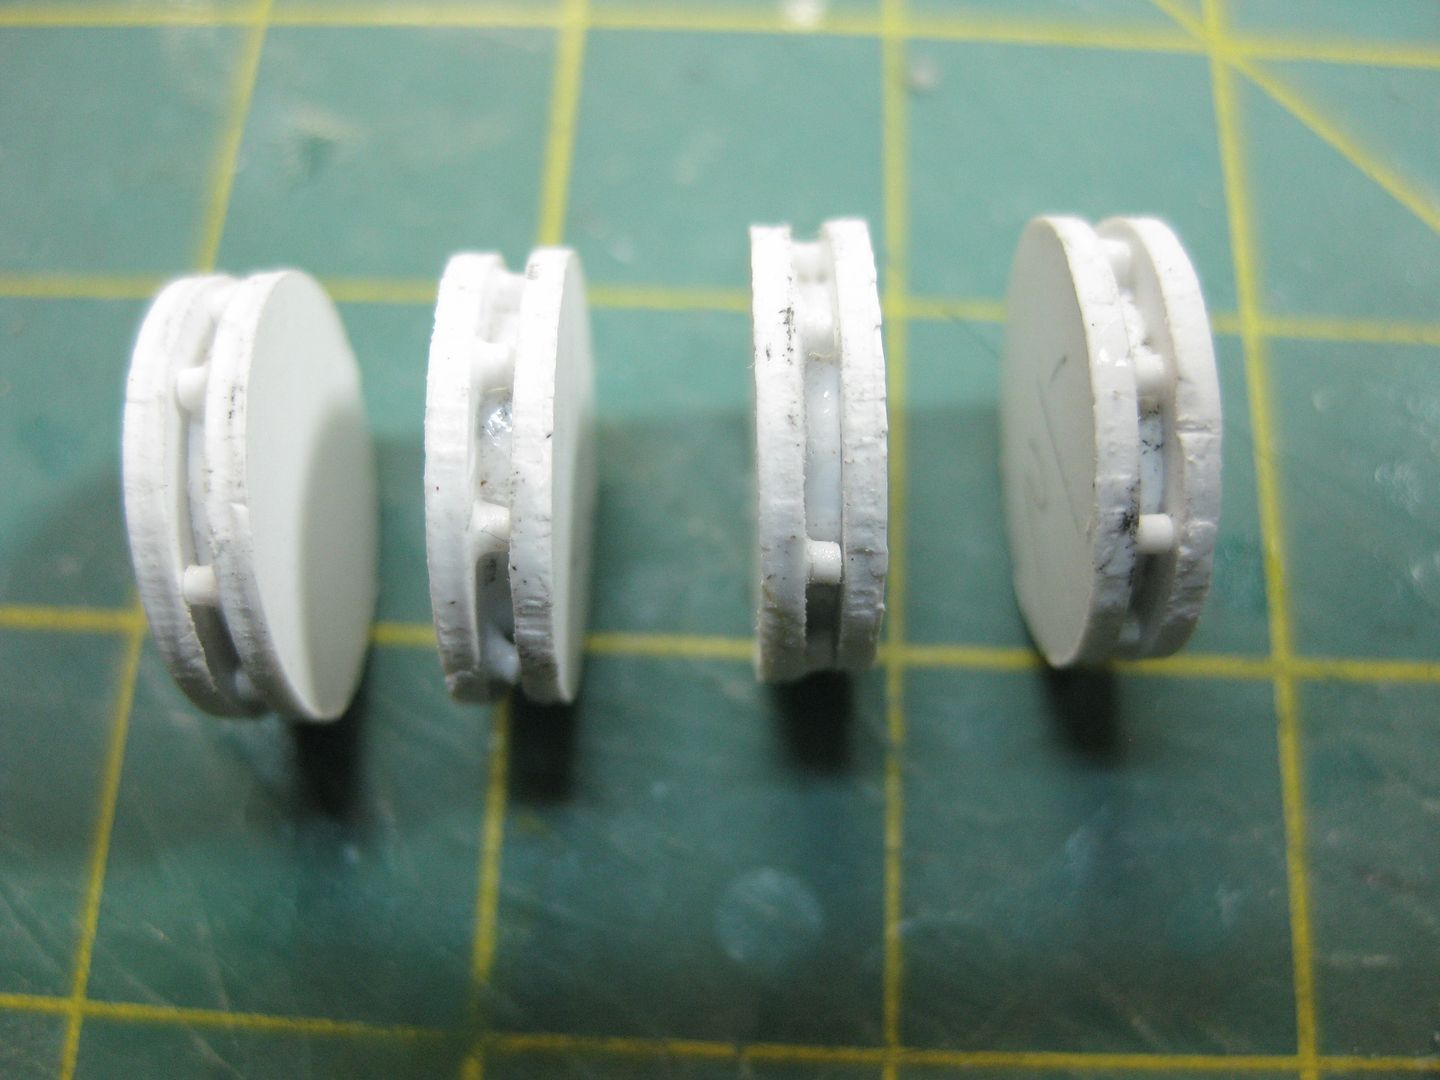
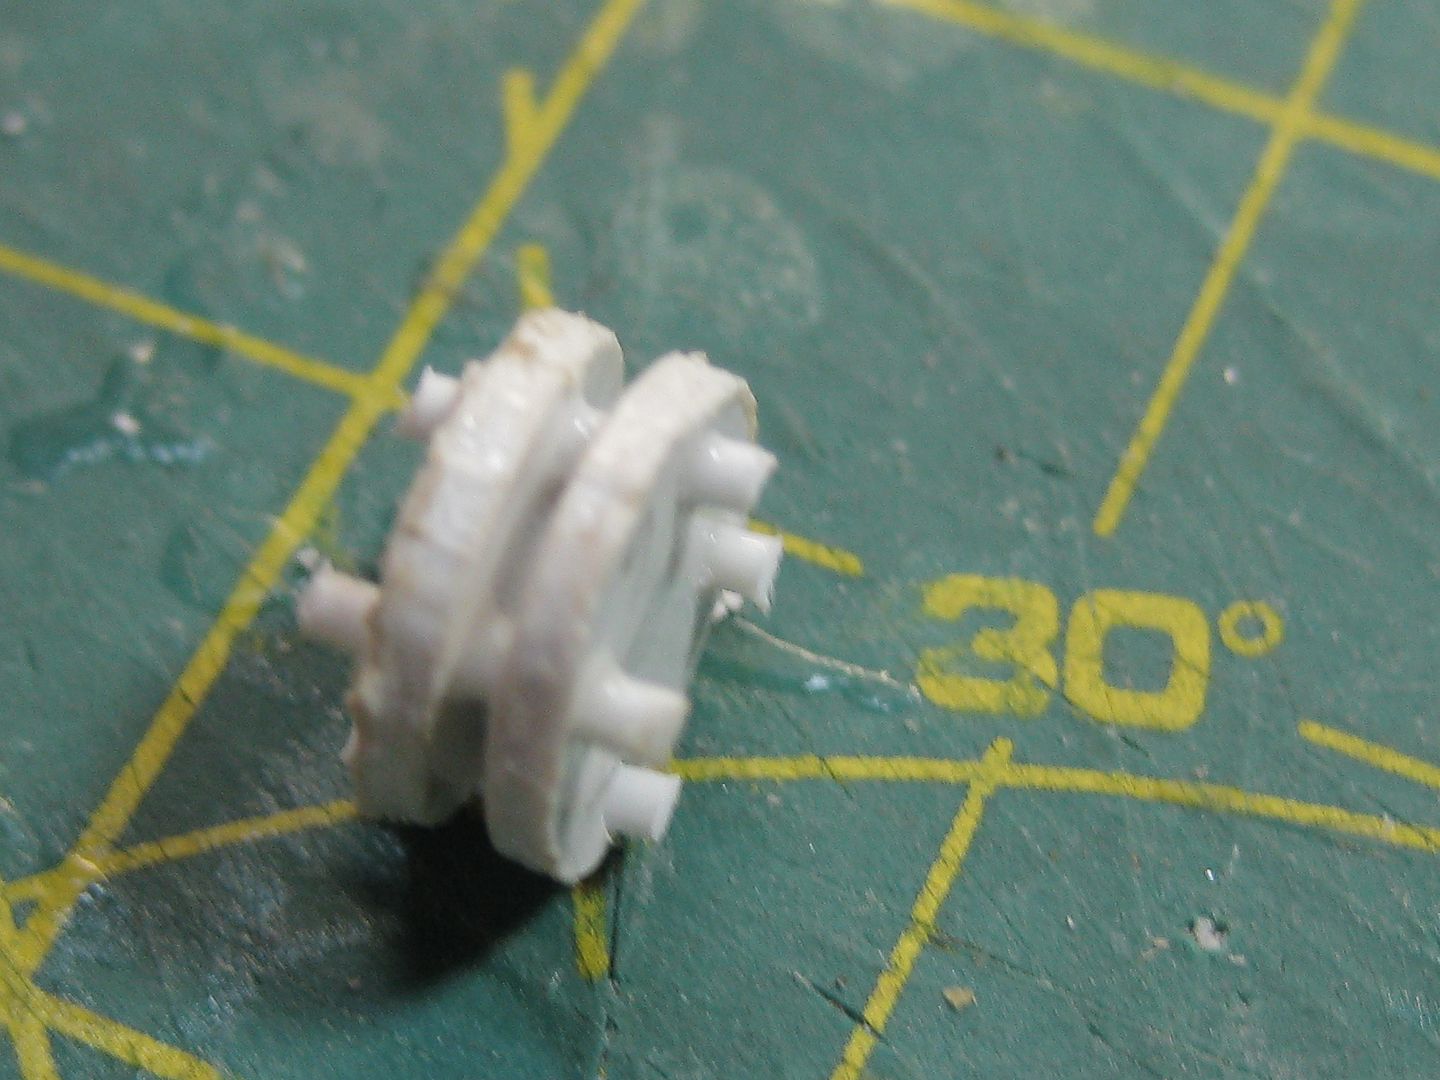
Flange Test 1
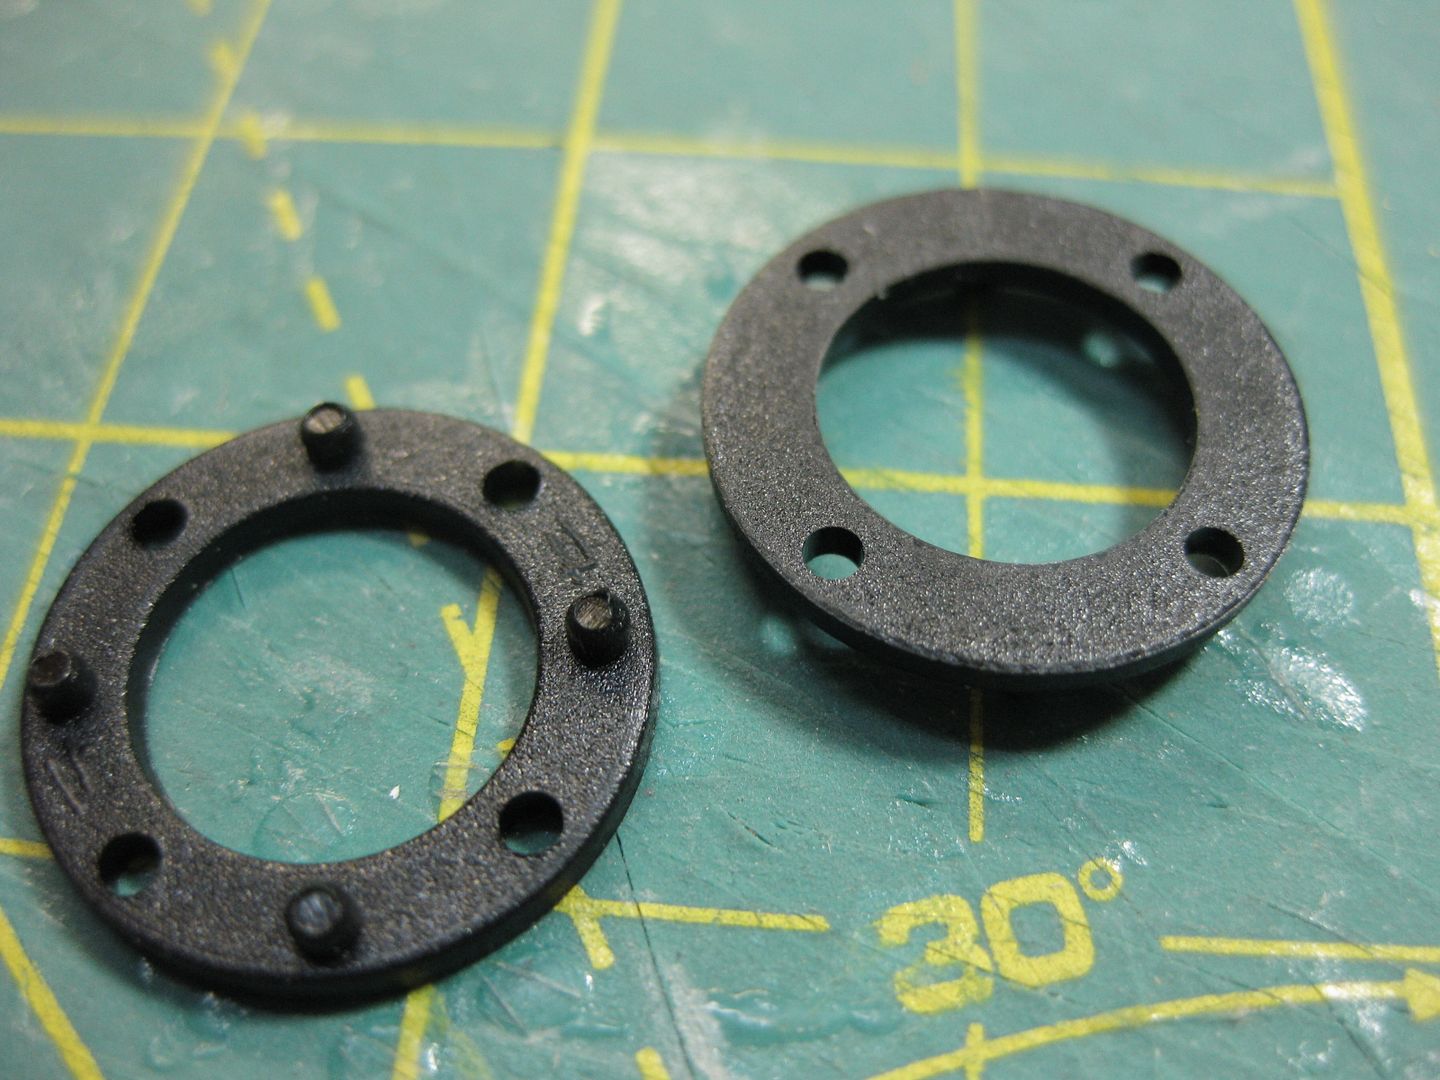
These are spacers that came with some cable-locks for laptops and other such devices
Notice the offset studs (rivets) and holes?
Believe it or not, I do NOT have any 10mm tube, so this plastic clicker from an old inkpen is doing the job for the moment.
You continue to amaze, DST! These are unbelievable! You should certainly figure out a way to mass produce these!
monkeytroll wrote:Would a one-piece mold work for a vertically placed pipe, flat 'underside' of the flange being the top of the resin when poured? Kind of a T shape.
Monkeytroll's idea got a little lost, but I think it's a good one. For the concept pic that you showed, you wouldn't need 3D pipes, just half of one. If you go with the general concensus of split it in half and cast it, I think you should keep that idea in mind.
If he thinks that it can be done, then I can always make the master in that way. But if I were to cast two halves lengthwise, it will look completely stupid if the two casts are not symmetrical, including the rivets/bolts. Everything would need to line up properly.
dsteingass wrote:I am the design studio.
Galorn is the mold-maker.
If he thinks that it can be done, then I can always make the master in that way. But if I were to cast two halves lengthwise, it will look completely stupid if the two casts are not symmetrical, including the rivets/bolts. Everything would need to line up properly.
M0rdain wrote:I was assuming that they were meaning to split it like -| |-
I thing Mord has it. Think of two top hats. "final assembly" would be glued Brim to Brim.
I have just had, possibly the greatest brainwave ever....
1: Where did you get those? And are they available in bulk?
2: How do they fit together, do they "snap" together, or did you need glue?
3: Do you think it would be possible to make it so that each flanged joint is actually a joint that can be seperated? Possibly by using magnets?
Because the idea I had, if it is possible, you could make a variety of pipe spools and put them together in a different way each game, make the whole thing modular.
Besides, the denizens of the underhive could be expected to have to had to replace nearly everything, so by Tibbsey's observation that they are mainly used for that i think there should be a flange every 1.5 inch......
Automatically Appended Next Post: I know nothing of pipefitting but I don't think that Tibbsey should be thinking of pipe all day at work.....
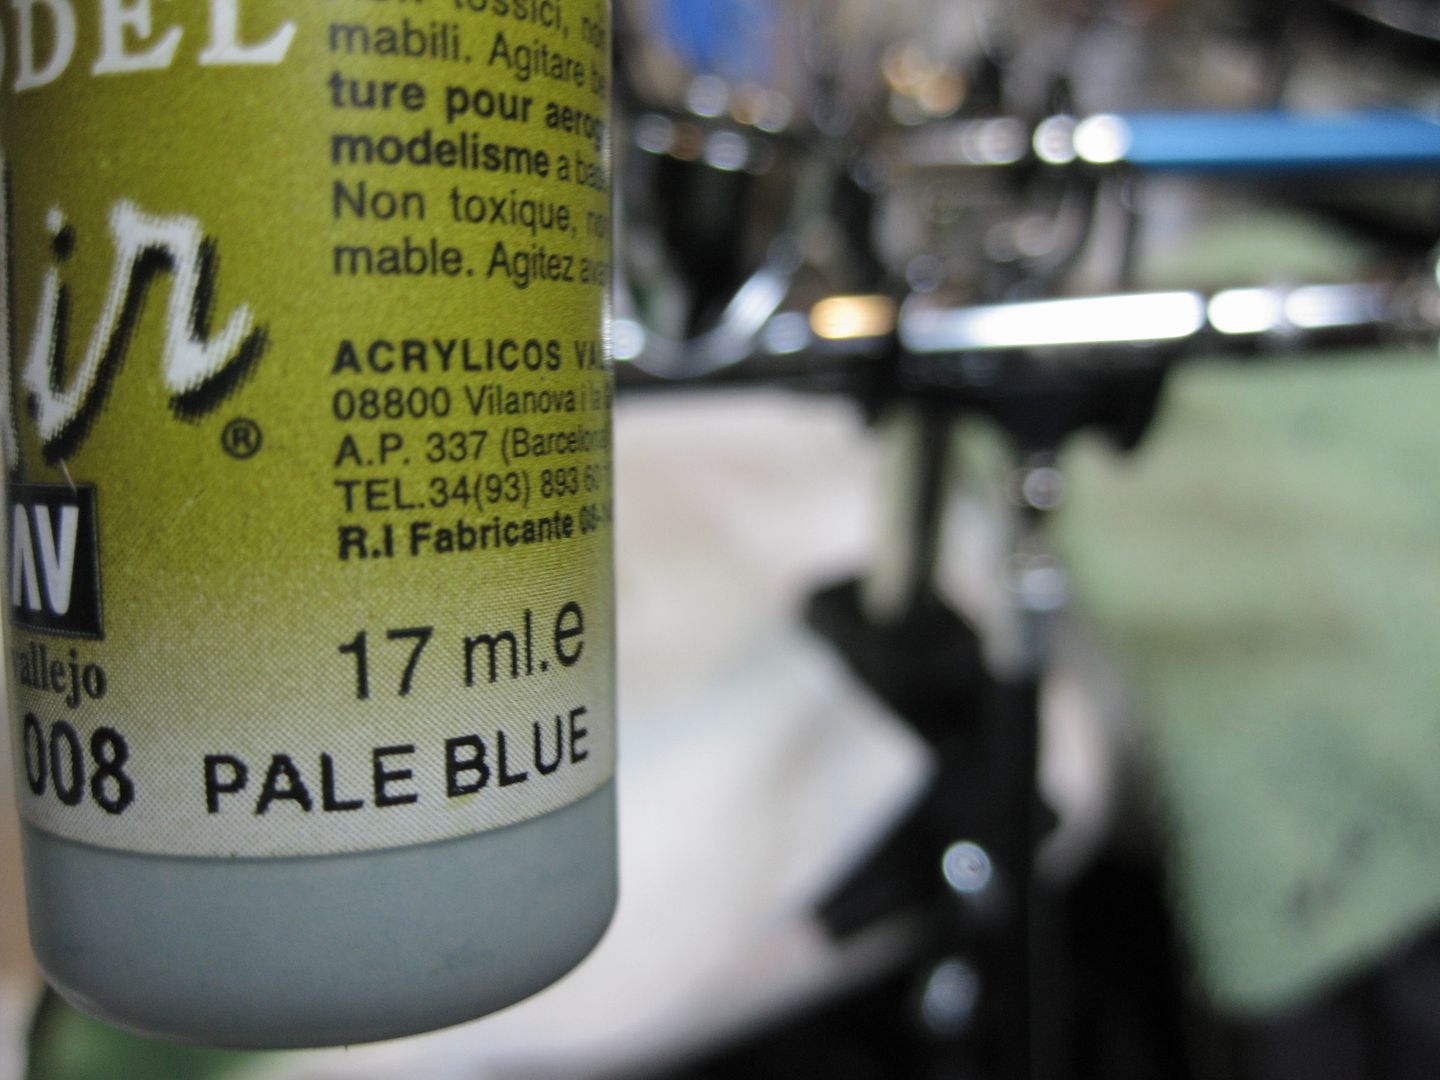
And the Vallejo airbrush primer was not very expensive at all, I also bought some smaller bottles of the primer in German Grunbraun, German Dunkelgelb, and grey.
I only used a few drops of the white primer in my airbrush, and that was enough to prime the pipe AND I had enough left to prime the Finecast Lord Commissar you see there too.
So I will most likely never buy another rattlecan of primer, since in theory, that big bottle should last me a long time.
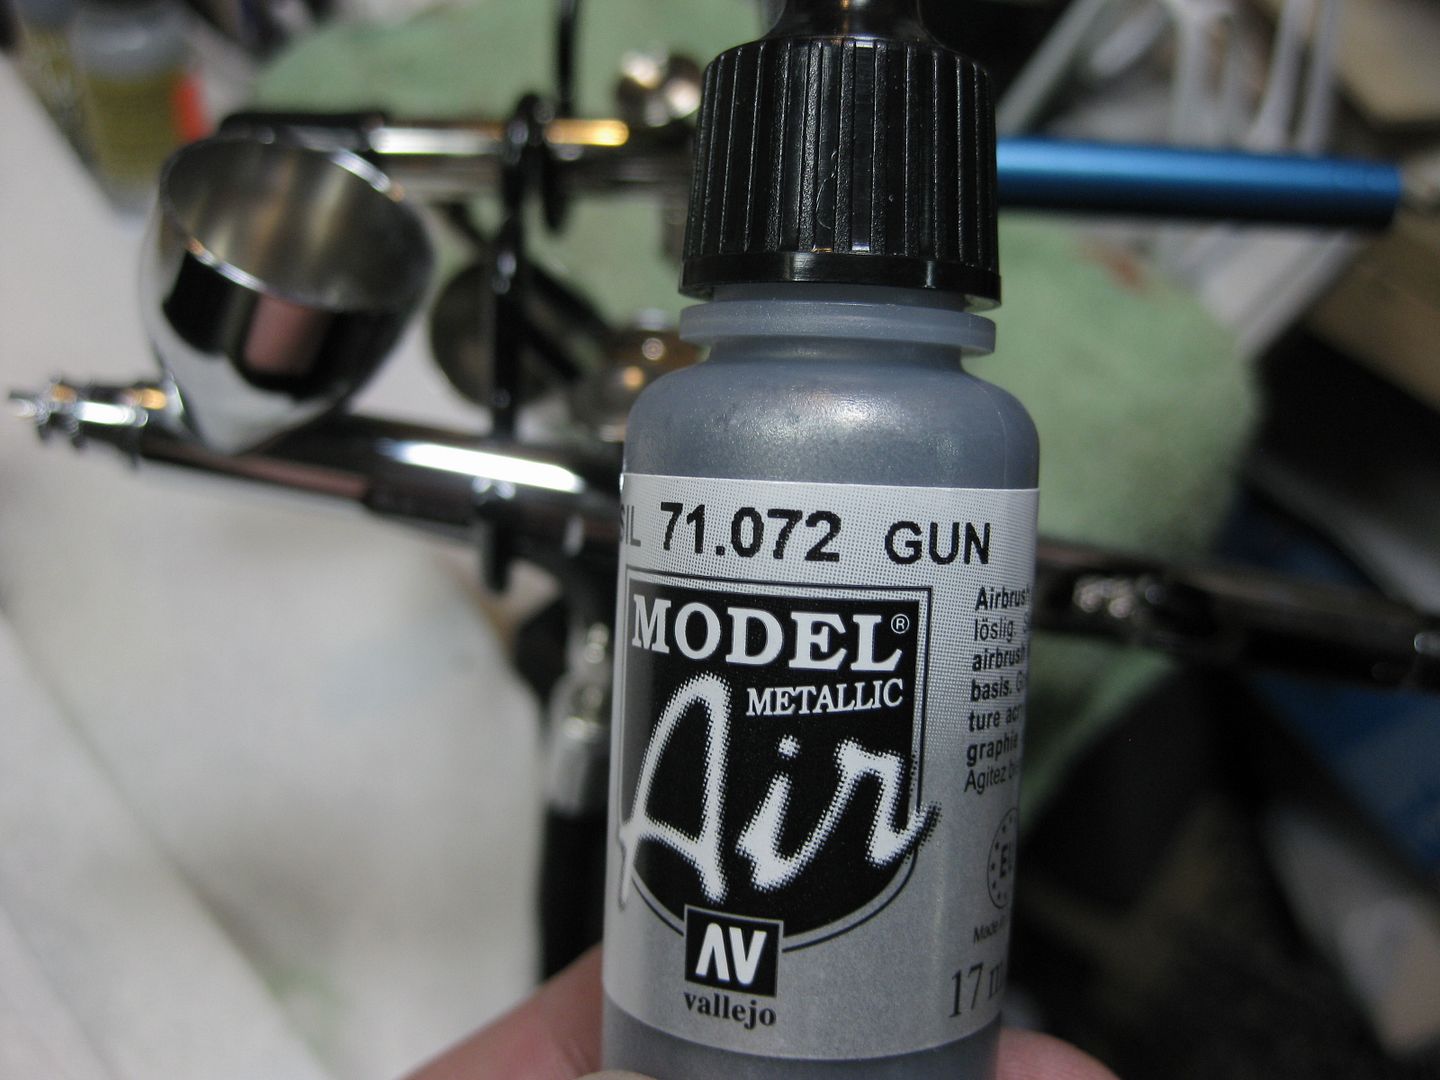
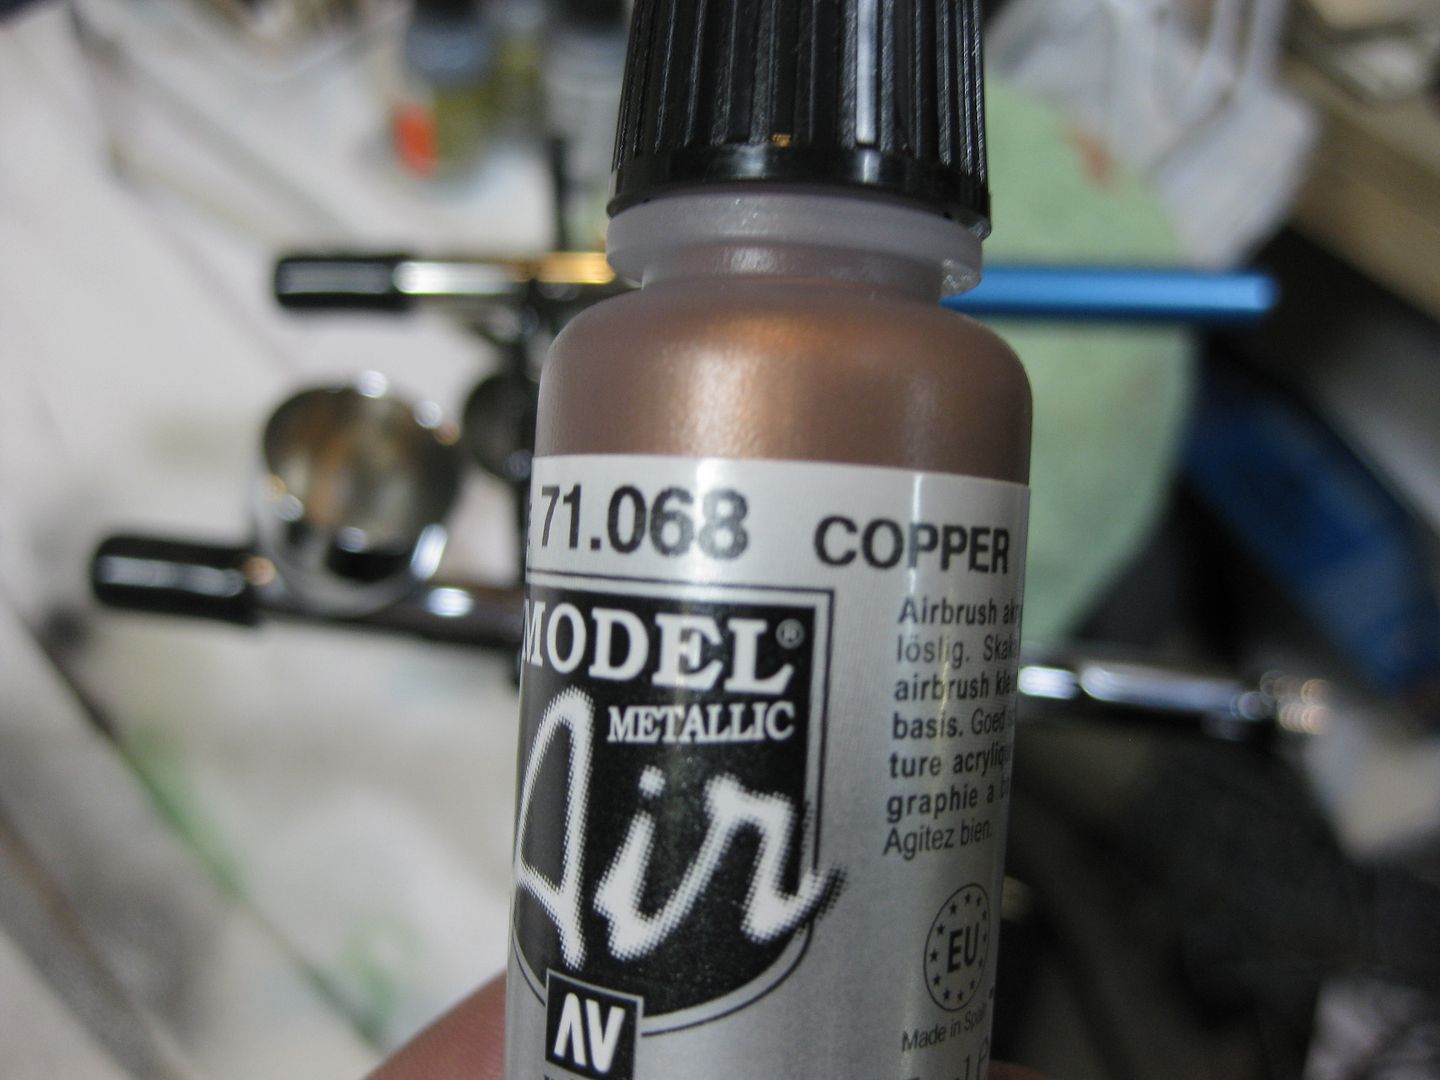
I am contemplating just investing in the entire line of 72 Vallejo Airbrush paints. I am ordering their metallic set, and I am very anxious to use them. from their website:
"The formula contains a new acrylic resin with properties until now impossible to obtain in a waterbased acrylic. The resistence, hardness and covering power of Model Air is superior to any known acrylic for airbrushing."
Automatically Appended Next Post:
Tibbsy wrote:
1: Where did you get those? And are they available in bulk?.
From an old box of unused cable locks for laptops, no they are not
Tibbsy wrote:
2: How do they fit together, do they "snap" together, or did you need glue?
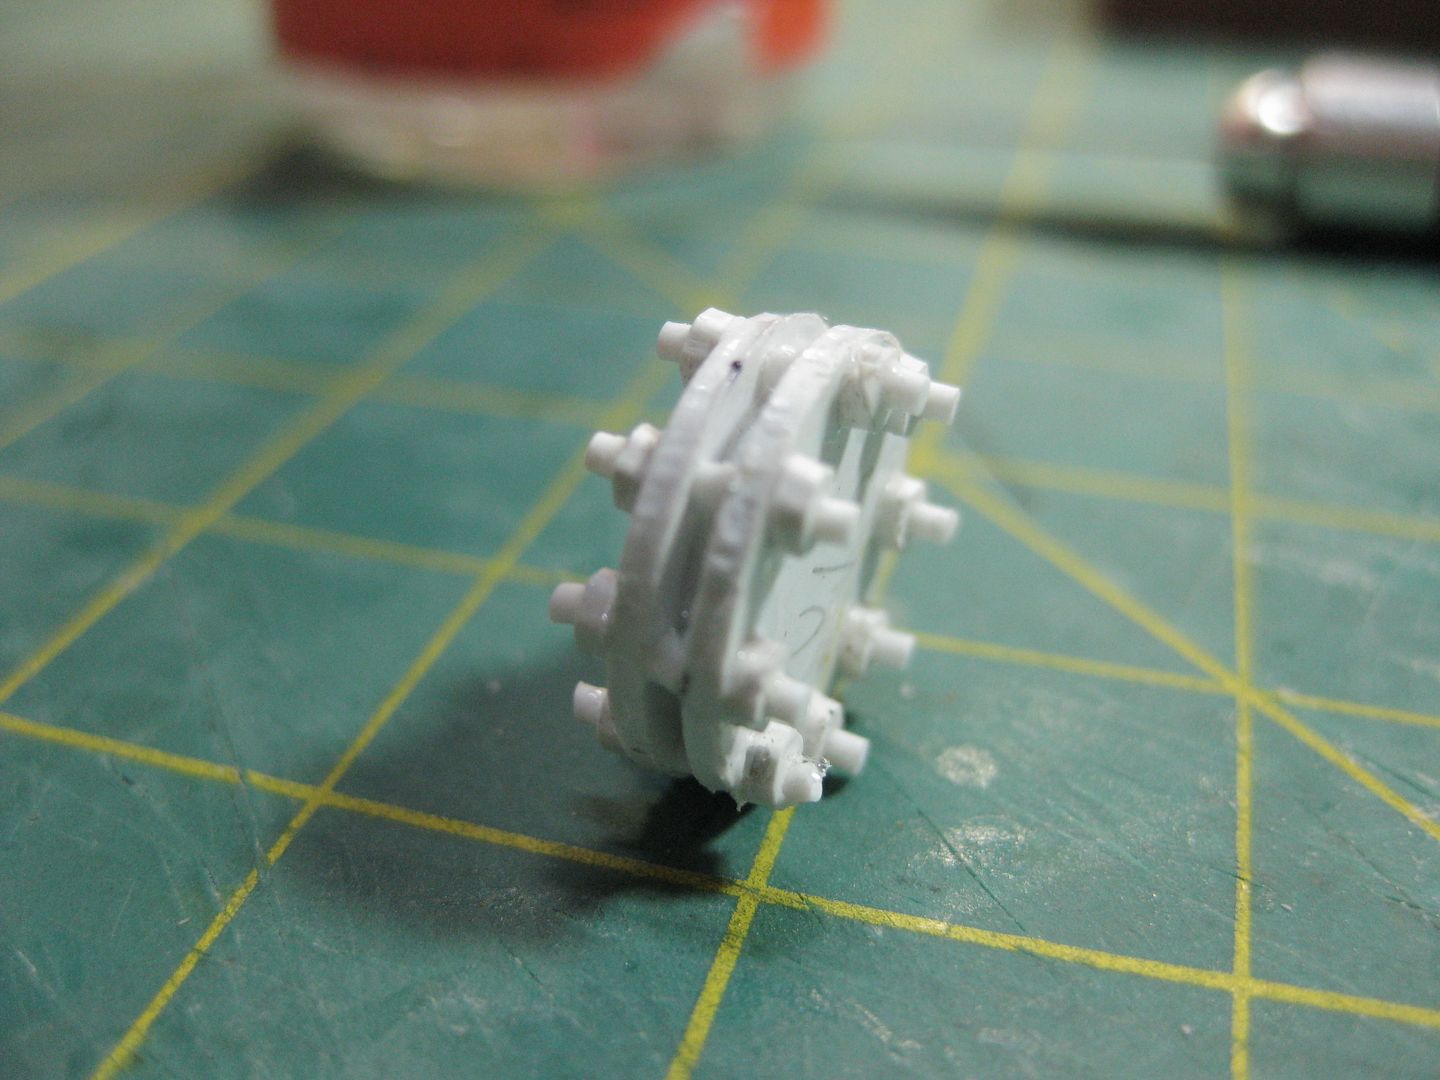
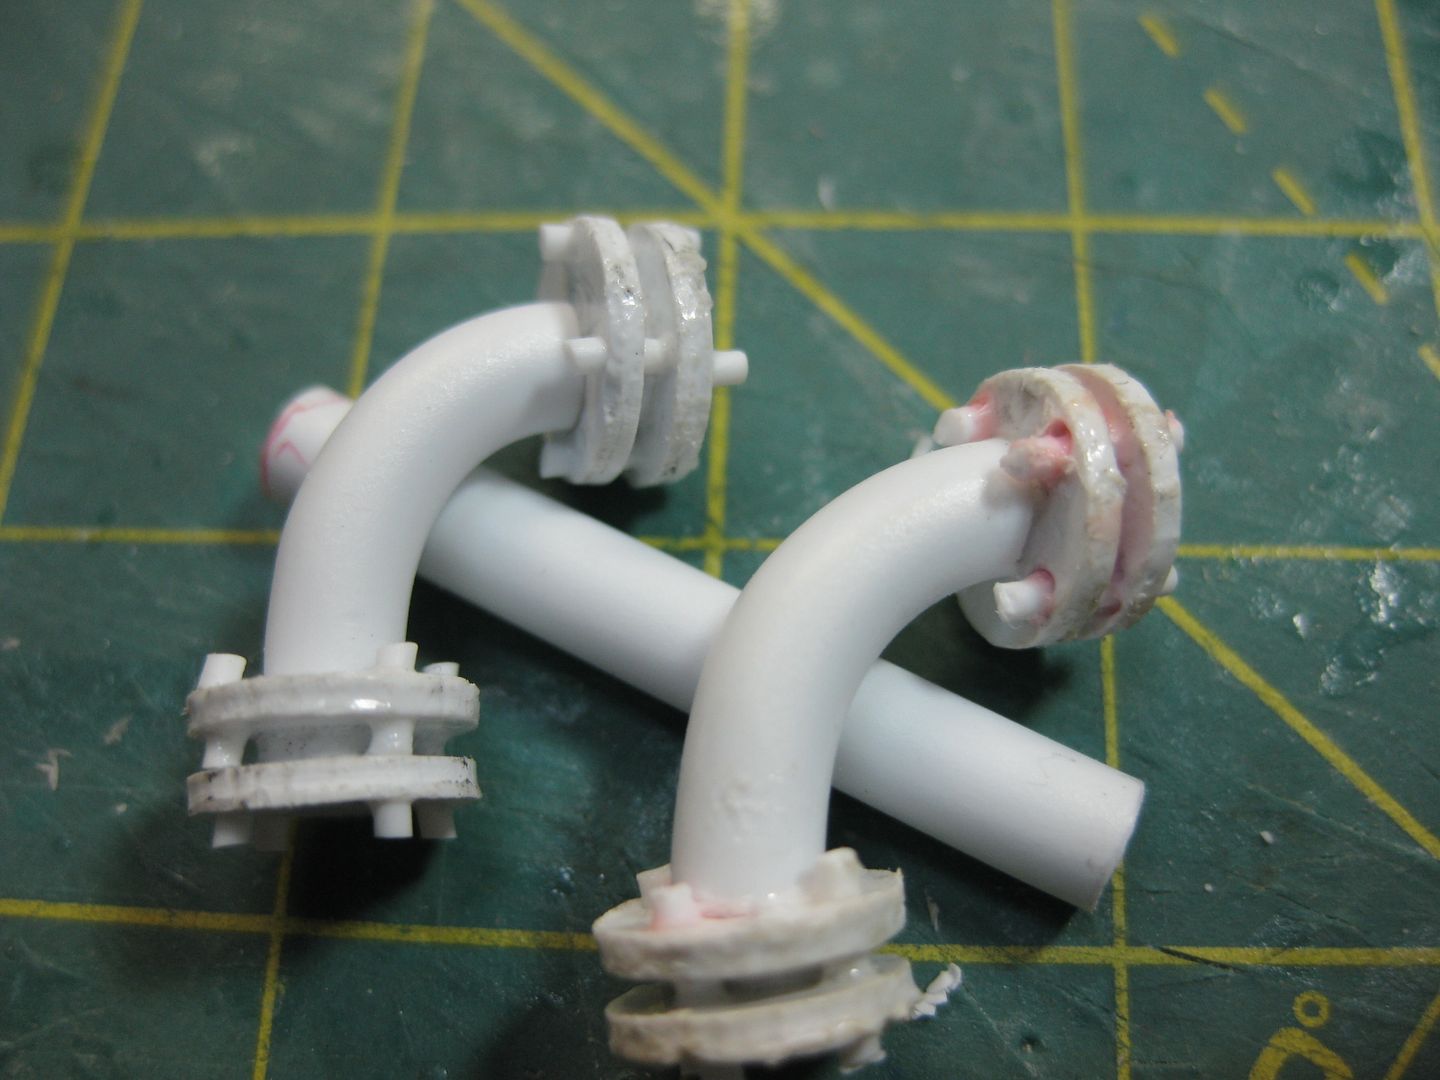
Look at the pic, they have offset studs and holes, they snap together tightly, but to retain the look of the bolts between flanges, I did not snap them together tightly, I left a gap. I did not glue the two halves together, when I brushed on glue for the bolts, capillary action glued them together in the holes I covered up with bolts.
Tibbsy wrote:
3: Do you think it would be possible to make it so that each flanged joint is actually a joint that can be seperated? Possibly by using magnets?
That is entirely possible, but probably prohibitively expensive.
Tibbsy wrote:
Because the idea I had, if it is possible, you could make a variety of pipe spools and put them together in a different way each game, make the whole thing modular.
Sure, but everything would really need to be made of injection molded ABS plastic (like LEGO) , so that the constant pressure of fitting and unfitting the parts would not warp/maul anything. Also, that type of action would quickly wear any paint off, so it would quickly look like crap, unless the color was also molded in the ABS.
I use vallejo airbrush paints all the time, though I can't seem to find their air primers (I can get the regular primers though). Just don't try to dilute them with alcohol, the pigments will precipitate out.
I think the airbrush surface primer often gets mis-categorized on websites, since the label of the bottle does not specify "for airbrush", yet the instructions state to apply directly with airbrush.
Automatically Appended Next Post:
M0rdain wrote:I was assuming that they were meaning to split it like -| |-
But it's not flat, there are the little bolts in-between, they would need cut precisely so that when two were butted up against each other, the bolts line up. any deviation, and it will look wrong.
Everybody is talking about casting, and that is great, but unless a system of interchangeable pipes like this is 100% precise, it WILL NOT work!
So, let's not get ahead of ourselves yet. THIS WAS JUST A TEST PIECE!!!!
It will NOT get a mold made of it, it will NOT be used for anything other than junk or rubble. I would be completely embarrased to have this piece in production and have my name tied to it as-is. I was in a hurry to test a concept and therefore nothing is straight on it.
Well, you're right Dave, it looks like gak! I know it was done fast and furious. You even said the bolts were wonky, but it does look pretty good! If you re-did it and got the bolts on straight, I think it would be a good thing to mass-produce!
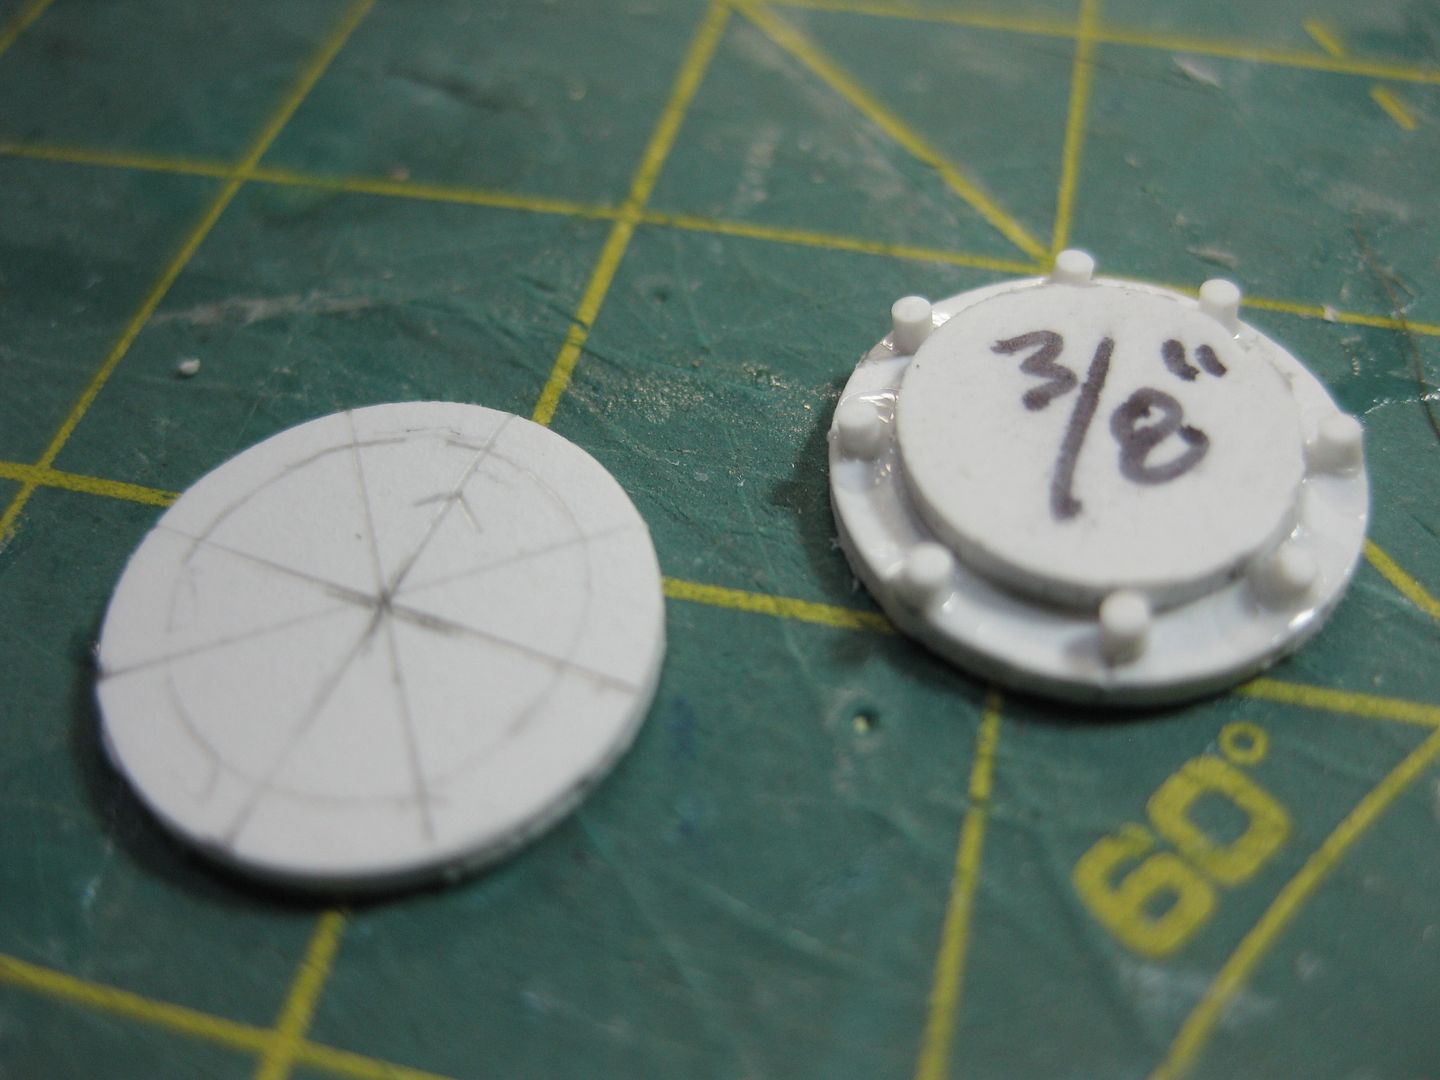
Also, if these are going to be the "fittings" , then the pipe you need in general would be smaller, right? What is the Inside Diameter of the fitting? Do you have pipes in that size?
Inside diameter of the flanges is 10mm. Trust me, I want to get out of work and go get some 10mm tube more than you guys want me to I can make flanges of any size, but I need some sort of punch or tap tool do do so.
Well, the physics of plumbing would not change even in the Grimdark. Bolts and pipes would all still need to be identical.
It is really not that big of a deal or difficult at all to make everything nice and straight and looking proper on future pipes.
(I am wishing that I would not have even posted these goddamn pics now).
It's fethed up, and I don't like it.
I'm wondering if these tools would work on plasticard?
If they work on metal, they should not cause any problems with plastic right?
I am expecting to hit it with a hammer and perfect. identical disks pop out right?
They'll work. Probably work best if you had a thick piece of plastic to punch down into (I mean below the styrene sheet your using for your buildings). A soft-plastic cutting board or something.
might i add a few of my own expieriences with these tools?
if you use the hammer methode... it is pretty loud and it is more energy wasting then productive in my opinion...done that for larger diameters...and the pressure due to a hammer induced punch is not better than that of a real holepunch... if you would be able to get yourself a holepunch with a diameter that big i would suggest getting that... i used these old metal punches too..and it was crappy...and you get very tired just after a few of them...depends of course in which bulks you wnat to make those discs... if you only need two or three at once...fair game...20...not my modus operandi here...and i wouldn´t recommend this... isn´t there an option to get lots of cheap discs made of plastic somehwre for a whole different use? sometimes the industry makes stuff for other uses and we hobbists can benefit from that "missuse"...
I don't think hole punches come in any size bigger than 10mm (3/8"). I wouldn't know where to start even looking for them Vik...This whole thing is frustrating. I have a huge pile of styrene, and I have no idea how to make simple fething discs. They make a set of those punches with a drill-bit end for mounting in a drill press. Feth I dunno.
Yep Jake, I saw that, backordered of course online. Perhaps I'll take the drive across town to their store and see if I can be disappointed further today
You know you can call them up....but then again, I've called them before, and they told me they had the item I wanted, only to get there and the person I was talking to on the phone was looking at the wrong part on the computer...so....good luck!
heck...why not make your own casted discs the diameter you want them to be? you could make your own mould...it is the simplest shape you could ask for...so there is little failure here...and it would be rather a flat mould too... it is just this one structure that is holding you down... so make a mould with like...20 discs in one go and presto! probelm solved and you also get new expierience...
and thse big punchsets... hobby or hardwarestore... and this is too the place i woul look for any stuff of that shape too... maybe in the plumnering department you coudl get seals or stuff like that in that diameter...
Yeah, the people who work at Harbor Freight all seem to have the helpfulness and personality of a wet noodle in my experience.
@Vik, Sorry bro, but giving me a solution of "casting" isn't helping me at all if I can't make the master in the first place. Also I don't have any means of making any kind of mold whatsoever, nor do I have any interest/intent in making molds.
hmmmm...make a big searching through your household...maybe you have some shotglasses or buttons that could be used for that purpose...or...you get to the 25mmm diameter standard and use bases for the moldmaking process...
and aren´t peeps at a hardewareshop always some wierd fellas??? no i tell a lie here... the chap that works at the woodcutting desk is a very fine exception of the rule...he understands me and tries to be a true problemsolver...but when i go to screws or gluesection..the guys/ladies are just dorks...even the ladies..heck they are even bigger ones^^
I'm sorry everyone, if I seem annoyed and short, but the whole "you should cast that/those" is a great idea, but it takes more thought and planning than that in reality. I can't just pull a magic RTV mold out of my ass on command.
Automatically Appended Next Post: Trust e Vik, I was all over the damn house last night with ruler in hand, looking for any kind of tube at all that was 10mm, that little damn pen clicker bit is the only thing I could find.
lol...i had these manic search session too...^^ maybe i can come up with something later... sometimes there is another obvious solution...and yep... you are of course right...casting is not the end of all problems...more of a different start for new ones^^
dsteingass wrote:I'm sorry everyone, if I seem annoyed and short, but the whole "you should cast that/those" is a great idea, but it takes more thought and planning than that in reality. I can't just pull a magic RTV mold out of my ass on command.
But I can... (heh)
dsteingass wrote:
Automatically Appended Next Post: Trust me Vik, I was all over the damn house last night with ruler in hand, looking for any kind of tube at all that was 10mm, that little damn pen clicker bit is the only thing I could find.
Have you considered a "paper compass" that is used to cut circles of paper for srcapbooking such as this?
I've used one just like this to cut neoprene foam circles to use as WM/H templates.
Sorry if we push you sometimes Dave. But if my memory serves, we were trying to push you to do something else a few months ago, and even though we annoyed you alot, we got you to do it....I just don't remember what it was, and I don't want to go back 30 pages to find it.
Was it "More rivets" I think it might have been. And see where that lead us to?
In 3 months time, we might be following along as you build molds and cast your own stuff, and we will all be amazed! There may even be a "Leage of Extrodinary Mold Makers" in the future!
Viktor von Domm wrote:that might work with neoprene...but it is useless in my opinion on plastic card... i own one and i think it was a waste of money...
cut a template out of paper then drill out the inner circle. Use it to SLOWLY score the exterior. for Thin plasticard it should work fine (I used it to cut out the base tops for my necromunda gang.)
Automatically Appended Next Post:
RSJake wrote:Sorry if we push you sometimes Dave. But if my memory serves, we were trying to push you to do something else a few months ago, and even though we annoyed you alot, we got you to do it....I just don't remember what it was, and I don't want to go back 30 pages to find it.
Was it "More rivets" I think it might have been. And see where that lead us to?
In 3 months time, we might be following along as you build molds and cast your own stuff, and we will all be amazed! There may even be a "Leage of Extrodinary Mold Makers" in the future!
My wife bought a set of cantilevered circular and square hole punches that cames in 6 sizes starting at 2 inches and down that I have used prolifically on my projects. Just don't tell her because she was adamant about not letting me. Afraid they would get dull quickly. They don't work on anything bigger than .040 or garage sale signs, though.
As for the paper compass, I feel like it was money wasted for cutting as well but you can put lead in it and use it to draw the circles you need to cut.
As far as pushing you, I don't feel like we push you hard enough as there is STILL no Nuka Cola machine on that table of yours, Dave.....
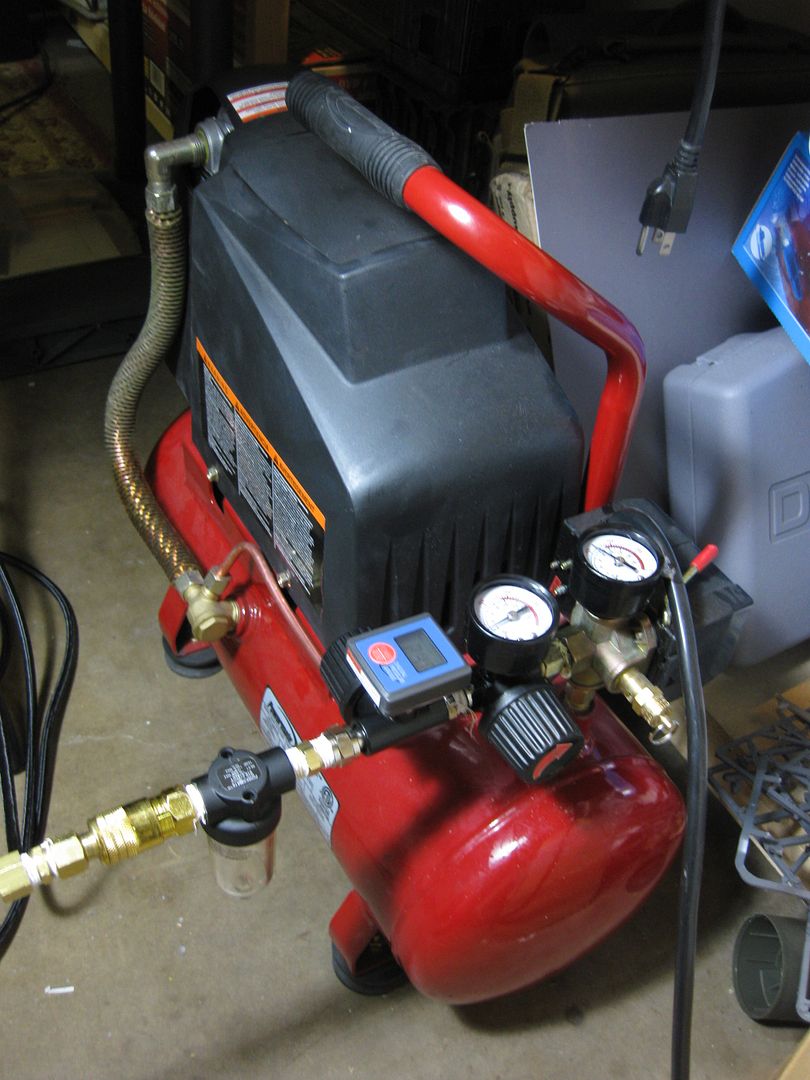
I believe my obsessive trek through traffic has solved my problem, at least 9 sizes of my problem
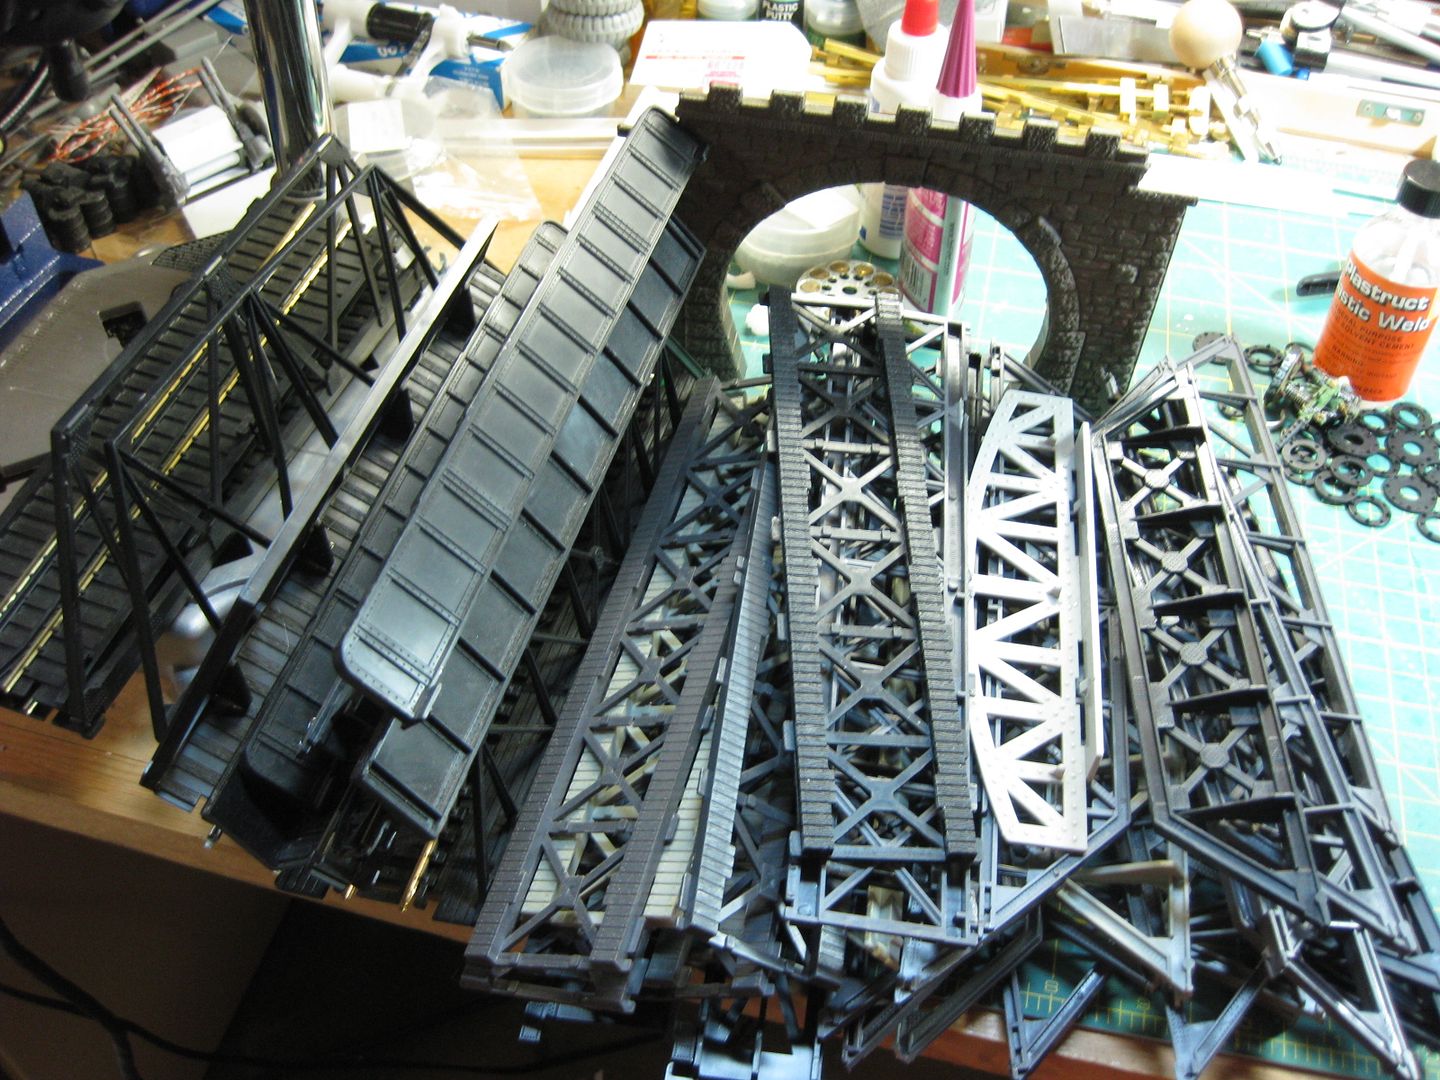
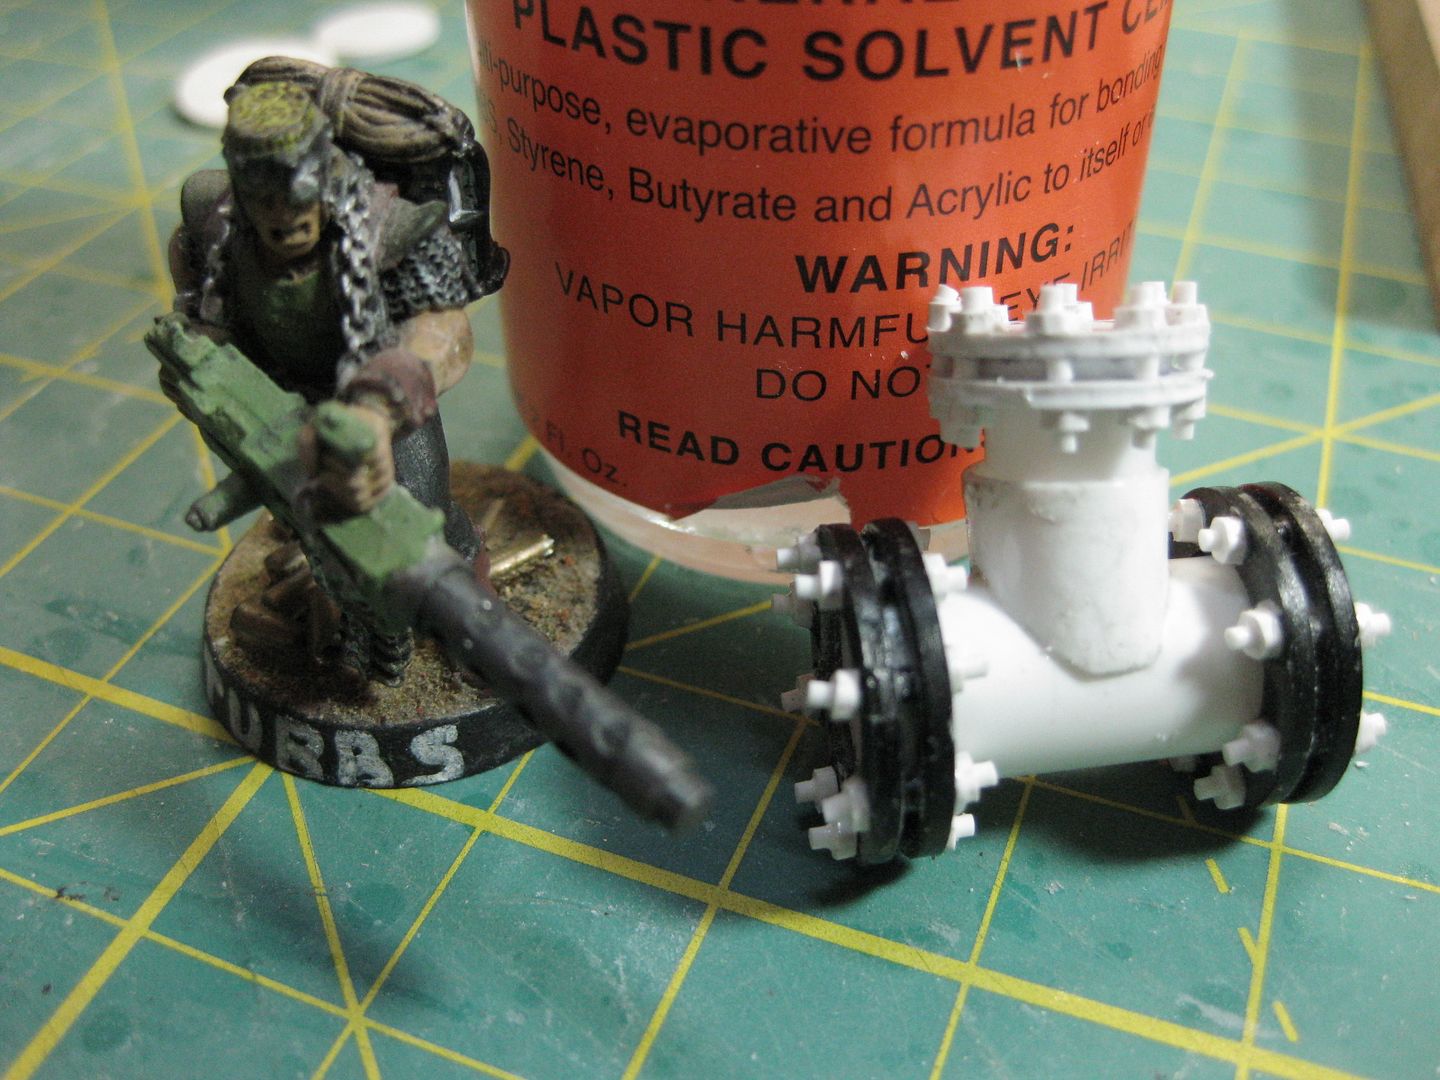
And guess what? 10mm styrene tube was NOT available, however I got plenty of other tubes, including a box FULL of used HO scale train bridges- The same thing Skalk used for his badass walkways
I also picked up a rotating leather punch, and a digital air compressor replacement gague for pretty cheap.
I use a compass cutter like that for the tops/bottoms of terrain - it doesn't work well for tiny circles, but is great at the larger stuff, so not much use for this project.
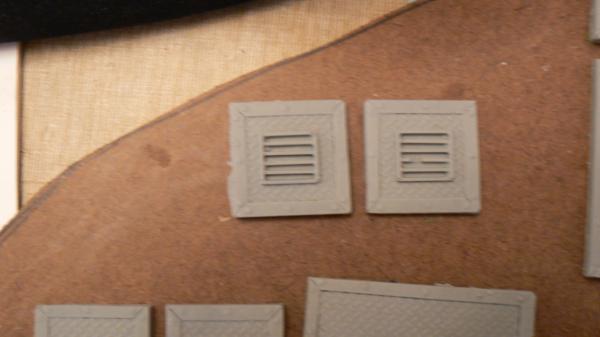
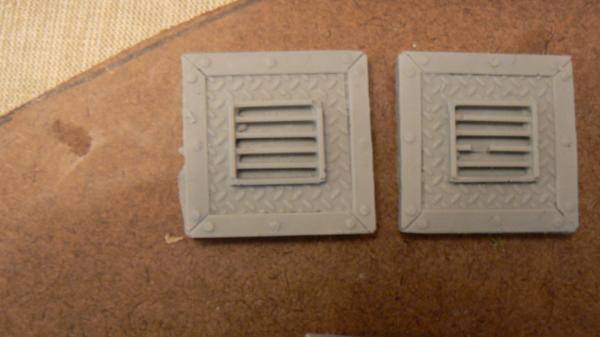
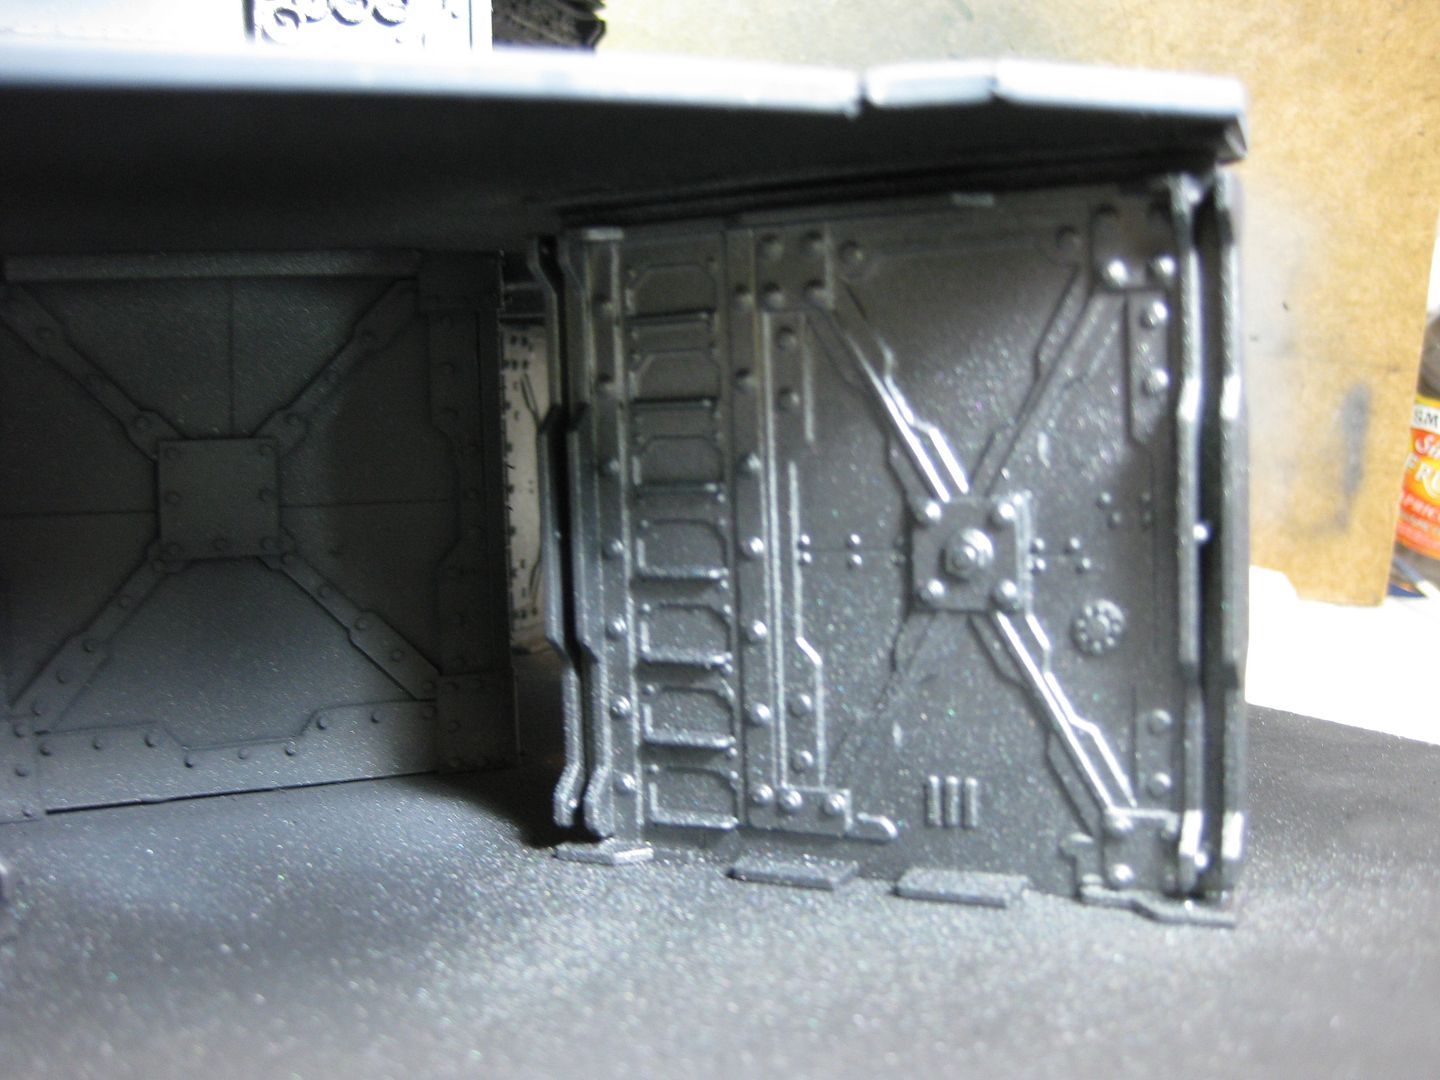
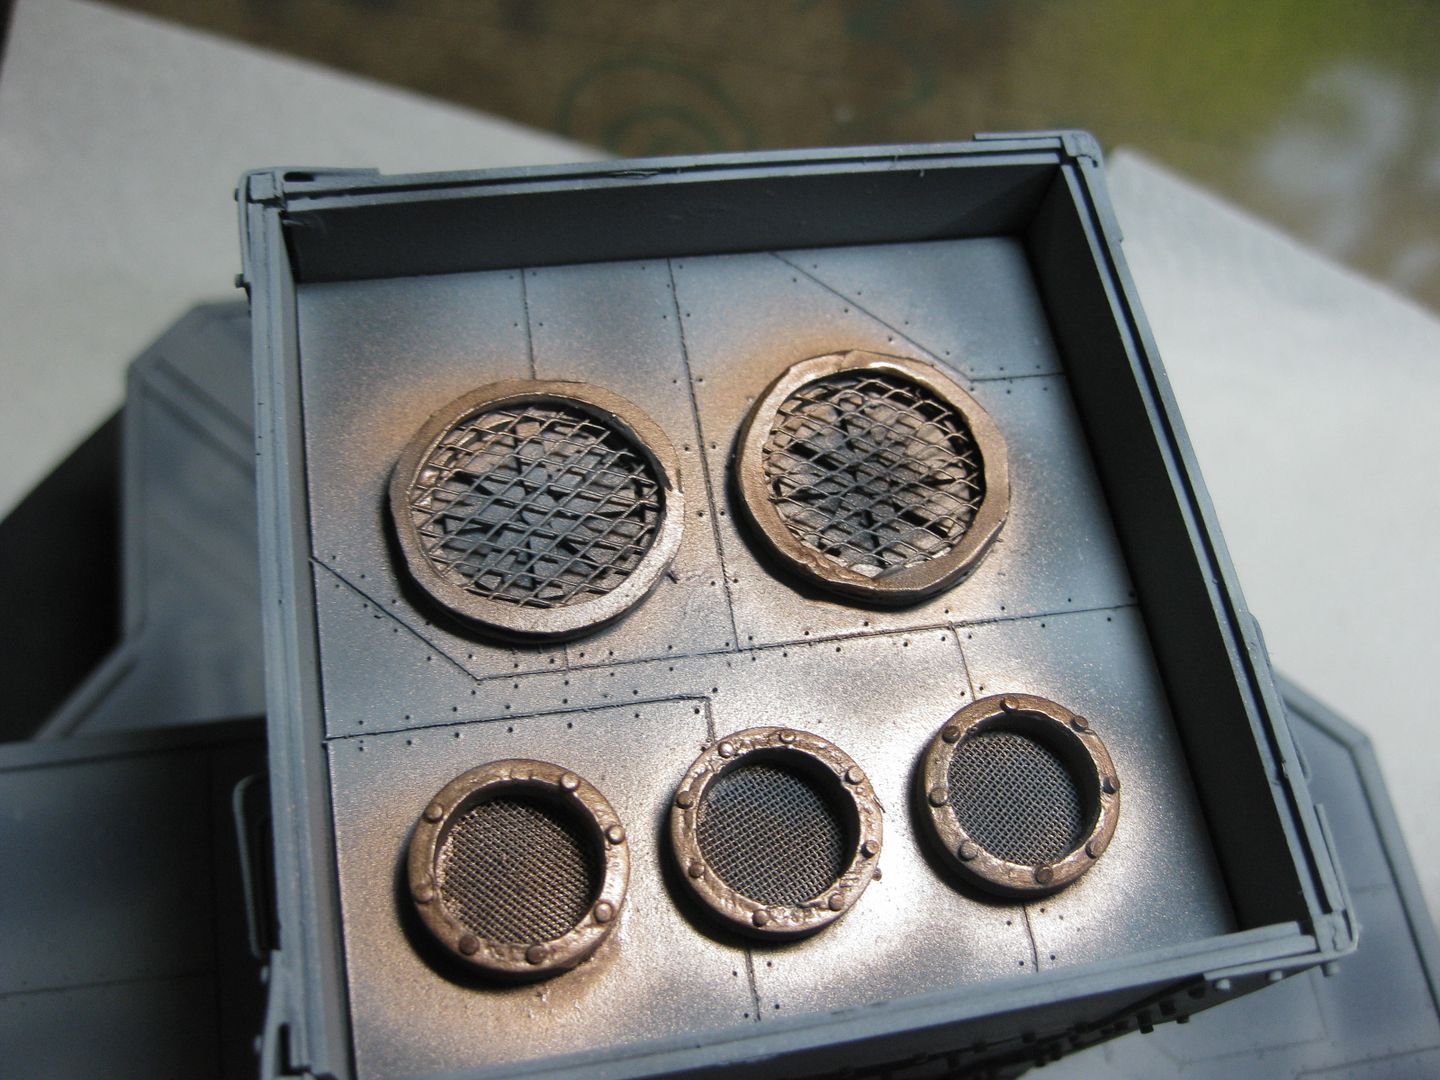
dsteingass wrote:OMG, the vent looks MUCH MUCH better!
I believe my obsessive trek through traffic has solved my problem, at least 9 sizes of my problem
And guess what? 10mm styrene tube was NOT available, however I got plenty of other tubes, including a box FULL of used HO scale train bridges- The same thing Skalk used for his badass walkways
I also picked up a rotating leather punch, and a digital air compressor replacement gague for pretty cheap.
made a half assed vibrating table by placing my compressor next to the molds and just letting it run...
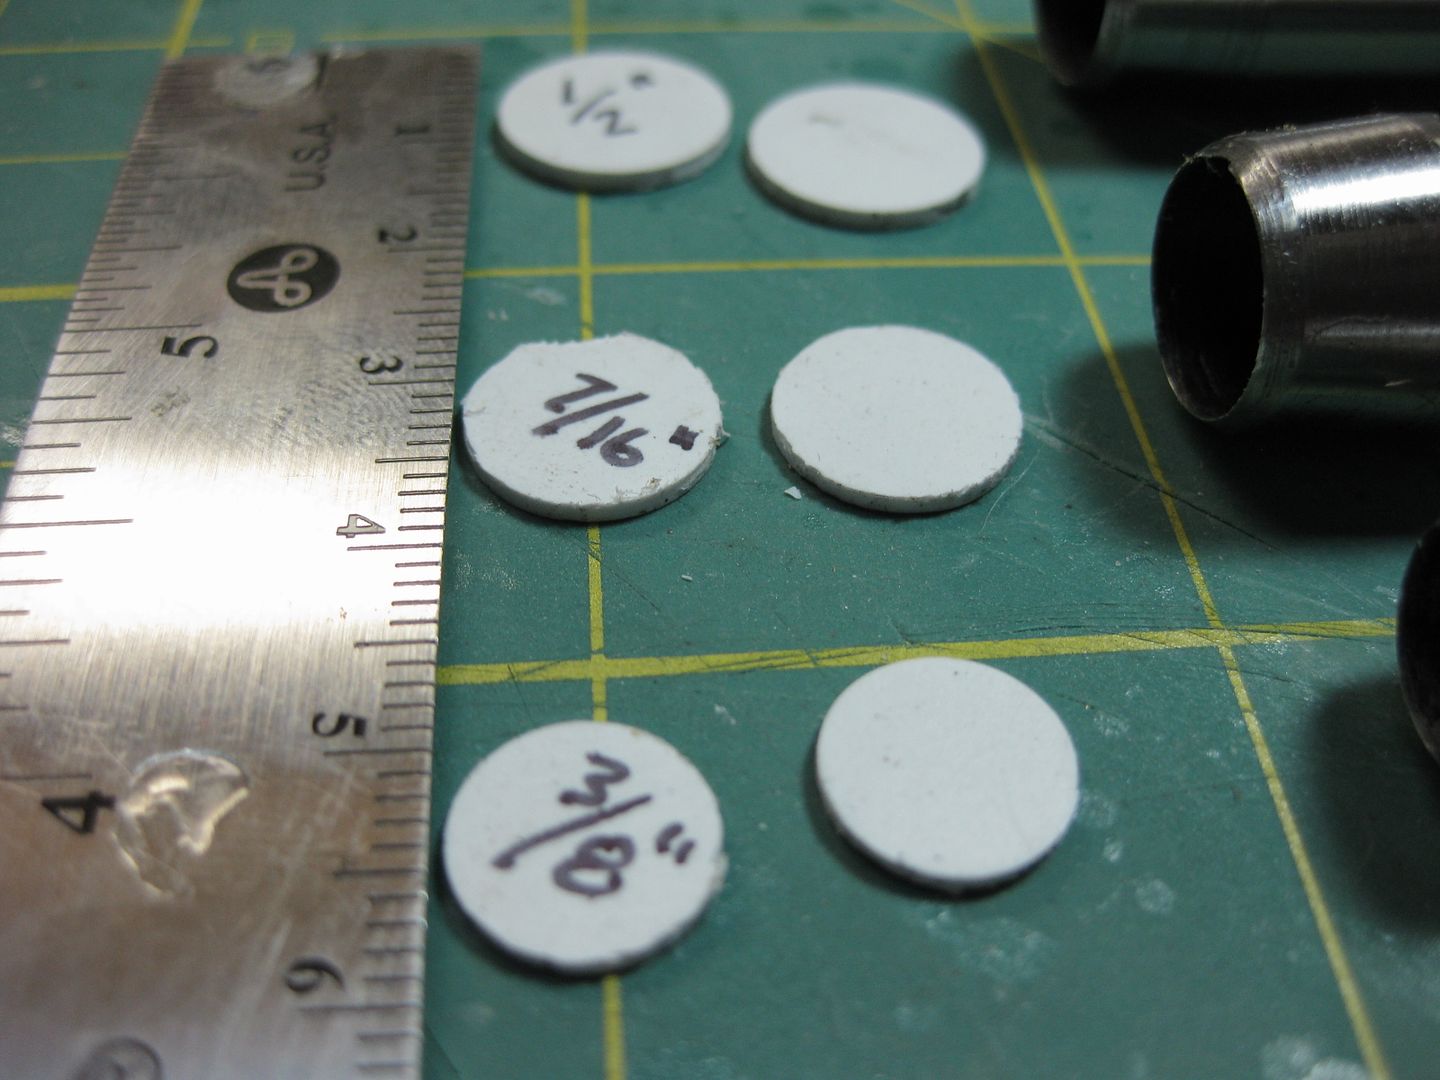
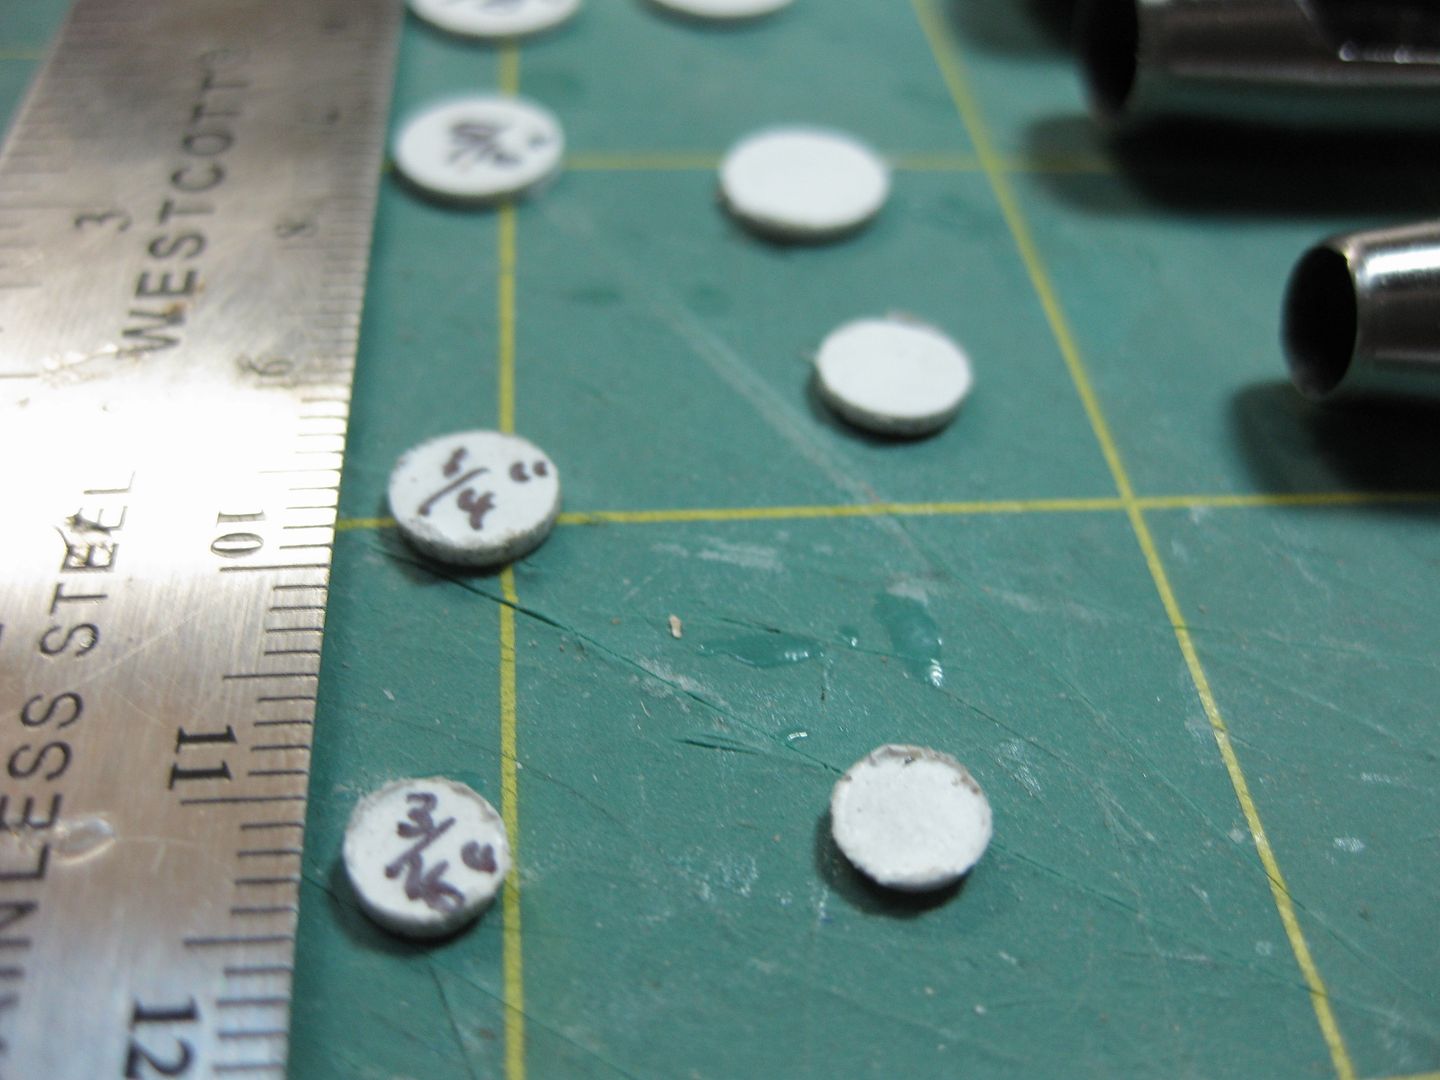
There is no easy way to explain converting inches to metric, so here, I hope this helps.
I prefer metric when building, metric is soo much more condusive to a system of interchangeable parts IMHO.
They aen't bad, nothing a quick sanding won't fix. I had trouble until I rummaged around and found a thin galvanized steel rod to poke them out.
THe one 7/16" has a bite because I got it too close to another punch hole
Automatically Appended Next Post: @Galorn, good idea!! yeah I have one of those back massagers, I was going to try using it next time I poured.
THe one 7/16" has a bite because I got it too close to another punch hole
ah... that happens to me from time to time too... when i make lots of them for sandwich uses... sometimes i even keep them in the sandwich...as for the robots this makes it look a bit used and weathered....
I prefer metric when building, metric is soo much more condusive to a system of interchangeable parts IMHO.
it must be true stuborness as to why the US and some other countries still uses inches for measurements... and stones and other eerie measurement units...
seeing the pics... am i guessing right that the 3/8'' is coming close to the 10mm needed scale? angle is a bit unhelpful^^
anyway...wish you a prodctive night...(fom my point of view^^)
HOLY CRAP you lot don't half go on been away for less then a day and 2 pages plus
Fisrtly dam you dave it was my turn to give you a push and tell you to stop chucking your rattle out of the pram, but no you had to resolve your issue before i had the chance
However glad you got there and that is a hell of a haul their can see some great updates coming…….
Thanks for the links will come in handy, after seeing those results with the primer if I can get hold of it buy buy spray can.
Vik the metric system is some kind of crazy witch craft founded in Europe lol ……. it's roughly 25 mm to an inch used to make furniture we had to use both system's …….
do
Dave totally understand about the hassle of the casting issue, if you aint happy then we totally understand after all its your work, however it would be a cool piece to replicate when you redo it , and I would be happy to purchase a mould of said item when you do
Someone apparently sold their entire (or their departed father/grandfather's) train layout to the hobby shop, all the buildings and rolling stock was organized into big boxes, priced up for re-sale very neatly. This box was not labeled, I asked, he said $5 ea, I said No, I can get them new on ebay for $5 ea, I offered $20 for the whole box, he sad he needed $36, etc. we shook on $30
dsteingass wrote:Someone apparently sold their entire (or their departed father/grandfather's) train layout to the hobby shop, all the buildings and rolling stock was organized into big boxes, priced up for re-sale very neatly. This box was not labeled, I asked, he said $5 ea, I said No, I can get them new on ebay for $5 ea, I offered $20 for the whole box, he sad he needed $36, etc. we shook on $30
You are the Jedi of haggling! Well done sir...well done!
pipes looking great, now if only i had some random comment to add seeing as my posts have been lacky of any word content.. and if you where wondering it is definatly NOT because of some brain surgery by the =][=, and definatly not the =][_,=
if that ork was winking with his left eye, then i would consider that offensive!
Automatically Appended Next Post: damn your the best dave, reading that i finaly figured out what (who) im going to try to sculpt as a full model.. it must be the prophet of rivets!
you do that= instant membership...no argument there...or i need to stomp me feet^^
lol...weety... if i could do maths i could do precise measurements as well... so thanks...but er...^^
at dave... one day you should do an artikel with us riveteers... that range of discs looks like a very good entry...
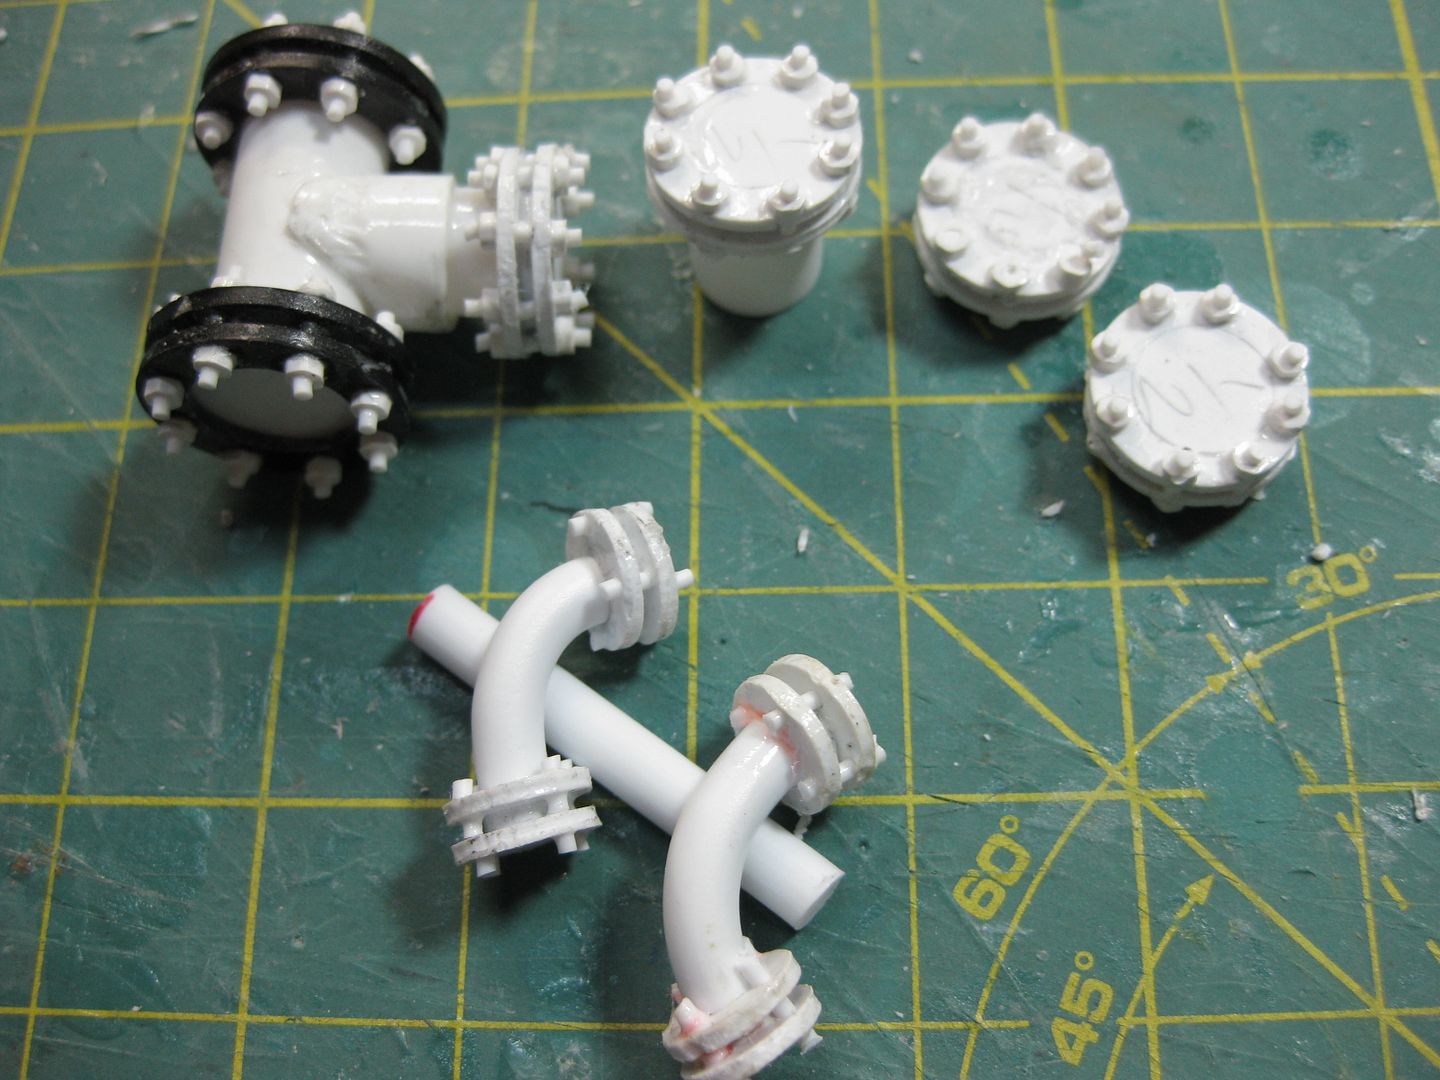
the "T" of tubes looks very cool!
and seeing that amount of suply there and then your haggling... i thought you took the trainstuff and the 30 bucks ...as well... glock as a means to an argument...hmmm... pretty punch...concealable and quick...who could ask for more^^...that shopowner might even asked for less lol^^
I actually broke my air compressor late last night!! I was removing fittings to put on the new digital regulator when I learned the hard way that the cheap-ass, POS compressor of mine had some damn plastic internal fitting between the old regulator and the moisture trap!! No brass or metal pipe!! It sheared right in half when I tried to loosen what should've been a brass threaded pipe!
So, I guess I have to go buy a new compressor before any more airbrushing can happen.
Wow, really jealous of your haul there... Lucky bugger... I expect great things from it!
Vik the easiest way I've found converting Metric to Inches is that 1" is exactly 25.4mm.... Using that measurement you can get pretty much anything - 1/2", 1/4" - hell, 14/16" if you really want
I would of said yes to $5! Yup I'm that mean! (Probally about the same price as yours). Tbh that rouge trader rhino I bought only cost £4! the person said it was a choas tank, but he was eladerly so I let him off! (Not mean to affend) It was prbally his sons or somthing. (I like buying off elderly people they are allways the nicest).
Dang Dave! That is a great haul! I can't wait to see what you do with the tunnel entrance! It would look great on the board your were thinking of some months ago! Of course, it looks like you would need more room than you ahd planned...still, awesome!
Welcome Montrano! Yes we are insane!- What brings you to de-lurk and register?
Tonight, an essential investment in capital for this crazy enterprise.
My Wonderful GF actually bought it for me, she said the look on my face last night when I broke my old compressor was heartbreaking New compressor, with added moisture trap and second digital regulator. This one has a 3 gallon tank, but a much bigger, and faster motor, so it only takes about 30 seconds of running to fill the tank. And I checked, NO BS plastic pipes, all brass goodness. It is painted red, that is why it Goes Fasta!! Now I'm back in business, the airbrush needs fed
Erm, i just think the madness had reached a new low, so i felt the need to finally comment. I think 96 pages of lurking was more than enough.
This is one of the few threads i actually read the post rather than just looking at the pictures.
A question to guys in the UK, where do you get the styrene tubes, i love them and use loads, but those evergreen packs seem rather expensive.
Those are some high quality flanges, my friend. Amazing work as always - really jealous of your new compressor
Bit cheeky to ask, but I really like your gangers whenever they show up - any chance we could please get a peek at all your necro minis together? And while I'm being annoying - any chance we could get a rundown on how you painted the vending machine? I'd be super grateful! Would kill for rust effects like that
I am feeling a lot better after getting some inspiration (and validation for my ideas) from these pics of old flanged steam pipe goodness.
It appears that I can just connect anything any old way and it will look authentic-enough! This frees me up to just go OTT with this stuff Notice the rivety-goodness everywhere too!
oops, I guess I should have photoshopped out the railing before I lied, because everyone knows, there are no safety railings in the grim darkness of the far future, there are only hazard stripes.
appears that I can just connect anything any old way and it will look authentic-enough!
that was my first thought too...^^
by the way... how do you intend to make the rounded bellies on the T-connections... the pipes get thicker there...adds a ton of feel to the parts as well...
Vik Those rounded Tees actually seem to be Valves with the bonnets removed and a blank flange or something bolted in place to cover it, the Tees are the same diameter as the pipe...
dsteingass wrote:I dunno Vik, I was hoping to ignore the pot-bellied Tees and hope no one would notice
busted^^...and if you are indeed going for a steampunky look i wouldn´t ignor them...even if this might mean it would get again tricky...but these small point add lots of character...er...on second thought...on that scale i guess nobody might notice anyways^^
at tibbsy... valves i could imagine...but i think they have a different diameter...
DST; You may be right, they could be something different... Looking at the whole assembly I would guess it may be some kind of steam trap with a bypass? Not entirely sure... It could even be a Non-return valve of some kind...
If he would have just looked back somewhere in Vik's Thread, Skalk would have realized that he was ASKED to be part of the -=[_,=- In the beginning, but unfortunately, because of his heresy, now all he sees is this:
well the first real problem here is the amount of time i would have to spend on the throne...my wife would go libarian poo on me...for i wouldn´t get anything done that day...
If you remember correctly, I was appreciative of the offer but respectfully declined membership because I knew I did not deserve that honorable distinction. I haven't riveted anything in months and my attempts at riveting have been underwhelming at best.
However, I do have an Ork project planned once I make my triumphant return to modeling, and my riveting "skills" are absolutely perfect for the ramshackle construction process that Orks engage in. I may resubmit a request at that time for the LoER, but until then I carry the shame of failure.
at dave... yep, i know that pretty well...i find a good piece of nice looking plastic and when i glue it either with revell or testors it soon gets knowcked off...most vexing... on that matter has anyone ever tried to use bicycle glue? the one you use to glue patches on your inner tubes? it is vulcanizing...
ummm....
NOTE: Plastruct Plasic Weld glue does not work on whatever this black plastic is.
The slightest touch knocked them all off.
I should know better than to eat or drink anything while surfing Dakka....but I just choked on an apple when I saw this! My boss came in asked if I was going to live! LOL.
I don't have any yet, but it's on order....have you tried UHU glue? I hear it's amazing!
i have that glue and for me it is not really a good choice... the uhu was meant... dave yet again jumped in between posts...well it is his thread after all^^
so you used super glue now...but this doesn´t mean it cant be knocked off yet again...
i think the new flanges are the right choice... i come to the point that i dislike mixed colored models... if it isnt completly white i have the feeling that the parts might come off too soon...
as for the uhu in the tool box...lol^^ priceless and a bit o a who puts glue in the case with all those sharp screwdrivers and unused screws and knifes and nials and clippers and...you get my point^^
New flanges are looking good although I liked the contrast of the black and white myself …
Actually I think the old man had used it and while unscrewing it twisted the tube and split it, although when I asked him he had never touched it, talk about role reversal ………. Parents who would have em …..
dave, that black plastic can only be boned with superglu equivalents. Its kind of te same more rubbery plastic they make some brands of model soldiers with. (revell, italeri 1/72 scale)
trust me, i've worked with hundreds of those, and any other glue will detach eventually...
dsteingass wrote:Thanks Flange Wolves and Flange Dirty Flange!
These would cast up no problem. (two per "full flange") One half is the "bottom plate" center + top plate with bolts, the other half would be the "bottom" plate with bolts.
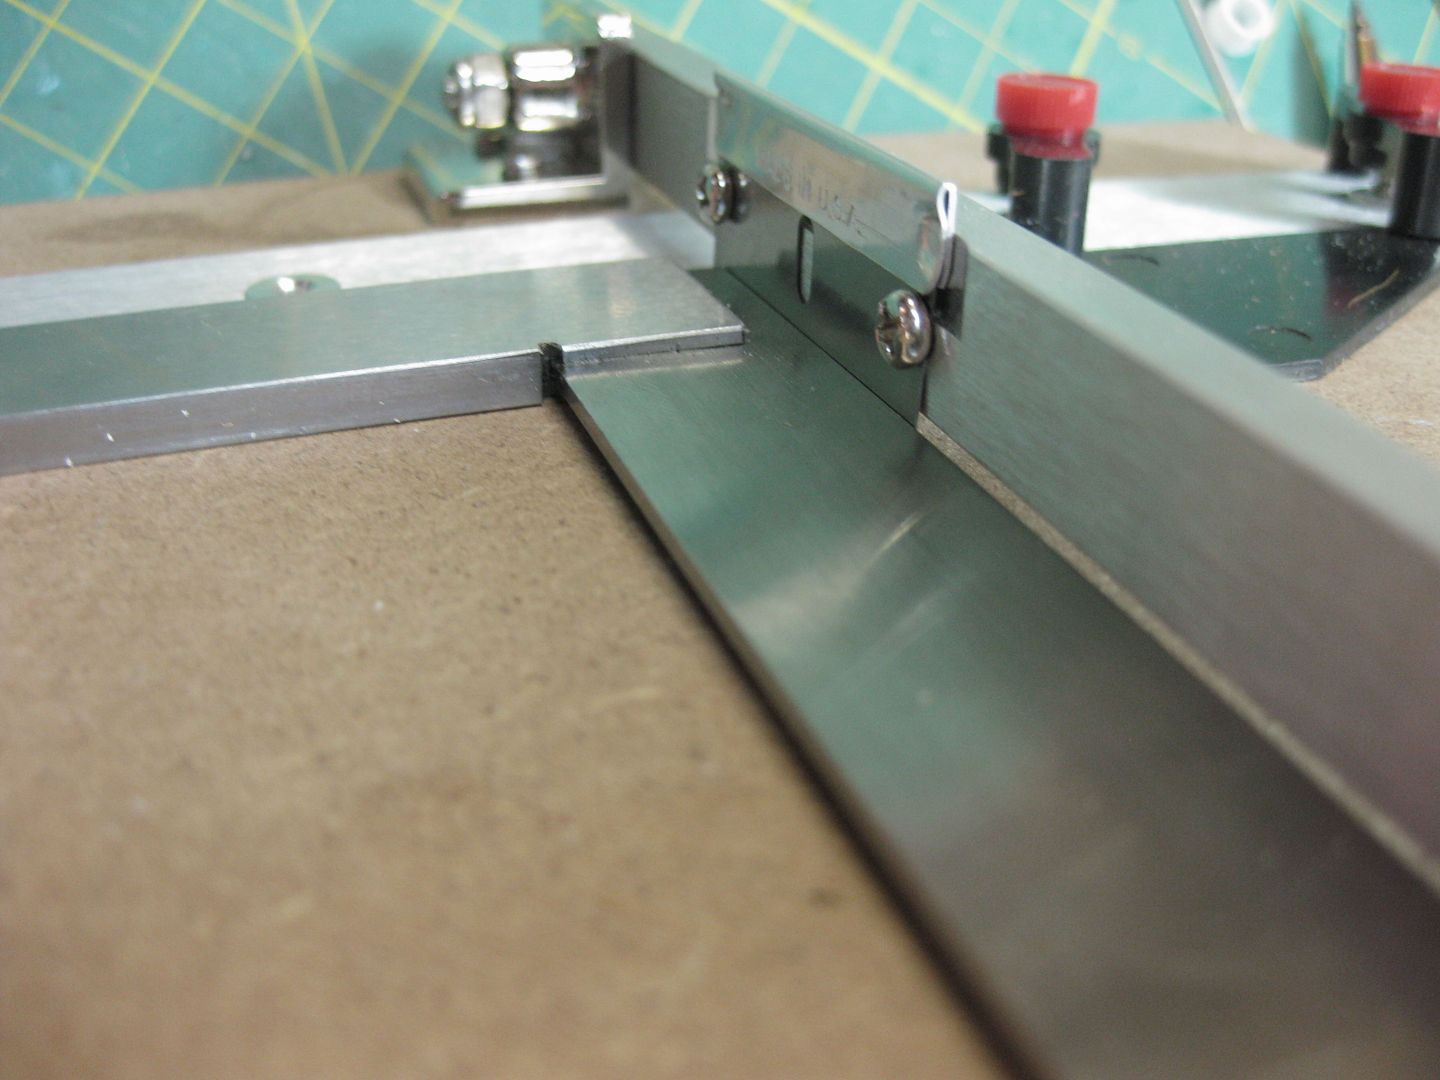
and do you know a good way to measure it precisely ? i screwed tight every screw but it still has a bit of play... i am trying to get the hang of it... or do you rather mark the cutting point on the to be cut material and skipp the on tool measurements?
Automatically Appended Next Post: i too would have assumed that drilling the hexes would be not a good carreer movement^^
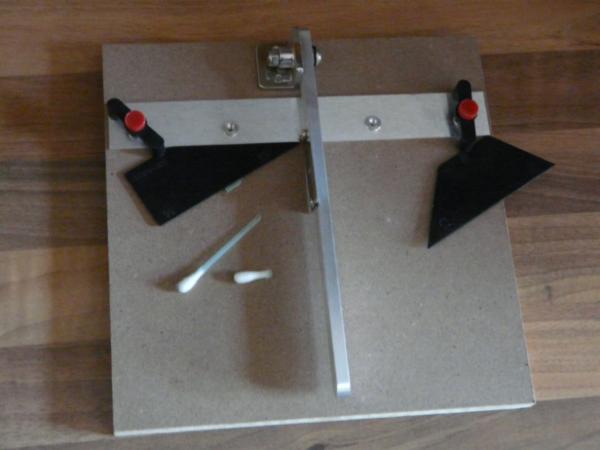
First, you want to make sure it is set up- probably not just out of the box.
Loosen both of the screws on the bottom, and loosen the arm hinge nut, you might want to oil the hinge bitz some
Use any for sure square edge, and set the play against the square edge
and tighten everything up right there.
Once your blade is set up for sure at 9 degrees, then I measure from the blade and set the plastic stop
This sets you up for cutting identical parts You don't have to account for blade width on the side the loosely cut part falls free
I really need to invest in more tools for the making of things! Then i may actually be able to make mold worthy stuff and sell generic sci fi tanks as well!
shasolenzabi wrote:I really need to invest in more tools for the making of things! Then i may actually be able to make mold worthy stuff and sell generic sci fi tanks as well!
DO IT !!!!! DO IT !!!!!!!!
Have you had the new Micro Mark catalogue it has some cool stuff, but I need to ask your opinion on a couple of possible investments, First the 4 step rust effect powders, looks great in the mag but do you think they are worth the money and work that well
The next thing is the MicroLux Multi Power Saw, seems pretty good and will allow me to cut up larger sections for building larger stuff.
you do that shaso... a guy with your talent could go miles further with the right tools!
thans dave... i will do so tomorrow imidiatly... i tried my best but i didn´t think of putting a right angle ruler to set the cutting edge in the right position! thanks for the hint...
oh and they had a cataloge in the parcel too... had a joyfull time reading through... man... you could aply for three jobs when you see all their stuff...there is so many needfull things there...
oh and i see yoou use the two screws to secure the guide...
Yep! That's what they are there for! You'll finding yourself wishing it came with 2 more of those soon @LDD- I think I'd rather have the new Dremel Saw Max myself, It's probably cheaper than the MicroLux, but MAN, I would LOOVE to have that miniature belt/dusc sander they make As for the rust powders, I dunno, the Doc O Brien's powders are god, wait for the buy one get one free sale for the powders.
dsteingass wrote:Yep! That's what they are there for! You'll finding yourself wishing it came with 2 more of those soon @LDD- I think I'd rather have the new Dremel Saw Max myself, It's probably cheaper than the MicroLux, but MAN, I would LOOVE to have that miniature belt/dusc sander they make As for the rust powders, I dunno, the Doc O Brien's powders are god, wait for the buy one get one free sale for the powders.
Dave without sounding an idiot which one is the Dremel Saw Max ? cant find that in the catalogue, I like the MicroLux as its like a miniature table saw which would be much easier for cutting larger size pieces, I like the mini belt disc sander as well nice little tool there.
I think I will wait for the sale, value for money and all that but if I can get the same effect from the Rust And Dust Range I will be buying them …..
Dave, I understand not wanting to dril through the hex nuts, but what about cutting hex nuts out of PC that already has holes drill in it. Like, cutting a hex shape out from around the hole.......
I have no idea how I am going to incorporate all of this into a final product yet. But you can't have any of that until you work out how to mass-produce fittings and such to get there. As far as that goes, I think i have been successful.
dsteingass wrote:I have no idea how I am going to incorporate all of this into a final product yet. But you can't have any of that until you work out how to mass-produce fittings and such to get there. As far as that goes, I think i have been successful.


 I am trying to find something with plenty of rivets to start my thread and I just don't have anything worthy ……… I am running out of excuses here


 The large black one is the hole punch, the purple colour ones are a small hole punch and a double small hole punch and the yellow one is a star shape (thought it would be good for a grot red army, it was not though )