| Author |
Message |
 |
|
|
|
|
Advert
|
Forum adverts like this one are shown to any user who is not logged in. Join us by filling out a tiny 3 field form and you will get your own, free, dakka user account which gives a good range of benefits to you:
- No adverts like this in the forums anymore.
- Times and dates in your local timezone.
- Full tracking of what you have read so you can skip to your first unread post, easily see what has changed since you last logged in, and easily see what is new at a glance.
- Email notifications for threads you want to watch closely.
- Being a part of the oldest wargaming community on the net.
If you are already a member then feel free to login now. |
|
 |
2010/09/09 13:35:02
Subject: Ork City Project: Squig Fighting Arena (Finished!)
|
|

Regular Dakkanaut
|
Greetings Dakkers, we’ve had a long running project for a client, for an entire city for his Orks, approximately 22 structures in all, including things like HQ buildings, armories, refineries, watchtowers, a cantina, fighta-bomba airstrip and hanger, and of course, a fighting arena for Squigs.
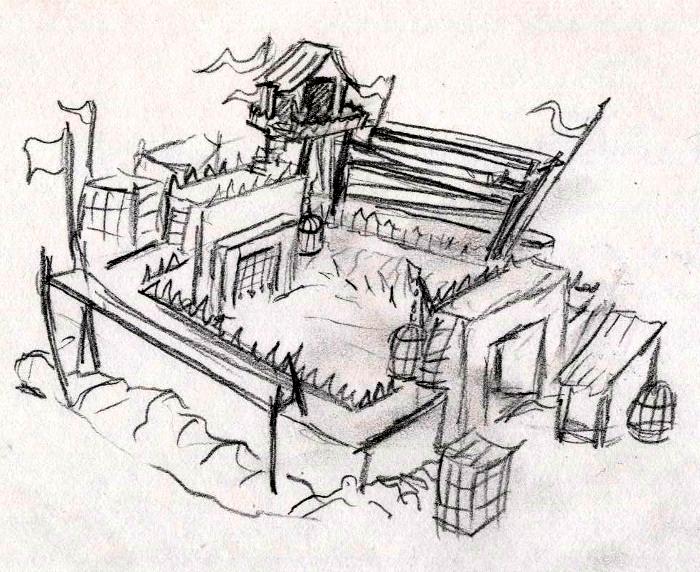
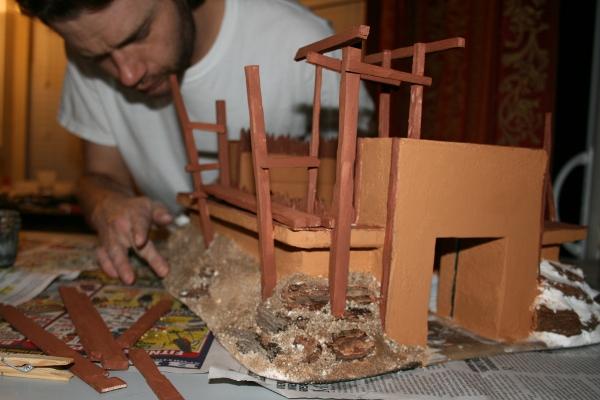
We’re not even at the halfway mark for this project yet, but we’re getting ready to tackle a very unique piece, which is the Squig Fighting Pit. Fortunately we’ve been given a fair amount of artistic freedom to do these pieces, because as you’ll see, our ideas tend to “evolve”. Case in point:
See this?

The idea was “let’s build an orkish power plant looking thing.”
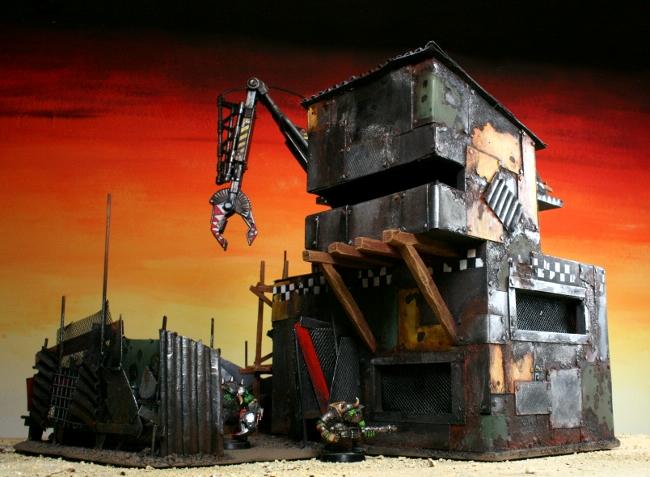
Here is what that little doodle turned into:

We just don’t know how to stop at times.
So imagine how this concept could go, an arena where Orks gather and pit their squigs in fights to the death, placing bets and shoving each other into the pit, feeding captives to the caged monsters, with Ork warbosses, nobs and overseers watching the games and tossing back drinkies.
We threw around a couple of very rough sketches when we realized that this wasn’t going to be a small piece, this piece needed to tell a story!
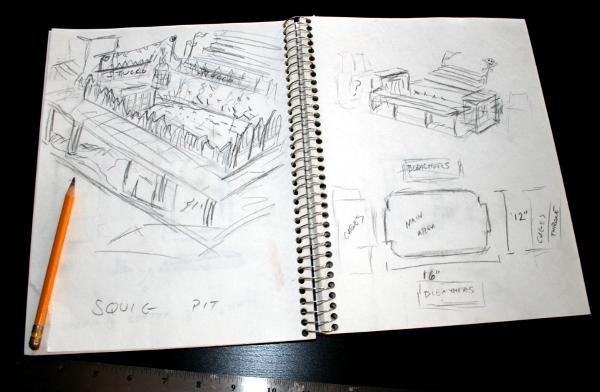
The original “plan” called for a 5 piece set, including a central fighting pit, two separate bases for the bleachers designed to fit up against the wall of the pit, and two areas to either side for the Squig cages, guard posts, betting booth, and observation tower for the warboss and his retinue.
With a solid direction in mind, I gathered my sketches and headed towards the cutting area.
 MDF
MDF board is great stuff. It has a smooth finish and can slide around on a flocked table without the edges of the terrain piece turning into little flock-plows, and best of all, it’s really hard to warp MDF or chip it. Unfortunately all those qualities make cutting the stuff an adventure in itself.
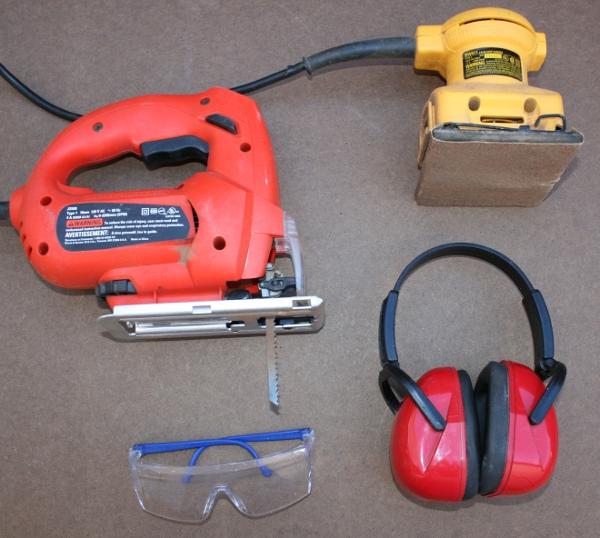
Here is what I use for free-form bases. For precise or urban bases which need to be squared to look like sidewalks I would usually use a table-saw and/or a miter saw.
While this isn’t necessarily a do-it-yourself guide, I have to stress the importance of safety when using power tools of any kind. There’s a reason why soldiers in the 41st millennium bolt power tools on the ends of their guns, these things are SCARY. I’ve sliced right through my cutting table without realizing it. Always wear eye and ear protection, never use tools while under the influence of anything, and please get some instruction or help if you’ve never used power tools before.
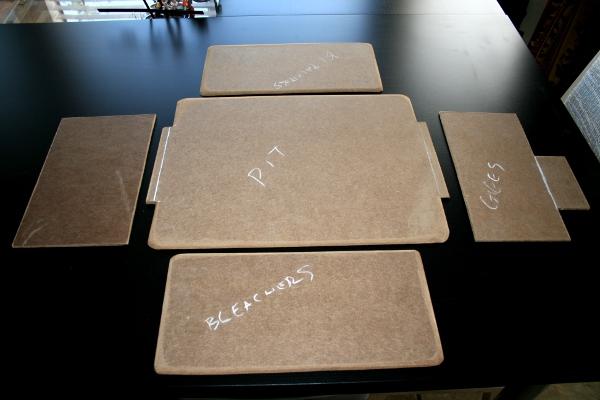
Here are the five pieces, cut and sanded. Since I know already how these projects can go, I decided to start with the central pit before anything else, that way if I run into issues I can make the other pieces to fit, rather than have to rebuild the whole thing.
The image in my mind that was most important was the sliding portcullises at each end, with vicious, snarling squigs being prodded into the pit at the ends of spears, with cheering and jeering Orks above. So I wanted to get the gate houses built first, and build the whole rest of the structure around them.
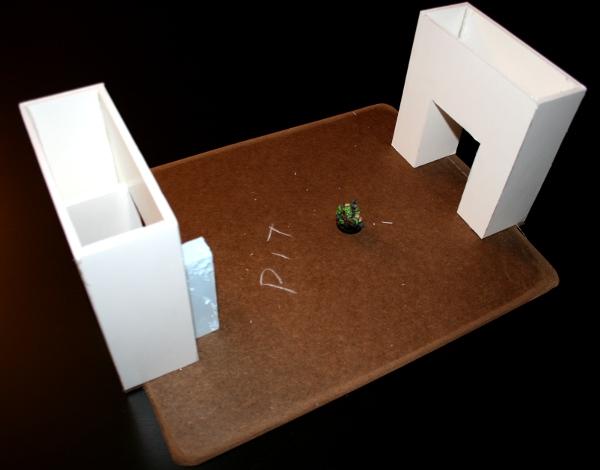
A few slabs of foamcore and some dulled razor blades later, I had a good shape. Now the walls.
I ran into my first change of plans at this point, and it would prove to change far more than I anticipated. The critical decision was that making the pit walls out of foamcore would be too thin and weak for this kind of structure, so I upgraded the walls to 1″ blue insulating foam, giving the walls thickness and enough room to build the walkways on top.
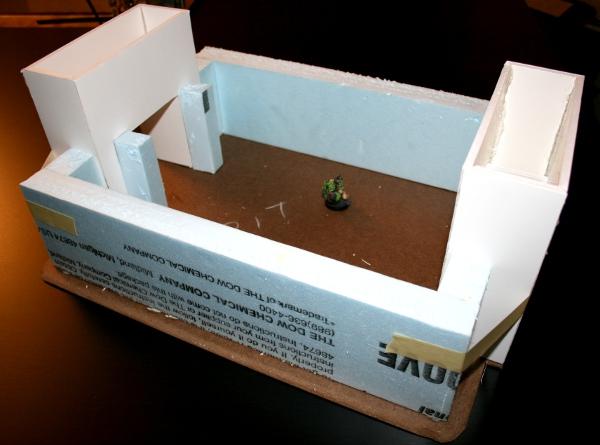
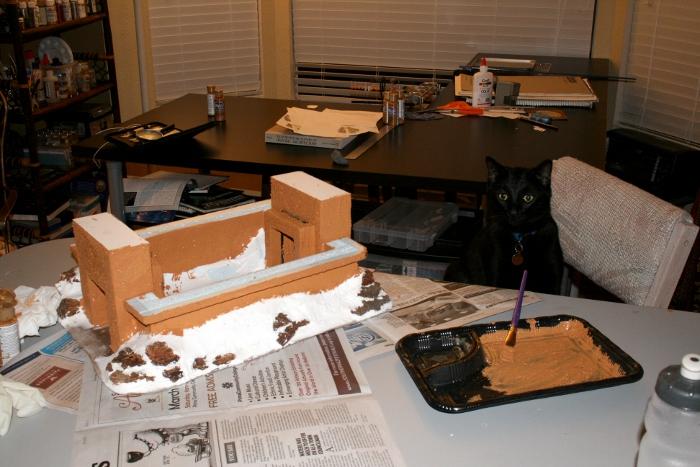
Yes, this seemed to work perfectly. I started attaching trim pieces and finished the pop-outs for the portcullises with no problems. I was on a roll! I sat back with a smug expression as the glue dried, content with the direction this project was going. 
And then MisMuse walked by.
Let me introduce Mismuse for those new to our studio. Here's a brief bio. She's my other lead artist, with a professional background in art, design, photography and miniature making. ( miniature food jewelry.) She's made other artists cry. Yet everything she touches turns to gold.
Remember where I decided that the walls needed to be thicker? Well that had the effect of pushing the whole structure just about to the edge of the board. Meaning the wide margin I left to pile up dirt around the sides was not so wide anymore.
MisMuse cheerfully brought this to my attention as she passed by and asked me “I thought you were going to make that thing look like a pit? It looks like a big Ork refrigerator laying on its side.”
“Well, I left a little space around the sides, I can still pile up a little…” I tried feebly to avoid what I knew was coming, it was inescapable and the worst part was the sinking feeling, the immediate knowledge of what I was about to hear, and what I had to do.
“It’s just square walls. It should be a pit, you know? a dug in look? But if you want to send it out like that, hey you’re the boss.”
Then she walked off as I slowly drew my knife.
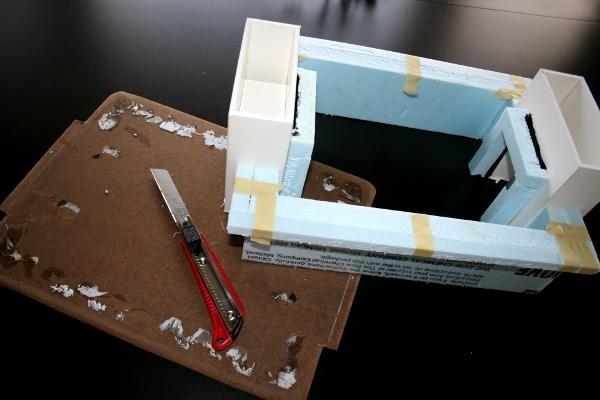
And sliced that sucker from its foundations! Another typical day in our little ol’ studio.
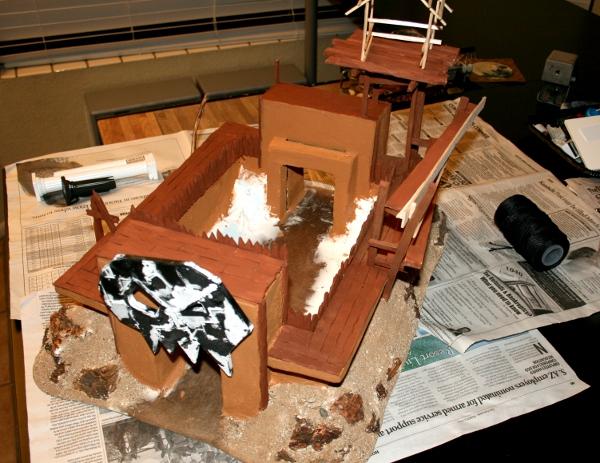
She was right darn it. I tossed the old MDF base to the scrap pile and cut a new piece, this time it was much larger, with room to properly build up dirt and rocks around the sides and make this piece seem like it was carved into the ground.

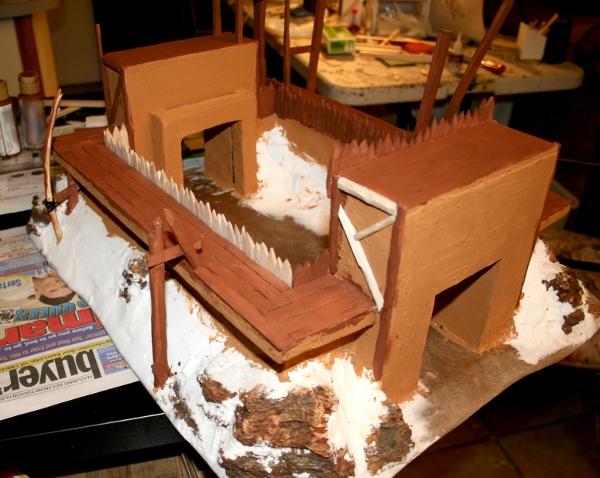
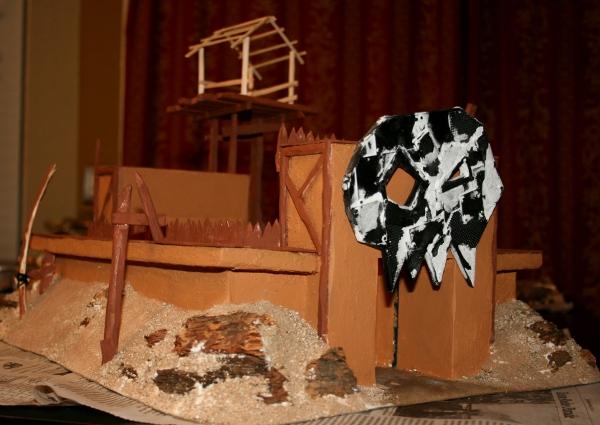
I used white plain styrofoam to build out the shape of the sloped walls both inside and out, and began to sketch out the skull icon on the gatehouse just to aid me in visualizing how the finished piece will look.
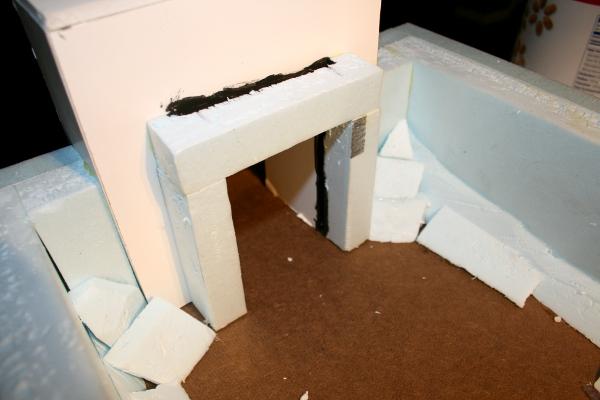
I also decided that whatever happens, this thing has to have actual, working portcullis gates. I knew it wouldn’t be fun or easy, but I’m from the generation of toys that have spring loaded missile launchers, working doors and hatches and blinking lights. I crave interactivity with my creations and usually go far out of my way to make a big piece do something.
I carved notches into the pop-outs and pre-painted them black, knowing how hard they will be to paint later. At the same time I raided the Plastruct bin and primed the channels that I’d use to make the gates slide smoothly. I’ll add those later after I do the texture and painting to avoid gumming up the channels.
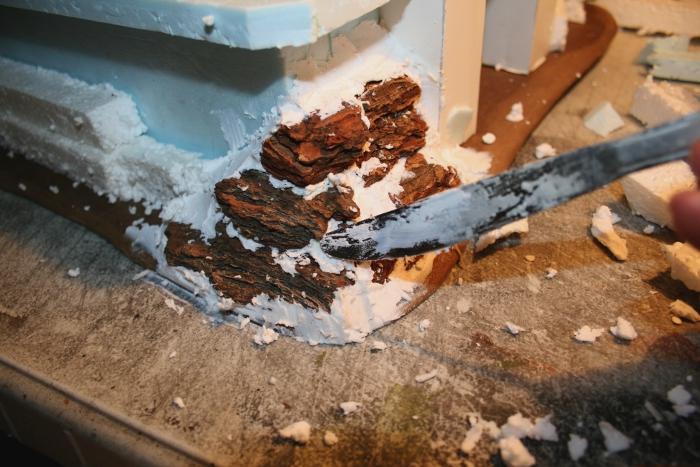
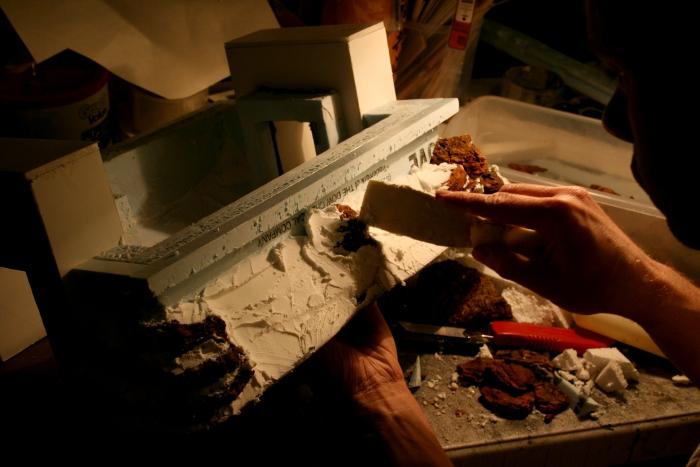
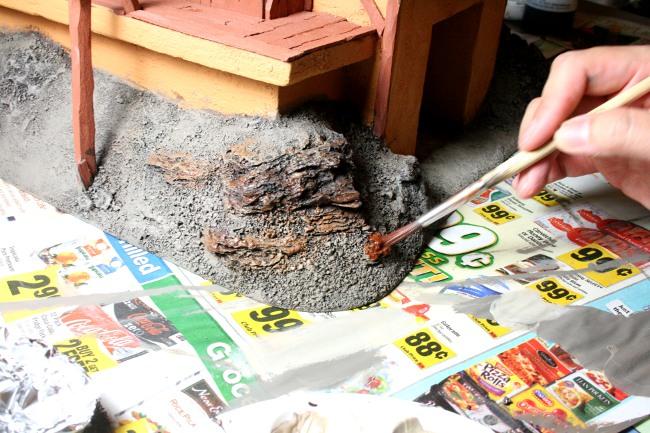
I carved away styrofoam in places that I wanted to construct rocky outcroppings, then glued together piles of decorative bark, paying careful attention to the grain so that it would look like bits of flaking, shale-like rock poking out of the slope. The slope itself is then slathered on lovingly, using lightweight spackle. If you were to use plaster or any other kind of filler on a project this size, it would weigh about 40 pounds after completion. Spackle is light and hard, doesn’t shrink, and it’s really easy to shape and carve. This is one of our trade secrets, don’t anyone here tell anyone else.
This step took a while, working into the wee hours of the morning. In the darkened silence of the workshop, I found myself pondering my place in life. Why why am I here? How did I end up in this place, living the life of a terrain maker? Was it the money, fame and glory that drove me to this lifestyle? Or just the women? Sometimes in the hectic pace of it all, with the fast cars and huge parties, life rushes by so fast, one can easily forget what’s important.
“ Never forget, it’s the terrain that matters most.” My old master told me during one of my visits to the peaks of Bhutan. “ Breath life into it, feel it in your soul, and most of all, make it rockin’ awesome.”
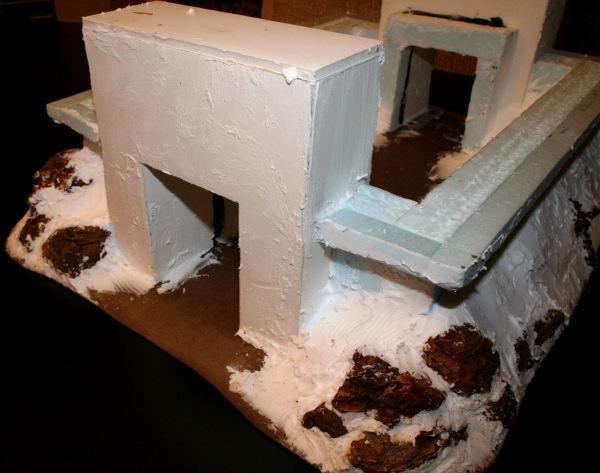
Yes it looked like the worst cake ever, but this was a crucial step.
However something occurred to me: With the new base, the bleacher sections won’t fit flush against the sides. For that matter I looked at my original sketch and decided it was all wrong. It was too boxy, symmetrical and didn’t look like something Orks haphazardly threw together.
A new sketch and plan was in order!
In the new plan, I would make ramshackle bleachers integrated with the structure, and give everything a more precarious feel, as if Orks grabbed more panels and tied them together just to have places where they could see the action. This would make the central piece much bigger than our average large shipping box, but I’ll let our shipping guy, Pedro, worry about that.
I mixed dry paint texture from a hardware store with my honey brown acrylic paint, thinned just a little. I let one of our other artists do the textured basecoat for the stucco. Believe it or not, he does rather well once you get the lil’ guy focused on a task.
Now there’s one more important step to take care of while the paint dries.
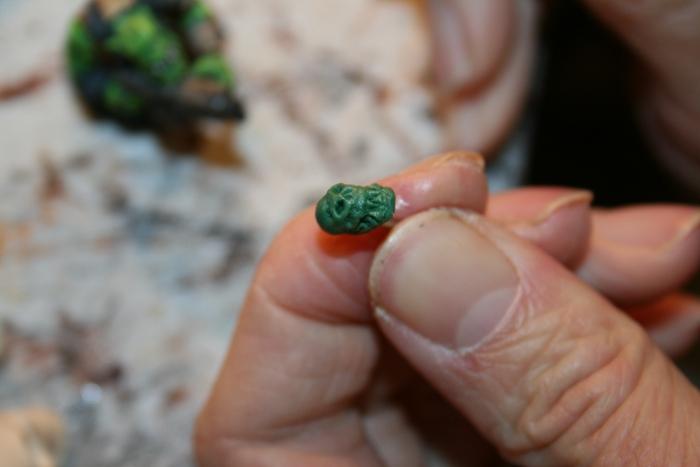
We needed skulls, lots of skulls of Orks, humans and whatever else to litter the cages and floor of the pit. Since I was already sculpting master skull models for another project, I went to work on a few Ork skulls to do alongside. (This skull is only partially finished, final product will be smoother and better defined.)
Next comes ground cover, spikes in the pit, and LOTS of wood carving.
To be continued...
|
|
This message was edited 2 times. Last update was at 2010/09/24 06:07:00
|
|
|
 |
|
2010/09/09 13:39:22
Subject: Re:Ork City Project: Squig Fighting Arena
|
|

Lone Wolf Sentinel Pilot
Inside that little light in your refridgerator
|
This looks awesome, man. Can't wait to see the end result.
Subscribed.
S_P
|
Fafnir wrote:What part of "giant armoured ork suppository" do you not understand?
Balance wrote:Nothing wrong with feathers. Now, the whole chicken, that's kinky.
|
|
|
|
|
2010/09/09 13:47:10
Subject: Ork City Project: Squig Fighting Arena
|
|
Hubcap
|
Concession stand like brew and hotdogz, Could the bleachers be on stilts and a ramshackle scaffholding supporting it?
Tried drawing it in ASSCCI but it didn't work. sorry
|
|
This message was edited 1 time. Last update was at 2010/09/09 13:47:46
|
|
|
|
|
2010/09/09 13:58:38
Subject: Ork City Project: Squig Fighting Arena
|
|
Regular Dakkanaut
|
Anthony_D wrote:Concession stand like brew and hotdogz, Could the bleachers be on stilts and a ramshackle scaffholding supporting it?
Tried drawing it in ASSCCI but it didn't work. sorry
The bleachers will be supported in a way very close to your idea, we steered away from the neat, orderly rows of seats we originally planned and made the seating more like long, crude planks lashed to poles and stilts sticking into the side of the structure.
As for food and refreshments, we actually have a whole cantina planned for sometime after this project, so stay tuned for that one too.
|
|
|
|
|
|
2010/09/09 14:00:53
Subject: Ork City Project: Squig Fighting Arena
|
|
Hubcap
|
Sounds sweet. Have you heard of an old game called brewhouse bash?
And a mek workshop? there are some great Gorkamorka garages about to borrow ideas from? 
|
|
|
|
|
|
2010/09/09 14:08:13
Subject: Ork City Project: Squig Fighting Arena
|
|
Regular Dakkanaut
|
Anthony_D wrote:Sounds sweet. Have you heard of an old game called brewhouse bash?
And a mek workshop? there are some great Gorkamorka garages about to borrow ideas from?
I had to google Brewhouse bash, but when I did it rang a bell, never got to play it though. Reminds me of a much older, very obscure cut-out board game from the Lone Wolf series' companion book. A million points if anyone knows what I'm talking about.
And Mekshop you say?
More pics in our gallery.
|
|
This message was edited 1 time. Last update was at 2010/09/09 14:15:01
|
|
|
|
|
2010/09/09 14:19:07
Subject: Ork City Project: Squig Fighting Arena
|
|
Hubcap
|
looks awesome.
I wish I had the time, patience and space to make scenery or store it once built.
|
|
|
|
|
|
2010/09/09 14:33:25
Subject: Ork City Project: Squig Fighting Arena
|
|
Fighter Pilot
|
I DEMAND YOU STOP BLOWING OUR MINDS!
|
|
|
|
|
2010/09/09 14:45:07
Subject: Ork City Project: Squig Fighting Arena
|
|
Decrepit Dakkanaut
|
Really interesting... looking forward to following your progress!
|
|
|
|
|
|
2010/09/09 14:54:22
Subject: Ork City Project: Squig Fighting Arena
|
|

Krazy Grot Kutta Driva
|
MOREMOREMORE!!!
(sorry)
|
|
|
|
|
|
2010/09/09 14:59:28
Subject: Ork City Project: Squig Fighting Arena
|
|
Hubcap
|
check out the webpage for and i quote "MOREMOREMORE!!!"
|
|
|
|
|
|
2010/09/09 16:25:44
Subject: Re:Ork City Project: Squig Fighting Arena
|
|

Flashy Flashgitz
|
Wow...
|
|
|
|
|
2010/09/09 16:47:14
Subject: Ork City Project: Squig Fighting Arena
|
|

Did Fulgrim Just Behead Ferrus?
|
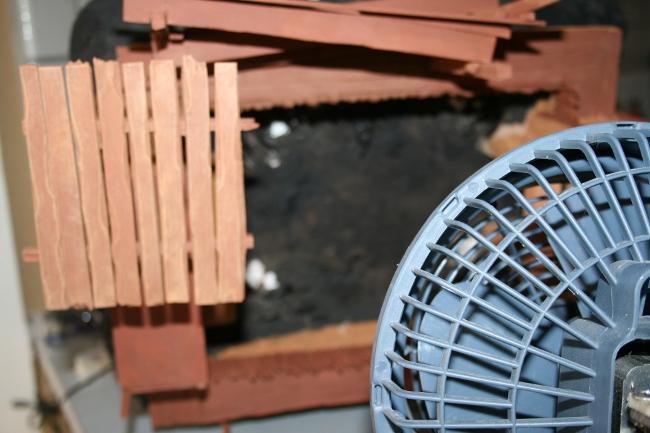
Looking great man! You just need to do something about the wood, add more details to it and make it look dirtier or something, it looks too plain compared to the rest of the pieces.
|
|
|
|
|
|
2010/09/09 17:09:54
Subject: Ork City Project: Squig Fighting Arena
|
|
Regular Dakkanaut
|
Malika2 wrote:Looking great man! You just need to do something about the wood, add more details to it and make it look dirtier or something, it looks too plain compared to the rest of the pieces.
If you mean the wood shown on this piece in our blog, yes I do plan on attacking the wood and stucco as well with all manner of weathering, shading and grime. Thanks for looking 
|
|
|
|
|
|
2010/09/09 17:16:34
Subject: Ork City Project: Squig Fighting Arena
|
|
Irked Blood Angel Scout with Combat Knife
uk
|
looks great! subscribed! will be watching this closely!!!
|
 "From the deepest desires often come the deadliest hate" -Socrates. "From the deepest desires often come the deadliest hate" -Socrates.  |
|
|
|
|
2010/09/09 17:17:48
Subject: Ork City Project: Squig Fighting Arena
|
|
Hardened Veteran Guardsman
|
This project is pretty amazing. Good terrain is underrated. I will be checking out your site for more.
|
|
|
|
|
2010/09/09 23:37:18
Subject: Re:Ork City Project: Squig Fighting Arena
|
|
Regular Dakkanaut
|
When we last left our Squig fighting pit, we were barely shaping the base and walls, and after sanding down the textured coatings we applied the first base coats of paint.
Some projects we follow the logical order of: build, detail/accessorize, prime, paint base-coats, highlight. And some projects, like this one, we have to apply a more flexible strategy. This thing was going to have a lot of woodwork and details, and getting a brush, or even airbrush stream into all the corners and crevices would be nearly impossible, and my cardinal rule for painting that I instill into all my henchmen or aspiring artists is this: If you do only one thing right, make sure your base-coats are clean!
Just like figure painting, scenery has (and should have) many different contrasting colored areas, and the sharper and more well-covered those areas look, the nicer the whole model will look. That being said, we started painting the woodwork the moment we glued it on, or even beforehand.
Spiky trim, support beams for the seating areas, plank floors, misc. woodwork was now being attached. All the wood we we attach we hack at a little with a blade, to notch corners and edges and make the whole thing look roughly chopped with an axe. These uneven textures would also nicely capture the highlights and shading later on in the project.
This part is tough. We build all our Orky scenery to a certain standard of pointy-ness and defensibility. For a structure this big, that means lots and LOTS of wooden planks, carved into rough-hewed spikes or boards, glued on, then painted in three or more consecutive coats of base-color. And even that rarely covers all the little nooks where raw balsa can peek out from.
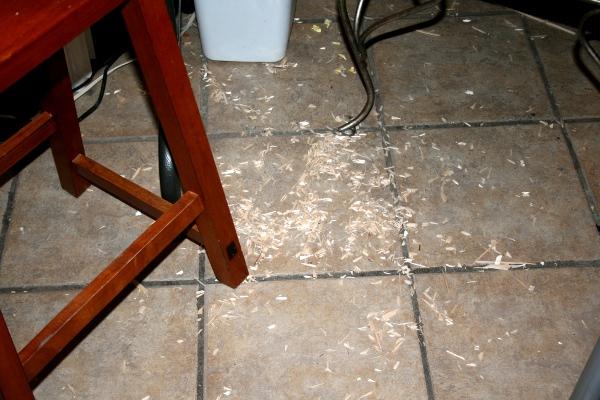
Every square foot of our floor looked like this, in every room.
While glue and paint dried, we got to work on some of the larger, distinctive parts of this project. Remember the sketch of the skull I made on one gatehouse in part 1? That wasn’t going to be a painted-on detail. We don’t do anything halfway. Mismuse, our resident Orkish icon expert began to shape this massive glyph from foamcore.
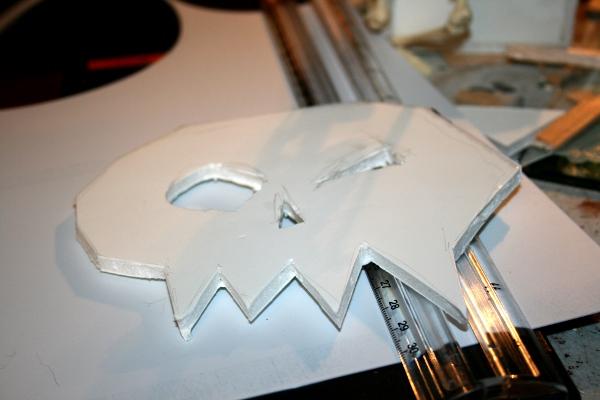
It didn't need to be smooth, it’s mostly for shape, and rougher = Orkier.
The foamcore is just an under-structure, the next phase is to clad the whole skull to appear as if it were bolted together from spare parts and scrap metal plates. This starts with a pile of hacked up styrene of various shapes and textures, glued together in simulated randomness.
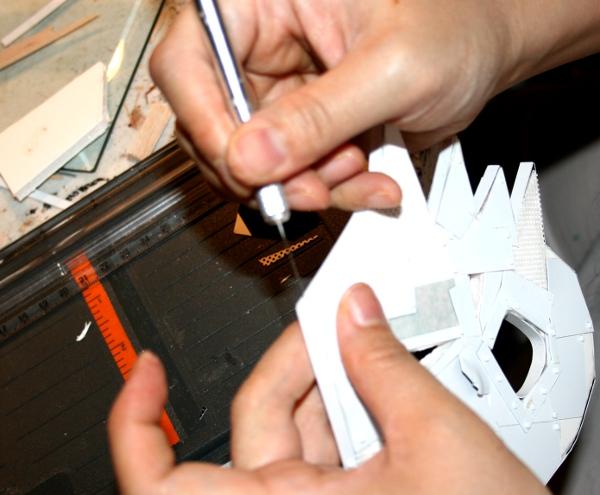
“Oops, glued the whole thing to my hand again.”
Then it’s rivets. We rivet the plates, gluing on each individual rivet, some with washers.
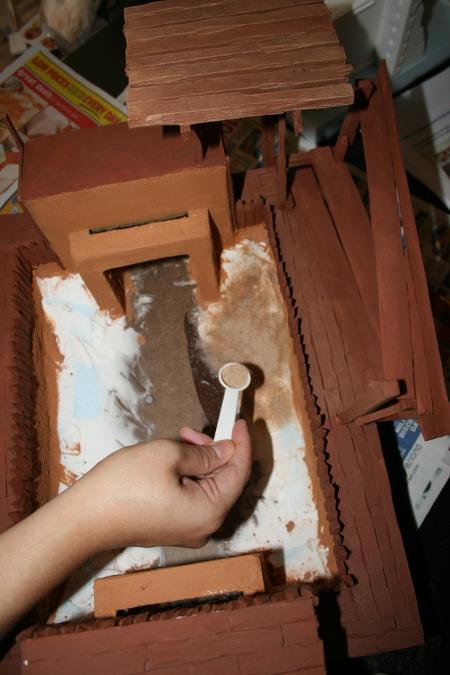
It’s exhausting. To watch. So I got to work on applying the ground texture to the built up soil around the structure.
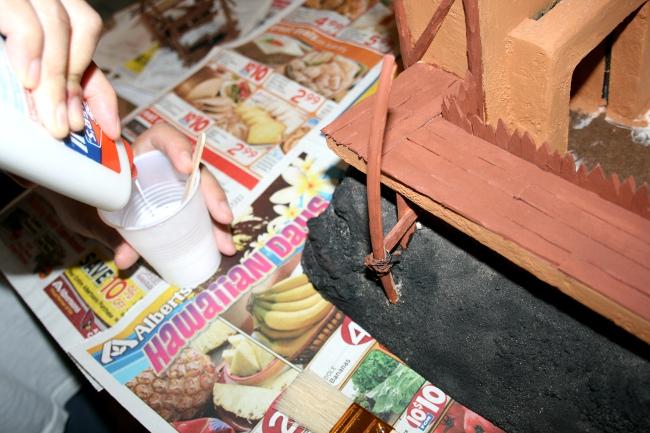
Nothing magical here. Just watered-down PVA glue and garden variety sand. Of course we don’t like to just throw dirt on randomly, we actually sift riverbed sand into three different grades, making sure that the rougher grade sand and gravel (actually boulders at 28mm scale) accumulate around the rocky outcroppings to simulate crumbling, weathered geology.
Then while that dried, we primed the skull, and added texture for the rust I'll be adding later. We’ll cover the whole rusting process and our own different varieties and color schemes in an eventual tutorial, but you can read an excellent guide here. Seriously, whole books could probably be written on the varieties and techniques to make things look like rusty metal.
Notice wood planks on all the floors, bleachers beginning to take shape, boss-hut framework also being assembled. I temporarily attached the skull with masking tape to test its positioning. We use black nylon cord in a couple locations, wrapped around joins in the wood planks and posts to simulate the whole thing being lashed together when rivets were unavailable, because sometimes and Ork's gotta do what an Ork's gotta do.
I started to assemble the Nob shack on the watchtower structure, framing out the construction and adding boards and plates to make it look like a little shed.
And here is where we leave off for now.
|
|
|
|
|
|
2010/09/09 23:49:24
Subject: Ork City Project: Squig Fighting Arena
|
|
Wolf Guard Bodyguard in Terminator Armor
|
This looks awesome cant wait to see it all painted
|
DR:90+S++G++M+B++I+Pw40kPwmhd+ID+++A++/wWD359R+++++T(M)DM+
 Deff Gearz 2,000+pts. (50% painted), Deff Gearz 2,000+pts. (50% painted),  Retribution 57pt.(70% painted), Retribution 57pt.(70% painted),  FOW British Armoured Squadron 1660pts. (15% painted) FOW British Armoured Squadron 1660pts. (15% painted)
|
|
|
|
|
2010/09/09 23:59:34
Subject: Ork City Project: Squig Fighting Arena
|
|

Phanobi
Canada,Prince Edward Island
|
Very nice ork scenery! Some of the best I have seen.
|
|
|
|
|
|
2010/09/10 00:27:53
Subject: Ork City Project: Squig Fighting Arena
|
|

Screamin' Stormboy
|
i want one of those! or two and make a gorkamorka game! yay! I need more free time
|
i juzt want to go more fazta |
|
|
|
|
2010/09/10 00:38:21
Subject: Ork City Project: Squig Fighting Arena
|
|
Deadly Tomb Guard
|
OUTSTANDING!
|
|
|
|
|
|
2010/09/10 16:17:15
Subject: Re:Ork City Project: Squig Fighting Arena
|
|
Lone Wolf Sentinel Pilot
Inside that little light in your refridgerator
|
I think I just  my pants in amazement.
S_P
|
Fafnir wrote:What part of "giant armoured ork suppository" do you not understand?
Balance wrote:Nothing wrong with feathers. Now, the whole chicken, that's kinky.
|
|
|
|
|
2010/09/10 17:26:42
Subject: Ork City Project: Squig Fighting Arena
|
|
Renegade Kan Killin Orks
|
AWESOME!
That is above and beyond, truly.
But where do you keep it all? I have been admiring your terrain since I first saw your posts. Have you a large garage with no car, or some humongous shelving system or a permanent gaming table?
|
|
This message was edited 1 time. Last update was at 2010/09/10 17:26:59
|
|
|
|
|
2010/09/10 17:41:26
Subject: Ork City Project: Squig Fighting Arena
|
|
Hubcap
|
The Good Green wrote:AWESOME!
That is above and beyond, truly.
But where do you keep it all? I have been admiring your terrain since I first saw your posts. Have you a large garage with no car, or some humongous shelving system or a permanent gaming table?
it's a commission piece, it's his job
|
|
|
|
|
|
2010/09/10 21:29:45
Subject: Re:Ork City Project: Squig Fighting Arena
|
|
Regular Dakkanaut
|
The next handful of updates will bring this project log current. There are a lot of pictures ahead, so if you're using dial up out in the wilderness, now would be a good time to go out and feed the chickens or complain about the government.
So far the working time on this project has been many months, working off and on with other projects. I honestly lost count of how many, but luckily our client is patient and knows the wait will be worthwhile.

In the previous chapter we were building the Nob shack on top of the observation platform. Well Mismuse walked by, picked up the balsa wood structure and while examining it, she  “accidentally” crushed it between her fingers, and ended up designing a whole new shack. Only a minor setback fortunately, and just a small example of the kind of changes these projects go through.
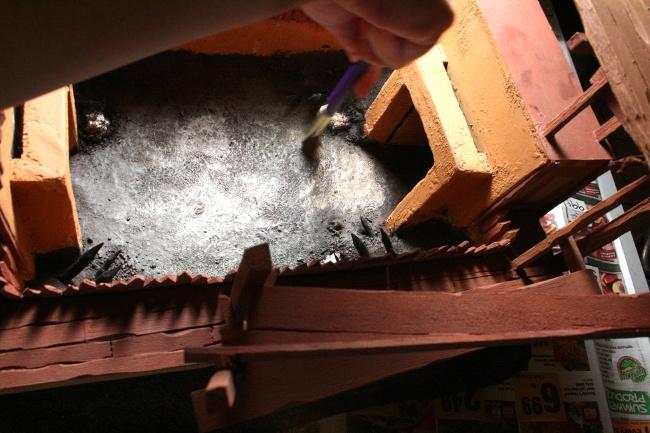
After the destruction of the Nob shack, Mismuse got to work on the ground cover. The outer ground was painted black, then painted again, then washed black to fill all the gaps that the first two coats missed, then touched up yet again where the previous three coats missed. The inner ground in the arena was to be a much finer grade, to represent the the mud and dust where the actual fighting takes place.
After painting on the diluted PVA glue with an old brush, she sprinkled finely sifted sand as the base cover for the inside.
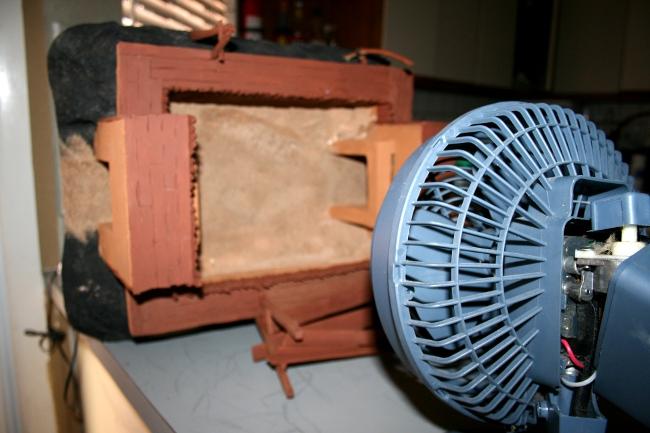
To speed drying time, the model was placed in front of a fan. (Or the battered remains of a fan.)
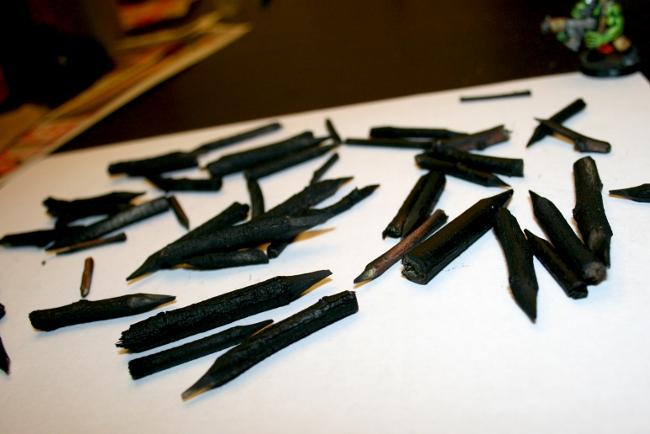
While that was drying, she then started carving small natural branches to points, which I primed black. Mesquite trees are her favorite because the bark has a very fine and rough skin that catches great detail when painted.
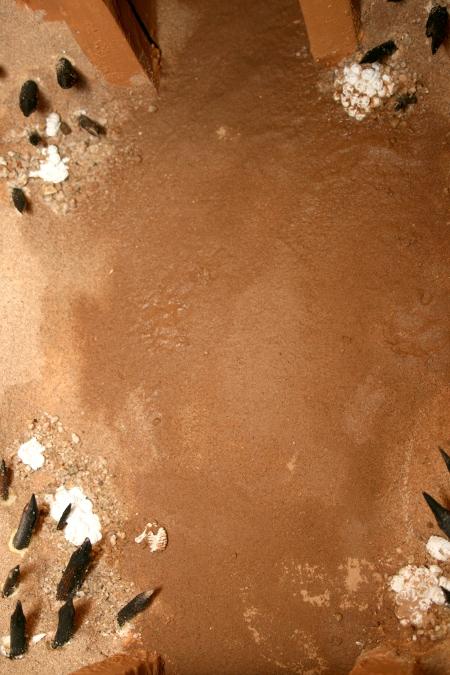
The pointy sticks were stuck into the sides and corners of the fighting pit, these were there to keep ravenous squigs and other desperate contenders from climbing the corners and attacking the cheering spectators. They also looked thoroughly nasty and orky. The spikes were accessorized with piles of skulls and bones from some of my resin castings, and everything was blended in with a little coarse gravel around the base of the spikes and bones. Finally, Mismuse poured diluted PVA into the pit, making a large, milky pool before tossing handfuls of our finest grade sand/dust into the pit, making a big, muddy mess. Yes, I was a little taken back at this technique, but she promised she knew what she was doing.
The glue had barely started to dry when Mismuse started painting it black. “This is madness!” I shouted, but she simply shrugged and put the whole thing in front of the fan again. I have ingrained values in my craft that state one should never use excessive materials or paint something onto a moist surface, which is why we have beat-up fans and hair-dryers everywhere. Since we work a certain number of hours on multiple projects each day, we often have to accelerate the drying process to make good progress and meet our deadlines. Sometimes the workshop is a roaring cacophony of fans and dryers and heaters, and of course the air conditioner to compensate for all the heat generated. The electric bill here is often astonishing.
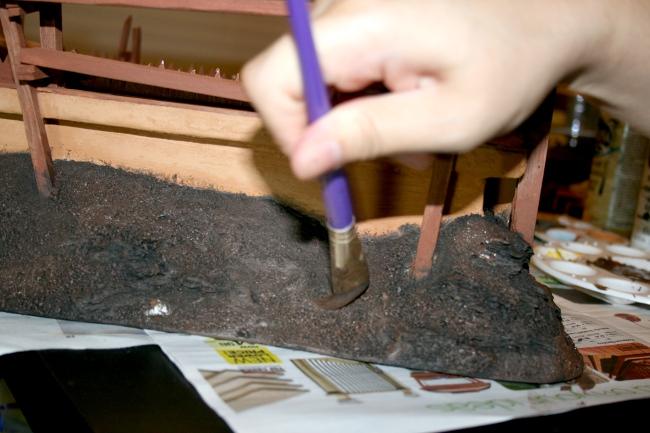
While the inside finally started to dry out, Mismuse started painting the outside ground cover. She started with a coat of cinnamon brown mixed with a tiny amount of dark grey. She then applied this coat liberally, even watering it down to a wash in places, but careful to leave most of the deep texture of the rocks black. Progressive highlights were added using lighter tones of brown mixed with lighter grey. These highlights were done in mottled patterns, and in places had to be carefully brought back down with dark washes to keep the ground color naturally varied.
Mismuse then started working on the inside ground, using the same base color but working up to lighter tones of grey and sand colors.
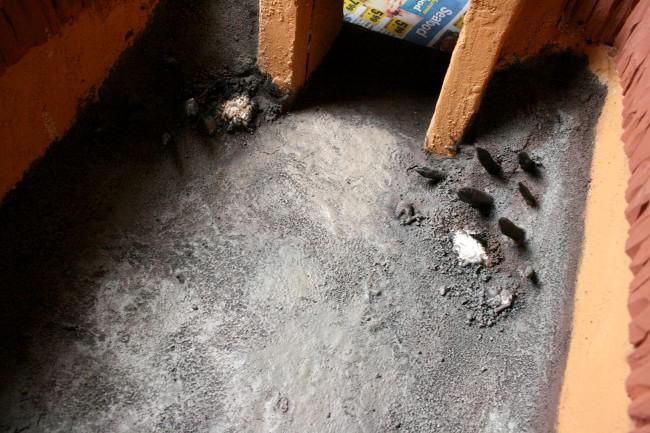
This is where reason behind her wet-on-wet tactic began to reveal itself. The rapid drying of the mud and glue with paint on it caused the ground to take on the exact texture of compacted, dried mud, complete with tiny cracks everywhere. I couldn’t really capture the full effect in this picture but it’s there.
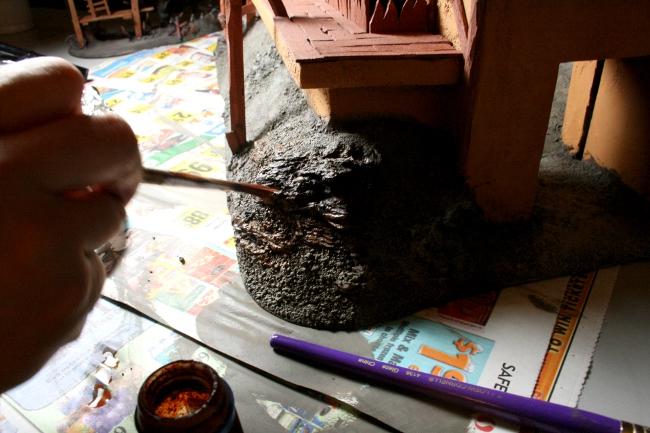
Next was my turn into the ring. The rocks were washed with good ol’ GW chestnut ink. (Do they even call it that anymore?) I wanted the rocks to have good contrast with the rest of the model so I decided to make them ruddy red/brown.
After washing, the rocks were semi-drybrushed in russet, a red/brown color, then highlighted with russet mixed with the ground cover highlights. The similar color pallet will help tie the rocks to the ground around them.
Next update we'll start to work on the metal parts and accessories, as well as begin highlighting!
|
|
|
|
|
|
2010/09/10 21:48:56
Subject: Re:Ork City Project: Squig Fighting Arena
|
|
Flashy Flashgitz
|
I can't wait!
|
|
|
|
|
2010/09/10 21:54:11
Subject: Ork City Project: Squig Fighting Arena
|
|
Hardened Veteran Guardsman
|
WOW
This is absolutly amazing!
Though right now the popsicle stick fence thing looks just like well a bunch of popsicle sticks with some mild cutting.
After seeing some of your other work i demand better!!!!
|
Edward Cullen. In front of a Blood Angels Death Company. Let's see your sparklepeen save you now, you filthy mutant. - The Dizzler
It's kind of like they took the old codex, took out everything everyone liked, then shat on it. - alexwars1
crew gender equality, screw gender altogether. So long as you have a place on your body where sexual torture instrument #367 may be inserted into, they don't care. - Fafnir on Dark Eldar
DR:90SG-M+B++I+Pw40k08#-D+A+/areWD-R++T(M)DM+
 (custom chapter) 750 (custom chapter) 750
 Started! Started! |
|
|
|
|
2010/09/10 22:01:57
Subject: Re:Ork City Project: Squig Fighting Arena
|
|
Yellin' Yoof on a Scooter
chichester
|
looks mega, will follow this, keep up the good work
|
 is it not better to die on your feet, then live on your knees? is it not better to die on your feet, then live on your knees?

myname is Lrak not Irak!!!!!!  |
|
|
|
|
2010/09/10 23:24:02
Subject: Ork City Project: Squig Fighting Arena
|
|
Regular Dakkanaut
|
sc0ttfree wrote:WOW
This is absolutly amazing!
Though right now the popsicle stick fence thing looks just like well a bunch of popsicle sticks with some mild cutting.
After seeing some of your other work i demand better!!!!
They're actually balsa stakes, they're well carved and when highlighted the textures pop out much better. It should also be noted that there are a couple of different styles of Orkish crenelations that we generally use. Most of the detail work on this piece isn't even in place yet, so the whole thing is still pretty plain. For this piece we're matching the style of building our client chose and has a half-dozen or pieces already. Here's a couple samples:
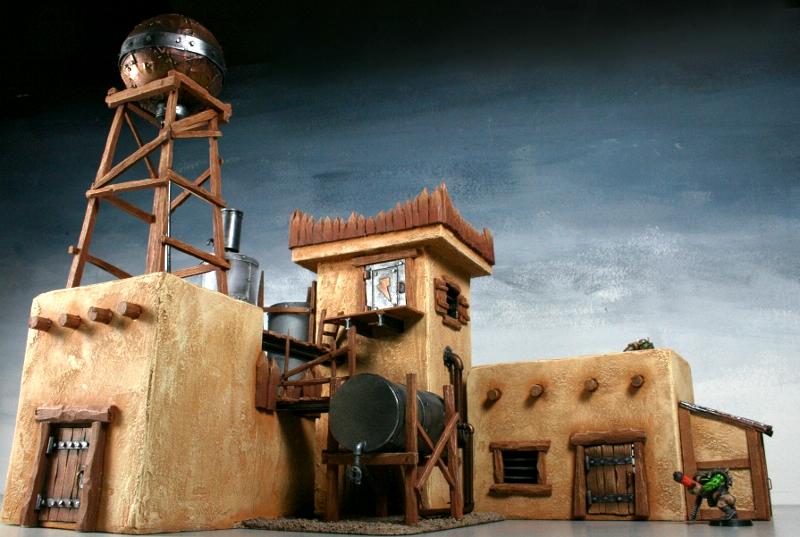
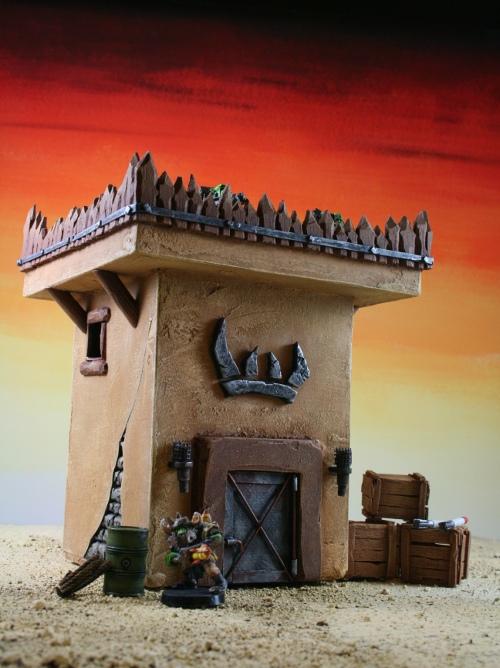
This style pays homage to the old-school GW theme.
|
|
|
|
|
|
2010/09/13 07:59:14
Subject: Re:Ork City Project: Squig Fighting Arena (lotz o' pictures!)
|
|
Regular Dakkanaut
|
Moving on with the updates,
While I worked on the outside ground boulders, Mismuse started putting together the metal bits and the new Nob shack. The new design was to be stucco with heavy metal barriers around the platform. It was a fighting pit, yes, but it also needed to be defensible in case of an attack from inside our outside the pit. Her construction is based on my earlier drawing.
The rivet-laying process is tedious, painful and thankless. The rivets we normally use are sliced plastic rods with different shapes, either square, round or hexagonal, in different sizes. For Orkitechture, we use all those shapes and then some. Mismuse likes to use the point of a hobby knife to pick up the rivet and dip the back into a small dab of cyno glue before applying it, I prefer to use tweezers. I think she just likes to stab things.
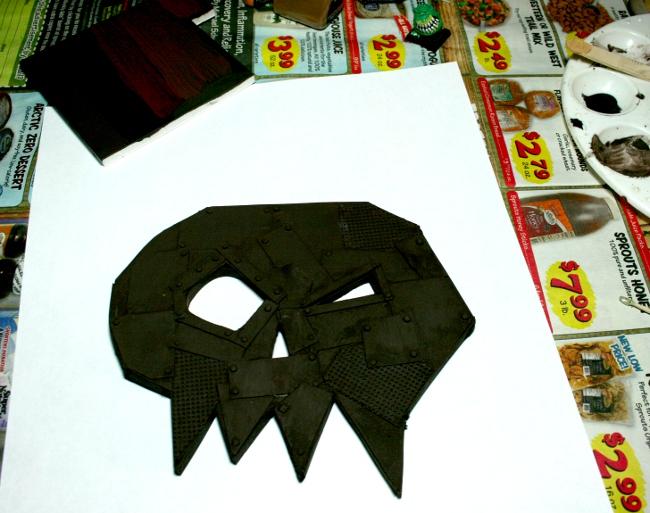
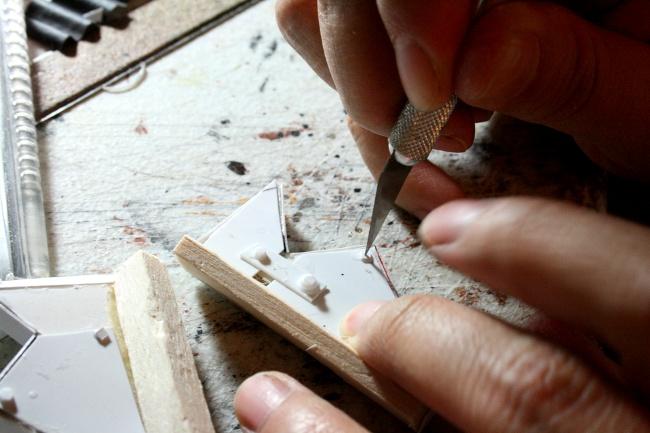
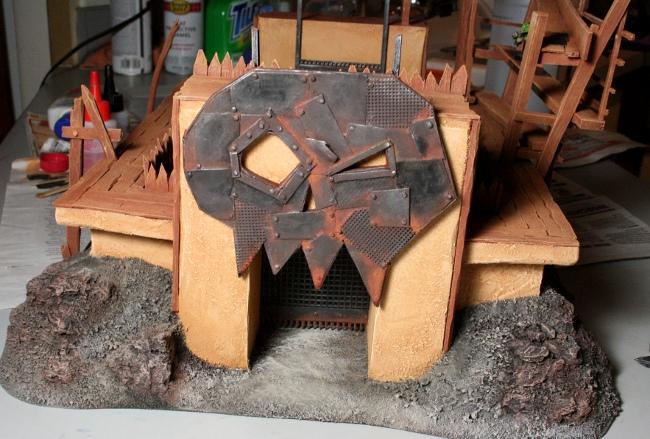
Next it was time to paint the skull. Like all good metal bits, I primed the whole thing black and prepared to paint it like bare, unpainted old rusty metal pulled from a junkyard.

Next I gave it a base-color. Most bare metal that's been left out in the elements has an oxidation over most of the surface, of different colors depending on weather and metal type. That square in the top left corner with the brown stripes on it is my test pallet for different shades of rust colors that I use, painted onto a black base color. This helps me decide how light or dark to start. In this case I chose the standard Vallejo dark rust, but most brands of burnt umber would be a good choice as well.
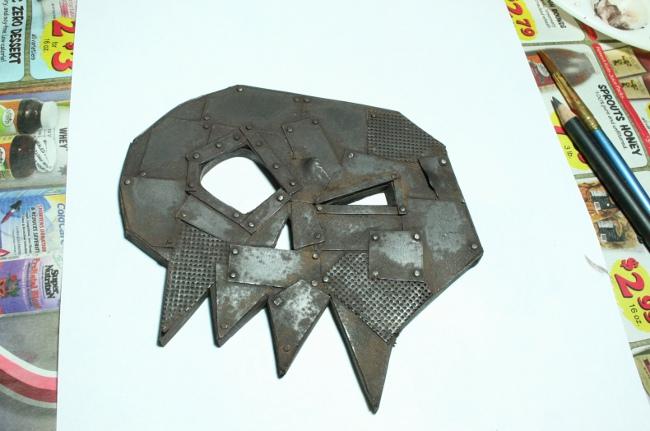
Now I used a graphite pencil onto the smooth metal surface and using my finger I smudged the graphite all over the skull. The raised edges and rivets caught the most graphite, making them shine more. I would further enhance the shine with a careful dry-brushing of pure silver around certain edges and rivets. I used a tiny bit of MIG pigments “Dark Mud” emulsified in turpentine and washed lightly around some of the rivets and textured areas. The effect would already be nearly perfect for some applications, and it already looked like old tarnished iron with some dust collected in the recesses. However this was no ordinary application, this was an ORKY icon, and needed to really show some serious neglect and carelessness.
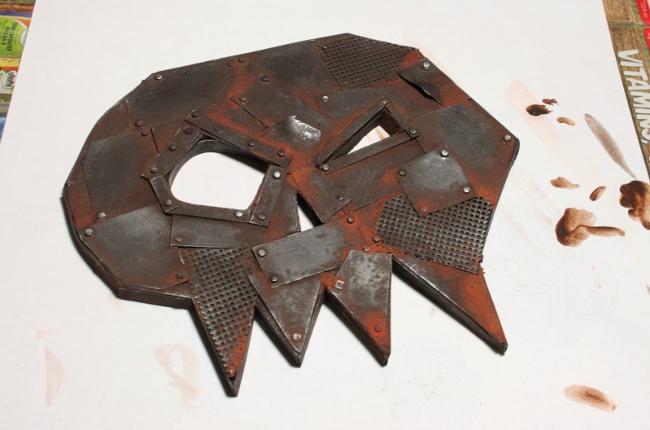
Now we’re talking! I used the rest of the MIG range of rust colors in the same way, progressing to lighter and lighter rust shades in smaller patches until the skull looked like its been hanging out in the elements, exposed to grime, oxidizing fumes and rain. A few plates I washed with thin layers of black ink to make the whole thing look less uniform. I set the skull aside for now.
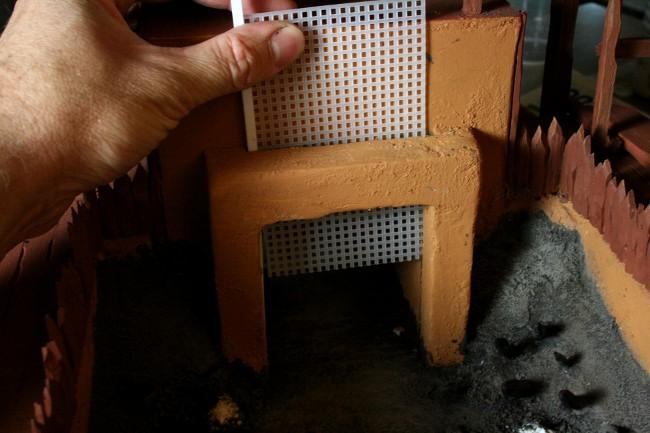
Next I got to work on the portcullises. I cut pieces of a knitting guide to size and inserted some plastic Evergreen H-channels into the grooves I left on the inside walls. I wanted these gates to be operable, or at least be able to slide up and down so it took a little fiddling and trimming, and I was pleased with the result even though I had to cut the mesh into a slightly funny shape to make it work. When I stepped out to run some errands, Mismuse threw my portcullises away and made new, better ones that worked better and had metal plates, spikes and rivets. Sigh.
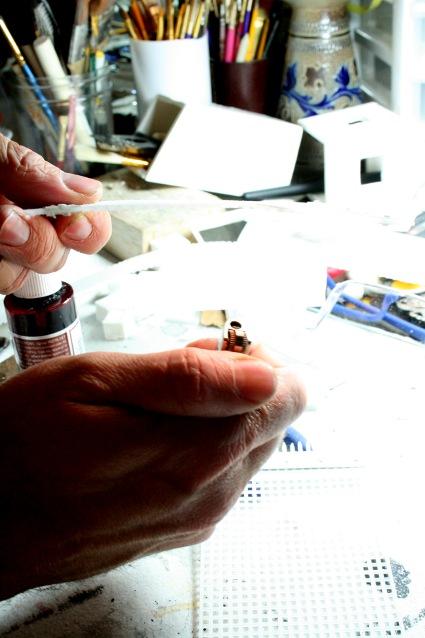
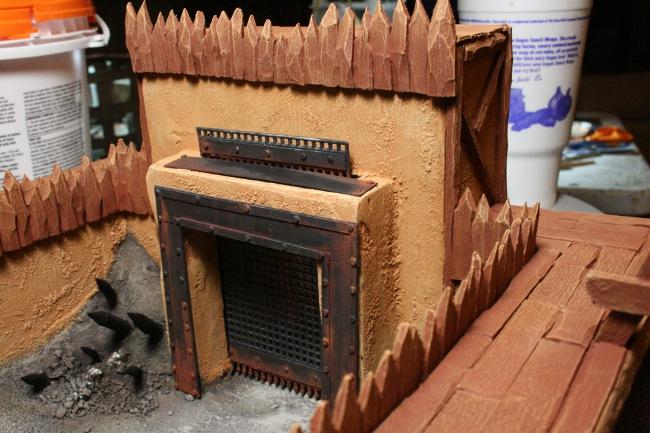
Okay since we’re on the topic, lets talk about knitting guides. They’re square mesh sheets sold in hobby and craft stores, sometimes called “granny grating” by terrain builders. They’re cheap and are a perfect size for many 28mm miniature applications, but they have a couple of flaws. First of all, they’re made of Vinyl and most primer won’t stick to them very well. This is solved by giving the sheet a very thorough sanding with a medium grade sandpaper before priming, preferably with a high-grade auto primer. The other issue is these sheets sometimes have flash lines that are so bad they literally fill the inside of the squares with a thin film. The solution to this is equally simple- a cigarette lighter or other small flame waved briefly under the grating melts all the flash right off. (But you probably need to sand it again after.)
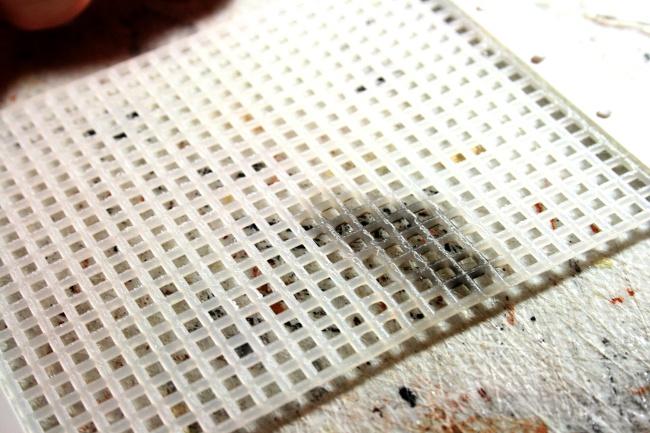
The end result after sanding and burning off flash. The dark area is where I held the flame too long and the vinyl started to burn. Which was perfect, because it actually looks more like crude metalwork with a little texture. < DANGER! Be careful using flames, especially in a hobby environment where there may be exposed, flammable solvents, paints and other hazards. Melted plastics give off toxic fumes, use with adequate ventilation, always wait 30 minutes after eating before taking candy from strangers. >
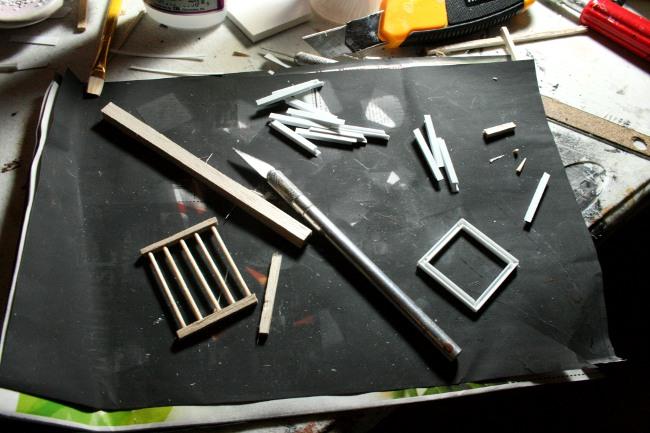
Now Mismuse started putting together another vital component, the squig cages. Using balsa, plastruct, toothpicks, cutting tools and a quiet, zen-like focus, broken only by sharp, blood-curdling expletives, she made an impressive variety of cages, as well as a large pile of “metal” parts and accessories for the fighting pit.
Automatically Appended Next Post: 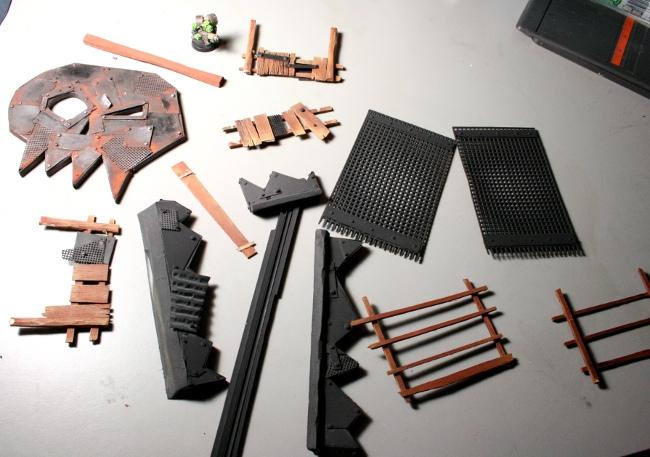
Here are some parts already on my desk for “metalizing” and rust treatment. I began to receive an endless stream of parts for painting. Some pieces I recognized as parts of my old Nob shack.
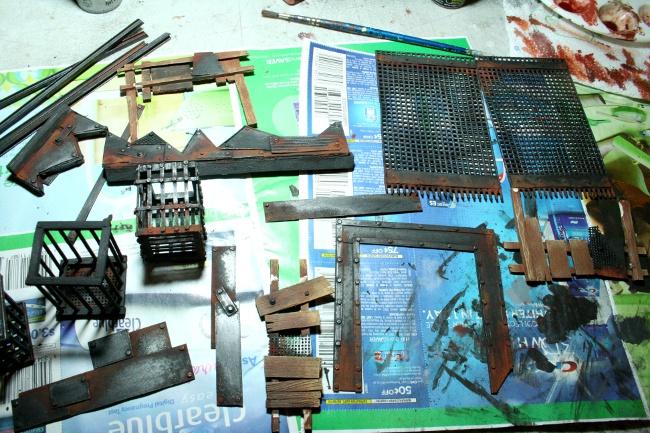
And here are pieces being finished. Each one has been rusted the same way as the skull, using MIG powders and graphite, and a little bit of silver drybrushing.
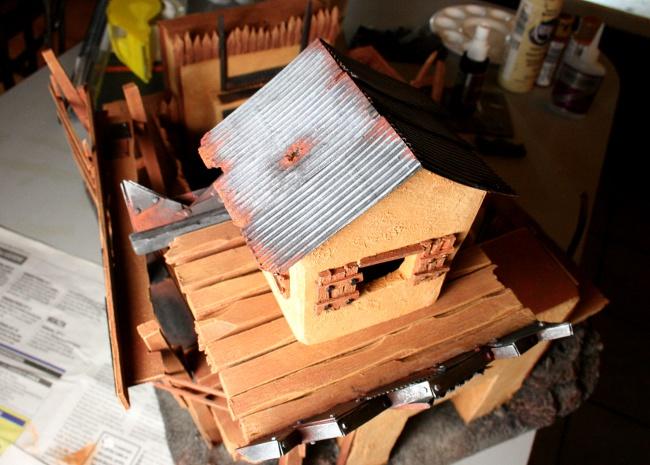
The new Nob shack on the top of the watchtower featured a much more solid appearance, and rusty corrugated metal roofing, and a generally Orky, slightly whimsical style that that we all love in Ork buildings, and which Mismuse has a innate eye for capturing perfectly, every damn time.
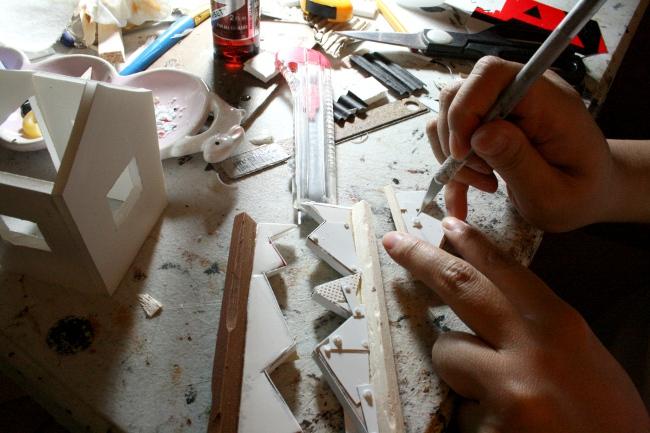
At various points in the process we tag-teamed the wood highlights, which was a daunting task in itself, to say the least. From light cinnamon we brought the tips and exposed areas of wood up through honey brown and sand color for the very edges. We did the same with the stucco building itself, highlighting up to the edges. Now I say we worked at various points, because there were three primary areas to paint- The wood, the walls and the ground. And each time you add a highlight to say, the stucco walls, you then have to go back to the wood and touch it back up because the stucco highlights tend to get everywhere. Then when working on the ground, the walls have to be touched up because the ground highlights need to be cleaned up, and so forth.

Here Mismuse is re-touching the wood after working on the stucco, probably at some unearthly hour of the night or morning. In order to keep the overall look of the project clean and sharp, this process of highlighting and re-touching had to be done over, and over and over, usually with a fine brush.
And here is the result so far. This thing is far from finished. Seriously, when I say we don’t know how to do anything half-way, I mean it, it’s something pathological. We need help.
Someone send help.
The voices, voices telling us to… to… make squigs, add ladders…. must…. wire lights!!!11sghfhfg
To be continued.
|
|
This message was edited 1 time. Last update was at 2010/09/13 08:08:21
|
|
|
|
|
|
|
|