| Author |
Message |
 |
|
|
|
|
Advert
|
Forum adverts like this one are shown to any user who is not logged in. Join us by filling out a tiny 3 field form and you will get your own, free, dakka user account which gives a good range of benefits to you:
- No adverts like this in the forums anymore.
- Times and dates in your local timezone.
- Full tracking of what you have read so you can skip to your first unread post, easily see what has changed since you last logged in, and easily see what is new at a glance.
- Email notifications for threads you want to watch closely.
- Being a part of the oldest wargaming community on the net.
If you are already a member then feel free to login now. |
|
 |
2010/09/17 16:31:45
Subject: Re:Ork City Project: Squig Fighting Arena (lotz o' pictures!)
|
|

Stabbin' Skarboy
|
Lovin this!!
will be following this for sure! 
|
 Oi!! Which Butt'n makes dis ting go!?! Oi!! Which Butt'n makes dis ting go!?!
|
|
|
 |
|
2010/09/18 09:28:47
Subject: Re:Ork City Project: Squig Fighting Arena (lotz o' pictures!)
|
|
Regular Dakkanaut
|
Still going! It’s easy to start a large piece of scenery and think “It’ll be just as easy a smaller piece, just larger components.” But the reality is that to keep scale and detail level accurate, every inch needs to be given extra attention. We just keep looking at it and saying things like “needs more plating there.” and “Why not add a real spotlight and post?” making the amount of work time increase exponentially. Also we’re having fun.
And that’s where we are now, continuing the electronic part of this project from the last chapter.
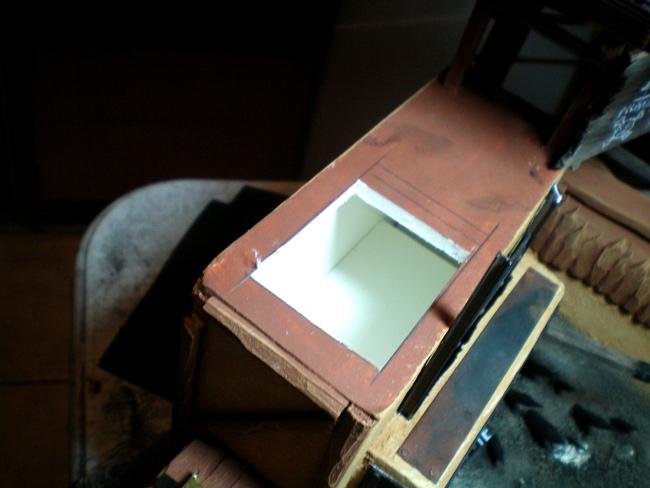
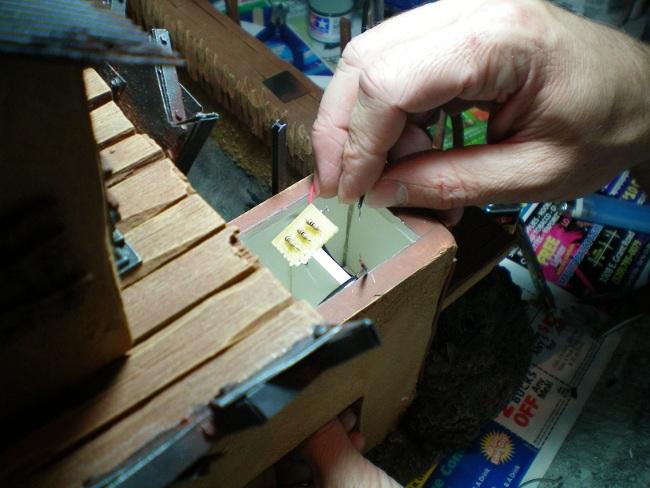
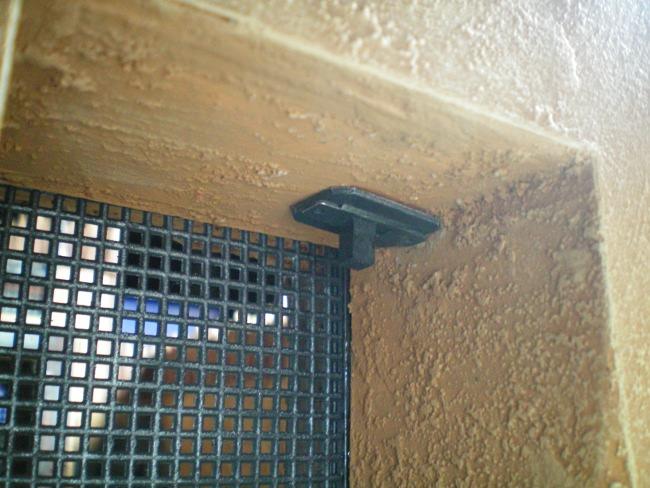
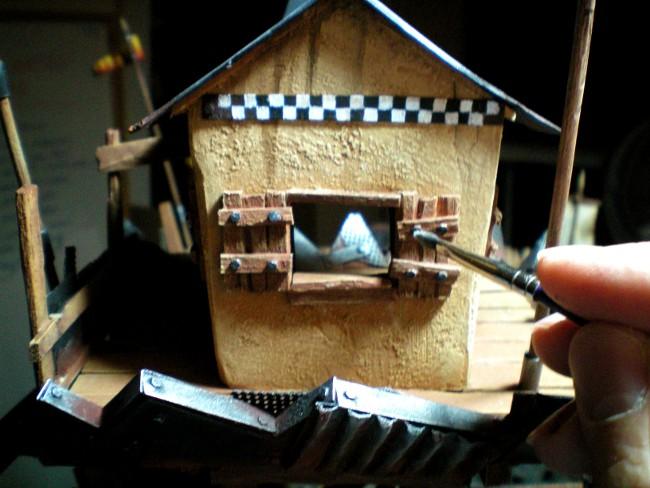
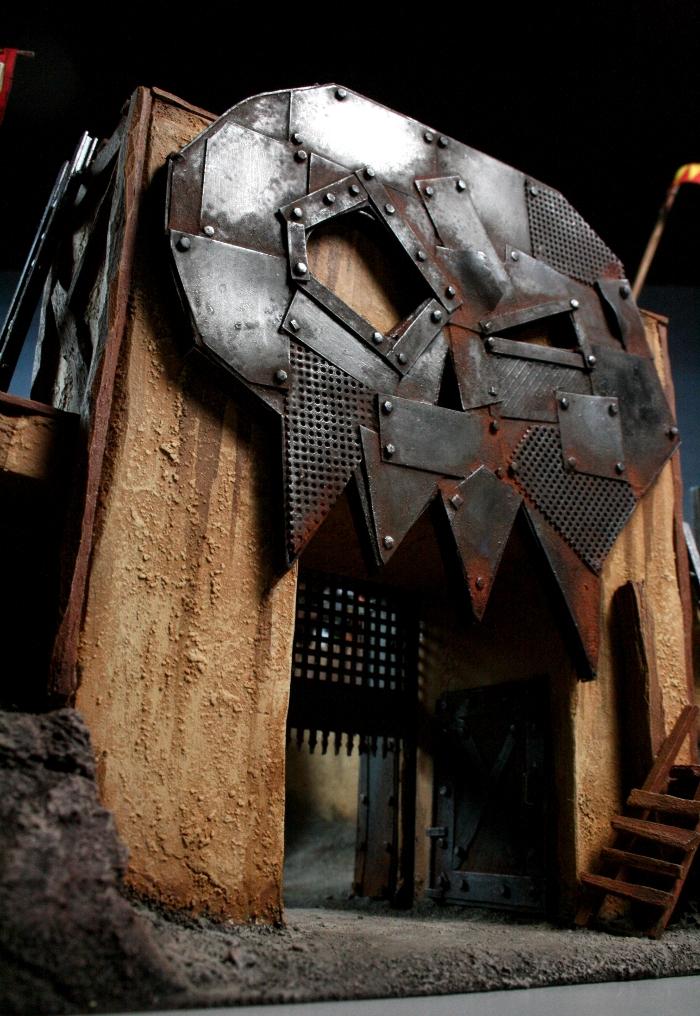
Since the lightpost was a bit of an afterthought, I had to find a place to hide the battery and wiring. I chose the gatehouse opposite the side with the metal skull icon and carved a square out of the foamcore structure.
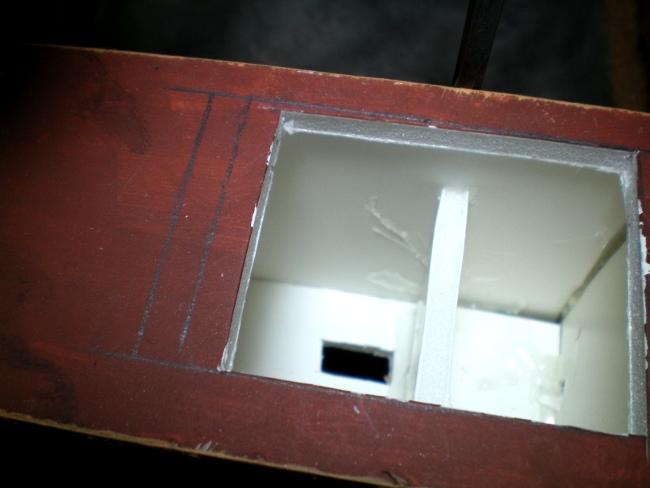
Since the gatehouse was tall, I couldn’t just drop a battery down the side, nobody would ever be able to reach it without forceps or something. I made a few foamcore walls inside, just to make a nest for the 9v battery. Before attaching the walls, I cut a small opening on the bottom for the switch.
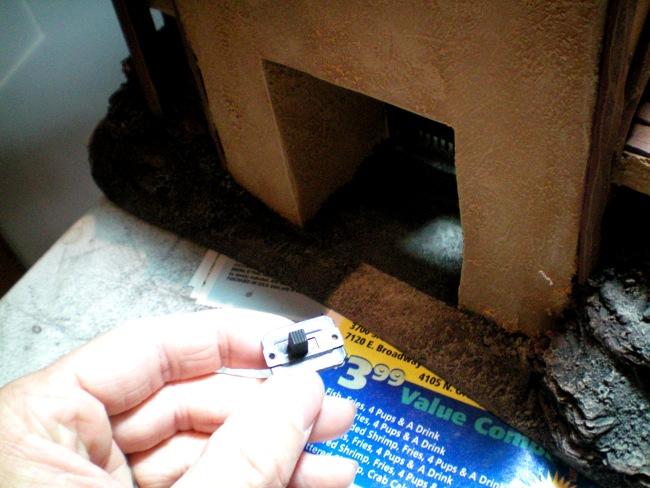
The switch is just a simple on/off slide switch. I made a plasticard flange around the edge and glued it to the switch so the whole thing would have more surface area for gluing it to the wall. I chose to mount the switch in a semi-hidden spot just under the doorway of the gatehouse.
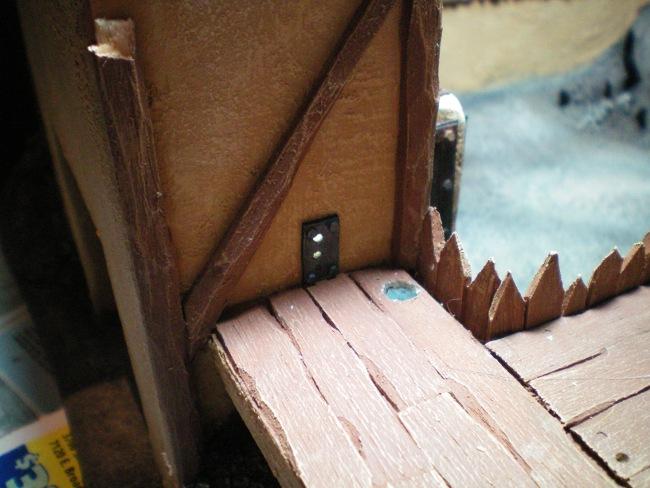
After the switch, I made a small plate cover with holes for the wires, and carved a round post hole into the floor of the structure, for inserting the post.
Now I wired the whole mess together at last. The single white LED called for 270 ohms of resistance against a 9v battery. There are a lot of websites that help you calculate this formula. In fact there’s websites for any bit of knowledge you need to know about anything imaginable. Someday we’ll all walk around plugged directly into google asking it everything about everything we see, too paralyzed to even move without first being directed a yahoo answers page with how-to-walk instructions.
On that day, the machines will have truly won.
The switch was in place, and firmly attached with fast-setting 2-part epoxy glue. I tried to test out the motion a few times and found that yes, I had indeed gotten epoxy into the operating channel of the switch, even as hard as I tried to avoid it, even though I was literally chanting “don’t glue the switch closed, don’t glue the switch closed..” Oh well, luckily I had a whole box of switches.
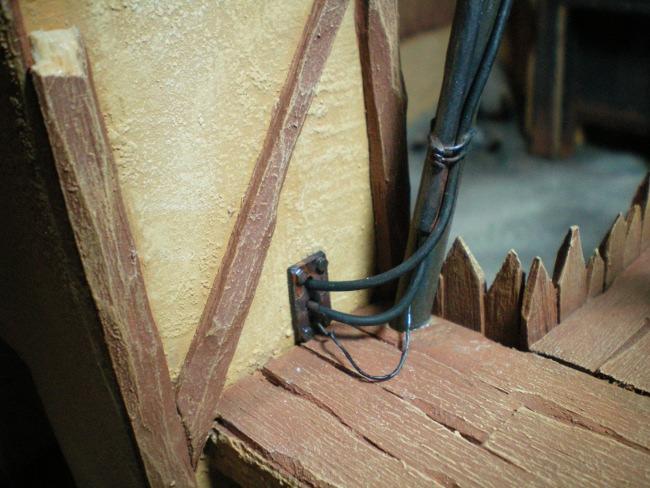
After replacing the switch, I fed the pole wires through the plate cover, and glued the post in place with carpenter’s wood glue. Basically a PVA glue designed specifically for wood. Yes, the pole is supposed to be at an angle, there's a reason Orks don't work at the telephone company. (I also wired the battery and resistors to the LED temporarily while I positioned the pole, to make sure the light beam would land where we needed it.)
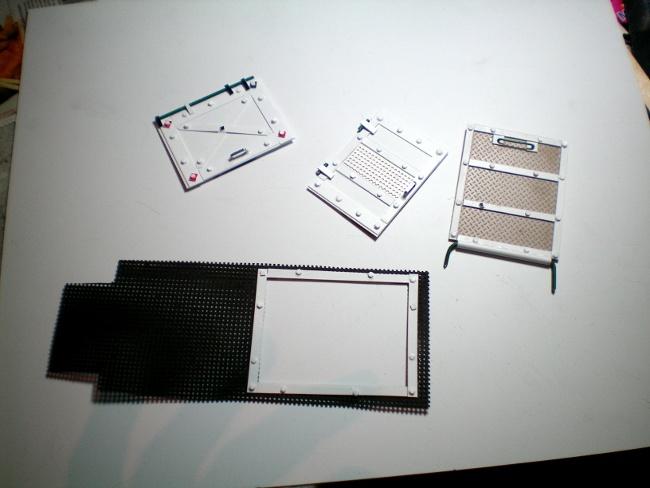
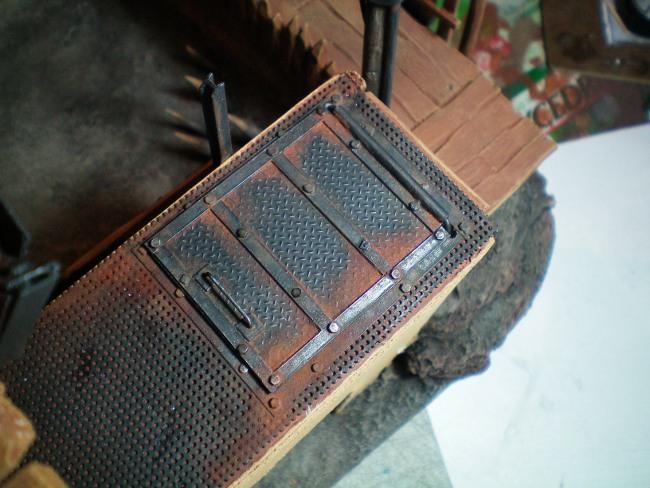
I didn’t want a gaping hole on the gatehouse, so I modified the perforated flooring with some plasticcard strips and rivets, then made a hatch with a working hinge by slipping a length of heavy-gauge florist wire into an evergreen styrene tube and bending the ends. I made a few more doors too so I could prime and paint them all at once.
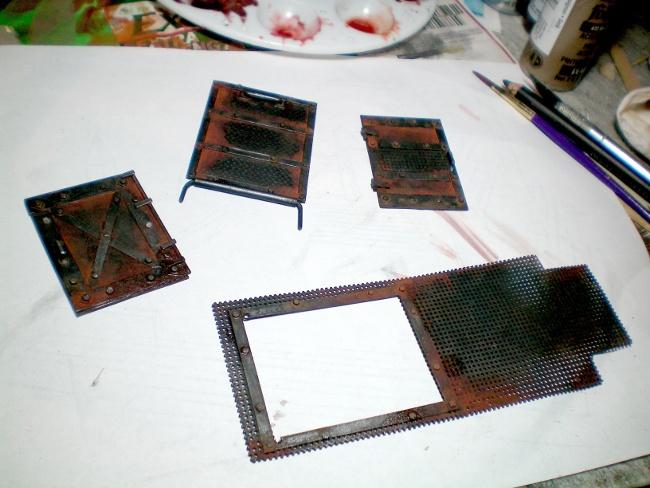
More burnt umber base coats, graphite rubbings, MIG pigments and turpentine. A final silver drybrush on the edges and I attached the doors inside the gatehouses.
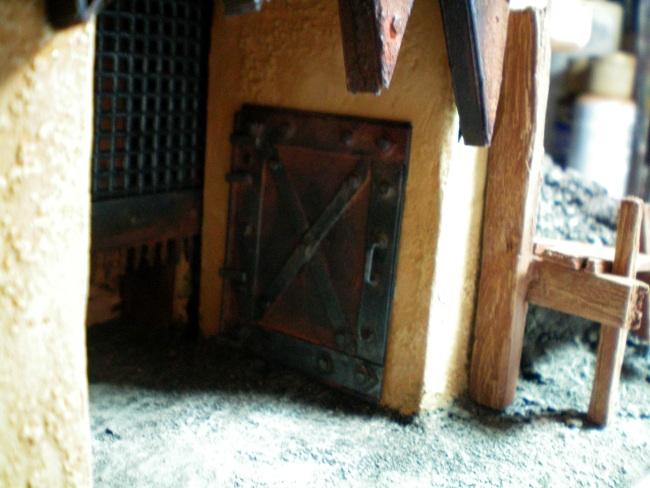
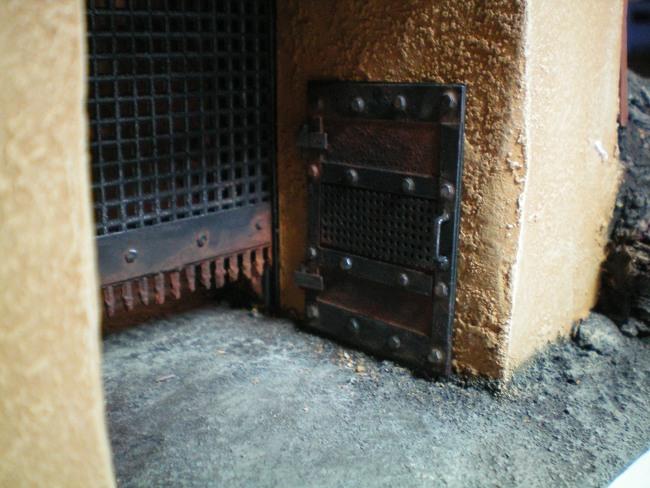
These doors would give the impression off access to interior space within the arena.
Here is the finished hatch and floor. I used my pin vice to drill holes in the flooring after gluing it in place and then pushed the ends of the hinge into the foamcore with the aid of a little expanding glue to make sure it doesn’t ever go anywhere.
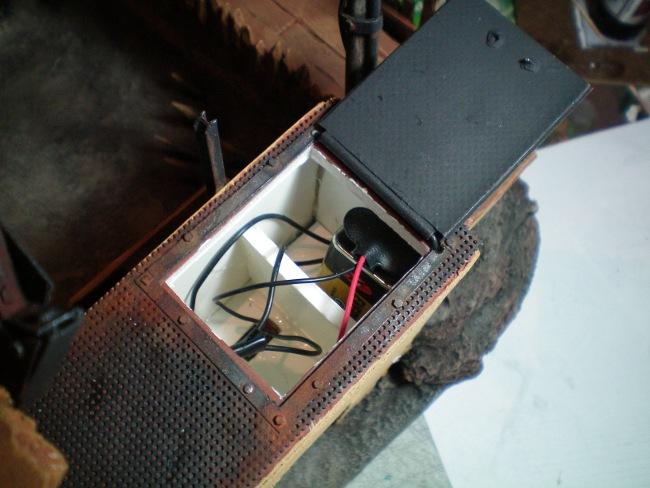
And the guts inside. Easy to access for any battery changes or future modifications. Now the last step was to test it out.

Turned off, it looks like a really nice prop.
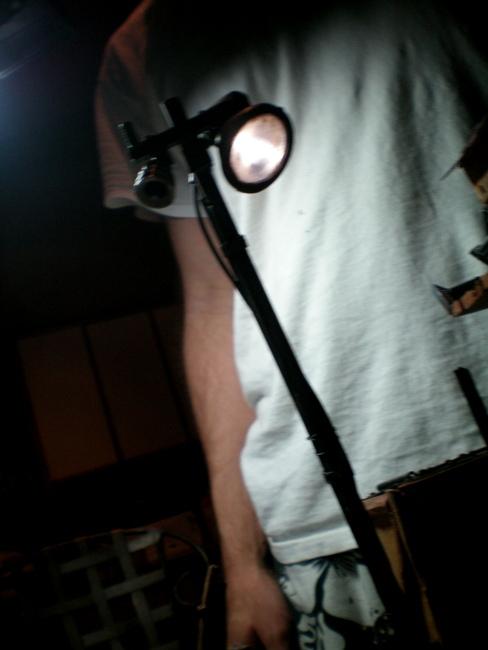
And turned on, we have magic!
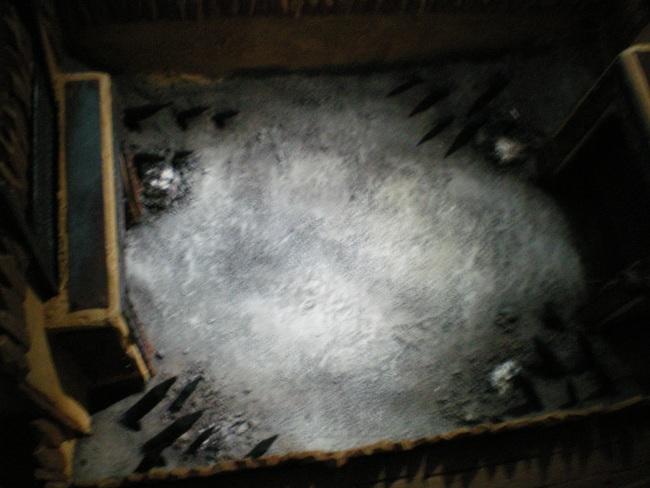
Pardon the lousy quality of the shot, it’s low light with the pit illuminated strictly by the spotlight. Looks like a stage set for a grisly show, yes?
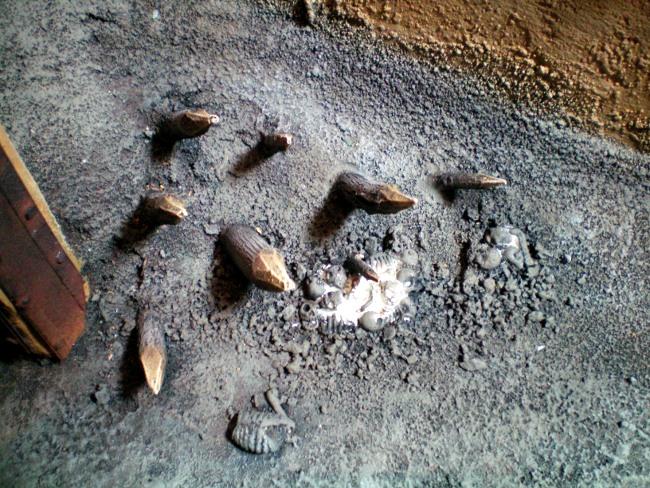
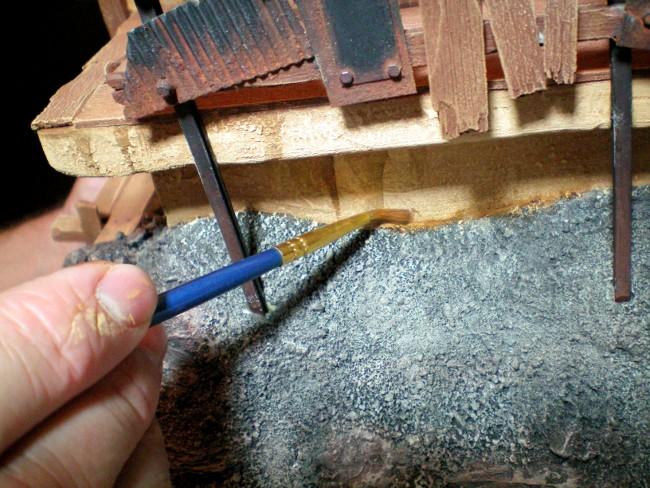
Taking advantage of the extra illumination, I began painting the details in the pit, starting with the spikes. A dark grey/burnt umber mix for the bark, highlighting up with a little sand color. The tips, which were to appear to be carved more recently, were painted the same tones as the wood trim of the pit for a splash of color.
Now at this point, there was a raging virus rampaging through the workshop, and unfortunately I was next in line to succumb to the pestilence. After a few rounds of chicken soup and reckless amounts of Nyquil, I’ll be posting the next update to this unending piece!
|
|
|
|
|
|
2010/09/18 09:33:15
Subject: Ork City Project: Squig Fighting Arena (lotz o' pictures!)
|
|

Stalwart Space Marine
|
That last edition is freaking awesome!!!!
Top class work mate.
|
|
|
|
|
|
2010/09/18 09:52:10
Subject: Ork City Project: Squig Fighting Arena (lotz o' pictures!)
|
|
Tunneling Trygon
|
Holy gak. That is too awesome.
|
|
|
|
|
2010/09/18 16:54:45
Subject: Re:Ork City Project: Squig Fighting Arena (lotz o' pictures!)
|
|

Lone Wolf Sentinel Pilot
Inside that little light in your refridgerator
|
What is it that makes you so awesome Terraformer?
Is it sacrifice? It's sacrifice isn't it?
It's definately sacrifice.
S_P
|
Fafnir wrote:What part of "giant armoured ork suppository" do you not understand?
Balance wrote:Nothing wrong with feathers. Now, the whole chicken, that's kinky.
|
|
|
|
|
2010/09/18 17:58:19
Subject: Ork City Project: Squig Fighting Arena (lotz o' pictures!)
|
|

Phanobi
Canada,Prince Edward Island
|
Great work! the working flashlight really shows your dedication to this monster of a project. I can not find a single criticism, the metal plates really bring it to life.
|
|
|
|
|
|
2010/09/18 19:11:00
Subject: Ork City Project: Squig Fighting Arena (lotz o' pictures!)
|
|
Renegade Kan Killin Orks
|
Incredible!
Have you thought about put some mushrooms in the darkest corner, a little boost for a lucky fighter.
|
|
|
|
|
|
2010/09/18 23:16:15
Subject: Re:Ork City Project: Squig Fighting Arena (lotz o' pictures!)
|
|
Regular Dakkanaut
|
Space_Potato wrote:What is it that makes you so awesome Terraformer?
Is it sacrifice? It's sacrifice isn't it?
It's definately sacrifice.
S_P
Who told you about the offerings and sacrifices??
|
|
|
|
|
|
2010/09/19 02:04:30
Subject: Re:Ork City Project: Squig Fighting Arena (lotz o' pictures!)
|
|
Raging Rat Ogre
|
Wow just wow nice job mate
|
|
|
|
|
|
2010/09/23 16:42:02
Subject: Ork City Project: Squig Fighting Arena (lotz o' pictures!)
|
|

Hungry Little Ripper
The Restaurant at the end of the Warp
|
I reckon a few of those metal doors, grates, gates and hatches are screaming for molds. "Mold me! Cast me! Sell me!" Yep Yep.
|
|
|
|
|
|
2010/09/23 17:12:43
Subject: Ork City Project: Squig Fighting Arena (lotz o' pictures!)
|
|
Regular Dakkanaut
|
This is almost so good that I don't want to even bother trying my hand at scenery. Almost 
|
|
|
|
|
2010/09/23 20:16:36
Subject: Re:Ork City Project: Squig Fighting Arena (lotz o' pictures!)
|
|
Painting Within the Lines
|
You have amazing, jaw-dropping talent for terrain. Wow, just wow...
|
Casual wargamer, casual painter, casual grad student. I can do formal though, I do own a tuxedo T-shirt.
My wargaming blog: http://headspigot.blogspot.com |
|
|
|
|
2010/09/23 20:34:34
Subject: Ork City Project: Squig Fighting Arena (lotz o' pictures!)
|
|

Nurgle Predator Driver with an Infestation
|
I second that!
|
"Not only is life a bitch, but it is always having puppies." --Adrienne Gusoff
"Put enough ranks in it, and you don't NEED combat skill" |
|
|
|
|
2010/09/24 02:46:57
Subject: Re:Ork City Project: Squig Fighting Arena (Updated 9/23 on page 3)
|
|
Regular Dakkanaut
|
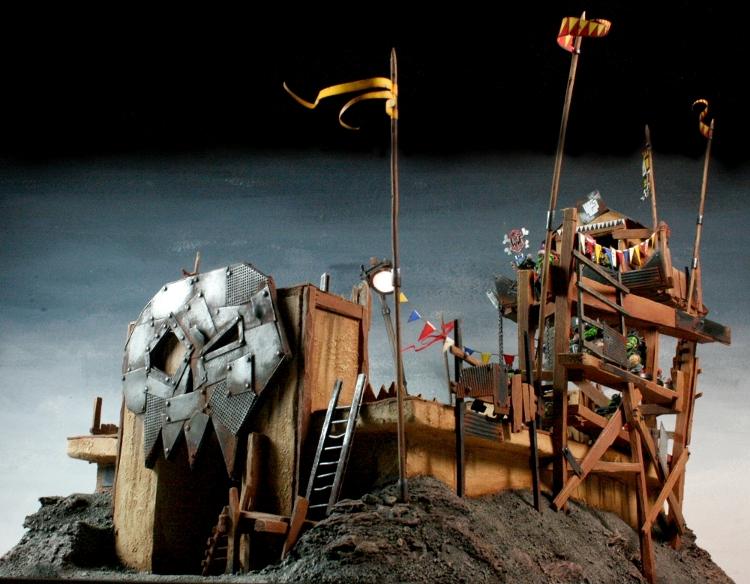
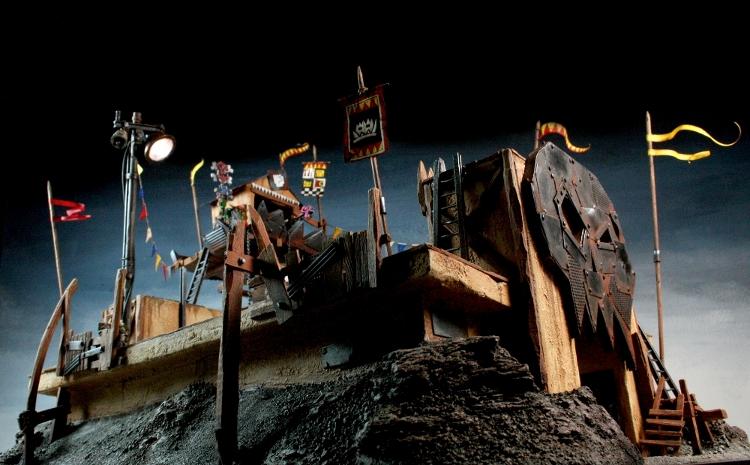
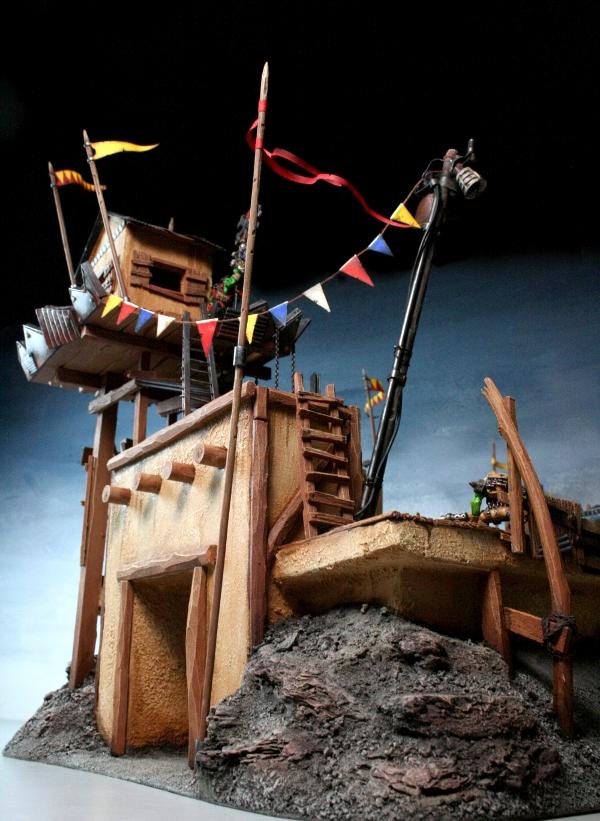
In our last installment we wired the LED spotlight. Now, after a short break while we were all battling with a rampaging flu/nurgle virus, we’re going to make the final push to get this project finished. We had a ridiculous amount of little pieces, accessories and details to finish still and this was after making some concessions about what we could realistically finish and what we should leave out or save for other projects, which I’ll talk about later.
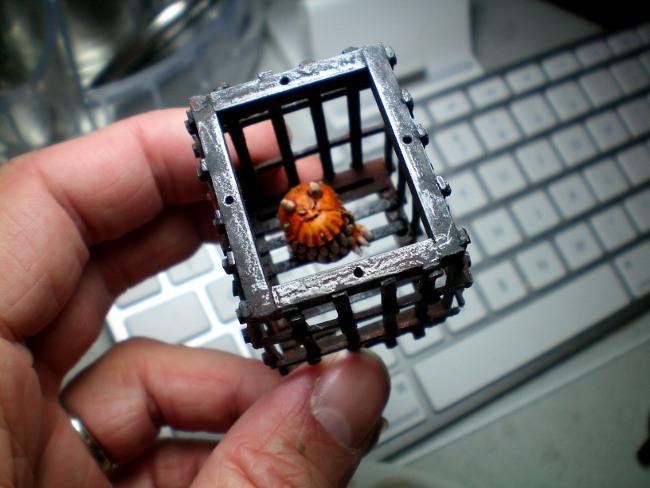
Next item of business was the squig cage, which I painted an occupant for and pinned his feet to the floor bars. An easy enough task in concept, especially if you’ve ever pinned parts or bases before, but I learned quickly that i couldn’t fit two fingers into the cage at once, which made guiding a tiny hole on the squig’s foot, over an equally tiny, glue-covered post on the bottom of the cage, an hour long ordeal.
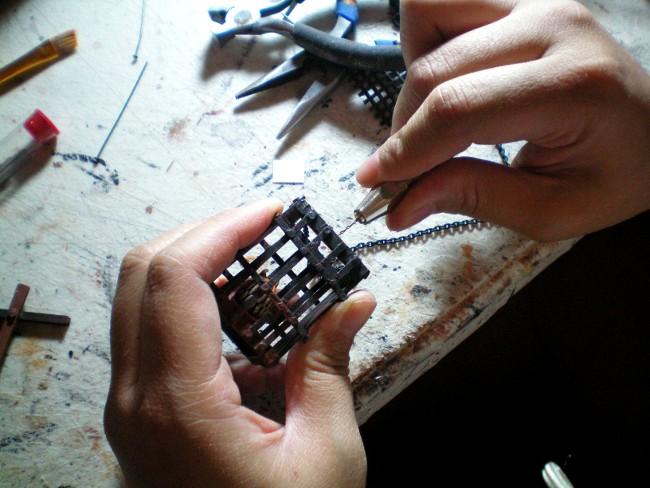
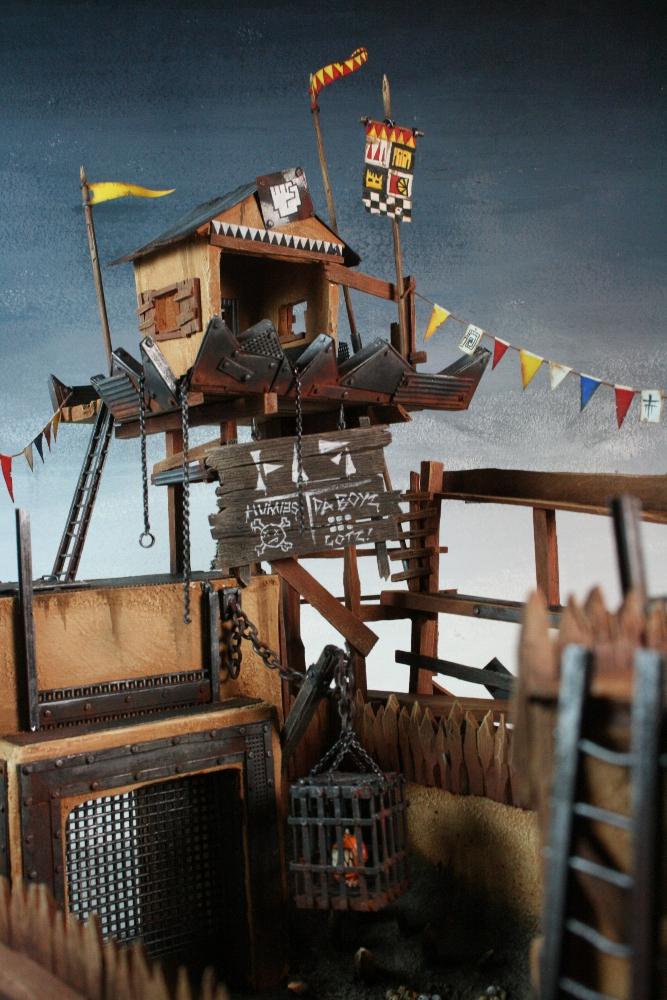
I handed the cage back to Mismuse, who drilled out the holes in the top of the cage and used chain, jewelry eyelets, and metal rings to fashion a 4-part suspension system before putting a lid on the cage, sealing the little guy in (until his turn to fight presumably.)
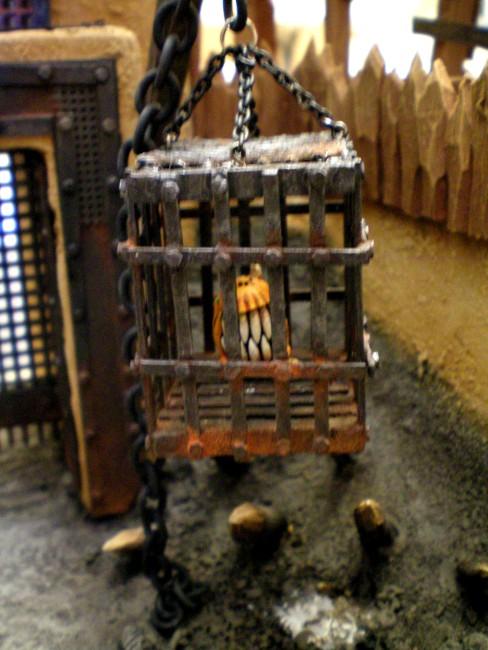
Here the cage is hung, but the chains still need painting and rusting.
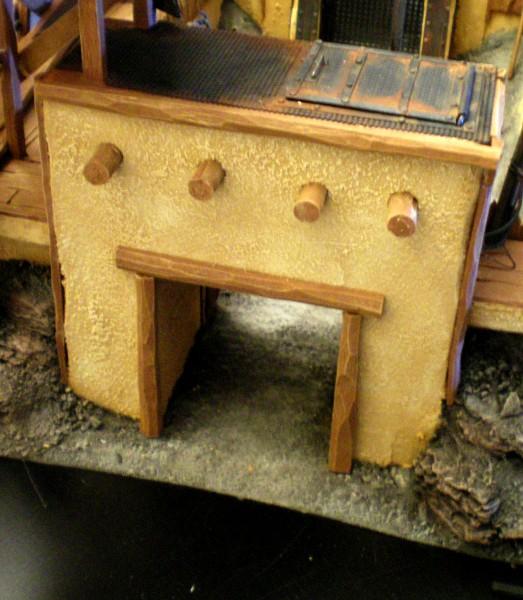
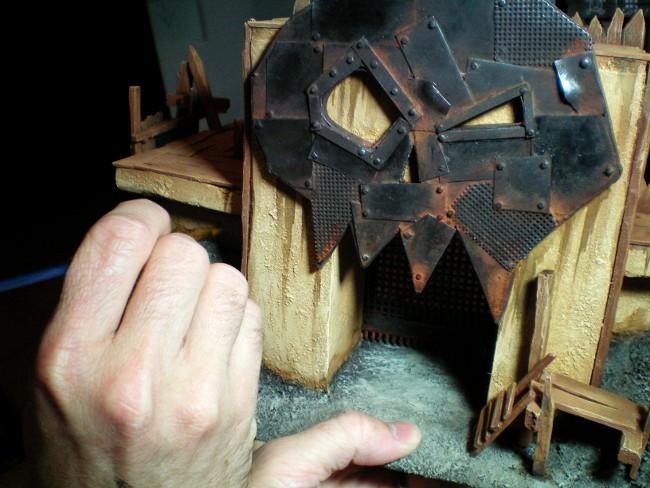
Mismuse finished the trimwork for the gatehouse opposite the metal skull, including the pieces of wooden dowel for the “pueblo” beams sticking out of the wall.
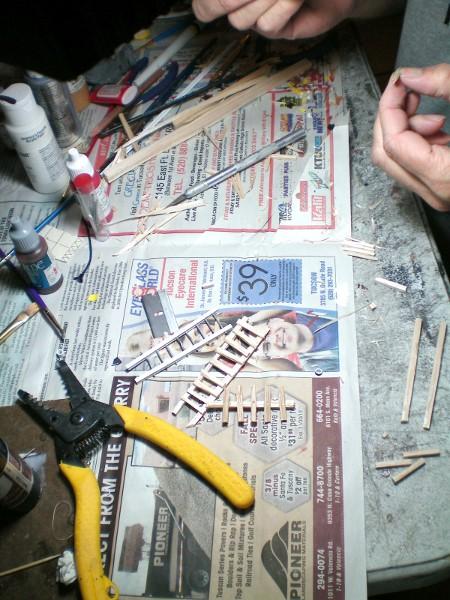
While she worked on final pieces of trimwork, I started on a stack of ladders, both wooden and metal to place all around the walls for access to bleachers and upper and lower areas. Wooden ladders were just carved balsa wood, the metal style ones were plastruct H-channels with 1″ pieces of heavy florist wire rungs glued into holes drilled through the channels with a pin vice. The rungs were dented and made deliberately uneven in places. Stupid Orks.
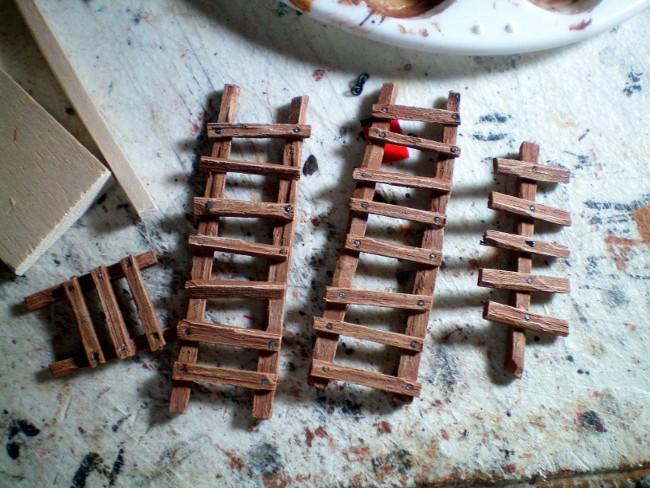
The wooden ladders were given “nail” indentations with our brush ferrule, then painted by Mismuse, leaving me to do the metalwork.
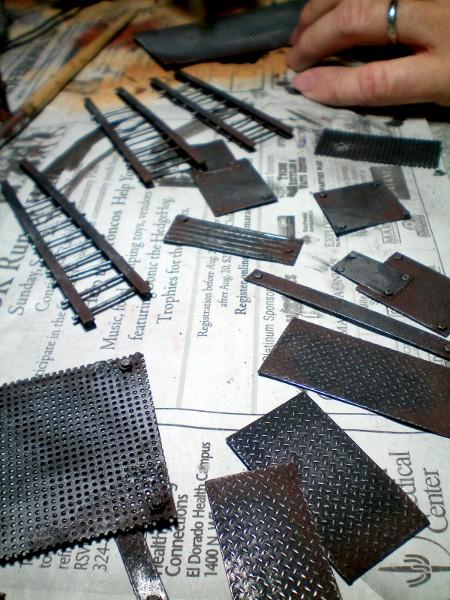
And still the metal plates kept coming! I really should try to count how many were used on this project. I painted and rusted the chains as well, and the metal ladders, and flooring pieces. This batch here is still wet with turpentine from the first, darkest washes of rust and grime.
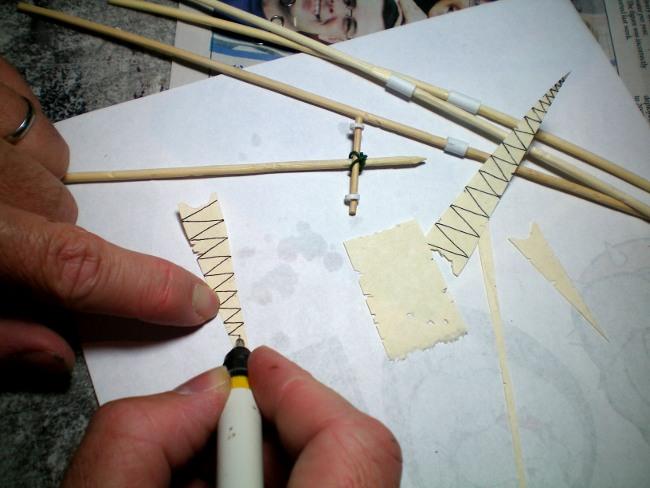
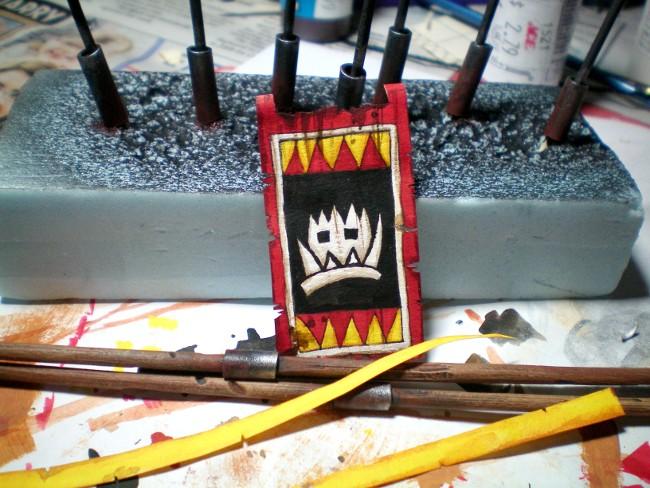
Then while the plates dried, I got to work on the banners, flags and streamers which we envisioned festooning this piece from early on to give this whole thing a festive feel. I used a hand-made paper with a smooth texture and fairly random grain directions. I figured this would simulate fine-scale, crude cloth the best. I cut the shapes out, notched the edges for wear and tear and then used a Rapidograph technical pen to outline the patterns on the banners. The poles were made from dowels and skewers, carved rough and given bits of plastic tube to simulate joins and brackets.

I painted the dags with Vallejo model colors. Why not print out the banners and save a lot of time and energy you ask? Because printed banners have no character! These were supposed to look like they were painted by cheerful grots happy to have the opportunity to do something other than get launched off in rockets or squished under stompa feet.
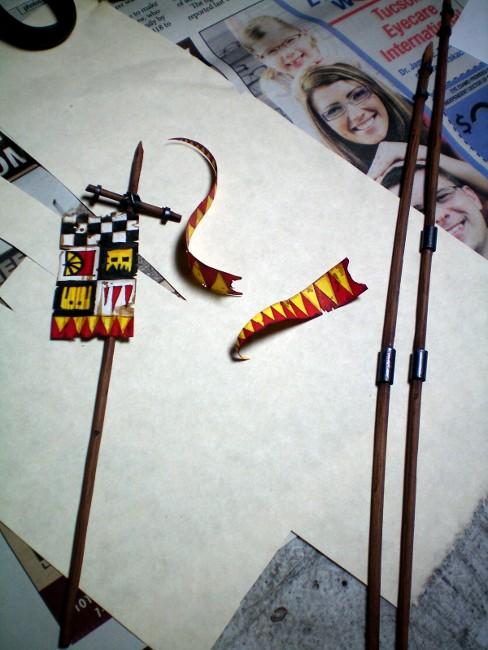
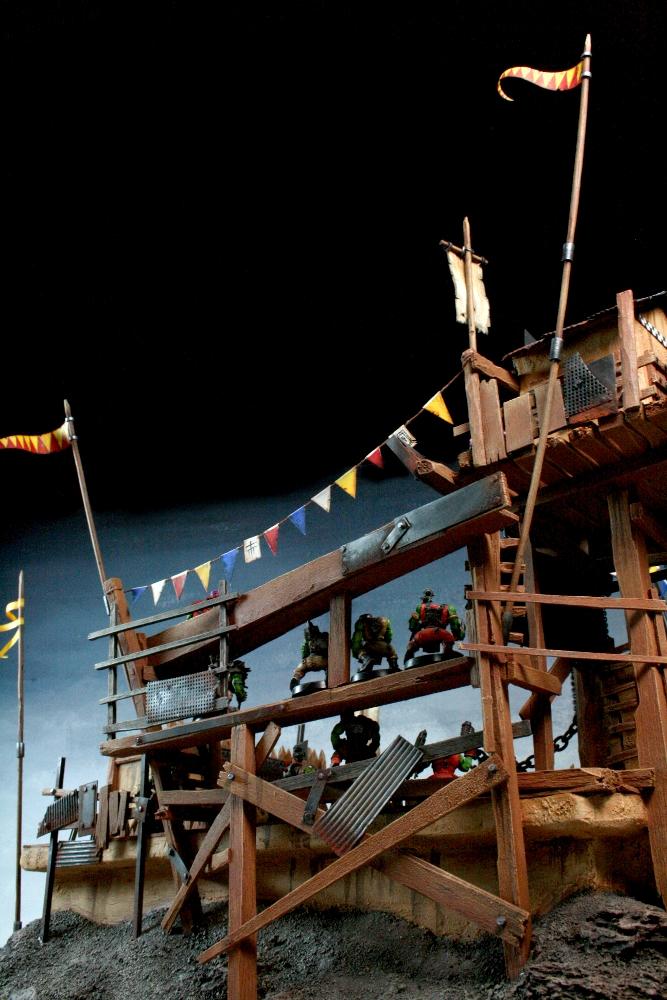
I painted flags, streamers and banners, then applied light shading and weathering to the edges, as well as stains. The flag on the left (which is upside-down in this picture) shows the glyphs for “funfair”, “squig”, “duel” and “gore/violence”. That should get the point across to what this place is all about.
More poles, yellow and red streamers, a big flag with a picture of a “dangerous squig” and those things in the background impaled on the partially melted block of styrofoam are small pieces of plastic tube to be used as the banner stands, being primed and painted while on toothpicks to keep them upright.
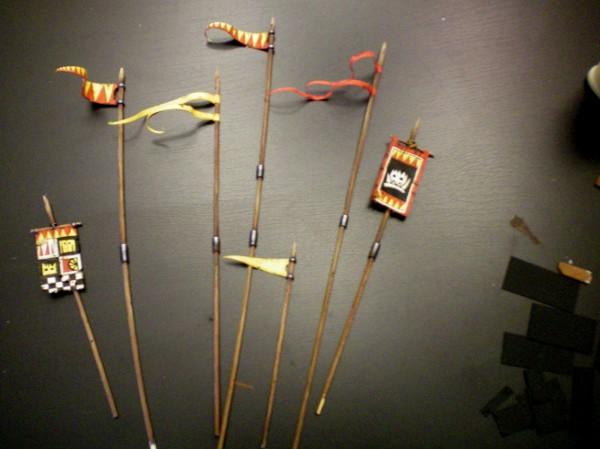
Here are the finished banners and poles, What is that to the right? Argh! it’s one last stack of metal plates waiting to be painted. I trudged back to the painting table and got out the metal-izing stuff again.

At this point I was done. I mean really, I had a couple more steps to finish this monster once and for all and I felt that if I added more to this project it would become the Winchester House of scenery projects. As it was we had a dozens planned items to keep reduce the amount of labor going into it. So when Mismuse asked me about making little triangle flag banners, I was naturally not very receptive to the idea, and pretended not to hear her at first. But she insisted that it would really, really help with the finished look, so I compromised and said that if she constructed them, I would paint them.
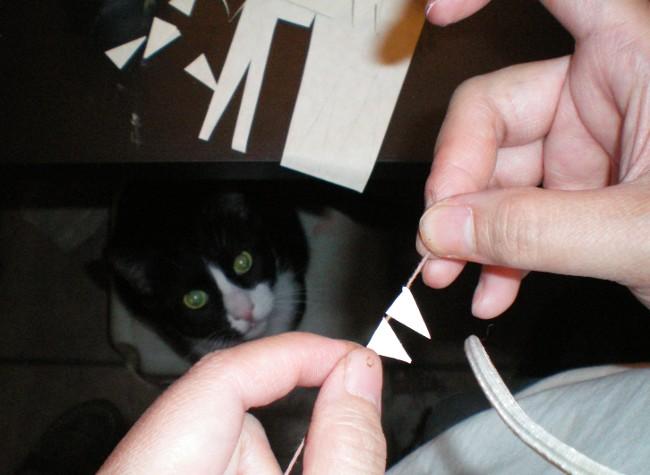
This is Mismuse’s asthmatic cat, Noodle, eying a most wonderous creation, obviously made just for him, little bits of paper, stuck to a string! Ohboy! Yes, I painted the damn things.
Now it was finally time to start weathering. This was the home-stretch, but it was a big one. Using chestnut ink and fleshwash mixed with black in different proportions, I went around the base of the structure, dirtying up the stucco, and adding streaks and water damage.
I paid extra attention to parts jutting from the walls, where rust and grime would wash down over time. For bright, light stucco walls like this, less is more, so I didn’t go overboard to make the thing look like a burned out ruin that’s been rained on.
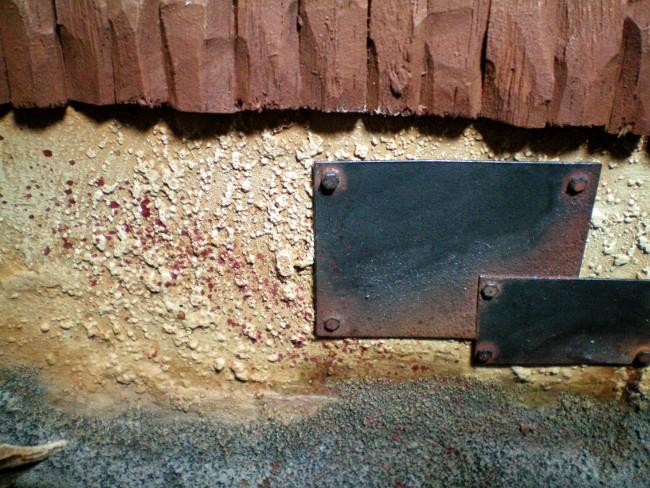
Then moving to the inside of the pit, I added stains and splatters in rust colored and dark maroon red shades on the ground and walls. One can use their imagination to figure out what causes this sort of “weathering.”
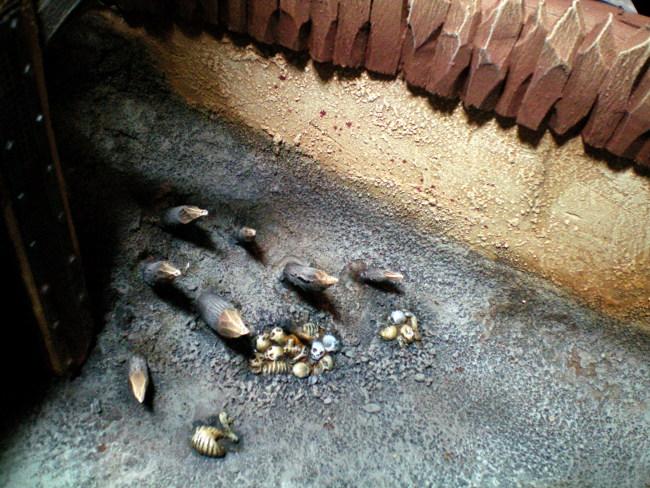
Oh yes, the skulls and bones. I finally painted them too. Snakebite leather/bleached bone/white, with some skulls in shades of grey to show different states of age. Also note the wooden stakes are highlighted and shaded to final colors.
Last little bits of metal trim were added all around, and then the numerous rivets needed to be touched up with just a little gunmetal and silver so they would stand out.
And on into the night. Every time I think it’s finally over, I notice one more bit of bare plastic that needed to be touched up, one more rivet I missed, a piece of wood with a mistake, Etc.
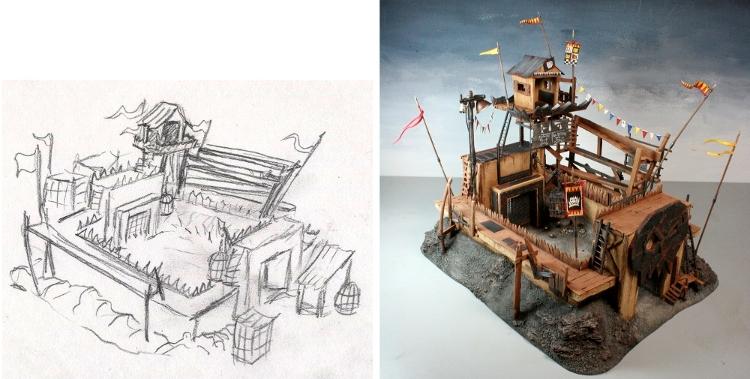
Some of the things we ended up leaving on the cutting room floor, so to speak, were the multiple cages of the original drawing, the working winches to pull the portcullises up, a customized grot hanging off of the scoreboard with a paintbrush in hand, and many more skulls hanging off chains and on pikes around the pit, trash piles outside and under the bleachers, detailed and textured splatters of slime and gore using thick, dyed resin as well as a handful of custom sculpted squigs, and numerous little bits and pieces. Some of those items, like the custom squigs we will be including in another project, a smaller companion piece to this one which we’ll be finishing later. But adding all of these items would have pushed this project much further back beyond our lead time, and would not have been very cost effective for one piece, even one of this size. (Also, by popular demand, we are going to be working on a squig taco stand as a small separate piece. Please stop nagging me about it everyone.)
And that’s it, as I type this, we’re finally done. Pictures will be posted later tonight then we’re all taking a nap.
|
|
This message was edited 3 times. Last update was at 2010/09/24 03:04:03
|
|
|
|
|
2010/09/24 04:18:39
Subject: Ork City Project: Squig Fighting Arena (lotz o' pictures!)
|
|
Boosting Black Templar Biker
|
Absolutely insane! You should upload some skill to the intarwebs and share it with us. You two obviously have plenty to spare :-)
|
DS:80S++G++M+B++I+Pw40k01#+++D++A+++/fWD255R+++T(Pic)DM+
 6500 pts 6500 pts
 8500+ and counting 8500+ and counting
 3300 3300 |
|
|
|
|
2010/09/24 04:19:26
Subject: Ork City Project: Squig Fighting Arena (lotz o' pictures!)
|
|
Stalwart Space Marine
|
Honestly, wow.
I saw your terrain on ebay and thought (I'm going to sound like a douche), 'Well photographed, but you have to be kidding! I could make that!'.
After following this thread, I could take the photograph, but I could not in a million years make scenery (Is it still scenery when it's this good?) to this standard. You guys have put an incredible level of detail into each of the pieces and I am gobsmacked! If only I could pony up and buy one for myself I would be a happy man.
Well done and thanks for taking us on the journey with this masterpiece.
|
|
|
|
|
|
2010/09/24 06:05:14
Subject: Re:Ork City Project: Squig Fighting Arena (lotz o' pictures!)
|
|
Regular Dakkanaut
|
|
|
|
|
|
|
2010/09/24 08:12:24
Subject: Ork City Project: Squig Fighting Arena (Finished!)
|
|
Auspicious Skink Shaman
|
Just brilliant, I can almost hear the orky cheering and the screams of the runty humies as I type.
|
 and and  |
|
|
|
|
2010/09/24 08:57:16
Subject: Re:Ork City Project: Squig Fighting Arena (Finished!)
|
|
Hungry Little Ripper
The Restaurant at the end of the Warp
|
Briliant. The little finishing details like the flags make it even better. I reckon there is one happy client.
|
|
|
|
|
|
2010/09/24 10:37:23
Subject: Ork City Project: Squig Fighting Arena (Finished!)
|
|

Hurr! Ogryn Bone 'Ead!
|
Man this is just great..
You make the most awesome terrain in the world.. So much nice details everywhere and everything painted in high standard..
|
|
|
|
|
|
2010/09/24 12:02:57
Subject: Ork City Project: Squig Fighting Arena (Finished!)
|
|
Mighty Brass Scorpion of Khorne
|
Amazing 
playing on one of your boards filled with your scenery would be the most epic battle of my ife 
|
|
|
|
|
|
2010/09/24 17:46:21
Subject: Ork City Project: Squig Fighting Arena (Finished!)
|
|
Flashy Flashgitz
|
Great work. Thank you for sharing your project with us, as it's incredible to see something like this come together.
|
|
|
|
|
2010/09/24 19:07:24
Subject: Ork City Project: Squig Fighting Arena (Finished!)
|
|
Screamin' Stormboy
Suffolk, UK
|
Awesome stuff as per usual!
This is why there should be a terrain/scenery/building category in golden demon.
|
|
|
|
|
|
2010/09/24 19:44:11
Subject: Ork City Project: Squig Fighting Arena (Finished!)
|
|
Sneaky Kommando
|
This is really amazing! Haven't seen terrain like this in a while. Great stuff
|
|
|
|
|
2010/09/24 19:49:11
Subject: Ork City Project: Squig Fighting Arena (Finished!)
|
|
Ork-Hunting Inquisitorial Xenokiller
|
Ow, my Jaw.
|
On-Dakka Deathwatch Blog
DA:90S-GM--B++I+Pw40k#--D++A++/eWD305R++T(M)DM+
[TYRANIDS] - Recycle, the posibilities are endless.
|
|
|
|
|
2010/09/25 15:51:13
Subject: Re:Ork City Project: Squig Fighting Arena (Finished!)
|
|
Raging Rat Ogre
|
Incredible, Amazing the work you put into it shines through it's an awesome bit of Orky goodness
|
|
|
|
|
|
2010/09/29 00:08:22
Subject: Ork City Project: Squig Fighting Arena (Finished!)
|
|
Journeyman Inquisitor with Visions of the Warp
|
I think we could be friends... not in a scary way though! jk
I like where your heads at very very obssevive , just how great art is created. love to know what your next project is!
keep up the inspirational work
|
|
This message was edited 1 time. Last update was at 2010/09/29 00:10:26
|
|
|
|
|
2010/09/29 00:15:56
Subject: Ork City Project: Squig Fighting Arena (Finished!)
|
|
Longtime Dakkanaut
|
You and your team are STELLAR! Another incredible creation, kudos!
Mike
|
|
|
|
|
|
2010/09/29 00:51:24
Subject: Re:Ork City Project: Squig Fighting Arena (Finished!)
|
|
Nimble Pistolier
|
Totally awesome! I wish I could scratch build stuff like this.
|
|
|
|
|
|
2010/09/29 01:32:37
Subject: Ork City Project: Squig Fighting Arena (Finished!)
|
|
Nigel Stillman
|
Personally I don't think it looks right, and while I may get some grief here for saying so, there are a few points I think could have been improved upon.
I think it looks too clean, a lot of the ideas that you gave the axe (such as blood splatter, trash heaps, the pikes with skulls, the rusty chains) would have looked great. As it is there is very little that seems orkish about the piece other than the skull on the front and the score board.
In fact the skull above the front entrance (and small bits of iconography on a few flags) is the only bit that really screams that this is an ork structure; if you were to remove it (and the light) then this could easily be a mistaken for a human wfb piece.
It could have used some gots lurking around and some dead squigs in the pit. I know it would have taken you longer but they would have added more character to the piece, and more character is what this piece needed IMO.
I don't consider any ork building complete without at least one mounted gun somewhere on it. Orks are made for war and when you have lots of them in one place placing bets and getting into fights, the need for crowd control seems extremely necessary.
I also think more metal should have been used in the construction and a little less wood. Replacing a bit of that wooden scaffolding with an I-beam (or two) would have looked cooler and more orky IMO.
While it is an impressive piece of scenery I think that you could have done more with it.
|
|
|
|
|
|
|
|


 ?
?
