| Author |
Message |
 |
|
|
|
|
Advert
|
Forum adverts like this one are shown to any user who is not logged in. Join us by filling out a tiny 3 field form and you will get your own, free, dakka user account which gives a good range of benefits to you:
- No adverts like this in the forums anymore.
- Times and dates in your local timezone.
- Full tracking of what you have read so you can skip to your first unread post, easily see what has changed since you last logged in, and easily see what is new at a glance.
- Email notifications for threads you want to watch closely.
- Being a part of the oldest wargaming community on the net.
If you are already a member then feel free to login now. |
|
 |
2024/08/15 18:44:41
Subject: Re:sCratchBuilding CuStomiZing & CitbaShing: 08AUG: Regluing and more rivets
|
|

Krazed Killa Kan
|
True, this amazing build does seem like you're flexing on us Meer 
Just kidding, and I hope you don't mind that I took that little bit of text out of context for that joke.
I find builds that require so much measurement and precision to be tiring. I will often switch to free form slapdash scratch building of ork vehicles when I need a break from imperial builds. Maybe you should do the same? Either way keep up the great work on the Kittyhawk 
|
|
|
|
 |
|
2024/08/16 00:56:03
Subject: Re:sCratchBuilding CuStomiZing & CitbaShing: 13AUG: Wepps Gondola
|
|
[DCM]
Boom! Leman Russ Commander
|
Thanks for looking in, Syro! Being able to exchange the odd joke with your friends and peers on Dakkadakka is a big part of why I keep posting here! 
And yes- after a build like this, next project is going to be something with no curves, no right angles and no long calendar given over to it.
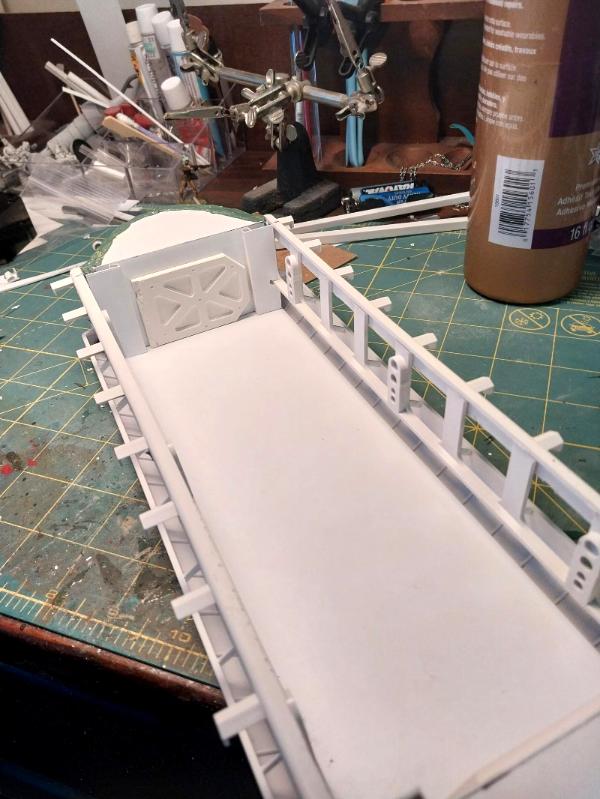
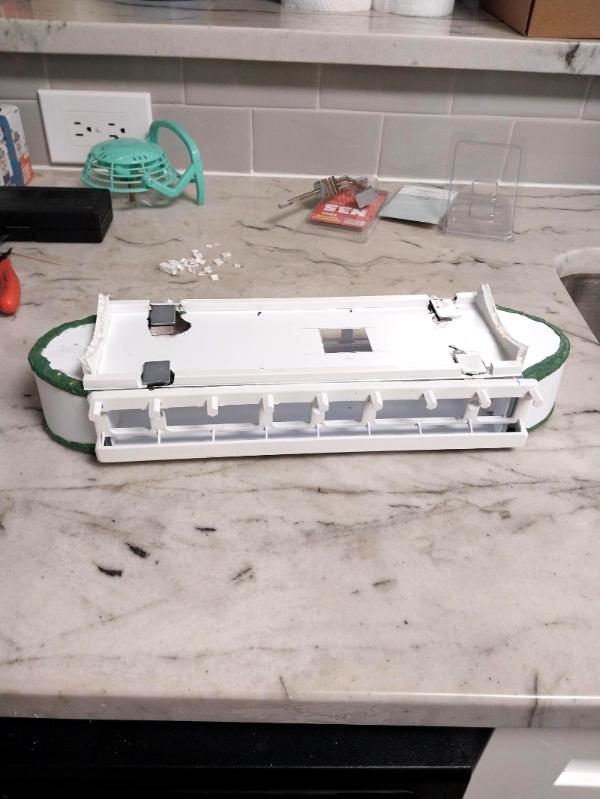
Tonight was a 'slug it through' kind of experience, ending with all my fingers glued together and baking soda everywhere. First up, I finished tweaking the hull plate so it fits exactly into the top rim of the gondola:
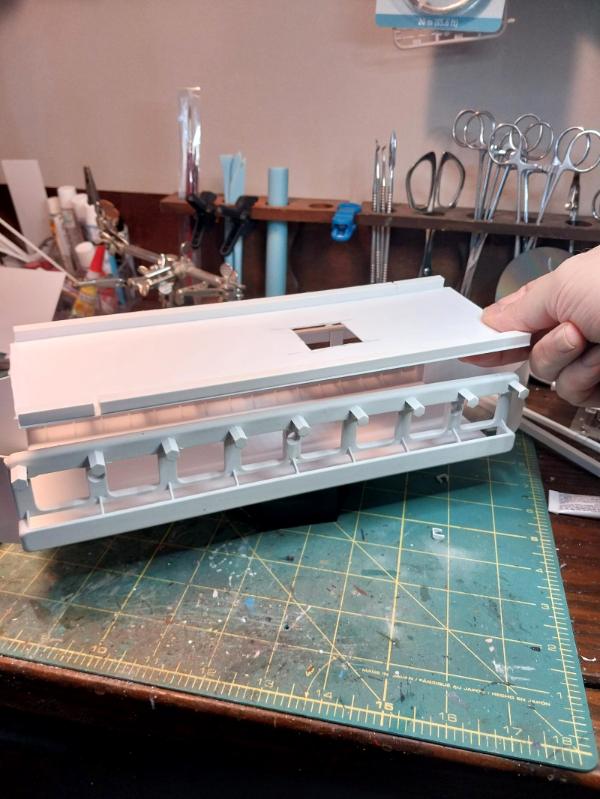
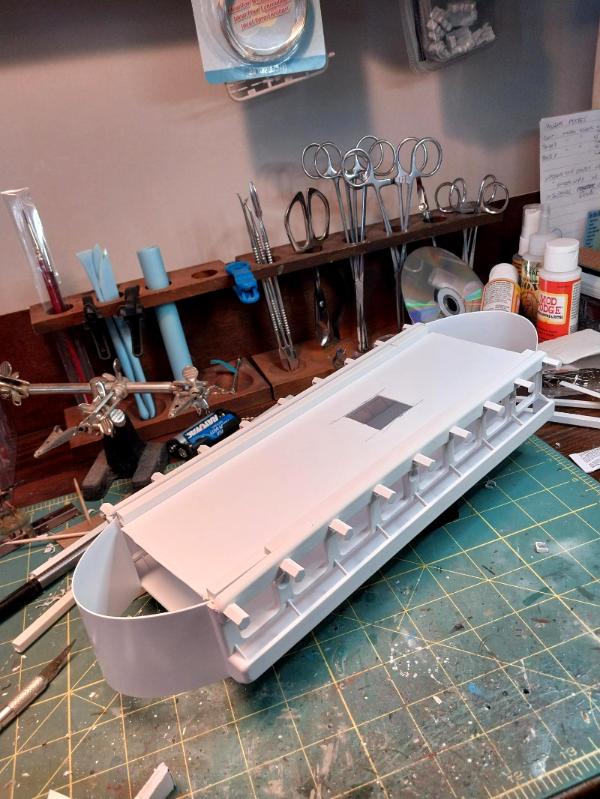
Then cut out the upper and lower plates for the rounded ends and started gluing up. Started with Aileen's Tacky glue, shifted to 527 and then tried cyanoacrylate, then cyanoacrylate with baking soda as a catalyst. I went a bit too fast on the second end and it broke apart and I had to start over, so one end is finished, the other needs the plates installed. I'll need to fill in the gaps- probably with greenstuff- and then can get on with the rest of the work:
So, a lot of time invested for not a terrible lot to show, but all necessary. Really, the work should get easier once the framing for the gondola is complete- just fiddling in the guns and lights!
I'm also thinking that instead of windows on the rounded ends, I may do a Nekomimi version of aquila, some kind of big heraldic emblem, preferably in 3D if I can figure out what I want and how to do it (a problem for another day).
Thank you for looking in; more follows soonest.
|
"He fears his fate too much, or his desserts are small, who will not put it to a single touch; to win- or lose- it all."
Montrose Toast

|
|
|
|
|
2024/08/21 22:55:04
Subject: Re:sCratchBuilding CuStomiZing & CitbaShing: 15AUG: Wepps Gondola slow but steady
|
|
[DCM]
Boom! Leman Russ Commander
|
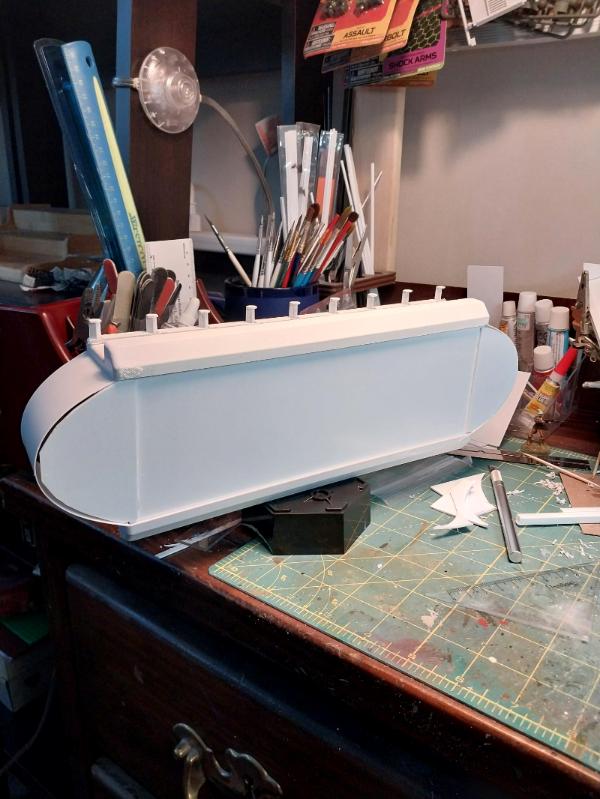
Welp, we've tried Aileen's Tacky Glue, cyanoacrylate, superglue plus baking soda- tonight we try the strongest adhesive and substance known to man- GREENSTUFF. 
Basically, I'm going to cover all the 'structural' seams of the weapons gondola with greenstuff and then use the utmost of my acumen to hide it all using paints, trim pieces and other textures. I'm very hopeful that this will work, as I'm tired of being stalled out on this step:
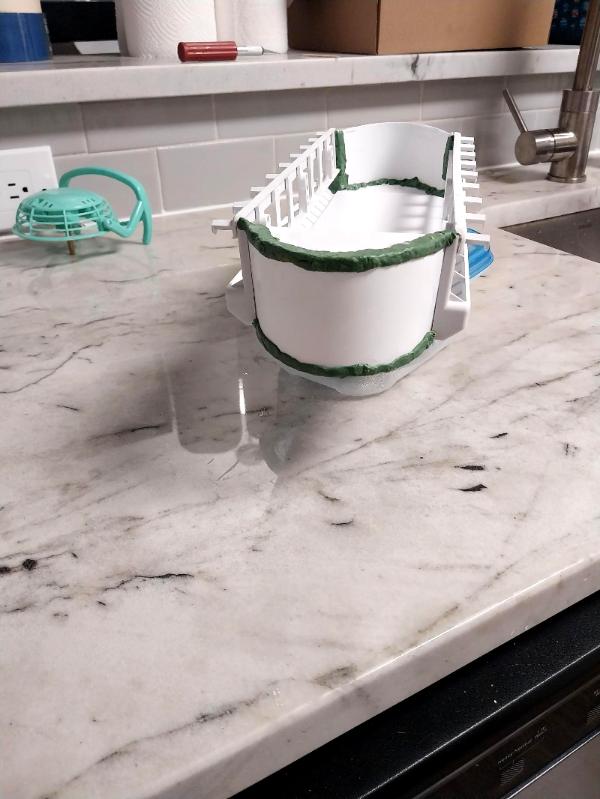
A lot of it on the inside will get closed in and those rounded ends just became crew's quarters. The stuff on the outside top won't be seen anyway- and the stuff on the outside underside we'll see. I may just paint it like kapok and it's some kind of 'floatation' for if the zep sets down on water. Or, just paint some interesting color and maybe add texture or leave it alone and let the viewer figure out what it is. High altitude insulation to avoid losing cabin heat? Sure! Something else? Sure!
This junk better hold or I'm scrapping the whole idea and trying something else- probably get rid of the curved surface and stick to right angles even though they won't look right on an airship- but they'll be easier to glue up.
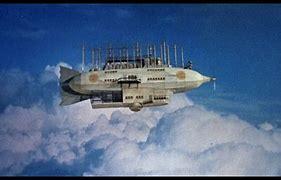
Come to think of it, Vincent Price's airship in the movie Master of the World had a lot of right angles:
I may get some more in tonight, but surely tomorrow.
|
"He fears his fate too much, or his desserts are small, who will not put it to a single touch; to win- or lose- it all."
Montrose Toast
|
|
|
|
|
2024/08/23 00:13:04
Subject: Re:sCratchBuilding CuStomiZing & CitbaShing: 21AUG: Greenstuff sticks everything! I hope.
|
|
[DCM]
Boom! Leman Russ Commander
|
Okay- we're moving forward again.
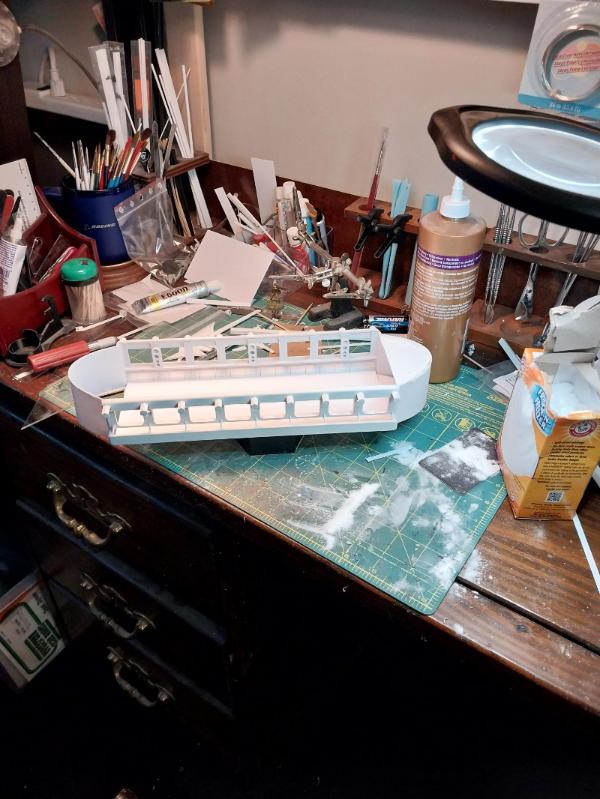
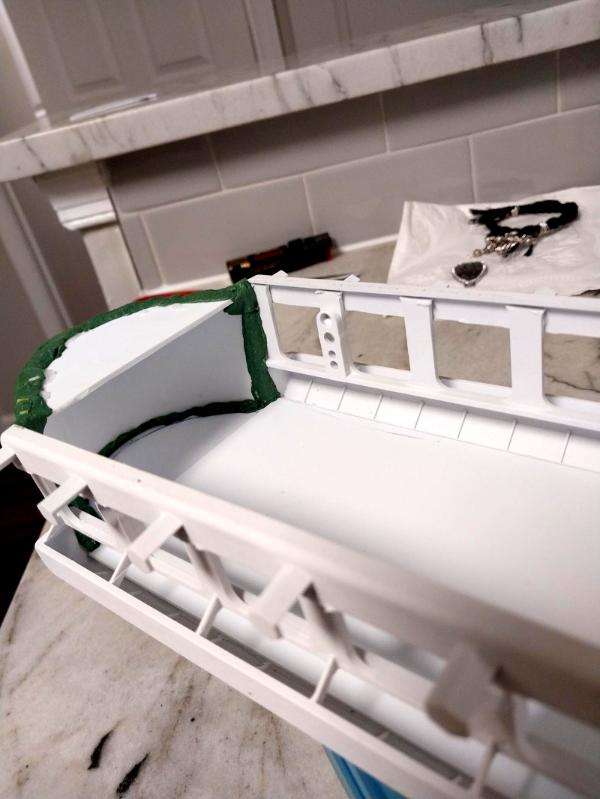
The greenstuff has made for a very solid 'box' that is the walls and decksole of the gondola; the one end (arbitrarily designated as 'the bow' since both ends are symmetrical) is finished and I've started closing in the crew's berthing as you can see; I've leaned a plaster casting spaceship door (Hirst Arts) to get a feel for the dimensions and I think it will work fine (naturally I can only find one; I'll have to hunt around some more or cast another for the other end):
At the other end (stern, arbitrarily) you can see I've got the decksole panel in and, because of course, ran out of greenstuff. I'll have more by the weekend and can finish it up on Monday or Tuesday. I'm not being terribly careful about smoothing things out as it won't be visible once closed in.
Everything to finish this step off now requires just styrene, superglue gel and an Xacto knife. I'm looking forward to finishing this part, as then next is wiring the running lights, battery box and finally moving on to the nose assembly/bridge. Last step will be applying a myriad of decalage and painting the crew figures.
Toujours en avante!
Thank you for looking in, more follows soonest.
|
"He fears his fate too much, or his desserts are small, who will not put it to a single touch; to win- or lose- it all."
Montrose Toast
|
|
|
|
|
2024/08/24 06:52:45
Subject: sCratchBuilding CuStomiZing & CitbaShing: 22AUG: Moving forward again
|
|

Gargantuan Great Squiggoth
|
Firstly sorry for not being around.
Secondly, my gods man, what have you been up to!!!
Spectacular work. Fabulous ideas, brought into amazing reality. The riveting alone is sublime.
|
|
|
|
|
|
2024/08/24 19:23:16
Subject: Re:sCratchBuilding CuStomiZing & CitbaShing: 22AUG: Moving forward again
|
|
[DCM]
Boom! Leman Russ Commander
|
Thanks very much for the kind words, Cam- it means a lot coming from you (first person to ever comment on my thread!).
Once this is wrapped up, I'll be very happy to tackle some more mundane 'limited in scope' projects. I need more riflecat infantry, for instance. Not to mention the Mountain of Shame that languishes awaiting commencement.
My emergency resupply of greenstuff arrived today, so when I can get back to work ([possibly Tuesday night) I have the wherewithal to get everything done, given the determination; and you folks provide me with that.
More follows soonest.
|
"He fears his fate too much, or his desserts are small, who will not put it to a single touch; to win- or lose- it all."
Montrose Toast
|
|
|
|
|
2024/08/27 22:43:04
Subject: Re:sCratchBuilding CuStomiZing & CitbaShing: 22AUG: Moving forward again
|
|
[DCM]
Boom! Leman Russ Commander
|
Some good, fiddly work done tonight.
The greenstuff work is finished- the box that is the frame of the gondola is very sturdy, so much so that I have now decided that, in times of stress or necessity, it can be detached from the lifting bag and descend to earth under the power of its own rockets. This way, the weapons gondola serves as the vessel's lifeboat or could even be deployed as a mobile battery. I was only half kidding before when one of you asked if the ship was intended to be gamed- I said yes then and am more serious about saying yes now; it might be that the boarding rules from Pike & Shotte or some game like that might be adaptable, plus the whole ship-to-ship aspect of combat.
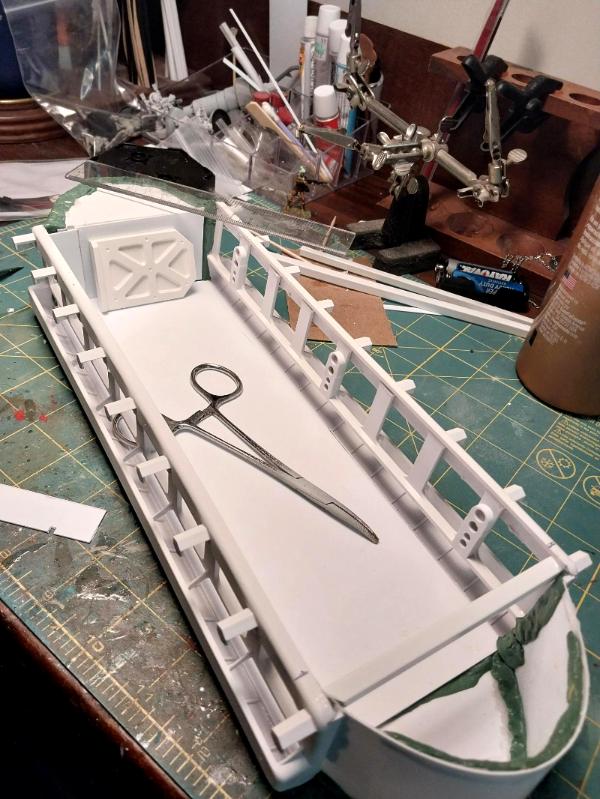
Got both end sections closed in with plasticard. Now we're at the 'add trim to hide the errors in the previous trim' stage:
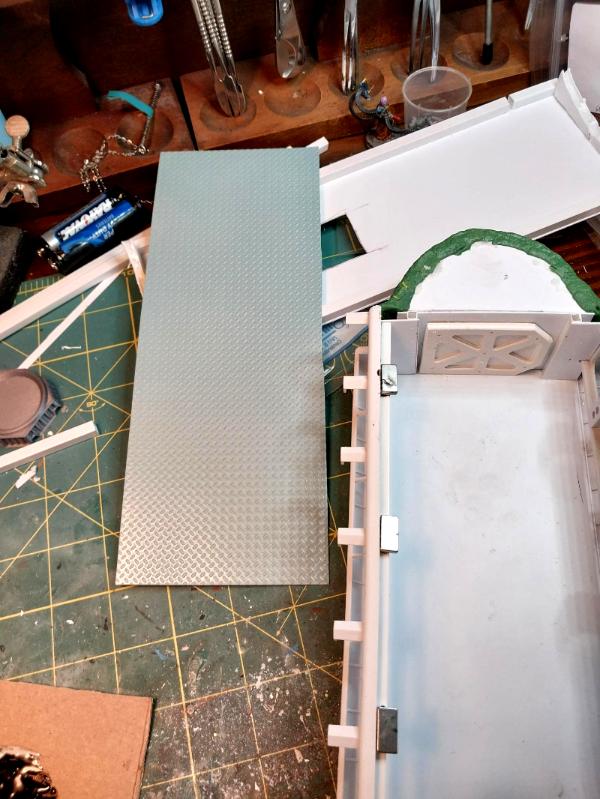
Next up (maybe even tonight) is to add a piece of diamond plate plasticard for the decksole; I reckon to paint this a tan color to provide some visual distraction from everything else being shades of white.
And then the real fun begins with the addition (finally) of actual guns, plus any gubbins I have lying around to help fill all that empty space. I have also decided that the projections hanging over the top of each weapons port are lifting/loading winches and can also be used for fast-roping troops into harms way- or even boarding other zeppelins. Over the side your breachers go, land on the other zep's bag, place the cratering charge and BOOM! you're in and rampaging through the enemy's superstructure before he knows it.
I even have some multipart, multi-pose Aero Pixies to customize for the fast-rope assault troops.
Oh, and the greenstuff on the outside of the gondola that I can't hide behind plasticard? I'm going to add more and make it into decorative red, white and blue bunting that highlights the ship's sigils I'll be adding.
More follows soonest. Much as I like working with greenstuff, I'm glad to be back to plasticard and superglue again!
Thank you for looking in.
|
"He fears his fate too much, or his desserts are small, who will not put it to a single touch; to win- or lose- it all."
Montrose Toast
|
|
|
|
|
2024/08/28 22:31:00
Subject: Re:sCratchBuilding CuStomiZing & CitbaShing: 27 AUG: Greenstuff done, interior nearly so
|
|
[DCM]
Boom! Leman Russ Commander
|
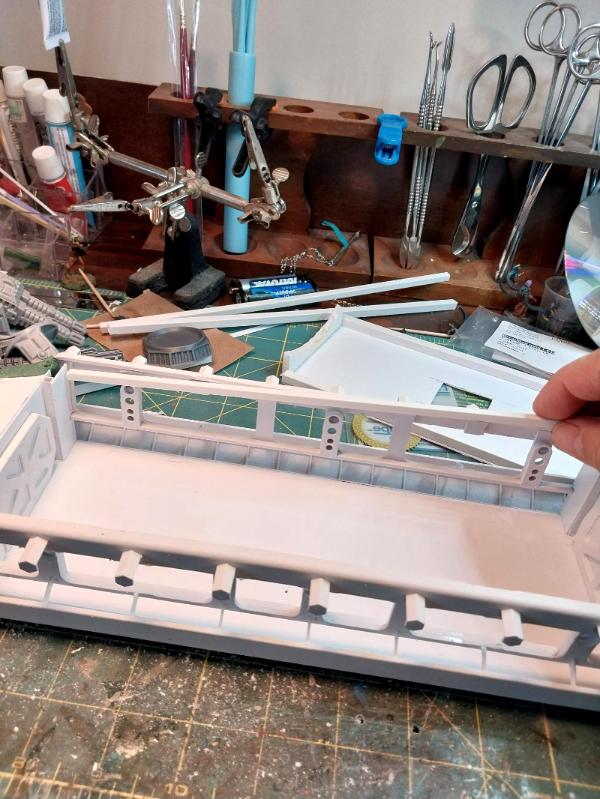
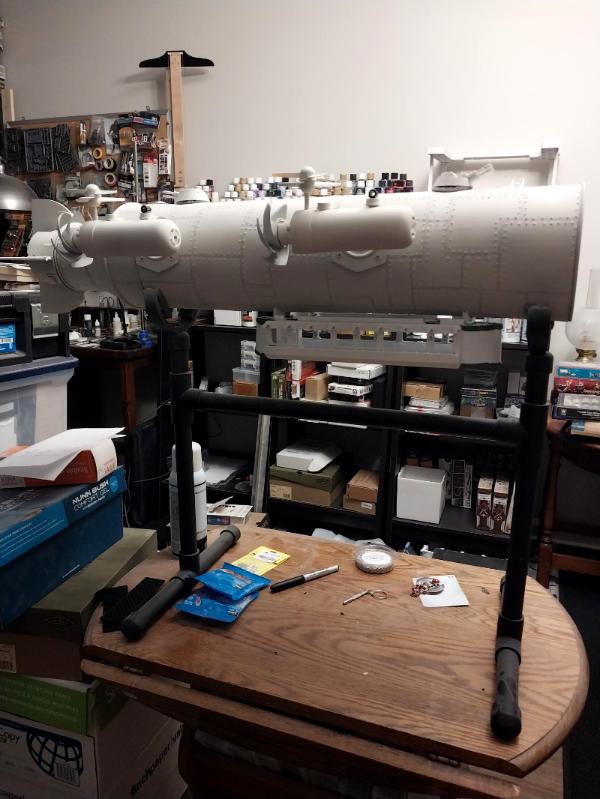
More work done tonight and hopefully a bit more later:
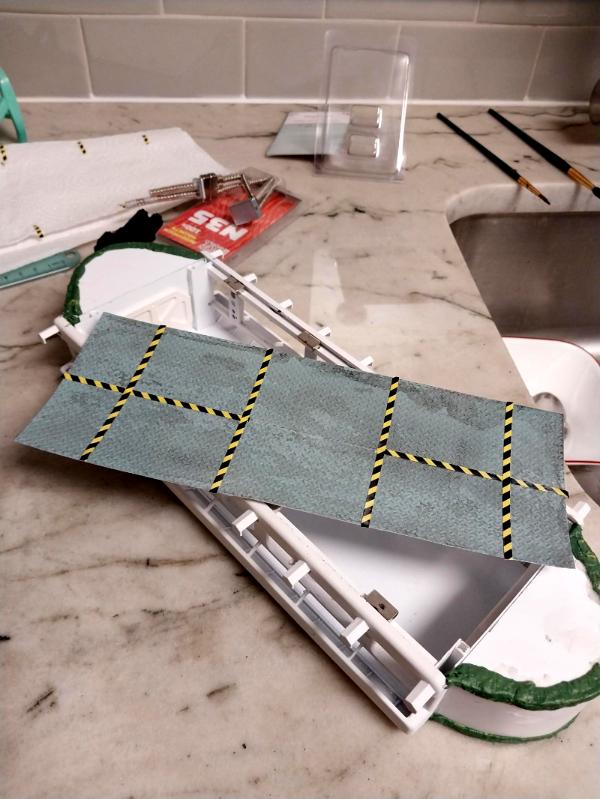
First up, cut that piece of diamond pattern treadplate for the decksole and used Rustoleum's Primer & Paint Panzer Pixie Blue to both primer and basecoat it (would have [preferred a tan, but didn't want to stall out again waiting to get the right color; as Jessie the Body Ventura schools us in the original Predator movie: "Ain't got time to bleed."
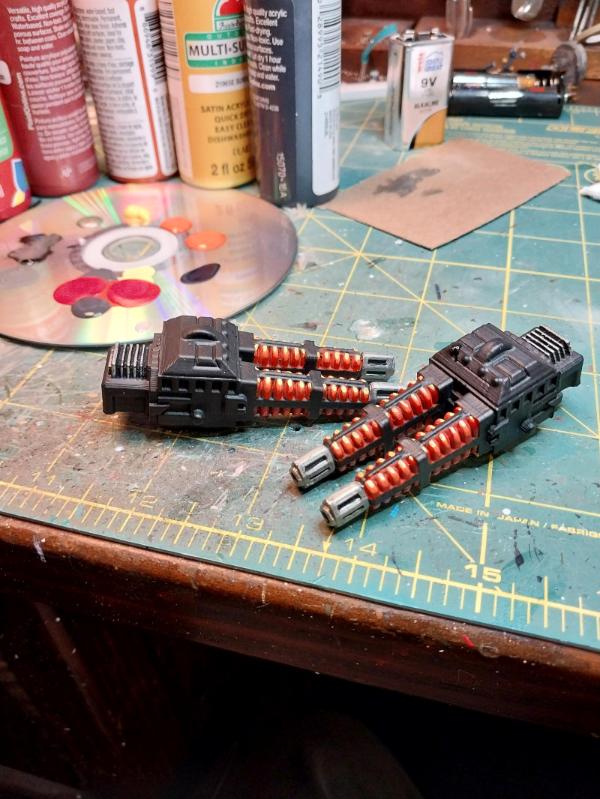
Next, test fitted the guns- as anticipated I needed to cut out a window bay strut to give them full range of motion to track forward and aft (I'll hold them in place with 3mm magnets), but they'll fit nicely and I can add black and yellow hazard striping around them to mark the danger areas when firing:
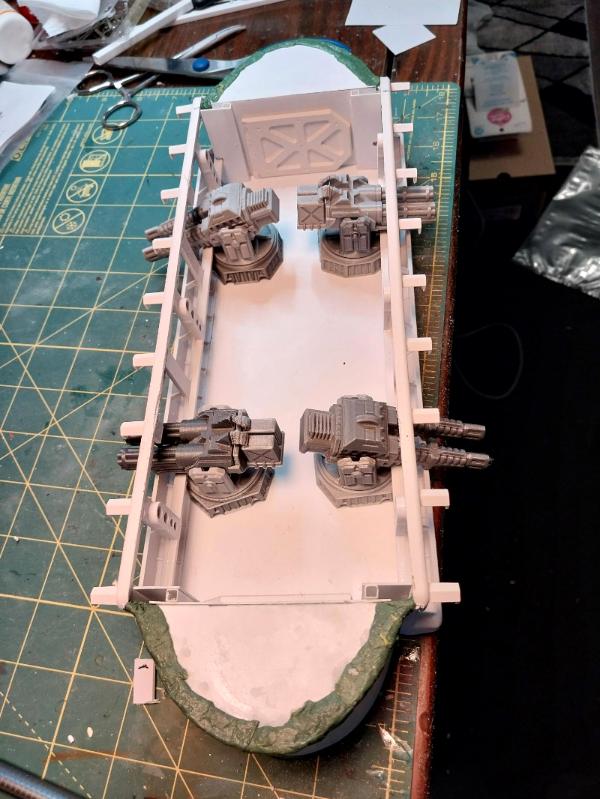
Score: there's that nice big open area in the middle that's just begging for a weapons control station to get built in; I wasn't anticipating doing somethign like that but it's too perfect, so that may be tomorrow night's task.
Two twin plasma cannon mounts and two twin GAU-8 30mm depleted uranium gatling gun mounts (same as the A-10 Warthog, just because) ought to be enough (although as the man said, you can never be too rich, too handsome, or too heavily armed).
So those are being primered now:
Next, glued in a rail to fasten the bottom set of neodymium magnets to (there will be an upper set on the plate that permanently mounts to the hull)- this will let me attach or remove the gondola to turn on lights, change batteries or game the gondola separately:
And then used JB Kwik Weld to fasten the magnets; when seriously dry I'll primer the whole thing and then test fit the upper magnets to the plate and see how it all hangs together:
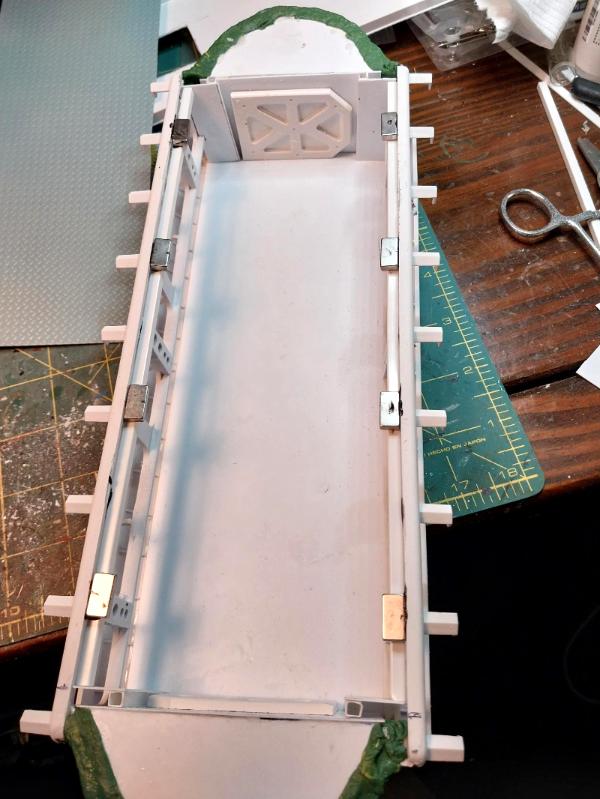
I indexed the poles on the magnets by lining them all up together and running a Sharpie marker down the middle, so hopefully they'll mate up properly with the top set of magnets- but that's why the test fit, to make sure the poles align and the streams don't cross. Something I meant to do but see I didn't looking at the photo is glue some caps to those open spaces on the bulkhead trim- I may get to that a bit later.
Thank you for looking in, more follows soonest.
|
"He fears his fate too much, or his desserts are small, who will not put it to a single touch; to win- or lose- it all."
Montrose Toast
|
|
|
|
|
2024/08/31 07:03:01
Subject: sCratchBuilding CuStomiZing & CitbaShing: 28 AUG: Sun's out, guns out!
|
|
Gargantuan Great Squiggoth
|
This is so impressive.
|
|
|
|
|
|
2024/08/31 22:03:17
Subject: Re:sCratchBuilding CuStomiZing & CitbaShing: 28 AUG: Sun's out, guns out!
|
|
[DCM]
Boom! Leman Russ Commander
|
Thanks very much, Cam.
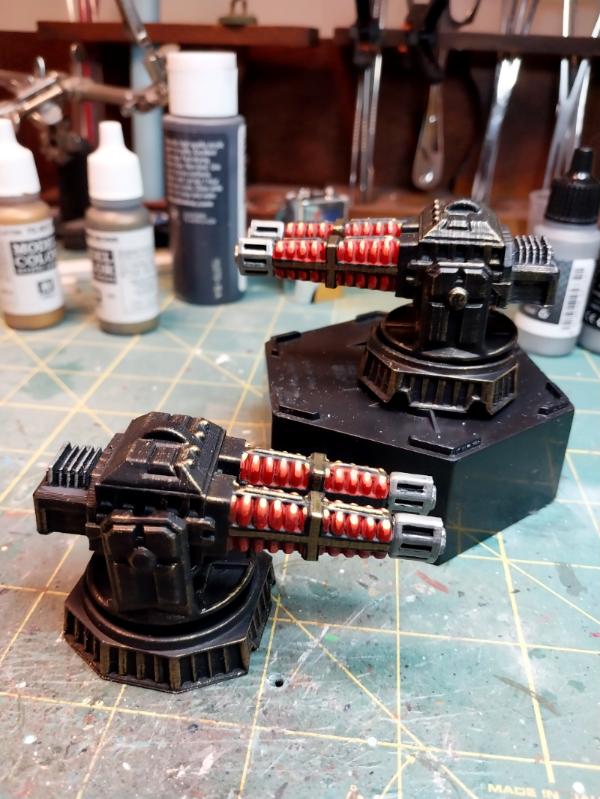
I did actually get some more work done before heading up to the farm for the weekend, but not really enough I thought to be worth taking a pic and posting here. I've primered and now basecoated all the guns and mounts- going for a "Imperial Death Star" motif with black and bronze, and primered the gondola. I've some ideas for the fire control center- heavily influenced by the work Klaus, Not Santa did on his Athena some years back- not sure I have the skill to carry it off.
Then it will be assembly time and at any time I can run the wiring for the port and starboard running lights (my blinky LEDs came in). With 8 LEDs total, each at 3 volts, I can't run one long series circuit- I'm going to have to run things in parallels of 9 volts (need to add another LED in there- maybe two lamps in the gondola), so I'm not going to solder the joins, I'm going to try these 'press connector' fittings in hopes it will be easier to run the correct wires together. I'll post pics when I get to that stage.
Then it will truly be on to the bridge, and looking into the home stretch for completion.
Thank you all for looking in and especially the encouragement. I find it very easy some nights to find excuses not to work in the project, but as soon as I am in the chair, bingo! Two hours have passed and I don't even realize it.
More follows soonest.
|
"He fears his fate too much, or his desserts are small, who will not put it to a single touch; to win- or lose- it all."
Montrose Toast
|
|
|
|
|
2024/09/03 23:15:57
Subject: Re:sCratchBuilding CuStomiZing & CitbaShing: 28 AUG: Sun's out, guns out!
|
|
[DCM]
Boom! Leman Russ Commander
|
OK- not a lot to show for it, but got a lot of skull sweat out of the way, learned some things and got a little bit done.
What I thunk about: I now know definitively what LED lights I need, what voltage battery holder to use and where it will be mounted and how many circuits it will take to rig everything. I learned this largely by testing the blinking red and green running lights I ordered (always test, test, test before you start soldering!). The red and amber lights I ordered worked fine, but four of the green ones were completely dead and the fifth didn't blink, just steady light. But in looking at how I was going to actually wire them up, I realized I'm going to have to pull the tail section off to get inside the hull to run the wires. Not a problem, as there is only a single sheet metal screw holding the whole thing together. But progress, as I know how to do what I want to do now.
What I learned:
- If you have a blinking LED in your series or parallel circuit, all the lights will blink, to include the cabin lights you were including to balance the circuit to avoid having to solder in a resistor. This may seem obvious in retrospect, but it didn't occur to me before monkeying with test circuits. The positive is that I now know I'm going to use 3V coin batteries rather than 1.5V stick batteries, which will make fitting the battery boxes in much easier, be more efficient and easier to wire. Lighter, too.
- Old greenstuff is a fething  to work with. The stuff I'd been using until recently must have been at least two years old and- despite being kept as best as possible in an airtight container, was extremely stiff. Tonight I used brand new greenstuff to attach a few things (see below) and was amazed at how soft and easy it was to work with. Don't get me wrong- my hat is still off to the gang that craft incredibly intricate details in the stuff, that's an art. But I was making it harder on myself than it needed to be. When I go to make the banner bunting to hide the crappy greenstuff welds on the bow and stern of the gondola, I go at it gaily knowing that it won't be nearly the bear I thought it was going to be.
What I done:
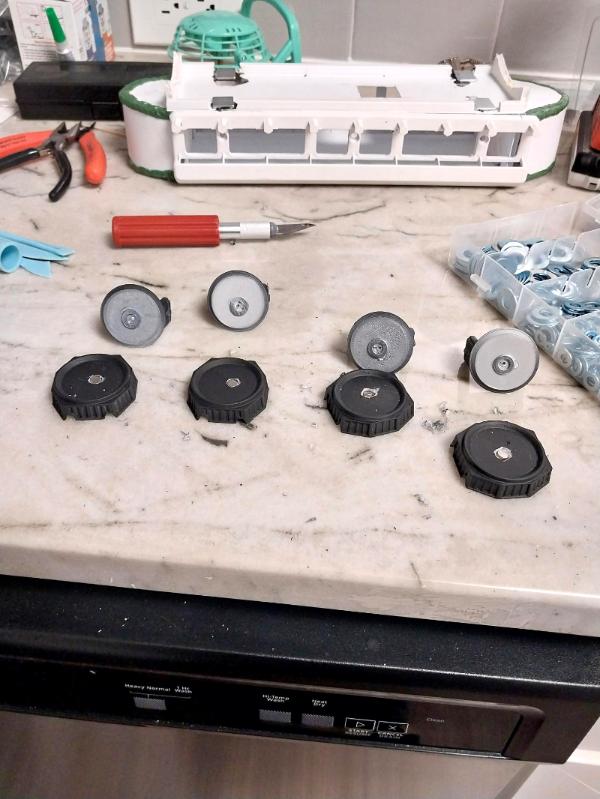
Firstly, I'm ready to mount the cabin plate to the zeppelin hull that will allow the gondola to be removed to game or change LEDs, batteries, etc. I tested the magnets I have and they will easily hold everything together. Got my supplies laid out:
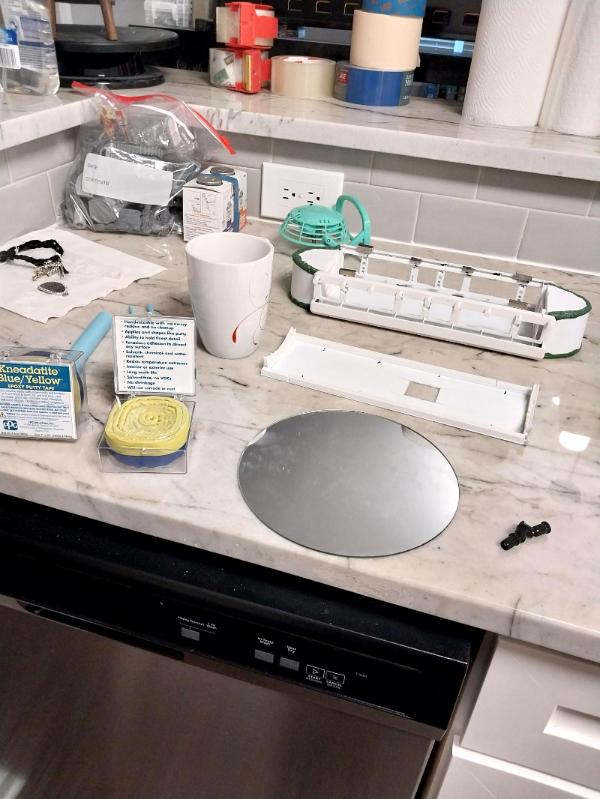
And attached the magnets with greenstuff:

The side you see will get greenstuffed directly to the hull and the magnets will be directly over the magnets that are attached to the gondola itself.
I also know how I'm going to run my wires to the cabin and running lights, so greenstuffed the 5mm LED sockets to the locations where the lights will be:
I know where the cabin lights will go (ice blue) but am not positive how I'm going to mount them- I may wind up just gluing them to the cabin plate and the whole kit and kaboodle will remain attached to the hull when the gondola is removed.
I also know (mostly) what the Gunnery Station is going to look like and only need to figure out how to make that happen- glue up styrene or carve pink foam board. Each method has strengths and weaknesses.
In any event, I have to order some doo-dads, which will give me time to finish the gondola, run some wires, and even paint some things. Depending on how fast they get here, I'll have time to stattt on the bridge/nose section and by golly we're nearly done.
Thank you for looking in. More follows soonest.
|
"He fears his fate too much, or his desserts are small, who will not put it to a single touch; to win- or lose- it all."
Montrose Toast
|
|
|
|
|
2024/09/04 01:11:15
Subject: sCratchBuilding CuStomiZing & CitbaShing: 03SEP: Thinkin', Plannin', Greenstuffin'
|
|
Ragin' Ork Dreadnought
Deep in the Outer Boroughs of NYC
|
Ooo, this project looks fantastic! I also love that you've kept the curved ends despite the annoyance that they've brought you. The shape looks great. Looking forward to seeing the rest of this build.
|
|
|
|
|
|
2024/09/04 11:26:32
Subject: Re:sCratchBuilding CuStomiZing & CitbaShing: 03SEP: Thinkin', Plannin', Greenstuffin'
|
|
Krazed Killa Kan
|
Amazing workon the gondola, Meer You've progressed so much in what feels like a short period of time. That's exciting that you are going ahead with having the gondola detachable and playable. The ship to ship combat idea is intriguing too, does anyone else have something that could battle it out with the Kittyhawk? I also like how you figured out the lights with the tail section. Keep up the amazing work
|
|
|
|
|
|
2024/09/04 23:30:50
Subject: Re:sCratchBuilding CuStomiZing & CitbaShing: 03SEP: Thinkin', Plannin', Greenstuffin'
|
|
[DCM]
Boom! Leman Russ Commander
|
Thank you much for the kind words Syro and Warboss! The largest part of my satisfaction in posting to Dakkadakka is the opportunity to share work with friends who will at the same time encourage but also provide well-intentioned constructive criticism at critical junctures.
Tonight was very much in keeping with the Paula Adbul song Opposites Attract, especially the line "I take two steps forward, you take one step back". Some of what got done tonight was rework of what got done last night, starting with:
The greenstuff I used to fasten the top plate magnets didn't hold them to the styrene sheet. Also, the magnets didn't line up and were so strong the gondola and the top plate wouldn't line up. So, off came the greenstuff (disappointingly easily) and on went the JB Weld:

I cut notches in the side rails of the plate so the magnets would line up and tested by fitting them together to stay whilst the JB Weld sets. So far, it works.
Next, wanted to get moving on the guns- starting with the mounts. I didn't like the way the trunions set into the base and just wobbled around, so I drilled out a 3mm hole, filled it with superglue and tamped in a magnet. Then I glued a small washer to the underside of the trunion, let set, and fitted together. This also seems to work:

I wanted to get some actual painting done (you know, that skill that forms 90% of the hobby for most of us) but I've been terribly bad at using a shaker can to primer/basecoat the gun parts: every time I look at them again there is a glaringly huge grey spot that wasn't covered. I've hit them again, and if they are finally completely coated, will start painting on bronze and/or plasma coils tonight.
All else being equal, tomorrow I want to spend rummaging through all my bits boxes, drawers, bags, envelopes, clutches and zip purses and adding beaucoup gubbins to the gondola, preparatory to basecoating it and getting ready for final assembly (with the exception of the weapons control console, which will be a separate build of its own).
Perhaps more follows soonest, but thank you for looking in.
Rock on.
|
"He fears his fate too much, or his desserts are small, who will not put it to a single touch; to win- or lose- it all."
Montrose Toast
|
|
|
|
|
2024/09/04 23:51:42
Subject: Re:sCratchBuilding CuStomiZing & CitbaShing: 04SEP: Some rework, some new work
|
|

Long-Range Ultramarine Land Speeder Pilot
|
Nice progress on the zeppelin.
Can you take the gondola off without damaging it with those strong magnets?
|
|
|
|
|
2024/09/05 00:07:56
Subject: Re:sCratchBuilding CuStomiZing & CitbaShing: 04SEP: Some rework, some new work
|
|
[DCM]
Boom! Leman Russ Commander
|
I think so, Tommygun. I've swapped out the big magnets on the top plate for lighter ones, and added two of the strongest ones I have to the ends deck plate so that they will reinforce the JB Weld I'll use to attach the plate to the hull. And the trick for removal is to slide the gondola to one side or the other, not try to pull directly away. If I ever sell this beast (and I probably will) I'll have to include instructions on how to turn on all the lights and remove the gondolas, and everything. And drop the bomb load that will be mounted on the battery gondola.
I will add some greenstuff to the inner corners of the gondola cabin to stiffen them up, just in case.
If not, well, everything pulls apart and I have to start over. It's good to remain humble! Automatically Appended Next Post:
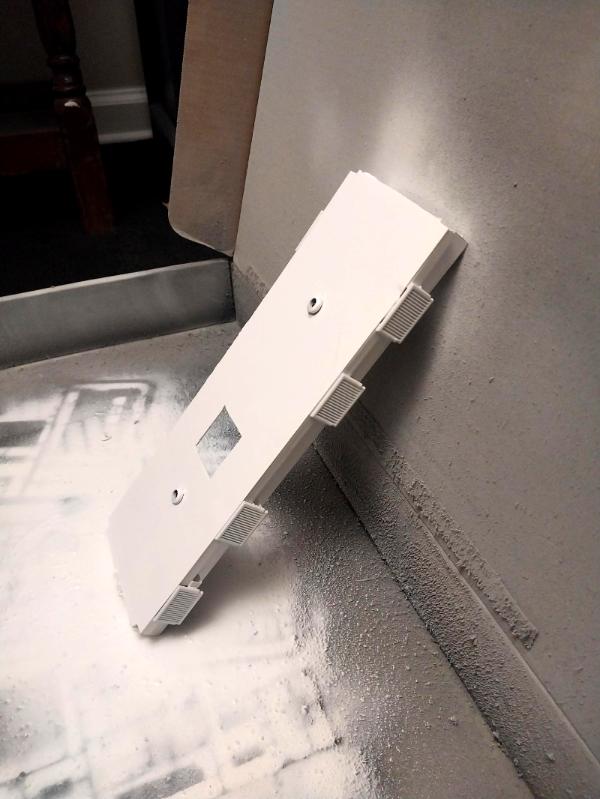
Quick morning update: all the glue, greenstuff, JB Weld and magnets have set, dried, quickened, clotted and the result is:
It works! It's alive! Mwahahahahahahaha!
That pic is showing it attached with just the new magnets on the top plate- I may not glue it to the hull at all.
More follows tonight.
|
|
This message was edited 1 time. Last update was at 2024/09/05 09:44:44
"He fears his fate too much, or his desserts are small, who will not put it to a single touch; to win- or lose- it all."
Montrose Toast
|
|
|
|
|
2024/09/06 00:13:28
Subject: Re:sCratchBuilding CuStomiZing & CitbaShing: 05SEP: It's alive! Mwahahahahaha
|
|
[DCM]
Boom! Leman Russ Commander
|
Only a little time to work tonight, and Paula Abdul's Two steps forward, you take one step back is still playing.
The one step back is the magnet that attached the top plate to the hull was too strong- it pulled the curved collar off the styrene piece when I went to remove the assembly from the hull. Not too much of a set back, as I always intended to use JB Weld or 2-part epoxy to permanently attach it, it would have been nice if the magnet had been sufficient by itself, but no real problem.
It is annoying that every glue or adhesive I try to use on the styrene works only about half the time; some attachments are very solid, others pop right off no matter what I do. I've cleaned the area to be glued with alcohol pads, scored it with sandpaper to make for a better grip, doesn't help or hurt as far as I can see. The thing that works the best so far is some cheap 2-part epoxy from the Dollar store, but it makes for a lot of waste because once open, there is no good way to reseal the plungers- once you start you use it all or lose the excess.
So back to the original plan: the gondola attaches to the top plate by magnets, the top plate permanently attaches to the hull via epoxy and very strong magnets.
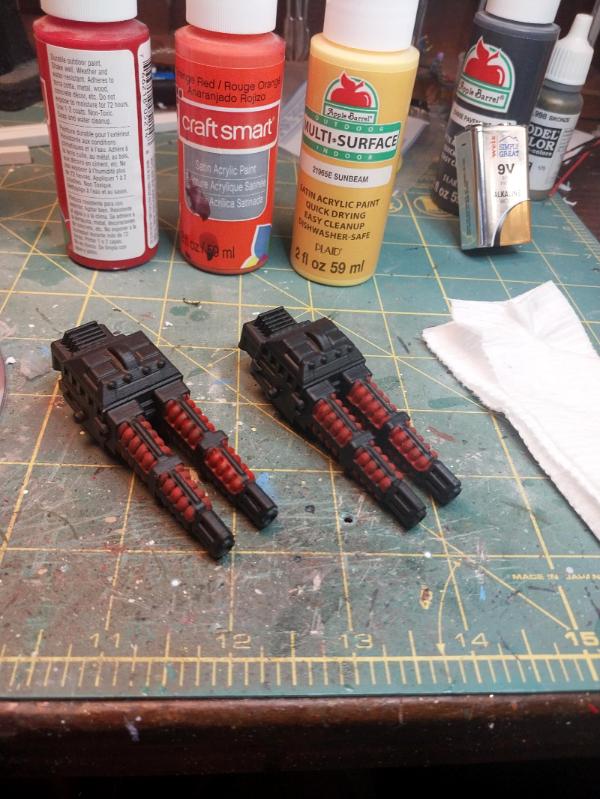
The step forward is that I actually got a little bit of stick time in on a paint brush and applied the first of two coats of the first of four colors to the plasma cannon:
That's it for now, but the pieces are lining up to finish the gondola, the guns, and the running lights, leaving the bridge, weapons console and crew.
More follows soonest. Thank you for looking in.
|
"He fears his fate too much, or his desserts are small, who will not put it to a single touch; to win- or lose- it all."
Montrose Toast
|
|
|
|
|
2024/09/06 08:17:39
Subject: sCratchBuilding CuStomiZing & CitbaShing: 05SEP: Fix one thing, start another
|
|

The Dread Evil Lord Varlak
|
To think that effort for that airship... It's truly amazing what some hobbiests do and you are a paragon for that work.
|
https://www.dakkadakka.com/dakkaforum/posts/list/0/766717.page
A Mostly Renegades and Heretics blog.
GW:"Space marines got too many options to balance, therefore we decided to legends HH units."
Players: "why?!? Now we finally got decent plastic kits and you cut them?"
Chaos marines players: "Since when are Daemonengines 30k models and why do i have NO droppods now?"
GW" MONEY.... erm i meant TOO MANY OPTIONS (to resell your army to you again by disalowing former units)! Do you want specific tyranid fighiting Primaris? Even a new sabotage lieutnant!"
Chaos players: Guess i stop playing or go to HH. |
|
|
|
|
2024/09/07 01:13:39
Subject: Re:sCratchBuilding CuStomiZing & CitbaShing: 05SEP: Fix one thing, start another
|
|
[DCM]
Boom! Leman Russ Commander
|
Thank you for the kind swords, Not Online!!!
I have to admit, I didn't intend for this to be quite such a large project when I started out, but then again- I don't really plan beyond the broad strokes of a design and really only find out what I've gotten into when I have to make the big pieces fit together!
This one has been a lot of fun so far and definitely is not in my normal "infantry and muddy tanks" genre, so- lots of learning!
Plus I get to sound off with 'Arrrr' and 'shiver me timbers' aperiodically as I do the work, so bonus.
|
"He fears his fate too much, or his desserts are small, who will not put it to a single touch; to win- or lose- it all."
Montrose Toast
|
|
|
|
|
2024/09/07 06:33:31
Subject: sCratchBuilding CuStomiZing & CitbaShing: 05SEP: Fix one thing, start another
|
|
Ragin' Ork Dreadnought
Deep in the Outer Boroughs of NYC
|
Plasma cannons are starting to look good. All progress is good progress. Even when we stumble.
|
|
|
|
|
|
2024/09/07 10:48:09
Subject: Re:sCratchBuilding CuStomiZing & CitbaShing: 05SEP: Fix one thing, start another
|
|
[DCM]
Boom! Leman Russ Commander
|
It's funny: the top plate would have been fine if I hadn't tried to pry it off the hull- those are very good neodymium magnets. I was caught with the idea that the plate could remain attached to the gondola, instead of the original plan to permanently attach the plate to the hull and so tried to make it work.
Edison used to say he learned more from his mistakes than from his successful experiments. And earlier in this blog I posted the video of Dick Van Dyke & Co singing The roses of success grow from the ashes of defeat. from the movie "Chitty Chitty Bang Bang.
It's all good and I think I'm seeing the end of the project in the foreseeable future (which is more than I could say when I was applying more than 2500 rivets by hand! )
Plus this week some more gubbins came in to be added, like my Danforth anchors, so rapidly accumulating all the 'neat additions' the ship will need.
More follows soonest.
|
"He fears his fate too much, or his desserts are small, who will not put it to a single touch; to win- or lose- it all."
Montrose Toast
|
|
|
|
|
2024/09/16 23:29:26
Subject: Re:sCratchBuilding CuStomiZing & CitbaShing: 05SEP: Fix one thing, start another
|
|
[DCM]
Boom! Leman Russ Commander
|
Finally, back in action!
On the work front, my company won the rebid for the renewal of the program I'm on, which is good, but we won't be staying in our existing facilities. So everything is crazy as we prep for the move and make sure our client is satisfied that we know what we're doing. (He's acting much like Steve Martin as SGT Bilko in the eponymous movie where he's trying to act like he remembers drill and ceremony to conduct a platoon level inspection- lots of barking and mayhem, not much direction.)
On the home/farm front: we got our second and last cutting of hay in, so, yay! But my behind now confirms exactly to the seat of the Alice-Chalmers tractor I sat in for so many hours. It's good the weather cooperated, and we actually got it done, though.
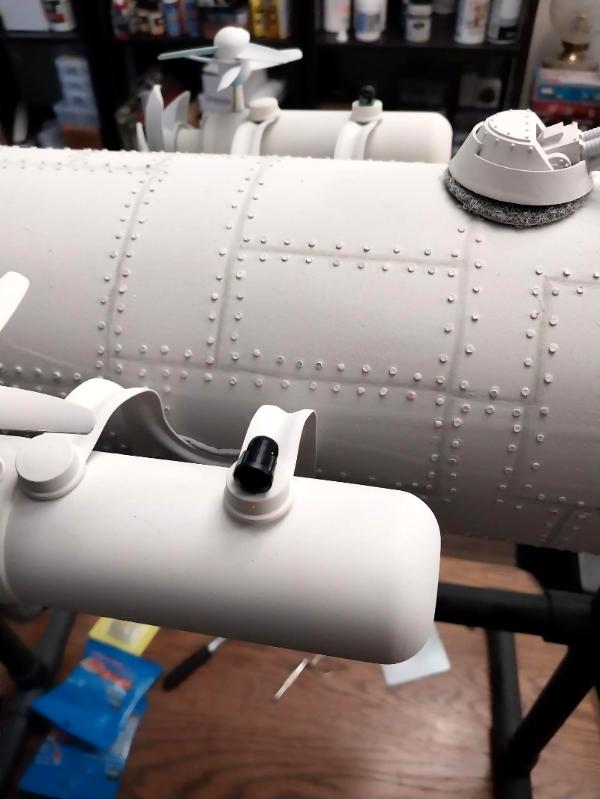
For the really important work on the Kittyhawk, tonight saw the twin plasma cannon systems nearly completed; they just need muzzle burn and some bronze wash to pick out the edges and I'm calling them done:
I've never put so much effort into trying to get the plasma glow right: that's two coats of four different colors on top of the flat black base coat to try to get it done right. Better than my previous efforts, I think, but I've still got some larnin' to do.
Also applied black wash, swabbed around with my dirty paint brush cup water, to the deck sole (I can't not grub a vehicle up somehow- even the Queen of the Imperial Fleet! ) and applied hazard striping to mark off where the guns will go:
The center area is where the gunnery console will go.
My new blinky LEDs are in, to replace the defective ones from earlier, so I'm hoping this week to also get the running lights, weapons gondola lights and bridge lights wired in and be done with that. I have my two-cell 2032 coin battery boxes ready, so it's just a question of doing it. Then paint the GAU-8 twin Gatlings, wash all the mounts in bronze, finish the wepps gondola and stat the bridge.
Applying all the decals I want to is going to be a couple of days work also, at the end.
And the INAS Kittyhawk puts to atmosphere to enforce the Will of the Imperial Throne!
Thank you for looking in, more follows soonest.
|
"He fears his fate too much, or his desserts are small, who will not put it to a single touch; to win- or lose- it all."
Montrose Toast
|
|
|
|
|
2024/09/17 15:58:50
Subject: sCratchBuilding CuStomiZing & CitbaShing: 16SEP: Plasma guns and deck soles, the usual
|
|
Ragin' Ork Dreadnought
Deep in the Outer Boroughs of NYC
|
Those plasma cannons are looking sweet! Your efforts are paying off. The deck looks great. I'm really looking forward to seeing more progress on this.
|
|
|
|
|
|
2024/09/17 23:59:58
Subject: Re:sCratchBuilding CuStomiZing & CitbaShing: 16SEP: Plasma guns and deck soles, the usual
|
|
[DCM]
Boom! Leman Russ Commander
|
Thanks very much, Warboss!
It took all the time I had tonight, but I have (nearly) finished the gallery guns for the weapons gondola. All that remains is to add the muzzle burn to the plasma cannon and then they're as done as I'm going to do them.
Here's the plasma cannon:
And the GAU-8 Gatlings:
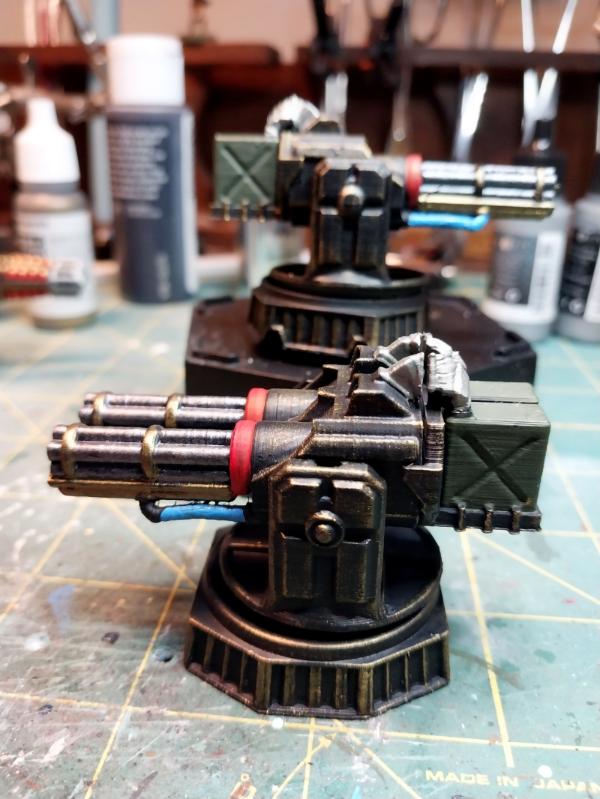
I added a color in each case to help make the weapon 'pop', although the plasmas didn't really need it. With that, I didn't want a lot of color on the gun mounts, so just drybrushed some Model Color Brass and called it done.
Unfortunately, three of the four guns wouldn't sit tight enough to remain at whatever angle of elevation I chose, too loose. I tried punching washers out of styrene to fit over the trunnions, but that didn't work, so I just glued them more or less level. The guns will traverse, but not elevate. You pays your money and you takes your chances.
Tomorrow, I'll finish the muzzles and then move on to finally finishing off the gondola itself. I've used the extra time to obtain some more bits and bobs to help dress everything out.
Thanks for looking in, more follows soonest.
|
"He fears his fate too much, or his desserts are small, who will not put it to a single touch; to win- or lose- it all."
Montrose Toast
|
|
|
|
|
2024/09/18 23:30:36
Subject: Re:sCratchBuilding CuStomiZing & CitbaShing: 17SEP: Sun's down, guns done, on to the gondola
|
|
[DCM]
Boom! Leman Russ Commander
|
Tonight, I got a surprisingly large amount of 'nug' work in- lots done in prep for some flashy work (hopefully) tomorrow, but little to show tonight. As a placeholder, here's some of what I've got up to:
The plasma cannon are done- added the muzzle burn:
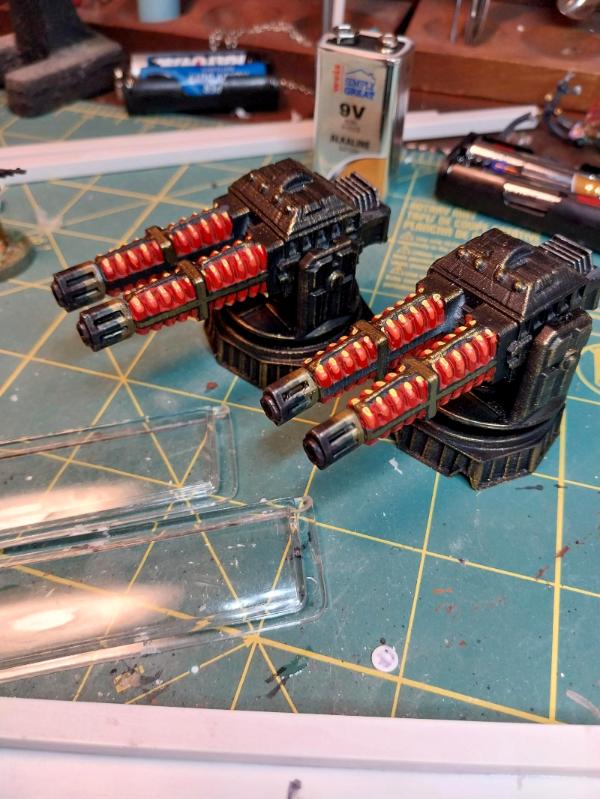
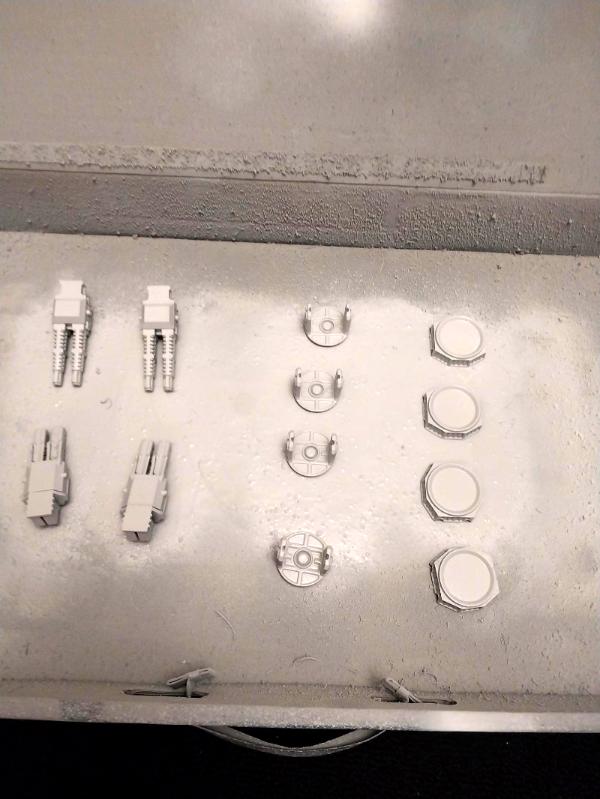
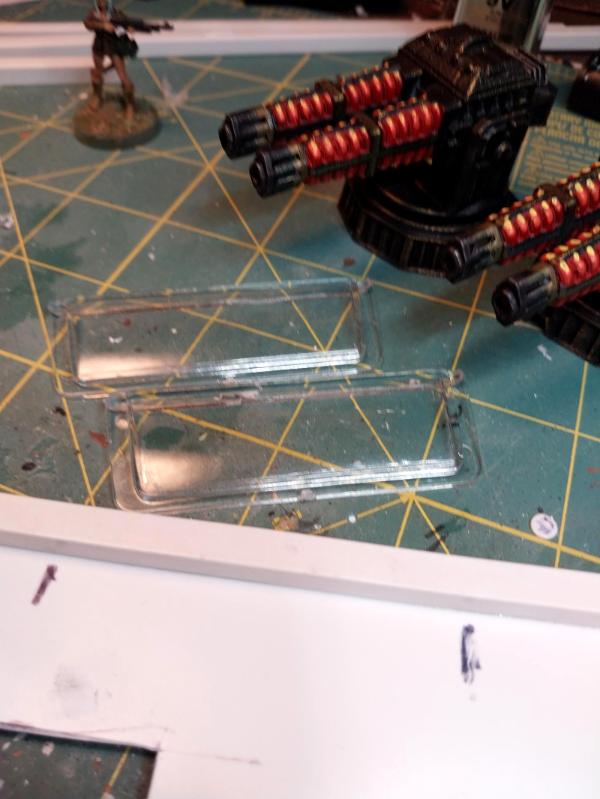
Found a metric crap-ton of bits and bobs that are going into the gondola- part of tonight was given over to finding them amongst all the boxes and bags and priming them. Amongst the lot are these clear plastic pieces, that will become the port covers for the windows/portholes located to either end of the weapons control console; I'm thinking about adding bulkheads inside, to separate the guns from console area, we'll see. I have no idea what this gidgits are or even where I got them, but they are exactly the right size to cover the openings (both in length and height):
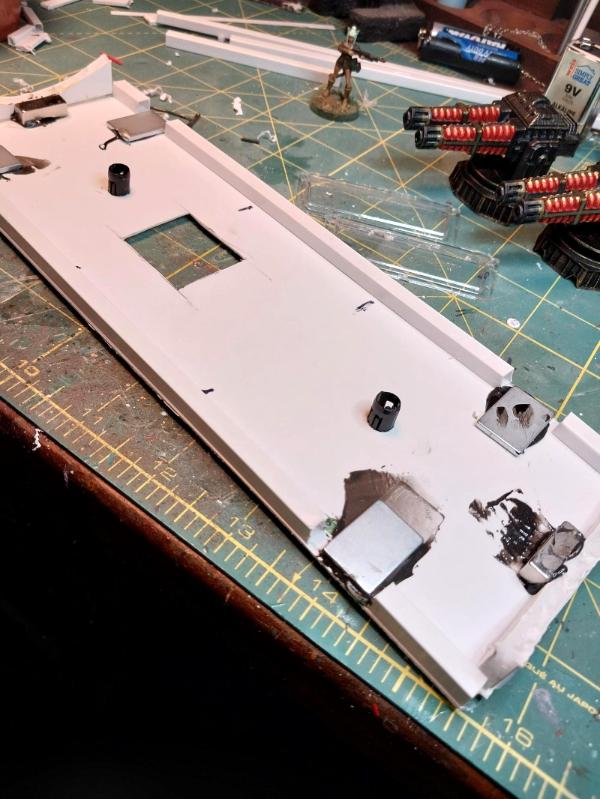
I also added LED bulb fittings to the gondola plate, the footplate of which is really the gondola ceiling. It's ready for priming now, but I can't glue it into place until I run the wires:
Tomorrow should have a lot more to show, nothing to do but vut to size and glue into place for a lot of things. Thank you for looking in, more follows soonest.
|
"He fears his fate too much, or his desserts are small, who will not put it to a single touch; to win- or lose- it all."
Montrose Toast
|
|
|
|
|
2024/09/20 00:04:59
Subject: Re:sCratchBuilding CuStomiZing & CitbaShing: 18SEP: Nug work invested- ready to rock the house
|
|
[DCM]
Boom! Leman Russ Commander
|
Lot of work done tonight, all over the place- gondola, gondola attachment plate, gubbins and wiring. The wepps gondola is finally approaching end state.
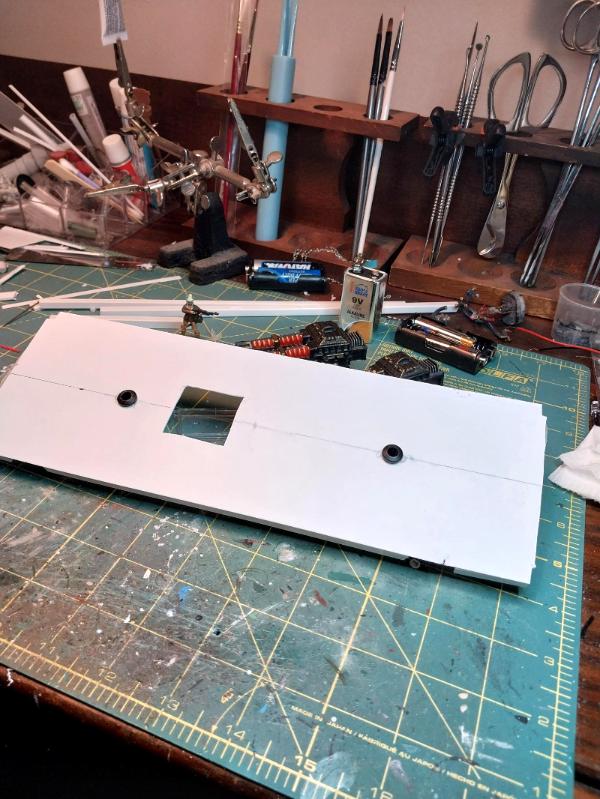
For the attachment plate, cut all my pieces to form the side panels and struts to have something to attach to:
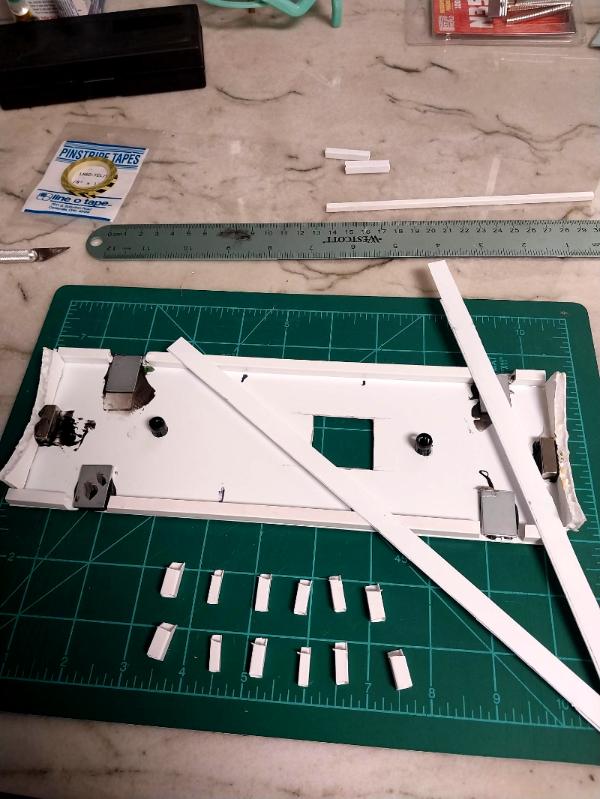
And glued it up and got some primer on:
This is ready to attach to the zepp and I will as soon as I finish running my wiring. I'm not going to glue, epoxy or greenstuff it as I originally thought, the magnets hold it strongly enough that it would be redundant, and being able to tug it off lets me replace LEDs more easily if I ever need to.
The louvres on the side panels are Lego window shutters; I definitely got the idea from someone here on Dakkadakka, possibly Flapjack or one of the other scratch builders that have been so inspirational.
I went through all my bits boxes and bags again and found more gubbins for inside the gondola, which are glued in now but I'm not done yet so no pics for now, and others that will go on top of the deck sole; as you can see, deck lockers, ammo boxes and some other things:
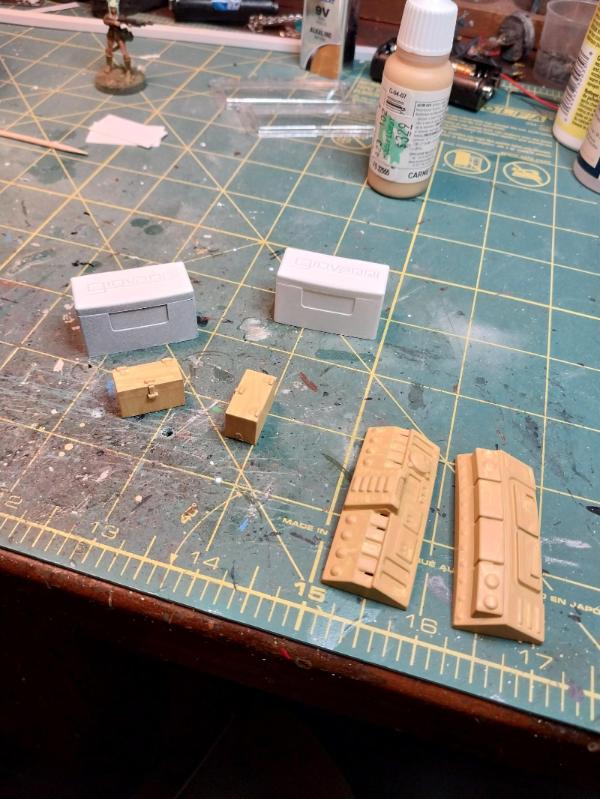
The small boxes are left over from the Polish Tankette kit that became one of the Doom Pixie armored scout vehicles; the large ones are the caps from one of the brands of hand sanitizer we use. The larger pieces will form the long sides of the weapons console and are Bronekorps tank bumpers from two of the older kits. I've got a couple of other things painting up- first aid kits to hang on the wall and deck cleats for tying off lines (because air ship of course) and some other things- pictures hopefully Monday.
It's getting there. Monday's push will be to finish off the gondola, get it primered and base painted, so I can get the deck sole in and attach all the other junk, then mount the guns and that's about it; then I can rig the wiring and lights and all that will be left is the bridge and crew figures.
Thank you for looking in, more follows soonest.
|
"He fears his fate too much, or his desserts are small, who will not put it to a single touch; to win- or lose- it all."
Montrose Toast
|
|
|
|
|
2024/09/23 23:18:59
Subject: Re:sCratchBuilding CuStomiZing & CitbaShing: 19SEP: More nug work, gondola getting towards complete
|
|
[DCM]
Boom! Leman Russ Commander
|
Hokey smokes, they say that we learn more from our failures (ahem temporary setbacks ) than from our successes; therefore, I have completed my Master's Degree in hobbying and am moving on completing my thesis defense for my PhD.
Lots of lessons learned tonight.
First, although I'm keeping it in the dark until I get some painting done on it, I have modeled the bunting from greenstuff that will go on the bow of the weapons gondola and have a wicked cool sigil attached- I'm very excited to show all y'all and hopefully will get it done enough this week to show.
Lesson learned: Don't waste your time on fine detail greenstuff projects with old greenstuff: use fresh. It was a pleasure kneading the two components between my fingers to mix them rather than beat them to death with a claw hammer.
Second: I removed the aileron section and aft hull tail section to facilitate wiring the blinky lights for the engine pods and the gondola and bridge lights. Fortunately, I hadn't glued or epoxied this piece of stovepipe- I used a single sheet metal screw to hold it in place:
Lesson learned: To the degree possible, leave yourself a way to get back inside things that might need modification or maintenance.
Lesson learned: When I put this booger back it's getting three sheet metal screws to hold it in place; I was surprised at how easily the whole thing came off once the one screw was pulled.
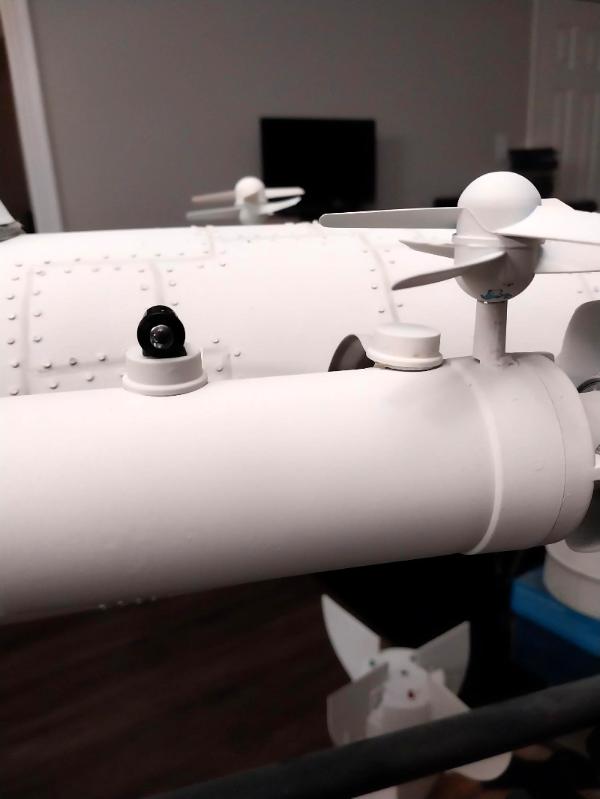
Third: Put most of my time tonight into building the red blinky lights circuit (portside running lights). You can't see it in this pic, naturally, but the two LED circuit, its battery box and its switch all work. Of course the blink is out of phase with the camera capture, but trust me, the bulb you see is blinking like a blinkin' beacon (hat tip to Yukon Cornelius):
Lesson learned: I know (now) several things:
a) How long to make my wire leads to make it easier to join everything up
b) That the 'press and hold' connectors don't work for this project- the connections must be soldered or taped with electrical tape
c) Multiple tests to ensure the circuit is wired correctly and batteries installed properly in the 2-coin battery box is never wasted: of everything that I had to do over tonight it was never because something was misrouted or wired incorrectly. Test, test, test!
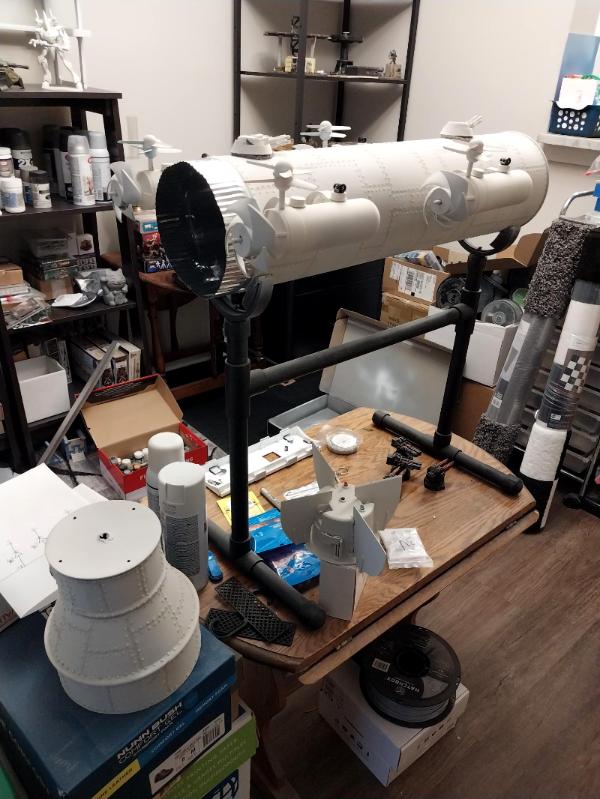
Finally, the greatest lesson learned of all: To Do Anything, You Need EVERYTHING:
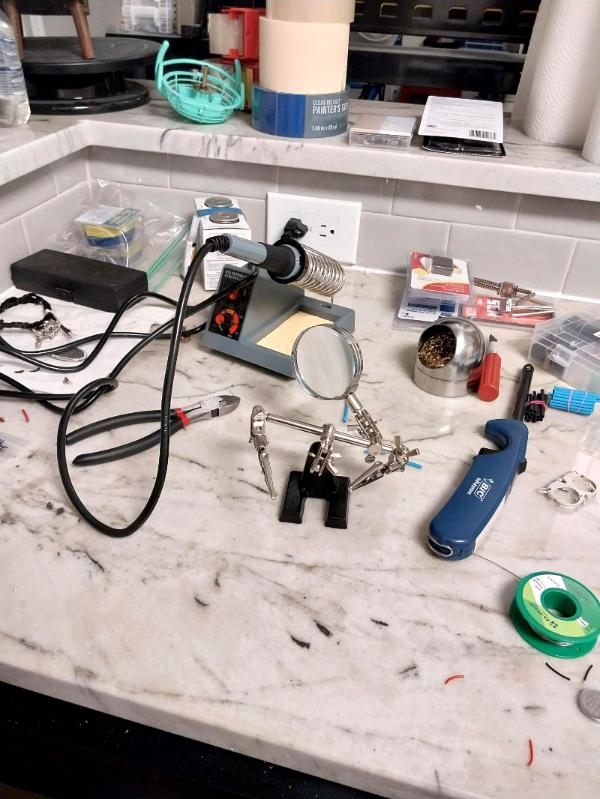
Tomorrow, I'll wire the starboard (green) blinky lights and maybe the wepps gondola as well and run the wire that will eventually feed the bridge lights. Then the top plate can go on (it's done) and I can focus on wrapping up the wepps gondola (it's almost done).
I'm at the point where I'm looking forward to some nice, relaxing painting of the 10 crewcat Aero Pixies I figure to do up to put in this beast. I enjoy soldering from time to time but I taught myself from YouTube, I'm not terribly good and I do find it somewhat nerve wracking at times.
Thank you for looking in, I really appreciate seeing that people have been here and even more when you comment (when there is something that needs saying- your constructive criticism is always welcome).
More follows soonest.
|
"He fears his fate too much, or his desserts are small, who will not put it to a single touch; to win- or lose- it all."
Montrose Toast
|
|
|
|
|
2024/09/24 19:50:23
Subject: Re:sCratchBuilding CuStomiZing & CitbaShing: 23SEP: Greenstuff, solder & LEDs
|
|
[DCM]
Incorporating Wet-Blending
|
The Kittyhawk is really coming along. The guns in particular a nifty, especially the plasma. If you put that much attention to detail in the whole model, it will look truly fantastic. I look forward to seeing the next steps.
|
|
|
|
|
|
2024/09/24 23:46:39
Subject: Re:sCratchBuilding CuStomiZing & CitbaShing: 24SEP: Lies, Darned Lies and Statistics
|
|
[DCM]
Boom! Leman Russ Commander
|
Thank you very much, Josh. This is something very different from any 'large scope' project I've done before and in some ways is influenced and inspired by Captain Brown's Chilliwack project- there was attention to detail on a massive scale! For anyone who hasn't seen it, I highly recommend taking a look.
Work got in the way of putting any time in tonight, which is disappointing, as we're getting to the stage where major subcomponents are so close to being ready to install, the changes should start coming quick.
Some stats on the Kittyhawk to date:
* More than four feet long
* More than 2500 hull rivets
* 12 LED navigation lights...
* ...using more than three yards of wire...
* ...and one 9 volt and four two cell 2023 coin battery boxes
* Four Daimler Khrushart 18 Megawatt Ethereal Turbine Engines
* Armament consisting of:
- Two twin 30mm depleted uranium GAU-8 Gatling Gun mounts
- Two twin 8000 Ohm Plasma Cannon Gun mounts
- Two twin 40mm anti-aircraft dorsal mounts
- One twin 40mm Dual Purpose ventral mount (chin gun)
Thank you all for looking in. More follows soonest.
|
"He fears his fate too much, or his desserts are small, who will not put it to a single touch; to win- or lose- it all."
Montrose Toast
|
|
|
|
|
2024/09/25 05:54:40
Subject: sCratchBuilding CuStomiZing & CitbaShing: 24SEP: Lies, Darned Lies and Statistics
|
|
Ragin' Ork Dreadnought
Deep in the Outer Boroughs of NYC
|
I totally appreciate the level of detail going into this project.
|
|
|
|
|
|
|
|


