| Author |
Message |
 |
|
|
|
|
Advert
|
Forum adverts like this one are shown to any user who is not logged in. Join us by filling out a tiny 3 field form and you will get your own, free, dakka user account which gives a good range of benefits to you:
- No adverts like this in the forums anymore.
- Times and dates in your local timezone.
- Full tracking of what you have read so you can skip to your first unread post, easily see what has changed since you last logged in, and easily see what is new at a glance.
- Email notifications for threads you want to watch closely.
- Being a part of the oldest wargaming community on the net.
If you are already a member then feel free to login now. |
|
 |
2011/01/21 18:43:36
Subject: Rebuilding the Mantis Warriors (1/21: Razorback WIP #8)
|
|

Nurgle Chosen Marine on a Palanquin
|
Tank looks great Gits, the mantis symbol came out great
|
 BobtheInquisitor wrote: BobtheInquisitor wrote:I tend to glue metal models with a combination of BSI cyanoacrylate and my tears of frustration.
|
|
|
 |
|
2011/01/21 18:47:35
Subject: Rebuilding the Mantis Warriors (1/21: Razorback WIP #8)
|
|

Longtime Dakkanaut
|
Agree with Blackhand. I really dig the contrast red used on the air vents. It looks awesome with a little bit of old school flair.
Haha and thanks for having my back over at B&C with those mold lines.
|
|
|
|
|
|
2011/01/21 18:49:12
Subject: Rebuilding the Mantis Warriors (1/21: Razorback WIP #8)
|
|

Longtime Dakkanaut
|
Nice job on the Mantis head...
|
My WiP  -affiliated Traitors - War on Tranch : Renegades -affiliated Traitors - War on Tranch : Renegades
The World Tree's offsprings - Various WIPs : Skavens, Tzeentch & Nurgle CSMs, Marine Swap
My first tutorial - Object Source Lighting
What will I achieve in 7 months? : Radio Omid is online
"Squat Hulk- in space no one knows you no longer exist." - Gitzbitah
"Now you're just being silly, everyone knows red paint tastes fasta." - monkeytroll
"Both servers are on different continents so space meteors or thermonuclear war will not be enough take out dakka hopefully." - legoburner
Please remember to tick the "Disable Voting" box, if the pics you are uploading do not deserve votes (ie. early WIP, blurry pics, batreps, ...) Thanks in advance. |
|
|
|
|
2011/01/21 20:10:33
Subject: Rebuilding the Mantis Warriors (1/21: Razorback WIP #8)
|
|

Battle-tested Knight Castellan Pilot
|
love it Git
|
the banner is click able. it takes you to a magical country. if you don't believe me click and see for your self

|
|
|
|
|
2011/01/21 20:30:57
Subject: Re:Rebuilding the Mantis Warriors (Anyone going to Adepticon?)
|
|
Incorporating Wet-Blending
|
Ooooh.... tank's looking awesome!
Gitsplitta wrote:
Edit" Woah! Ramos! didn't see your update with the photo... sorry bud. Very nice. It looks a little cutlassy rather than katana-like. Perhaps the curve transition to the point is the issue?? Should be angular transition from the blade edge to the point. Can you try adjusting this & then we can take another look at it? Might be the width of the blade in relation to it's length too, though that's something we wanted to increase to make painting effects more plausable... In any case, really nice work... Clean and crisp, nice job!
Ya the proportions are gonna make it look a bit wacky, but I see what you're meaning about the tip.
I freehanded most of the shape, tweaking it with file, knife, and sandpaper. I loosely (very verrry loosely) based the curve to that of a katana I have sitting in my room.
Ill try doing a really sharp angle cut on the tip, see if I cant get that edge we want.
Will update later tonight.
|
|
|
|
|
|
2011/01/21 20:48:22
Subject: Re:Rebuilding the Mantis Warriors (1/21: Razorback WIP #8)
|
|
Longtime Dakkanaut
|
Outstanding stencil work, it turned out better than my first few attempts
|
Happiness is Mandatory!
|
|
|
|
|
2011/01/21 20:54:01
Subject: Rebuilding the Mantis Warriors (1/21: Razorback WIP #8)
|
|

Liberated Grot Land Raida
|
Looking good! I like the red parts, they fit in nicely and act as a nice spot colour.
|
A Squeaky Waaagh!!
Camkhieri: "And another very cool thing, my phones predictive text actually gave me chicken as an option after typing robot, how cool is that."'
Meercat: "All eyes turned to the horizon and beheld, in lonely and menacing grandeur, the silhouette of a single Grot robot chicken; a portent of evil days to come."
From 'The Plucking of Gindoo Phlem' |
|
|
|
|
2011/01/21 21:11:29
Subject: Rebuilding the Mantis Warriors (1/21: Razorback WIP #8)
|
|
Boom! Leman Russ Commander
|
the razorback is looking good!
|
"Reality is, when you stop believing in it, doesn't go away"
-Philip K. Dick
Constant Lurker, Slowly getting back into modelling! Someday a P&M Blog link will lurk here! |
|
|
|
|
2011/01/21 21:13:34
Subject: Rebuilding the Mantis Warriors (1/21: Razorback WIP #8)
|
|

Blood Angel Chapter Master with Wings
|
It looks great dude, you just set the bar higher for yourself, awesome!
All it needs is that sponge weathering to tie it all together now 
|
|
|
|
|
|
2011/01/21 21:17:08
Subject: Re:Rebuilding the Mantis Warriors (1/21: Razorback WIP #8)
|
|
Chalice-Wielding Sanguinary High Priest
Arlington TX, but want to be back in Seattle WA
|
The tanks look fantastic Gits! Forgive me for not wanting to crawl back into the archives of this thread, but did you airbrush the green? I think the tones of the green turned out well, from the looks of things you may have sprayed more than one tone....really turned out nicely. I am also a fan of the yellow side hatch and the mantis icon. The placement of your colors look well thought out and perfectly executed. Finally, someone that shares my philosophy on detail vs. time management  . I dont think its neccessary to hit every detail either, often times in the past that is how i burned out so quickly on painting. I feel lately im able to accomplish more simply by overlooking subtle details of the models. Eventually I would love to come back to the character/vehicle and finish it in its entirety, but further expanding my army or starting a new army are much bigger incentives to me . I can also relate to the task of suddenly painting mech instead of figures. Its a completely different animal. Ive got 5 tanks ahead of me before I can consider the 1st wave of my Blood Angels basically finished; tanks are really tough to paint in my opinion. Even with the assistance of an airbrush/spraygun/spraypaint they are still are time consuming project. I look foward to more of your work....keep it up!
How are your boys silver skulls coming along? Did you get them any new 40k models for the holidays?
|
 4250 points of Blood Angels goodness, sweet and silky W12-L6-D4 4250 points of Blood Angels goodness, sweet and silky W12-L6-D4
 1000 points of Teil-Shan (my own scheme) Eldar Craftworld in progress 1000 points of Teil-Shan (my own scheme) Eldar Craftworld in progress
 800 points of unassembled Urban themed Imperial Guard 800 points of unassembled Urban themed Imperial Guard
 650 points of my do-it-yourself Tempest Guard 650 points of my do-it-yourself Tempest Guard
 675 points of Commoraghs finest! 675 points of Commoraghs finest!
The Dude - "Jackie Treehorn treats objects like women, man."
Lord Helmet - "I bet she gives great helmet."
|
|
|
|
|
2011/01/21 22:14:01
Subject: Rebuilding the Mantis Warriors (1/21: Razorback WIP #8)
|
|

Longtime Dakkanaut
The ruins of the Palace of Thorns
|
I also find myself wondering if Tyranid Scything Claws might play a part in some conversions...
|
|
|
|
|
|
2011/01/21 22:32:05
Subject: Re:Rebuilding the Mantis Warriors (1/21: Razorback WIP #8)
|
|
Decrepit Dakkanaut
|
OK guys, thanks for all your comments & I will respond later but I've been up to my neck in cub scout pinewood derby stuff all day (and all day tomorrow) and I wanted to get a quick "how to" up for you. This is based on the second door where I modified my technique a bit from the first and it was much easier and turned out much better. Step 1: Take a piece of masking tape large enough to cover your area, then draw your design on it. 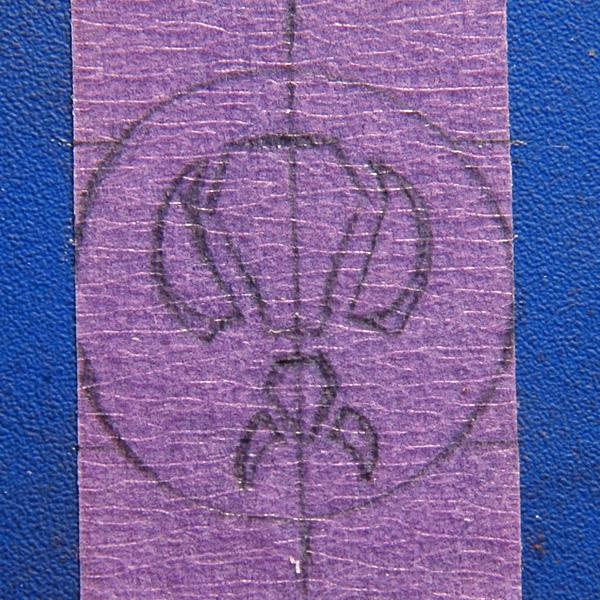 Step 2: Cut it out with a very sharp hobby knife... 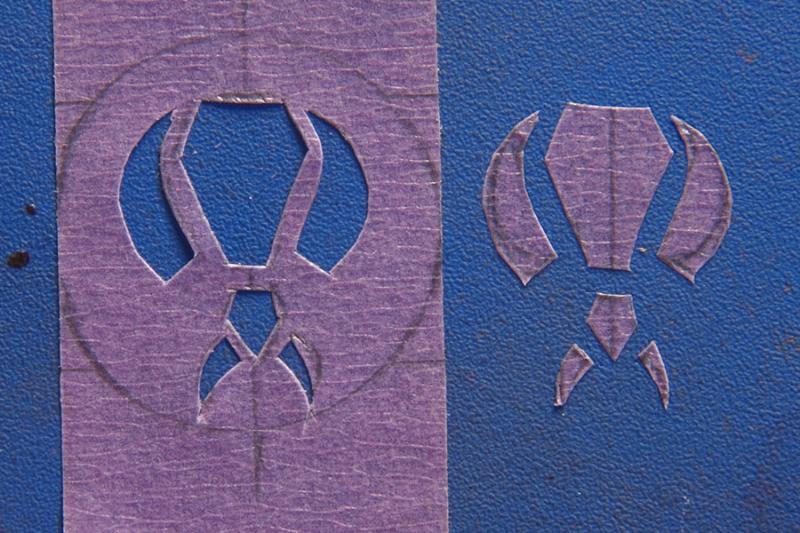 Step 3: Place your "stencil" on your surface and burnish the edges of the stencil so they adhere tightly to the surface. The extra tape here is to cover an error in the cut. 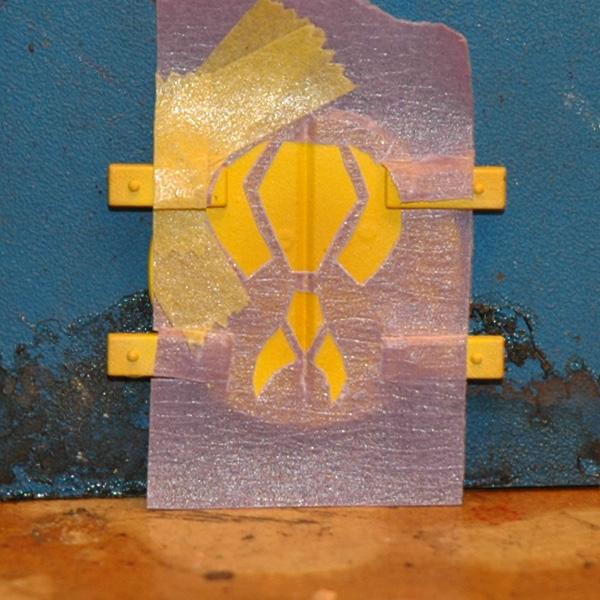 Step 4: Airbrush on your lightest color. Go slowly and with low pressure! If it takes you less than 5 coats to get up to full coverage you're putting on too much too fast and are likely to get bleed through! I should mention that the less you fiddle with your tape, the better off you'll be. In my first go-round I actually masked off the black when I painted the red, then removed that... masked off the red areas and painted the black. I think the removal of the masking over the black areas probably weakened the overall stencil adnerance which caused far more bleed through on the first try than on the second. I also applied my coats much heavier and faster, which kept the paint "liquid" longer allowing it to bleed more readily. If you spray lightly, the paint essentially dries on contact which greatly decreases the odds that you're going to get it moving beyond the tape edges. 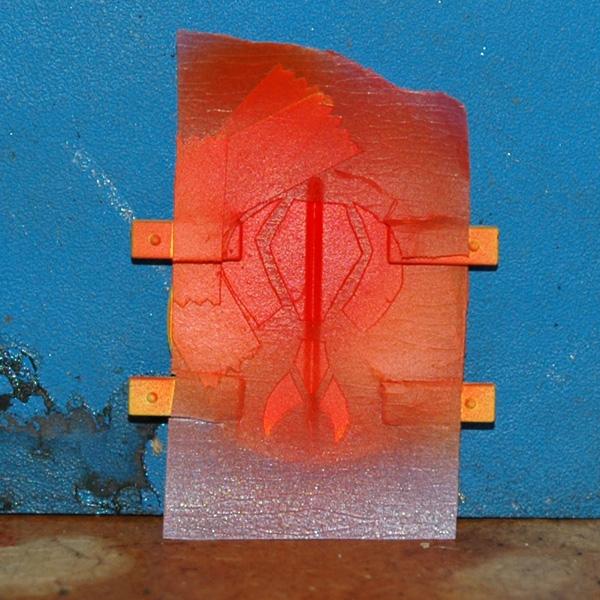 Step 5: Mask over those areas you want to remain the lightest color. 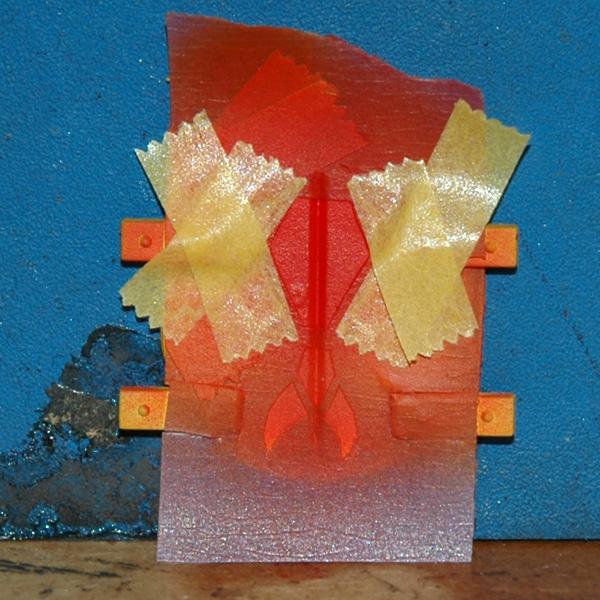 Step 6: Spray on your next darkest color, same rules apply as in step 2.  Step 7: When dry, carefully remove tape stencil and viola! Not too bad. 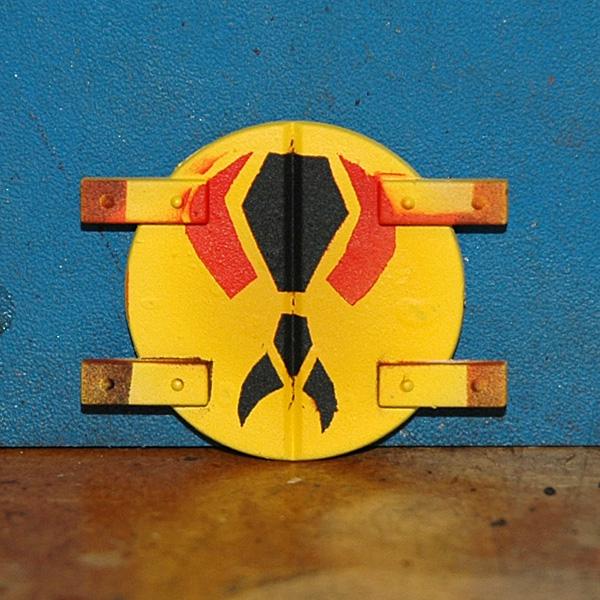 Step 8: Clean up the lines, cover the over-spray and bleed through (hopefully not too much) and you're all set! The less crap you have on your surface (these doors have a lot of extraneous crap on them) the easier this will be. 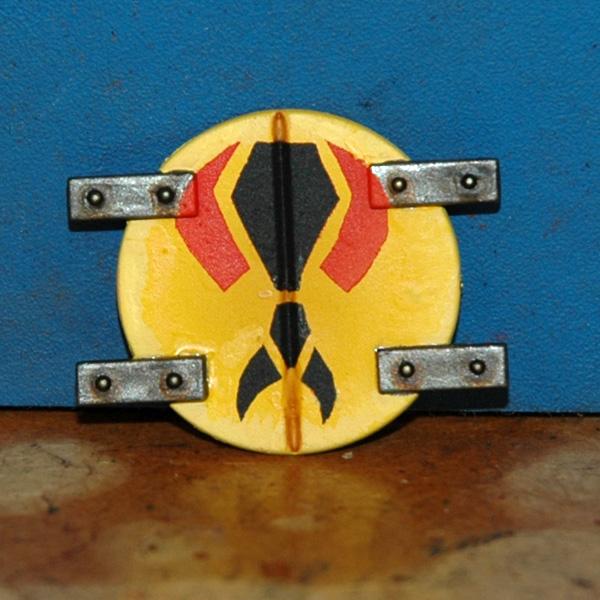 There you have it! Worst part is cutting the design cleanly into the tape. Figure that out and you've got it licked. Well, off to go set up a race track... will check back in tonight when I'm done with my chores. Next up.... sponge weathering or... "How Gits can screw up two weeks of work in 15 minutes!".
|
|
This message was edited 4 times. Last update was at 2011/01/22 12:23:55
|
|
|
|
|
2011/01/21 23:54:25
Subject: Rebuilding the Mantis Warriors (1/21: Tape Stencil Tutorial)
|
|
Incorporating Wet-Blending
|
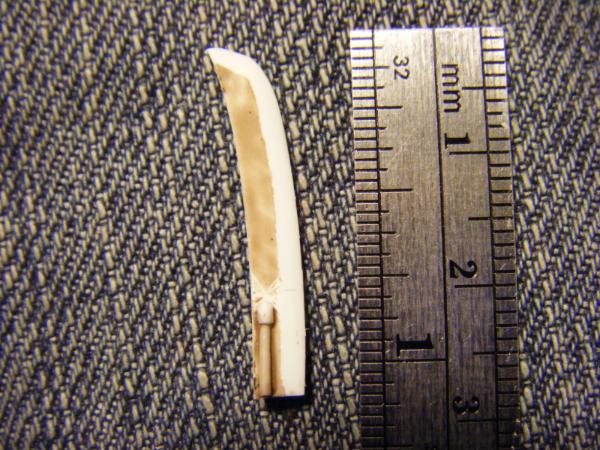
Fixed the tip- I think I got it more katana-like.
Sharpened it a bit too, and this lets ya see the full hamon area
|
|
|
|
|
|
2011/01/22 01:26:17
Subject: Re:Rebuilding the Mantis Warriors (1/21: Tape Stencil Tutorial)
|
|
Blood-Drenched Death Company Marine
|
Looks great Ramos. I think it will be even better wielded by a mantis warrior!
|
|
|
|
|
|
2011/01/22 01:30:03
Subject: Rebuilding the Mantis Warriors (1/21: Tape Stencil Tutorial)
|
|
Longtime Dakkanaut
|
Thanks for the "How to"!
I used to do some of stencil work in high school...sigh, so long ago...anyways, when making a stencil out of tape, I always found it easiest to cut the design out if the tape was placed on a sheet or piece of glass. Then, once cut out you can easily remove the stencil from the glass and place on a canvas or tank in this case.
|
|
|
|
|
|
2011/01/22 02:40:38
Subject: Rebuilding the Mantis Warriors (1/21: Tape Stencil Tutorial)
|
|
Decrepit Dakkanaut
|
@Ramos: looks much better.... and the sharpening helps as well., helps give it definition.
@Moltar: I put the tape on a cutting pad and did my cutting there. Here's a pic from the first run (give a minute to upload it)... O.K. added two new pics to the tutorial above. That shows the early steps. It's just always clumsier for me when I cut something out than when I draw it in the first place... never quite works the way I want it to.
|
|
This message was edited 1 time. Last update was at 2011/01/22 02:50:25
|
|
|
|
|
2011/01/22 03:25:04
Subject: Rebuilding the Mantis Warriors (1/21: Tape Stencil Tutorial)
|
|
Longtime Dakkanaut
|
i think the "give" in the cutting pad maybe making it difficult. The benefit to doing it on glass was that it resisted against the pressure caused by using the blade and it is a smooth surface, opposed to cutting on wood or something else. I think that would help you cut it out more cleanly. Unless, I'm stupid and the pad you're referring to is more like a hard plastic cutting board.
|
|
This message was edited 1 time. Last update was at 2011/01/22 03:25:39
|
|
|
|
|
2011/01/22 03:39:37
Subject: Rebuilding the Mantis Warriors (1/21: Tape Stencil Tutorial)
|
|

Mutilatin' Mad Dok
|
Digging the taping tutorial! good job man! Looks sweet!
|

S'all fun and games until some no life troll master debates all over your space manz & ruins it for you |
|
|
|
|
2011/01/22 03:49:13
Subject: Rebuilding the Mantis Warriors (1/21: Tape Stencil Tutorial)
|
|
Decrepit Dakkanaut
|
Thanks Mukkin'!
@Moltar: No you're right... my cutting pad is a stiff kind of rubber thing you can get at most hobby shops, but it is designed to give a little under the blade. I'll have to try it on glass and see if it makes a difference.
Automatically Appended Next Post: Element206 wrote:The tanks look fantastic Gits! Forgive me for not wanting to crawl back into the archives of this thread, but did you airbrush the green? I think the tones of the green turned out well, from the looks of things you may have sprayed more than one tone....really turned out nicely. I am also a fan of the yellow side hatch and the mantis icon. The placement of your colors look well thought out and perfectly executed. Finally, someone that shares my philosophy on detail vs. time management . I dont think its neccessary to hit every detail either, often times in the past that is how i burned out so quickly on painting. I feel lately im able to accomplish more simply by overlooking subtle details of the models. Eventually I would love to come back to the character/vehicle and finish it in its entirety, but further expanding my army or starting a new army are much bigger incentives to me . I can also relate to the task of suddenly painting mech instead of figures. Its a completely different animal. Ive got 5 tanks ahead of me before I can consider the 1st wave of my Blood Angels basically finished; tanks are really tough to paint in my opinion. Even with the assistance of an airbrush/spraygun/spraypaint they are still are time consuming project. I look foward to more of your work....keep it up!
How are your boys silver skulls coming along? Did you get them any new 40k models for the holidays?
Hey Element, thought you deserved a proper response...
Yes, that's airbrushed. My first serious attempt at doing gradients or zenithal lighting techniques... whatever it's called. I usually try to paint the detail that's modeled, out of respect for the sculptor if nothing else... but I have a hard deadline with this army and it's approaching fast... and I'm way behind where I need to be. So I leave some details to the imagination. Plus these things would probably have been sprayed as-is with most gear in place, so I suspect this is a more realistic "tank" paint job than if I'd have picked out a bunch of details for special painting.
They're Doom Eagles actually. He's working on his Telion counts-as right now. He's also starting a Necron army and while I've been doing a lot of the painting with my airbrush, he's currently painting his Nightbringer the old fashioned way.
|
|
This message was edited 1 time. Last update was at 2011/01/22 04:27:31
|
|
|
|
|
2011/01/22 06:35:33
Subject: Rebuilding the Mantis Warriors (1/21: Tape Stencil Tutorial)
|
|
Decrepit Dakkanaut
|
Excellent tutorial mate. Always impressed about how you are prepared to try new techniques; it's very inspiring, and is actually encouraging me to step out of my comfort zone, with (I think) really positive results. On a side note, try a ceramic tile instead of glass maybe? Similar use but somehow seems safer!
|
Theophony"... and there's strippers in terminator armor and lovecraftian shenanigans afoot."
Solar_Lion: "Man this sums up your blog nicely."
Anpu-adom: "being Geek is about Love. Some love broadly. Some love deeply. And then there are people like Graven. |
|
|
|
|
2011/01/22 08:16:10
Subject: Rebuilding the Mantis Warriors (1/21: Tape Stencil Tutorial)
|
|
Battle-tested Knight Castellan Pilot
|
tiels is there something they cant do?
thanks Git for the tut looks great i am going too try that. its better than my oke i m gonna paint this on that hopefully it will look good style.
|
the banner is click able. it takes you to a magical country. if you don't believe me click and see for your self
|
|
|
|
|
2011/01/22 09:41:21
Subject: Re:Rebuilding the Mantis Warriors (1/21: Tape Stencil Tutorial)
|
|
Death-Dealing Devastator
London
|
Thanks for the tutorial gits, given me quite a few ideas now on what to do for my marines. Now if only I had some masking tape, lol
On a side note I agree that a cheap ceramic tile is preferable to glass. Then again I am heavy handed and frankly don't trust myself! Plus the Mrs would not be happy if the hoover were to break (again) due to my modelling influence 
|
|
|
|
|
|
2011/01/22 10:51:08
Subject: Rebuilding the Mantis Warriors (1/21: Tape Stencil Tutorial)
|
|
Willing Inquisitorial Excruciator
|
Ramos Asura wrote:Fixed the tip- I think I got it more katana-like.
Sharpened it a bit too, and this lets ya see the full hamon area
My only beef with the power katana bit is that the tip looks a bit too rounded off for me. almost sabre-ish as opposed to a bit more of a squared off edge that I would expect from a katana.... it could be just from having a wider blade than I'm used to seeing though.
|
|
|
|
|
|
2011/01/22 11:59:23
Subject: Rebuilding the Mantis Warriors (1/21: Tape Stencil Tutorial)
|
|
Decrepit Dakkanaut
|
Actually Wolf, Ramos did change the tip towards the more angular style from the original. It may still need some shaping yet... though I wonder if the thickness of the blade at the point where the tip starts isn't a bit thicker than it is at the base... which might be contributing the that "rounded" appearance.
It's certainly not an easy task to try something new. I aways seem to be procrastinating in my attempts when I'm not sure of where I'm going or how things work out. But eventually I get up the nerve and give it a go. Having a good tutorial has always helped me in finally making the decision to try something new so I figured it might help some of you as well.
I should mention that the less you fiddle with your tape, the better off you'll be. In my first go-round I actually masked off the black when I painted the red, then removed that... masked off the red areas and painted the black. I think the removal of the masking over the black areas probably weakened the overall stencil adnerance which caused far more bleed through on the first try than on the second. I also applied my coats much heavier and faster, which kept the paint "liquid" longer allowing it to bleed more readily. If you spray lightly, the paint essentially dries on contact which greatly decreases the odds that you're going to get it moving beyond the tape edges. (Note: This paragraph has been added to the tutorial).
Do you guys think my tutorial is worth adding to the "tutorials" section of Dakka, or should I just leave it here?
|
|
This message was edited 2 times. Last update was at 2011/01/22 12:26:11
|
|
|
|
|
2011/01/22 13:06:12
Subject: Rebuilding the Mantis Warriors (1/21: Tape Stencil Tutorial)
|
|
Thunderhawk Pilot Dropping From Orbit
|
Add it to the tutes section if I were you Gits. I'll tell you why cos in about two weeks it will be lost in the middle of 'The Beast' (my nickname for your blog). This way it'll be far more accessible.
|

No trees were hurt in the making of this sig, however many electrons were disturbed.
|
|
|
|
|
2011/01/22 13:26:42
Subject: Rebuilding the Mantis Warriors (1/21: Tape Stencil Tutorial)
|
|
Decrepit Dakkanaut
|
Done, linked in my sig.
|
|
|
|
|
|
2011/01/22 16:41:29
Subject: Rebuilding the Mantis Warriors (1/21: Tape Stencil Tutorial)
|
|
Incorporating Wet-Blending
|
wolfshadow wrote:Ramos Asura wrote:Fixed the tip- I think I got it more katana-like.
Sharpened it a bit too, and this lets ya see the full hamon area
My only beef with the power katana bit is that the tip looks a bit too rounded off for me. almost sabre-ish as opposed to a bit more of a squared off edge that I would expect from a katana.... it could be just from having a wider blade than I'm used to seeing though.
Played with it a bit more and neatened it up, mostly making the tip there more sharply angled.
I think is always gonna look a little "off", as its a great deal thicker in proportion to its height. Today Im gonna see if I can find some rod for the grip, and knock out a tsuba or two as well.
|
|
|
|
|
|
2011/01/22 20:39:33
Subject: Re:Rebuilding the Mantis Warriors (1/21: Tape Stencil Tutorial)
|
|
Decrepit Dakkanaut
|
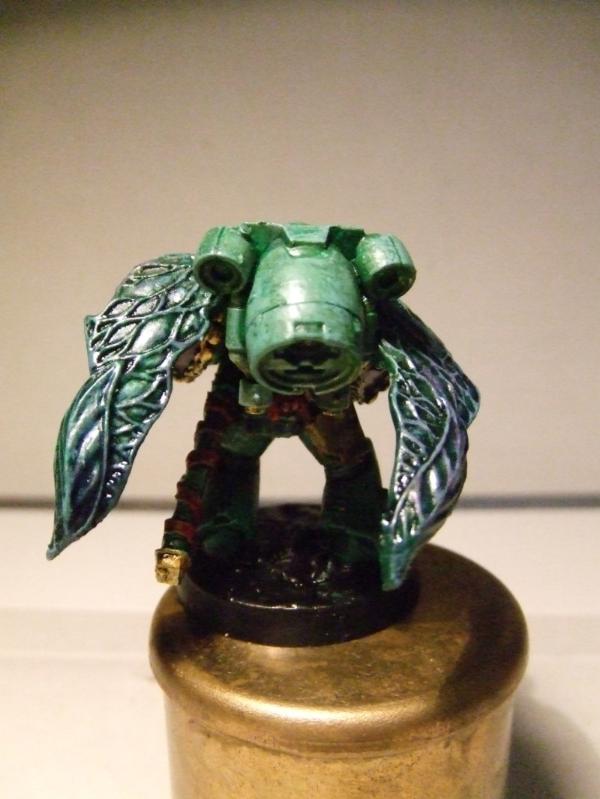
Well, rubbish photography as usual:
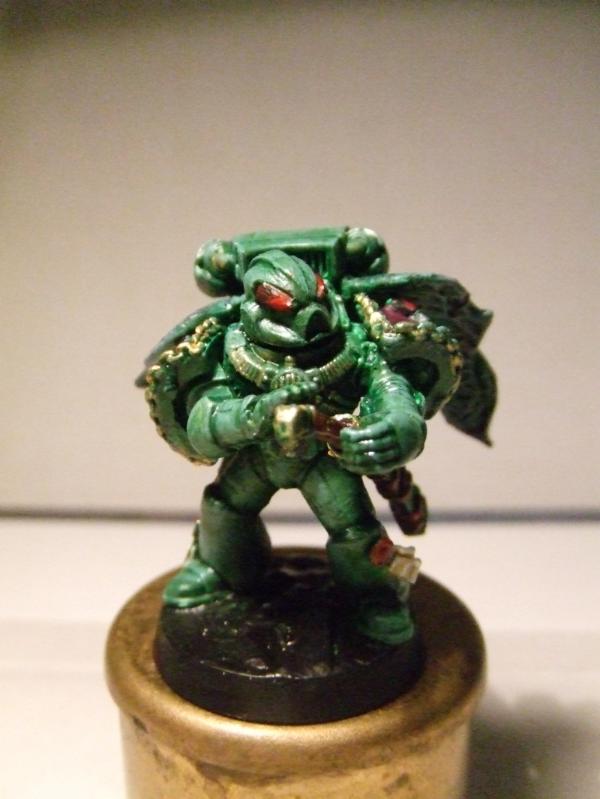
But happy, at least, with the wings:
And side views are on bloggit. Don't want to clutter Gits' thread much more!
|
|
This message was edited 1 time. Last update was at 2011/01/22 20:45:09
Theophony"... and there's strippers in terminator armor and lovecraftian shenanigans afoot."
Solar_Lion: "Man this sums up your blog nicely."
Anpu-adom: "being Geek is about Love. Some love broadly. Some love deeply. And then there are people like Graven. |
|
|
|
|
2011/01/22 22:08:06
Subject: Re:Rebuilding the Mantis Warriors (1/21: Tape Stencil Tutorial)
|
|
Decrepit Dakkanaut
|
@Ramos: Does not need to be perfect... and you're right, the increased depth of the blade is going to mess with the overall look. Looking forward to seeing what you come up with for the tsuba and handle.
@graven: What are you talking about, those are MUCH better photographs than the last set! An the MW looks great! Also the whole "Weeping Angel" thing is just wonderful... and you've done a bang-up job on the figure too (see graven's bloggit for details).
|
|
|
|
|
|
2011/01/22 22:19:17
Subject: Rebuilding the Mantis Warriors (1/21: Tape Stencil Tutorial)
|
|
Willing Inquisitorial Excruciator
|
I love those heads.
And your photos are better than mine. :-)
|
|
|
|
|
|
|
|


 A lot. 5K +
 DH: 750
 3K
3K
 800
800