| Author |
Message |
 |
|
|
|
|
Advert
|
Forum adverts like this one are shown to any user who is not logged in. Join us by filling out a tiny 3 field form and you will get your own, free, dakka user account which gives a good range of benefits to you:
- No adverts like this in the forums anymore.
- Times and dates in your local timezone.
- Full tracking of what you have read so you can skip to your first unread post, easily see what has changed since you last logged in, and easily see what is new at a glance.
- Email notifications for threads you want to watch closely.
- Being a part of the oldest wargaming community on the net.
If you are already a member then feel free to login now. |
|
 |
2010/01/28 16:56:31
Subject: Re:guynamedFleck's Harlequin themed army blog (Jetbike Farseer, Objective Marker and Eldrad)
|
|

[DCM]
.
|
guynamedFleck wrote:
@ SilverMK2
I wanted a simple to construct base that still looked fairly exotic. Well, that and even though I understand the argument, I just can seem to give up flocking my bases.  So the 'lost city' style really does well to make the brighter colors of the eldar pop while not overpowering the scene. The only problem is, now I want to use this army for Adepticon and all the bases prior to the Council were just mass produced and attached to the models. All fine until I go to make the display board. When a squad lines up based on the tile grid, they will all be facing different directions not to mention the random switch from tile to grass. Well, we will cross that bridge when we get to it.
guynamedFleck wrote:
McNutty wrote:Great stuff. With the risk of sounding repetitive, the freehand on the jetbikes is amazing and I love how the bases complement the army.
What did you use for the tile on the bases?
No big secret here, its just tile textured plastic card. I'm forever amazed at how simple basing can be (read: my tiny modeling brain can't wrap around the concept of intricate basing technique)
First:
Your army is fantasitc! Good luck on getting everything ready in time!
Second:
I know you're busy, but any chance on a 'how to' on your bases?
Maybe a link to the plasticard you're using, and a WIP shot of the bases?
I'd really like to try something similar for my in progress Truescale Alpha Legion army....
Thanks!
|
|
|
 |
|
2010/02/01 03:21:17
Subject: Re:guynamedFleck's Harlequin themed army blog (Jetbike Farseer, Objective Marker and Eldrad)
|
|
Vlad_the_Rotten
|
|
|
|
|
|
|
2010/02/01 06:06:11
Subject: guynamedFleck's Harlequin themed army blog (3 new Jetbike Warlocks and PIP shining spears)
|
|
Violent Space Marine Dedicated to Khorne
|
Not bad, The exarch looks a bit off. But I assume he isn't zooming forward and he is directing the other spears.
If I ever get my my last Zoanthrope I will start to paint my nids(not looking so good at the moment), I wanna see how well a mawloc will fare against the seer council!
speaking of painting, how do you get in the mood to paint? I'm having some serious troubles with just sitting down and doing. How complex is your painting? Do you prime them, throw on a base coat, use some inks, and thats it? Or do you do more than that? I think I need to do something more like that, as opposed to carefully detailing every single part and spend too long on a model.
|
|
This message was edited 2 times. Last update was at 2010/02/01 06:13:47
|
|
|
|
|
2010/02/01 06:18:49
Subject: Re:guynamedFleck's Harlequin themed army blog (3 new Jetbike Warlocks and PIP shining spears)
|
|

Kabalite Conscript
|
Love the concept love the paint jobs and particularly love the bases, definately one of the best executions of this army I've ever seen! Can't wait to see the tanks!
|
|
|
|
|
|
2010/02/01 09:30:36
Subject: guynamedFleck's Harlequin themed army blog (3 new Jetbike Warlocks and PIP shining spears)
|
|
Avatar of the Bloody-Handed God
Inside your mind, corrupting the pathways
|
Wow, I love the charger SS. And your council look rather spiffy too, if I may say so
|
|
|
|
|
|
2010/02/01 11:55:17
Subject: guynamedFleck's Harlequin themed army blog (3 new Jetbike Warlocks and PIP shining spears)
|
|

Stabbin' Skarboy
|
I love the charging shining spear! very characterful, overall very nice army 
|
monkeytroll wrote:
In the grim darkness of the future there is only boar.
 Waagh Nazdreg! Waagh Nazdreg!
|
|
|
|
|
2010/02/02 02:43:43
Subject: guynamedFleck's Harlequin themed army blog (3 new Jetbike Warlocks and PIP shining spears)
|
|
Fresh-Faced New User
|
You must have mistyped when you wrote "Here is a shot of the finished Dire Avengers Wave Serpent cowl," because it is far from finished and I will not let you put that on the table across from me. Get back to work
Automatically Appended Next Post:
You must have mistyped when you wrote "Here is a shot of the finished Dire Avengers Wave Serpent cowl," because that thing is far from done and I will not let you put it on the board across from me, so get back to work.
|
|
This message was edited 1 time. Last update was at 2010/02/02 02:49:19
|
|
|
|
|
2010/02/02 03:44:35
Subject: guynamedFleck's Harlequin themed army blog (3 new Jetbike Warlocks and PIP shining spears)
|
|
[DCM]
.
|
Unbelievably creative stuff here - looking forward to more!
|
|
|
|
|
2010/02/02 22:12:58
Subject: guynamedFleck's Harlequin themed army blog (3 new Jetbike Warlocks and PIP shining spears)
|
|
Vlad_the_Rotten
|
@ everyone
Thanks again for all the comments. They truly help inspire me to keep up the quality of this army build.
We'll let this next poster fly with his criticism as he is none other than Frank, the painter of the seer council (and if he's not careful, the dire avenger wave serpent cowl).
@Supermanfxk
Well, until they earn their place back in the army, this will have to do. And besides, who's the one using blood angels warbikers as their Thunderwolf Cavalry again?
@ Sneezypanda
I got to play the mawloc vs seer council this week at the flgs. well, more the mini seer council (farseer + jetbike squad), it did the trick just fine. Farseer cast mind war, left the mawlock with a single wound and then the jetbikes finished him off. 'Bigger they are' and all that jazz. No, my real problem against the new nids are those stupid horde producing tervagons cranking out dozens of bodies that eliminate my escape routes. When you are running 24-30 jetbikes in your 1850pt and the enemy can cover nearly 1/3 of the table in 'free' models, a 24" turbo boost doesn't really feel that mobile.
As for motivation to paint. Sometimes you just have to force yourself to do it. I will go through phases where I really want to paint and other times, I just want to convert. The escalation league at the flgs has been a mixed blessing. Seeing everyone playing painted armies has been great, but then again I have really wanted to switch over and do a squad for one of my other armies and not had the time.
As for the complexity of painting, It depends on the army/model/squad. Generally for table-top standard, on any given surface, it is prime, base, wash, double highlight, detail, 2nd wash. The first wash is usually devilan mud or badab black and really just does all the shadowing work. The double highlight is done a few shades brighter than what I want the end product to be. And finally the second wash is done with whatever color the base was. (thrakka green for orks, asurman blue for dire avengers, etc). This process saves the time that would be spent on blending.
Save the detailed paint jobs for characters and center piece figures.
Any way, on to the update. Just a short one, then I will follow with a tutorial of my basing technique.
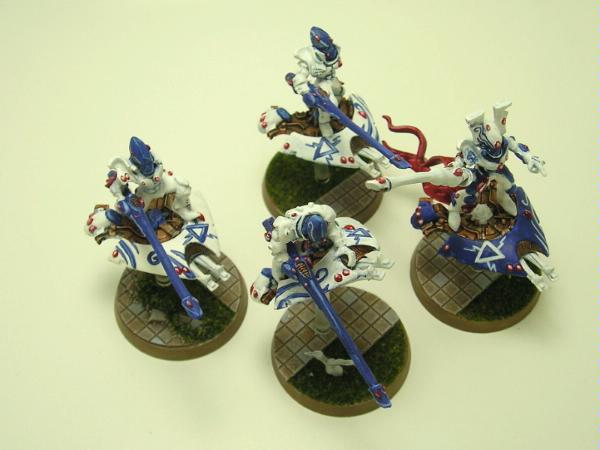
The 'finished' shining spears. Say 95% complete, as I am still awaiting a package that should contain suitable left arms for the two kneeling spears.
The second objective marker. All I can say is that painting parties can have some odd side effects on your hobby. Another guy for the escalation league (in fact the guy that set it up) was going through his bits box (read: bits - huge freaking tupperware storage bin) trying to come up with objective markers for his tyranid army. Blame it on the paint fumes, or multiple hours of hobby work, but he ended up with a random elephant head stuck to a base, being over run by rippers. Deciding to play off the confusion that would arise from such an objective, we thought it best to confuse the flgs with hidden references to said elephant. So I present to you objective marker number 2. An ancient tome of chaos knowledge, to be claimed for the black library.

Alright, as the paint fumes dissipate and my head begins to clear, I will go ahead and type up the basing tutorial...
|
|
|
|
|
|
2010/02/02 22:20:00
Subject: guynamedFleck's Harlequin themed army blog (3 new Jetbike Warlocks and PIP shining spears)
|
|
Avatar of the Bloody-Handed God
Inside your mind, corrupting the pathways
|
Haha! Excellent as usual. I love the elephant tome of evil doom Really beautiful paintwork on the SS and objectives.
|
|
This message was edited 1 time. Last update was at 2010/02/02 22:20:20
|
|
|
|
|
2010/02/02 22:38:23
Subject: Re:guynamedFleck's Harlequin themed army blog (3 new Jetbike Warlocks and PIP shining spears)
|
|
Xenohunter with First Contact
|
Man thats amazing. I'm having a hard time thinking about anything but that first painted wave serpent. This stuff is just amazing.
|
|
|
|
|
|
2010/02/02 23:48:32
Subject: Re:guynamedFleck's Harlequin themed army blog (3 new Jetbike Warlocks and PIP shining spears)
|
|
Vlad_the_Rotten
|
Here is a quick run through of my basing technique. Luckily I needed to make the bases for my shining spears, so I will be making 40mm bases in the tutorial. The concept is identical for 25mm and 60mm bases (and fingers crossed valkerie bases when our new codex comes out ) just adjust your cutter accordingly.
In this tutorial I used,
-a circle cutter
-hobby knife (I use one with a retractable, snap-off blade)
-Plastic Cement
-PVA Glue
-Super Glue
-Fine Grade Modeling Ballast
-Matte Varnish
-Flock
-Tiled Plastic Card (mine was 3/16" tiles, by either plastruct or evergreen)
-Citadel paints (Khemri Brown, Dheneb Stone, Space Wolves Grey)
Optional
-Rare earth magnets (mine are 6mm x 1.5mm thick, from K & J Magnetics)
-Elmers Stick-All epoxy glue
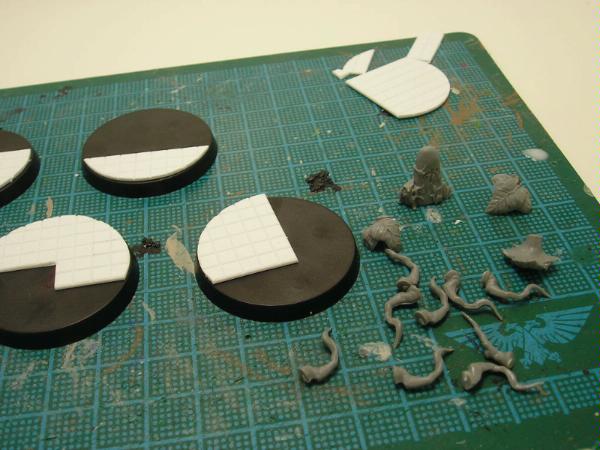
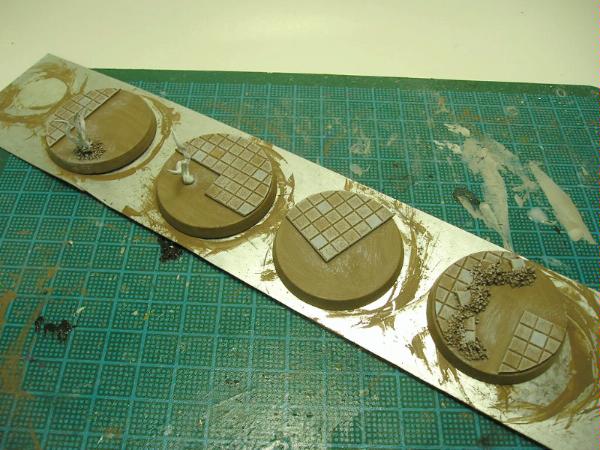
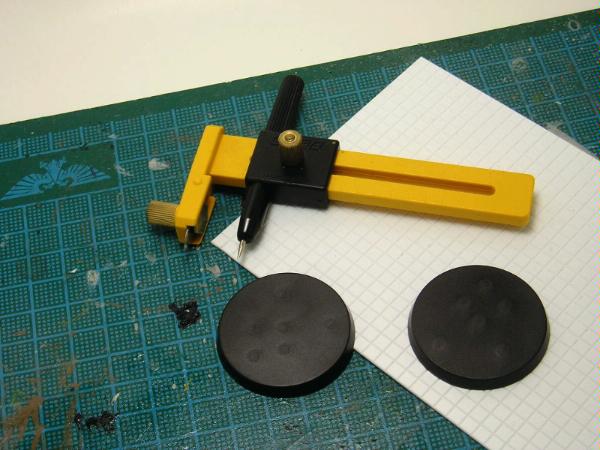 Step 1
Set your circle cutter to the radius of your base. Make sure to make it the raduis of the top, not the bottom (i.e. not 40mm). A slightly larger or smaller cirlce can be fixed a bit, but it is easier if your circles are the exact size. Flip your plastic card over (texture down) and start cutting circles out of it. I tend to get 2 - 3 finished bases out of each circle I cut. With the circle cutter it is better to do several light passes with the blade. Pressing to hard will flex the tool and change the radius of your cut.
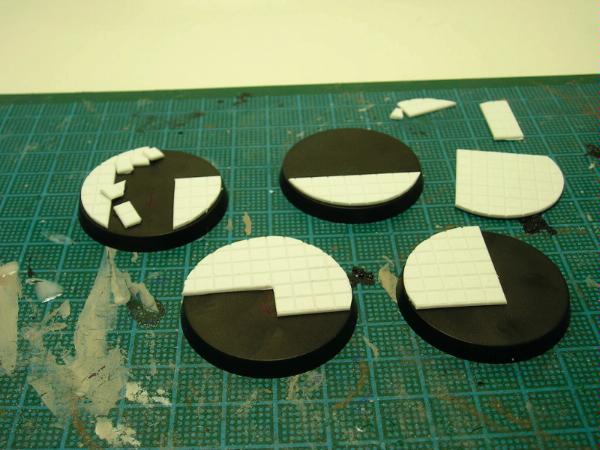
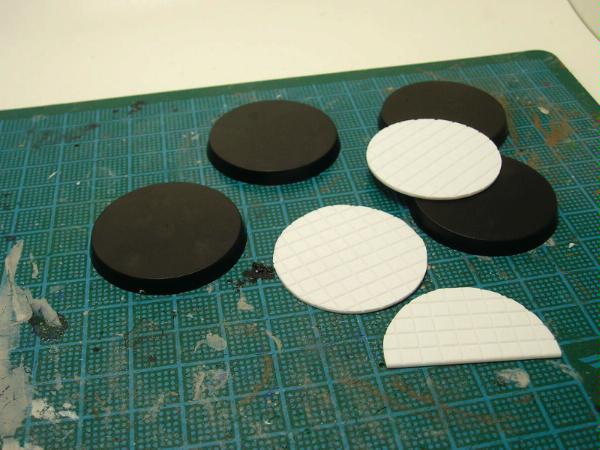 Step 2
Using your hobby knife, score between the groves of the tiles and break them down into the shapes you want to use on your bases. I keep these shapes fairly simple. Either straight lines or right angles for the undamaged sections. For the damaged sections you can do the same, or use up some of the waste from cutting your original circles (the concave pieces left over on your plastic card sheet). Glue these pieces down with plastic cement. You can then add on a few 'broken' tiles.
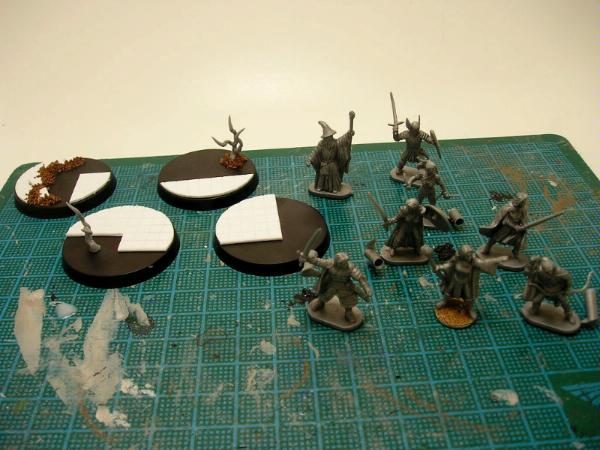
 Step 3
Depending on what the bases are being used for, I find that a few extra details can add a lot. For the 'lost city' feel I like to use an assortment of extras from the wood elf glade guard box. It comes with several small tree sprouts and rune stones. I like to trim the base off of one or two of the sprouts and build larger branches. Be sure to clip or shave off any of the little wood elf sprites that are hidden in the bits (or maybe not, that's all up to you).
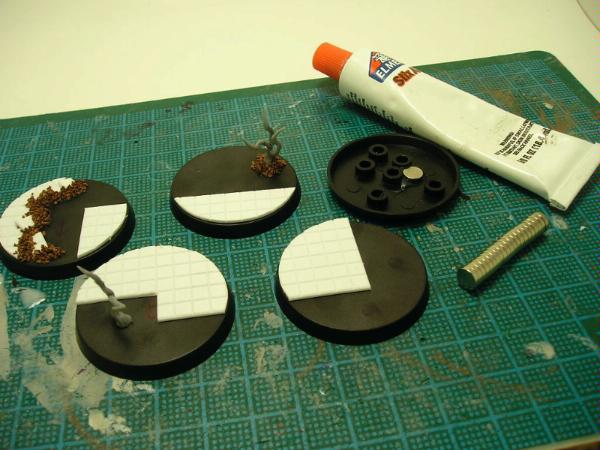
 Step 4
After all the ground details are in place, apply super glue along the damaged edges of the tile and dip the base into the modeling ballast. You can also apply ballast to any areas that you want a cleaner transition for the flock (around trees for example). You can also make small hills in the base by gluing ballast to a large open area.
I wanted something a bit more ornate for my seer councils bases. I wanted to add statues, but felt that the bases would get over crowded if I tried to add larger scale models. So I opted to go the other direction with the statues. Caesar Miniatures makes several great lines of 1:72 scale miniatures. I happened to have a set of their fantasy adventurers laying around. I just cut them in half where ever it seemed the 'statue' would be weakest and then roughed up the edges.
 Step 5 (optional)
All of my armies are built with magnetic bases for the purpose of transportation. I got tired of delicate weapon arms and spiky bits constantly breaking off, so now all my models are transported upright in large trading card boxes (about 18"x 24"x 5"), standing upright and happy! It also works well for magnetic display boards. Anyway, I was at a stopping point for the night and it was a good time to do this step (which also helps out in the painting process.
Attach a rare earth magnet to the bottom of each base. 1 is usually strong enough for anything on a 40mm base, unless it is the size & weight of an IG ogryn. I prefer to use elmers brand 'stick all'. It tends to wrap around the magnet just enough to hold onto it and isn't expensive.
A few tips.
-Place the magnet touching something upright if possible (i.e. between two pegs on the 40mm or 60mm bases, or alongside the slot on a slotta base.
-Try to get the magnet as centered as possible. If placed on the outer edge of a base, lighter models can occasionally attract or repel each other on the game table. (fun to see, but not good for game play.) 
-place your magnet/glue over writing on the base, or if it is blank, score the base a few times with your hobby knife. This give the epoxy a better surface to bond to and you are less likely to 'leave' the magnet in your transport case when you pick up your model.
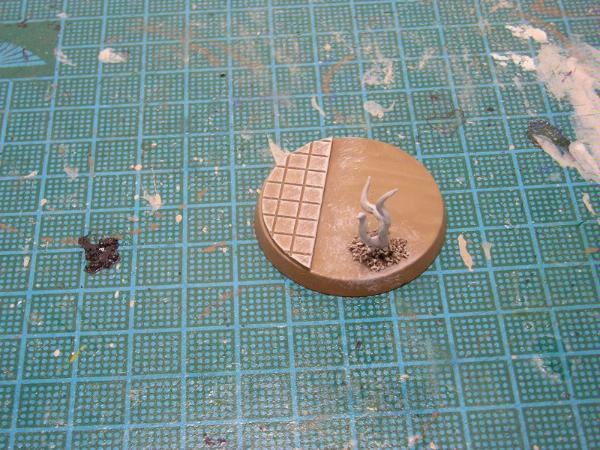
 Step 6
I prime the bases in grey, this tends to keep the paint job a bit lighter and gives the feeling of an untouched city. Base coat the bases in Khemri Brown and allow them to fully dry.
 Step 7
Drybrush the bases in Dheneb Stone and then again in Space Wolves Grey. I like to drybrush from the center of the base outwards so that the highlights are on the 'real edges' and not the edges created by the base (no hard line around the exterior of the base).
If you have branches on your bases, I drybrush them as well and then finish with a final highlight of pure white.
 Step 8
Go back and hit individual tiles with Space Wolves Grey and Khemri Brown. Not to many, just 2-3 in each color. Keep the paint thin. I find it helps to immediately dab my thumb over tiles that I paint with Khemri Brown (it removes some of the darker color and breaks up the solid pattern).
That's it for painting, be sure to matte seal the bases before the next step.
 Step 9
Apply elmers glue to any grassy area as well as the ballast. Dip the base into your chosen flock and knock off the excess. Allow the glue to dry. Your all finished. All that's left is to attach your mini.
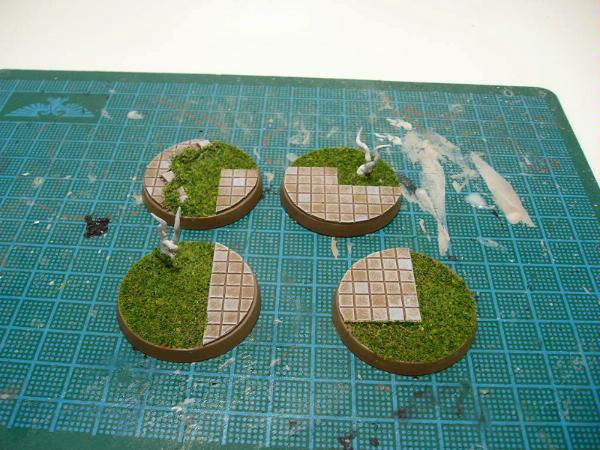
That's the basic idea, obviously you can dress it up or dumb it down from there. Hope this tutorial helps you out.
|
|
|
|
|
|
2010/02/03 02:28:55
Subject: guynamedFleck's Harlequin themed army blog (Shining Spears, 2nd Objective Marker and basing Tut.)
|
|
[DCM]
.
|
AWESOME!
Thank you very much for the tutorial - you should turn it into an article!
Again - thanks!
|
|
|
|
|
2010/02/03 09:20:12
Subject: guynamedFleck's Harlequin themed army blog (Shining Spears, 2nd Objective Marker and basing Tut.)
|
|
Avatar of the Bloody-Handed God
Inside your mind, corrupting the pathways
|
Very nice tutorial.
I may well have to rebase some of my models at some point now 
|
|
|
|
|
|
2010/02/03 14:30:27
Subject: guynamedFleck's Harlequin themed army blog (Shining Spears, 2nd Objective Marker and basing Tut.)
|
|
[DCM]
.
|
Any links to a site where I can but a good circle cutter?
|
|
|
|
|
2010/02/03 15:20:11
Subject: guynamedFleck's Harlequin themed army blog (Shining Spears, 2nd Objective Marker and basing Tut.)
|
|
Vlad_the_Rotten
|
Alpharius wrote:Any links to a site where I can but a good circle cutter?
Mine happens to be an OLFA compass cutter. http://www.olfa.com/Default.aspx?snLocation=1
Though, I picked mine up at HobbyTown. They had a selection of 2-3 different brands. Mine is in no way top of the line, but it has never failed me. Hope this helps.
|
|
This message was edited 1 time. Last update was at 2010/02/03 15:20:42
|
|
|
|
|
2010/02/03 18:30:17
Subject: guynamedFleck's Harlequin themed army blog (Shining Spears, 2nd Objective Marker and basing Tut.)
|
|
[DCM]
.
|
It does, a lot!
Again, thanks!
I'm about to start a big project, so this is going to come in VERY handy!
|
|
|
|
|
2010/02/07 19:44:48
Subject: guynamedFleck's Harlequin themed army blog (Shining Spears, 2nd Objective Marker and basing Tut.)
|
|

Longtime Dakkanaut
|
Nice tutorial for the base, efficient indeed!!!
And congratulations for both Shining Spears & Council, they're great!!!!
|
My WiP  -affiliated Traitors - War on Tranch : Renegades -affiliated Traitors - War on Tranch : Renegades
The World Tree's offsprings - Various WIPs : Skavens, Tzeentch & Nurgle CSMs, Marine Swap
My first tutorial - Object Source Lighting
What will I achieve in 7 months? : Radio Omid is online
"Squat Hulk- in space no one knows you no longer exist." - Gitzbitah
"Now you're just being silly, everyone knows red paint tastes fasta." - monkeytroll
"Both servers are on different continents so space meteors or thermonuclear war will not be enough take out dakka hopefully." - legoburner
Please remember to tick the "Disable Voting" box, if the pics you are uploading do not deserve votes (ie. early WIP, blurry pics, batreps, ...) Thanks in advance. |
|
|
|
|
2010/02/07 22:22:27
Subject: Re:guynamedFleck's Harlequin themed army blog (Shining Spears, 2nd Objective Marker and basing Tut.)
|
|
Vlad_the_Rotten
|
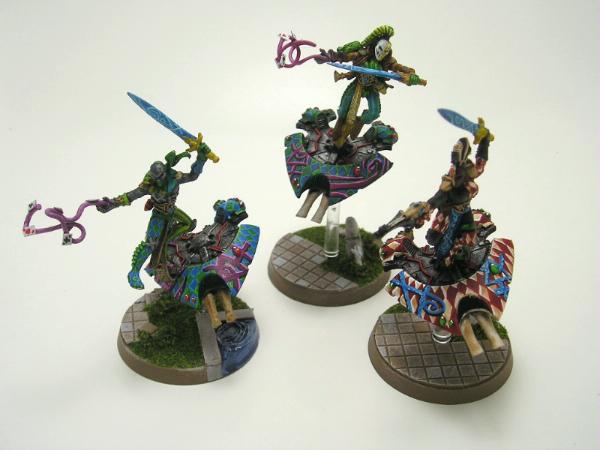
Well tomorrow marks the first day of the 1000pt stage in the flgs Escalation league, so in tried and true form.... I changed direction with the army list one last time and spent the weekend frantically converting and painting up 3 vyper jetbikes. Looking at the 500pt list, I decided it was better to take the points and correct the flaws in it before placing all my trust in the next 500pts to pull the weight of the army. Anyway, here is a shot of the 1000pt army (well, 99.9% sure it is, I do still have 24 hours until my first game). I've added an embolden warlock to each of the jetbike squads, a Farseer on jetbike, and 3 vypers.
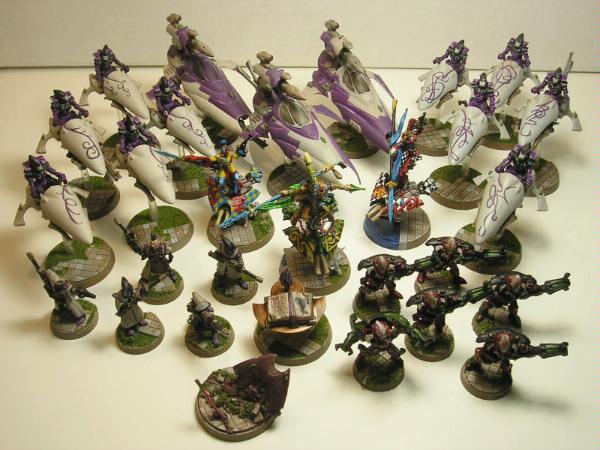
The Jetbike Warlocks are complete.
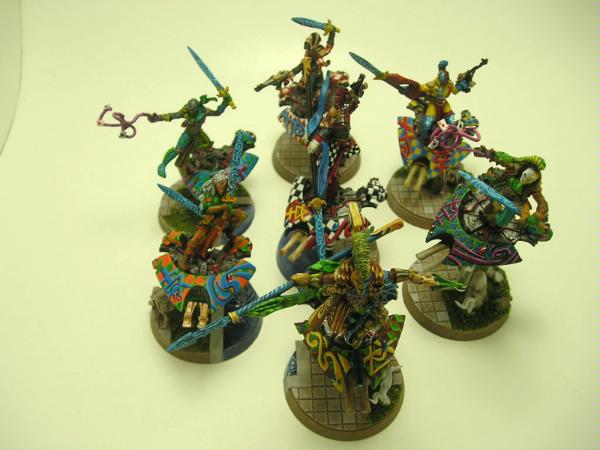
A better shot of the final 3 warlocks. From left to right, Enhance, and 2 with singing spears.
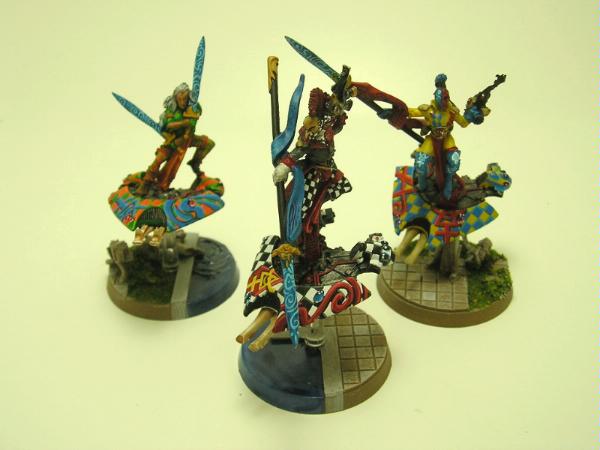 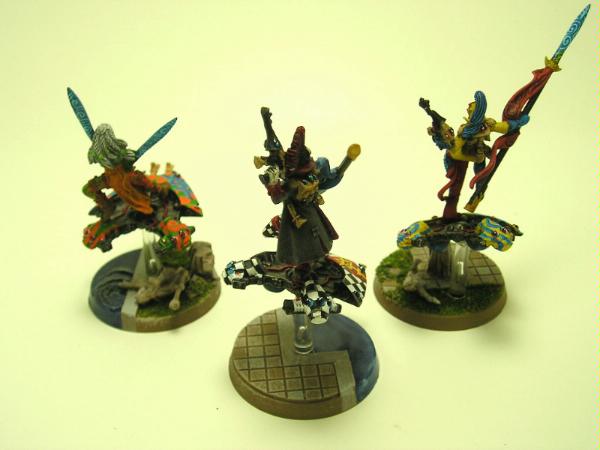
This is my absolute favorite of the squad.
 
 
And lastly the product of the mid-week army list rethink. After playing a few tests against the new tyranid book and some space wolves. I decided my farseer needed a bit more anti-psyker ability. These upgrades sadly took a chunk out of my points set aside for the shining spears. Since they are such a fragile unit to begin with, I decided to pull them out until I could spare the points to max them out later on. So, in with the Vypers to replace the high armour piercing void in the army. If you haven't figured out just yet, I have a problem with the style of the eldar bikes and find any reason to retool the designs. So, short on painting time and already disliking the current vyper model. I wasn't about to paint up 3 gunners for the squad. A quick bit of conversion work and I think what I have here is a far sleeker vyper model.
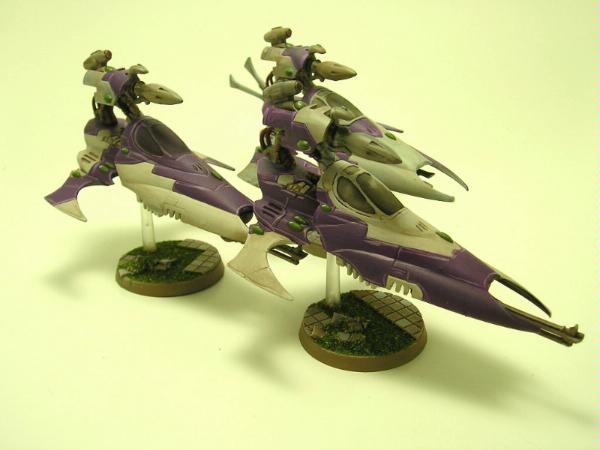 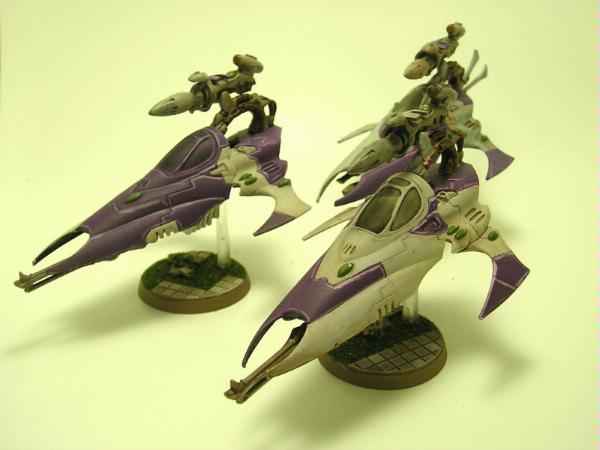
Here is a close up of one of the vypers so you can see the conversion work a bit better. Please disregard the warped EML which I just noticed posting the pictures (thats just odd). The top guns are magnetized for swap outs (same guns are used for my wave serpents).
 
 
Well, it has been a crazy 4 weeks of converting and painting, but at least I can say I painted more than 500pts in that time! The next 500pts should be a breeze...
|
|
|
|
|
|
2010/02/08 08:36:15
Subject: guynamedFleck's Harlequin themed army blog (1000pt list, finished jetlocks and new vypers!)
|
|
Avatar of the Bloody-Handed God
Inside your mind, corrupting the pathways
|
Wow, I would love to play that army. It puts my paintwork to shame.
Love the conversions on the vipers too, never really liked the non-streamlined gunner sitting in the back.
|
|
|
|
|
|
2010/02/08 15:54:37
Subject: guynamedFleck's Harlequin themed army blog (1000pt list, finished jetlocks and new vypers!)
|
|
Stabbin' Skarboy
|
Wow! those Vypers look really sleak! like the conversion and looks alot better than the original vypers imo
|
monkeytroll wrote:
In the grim darkness of the future there is only boar.
Waagh Nazdreg!
|
|
|
|
|
2010/02/08 17:21:55
Subject: guynamedFleck's Harlequin themed army blog (1000pt list, finished jetlocks and new vypers!)
|
|
Regular Dakkanaut
|
this project is so lush. i'm really into it.
|
'zek out.
|
|
|
|
|
2010/02/08 19:28:05
Subject: guynamedFleck's Harlequin themed army blog (1000pt list, finished jetlocks and new vypers!)
|
|
Xenohunter with First Contact
|
azekio wrote:this project is so lush. i'm really into it.
Theres the word I wanted. Lush. TYVM. Seriously dude everything looks candy coated, lets see a fire prism.
|
|
|
|
|
|
2010/02/08 19:40:43
Subject: guynamedFleck's Harlequin themed army blog (1000pt list, finished jetlocks and new vypers!)
|
|

Battle-tested Knight Castellan Pilot
|
Wow. Just wow. I can´t believe I haven´t seen this before.
I think it shows how much awesome stuff there is on Dakka these days, that a project like this can slip right under my nose, and I don´t even notice it until it´s done.
Great freehand. And I looooove the seer council, great idea, and amazing paintjobs.
|
 Back on the path of the Imperial Citizen Back on the path of the Imperial Citizen
Still rolling ones... 
 Krieg: More wins than Losses. Krieg: More wins than Losses. |
|
|
|
|
2010/02/08 20:36:24
Subject: guynamedFleck's Harlequin themed army blog (1000pt list, finished jetlocks and new vypers!)
|
|
Slaanesh Chosen Marine Riding a Fiend
|
Excellent! It's great to see bunches of nice 2nd ed models getting good dose of loving. Extra thumbs up to Supermanfxk for the diamond patterns.
|
|
|
|
|
2010/02/11 02:34:34
Subject: guynamedFleck's Harlequin themed army blog (1000pt list, finished jetlocks and new vypers!)
|
|
Fresh-Faced New User
|
@ Mellon - Thanks for the props! I will do commission work so feel free to hit me up. My stuff won't win you any awards, but it looks great on the table top.
|
|
|
|
|
2010/02/11 03:49:40
Subject: guynamedFleck's Harlequin themed army blog (1000pt list, finished jetlocks and new vypers!)
|
|

Bounding Assault Marine
|
Great conversions for the warlocks!
The whole army looks fantastic!
|
.. Black Forest .. Red Sea .. |
|
|
|
|
2010/02/16 20:04:10
Subject: guynamedFleck's Harlequin themed army blog (1000pt list, finished jetlocks and new vypers!)
|
|
Vlad_the_Rotten
|
@ SilverMK2 Well, not sure where you are located, but I will be in attendance at Adepticon this year and am always looking for pickup games outside of the tournaments. So feel free to get in touch if you are going.
@ azekio & Qualude Hmm, lush, yeah I'll take that, haha. Candy coated has been a real struggle for this army along the way, with wanting an old style eldar and a grim feeling combined. I have realsed it is still possible to have the variety of colors but not fall entirely into the 'clean' armour category.
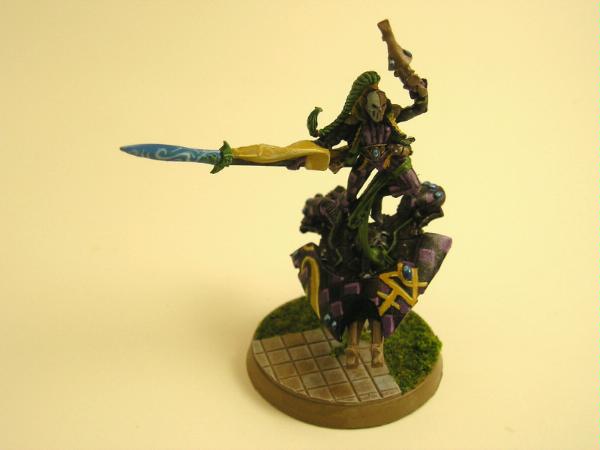
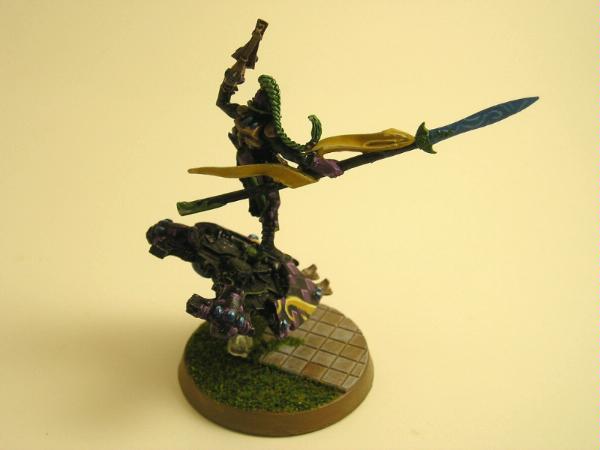
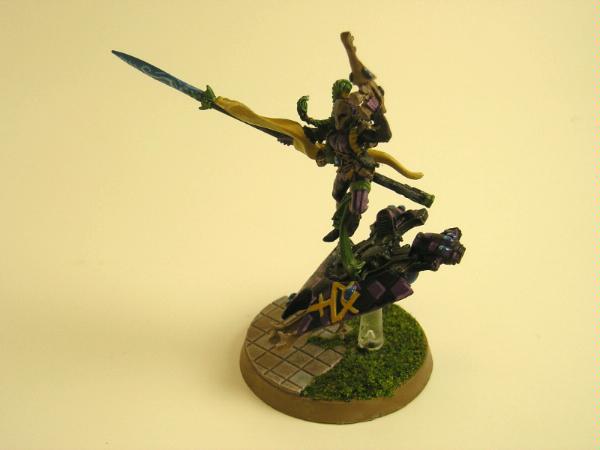
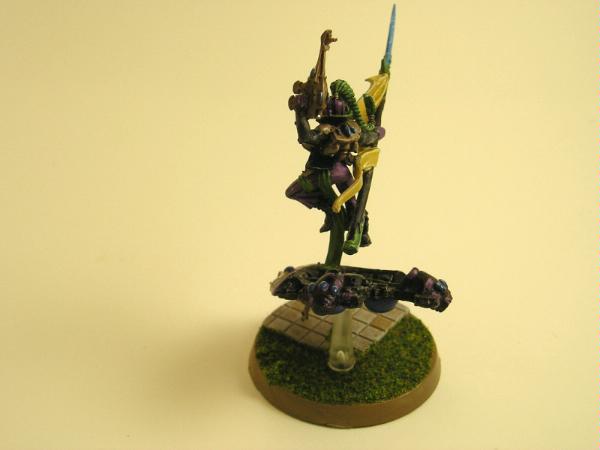
Small update. Not wanting to be shown up by Supermanfxk (and realizing I needed another Warlock w/ Singing Spear), I knocked this gal together and paint her up on the recent snow day (yes adults get these too). She'll be leading one the the jetbike units once we make the jump to the 1500pt mark in the escalation league. Perhaps a little bit darker than the members of the seer council, but I think she will fit better along side the jetbikers. The main criticism I've received is that the warlocks don't look like they belong in the jetbiker units. Hopefully this will hush those nay-sayers. I apologize for the poor lighting, my light box-foo is off today,
|
|
|
|
|
|
2010/02/16 20:11:55
Subject: guynamedFleck's Harlequin themed army blog (Another Jetbike Warlock)
|
|
Avatar of the Bloody-Handed God
Inside your mind, corrupting the pathways
|
As much as I would love to take you up on your offer, I am many weeks swim and walk away from you, over in the motherland.
And I have to say I like this darker (I hesitate to say more subdued) colour scheme. It is a nice step between the relatively simple colours on the jetbikes, and the very complex, strong patterns and colours of the council.
A great model.
|
|
|
|
|
|
2010/02/16 20:43:04
Subject: guynamedFleck's Harlequin themed army blog (Another Jetbike Warlock)
|
|

[MOD]
Making Stuff
|
Lovely work so far. The jetbikes are certainly a creative idea, and fitting for Harlequins.
|
|
|
|
|
|
|
|


 Dark Eldar Kabal of Bleeding Eyes plog
  Radical Inquisition with Stompy Robots

