Forum adverts like this one are shown to any user who is not logged in. Join us by filling out a tiny 3 field form and you will get your own, free, dakka user account which gives a good range of benefits to you:
No adverts like this in the forums anymore.
Times and dates in your local timezone.
Full tracking of what you have read so you can skip to your first unread post, easily see what has changed since you last logged in, and easily see what is new at a glance.
Email notifications for threads you want to watch closely.
Being a part of the oldest wargaming community on the net.
If you are already a member then feel free to login now.
2017/10/07 21:31:46
Subject: Cleatus, the Scratch-building Mekboy -- Incremental Progress...
Mastodon: @DrH@dice.camp
The army- ~2295 points (built).
* -=]_,=-eague Spruemeister General. * A (sprue) Hut tutorial * Dsteingass - Dr. H..You are a role model for Internet Morality! // inmygravenimage - Dr H is a model to us all Theophony - Sprue for the spruemeister, plastic for his plastic throne! // Shasolenzabi - Toilets, more complex than folks take time to think about!
2017/10/07 21:32:18
Subject: Re:Cleatus, the Scratch-building Mekboy -- Incremental Progress...
Cleatus wrote: Hello folks. Thanks for the feedback. Yes, agreed, the rebar was too orange. I toned it down a little, check out the results:
Still a hint of rusty orange there, but not so overwhelming now.
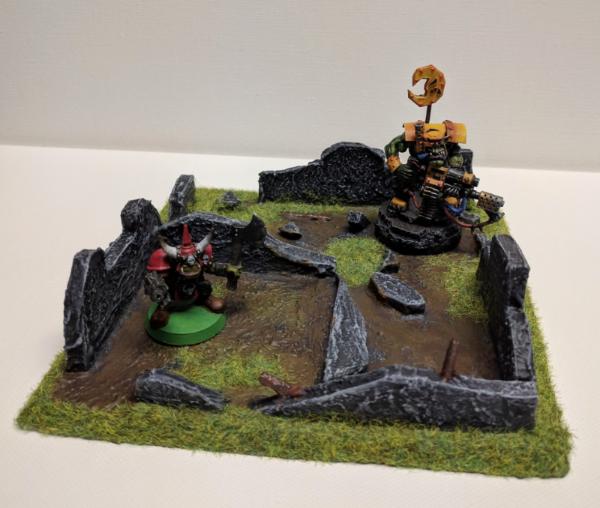
Anpu-adom, I forgot to take any WIP shots of the walls, so I made another one quickly. Each wall section is 5"x1" of foam board. The misaligned bricks are actually just 1/4"x1/2" card stock glued to the foam board.
Then I coated the walls with spackle for some texture, primed and painted.
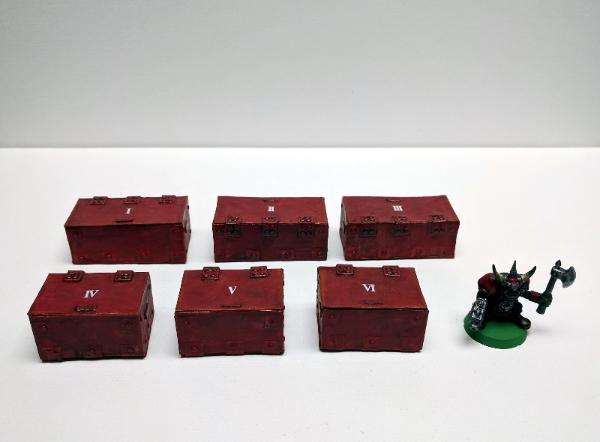
In another thread someone was asking me about how I made the ammo crates. Again in my haste to build I forgot to take photos, so I went back and recreated my process. I hope someone finds this helpful.
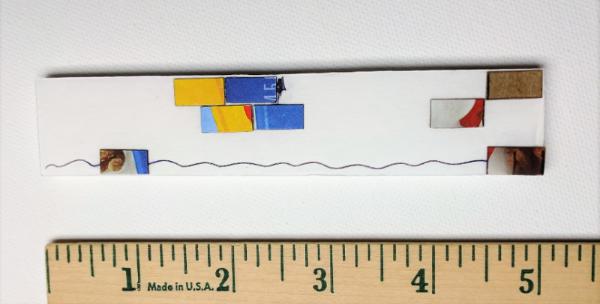
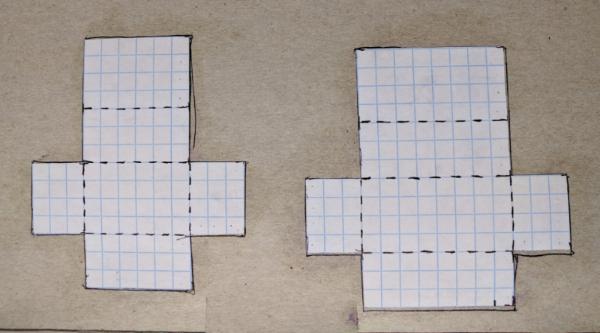
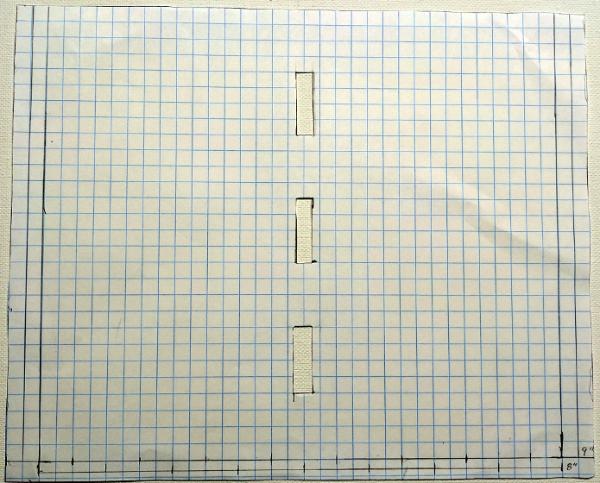
How to Build Ammo Crates from Scratch Start with a template. I like to use graph paper, because it makes measuring easy. I made two different size ammo crates. The small one measures 1.5"x0.75"x0.75", and the large one measures 2"x0.75"x0.75". I based these dimensions on what looked right to me in relation to a 25mm-28mm miniature. I glued my templates to cereal box card stock. You can use whatever materials you wish, or even trace the templates on to styrene. It's up to you.
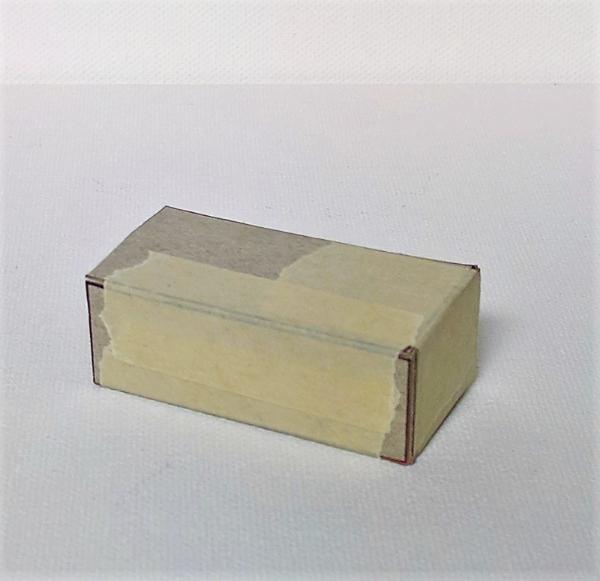
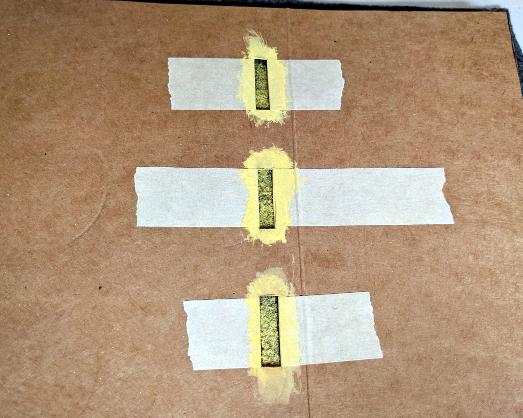
You could just glue the pieces together, and maybe even reinforce from the inside (bracing with supports at 45 and 90 degree angles, etc.), but that takes a long time for such a little box. A faster way is to tape the pieces together with masking tape:
However with no internal reinforcement, the boxes are a bit flimsy and "squish" if you aren't gentle with them. Terrain usually needs to be able to withstand a little punishment, so another way to go is to fill the inside of the box with something sturdy. You could use crumpled up news paper, or if you're willing to spend a little cash, try foam board. I get sheets of this from the $1 store, which is pretty darn cheap. Here I have traced my template and created a stack of four pieces of foam board:
Then glue the pieces of the box to the stack. I use PVA glue. For a more finished edge, you can even use the graph paper to cover the gap where two pieces meet:
Next, add some details to the crates. I added some small pieces of card stock to mine to give the impression of handles and hinges. The handles are 1/8"x1/4", and the hinges are simply made up of two small 1/4"x1/4" pieces of card stock joined at a 90 degree angle. Smooth over the gap with more paper, or PVA glue.
At this point they're looking halfway decent, but you know what would really bring them to the next level?
RIVETS!
A 1/16" hole punch is perfect for creating rivets at this scale. Again, I'm using card stock from cereal boxes here (cheap and plentiful). I make these in batches. Fire up Netflix and watch something dumb for a while that doesn't require much attention, and crank out a few (hundred) of these. You will want to make more than you need for this project because some will flake and not be usable.
Use PVA glue to stick the rivets to the box. When I say "use", I mean drown. Use twice as much PVA glue as the diameter of the rivet. Cover them in glue. It will soak in to the cardboard, and since PVA both shrinks and dries clear you won't even notice it when they are dry. Give it a few hours. Go watch Netflix. Or go outside.
Once you have applied all of your rivets, you are ready to prime and paint. I use gesso to prime most stuff (personal preference). My crates were painted with craft paints; DecoArt Americana Tomato Red for the base coat, and then some edge highlights with Georgia Clay. I gave them an Agrax Earthshade wash. This helps add some shadows to the rivets and handles. Here is my finished result:
You'll note on my first batch I glued down some extra strips of 1/4"x1/2" graph paper before applying the rivets. This both added structural integrity, and ended up adding a little more detail to the finished product.
I think it took me about an hour to cut out and glue all of these together. Adding the rivets takes a while, but it's absentminded busy work that you can do while watching TV. If you were to use styrene they would cost a little more, but you could use plastic glue to get to an end result faster.
Let me know if you have any questions.
Happy riveting!
Mastodon: @DrH@dice.camp
The army- ~2295 points (built).
* -=]_,=-eague Spruemeister General. * A (sprue) Hut tutorial * Dsteingass - Dr. H..You are a role model for Internet Morality! // inmygravenimage - Dr H is a model to us all Theophony - Sprue for the spruemeister, plastic for his plastic throne! // Shasolenzabi - Toilets, more complex than folks take time to think about!
2017/10/07 23:20:58
Subject: Re:Cleatus, the Scratch-building Mekboy -- Incremental Progress...
Great tutorial- thanks for posting again. I especially like the tip about cardboard rivets and PVA glue. Currently, I use cheap (plastic) yard sale signs or something equally cheap, so long as the plastic isn't too thick. I get frustrated gluing a billion rivets on with plastic glue- I think I might do better with the slop and run method with cardboard and PVA!
Keep up the good work!
"He fears his fate too much, or his desserts are small, who will not put it to a single touch; to win- or lose- it all."
Montrose Toast
2017/10/08 12:06:39
Subject: Cleatus, the Scratch-building Mekboy -- Incremental Progress...
Nice. I haven't really found a riviting system I like, so I might try your cardboard and PVA system. How do you find the durability on your spackle pieces?
Automatically Appended Next Post: Also, that monowheeel is awesome. Always loved that style for orks. Good job mass producing the cans though too!
This message was edited 1 time. Last update was at 2017/10/08 12:14:31
Whew, long time, no post. Funny how one's hobby time dries up when you're insanely busy at work. Thank you to the folks who left comments on my last update. I really do appreciate them.
kestral wrote: How do you find the durability on your spackle pieces?
The spackle pieces hold up pretty well. I haven't done any stress tests, or subjected them to serious use, but I would say they are sturdy enough for casual gaming for sure. And they are very cheap to produce, so if they get a little dinged up you're not going to cry over it.
Here is my latest project. Tutorial below
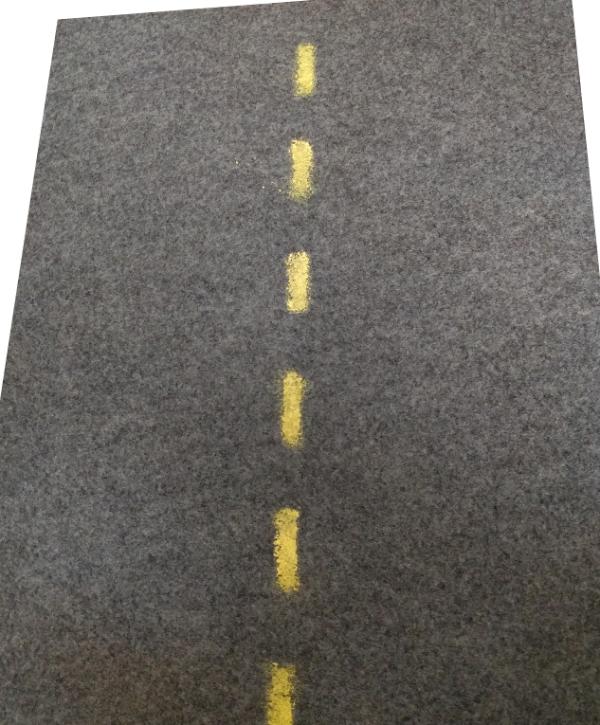
Roads I have only played maybe one or two games of Warhammer 40K this year. Hence, my motivation to build and paint has been a little low. However I do enjoy my hobby time and as I was thinking about what I could add to my game table, it occurred to me that I would like some roads. Being a frugal sort, I looked at options to build/make versus buy. To start with, I did some back of the envelope calculations. I figured that a road wide enough for 40K vehicles (Rhinos, Trukks, etc) should be roughly 4 inches per lane, or 8+ inches wide for a two lane road. My first attempt was to use foamcore board, but that warped badly. Then I had an idea. While browsing the aisles at Michael's I happened to see that pieces of 9"x12" felt were $0.39 each. Perfect! There are many different colors available; I bought several pieces of gray felt and headed home.
The next thing I did was create a template for road lines. Adding yellow dashes seemed like an easy way to make the sections look like they were actually part of a road. Here's my template, with measurements if anyone is interested:
I added masking tape to help prevent warping:
Yellow offered a nice contrast to the gray felt. Here I mixed DecoArt Americana Snow (Titanium) White and Cadmium Yellow:
One coat of the mixed paint, and then a follow-up coat of just yellow for brightness:
I found that the edges stayed crisp if I simply dabbed the paint on to the felt, rather than trying to brush it on.
End result:
I went back and cleaned up mistakes with some gray paint to help sharpen up the lines.
In an afternoon of watching Netflix I made 8 sections of road, for a total of 96 inches of roadway. More than enough to span a standard 4'x6' table.
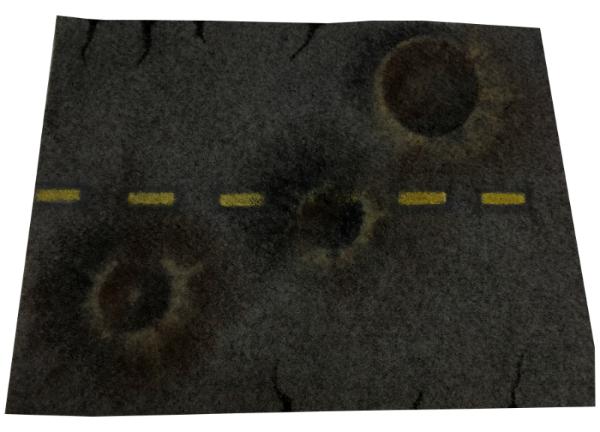
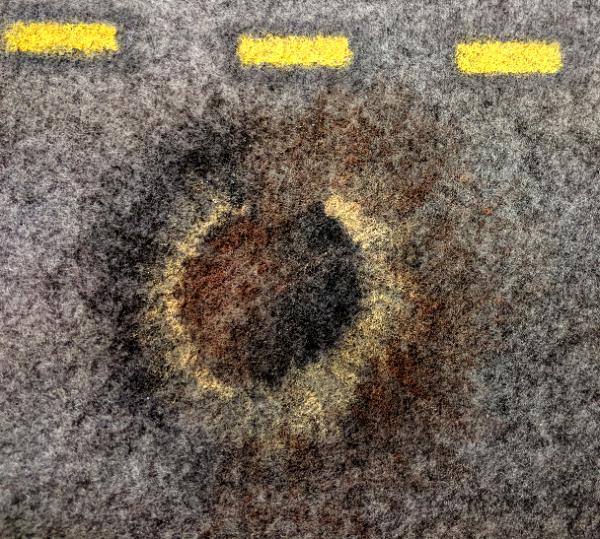
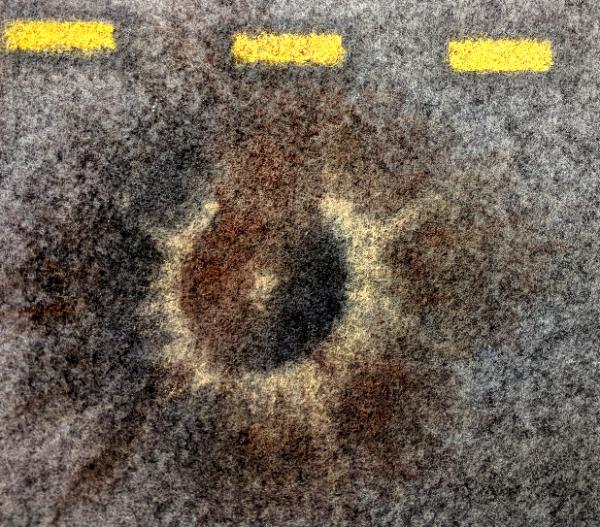
Roads v2.0 But you know, I just wasn't completely satisfied. These were decent, good enough to represent a road on a tabletop surface, but a little simple. I decided to push myself, and see what else I could do here. 40K is a violent, war-torn setting. It seemed unlikely that perfectly paved roads would stay that way for very long. So I thought, hey, let's paint some cracks... and craters. Yes, craters!
How the heck do you paint a crater onto a flat surface?
Google image search was helpful in providing example images of craters, but I was hoping to find a tutorial on painting cracked roads and craters.
search: "cracked paved roads" > "6 Insane Roads You Won't Believe People Actually Drive On" > "5 Famous Movie Lessons (That Didn’t Make A Lick Of Sense)" > Wikipedia article on "Avengers: Age of Ultron" > Wikipedia: "Marvel Cinematic Universe" > OMG comic book enthusiasts have written a lot of articles on Wikipedia... > hey look, it's dawn.
After taking in all this information, digesting it, and thinking about how to represent a crater on my felt surface, I came up with the following formula for creating exaggerated but semi-realistic craters on a flat surface:
Pick a spot where you want a crater:
Outline the crater edge with a color that contrasts with your surface. In this case, I used Apple Barrel Khaki:
Select a third color somewhere in between the two. Fill in the center of the crater, and ring one half of the crater with this color. In this example, I used Delta Ceramcoat Burnt Umber. On the inner lip of the crater, create a shadow with black paint:
Next, add a shadow on the opposite side of the crater. Note that the shadows are going the same direction, as if the light source were on the right:
You can create the impression of a "raised" bit in the middle of the crater by adding another dab of Khaki paint. I also created some ridges stemming out from the rim of the crater, to give the impression of height:
Finally, I softened up some of the edges with more Burnt Umber paint around the edges, both inside and out of the crater. I was trying to create a sense of dirt having been thrown out of the crater when the impact occurred:
And there you have it! Each crater takes maybe 10-20 minutes, depending on how much detail and effort you want to put into it. But again, do this while watching something mindless on TV or Netflix and you'll be done before you know it.
These craters are just meant to convey the impression of impact damage. There's no actual raised ridges or depth to them. At arms length they look pretty darn good. It's a bit of an optical illusion I suppose. The road damage is very exaggerated, which is both necessary for this medium, and intentional. 40K is an exaggerated setting (just look at the proportions on some of the models!).
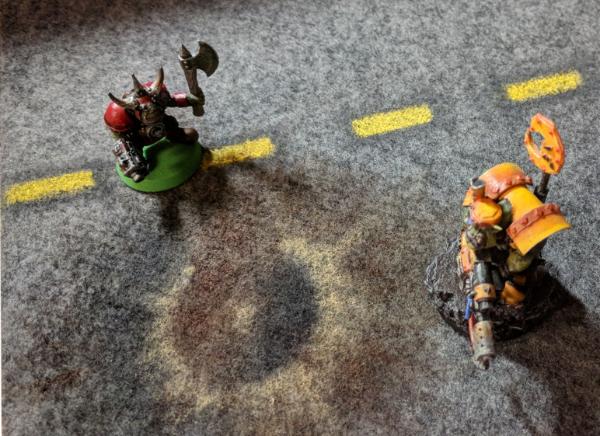
Here is a shot with two minis for scale:
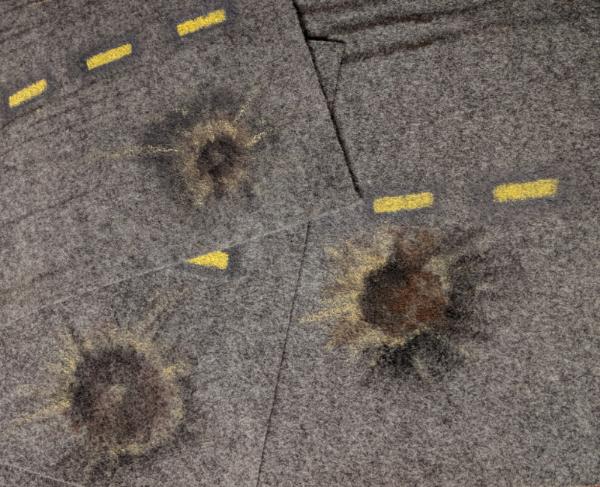
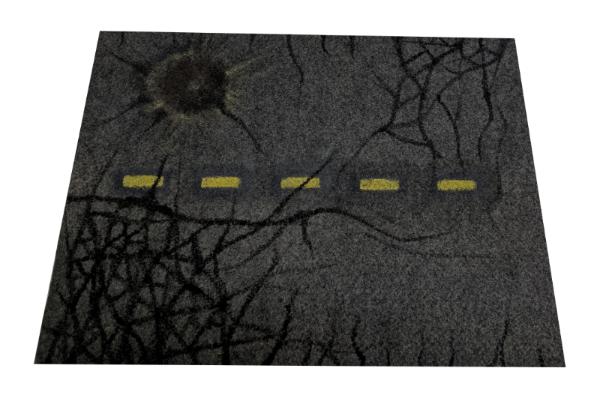
And here are my final results, complete with cracks that I added too. I kind of went wild with the cracks:
This one is supposed to give the sense that there was some vehicle burning rubber, and possibly ran over something (or some one). It didn't turn out as well as I would have liked:
Some sections are more cracked than others. I just had fun with it.
Not bad, eh?
Let me know if you have questions. I'll be happy to answer (in a hopefully timely fashion).
nice...what a truly lovely way to make roads...other surfaces are possible too...the bleed through effect that occurs by using stencils is avoidable when you are willing to paint the whole felt piece with one colour...first the ground colour then stencil application then ground colour in the stencil and THEN the stencil colour...
but that aside...it looks real terrific...and i now regret a bit how went with my own modular table...
Mastodon: @DrH@dice.camp
The army- ~2295 points (built).
* -=]_,=-eague Spruemeister General. * A (sprue) Hut tutorial * Dsteingass - Dr. H..You are a role model for Internet Morality! // inmygravenimage - Dr H is a model to us all Theophony - Sprue for the spruemeister, plastic for his plastic throne! // Shasolenzabi - Toilets, more complex than folks take time to think about!
I really like how you've achieved the illusion of three-dimensionality with the craters without also inflicting wobbly model syndrome. Awesome work, Cleatus. Well done.
Camkhieri: "And another very cool thing, my phones predictive text actually gave me chicken as an option after typing robot, how cool is that."'
Meercat: "All eyes turned to the horizon and beheld, in lonely and menacing grandeur, the silhouette of a single Grot robot chicken; a portent of evil days to come."
From 'The Plucking of Gindoo Phlem'
My Project Blog: Necrons, Orks, Sisters, Blood Angels, and X-Wing "
"One morning I shot an elephant in my pajamas. How it got into my pajamas, I'll never know." Groucho Marx
~A grammatically correct sentence can have multiple, valid interpretations.
Arguing over the facts is the lowest form of debate.
Interesting. A few tips: For the yellow stripes or dashes, paint them on the felt in white first, then paint the yellow over the white -- after it has dried of course. It'll look better. Also, the dashes are too close together, at least by modern standards. For a more 'realistic' look, use the following dimensions: Dashes are 1 3/16" long and 3/16" wide and spaced 2 3/8" apart. (Some time ago, I actually looked up the regulation dim.s from the USDOT and did the math to scale them. Hmmm, not sure what that says about me.)
Now those things get repainted all the time, and if you were to make the adjustments to what you did, and 'blacking out' the parts which don't belong, you would get a interesting, and commonly seen effect-- at least commonly seen on roads around here. Perhaps add white shoulder stripes at some point?
Use of the gray felt is a brilliant idea. The cratering effect reminds me of what I've seen on some of these game mats made from mousepad materials. Very cool. And excellent work.
This message was edited 1 time. Last update was at 2017/12/19 20:25:48
Thanks for the praise and feedback, folks. Much appreciated.
And now for something completely different...
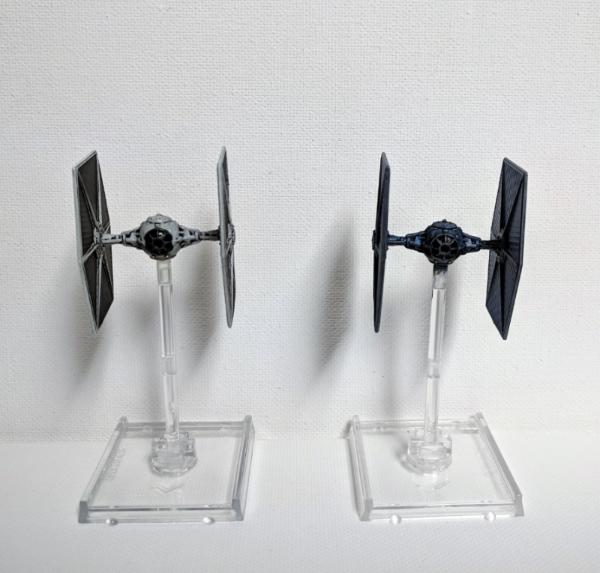
Tie Fighter Repaint I've been casually playing the X-Wing Miniatures game with a friend for some time. When Christmas rolled around I decided to try my hand at a repaint of the classic Tie Fighter. I think it came out pretty good for a first attempt. Here it is, next to one with an original paint job on the left, and my repaint on the right:
Bonus pic, just for fun:
I found these "Squigz" at Target. The name is amusingly similar to the GW squiggly beasts. No relation. Doesn't look anything like them obviously, just an odd coincidence.
Camkhieri: "And another very cool thing, my phones predictive text actually gave me chicken as an option after typing robot, how cool is that."'
Meercat: "All eyes turned to the horizon and beheld, in lonely and menacing grandeur, the silhouette of a single Grot robot chicken; a portent of evil days to come."
From 'The Plucking of Gindoo Phlem'
Thanks for the feedback, gentlemen. I have some new stuff for you.
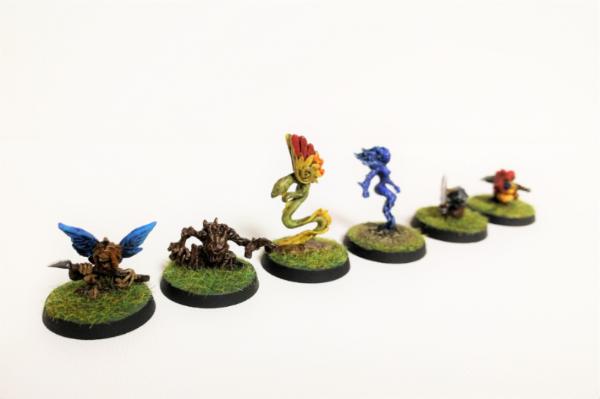
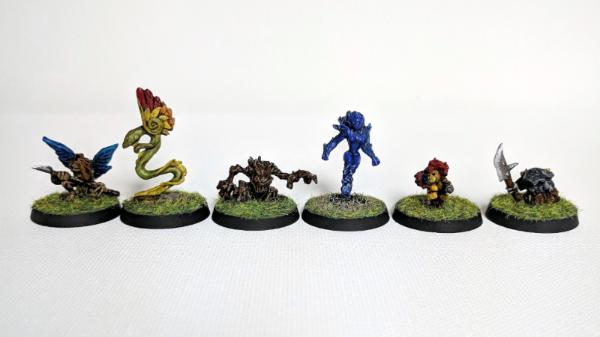
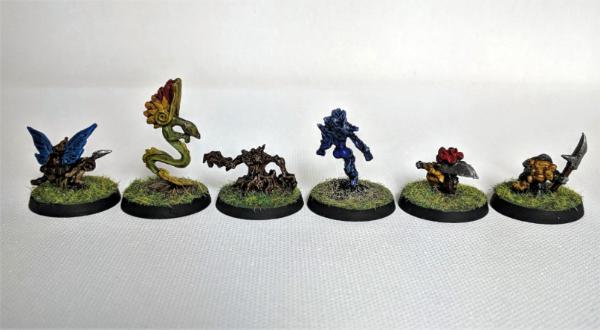
Reaper Bones Familiars 2: Getting back into the swing of painting miniatures I thought I would tackle some Reaper minis. This was a fun group to paint, each one was different. But so tiny! See what you think.
The little dolly with a knife is one of my favorites:
The little death, begrudgingly hauling around scrolls for its master:
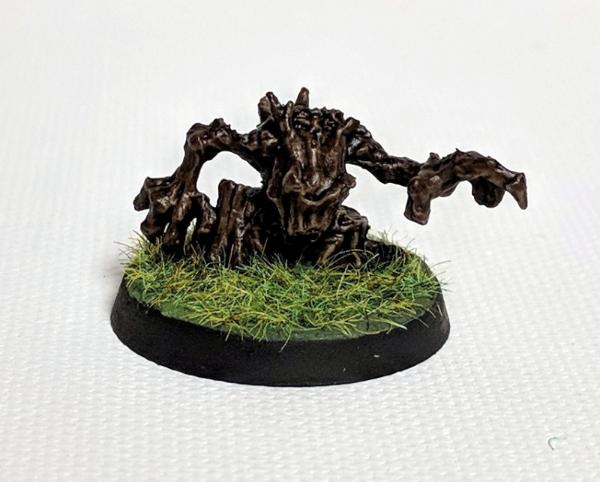
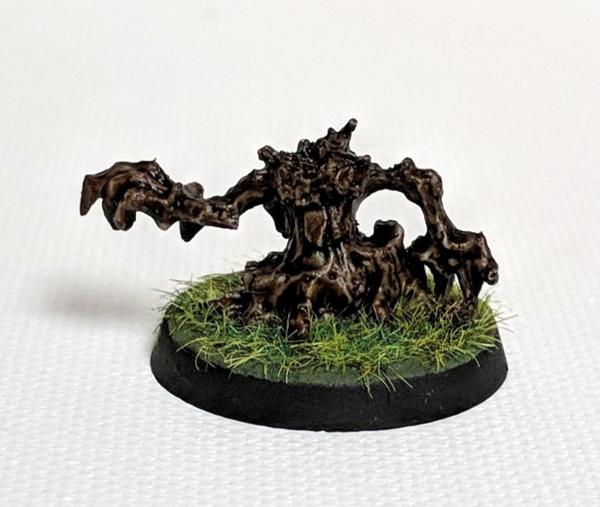
Entling:
Fairy Dragon / winged serpent (quetzalcoatl?):
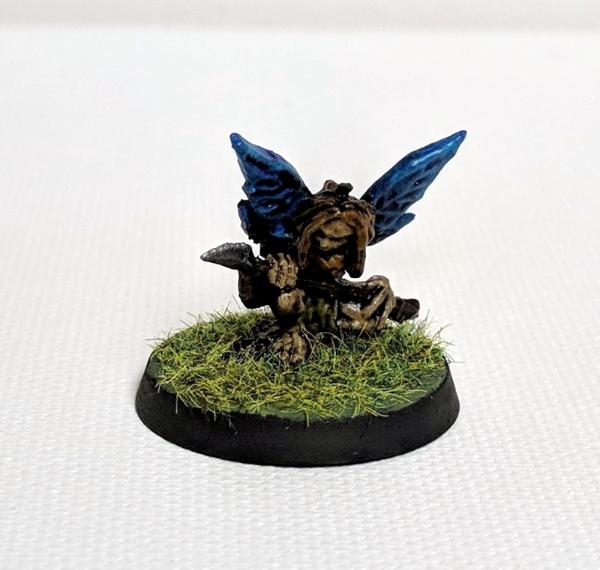
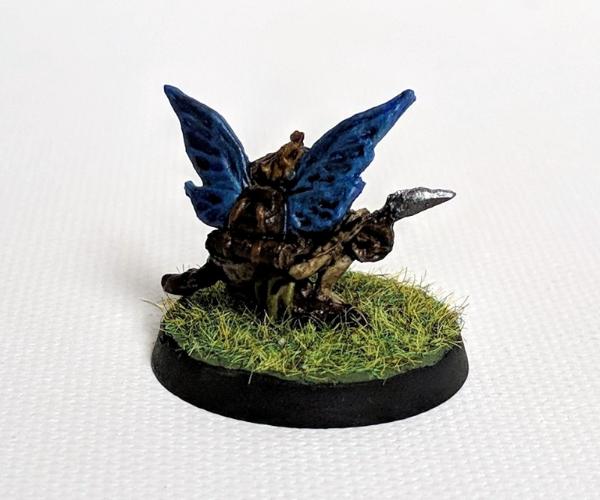
Fairy Hunter / Angry Fairy:
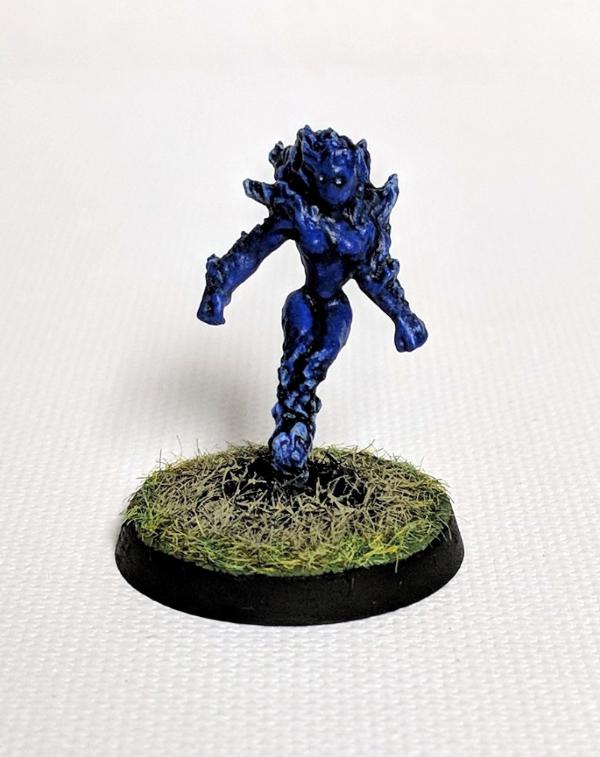
Blue Fire Elemental (or maybe a Water Elemental):
Most other people I have seen paint this one use a traditional fire scheme (red/orange/yellow, or black with fire at the edges like lava). I decided to go another way.
Good work. Can't say that I'm that ... familiar... with any of them specifically.
Mastodon: @DrH@dice.camp
The army- ~2295 points (built).
* -=]_,=-eague Spruemeister General. * A (sprue) Hut tutorial * Dsteingass - Dr. H..You are a role model for Internet Morality! // inmygravenimage - Dr H is a model to us all Theophony - Sprue for the spruemeister, plastic for his plastic throne! // Shasolenzabi - Toilets, more complex than folks take time to think about!
They look fantastic bud, love the Entling the best, really great work all round, though the length of the grass is bothering me, need to get the mower out. The base on the blue girly is superb mind, the way you have it looking scorched almost.
Camkhieri: "And another very cool thing, my phones predictive text actually gave me chicken as an option after typing robot, how cool is that."'
Meercat: "All eyes turned to the horizon and beheld, in lonely and menacing grandeur, the silhouette of a single Grot robot chicken; a portent of evil days to come."
From 'The Plucking of Gindoo Phlem'
@ Cam: Yes, I kind of agree. This static grass is a little too long. Not sure what I could do about it now, short of scraping it all off, or getting out a tiny pair of scissors and trimming it. But it could also be a trick of perspective due to the relative size of the miniatures. They are rather tiny after all.
On to new stuff!
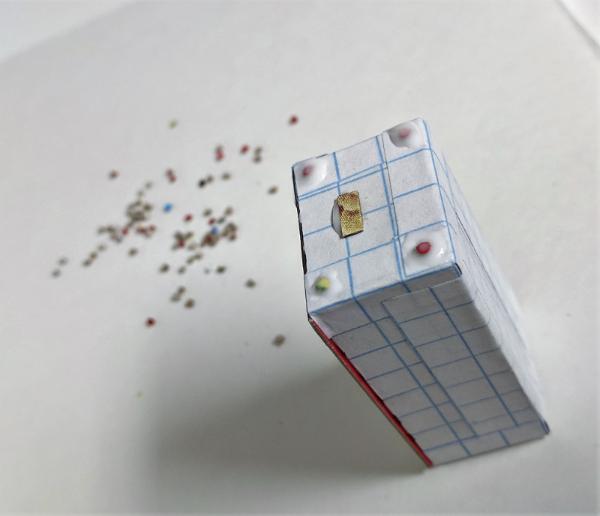
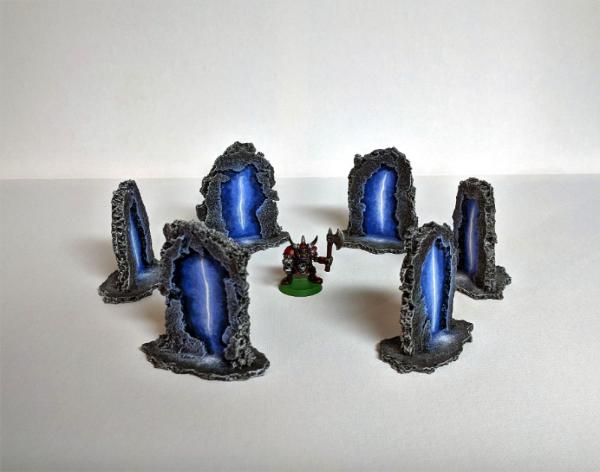
Portals / Objective Markers: I saw a nice little tutorial here by Wyloch on making Necron objective markers / portals, and I was inspired to make some of my own. I also checked out the BoLS Hobby YouTube video featuring the blue portals. So here is my attempt at making a set of these portals for myself:
And here's a scale shot with an Ork Boy on a 25mm base:
I debated gluing these to bases. I might still do that, just to give them a little more stability and longevity. But I think they look pretty good on their own.
In other news, I started painting a unit of Ork Kommandoes. Here's a WIP test paint scheme with camouflage:
I'm really trying to paint more this year, and FINISH things. Starting new projects is fun, but I have an awful lot of unpainted plastic and metal begging for attention. But hey it's a hobby, not a job. This is what I do for fun. No need to stress over it. Hopefully I'll have another update soon.
Thanks for looking!
This message was edited 1 time. Last update was at 2018/03/18 13:03:53
Those portals are brilliant, really impressive paint job on the blue.
Speaking of which, that kerchief on the ork is blooming fantastic bud.
As to the static grass issue, don't worry at it. However if you really want to, you could flash over it with a flame, be very careful. But it withers it back nicely if you are careful.
Nice portals. You need some orange ones to go with them though
Good job on the Ork too.
Mastodon: @DrH@dice.camp
The army- ~2295 points (built).
* -=]_,=-eague Spruemeister General. * A (sprue) Hut tutorial * Dsteingass - Dr. H..You are a role model for Internet Morality! // inmygravenimage - Dr H is a model to us all Theophony - Sprue for the spruemeister, plastic for his plastic throne! // Shasolenzabi - Toilets, more complex than folks take time to think about!
Camkhieri: "And another very cool thing, my phones predictive text actually gave me chicken as an option after typing robot, how cool is that."'
Meercat: "All eyes turned to the horizon and beheld, in lonely and menacing grandeur, the silhouette of a single Grot robot chicken; a portent of evil days to come."
From 'The Plucking of Gindoo Phlem'
Back after posting hiatus. But not hobby hiatus! (I'm just not good at posting. haha...) Some updates to share:
Portals:
I made another bunch from cork board and card stock.
Here are all six, soon to be all orange and glowy:
WIP shots:
Spoiler:
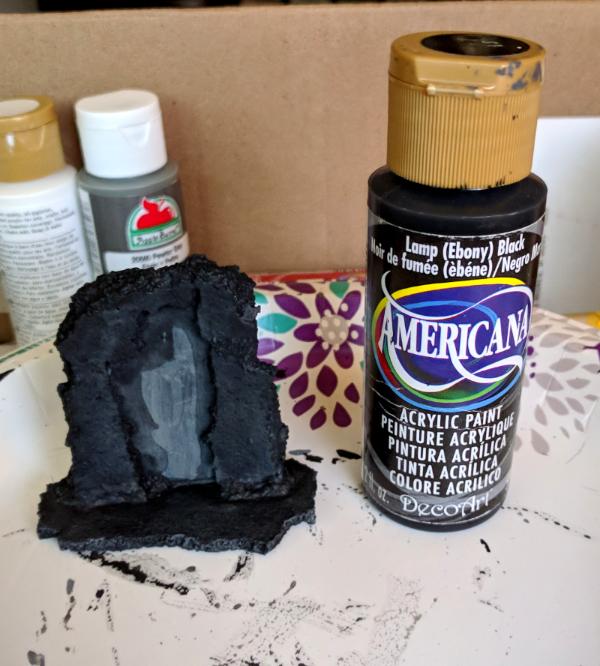
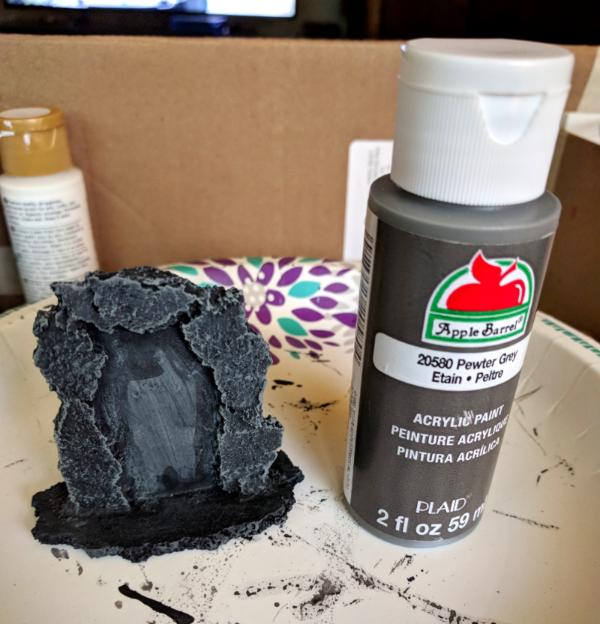
Filled in the gaps with spackle and sand.
Basecoat:
Drybrush gray:
Drybrush white:
Other WIP:
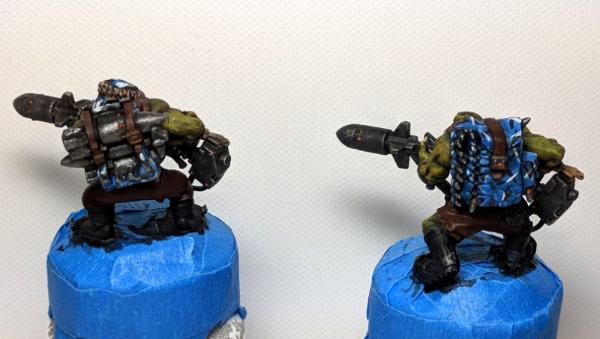
A couple more Ork Kommandoes I painted up, totin' rokkits:
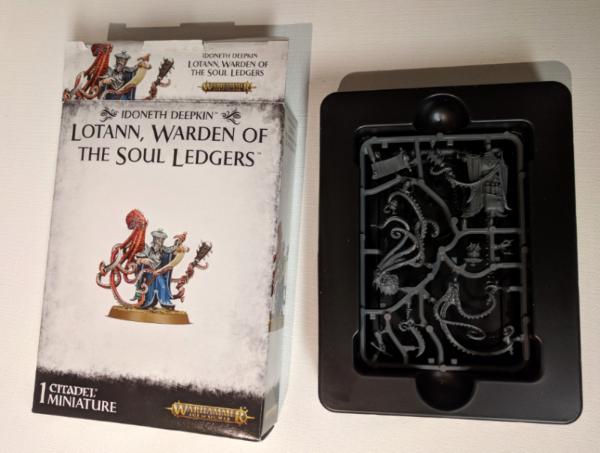
My wife expressed interest in Lotann, the AoS model. So I bought it and will try to do a credible paint job for her. Behold his many appendages!
I posted a tongue-in-cheek thread in the P&M forum about the mixed emotions I have regarding buying and painting yet another chunk of gray plastic, which I thought was funny, but sometimes humor is lost on the internet. Eh!
LOER:
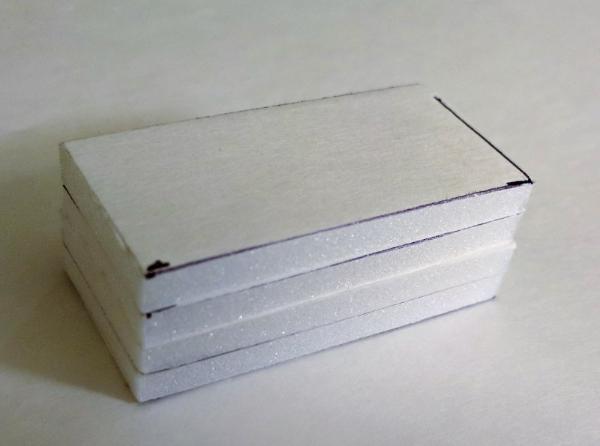
This was the styrafoam that came with a ceiling fan I recently replaced. It just screams TERRAIN to me. I'm going to try using this as a starting point for my LOER entry this round.
That's all for now. I'm going to try and post another update soon. So much to do, so little time!


 // inmygravenimage - Dr H is a model to us all


 RIVETS!


 You need some orange ones to go with them though