| Author |
Message |
 |
|
|
|
|
Advert
|
Forum adverts like this one are shown to any user who is not logged in. Join us by filling out a tiny 3 field form and you will get your own, free, dakka user account which gives a good range of benefits to you:
- No adverts like this in the forums anymore.
- Times and dates in your local timezone.
- Full tracking of what you have read so you can skip to your first unread post, easily see what has changed since you last logged in, and easily see what is new at a glance.
- Email notifications for threads you want to watch closely.
- Being a part of the oldest wargaming community on the net.
If you are already a member then feel free to login now. |
|
 |
2018/09/04 11:50:19
Subject: Re:Cleatus, the Scratch-building Mekboy
|
|

Nasty Nob
|
Thank you, ladies and gents. 
|
|
|
|
 |
|
2018/09/22 20:17:16
Subject: Cleatus, the Scratch-building Mekboy
|
|

Mastering Non-Metallic Metal
|
Catching up on my subs'... Good job on the LoER piece. Nice, natural look to the rock/stone surfaces. One thing I will say for the future, Think about ways of breaking up the main colour a bit more: As nice as the rock is, it's difficult at a glance to tell what's a wall, floor, path, room... Some things you can do are to colour the floors differently than the walls; lighter, darker, browner, etc. Even if made from the same stuff, the floor gathers dirt differently than the walls (note that the top of the walls would also gather similar dirt to the floor). Also consider a worn path where there is the heaviest foot traffic (gives it some history). Or, consider occasional floor coverings, like you have in a couple of places. You don't have to carpet the whole thing, but a rug (for certain circumstances, not all) or rubber mats, diamond-plate patches, tiles. In good contrasting colours/shades to break it up. Or, buildings often have painted walls. Paint the inside surfaces of the walls and weather them (or even wallpaper them  ). Just a remnant of colour can be enough to distinguish walls from floor and to give each room a separation from corridors and the outside. Also, posters, signs, graffiti all help in breaking up the bulk colour. Just some things to think about next time.
|
|
This message was edited 1 time. Last update was at 2018/09/22 20:18:09
     Mastodon: @DrH@dice.camp Mastodon: @DrH@dice.camp
The army-                   ~2295 points (built). ~2295 points (built).
 
* -=]_,=-eague Spruemeister General. * A (sprue) Hut tutorial *
Dsteingass - Dr. H..You are a role model for Internet Morality! // inmygravenimage - Dr H is a model to us all 
Theophony - Sprue for the spruemeister, plastic for his plastic throne! // Shasolenzabi - Toilets, more complex than folks take time to think about! |
|
|
|
|
2018/11/20 13:44:05
Subject: Re:Cleatus, the Scratch-building Mekboy
|
|
Nasty Nob
|
Hello folks, back after a hiatus.
Dr H, thanks for the comments on my terrain. I might go back and make improvements to the piece at some point. Feedback appreciated.
I've had some hobby time over the last couple of weeks so I've been puttering around and trying to decide what to do. Half-starting projects, getting ideas, etc.
Couple of things to show:
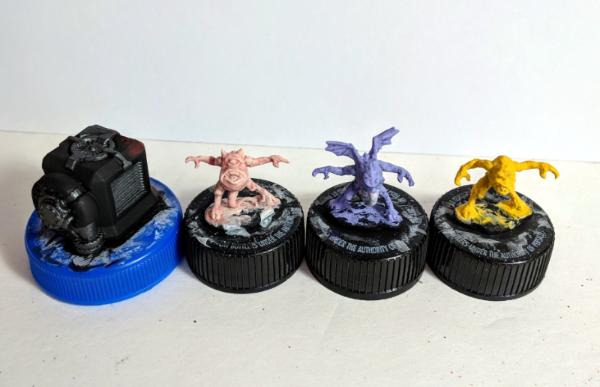
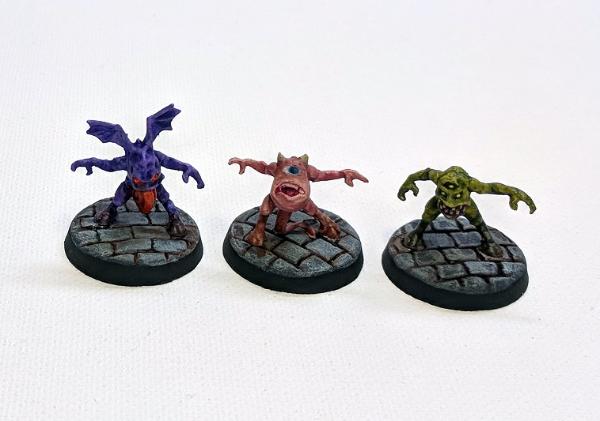
Here are a few Reaper minis I base coated. On the left is a Starship Generator. The three little guys on the right are from the Hordlings Sprue (3 little guys in one pack). I'll give them a wash and some highlights next.
I was digging around in an old tub of toys from my childhood and found a little die-cast Lamborghini car. As I stared at it, I thought: what if an Ork built a car like this on some remote world? A "Lamborkghini" if you will.  I'll admit I was inspired a little by the new Ork model releases for the Speed Freaks game, but equally by the idea of designing and building a scale model of this little toy from scratch. I am not a professional artist, and I know next to nothing about Lamborghini's, but hey it's my hobby time so why not? So I set about sketching it out, taking measurements off the die-cast model and trying to keep the scale right. Here's what I came up with after a few hours of effort:
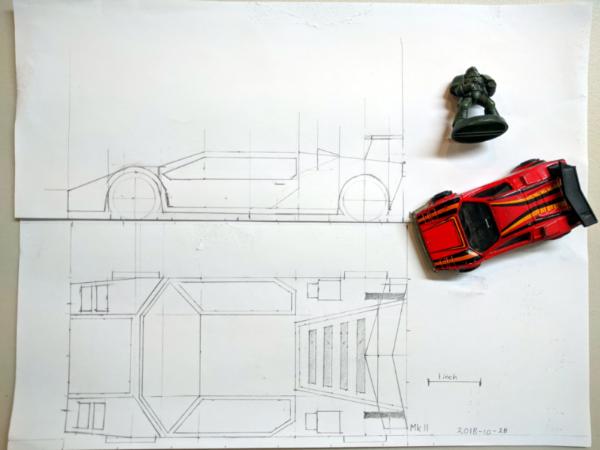
Bear in mind these are just concept drawings. It's big... long and lean, roughly the same footprint of an Ork Battlewagon! I feel it needs rivets. The angle of the windows is going to be tricky. I'm not sure if anyone has done anything like this before, but regardless I think it's a fun concept and I'm excited by the idea of bringing it to life. I've already started cutting styrene... hopefully I can get some good WIP shots of this project. Wish me luck haha!
Thanks for looking!
|
|
|
|
|
|
2018/11/20 16:11:31
Subject: Cleatus, the Scratch-building Mekboy
|
|
Longtime Dakkanaut
|
Good luck, mate, that looks tricky
|
|
|
|
|
|
2018/11/20 18:47:16
Subject: Cleatus, the Scratch-building Mekboy
|
|
Stealthy Grot Snipa
|
I did the same thing with my Ferrarii F1 themed Evil Suns warband, Da Skooderia Ferrorki! Go for it, love to see the results
|
|
|
|
|
|
2018/11/20 22:55:21
Subject: Cleatus, the Scratch-building Mekboy
|
|
Mastering Non-Metallic Metal
|
That's a Countach, should you want to look up reference pictures.
I have this kind of project on my to-do list, won't be happening for a long time yet though. I do like Lamborghinis. 
Good start to the plan.
|
Mastodon: @DrH@dice.camp
The army- ~2295 points (built).
* -=]_,=-eague Spruemeister General. * A (sprue) Hut tutorial *
Dsteingass - Dr. H..You are a role model for Internet Morality! // inmygravenimage - Dr H is a model to us all
Theophony - Sprue for the spruemeister, plastic for his plastic throne! // Shasolenzabi - Toilets, more complex than folks take time to think about! |
|
|
|
|
2018/11/21 03:46:17
Subject: Cleatus, the Scratch-building Mekboy
|
|
Gargantuan Great Squiggoth
|
Interesting. Seen it done before, always good to see others have a go. At the end of the day, you will have a unique but very cool army.
|
|
|
|
|
|
2018/11/22 12:08:14
Subject: Re:Cleatus Paints Reaper Minis, and Builds a Lamborkghini Countach
|
|
Nasty Nob
|
Wow, so many comments.
Slinky wrote:Good luck, mate, that looks tricky
Thanks!
Skinflint Games wrote:I did the same thing with my Ferrarii F1 themed Evil Suns warband, Da Skooderia Ferrorki! Go for it, love to see the results
Sweet, I'd love to see some pictures. Link?
Dr H wrote:That's a Countach, should you want to look up reference pictures.
I have this kind of project on my to-do list, won't be happening for a long time yet though. I do like Lamborghinis.
Good start to the plan.
Interesting. Yes, I think you're right. Certainly the same wedge design. Like I said, I really know nothing about these cars so don't judge me too harshly haha. The die-cast model only says "LAMBORGHINI" on the bottom. I do think they look really cool. Thanks for the feedback.
Camkierhi wrote:Interesting. Seen it done before, always good to see others have a go. At the end of the day, you will have a unique but very cool army.
I looked around and couldn't find others who had done a similar project but maybe my keyword searches were off. Please do share links if you have them handy.
OK, so more WIP pictures, yes?
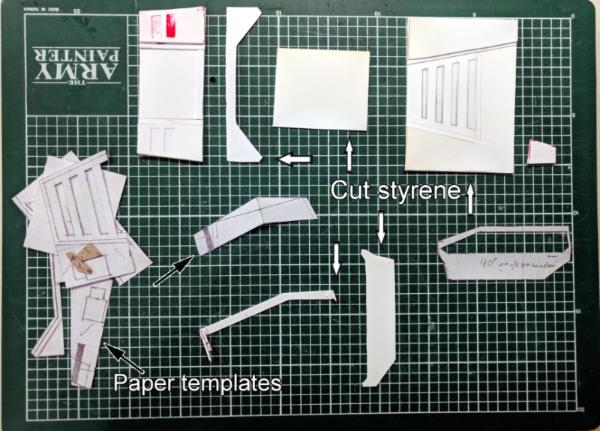
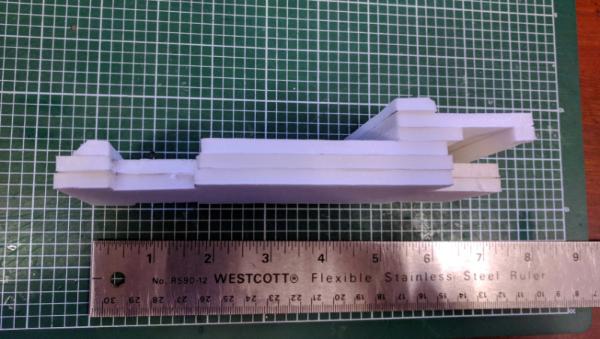
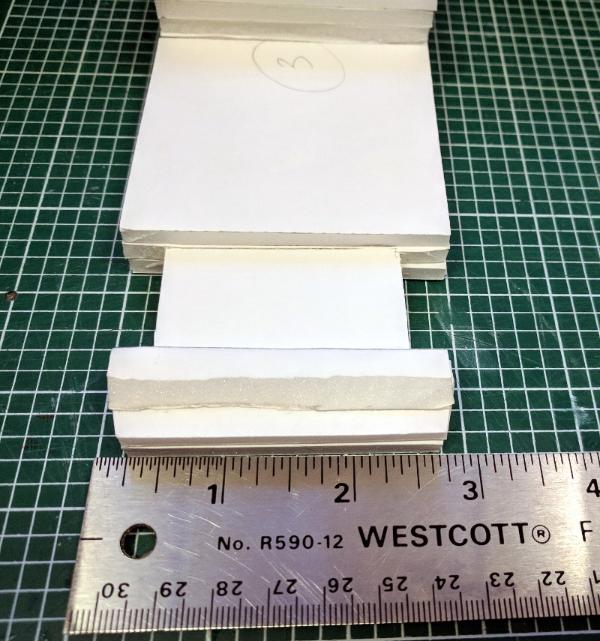
I photocopied my design and began cutting out pieces of styrene. I apologize for the slightly confusing WIP picture here, but I added some arrows to clarify what's plastic and what are the paper templates. I'm building up the front and rear with multiple layers of styrene. This is a very flat, angular car so I think this method will work well to achieve the effect. The hood has 3 layers, and the rear currently has 4. I used a some different thicknesses, between .01" (0.254mm) to 0.05" (1.27mm). I used what I had laying around, including some Evergreen styrene, and some yard sale signs. Hence the red color you see peeking out here and there. The edges are a little rough and uneven but I figure I can clean that up with some Milliput and sanding. Bottom-center you can see what I've been working on for the doors. I'm going to try a two-piece design, and what I've done here is added some supports off the upper window frame part of the door at angles. My rough measurements say that the window portion of the door is at a 40 degree angle to the side of the car (Lamborghini enthusiasts, don't hang me if this is incorrect or blasphemy!). So I've fashioned two supports at 40 degree angles on either side. Then I'll attach the window frame to the door. I'm not too worried about windows per-se... my intention here is that this will be an Ork vehicle. How can you tell how fast you're going if you can't feel the wind in your teef?!
I'm considering casting these pieces once I get them trued up. I have very little casting experience, only press-molds really. I picked up an Amazing Casting Resin kit and Amazing Mold Rubber kit and have read some great tutorials on the subject. I'll do some test casts first to build up my confidence and better understand the process.
I've also cut out and glued together a rough shape for the body to support the pieces as I'm gluing them together. Spoilered here for size.
I think the project is coming along nicely. Suggestions appreciated.
In other news, I'm nearly finished with these Reaper minis:
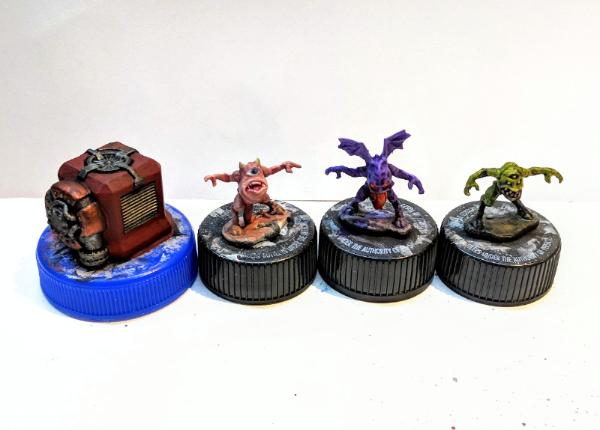
Just needs basing and varnish. I love that little cyclops guy. He looks like John Candy trying to tiptoe around quietly in an 80's movie. Or maybe like he's about to start singing and dancing around rather than being a menacing demon thing from the abyss. Makes me think of this scene from The Hobbit movie:
(my apologies for inflicting that upon you )
Thanks for looking!
|
|
|
|
|
|
2018/11/22 18:36:13
Subject: Cleatus Paints Reaper Minis, and Builds a Lamborkghini Countach
|
|

Liberated Grot Land Raida
|
Ooh, nice stuff in here . Following the lamborghini with interest, and those little guys are totally cute!
|
A Squeaky Waaagh!!
Camkhieri: "And another very cool thing, my phones predictive text actually gave me chicken as an option after typing robot, how cool is that."'
Meercat: "All eyes turned to the horizon and beheld, in lonely and menacing grandeur, the silhouette of a single Grot robot chicken; a portent of evil days to come."
From 'The Plucking of Gindoo Phlem' |
|
|
|
|
2018/11/22 19:32:57
Subject: Re:Cleatus Paints Reaper Minis, and Builds a Lamborkghini Countach
|
|
Fixture of Dakka
|
Love the little guys, those are great.
And interested to see how the lamborkini develops.
|
|
|
|
|
|
2018/12/01 17:17:58
Subject: Cleatus Paints Reaper Minis, and Builds a Lamborkghini Countach
|
|
Mastering Non-Metallic Metal
|
Good progress. Keep at it.
|
Mastodon: @DrH@dice.camp
The army- ~2295 points (built).
* -=]_,=-eague Spruemeister General. * A (sprue) Hut tutorial *
Dsteingass - Dr. H..You are a role model for Internet Morality! // inmygravenimage - Dr H is a model to us all
Theophony - Sprue for the spruemeister, plastic for his plastic throne! // Shasolenzabi - Toilets, more complex than folks take time to think about! |
|
|
|
|
2018/12/02 00:23:06
Subject: Re:Cleatus Paints Reaper Minis, and Builds a Lamborkghini Countach
|
|
Stealthy Grot Snipa
|
Skinflint Games wrote:I did the same thing with my Ferrarii F1 themed Evil Suns warband, Da Skooderia Ferrorki! Go for it, love to see the results
Sweet, I'd love to see some pictures. Link?
You wanted it, you got it! https://wp.me/p5ZE37-TA
|
|
|
|
|
|
2019/01/26 15:45:48
Subject: Re:Cleatus Paints Reaper Minis, and Builds a Lamborkghini Countach
|
|
Mekboy Hammerin' Somethin'
|
Hi Cleatus, I remember checking your blog several times over the last few years.
As a fellow Ork converter its always interesting to see what you are up to, some very fun and inspiring conversions on here
The Lamborkghini is a brilliant idea and will fit in wonderfully with the current focus on speedfreaks, looks like you have made a good start, I'm looking forward to see how it develops.
|
|
|
|
|
|
2019/02/20 11:29:04
Subject: Re:Cleatus Paints Reaper Minis (Lamborkghini Stalled)
|
|
Nasty Nob
|
I finished the Reaper Hordlings.
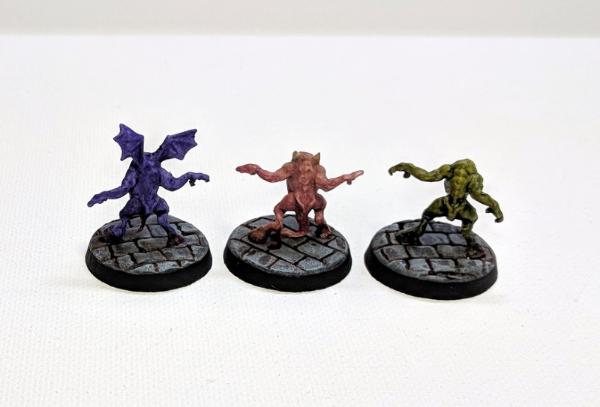
Actually, I finished these at the beginning of January. The miniature painting was done in November/December, but I got stuck on basing. I wanted to try something a little different than sand grass flock. After giving it some thought and looking for ideas online I decided to try making my own custom bases. So what you see here are simple green stuff bases with a stone pattern. These were really simple to make; I just put a blob of GS on the base, flattened it out, then dragged the back of my hobby knife over them to create the pattern. I think they turned out pretty nice all things considered.
I held off on posting because... guilt? One factor was that my focus shifted to other non-hobby activities (work, holidays, family time, shoveling snow!). But even when I had some hobby time to myself I found myself drawn to other projects. I'm glad that I finished these little minis, but for some reason I felt that I shouldn't post anything if I wasn't working on my ambitious Lamborkghini scratch build. Which is dumb. I've been puttering away on some other painting. I chipped away at some Orks, Skitarii, did some other GS sculpting (no photos yet). I guess the thought of taking the time to take photos, crop, adjust colors, and post them was daunting for some reason? Also silly. But hey, the brain isn't always logical. So here I am posting a picture of something to share.
One more. Here's an updated WIP shot of Cassie, Gnome Wizard:
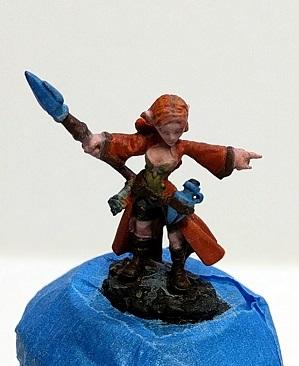
This is nearly done really. A few more highlights and washes to give depth, then base it. I started on this model months ago, but again got distracted or lost interest. It's a common problem I know. But hey, it's a hobby.
Thank you to the handful of people who visit and post. I'm lurking on my phone and rumor has it I even comment on some posts here occasionally. Thanks for looking.
|
|
|
|
|
|
2019/02/25 21:34:30
Subject: Cleatus Paints Reaper Minis (Lamborkghini Stalled)
|
|
Mastering Non-Metallic Metal
|
You do whatever you want with your hobby, and post whatever you want in your blog.
Ambitious projects take exponentially more time than the usual model building and painting. They come and go with the waves of inspiration. It's good to occasionally do other things to keep it interesting.

|
Mastodon: @DrH@dice.camp
The army- ~2295 points (built).
* -=]_,=-eague Spruemeister General. * A (sprue) Hut tutorial *
Dsteingass - Dr. H..You are a role model for Internet Morality! // inmygravenimage - Dr H is a model to us all
Theophony - Sprue for the spruemeister, plastic for his plastic throne! // Shasolenzabi - Toilets, more complex than folks take time to think about! |
|
|
|
|
2019/02/26 17:32:23
Subject: Cleatus Paints Reaper Minis (Lamborkghini Stalled)
|
|
Decrepit Dakkanaut
|
I'm a shameless lurker. Your hordlings make me grin
|
Theophony"... and there's strippers in terminator armor and lovecraftian shenanigans afoot."
Solar_Lion: "Man this sums up your blog nicely."
Anpu-adom: "being Geek is about Love. Some love broadly. Some love deeply. And then there are people like Graven. |
|
|
|
|
2019/07/07 20:58:02
Subject: Cleatus Paints Reaper Minis (Lamborkghini Stalled)
|
|
Drew_Riggio
|
Those little reaper creatures are kind of adorable
|
-------------------------------
Click Here for my terrain blog.
----------------------------
Commission Terrain
---------------------------- |
|
|
|
|
2019/07/12 12:46:40
Subject: Re:Cleatus Paints Again!
|
|
Nasty Nob
|
Thanks for the comments folks. I'm back! Been a while since I've posted anything, but I've been lurking and working on stuff in my nerd cave. Felt like time to share.
So having read and observed some of the hype around the new Contrast paints, I was... I guess you could say inspired to start painting again? I had not actually painted anything for months. (Primarily due to work, and other commitments.) But seeing the fantastic results some people were able to achieve in a short amount of time using only the new Contrast paints, I thought that I might pick up the brush again. However I wasn't keen on spending a lot on new paints just to try things out. Then I remembered I have a decent number of artists inks that I bought to make ink washes. And I thought to myself... I wonder what results I could achieve using inks? So I decided to give it a try. (Note that I am *not* trying to say that Contrast paints are inks, or washes, or even necessarily trying to prove that inks are just as good or anything like that. Just thought I'd put that out there, because I read enough drama about people arguing over this stuff. I just wanted to see what I could do with inks. ).
Let's start in medias res:
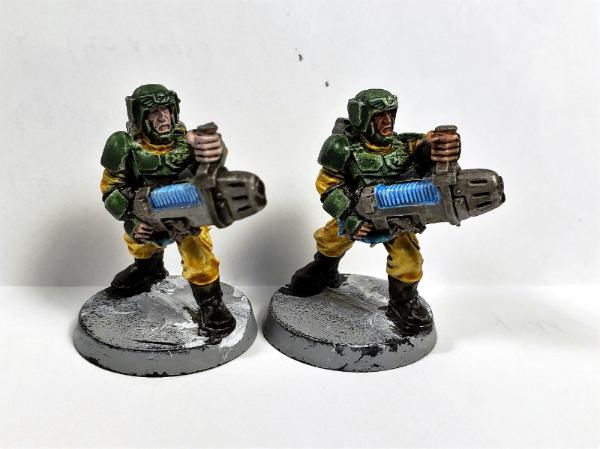
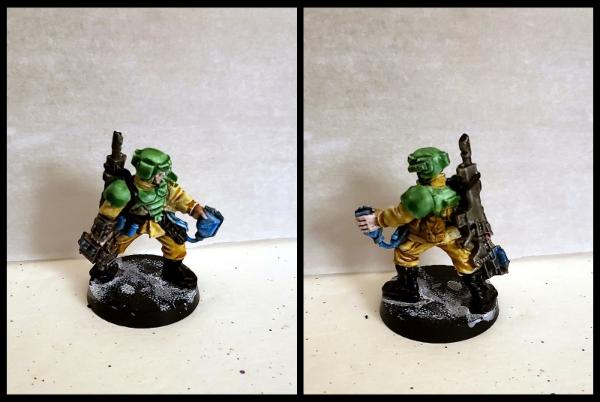
15 minute Imperial Guardsmen with plasma guns. These gents were painted primarily with inks. When I say primarily, I mean almost entirely, with no base coat. Just primer, then ink. Mostly. But I'll get to that. 
Here's where I started:
Left-to-Right: First test Ork Boy with normal ink washes (painting time: 7 minutes); second model test with "stronger" ink wash for skin and clothes (painting time: 10 minutes). Model on the right is a control that has only been primed with gesso. Using Daler Rowney FW acrylic artists inks to paint these models.
I used Les Bursley's Wash Recipe as a starting point:
https://www.dakkadakka.com/dakkaforum/posts/list/261541.page
The model on the left was washed with "normal" strength ink wash, which is basically 40 drops of ink, matte medium, and a solution of flow-aid and water. For my second attempt I increased the amount of ink. A lot. The skin is roughly 3x as much ink as a normal ink wash. The clothes also have an increased strength ink wash applied (roughly double strength). But it looks pretty good considering that's just ink, no base coat!
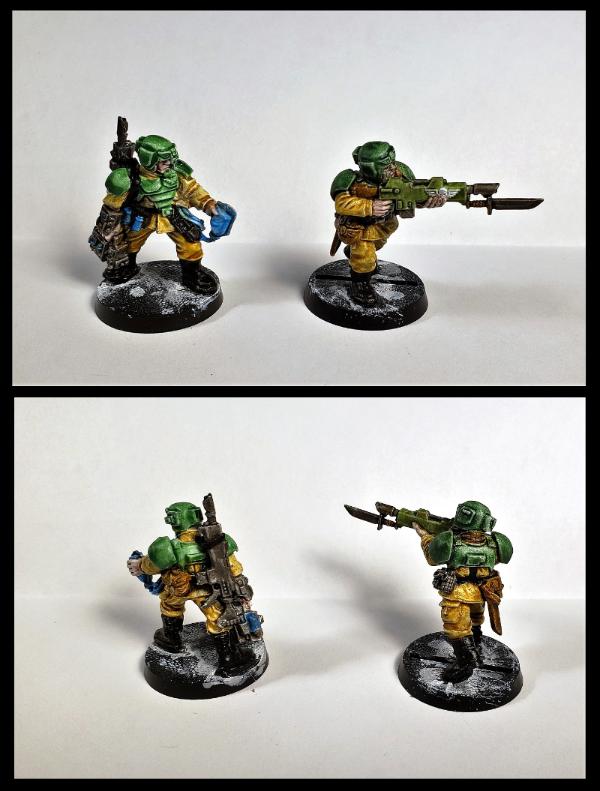
Round 2:
Left-to-Right: First test with normal ink washes (painting time: 7 minutes); second model test with "stronger" ink wash for skin and clothes (painting time: 10 minutes); the 3 models on the right were painted with "extra strength" ink washes (painting time: 15 minutes each). Also applied Leadbelcher to the metallic bits, and a wash with Nuln oil for contrast.
Round 3:
Finally, I went back and repainted the first two Ork Boy models with the 3rd iteration of the "extra strength" ink washes for consistency. Here they are all together.
I also spent just a few minutes on details, like teeth and eyes. This added a few minutes to each model, maybe 5, for a total of 20 minutes each. Still not bad.
Ok, let's move on...
Further tests:
Testing ink washes on an Imperial Guard model. Forgive me if the paint scheme looks weird, I don't play Guard! This guy took maybe 10 minutes from primed to good-enough-for-the-tabletop (not including drying time). Using Daler Rowney FW acrylic artists inks, and P3 flesh wash for the skin. Note that for this model I did not use metallics at all; the weapon and other bits were just washed with a thin black ink for contrast. It looks OK I guess.
IG Test 2:
Comparing the first IG test model I did with inks with my second attempt on an Imperial Guard model that a buddy gave me. I went for a darker ink wash on this one's armor, but kept a lighter olive color on the weapon body. Using Daler Rowney FW acrylic artists inks, and P3 flesh wash for the skin. Oh, and I applied some Leadbelcher to the metallic bits, then gave those a wash with Nuln oil. This one took maybe 15 minutes, not including drying time.
IG Test 3 (with Plasma!):
Another attempt painting some old IG models. Again using ink washes, and P3 flesh wash for the skin. I received some feedback that the model on the left with only the flesh wash was very pale, so for the model on the right I applied a layer of Reikland Fleshshade to the skin as well. I think the contrast is better. The plasma effect is just 1 coat of Cyan ink if you can believe it! Painting time: 15 mins each.
IG Group Shot, Tests 1, 2, & 3:
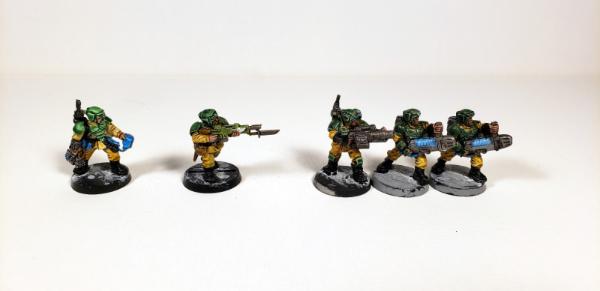
Group shot of the IG models that I painted up with inks. Left-to-right: 1st attempt, 2nd, attempt, the 3 models on the right were painted with "extra strength" ink washes. You might notice some variation in the color of the armor. I chalk that up to mixing the inks individually for each model. If painting a whole army I would mix up a big batch and then paint them all the same. The models on the right were painted with a solution of green and black ink (roughly 3:1 mix). Using Daler Rowney FW acrylic artists inks, and P3 flesh wash for the skin, Leadbelcher for the metallic bits, and a wash with Nuln oil for contrast.
Not bad, right? I mean, it's not award winning, but considering that it's almost entirely inks with no base coat, and super fast, I'm very pleased! Certainly good enough for the table top. Moreover, I painted up some models that had been sitting there on the shelf, bare plastic (or metal), for a long time. Possibly years. This technique is fast, and produces decent enough results that I'd be satisfied to call these "done" once they are based. As I mentioned, I went back and picked out a few details after the fact, but considering I went from raw models to "good enough" in minutes, I'm satisfied. My usual painting style takes an hour or more on even basic troops. Details? forget it, I might spend 5 hours on a model. Maybe it's because I'm sloppy, or slow, or whatever. But with this technique it's hard to argue with the results considering the time spent.
Thanks for looking!
|
|
This message was edited 2 times. Last update was at 2019/07/12 12:52:00
|
|
|
|
|
2019/07/12 13:38:28
Subject: Cleatus Paints Again!
|
|
Decrepit Dakkanaut
|
Fascinating study! A useful read.
|
Theophony"... and there's strippers in terminator armor and lovecraftian shenanigans afoot."
Solar_Lion: "Man this sums up your blog nicely."
Anpu-adom: "being Geek is about Love. Some love broadly. Some love deeply. And then there are people like Graven. |
|
|
|
|
2019/07/13 07:38:14
Subject: Cleatus Paints Again!
|
|
Nasty Nob
|
|
|
|
|
|
|
2019/07/13 11:07:09
Subject: Cleatus Paints Again!
|
|
Stealthy Grot Snipa
|
Nice to see you back Cleatus, and great results with the washes!
|
|
|
|
|
|
2019/07/14 21:31:23
Subject: Cleatus Paints Again!
|
|
Drew_Riggio
|
Ugh, so many salty people going on and on about the contrast paints here and in the FB groups. This is some really interesting reading though - thanks for taking the time to do the tests!
|
-------------------------------
Click Here for my terrain blog.
----------------------------
Commission Terrain
---------------------------- |
|
|
|
|
2019/07/16 12:06:36
Subject: Cleatus Paints Again! (now with 200% more ink)
|
|
Nasty Nob
|
Skinflint Games wrote:Nice to see you back Cleatus, and great results with the washes!
Thanks!
TerrainWalker wrote:Ugh, so many salty people going on and on about the contrast paints here and in the FB groups. This is some really interesting reading though - thanks for taking the time to do the tests!
Yeah, I considered sharing this in the News and Rumors thread about Contrast paints, but I just don't want to deal with the potential drama. Besides I'm not trying to replicate Contrast paints. I have nothing to prove. I'm just seeing what results I can achieve with heavy ink washes. At the end of the day I just want to get some models painted. If people find this information helpful, great!
For those who are curious, I've spent less than $30 (USD) on supplies... I might share details if I get around to typing it all out rather than painting.
|
|
This message was edited 2 times. Last update was at 2019/07/16 12:11:40
|
|
|
|
|
2019/07/16 22:01:45
Subject: Cleatus Paints Again! (now with 200% more ink)
|
|

Fixture of Dakka
|
Cleatus,
Anything that helps win the war against the unpainted is a victory in my books.
The long painting war continues...
CB
|
|
|
|
|
|
2019/07/18 16:15:07
Subject: Cleatus Paints Again! (now with 200% more ink)
|
|
Longtime Dakkanaut
|
Nice one, Cleatus, really nice results!
|
|
|
|
|
|
2019/07/19 06:38:05
Subject: Cleatus Paints Again! (now with 200% more ink)
|
|
Longtime Dakkanaut
|
I was clearing through some old stuff the other day, and discovered some Cadians that I had done just the same thing to - primed white with a helping of Daler Rowney inks. I obviously had the same concerns back then: how do I paint all of these buggers!
They looked alright, actually, as do your tests. Does Contrast take your fancy at all? I’m really looking forward to giving them a good go.
Keep up the good painting fight!
|
|
|
|
|
|
2019/07/21 11:11:31
Subject: Cleatus Paints Again! (now with 200% more ink)
|
|
Nasty Nob
|
Captain Brown wrote:Cleatus,
Anything that helps win the war against the unpainted is a victory in my books.
The long painting war continues...
CB
Agreed. Thanks!
Slinky wrote:Nice one, Cleatus, really nice results!
Thank you!
Cosmic wrote:I was clearing through some old stuff the other day, and discovered some Cadians that I had done just the same thing to - primed white with a helping of Daler Rowney inks. I obviously had the same concerns back then: how do I paint all of these buggers!
They looked alright, actually, as do your tests. Does Contrast take your fancy at all? I’m really looking forward to giving them a good go.
Keep up the good painting fight!
Great minds think alike. I'm interested in Contrast, but not interested in the price tag... if I can find some at a discount I might pick up a jar or two.
Thanks for the feedback gents!
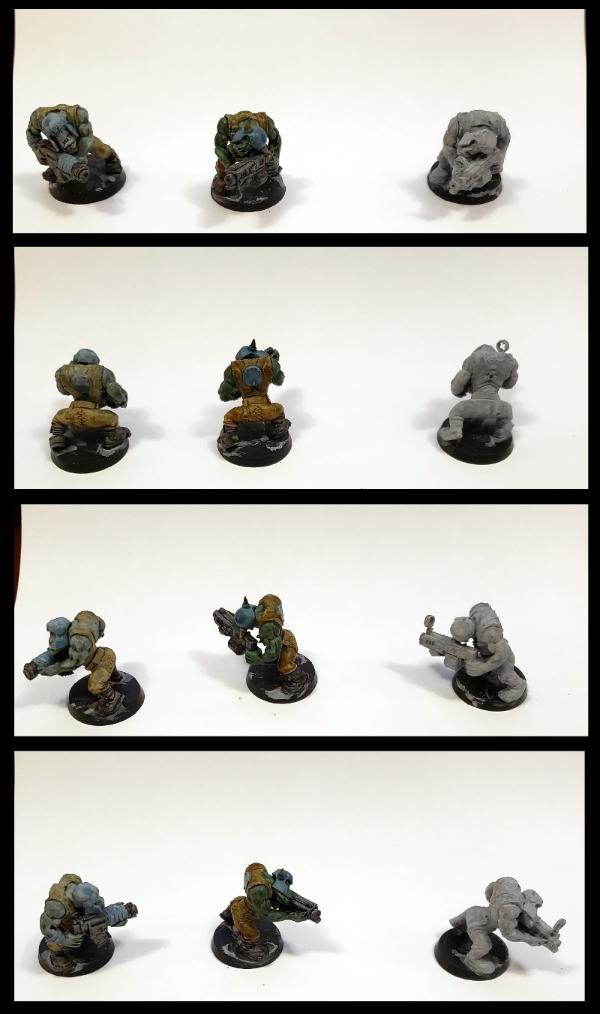
Working on some more Ork Boyz. Here's a comparison shot of my 3rd attempt (left) which looks pretty darn good, and my 4th attempt with brighter colors.
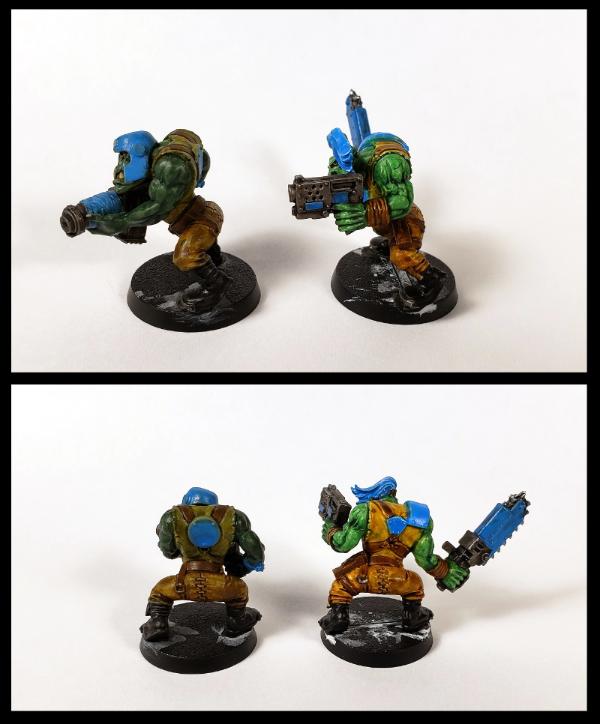
The most obvious difference is the skin. On left I only painted the skin with dark green ink (1:3 mix of black and green inks). On the right I painted the skin first with just green ink, then gave the recesses a wash of the dark green ink mixture. The shirt is also much brighter. On the left the shirt was painted with a sort of olive green ink wash (I think this was burnt umber and green mixed?), whereas on the right I went for straight yellow ("Brilliant Yellow"). The colors are almost too bright for me, but they are very striking and eye catching from further away. I like the dark Ork skin, but from 3+ feet away they look like dark blobs haha.
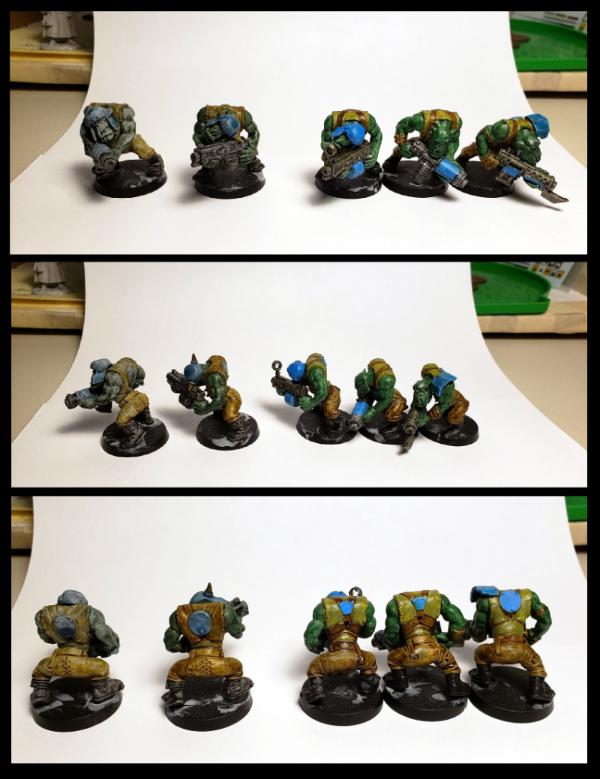
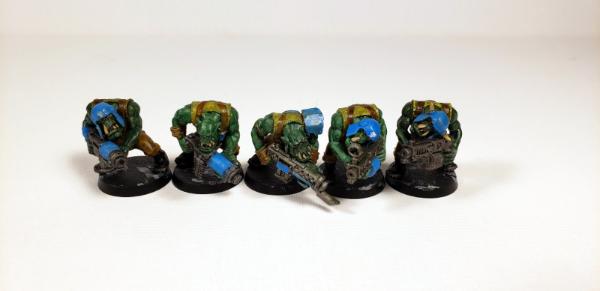
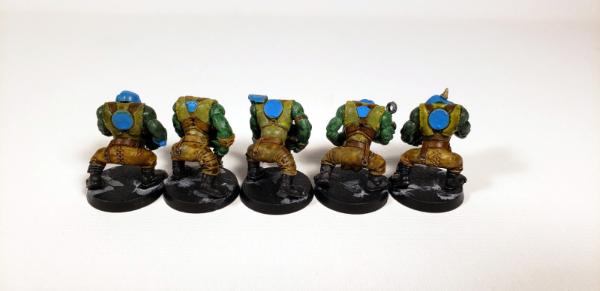
Here's a group of 3 that I painted up with this newer color scheme.
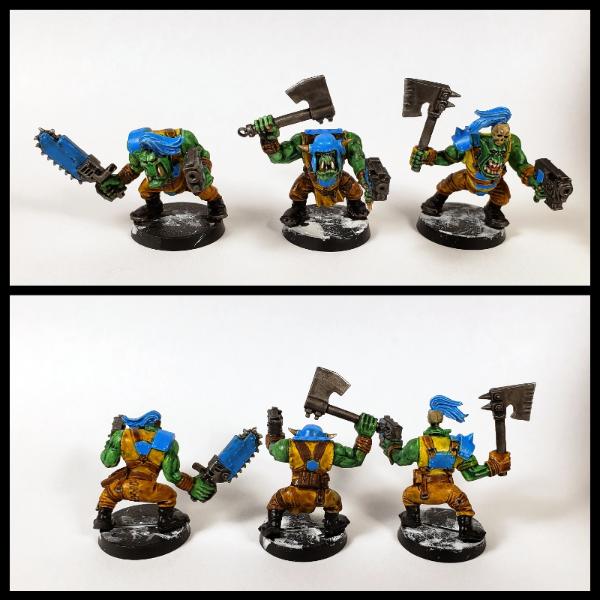
I took a little time to add some details, namely teeth, horns, eyes, and edge highlights on the choppas. I've got several more Choppa Boyz in the queue so I'll end up with at least a squad of 10 with this color scheme.
In other news, I was motivated to finish off some other models I've had 95% complete for a long time. All that needed done was varnish and basing. I had a good day for spraying so I varnished a whole bunch of models. Most of these have not been painted with inks, but rather with "normal" acrylic paints. Just posting to share.
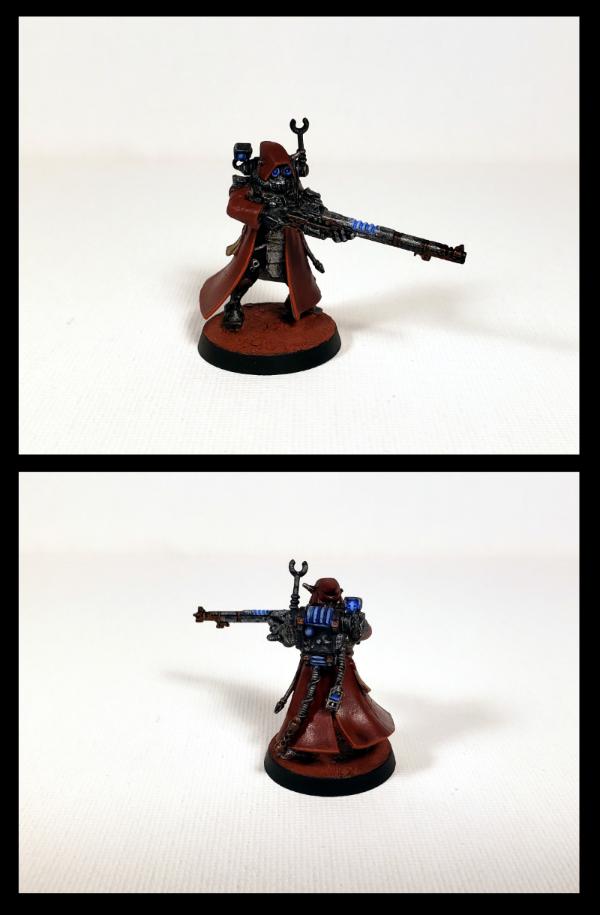
Here's a lone Skitarii model (Skitarius?) that I painted some time ago. Now based with Martian Ironearth.
Here are some old school 2nd ed Ork Boyz that I painted up over a year ago.
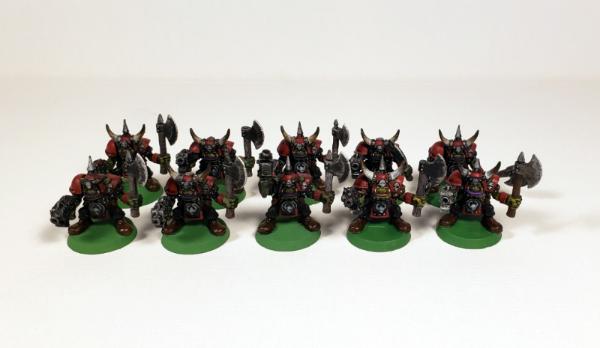
They've just been sitting around waiting for varnish. I think these are considered "based" per the usual standards of 2nd ed (green!), but I could throw some sand or grass at them if I felt like it I suppose.
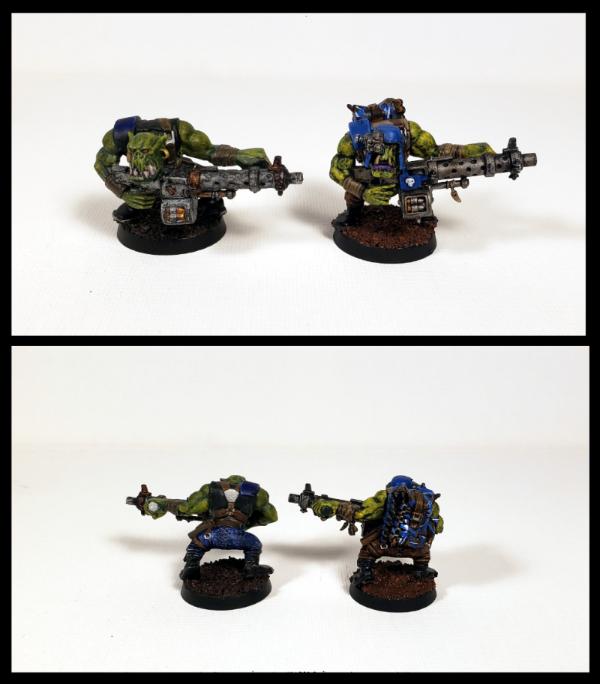
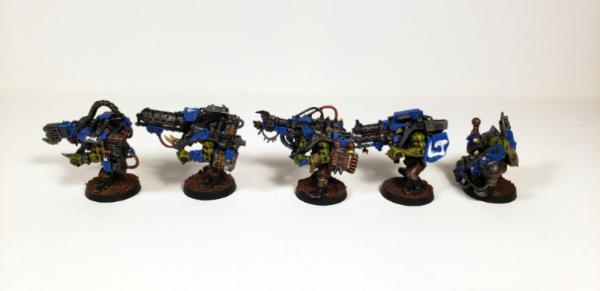
Couple of Big Shoota boyz. These were done years apart and it shows, haha. At least they're based now.
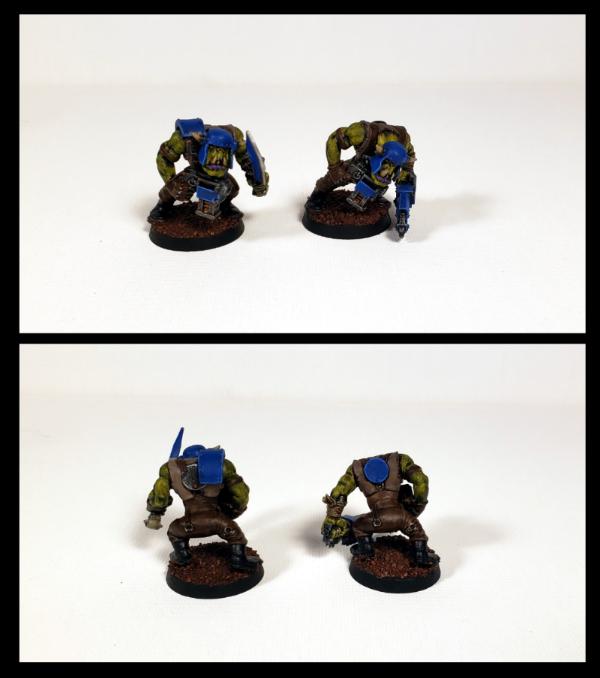
Some more recent Deathskulls Ork Boyz with sluggas and choppas.
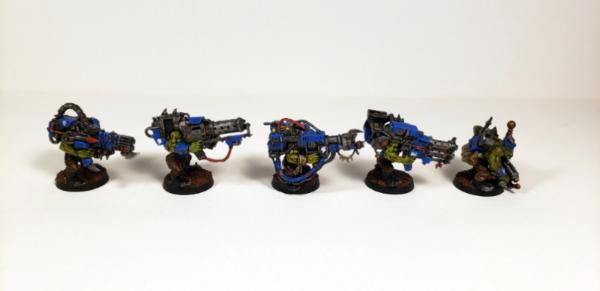
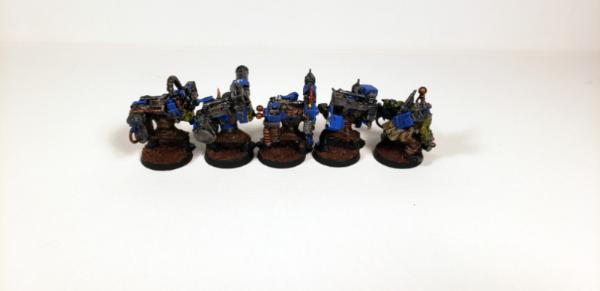
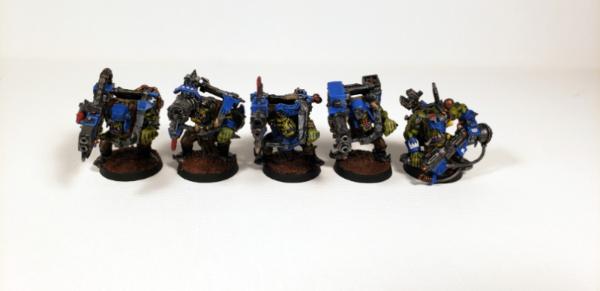
These Lootas were a rescue.
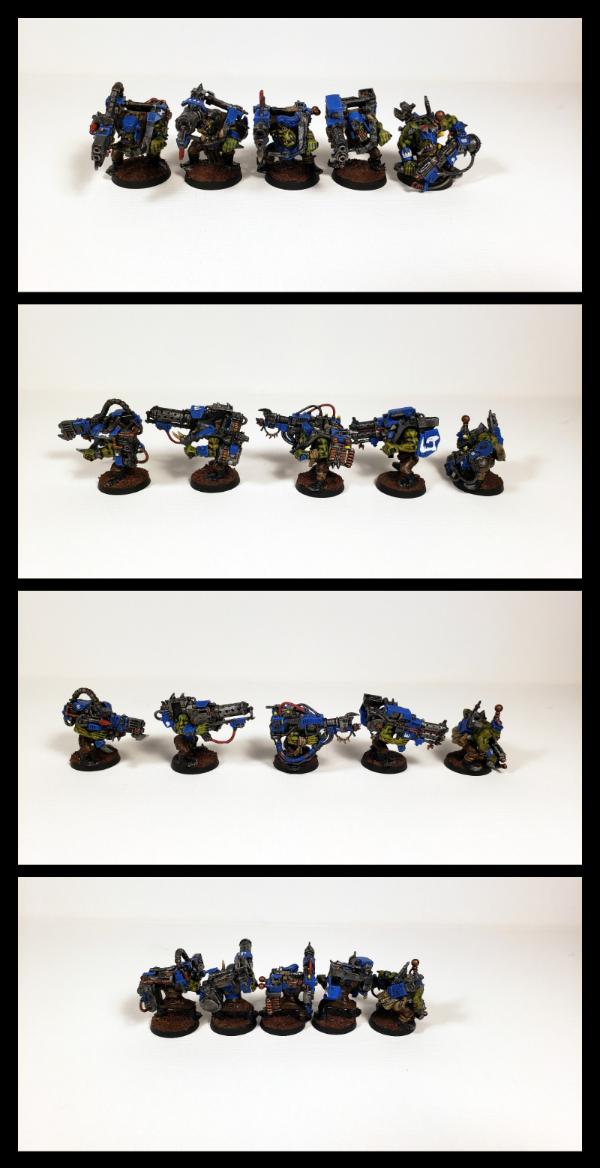
Some of the joins are not joined at all, and I tried fixing them a bit, but the bits were fused together due the type of glue used, and it seemed like a lot of hassle to cut them all up and reposition, rebuild and fill gaps, etc. So I ended up leaving them. Honestly because they're Orks, the aesthetic kind of works haha! These were originally painted back in 2013/2014, and I revisted them at some point in the last 6 months. I spent a fair amount of time on them picking out details. Lootas are fun models to paint. These were probably the last models I painted before taking a hiatus. Just never based them. Now they're done and I can move on.
Gratuitus high-rez shots if you like that sort of thing:
I've got another half dozen Ork Boyz in the queue that I'm working on with the new ink technique and latest color scheme. I'm excited to be painting again. So I've got that going for me, which is nice.
Thanks for looking!
|
|
|
|
|
|
2019/07/21 11:49:44
Subject: Cleatus Paints Again! (now with 200% more ink)
|
|
Longtime Dakkanaut
|
I agree that the brighter skin will look better on the tabletop. Well done on getting started again, just like me
|
|
|
|
|
|
2019/08/02 10:12:10
Subject: Cleatus Paints Again! (now with 200% more ink)
|
|
Nasty Nob
|
 Slinky wrote: Slinky wrote:I agree that the brighter skin will look better on the tabletop. Well done on getting started again, just like me
Thanks Slinky. I appreciate the feedback.
|
|
|
|
|
|
2019/08/18 10:14:24
Subject: Cleatus Paints Again! (now with 200% more ink)
|
|
Gargantuan Great Squiggoth
|
They are looking fantastic bud, like the newer fresh look to them, good on you rebooting yourself. Also found that paint study very useful thanks bud.
|
|
|
|
|
|
|
|


 Finished Forge World Elysian Army
  Finished Order of Our Martyred Lady - Sisters of Battle
  Finished Necromundian Imperial Guard Regiment