| Author |
Message |
 |
|
|
|
|
Advert
|
Forum adverts like this one are shown to any user who is not logged in. Join us by filling out a tiny 3 field form and you will get your own, free, dakka user account which gives a good range of benefits to you:
- No adverts like this in the forums anymore.
- Times and dates in your local timezone.
- Full tracking of what you have read so you can skip to your first unread post, easily see what has changed since you last logged in, and easily see what is new at a glance.
- Email notifications for threads you want to watch closely.
- Being a part of the oldest wargaming community on the net.
If you are already a member then feel free to login now. |
|
 |
2009/09/02 10:14:54
Subject: Malfian IVth, The Junos Moles (IG Blog) ( with Preacher V2, new head and Psyker base - 27/08/09)
|
|

Thinking of Joining a Davinite Loge
|
This I love. Really love!
|
Armies:
(CSM/HH) - Iron Warriors; Death Guard; World Eaters; Night Lords
IG - Vestfalian Expeditionary
Force (Solar Auxilia - HH)
SM - Blades of Inaros (Homebrew)
DE - Kabal of Ouroboros
|
|
|
 |
|
2009/09/02 11:28:06
Subject: Malfian IVth, The Junos Moles (IG Blog) ( with Preacher V2, new head and Psyker base - 27/08/09)
|
|
Calculating Commissar
|
infilTRAITOR wrote:
This I love. Really love!
Thanks 
That started it's life as an Empire Goldsword head.
Casting update
Using talc in the mould last night did produce more detail in the casts, so I finally have at least some bits that I'm happy with; mainly three bodies, a head and the helmet, so tonight I'm going to put one together for you to see. The Lasgun is still missing too much detail on the back side, so I think I need to find a supply of bolters to try making that one again. Casting the legs is still proving tricksy too as there are too many undercuts and odd positions, so the mould isn't all that great. I probably need to resculpt some more accessible (ooo err!) legs before trying that part again. Now I've (sort of) got the hang of casting helmets, heads and bodies; I can try creating a bigger moulds so I'm not getting one head/helmet in each casting batch
|
|
|
|
|
|
2009/09/02 14:00:55
Subject: Malfian IVth, The Junos Moles (IG Blog) ( with Preacher V2, new head and Psyker base - 27/08/09)
|
|
Avatar of the Bloody-Handed God
Inside your mind, corrupting the pathways
|
Have you tried making a vibration table?
Get a PC's CPU fan (can get them for a couple of £), glue a couple of chunks of metal to one of the fan blades (such as a nut), get a 9V battery and hook it in.
Then you mount that on a wooden board.
If you want to keep it cheap, stick on a couple of pieces of fairly soft foam in the corners/edges, then stick it onto another board.
You can refine the method by building a frame with springs, replacing the fan blades with bolts and nuts (so you can vary the vibration), or dimmer switches (to do the same).
This may help work some of the casting material into the harder to reach recesses in your moulds.
|
|
|
|
|
|
2009/09/02 17:13:12
Subject: Malfian IVth, The Junos Moles (IG Blog) ( with Preacher V2, new head and Psyker base - 27/08/09)
|
|
Calculating Commissar
|
Oh dear. I sense a massive speed bump coming up!
Space Hulk just arrived and it's GORGEOUS!
|
|
|
|
|
|
2009/09/02 17:58:46
Subject: Malfian IVth, The Junos Moles (IG Blog) ( with Preacher V2, new head and Psyker base - 27/08/09)
|
|
Massive Knarloc Rider
|
lol
i was wondering, are you gnna sell any of the cast ups?
cos i love that lasgun o.o
|
|
This message was edited 1 time. Last update was at 2009/09/02 17:59:05
|
|
|
|
|
2009/09/02 20:16:22
Subject: Re:Malfian IVth, The Junos Moles (IG Blog) ( with Preacher V2, new head and Psyker base - 27/08/09)
|
|

Drop Trooper with Demo Charge
|
They do look nice!
|
|
|
|
|
|
2009/09/02 22:18:35
Subject: Malfian IVth, The Junos Moles (IG Blog) ( with Preacher V2, new head and Psyker base - 27/08/09)
|
|
Calculating Commissar
|
ghosty wrote:i was wondering, are you gnna sell any of the cast ups?
cos i love that lasgun o.o
The lasgun has too many obviously GW pieces in it to sell unfortunately; plus it didn't cast very well anyway as half the details were missing, or faint. I've not really tried making up my own rifle yet... maybe that should be on the list of things to do soon. I've just ordered some more bits to make a unit's worth, so I'll stick up a little tutorial when they arrive.
I'd like to be able to sell bits I've done myself, but that's waaaaaaaaaaaay down the line once I don't have any GW pieces in there at all (pretty much like the bodies now I guess) and I've worked out the casting properly (unless someone else wants to do the casting part for me? 
|
|
|
|
|
|
2009/09/02 23:25:24
Subject: Malfian IVth, The Junos Moles (IG Blog) ( with Preacher V2, new head and Psyker base - 27/08/09)
|
|
Stealthy Warhound Titan Princeps
|
Nice to see original guard regiments - I'd love to see a page somewhere with all the unusual regiments people have come up with.
Great work!
|
|
|
|
|
2009/09/03 00:24:25
Subject: Malfian IVth, The Junos Moles (IG Blog) ( with Preacher V2, new head and Psyker base - 27/08/09)
|
|

Morphing Obliterator
|
This is great - how have I missed this? I think you need sentinels armed with Drills instead of chainsaws.
Very very cool.
|
|
|
|
|
2009/09/03 05:44:21
Subject: Malfian IVth, The Junos Moles (IG Blog) ( with Preacher V2, new head and Psyker base - 27/08/09)
|
|
Servoarm Flailing Magos
|
I love how you paste in that goofy avatar of yours into every image you post... it creates a statement to the effect of "Don't jack my pictures, jacka55". Very nice.
I can't wait to see the results of your casting... I suck at sculpting so any inspiration helps 
|
http://www.teun135miniaturewargaming.blogspot.com/ https://www.instagram.com/teun135/
Foxphoenix135: Successful Trades: 21
With: romulus571, hisdudeness, Old Man Ultramarine, JHall, carldooley, Kav122, chriachris, gmpoto, Jhall, Nurglitch, steamdragon, DispatchDave, Gavin Thorne, Shenra, RustyKnight, rodt777, DeathReaper, LittleCizur, fett14622, syypher, Maxstreel |
|
|
|
|
2009/09/03 09:36:51
Subject: Malfian IVth, The Junos Moles (IG Blog) ( with Preacher V2, new head and Psyker base - 27/08/09)
|
|
Calculating Commissar
|
kestral wrote:I'd love to see a page somewhere with all the unusual regiments people have come up with.
I still need to fix some of the tags and add in some of the missing references, but I've been compiling things like that and other guard inspirations in my travels. They can be seen over on http://igideas.tumblr.com
darkkt wrote:This is great - how have I missed this? I think you need sentinels armed with Drills instead of chainsaws. Very very cool.
Thanks. The aim is to try and modify sentinels so they aren't quite so tall and to add things like drills or plasma cutters onto them, so you're spot on
Casting Update
Well, here you can see the body cast in all it's leaky, not so crisp glory. The green bits in there are a cunning part of my mould. These pieces lock into some sockets in the mould and allow for large recessed areas that I wouldn't normally be able to do. It seems to work quite well and will produce less stress during the demoulding process. Any guesses as to which sprue was used to create the pouring channel?

And here's some of the pieces put together.
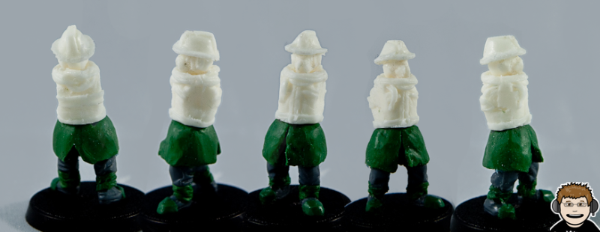
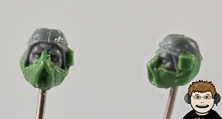
I don't know what it is, but it doesn't look as nice as it did with the original greens. I may have to try the body with normal Cadian legs to see if it's just that the new legs are wrong, or what. The head certainly isn't looking as good because a lot of the detail seems to be missing, or at least difficult to see in the resin. I really need to try and build a vibrating table, like SilverMK2 suggested, to see if that improves the crispness of things. If that doesn't work... it looks like I'm green stuffing the whole lot; which complicates things no end where the heads and helmets are concerned. p00t.
|
|
This message was edited 1 time. Last update was at 2009/09/03 09:38:29
|
|
|
|
|
2009/09/03 11:07:21
Subject: Malfian IVth, The Junos Moles (IG Blog) ( with test cast body/head - 3/9/09)
|
|
Avatar of the Bloody-Handed God
Inside your mind, corrupting the pathways
|
To be honest, they look pretty cool to me.
If you give casted pieces a bit of a wash so that the details show up better in pictures, we can judge a little better but I think they look pretty cool.
|
|
|
|
|
|
2009/09/03 11:17:18
Subject: Malfian IVth, The Junos Moles (IG Blog) ( with test cast body/head - 3/9/09)
|
|
Calculating Commissar
|
I'll do that tonight and repost it. I may tack the green stuff version together as well for a side by side comparison as well.
One thing I have learnt is that I've made the channels to the bodies a little bit too thick in the mould. The back of the grenade has become part of the flow channel. This isn't too big an issue in this case as an arm will cover it up...
|
|
|
|
|
|
2009/09/03 11:37:48
Subject: Malfian IVth, The Junos Moles (IG Blog) ( with test cast body/head - 3/9/09)
|
|
Avatar of the Bloody-Handed God
Inside your mind, corrupting the pathways
|
Well, be sure to document all your trials and tribulations casting, as I plan to do a fair bit when I eventually get round to doing my IG and want to learn from you, as you are doing something simmilar to what I want to do in terms of custom uniforms and heads etc.
|
|
|
|
|
|
2009/09/03 12:57:06
Subject: Malfian IVth, The Junos Moles (IG Blog) ( with some casting/mould making tips - 3/9/09)
|
|
Calculating Commissar
|
SilverMK2 wrote:Well, be sure to document all your trials and tribulations casting, as I plan to do a fair bit when I eventually get round to doing my IG and want to learn from you, as you are doing something similar to what I want to do in terms of custom uniforms and heads etc.
Sure thing
So far da fings wot I av lerned :
There's a shed load of stuff you need. I keep having to do trips into town at the weekends to pick up something else :
- RTV rubber
- the fast cast resin
- plasticine
- wooden spatulas (either buy lots of cheap ice lollies from Asda and feel refreshed each time you make a mould or cast, or Tomps sell boxes of 100)
- syringes
- lots of lego blocks, preferably the 2x4 or longer, plus a large, thin base
- plastic party cups (50p for 100 from Asda)
- Vaseline.
- a cheap brush
- something to melt vaseline in, I've got a cheap curry bowl from poundland
- some decent scales
- lots of old sprues to make the mouring channels in the moulds
- Talc
JB's casting tutorial in the Articles section is pretty good, with a few modifications as noted below. I think most of the variations are because I couldn't get hold of the moulding putty he used in the UK without paying a fortune to import it from the US. In the UK, the best place to get resin and mould rubber is http://www.tomps.com , they were quick to respond to my questions and are planning on putting together a beginner's pack sometime soon. Just don't be fooled into buying the casting manual they have... the useful bits are already on their website; the rest you really don't need.
1. Why the Vaseline?
A number of tutorials suggest putting a layer of olive oil on the first half of the mould. this may work if you're using moulding putty like the article suggests. This doesn't seem to stop the RTV rubber from sticking together though, so a thin layer of melted vaseline painted over the rubber (not the models!) will help you not to make a large blue rubber block. Painting over the models as well will obscure details and give you a rubbish mould. You can use a spray can of release agent, but Tomps didn't think it was necessary while I was learning as I'm unlikely to want the early moulds to last too long.
2. Why the Talc?
The first test cast I did came out minus most of the smaller details. There were no visible air bubbles in the casts, it just didn't seem to have made it into all the corners. A layer of talc on the moulds before casting (with the excess shaken off of course) seems to help the resin flow into some more details; though it's still not 100% crisp. I'm working on this bit... suggestions welcome!
3. Why the syringe?
Leaving gravity to do it all may work if you're only doing one or two large bits, but if you're trying to do smaller things like rifles with fiddly bits, you're going to need some pressure to get it flowing through the mould. Be careful not to push the syringe into the mould when invecting the resin though; you'll push the two halves apart and cause leakage/air bubbles.
4. where's the elastic bands mentioned in the Article?
The first time I tried casting, I did have elastic bands and card around the moulds, but it didn't seem to be working very well. The moulds were deforming and I was getting a lot of leakage and air bubbles. Luckily the two moulds that I'd made, side by side, can be secured between lego blocks on the base. This allows nice even pressure across everything apart from the top. It's not stopped the flash from forming, but it's now significantly less than with the elastic band. I think I just need to put more bits of card in between the moulds and the lego, to increase the pressure slightly.
5. Think about the placement of your pieces in the mould
As the title says... think carefully and make sure there aren't any bits that are going to trap air. I'll post a picture of my moulds tomorrow so you can see how I placed things. I've only had one air bubble in 5 test casts because I forgot to allow air out of the head. oops!
6. Indentations and a simple solution
If you look back at the original body parts I sculpted you'll notice that the head is recessed inside the body. When it came to creating the first mould I noticed that it was going to cause a massive problem.; then I had a brainwave. Using a bit of green stuff I created some little plugs that are moulded to the recessed area and a hooked area at the top. When you create the mould halves, make sure this piece is sitting in the recessed area properly. When you go to create an actual cast, carefully place the plugs back into the now empty mould. If you look at the picture I posted earlier of the test cast you can see the plugs in place. They easily pop out and leave you with a recessed area. *tada!* I wouldn't suggest using too many things like this though as you're bound to forget to put them in (like I did for test cast 2) and you end up with an odd hooked lump on your piece
7. What about all these rubbish test moulds?
You don't need to throw them away. Keep them; slice them up into little bits and put them around the edges when pouring in your RTV to create a new mould. As long as there's no release agent or vaseline on them they will stick to the new rubber, bulking out the mould and saving you some precious rubber
What else?
A number of people recommend vacuum chambers or pressure pots. If you're only doing basic, fairly plain things I don't think they are necessary. They may, however, be the answer to me getting more detailed casting... though it's rather expensive to shell out a couple of hundred pounds on a theory. I'm already in trouble at home for buying Space Hulk and have been told I need to perfect the casting thing before I'm allowed to shell out on more equipment... I think I'll try SilverMK2's suggestion of making a vibrating table first though... I wonder if Poundland still sells those "personal massagers"
I'm sure there are other tips/tricks that I've picked up along the way (or will in the future). Do people think it would be ok to add these tips to the end of JB's article? (I'm not sure what the local etiquette is for that sort of thing)
|
|
This message was edited 4 times. Last update was at 2009/09/03 13:04:29
|
|
|
|
|
2009/09/03 13:43:42
Subject: Malfian IVth, The Junos Moles (IG Blog) ( with test cast body/head - 3/9/09)
|
|
Avatar of the Bloody-Handed God
Inside your mind, corrupting the pathways
|
Thanks for the good info
I am sure if you PM him, he will probably give you the OK (I don't really know what the etiquette is for editing articles either ).
I was thinking of casting out of the really hard plaster, rather than resin. I can't remember off the top of my head what the type was that I decided on but there is a lot of information on plaster casting on the Hirst Arts website discussion page.
It can apparently be very strong and durable, though I think most of the people on there only really cast blocks etc out of it rather than models, but I am willing to experiment 
|
|
|
|
|
|
2009/09/03 13:53:26
Subject: Malfian IVth, The Junos Moles (IG Blog) ( with test cast body/head - 3/9/09)
|
|
Calculating Commissar
|
I'd have thought trying to do anything too fiddly with plaster would be very brittle?.
I know the resin rifles I've made snap fairly easily, so I think they may end up being plastic after all. I'd be interested to know how you get on with the plaster though
|
|
|
|
|
|
2009/09/03 14:34:02
Subject: Malfian IVth, The Junos Moles (IG Blog) ( with test cast body/head - 3/9/09)
|
|
Avatar of the Bloody-Handed God
Inside your mind, corrupting the pathways
|
I'm not sure... from what I have read on hirst you can get very strong plaster, though as I say, they are mostly building brick shapes out of them, so I can't really say how goor they will be for models.
Here is the link to the discussion page I was talking about anyway.
|
|
|
|
|
|
2009/09/03 16:51:21
Subject: Re:Malfian IVth, The Junos Moles (IG Blog) ( with test cast body/head - 3/9/09)
|
|
Navigator
|
Great stuff!
Subscribed!!!
|
|
This message was edited 1 time. Last update was at 2009/09/03 16:51:32
 Raven Guard 3,000pts Raven Guard 3,000pts
WIP  Imperial Navy Armsmen Imperial Navy Armsmen
WIP  Birmingham 411th Birmingham 411th
==][==Begin Dakka Geek Code==][==
DC:90-SG+++MB++I+Pw40k04#-D+A+/areWD325R++T(T)DM+
==][==End Dakka Geek Code==][== |
|
|
|
|
2009/09/04 09:12:18
Subject: Re:Malfian IVth, The Junos Moles (IG Blog) ( with test cast body/head - 3/9/09)
|
|
Calculating Commissar
|
Wow. We are nearing the end of page three and no actual finished items in sight
Last night I took another look at the test model I put together yesterday morning. Looks like I wasn't paying attention. The head I used was from a previous cast, not the most recent; The newest head is actually pretty good, so I didn't need to worry too much. The Rifles are about the only bit I'm not sure are casting well. I ran a wash over the resin figure from yesterday so you can see the detail more clearly (cringe at the lumpy head!). Seeing the body on cadian legs actually looks a lot better than on my legs, so that may have been another problem I was having yesterday... time to have another bash at creating some better legs too. Getting these ideas out of my head onto an actual model is slowly driving me crazy, especially as I only get about half an hour a day to do anything in at the moment. Curse you project deadlines!
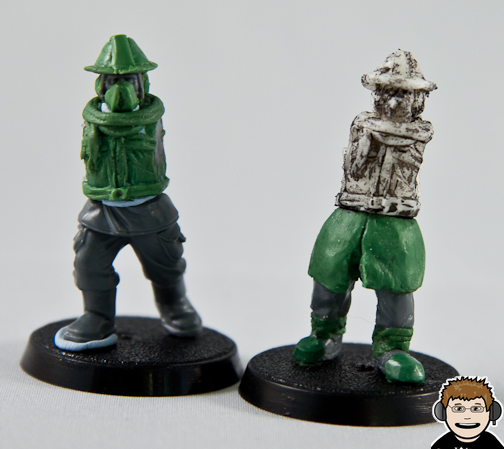
There are some bits that aren't as clear as the original, but I think most of these are down to the fact that they are subtle; it's easy to see subtle on greenstuff. My lesson from this is exaggerate detail more when sculpting for casting. It would also explain why some of the detail is missing form the rifle. I should have some more bitz arriving in the next week or so, so I can put together some new rifles and try again. I'm also going off the helmet design, mostly because my sculpt so far is a bit wonky, not circular and looks like a fireman's helmet!. I've got some Brettonian heads in the post, so I'll see what I can do with those to get closer to the actual helmet design I have in my head.
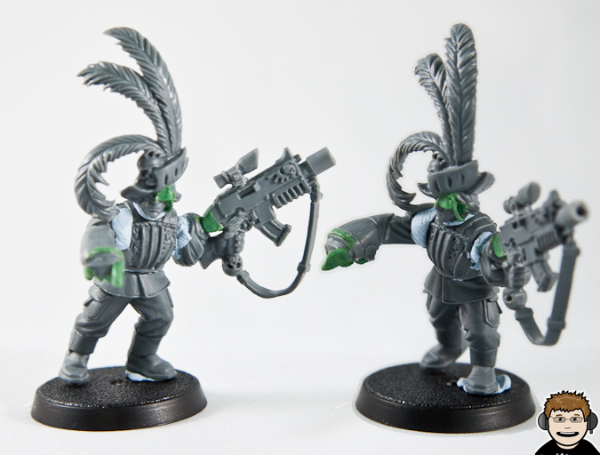
Also, this may, or may not, be the basis for the Rogue Trader that leads my force. There's a lot of work left to do to disguise where all the parts have come from and make him look a bit more foppish, bu tyou get the rough idea.
I've reached Sabbat Maryr in the Gaunt books and they have a great idea about flamers that I may steal. The commanding officers wear an armoured sleeve with a built in flamer unit (canister on their back). In Sabbat Martyr this is because they believe flame is a purifying thing that only the leadership should wield. For the Junos it could well be that (returning to SilverMK2's idea) flamers like these are limited to boarding specialists; only available to elites and HQ units.
|
|
This message was edited 2 times. Last update was at 2009/09/04 09:19:30
|
|
|
|
|
2009/09/04 10:15:28
Subject: Malfian IVth, The Junos Moles (IG Blog) ( with improved test cast & Rogue Trader idea - 4/9/09)
|
|
Avatar of the Bloody-Handed God
Inside your mind, corrupting the pathways
|
Wow, fop 'til you drop
I think the resin cast is pretty reasonable. I think if you want better quality casts, you will need to really, really make sure that the item you are casting from is exactly right, utterly flat where it needs to be flat, etc.
In my experience, (which is limited) any mistake or bit of slightly unfinished sculpt/etc on the master model is usually emphasised on the casted pieces, so it really does pay you back a lot to make the master as well as you can.
|
|
|
|
|
|
2009/09/04 12:48:57
Subject: Malfian IVth, The Junos Moles (IG Blog) ( with improved test cast & Rogue Trader idea - 4/9/09)
|
|
Ragin' Ork Dreadnought
|
Original sculpt - awesome. The body resin cast looks fine - I guess paint will tell. Agree the heads could use some work... (your lightbox setup looks to be working awesome too!)
Love the Rogue Trader - are you planning to defeat my orks while they are rolling around in laughter? Or should I bring some freebooterz/flash gitz for a looting expedition?
|
|
|
|
|
|
2009/09/04 12:56:58
Subject: Malfian IVth, The Junos Moles (IG Blog) ( with improved test cast & Rogue Trader idea - 4/9/09)
|
|
Calculating Commissar
|
damn you. Now I want a jester as a sidekick for my RT
If my current project allows me a weekend (which currently looks doubtful) I'll try and make some arms to fit the cast body and try adding some paint to see how it looks.
I need to get something final soon and start painting if I'm ever going to catch up with your orkses... nothing ever quite fits with what I was aiming for.
|
|
|
|
|
|
2009/09/04 16:56:29
Subject: Re:Malfian IVth, The Junos Moles (IG Blog) ( with improved test cast & Rogue Trader idea - 4/9/09)
|
|
Long-Range Ultramarine Land Speeder Pilot
Probably somewhere I shouldn't be
|
The Rogue Trader is inspired! I can't wait to see him painted. I'm also looking forward to seeing how your casts paint up - I've not had the guts yet to try casting my own stuff, but it's something I plan to do one day, so I'm following this thread closely.
|
40k:    WHFB: WHFB:  (I want a WE Icon, dammit!) (I want a WE Icon, dammit!)
DR:80S+G+M(GD)B++I++Pw40k96+D+A+++/areWD206R+++T(M)DM+
Please stop by and check out my current P&M Blog: Space Wolves Wolf Lord |
|
|
|
|
2009/09/05 11:30:13
Subject: Malfian IVth, The Junos Moles (IG Blog) ( with improved test cast & Rogue Trader idea - 4/9/09)
|
|
Rampaging Reaver Titan Princeps
|
Utterly awesome stuff here can't wait to see what you come up with. Maybe some WW2 British Heads would be a good base for the miners. Also Ramshackle Games do a Giant Boring Device. I've had dealings with them in the past and their great!
|
"But me no buts! Our comrades get hurt. Our friends die. Falkenburg is a knight who swore an oath to serve the church and to defend the weak. He'd be the first to tell you to stop puling and start planning. Because what we are doing-at risk to ourselves-is what we have sworn to do. The West relies on us. It is a risk we take with pride. It is an oath we honour. Even when some soft southern burgher mutters about us, we know the reason he sleeps soft and comfortable, why his wife is able to complain about the price of cabbages as her most serious problem and why his children dare to throw dung and yell "Knot" when we pass. It's because we are what we are. For all our faults we stand for law and light.
Von Gherens This Rough Magic Lackey, Flint & Freer
Mekagorkalicious -Monkeytroll
2017 Model Count-71
|
|
|
|
|
2009/09/05 13:29:07
Subject: Malfian IVth, The Junos Moles (IG Blog) ( with improved test cast & Rogue Trader idea - 4/9/09)
|
|
Calculating Commissar
|
Good thought with the british heads as a base. I hadn't thought of those... it's obvious from the shape when you think about it!!
|
|
|
|
|
|
2009/09/05 17:05:18
Subject: Re:Malfian IVth, The Junos Moles (IG Blog) ( with improved test cast & Rogue Trader idea - 4/9/09)
|
|
Navigator
|
Rogue trader is looking positively lovely, the hat is really working for me. If you're planning on increasing the fop factor, perhaps you should exchange his cargo pants for some poofy fencer's shorts or tights with a rather ornate codpiece?
|
Raven Guard 3,000pts
WIP Imperial Navy Armsmen
WIP Birmingham 411th
==][==Begin Dakka Geek Code==][==
DC:90-SG+++MB++I+Pw40k04#-D+A+/areWD325R++T(T)DM+
==][==End Dakka Geek Code==][== |
|
|
|
|
2009/09/05 17:25:42
Subject: Malfian IVth, The Junos Moles (IG Blog) ( with improved test cast & Rogue Trader idea - 4/9/09)
|
|
Calculating Commissar
|
The legs are currently just there to hold him up while I decide what to do
Current thinking is to cut off the pockets and make them more like normal trousers, or something and then add a big, ornate frock coat over the top
|
|
This message was edited 1 time. Last update was at 2009/09/05 17:26:58
|
|
|
|
|
2009/09/05 23:12:15
Subject: Malfian IVth, The Junos Moles (IG Blog) ( with improved test cast & Rogue Trader idea - 4/9/09)
|
|
Rampaging Reaver Titan Princeps
|
I'd be tempted to go Cyborg! A cyborg Fop just the thing to lead grizzled miners into battle!
|
"But me no buts! Our comrades get hurt. Our friends die. Falkenburg is a knight who swore an oath to serve the church and to defend the weak. He'd be the first to tell you to stop puling and start planning. Because what we are doing-at risk to ourselves-is what we have sworn to do. The West relies on us. It is a risk we take with pride. It is an oath we honour. Even when some soft southern burgher mutters about us, we know the reason he sleeps soft and comfortable, why his wife is able to complain about the price of cabbages as her most serious problem and why his children dare to throw dung and yell "Knot" when we pass. It's because we are what we are. For all our faults we stand for law and light.
Von Gherens This Rough Magic Lackey, Flint & Freer
Mekagorkalicious -Monkeytroll
2017 Model Count-71
|
|
|
|
|
2009/09/05 23:30:51
Subject: Malfian IVth, The Junos Moles (IG Blog) ( with improved test cast & Rogue Trader idea - 4/9/09)
|
|
Calculating Commissar
|
Llamahead wrote:I'd be tempted to go Cyborg! A cyborg Fop just the thing to lead grizzled miners into battle!
Oddly enough, you'll never guess what I was making this evening
Not going to get a chance to take any photos until later in the week sadly... hopefully the wait will be worth it though.
|
|
This message was edited 1 time. Last update was at 2009/09/05 23:33:29
|
|
|
|
|
|
|


 15/2/0
 Da Dark Angelz
 Arakasi vs Infinity