| Author |
Message |
 |
|
|
|
|
Advert
|
Forum adverts like this one are shown to any user who is not logged in. Join us by filling out a tiny 3 field form and you will get your own, free, dakka user account which gives a good range of benefits to you:
- No adverts like this in the forums anymore.
- Times and dates in your local timezone.
- Full tracking of what you have read so you can skip to your first unread post, easily see what has changed since you last logged in, and easily see what is new at a glance.
- Email notifications for threads you want to watch closely.
- Being a part of the oldest wargaming community on the net.
If you are already a member then feel free to login now. |
|
 |
2012/12/20 21:16:14
Subject: Re: Terrain Project- Building a Better Battlefield
|
|

Longtime Dakkanaut
|
@ Bruticus- I've completely given up on the crackle idea. Pity, ity seems like it would have made excellent 'ruined pavement'. the checkered floor isn't 'gone', I could still put the platform back on the same base but I'm still having a go at something unique (for me) instead of going w/ the old standard of tiled plasticard for flooring. I am probably going to use plain plasticard and detail it better.
@ Dave- I've scrapped the crackle idea.
@ rust- I've worked in a few warehouses before and know what you are talking about. All it takes is 1 forklift to back into something w/ anchor bolts and you suddenly have a nice impact crater. My favorite was a way overloaded cart being drawn by a lift. Tire blew, ground to the rim, rim broke, jagged edges of rim gouged a 1/4 - 1/2 inch deep grooves almost 3/4 the way around the faculty. Thankfully I wasn't one who did that as the guy that did was sacked on the spot.
You are right about the inspiration. Every idea I have is inspired by other peoples work or some IRL thing I have seen. I have seen interior tiled floors but never exterior (except snooty rick folk hand-laid driveway stone, but that doesn't count. This a PDF designed refueling depot and I want it to reflect that. Although the fluff might support something . I'll figure it out, even if I go back to the original base.
@ hdbbstephen- Dakka is a great place for inspiration. There is so much amazing work going on all the time from so many incredible artisans / craftsmen that it's impossible to keep up with them all. Almost all of my attention is in the P&M sections because I'm always looking to learn new things.
 
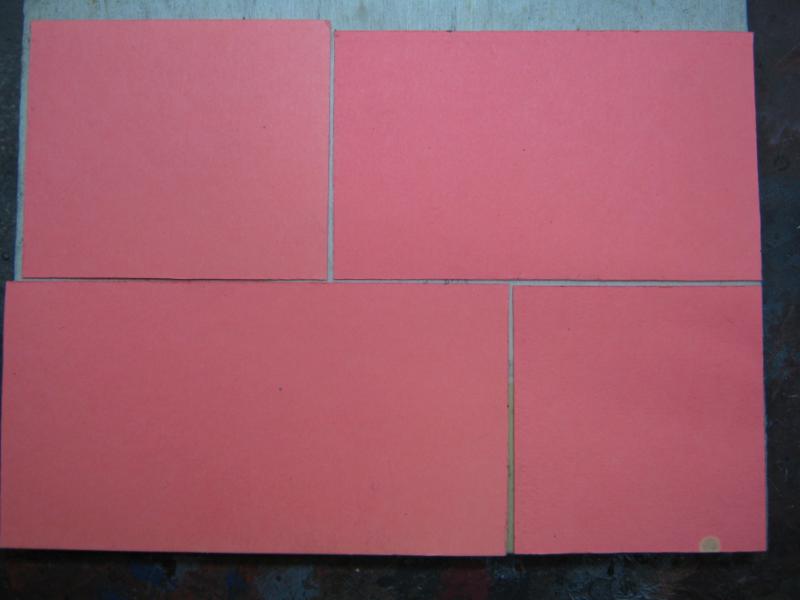
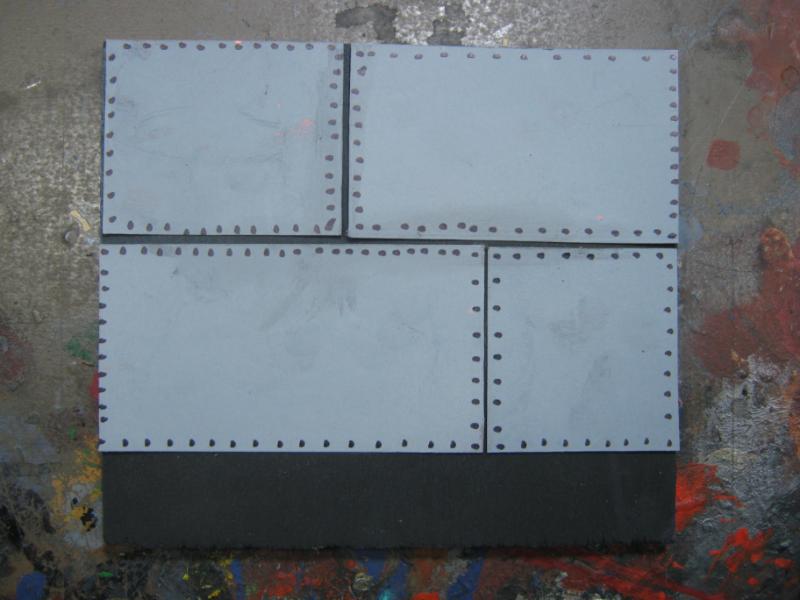
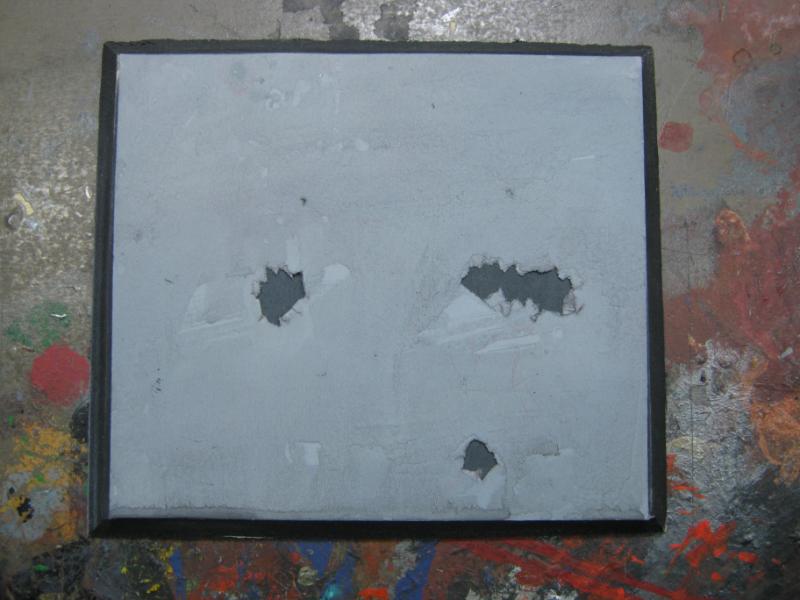
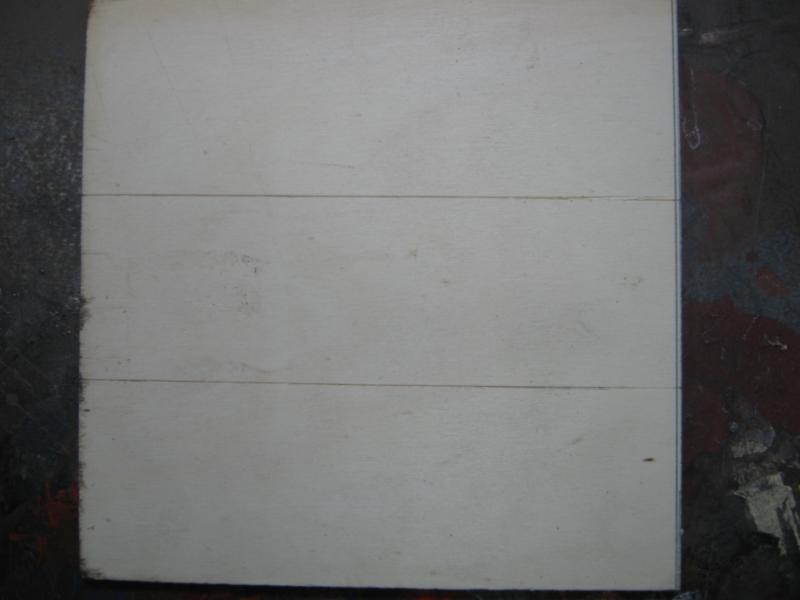
I haven't had much time to model today. But I did take some time to get a bit of stuff done. These are tests for possible flooring solutions. Keep in mind I did these VERY quickly so please don't critique the result, critique the idea.
LARGE STEEL PLATES
 WORN ASPHALT (paper)
 WORN ASPHALT (wood)
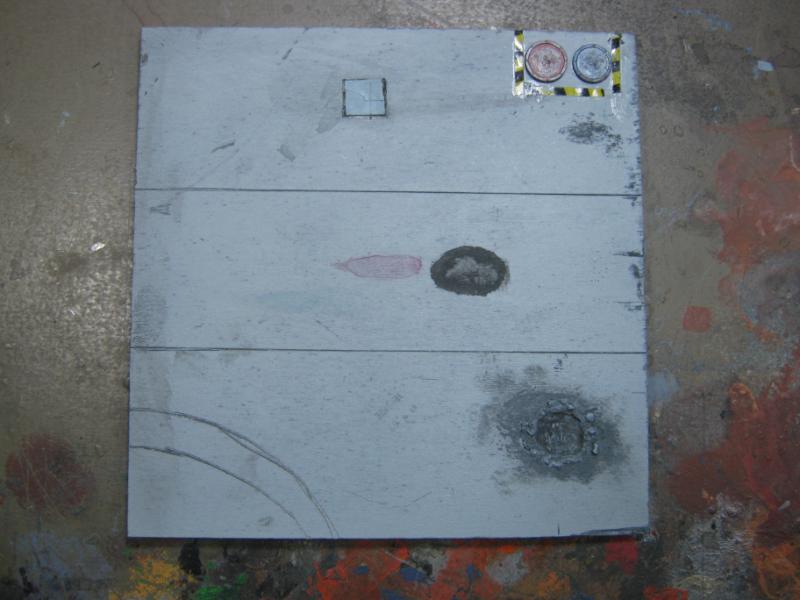
Obviously I like the last one best, but the first two have application. First would be great for a building wall, 2nd could work on anything including the asphalt if I made both of them out of plasticard instead of paper.
Ideas / comments / advice? I'm open to the idea of putting the platform back on the tiled base. In case anyone is wondering, I do not consider any of this to be wasted time / effort. I've learned a few things I did not think of before, and taking the platform off gave me the opportunity to do something cooler w/ it.
I'll be back. 
|
|
|
|
 |
|
2012/12/20 21:31:19
Subject: Terrain Project- Building a Better Battlefield
|
|

Aspirant Tech-Adept
|
I like how you keep experimenting, keep up the good work. I think a painted floor is fine but I misunderstood I think - I thought you wanted the crackle paint to look like old peeling flaky paint on the floor which I didn't think would look right as it more looks like it is the paint on a long neglected wall that is flaking off from the damp, rather than paint on a well worn floor which I think would be more scraped and eroded.
The tiles looked good to me, but were a bit plain. Whatever you do with the base I think you ought to include a lot of visual interest to justify having a large base, otherwise it may as well not have a base at all.
|
|
|
|
|
|
2012/12/21 06:09:27
Subject: Re: Terrain Project- Building a Better Battlefield
|
|
Contagious Dreadnought of Nurgle
|
Pic of the damaged tiles by my workplace...  The discolorations are where the rubber mats with the diamond plate texture usually rest to cover the damaged areas. Another option for an interesting texture option is 1/2 foamcore (remove the paper from one side) then carve in details... (works really well for "mixed" surfaces, or cobbled.) you'll need to "seal" it after you carve in your details. I reccommend a 50/50 PVA water mix.
|
|
This message was edited 1 time. Last update was at 2012/12/21 06:10:26
Link to my Index Thread here on dakka


Find me on Twitter Sam Butler @Rivet_Zone
Winner "Best 40k Table" Daboyz GT 2010,2011
"Sic Vis Pachem Parabellum" - Publius Flavius Vegetius Renatus
Veni, Vidi discessi.-Galorn. |
|
|
|
|
2012/12/21 11:26:13
Subject: Terrain Project- Building a Better Battlefield
|
|
Decrepit Dakkanaut
|
I've used cereal box card for pretty effective cracked asphalt before. Riveted Steel is of course, my favorite though 
|
"dave you are the definition of old school..." -Viktor Von Domm   My P&M Blog : My P&M Blog :
It's great how just adding a little iconography, and rivets of course, can make something look distinctly 40K-adamsouza
"Ah yes, the sound of riveting.....Swear word after swear word and the clinking of thrown tools" "Nope. It sucks do it again..."- mxwllmdr
"It puts together more terrain, or else it gets the hose again...-dangledorf2.0
"This is the Imperium, there is no peace, there are only rivets" -Vitruvian XVII
"I think rivets are the perfect solution to almost every problem"- Rawson
More buildings for the Building God! -Shasolenzabi
  |
|
|
|
|
2012/12/21 14:02:38
Subject: Terrain Project- Building a Better Battlefield
|
|
Slippery Scout Biker
North Carolina
|
Diggin' that last option too. Love seeing your various idea experiments, it's giving me a bunch of great ideas (at some point I really need to post my own work...) and I'm sure that it's certainly helping out others who are trying to figure out how they want to do things too.
After seeing all of your cool stuff Dave, yeah, I'd have to say that you definitely seem to like rivets! 
Just as an idea, I've used this and it's worked pretty well, using cup cake bead sprinkles to represent rounded rivet heads. Drill a shallow pilot hole on the surface and glue a sprinkle to it. Once painted its very convincing.
|
|
|
|
|
|
2012/12/21 15:06:04
Subject: Re: Terrain Project- Building a Better Battlefield
|
|
Longtime Dakkanaut
|
@ Bruticus- I was thinking about the crackle paint to simulate the type of damaged an asphalt drive takes from the seasons and from wear (hot dry wet cold / heavy weight / pressure / friction). After reading up on it it's pretty obvious that it would not work in this application. Certain glues might do this better, but I'm finished with searching for solutions right now. I'll revisit later if the need arises.
@ Galorn- that's almost funny, being it's all 3 of the surface types I'm looking at replicating on my models. I'm keeping that pic for next time.
@ Dave- it's amazing how many applications cereal boxes can be used for in terrain building. They are what I use for roof shingles on my WFB buildings, they have been used as floor panels in Necromunda, have been used to makes doors in both games... they are a great 'general purpose' item.
@ rust- I like sharing my ideas and mistakes as it shows the 'human factor' behind the finished work. There are guys on Dakka that only share the 100% A+ end result, and while I admire their talent I wish they would share the techniques they use w/o having to be directly asked. I know that I don't always how the minutia of my work but I'll share as much as comes to mind and hopefully seem happy to explain anything specific if asked.
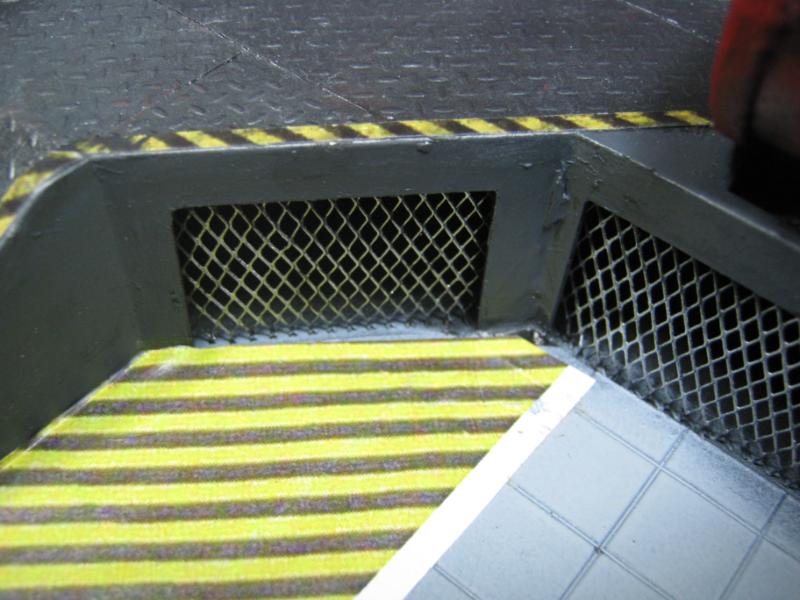
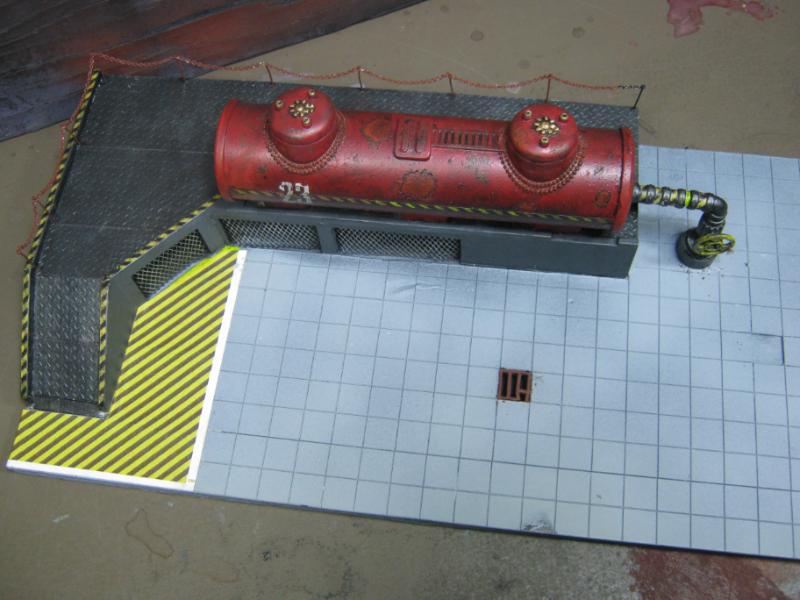
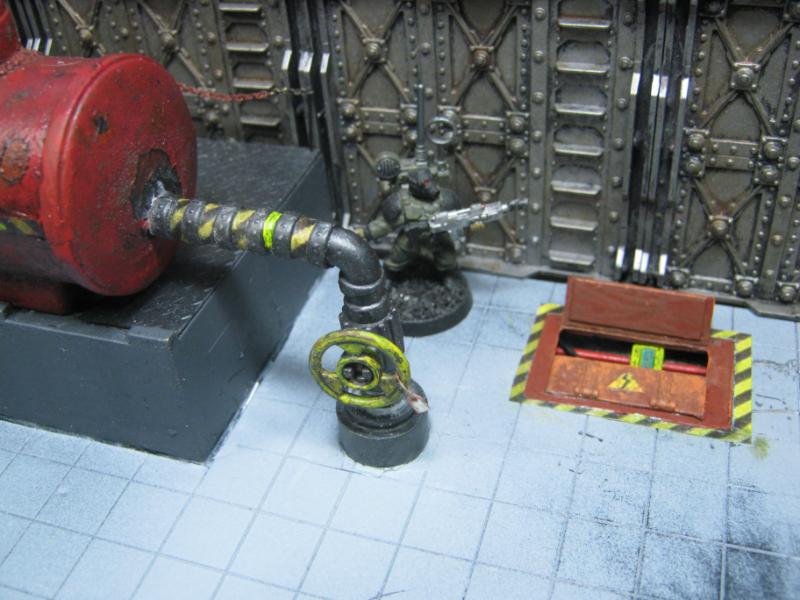
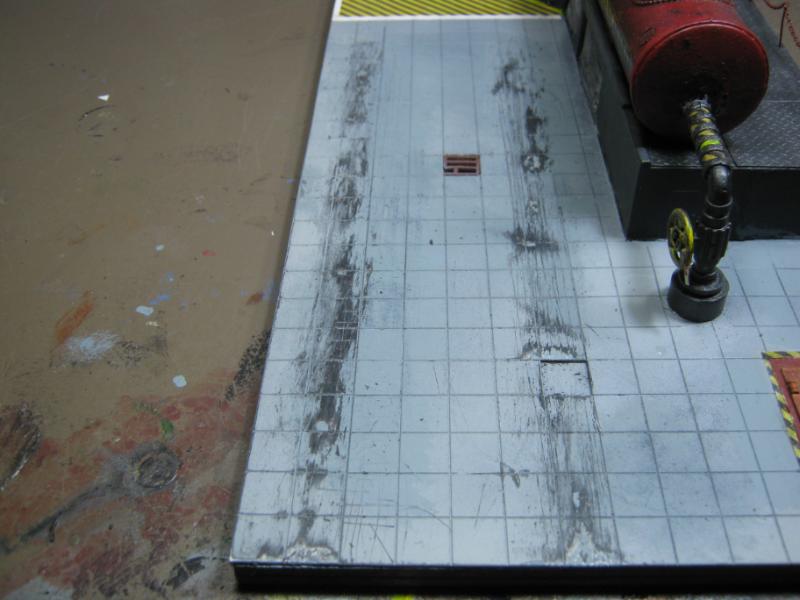
Ok. A lot of consideration went into this. It isn't done by far, but what you are looking at is going to be the base I build up from. I decided to go back to the tiles for a number of reasons, but this time they will represent concrete and will have plenty of markings / scuffs / debris scattered about / etc to show why I have the open space and to further define what the terrain piece is and how it relates to the narrative I'm forging.
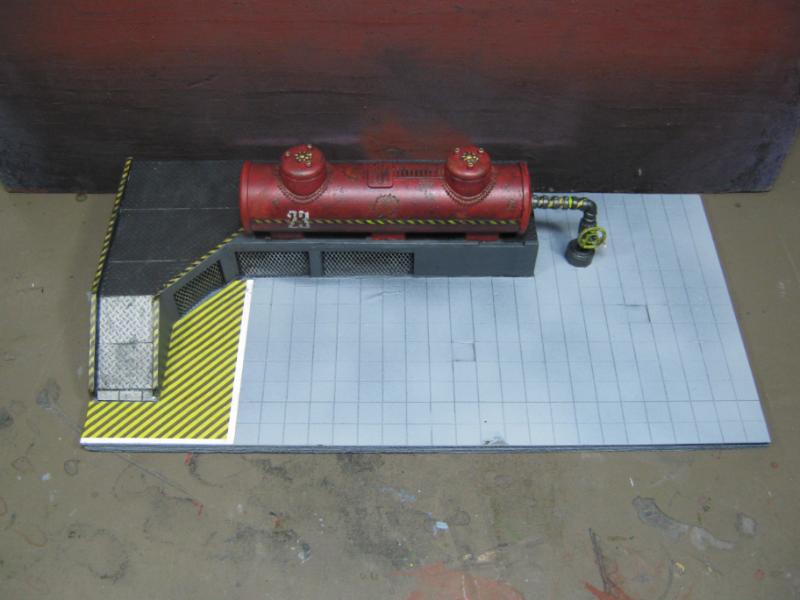
I'm very happy with the area hazard stripes. The intent is to create a 'use caution' zone for pedestrian traffic and also indicate a 'no zone' for vehicles. There will be more trafic markings soon, and of course the entire thing will receive multiple washes of different shades to show grit / usage / neglect. I'm also proud of myself for doing an almost perfect cut because I'm usually very "dimensionally challenged" when it comes to cutouts. This is one of my better jobs, so yay me.

I replaced the pipe and valve but not the stairs yet. I have a better idea for the stairs.
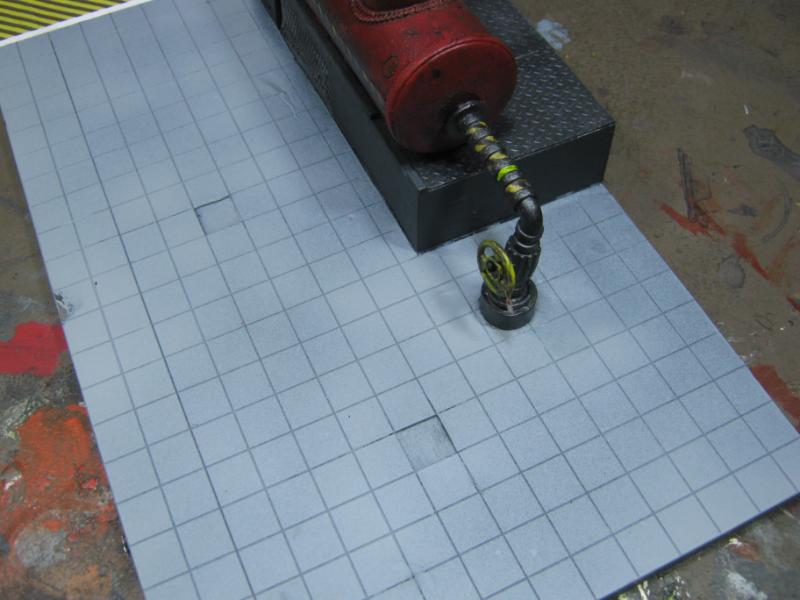
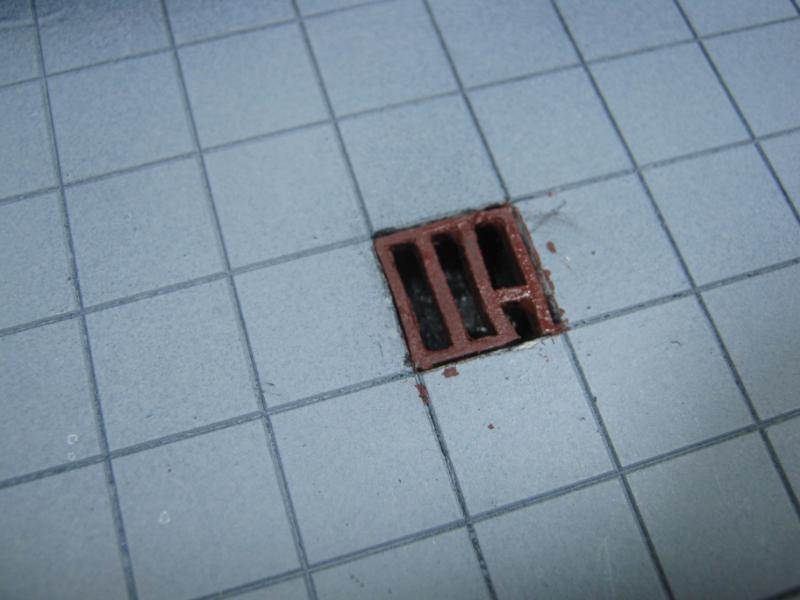
I replaced the overly rusted grates and replaced with mesh wire that is much cleaner and provides a better scale reference. I'll be rusting these up a bit, but not nearly as much as the other ones. Keep in mind that the effect intent here is 'functional but ill-maintained' instead of 'ruined and abandoned'.
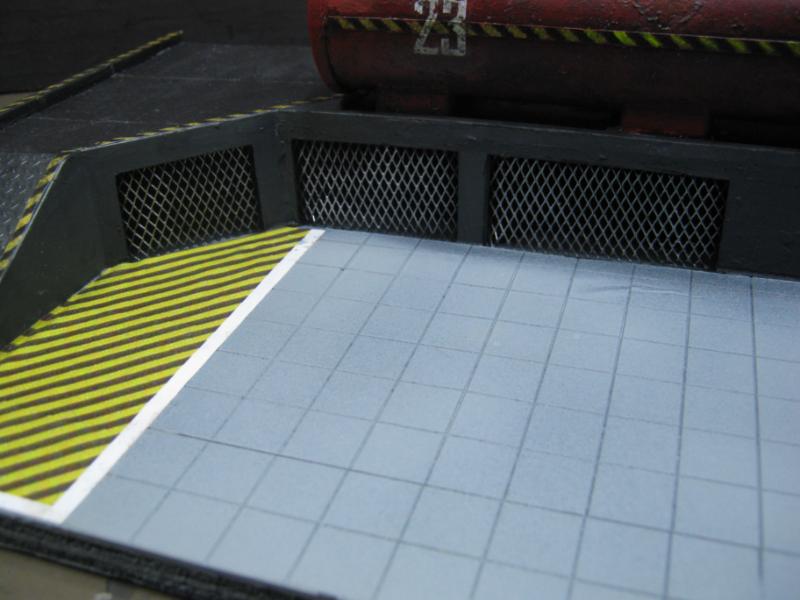
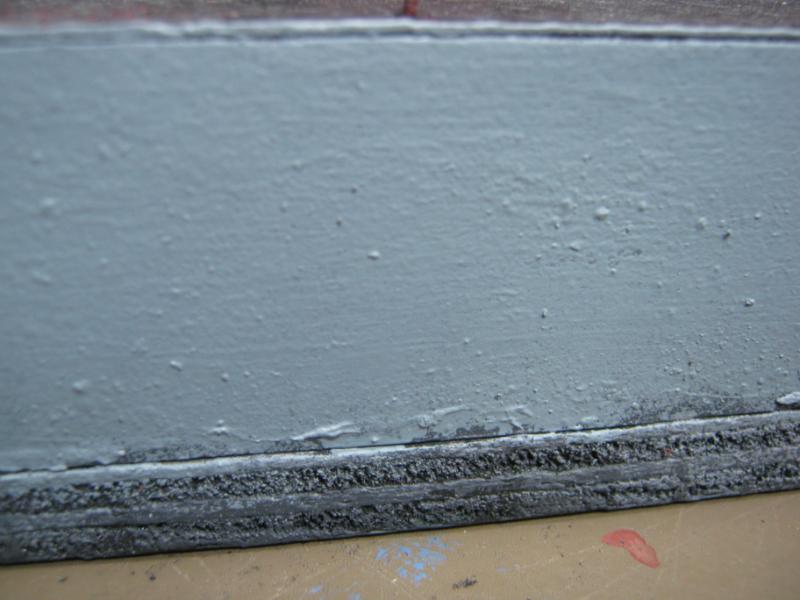
Slight gap will be repaired before floor is washed.
End of tank looking very clean. Not replacing the Aquila, have a much better idea.
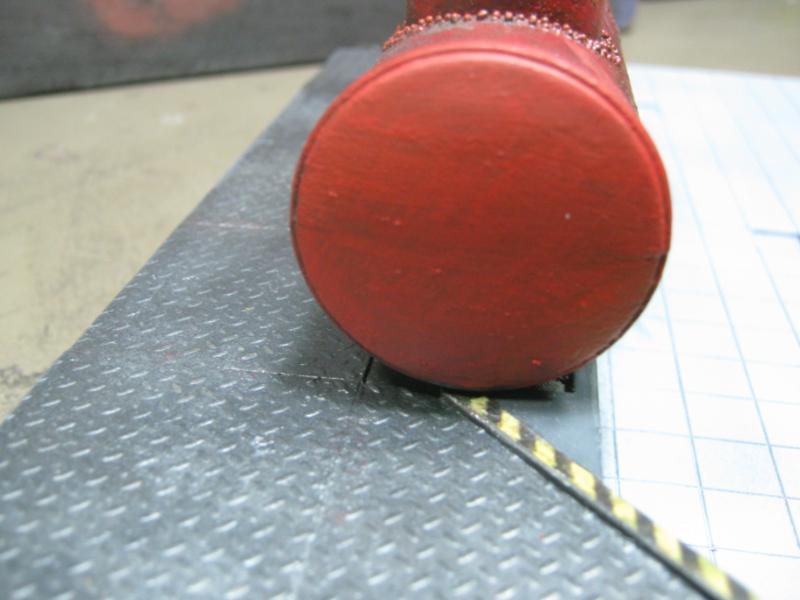
Treadplate is a bit cleaner right now due to cleaning up after a few mistakes (drips from other colors, etc) but it will get dirtied up again. I won't be pealing any up or adding any more damage here.
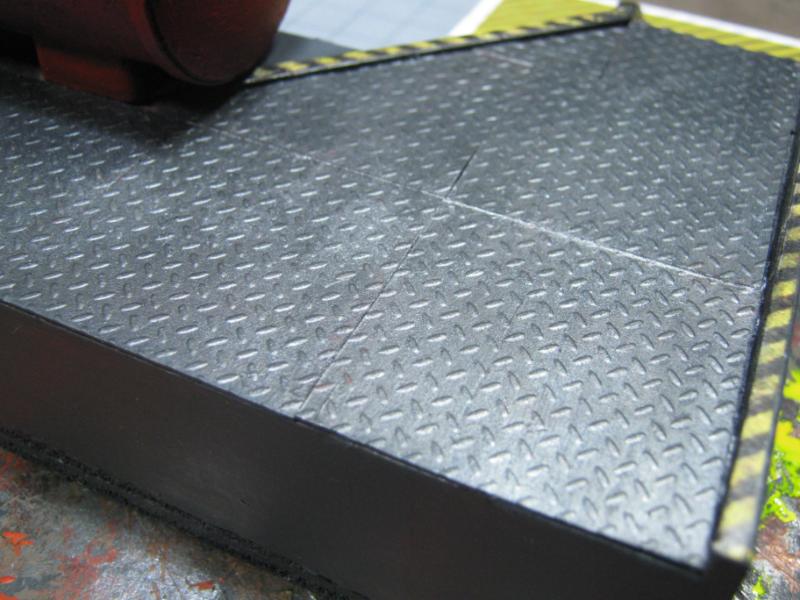
The concrete is very dark on purpose. It will be drybrushed w/ a lighter color and washed to give it a weathered / gritty look, may also use my Dremel to make shallow damage marks as bolter or stubber hits. And again, the stairs I'll be replacing the old ones with will be much cooler.
Ending up this post w/ action shots. It appears the PDF is having a bit of trouble today. 
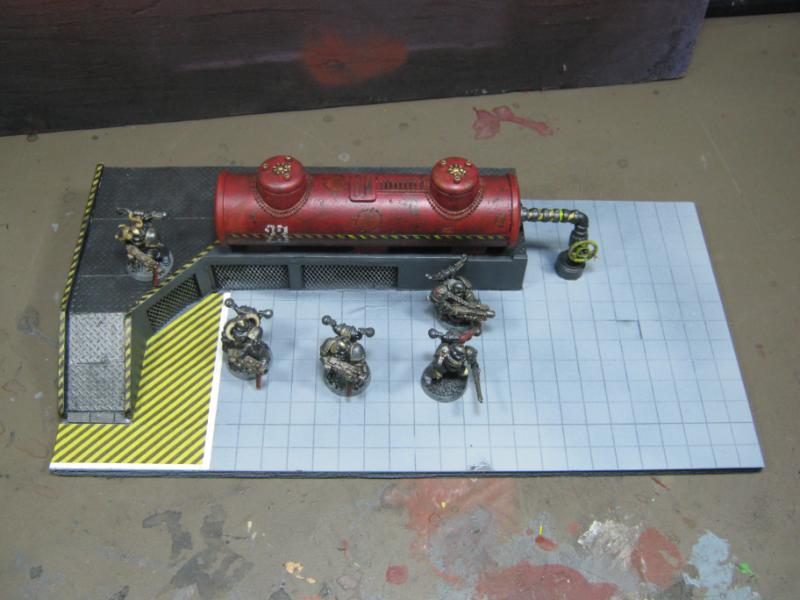
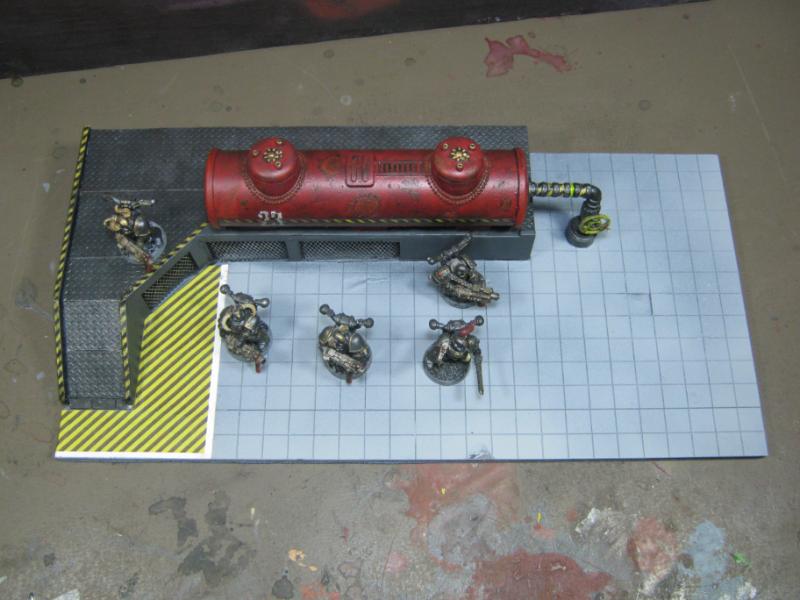
C&C welcome.
|
|
This message was edited 1 time. Last update was at 2012/12/21 15:17:18
|
|
|
|
|
2012/12/21 15:14:51
Subject: Terrain Project- Building a Better Battlefield
|
|
Decrepit Dakkanaut
|
Looking sweet! Just make sure you sponge your concrete color over those hazard stripes on the floor and it'll be 100% real! -Amazing job Skalk!
|
"dave you are the definition of old school..." -Viktor Von Domm My P&M Blog :
It's great how just adding a little iconography, and rivets of course, can make something look distinctly 40K-adamsouza
"Ah yes, the sound of riveting.....Swear word after swear word and the clinking of thrown tools" "Nope. It sucks do it again..."- mxwllmdr
"It puts together more terrain, or else it gets the hose again...-dangledorf2.0
"This is the Imperium, there is no peace, there are only rivets" -Vitruvian XVII
"I think rivets are the perfect solution to almost every problem"- Rawson
More buildings for the Building God! -Shasolenzabi
|
|
|
|
|
2012/12/21 15:41:01
Subject: Re: Terrain Project- Building a Better Battlefield
|
|
Longtime Dakkanaut
|
I'll likely scratch some of the striping up to show wear and will dab some concrete color to indicate wear.
|
|
|
|
|
|
2012/12/21 16:34:14
Subject: Terrain Project- Building a Better Battlefield
|
|
Slippery Scout Biker
North Carolina
|
Looking good Skalk! Liked the old grating but the new version is pretty kick ass! Every reiteration of the layout makes the gears in my mind turn and makes me wonder what direction you're going to take it next! Love it!!
|
|
|
|
|
|
2012/12/21 17:51:12
Subject: Terrain Project- Building a Better Battlefield
|
|
Rampaging Reaver Titan Princeps
|
Only thing to say is it's looking far too clean would drains and a manhole be an idea as well?
|
"But me no buts! Our comrades get hurt. Our friends die. Falkenburg is a knight who swore an oath to serve the church and to defend the weak. He'd be the first to tell you to stop puling and start planning. Because what we are doing-at risk to ourselves-is what we have sworn to do. The West relies on us. It is a risk we take with pride. It is an oath we honour. Even when some soft southern burgher mutters about us, we know the reason he sleeps soft and comfortable, why his wife is able to complain about the price of cabbages as her most serious problem and why his children dare to throw dung and yell "Knot" when we pass. It's because we are what we are. For all our faults we stand for law and light.
Von Gherens This Rough Magic Lackey, Flint & Freer
Mekagorkalicious -Monkeytroll
2017 Model Count-71
|
|
|
|
|
2012/12/21 18:30:14
Subject: Re: Terrain Project- Building a Better Battlefield
|
|
Longtime Dakkanaut
|
@ rust- You're not the only one wondering where I'm going to take it next. The more I look at it the more I think of different things.
@ Llamahead- That is an awesome idea!! I literally  for not thinking of it myself, and I'll be doing that tonight. I even know what to do for it to happen. Sweet idea man, really like it and appreciate it!
|
|
|
|
|
|
2012/12/21 18:42:21
Subject: Terrain Project- Building a Better Battlefield
|
|
Decrepit Dakkanaut
|
Now fire up that air compressor
|
"dave you are the definition of old school..." -Viktor Von Domm My P&M Blog :
It's great how just adding a little iconography, and rivets of course, can make something look distinctly 40K-adamsouza
"Ah yes, the sound of riveting.....Swear word after swear word and the clinking of thrown tools" "Nope. It sucks do it again..."- mxwllmdr
"It puts together more terrain, or else it gets the hose again...-dangledorf2.0
"This is the Imperium, there is no peace, there are only rivets" -Vitruvian XVII
"I think rivets are the perfect solution to almost every problem"- Rawson
More buildings for the Building God! -Shasolenzabi
|
|
|
|
|
2012/12/21 19:29:54
Subject: Re: Terrain Project- Building a Better Battlefield
|
|
Longtime Dakkanaut
|
I will as soon as the Fuel Depot project is done. If I fire up the Badger first I'll jump onto other projects and this will just get put on a shelf and sit there for who knows how long. Next weekend at the latest. I have something I really want to try it on.
|
|
|
|
|
|
2012/12/21 22:31:51
Subject: Terrain Project- Building a Better Battlefield
|
|
Decrepit Dakkanaut
|
Looking very nice sunshine. Moar!
|
Theophony"... and there's strippers in terminator armor and lovecraftian shenanigans afoot."
Solar_Lion: "Man this sums up your blog nicely."
Anpu-adom: "being Geek is about Love. Some love broadly. Some love deeply. And then there are people like Graven.  |
|
|
|
|
2012/12/22 07:17:02
Subject: Re: Terrain Project- Building a Better Battlefield
|
|
Longtime Dakkanaut
|
@ graven- Uhm... ok
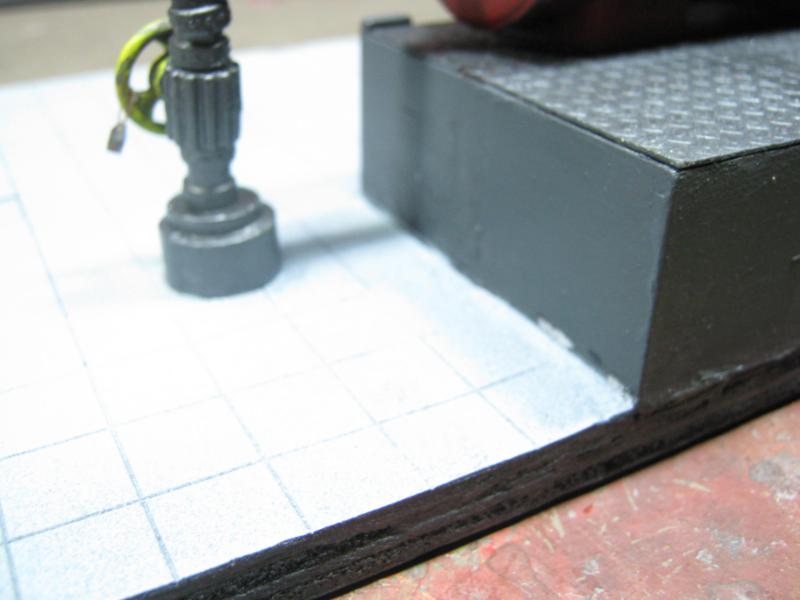
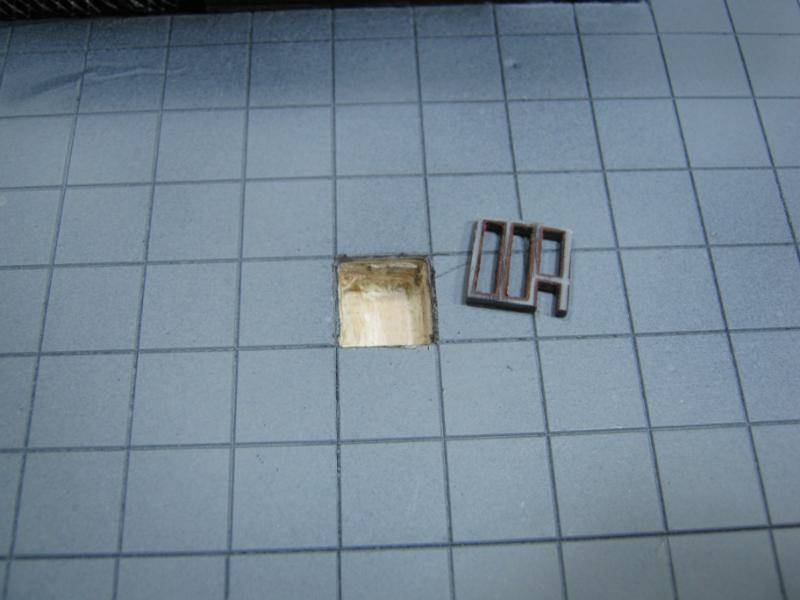
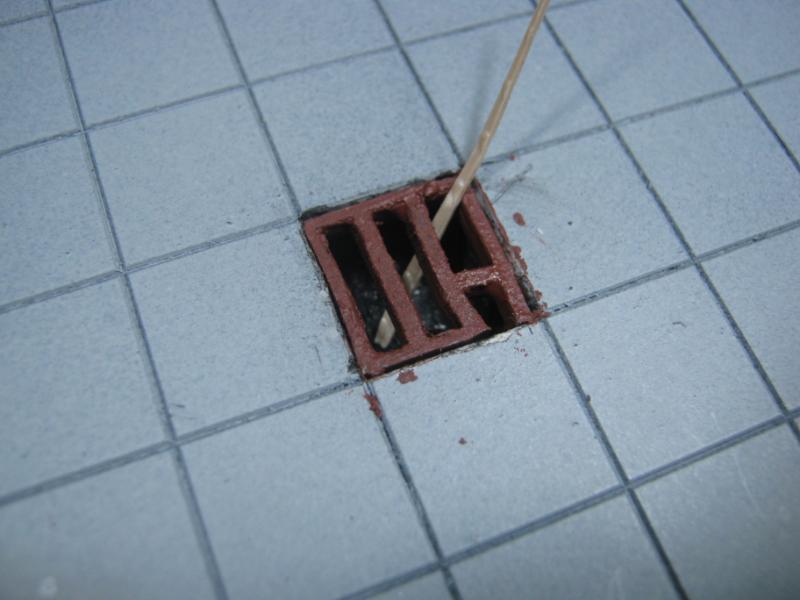
Got a bit of work done on the Fuel Depot tonight. First I went with the idea Llamahead had about installing a grate. As luck would have it, a tile I removed from the baser earlier on in the project was in the exact place I wanted the grate to go, so I dug down to the last layer of plywood on the base and then painted the inside black. Grate gets a dark rust treatment, covers the hole, instant drain with a depth effect that I am pretty happy about.
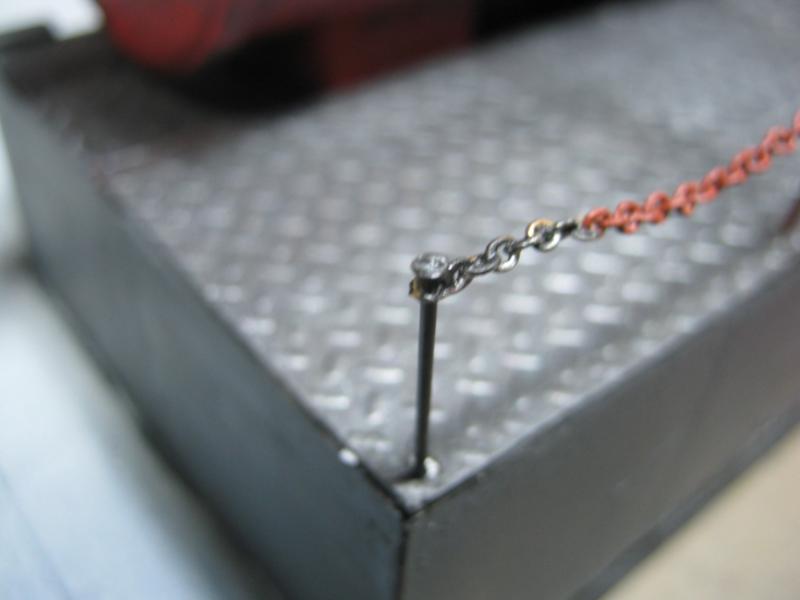
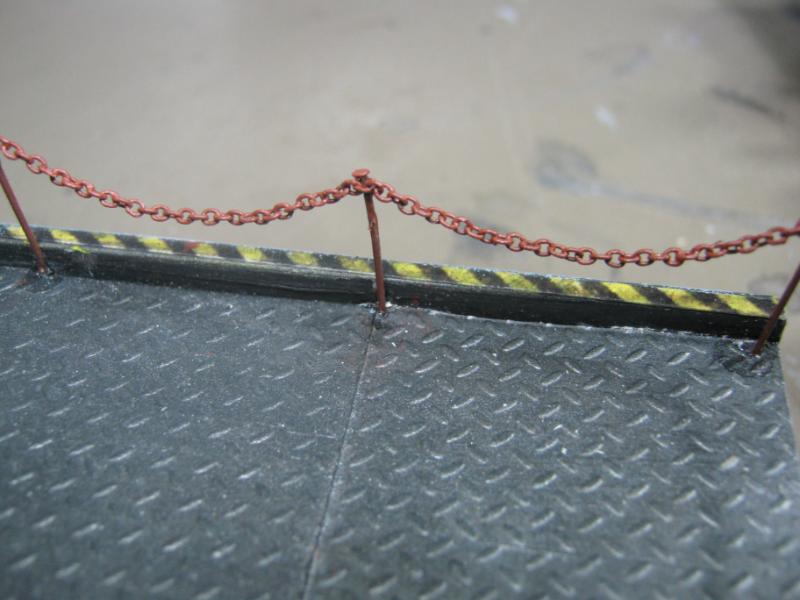
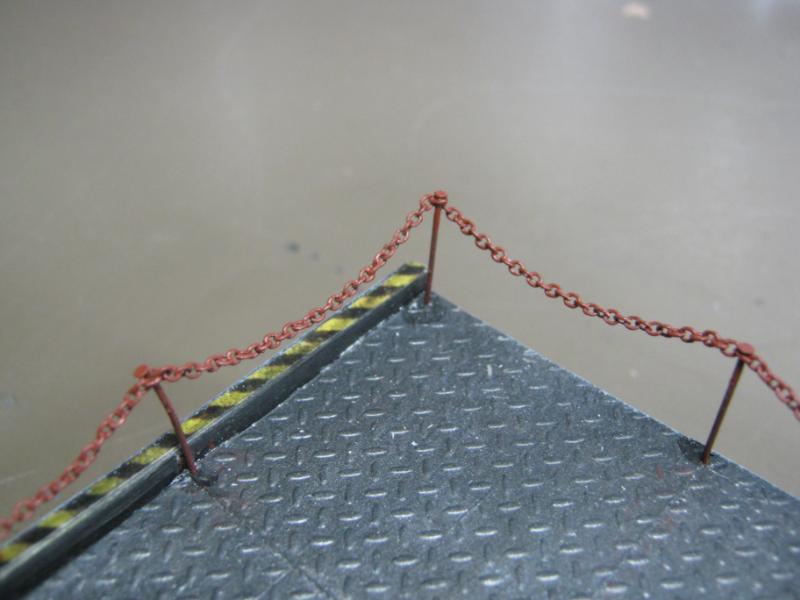
I also replaced the chain railing. I was going to do a really cool pipe railing with 1/32 rod and lots of fiddly bitz like connection joints and all that. But then it occurred to me that when it is broken it will be difficult to repair, and it will be broken because accidents happen. The chain will be much easier to re-splice or replace a single metal pin.
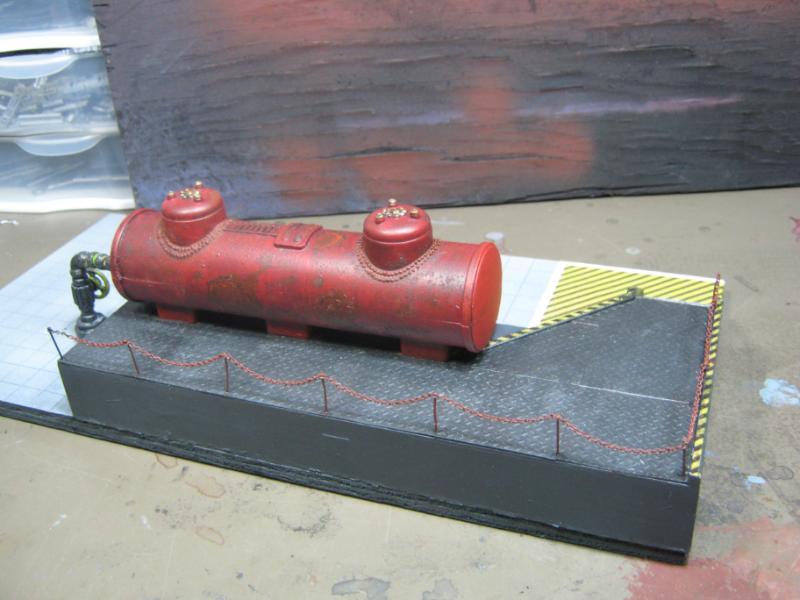
I extended the chain to cover an area it was too short for earlier.
One last shot of everything so far.
C&C welcomed and encouraged. My piece has been getting better with your ideas.
I'll be back tomorrow with an update.
|
|
|
|
|
|
2012/12/22 09:30:19
Subject: Terrain Project- Building a Better Battlefield
|
|
Fixture of Dakka
|
Wow Skalk this keeps getting better and better, love the drain idea.
|
|
|
|
|
|
2012/12/22 10:50:04
Subject: Terrain Project- Building a Better Battlefield
|
|
Decrepit Dakkanaut
|
How about an electrical access panel somewhere in the concrete? Something to control the internal mechanisms of the tank (temperature control, pump, fill gauge, etc.)?
|
|
|
|
|
|
2012/12/22 16:08:57
Subject: Re: Terrain Project- Building a Better Battlefield
|
|
Fixture of Dakka
|
Wow Skalk - impressive going there....just caught up on the last few pages.
Big shout out for pulling it apart and re-doing sections, always a brave call to make
Loving the look of it so far, great details coming out with each iteration. I agree totally with what you said about showing wip...that's the real interesting stuff, seeing other people's ideas and solutions, getting a feel for their thought processes - that's what I love about this place.
That drain - Yes!! Fantastic.
Really enjoying watching this take shape and looking forward to seeing it progress..
|
|
|
|
|
|
2012/12/22 21:02:41
Subject: Terrain Project- Building a Better Battlefield
|
|
Storm Trooper with Maglight
|
The drain is the icing on the cake, little details like that, and the inspection tag on the wheel, really make this piece special.
|
|
|
|
|
|
2012/12/23 22:02:02
Subject: Terrain Project- Building a Better Battlefield
|
|
Decrepit Dakkanaut
|
The guard chain is very effective, and the strong colours really offset the piece as a whole. Too often - and I'm guilty of this myself - the grimdarkiverse shies away from that, especially in terrain. Great work sir!
|
Theophony"... and there's strippers in terminator armor and lovecraftian shenanigans afoot."
Solar_Lion: "Man this sums up your blog nicely."
Anpu-adom: "being Geek is about Love. Some love broadly. Some love deeply. And then there are people like Graven. |
|
|
|
|
2012/12/24 06:06:21
Subject: Re: Terrain Project- Building a Better Battlefield
|
|
Longtime Dakkanaut
|
@ GiraffeX- I think this piece is going to turn out to be a lot more than I had originally intended. It's taking on detail like I've never done before, both volume and detail.
@ Gits- Hey, that's a great idea! Thanks!
@ monkey- Tearing this apart was one of the more difficult modeling decisions I've had to make this year. I am very happy that I did. I'm really liking this piece and it's amazing how far it has come from what it once was. Funny thing about this piece- it was supposed to be a 'side project' while I was waiting for some panels on my Basilica dried. Ha. Now it's my #1 focus.
@ hdbbstephen- Thanks for the compliment, and I completely agree. I expect more of the same will be coming on this piece and the pieces to come.
@ graven- I've been afraid to use bold colors for a long time because the reason you pointed out- grimdark. I've been putting a dark theme together on my table for some time, and now that has been challenged by a single red tank. It will stand out, but it won't look out of place.
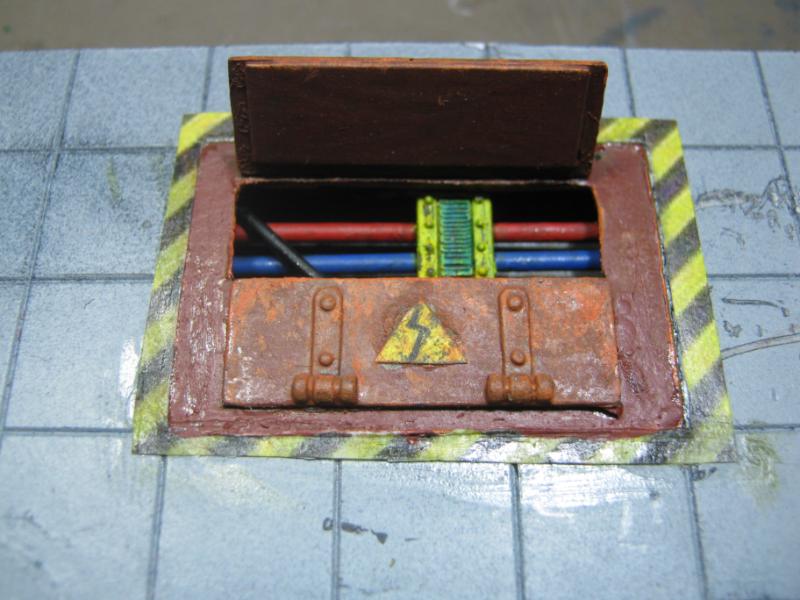
Huge thanks to Gitsplitta for this next bit. He is 100% the inspiration for this. I'm hoping I did the idea justice.
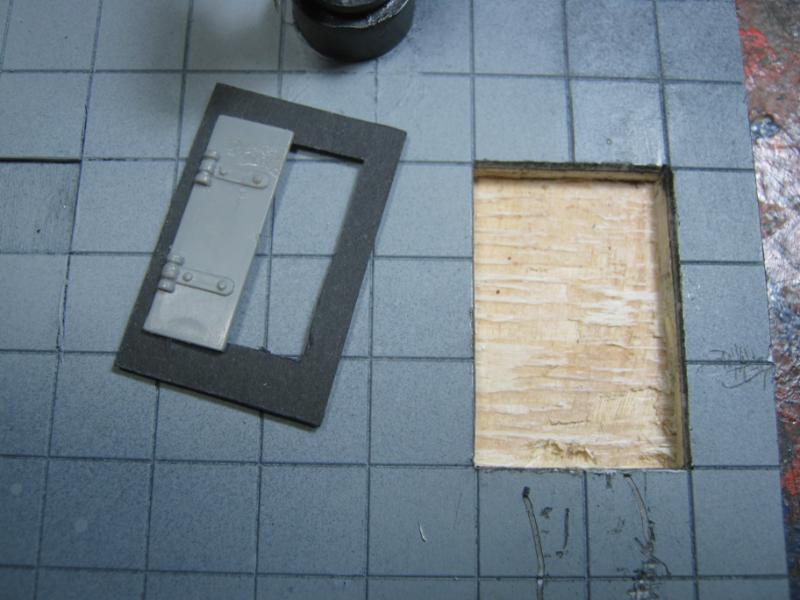
First hurdle was to decide how I wanted to do this. Went through my bitz boxes one at a time and took out things that could have potential application. I didn't find exactly what I was looking for, so I settled on rear top hatch doors from an old Chimara. Then I had to figure out how to fit them properly on the board, so I made a hatch frame out of tiled plasticard that would be the same size as the plastic coming out so it would sit flush. Here I'm making the hatch frame.
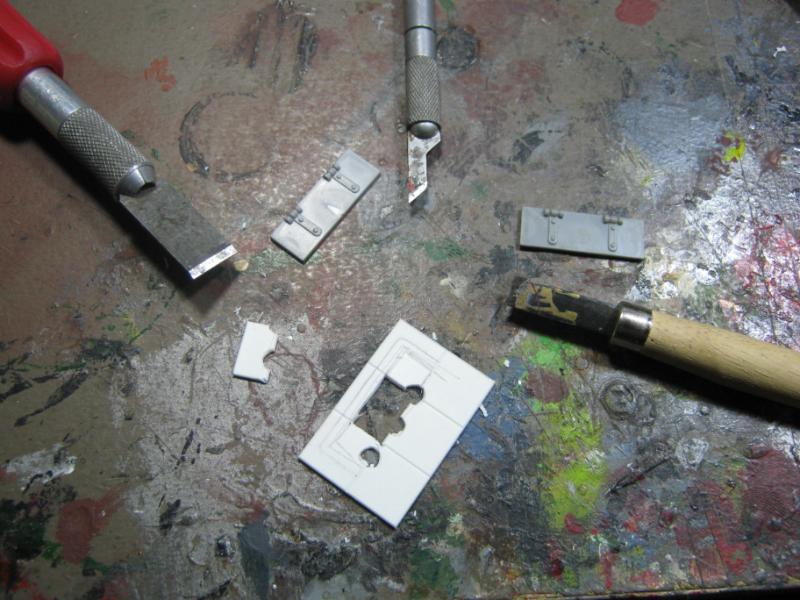
Hatch frame done. I made a mistake and took out some plastic I intended to keep (and by default kept some plastic I intended to cut off) so I had to file out the obvious parts, and by the time I was done it was larger than the doors were wide. To fix this I glued a piece of paper over the hatch frame.
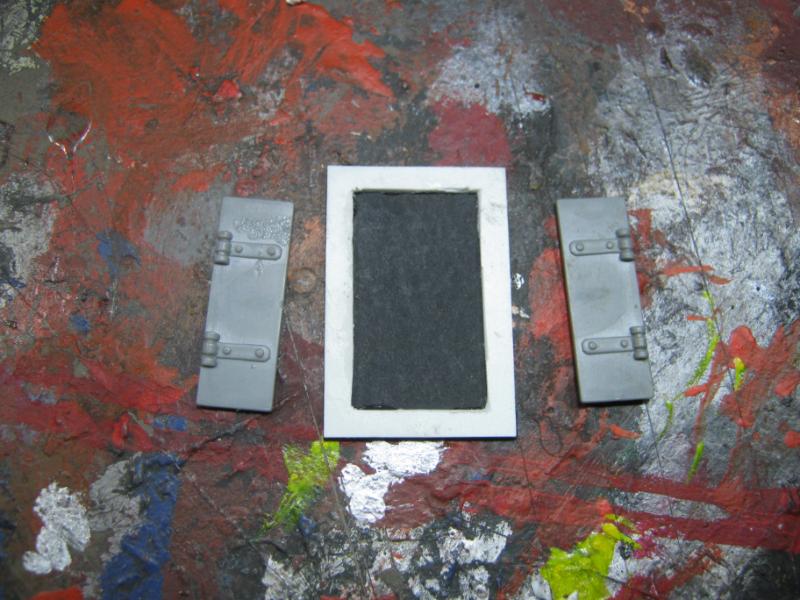
Hatch frame looking better, but had to really file out what would later be the closed side of the box.
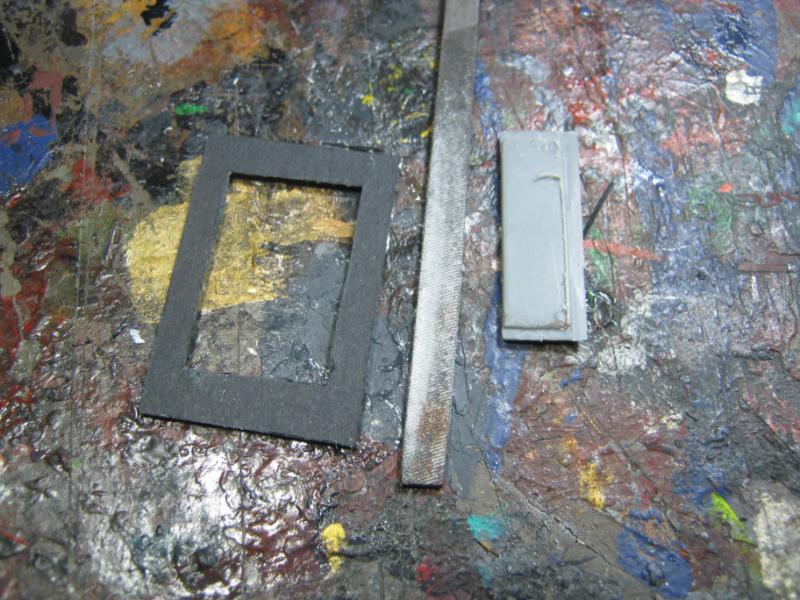
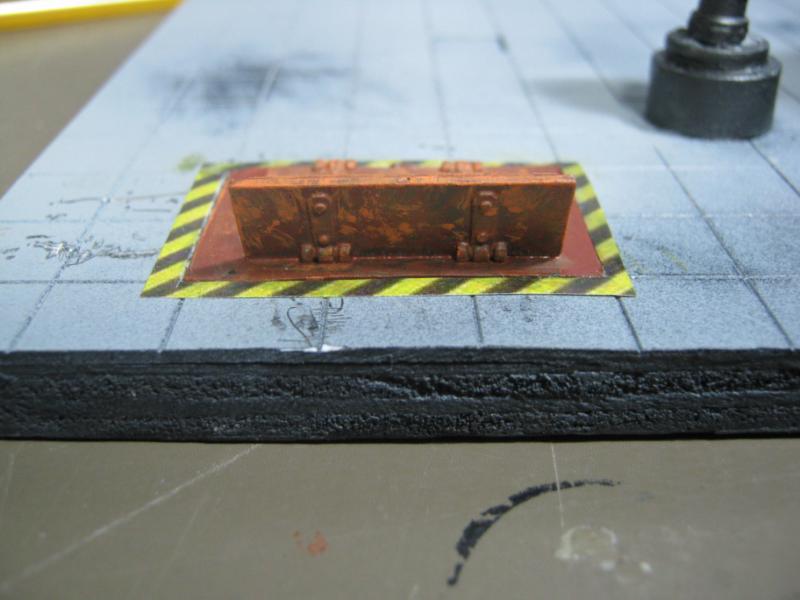
Hatch frame done and 'closed' hatch glued on. I also cut very deep into the board because I had an idea earlier for using plastic rod but couldn't. This time I could, and did.
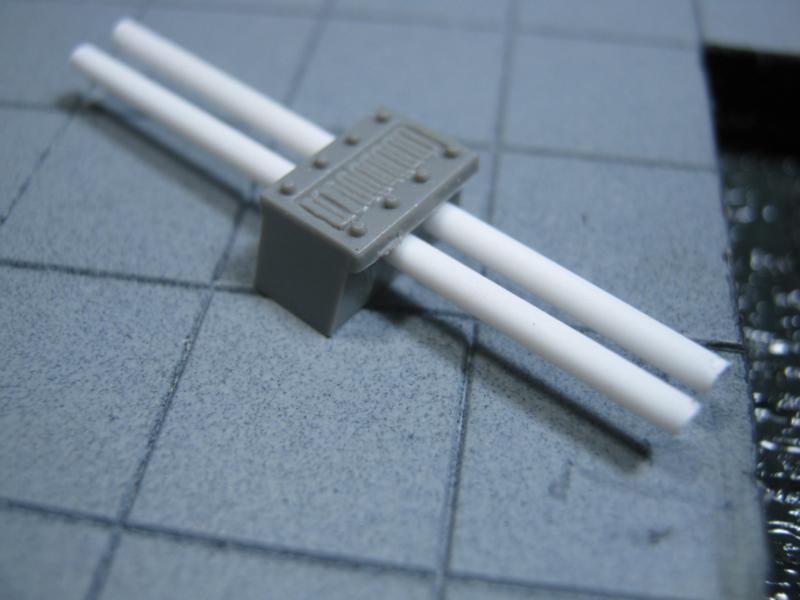
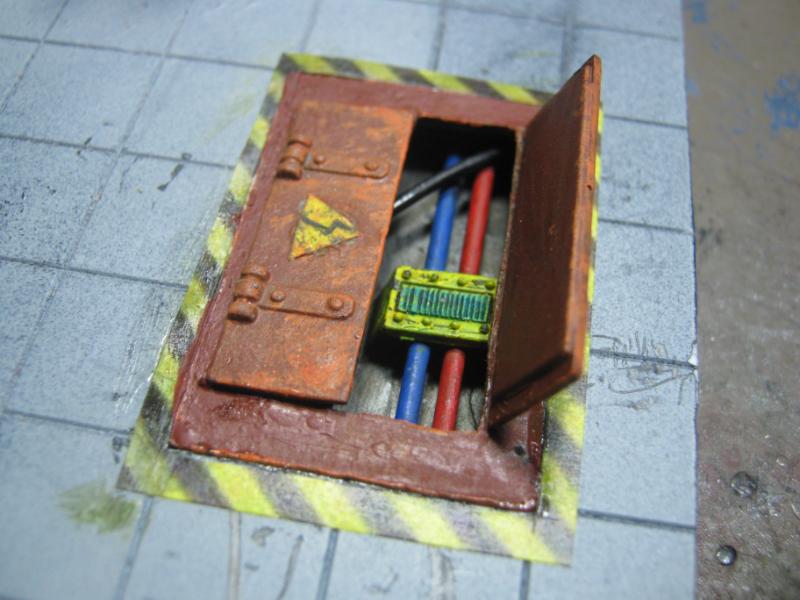
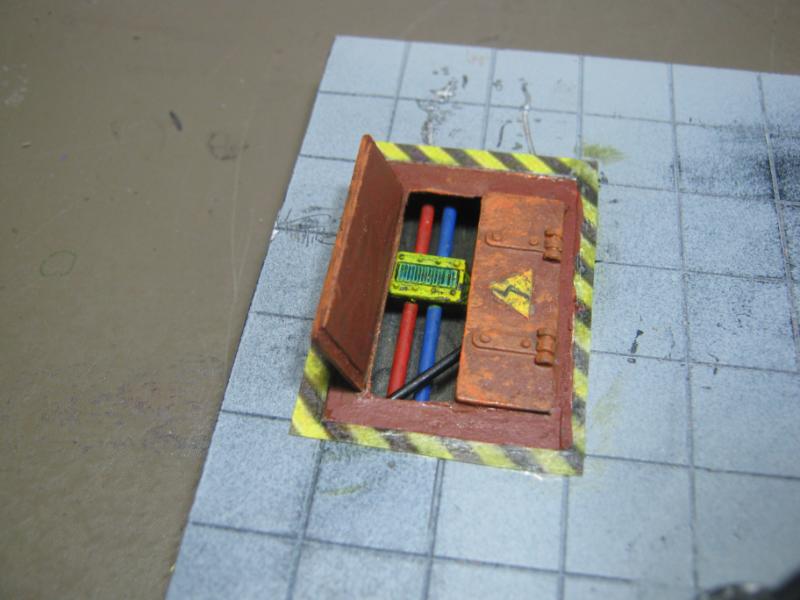
Officially in my fluff it's a control box thingy of some sort. It's former life was a unused magazine for a Storm Bolter on the old Imperial vehicles. I drilled it through both sides and threaded the rod. I really like the results:
With some paint on it. It's not finished yet but I snapped this shot before i started putting it together:
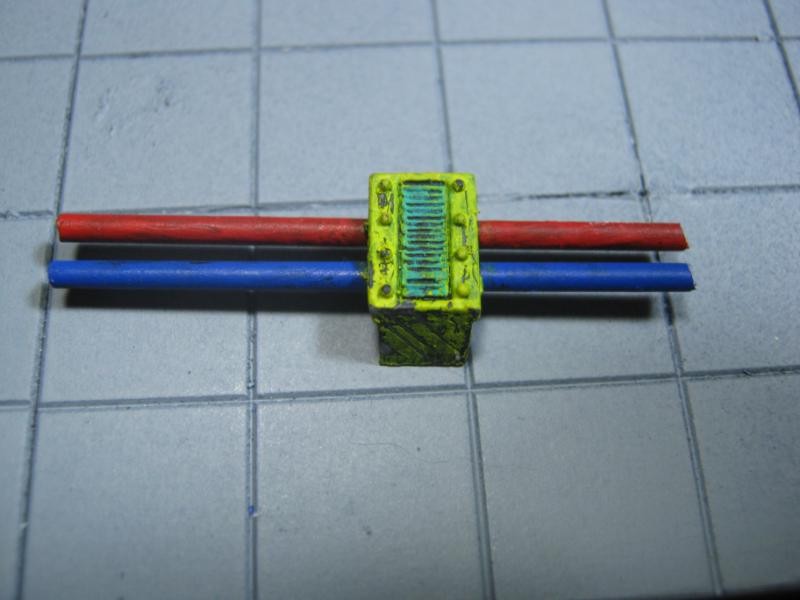
Utility Lock Box interior done. The control box now has a wash of turquoise gloss to make it 'pop' a bit more. I decided to run another cable over the top of the other two for some randomness in the utility box. I think it came out decent.
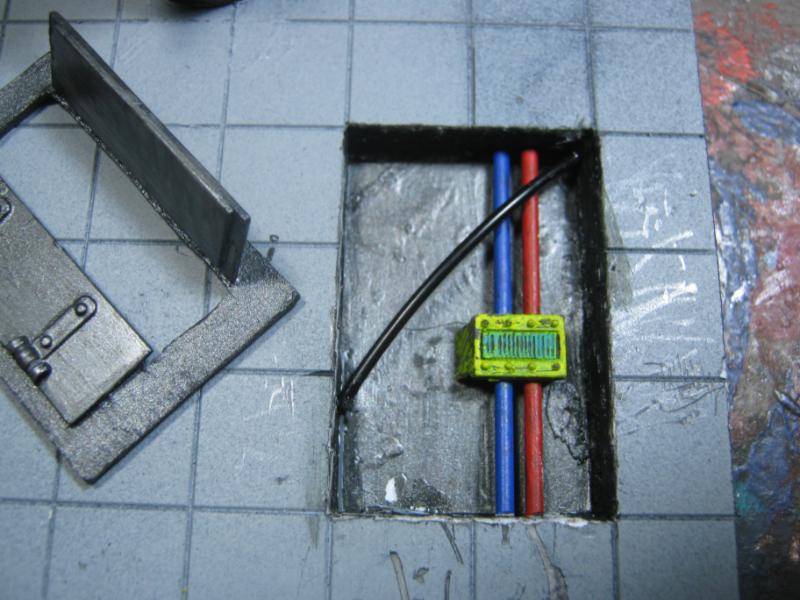
And done. I'll likely wind up doing something more on this (improving the rust comes to mind right off) but it's way above what I normally do. I really enjoyed this step of the project. Don't focus too much on the glossy finish from the superglue, it is going to be matted down toward the end of this project. Here are the 'final' (for now) photos:
I'll end this one w/ the obligatory 'action shot':
This project has been a challenge, no doubt. And not only to improve my standard of work. I'm trying to overcome many years of bad habits. I still need to focus on that last bit of detail that finishes a piece instead of rush through just to be done with it. I finish a model to somewhere around 80%-90%, and then it's done. Not finished (completed), just 'done'. I'm not doing that this time, although I did try.
However, I also want to say that I am having a lot of fun w/ this project. It's been a while since I've been this into what I am doing. There are likely more projects of similar kind coming in the far-off future. For now, I need to finish this and then get back to the other projects I'm trying to finish up, but I'm not going to rush.
That's it for this one. As always, C&C welcomed and I always appreciate the feedback. And sometimes... it drives to action.
I'll be back.
|
|
|
|
|
|
2012/12/24 07:01:51
Subject: Terrain Project- Building a Better Battlefield
|
|
Contagious Dreadnought of Nurgle
|
Hmm that looks like it would be relatively simpe to conceal some lights for a "shorting out /fire " fx in the lower level pipes bit. very nice job so far Skalk... now add the old discarded papers and suchlike...
|
Link to my Index Thread here on dakka
Find me on Twitter Sam Butler @Rivet_Zone
Winner "Best 40k Table" Daboyz GT 2010,2011
"Sic Vis Pachem Parabellum" - Publius Flavius Vegetius Renatus
Veni, Vidi discessi.-Galorn. |
|
|
|
|
2012/12/24 10:52:09
Subject: Terrain Project- Building a Better Battlefield
|
|
Decrepit Dakkanaut
|
Very nice indeed. Only quibble would maybe wash the junction box in sepia to even out the tone. Beautiful build though.
|
Theophony"... and there's strippers in terminator armor and lovecraftian shenanigans afoot."
Solar_Lion: "Man this sums up your blog nicely."
Anpu-adom: "being Geek is about Love. Some love broadly. Some love deeply. And then there are people like Graven. |
|
|
|
|
2012/12/24 12:01:26
Subject: Terrain Project- Building a Better Battlefield
|
|

Shroomin Brain Boy
|
now that is what i call a piece that tells us a story ...or at least is a good canvas for a story to happen upon...
so many nice and thought through details... the chain is an awesome idea... and you planned it very thourough...
the tanks seal...the small item on the closing wheel... that is a nice detail if i ever seen one! i dare say...you out done yoursefl with this one!
|
|
|
|
|
|
2012/12/24 12:37:27
Subject: Terrain Project- Building a Better Battlefield
|
|
Storm Trooper with Maglight
|
Beautifully done!
I know exactly what you mean about getting a project to 90% and calling it a day, "good enough" for play purposes but not eye-popping. I am definitely going to apply that lesson to my big projects in the future.
BTW (and I apologize if you've already mentioned it) what colors/blends are you using for that rust effect? Is there a tutorial that you recommend?
Age-ing and weathering are techniques that I need to work on.
Thanks, and Merry Christmas!
|
|
|
|
|
|
2012/12/24 14:31:06
Subject: Terrain Project- Building a Better Battlefield
|
|
Executing Exarch
|
looks mighty fine man. thats a really inspired bit. I think that makes this project look even better and it looks very easy to do.
Happy Holidays to you and yours Skalk!
Bama
|
|
|
|
|
2012/12/24 14:57:12
Subject: Re: Terrain Project- Building a Better Battlefield
|
|
Fixture of Dakka
|
Good job Skalk!
Definitely bringing the piece to life now.
I love those old storm bolter mags, use 'em all over the place.
|
|
|
|
|
|
2012/12/25 03:25:59
Subject: Terrain Project- Building a Better Battlefield
|
|
Decrepit Dakkanaut
|
Fantastic job mate... that box is an excellent addition!
|
|
|
|
|
|
2012/12/25 15:02:03
Subject: Terrain Project- Building a Better Battlefield
|
|
Decrepit Dakkanaut
|
The recessed bit is Genius! really..genius!
..However, I have to ask why use so many special knife blades? Your no. 11 blade would've done the job? You only need the lightest scoring.
|
"dave you are the definition of old school..." -Viktor Von Domm My P&M Blog :
It's great how just adding a little iconography, and rivets of course, can make something look distinctly 40K-adamsouza
"Ah yes, the sound of riveting.....Swear word after swear word and the clinking of thrown tools" "Nope. It sucks do it again..."- mxwllmdr
"It puts together more terrain, or else it gets the hose again...-dangledorf2.0
"This is the Imperium, there is no peace, there are only rivets" -Vitruvian XVII
"I think rivets are the perfect solution to almost every problem"- Rawson
More buildings for the Building God! -Shasolenzabi
|
|
|
|
|
2012/12/25 22:27:16
Subject: Re: Terrain Project- Building a Better Battlefield
|
|
Longtime Dakkanaut
|
@ Galorn- I don't disagree about the lights (would be white and blue LED), but it's a task I'm not up for. I am however up discarded papers and suchlike.
@ Graven- perhaps it is the lighting in the pic, or I applied too lightly, but it was washed. Small matter though, it has been washed again.
@ Vik- Thank you for the compliment. I agree that this is way over the top of my regular terrain. I expect there will be more before this is over.
@ hdbbstephen- No apology, you didn't ask. By complete coincidence I inadvertently created a small 'how to' in this post.
I can't recommend any tuts specifically because this has been trial and error (and error and error) for the most part. I've been given some good advice from people who are accomplished well beyond what I am doing. Here's some of the things I have learned (brush only, salting is a list in itself)
- Paint the primary color of your model and then create some damage to the paint job that leaves empty patches (see my post for example)
- Start with a darker color brown and work your way lighter to the edges. You can also start dark and drybrush light over it to bring out highlights from the texture. You can create texture simply with your brush - stipple it as it becomes 'tacky' when drying.
- Wash your entire model with a watered-down black wash. I mix mine 50/50 water / paint or 60/40 water / paint. Experiment with this to find your preference.
That's it. Everyone that does it better than me could offer their method as well.
@ Bama- Thanks, really appreciate the compliment. There's more of the same coming on this project
@ Monkey- It was easy and fun to do. Chances I'll be doing something similar w/ same idea on other pieces soon, really happy how it came out and creates a 3D effect of sorts that could bring a flat wall to life.
@ Gits- It was your idea, and I'm glad I did something decent with it. I didn't even consider gluing a hatch down and that be it. I did this on purpose with a specific vision. It's not often I set out to create something and wind doing exactly what I wanted instead of wind up wherever to project took me.
@ Dave- All I did was take your idea from the Necromunda building you built about a year ago. But I'm psyched that I did a decent job with it. About the blades- I was cutting out firmly glued tiles. I used the 11 to score the seams and then used the 18 to 'pry under' and dig it out slowly. The chisel was for gouging out the wood, and the 18 was handy for that as well w/ cutting the sides of the trench down flush before prying the plywood layer up.
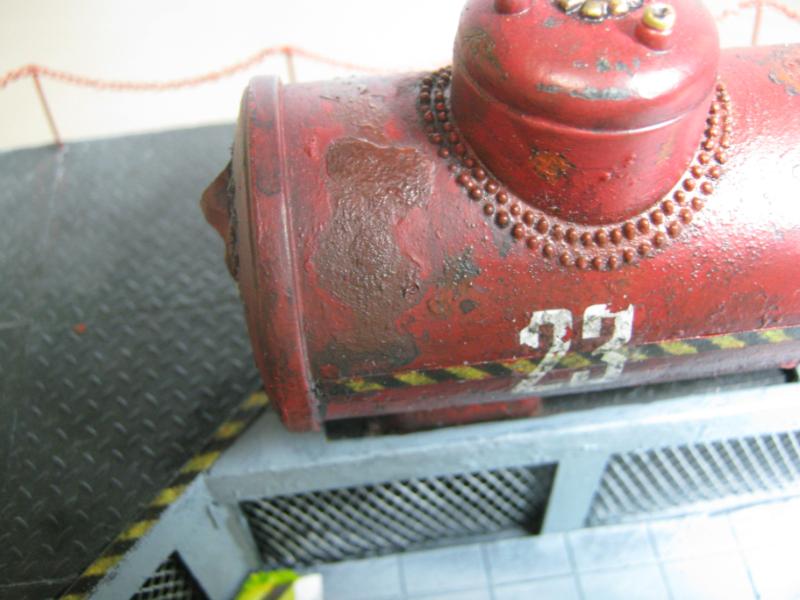
Lots to share in this update. Spent the last couple days getting to where the project is right now. I did a lot of experimentation on it this time, and I'm hoping some of the rust ideas help other people. I don't have the painting technique down completely, but I have figured out the modeling aspect.
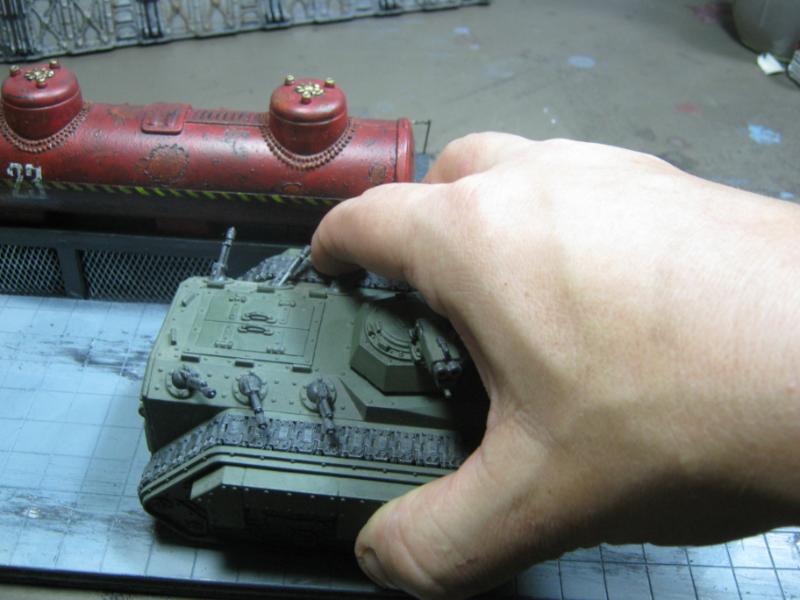
Here's an 'action shot' to show what this facility is for and to offer some scale perceptive. It also helped me w/ the width of the tracks and figure out where the track damage would be from the vehicles pulling in:
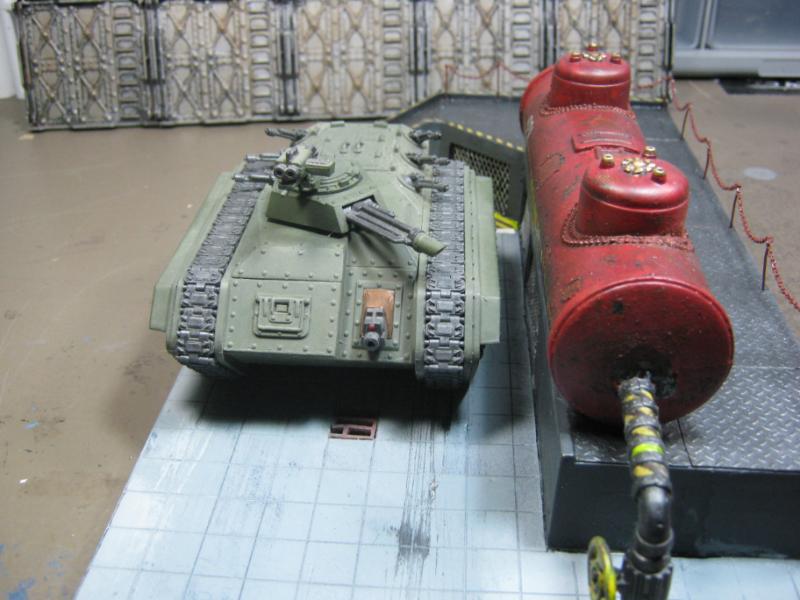
Then I had the great idea to use the Chimera to actually make marks on the tiles. I scraped it back and forth until I had clear makings:
Here's how it came out. Pretty rough, but gives me an area to work with later:
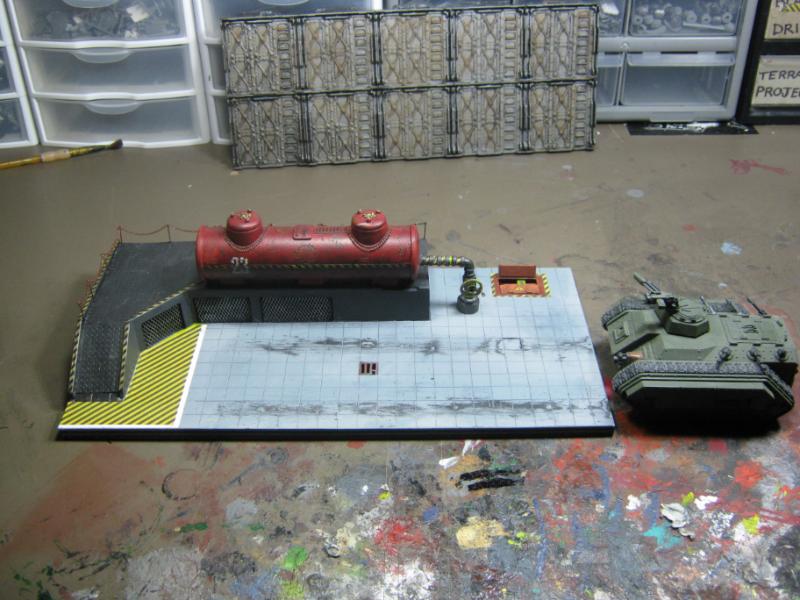
I also repainted the concrete platform and gave it more texture along the way to try for that 'concrete' look:
And I finished the chain railing (minus wash). It was annoying to have to keep going back over the chain as there were shiny bits here and there all over the chain as it twisted from being painted. Took quite a while to get this done correctly:
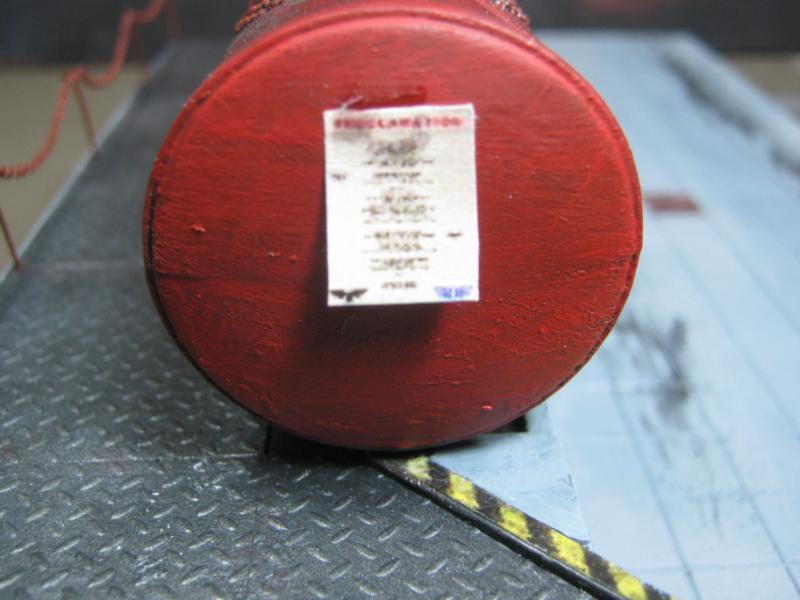
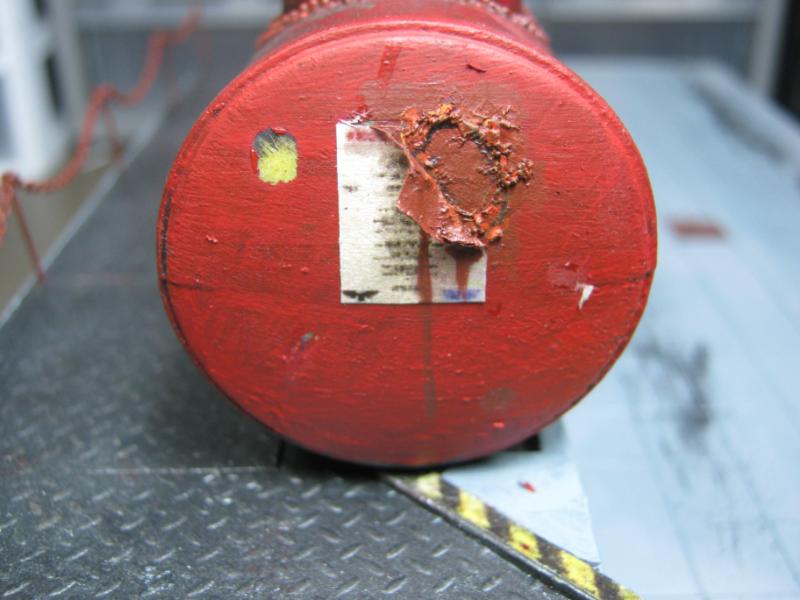
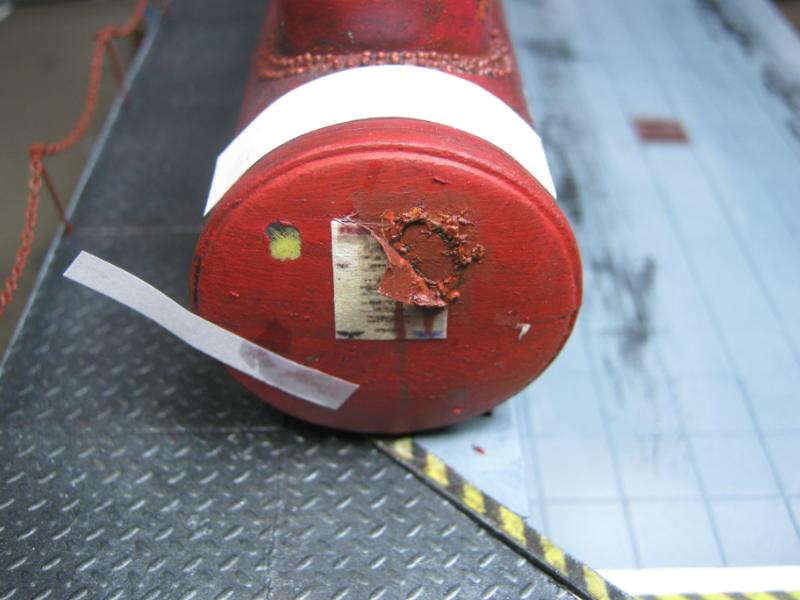
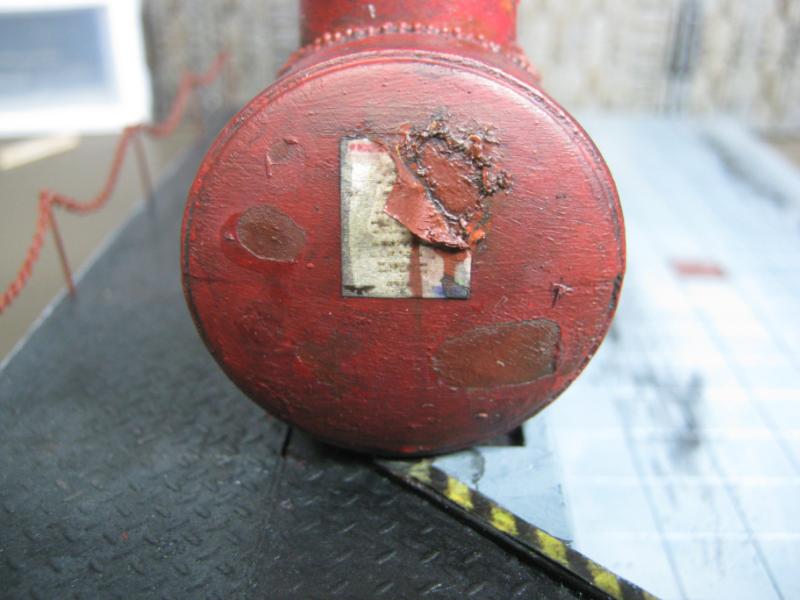
I started the end of the tank where I had the Aquila before. This time I went for what I envision as an instruction sheet sticker like you see on industrial tank, fuel trucks, etc. I like this a lot better:
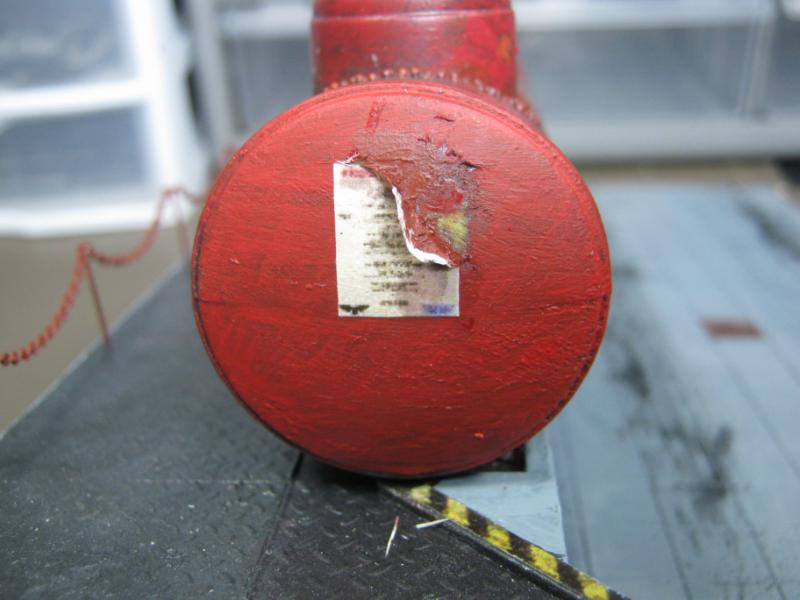
I messed it up a bit to look like rust had started beneath the sticker and is pealing off.
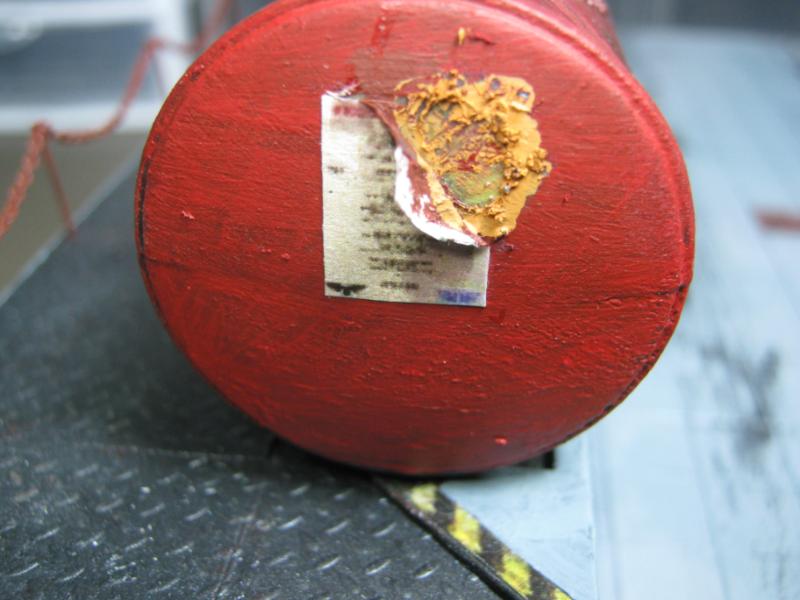
The 'border' I have been making for my rust spots was really difficult on this one for some reason, so I tried something different. I globed on some thicker paint (in this case Vomit Brown) and waited for it to almost dry:

It turned out to a bit more messy than I had intended, but now I know how to do it and just need some practice. I'll be trying this again soon:
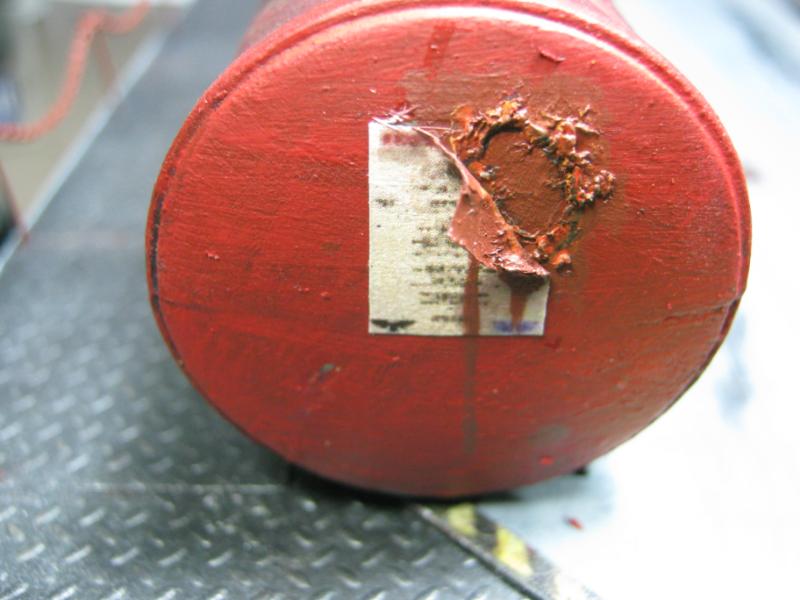
I smoothed it out a bit and then painted the dark base:
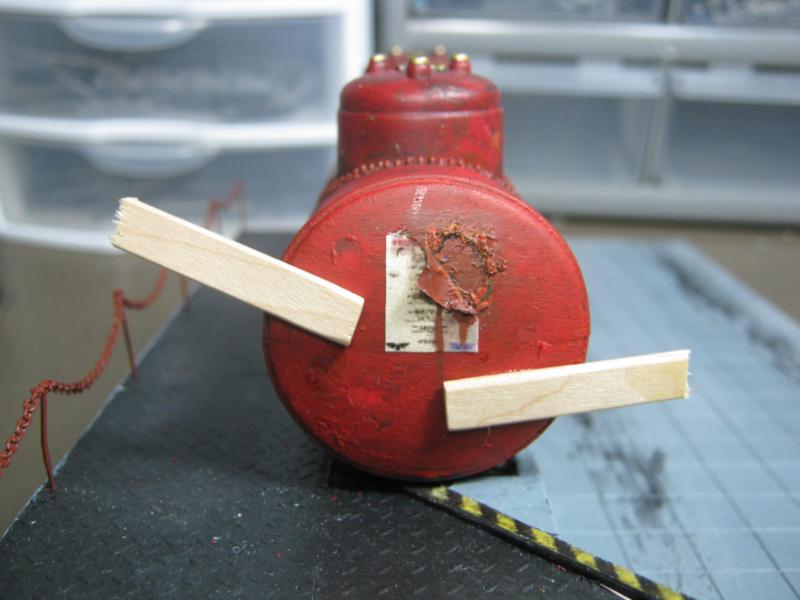
Here's a bit of experimentation. You'll see what works and what doesn't as I go along. I noticed something earlier when I was working with the fuel pipe on the other side of the tank. When I had to take the model apart I pulled it off (the beauty of superglue) and it took a huge chunk off down to the basecoat. At first I was really bummed, but then I realized it was an awesome rust effect. So this time I tried it on purpose. Here's what I did:
First I glued some matchsticks to the paint. Here are the before and after pics:

Not what I was looking for, but I also kept in mind there are only two coats of paint on this instead of my 3-4. So I tried paper instead. This was a mistake. Never do this. I had to do a lot of work to fix this, and I didn't bother to show the end result. Suffice to say it took me about 20 minutes to fix the damage I cause to the main tank.
The next test was something a bit more manageable- coffee stir stick. Here's the before / after. I really like how this came out:
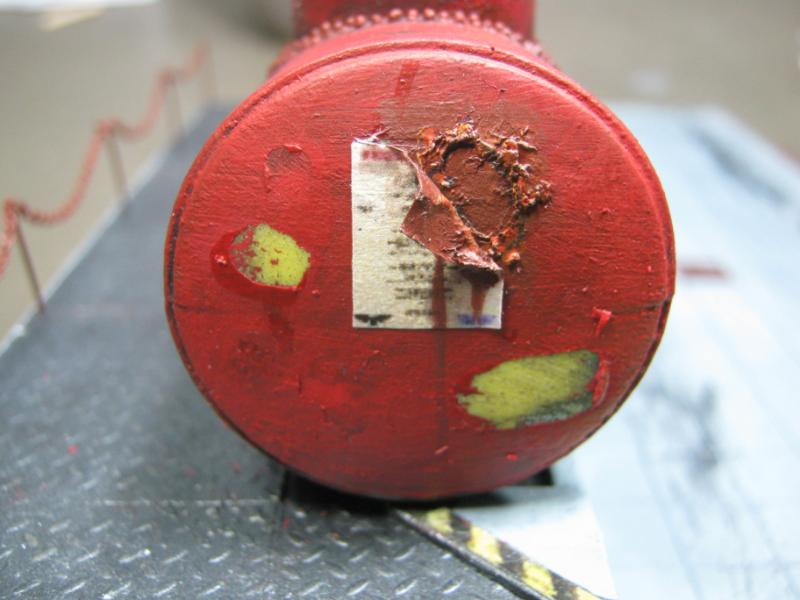
I put a bit of rust on it to see how it would look w/ color. I like this a lot.
Here's an 'after' shot from the paper debacle, except with paint on it. I'll admit that once I had it cleaned up the efft was pretty cool, but I still recommending not doing this.
Also tried a stipple effect on the rust spots. Came out well I think:

In between waiting for things to try I was busy on the trash can. The paint pot is not part of the model.  I put a lot of thougt into this and I tried to make things as varied as I could while staying within a realistic idea that someone would throw that away, with a couple twists. I kept adding to it more and more until I really liked how it looked, and knew it would get even better once i could put it on the base and add more things.
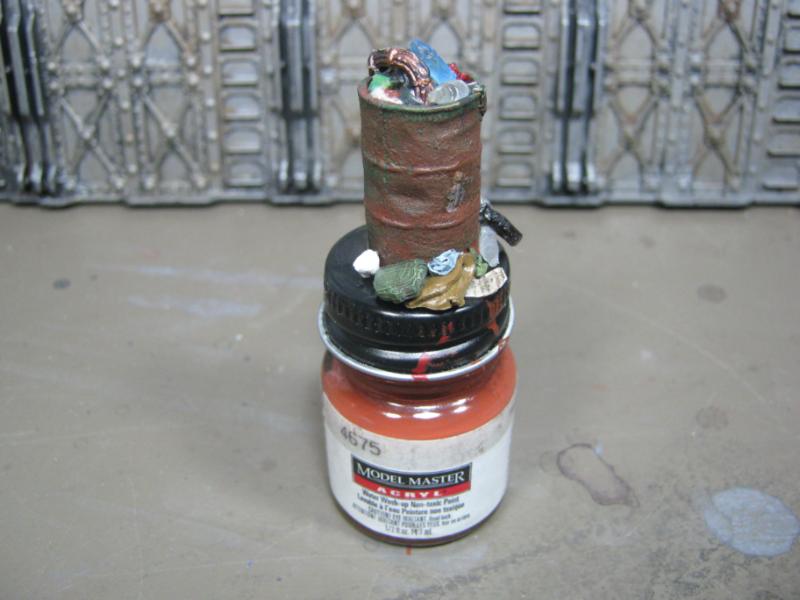
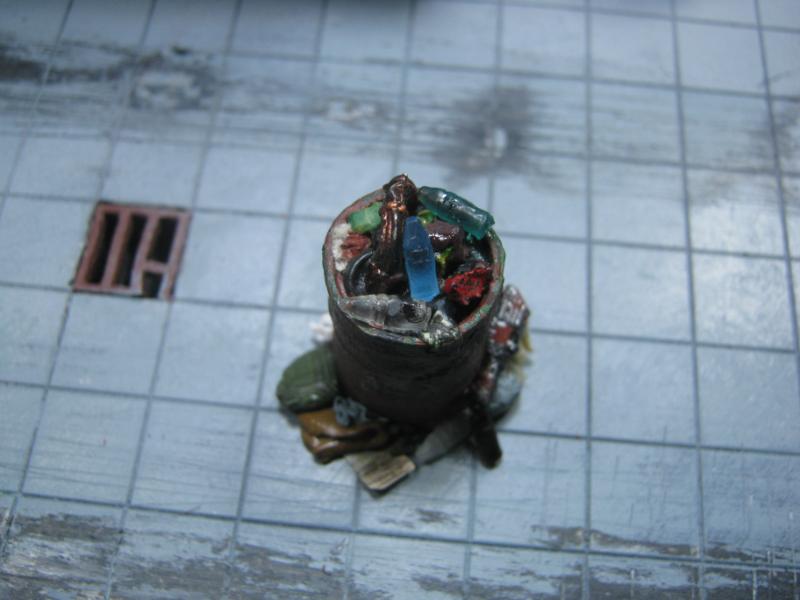
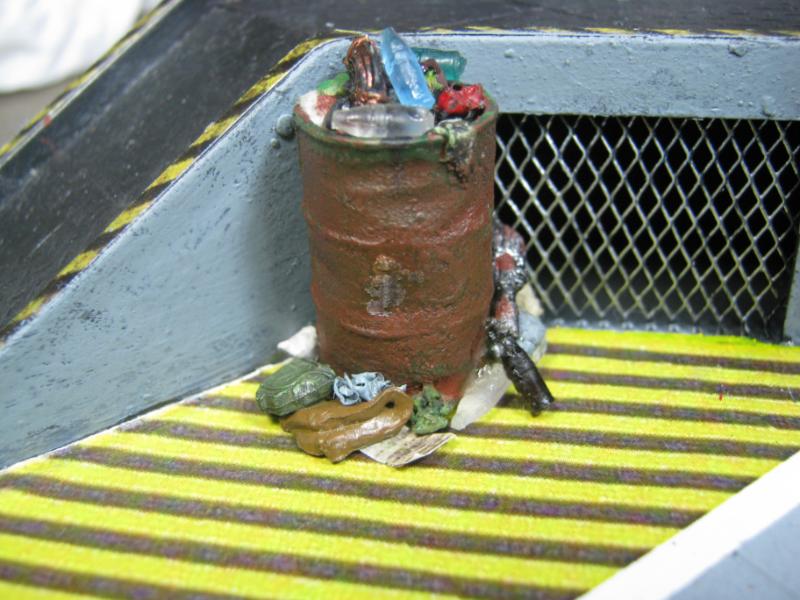
First black wash. I like the subtle shadows that are created by layers of light washing instead of drowning it in one huge glop.
And back tot eh trash heap. It just occurred to me that I didn't take any WIP shots of how I wore down the caution stripes, but you can see the end result in the same pic. But that's not what this shot is about. I really put some attention into this, and as you look at the pics you'll notice a lot of small things just 'there', and not all of it is trash. Everything is glued in place now, so what you see if what will be staying (unless I decide to tear it all apart again). Also notice the stiff against the bottom of the wall on right side of pic. It's foam. Showing both pics here:

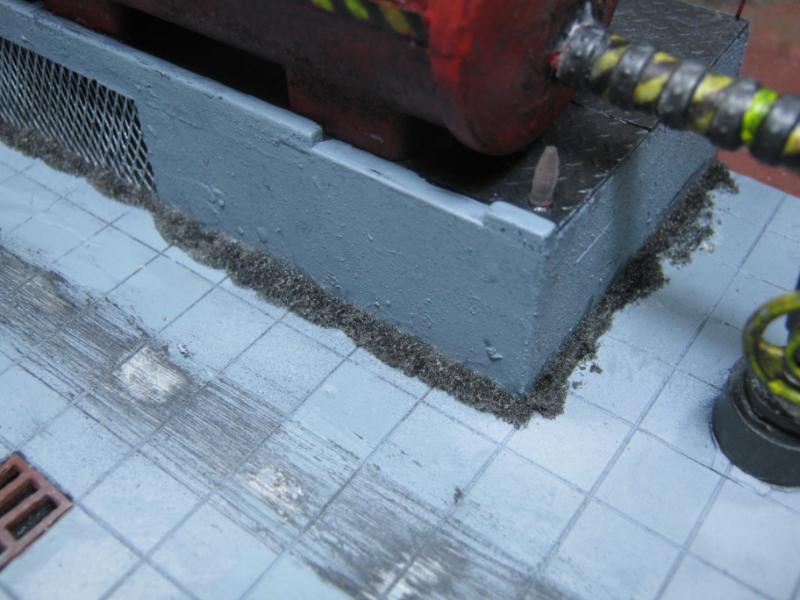
Still a lot to be done. Need washes, drybrush, weathering, etc. I think the build is almost done, just a few more 'little things' here and there. The true challenge to finish this properly will be in the paint. We'll see how that goes.
Thanks for looking and your C&C. I'll be back soon I hope.
|
|
|
|
|
|
|
|


