| Author |
Message |
 |
|
|
|
|
Advert
|
Forum adverts like this one are shown to any user who is not logged in. Join us by filling out a tiny 3 field form and you will get your own, free, dakka user account which gives a good range of benefits to you:
- No adverts like this in the forums anymore.
- Times and dates in your local timezone.
- Full tracking of what you have read so you can skip to your first unread post, easily see what has changed since you last logged in, and easily see what is new at a glance.
- Email notifications for threads you want to watch closely.
- Being a part of the oldest wargaming community on the net.
If you are already a member then feel free to login now. |
|
 |
2016/09/29 00:37:07
Subject: The (Mad) Scientist and his Army of the Second Law: Beware of the HAW206!
|
|

Decrepit Dakkanaut
|
That looks damn nice! Rivets will strengthen it and those puny muhreen weapons will just bounce off. Besides, a riveted scorpion tank? come on man!
|
"dave you are the definition of old school..." -Viktor Von Domm    My P&M Blog : My P&M Blog :
It's great how just adding a little iconography, and rivets of course, can make something look distinctly 40K-adamsouza
"Ah yes, the sound of riveting.....Swear word after swear word and the clinking of thrown tools" "Nope. It sucks do it again..."- mxwllmdr
"It puts together more terrain, or else it gets the hose again...-dangledorf2.0
"This is the Imperium, there is no peace, there are only rivets" -Vitruvian XVII
"I think rivets are the perfect solution to almost every problem"- Rawson
More buildings for the Building God! -Shasolenzabi
  |
|
|
 |
|
2016/09/29 20:58:36
Subject: The (Mad) Scientist and his Army of the Second Law: Beware of the HAW206!
|
|
Rogue Inquisitor with Xenos Bodyguards
|
Oh yeah! that does look nice and beefy compared to the Predator tank! I still have a LOT of super-heavy/heavy and normal to light tanks, I went with the Stalin ideal that "Quantity has a quality all it's own" Hence my tank collection as big as it is.
|
"Your mumblings are awakening the sleeping Dragon, be wary when meddling the affairs of Dragons, for thou art tasty and go good with either ketchup or chocolate. "
Dragons fear nothing, if it acts up, we breath magic fire that turns them into marshmallow peeps. We leaguers only cry rivets!


|
|
|
|
|
2016/10/01 20:46:55
Subject: The (Mad) Scientist and his Army of the Second Law: Beware of the Walking Tank!
|
|

Mastering Non-Metallic Metal
|
And so, after much planning (and running about Skyrim to try out a load of new mods)...
You wanted rivets. Here's some rivets:
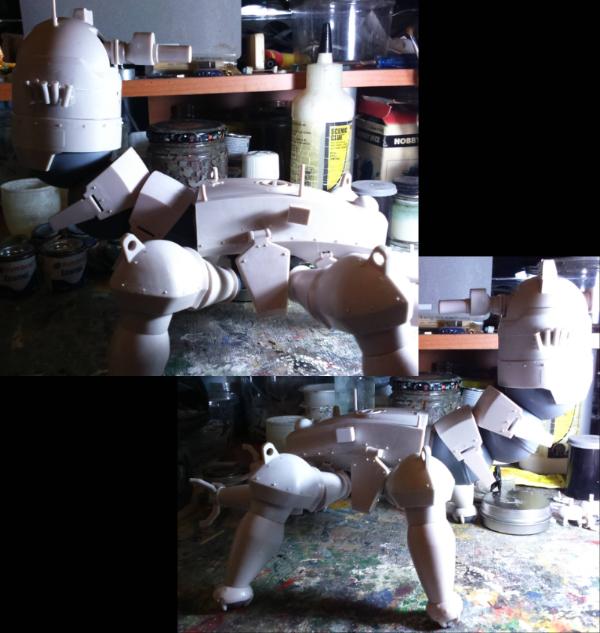
One of my bulbs has gone, so you'll be getting high-contrast photos until I get a new bulb.
There's a few more details I want to add before it's painted.
|
     Mastodon: @DrH@dice.camp Mastodon: @DrH@dice.camp
The army-                   ~2295 points (built). ~2295 points (built).
 
* -=]_,=-eague Spruemeister General. * A (sprue) Hut tutorial *
Dsteingass - Dr. H..You are a role model for Internet Morality!  // inmygravenimage - Dr H is a model to us all // inmygravenimage - Dr H is a model to us all 
Theophony - Sprue for the spruemeister, plastic for his plastic throne! // Shasolenzabi - Toilets, more complex than folks take time to think about! |
|
|
|
|
2016/10/01 23:24:30
Subject: The (Mad) Scientist and his Army of the Second Law: Beware of the Walking Tank!
|
|
Decrepit Dakkanaut
|
St. Rosie bless you my son....
|
"dave you are the definition of old school..." -Viktor Von Domm My P&M Blog :
It's great how just adding a little iconography, and rivets of course, can make something look distinctly 40K-adamsouza
"Ah yes, the sound of riveting.....Swear word after swear word and the clinking of thrown tools" "Nope. It sucks do it again..."- mxwllmdr
"It puts together more terrain, or else it gets the hose again...-dangledorf2.0
"This is the Imperium, there is no peace, there are only rivets" -Vitruvian XVII
"I think rivets are the perfect solution to almost every problem"- Rawson
More buildings for the Building God! -Shasolenzabi
|
|
|
|
|
2016/10/02 05:54:15
Subject: The (Mad) Scientist and his Army of the Second Law: Beware of the Walking Tank!
|
|
Gargantuan Great Squiggoth
|
Now that is one very spectacular model. Just beautiful.
|
|
|
|
|
|
2016/10/02 21:34:13
Subject: The (Mad) Scientist and his Army of the Second Law: Beware of the Walking Tank!
|
|
Rogue Inquisitor with Xenos Bodyguards
|
The rivets are working out very nicely!
|
"Your mumblings are awakening the sleeping Dragon, be wary when meddling the affairs of Dragons, for thou art tasty and go good with either ketchup or chocolate. "
Dragons fear nothing, if it acts up, we breath magic fire that turns them into marshmallow peeps. We leaguers only cry rivets!
|
|
|
|
|
2016/10/03 20:17:17
Subject: The (Mad) Scientist and his Army of the Second Law: Beware of the Walking Tank!
|
|
Mastering Non-Metallic Metal
|
Thanks Chaps.
I didn't mention it, but these are the water-filter bead inna' drilled divot style rivets. I thought the clean design called for round-head rivets.
Progress on the modifications has proven to be much slower than the building on the kit as I've been going back and fourth over possible additions.
I've had a look through my collection of bits and the majority just don't fit the model's design.
Either too boxy,
too curvy,
too spiky,
not suitable for the "clean" look (too clutter-y),
or not something I can rationalise would be needed; e.g. I thought about adding a towing chain, but when you have hands you don't need to tow something with a chain.
Tau items were the closest to the design I have, but I couldn't see anywhere to position any of the bits that didn't look "stuck on" for the sake of it.
Eldar, Tyranid, Ork and Space Marine stuff just didn't look right.
Many things also interfered with other elements of the tank's design (getting in the way of the defence lasers, line of sight from the various "eyes", or just making the thing even taller...).
And then I came across the Necron bits, and one piece (of many) in particular... the simple scarab.
What better for a walking spider/scorpion tank, than it's own personal grooming repair walking bug. 
But to have a repair bug, it needed damage:
New bulbs are incoming, but in the mean time I've found an old "yellow" bulb to make the photos slightly less high-contrast.
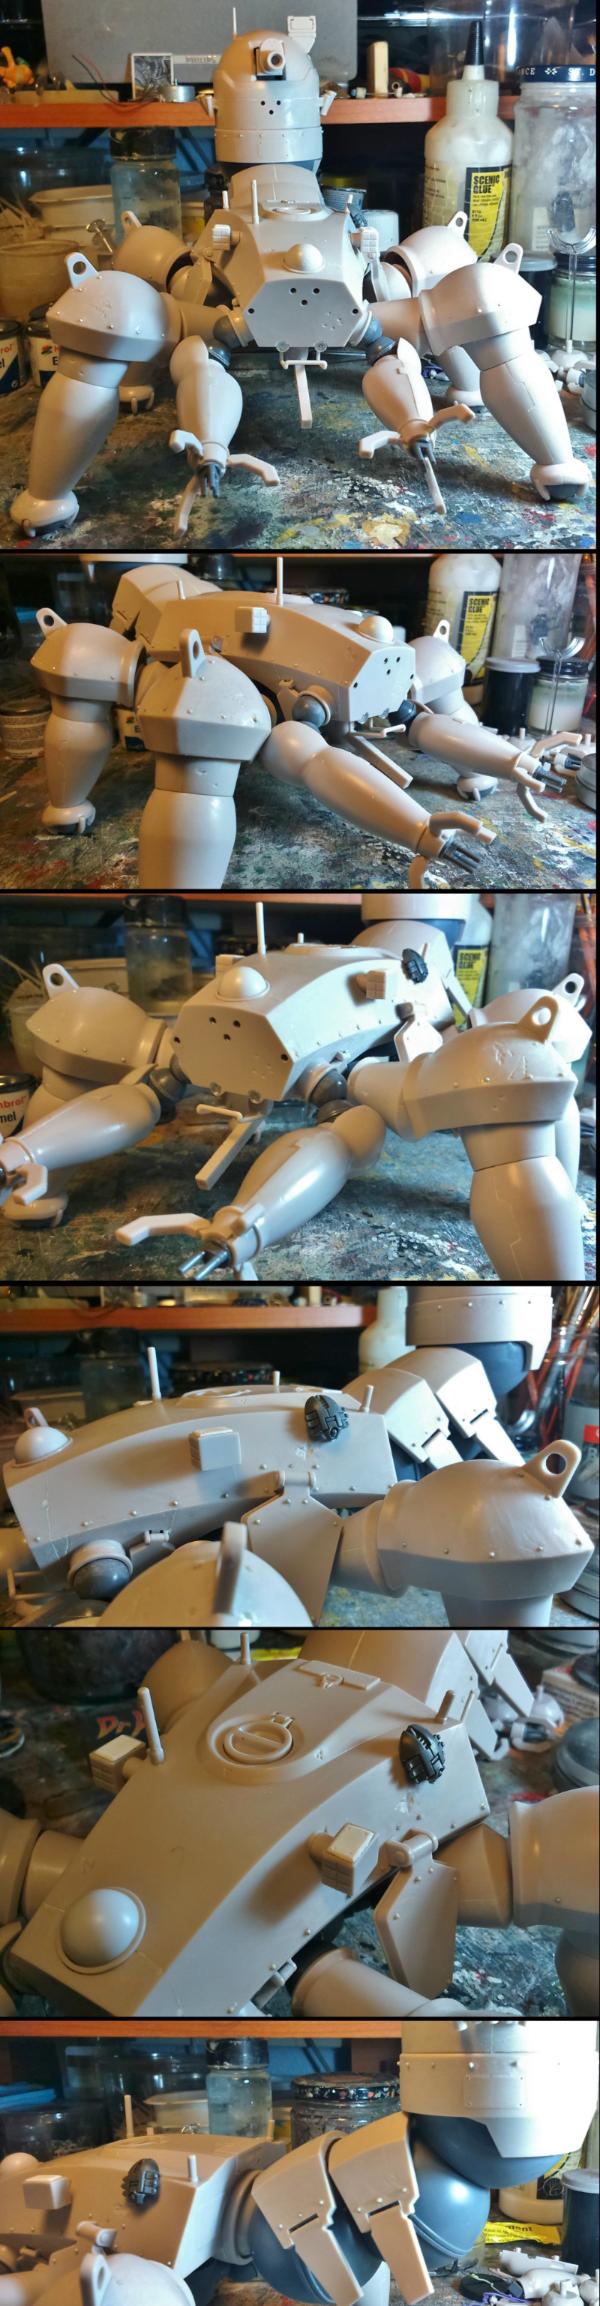
To the right, as you look at it, of the scarab will be painted as if it's just been welded (or similar).
Kept the rest of the damage fairly low-key. This is meant to be heavily armoured, the majority of incoming fire is either going to do nothing or kill it. For those in-between, it'll be repaired by the scarab. So the only damage left will be too minor for it to bother repairing.
I have plans for a little flag/banner to hang from the bull-bar at the front, and that'll be pretty much it before painting.
In other news; I've opened my Etsy shop so that I can sell things "legitimately". Still got to work on filling the "shelves" and creating a look for the shop, but open for business.  The Mini Details of DrH - Etsy Shop
|
Mastodon: @DrH@dice.camp
The army- ~2295 points (built).
* -=]_,=-eague Spruemeister General. * A (sprue) Hut tutorial *
Dsteingass - Dr. H..You are a role model for Internet Morality! // inmygravenimage - Dr H is a model to us all
Theophony - Sprue for the spruemeister, plastic for his plastic throne! // Shasolenzabi - Toilets, more complex than folks take time to think about! |
|
|
|
|
2016/10/03 21:17:53
Subject: The (Mad) Scientist and his Army of the Second Law: Beware of the Walking Tank!
|
|
Decrepit Dakkanaut
|
Looks damn fine mate. I like the scurrying beastie! Etsy store is neat idea, will you be putting your resin goodies up?
|
Theophony"... and there's strippers in terminator armor and lovecraftian shenanigans afoot."
Solar_Lion: "Man this sums up your blog nicely."
Anpu-adom: "being Geek is about Love. Some love broadly. Some love deeply. And then there are people like Graven. |
|
|
|
|
2016/10/03 21:36:11
Subject: The (Mad) Scientist and his Army of the Second Law: Beware of the Walking Tank!
|
|
Mastering Non-Metallic Metal
|
Ta. It was a good 15-20mins of just deciding which way round to have the scarab.  This way it looks more like it's own separate entity.
Etsy store is neat idea, will you be putting your resin goodies up?
For the things I'm trying to sell it seems to make more sense than a general ebay shop. Etsy is more handmade artwork focused.
I may put my casts on there. But they'll have to be in groups (rather than individual) as the fees for selling make small prices worthless, especially if they don't sell quickly.
Either way, for things like that it'll be much cheaper (for everyone) to just contact me through DDakka... that reminds me to poke my swapshop thread.
|
Mastodon: @DrH@dice.camp
The army- ~2295 points (built).
* -=]_,=-eague Spruemeister General. * A (sprue) Hut tutorial *
Dsteingass - Dr. H..You are a role model for Internet Morality! // inmygravenimage - Dr H is a model to us all
Theophony - Sprue for the spruemeister, plastic for his plastic throne! // Shasolenzabi - Toilets, more complex than folks take time to think about! |
|
|
|
|
2016/10/04 12:38:55
Subject: The (Mad) Scientist and his Army of the Second Law: Beware of the Walking Tank!
|
|
Never Forget Isstvan!
|
Big beast for sure. need to put a recognizable figure next to it, so we can get a true scale idea just how big.
|
|
This message was edited 1 time. Last update was at 2016/10/04 12:39:20
|
|
|
|
|
2016/10/04 16:19:43
Subject: The (Mad) Scientist and his Army of the Second Law: Beware of the Walking Tank!
|
|
Mastering Non-Metallic Metal
|
 Solar_lion wrote: Solar_lion wrote:Big beast for sure. need to put a recognizable figure next to it, so we can get a true scale idea just how big.
Did you miss the Space Marine standing underneath this tank in the top photo here:
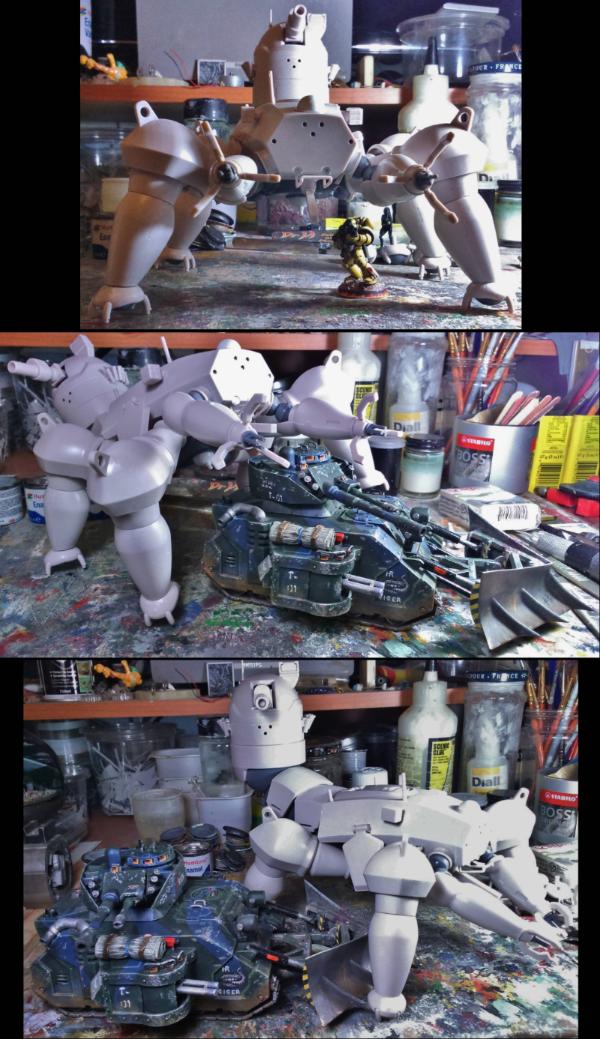
Or that it can, just about, step up onto a basic Rhino chassis.
The front end of the tank can be posed quite a bit lower though as you can see here:
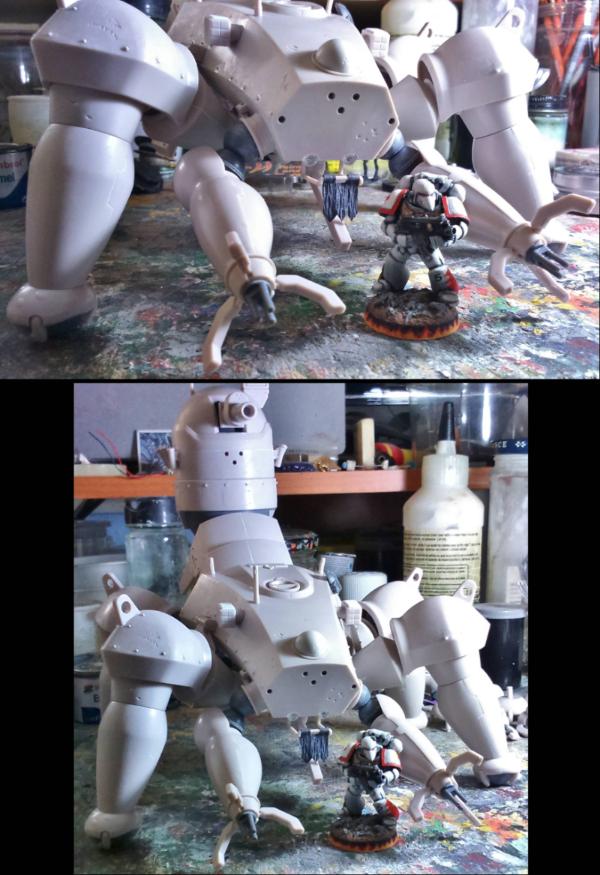
He could still walk under the tank though, if it let him...
Posed like this, the top of the "body" of the tank is about 9cm from the table. The gun of the turret is 16cm from the table. How tall are the GW knight titans, or at least the height of their guns?
Also, the purpose of that last picture is actually to show the added banner at the front. Should be good for a simple piece of (Mad) Scientist propaganda.
With that, it's probably about ready to paint.
Time to pour over references to pick out a scheme for this beasty.
I'll be back soon...ish
|
Mastodon: @DrH@dice.camp
The army- ~2295 points (built).
* -=]_,=-eague Spruemeister General. * A (sprue) Hut tutorial *
Dsteingass - Dr. H..You are a role model for Internet Morality! // inmygravenimage - Dr H is a model to us all
Theophony - Sprue for the spruemeister, plastic for his plastic throne! // Shasolenzabi - Toilets, more complex than folks take time to think about! |
|
|
|
|
2016/10/04 20:18:15
Subject: The (Mad) Scientist and his Army of the Second Law: Beware of the Walking Tank!
|
|
Combat Jumping Ragik
|
Second photo down. Some odd sort of Pr0n. Fortunately they cannot reproduce. 
Progressing nicely, but it looks like the tachikoma practically assembles itself.
|
|
|
|
|
|
2016/10/04 22:48:35
Subject: The (Mad) Scientist and his Army of the Second Law: Beware of the Walking Tank!
|
|
Mastering Non-Metallic Metal
|
For once you've had a dirtier mind than I, Red'.
If I had had that thought, I'd have positioned the "tail" differently.
Yeah, the kit was a joy to assemble. Everything slots into everything else, the fit is tight and neat, and with all the polyethylene joints it can be pulled apart to paint and reassembled easily.
|
Mastodon: @DrH@dice.camp
The army- ~2295 points (built).
* -=]_,=-eague Spruemeister General. * A (sprue) Hut tutorial *
Dsteingass - Dr. H..You are a role model for Internet Morality! // inmygravenimage - Dr H is a model to us all
Theophony - Sprue for the spruemeister, plastic for his plastic throne! // Shasolenzabi - Toilets, more complex than folks take time to think about! |
|
|
|
|
2016/10/04 22:56:41
Subject: The (Mad) Scientist and his Army of the Second Law: Beware of the Walking Tank!
|
|
Never Forget Isstvan!
|
Thanks for the scale shot.
|
|
|
|
|
|
2016/10/04 22:59:06
Subject: The (Mad) Scientist and his Army of the Second Law: Beware of the Walking Tank!
|
|
Gargantuan Great Squiggoth
|
It's a really great looking kit, and looking at the prices it is pretty reasonable for the money. If I were to get one it would probably be for conversion which would almost be criminal I think. Might take inspiration and scratch up something similar. Been thinking of doing a sand spider walker for my orks for ages, this may be the push I need.
|
|
|
|
|
|
2016/10/05 00:02:38
Subject: The (Mad) Scientist and his Army of the Second Law: Beware of the Walking Tank!
|
|
Mastering Non-Metallic Metal
|
Not a problem, Solar'. It really is a big beastie. Although far from the largest model I've built.
Cam': Yeah, I got it on a good deal from hobbylink Japan. Cheaper (~£35 I think) than it is now (~£40) http://hlj.com/product/KBYKP-259#
For the amount of model you get, it's a nice price. Considering the quality of the kit, it's great.
I'll be keeping an eye out for any Kotobukiya kits in the future, they have impressed me.
Once I start painting I'll show all the sub-assemblies and you can see how easy it would be to swap out pieces for conversions.
There's little need to chop something off as most joints can be disassembled easily due to the PE.
However, any conversions would probably have to be permanent, as making something that would fit as well as the kit parts would be difficult...
...But not impossible. I would go as far as using Oyumaru to make exact casts of the pegs for any part I would swap out and then build that peg into the replacement.
Or (I've not measured) there may be standard plastic rods that would fit the holes, making it really easy.
However, I'm such a fan on the design I couldn't bring myself to do any major changes to my only one.
If I got another...
There's not a huge scope for doing anything internal to any of the parts due to the joints and structure filling the sub-assemblies. But then, you could work with them.
Good to see it inspire though.
|
Mastodon: @DrH@dice.camp
The army- ~2295 points (built).
* -=]_,=-eague Spruemeister General. * A (sprue) Hut tutorial *
Dsteingass - Dr. H..You are a role model for Internet Morality! // inmygravenimage - Dr H is a model to us all
Theophony - Sprue for the spruemeister, plastic for his plastic throne! // Shasolenzabi - Toilets, more complex than folks take time to think about! |
|
|
|
|
2016/10/05 02:21:20
Subject: The (Mad) Scientist and his Army of the Second Law: Beware of the Walking Tank!
|
|
Decrepit Dakkanaut
|
That's amazeballs! Could you be assed to take some close-up shots and do a quick how-to of the technique for all the little riveteers to aspire to?
|
|
This message was edited 1 time. Last update was at 2016/10/05 02:21:48
"dave you are the definition of old school..." -Viktor Von Domm My P&M Blog :
It's great how just adding a little iconography, and rivets of course, can make something look distinctly 40K-adamsouza
"Ah yes, the sound of riveting.....Swear word after swear word and the clinking of thrown tools" "Nope. It sucks do it again..."- mxwllmdr
"It puts together more terrain, or else it gets the hose again...-dangledorf2.0
"This is the Imperium, there is no peace, there are only rivets" -Vitruvian XVII
"I think rivets are the perfect solution to almost every problem"- Rawson
More buildings for the Building God! -Shasolenzabi
|
|
|
|
|
2016/10/05 06:14:14
Subject: The (Mad) Scientist and his Army of the Second Law: Beware of the Walking Tank!
|
|
Rogue Inquisitor with Xenos Bodyguards
|
Ah, Cron walker then! good choice!
|
"Your mumblings are awakening the sleeping Dragon, be wary when meddling the affairs of Dragons, for thou art tasty and go good with either ketchup or chocolate. "
Dragons fear nothing, if it acts up, we breath magic fire that turns them into marshmallow peeps. We leaguers only cry rivets!
|
|
|
|
|
2016/10/05 14:44:09
Subject: The (Mad) Scientist and his Army of the Second Law: Beware of the Walking Tank!
|
|
Mastering Non-Metallic Metal
|
dsteingass wrote:That's amazeballs! Could you be assed to take some close-up shots and do a quick how-to of the technique for all the little riveteers to aspire to?
Of the rivets?
Not a problem.
First find a water filter:

Other types are available. 
Open it up and remove the contents.
Then separate the contents into the black carbon gravel and the white-ish beads.
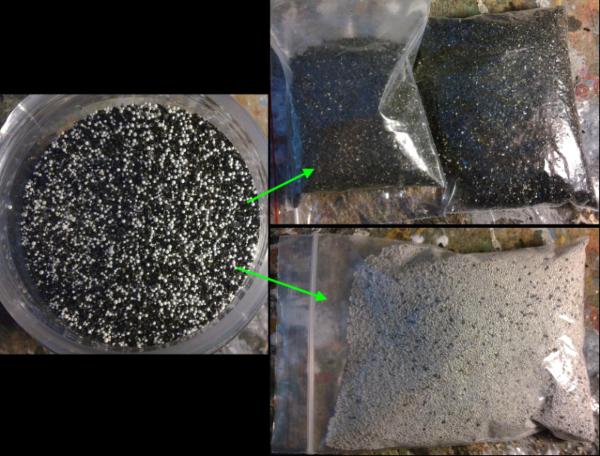
Then follow this:
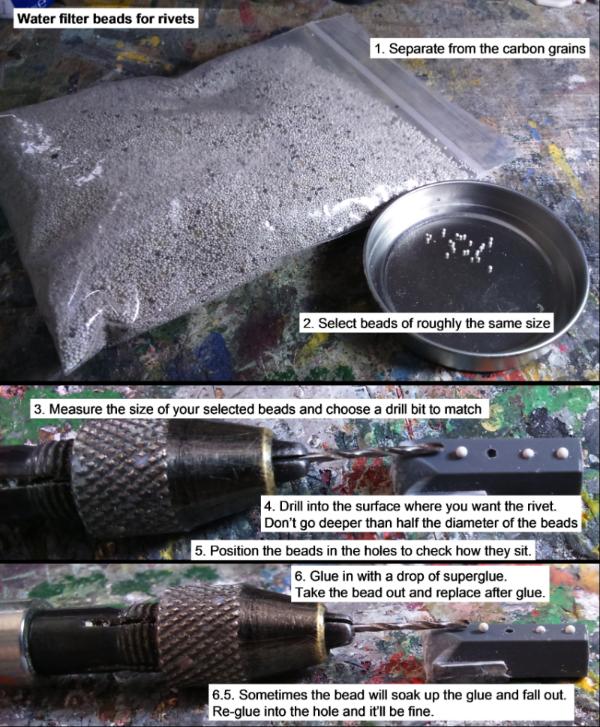
You may also want to tidy up around the rivets once the glue has set, they can get a bit messy with excess glue.
shasolenzabi wrote:Ah, Cron walker then! good choice!
Well not necessarily Necron in origin. I've not written any fluff for this yet, but I feel it's going to be The Scientist's invention. But with access to Necron technology he can add a repair scarab.
I've also still to create some rules for this thing.
Apparently, the main gun is supposed to be the same calibre as a Leman Russ tank, but is a shorter barrel. So I'll use that as a basis.
The 12.7mm Gatling guns, I don't know what to base on, possibly the Space Marine assault cannon.
Then there's defences against laser-guided weapons, smoke launchers, spotlights (those are the square blocks on either side of the body), and the manoeuvrability and armour rating... 
Anyway, it's disassembled for painting, I said I'd show all the pieces:
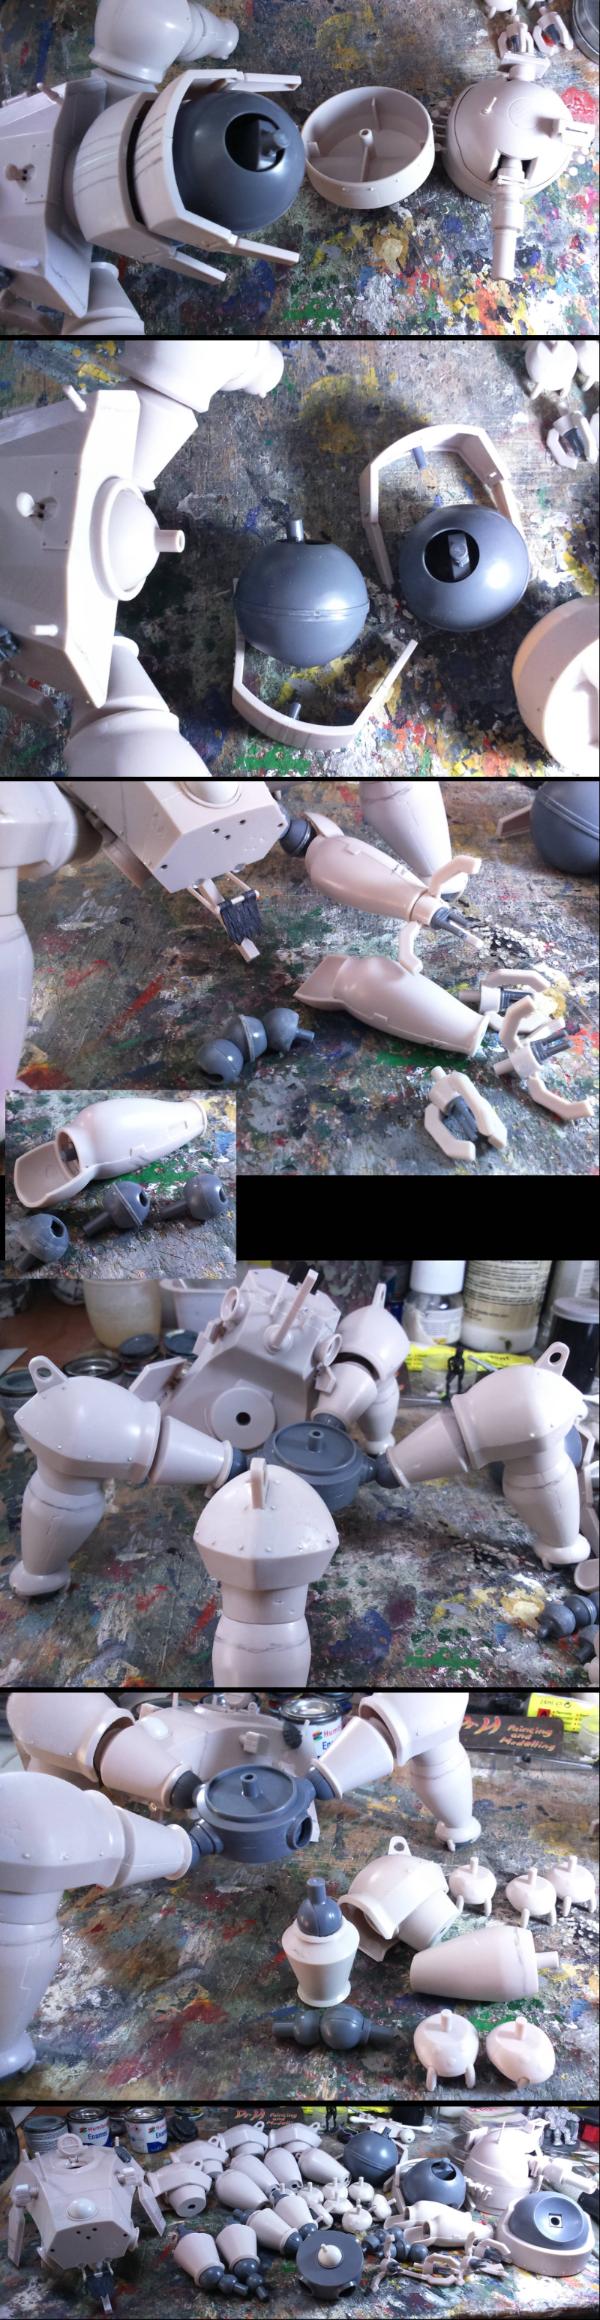
Primed since then.
Still considering paint scheme; thinking of white with either orange or purple at the moment (also with large sections of hazard stripes)...
|
Mastodon: @DrH@dice.camp
The army- ~2295 points (built).
* -=]_,=-eague Spruemeister General. * A (sprue) Hut tutorial *
Dsteingass - Dr. H..You are a role model for Internet Morality! // inmygravenimage - Dr H is a model to us all
Theophony - Sprue for the spruemeister, plastic for his plastic throne! // Shasolenzabi - Toilets, more complex than folks take time to think about! |
|
|
|
|
2016/10/05 15:42:29
Subject: The (Mad) Scientist and his Army of the Second Law: Beware of the Walking Tank!
|
|
Decrepit Dakkanaut
|
Fantastic tut! Thanks! You can do some gnarly weathering on white paint jobs- the contrast colors becomes the key then.
|
"dave you are the definition of old school..." -Viktor Von Domm My P&M Blog :
It's great how just adding a little iconography, and rivets of course, can make something look distinctly 40K-adamsouza
"Ah yes, the sound of riveting.....Swear word after swear word and the clinking of thrown tools" "Nope. It sucks do it again..."- mxwllmdr
"It puts together more terrain, or else it gets the hose again...-dangledorf2.0
"This is the Imperium, there is no peace, there are only rivets" -Vitruvian XVII
"I think rivets are the perfect solution to almost every problem"- Rawson
More buildings for the Building God! -Shasolenzabi
|
|
|
|
|
2016/10/06 20:36:25
Subject: Re:The (Mad) Scientist and his Army of the Second Law: Beware of the Walking Tank!
|
|
Longtime Dakkanaut
|
Love that cockpit detail no one will see ! You should do a cutaway version revealing the interior, but then you'd need to scratch build all the piping , wires engines etc etc ! 
It actually looks very 80's Rogue Trader. I approve !
|
|
|
|
|
|
2016/10/06 22:31:53
Subject: The (Mad) Scientist and his Army of the Second Law: Beware of the Walking Tank!
|
|
Mastering Non-Metallic Metal
|
dsteingass wrote:Fantastic tut! Thanks!
No problem. You can do some gnarly weathering on white paint jobs- the contrast colors becomes the key then.
That you can. Still contemplating scheme... Big H wrote:Love that cockpit detail no one will see ! You should do a cutaway version revealing the interior, but then you'd need to scratch build all the piping , wires engines etc etc ! It actually looks very 80's Rogue Trader. I approve !
Thanks Big'. It's not the first time I've built and painted something that'll be hidden inside a model... and won't be the last. At least I now take photos of the hidden things. A cutaway would be cool. Not today though. While I procrastinate on the paint scheme I've had a play with my 3D printing pen:  It'll take practice (as most things do), but it's never going to be a replacement for straight lines. And yes, I was a bit over-ambitious on the first attempt. After some trial and error I settled on heat and speed settings; I've got it towards the top end of heat so that the plastic flows more like a glue that just an extruded plastic (would be useful for other applications), and the speed is almost at it's slowest. I found the best method (for varying values of "best") was to keep the pen as upright as possible so that you can move in any direction; pushing forward doesn't work out well, as you might expect. A paper surface is good as the plastic sticks to the paper and allows you to draw the shape. If it doesn't stick in place you end up dragging the extruded plastic about the place rather than drawing a line. The paper did curve up as the plastic cooled, but once the plastic is peeled off the paper (comes off easily with no problems) it appears to sit quite flat. The final structure is pretty solid. Holding the tip of the pen to an existing piece of plastic just before extruding the next piece melts them together and forms a pretty permanent bond. You have to stop extruding before moving the pen away, but even then you end up with lots of little strands. These can be "cut" off with the hot tip of the pen though. I may need to investigate the creation (or acquisition) of a hot implement for smoothing the prints. Could be the start of some interesting things.
|
|
This message was edited 1 time. Last update was at 2016/10/06 22:32:46
Mastodon: @DrH@dice.camp
The army- ~2295 points (built).
* -=]_,=-eague Spruemeister General. * A (sprue) Hut tutorial *
Dsteingass - Dr. H..You are a role model for Internet Morality! // inmygravenimage - Dr H is a model to us all
Theophony - Sprue for the spruemeister, plastic for his plastic throne! // Shasolenzabi - Toilets, more complex than folks take time to think about! |
|
|
|
|
2016/10/07 01:40:59
Subject: Re:The (Mad) Scientist and his Army of the Second Law: Beware of the Walking Tank!
|
|
Decrepit Dakkanaut
|
Wow! So fracking cool! If I had that, I'd lock myself in my basement and just make
|
"dave you are the definition of old school..." -Viktor Von Domm My P&M Blog :
It's great how just adding a little iconography, and rivets of course, can make something look distinctly 40K-adamsouza
"Ah yes, the sound of riveting.....Swear word after swear word and the clinking of thrown tools" "Nope. It sucks do it again..."- mxwllmdr
"It puts together more terrain, or else it gets the hose again...-dangledorf2.0
"This is the Imperium, there is no peace, there are only rivets" -Vitruvian XVII
"I think rivets are the perfect solution to almost every problem"- Rawson
More buildings for the Building God! -Shasolenzabi
|
|
|
|
|
2016/10/07 04:26:20
Subject: The (Mad) Scientist and his Army of the Second Law: Beware of the Walking Tank!
|
|
Gargantuan Great Squiggoth
|
Cool.
One idea would be to try it on silicone molds. Making hollow pieces. Also would be interesting to see if it is hot melted enough to take a texture from below.
And I use soldering iron's a lot for heated sculpting tools. My best is a gas one, has a very variable temperature and I have several different tips.
I can see massive potential in these, but just like 3d printers, it will depend on results. You can get a 3d printer for couple hundred pounds, but for our purposes it is really of little use because of the level of finished detail. You have to spend a lot of money to get good results. I really hope that some practice and you will find that this performs as well as we hope. Be very interested to see how you get on.
|
|
|
|
|
|
2016/10/07 05:54:52
Subject: The (Mad) Scientist and his Army of the Second Law: Beware of the Walking Tank!
|
|
Pious Palatine
|
That giant robot is super cool. Ultimate props for painting up the cockpit even though it can't be seen, it looked super cool.
EDC
|
|
|
|
|
2016/10/13 23:22:19
Subject: Re:The (Mad) Scientist and his Army of the Second Law: Beware of the Walking Tank!
|
|
Mastering Non-Metallic Metal
|
Apologies for that long wait, been doing behind-the-scenes things for the Etsy shop and making a present, thinking of another present, and planning the build for the LoER terrain contest...
And scratching my head on the paint scheme for the tank... more on that below.
dsteingass wrote:Wow! So fracking cool! If I had that, I'd lock myself in my basement and just make ...
Yeah, with patience and a steady hand (and the right setting on the printer) those could be done. And so could wrought iron gates/fences. Much potential, but really tricky to do something neat straight off.
Camkierhi wrote:Cool.
One idea would be to try it on silicone molds. Making hollow pieces. Also would be interesting to see if it is hot melted enough to take a texture from below.
It can be turned up hotter to melt the plastic more than I've been using (not tried it on full POWER yet), not sure it'll go far enough to make it runny enough to fill moulds though. I'll have to give it a go at some point though.
And I use soldering iron's a lot for heated sculpting tools. My best is a gas one, has a very variable temperature and I have several different tips.
I had the same idea and tried out a "spare" soldering iron we had. It works... kind of; not really hot enough to melt the plastic without touching it, too hot to use with long contact (long being seconds).
Good for getting rid of large errors, but not easy to really produce smooth, rounded shapes.
However, I've also discovered (as it's not mentioned in the packaging, booklet, or anywhere else) that the filament I have is ABS, not PLA, and therefore can be smoothed (dissolved) and glued with poly cement (and therefore other solvents). Good for getting rid of the fine strings you get as you pull the printer away from the melted plastic, and for smoothing rough/sanded parts.
I can see massive potential in these, but just like 3d printers, it will depend on results. You can get a 3d printer for couple hundred pounds, but for our purposes it is really of little use because of the level of finished detail. You have to spend a lot of money to get good results. I really hope that some practice and you will find that this performs as well as we hope. Be very interested to see how you get on.
Ja. These are much cheaper than a full 3D printer, but are not going to replace them as the way they produce the extruded plastic is different (there'll be no building up a shape in thin layers); different tool for different jobs.
I'll keep experimenting with it (some has been done on the present I mentioned, but can't show yet) and practising with it, and we'll all see how it goes.
evildrcheese wrote:That giant robot is super cool. Ultimate props for painting up the cockpit even though it can't be seen, it looked super cool.
EDC
Ta. If someone has taken the time to design and cast a piece, the least we can do is paint it. And photos mean we can always look back at it.
And on that theme (the tank): I have started painting...
Don't get excited though, it's just the base coat.

Going to paint the majority of it in an off white (highlighting up to white), and the black areas are going to be a charcoal grey or similar.
Then I'll go over those in the more exciting colours.
But I have 2 presents to finish/start before the end of the month, and I've been slacking.
|
Mastodon: @DrH@dice.camp
The army- ~2295 points (built).
* -=]_,=-eague Spruemeister General. * A (sprue) Hut tutorial *
Dsteingass - Dr. H..You are a role model for Internet Morality! // inmygravenimage - Dr H is a model to us all
Theophony - Sprue for the spruemeister, plastic for his plastic throne! // Shasolenzabi - Toilets, more complex than folks take time to think about! |
|
|
|
|
2016/10/14 20:50:17
Subject: The (Mad) Scientist and his Army of the Second Law: Beware of the Walking Tank!
|
|
Decrepit Dakkanaut
|
You're very patient. I want it to be massively garish.
|
Theophony"... and there's strippers in terminator armor and lovecraftian shenanigans afoot."
Solar_Lion: "Man this sums up your blog nicely."
Anpu-adom: "being Geek is about Love. Some love broadly. Some love deeply. And then there are people like Graven. |
|
|
|
|
2016/10/21 13:46:58
Subject: The (Mad) Scientist and his Army of the Second Law: Beware of the Walking Tank!
|
|
Mastering Non-Metallic Metal
|
Ta Graven. If I can make the planned colour scheme work out in a way that pleases me, it'll be "bright" indeed.
Sadly, no progress on the tank. Presents take priority, and one is done.
I'm showing it here as it's relevant to the 3D printing pen I showed in here; using and expanding on the parts you've seen here, as well as a new and more interesting use for the pen.
Those of you that have followed my other thread ( making money with modelling) will have seen me make quite a few earrings. Up until now, the owner has been "storing" these and her other earrings in a block of polystyrene foam (in spite of a perfectly good jewellery box), so I thought I'd make a stand to serve the purpose of the poly-foam.
She likes butterflies (as I found out when I made the previous earring/pendant set) so the "practice" 3D prints were with something like this in mind; if they turned out useful, I'd make use of them.
Previously you all saw the raw, first attempt at the printing and we discussed smoothing rough edges.

As I mentioned, it turns out I have ABS filament and so can smooth most things with solvents; the soldering iron method has some use, but is not very subtle.
One thing to point out about printing things out onto a flat surface is that you end up with one flat side and one rounded/rough side.
Since then I used the pen to add more material to the flat side to make the pieces even on both sides.
I then smoothed what I could with a combination of soldering iron and solvent.
These were glued to the main body of the stand and then I used the pen to add more details to tie the "wings" to the stand.
The heat required to melt the ABS is hot enough to melt plasticard and, so long as you avoid touching the surface, this means the printed material is firmly welded to the surface; important for possible modelling use. And both being styrene based, can be glued together with poly cement as normal.
Then I wanted a handle of sorts at the front and try out a different use for the pen.
The above technique makes use of a flat surface to "draw" the print on and anchor the extruded plastic to. This new technique makes use of the 3D side of this technology:
As the filament is fed through the pen it is heated, melts, and is then pressed through a die to extrude a length of molten/softened plastic, as it cools is hardens. With the right balance of speed and temperature you can "draw" in free space. You need a single point of contact to a solid object so that you can move the pen with respect to the print, but from then on you can branch out in any direction and create a 3D object (from a long thin line).
For the handle I embedded 2 metal wires into the body of the stand and proceeded to print around and over them, allowing the extruded plastic to twist and curl. I wrapped and overlapped the strands to create an interlocked structure strong enough for a handle.
This technique would be good for electrical arcing for SM Librarians, KFFs, and other mages/weapons/etc. for 40K and other games.
Painting though, caused me problems. Not because of the material (it takes paint perfectly fine), but what colours to use.
I started with bright colours, mainly red (to match the felt on the base) with blue and green parts in the "wings" to enhance the butterfly idea.
But it looked like something that comes from poundland for a 5 year old girl to keep her dolls happy. Not wrong if that's what you are going for, it was not what I was going for.
So I went over it all with metallics and decided to make it aged to get as far away as possible from the girl and her dolls.
But I kept the underlying colours in the many recesses to give it and interesting look, a hint of colour, and not just plain, boring metal.
And I also made some simple earrings (not involving the 3D printer) to match the pattern on some cloth that the recipient is sewing with.
That leaves us with this:
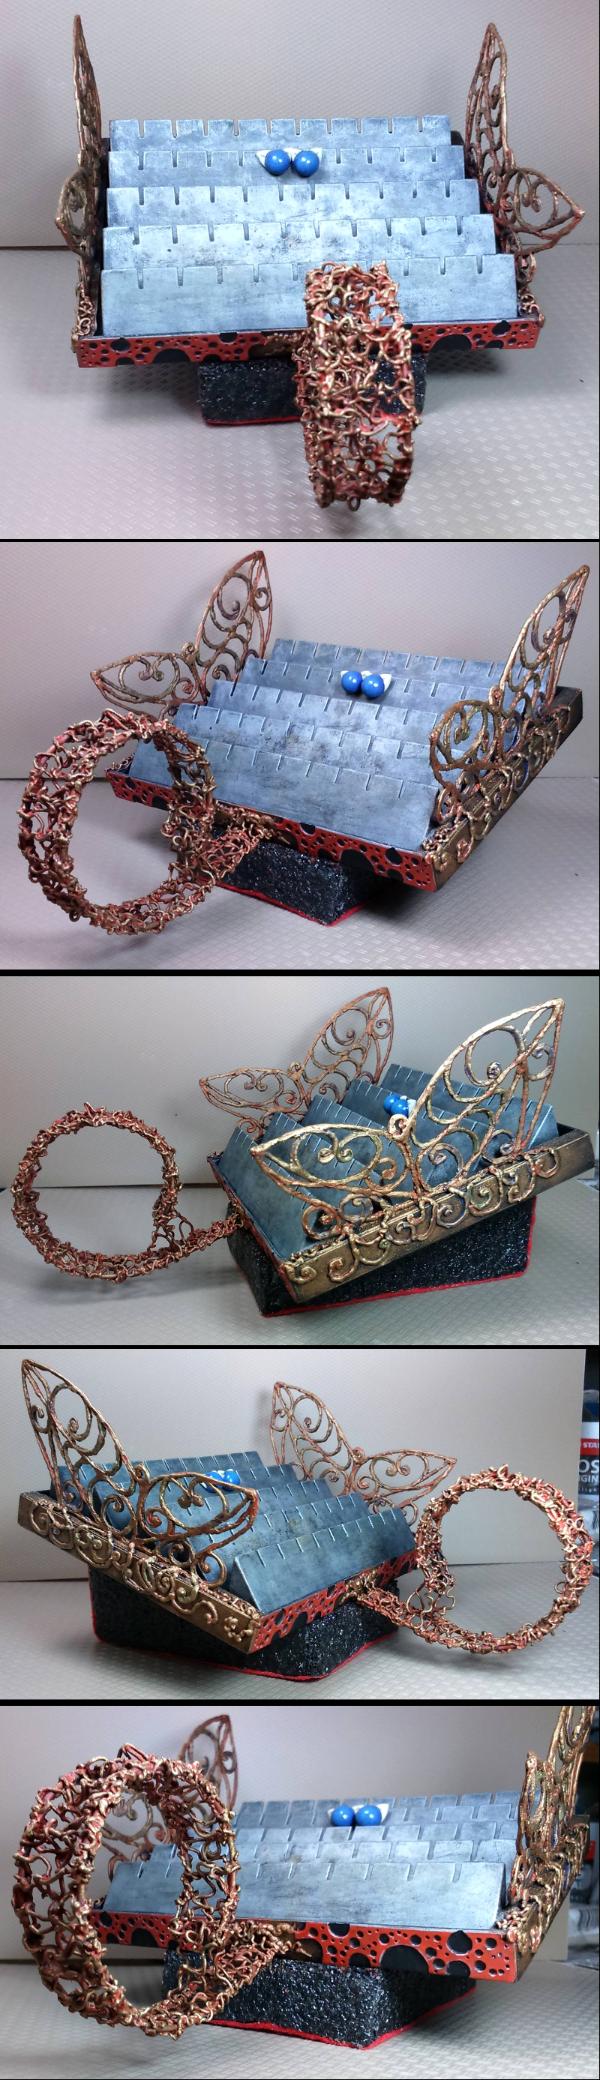
Better than a block of polystyrene anyway...
I have a sculpture to finish off by the end of the month and then I'll be back on to the tank.
I also need to catch up on my followed blogs...
|
Mastodon: @DrH@dice.camp
The army- ~2295 points (built).
* -=]_,=-eague Spruemeister General. * A (sprue) Hut tutorial *
Dsteingass - Dr. H..You are a role model for Internet Morality! // inmygravenimage - Dr H is a model to us all
Theophony - Sprue for the spruemeister, plastic for his plastic throne! // Shasolenzabi - Toilets, more complex than folks take time to think about! |
|
|
|
|
2016/11/03 16:24:27
Subject: Re:The (Mad) Scientist and his Army of the Second Law: Beware of the Walking Tank!
|
|
Mastering Non-Metallic Metal
|
Right... So... Bit of a gap there.
Besides having some presents to make and the usual procrastination, this paint scheme has been beating me down; trying to come up with a suitable base colour and then achieving it on the model has been a pain to the point of sapping my enthusiasm.
I got to this point on the main body:
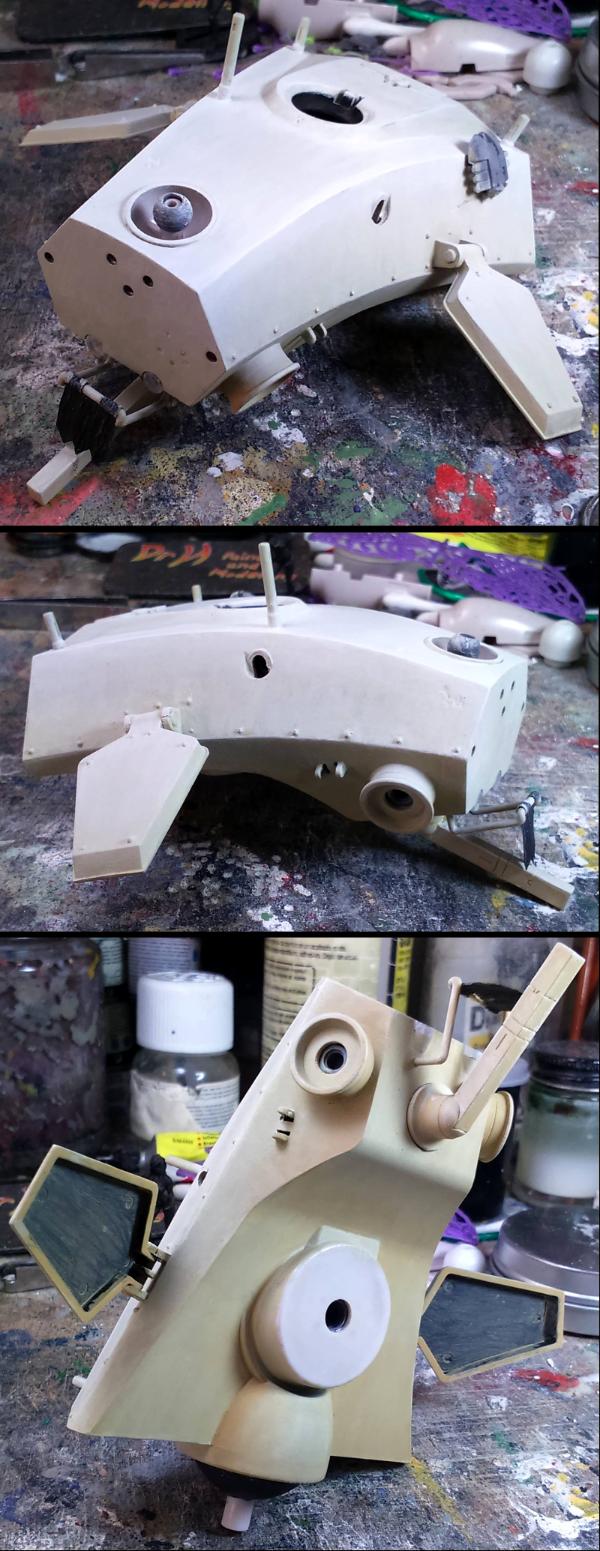
Streaky finish, imperfect blending, but generally the right colour.
Then I thought: I've had enough of layering on paint (should have airbrushed), it's going to be weathered, covered in markings etc. It'll be fine in the end.
I mentioned I was going to add orange. I spent ages deciding with the help of paint (the windows program, before using actual paint on the model) where the colour should be added and finally got around to adding it to the model... and promptly diverged from any plans I had tried; you can't substitute for a real 3D object.
And this is how the scheme is going:
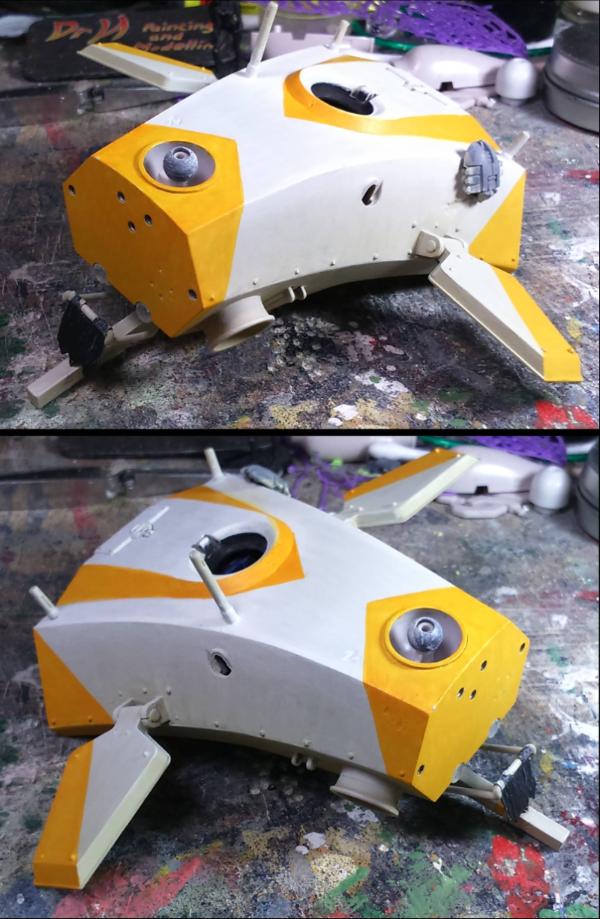
That's looking futuristic already.
I need to touch up around this so that'll work into smoothing the base colour anyway. I just needed to move forward on the model.
|
Mastodon: @DrH@dice.camp
The army- ~2295 points (built).
* -=]_,=-eague Spruemeister General. * A (sprue) Hut tutorial *
Dsteingass - Dr. H..You are a role model for Internet Morality! // inmygravenimage - Dr H is a model to us all
Theophony - Sprue for the spruemeister, plastic for his plastic throne! // Shasolenzabi - Toilets, more complex than folks take time to think about! |
|
|
|
|
2016/11/03 16:31:50
Subject: The (Mad) Scientist and his Army of the Second Law: Beware of the Walking Tank!
|
|
Rogue Inquisitor with Xenos Bodyguards
|
I am liking the yellow markings, gives it a SW vibe so to speak.
|
"Your mumblings are awakening the sleeping Dragon, be wary when meddling the affairs of Dragons, for thou art tasty and go good with either ketchup or chocolate. "
Dragons fear nothing, if it acts up, we breath magic fire that turns them into marshmallow peeps. We leaguers only cry rivets!
|
|
|
|
|
|
|


