| Author |
Message |
 |
|
|
|
|
Advert
|
Forum adverts like this one are shown to any user who is not logged in. Join us by filling out a tiny 3 field form and you will get your own, free, dakka user account which gives a good range of benefits to you:
- No adverts like this in the forums anymore.
- Times and dates in your local timezone.
- Full tracking of what you have read so you can skip to your first unread post, easily see what has changed since you last logged in, and easily see what is new at a glance.
- Email notifications for threads you want to watch closely.
- Being a part of the oldest wargaming community on the net.
If you are already a member then feel free to login now. |
|
 |
2010/11/08 18:20:13
Subject: Basing the Gitsplitta Way (high plains/steppes/fall basing)
|
|

Decrepit Dakkanaut
|
I get a lot of questions regarding how I do my bases... so I put together a tutorial to explain the process. While it is a long tutorial, it is actually quite a simple process that is very repeatable. You can vary the look you get by changing the mix of basing grit, wash color and foliage materials you use... so look at this more as a basing approach than an exact formula to follow. Step 1: Paint the base bestial brown, the color is close to the ultimate color of the basing grit and will hide any imperfections in your coverage.  Step 2: Step 2: Spread a generous layer of glue on the base. I use white PVA glue spread with a toothpick. You can also use an old brush, just be sure to clean it thoroughly afterwards. Super glue works as well but I like the working time and clean up options the PVA gives me. The thicker the glue layer the more grit and larger grit you'll pick up. Make sure to use plenty extra to cover up the slots in a slotta-base. 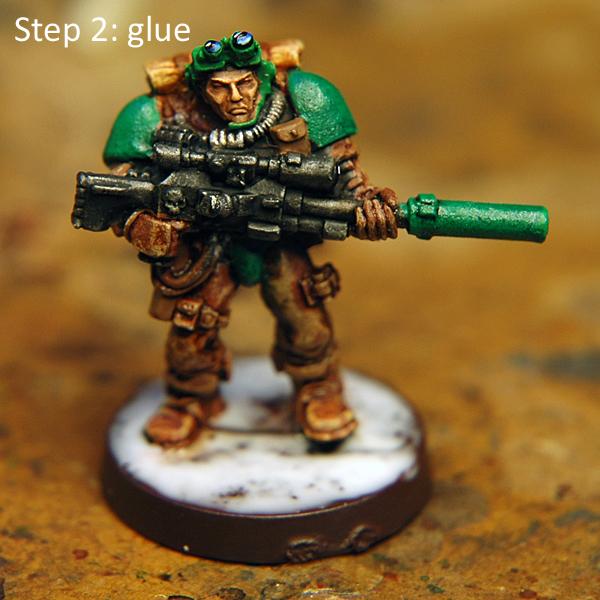 Getting the glue into the nooks and crannies of a complex base can be tricky, I actually used a brush for the deeper recesses as it was easier to control and move glue. Be careful not to get glue up the sides of your figure (unless you want to of course) as the grit will stick to that too! 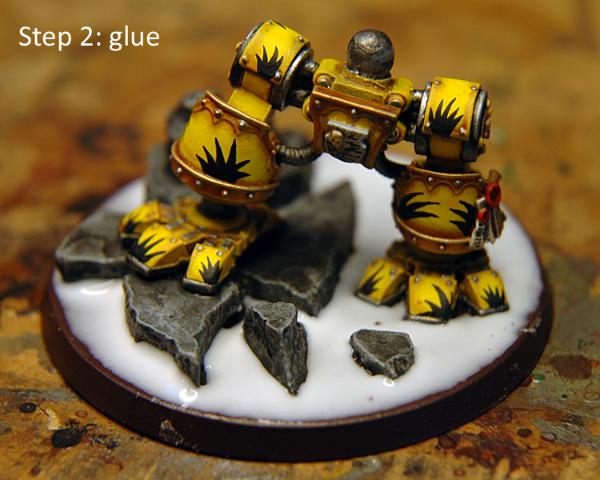 Step 3: Get your grit on. If you're going to add anything extra to the base (large rocks, body parts, etc.) do it before you add the grit. I use Gale Force 9 basing grits small, medium and large in a 1:2:1 mix. 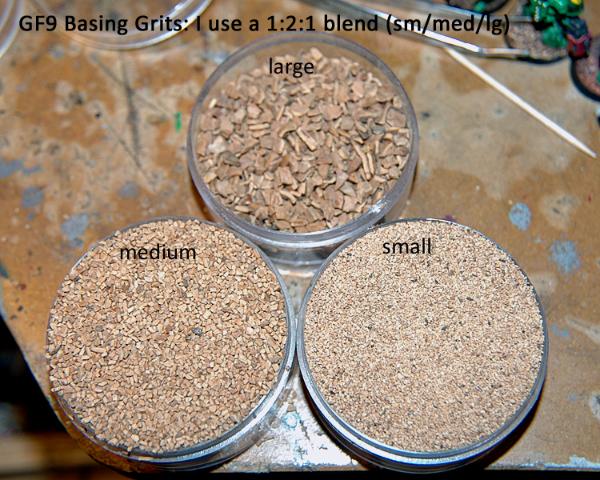 Here is my basing grit mix. With grit of such size variation you have to be careful as with the slightest agitation (shaking/vibration) it will start sorting by size (smallest sinks to bottom, largest rises to top). I use my finger and swirl the pot after each figure is inserted to mix things up a bit. 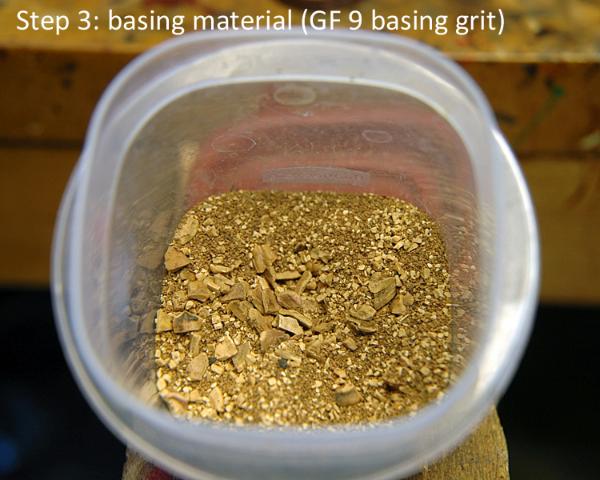 Now insert the figure into the grit. I use a rocking motion to insert the figure into the grit... almost like you'd strum a guitar. Once he's in, I gently place my finger on top of the head and shake the bin slightly to make sure the small grit settles in, filling in the gaps between the larger pieces. The longer you let it sit, the more of the large pieces will get stuck. Usually, 30-60 seconds is quite sufficient for my purposes. 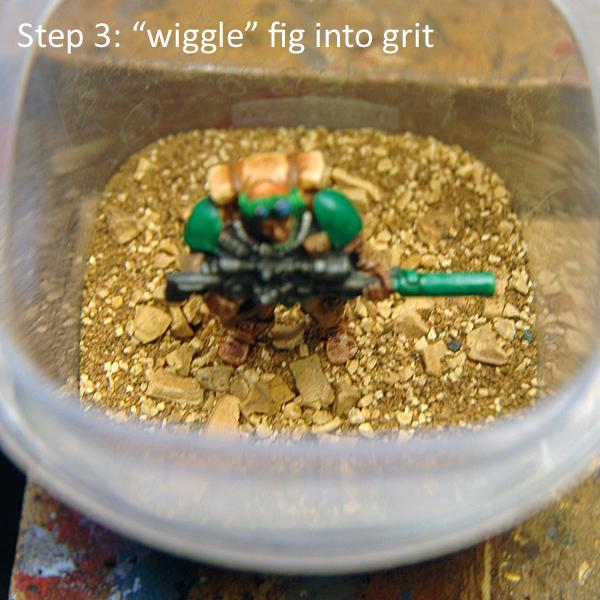 Side view of another figure in the bin. This would make a cool diorama actually. 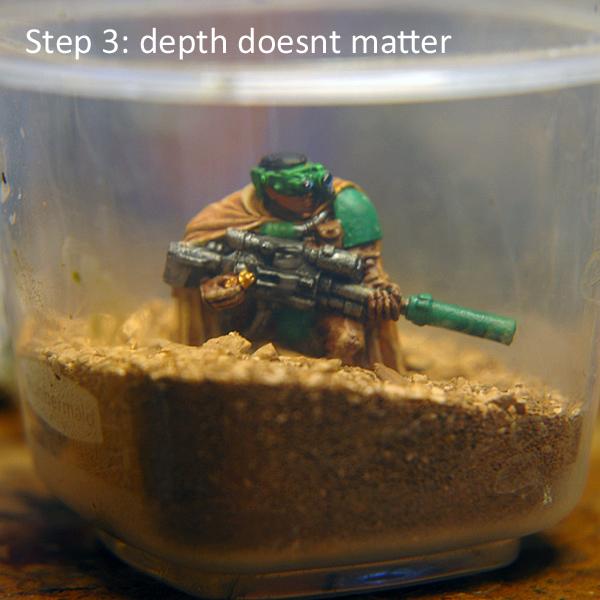 For large bases, put then in a decent size tray and either fill with grit & use the regular process, or pour grit over the top. WARNING The grit will sort in the pouring, so by pouring you will have mostly small grit with fewer large pieces... which might be the effect you're looking for. 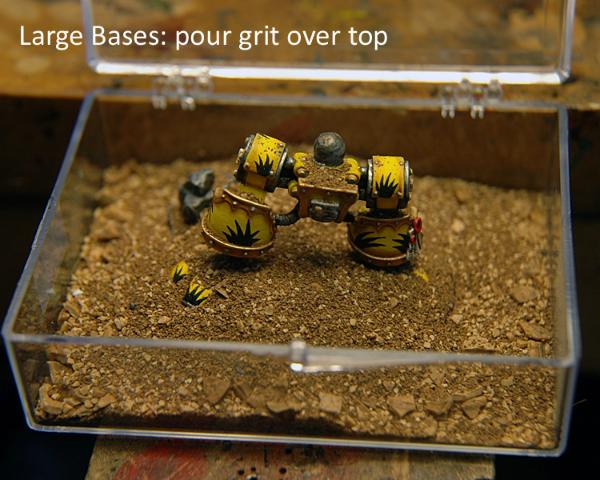 Once the allotted time period has elapsed, simply lift the figure out of the mix, turn it sideways over the bin or lid (whatever you're using to catch the grit) and tap the figure firmly with your finger to dislodge the loose material back into the bin. Here's the final product... trooper with a nice mix of varying sized grit on his base.  A wider shot showing the results so far. You can see that there bases are all consistent but not identical, adding to the illusion of people standing in different locations but on the same battlefield. Note: the scout in the front just to the left of the dread is actually a re-flocking of an old version, which is why he's got more large pieces (there were more crevices to hold larger amounts of glue, which then seeped out into the mix and grabbed onto the larger pieces. If I'd had poured the grit onto him, I would have gotten a smaller mix over-all).  Step 4 Step 4: Once the glue is dry, give the base a generous wash with sepia. Be careful as if your glue was set but not dry, the wash will liquefy it again and things will move on you! You want to "flood" the base with the wash so you're sure it's gotten everywhere. 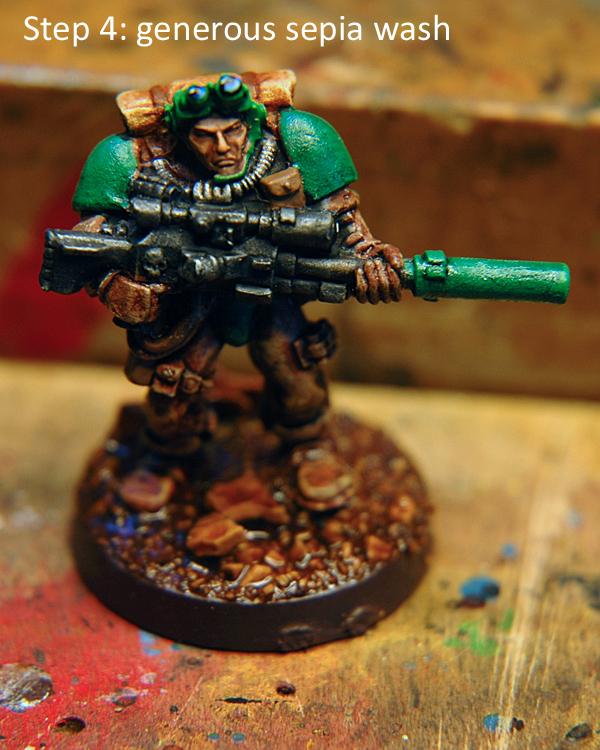 Immediately after washing the base, rinse off your brush, tap it once on the water cup to remove some of the water (not all) and the brush over each of the large rocks, diluting the wash on them and essentially giving them their natural highlights. Once the wash and dilution is done, you can use a large dry brush to pull off the excess wash from the base. This will not only speed drying by decreasing the volume of liquid on the base, but will help give some highlights to the medium sized grit by pulling the pigment off the tops of them & down into the smaller grit only. 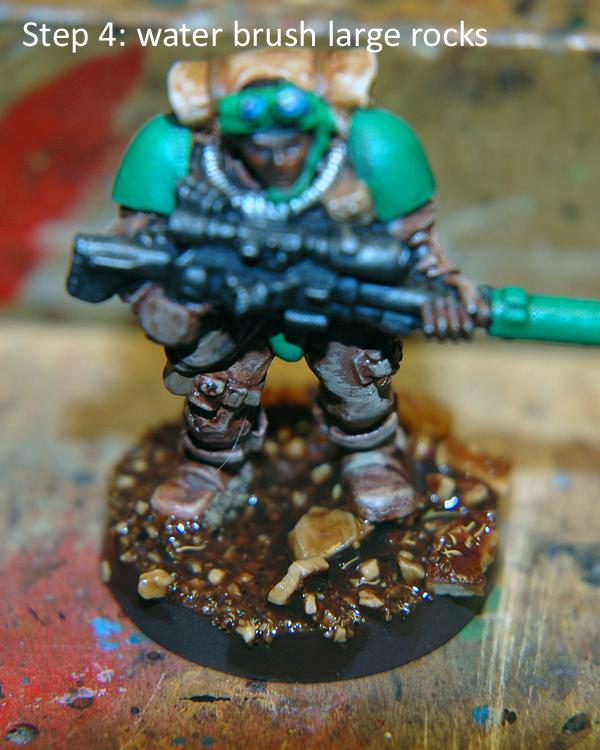 And here's where we are so far. 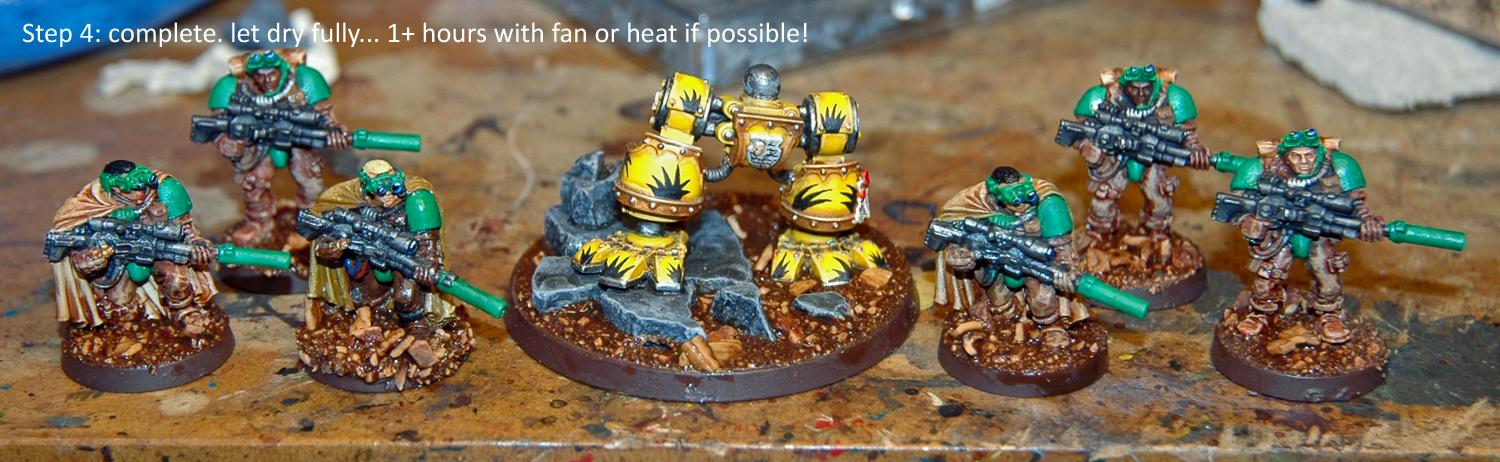 Step 5: Step 5: After the wash step has been allowed to dry completely... (be patient!), ring the base in your chosen color. Since I want these to look natural and blend in with my table better, I go back to bestial brown. I dilute the paint a bit here, you're really just trying to cover up any discolorations from the wash or bare bits from handling. Ideally you want a nice, smooth finish at this stage. 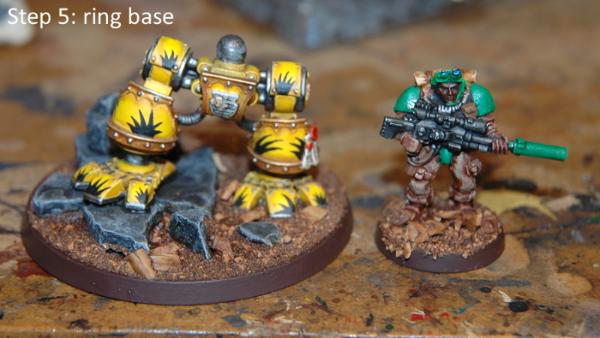 Step 6: Step 6: This is your one and only chance to get some lacquer on the base to protect all your hard work! Once you start with the static grass and shrubbery... it's too late (the lacquer will mess up the look of the foliage. 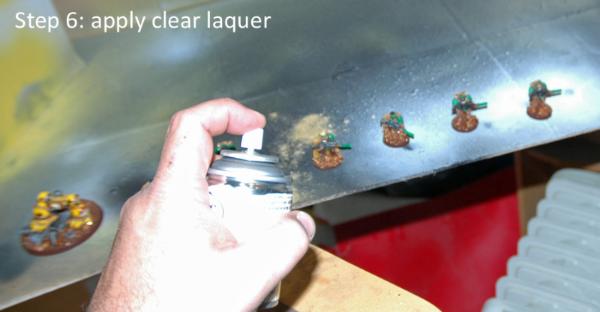 Step 7: Step 7: At this point we get to start adding growing things (or formerly growing things) of various sorts. I can not stress enough that it is of the utmost importance that you don't over do it! Too much grass makes it look like they're fighting in your back yard! Use these elements sparingly and they'll enhance the figure, rather than becoming a distraction in themselves. I do the static grass first. I use a couple of muted Gale Force 9 varieties of grass. They match the semi-arid, stressed environment (or fall) theme, their muted colors contrast with the base but don't compete with the figure, and it's a fairly short static grass which I think works nicely with the figures. 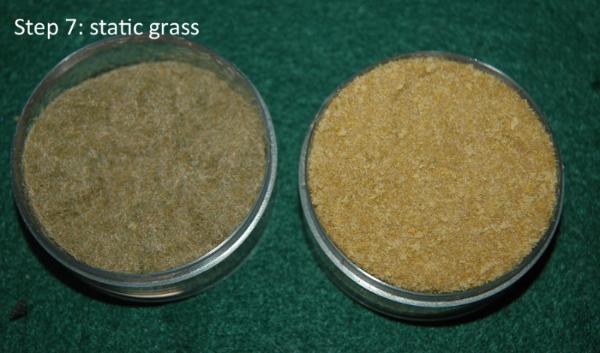 I apply most of my grass in tufts as this is typically now C4 (dryland) grasses grow. I have a rule... usually not more than 3 tufts per 25mm base, and never more than 4. I only apply what I need to balance out the base, add some color and or cover up basing imperfections. I also mix it up so each base has varying colors in varying combinations or size patches. Use your CA glue sparingly... if you put too big a drop on you're either going to get a carpet effect or a huge mound of grass, neither of which will be flattering to the figure. If you want to make a line of grass, put a drop down and use the tip of a toothpick to draw it out. Once your glue is down for the first color of grass, put the figure in a small container (I use the lid from the GF9 grass containers) and with a tweezers, take a mound of static grass and press it down onto the glued spot on the base, Do this for each spot, Use a lot of grass as you want to overwhelm the glue drop with grass. This, and the pressure of pushing the grass down on the glue seems to help the glue spread through the grass in such a manner that a lot of blades will stand up. 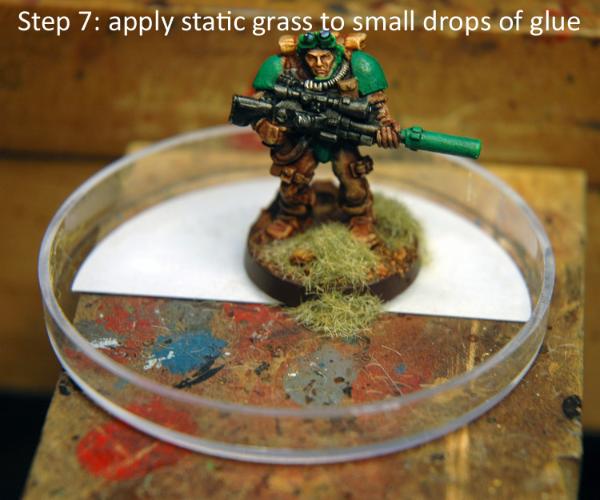 You only need to leave the grass on the figure for 5 to 10 seconds, then pick the figure up, turn it on it's side/ upside down and tap firmly with your finger until all the loose grass falls back into the lid. Then you can take the grass in the lid and easily return it to it's original container. Lastly, you want to hold the figure upside-down and blow strongly from the outside of the base towards the center in order to help the grass patches stand up straighter. This also helps get rid of any stragglers that are lying about on the base unglued. Repeat process for other colors (I wouldn't recommend more than 2 on a small base). Here's what it looks like at the end of this step. 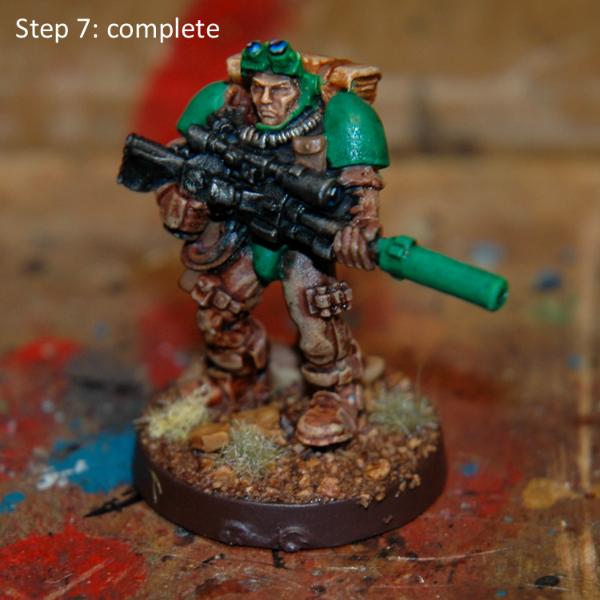 Step 8: Step 8: Adding foliage / shrubbery. Dozens of companies make foam or lichen foliage for shrubbery. I am currently using (again) a GF 9 foam product, though I think litchen would also work very well. The foam has some advantages though. At the rate I use it, this one bin will last me for years. The exact material I am using is Gale Force 9 #92015 "Clump Foliage Autumn). 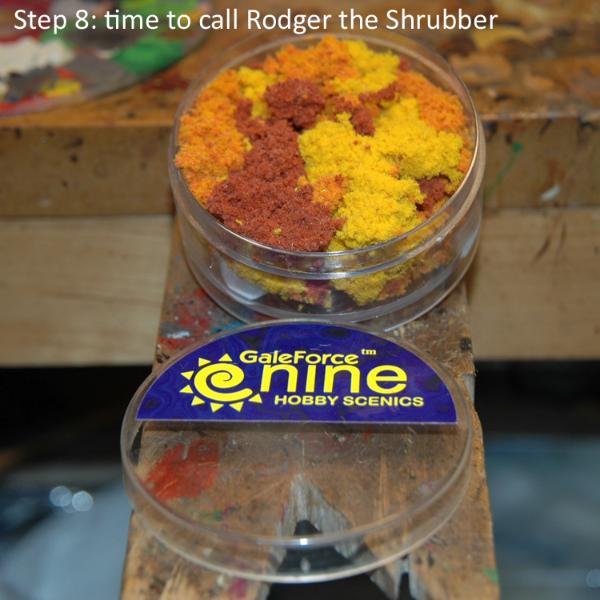 I find the foam right out of the package to be too bright, so I mute it by a quick wash in dilute sepia. You can either do this before or after they're glued to the base. Note how small the individual pieces of foliage are... anything bigger would overwhelm the figure and not look believable as actual plants. 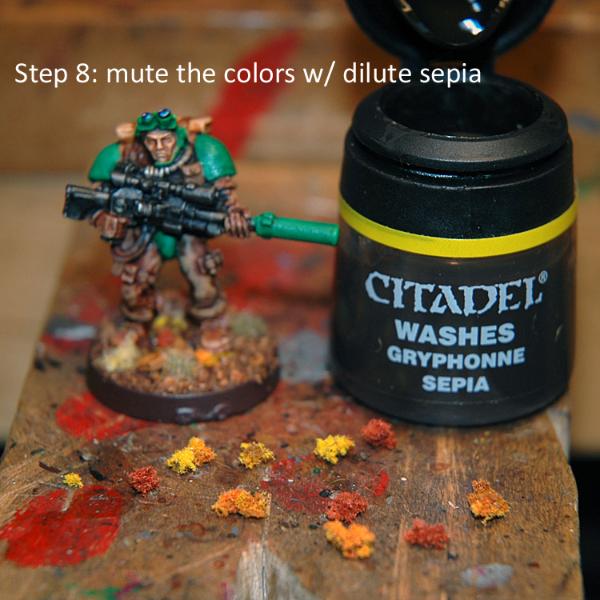 Even more so than the grass, I look to place the shrubs in the lee of rocks, cracks and the like as this is where you'd find them in nature, especially in a harsh environment. They are also very good at covering up areas where your grit didn't quite fill properly (like a slotta base or underneath a boot or rock that didn't quite get stuck down all the way). 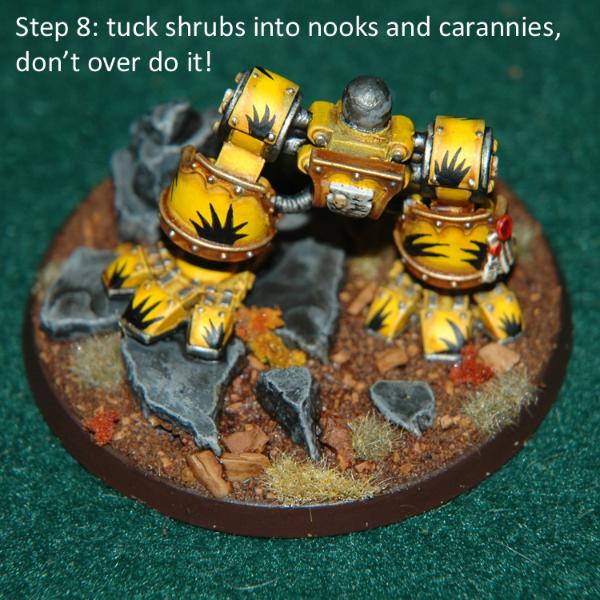 Step 9: Step 9: Tall grass. The tall grass I use is made by a company called Woodland Sceenics, and can be found at most any (US) shop that caters to model railroaders. The grass comes in many colors and some mixes of colors in a baggie filled with long, straight fibers of reasonably uniform length. Separate a small bundle with your fingers and fiddle with it until it is the shape you want in cross section (round or straight, depending on what you want to do with your grass. You will lose fibers during this process... ignore them or gently pull them out of the bundle. Next you need to add a little bit of CA glue to the center of the bundle, this is easiest with two people as one can hold the bundle from the ends while the other adds the drop of glue. One person can do it though by putting a drop of glue on any surface and then gently touching the middle of the grass bundle to the glue for a second or two. The fibers in the bundle will quickly draw up the glue and you can set the bundle aside for drying. You will note that many parallel fibers are very good at pulling up the glue and sending it down the length of the grass tuft. This is why we put the glue in the middle of the bundle rather than at the bottom as you will end up with a long stiffened section of grass at the bottom, not very natural looking. Let dry, either by holding until dry, gently placing it on a surface to dry, or nailing it with CA setting agent. 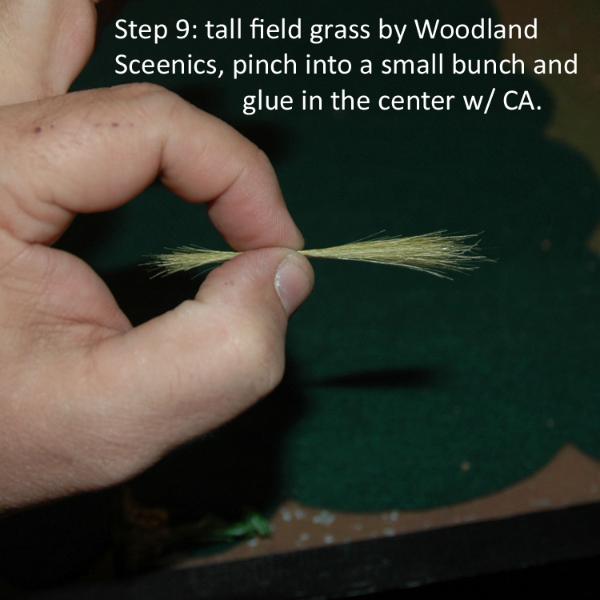 When dry, you'll note all kinds of stray fibers sticking out of your bundle, many of these are not glued and can be gently pulled off the bundle with your fingers. You may also notice that the top of your bundles have developed a very un-grass like shape. Take a scissors and trim each fiber individually until you get it into the shape you want. No seriously... one fiber at a time. Cutting as few as 2 or 3 fibers simultaneously will set up a pattern in the tuft which will make it look like the grass has been to a bad barber shop. It should only take about a minute per tuft to get them looking right. 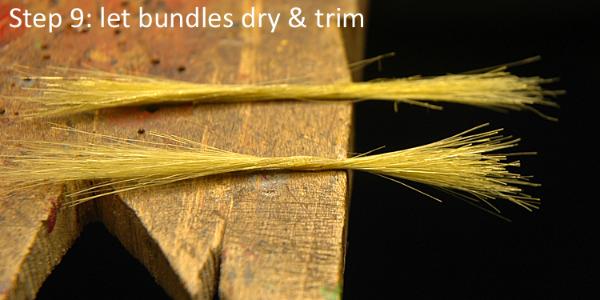 Once they are nice and dry, cut the bundles in half with an end-nippers (or flush cutter if you prefer), this will give you a nice flush cut without disturbing the bundles much. You will notice that rather a large portion of the "bottom" of each of these tufts is now a hardened mass. Trim most of this off with the nippers, leaving about 3/16" of the hard area to serve as the solid base for your grass tuft. You can rub your finger across the top of your grass to fluff it out a bit if you want. In the photo here there are several round tufts and one elongated one. 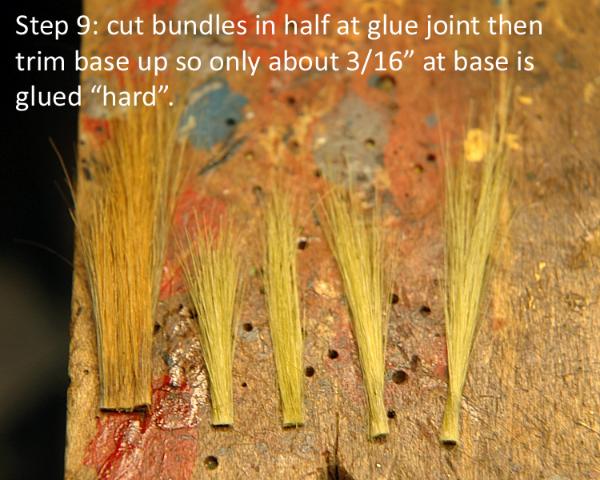 The grass tufts may now be glued to the base. Because the base fibers are already clogged with glue, the grass tuft can be safely glued down with no further worry about it drawing up the glue and hardening into a solid pillar. I prefer slow jet for this part of the process as it's thick, gel-like texture provides more support for the tuft than thin CA. Note that the bottom of the tuft must be trimmed off cleanly, just 2 or three stray fibers can hold your grass far enough off the base to prevent it from gluing correctly (see photo below... there's a shadow *under* the bottom of the grass tuft). The grass tufts will also not want to stay upright while drying, so some help from neighborhood sternguard with their long, sniper rifles can be very fortuitous. As before, be prudent in the placing of your tall grass, don't over do it! Note you can get different heights of grass by moving the initial glue point from the center of the bundle towards one of the ends a bit.  When you're finished... it looks like this!  This seems like a long procedure, but it's actually quite simple. Just do everything in a logical order and you'll be fine. Happy basing!
|
|
This message was edited 16 times. Last update was at 2010/11/13 14:13:17
|
|
|
 |
|
2010/11/08 18:23:27
Subject: Basing the Gitsplitta Way (high plains/steppes/fall basing)
|
|
Boosting Space Marine Biker
|
That is a pretty nifty way to do it. Sure beats my way of just sprinkling stuff on.
Have you tried that technique with flocking (grass and the like)? Seems that you would get more on there using the dip technique than is desired.
Still, great tip. Thanks.
|
If I give you a cookie, will you go away? If I give you the bag, will you go far, far away?
---------------------
Successful Trades: 15 (with Gitsplitta, MadMaverick76, gregornet, AtariAssasin, Fists of the emperor, Kazi, Centurionpainting, zatazuken x2, Sunde, Carlson793, Scorpiodrgon, quickfuze, Stevefamine, Mercury). Check Reputable Trader List for proof. Go on, I dare ya! |
|
|
|
|
2010/11/08 18:31:51
Subject: Re:Basing the Gitsplitta Way (high plains/steppes/fall basing)
|
|
Decrepit Dakkanaut
|
Oh yes, that's next. I don't want to do things out of turn, but if you want to see an example of the end result... go to this post: http://www.dakkadakka.com/dakkaforum/posts/list/1530/289929.page#2096184
|
|
This message was edited 1 time. Last update was at 2010/11/08 18:32:45
|
|
|
|
|
2010/11/08 18:41:54
Subject: Basing the Gitsplitta Way (high plains/steppes/fall basing): part 1
|
|
Boosting Space Marine Biker
|
Nifty. Am waiting with baited flocking. 
|
If I give you a cookie, will you go away? If I give you the bag, will you go far, far away?
---------------------
Successful Trades: 15 (with Gitsplitta, MadMaverick76, gregornet, AtariAssasin, Fists of the emperor, Kazi, Centurionpainting, zatazuken x2, Sunde, Carlson793, Scorpiodrgon, quickfuze, Stevefamine, Mercury). Check Reputable Trader List for proof. Go on, I dare ya! |
|
|
|
|
2010/11/08 21:01:42
Subject: Basing the Gitsplitta Way (high plains/steppes/fall basing): part 1
|
|
Boom! Leman Russ Commander
|
great work! I will try this soon! now needa get some rocks!
|
"Reality is, when you stop believing in it, doesn't go away"
-Philip K. Dick
Constant Lurker, Slowly getting back into modelling! Someday a P&M Blog link will lurk here! |
|
|
|
|
2010/11/09 06:02:56
Subject: Basing the Gitsplitta Way (high plains/steppes/fall basing): part 1
|
|

Nurgle Chosen Marine on a Palanquin
|
Excellent, I wanted to know how you did the tall grass that process will come in handy
|
 BobtheInquisitor wrote: BobtheInquisitor wrote:I tend to glue metal models with a combination of BSI cyanoacrylate and my tears of frustration.
|
|
|
|
|
2010/11/09 16:15:56
Subject: Basing the Gitsplitta Way (high plains/steppes/fall basing): part 1
|
|
Decrepit Dakkanaut
|
Glad you like it!
|
|
|
|
|
|
2010/11/09 17:16:08
Subject: Basing the Gitsplitta Way (high plains/steppes/fall basing)
|
|

Sword-Bearing Inquisitorial Crusader
|
This will help me a lot with my constantly delayed 40k Slann Project when it comes to basing, and putting tall grass and plants on the Ziggurats.
|
|
This message was edited 1 time. Last update was at 2010/11/09 17:16:32
|
|
|
|
|
2010/11/09 18:29:05
Subject: Basing the Gitsplitta Way (high plains/steppes/fall basing)
|
|

Battle-tested Knight Castellan Pilot
|
dude this is awsome !!!
|
the banner is click able. it takes you to a magical country. if you don't believe me click and see for your self

|
|
|
|
|
2010/11/09 20:29:56
Subject: Basing the Gitsplitta Way (high plains/steppes/fall basing)
|
|

Shroomin Brain Boy
|
i knew there was a use for sniperguns in 40k!
lovley art, is there even the posibility do make it better than that?
vik
|
|
|
|
|
|
2010/11/09 20:37:14
Subject: Basing the Gitsplitta Way (high plains/steppes/fall basing)
|
|
Decrepit Dakkanaut
|
@GS: great! Will look forward to seeing you adopt these techniques to your specific project.
@fatty: dude, thanks!
@Viktor: There's *always* the possibility of doing it better. At least I hope so... hate to think this was the best I was ever going to get & it's all down-hill from now on.
Where I always screw up is getting the super glue for the grass too close to the edge & then it dribbles down, gluing odd little grass bits down the side of the base, initiating infinite amounts of repair/cover up work.
Went through and gave it a good editing. Took care of some typos and tweaked some of the narrative. It should be a bit of a clearer read now.
|
|
This message was edited 1 time. Last update was at 2010/11/09 21:00:54
|
|
|
|
|
2010/11/09 20:51:27
Subject: Basing the Gitsplitta Way (high plains/steppes/fall basing)
|
|
Shroomin Brain Boy
|
that was only met as an encouragement for you. i often wodered how you do it, how many armies do you got uinder your respective wings? its more than 4 now i guess...
i have yet to master one lest the three i have started^^
i truly admire your work.
best wishes, vik
|
|
|
|
|
|
2010/11/09 21:06:00
Subject: Re:Basing the Gitsplitta Way (high plains/steppes/fall basing)
|
|
Decrepit Dakkanaut
|
I know Viktor, and I appreciate it. Just acknowledging on my part that learning really never ends.
Personally, I have Mantis Warriors, Bad Moon orks and Craft World Eldar (though they are in semi-retirement).
My eldest has Doom Eagles and Necrons
My youngest shares my orks and is starting a Nid army.
There is a temporary injunction on the kids and 40k until they get their collective acts' together at school, so I'm making hay on my MWs while I can. Though I expect the eldest, or perhaps both will be off-the-hook in a week or so. Then my progress on my own army slows considerably.
|
|
|
|
|
|
2010/11/09 21:14:26
Subject: Basing the Gitsplitta Way (high plains/steppes/fall basing)
|
|
Shroomin Brain Boy
|
well someones loss is always another ones gain^^.
even your sons have more than one army...though 40k family^^
|
|
|
|
|
|
2010/11/10 18:22:36
Subject: Re:Basing the Gitsplitta Way (high plains/steppes/fall basing)
|
|
Chalice-Wielding Sanguinary High Priest
Arlington TX, but want to be back in Seattle WA
|
Nice base tutorial Gits. Your right, the technique is quite simple yet yields a fantastic, natural looking result. I think what I like most about your procedure is the fact that you mix different sized gravel pieces together, thus giving you that uneven terra effect. Its just nice to see that some armies out there dont meet on a perfectly level and sodded battlefield! 
|
 4250 points of Blood Angels goodness, sweet and silky W12-L6-D4 4250 points of Blood Angels goodness, sweet and silky W12-L6-D4
 1000 points of Teil-Shan (my own scheme) Eldar Craftworld in progress 1000 points of Teil-Shan (my own scheme) Eldar Craftworld in progress
 800 points of unassembled Urban themed Imperial Guard 800 points of unassembled Urban themed Imperial Guard
 650 points of my do-it-yourself Tempest Guard 650 points of my do-it-yourself Tempest Guard
 675 points of Commoraghs finest! 675 points of Commoraghs finest!
The Dude - "Jackie Treehorn treats objects like women, man."
Lord Helmet - "I bet she gives great helmet."
|
|
|
|
|
2010/11/10 18:34:16
Subject: Basing the Gitsplitta Way (high plains/steppes/fall basing)
|
|
Decrepit Dakkanaut
|
Viktor von Domm wrote:even your sons have more than one army...though 40k family^^
Neat thing is they came to me with this neat new game they'd discovered from friends at school. I'd been "retired" from 40k for a number of years so they'd never seen me play (last edition I'd played was 3rd). Then I took them downstairs and opened up the large chest in the basement... The rest is history. @Element: Thank you! I just think it makes for a better figure. I know people who don't do anything to their bases because I feel it distracts from the figure. I disagree, a well done base can really augment the look of a figure and compliment it's design and color. That dread has been up on the gallery page for a couple of days now and has gotten pretty good reviews... I don't think they would be as favorable if he was just sitting on a plain base. A good basing job sets the mood for the figure and puts it in context... that's huge! And it doesn't have to be a "display" base either. You can do a lot with standard materials on a normal base... it just takes a little bit of imagination and patience.
|
|
This message was edited 1 time. Last update was at 2010/11/10 18:34:35
|
|
|
|
|
2010/11/10 20:35:18
Subject: Basing the Gitsplitta Way (high plains/steppes/fall basing)
|
|
Shroomin Brain Boy
|
yep i read your beginning thread with your oldest son, nice turn of history you could say^^ gone full circle one could say^^
vik
|
|
|
|
|
|
2010/11/10 20:44:13
Subject: Basing the Gitsplitta Way (high plains/steppes/fall basing)
|
|
Decrepit Dakkanaut
|
Yes, GW's getting an inordinate amount of my money at the beginning and middle parts of my professional life... next they'll be collecting my retirement too!
|
|
|
|
|
|
2010/11/10 21:13:44
Subject: Basing the Gitsplitta Way (high plains/steppes/fall basing)
|
|
Shroomin Brain Boy
|
does that mean you will be selling your retirement plans or will you go into same?
with kids at that age you cant possibly think about early retirement, or do your kids let you age faster than avarage? in the morning i sometimes feel that way too^^
vik
|
|
|
|
|
|
2010/11/12 16:14:48
Subject: Basing the Gitsplitta Way (high plains/steppes/fall basing)
|
|

Morphing Obliterator
|
Wow that pretty Impressive and quick too. My dessert bases have like 20 steps (give or take a few)
|
|
|
|
|
|
2010/11/12 20:35:01
Subject: Basing the Gitsplitta Way (high plains/steppes/fall basing)
|
|
Painting Within the Lines
|
Thanks man, i've been needing to sort out my basing technique for a while.
Great tut, good step-by-step pics and good explanation.
|
FOW: Soviet - Tankovy
Infinity: Aleph
|
|
|
|
|
2010/11/12 21:05:46
Subject: Basing the Gitsplitta Way (high plains/steppes/fall basing)
|
|
Decrepit Dakkanaut
|
Thanks guys! I'm actually kind of excited at the prospect of having others try this out but giving it their own spin. So if you try this system... please post your results here, I'm sure it would benefit everyone to see what you come up with.
|
|
|
|
|
|
2010/11/20 18:58:55
Subject: Basing the Gitsplitta Way (high plains/steppes/fall basing)
|
|
Death-Dealing Dark Angels Devastator
|
Thats one sweet and simple basing tutorial Gitz man...
I will be trying the long field grass tip myself. ive had some for ages but could not get it right.
Thanks man
Jim
|

"Only the DEAD have seen an End to WAR" - Plato
2010 W:3 L:4 T:5
2011 W:3 L:4 T:3 |
|
|
|
|
2010/11/20 23:58:33
Subject: Basing the Gitsplitta Way (high plains/steppes/fall basing)
|
|
Journeyman Inquisitor with Visions of the Warp
|
Great tutorial
|
|
|
|
|
2011/06/12 18:17:29
Subject: Basing the Gitsplitta Way (high plains/steppes/fall basing)
|
|
Boosting Space Marine Biker
|
That's exactly how I do it, but I keep my dirt/rubble etc natural color. I also don't have my hands on that tall grass, though that looks useful. I'm digging up old brushes as I'm typing (typing with one hand) to get some hairs I'll cut off, stain, glue and put on my most recent mini.
Automatically Appended Next Post:
Sorry for the revival
|
|
This message was edited 1 time. Last update was at 2011/06/12 18:17:39
|
|
|
|
|
2011/12/08 22:52:37
Subject: Basing the Gitsplitta Way (high plains/steppes/fall basing)
|
|
Oozing Plague Marine Terminator
|
Very nice Gitsplitta. I really very much like this technique. Well, done.
|
You are waaaaay beyond crazy my friend -DSteingass
Yes, everything that changes the entire fething world is overrated..... - DSteingass
...yep... some of the dakka chaps here sure made the joints of my jaw quite loose..Viktor Von Domm
...they put Space Marines in tin cans and drop them from orbit, I don't think fuel consumption or aerodynamics is a concern - DSteingass
I think once again my motormouth has brought me into deep... - Viktor Von Domm
he knows no pain...nor fear, he is a riveteer - Viktor Von Domm
We don't do generic, mainstream, normal, or anything of the sort! ^^ - Shrike
You build fething Titans Henry Ford style Max!! - DSteingass
 |
|
|
|
|
2011/12/08 23:21:26
Subject: Basing the Gitsplitta Way (high plains/steppes/fall basing)
|
|
Decrepit Dakkanaut
|
Thanks mx (BoA, neil & jim)! I do find it gives a very nice result. Neat thing is the basic technique is pretty flexible as BoA suggests... so you don't have to do "fall themed" bases... you can make them any style you want, vary the grits however you'd like, give them whatever tone.
|
|
|
|
|
|
2011/12/08 23:24:46
Subject: Basing the Gitsplitta Way (high plains/steppes/fall basing)
|
|
Blood Angel Terminator with Lightning Claws
|
Thanks for the info man i'll make sure to follow it next time im basing,i always get carried away with static grass.
|
|
|
|
|
|
2011/12/09 02:07:44
Subject: Basing the Gitsplitta Way (high plains/steppes/fall basing)
|
|
Decrepit Dakkanaut
|
It's easy to do. Trick is to just get enough static grass on to contrast nicely with the grit or whatever you're using on the base, or compliment the colors of the model itself. The lichen shrubs are nice but again, moderation is recommended. You can even make plants and leaves out of paper that look great and very realistic lying on the ground.
|
|
|
|
|
|
2011/12/09 15:51:51
Subject: Basing the Gitsplitta Way (high plains/steppes/fall basing)
|
|
Longtime Dakkanaut
|
Nice Gits! Usually all I do is paint my base black or brown =S
|
I RIDE FOR DOOMTHUMBS! |
|
|
|
|
|
|
 Marshal Helo's Strike Force: 1700 points (Complete)


