| Author |
Message |
 |
|
|
|
|
Advert
|
Forum adverts like this one are shown to any user who is not logged in. Join us by filling out a tiny 3 field form and you will get your own, free, dakka user account which gives a good range of benefits to you:
- No adverts like this in the forums anymore.
- Times and dates in your local timezone.
- Full tracking of what you have read so you can skip to your first unread post, easily see what has changed since you last logged in, and easily see what is new at a glance.
- Email notifications for threads you want to watch closely.
- Being a part of the oldest wargaming community on the net.
If you are already a member then feel free to login now. |
|
 |
2011/04/11 13:23:38
Subject: Modeling Tutorial: Magnetizing without Magnets - Termagant Edition
|
|

Lurking Gaunt
Out of my mind, back in 5 minutes.
|
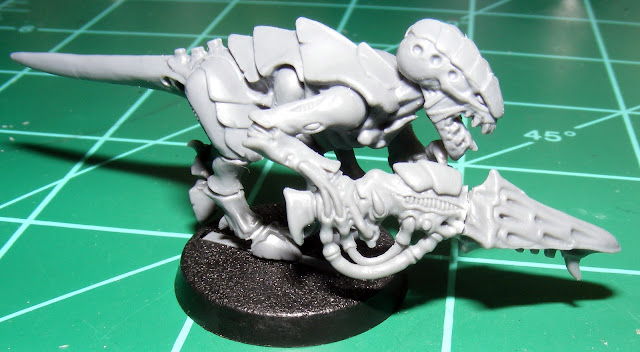
Hey everybody, Chaosheade here back with another tutorial. This time, I will show you how to "magnetize" your models without using a single magnet. I used a Termagant for the tutorial but the method can be used for just about anything. Click the link above to go to the tutorial and check it out. An example of the finished product can be found below. Don't mind the minor gaps and such, they are very easy to fix. If you don't find the gribbly handsome, at least you can find the tutorial handy. Catch you on the flip side.


|
|
|
|
 |
|
2011/04/18 13:32:30
Subject: Modeling Tutorial: Magnetizing without Magnets - Termagant Edition
|
|

Paladin of the Wall
|
That is really cool thanks 
I will have to try this
|
thornfall alliance: 30pts bringing home the bacon
menoth: 134pts "burn heretics, BURN!" |
|
|
|
|
2011/04/20 01:52:12
Subject: Re:Modeling Tutorial: Magnetizing without Magnets - Termagant Edition
|
|
Lurking Gaunt
Out of my mind, back in 5 minutes.
|
You're very welcome. Glad I could help 
|
|
|
|
|
|
2011/04/20 15:59:51
Subject: Re:Modeling Tutorial: Magnetizing without Magnets - Termagant Edition
|
|

Crafty Clanrat
|
Isn't this just pinning? (not that pinning is not awesome, just wondering.)
|
|
|
|
|
2011/04/21 12:06:17
Subject: Re:Modeling Tutorial: Magnetizing without Magnets - Termagant Edition
|
|
Lurking Gaunt
Out of my mind, back in 5 minutes.
|
Deefect wrote:Isn't this just pinning? (not that pinning is not awesome, just wondering.)
At the most basic level, yes.
It is more than that however. It uses the pinning technique in a new and innovative way. Instead of the standard pinning method of using a single pin to strengthen a glued joint so the pieces don't fall off, the pins themselves are what hold the two pieces together.
But yeah, it's basically just advanced pinning. 
|
|
|
|
|
|
2011/04/21 15:38:52
Subject: Modeling Tutorial: Magnetizing without Magnets - Termagant Edition
|
|

Wicked Wych With a Whip
|
Interesting!
Hmm... Couldn't you just do the double-pin thing on the arm joint and swap out the whole arm, weapon and all?
|
|
|
|
|
|
2011/04/27 20:55:23
Subject: Modeling Tutorial: Magnetizing without Magnets - Termagant Edition
|
|
Lurking Gaunt
Out of my mind, back in 5 minutes.
|
Foo wrote:Interesting!
Hmm... Couldn't you just do the double-pin thing on the arm joint and swap out the whole arm, weapon and all?
It could probably be done but would be very tricky to pull off and would be a lot more work. The problem is that you would have to do both arms and find a way for the left arm to line up with the little ball socket on the opposite side of the gun and have it stay there without glue. If you glue the two arms together you could probably fit them in the sockets and hold there without any pins but then you would have to bend the hell out of the arms to get them to go into the sockets every time you wanted to switch weapons which would probably end up screwing up the paint job or destroying the arms. The problem is how the two arms fit together. See: the ball and socket joint that's slightly hidden in the shadows.

Thanks for the feedback and I like the way you're thinking and trying to improve on the process but I have already considered that particular scenario. You would have to pin both arms in the shoulder sockets as well as a pin for the socket where the arms meet and I'm not sure how well that would hold together since there really isn't enough space for a double pin in those locations and you would probably have to bend some of the pieces to make them go together. IMO it is much easier to chop up the guns and just have one location pinned instead of trying to line up three at once. Plus you get to use the cooler looking devourer arms for either weapon. 
|
|
|
|
|
|
2011/05/18 10:29:15
Subject: Re:Modeling Tutorial: Magnetizing without Magnets - Termagant Edition
|
|

Lone Wolf Sentinel Pilot
|
wow this is awesome!
|
|
|
|
|
2011/05/21 11:37:51
Subject: Modeling Tutorial: Magnetizing without Magnets - Termagant Edition
|
|
Lurking Gaunt
Out of my mind, back in 5 minutes.
|
Thanks Far Seer, glad you like it!
|
|
|
|
|
|
2011/05/21 14:13:08
Subject: Modeling Tutorial: Magnetizing without Magnets - Termagant Edition
|
|
Hard-Wired Sentinel Pilot
|
Great tutorial.. AMAZING PIC QUALITY... what camera did you use?
|
|
|
|
|
|
2011/05/21 14:21:04
Subject: Modeling Tutorial: Magnetizing without Magnets - Termagant Edition
|
|

Longtime Dakkanaut
|
Brilliant Idea, will be checking this out  Thanks!
|
|
|
|
|
|
2011/05/23 14:31:41
Subject: Re:Modeling Tutorial: Magnetizing without Magnets - Termagant Edition
|
|
Lurking Gaunt
Out of my mind, back in 5 minutes.
|
Thank you very much Apostle Pat and Ifalna. It's great to see people using and enjoying the tutorial.
The camera I used is a Fujifilm FinePix S700 that I have had for about 4.5 to 5 years now. It was about $200 at that time from www.newegg.com and strangely new ones seem to have gone up in price since then. You can find used s700s on eBay with completed auctions closing at about $75-$100 or so, or you can find a newer model from newegg for about $200 with free shipping.
The specific model of the camera, assuming it has a few key features, is less important than how you use it. A couple good guides that I learned a lot from can be found here on DakkaDakka and one on CMON. The CMON tutorial also includes instructions for editing your pictures in photoshop to make them look better. It does not take much, just a couple quick adjustments to help the picture look more like the real thing.
I did not use my light box for these pictures but a light box/tent can help you get good lighting for your pictures. I used this guide on making a very cheap light tent to make one for about $3. That is the cost of the box itself, not including the cost of the lamps. There are plenty of other great guides out there but this will give you a great place to start learning how to improve your pictures. Hope this helps.
|
|
|
|
|
|
2011/05/30 05:45:56
Subject: Re:Modeling Tutorial: Magnetizing without Magnets - Termagant Edition
|
|
Scuttling Genestealer
|
I may have to try this, thanks!
|
|
|
|
|
|
2011/05/30 11:30:34
Subject: Modeling Tutorial: Magnetizing without Magnets - Termagant Edition
|
|
Lurking Gaunt
Out of my mind, back in 5 minutes.
|
You're welcome Terrifying Terror, and thank you for checking out the tutorial. Hope it works well for you!
|
|
|
|
|
|
2011/06/09 19:15:15
Subject: Modeling Tutorial: Magnetizing without Magnets - Termagant Edition
|
|

Thunderhawk Pilot Dropping From Orbit
|
I'm sorry I was going down the list when I saw "Magnetizing without magnets"... whaaaa... A its realy good idea though being a Space Marine... I don't realy need it... now...
|
|
|
|
|
|
2011/06/11 14:51:47
Subject: Re:Modeling Tutorial: Magnetizing without Magnets - Termagant Edition
|
|
Lurking Gaunt
Out of my mind, back in 5 minutes.
|
Heh heh glad my title is grabbing peoples' attention. For SM and other power armor armies, you could use this technique to magnetize just the weapon instead of the whole arm if you wanted to, but it's probably easier to just magnetize the whole arm. I'm sure you could find a way to use this for vehicles fairly easily.
|
|
|
|
|
|
2011/06/20 20:36:30
Subject: Re:Modeling Tutorial: Magnetizing without Magnets - Termagant Edition
|
|
Fresh-Faced New User
|
What is your secret to lining up the pins and receiving holes so accurately? I do pin from time to time, (less so with most minis being plastic now) but I have never been overly good at getting the pins and ports lined up well. You seem to have a pretty solid grasp on it. I used to use play-doh and powder, but even so, I never got past so-so with accuracy. 
|
|
|
|
|
|
2011/06/23 04:39:30
Subject: Re:Modeling Tutorial: Magnetizing without Magnets - Termagant Edition
|
|
Lurking Gaunt
Out of my mind, back in 5 minutes.
|
For the first set of pins and holes, the key is lots of very carefully lining up of the pieces... or however you say that in English... I'm tired.
What I did was drill the first two holes in the arm/gun half of the model. To make sure you start the hole in the right place I highly recommend using your hobby knife to make a small mark where you want the hole to be. It doesn't have to be much, just a little mark to help guide the drill bit. Go slow and check regularly to make sure everything is straight and in the right location.
After that, I placed 2 pins in the holes that were just long enough to poke out but don't glue them in, they are only temporary! You want just enough showing to make a mark on the other half (the gun barrel) but short enough that you can get the two pieces very close together so you can accurately fit them together. If you do it right, you can line up the two pieces just how you want them and then press them together to make 2 indentations on the barrel half and use those as guides for the holes just like the marks in the first step. This should make sure the pins on each half line up correctly. Again, go slow and check regularly to make sure everything is straight and lining up properly.
Once you get one set done, you can use the pins from that set to make marks on other sets to make them all uniform. I have a total of 10 of those "magnetized" termagants now and at least 9 out of 10 of all the pieces are completely interchangeable. The ones that don't fit together are because I got impatient and sloppy on a few of them but as a group they are looking pretty good.
In summary:
- small guide holes/cuts/indentations really help guide the drill bit exactly where you want it to go. This is the key to it all. Trying to start drilling on a smooth flat surface is a recipe for mis-placed holes.
- check and double check to make sure everything is lined up right, and then triple check. When you start to drill just do a little bit and make sure everything is still lined up before you go and make a really deep hole.
- Once you make one set of holes/pins, use them as a guide for other sets for uniform placement of pins and holes. That way they will all be interchangeable rather than having to keep the pieces with specific corresponding models.
The more practice you have at it, the better. Grab a test model that you don't care about or want to chop up for bits and get some practice in. You could even use some spare pieces of sprue to practice. Thanks for taking an interest in the guide and good luck. I know you can do it
|
|
|
|
|
|
2011/06/24 17:42:01
Subject: Re:Modeling Tutorial: Magnetizing without Magnets - Termagant Edition
|
|
Fresh-Faced New User
|
Thanks for the detailed response. I am looking forward to applying this technique to my Death Company. Flexibility with these kinds of units is crucial, since they are so dang expensive.
Again cheers! Thanks!
|
|
|
|
|
|
2011/06/25 11:48:00
Subject: Re:Modeling Tutorial: Magnetizing without Magnets - Termagant Edition
|
|
Lurking Gaunt
Out of my mind, back in 5 minutes.
|
You're quite welcome Grendler7.
One other thing I forgot to add is that you can create a "master" set of pins that you would use to mark every other piece to keep them all as uniform as possible. Just take a piece of sprue, or some other piece of scrap/spare part that is easier to handle, and drill a set of 2 pins in there. I did this with sprue and used a file to make the paper clip pins more pointy on the end for better precision and aside from the tiny piece of sprue being difficult to handle it's working like a charm. Now that I think about it, a T-shaped piece would be much better than the straight piece I used because it would give you much better control and leverage for making the indentations. I'm going to have to take my own advice on this and make a T-shaped piece for my own use now.
|
|
|
|
|
|
2011/06/25 19:15:19
Subject: Modeling Tutorial: Magnetizing without Magnets - Termagant Edition
|
|
Tunneling Trygon
|
While its a clever idea and whatnot, the sight of that gap between the two pieces scares me a bit...
It looks quite obvious, and when painted will look a bit worse...
|
Grimtuff wrote: GW want the full wrath of their Gestapo to come down on this new fangled Internet and it's free speech.
A Town Called Malus wrote: Draigo is a Mat Ward creation. They don't follow the same rules as everyone else.
|
|
|
|
|
2011/06/26 13:12:44
Subject: Modeling Tutorial: Magnetizing without Magnets - Termagant Edition
|
|
Lurking Gaunt
Out of my mind, back in 5 minutes.
|
Bloodhorror wrote:While its a clever idea and whatnot, the sight of that gap between the two pieces scares me a bit...
It looks quite obvious, and when painted will look a bit worse...
Thank you for the critique Bloodhorror. You make a very valid point. It's true that there can be a gap left when using this method. The termagant weapons are probably not the best example since I didn't make the cut on a flat surface but it's what I had on hand to work with. This would be much easier with power armored models because you can simply cut off the hand or just about anywhere on the arm and have a nice flat surface that can be easily matched up and mated with the other half. Devourers are a very difficult if not impossible bit to try to cut straight and have everything match up flush and it's in a very conspicuous part of the model. Any hidden area or flat surface will be much easier than a curved part for this technique; don't forget that it can be applied to many things other than just termagant weapons.
That being said, I have been contemplating a couple different ways to cover up the gaps. The first idea I had was to put the two halves together and stuff some green stuff in the gaps with something on the arm side so that the green stuff only sticks to the gun barrel half. Vegetable oil, petroleum jelly, talc/baby powder, just a piece of paper, or other methods should let you fill the gaps with modeling putty without sticking the two pieces together. I used a piece of wax paper when lining up the magnets and green stuff on the arms of my Greater Daemon to get everything lined up right without sticking the arm to the body permanently and it worked just fine.
The second method I was considering is using something to simply cover up the place where the two parts join. It could be green stuff, a band of plasticard or cardstock "plasticard" via this tutorial, or a number of other things. An idea I had for the termagant weapons was to have small green stuff tentacles coming from the barrel half but not stuck to the arm half as if the two pieces are in the process of being fused together. The intent would be to cover up the gap and make it look like the gants are in the middle of mutating from one weapon type to the other on the fly, adding some flavor and coolness points to the army.
If you are very careful in making your cuts and trim off uneven parts you can make a nearly seamless join with this technique but even if you end up with gaps there are ways to cover them up and possibly make the model look even better. There are plenty of other ways to achieve the same result and I'm sure others could come up with more or better ideas than what I threw together. I will try to find time to test a couple of these ideas of filling or hiding the gaps but I can't make any promises that it will get done any time soon.
|
|
|
|
|
|
2011/07/01 05:45:02
Subject: Modeling Tutorial: Magnetizing without Magnets - Termagant Edition
|
|
Hurr! Ogryn Bone 'Ead!
Australia (insert either funny or interesting fact here)
|
Great stuff.
|
|
|
|
|
|
2011/07/02 11:50:53
Subject: Re:Modeling Tutorial: Magnetizing without Magnets - Termagant Edition
|
|
Lurking Gaunt
Out of my mind, back in 5 minutes.
|
Thanks Cadichan Support
|
|
|
|
|
|
2011/07/20 02:18:11
Subject: Modeling Tutorial: Magnetizing without Magnets - Termagant Edition
|
|
Gangly Grot Rebel
|
On the fleshborer option, there is a hand holding underneath the barrel stock.
Any way you could show the model from the other side? Seems like it would necessitate the hand looking like it was off the wrist.
|
They're in there with their bear.
Proper grammar. Learn it, live it, love it.
|
|
|
|
|
2011/07/27 18:33:05
Subject: Modeling Tutorial: Magnetizing without Magnets - Termagant Edition
|
|
Lurking Gaunt
Out of my mind, back in 5 minutes.
|
On the other side of the gun there is a socket that can be easily shaved down and filled in. The fingers could easily be disguised as just ribbing similar to what you would see on the underside of a bolter, just more... organic.
I'll try to find some time to get a picture posted. RL has been pretty crazy these last 3 weeks or so.
|
|
|
|
|
|
2011/10/09 02:47:17
Subject: Modeling Tutorial: Magnetizing without Magnets - Termagant Edition
|
|

Basecoated Black
|
Yeah bud its old skool
|
|
|
|
|
2011/11/10 17:22:00
Subject: Re:Modeling Tutorial: Magnetizing without Magnets - Termagant Edition
|
|
Neophyte Undergoing Surgeries
Burlington, Ontario
|
Very great idea i have used it before but only with one pin though that worked well this is a much more effective way thank you for posting this up.
|
"Live as one already dead." --Japanese saying

 232nd Avengers of Asarith 1500pts 232nd Avengers of Asarith 1500pts
 Anvil Warriors 3000pts Anvil Warriors 3000pts
 3rd sphere strike force 1000pts 3rd sphere strike force 1000pts
 lone cell ship 270pts lone cell ship 270pts
|
|
|
|
|
2011/11/11 16:02:08
Subject: Modeling Tutorial: Magnetizing without Magnets - Termagant Edition
|
|
Longtime Dakkanaut
|
Personally I do this on some models however instead of 2 pins I do one tiny magnet and one pin. That way your get the stability of molding the piece in place, while keeping it straight.
|
|
|
|
|
|
2011/11/12 13:53:30
Subject: Re:Modeling Tutorial: Magnetizing without Magnets - Termagant Edition
|
|
Lurking Gaunt
Out of my mind, back in 5 minutes.
|
Thanks DawnLord, I'm glad you liked it. I tried the single pin as well and the pin doesn't stay on very well unless it's a really snug fit and eventually it will wear out and become loose if you are removing and replacing it.
That's also an excellent tip, BlueDagger. I decided to try it out recently and magnetized the arms on my trygon with a magnet and pin so the arms stay in place and don't rotate into awkward looking positions. It would also work for the double pin method but I've found that the extra holding power of a magnet it not necessary. If they do become loose at some point I always have some nice little 1mm x 1mm cylinder magnets that will fit in the current holes perfectly. Thanks for adding that tip.
|
|
|
|
|
|
|
|

 Knights of Titan 500 points Primary
  Warp Angels 750 points Primary
  The Eternal Crusade XXXX points Primary


 500 points of Biel Tan Mech-dar
 250 points of Dark Angels

