| Author |
Message |
 |
|
|
|
|
Advert
|
Forum adverts like this one are shown to any user who is not logged in. Join us by filling out a tiny 3 field form and you will get your own, free, dakka user account which gives a good range of benefits to you:
- No adverts like this in the forums anymore.
- Times and dates in your local timezone.
- Full tracking of what you have read so you can skip to your first unread post, easily see what has changed since you last logged in, and easily see what is new at a glance.
- Email notifications for threads you want to watch closely.
- Being a part of the oldest wargaming community on the net.
If you are already a member then feel free to login now. |
|
 |
2011/06/27 21:55:59
Subject: Applying Decals to Marine Shoulders
|
|

Fresh-Faced New User
Preston, Lancashire, UK
|
I'm hoping someone can provide some assistance with applying decals to shoulderpads. I'm really struggling with it, and it's beginning to get very frustrating.
I bought a decal sheet with Flesh Tearer symbols on from Forge World, and everytime I try to place the decal it always folds, or rucks up at the top. Obviously that's because of the curvature of the shoulder. I've been trying MicroSet and MicroSol with little success. I've tried placing a cut at various places, also with no success. Since the decal is of a circular buzzsaw it makes placing any cuts difficult. It's not as easy as an Ultramarine symbol would be.
I've seen numerous YouTube videos on the subject and none seem to have the problem I'm having. I watched Les Bursely's Flesh Tearer tutorial and he places his circular chapter symbol on with no problems what so ever. I've also watched Jan Adan's video which is posted here on DakkaDakka, and he makes it look easy as well. I've read numerous guides and such, and I'm just not getting the hang of it. :(
I don't want to go down the freehand route since I've already bought some decals which will no doubt look nicer than my shoddy freehand. So any advice would be very gratefully received.
|
Flesh Tearer Marines
http://s1124.photobucket.com/albums/l570/EvilEdwin/Flesh%20Tearer%20Tactical%20Marines/
Craftworld Iybraesil Guardians
http://s1124.photobucket.com/albums/l570/EvilEdwin/Iybraesil%20Guardians/ |
|
|
 |
|
2011/06/28 02:02:00
Subject: Applying Decals to Marine Shoulders
|
|

Willing Inquisitorial Excruciator
|
Did you start with a gloss varnish on the shoulder pads?
Here is what I did for my fleshtearer pads (not FW, homemade):
1. Gloss coat the shoulder pad.
2. Carefully cut out decal (thank you Capt Obvious), make small cuts at 10 and 2 on the decal, between saw blades
3. Place decal in room temp/warm tap water
4. Apply water to shoulder pad via brush
5. Slide decal onto pad, adjust location with brush
6. Dab decal with paper towel to draw away water
7. Brush with micro-sol (the decal softener, although I use another product by PollyS), the decal might slip around, so be careful to get under the 'raised' spots on the slope, and brush it over the entire decal.
8. Let it completely dry, like overnight, any wrinkles should straighten out. If there are still wrinkles, re-apply decal softener to just those areas.
9. When fully dry, touch up areas with white or black paint, finish with dullcoat to flatten it all down.
That works for me. The positioning, "10 and 2" cuts, etc. all take a little playing with. My homemade decals tend to be thicker than the FW, or even some GW ones. I've had various generations of GW decals be very difficult to work with (easy to fold, tear, etc.).
*edited for clarity and spelling
|
|
This message was edited 2 times. Last update was at 2011/06/28 02:03:32
 Legio Suturvora 2000 points (painted) Legio Suturvora 2000 points (painted)
30k Word Bearers 2000 points (in progress)
 Daemonhunters 1000 points (painted) Daemonhunters 1000 points (painted)
 Flesh Tearers 2000+ points (painted) - Balt GT '02 52nd; Balt GT '05 16th Flesh Tearers 2000+ points (painted) - Balt GT '02 52nd; Balt GT '05 16th
 Kabal of the Tortured Soul 2000+ points (painted) - Balt GT '08 85th; Mechanicon '09 12th Kabal of the Tortured Soul 2000+ points (painted) - Balt GT '08 85th; Mechanicon '09 12th
 Greenwing 1000 points (painted) - Adepticon Team Tourny 2013 Greenwing 1000 points (painted) - Adepticon Team Tourny 2013
"There is rational thought here. It's just swimming through a sea of stupid and is often concealed from view by the waves of irrational conclusions." - Railguns |
|
|
|
|
2011/06/28 02:16:26
Subject: Applying Decals to Marine Shoulders
|
|
Stalwart Veteran Guard Sergeant
|
This guy made a tutorial video a while back
http://www.dakkadakka.com/dakkaforum/posts/list/376835.page
hope that helps
|
Its what we do best. We die standing
"The Gods of Chaos are just like real human emotions, I mean when your Khorne your angry, when your Nurgle your sick, when your Slaanesh your horney, and when your Tzeench....YOUR SHOOTING DOOMBOLTS OUT OF YOUR HANDS...
 Cadian 901st "Rust Dogs" (1850) Cadian 901st "Rust Dogs" (1850)
 Emperor's Crusaders (585) Emperor's Crusaders (585)
|
|
|
|
|
2011/06/29 14:16:26
Subject: Re:Applying Decals to Marine Shoulders
|
|
Fresh-Faced New User
Preston, Lancashire, UK
|
Thanks for the advice. I'll give it a try again after the weekend.
|
Flesh Tearer Marines
http://s1124.photobucket.com/albums/l570/EvilEdwin/Flesh%20Tearer%20Tactical%20Marines/
Craftworld Iybraesil Guardians
http://s1124.photobucket.com/albums/l570/EvilEdwin/Iybraesil%20Guardians/ |
|
|
|
|
2011/06/29 14:23:54
Subject: Applying Decals to Marine Shoulders
|
|
Longtime Dakkanaut
|
I use 2 coats of 'Ardcoat on the area I'm going to apply a decal on to give it a nice, smooth surface to maneuver it in place. Otherwise, I follow all of the above advice and finish it with another 'Ardcoat before using a matte finishing spray.
|
What harm can it do to find out? It's a question that left bruises down the centuries, even more than "It can't hurt if I only take one" and "It's all right if you only do it standing up." Terry Pratchett, Making Money
"Can a magician kill a man by magic?" Lord Wellington asked Strange. Strange frowned. He seemed to dislike the question. "I suppose a magician might," he admitted, "but a gentleman never could." Susanna Clarke Jonathan Strange & Mr. Norrell
DA:70+S+G+M++B++I++Pw40k94-D+++A+++/mWD160R++T(m)DM+
 |
|
|
|
|
2011/06/29 14:47:34
Subject: Applying Decals to Marine Shoulders
|
|
Lieutenant Colonel
|
Okay I'm going to echo the guidance of Creuntus here by putting down my method. It only works if you use DULLCOTE or any kind of Matt Varnish at the final stage.
1. Satin or Gloss Varnish the area for the decal to be applied on.
2. Cut out decal.
3. Place on a damp piece of kitchen paper. Use some MicroSol and Water solution (3 drops water to 1 Microsol it softens the Decal and means you don't need to use a knife on the decal to make something square, fit something round.
4. Leave for 30-45 seconds.
5. Use tweezers to pick up the corner of the decal.
6. Use a very soft brush to gently tease the decal on to the surface area of the model you want it in (don't worry about positioning!). A tip to help out it to put a small dab of water on the varnished area to allow the Decal to float on a film of water.
7. THE SECRET WEAPON ! (APPLICATORS)

My wife uses these for eyeshadow etc she buys 10 for like £1 and they are disposable. She saw me trying to do this with brushes and suggested I try one (I love wive's they are brilliant!). Damp the tip with water and ring it out gently on a paper tissue. Use a gentle pressure and you will find the decal floats on a microfilm of water on top of the varnish allowing you to position it for upto 2mins no problem. Once in position dab the excess water off with a fresh dry applicator. Leave it to dry.
8. Finally to get rid of that decal shine, varnish/seal the miniature then coat with DULLCOTE or anyother MATT VARNISH.
I USED THIS TECHNIQUE on 15mm Scale Vehicles which are bit harder than 28mm and it was easy as 1-2-3 (if you've got the right tools!  )
Hope this little tip helps.
|
|
This message was edited 2 times. Last update was at 2011/06/29 14:55:59
Collecting Forge World 30k????? If you prefix any Thread Subject line on 30k or Pre-heresy or Horus Heresy with [30K] we can convince LEGO and the Admin team to create a 30K mini board if we can show there is enough interest! |
|
|
|
|
2011/06/29 18:00:08
Subject: Applying Decals to Marine Shoulders
|
|

Focused Fire Warrior
Where you least expect it...
|
I also had problems with transfers so i just paint them freehand. Yep i am crazy. Im infact writing this from a mental hospital
|
just because i'm swedish doesent mean that i'm blonde. I just hapen to be anyway |
|
|
|
|
2011/07/07 14:05:31
Subject: Re:Applying Decals to Marine Shoulders
|
|
Fresh-Faced New User
Preston, Lancashire, UK
|
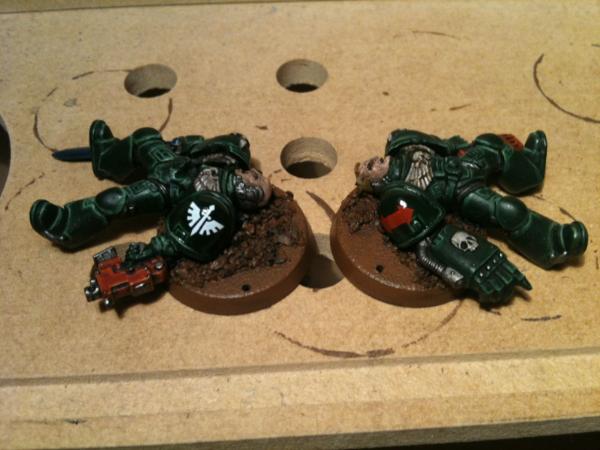
I've had a go following the advice you guys have given. They're an improvement, but I'm still having a little trouble.

You can see there are slight folds on the top left and top right of the decal. I've been applying Micro Sol to those areas but I can't seem to improve the finish. The top right side is actually lifting off the shoulder a little.
Does anyone else have any further advice please?
|
Flesh Tearer Marines
http://s1124.photobucket.com/albums/l570/EvilEdwin/Flesh%20Tearer%20Tactical%20Marines/
Craftworld Iybraesil Guardians
http://s1124.photobucket.com/albums/l570/EvilEdwin/Iybraesil%20Guardians/ |
|
|
|
|
2011/07/12 23:11:04
Subject: Applying Decals to Marine Shoulders
|
|
Lieutenant Colonel
|
Edwin, could you give a run down of the steps you took? As there is alot of advice above and I just need to see if we could tweak it slightly.
Obviously a 2D square decal (most of them are) fitting on to a 3D non flat/ surface will be a pain. But I am feeling your pain and want to help you, as i see this as a major challenge to overcome.
I have used several other techniques in the past for other hard to do areas.
One I used on Terminator Pauldrons, was to make small 1-2mm incisions around the edge of the decal to help it shift slightly. I then used a 000 Brush and small amounts of Black paint to ensure any gaps or slight "skewing" (Right word? meaning the decal looks out of shape).
The problem I found with this technique is the lifting of some edges. To get around this i literally varnished it on. The 1st layer of varnish went on, whilst still sticky I would put the decal on (using the minimum amout of water possible). I would position it carefully. Leave it about 30mins - 1 hour to start to set and then gently put another thin layer of varnish on. This sticky layer would seal the edges of the decal and hopefully stop it lifting. The Varnish step can be dropped, but it stops that horrible Silvering effect you get with decals.
If you are still struggling, I have had good results with Staedtler Micro-Pens and literall drawn designs on. These things. Cost about £2.50 a piece (0.3m and 0.05mm)
These Venerable Claws above, had the White section paint on, i then used Micro Pens to then colour over and neaten the shapes. Once dried I varnished them. Just a suggestion, and I do appreciate its annoying buying the decals and it's difficult to draw perfect circles on a curved surface at small scale. I know it doesn't help, but I worked out how much I was spending on Decals, Microsol and Microset and the extra time and varnish, I now just buy the Sculpted Pauldrons from Chapterhouse or GW or even FW. It saves time and effort, I know thats a kick in the balls but it's just where I have gone with it. The same with Moulded scenic bases it's so much easier than having Flock, and static grass.
|
|
This message was edited 2 times. Last update was at 2011/07/12 23:32:27
Collecting Forge World 30k????? If you prefix any Thread Subject line on 30k or Pre-heresy or Horus Heresy with [30K] we can convince LEGO and the Admin team to create a 30K mini board if we can show there is enough interest! |
|
|
|
|
2011/07/12 23:20:04
Subject: Applying Decals to Marine Shoulders
|
|
Shadowy Grot Kommittee Memba
The Great State of New Jersey
|
|
|
|
|
|
|
2011/07/13 06:40:13
Subject: Re:Applying Decals to Marine Shoulders
|
|
Ragin' Ork Dreadnought
|
If you think shoulder pads are hard, try tattoos
Though I've done shoulder pads recently as well...
Using my Decal/Transfer Information Download from the Forgeworld Tank Masterclass and also a post Decals 101 on Dakka.
Specifically for the tattoos, I did find I needed to cut into the gaps of the transfer (between the axes) for it to sit properly - probably the same issue you are having with circular icons. The cutting at 10 and 2 mentioned in a previous post sounds like a good idea...
Keep persisting! (perhaps on some spare shoulder pads! - I did my original tattoo trials on spare boyz arms....)
|
|
|
|
|
|
2011/07/13 07:20:41
Subject: Re:Applying Decals to Marine Shoulders
|
|
Last Remaining Whole C'Tan
|
Man, you guys put way more effort into it then I do.
1.) I carefully cut out the decal
2.) Apply a little Mr. Mark Setter to the target area, which I haven't prepped in any way beforehaqnd
3.) Dip the decal in water, wait 30 seconds, slide it a tiny bit off the paper, then pick it up with tweezers
4.) Put the mini in place, and reposition as needed with a soft brush.
5.) After a few minutes, when it's starting to dry, I rebrush with a soft, wet brush to get it to fit to the curves.
Optional Step 6: Apply Mr. Mark Softer to soften the decal; but I never really need this with OEM GWS decals.
Chemicals are really the answer here, not a problem with your technique. I haven't used micro-sol or set so I can't speak to them, but I have heard good things about them, are you possibly not using them correctly? Mine do look bunch initially, but after a few minutes the decals soften up and can be smoothed around curves.
|
 lord_blackfang wrote: lord_blackfang wrote:Respect to the guy who subscribed just to post a massive ASCII dong in the chat and immediately get banned.
 Flinty wrote: Flinty wrote:The benefit of slate is that its.actually a.rock with rock like properties. The downside is that it's a rock
|
|
|
|
|
2011/07/13 07:28:56
Subject: Re:Applying Decals to Marine Shoulders
|
|
Fresh-Faced New User
Preston, Lancashire, UK
|
Thanks everyone.
@Ouze
I'm using the technique that Cruentus posted above.
The problem I always have is that at about 10 and 2 there are folds. I've tried cutting between the saw blades, right up to the edge of the symbol itself, but it's never enough. I may try cutting right to the blood symbol and then fixing anything that goes awry by painting it afterwards.
It's possible I'm rushing it or I'm not patient enough, but I've looked at a few YouTube videos and the transfers always seem to conform straight away to the surface. So it's a little disheartening when yours don't :( Of course, I'm sure these people have more experience at it than I do!
I've always used MicroSol to help the transfer conform to the surface, but frankly it never really seems to be of much help.
|
Flesh Tearer Marines
http://s1124.photobucket.com/albums/l570/EvilEdwin/Flesh%20Tearer%20Tactical%20Marines/
Craftworld Iybraesil Guardians
http://s1124.photobucket.com/albums/l570/EvilEdwin/Iybraesil%20Guardians/ |
|
|
|
|
2011/07/13 14:59:48
Subject: Re:Applying Decals to Marine Shoulders
|
|
Longtime Dakkanaut
|
So here is what you do....AFTER the decal has fully dried, take a fresh exacto blade and CAREFULLY make a cut along the length of the fold, this requires very little pressure and a steady hand.
After you have made the cut, take some white vinegar, or the micro-sol and add a drop or two where you made the cut, wait a few hours and that should solve your problem.
Most people stop there, but there is 2 more steps that can be done to make the decal really look like part of the paint.
Get some Future Floor Polish and brush 2-3 coats of it onto the decal and surrounding area, this will help eliminate the ridge between the decal and surface, lastly coat with your clear coat of choice and your done.
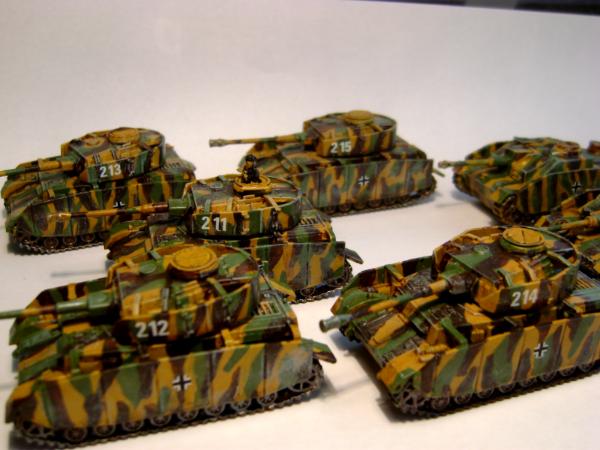
Example pic;

All of the checker patterns on the tanks were done via decals. The shoulder symbols and the checkers on the helmets as well.
Ashton
|
|
|
|
|
|
|
|
 Imperial Knights: The Avengers Initiative
 Da Dark Angelz
 Arakasi vs Infinity