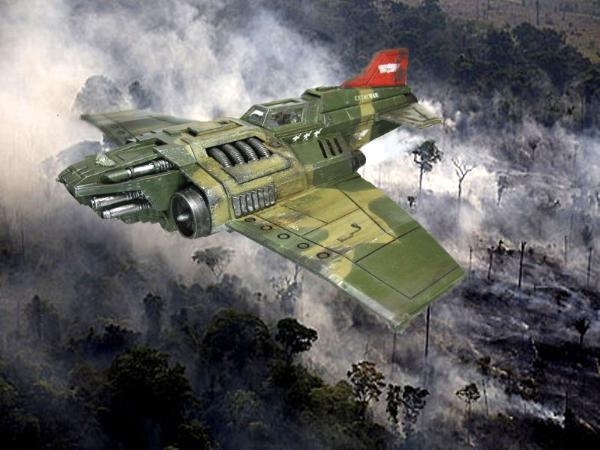
Of course they could have done shop work to see about a proper layout, of course nowadays, a plastic T-bolt is likely to have a box layout like the Ork/SM/Necron flyers as that appears to be the way GW is doing their boxes these days. Oh to see a plastic Thunderbolt for 50bucks!
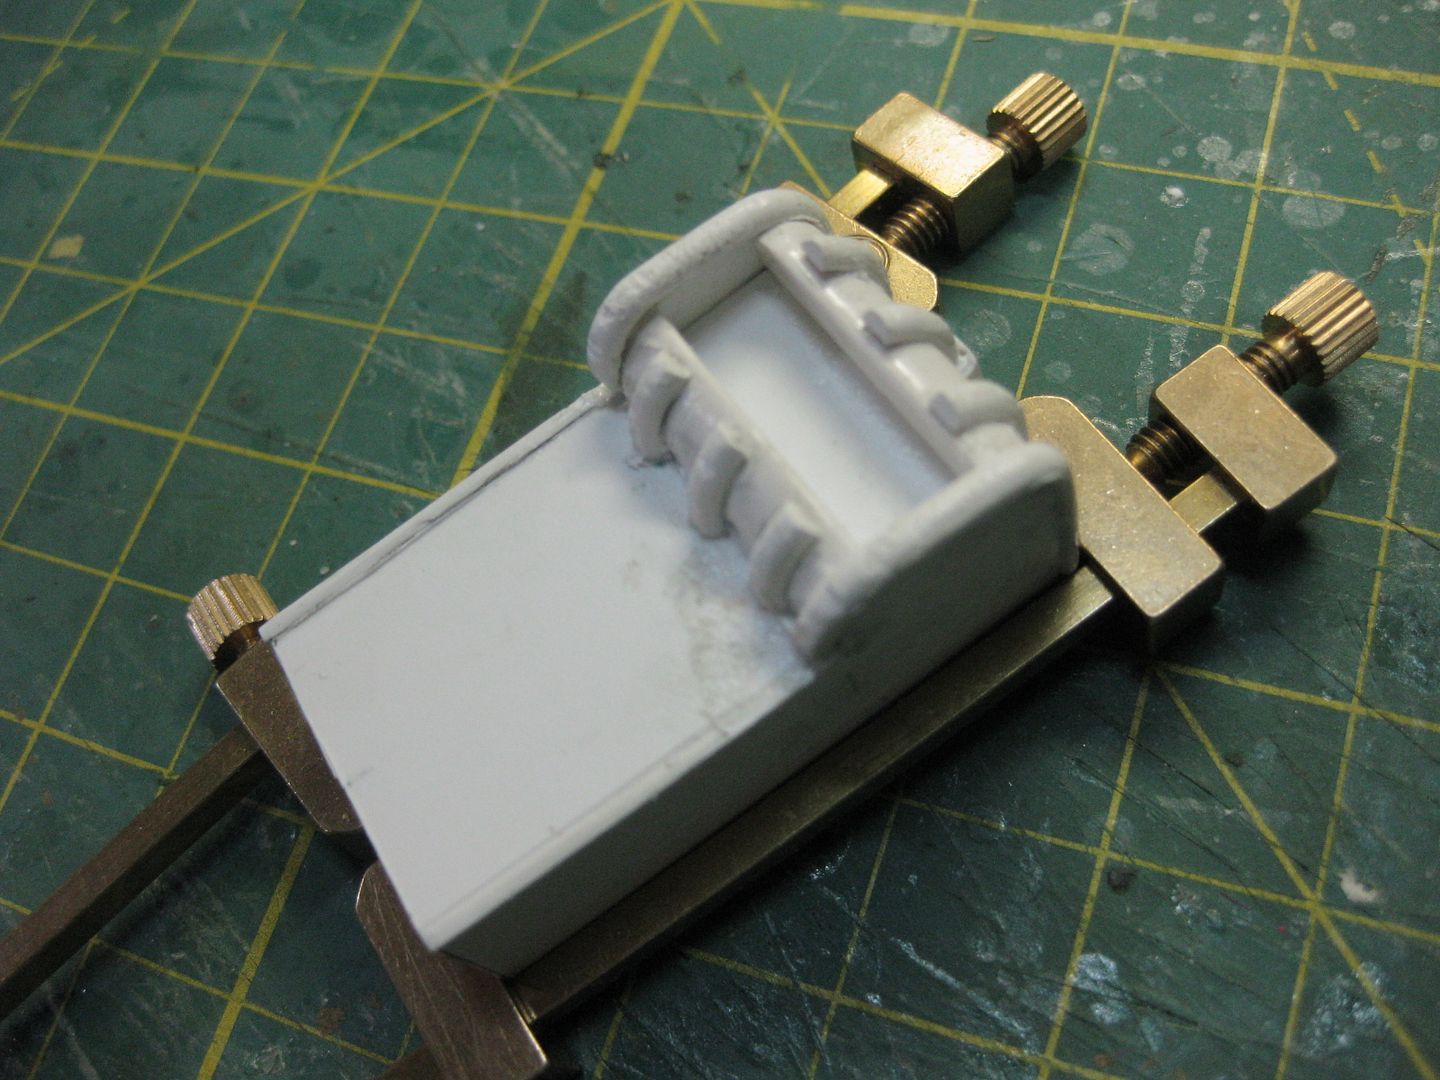
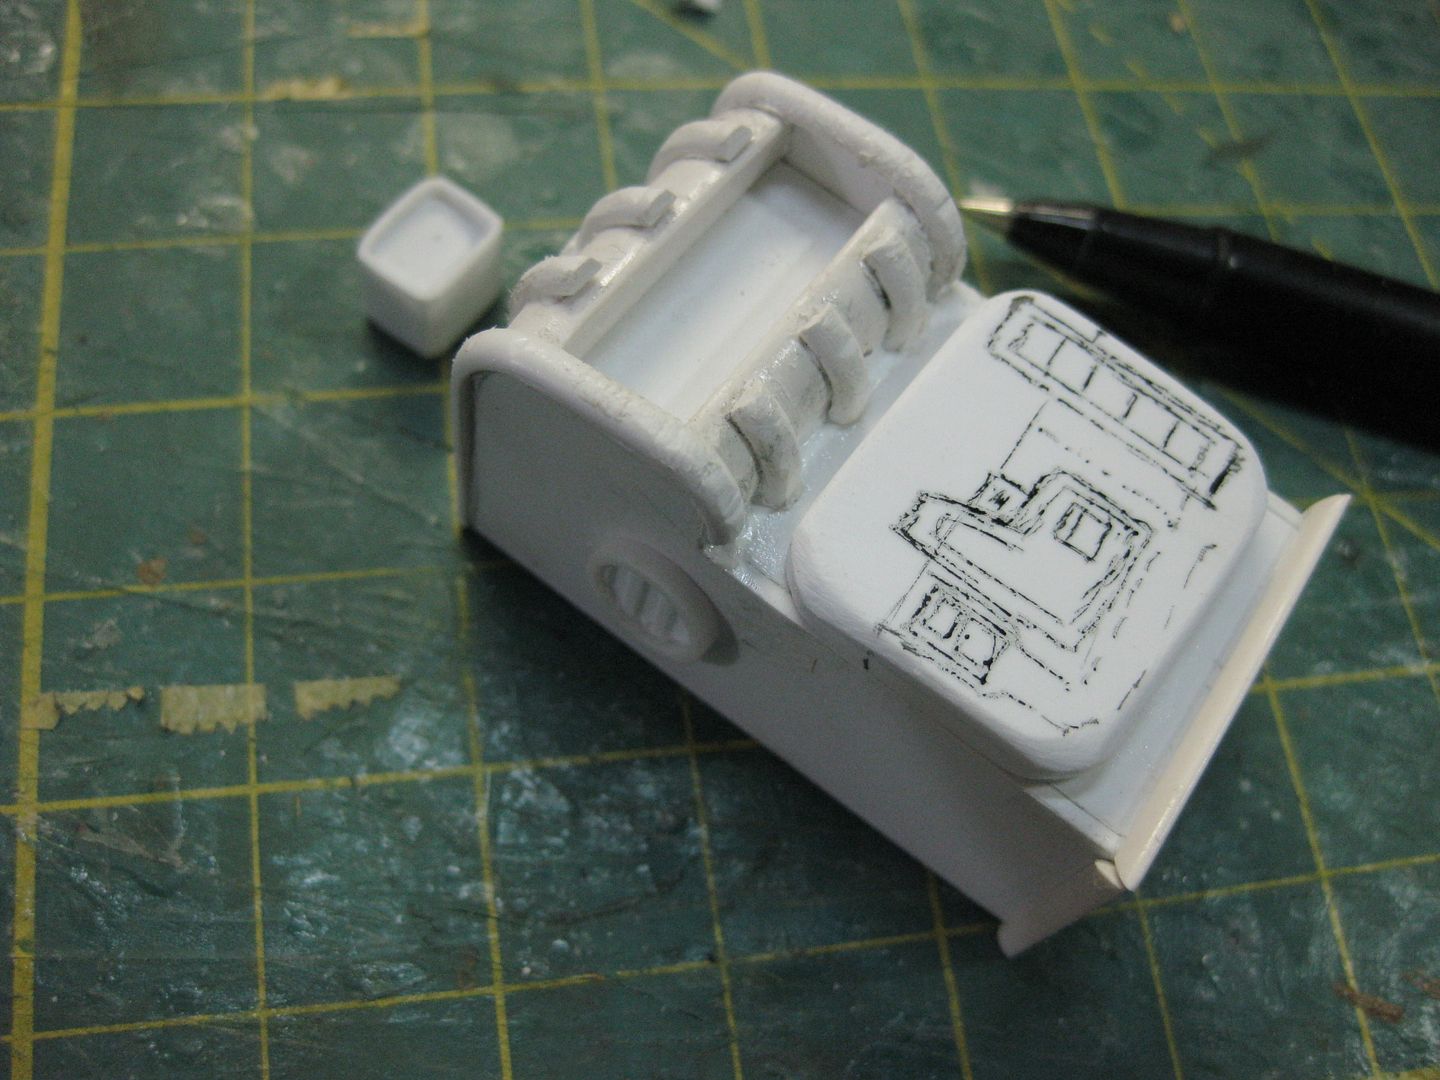
God i have to but those books... and thanks for the tips on the cockpit again. really appreciate it! but i have decided to get rid of the sticks he's holding in his hands...
...just so that i can create my very own one and fit right onto the panel itself!! stay put for that update. i'm quite happy with how the stick turned out now it's just a matter of getting it in place
hell... dave... you really make me want to start trying myself in como ... you and shaso that is... have you seen that some peeps use putty... the stuff kids use... for masking? i think IF i ever gonna do this then i will take this road...you know me and cheap^^
Hi dsteingess just checking in on my I pod taking advantage of the free wifi I've got whilst at away for the next two weeks! Tha the thuderbolt Is looking good too!
i just finsihed presenting the orkmower and the new thunderbolt to my wife... she liked it... tho she still sometimes shakes her head in disbelief^^... and when i showed her your range of paints... then she realized what proportions your mancave has^^
as for the thunderbolt... will you add thin squiggly lines like shaso does to the camo scheme? i think there is the need for a third color...
heh..Tell her my gf doesn't even make me keep the door closed? LOL
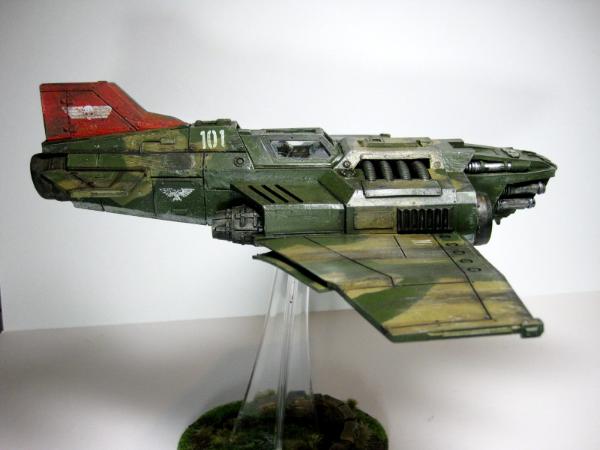
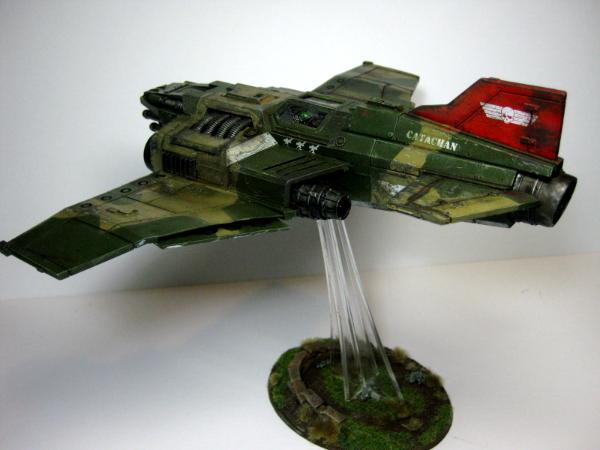
I thought about a third color, quite a bit, but ultimately decided against it for this scheme. This is really the GW Cadian Scheme, but I liked it and gave the order for the crews to paint them this way
and the current look made me think... if you dull it down later anyway... how about making the lines inbetween the diffrent camo colors a bit fuzzy? youst a slight blurryness to the camo? would you think this would look cool... probably would be a pain in the rear to see all this crispness ruined? just thought it might make the camo even more convincing...
Automatically Appended Next Post: I want it to be just the way it is. It's too late for all that gak Vik lol I've got damn decals on it already!
Automatically Appended Next Post: Yeah, I spent more than an hour masking with the blu-tac and tape specifically so I could get the crisp lines in the pattern.
ok Guys...there are some things that MUST be done in a certain order on any paintjob...ever
1. Camo pattern is done FIRST, always
2. Markings are all done SECOND (you can't change the camo after the markings are on it because when they paint something for real the stencils for the markings are put on AFTER.
3. Weathering is ALWAYS done over the markings, so they are weathered too. Natural elemental and combat weathering affects the ENTIRE thing.
Yes, you must be patient. If you've read Dave's plog, you'll see that he works in order, to get a proper finish. Also, he's going for a very specific look, here, the very crisp and clean lines of aerial camo.
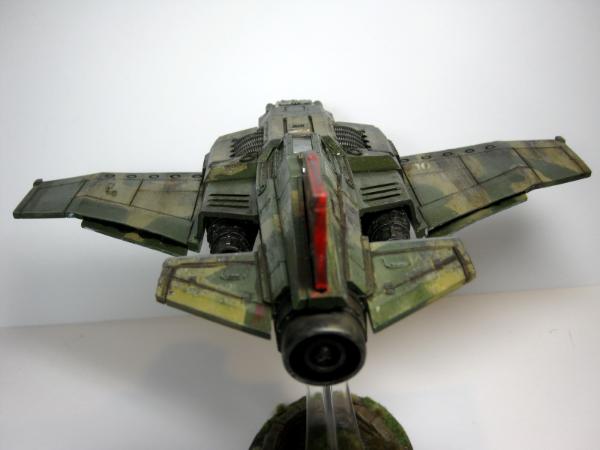
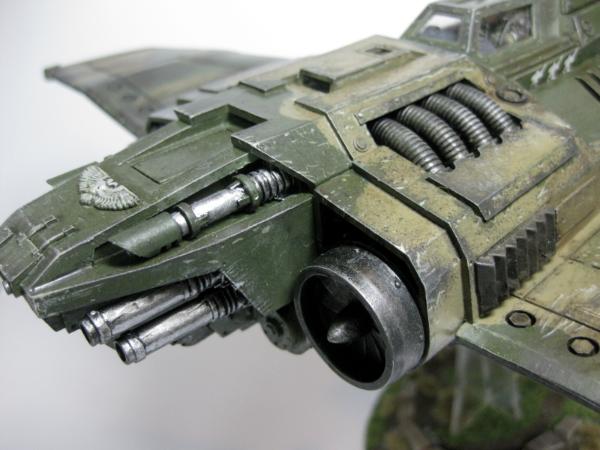
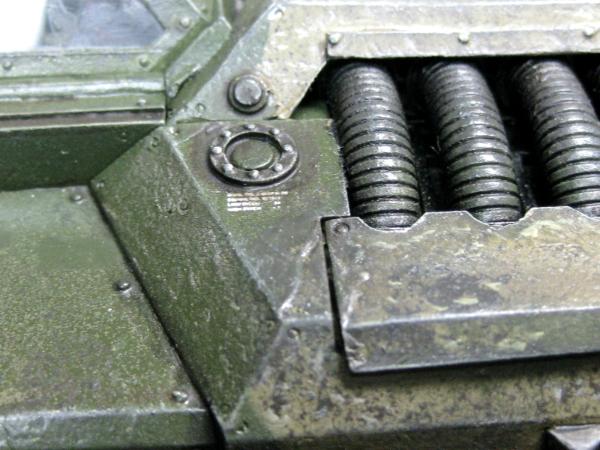
Correct- The requirements of aircraft camouflage are different than that of armor. Low Level aircraft often forgo the light underbelly camo. This is a Bomber Escort/air superiority fighter, meaning it generally operates at higher altitude, so the belly color should disrupt the shape when viewed from below. The Camo Pattern topside should do the same when viewed from above (the danger zone for fighters and bombers) at altitude, all you see below are sharp delineations of color, so you want your camo pattern to reflect that.
Brian's spitfire matches the colors below see, My Tbolt is deployed in Jungle Operations, a-la the F-4 Phantom here
Automatically Appended Next Post: My Tbolts however, will have bombs for game-purposes though, their twin-linked autocannons being plenty for pesky Ork Dakkajets or other flyers
Automatically Appended Next Post: Although I would LOVE to be able to arm them with Napalm..Orks get Napalm with the Burna-bommer.
So, for example, here
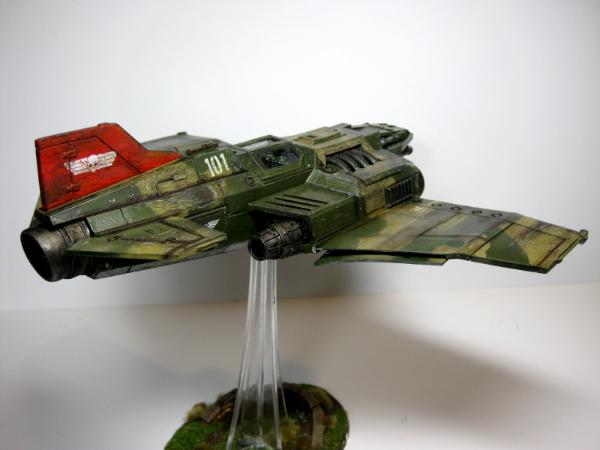
1. The Camo is DONE
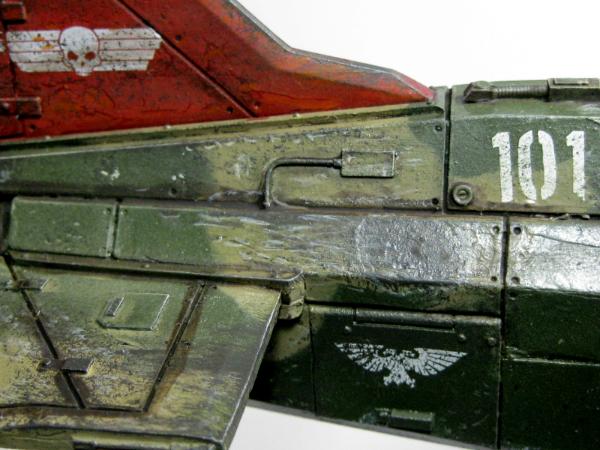
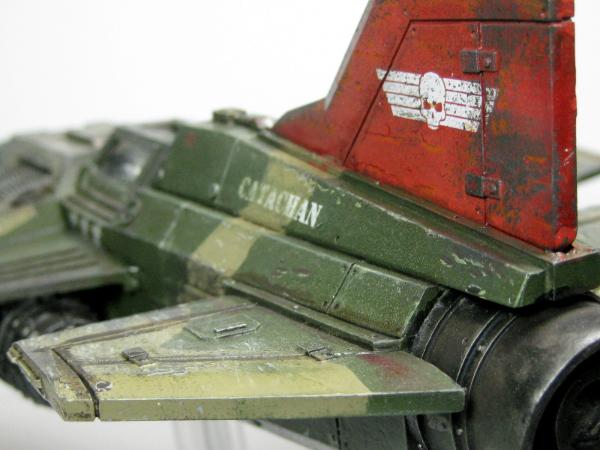
2. The markings are DONE..Except I have not decided what to do with the tail yet, All We know is that it is the Catachan 10th Fighter Wing, 1st Squadron.
3. The weathering has NOT yet begun
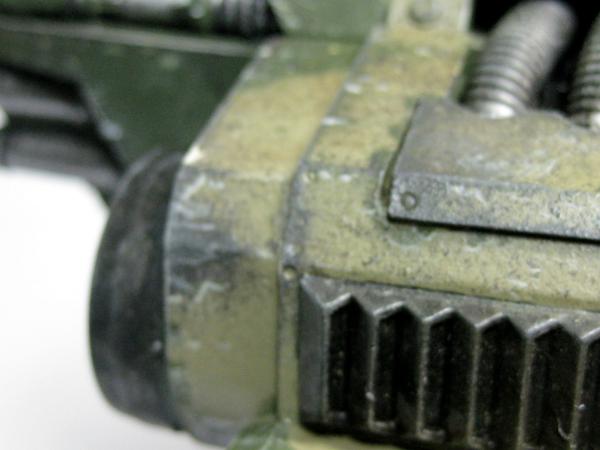
This says:
By Order of the Emperor of Mankind:
High Octane Promethium ONLY
After I decide what to do with the tail, and add paint chipping.. the whole thing will be given a final coat of future...
yes, more gloss -This is another exercise in patience!
... ..It will allow the oil weathering to flow smoothly around all the rivets and panel lines, and all the leaking oil and promethium stains, and soot will be lovely.
After any powders I will use Future again, but mix it with matte medium to dull it all down, then you will be pleased, but you must be Patient!
Automatically Appended Next Post: @Brian..there are two more lines of text below, I say that is Exactly what those lines are!
Future is liquid acrylic semi- gloss paint, basically.
I use Pledge Tile and Vinyl floor Finish. Te same ingredients would do the same thing, just look at the bottle ingredients.
Sounds very good well, it makes sence anyway camo, markings then weather hence getting the markings too. Did think you may be doing something like that.... ...... Now I know..... Well kinda!
Automatically Appended Next Post: I want it to be just the way it is. It's too late for all that gak Vik lol I've got damn decals on it already!
Automatically Appended Next Post: Yeah, I spent more than an hour masking with the blu-tac and tape specifically so I could get the crisp lines in the pattern.
hey mate... just some creative ideas that pooped up in m mond (pun intended)
as for future... the continuing mentioning of that product got me finally curious enough to look it up on evilbay... and here that was what i found in german ebay...
There is no "too much" in weathering Looks ace
He's been in the thick of things for a while now, and there is only time for refuel, rearm and minimum maintenance - well probably getting the windshields cleaned too - but definately not time for a *pfft* paint job!
Real men fly weathered jets
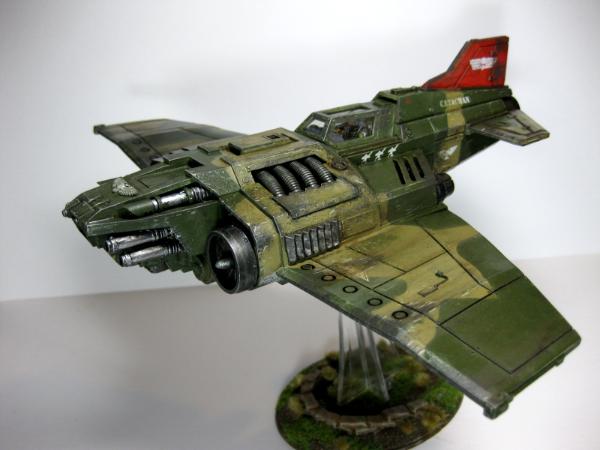
Bad flying, weather damage and battle damage it leaves its mark, like the red tail wing against the green camouflage, but where is the pin up on the nose
Now were taking!!!!! Im sorry too much weathering?!? There can never ever be too much weathering..... well unless it gets blown up...te he troll a lol a lol a lollollol....don't worry I wont quit my day job....
lone dirty dog wrote:Bad flying, weather damage and battle damage it leaves its mark, like the red tail wing against the green camouflage, but where is the pin up on the nose
I agree, a pin up would add another layer of awesomeness, and realism to what is already a great model.
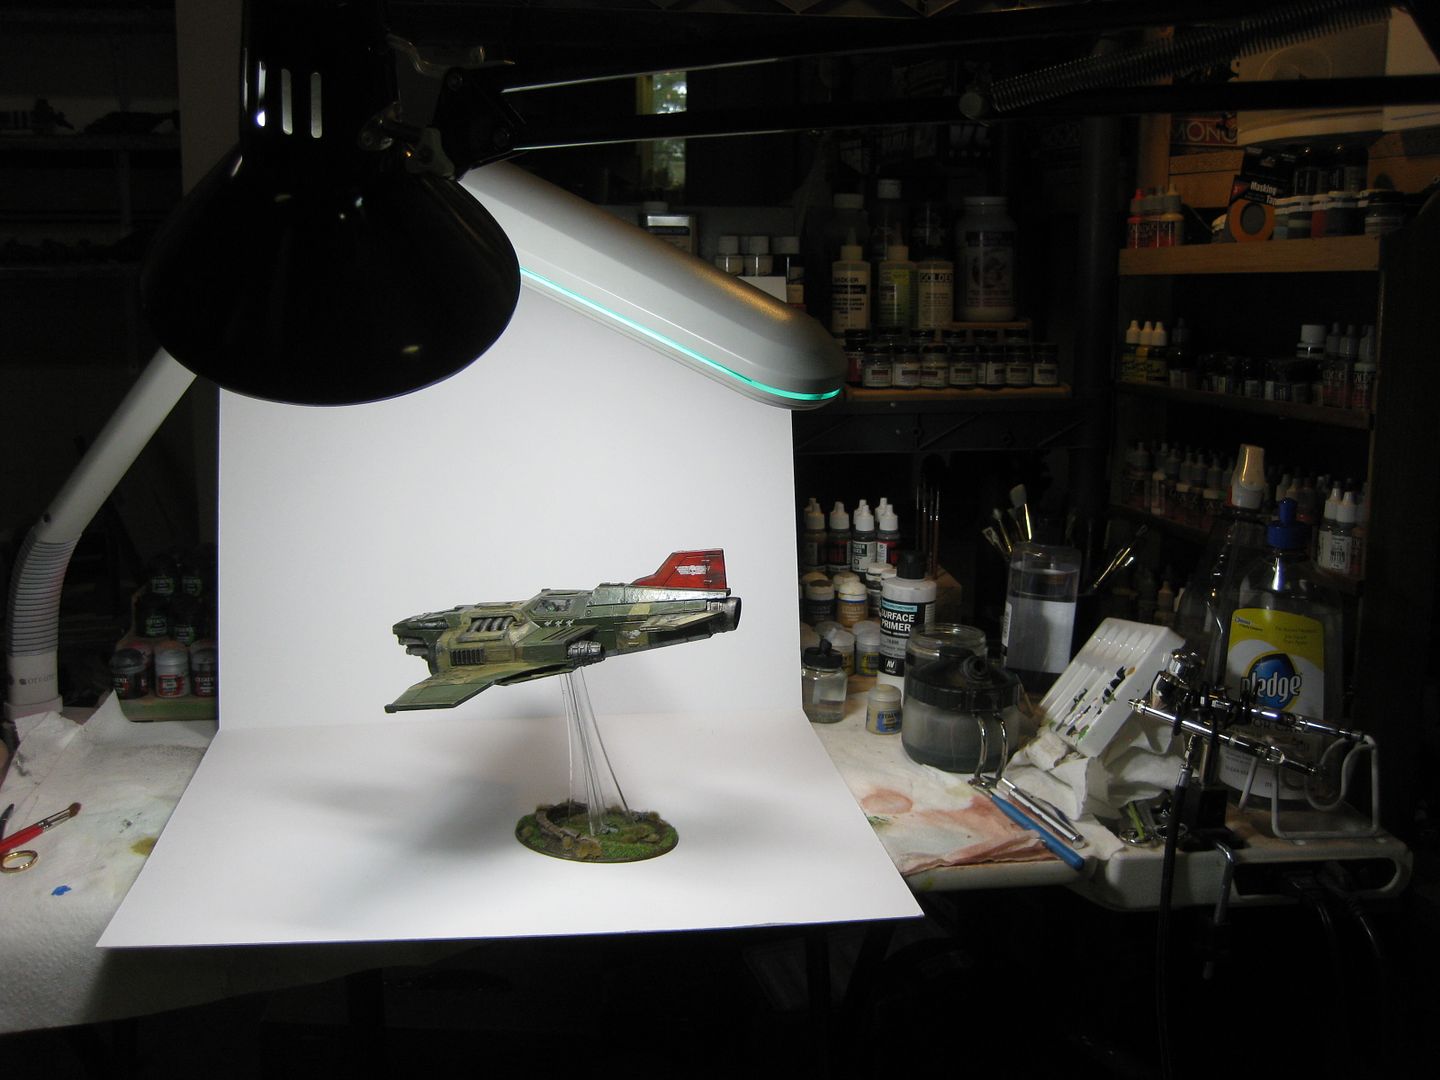
Wow! I wasn't expecting to wake up to such great comments! Thanks a lot guys! I went to bed feeling that I had overdone it, and was not looking forward to re-spraying some of the camo pattern with the 0.2mm needle.
dsteingass wrote:Wow! I wasn't expecting to wake up to such great comments! Thanks a lot guys! I went to bed feeling that I had overdone it, and was not looking forward to re-spraying some of the camo pattern with the 0.2mm needle.
She is beautiful, Dave. I expect nothing less from you. It the us airforce that insists on pretty planes.....
gotta agree to the fullest with all the others... the weathering looks totally convincing and is not overdone at all...
the red is a totally cool touch... as is the awesome looking skull decall on the fin... if it is possible... will you do some nose art? as with the model there is probably no real space enough but it would be so cool... tho i now my chances are probably slim to none
and matt... that is so cool...that lil pic just is exactly how i feel about lego^^
Great paint job as always, etc etc... same ol' same from me. What I really want to know is how many hours a day do you sleep? 3? 4? The productivity you display is not normal. Either you telecommute and glue things together while you code, or you are pushing the limits of human endurance.
My respect remains the same, even if your secret recipe for success is meth.
LOL You guys all see the pics, where do you suggest I paint nose art? .. the tail fin is really the only real place for the Personal Heraldry OR (like in my case) the Squadron Identification.
Supply Drop (or stuff I don't need right now drop)
1. The first of three FW orders I am expecting, PEB Aquillas and General Grizmund (He will ride in the cupola of my last Old-Skool Russ)
2. Trade Goods from Whalemusic!
Automatically Appended Next Post: LOL @ Skalk
I sleep about 6-7 hours a night (longer on weekends) What do you mean? I work 1.1 mile from home, 8 hours a day, we usually come home for lunch most every day.
LOL It's taking me forever to get this paintjob done!
I don't know, I'll have to ask WM. See the two kneeling minis? Those are Badass, but I don't know where they came from either. The Beret guy looks like he'd fit in with the old plastic Stormtroopers. The other and his forage cap will add to my growing squad/gang/killteam of forage-cap-wearing doods.
Yep, Pig Iron heads..A bunch of em too!
New Tank planned?? I have about 9000 new tank projects planned in my head, but perhaps??
Yep! If they don't have what you ask for at GD or any show, they ship it to you free, I went back 3 times I am still waiting on both sets of weathering powders, more decals, Punisher cannons, and bombs.
since your pics sadly are not zoomable... would you mind showing the heads a bit better?
and yes... those kneeling ones ... i think i saw them on ebay once... cool looking ones... specially because of the poses... the upper one is speaking in his com link?
well... grab yourself one of the big bags of warzone minis then.... it´s what i have done some months ago... and i will do some evil IG´s with these...
with your founds you could easily make 80 new men in less then a week... ebay is your lookout here... and the paintscheme for mine will be rather simple...
Automatically Appended Next Post: oh by the way... do you have a link to share how i can make a blast smoke cloud out of PVA and cotton wool?
No link, but just spraypaint it heavily with black, then mist on grey, then white. -If you do that with Woodland Scenics clump foliage, it looks like thick, black, noxious smoke from a burning vehicle.
well i don´t own foilage atm... but i do have cotton wool... hmmm do you think i can gue on the wool with superglue or PVA to the stand of my UFO? ad then do as you said?
There's an app called "Warpaint" (I think), it used to be "Paint Converter". There's a thread about it in the Dakka discussions forums. It handles exact paint matching between all the major paint lines. I downloaded it to my phone, and now I don't wonder, anymore, which matches which.
All that came from an IG bits bag I bought over a year ago. No clue where anything other than the heads are from. I've got 16 more of the head sprues if you or Dave want em, shoot me an offer! Im a sucker for FW...
Thought a necromunda player may get more use of the esoteric 3rd party and old school models. I think Dave got a pretty decent deal
Dave! I finally had a chance to come back for a proper look! :-) and I'm still like 30 pages behind! lol :-) I had a look at the latest few pages so i was up with the new stuff, and i have to say I love the marauder? the weathering is looking great, no need to stress about that point! it really looks how i imagine a Catachan vehicle would be, and on a side note... that Catachan tank on the display board is AMAZING! woo hoo that thing is cool! you really are a master and i love your work!
I will have to spend some long hours on my days off going back through the pages I missed and then spend another hour catching up on the pages that spring up while I'm reading the other ones! :-)
Beautiful, Dave! I have always loved the Thunderbolt: I've even got a template and a pile of bits that I got from eBay to build one, but haven't gotten up the nerve yet I think I need to find a smaller scratch build project before I attempt a thunderbolt
LDD is correct..huh..I thought they were PigIron heads too. I have some Pig Iron heads, I should have dug them out and shot pics next to them, they could easily work in the same unit/army methinks. Anyways, I might have some more stuff you'd like WM, if you'd be interested in trading the rest of your heads.
As for the nose art..I just can't freehand like that guys, sorry
Besides, I'm pretty sure the Imperial Navy would frown upon such artwork, Remember, losing your Lasgun, or *gasp* modifying your issued equipment is enough to get you flogged and shot in the Guard.
I don't like the one with the NES power glove, The second one is for a Bomber, The third one is specifically WW2. Where the hell would they go on the airplane LDD? You have a Tbolt sitting there unbuilt, build it and do it yourself man. I am not putting any nose art on because there is no room for it, and more importantly, I just don't want it.
dsteingass wrote:I don't like the one with the NES power glove, The second one is for a Bomber, The third one is specifically WW2. Where the hell would they go on the airplane LDD? You have a Tbolt sitting there unbuilt, build it and do it yourself man. I am not putting any nose art on because there is no room for it, and more importantly, I just don't want it.
Don't get me wrong, it's a great idea, just not on this model dood.
Remember, adding effects just because you can add effects usually ends up looking like that remake of King Kong with Jack Black if it doesn't make any sense for the effect to be there This is the worst green screen scene in Hollywood history, so absolutely lame it isn't even funny.
Automatically Appended Next Post: ..Like Jack Black's fat ass can outrun a mob of dinosaurs!
How do you do decals? I am about to do some, but I forgot how to make them look less shiny. Is it gloss, decal, then matte? Decal, gloss, matte? I can't remember
There are many ways to do it, but I like to make the film completely dissapear on mine, I do it like this:
1. Coat of future (gloss)
2. Brush on Micro Set
3. Dip decal in warm water, touch it to paper towel to get most of the water drops ff 4. apply decal over Micro Set (add more water with the brush if you need to move it)
5. Wait a few mins, dab decal with paper towel
6. Brush on more micro-set
7. when dry, Brush on Micro-Sol if you need the decal to fit to contours or irregular shapes (DO NOT TOUCH decal after doing this, it'll disintegrate if you do)
8. Spray with more gloss (future)
9. Weather the decal wit hthe model
10. final flat (matte) coat over the entire model.
You can do it without the Micro-set and Micro-sol, but I use that stuff just to eliminate the clear film. I have heard of guys who skip that step and do fine, I just like the assurance that it will be gone
Nice update Dave! :-).... again! and i'm seriously giving myself a palm face as i just checked at work and lo and behold I can SEE YOUR PICS AGAIN! Nrgrhhhhh! I missed so much when i didn't have to miss a beautifully painted thing!
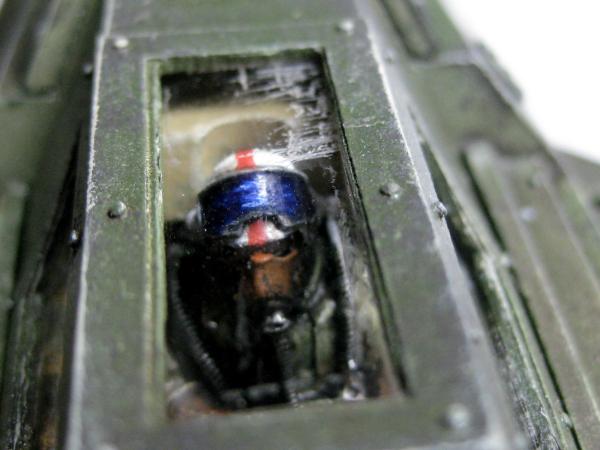
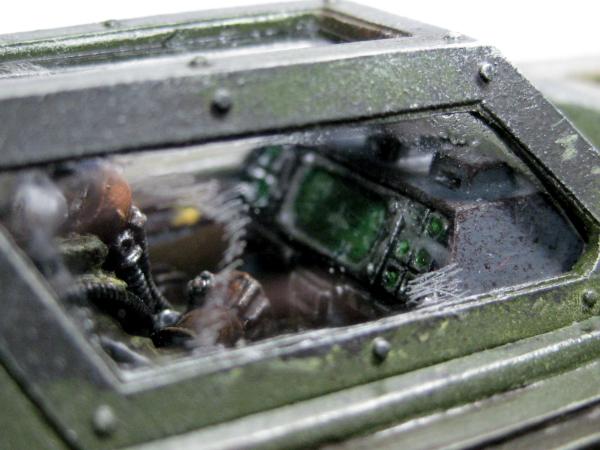
hey dave... what the hell are you doing? really what the hell... i know when you started here... you were a normal guy painting your stuff wishing it would look better.... seeing that pilot... where is that guy??? crisp painting mate... all around... and i mean it... the waethering is even on the hazard stripes on the ejection seat... way to go! and the visor on his helmet... ace... is it glossy or did you paint it to look glossy...? i really can´t tell...
I love the way the Tbolt looks dave, and the pilot is great! also.. mentioning the worst greenscreen scene in history did get me to laugh as I have seen that movie.. unfortinatly
Thanks Vik! I learned how to use my camera! , along with my existing lighting
@LDD- Thanks bud! -I absolutely think you should make it happen man! Testors makes some, but it is only for inkjet printers. I know other companies make it too. printable Waterslide decal film.
Automatically Appended Next Post: Here are the Tbolt pictures Uploaded to Dakka, and ran through their "Auto Fix" feature
They are zoomable, but are they really any better than I usually post?
What do you think?
Better?
Worse?
Meh?
Automatically Appended Next Post: What could this be?
Wow! Thanks guys!
@Rogue -Thanks man, I appreciate it!
@Brian- hahha- None of it is glued But yes I know, hazard-striped handles ARE needed! The pleasure will be mine on that shake sir!
@Galorn, Thanks man!- Feel free to use the pics if you need them!
@Skalk!- Thanks a lot dood! That really means a lot!
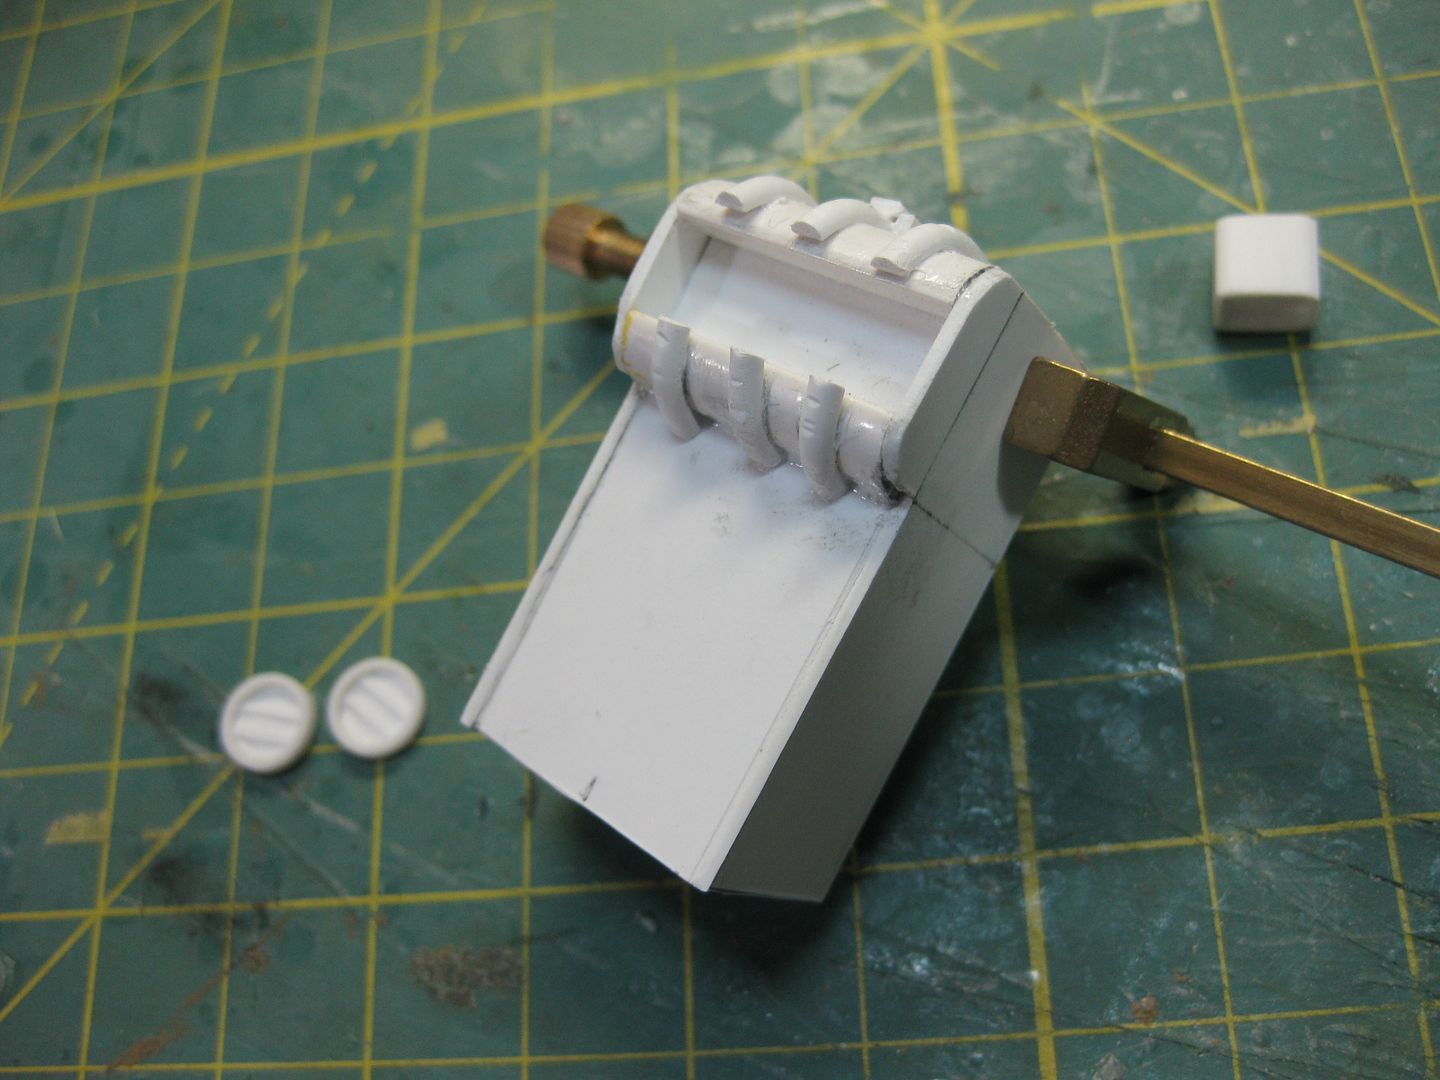
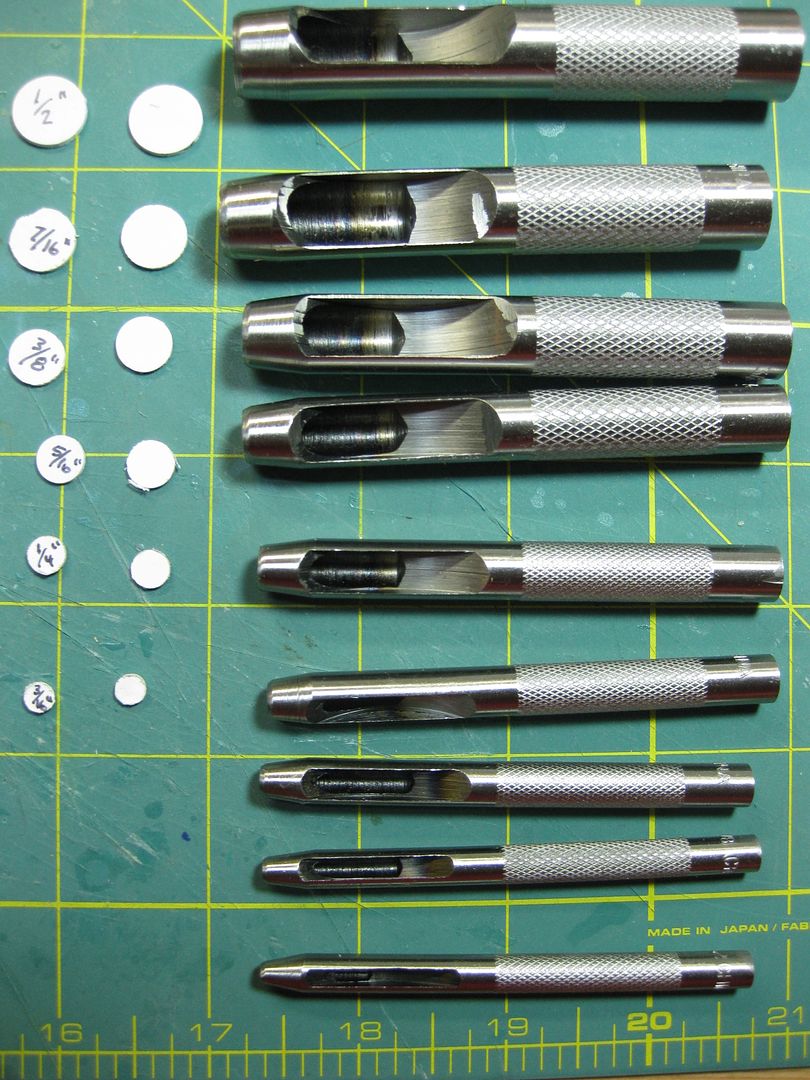
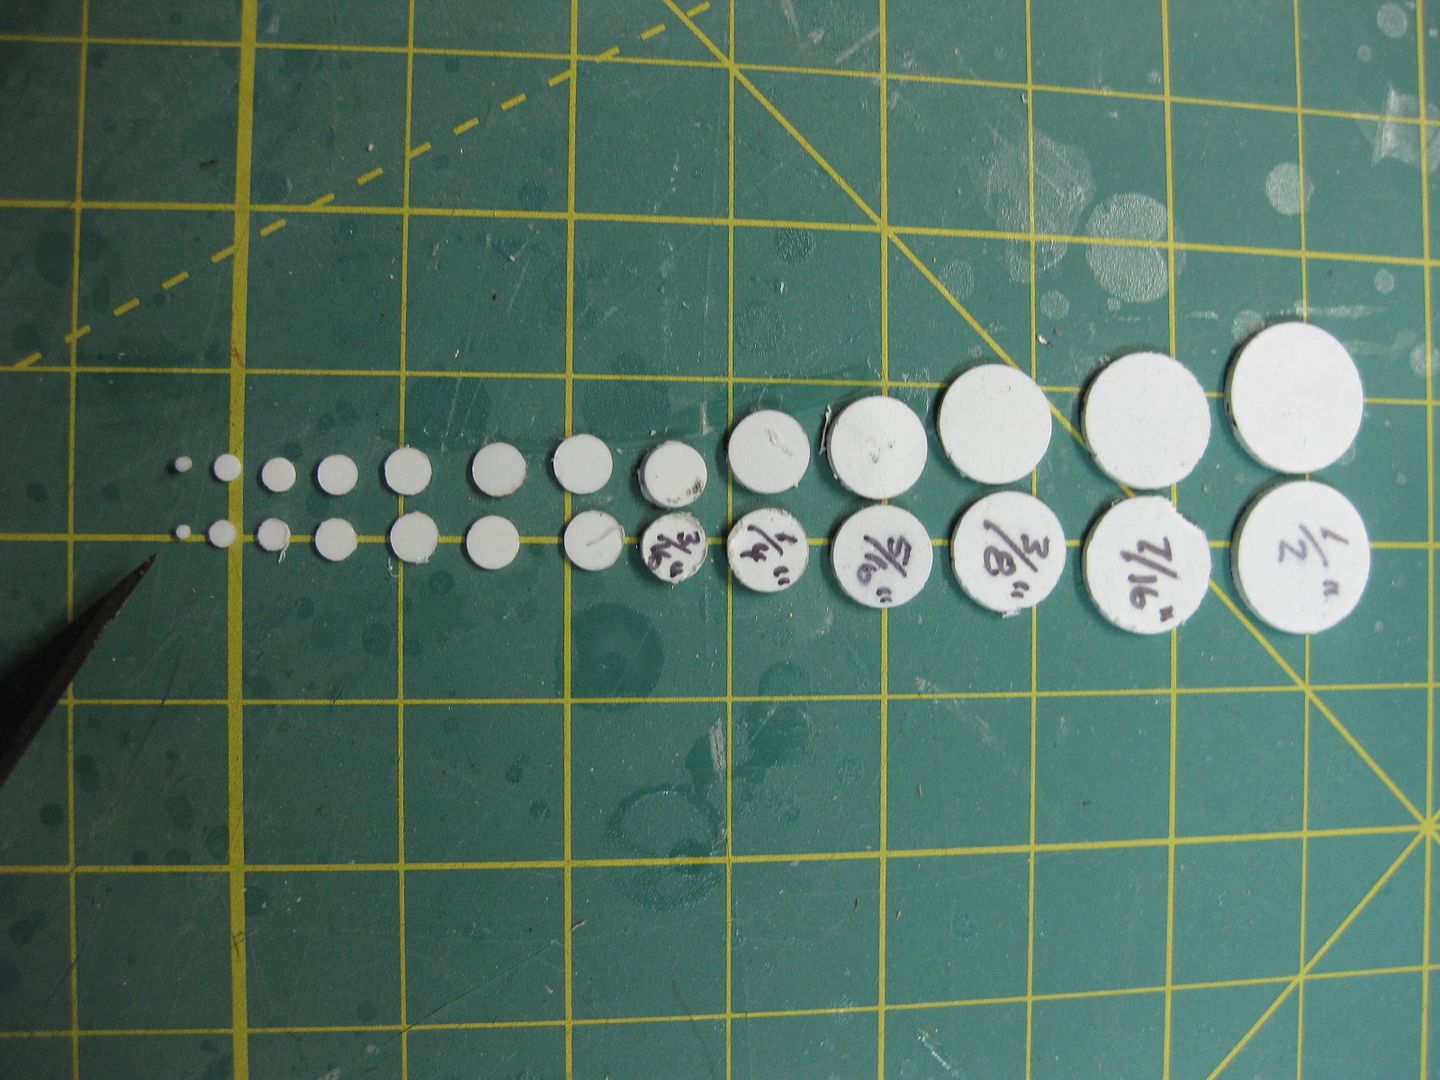
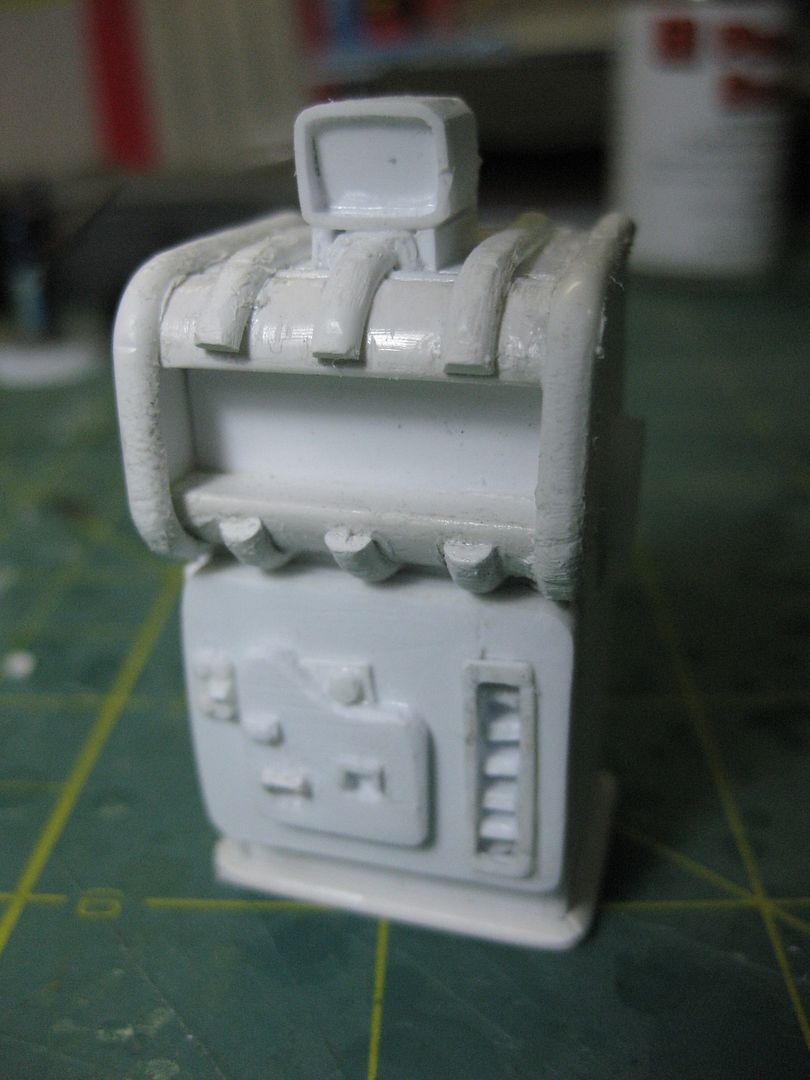
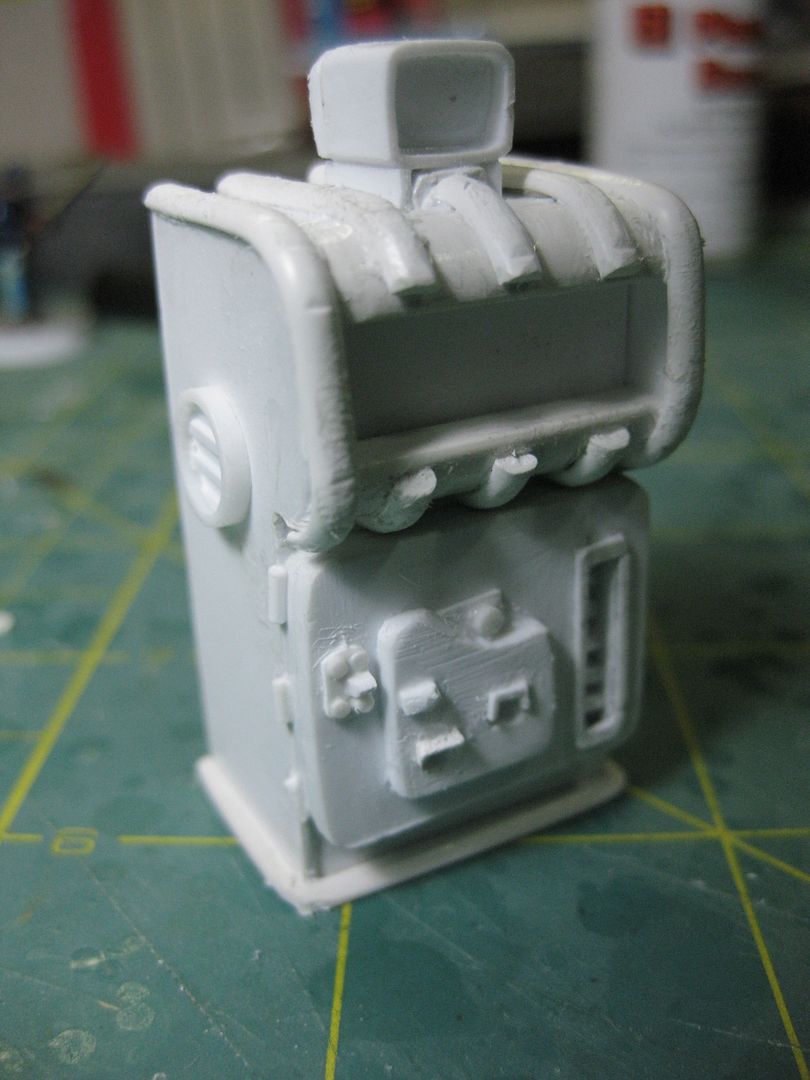
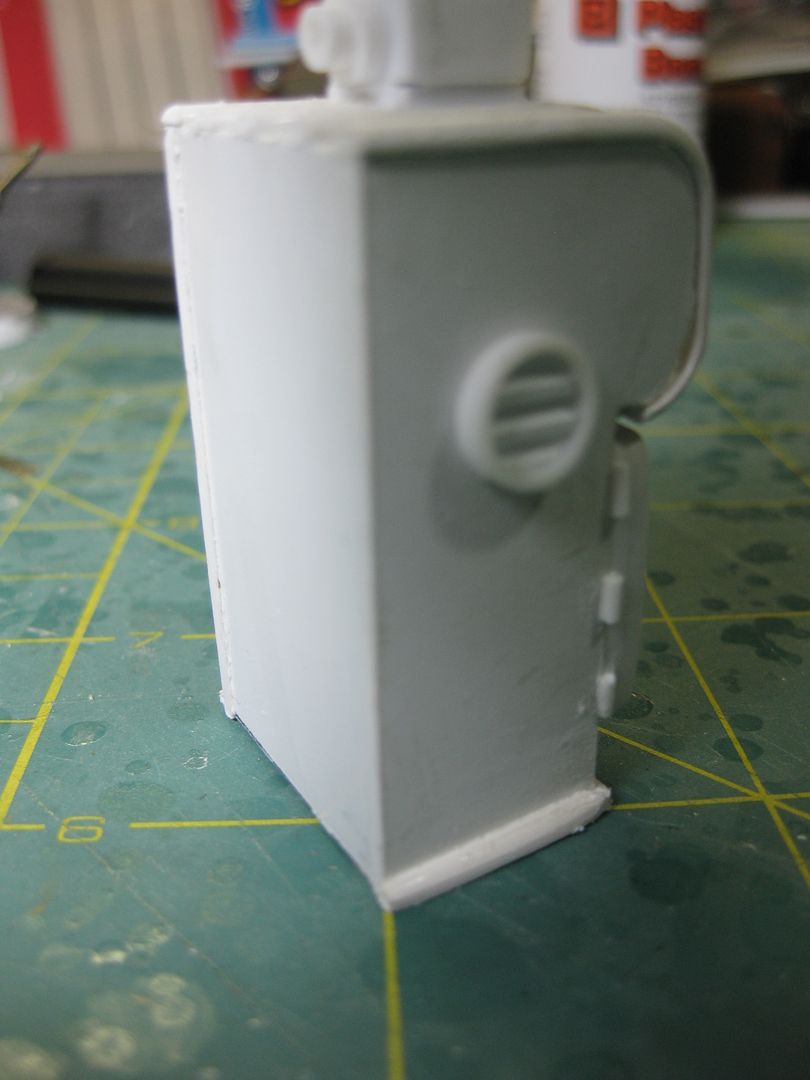
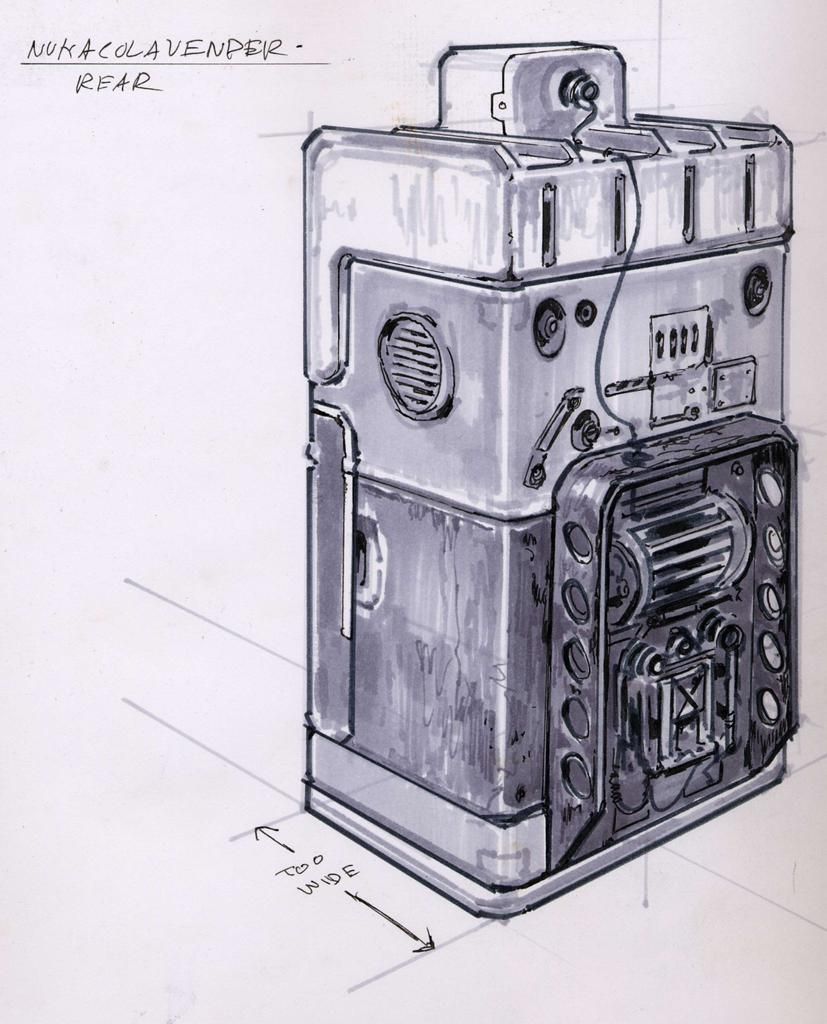
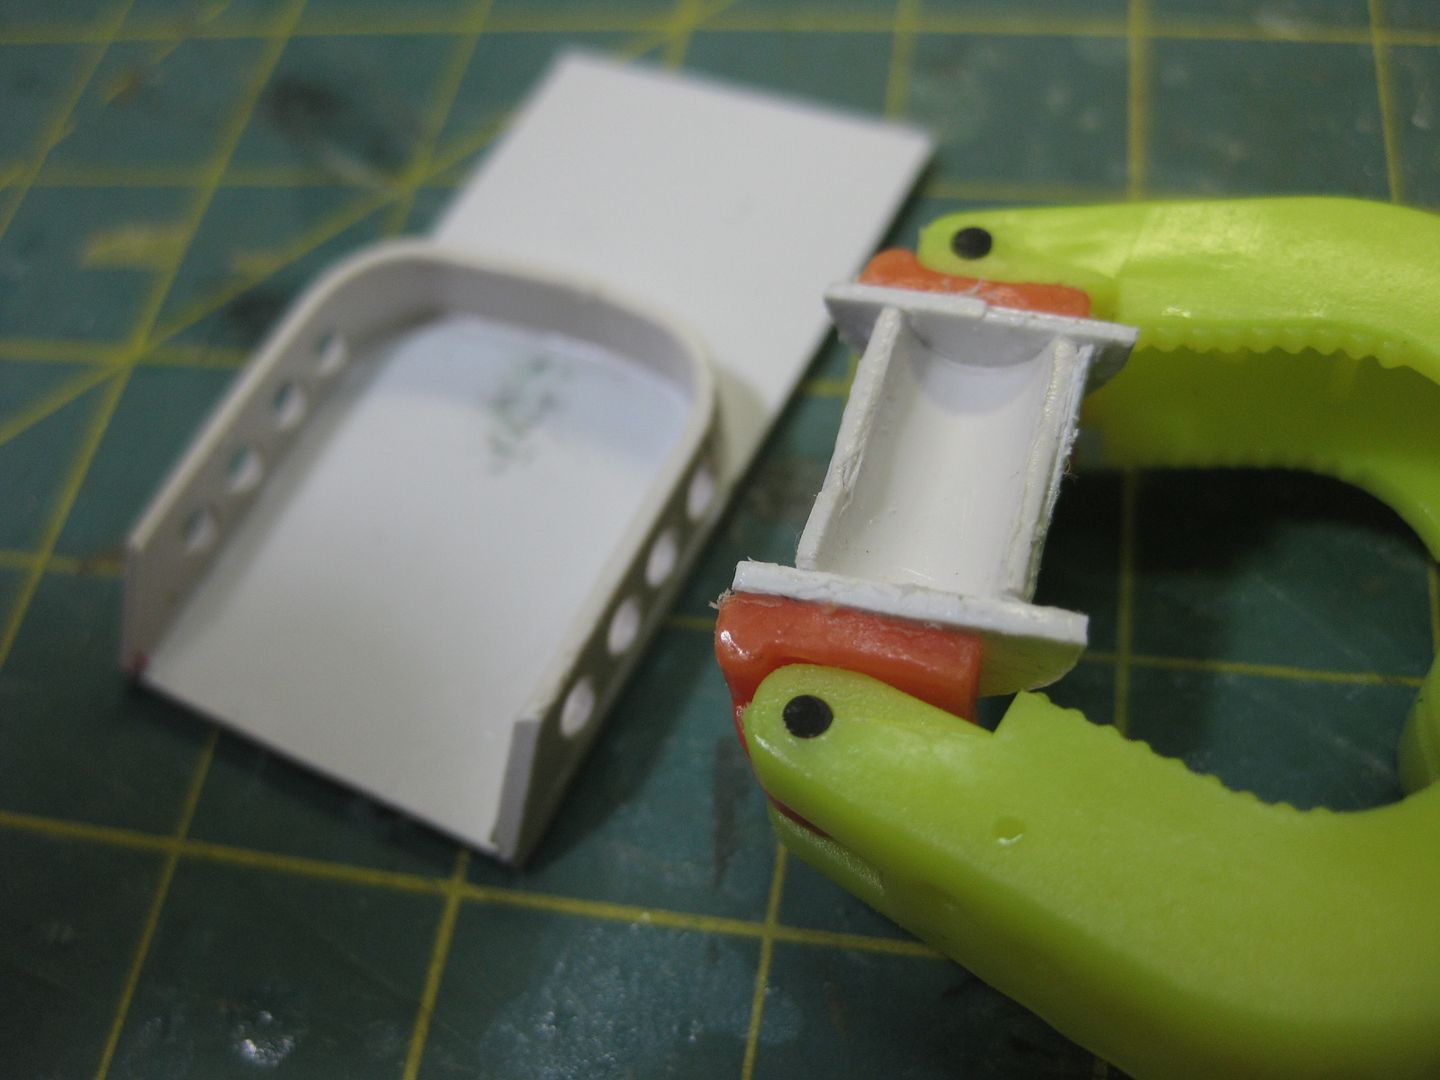
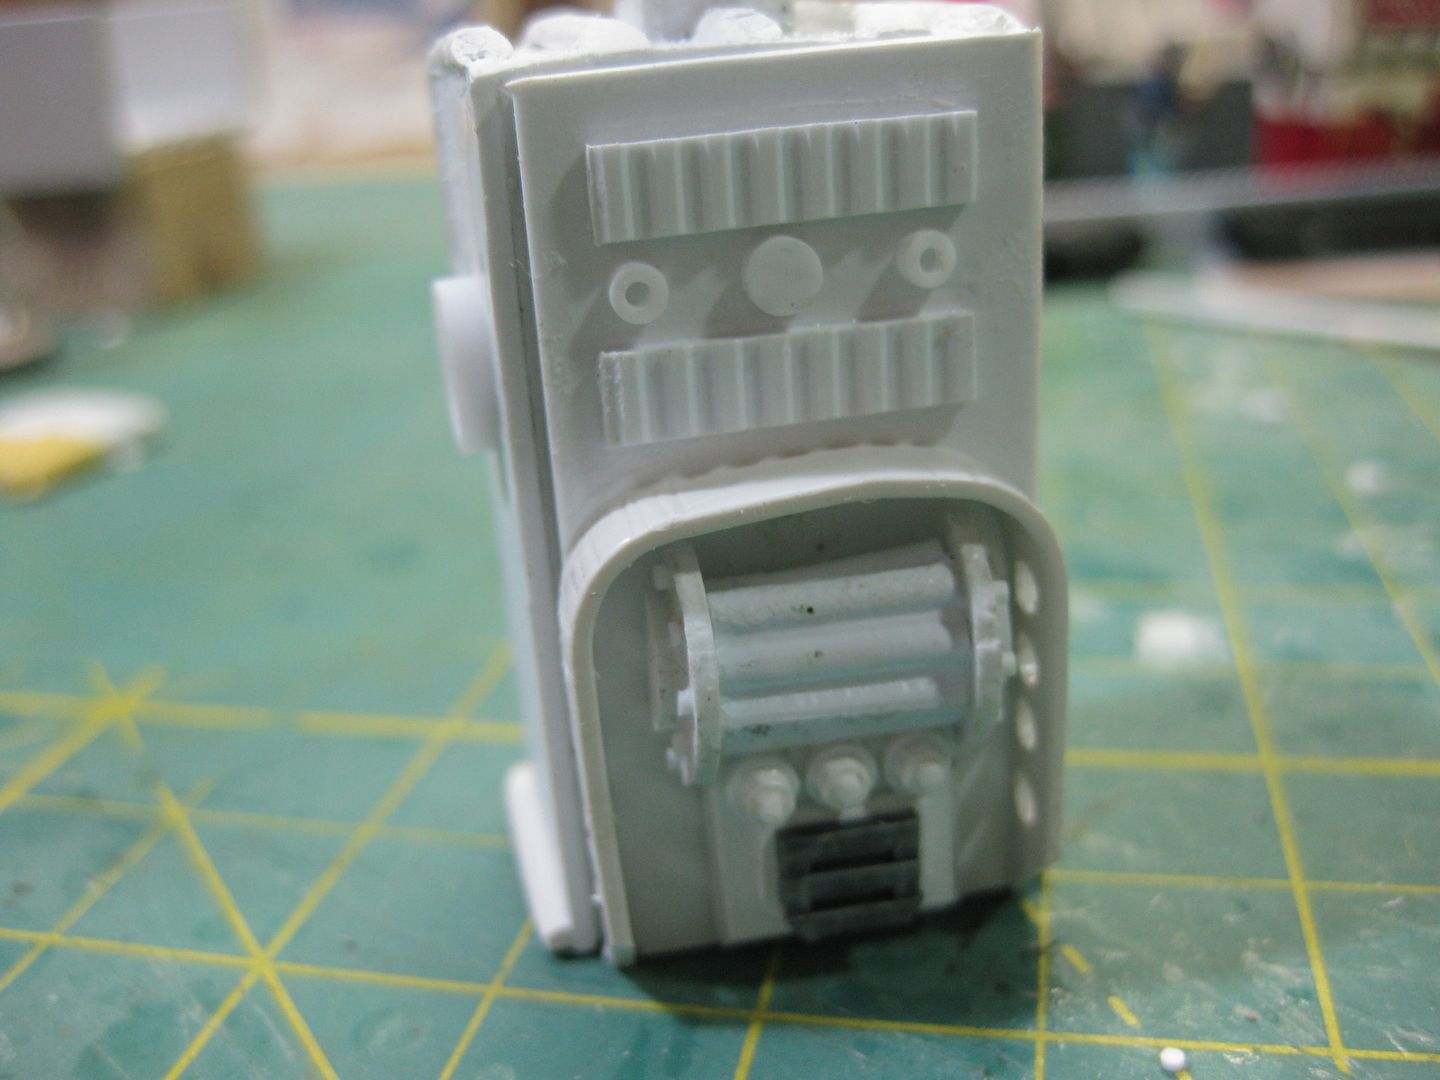
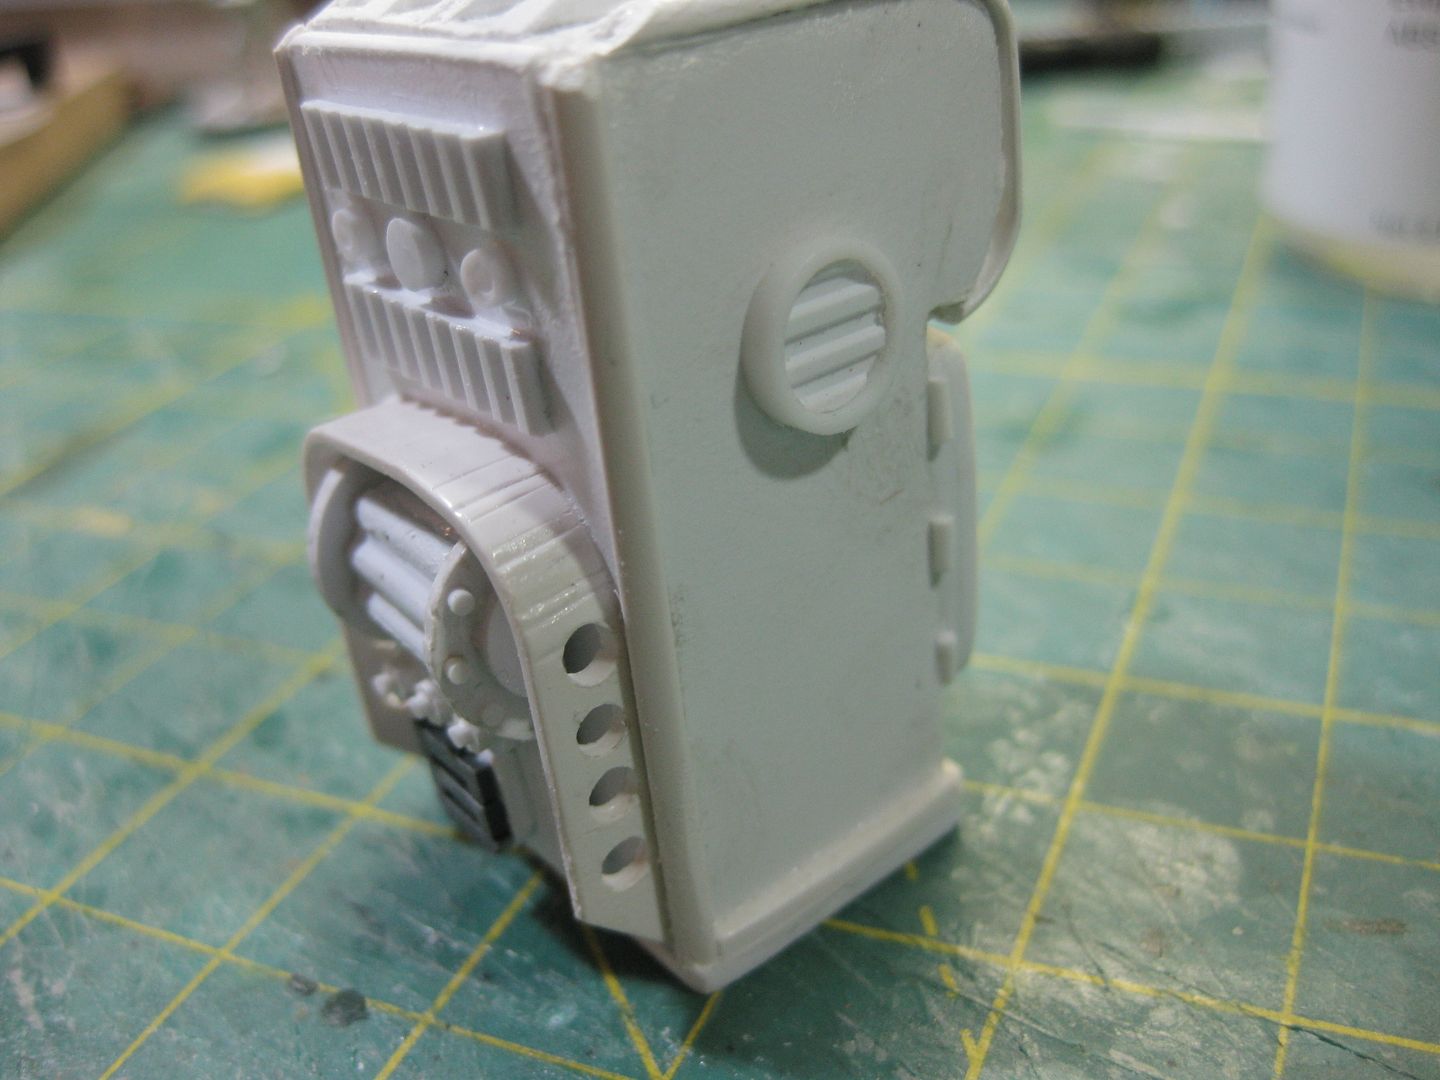
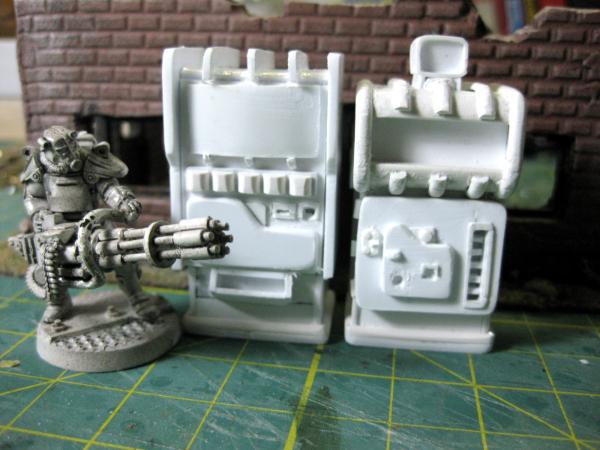
Is it an intake, like a blower scoop? Can we have a 20MM round base next to it for size ref? Yes, I see the squares on your cutting mat. I have no idea what size they are.
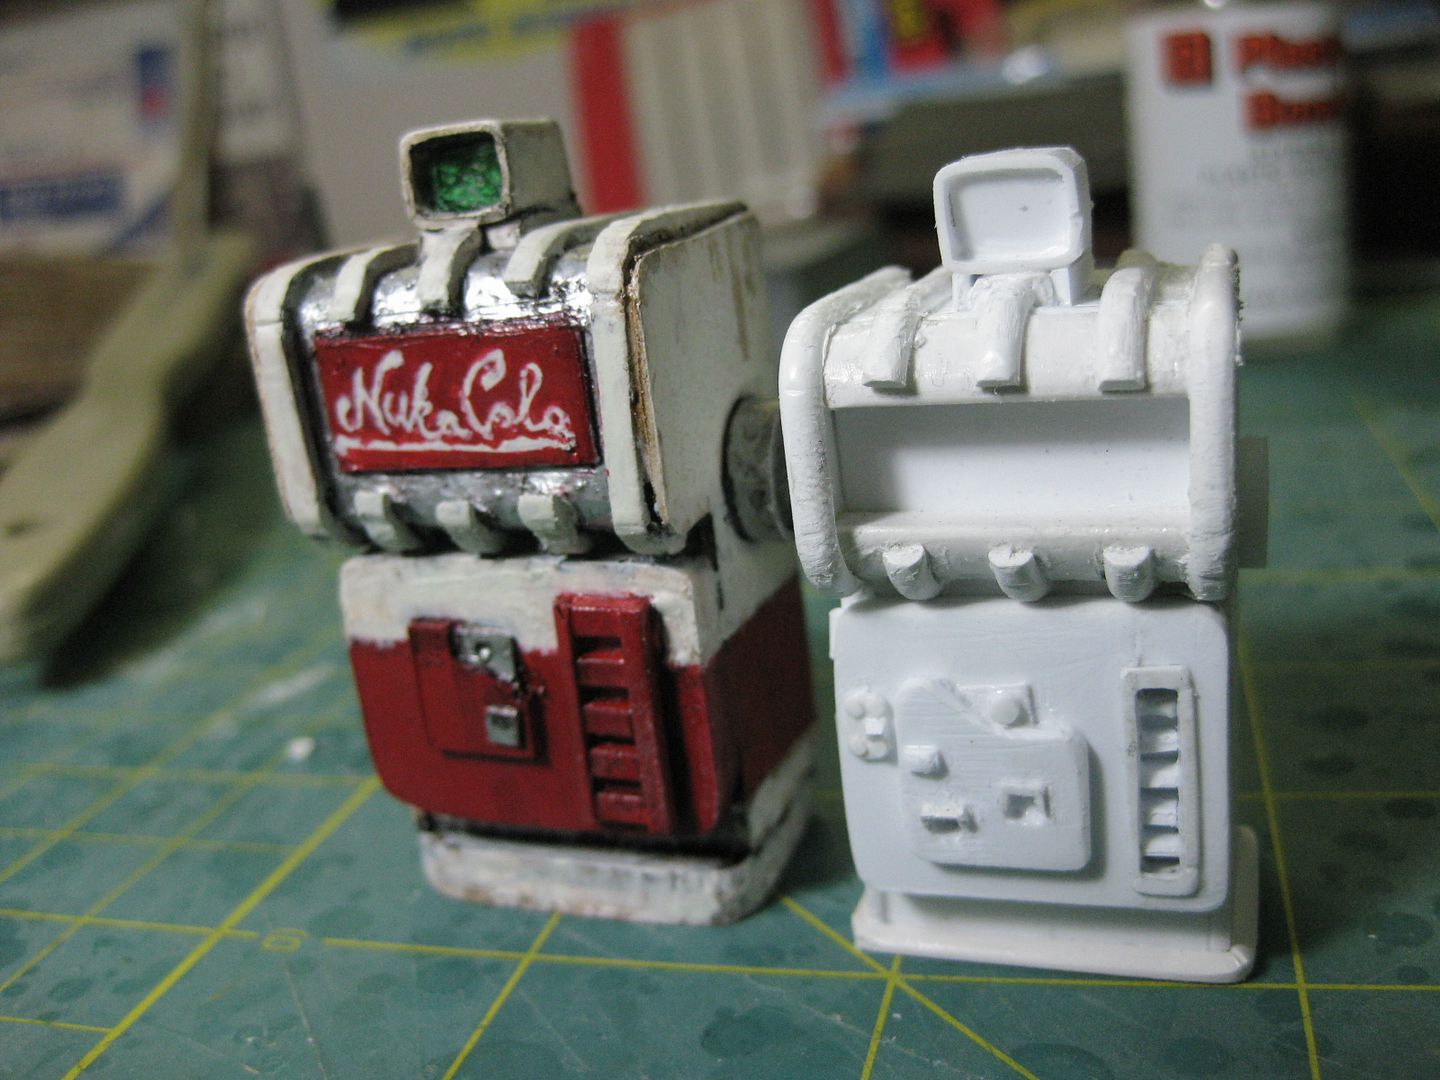
Pictures are clearer and crisper, it has turned out rather magnificently I was not sold on the camo pattern at first, but once again I was proved wrong
FAO 3 machine 2 is looking sweet, I have to ask how do you build those vents, I gather its rod cut down for the outside ring but how do you do the vent section ?
Is it made from some kind of boarding PC ? I gather maybe a punch is used to get the circle ? please share
Rogue Wolves wrote:night dave, and damn thats a sexy machine.. all its missing is some bottles
Thanks man! I've got those too!
Galorn wrote:
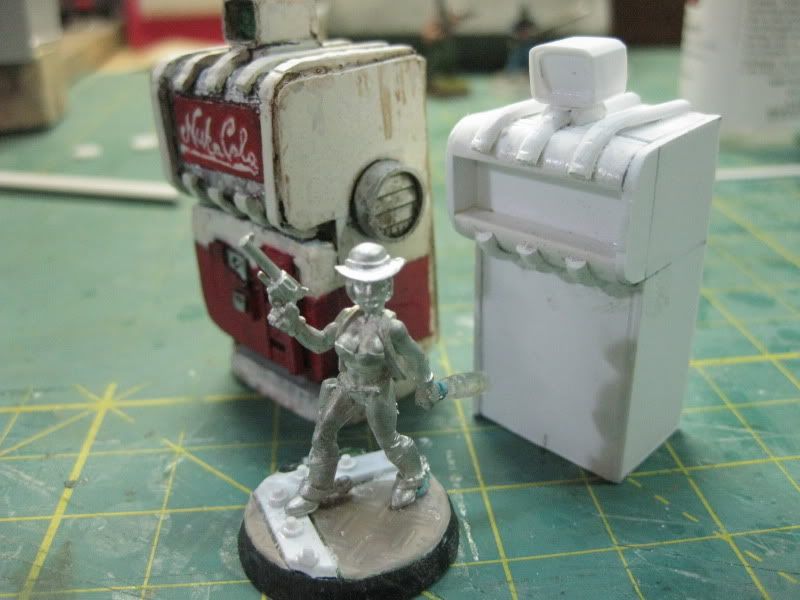
Night dave. This is looking alot like one of the coke machine restorations from Pawn Stars/American restoration...
That is truly an honor!
weetyskemian44 wrote:Your photos are definitely crisper now - Reminds me I need a better camera.
Awesome new nuka machine! I love it. its so perfect this time round
THanks Weets! It's my same old camera, I just learned to use it properly
lone dirty dog wrote:Got the PM will sort that out
Pictures are clearer and crisper, it has turned out rather magnificently I was not sold on the camo pattern at first, but once again I was proved wrong
FAO 3 machine 2 is looking sweet, I have to ask how do you build those vents, I gather its rod cut down for the outside ring but how do you do the vent section ?
Is it made from some kind of boarding PC ? I gather maybe a punch is used to get the circle ? please share
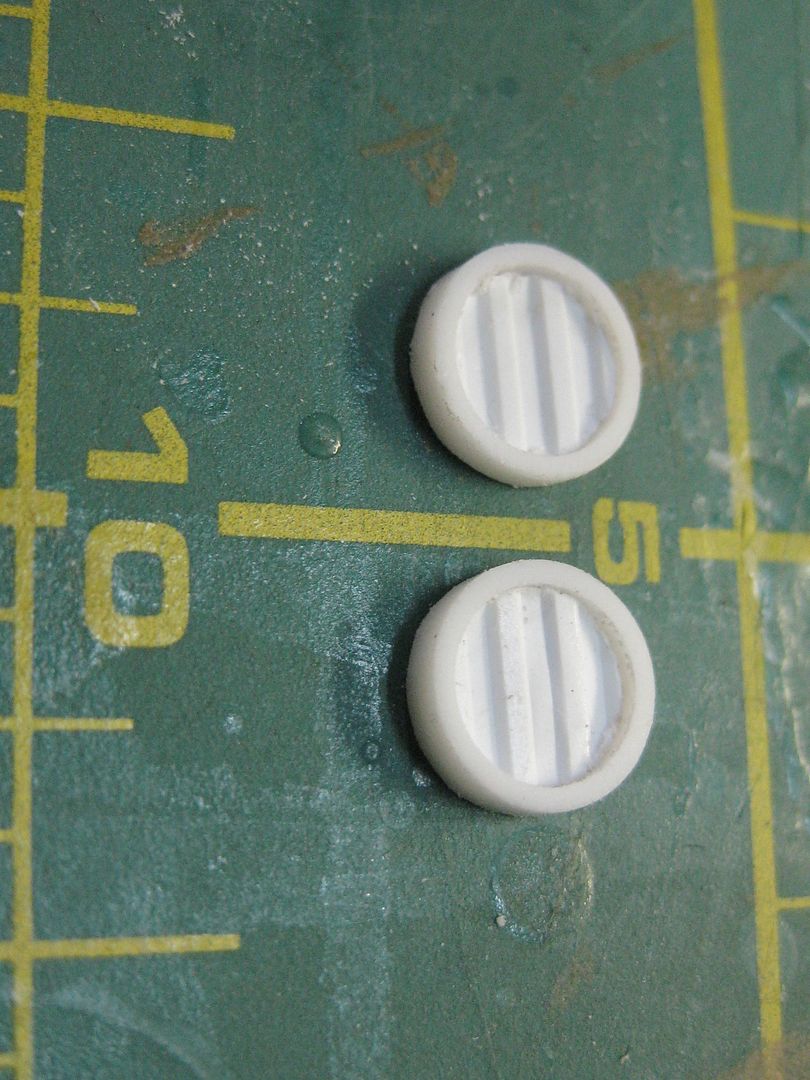
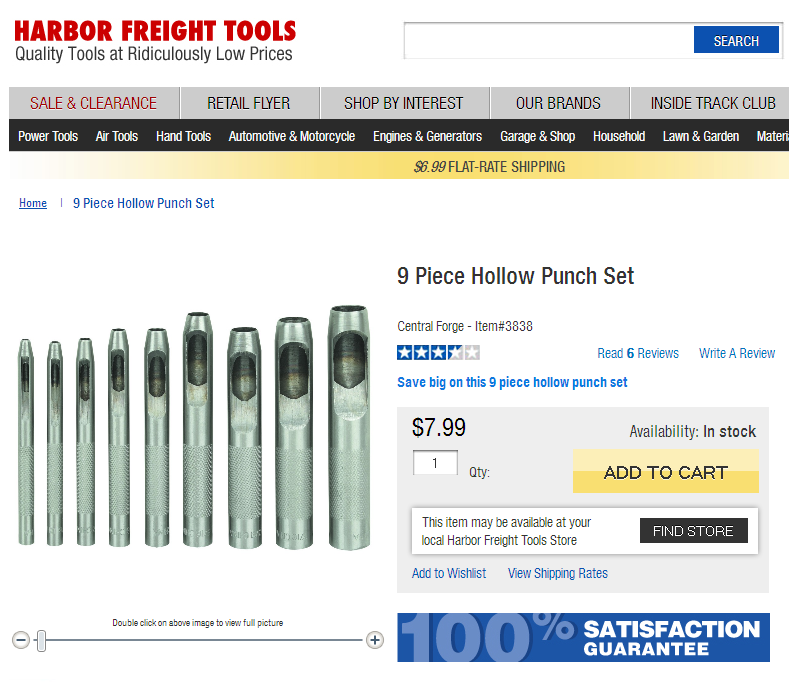
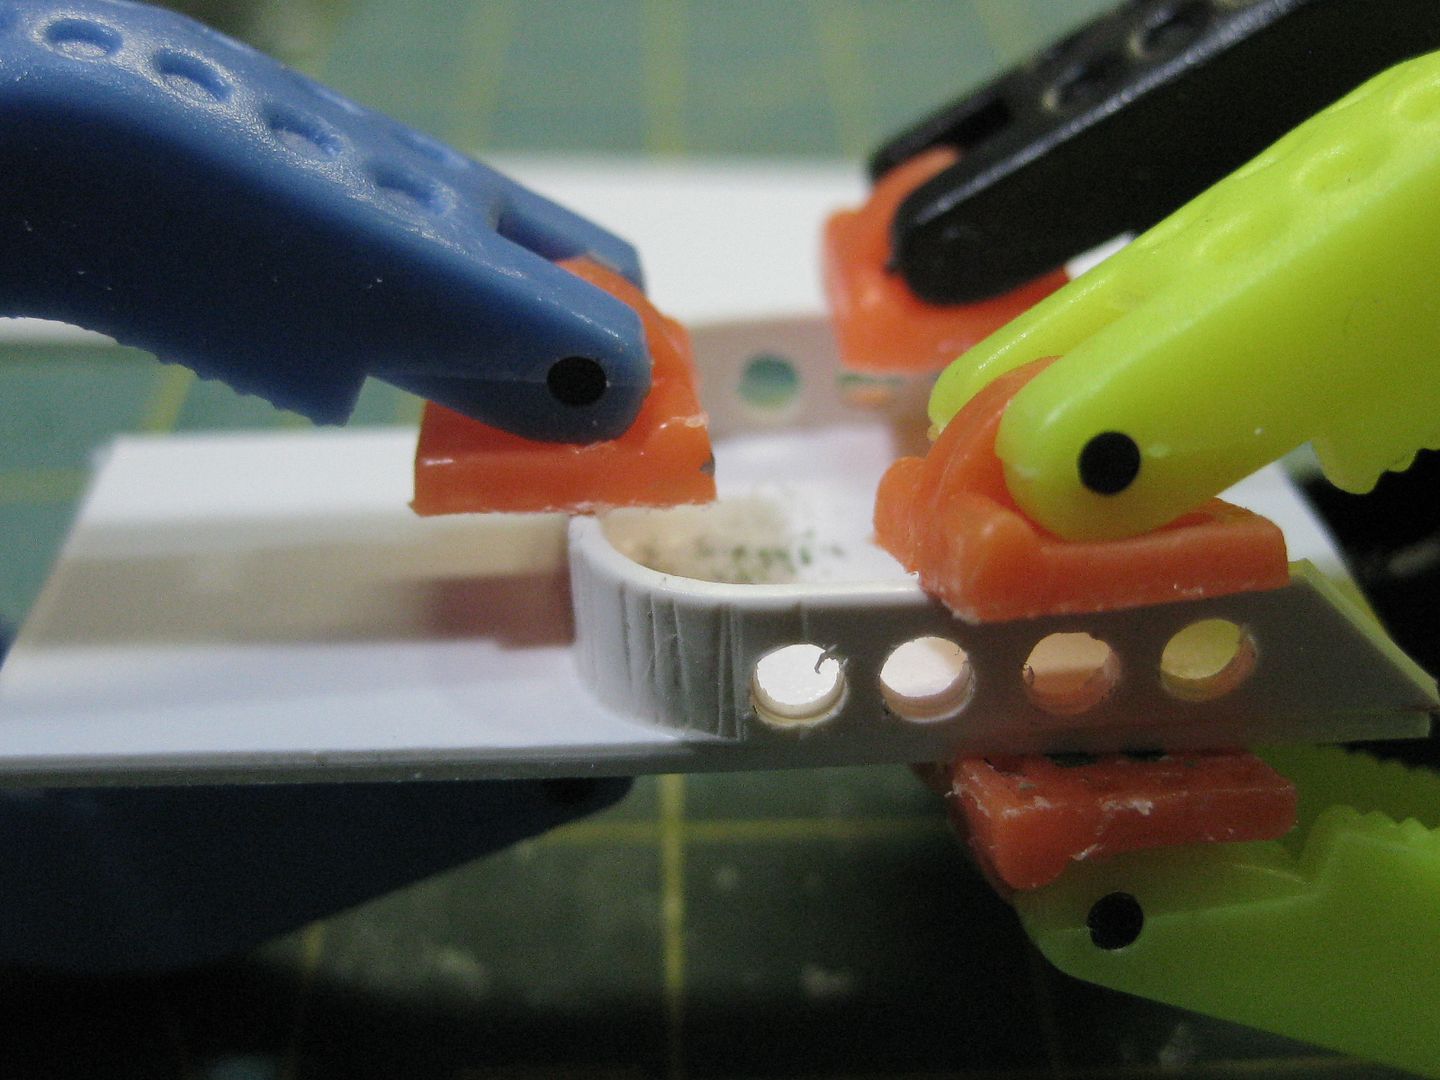
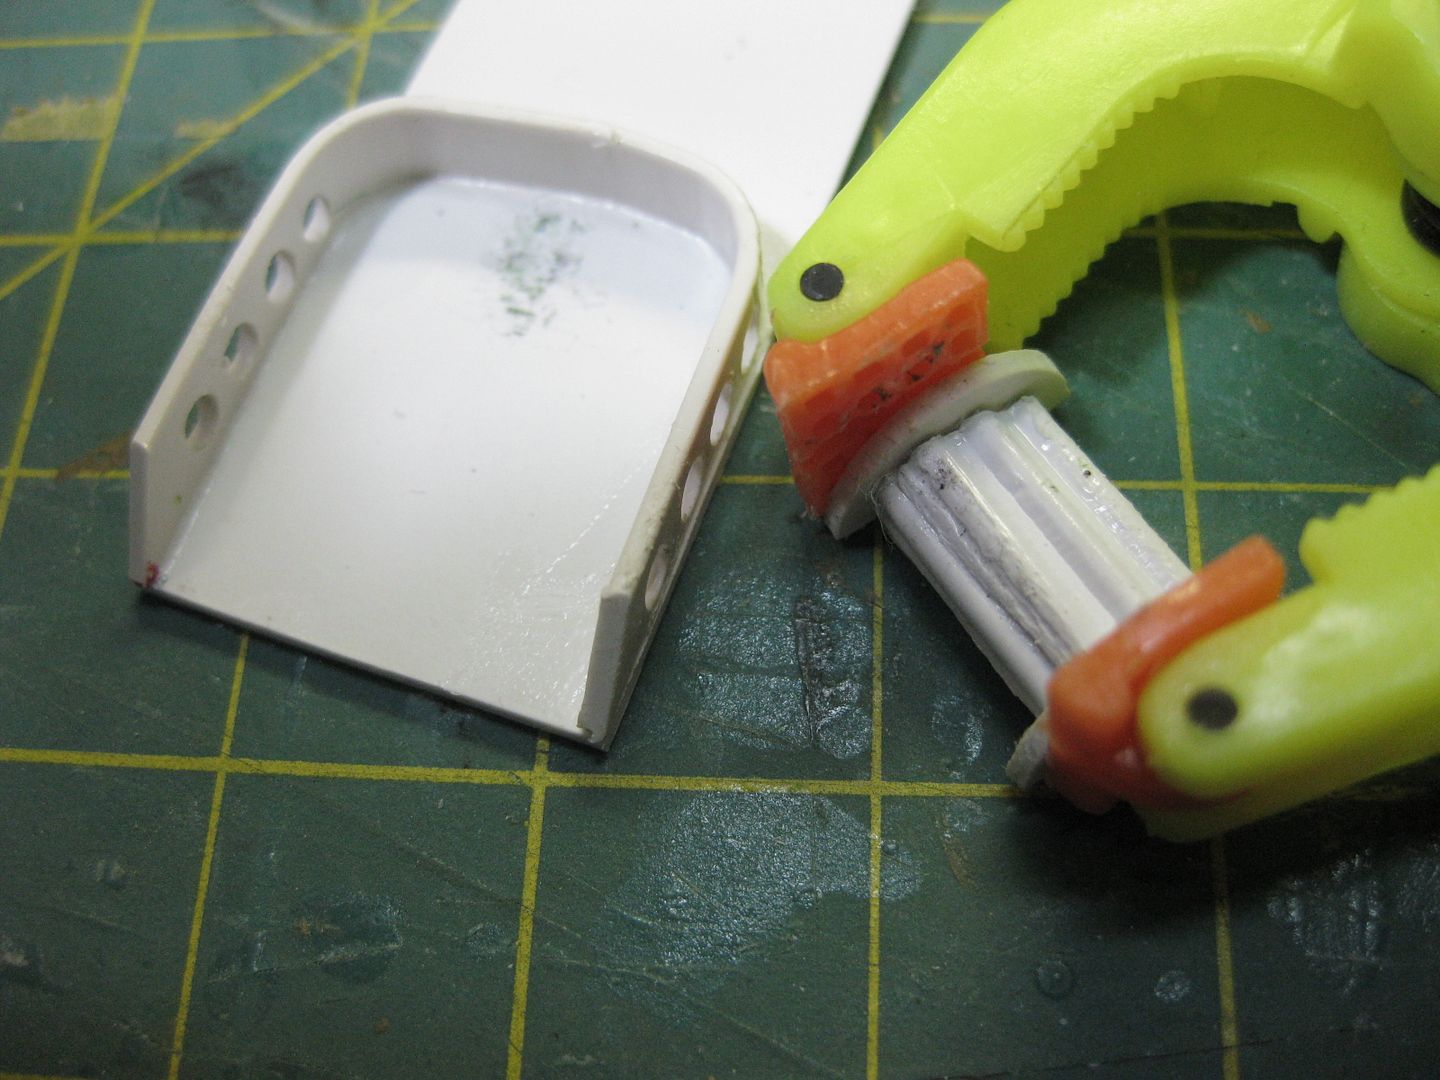
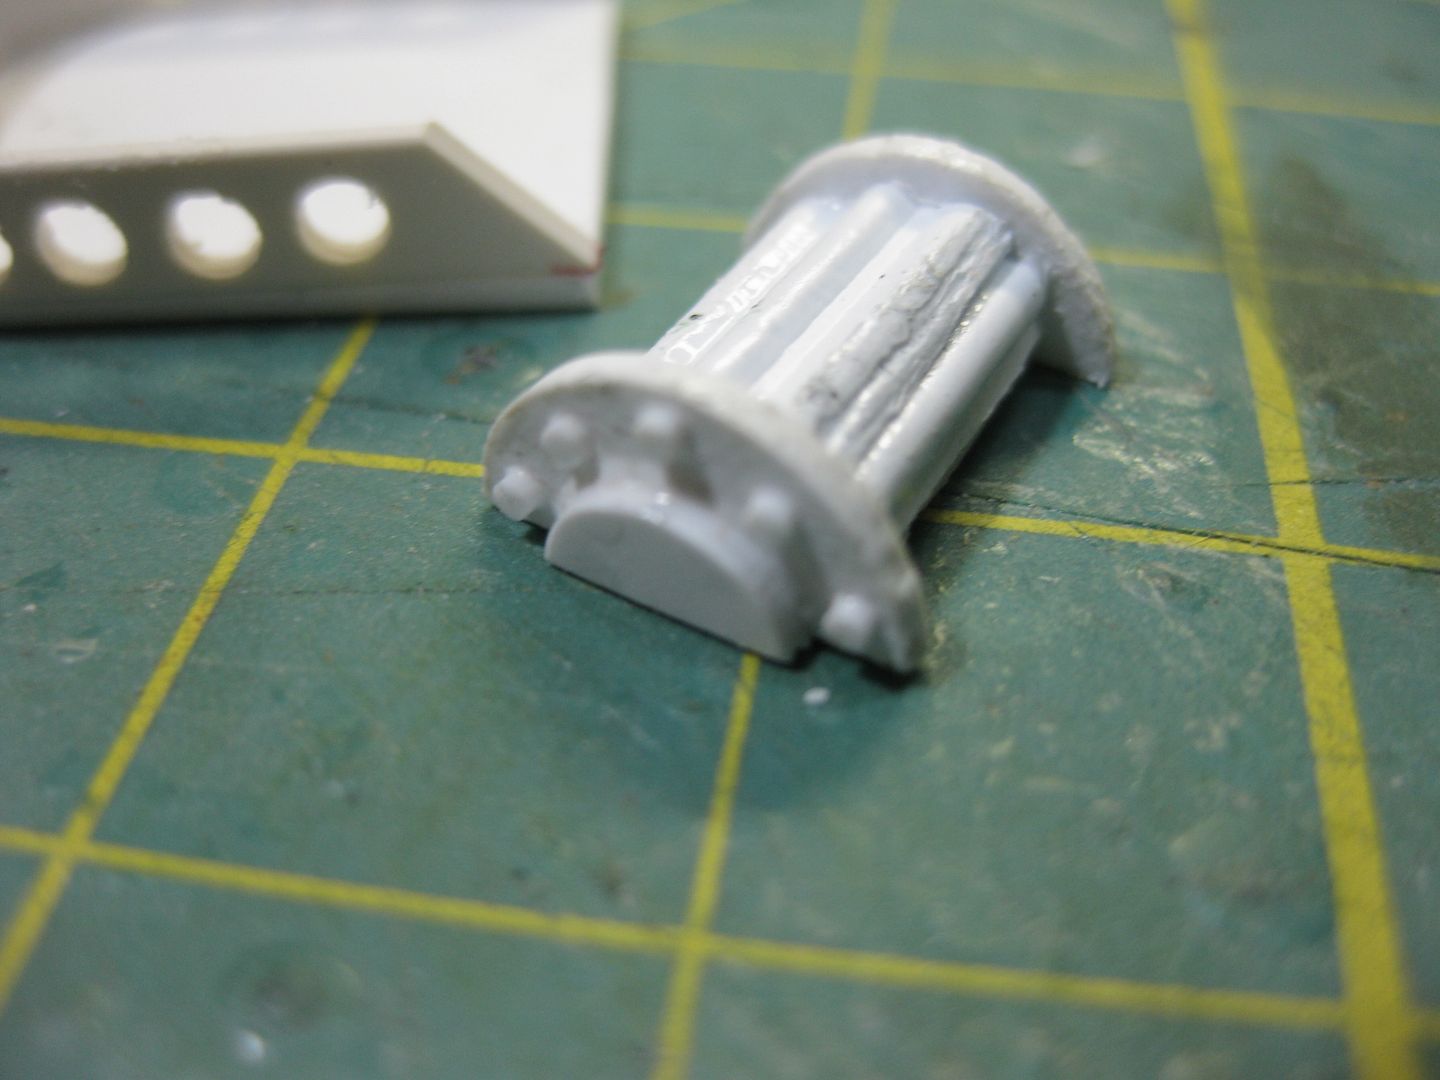
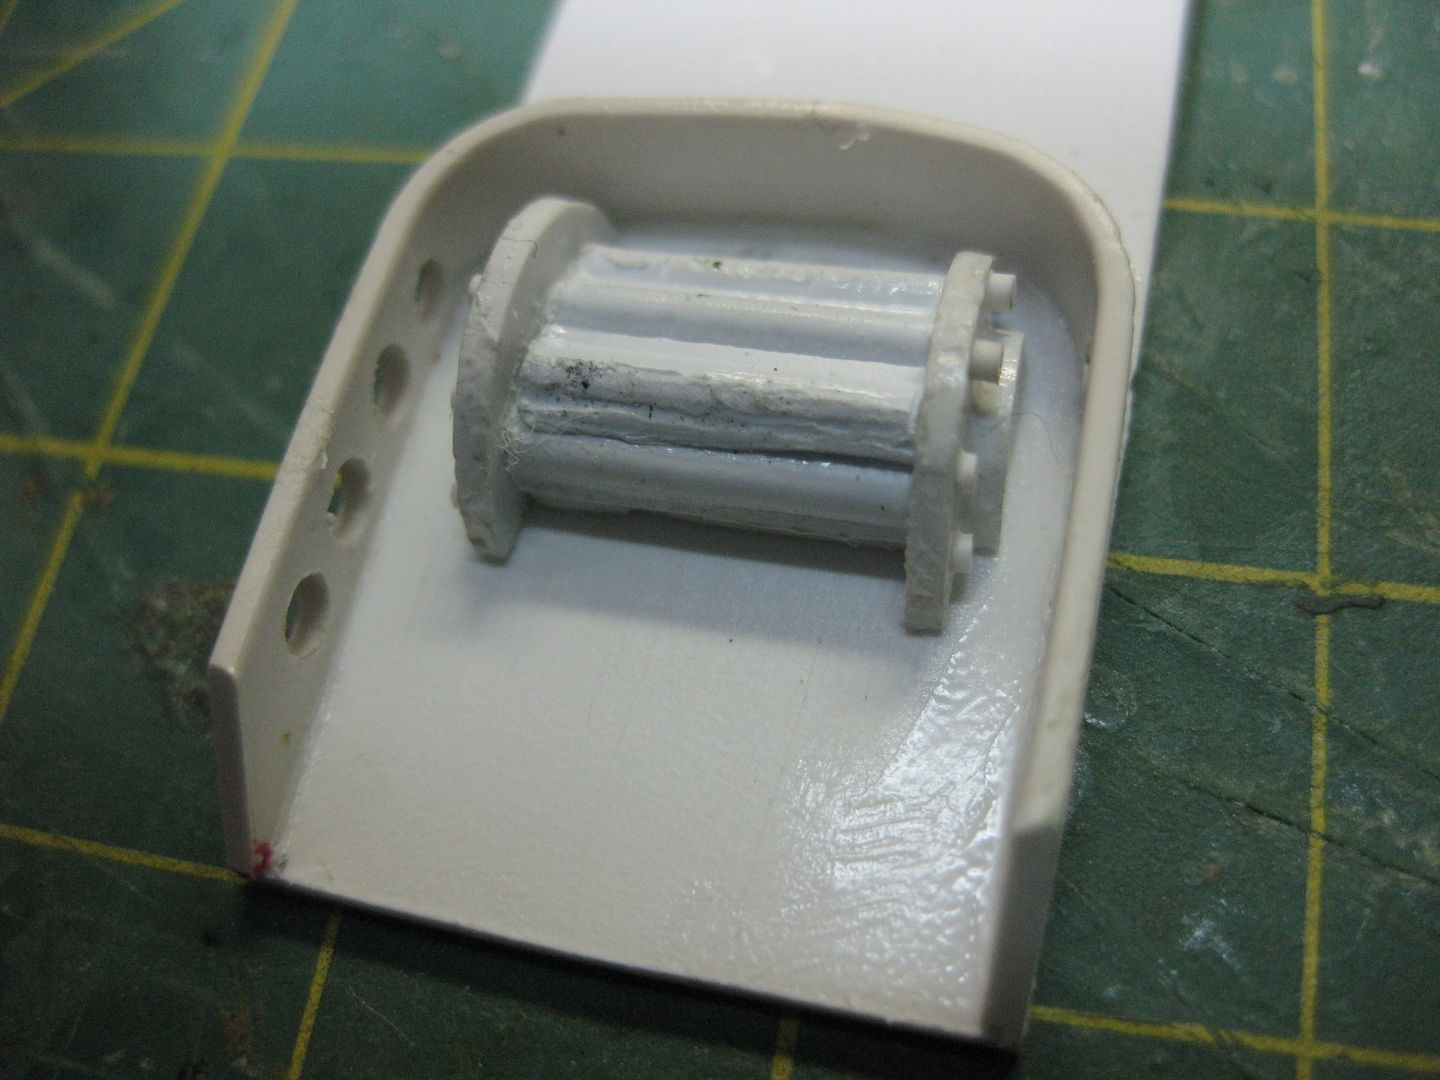
When will you trust me? Yes you are correct, discs are punched out of textured plasticard with these punches:
....And then fitted inside tube slices..The best $8 I ever spent
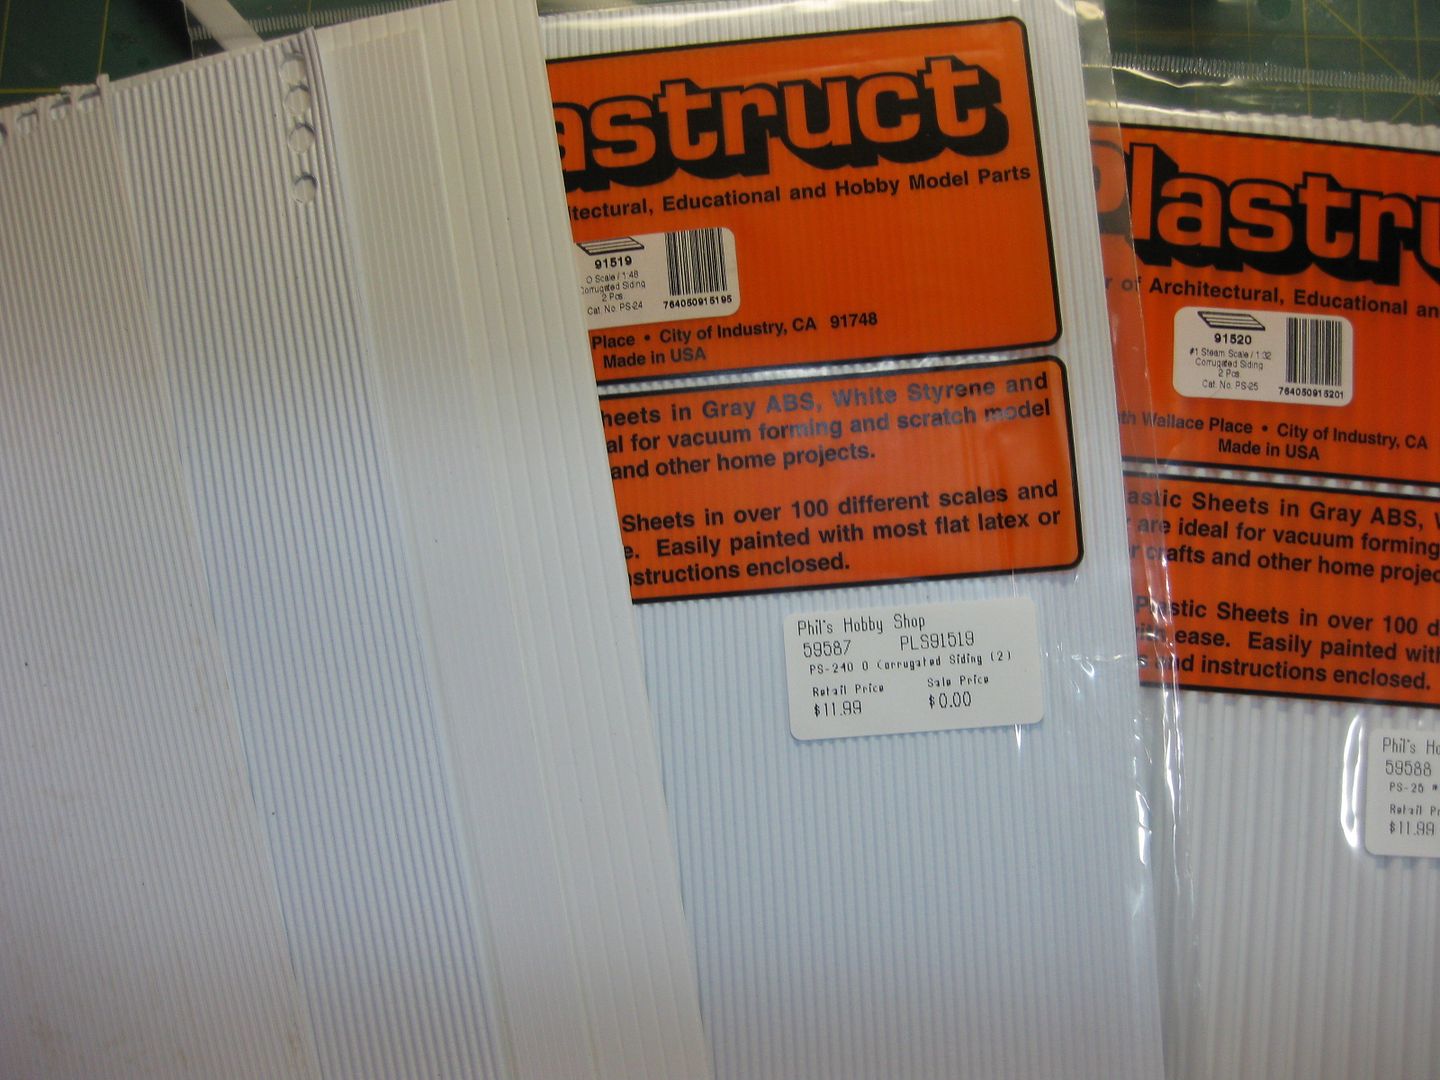
I'll have to look, but I know it's Plastruct, not Evergreen. I just bought a bunch of different sizes and styles when I was at the hobby shop one day..
Work Was slow today, I can't complain, so I used the time to get more familiar with GIMP.
that action shot is totally freaking cool!!!! i hear some wagner lyrics in the background now!!!
the zoomable pics are a nice treat for us... gives us way better oportunities to oggle over your work °o°
as for the new nuka vending machine... smooth work mate... and you do realize that is your secret super power to break donw those complicated structures in simple shapes and recreate these anew? you don´t get this talent too often...!lucky git
well.... we call them punches... but the french call them le punches in a bun....
you get them almost everywhere.... tho i admit... 8 quid for these.... i will never get this quiality for that price... damn... you yanks kill me one of these days with all these sweet and cheap tools...
To get pics rated 1-10 for coolness, and paintjob. The Gallery has votes on by default, that is what makes it a mess. That's why I usually only post finished pics to the Dakka Gallery, The front page thing only happens with Dakka gallery-hosted pics, they aren't legally allowed to advertise things that link to photobucket, but Photobucket is SOOO much faster and easier to use, I do most of my WIPs there.
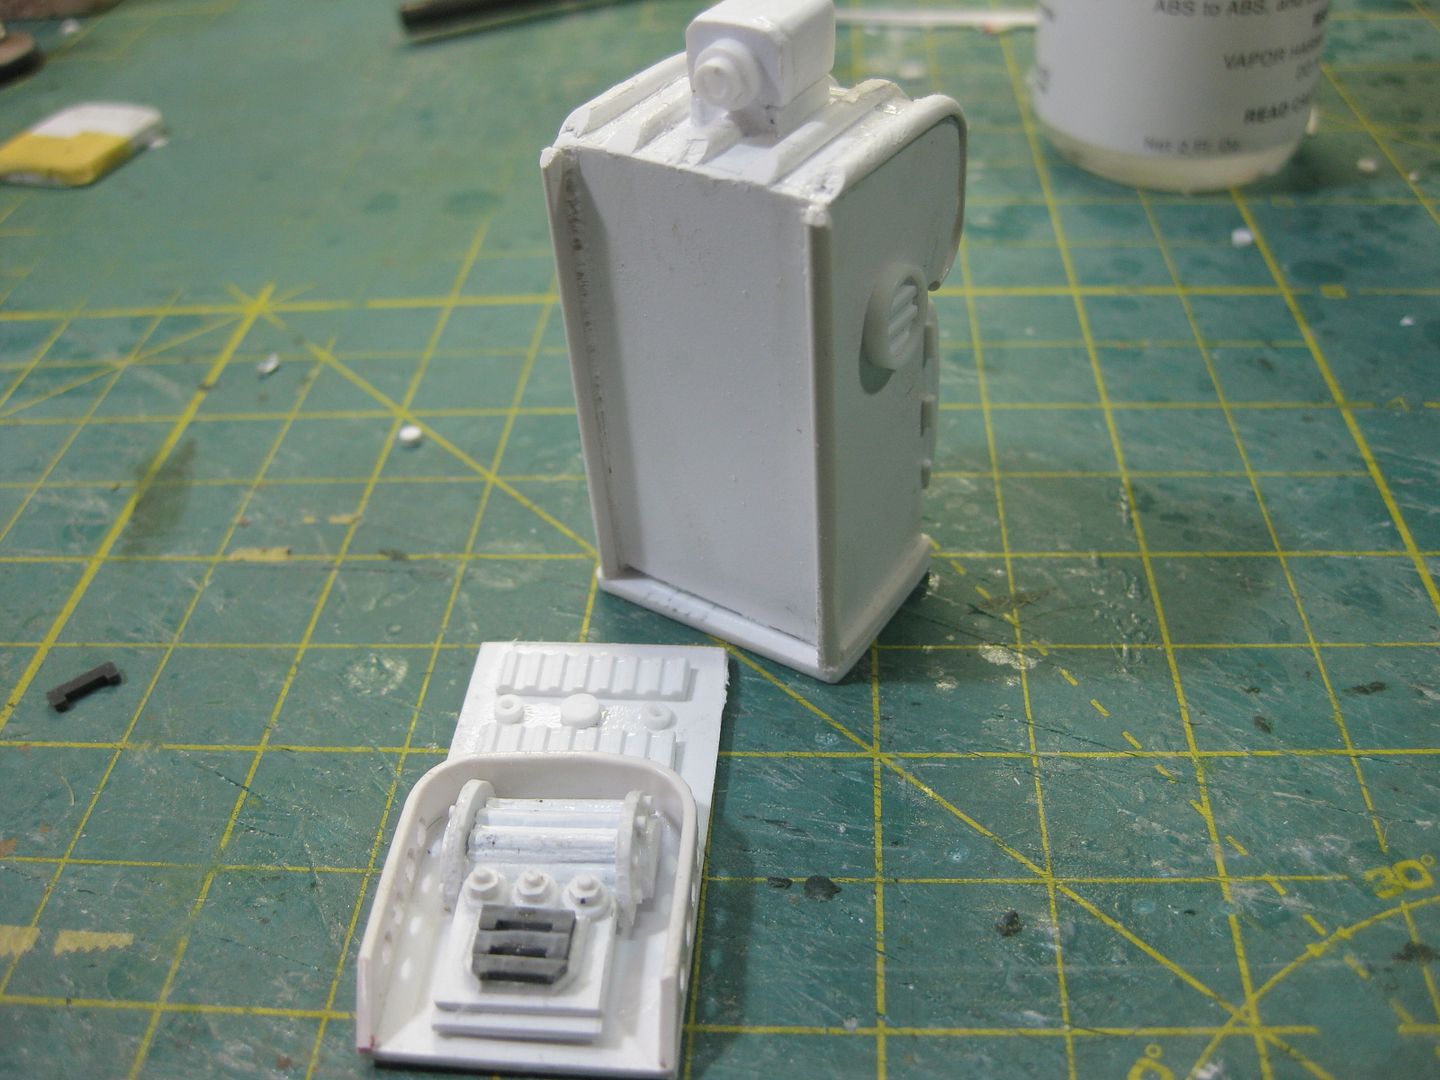
For Max:
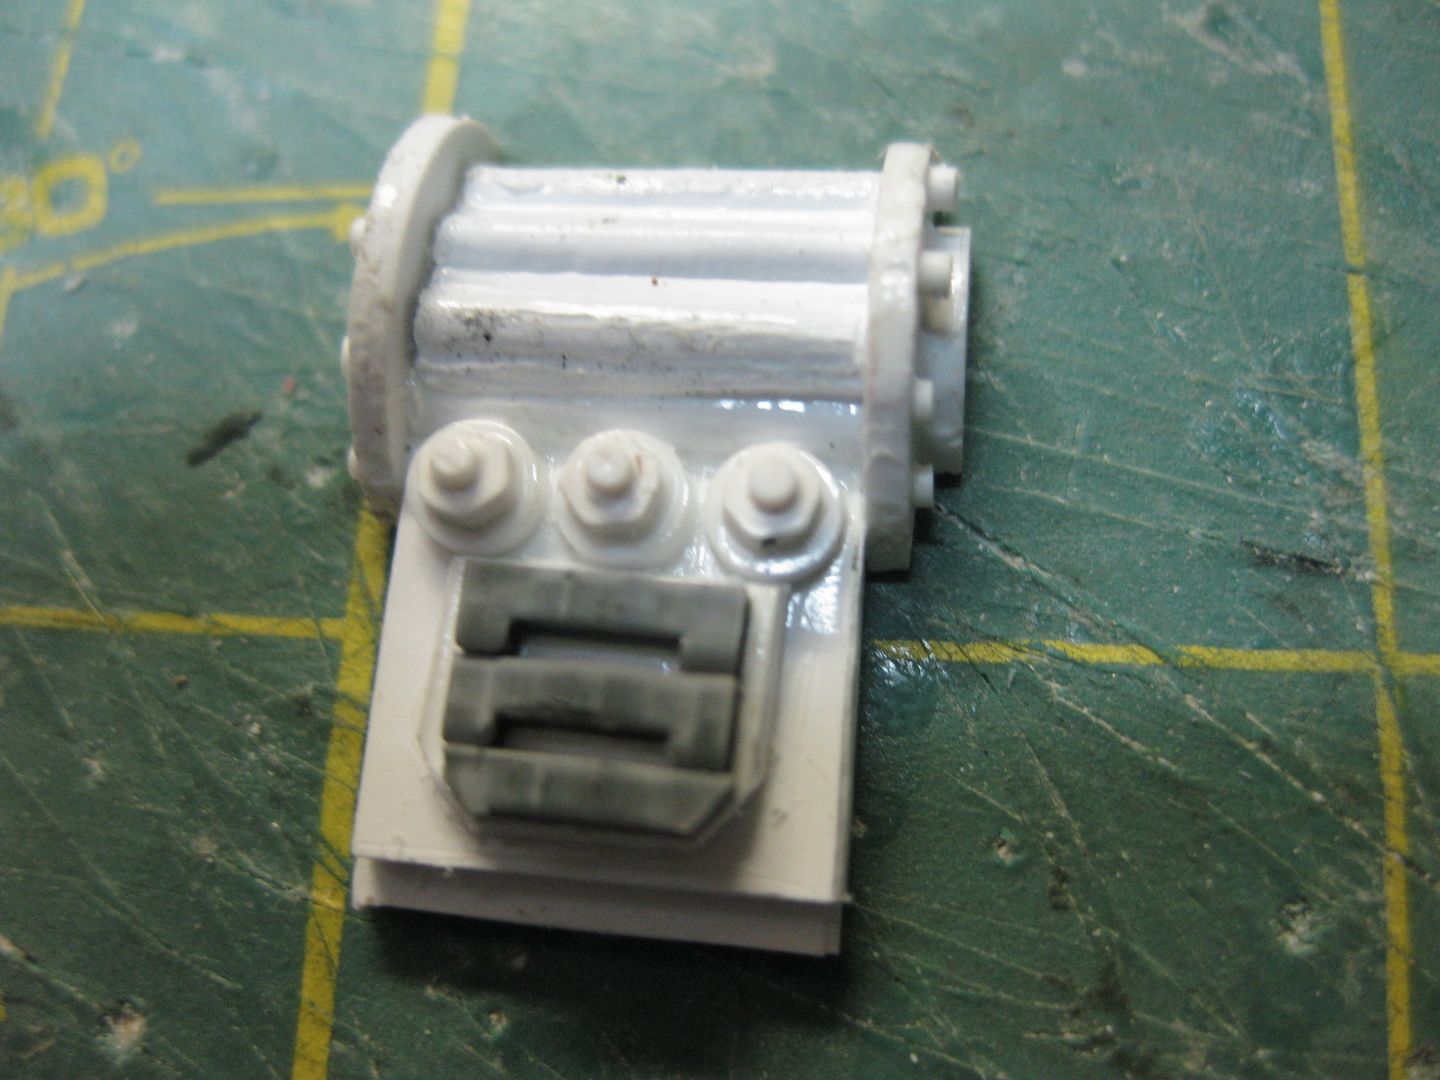
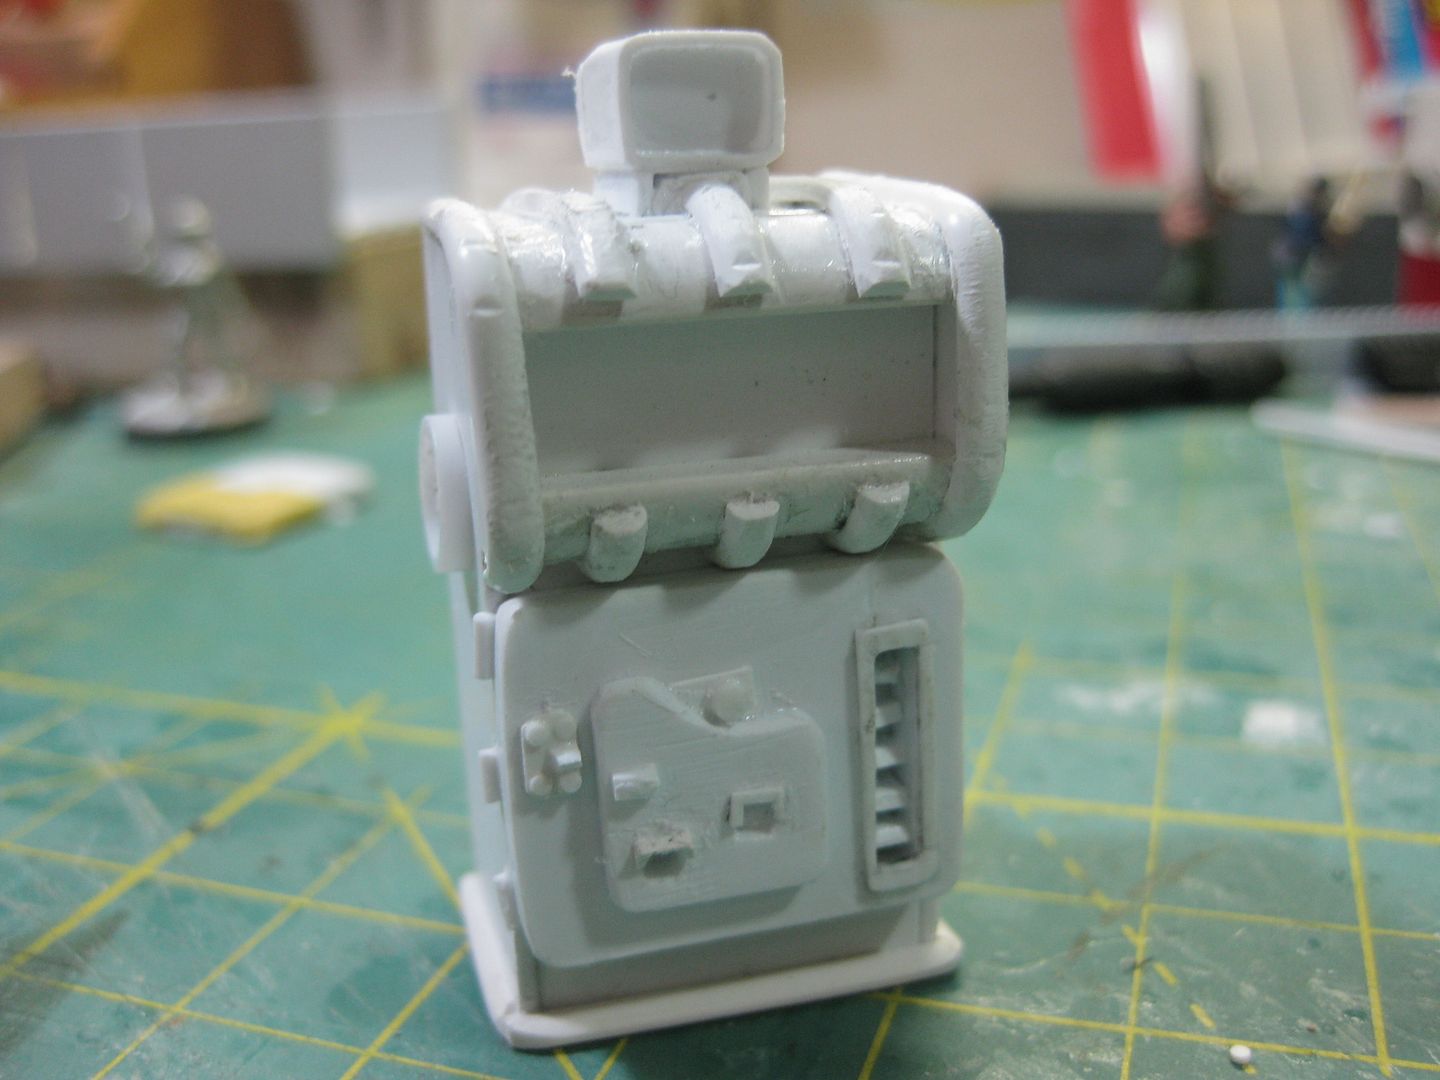
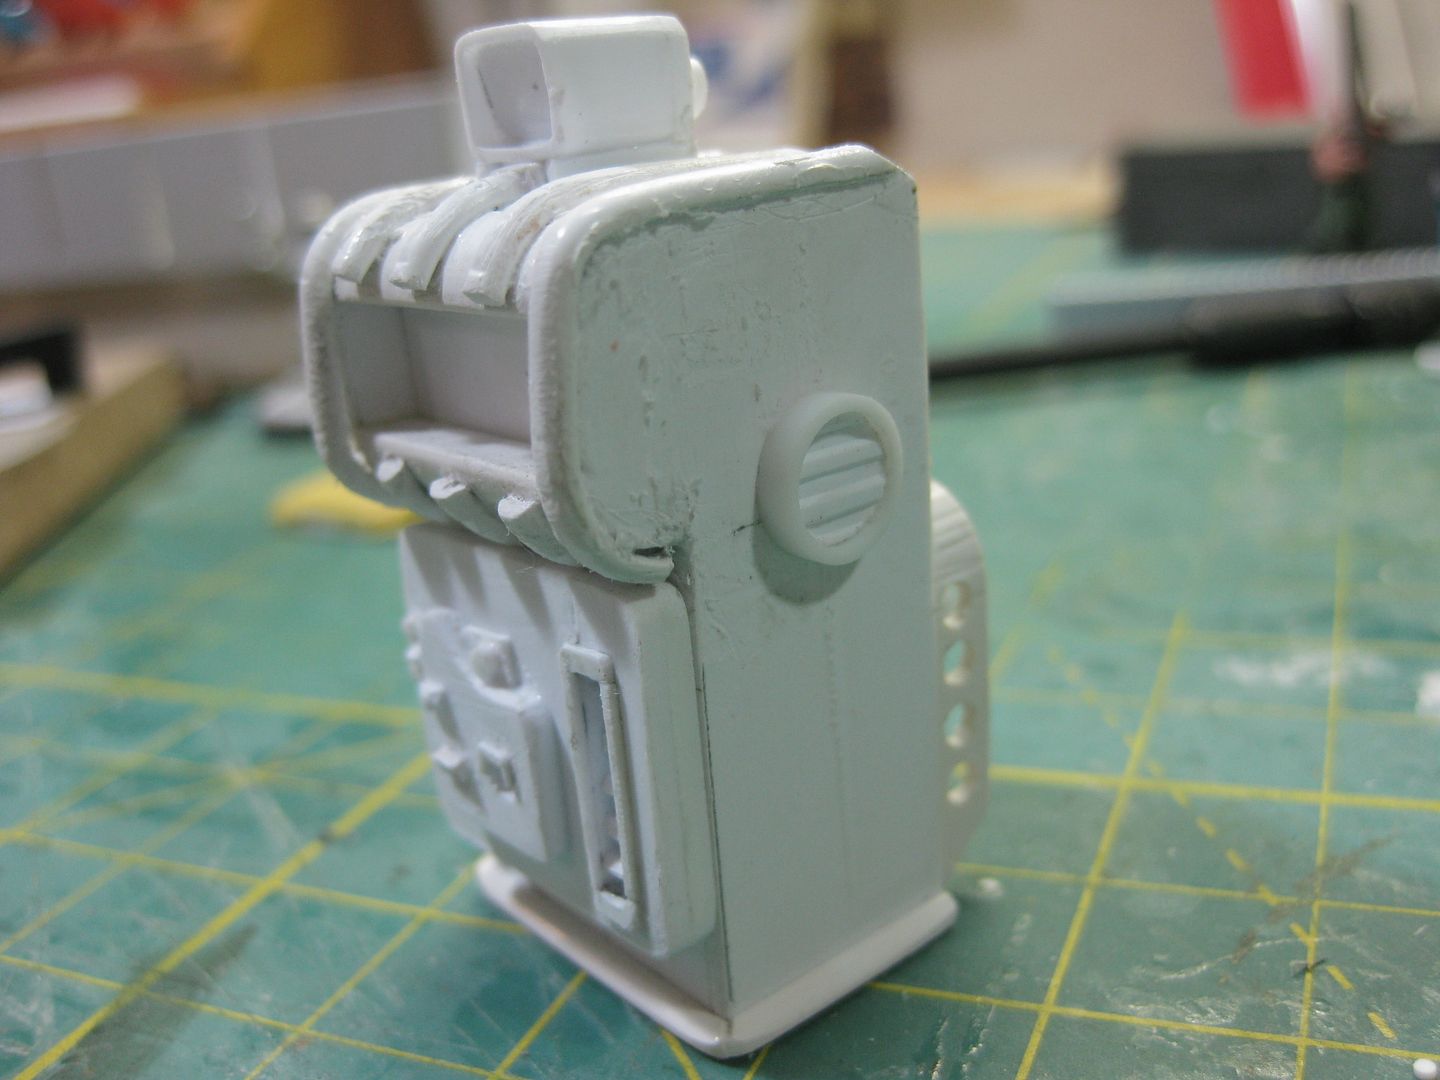
All Plastruct, the one variety is even corrugated on both sides!
With my IPMS membership, I get 20% off at my local Hobby Shop. A wonderful new branch store (Huge inside) just opened up really close to my house!
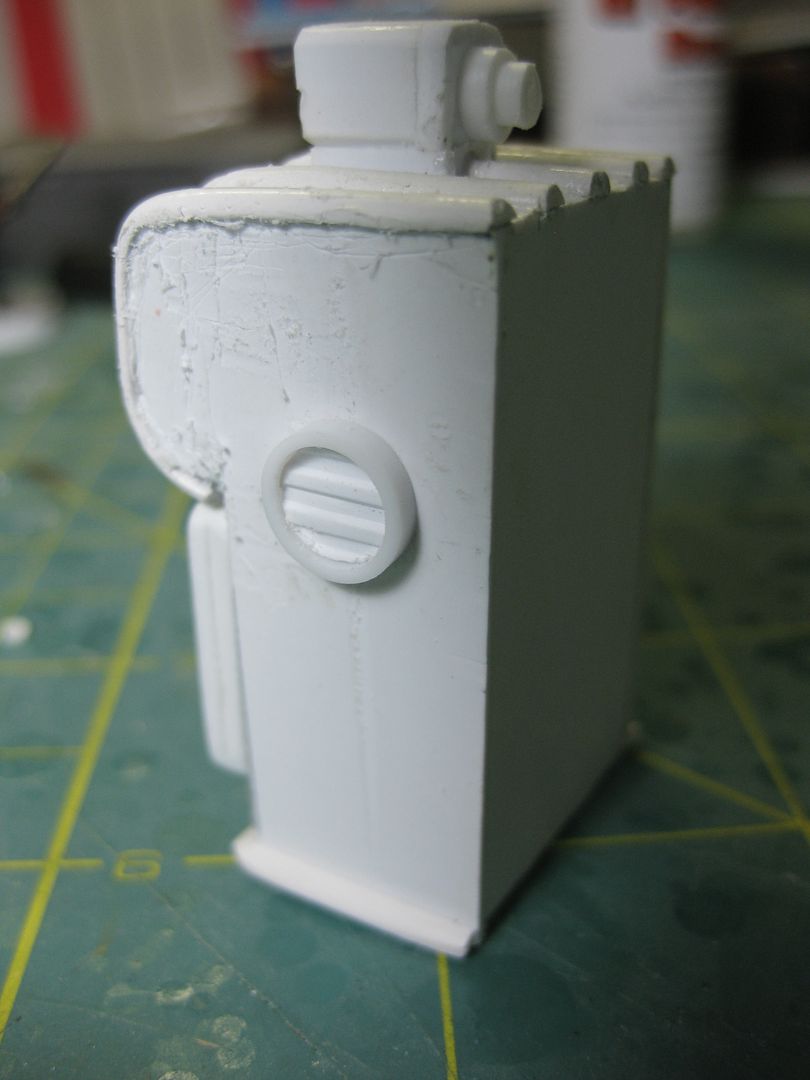
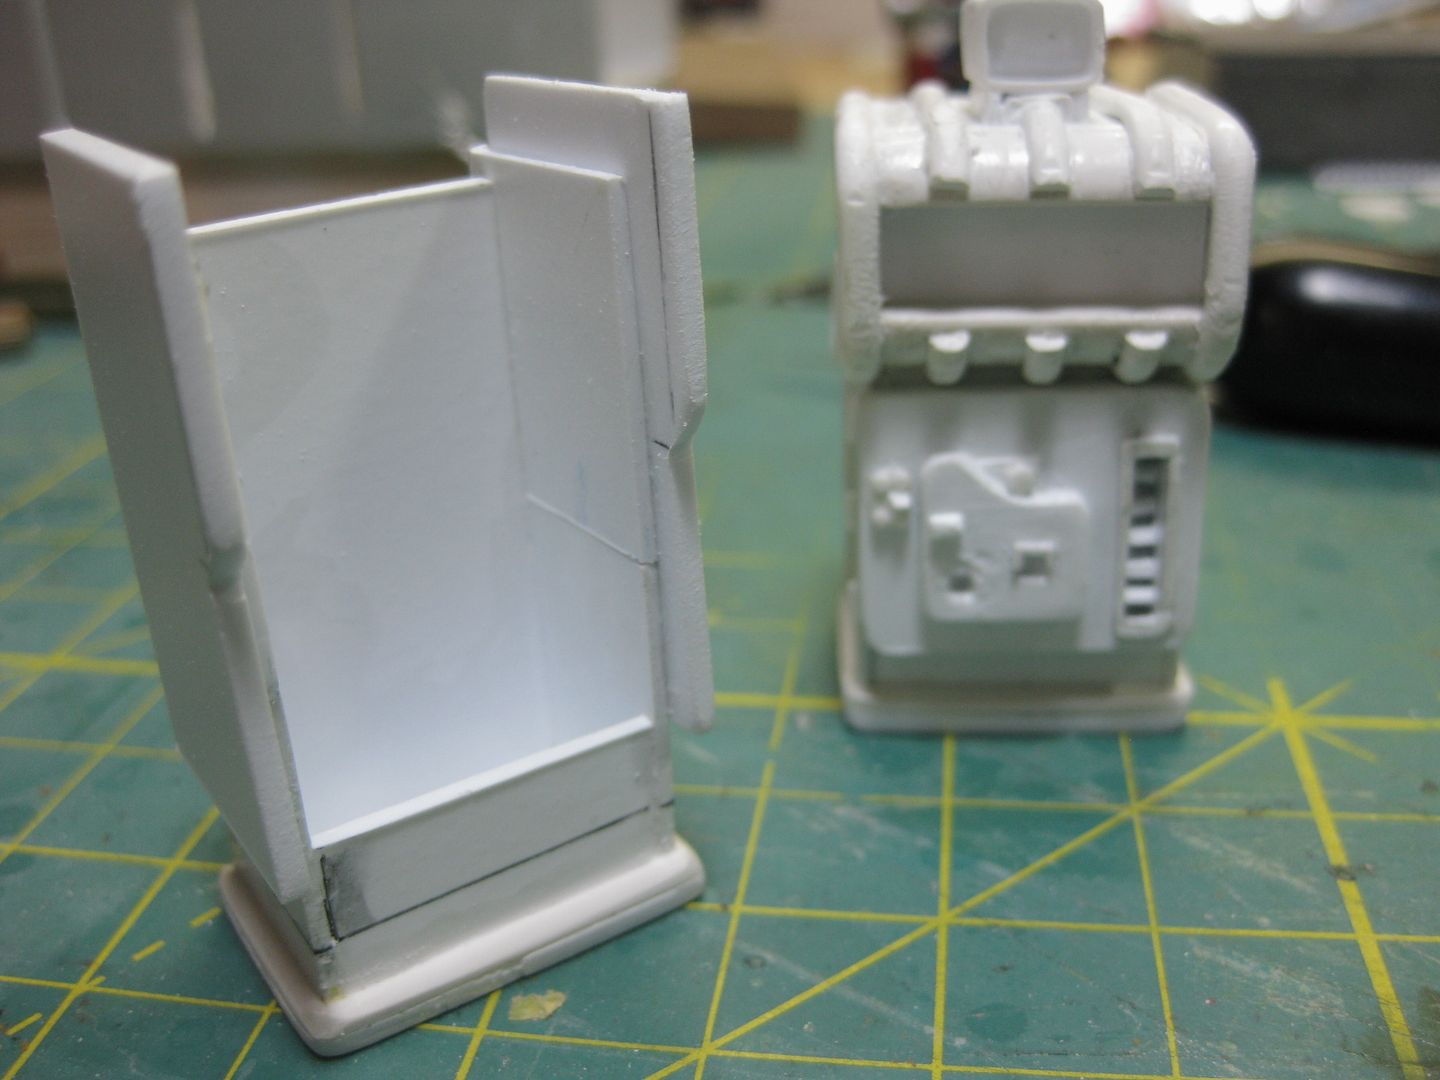
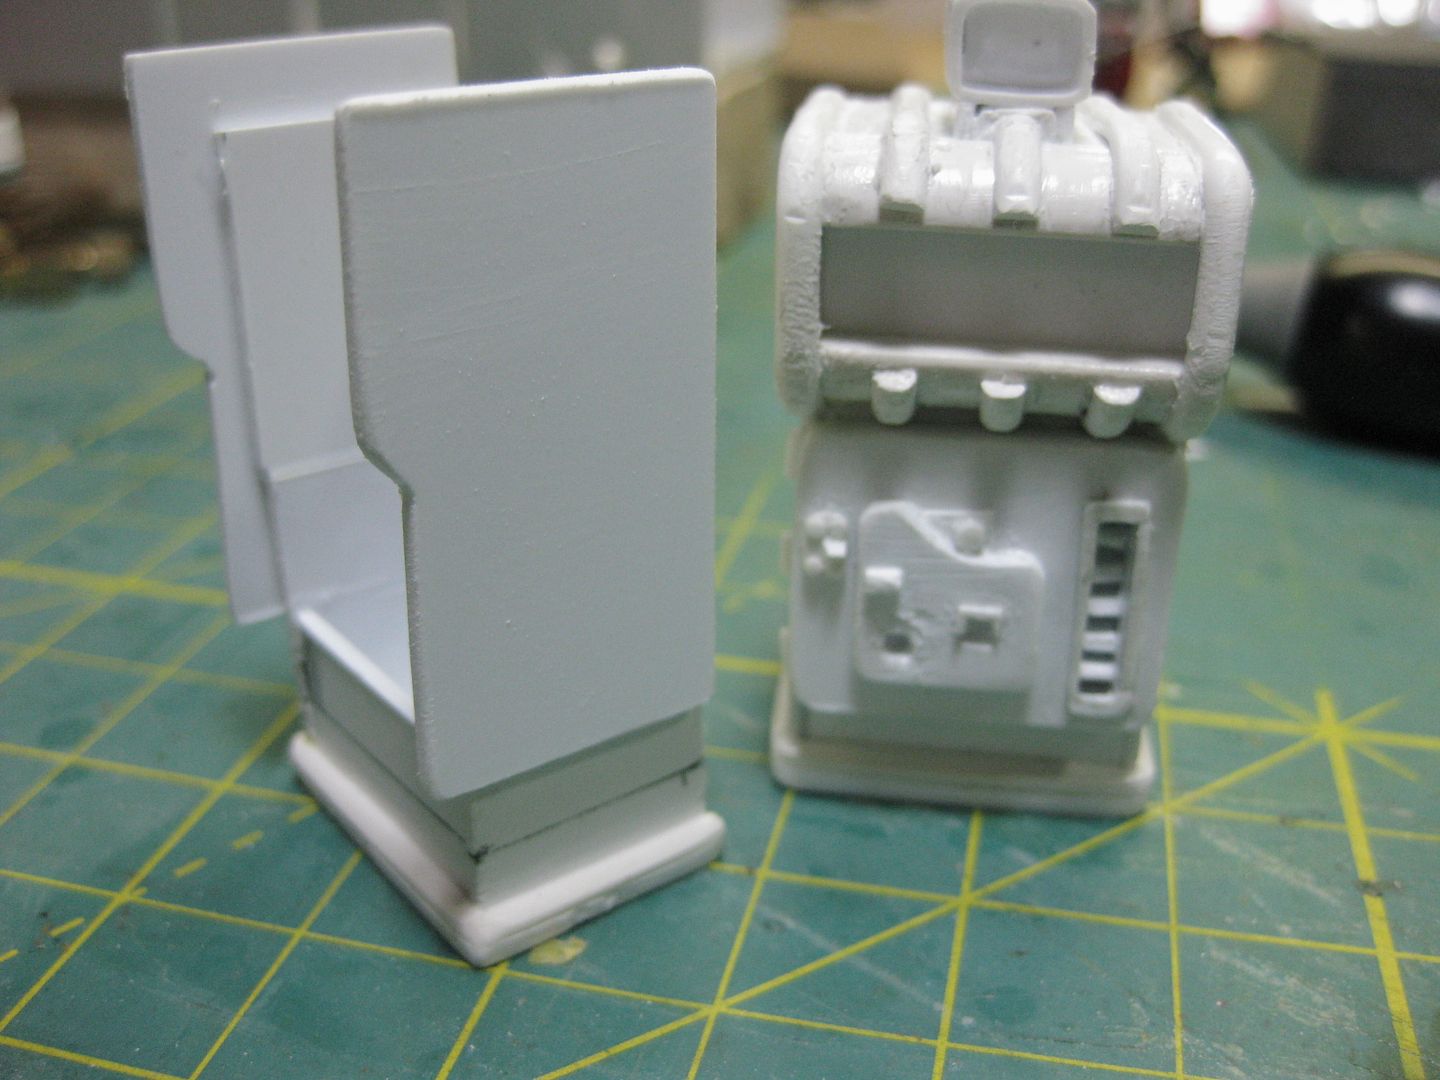
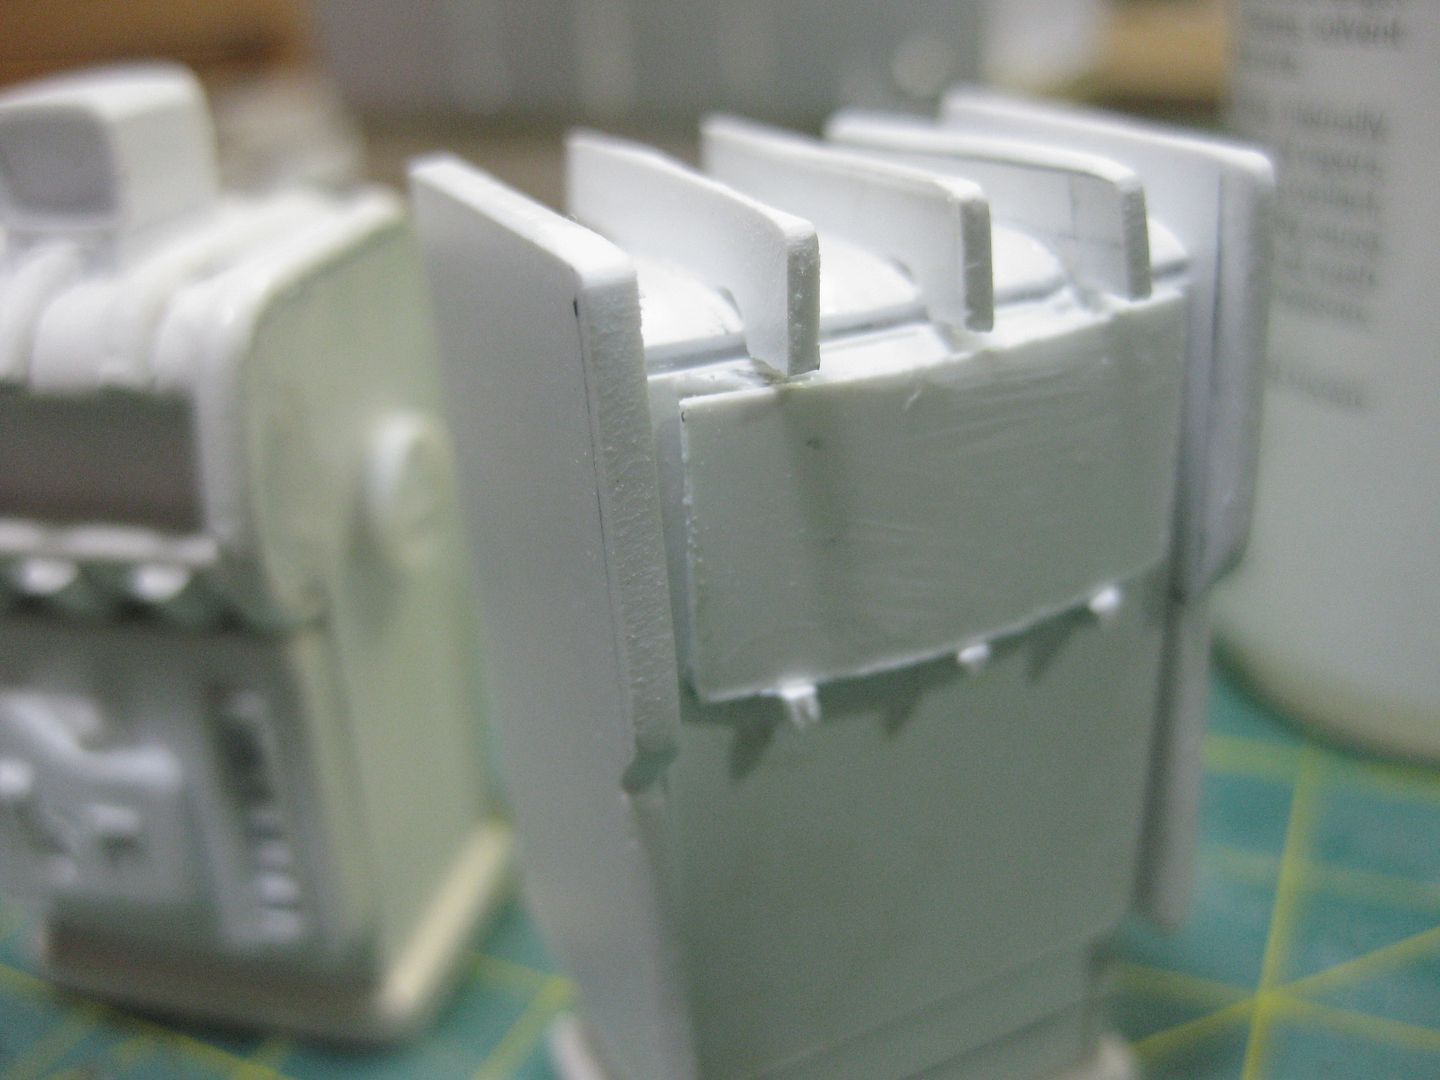
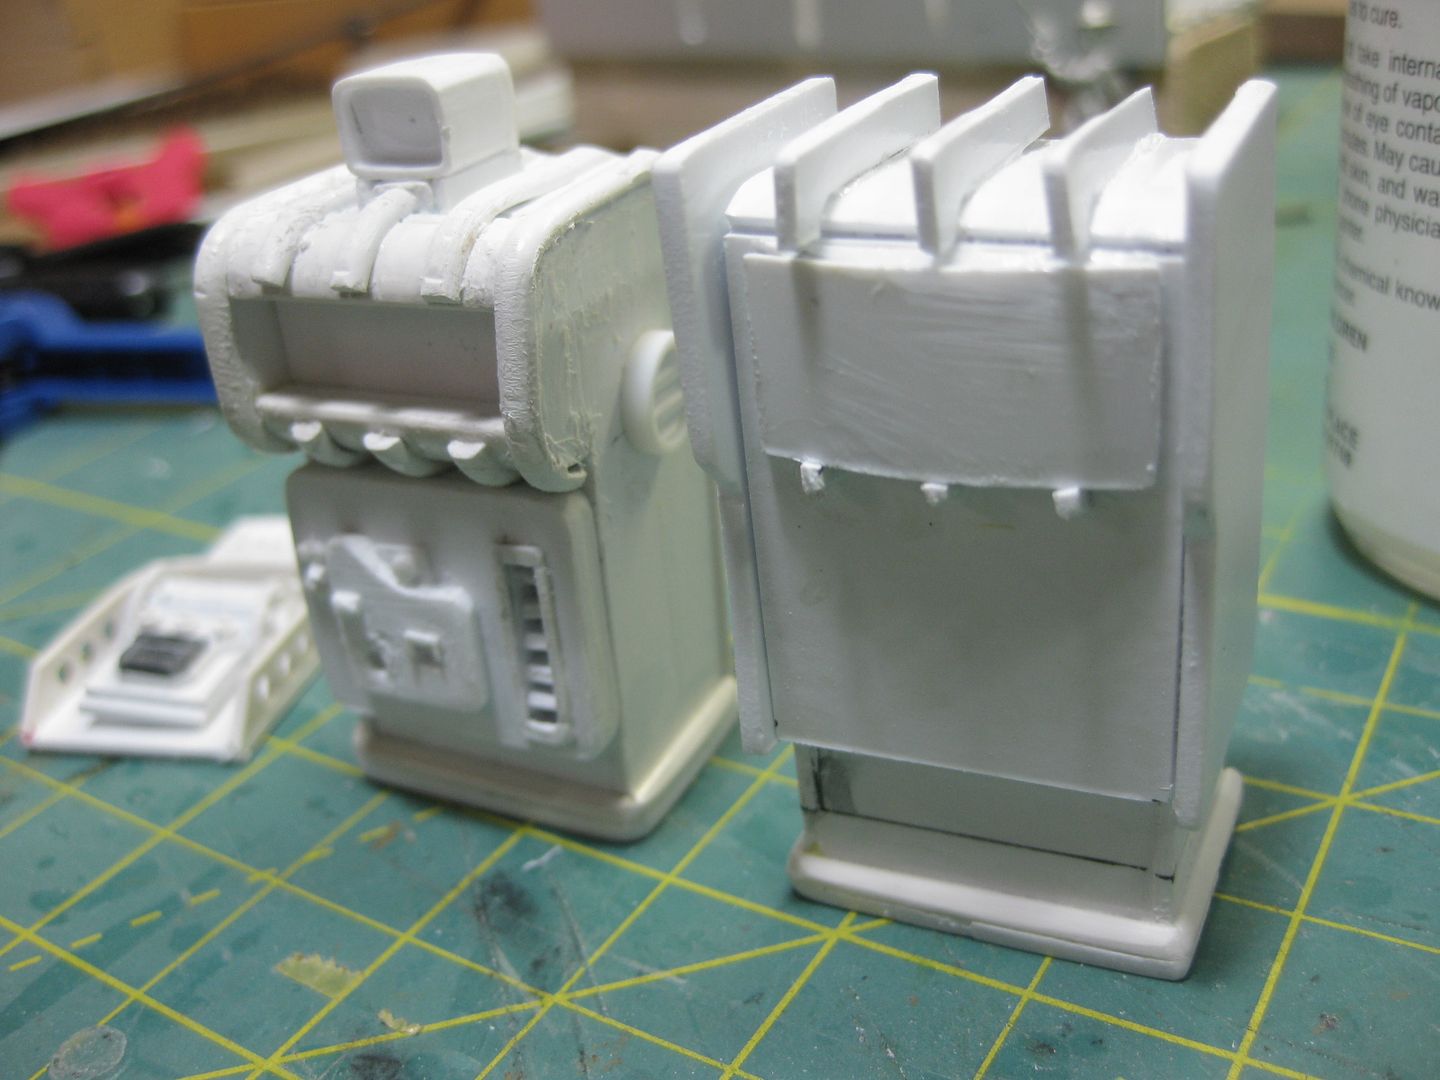
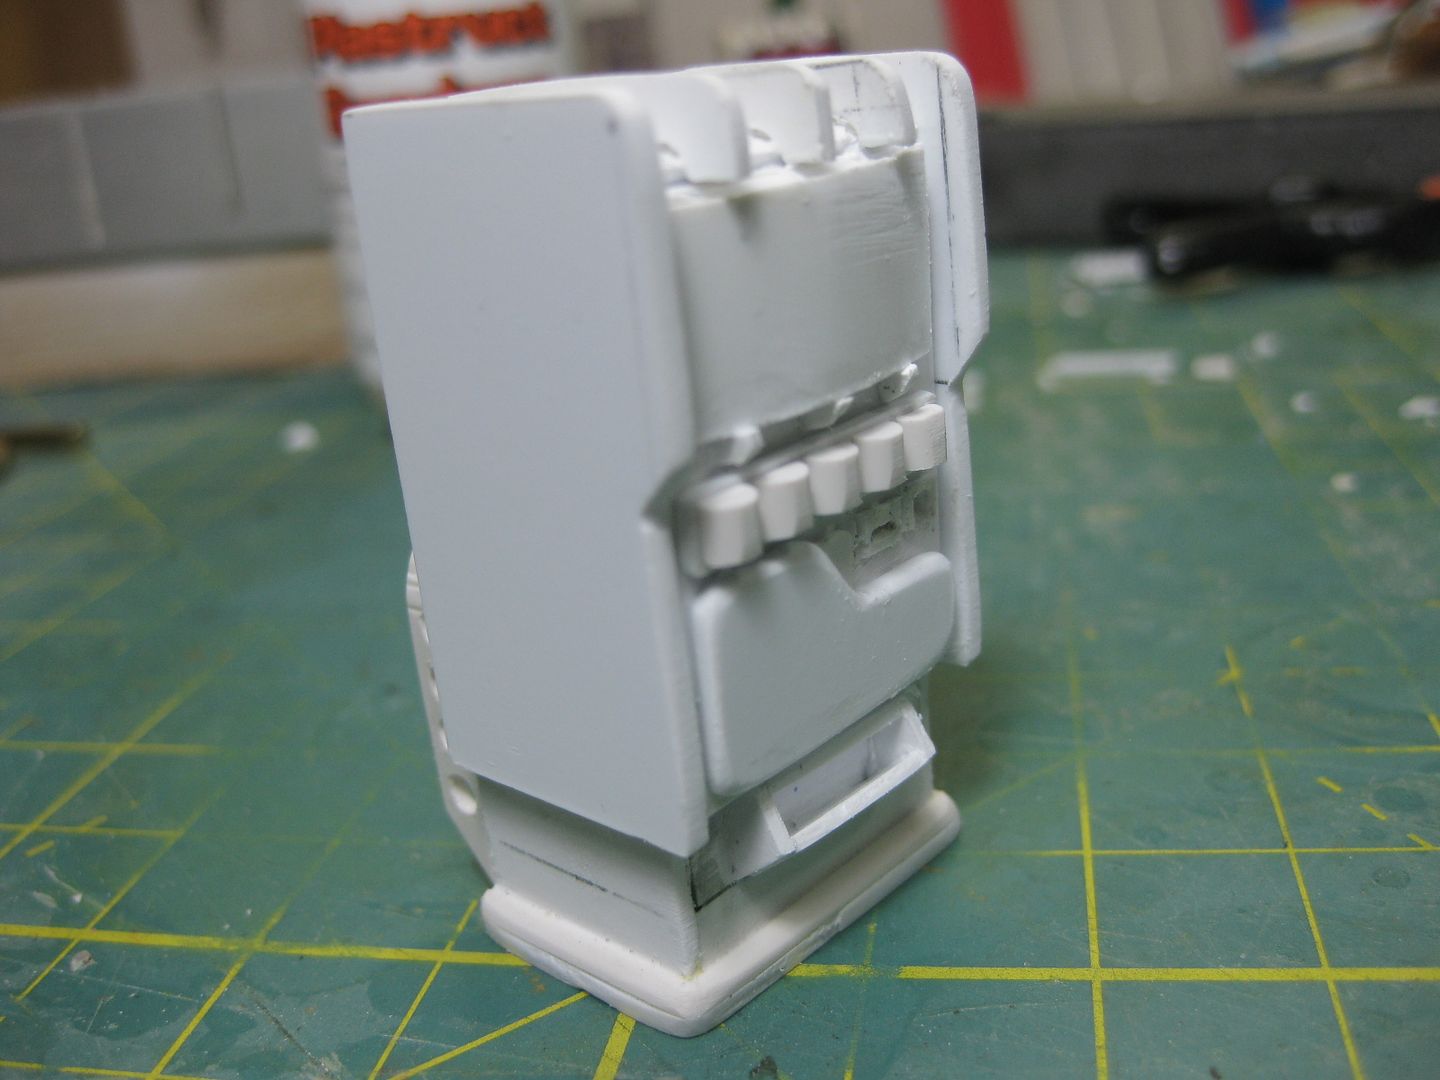
Might be a little crazy, but I think you'll eventually be able to build one that even hinges open to show the inner workings and add more use to it as well.
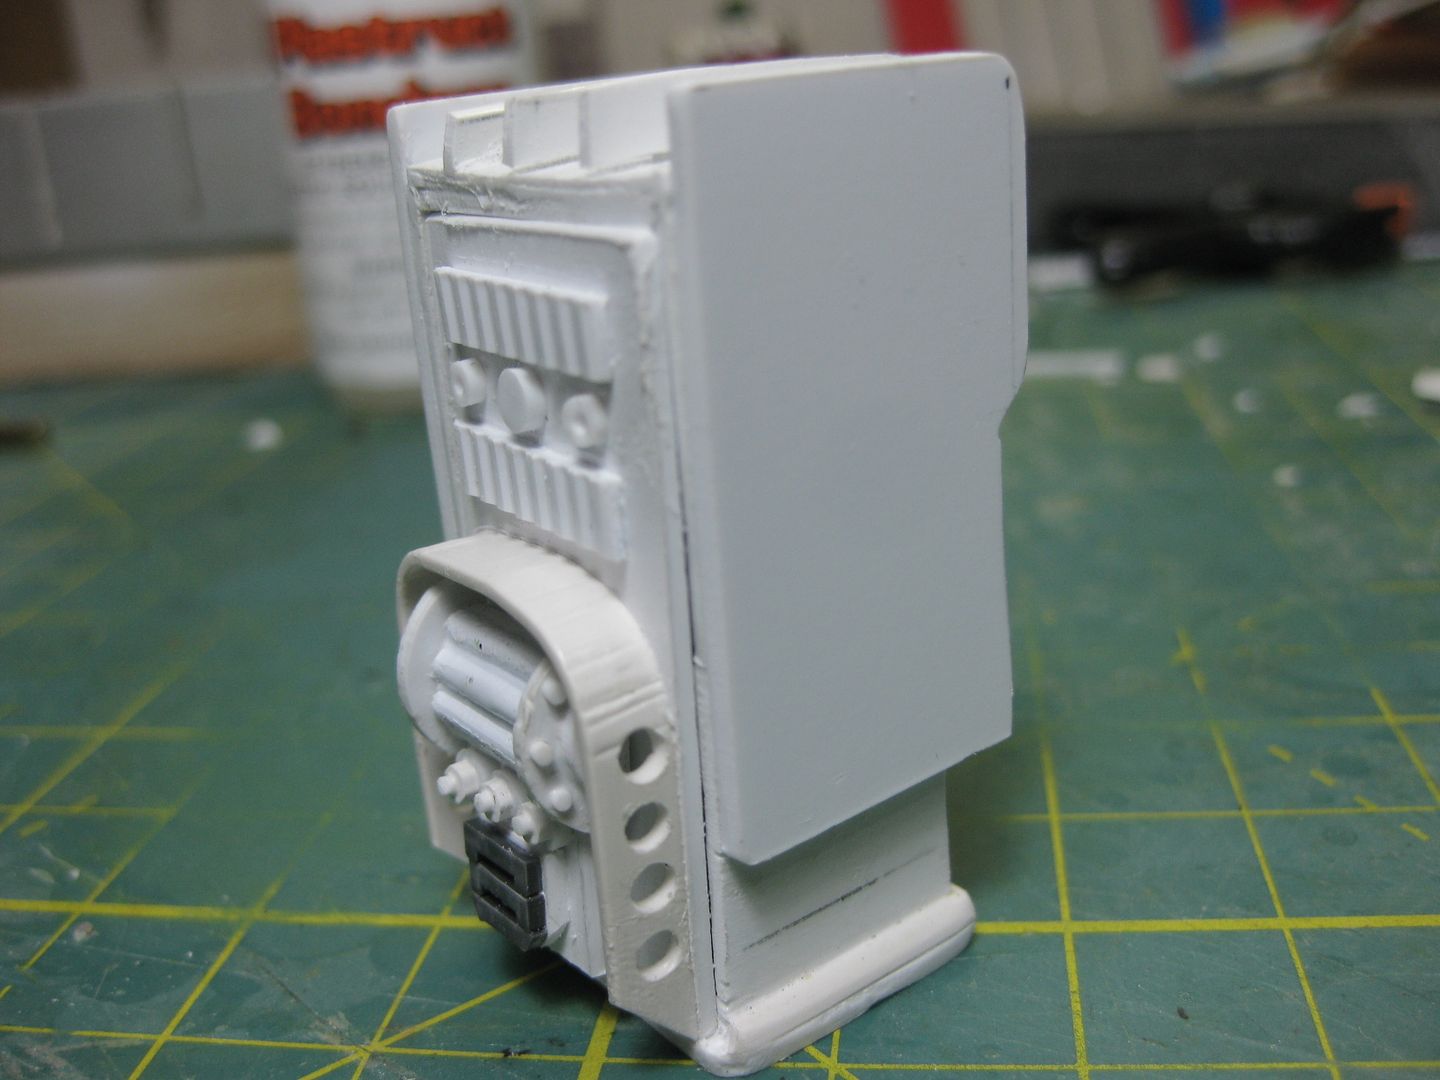
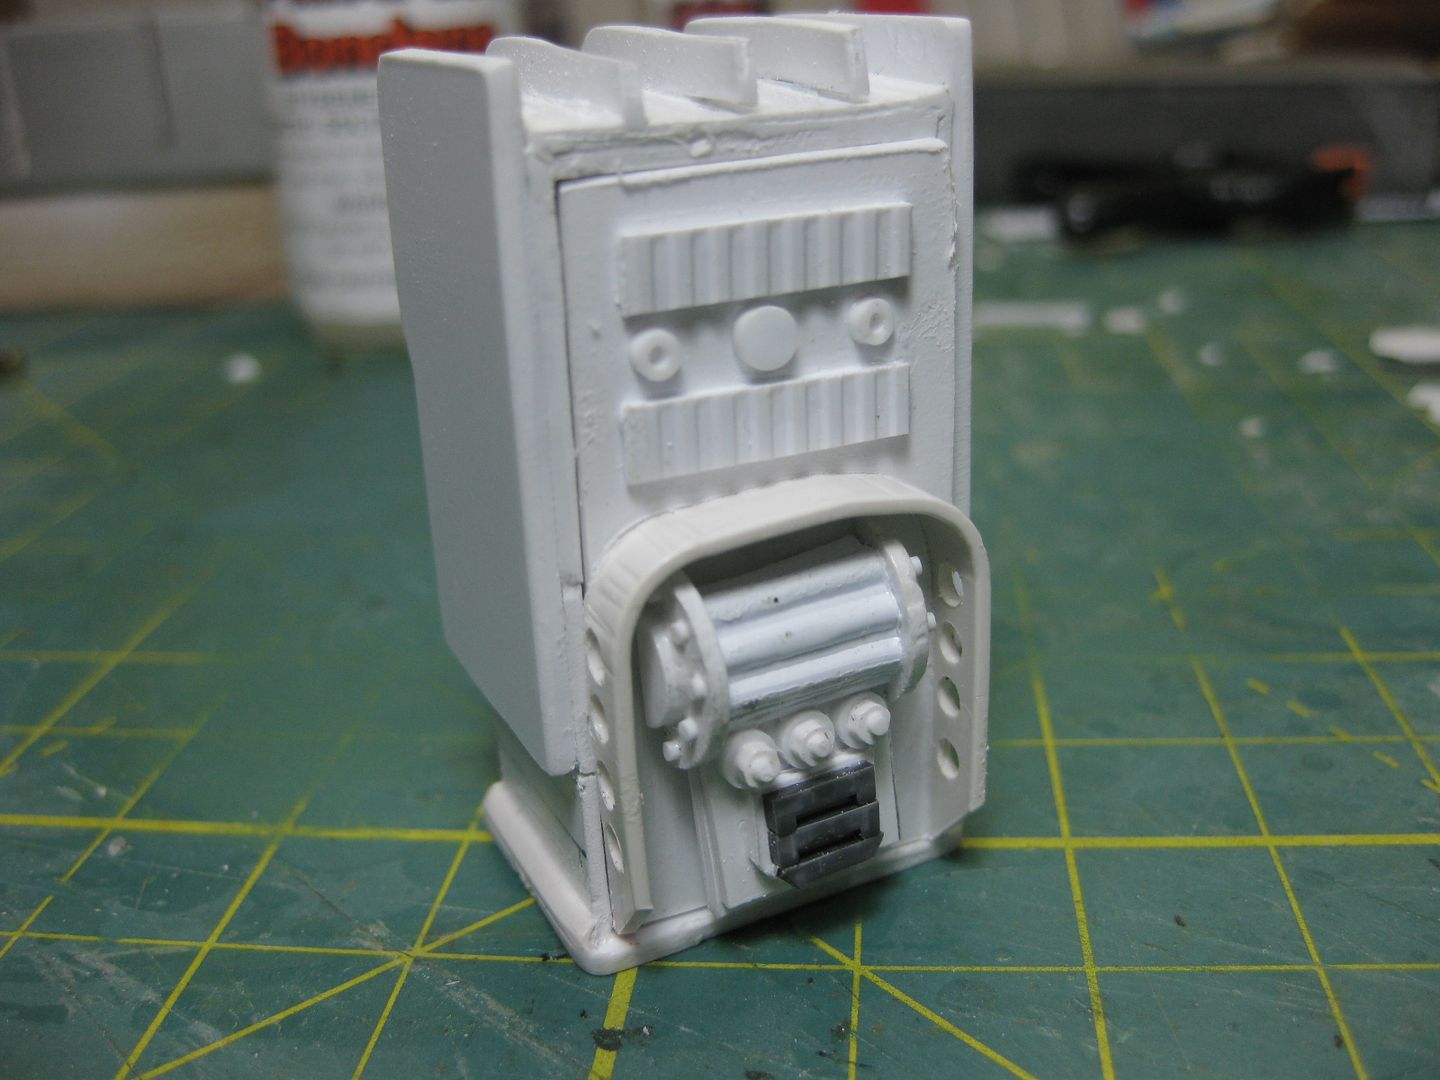
dsteingass wrote:Well, 4 hrs later... It was requested of me to make the back more like the prototype, so I'll make it as a seperate castable piece
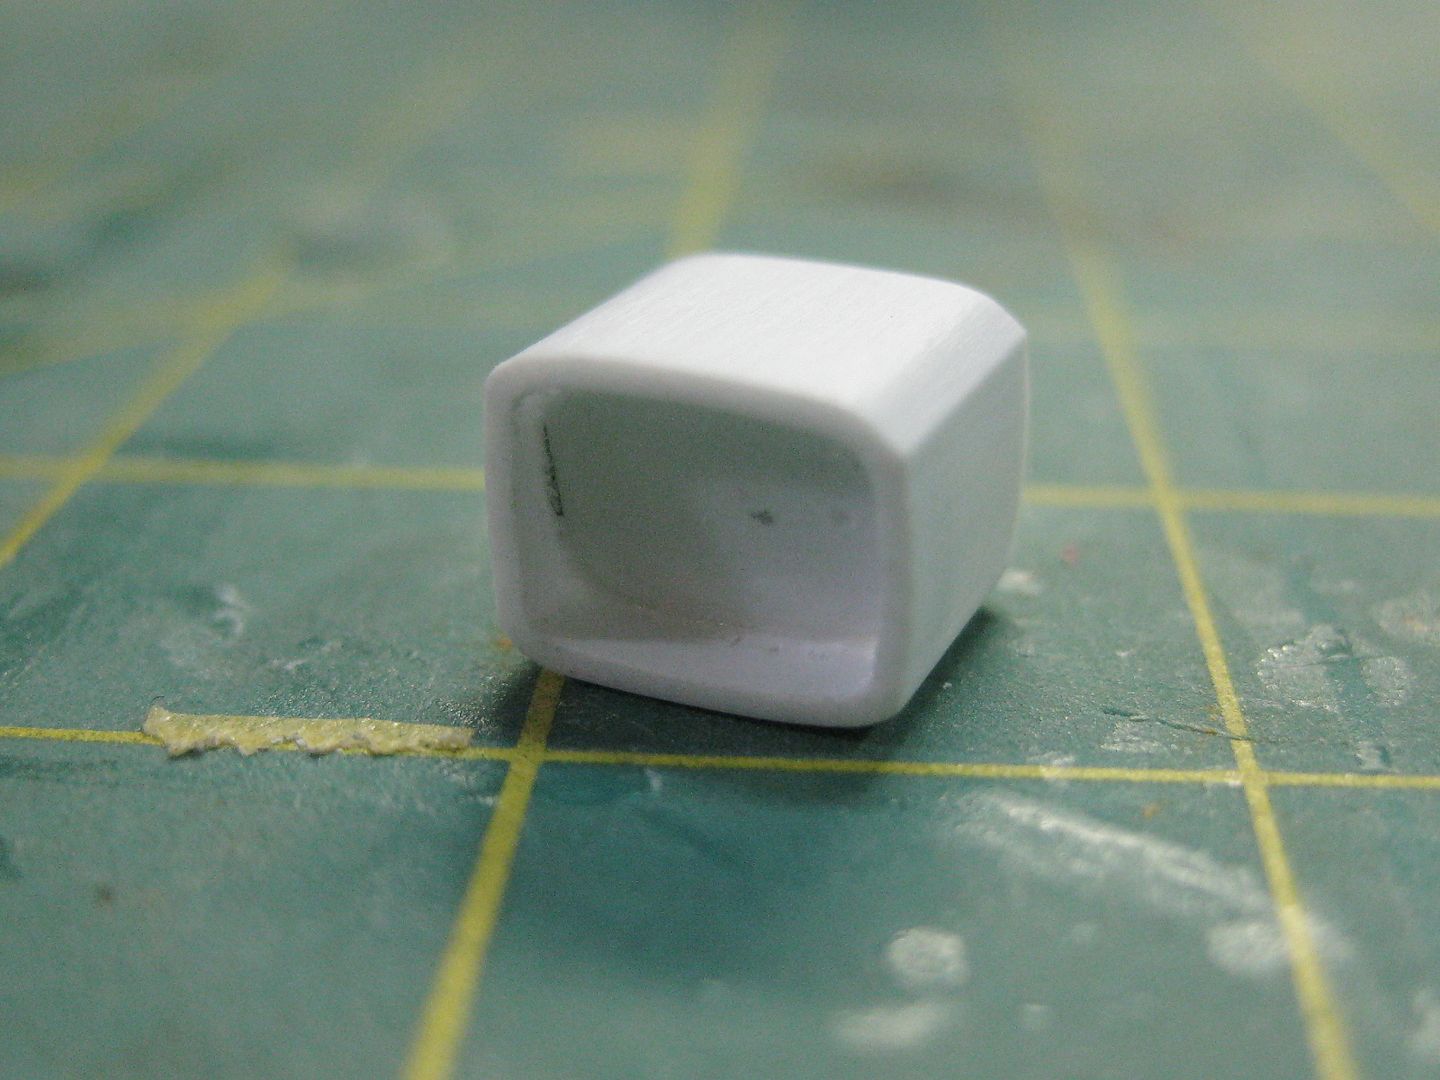
The finned bit in the back looks like a doable use of the el cheapo marker cap segment. (crayola, or knockoffs) the ones white lids with the vertical ridges that are roughly the same size a bic pens.
Holy bat crap bat man!!!! That's amazing I must get one of those its my birthday in only about 15 or so days... Early bray present!? that te thunderbolt is looking nice too, I my be getting an contempter soon too and the tattooist termites....
Automatically Appended Next Post: Holy bat crap bat man!!!! That's amazing I must get one of those its my birthday in only about 15 or so days... Early bray present!? that te thunderbolt is looking nice too, I my be getting an contempter soon too and the tattooist termites....
n0t_u wrote:Might be a little crazy, but I think you'll eventually be able to build one that even hinges open to show the inner workings and add more use to it as well.
Yes, that is quite crazy Not_u! TBH, I can't even tell how it is supposed to work, it's been a LONG time since I've seen a bottle vending machine.
Galorn wrote:
The finned bit in the back looks like a doable use of the el cheapo marker cap segment. (crayola, or knockoffs) the ones white lids with the vertical ridges that are roughly the same size a bic pens.
Good idea Galorn, the compressor does need to be there, a slice of one of those capped by a couple of pc discs should do it! I'll still make it a separate castable bit. Do you think the TV on top should be cast separately too?
HAZZER wrote:Holy bat crap bat man!!!! That's amazing I must get one of those its my birthday in only about 15 or so days... Early bray present!? that te thunderbolt is looking nice too, I my be getting an contempter soon too and the tattooist termites....
Well Happy early BDay Hazz, but I'm afraid it'll be longer than that before Galorn has it ready for casting, I'll send you one for free, but then you've got to pay if you want more
Rogue Wolves wrote:.. the only thing better than an early B-day present is a late one.. mine was only 1 month ago so its not too late
n0t_u wrote:Might be a little crazy, but I think you'll eventually be able to build one that even hinges open to show the inner workings and add more use to it as well.
Yes, that is quite crazy Not_u! TBH, I can't even tell how it is supposed to work, it's been a LONG time since I've seen a bottle vending machine.
Galorn wrote: The finned bit in the back looks like a doable use of the el cheapo marker cap segment. (crayola, or knockoffs) the ones white lids with the vertical ridges that are roughly the same size a bic pens.
Good idea Galorn, the compressor does need to be there, a slice of one of those capped by a couple of pc discs should do it! I'll still make it a separate castable bit. Do you think the TV on top should be cast separately too?
HAZZER wrote:Holy bat crap bat man!!!! That's amazing I must get one of those its my birthday in only about 15 or so days... Early bray present!? that te thunderbolt is looking nice too, I my be getting an contempter soon too and the tattooist termites....
Well Happy early BDay Hazz, but I'm afraid it'll be longer than that before Galorn has it ready for casting, I'll send you one for free, but then you've got to pay if you want more
Rogue Wolves wrote:.. the only thing better than an early B-day present is a late one.. mine was only 1 month ago so its not too late
Glad to see this getting done again. I know you weren't as happy with it as you wanted to be. Consider my order placed, from whomever will be producing it....
mxwllmdr wrote:Glad to see this getting done again. I know you weren't as happy with it as you wanted to be. Consider my order placed, from whomever will be producing it....
Excellent MUAHAHAHAHA. I mean MUAHAHAHA.
Like RS jake I'll be discounting for League Members... just PM me to work out details.
@ Dave did you get my PM with the tracking # for the molds?
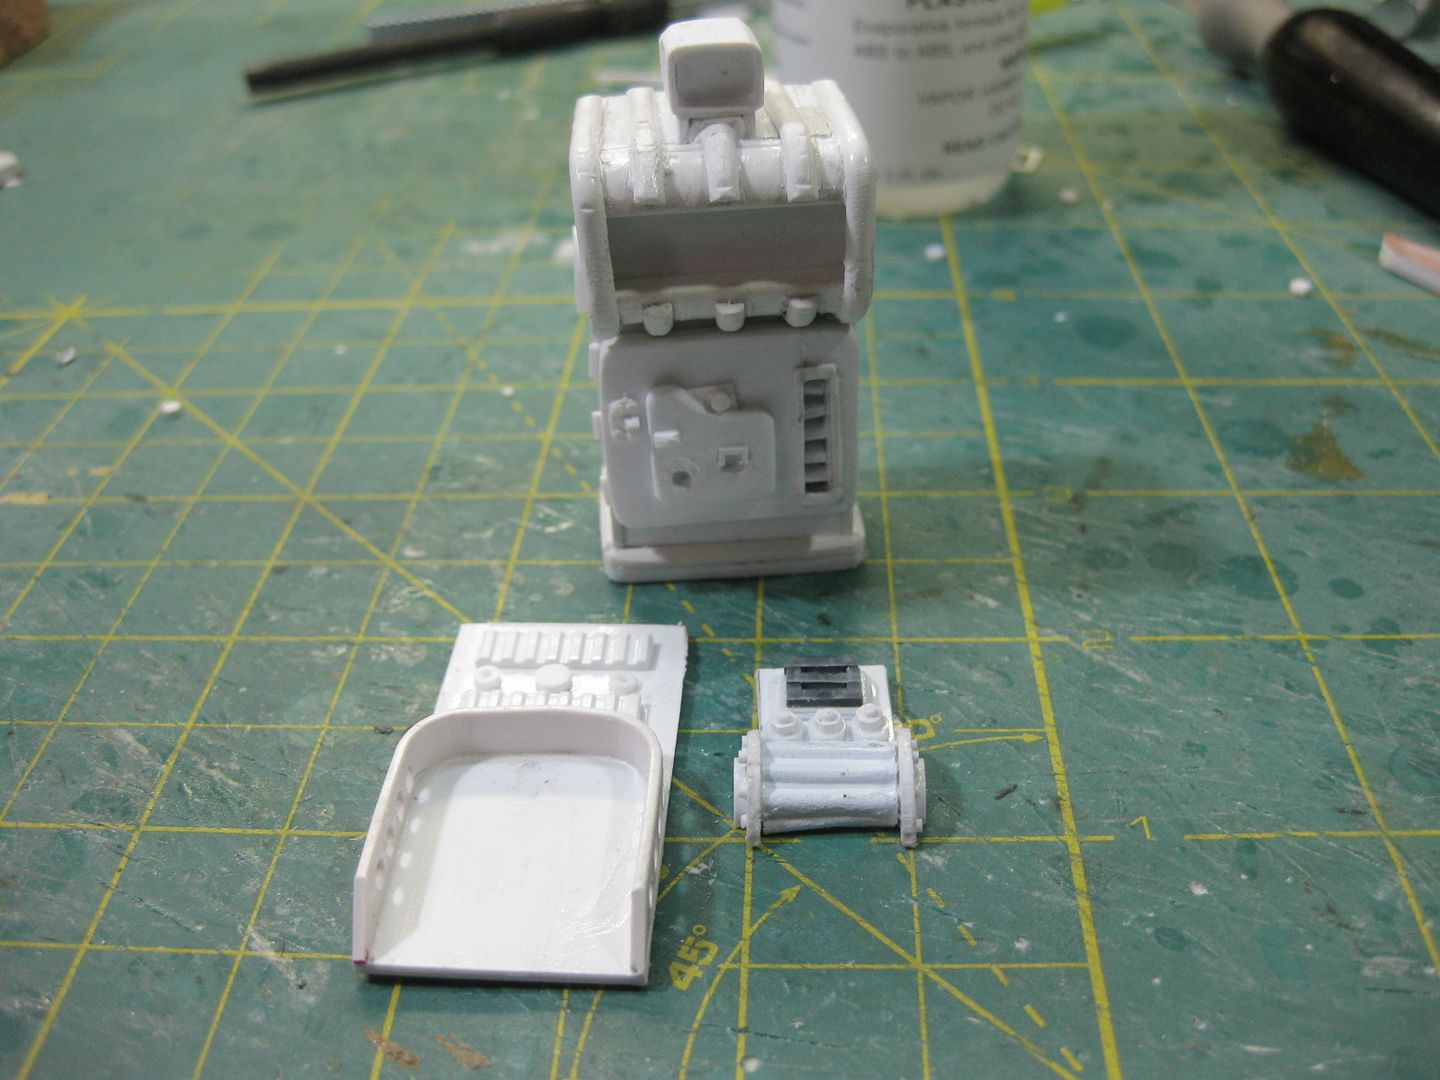
I have complete faith in you! I can always close them off from behind with more plastic if needed to, as long as they are aesthetically there, the owner can feel free to drill them out if they want to.
I've already glued on the TV, but if it is a problem for the mold, you can cut it off and cast it separately.
dsteingass wrote:I have complete faith in you! I can always close them off from behind with more plastic if needed to, as long as they are aesthetically there, the owner can feel free to drill them out if they want to.
I've already glued on the TV, but if it is a problem for the mold, you can cut it off and cast it separately.
I'll see It should be fine. Heh as for the holes my first plan was use a strip of scotch tape to close off one side... (the interior side) to keep the sillycone from going all the way through. (effectively making a mold cut for me...)
Viktor von Domm wrote:what???? i do in fact own a globe....it is sitting in the childrens room... and iirc china is waaaaaay closer to your yanky lands^^
Cool! It looks liek Jake's vote+comment put it over the top! Thanks a lot guys! too bad it'll be gone in like a minute I love it when it happens though!
indeed.... dunno why that thought poped in my mind tho... some things get kinda twisted in memory sometimes...
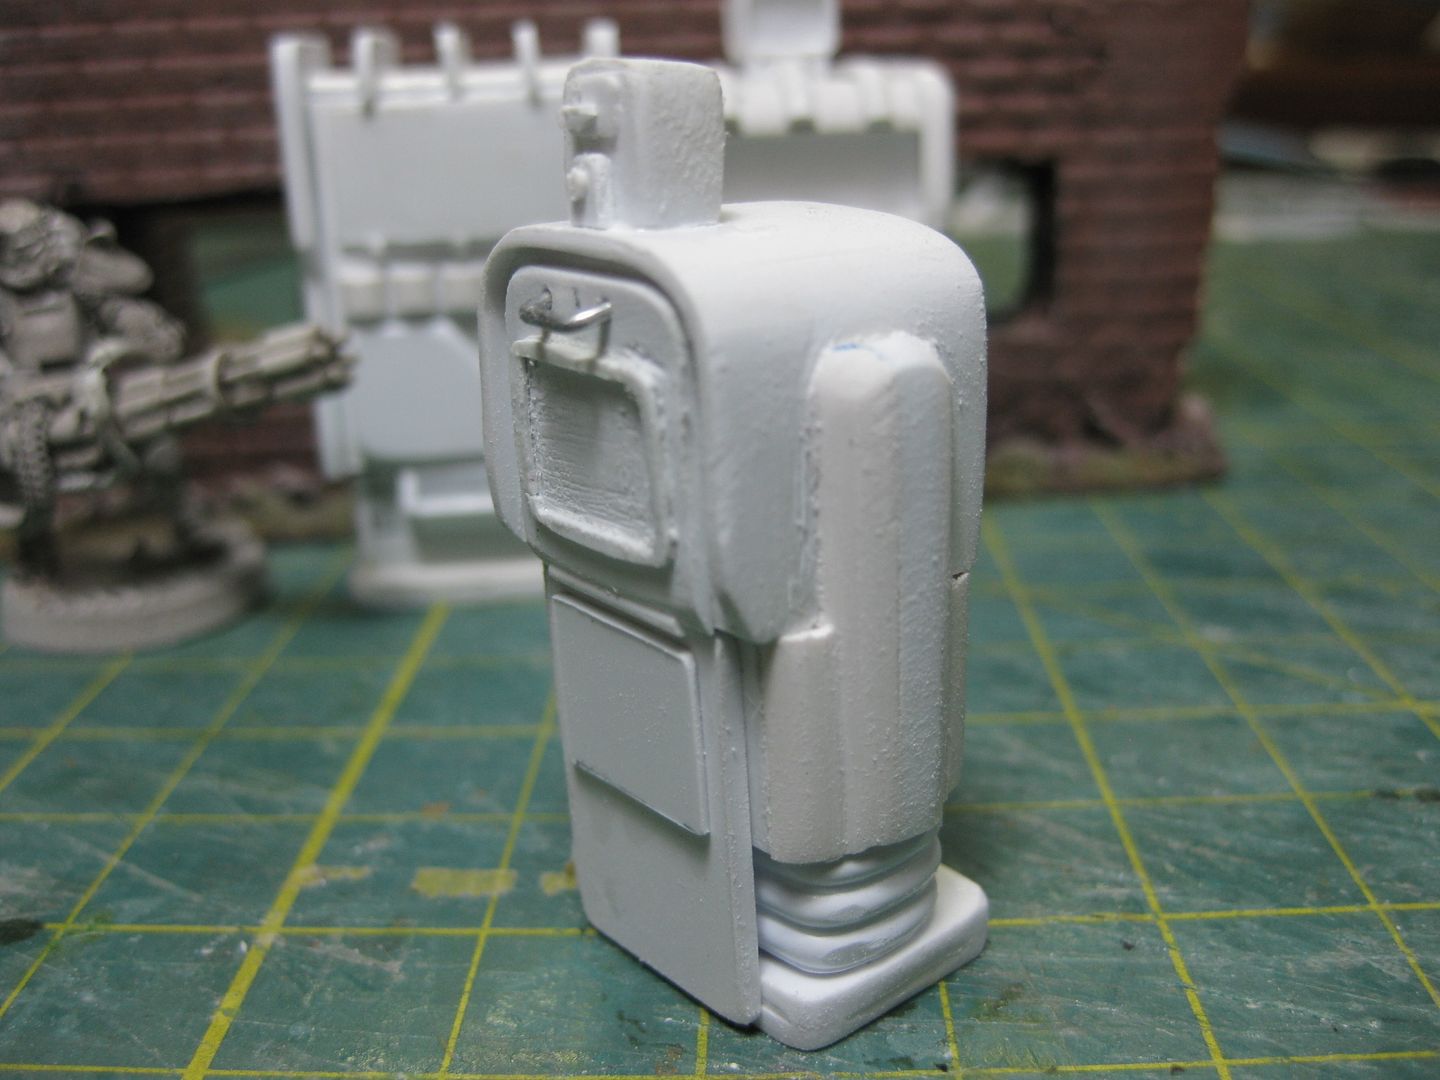
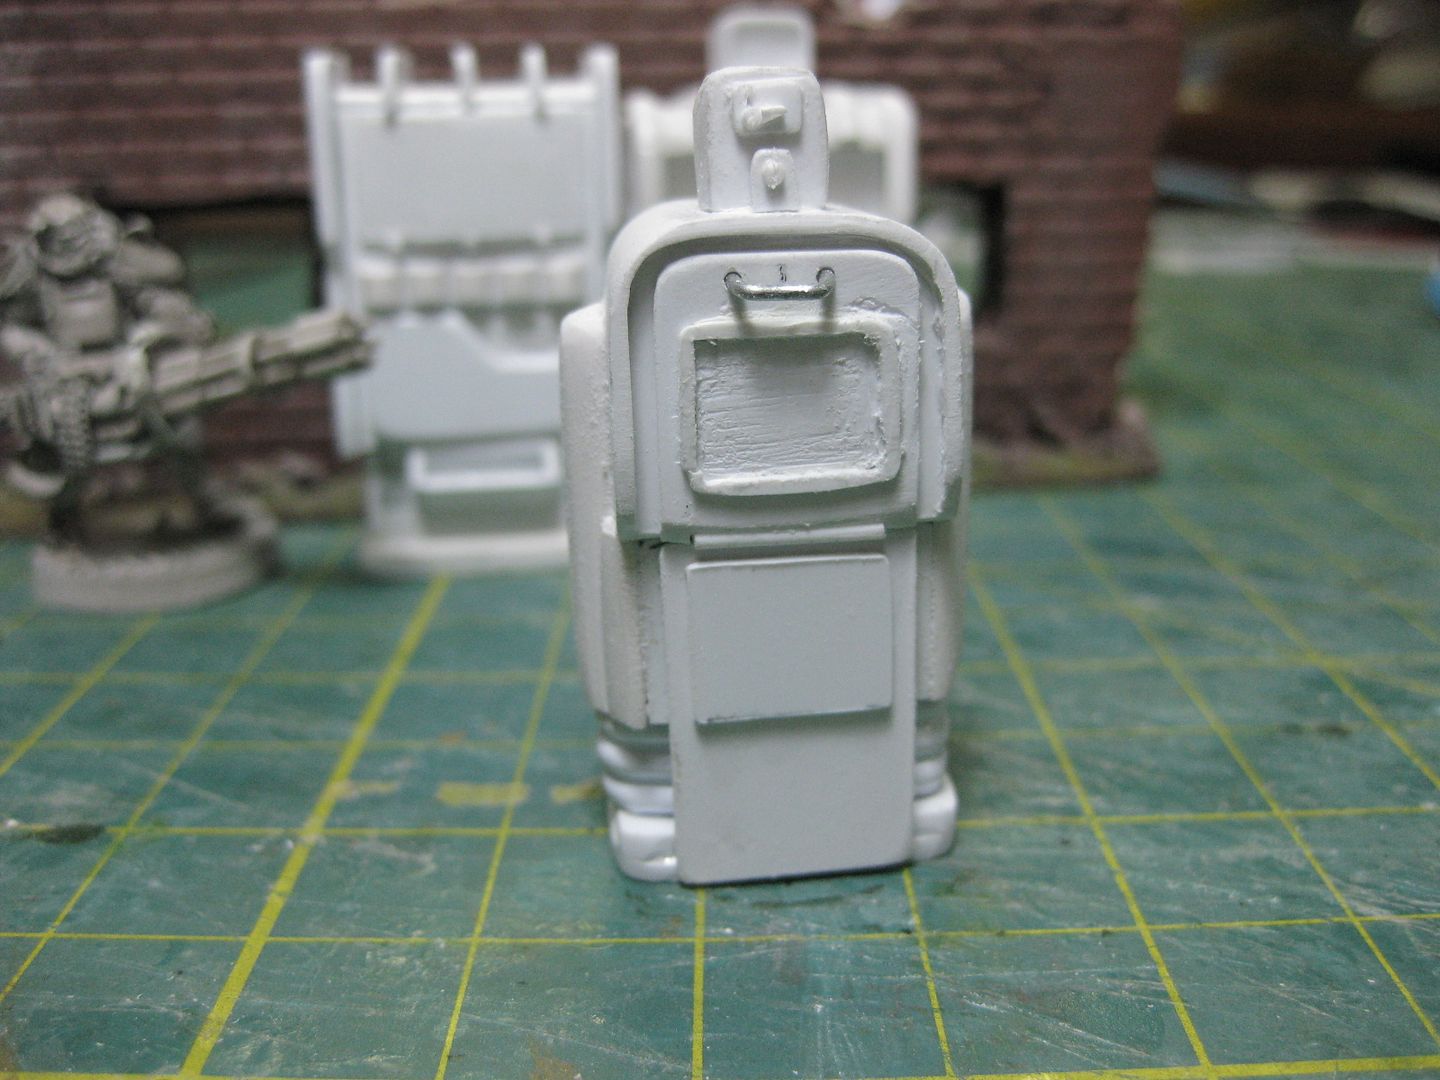
at dave... what i currently like best with that built... the coin thingy... the slit where the coins comeout or get put in...very good looking and so damn tiny!!!
and that is the best way to treat relationships at all... one day the humpy bumby bit of a relationship grows colder.... not about to happen in at least another 30? years to come... but then your friendship still is going on full swing... this is a dish that gets better from day to day
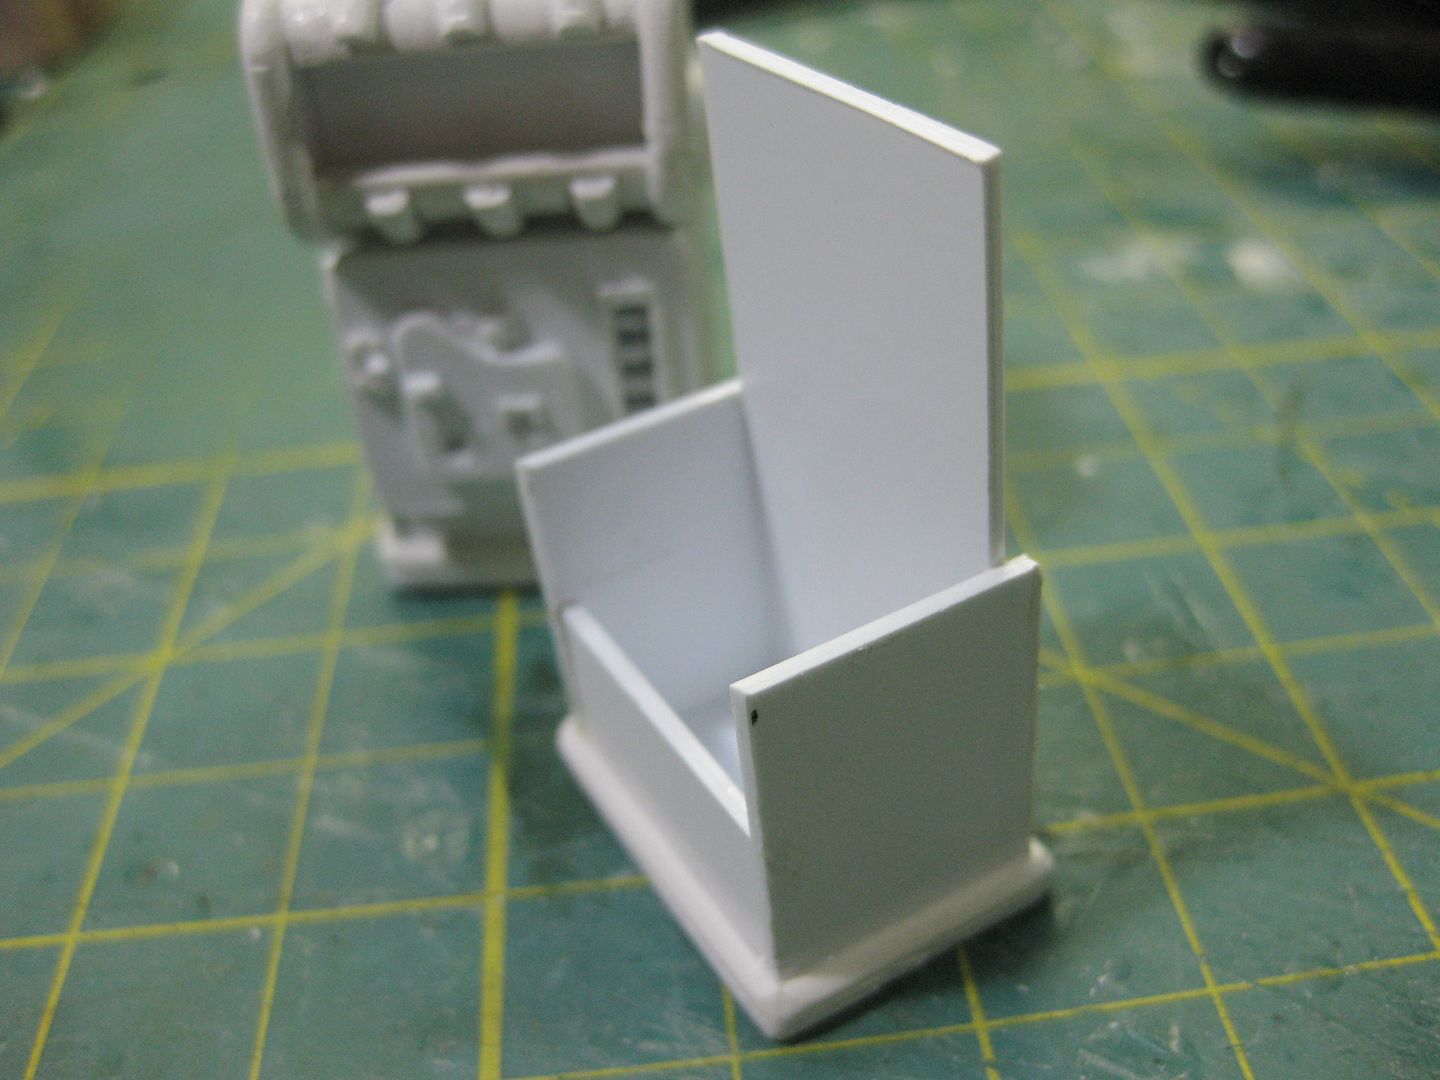
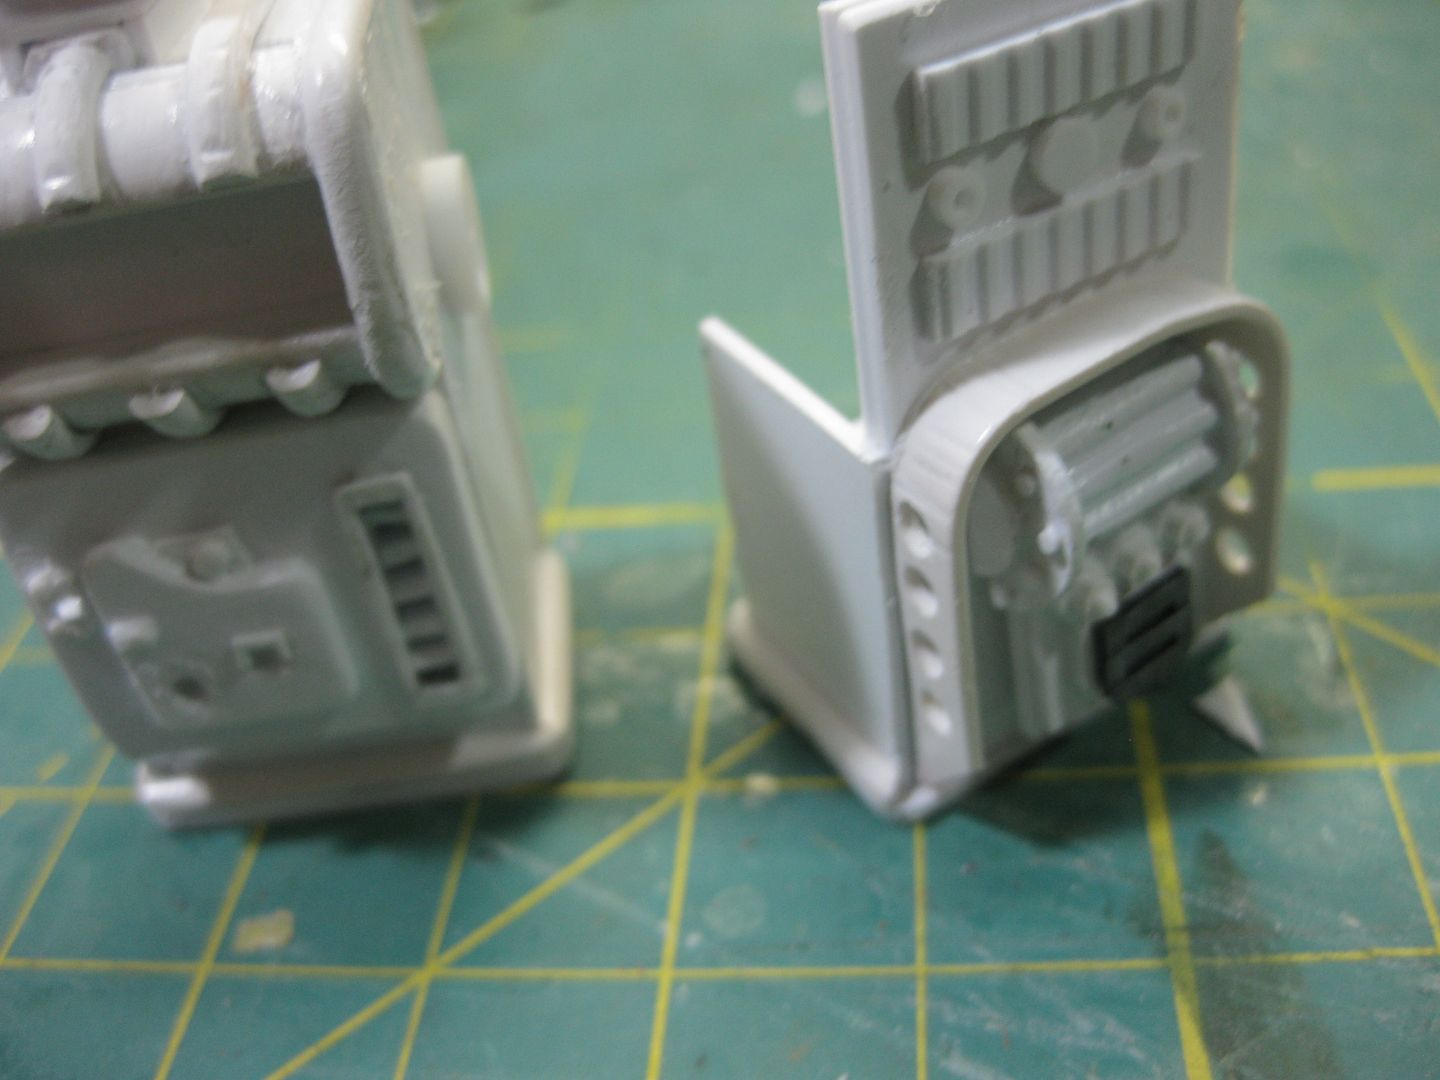
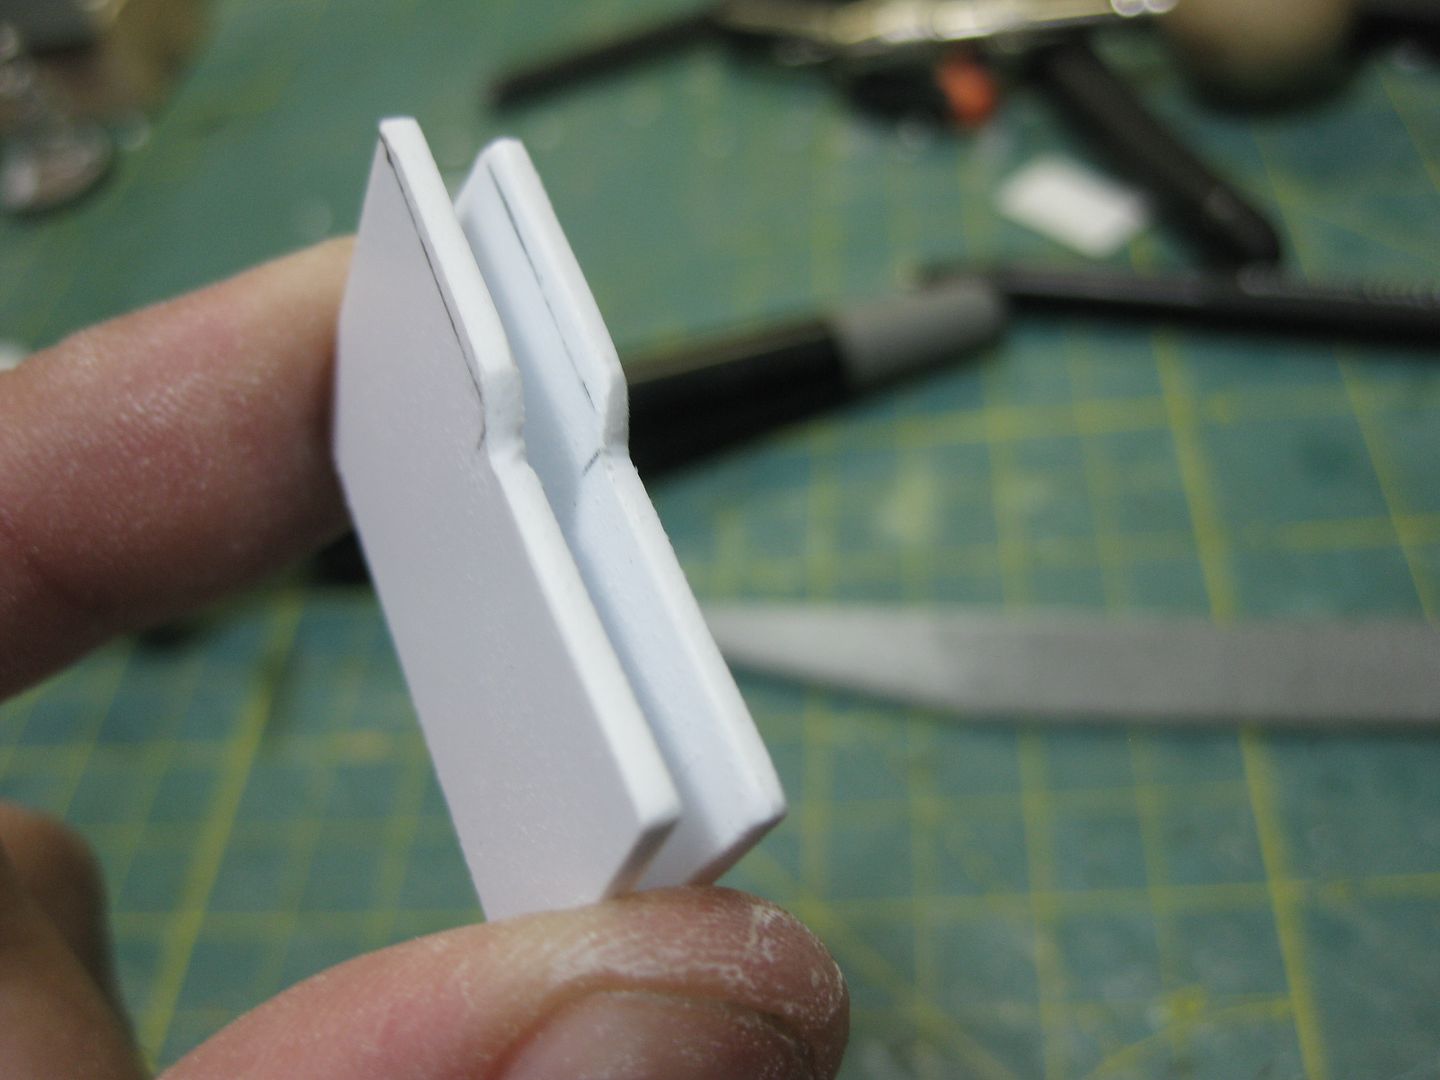
That is what I thought too! Here I trimmed it up, so the back slots in, which also closes up the hollow bottom and adds the thickness to the base.
Now..Here is the cool part IMHO...
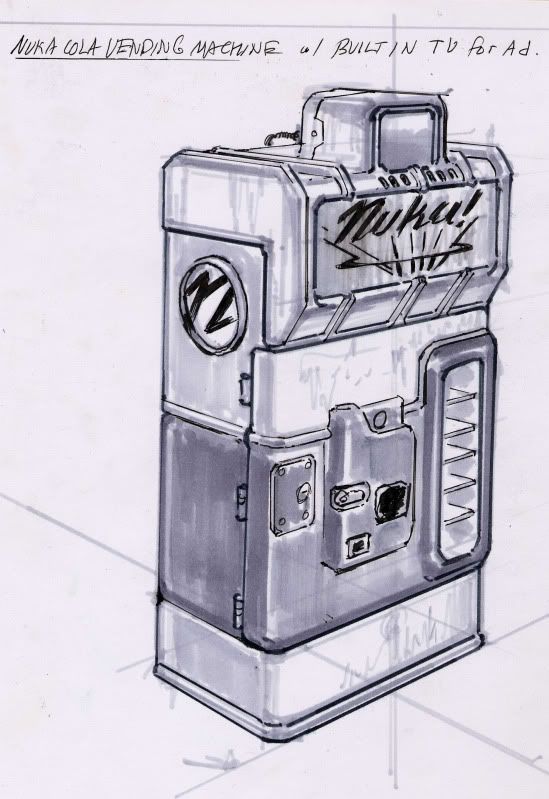
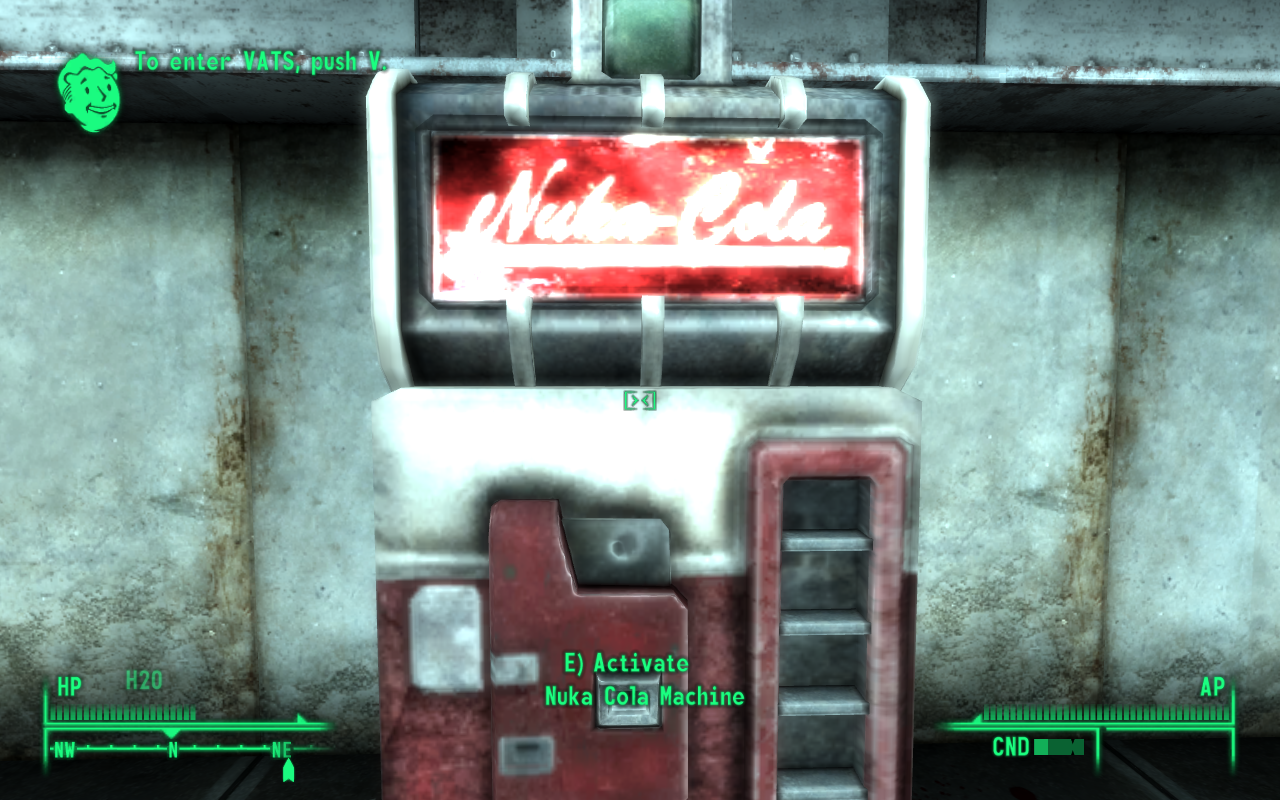
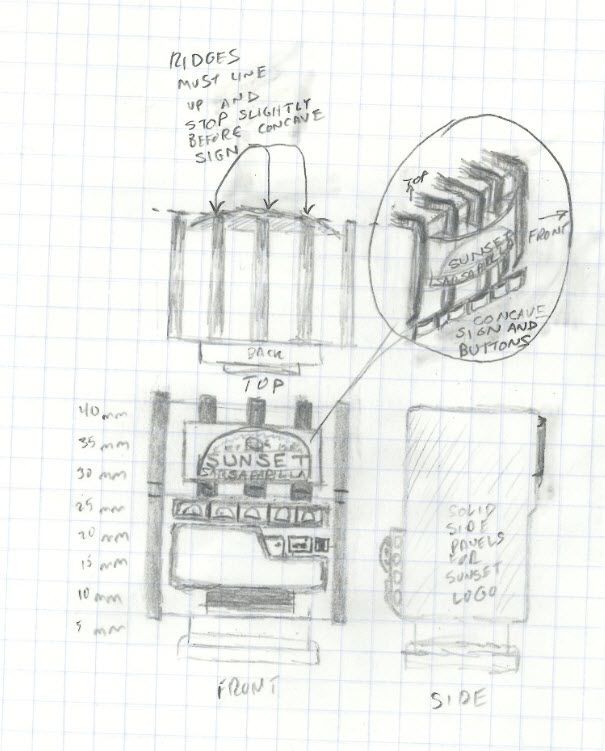
I build a Sunset Sarsaparilla front like the Nuka-Cola front...
..And the same cast bits can be used on the back of both machines!
dsteingass wrote:
Now..Here is the cool part IMHO...
I build a Sunset Sarsaparilla front like the Nuka-Cola front...
..And the same cast bits can be used on the back of both machines!
Yes, I learned MUCH from the first one!- Especially what NOT to do again
Thanks LDD, You have to think about the mold-making and casting process while building something like this. You can't just build willy-nilly and expect it to cast up properly.
The alumilite I buy in tan. It can be bought in black. I prefer the tan. If I weren't buying quickset I could buy dyes for it. They also have it in crystal clear and a less than water clear.
It kinda depends on what hardness/pot time you are buying. Those factors also determine whether or not you need to de-gas it. Quickset requires no de-gassing is why I use it. It is what keep me from being able to cast anything too large or complicated....
The grey is another brand whose name escapes me at the moment. It is really hard and has a pot time of about 3-5 minutes. The Alumilite is about 2-3 minutes.
hurhurhur....why paint everything when the damn model always ends up in flames anyway^^
good looking progress mate... and yep... would love to see that one painted soon too... i am currently a bit shy to say which one i like more... the first one or the new one...
atually a group painting thread would be something new... imagine we all paint one single identical item... each painter interprets the model after his own gusto... i think i really like the idea...
Viktor von Domm wrote:atually a group painting thread would be something new... imagine we all paint one single identical item... each painter interprets the model after his own gusto... i think i really like the idea...
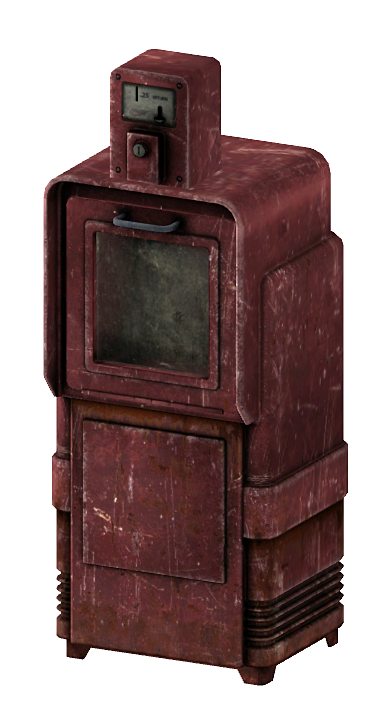
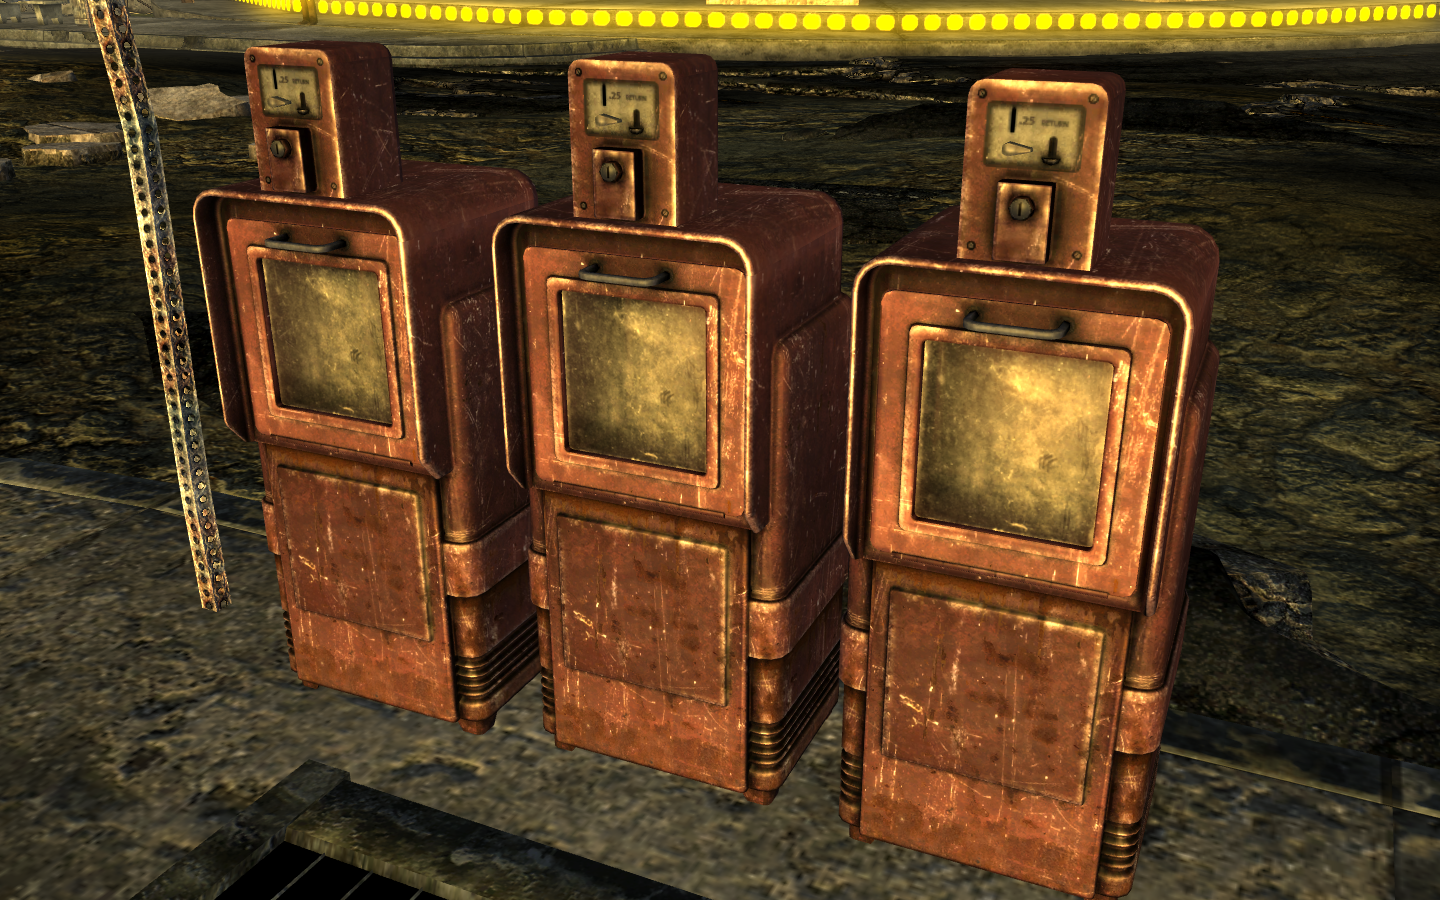
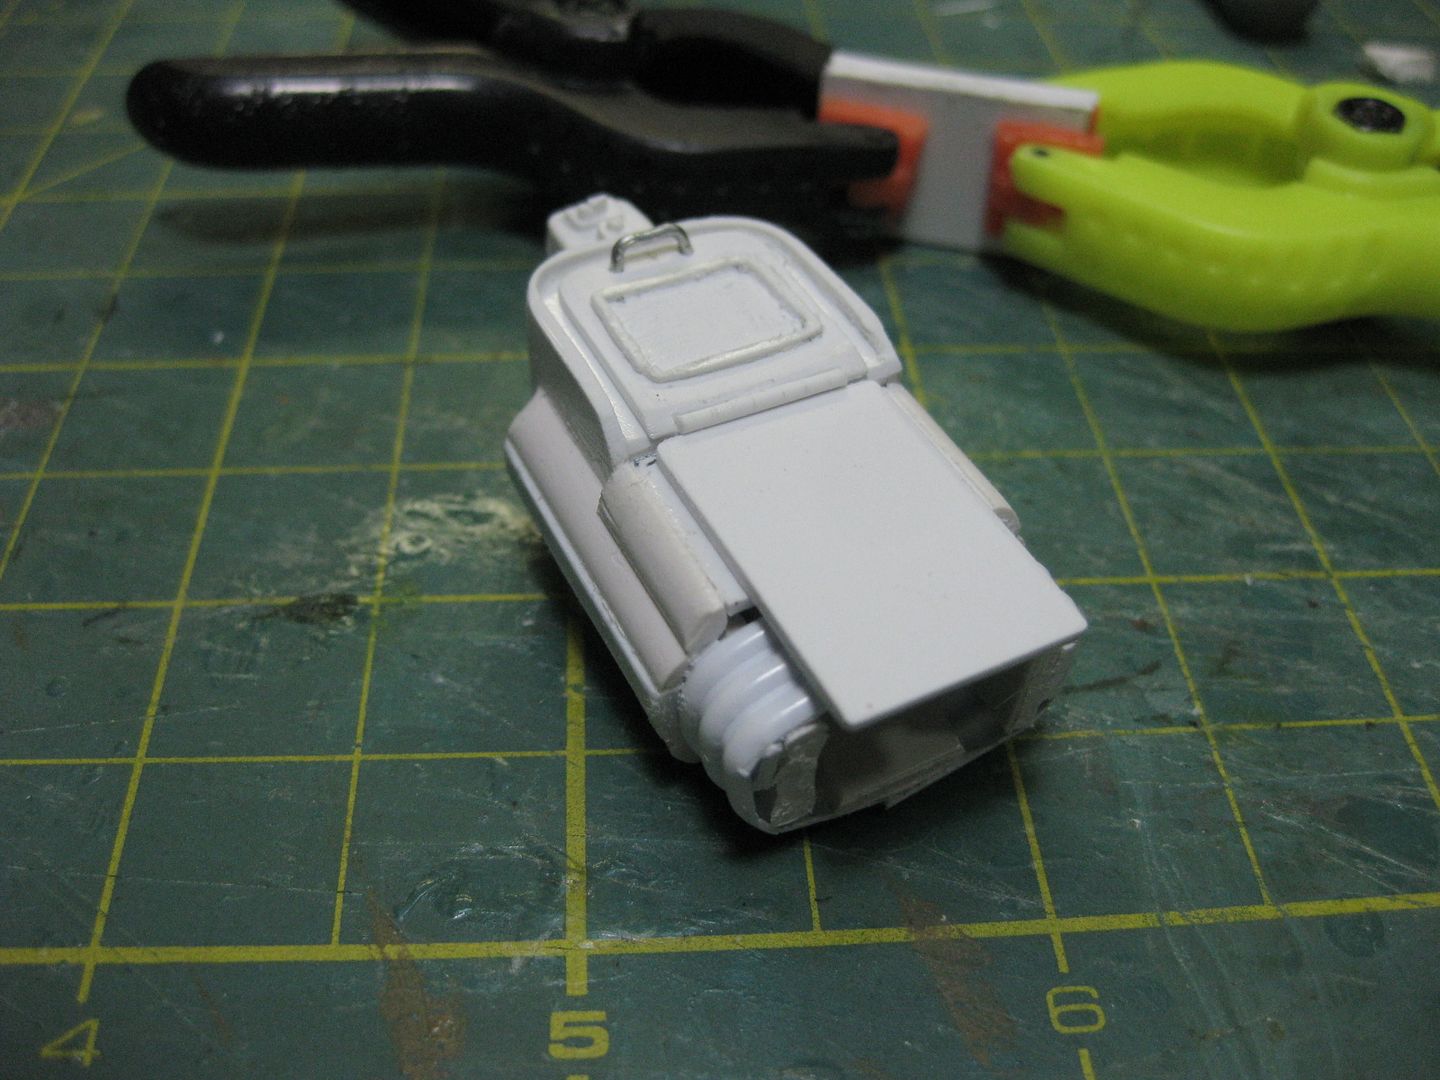
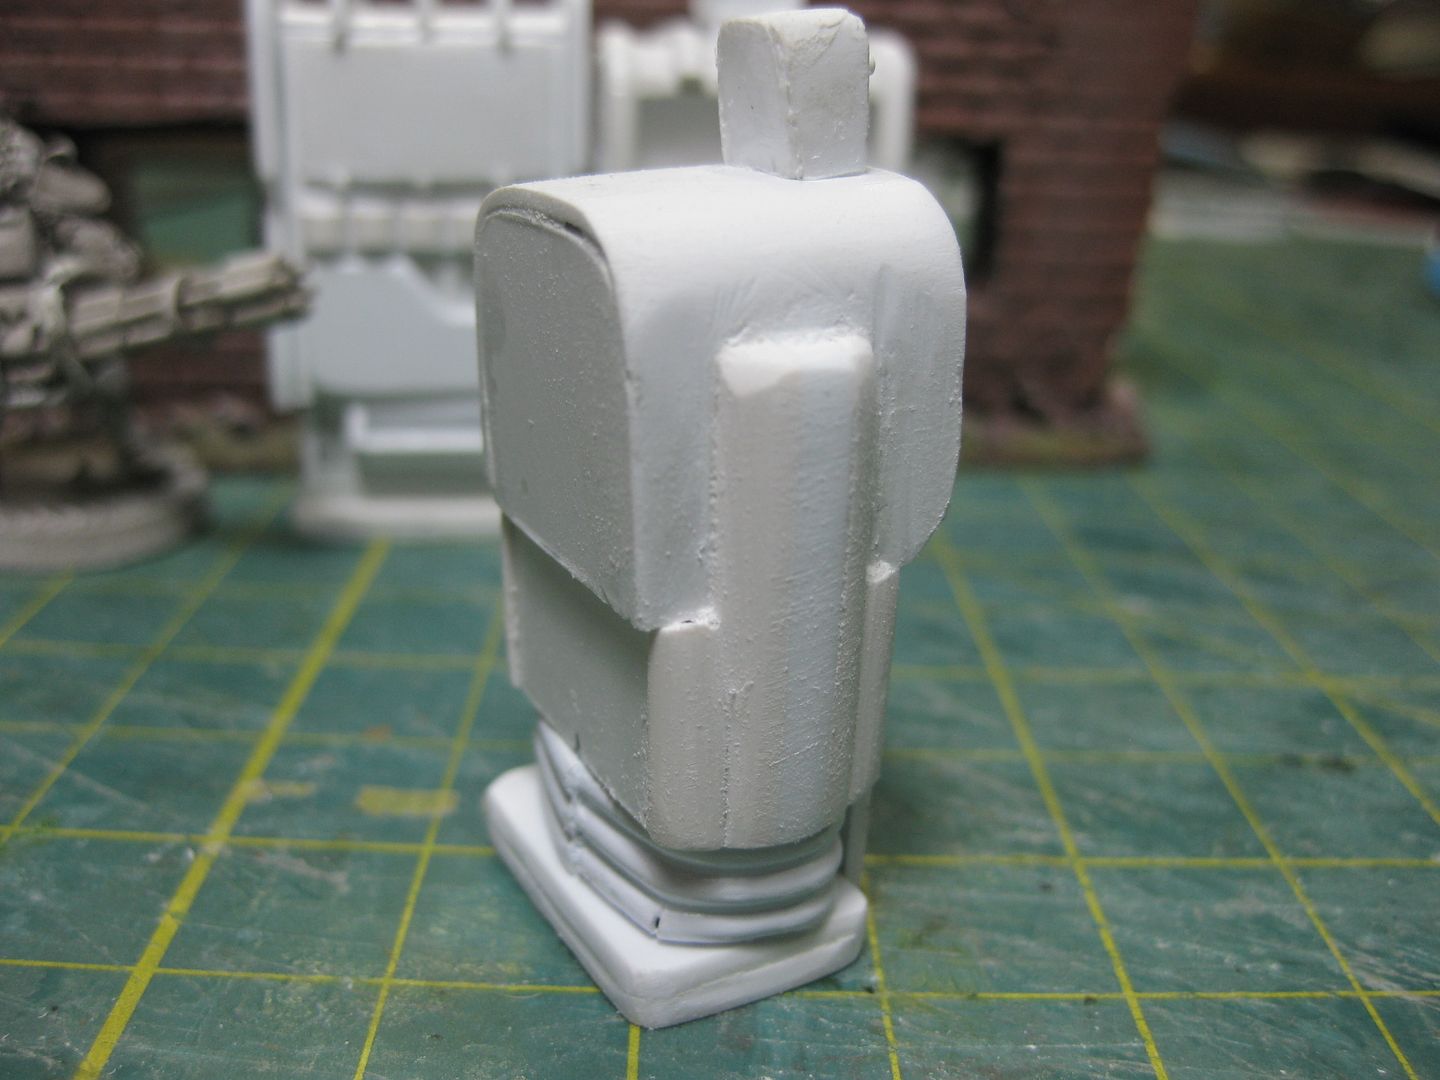
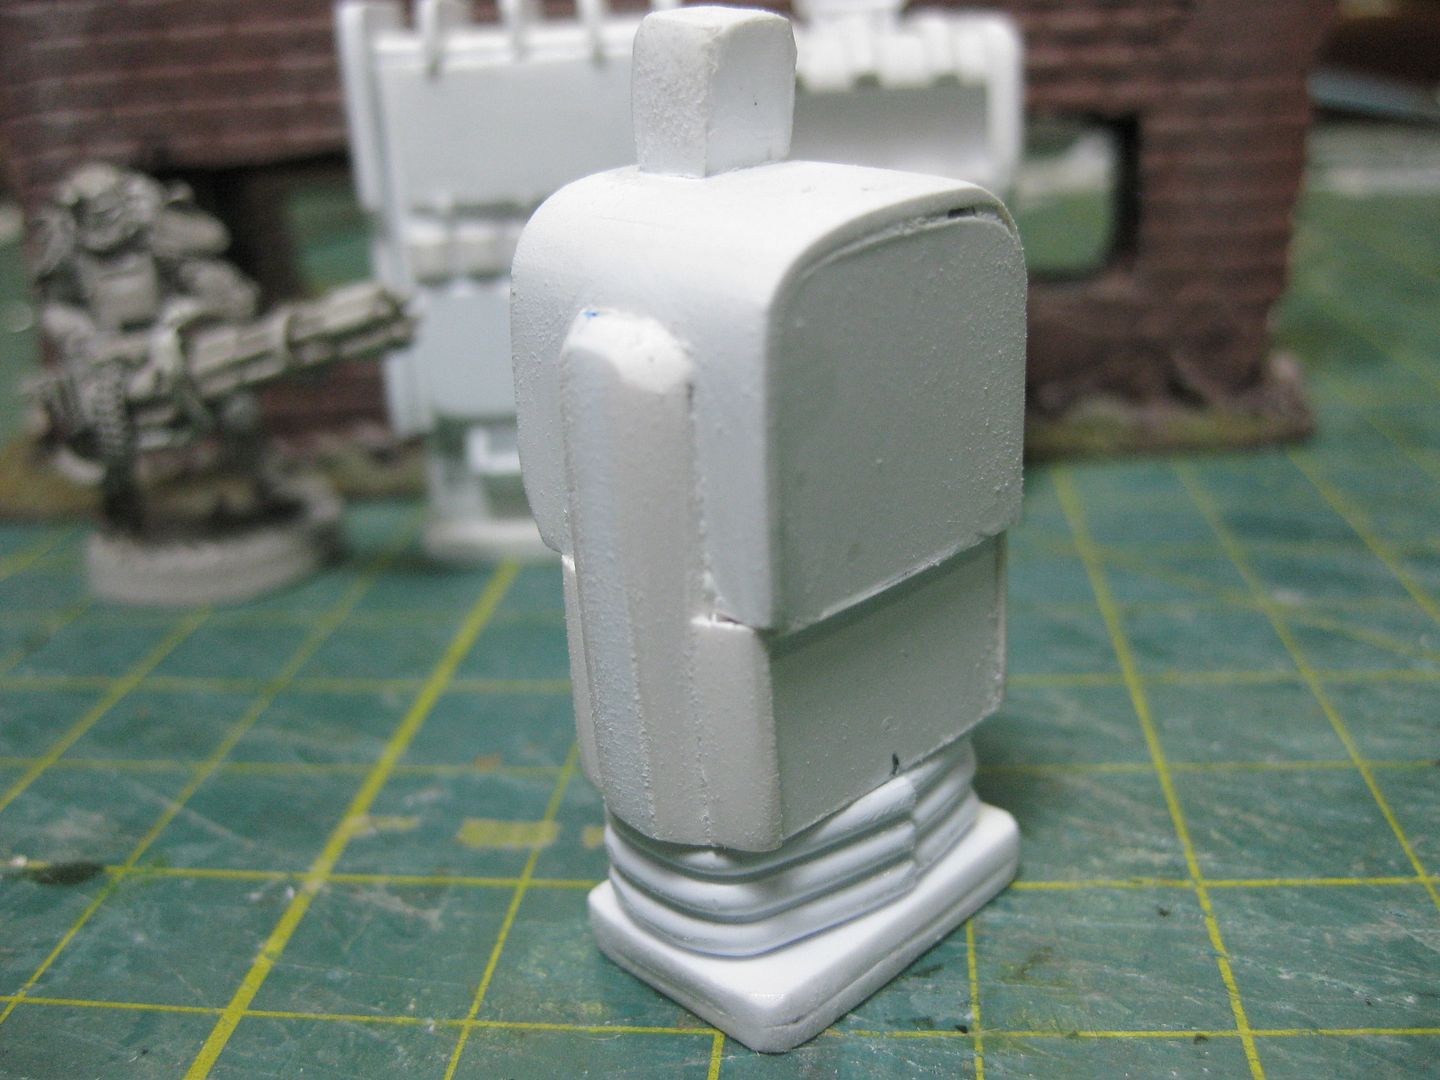
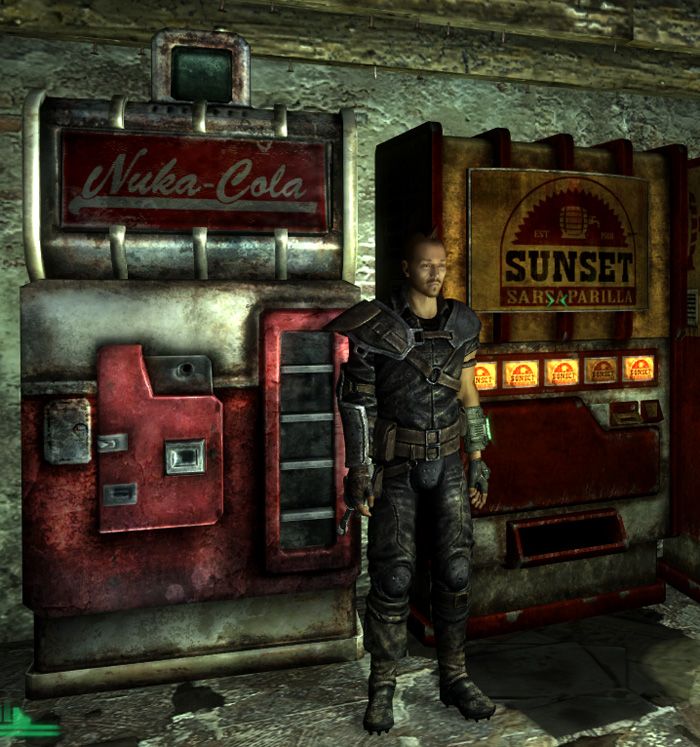
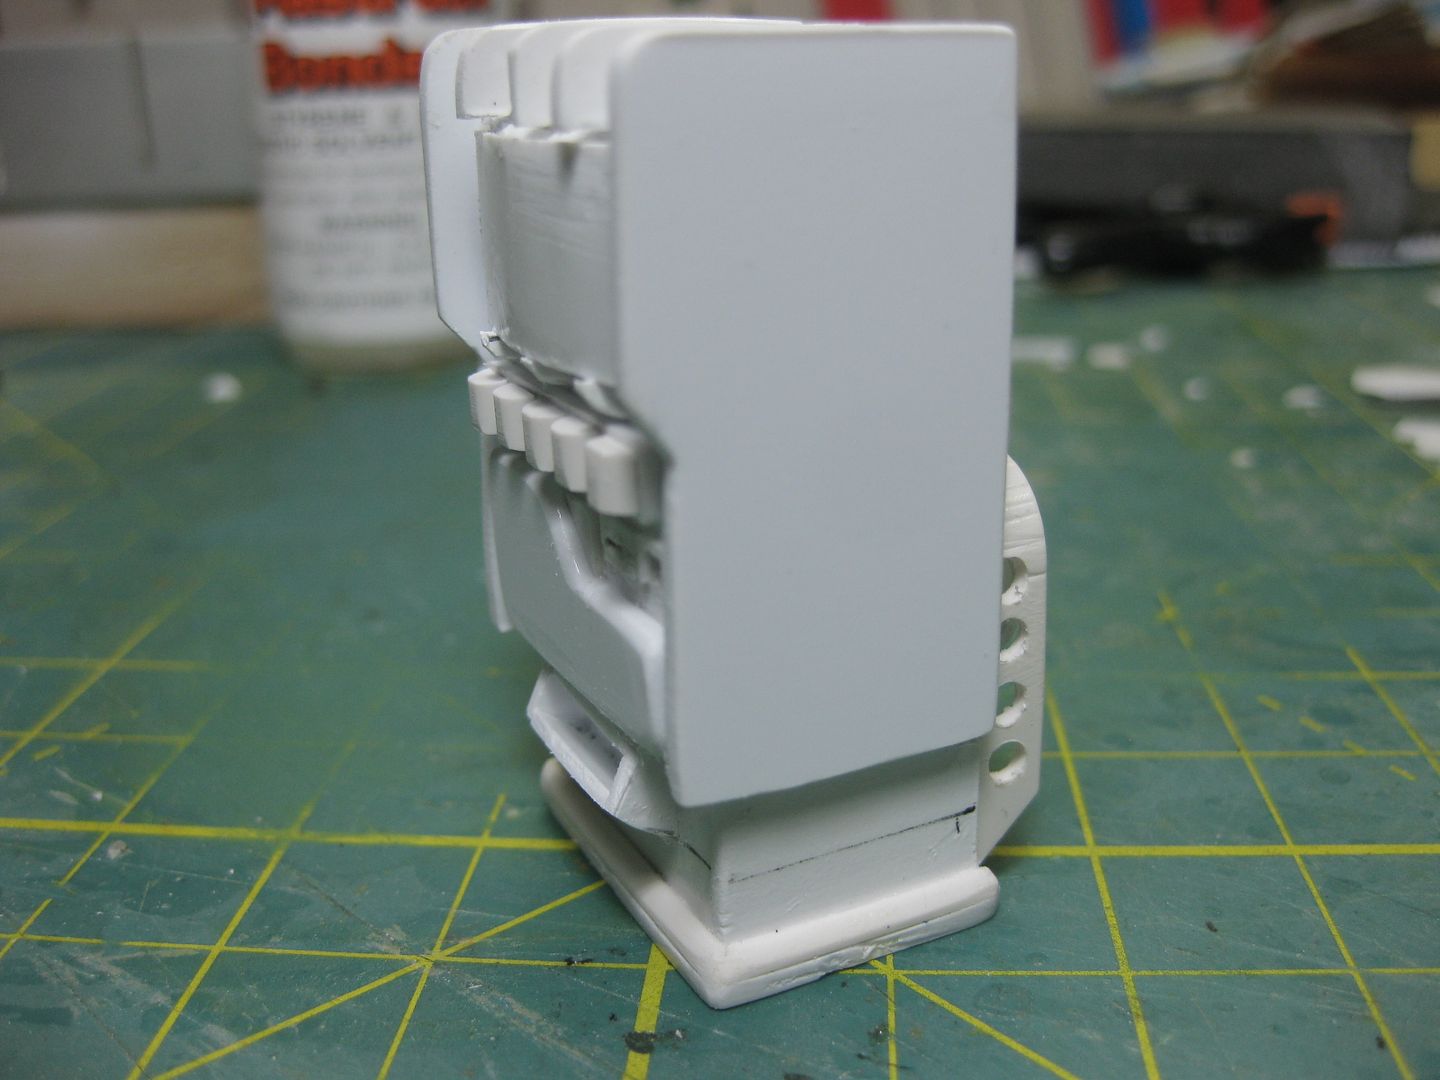
is it a fridge?
So there is a =][_,= terrain competition, how about a =][_,= painting competition!
Viktor von Domm wrote:atually a group painting thread would be something new... imagine we all paint one single identical item... each painter interprets the model after his own gusto... i think i really like the idea...
is it a fridge?
So there is a =][_,= terrain competition, how about a =][_,= painting competition!
Right, cause I got too much time on my hands as it is....... Titan painting for that comp, though. SHeese, how many members are there? I don;t think I could build that many titans.....
Make the most of your holiday dave! Guys on your side of the pond get what, like four days a year? hope youve got some fun stuff planned anyway.
The machines are looking incredible as ever - it's amazing to see you just lift something, form-perfect, straight out of the FO world like that. Can't wait to see the new one finished and cast up - will deffo be placing an order or three myself Remember those nostalgic days when you started this thread and had never even played fallout? Crazy
Looking forward to seeing your cookie creation too!
Automatically Appended Next Post: heh..That was January 25 of 2012!
mxwllmdr wrote:For starters, why that isn't a Nuka Cola Machine in your Avatar photo?
I guess Dakka inspires eh?
Automatically Appended Next Post: Here she is, Sunset Sarsaparilla, the West Coast competition for Nuka Cola!
For comparison, the same shot hosted at Dakka Gallery and ran through their Auto Fix feature:
It does something with the lighting, but I don't know what, it's not necessarily brighter or clearer is it?
and he is building some more...?! the sarsparillia machine i can´t say much about... looks clean and inscale and all... but as i never yet played the new vegas game... my expierience is not there...
and if you´re still able to read this... have fun... lots of fun mate on your vacation
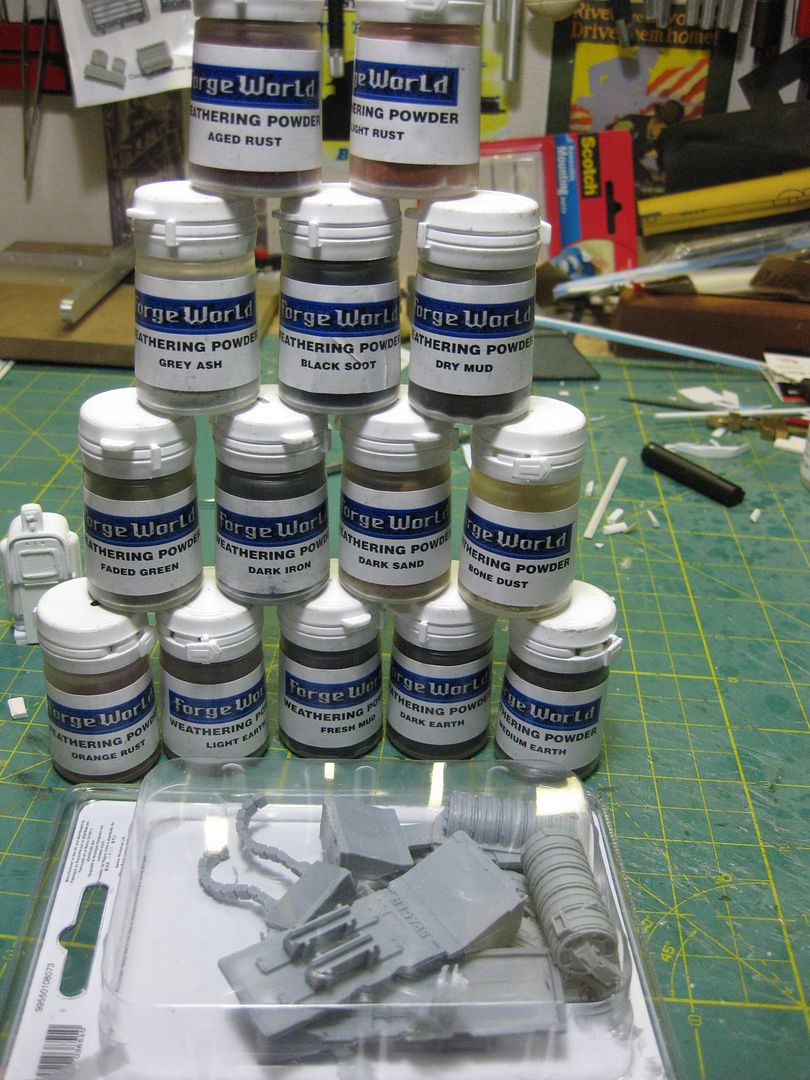
I just wanted more variety of colors of weathering powders, the MicroMark set is good, but only has two rusts, red and brown rust, mmmm...look at all that fresh rust!
Those are the underwing punisher gatling cannons for the Vulture!
Yep Monday will be mega-shipping post-office trip time, they will be on their way then
That sunset sarsaparilla machine is amazing! The others are awesome too, but the sunset machine is something else. I can't believe you've finished all three of them tonight - are you sure you're not a servitor? I'd deffo be in for at least 2 of each of them if you were selling
On a side note, anyone actually tried some sarsaparilla cola (or however its spelt)? I was really excited when I found some for sale in Tasmania, and it was the most disgusting thing I have ever consumed
EDIT: and re: their usefulness - as well as being awesome awesome game memorabilia items, they could add flavour to existing terrain pieces, or be incorporated into junk barricades - with the front and back detailing there's no need to have them propped up against a wall the whole time. They'd even be ace as objective markers, or with ingame purpose - health kits for necro, or a mission objective.
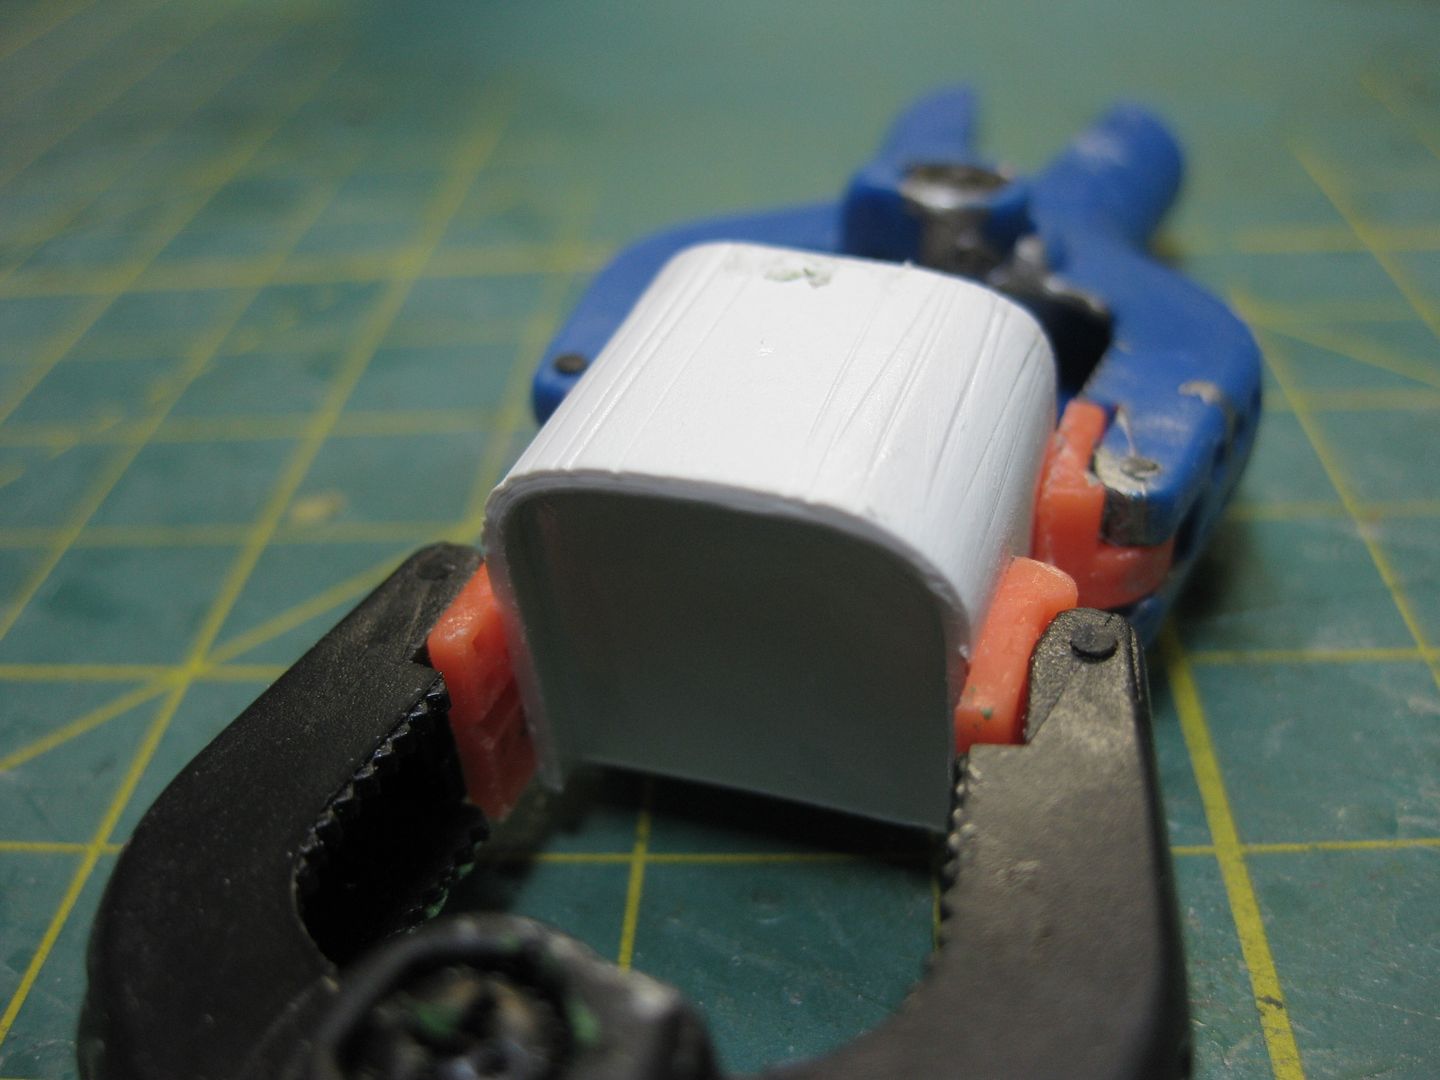
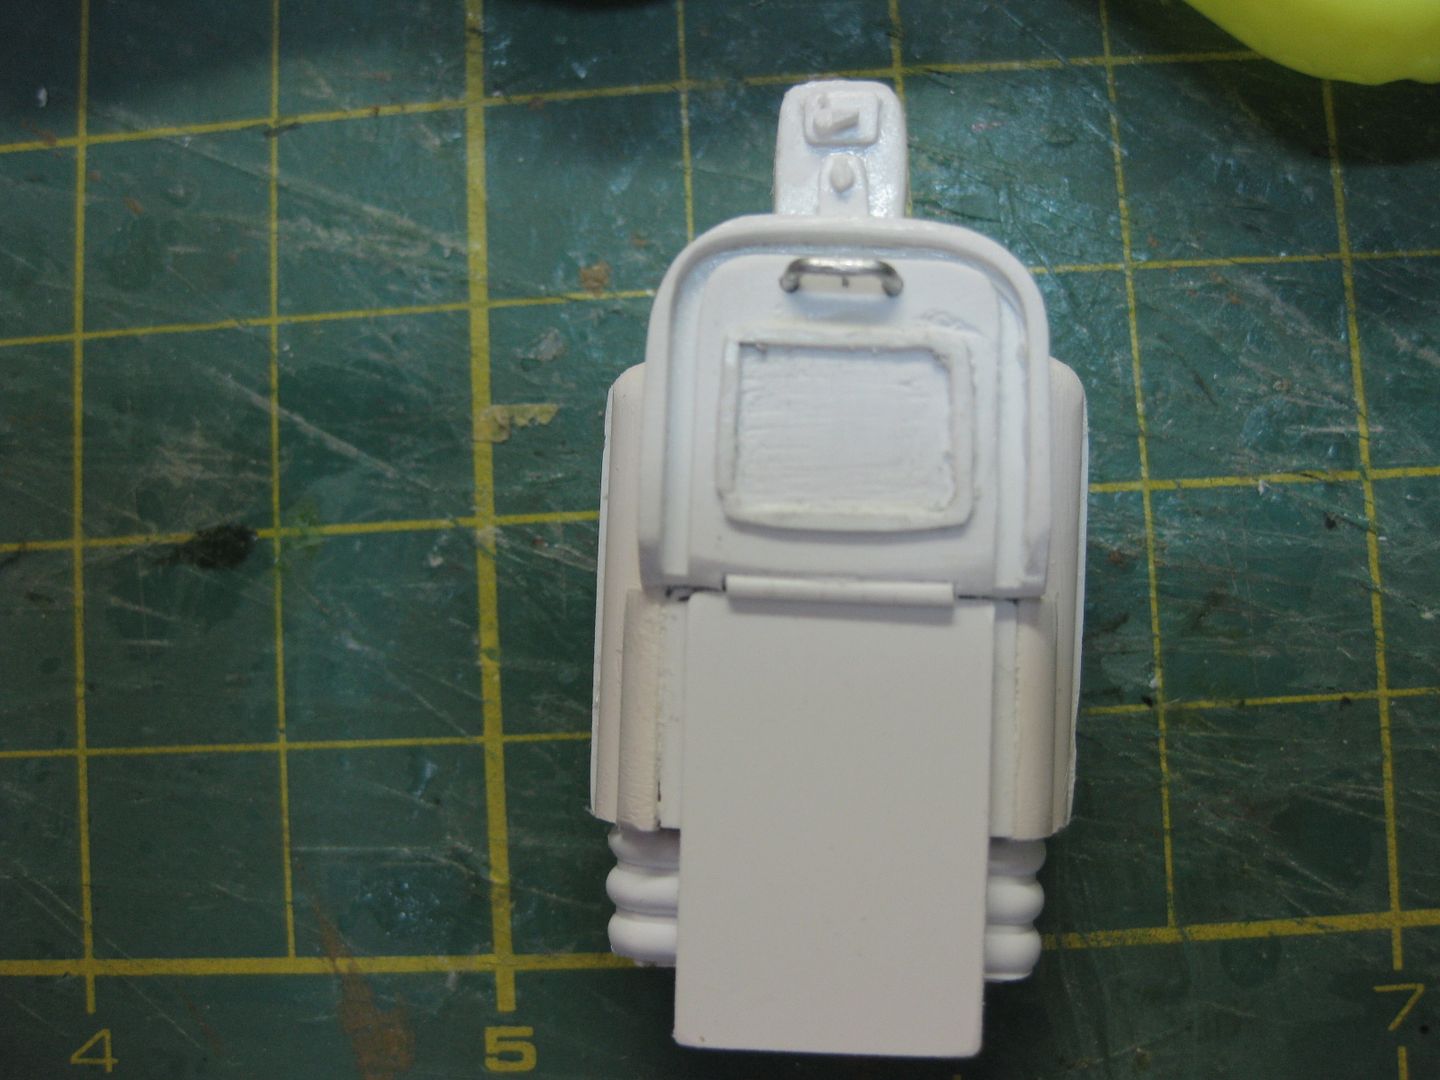
If possible please remove the newspaper machines pull handle... if it's already glued in, I'll kludge it to try and get it to mold/cast well but its a hell of an undercut on a VERY thin piece.
(it would cast fine a a stand alone bit though I think, especially injection molded via a syringe of resin.)


 maybe if we believe all together it will become reality


 now it's just a matter of getting it in place
 is there any techniques you have not used now Dave


 But the whole thing is just outstanding.


 Its like you want me to off myself
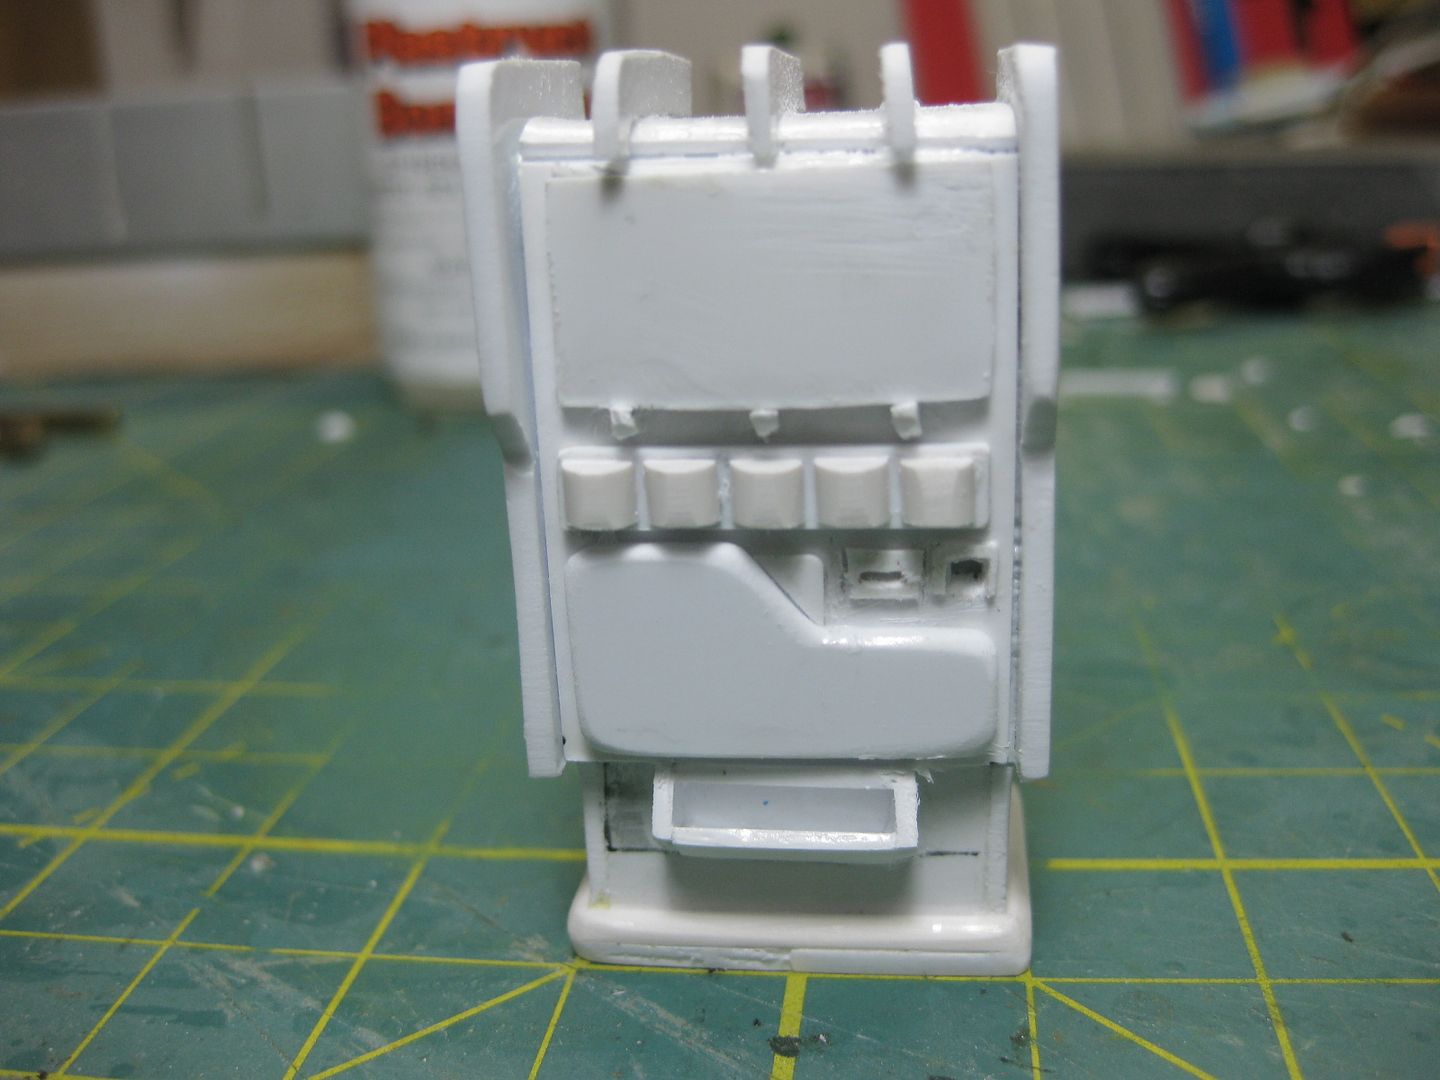

 )
)