dsteingass wrote:Yay! Everyone can always use more heads!
I have a bunch of great coats that will be getting a head swap as I used the original heads for some different kind of unit, but in the end, these will look cooler for me.
tweed jackets and leather elbows...arthurian knights and rams with tanks strapped onto them...boys it is so sweet that you guys have missed me^^
keeping me reading your stuff after i came back home today was so much fun.... i even told my wife you filled two pages by yourself without my own sillyness to help you^^ i am proud of ye!!!
ye asking were i´ve been? well one thing is certain as much as timetravel would be a real nice thing to be having^^
as for where exactly... ever imagined a noob making terrain pieces to look like rocks and mountains done with badly done drybrushing effects? if your into that then visit the elbesandstein gebirge near dresden....there you see sights like:
and
the great big maker of all there is used way too much paint when he did this drybrushing here^^
at shaso....funny that you showed that pic of the unicorn ram tank.... i had exactly that one in mind as i talked about the unicorn ram^^ found this whenever i did my weekly steampunksearch via google picsearch^^
and that tower tank by the way too^^ no one could ask for more dakka possibly^^
thanks dantay for the list.... will come in handy later!
at shaso... i thought i´d throw in that tschernobyl worm in for a laugh too^^, ever since you mentioned to me that your posting system in the states is a bit of a russian roulette style thing i was worried that you might never get it^^
i like the name comrede worm^^ !
chibi and monkey...thanks for the lecture of literature from the both of ye! i now have to search for a book for me of said story! i doubt anyone would think i would read anything flimsey when sporting this book in the bus^^
he shrike....DCM??? and a new avatar pic yet again??? that thingy looks like a bantam^^
at dstein... lol... did you post that when you saw me online??? omg i have a stalker^^ i am so proud^^
if i am able to get out some work tomorrow i will reward all your efforts here at this thread with some pics updates^^ but being a very special day tomorrow for my loved ones....(their dad gets yet another year older....) i might be running short on time hobbywise...but fear not...i will soonish present more work on the new tank...er old tank now...anyways^^
cheers mate and i am very glad to have you as such a loyal and loony followship of friends!!!
^^
that thing is an alot, my new favorite creature:
http://hyperboleandahalf.blogspot.com/2010/04/alot-is-better-than-you-at-everything.html important updates (me-wise, anway):
-I'm now a DCM.
-Have made an ork nob for waagh! Dakka (pics pending)
-have changed sig for a different quote and a waagh! Dakka link.
-Have added more fluff to the sons of corax.
lol... thanks for the helpful link...that helped me alot^^
so why is it stating that you are a dcm??? i too want me free DCM status....awww...crap...seems i was yet again well behind the doors when the free stuff was handed out...
if i had time for orks the waaaagh would have me too...but the emperials are way tooo challenging and demanding^^
there was another version of that quote i once read...:
doing a good job is like wearing black pants and wetting yourself...you get a warm feeling but no one is taking notice...
Viktor von Domm wrote:lol... thanks for the helpful link...that helped me alot^^
so why is it stating that you are a dcm??? i too want me free DCM status....awww...crap...seems i was yet again well behind the doors when the free stuff was handed out...
if i had time for orks the waaaagh would have me too...but the emperials are way tooo challenging and demanding^^
there was another version of that quote i once read...:
doing a good job is like wearing black pants and wetting yourself...you get a warm feeling but no one is taking notice...
^^
DCM status wasn't free ^^
that link is awesome- click any and all of the links on the right hand side for extra awesomeness.
that quote is pretty good, haven't heard that one before ^^
my ork's one of the goff rockers (the one with the top hat), with the mic and guitar swapped for two pistols.
^^ long time ago...well i guess you wouldn´t recognize many places...
it is good to be back.... the week was nice and we did have lots of fun with the kids.... but i too missed out on so much good stuff here...have been particulary exited to see your work and boy was i in for a treat!!!
Viktor von Domm wrote:^^ long time ago...well i guess you wouldn´t recognize many places...
it is good to be back.... the week was nice and we did have lots of fun with the kids.... but i too missed out on so much good stuff here...have been particulary exited to see your work and boy was i in for a treat!!!
Glad you liked it. just some more black squigglies, and then I can decal it. Now that you are back, I also anticipate more work on your Knight-tank.
(I google mapped Neu Ulm, my old barracks are all torn down.)
well as i recall many barracks got transformed now to elite apartmentbuildings and stuff or got torn down as you stated... you know life is like a stream.... you can never cross it twice...
lol... sounds like they have to purge that area with fire once your troops went away^^... but rest assured i have some first hand information how some russian baracks looked after they got left for good...horrible wouldn´t be fitting....would have been good for a bunch of splatter movies rather^^
Well, to be honest, I think it has to do with old materials used by the US as well as the chemicals likely spilled over the years in the motor-pool, and such, so best to let nature cleanse and heal the area herself before using it again, and it was a base section on the outskirts, some of the building were left standing for people to use. But the Barrack buildings and motor-pool as well as the command building are all flat earth now.
well if the army is working and living all on their own something like those incidents are bound to happen... soldiers are not known for their clean behavior with critical substances^^
i myself worked in the ABC defense section when serving.... well there are some ugly things in some peeps closets to say the least,...as i recall one way of dealing with nasty stuff was to simply burry it...and i am not telling stories here...
did the full second round today of the string methode.... was but not picture worth...at least for me^^
and on a side note... had my birthday today...we went to cinema with my son felix (aged 5) to watch a gemran movie from an old TV series called wicky (about a viking youngling...) and i got for present a popup book of some works from leonardo da vinci...well all i can say for now is that this will affect in some way my work^^...but the current plans will be completed first^^
so look tomorrow for picture updates from that direction^^
Crushy wrote:Hi guys! I just finished skimming over this awesome thread, figuring it was some 4 years old (for some reason) and I just noticed it wasn't dead yet.
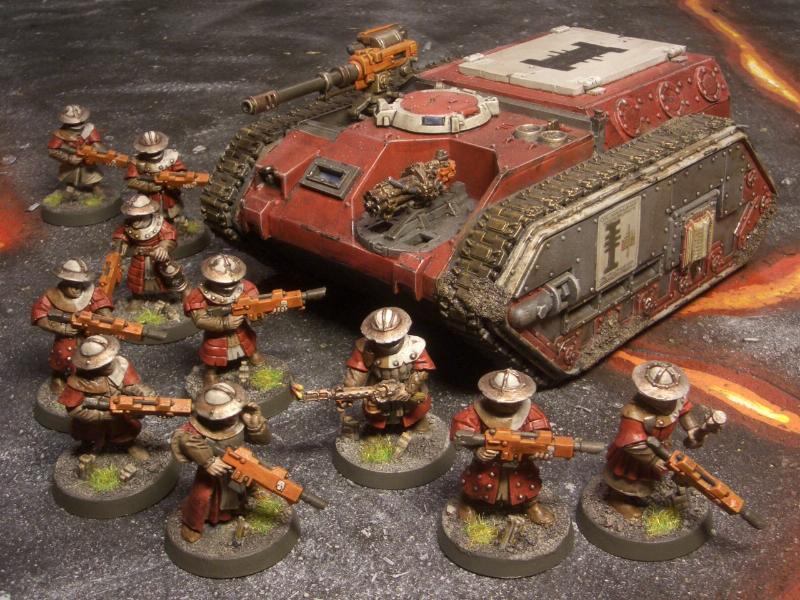
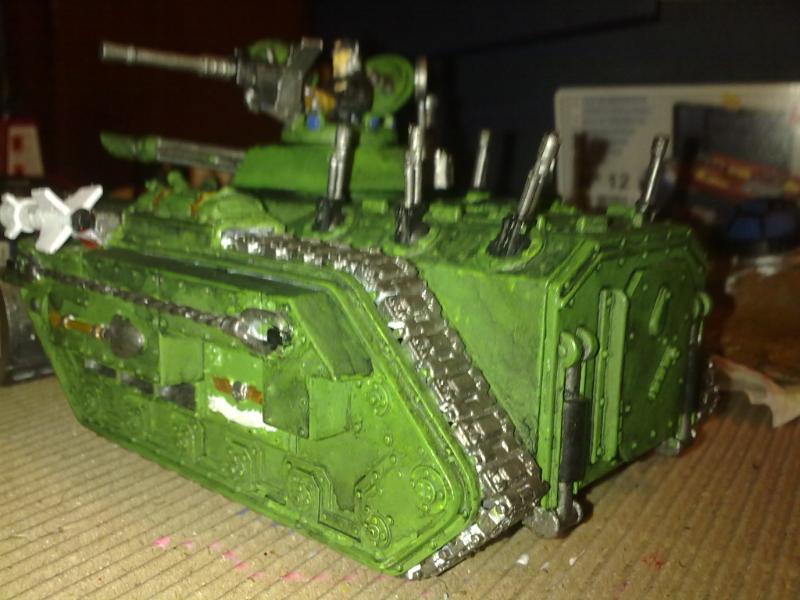
Just out of curiosity, has anyone tried to do steampunk/Preatorians by mixing fantasy and 40k? Like these guys:
or maybe these
I'm thinking of doing something similar and counting them like penal legionaries (fluff-wise, some inducted locals with random skills).
As my skills get better I hope to replace more and more of my army with steampunkish guard.
Many thanks for the awesome read, I hope I'm not overstaying my welcome and also wish you a happy birthday Mr. Vik.
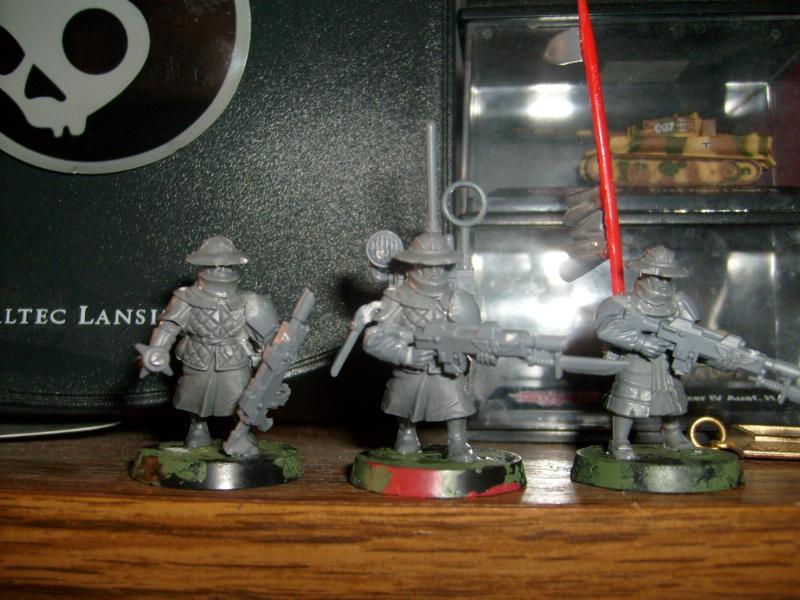
I think the easiest way to do Men at Arms with lasguns is to use Cadian arms and cut away from the Men at Arms torsos so that they fit flush on, with shoulder pads and everything.
I made mine (the painted ones in the top picture) by cutting away from the Cadian arms and fitting them to the Men at Arms half arms instead, but that is a lot more work and you have to make the other arm by your self as well.
speedfreek wrote:
I think the easiest way to do Men at Arms with lasguns is to use Cadian arms and cut away from the Men at Arms torsos so that they fit flush on, with shoulder pads and everything.
I made mine (the painted ones in the top picture) by cutting away from the Cadian arms and fitting them to the Men at Arms half arms instead, but that is a lot more work and you have to make the other arm by your self as well.
at Crushy ...yep those are great conversions and if you want to go that way and you are going to make your first models be sure to post them here too as i had wanted to try these style for my army for a long time too.... but i have so much stuff lying around that i have postponed that idea into oblivion^^ oh and thanks mate!
and speedfreak: be very proud of these models....i truly envy you!!!^^...by the way... that flamer guy... is he holding a FW cadian flamer or DKoK one??
at anvildud: Danke schön! and be sure to drop in more often!!! that is an order! and the aproriate answer would be: Jawoll! (meaning: sir, yes, sir!) ^^
at shrike... you are probably right...and even tho i still haven´t read it i will do so shortly....after clearing up my backlog here^^ and learning deutsch is easy...just think you are even more britisch than a stiff plank and then you are half way through to being a german.... and they eventually get to the language^^ after some 40 years^^
at neil...i have recently saved my holiday pic on my pc and the ones shown above are not my own...just webpics but mine too show the nice weather...ing as those^^
at monkey... thanks mate...another year older and deeper in debt...so to speak^^ and i hope that i can make some nice inlfuenced models with the book...also there is an architecture popup pic inside the book that gave me lots of ideas.... if we ever have to speculate about a true genius of mankind... my undivided vote is for da vinci...that man could do everything...
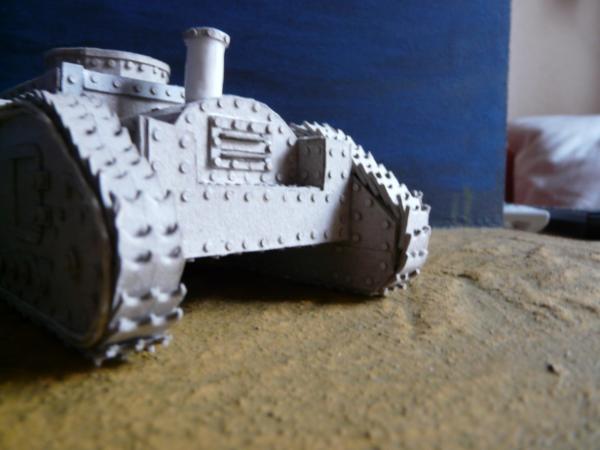
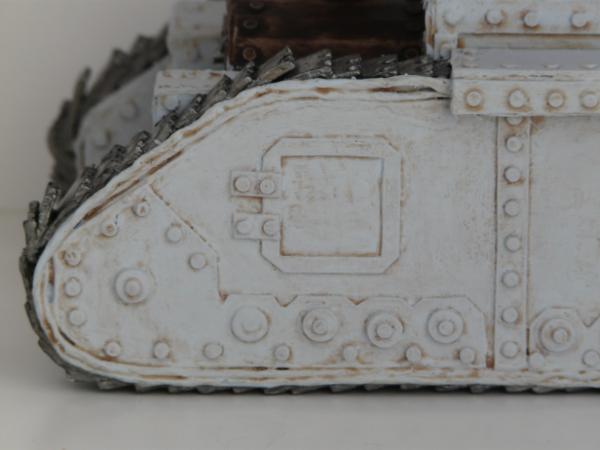
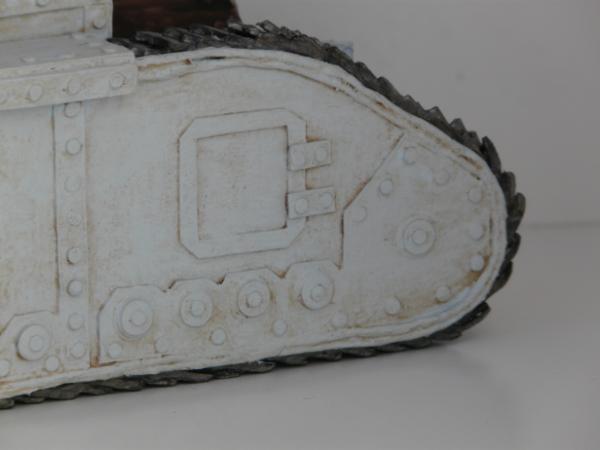
as for promises...well i have cut and punched up about 100 shoes for the treads today...and the regular followers might have read about my deep disdain against repetitive work...so you can possibly imagine how i felt after this...but it had to be done...now over 160 shoes are combined into two trackssystems and i have also implenented a trackcover to cover up the stringdecoration....only to realise that the second track still misses the stringdetail...argh....but i could pry free the part that needs to be free to tomorrow add the string there too...pheww^^^
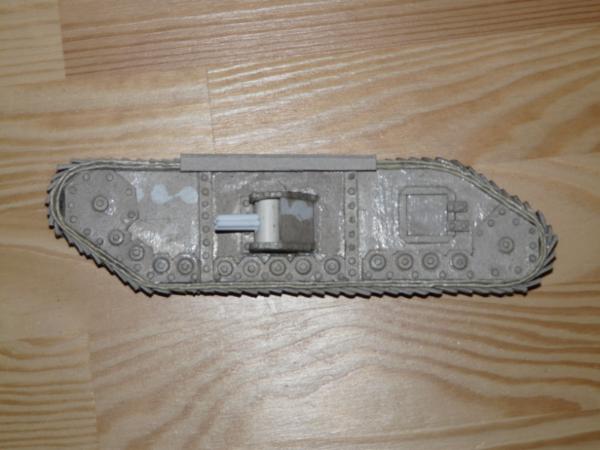
so here are now the pics of the firast complete tracksystem...when i say complete it means sans rivets as these will later on added too^^
by the way... can someone yet again tell me how tall a leman russ is sitting? i am forgetting this all too often....
the problem of the treads being too straight i solved by using lots of rubberbands to keep the pieces setting and thus also i shaped the from into a much more flowing apearance!!!
That's more like it! The russ has flattish tracks shoes, so it does have them all around and sits on them. to keep it all straight requires making sure both are lined up on the main hull just right so that when the glue dries, it is as straight as can be so no wobbling, but then again some kits come out a little wobbly.(no more than a 1-2mm wobble)
Automatically Appended Next Post: This image I found has men in the way, but you will see the track shoes under the tanks.
tomorrow i will show you my current dillema....if i will glue the tracks to the earlier planned place then the tank will have a suitablke height but will look goofy as there is too much room underneath currently...also the sponsons wouldn´t be realisticaly operated by men inside the tankbody... so i have tofix that somehow...
at sahso... i have to say i screw even the excalibur bulit up a bit... it is a tad wobbly... hopefully i will learn from that for the new tank...will do as you described it shaso! as you see i have opted for the complete round with shoes as it was thus easier to construct that way and i would have known how to do otherwise... those big shoes made it not possible for me to do the sunken in ground look...
also thanks for the quick comparission shot so that i can better determine how i will mount the tank...
at neil and dstein: thanks to both of ye, i was rather aiming for that agressive look to the tracks! the main point i had in my mind was what it would feel like when a tank with those treads would crawl towards you^^ i think for the next one i will try out some new looks for shoes for the treads tho^^ and my wife still wants to do me some macramme ones...^^
^^
Thought you'd like that, seeing as your favorite (IIRC) sketch was the picnic that went horribly wrong with all the ridiculous unnecessary violence ^^
lol... don´t get indegestion of this thread^^ it might cause sillyness in no short order^^ have fun and ask straight away if something particular takes your fancy^^
shaso: lol... i am currently thinking like crazy about a new tank^^ and from what i saw on your thread you are too^^
Automatically Appended Next Post: lol chibi... you are forgiven^^ and thanks^^
What you could do, Vik, is make a base for it. I know, that's near Heresy for tanks, but as long as you don't make the base too large (maybe only a millimetre or so out from the treads?) it shouldn't effect gameplay too much. You could make it from modelling putty or air-dry clay, and simply press the tracks into the 'muck'. Could let you get some really actiony poses out of it, too.
Viktor von Domm wrote:and speedfreak: be very proud of these models....i truly envy you!!!^^...by the way... that flamer guy... is he holding a FW cadian flamer or DKoK one??
at speedfreek:
*wide grin* wicked thats very nice of you^^
and you chopped up that pricey mini for your footslogers.... argh... but still it looks awsome^^...
at anvildude:
a base i have thought about for quite some time...a suitable piece of wood and then as you said some air dry clay and this could look quite nice...hmmm...
at crush:
well i klicked too and in the thread the pic is not showing...dunno why...
sanding the treads after all that hard work sounds like heresy....or rather would be a pain in my side...hmmm... do you all recon it is too raised currently?
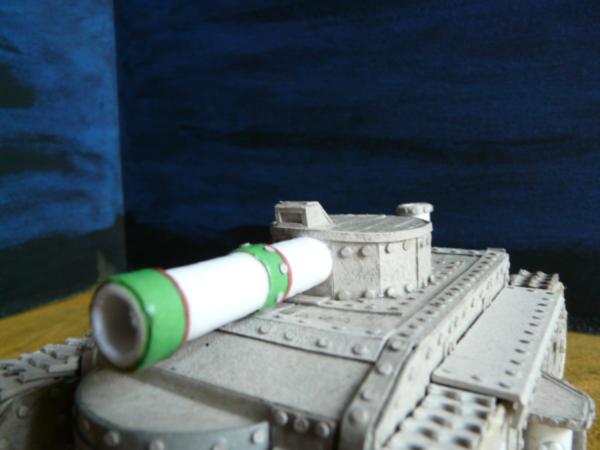
ok i will make a mockup pic to show you my current status with the tank...the second string is aplied already and i added some barrel details to the main gun...
at shaso... will make the pic and you tank veteran can tell me what to do next as i am a bit hazy on the next step....
Viktor von Domm wrote:ok i will make a mockup pic to show you my current status with the tank...the second string is aplied already and i added some barrel details to the main gun...
at shaso... will make the pic and you tank veteran can tell me what to do next as i am a bit hazy on the next step....
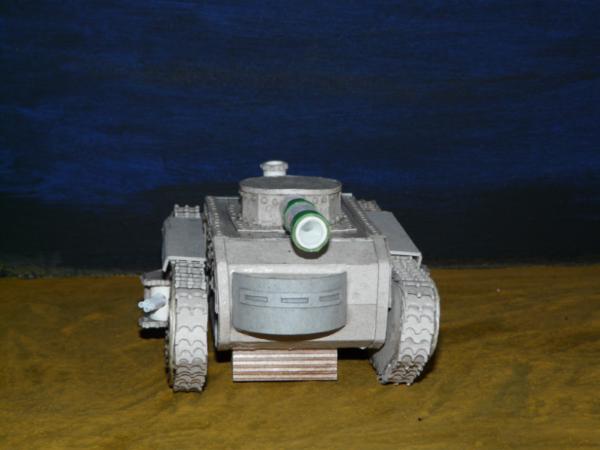
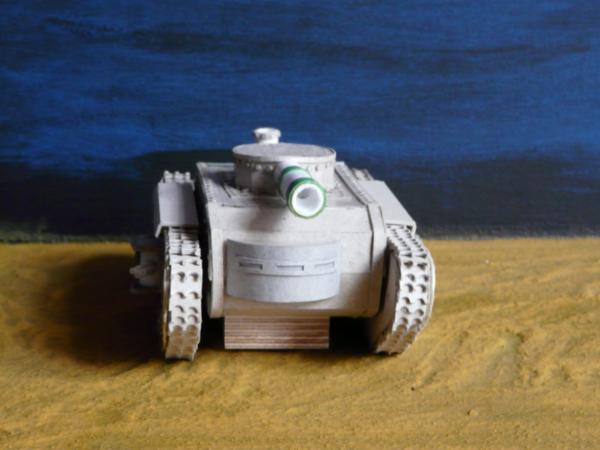
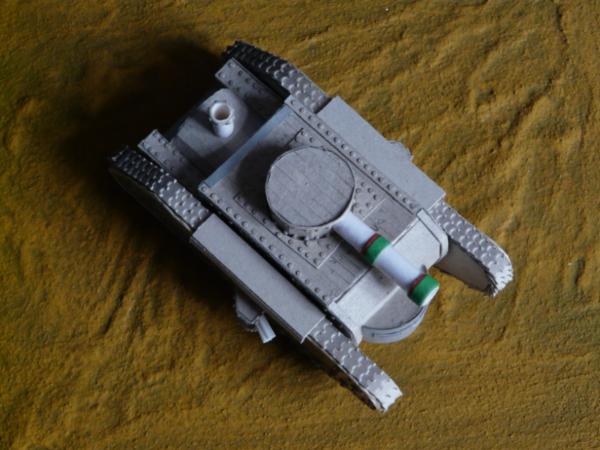
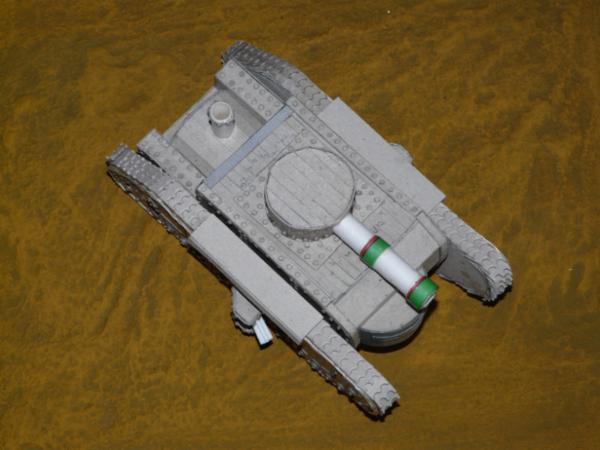
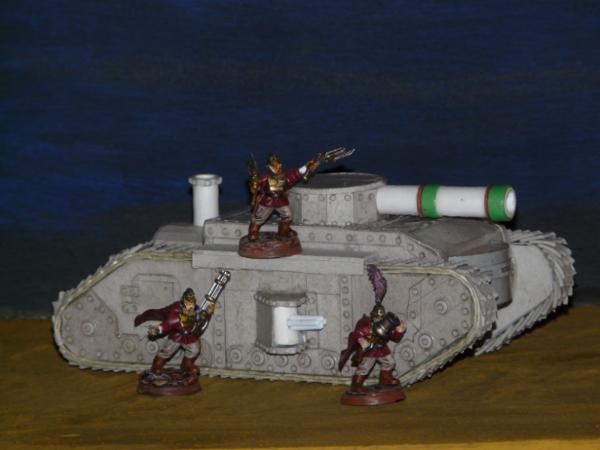
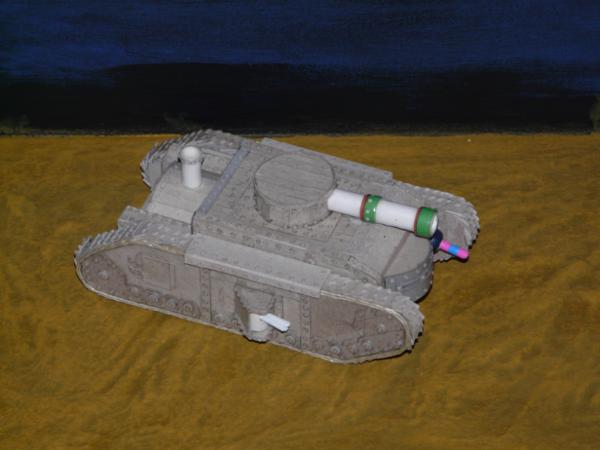
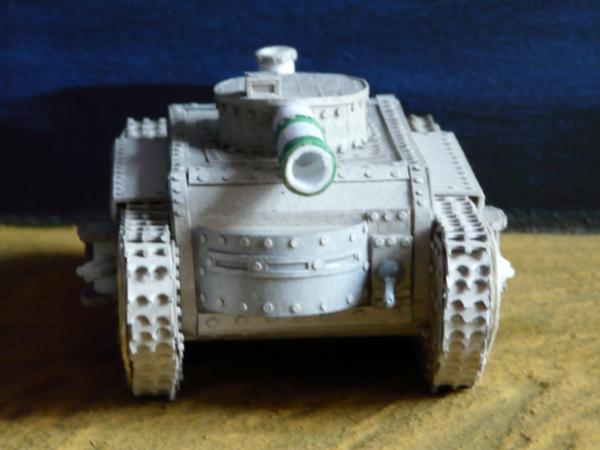
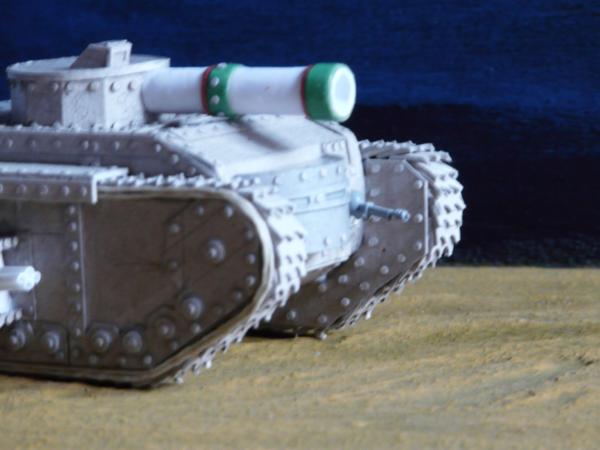
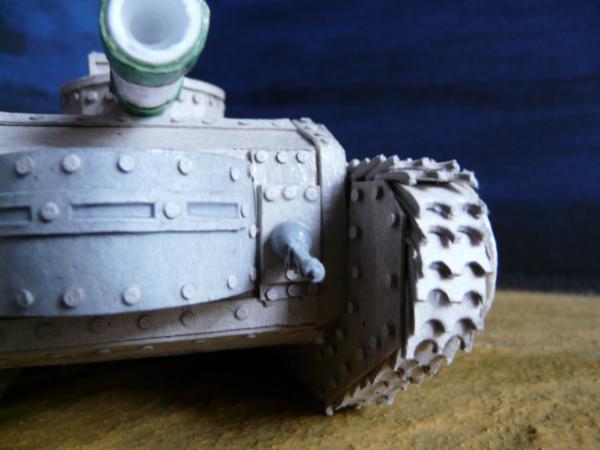
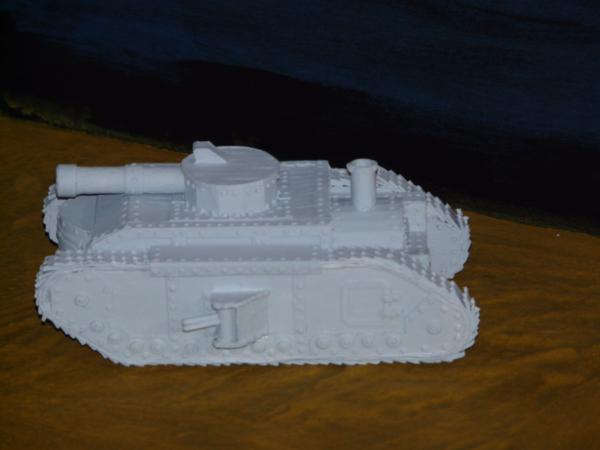
ok peeps, here are some pics of the still not glued together tankpieces...the height issue is still buging me and i need your ideas here... note that i took some more pics as might be needed ...some are with flash some not...
note the spacer wooden block is about 1.5 cm high...
do you recon this is a sound arangement of the pieces?
if needed i will make some referrence pics with some minis for heigt comparrision...
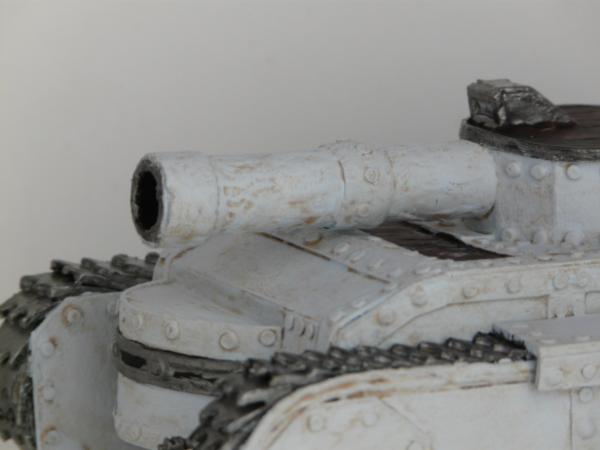
I think it looks fabulous Vik! Nothing wrong with the height at all! It looks like it would fit right in driving over trenches as an infantry support tank! Maybe add some sort of periscope or sight on the top so the gunner can aim that cannon?
It definitely looks more sneaky than it's larger cousin ^^
I like the frontal "bunker" look it has, too. You really have the metaphorical tap on right now, don't you?
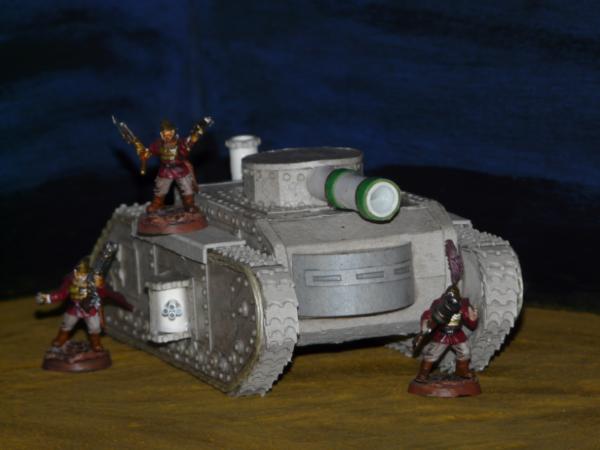
well mates thank you all for the nice comments... my main concern is the sponson and mainbody connection...i therefore have to anounce a change of the mainbody... no severe cutting involved but instead a enlargement of said piece...namly in the lower sections...i have to build up the space there...so tomorrow i will show you what i have changed...it was needed in my opinion to make the look more "working"...really i had to^^
if all works well and the first side is set in good condition i show you my endeavors^^
And that rounded driver section should take advantage of that shape so having it able to see past the front of the treads may help with how far forward it should be glued, but also keep in mid whether it would tip the whole thing forwards or not as well.
Looking nice now, and yeah as suggested, some scopes for the gunnery crews.
will see if scopes are possible... do you have a style already in mind?
as for the arangement of pieces...all will nearly stay as is, just be more substance to the lower section and thus raising the turret to a higher ground...
monkeytroll wrote:Add some to the bottom, ok, I can see that if you're concerned with sponson access, but why's the turret going to raise.
That's a great height for it as is, the low profile marks it out.
I agree, the hull sits high enough as is, and the illusion is the low silhouette of the turret, place a IG mini next to it and you will see.
Automatically Appended Next Post: Yeah, just vision ports will work, a rectangular cut out and have the thing next to the cannon, slightly higher than the cannon.
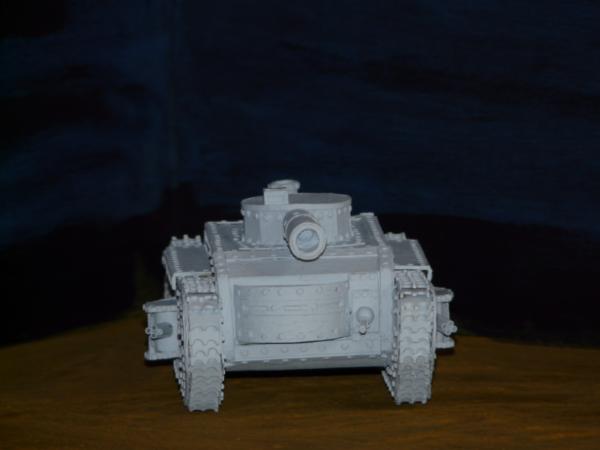
Hmm, I much prefered the sleeker version. With the forward observation bubble up high it feels more like a lumbering behemoth, more akin to a landship, not the sneaky, speedy thing it seemed before. The tracks look a little small for the overall size now too. I think this look would be far better suited to a super-heavy, but that's just my opinion
I was correct, the earlier pics were more spot on that is now taller than a Leman Russ, Hmmm... I knew it gave the illusion of a sleek speedy tank earlier, I meant getting the observation bubble driver section more forwards for a view. That is HIGH! I mean you likely could do that, it would be "comfy" but oh such a target for a main battle tank!
Two and a half guardsmen in height! Definitely agree with monkey, time to lower it.
well done it imediatly after monkeys comment and ripped the new sections apart...will fix the look and i think then its finally time to mount the tank for good...
sorry dstein^^
then some details and i think the tank will go into paintservice^^
Hey Viktor the finishe tank is brilliant ,really well polished work you have done there, i have to agree with monkey however that the sleeker version worked better for me , just looked so fast and dangerous , where as this version looks very similar to your other one. either way though its still fantastic work , congrats matey on turning junk in into art again.
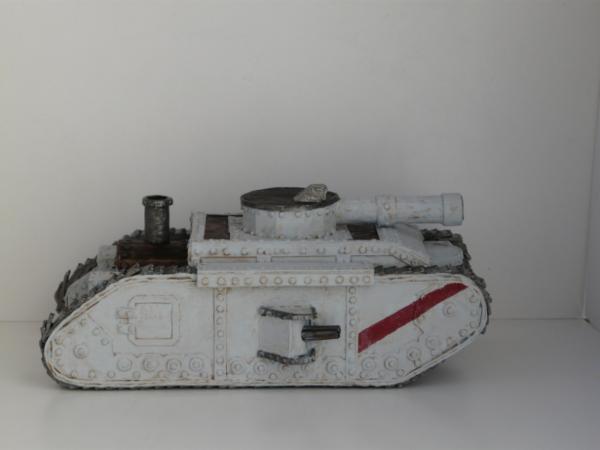
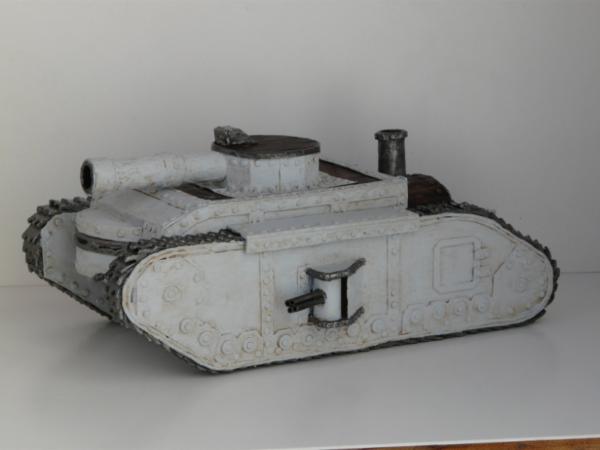
this is the final setup... it is now all glued in place...i have to add the odd rivet and some touchups armorwise and then the tank is heading straight to paintstation^^ hope i get the work done to get starting painting till weekend...cross fingers for me^^
One more thing to add, you should at leasy have another Vickers in the bow alongside the drivers "Bubble"
Automatically Appended Next Post: Like this or so.
Automatically Appended Next Post: Pf course the Lancelot has a bigger driver section, so a small port for that Vickers for yours would fit, and be more WW-I
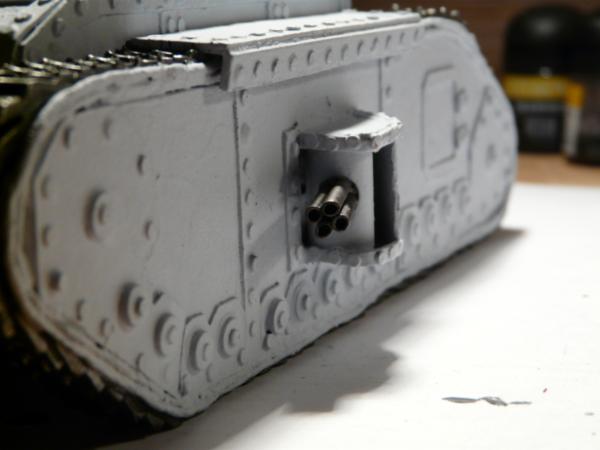
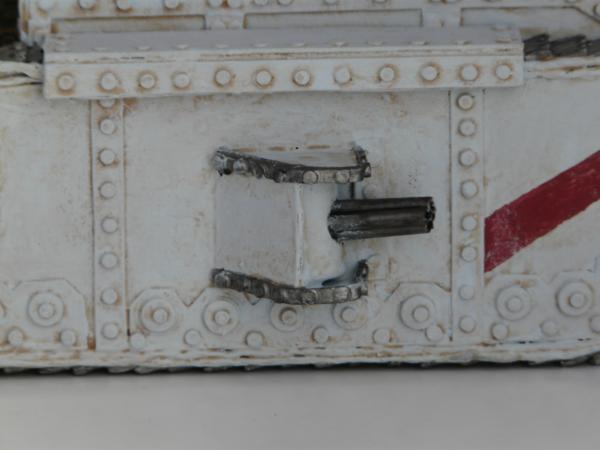
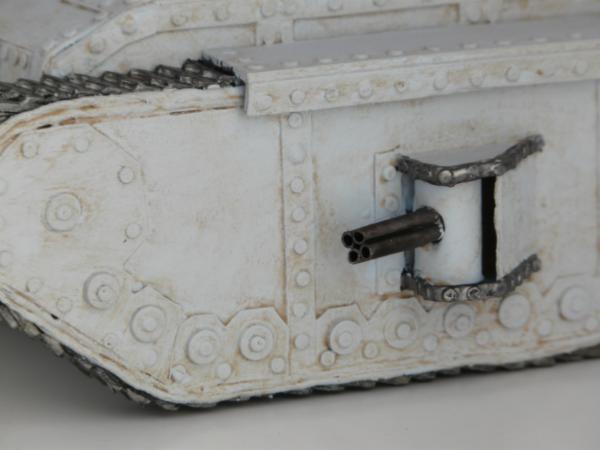
yeah that is one thing i wanted to do too...place is a tad crwoded but i think the new gun is needed... have to figure out how to mount that one tho...need to make a plan for the patern...probably a four barrel one too?
also i think i have to make a small ring around the vickers guns in the sponsons...they look currently too bland for my liking...
at shrike: salute, sir yes sir! will keep this up^^
at Arakasi: well no lurking allowed in here...an occasional "sweet" or "awsome" is fully sufficient^^
at bebopdrums2424: honored to have you with us here...well i hope that i don´t ruin it with my usual pain-tjob^^
at dsteingass: well mate i like the sound of a lowrider tank^^ but i think this cool naming wont be later seen on the painted thing^^
at shaso: caught^^
well mates... today was yet again some rivetmania needed^^
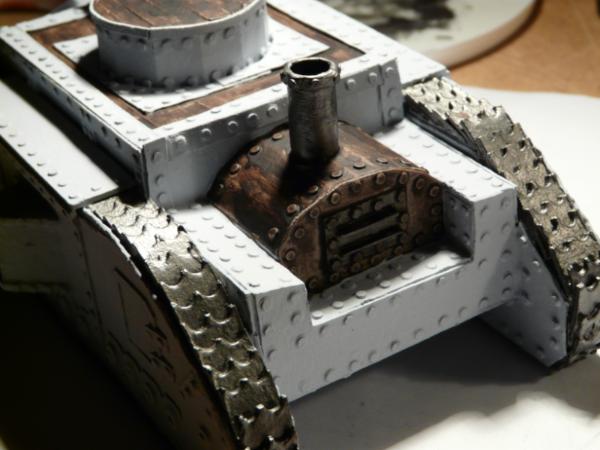
also i came to terms with the needed weapon on the fron beside the viewpoint... after some experiments with some plasic bitz and wooden pearls and stuff i came up with a lasgun barrel on a ball sponson...
and i riveted up the tank on some earlier neglected spots...tomorrow the tank hopefully will see the last in riveting and then i think i will prime it...oh almost forgott i have to make the peiscope thingys^^ and then it is primetime^^
no seriously... when i hold that tank in my hand i sometimes think i have gone a bit overboard with the rivets... but then i thought... hey with rivets you can never go too far...er...it´s like the modelers equivalent of a can of pringles...
Viktor von Domm wrote:no seriously... when i hold that tank in my hand i sometimes think i have gone a bit overboard with the rivets... but then i thought... hey with rivets you can never go too far...er...it´s like the modelers equivalent of a can of pringles...
I wanted to suggest doing something to make the turret less industrial and more steampunk but then I noticed the pattern. Are you going to paint the top as if they were wooden planks?
at crushy:
totaly wood! at least there^^ brass, wood and copper are for me the hallmarks of steampunk... and of course lots and lots of rivets^^
at shaso:
for now it looks just glued on but i will aply pva to make it like you suggested... was part of the plan anyway...it was just that i shoed you the first glued on pics...and after i posted it it fell of anyway^^ thats pva for you^^
hmm... arghh....damn thats what i get from going to sleep when america wakes up....i loose on set pva...argh^^hmmm will have to look if i could do that still... the thing is i HAD a smaller one before deciding towards the bigger one...dang^^
Viktor von Domm wrote:hmm... arghh....damn thats what i get from going to sleep when america wakes up....i loose on set pva...argh^^hmmm will have to look if i could do that still... the thing is i HAD a smaller one before deciding towards the bigger one...dang^^
I know it will still work, if you have to, just replace a torn spot with a covering plate, (More rivets time) and do it over again. With my plastic cement, the whole section has to be removed and supports added to do what you speak of!
ok if you put your feet down on that point i will do what you suggest...also i think the idea of making a new plate and thus the oportunitiy to make it rella sunken in is worth a second attempt...and well rivets.. what else is there to be said^^
Viktor von Domm wrote:ok if you put your feet down on that point i will do what you suggest...also i think the idea of making a new plate and thus the oportunitiy to make it rella sunken in is worth a second attempt...and well rivets.. what else is there to be said^^
I knew the chance for even more rivets would grab ya!
yep as is intended... maybe he is a drop tank and is even taking revenge out on the ground itself^^ before you reap what you sow you have to plough tho^^
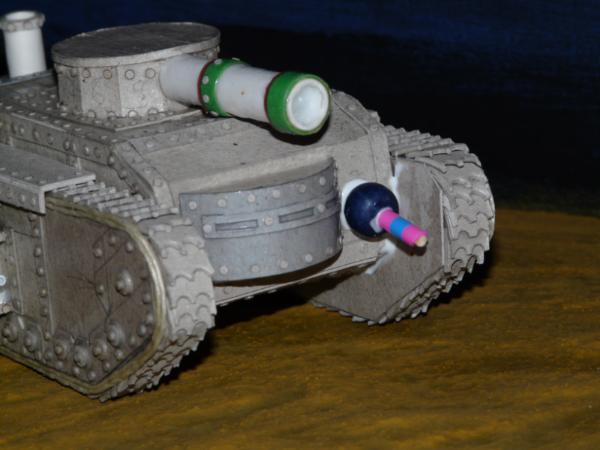
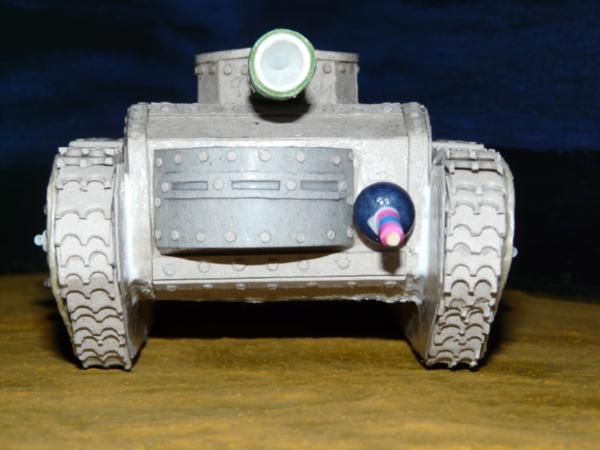
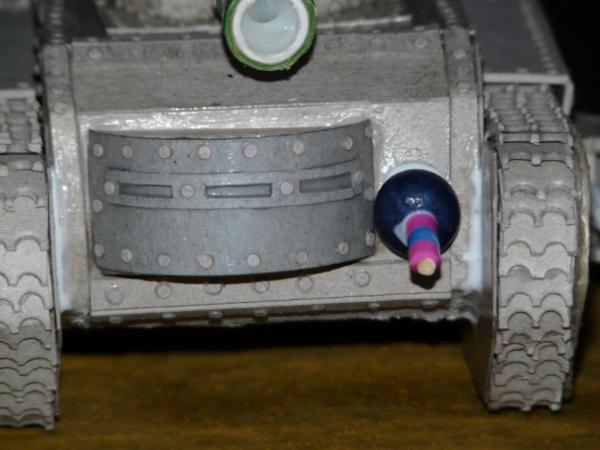
so while the glue is yet setting agian i can say i have reworked the sponson in the front idea... i used a chimera lasgun... the one with the ball... and this will serve now as the fron weapon...
also did a viewthingy up top on the turret... that issue now solved i think i can look forward to one final rivet making/aplication session in the night... *waves* pics later this night!
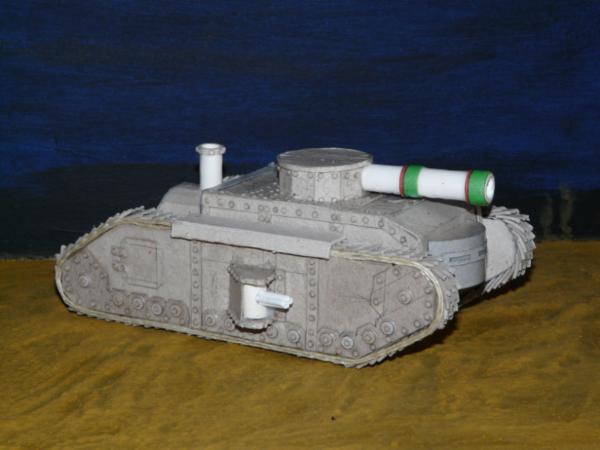
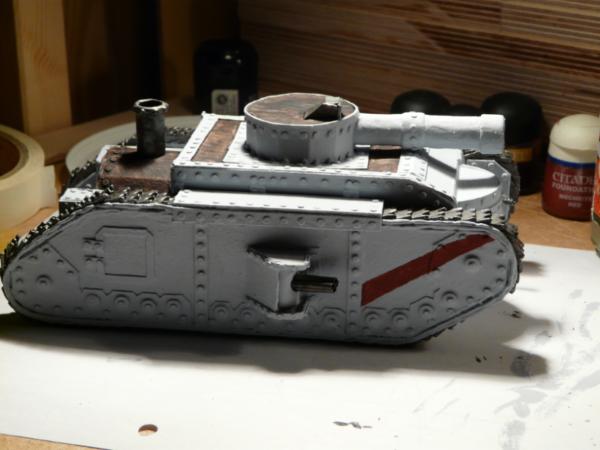
so ladies and gentlemen...early this morning o aplied the last rivets and a plate to the tank and i think he is now heading straight for prime ville to seal his doom...^^lol
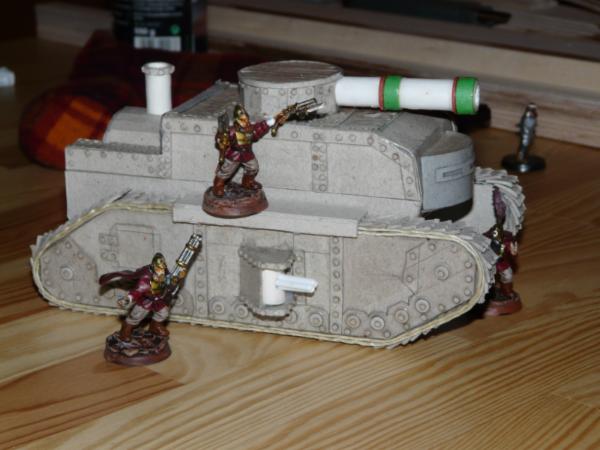
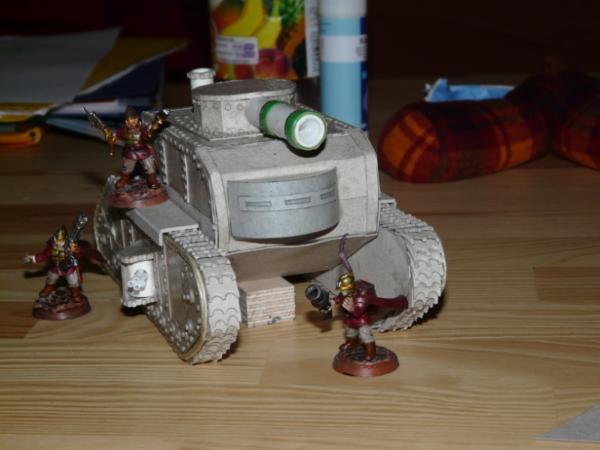
so behold fair gents and even fairer ladies the last pics of an unpainted tank:
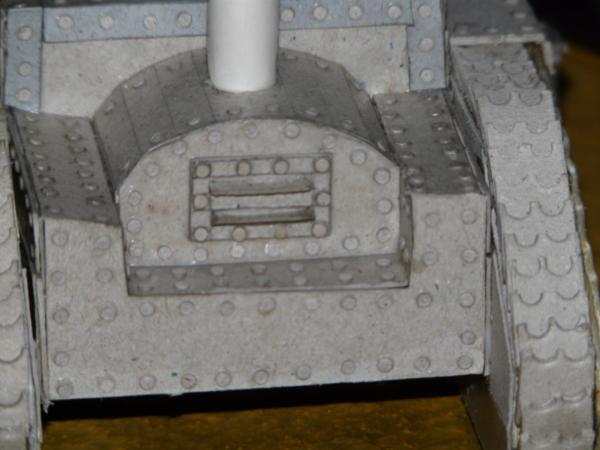
added viewpoint and front weapon and inside of the track now completed with rivets for support...
do you recon i should sprayprime this tank or do him like the excalibur one with cheaper wallpaint first and then go into full gear... i am a bit afraid of warping due to too much moisture from spray paint...
Looking hot Vik! I would take a scrap of the same cardboard and spray it to see if it warps, otherwise a nice basic prime will work like it dd on Excalibur, but if spray is good, it will be faster.
i guess i want to start with the painting and i will go for the paint rather than the spray...as for the scheme i am still totally game for anything or to put it in another way... i have no clue^^
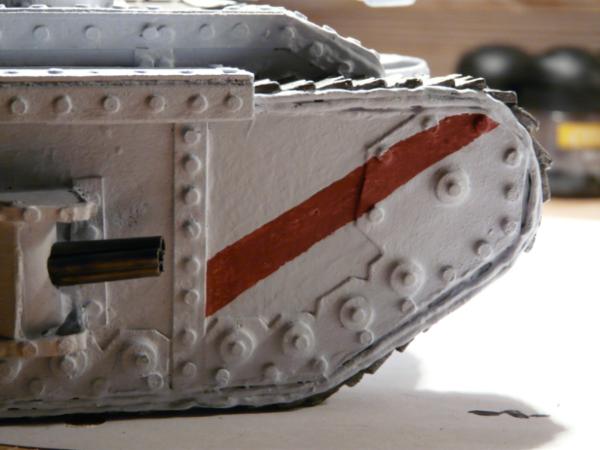
You can make it any color scheme you like, if not the red and brass of the Excalibur as it is special, then either a mono tone, or British early wars camo styles!
well then you are in for a treat, cuase i gone all grey firstly with a brushed on primer color... well actually it is just a paint called dolphin grey i got waaaay cheap from a sell out in a store, gotta have your eyes poped open at all times for hobby related bargains^^
well the tank now is all grey... literally, later on colors as blck will be added for undercoatings for metals and such like....i have a slight thought that this will be a quick one...done in a week... and as i am mostly slow i think this might be a fast one...oh and thanks shaso... while priming the tank i realized how much i like apinting tanks... somehow it is a thing i haven´t thought about and now i see myself fully addicted...argh....you are to be held responsible for that... you and your addictive thread about them oddball tanks...gotta spread my misery^^
Viktor von Domm wrote:lol... yep it does look in the pics a bit like canvas^^
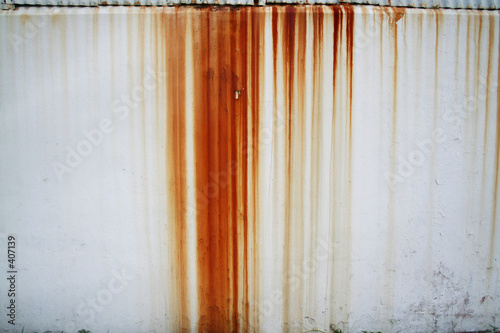
now i have to find out how to do rusty streaks...i saw that on some fairer tanks and i have to say i like those streaks...
like this...
Oil paints.
You could also try using extender and "smearing" the paint with a colour shaper.
If you let very wet paint just drip down the sides it will dry with a darker line to the outside of each "drip" instead of transitioning to a lighter rust colour.
ok... oilpaints... er how to use them and what beeds to be kown further about them? never worked with them before...
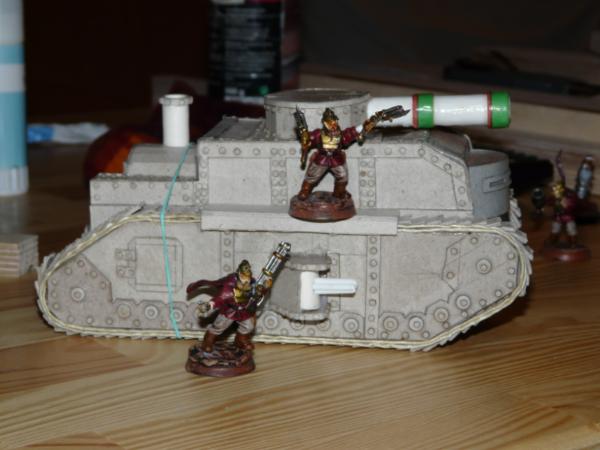
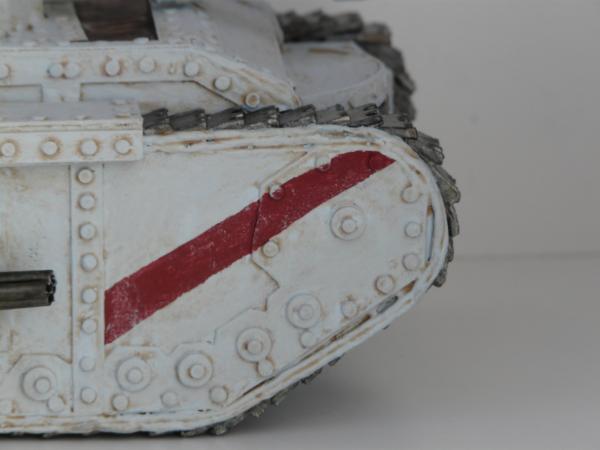
ok that aside some serious paint hit the model...it is in fact quite recognizable from the first pics anymore...
still very WIP but there is a general direction to be seen here...:
and some detailshots as well:
well what do you think? also a question to you: i am currently at a loss to where to add brass... somehow i feel that brass would ruin the scheme...your thoughts?
hmmm this could actually work...sponsons are a special place so i would not overly break up the scheme by doing this... as for the wood...thanks neil, one layer further and i think it is done..^^
The rims of the turret, cockpit bubble and sponsons would be the obvious place to add a bit of brazen hussy...err..detail, brazen detail. Brass is what I meant
But how about having the plates of the turret as brass? It could be a 'brass-clad'
hmmm the first points you mentioned seem a good idea... i am a bit unsure of the plates... tho i have to say there would be the ideal match as the wood would make a good contrast...hmmm...
Certainly ain't no lemon!
Looking really well Vik!
As for staining the way I do it is to apply some thinned acrylic medium to the tank where you want the stains and apply some paint thinned with the medium and a bit of water
Paint some streaks building it up
Wet on wet will bleed the paint and if you control it should give some good stain effects.
The initial medium and wash also need to be just the right thickness to stop the wash just running down the side
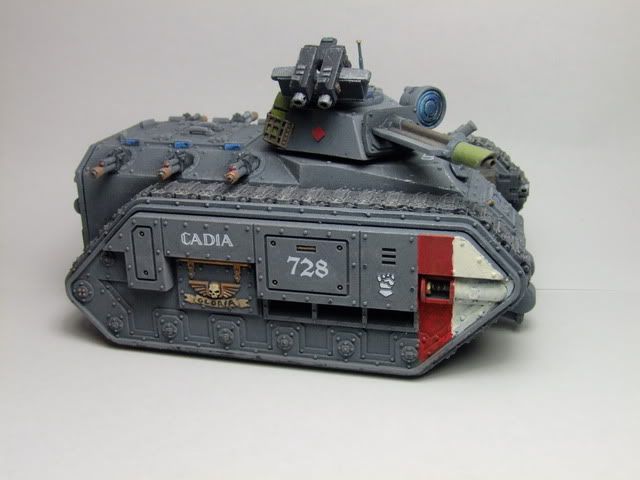
and yes these new kind of tanks more resemble a leman russ take to my army...the excalibur pattern tank is a super heavy and won´t be something that is seen in large numbers on the battlefield...
chibi i really think you are giving me good tips... but it is quite hard for me to yet again understand what i should do... what do you mean by acrylic medium? some substance i have yet to buy or using any paint i want? and how to aply that then?
dstein^^ yep viktor russ...how come no one before came up with that... i mean i know the primarch is called leman russ but the leman is a lame name in my opinion...
at troy...glad i could be of service^^ you can always highjack my thread for short showoffs^^
at rouge wolves...thanks, and would you care to tell what you didn´t like about the first one?
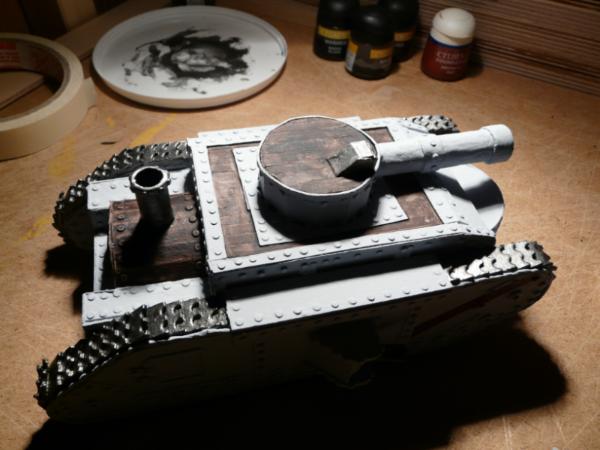
well later on i will show you my current progress...i gave the whole tank a very watered down wash of gryphon sepia and he looks now stained all over... a thing i will fix later on with a drybrush action of the prime color... also the rims on the turret and the sponson and the viewslits on the fron are all undercoated black now to be later on getting a brass treatment.
Hmmm... brass? If you are going for black/ dark grey, then I would maybe go with a boltgun metal with mithril highlight. Make it look more industrial than regal, like the red tank. Also a bit more of a masculine look compared to the other.
Also dark tank with dark metal and dark wood, on that low profile, would look really menacing.
If you go with brass then a verdigis would maybe look better than rust. Steel would look better with rust in my humble opinion
Acrylic medium- it's just acrylic paint without the pigment. You can get it in the art stores or here at least we have some cheap craft paints like Apple Barrel brand who sell acrylic medium with the craft paints. I use craft paints for terrain, you can get giant bottles(8 oz/236 ml) of commonly used colors (with lesser quality pigments than GW acrylics) that pretty much match bestial brown or codex gray for a couple dollars.
i see your point... also brass was a bit off the scale for that tank as well...as this is somehow a cheap and not so honored tank like the big red one...so i only thought about adding brass to tie it into the steampunk theme more...well as for a totally dark tank... the main color is this dolphin grey you see above... so the main apereance of the tank is rather bright... but the wood is quite dark...so...yeah... we stand where we left off^^
Automatically Appended Next Post: at dstein...
Acrylic medium- it's just acrylic paint without the pigment. You can get it in the art stores or here at least we have some cheap craft paints like Apple Barrel brand who sell acrylic medium with the craft paints. I use craft paints for terrain, you can get giant bottles(8 oz/236 ml) of commonly used colors (with lesser quality pigments than GW acrylics) that pretty much match bestial brown or codex gray for a couple dollars.
do you speak here of clear paint... so like transparent or just cheap acylic paint of no special color at all...of that i have quite enough...(the later)
ok from what i read the medium is a sort of substance that gives the color some better working conditions like dilluting the color but not weaken it... ok... and by adding poweders to a medium you then can aply them otherwise they wouldn´t be usable at all? ok...but i guess i will have to try out acrylic mediums in a future project... as shaso so precisly pointed out i am on a tight budget and from what i have seen the stuff costs more than i am currently willing to spend...
i did the heavy drybrushing today and i have to say it looks now like a very slight rusting effect to the grey plates...something i like... also i did not go the brassen way but instead used boltgun metal on the afore mentioned blackened points... thus keeping the warmth still out of the model...
i didn´t took any pics, will try that tomorrow in daylight to get you the best picture effect daylight only provides^^ you deserve only the best^^
very tempting mate... i have come to be quite interrested in inks and washes of late and think therein lies a new paining oportunity...i have some old washes from GW and i hold like mad to them ... my flesh wash i often use and i fear the day it is empty ...so if you could part^^ i´d be honored^^ also the name youst sounds very good.... i bet i could create a nice wooden effect with that....
hmmm i have recently bought me the blue wash from GW and not tried out that one... is the ink darker by chance? i want to start some day in the not too distant future the policeforce for my oldest son felix.... the felix fredom force^^... a arbites force based on some viod and infinity models i guess...and blue will be the main uniform color...so blue would help here...
if you are interrested in some older mint and sealed paints form GW...i have blazing orange in abundace ad two pots of warlock purple...jsut as a quick pick from my mind^^
Ink is much darker as it is thicker, but again will dry shiny.
Thanks for the offer, but I am all set for paints just now, 2 pots to you though, I am happy to give up stuff I do not need if it will hep those who can use it, or it just gets wasted.
will keep you on the newst status tomorrow! and thanks datay! either way i feel this will serve me very well^^
i truly have a soft spot for the older pots of GW anyway... the new ones give me the wind you could say^^ there are not built with a painter in mind...
ahh I miss the old flesh wash ink too, but the new Vallejo flesh wash is the next best thing. Dantay- yes its shiny, but you do spray your models with a final dull coat of clear right?
Sorry I haven't been posting recently, but I got new broadband that's faster... when it works It can go on for about 2 minutes, then it dies again for another 10 or so.
I'm thinking the sponson guns could do with a support band around the barrels, didn't think of it before, but now I've seen them with a lick of paint attached...
ok since dantay has anounced to support my efforts with some of his washes i will do so as you suggest dstein...
at shrike... the more things change the more things stay the same...lol... well i cross fingers for ye to be a regular from when your bandwidth is finally functioning^^... and we hope to see some updates in pictures then^^
at monkey... i knew something had slipped me when going priming the tank... this was on the list...do you recon i can fix it with paint still on?
These look like they have been ready for a fight or used in battle, not just fresh off the assembly line tanks, so you have accomplished much! Damn fine tank!
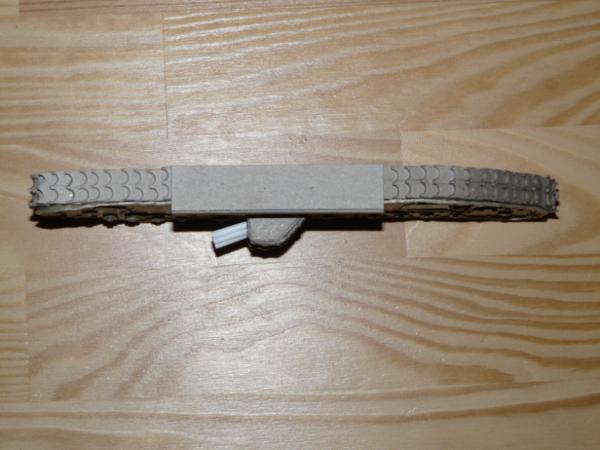
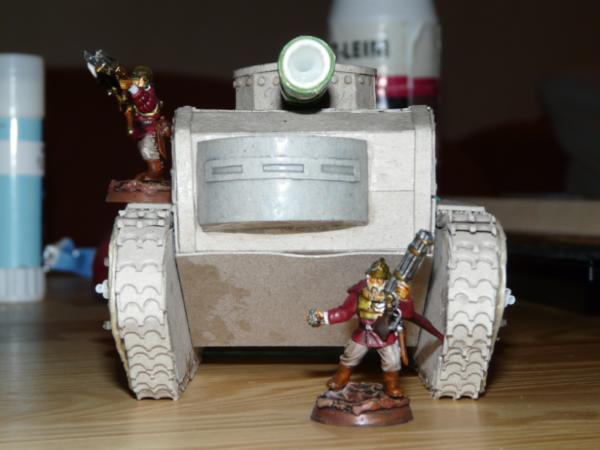
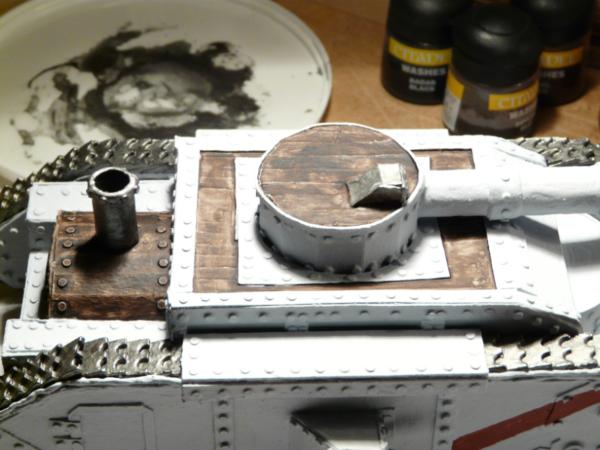
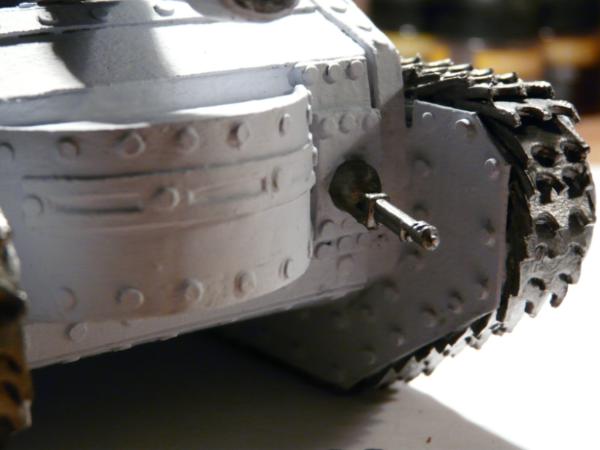
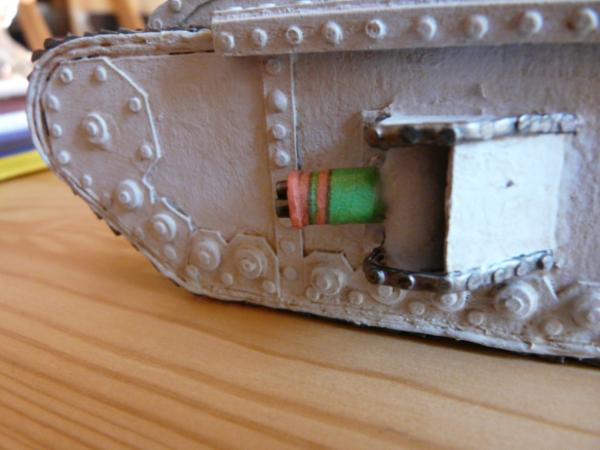
so i have uploaded the covered sponsons guns...i used blow out paper streamer as a material to cover the barrels like a vickers would have looked...this cased look that i have at least in my mind^^
also a good deal of PVA as a cover mender/sealer so that every thing looks like it was made from steel...
i will now begin to paint these to match the rest...
I was thinking of a single reinforcement band, but the covered look works really well for those - as shaso stated it has a nice watercooled vickers look.
I was thinking of a single reinforcement band, but the covered look works really well for those - as shaso stated it has a nice watercooled vickers look.
thats waht i wanted in the first place... the next tank gets vickers in that fashion for sure!!!
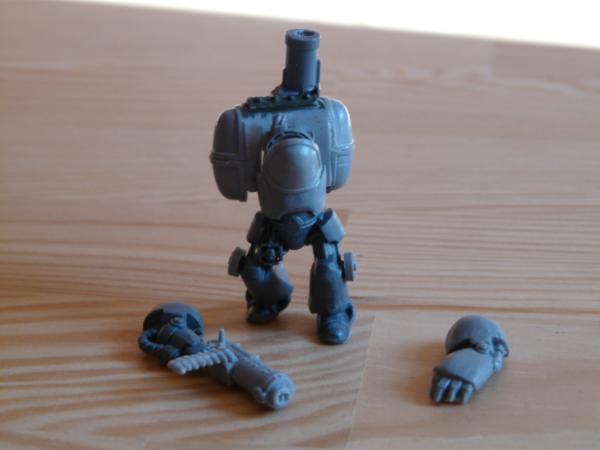
paint will hit the tank tomorrow... was a bit obsessed by a certain other project....there is a painting and modeling contest and for this i added an entry of my own...a steamknight....yup... i put yet again something new on my plate and i wanted to do some unique stormtroopers anyway^^ so this competition was a nice excuse^^
Oh come on, that piece is looking good! you just have to getthat brass and copper and steel work look maybe with some rusting for the steel, and the verdigris for the copper
yep that sounds quite like a good idea... i have some parts to even make a second one...some major parts like the somekstack and the legs and the frontorso...and lots of SM shoulderpads^^ this model has five already^^ i might even make one with an opened helmet...i picture them like the old deep divers from stories like 20.00 miles beneath the sea... did you see the smallish "V"?
well i was a bit in doubt if i was allowed to do that unlucky...
well it has sure been quite a long time since your last visit perkustin^^ glad you like my work^^ the treads were an ache as well^^ as they took quite some time... but all is well that ends well^^
lol... i just commented thr oposite on your tank thread^^ i have to do both...and i think whlie the one is setting the other can be painted... so...^^
Automatically Appended Next Post: and besides i just so love me converting stuff... that is the main part of the hobby for me...cobbling new minis out of miserable ones^^
Steam knight is wicked mate! your getting very creative in your old age.. how are you going to tackle the visor, with blending? also nice sponson addition
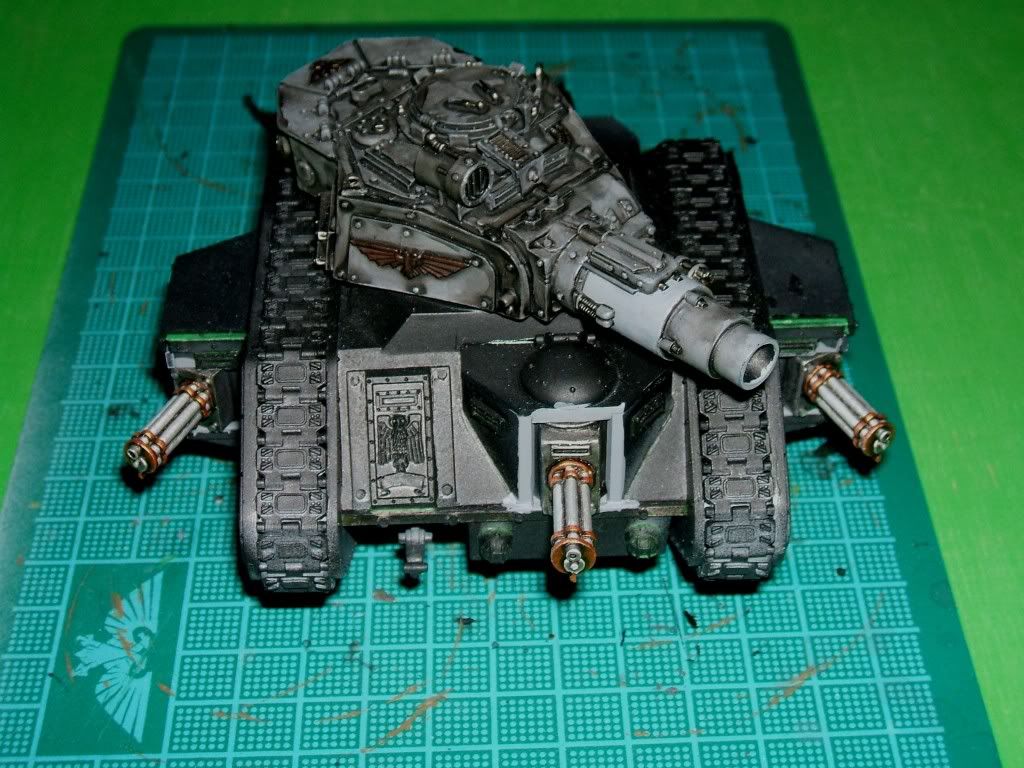
Vik, have to say that you and Demitry100 inspired me with your tanks to scracth-build a vehicle of my own and I already have something in my mind! And btw - the Astroknight is good, very clever use of SM shoulders! Reminds me of the space suits from UFO: Afterlight game, like this one:
please send my deepest regards to your friend speedfreak....his army has kept me through this all to short five pages in a constant state of awe... mind if he would join dakka to contact him? his thread is so old on BOCS that it would be no point joining that board too for me.... my own army attempt is a bit a mixture of steampunk and diesel punk elements so pointing out his army was an education and a half... i half secretly mused the use of killa kanz bodies for my own line of work for quite some time...and boy is this a good execution of my idea^^
at shaso... i bet someone already did that^^
at storag...lol... i currently play that game again^^ and i do see it as part of some influences that flooded into that work... also a bit of starcraft you could say is also in there^^
at monkey....
Forget painting the tank, get a force of those guys built up
lol... always temptation is it you offer^^ and i am certainly not the man to stop you from doing it... mind you you are trying to tear down doors already wide open^^ (dunno if that was a good translation of a german proverb...) as i already plan to make at least one more^^ oh and i painted the sponson guns too^^
at neil... the visor will be a ruined blening attempt^^ colorwise i am totaly in the unknown depth here....my next one will have to have an open one to have some face sticking out^^ and old age.... my hair is falling off and i have wrinkles all over (believe me^^) and you call that old age? so long as me jools are still working i am as fit as i care^^
worked on the steamknight some more... pics later... the main thing currently is that i am at a loss as to how to "close" the steampack...also the oven door is a bit uneasy task on me... can´t find the bitz to make a sound look.... so i went for some old curtainhook wheels... the ones i way back used as amomags for my aussie vets... guess i have to make way more GS work on him...
also i mave mused about adding a certain hammered look to the sides of the backpack...any other ideas?or is a door really needed if we take the dieslpunk influence into acount and think about some other fule as coal?
if i go again coal... then i would add a shovel to each knigt i have thought... some sort of other fuel i think all depends on the painting later on...
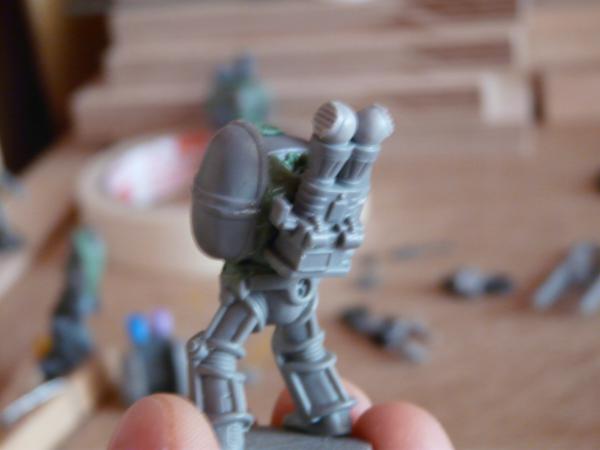
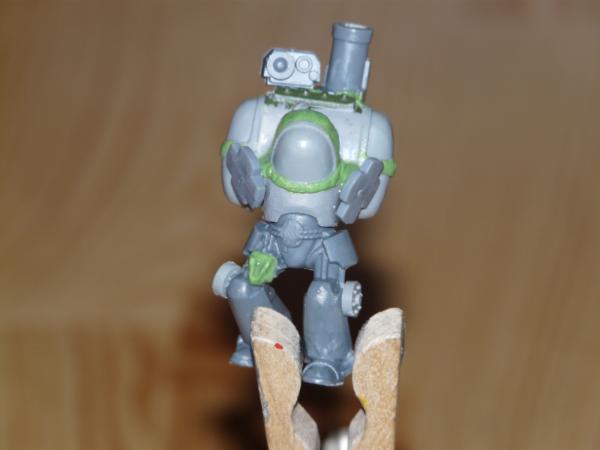
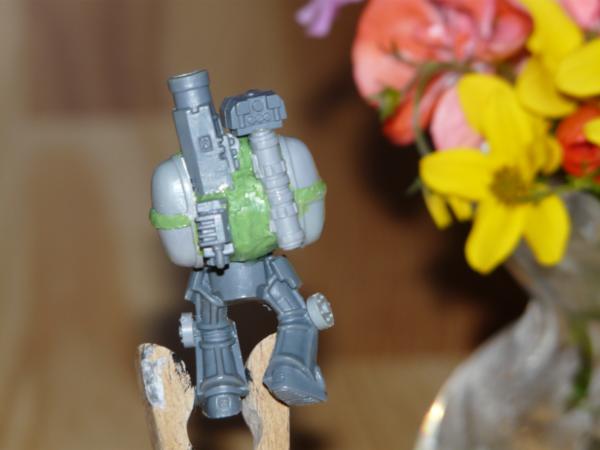
so fellas, that steamknight saw some more greenstuff action today... finally decided to makie him steampowered and thus i modeled a boiler door for the heating chamber...
greenstuff reminds me always of chewing gum... when you pull it it starts to go a kind of greyish color...yuk^^
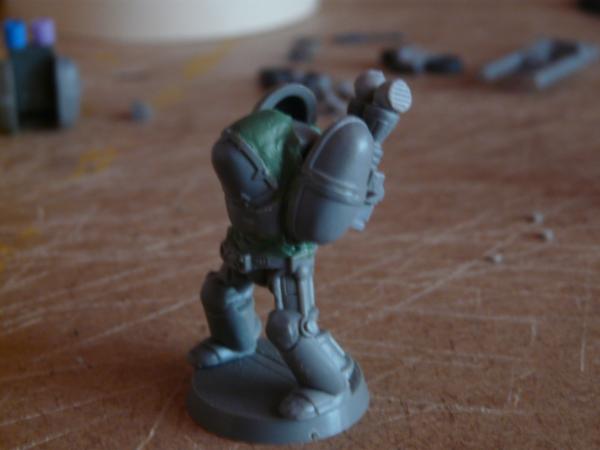
here are some pics of my latest work...
the uneven look on most surface is intentional... it should painted look like:
or
or even
what do you think? and should i really do another steamknight...i have a torso front and a pair of unused termy legs still around...and after that i might feel even the need to mistreat some of my still assembled but unattended termies...
nope... that is his mount for the arms...i am musing to paint the body before attaching the arms...that way i might get some better results with him... those bitz are cut off mortar feets...^^ well he looks a bit creepy that way^^
do you recon the beaten copper look would be a good choice?
well i am off for now... read ya all in the nighty night^^
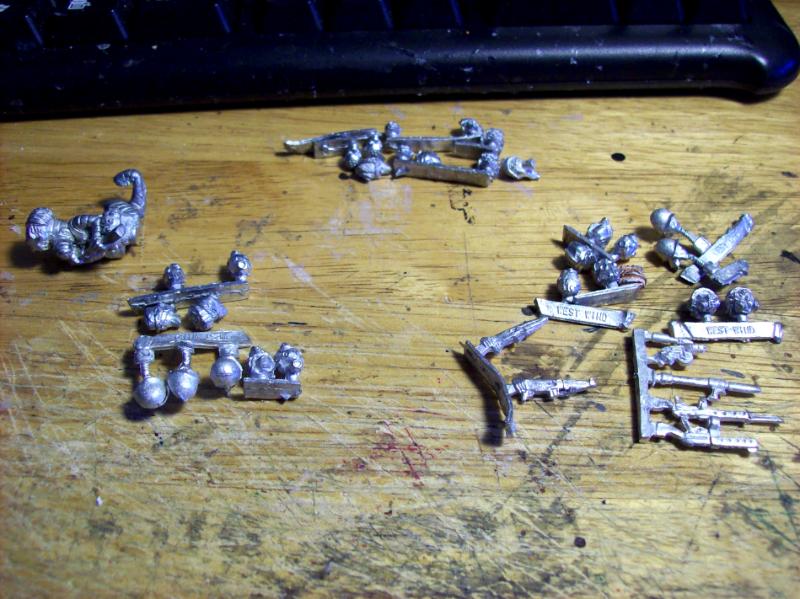
ohoh... thaT TARGETER WAS IN A BIG BITZBOX I GOT FROM EBAY:::I TENDED TO BE LUCKY SOMETIMES ON EBAY AND A BITZBOX IS SO (ups a capslock disaster^^) nice to search through once you had it in the mail...loks definte imperial but i´d be damned if i know....
I got lucky once, went into a small hobby shop here in town, and bought some guy's HO scale trains bitz box for $10. I guess some guy sold all his train stuff and all that was left was the biz box. I took it. It's full of cut up train cars, lots of rivety bitz.
Vik, you really should do the second one I think. Hope they will recieve some heavy guns to make up with their bulky appearence.
I'm not the one for CC but don't you think that this copper it overbeaten? I mean.. so much damage on such small surface makes it look more like it's made of a thin copper foil to my eye, rather than of a decent sheet of solid metal. And when painted it might look as.. Finecast, if you know what I mean Not sure I'm able to express my fears correctly but I came to conclusion that, considering the scale we all work with, a detail should have some space around it to be perceived as a intended detail and not as just a bad quality.
Don't take this critics to close please and keep up if your choise is intended on this matter
i think you have a good point there and i apreciate it full haertly! i had my doubts too about the structure... to tell you the truth i came up with that beaten copper idea because i wanted some different structure but i feared i would ruin it any way...so i thought why not make it even more beaten looking...but that fear is also now verified as i think that structure looks way too nurgle to me eyes...i will have to do something about that.... nurgleish look is the least someone should associate my steamknights with...
and i am currently working on a second mini even as we type^^ the first one was made from stuff from the new termies boxes i had in a bitzbox... the second one is of the old stuff ...a tad shorter edition and needs to be stretched firstly...to get the same height at least.... the look will vary slightly form knight to knight.... and i have gathered bitz for at least five atm^^ so stay shocked with me^^
and again... i really like guys that can say the truth in front of an "artist" as we need to know the dirty thruth.... after all being creative doens´t mean we have to keep living in wonderland^^ i want to make down to earth sculpts but with a head still in the clouds so i need earthing!!!
You're always welcome friend! Might I suggest a tool for you that helped me to smooth the GS on several ocasions:
This thing women use to polish their nail's surface.. foolish creatures! I found that it's much more usefull when applied to GS or even paint Helps ro remove and smooth unwanted relief. I think that after some polish, when the edges of bumps will become a surface, this will look more like a beaten metal.
hmmmm one side is more beaten looking even...so i too had thought about doing something to even the look...i take this is very fine sanding paper block? only just for fingernails then...hmmm miht have to take a stroll through a drugstore tomorrow...
at dstein... well my grandpa always tole me to use the right tool for the right job^^
Viktor von Domm wrote:hmmmm one side is more beaten looking even...so i too had thought about doing something to even the look...i take this is very fine sanding paper block? only just for fingernails then...hmmm miht have to take a stroll through a drugstore tomorrow...
It's more tender than any sand paper I had run in to. They usally come in with 2 or 4 sides, have a try
Nice work with that GS Vik! It is decent to work with and I have also used grey stuff, it stays soft longer than GS so you can keep fixing it a bit longer. Can be found at hobby shops or from Gailforce9
You may replicate the dented surface somewhere else and then try sanding it to see wether you like the result or not without messing this actual knight... Should not take long.
well i wnt sadly ahead of that and well... there is always more GS to say the least^^ but fear not this won´t be over in a hurry^^ also i have worked on a new mini!! and older termy and i have begun to make some bitzwise additions to him...pics will follow tomorrow i guess...
I wouldn't worry TOO much about the beaten metal look, if you imagine that second example pic you posted in green, it would look pretty nurgly. The metal gets beaten once by the artisans crafting the armour, then gets beaten several more times in the thick of battle
I hope you have something special planned for around 20 posts time
Free GS for every body^^ you can start by pulling the yellow out of my ears^^
as for hazelnuts... i am more an almond kind a guy^^
well actually new footage of the tank will have to wait...i am currently fully involved with my first love....no not what you pervs are thinking... converting plastic bitz into fully functioning minis^^
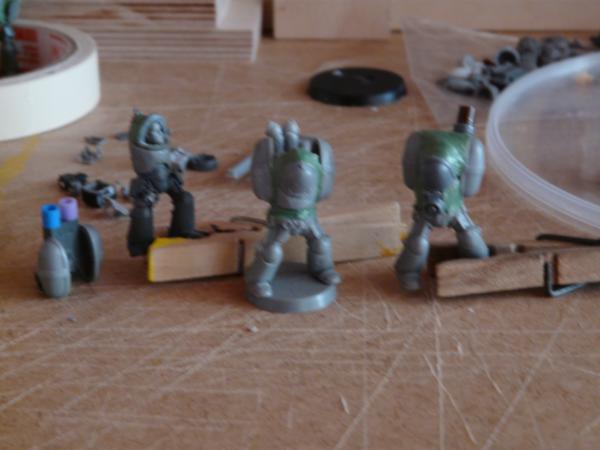
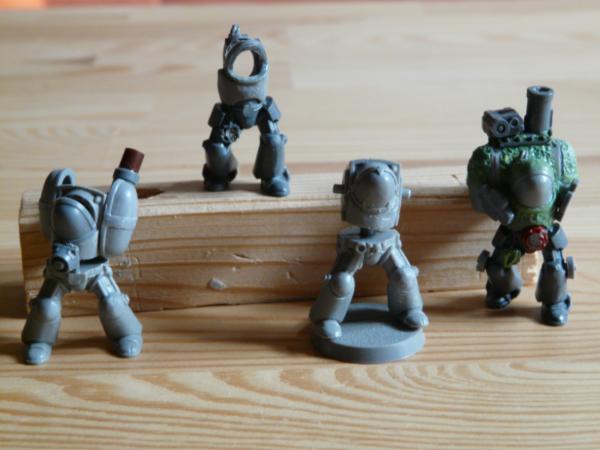
and i ahve thought what mostly drags me down when working with GS.... it is the amount of surfaces that i can cover on one mini in one session... so i went the same route like many other modelers and i will tomorrow work on 4! minis at the same time^^ yep you will get more minis to look at for your moneys worth...er...forget that last bit^^
well here is at fist Nr. 2 and the rightly followed by a group shot of all four as they are atm and ven a free turn around for all you makintosh wearing street strollers^^
well the one on the middle left will be a guy with an open helmet.... that was quiet a thing to do... cutting the flat surface out of a shoulderpad....mind you i currently own only dul blades so this was quite nerve breaking^^ he will get a cool grumpy catachan head and i have a vision of some starcraft marines with him.... also did you notice the choasy shouldpad? i thought i had more of that stuff....darn seems it was only one...
You'll cut your damn fingers off Vik! Don't use dull blades! I'd send you some good ones stamped U.S.A. on them but I'm afraid the FBI might show up at my door.
lol.... t be honest i am on soe days just too lazy to switch them ^^ and dull ones are in my opnion best to get rid of mold lines...
thanks meatshield...^^ and am i right that you are a guard player as well... that name has a certain gravitas in that direction^^ oh and you are spot on about the deep sea divers.... but more in the good old victorian days time as they used to be...
That pic reminds me of the Deep sea suit I had for my Gi-Joe figure, (the old 12inch tall fully posables, ) came with a treasure chest and huge black octopus and all poor Joe had was a knife!
I can't stop thinking about their weapons... something to replace the usual power-stuff... and to complement with the rivets that I'm sure will be there... A drill maybe? Like this divers use
at shaso: checked and commented on your new thread!
at shaso and dstein.... boy is that some pricey stuff...but way romantic boytoy stuff too^^
yep i had that idea too... yet i don´t own a drill bit...so mostly for now not happening...i guess... prove me wrong^^
also thanks for sharing with me the 100. page of silly painting (not much^^) and converting (a tad more than nothing^^) and conversation....for a lack of a better suiting term...lol
I'd just make some GS, get the right base thickness for the arm, twist like soft candy till you get the taper, and use tweezers to pinch the rolls into screw vanes like the pics storag provided.
Viktor von Domm wrote:hmmm...i will work later on with GS again and i will try that out...seems like a doable thing to do...cross fingers for me on that one^^
And if you get open seems between the GS, a sculpting tool should help smooth them out, or some other similar device.
got a whole dentist range of tools now and i think therein lies the success of my current works...and it is so educational for my kids to see what happens and what migt be used on them if they dont brush their teeth good enough^^
well today i want to go into an artshop.... maybe i find something plastic even there...as i am the master craftsman of our household i have quite a bunch of metal screws to my needs....some wooden screws would work too.... do you recon they could be attached with GS to an arm?...actually i have a cut off heavy weapon arm of a termy that could hold well a screwdrill^^...
Vik, go with the artshop and see if they have the right sized plastic screws, those would be easier to cut the heads from, I usually place a hole in the things and pin them.
storag wrote:I would suggest a 2-component epoxy glue rather than GS. GS is not a reliable glue, without some kind of wire-frame it can easily broke off on impact.
I tend to use pins and superglue for similar operations.
shasolenzabi wrote:I tend to use pins and superglue for similar operations.
Same man! but the glue depends on material and situation. Superglue is great but it gives a thin layer and an epoxy can give a volume and fill the gaps if needed, sparing extra work with GS.
well ppeps i did my own try to get a drill...with GS just attached to some metal bit.... i will however try that tut out so thank you dstein for that!! that is looking really sweet and totally to the point!
well for various reasons for gapfilling i sometimes use PVA glue... ithas an acrylic base and so it is not too far from the paint we use... well you do get sometimes cracks...but well...^^
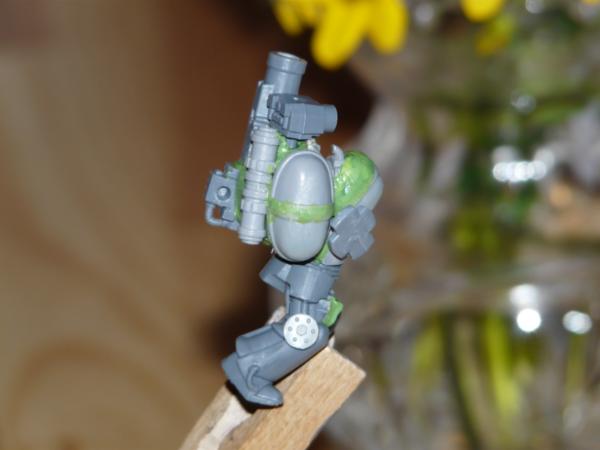
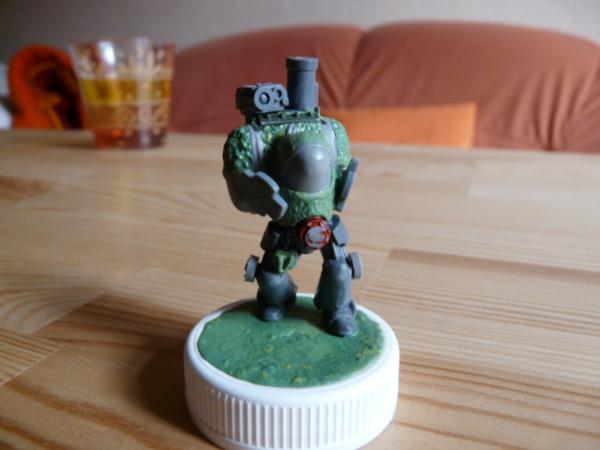
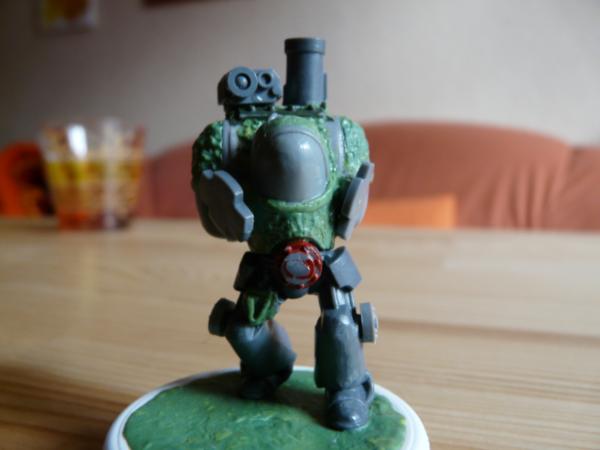
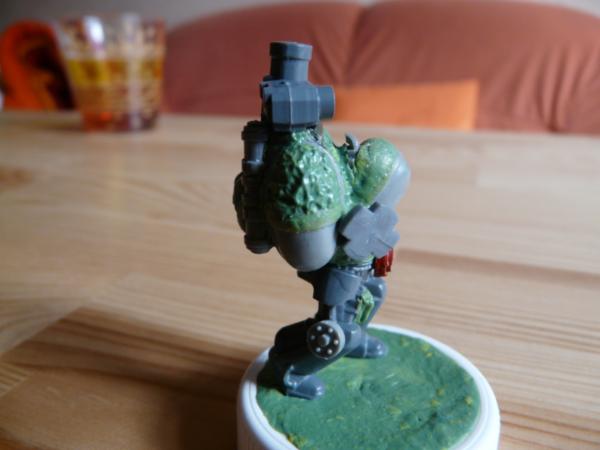
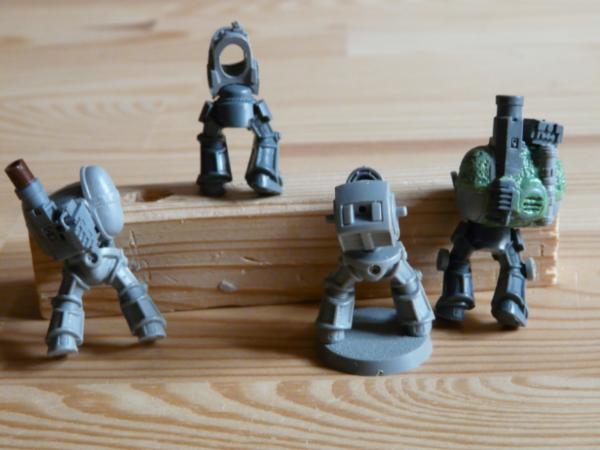
i worked with quite a bunch of minis today and i have some goood new for ye, todays eyecandy for those of you that floss regularly to this thread here^^
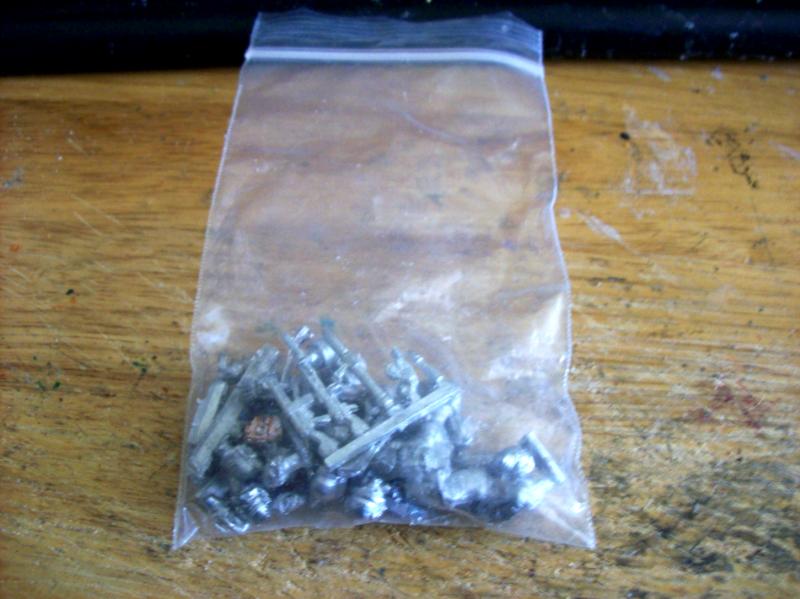
todays bunch atm sorry for the blurryness...
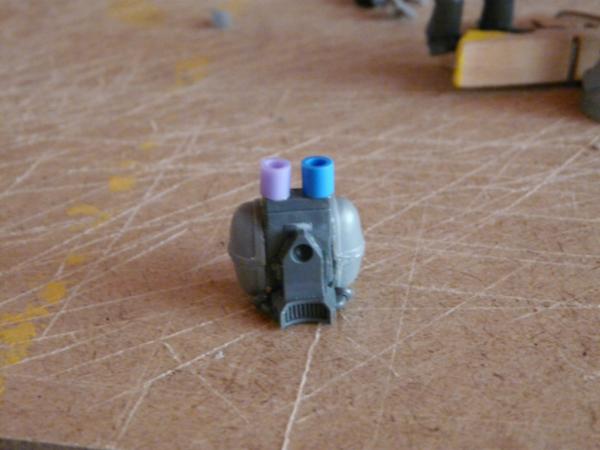
base for the old drill attemt...new one will see the light today^^
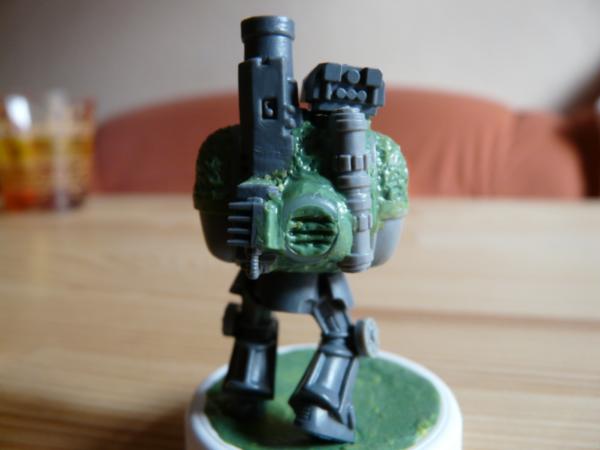
khorny steamknight^^
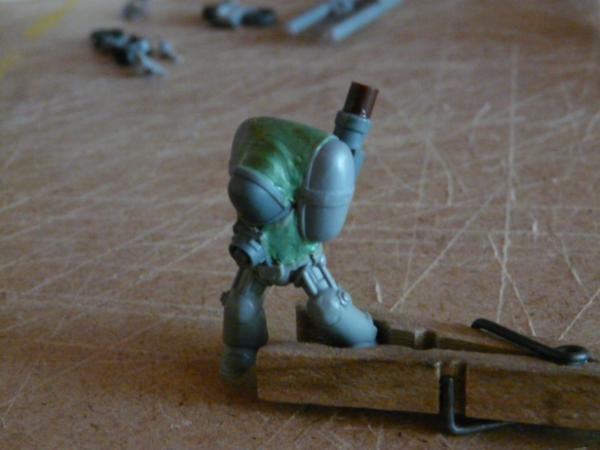
hunchback^^
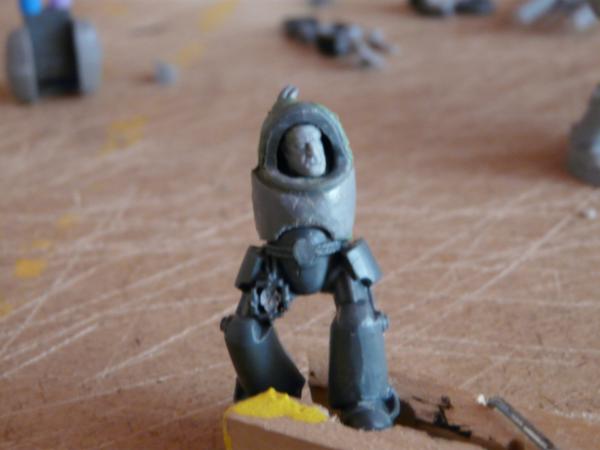
and the open(minded) helmeted guy with his trusty powerpack...


 and this will serve now as the fron weapon...


 Share a link please mate!