| Author |
Message |
 |
|
|
|
|
Advert
|
Forum adverts like this one are shown to any user who is not logged in. Join us by filling out a tiny 3 field form and you will get your own, free, dakka user account which gives a good range of benefits to you:
- No adverts like this in the forums anymore.
- Times and dates in your local timezone.
- Full tracking of what you have read so you can skip to your first unread post, easily see what has changed since you last logged in, and easily see what is new at a glance.
- Email notifications for threads you want to watch closely.
- Being a part of the oldest wargaming community on the net.
If you are already a member then feel free to login now. |
|
 |
2010/09/16 23:47:22
Subject: Challenge - Write A Tutorial.
|
|

Thunderhawk Pilot Dropping From Orbit
|
Hey guys.
So I was surfing this Icelandic forum and ran into a thread that said this(of course I translated this.):
Rules:
* In this thread there will be only advises and challenges, other posts will be reported( I'm gonna ask everyone to respect this, and the Mods to help me if it isn't). If men whant to wirte something about this thread or about whats in it please write in in italic's.
* Challenger writes one advide, be it one line or an essay, doesn't matter, and then challengen's someone else. This can be whatever you want, be it the painting set up or how to do NMM.
* If the one that is challenged doesn't want to participate, then he can send the one that challenged him a PM and then challenge someone else.( It would be best to PM the one you want to challange before actually challenging him.)
* Everyone that particiape are allowed to think outside the box. Lets watch out not to get stuck in Drybrushing only advices, as a 100 different drybrushing will just confuce the readers and kill the thread very soon. Not only painting advices are allowed here, I'm sure someone has good advice for ways to play an army etc.
* You can challenge someone that's already been challenged(most of us have more than one thing to say, ammirite?  )
*PICTURES ARE ALLOWED AND ENCOUREG'D!(sp?)
So, I'll start.
Using your nails for drybrushing!
Yes, you read right. I use my nails while drybrusing. How so?
Whenever I drybrush I'll dip my old, stiff brush into the paint pot, and then wipe it on a piece of paper as is most often adviced. When I was a beginner, that would usually be it, I'd put the brush straight on the model. Sometimes, this would turn out terribly, the drybrusing would turn out more like an overbrush etc. Then one day I was painting and didn't have any paper so I used my palm(please wash your hands afterwards, it looks terribly ugly when people have 90% of their hand covered after basecoating 1 little plastic miniture..), again, brushing straight one. The light from the lamp made me realize something. You'r nails are(in most cases) really rough and have a pattern to them that looks erh.. funky?  So, the next time I was drybrushing I brushed a little onto my nails and voila, using every nail one time will allow you to have a sort of look on how it will look on you'r model. My drybrushed areas look a 100% better now!
Now, after seeing his awesome Mantis Warriors, and also participation in The Great Marine Swap and The Objective Marker Swap, I'd like someone to blwo the dust of his book o' knowledge that has been collecting dust for some years now, and share some wisdom.
Gitsplitta, you'r up!
|
|
This message was edited 1 time. Last update was at 2010/09/18 20:45:15
|
|
|
 |
|
2010/09/17 12:08:00
Subject: Re:Challenge - Write A Tutorial (non-dakka,non-reward)
|
|

Decrepit Dakkanaut
|
O.K. Grettar, I'll bite. Hmmm... useful advice derived from my Mantis Warriors...
One thing that is true about the few mantis warriors that I've done that might not be noticable on most, is that they are each assembled for multiple component parts. Often arms and legs have been completely disassembled and repositioned in order to get the pose I'm looking for. Some parts are from my collection of original beakie plastics, some are from the newest lines of marines. As a result, I'm able to put them in poses you simply can not get from the base figures.
For example (and I apologize for the size of the photos).
This figure uses beakie plastics where the legs have been reassembled joint by joint, the body has been extended somewhat to get the right twist to the torso, and chaos marine arms made to accommodate beakie shoulder pads.
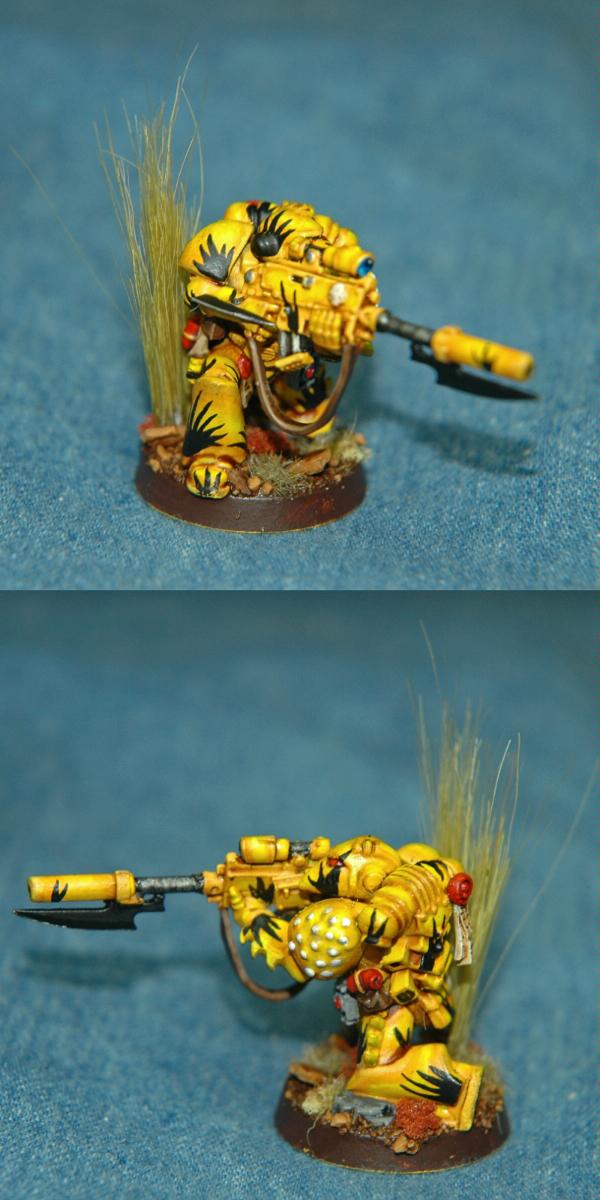
This figure has the kneeling legs from the devastator sprue, and the beakie arms have been completely disarticulated and reassembled to get them into position to hold the rifle in a logical position.
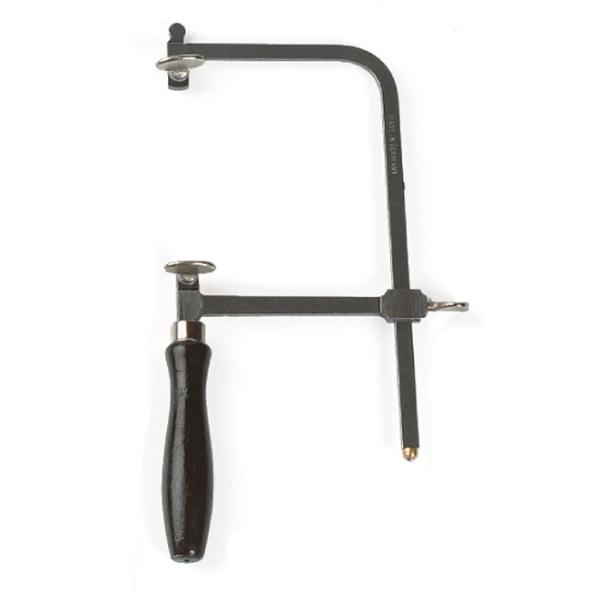
One of the reasons I can do all this repositioning is that I have a good saw. It's not a "hobby saw"... some plastic handled piece of trash from your FLGS... it's a proper, German jeweler's saw. I also have a variety of blade sizes to go with it for cutting plastic, metal, or even wood. It's a wonderful tool and not very expensive ($16.25 US). Blades are purchased separately.
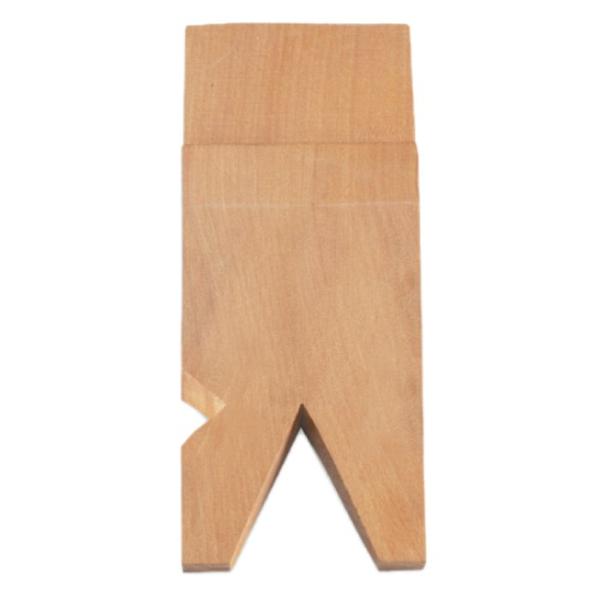
OH, you'll need a bench pin to go with it... $7 US with the notches pre-cut, it's a little wooden wedge you cut a "V" shape into that you clamp to your bench and supports your work while you cut. Any jewelry supply company will carry them. Here in the U.S. I use Rio Grande.
That's it for my two-cents...
Blackhand is doing some outstanding work at the moment... TAG brother... you're it!
|
|
This message was edited 2 times. Last update was at 2010/09/18 11:14:48
|
|
|
|
|
2010/09/17 22:43:32
Subject: Challenge - Write A Tutorial (non-dakka,non-reward)
|
|

Nurgle Chosen Marine on a Palanquin
|
Thanks Gitsplitta, now I have to reveal one of my carefully protected secrets given to me when I sold my soul to the Devil in exchange for my mastery of GS...just kidding, I sold my soul to the Devil for a chocolate donut hmmm chocolate donut...
Anyway...my tip would be a clever little tool I heard about here on Dakka and other sites which is woefully overlooked by a lot of beginners. If you ever want to get good results form Greenstuff you will need to pick up a couple...
...I am talking about, of course, PAINT BLENDERS!
As I am fairly cheap I previously used hobby knives, toothpicks and various other pointy things to shape my GS but was never able get it quite the way I wanted.
Once I bought a couple of paint blenders however I found that I was able to smooth the Gs to get cloth looking right for the first time eg...
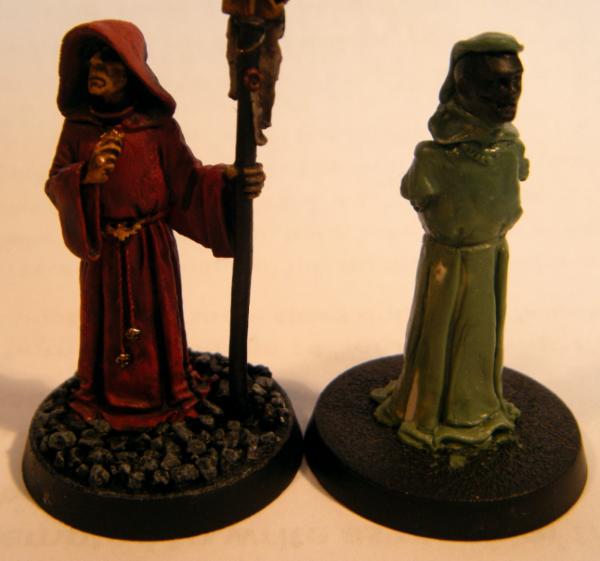
and to get crisp lines on those tiny details eg
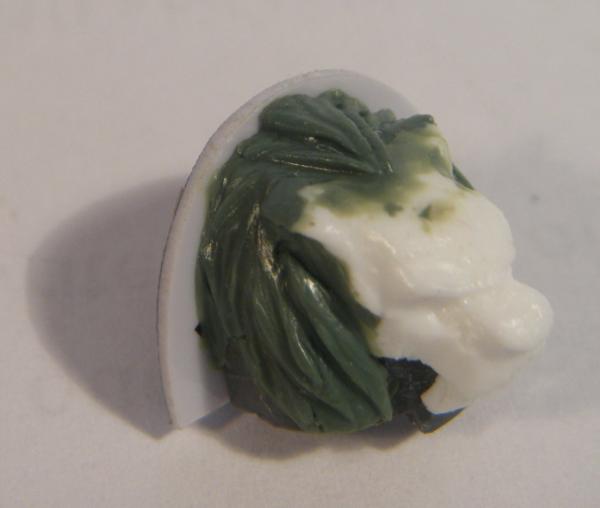
and to blend Gs into plastic much better eg
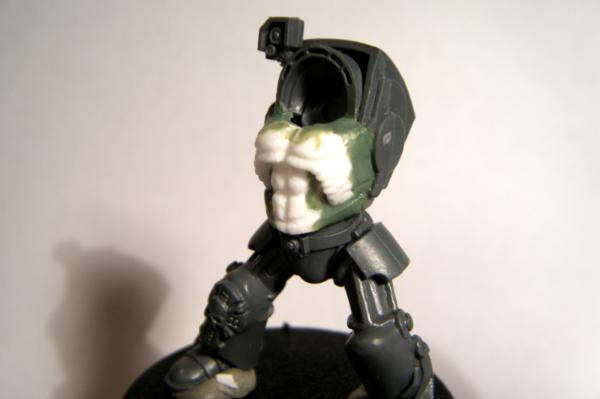
And all using these handy little silicone tipped wonders.
Thats great BLackhand I hear you say, but what do these things look like?
Like this!
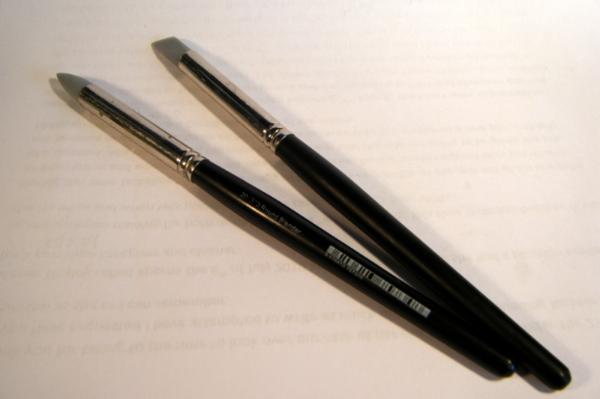
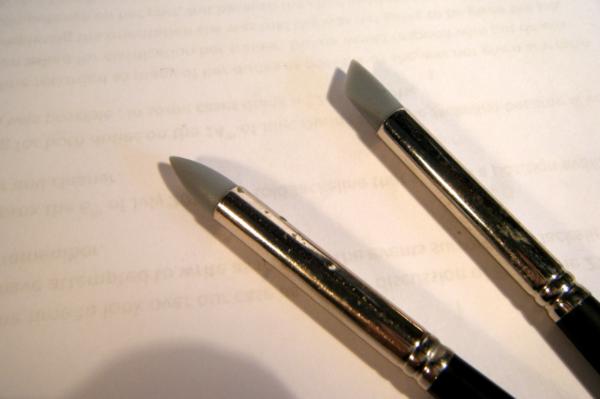
I use cone tip for larger scale work and the chisel tip for fine lines and smoothing GS into cracks in power armour
All up these guys are the cheapest and quickest way to improve the look of your GS work I have found.
And just because I know he enjoys the Dakka Community so much and will be happy to pass on some tips....I tag Whalemusic!
|
 BobtheInquisitor wrote: BobtheInquisitor wrote:I tend to glue metal models with a combination of BSI cyanoacrylate and my tears of frustration.
|
|
|
|
|
2010/09/17 23:35:16
Subject: Challenge - Write A Tutorial (non-dakka,non-reward)
|
|
[SWAP SHOP MOD]
Decrepit Dakkanaut
OH-I Wanna get out of here
|
Frick. Lemme come up with something over the weekend, unless you guys want a turtorial on stripping an AR15 or halo pointer 
|
|
|
|
|
2010/09/18 14:15:12
Subject: Challenge - Write A Tutorial (non-dakka,non-reward)
|
|
Thunderhawk Pilot Dropping From Orbit
|
Stripping you say? Hm..
I'll be waiting with curiosity in my mind 
|
|
|
|
|
|
2010/09/18 15:32:30
Subject: Challenge - Write A Tutorial (non-dakka,non-reward)
|
|
Decrepit Dakkanaut
|
Hey Gretar... I don't get the title of the thread... "non-dakka, non-reward". I think your going to lose a lot of potential viewers with that.
Just a suggestion.
|
|
|
|
|
|
2010/09/18 20:44:54
Subject: Challenge - Write A Tutorial (non-dakka,non-reward)
|
|
Thunderhawk Pilot Dropping From Orbit
|
Gitsplitta wrote:Hey Gretar... I don't get the title of the thread... "non-dakka, non-reward". I think your going to lose a lot of potential viewers with that.
Just a suggestion.
Yeah, I thought I would just put that there couse otherwice people would go "Oh, challenge" and hope for some DakkDakka rewarding competition, I'll remove it though, as I completely forgot they stick those threads up
|
|
|
|
|
|
2010/09/20 19:23:41
Subject: Challenge - Write A Tutorial.
|
|
[SWAP SHOP MOD]
Decrepit Dakkanaut
OH-I Wanna get out of here
|
Wow, I really cant think of anything to do. I just suck, lol. Does it have to be something no one has done before?
|
|
|
|
|
2010/09/20 19:37:03
Subject: Challenge - Write A Tutorial.
|
|
Thunderhawk Pilot Dropping From Orbit
|
whalemusic360 wrote:Wow, I really cant think of anything to do. I just suck, lol. Does it have to be something no one has done before?
Nononono, as long as it isn't already in this particular thread, you can write it
|
|
|
|
|
|
2010/09/20 20:09:07
Subject: Challenge - Write A Tutorial.
|
|
Decrepit Dakkanaut
|
WM: Talk about the way you design/pose your figures... you're really good at that. How do you go about sorting out the pose and parts? A lot of folks don't have the knack you do & I'm sure could benefit from your philosophy on the subject.
|
|
|
|
|
|
2010/09/20 20:23:34
Subject: Challenge - Write A Tutorial.
|
|
[SWAP SHOP MOD]
Decrepit Dakkanaut
OH-I Wanna get out of here
|
Ah, Bitchin. *Note, I'll add pics later*
So then I'm going to recommend Simple Green for stripping. Not sure how available it is over seas, but in the US, it is available at Home Depot, Lowes, Ace, and even Wal Mart.
Step one is to fill up an appropratly sized tupperware container about 2/3 full with SG. I use one big enough to hold a Land Raider, as that is the biggest thing I'm likely to come across.
Step two is put your model(s), plastic or metal in there. Make sure they are totally submerged. Some things like Whirlwinds may have to be turned. Now its a waiting game. I give em a few days, but have left it in there for 2 months (I forgot) and it will not hurt the model.
Step three. I'm lazy and dont want to tooth brush off the paint. So I put all the models in an old collander, put them in a larger plastic tub. Then hit em with a hose. Higher pressure is better, a hose with no nozzel doesnt cut it.
Step threepointfive. Depending on the paint, you may have to get in there with said dispised toothbrush. Other tools may include exacto's, files, etc.
Step four is basically like your starting a new model. Clean up any mold lines, drill the barrles out and so on.
|
|
|
|
|
2010/09/20 20:34:18
Subject: Challenge - Write A Tutorial.
|
|

Anti-Armour Yaogat
|
Whalemusic whos next then?
|
|
This message was edited 1 time. Last update was at 2010/09/20 20:34:55
Red corsairs -2000 points 
Empire army -2000 points 
Cygnar-15pts
======Begin Dakka Geek Code======
DR:90-S---GMB+I+Pwhfb09++D++A++/h WD362R+T(M)DM+
======End Dakka Geek Code======
psn-blackclaw12-add me and mention that you're from dakka.
|
|
|
|
|
2010/09/20 20:57:05
Subject: Challenge - Write A Tutorial.
|
|
[SWAP SHOP MOD]
Decrepit Dakkanaut
OH-I Wanna get out of here
|
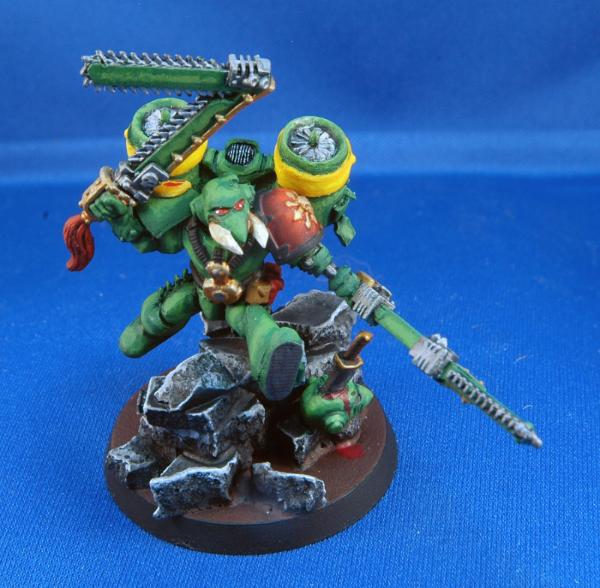
I'm gunna have to tag Arakasi next. He does some great stuff with his orks, I'm sure he can come up with a few of em to share with us.
|
|
|
|
|
2010/09/20 23:24:02
Subject: Re:Challenge - Write A Tutorial.
|
|
Ragin' Ork Dreadnought
|
Google
What!?! You want more than that? Oh, okay... I guess...
Right - so Google will solve just about anything, but for this post, lets talk about *inspiration*. Lets talk Google Images!
So you want to model (for example) an awesome Ork Trukk, that looks like it is actually *moving*. But your imagination and/or Physics is, lets say, a tad lacking...
Step 1. Think of something in real life - man made or from nature - that represents the concept you are looking for. For vehicles in motion, we could think "rally car" or for a Stormboyz Nob landing "bird of prey landing".
Step 2. Type it into Google.
Step 3. Switch to "Images" (you might need to expand the list on the left... click "more")
Step 4. Profit!
I tend to peruse and download images of interest from the list into a folder. I might try other search terms for additional images ("hot rod", "truck", "ute"). Each image I download will contain something that I either want to mimic or use as the basis of another idea. Multiple images will start to help build up a picture of how things work too - for an Ork Trukk for example - it helps to build up concepts of momentum and direction - this will help you to make new creations that don't look "off".
How was that? Fairly simple - but anything else you could be waiting a week for Now, where is my next suc... I mean contestant?
Automatically Appended Next Post: Lets see if I can get endtransmission to impart some of his wisdom, possibly from the Malfian IVth...
|
|
This message was edited 1 time. Last update was at 2010/09/20 23:26:54
|
|
|
|
|
2010/09/21 09:49:38
Subject: Re:Challenge - Write A Tutorial.
|
|
Calculating Commissar
|
Ooooo what to write?!
I would do casting as it's not been done yet; but there's still sculpting left to finish off.
The one trick that was imparted to me when I first started to use greenstuff was how to stop it from sticking to metal tools.
There will come a time when the clay shapers don't quite have the edge that you need for that fine, fine detail; or for when you need to cut out a piece that's still far from cured; in these cases you'll probably end up using either a hobby knife, or some metal sculpting tools (such as the Games Workshop ones).
So. The tip. Before putting metal to green stuff, gently (and very carefully in the case of the knife) rub the edge of the implement on the skin around your hairline or temple. This will build up a small amount of natural oil on the tools and prevent stickage. Using any other oil or lubricant can do slightly odd things to the greenstuff...
Who to tag next...
I wonder if SilverMK2 will give us some tips on his chaos marines?
|
|
|
|
|
|
2010/09/21 09:54:12
Subject: Challenge - Write A Tutorial.
|
|
Avatar of the Bloody-Handed God
Inside your mind, corrupting the pathways
|
I was hoping not to get tagged when I saw you had posted here endtransmission I will put something together later on tonight. May actually paint something up just for this thread. Though I have a half painted Land Raider that I could finish off...
|
|
This message was edited 1 time. Last update was at 2010/09/21 09:57:09
|
|
|
|
|
2010/09/25 19:00:07
Subject: Re:Challenge - Write A Tutorial.
|
|
Avatar of the Bloody-Handed God
Inside your mind, corrupting the pathways
|
Making a Daemon Prince
I'm not a fan of the GW DP's - I find them a bit too comic and not quite evil enough (plus the new ones were not out when I made this guy  ), so I have embarked upon creating my own. In order to do this I needed to bring several things together:
1) Vision - what did I actually want my DP to look like? Were there particular features that I wanted to incorporate? Theme? Etc...
2) Available bits - what bits do I actually have to make this out of, can I buy bits that will fit in with what I want to do? Can I simply modify an existing kit?
3) DIY - What parts will I have to make for myself? Will I have to do lots of sculpture? Do I have the tools for the job? Can I "make do" with other techniques and parts?
4) Paint - No use having a scratch built monster if he runs around naked. What colours do you want to use? How will I make him fit my army theme, but also stand out as a bit of a centre piece? What special techniques will I try out to make this model extra amazing?
Vision
So, to start with point (1): I run a mechanical/nurgle themed CSM army, so that means plenty of exposed machinery and a general rusty decayed look, with exposed flesh being riddled with disease, scars and pustules. This leads on into points 2 and 3, as I would need to find parts which fits my theme, or otherwise create them.
I also had a look through the rule book to pick out the weapons/powers/etc that I wanted to represent on the model. I tend to run my DP's with wings and usually have MoN too (which can be represented just through the general diseasedness of the model). It is important that no matter how cool your conversion that it at least looks like it will fit into the rules.
After the basic rough theme, I then went on a bit of a Vision Quest ( TM) - scouting the internet (and indeed DakkaDakka) for inspiration. It is actually amazing some of the work that people have done and I was able to find several reference pictures on which I would base various aspects of my own model (both in terms of modeling and paint work).
Two of the main images that I used were of this chap and this chap.
With these in hand I moved on to point (2) - what did I actually have to build this sucker out of?
Bits
Fortunately I used to live near a pretty good LGS which had a pretty extensive and varied bits box (actually a set of draws filled with stuff) and I had managed to buy quite a bit of stuff which would come in handy. Thus I had a fair number of parts with which to form the basis of my model. I went through my stash and put aside anything I thought might come in handy - chaos icons, skulls, weapons, larger arms, hands, heads etc until I had drawn out everything that I might need. From this "master pile" I then picked out the best stuff and created a smaller pile of bits that I was almost definitely going to use.
From this I then made a mock up of the DP, tested out a few poses, decided what bits went and what would have to be changed for something else, etc.
However, there were a lot of gaps to fill and plenty of pieces which I either did not have or which would have to be modified.
Since a I had a lot of the main structure built (I was quite lucky with the parts for this DP), I could pretty much fully assemble the whole thing and then sculpt around it.
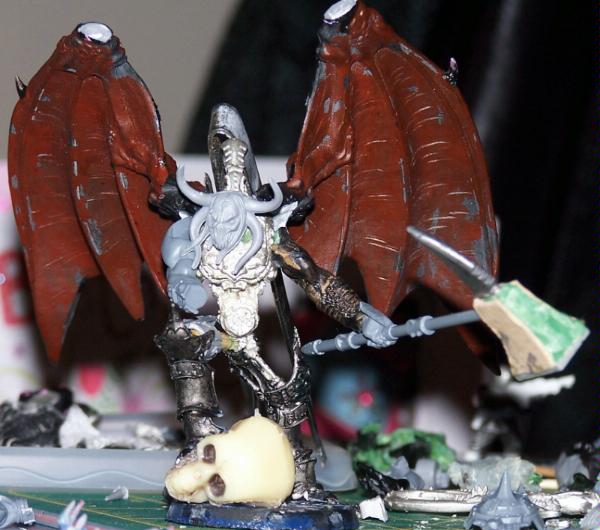 DIY
DIY
So, I have the main structure built, but there are lots of gaps to fill, and lots of detailing to be done. For a start, those wings look way too fresh to be the wings of a nurgle DP, so I broke out the ol' power drill and went to town on those babies, drilling holes and recesses of varying size and shape to represent the damage caused by war and disease. Looking back on the model now, I could probably have taken out more material from the wings to make them look even more diseased and damaged, but that is something to take on to the next project
The edges of the holes were then hacked out using a modeling knife, and the larger holes were made by chopping several drill holes into one. The nurgle theme was continued by using strips and tubes of GS along the edges and spines of the wings to create a pitted and pockmarked look. This was done by, after flattening the GS in the required places, using a pointed metal sculpting tool and simply dotting the surface. This was repeated using a slightly more rounded colour shaper to give a slightly more organic look to the flesh. I also used a flat metal sculpting tool to ease out the edges of the flesh and blend it into the wing membranes a little bit.
The larger welts were made using a combination of pointed colour shaper and pointed metal sculpting tool - using the colour shaper to press into the GS, rolling the colour shaper around on the point to enlarge the hole/indent, then using the pointed metal tool to "pull" at the edges to give a more distressed outer edge and make it look like it was actually part of the flesh.
This part took bloody forever, and was by far the longest part of the build. Certainly worth it in the end though
After finishing the wings I also then sculpted the shoulders (which received the same pitting/decay as the wings) and wing joints. I also filled in the various holes and so on which required it and applied the appropriate textures. Sadly I don't have a picture of this stage (sorry!).
At this point the model was pretty much done. The only major change I made was replacing the hand with a power fist after feedback from Dakka users (something I encourage you to get, as fresh eyes are always good!).
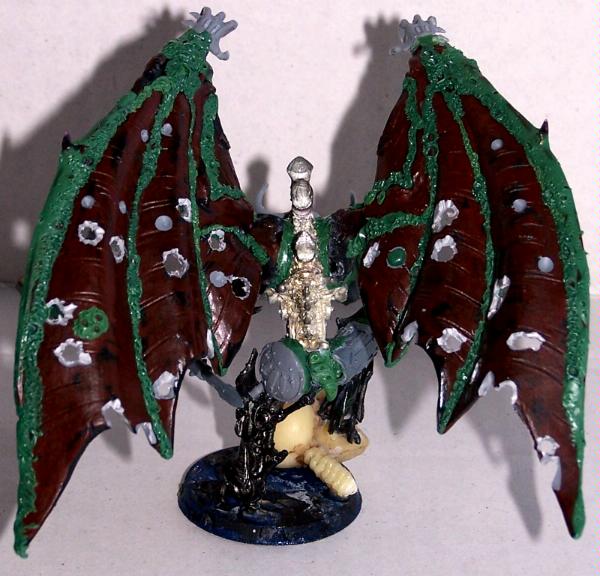
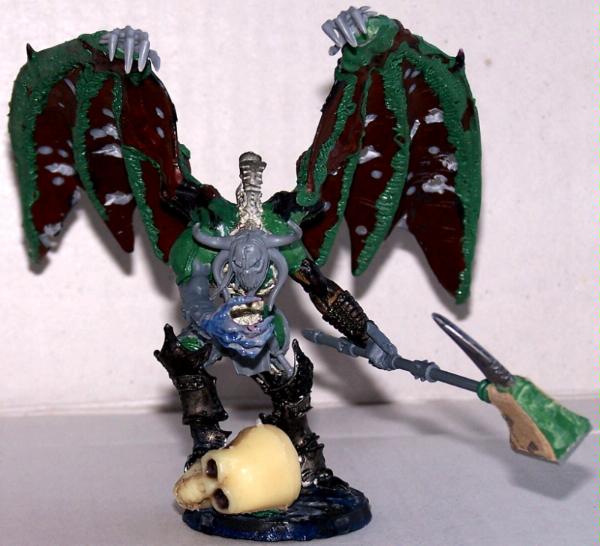
Painting
Unfortunately I don't have any step by step painting pictures as I did this guy in a single massive sitting since I was entering him into a contest the next day. Also means that the painting is not amazing (though I have gone back to touch him up since - but my painting is not the best even then ).
So, here are a couple of pictures of him painted, and I will go through some of the main painting things that I did for him below:
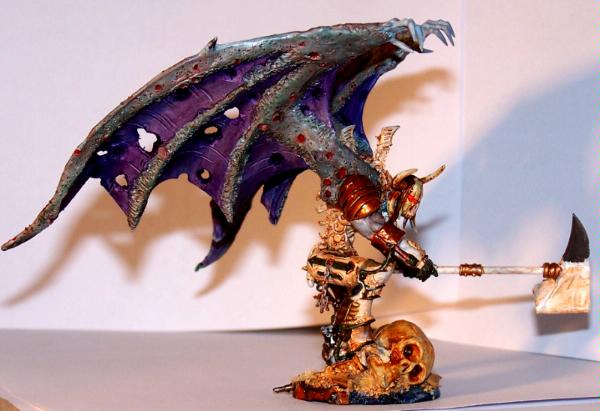
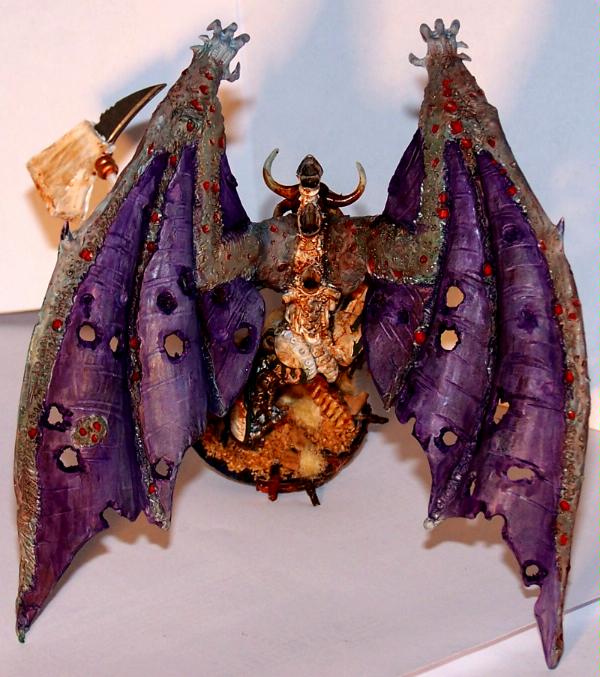
Wings - painted using the purple wash over rotting flesh. Deeper creases were painted using several layers of wash.
Flesh - painted using flesh wash over rotting flesh.
Cuts + spots - painted using watered down blood red then various red washes to dim it down.
Armour - undercoated black, washed white (watered down skull white), washed in flesh wash.
Bronze - dwarf bronze with flesh wash. Can also add red washes to give a dirtier, older bronze look.
Armour trim - olive green (mix of about 40/60 chaos black to goblin green - don't know the exact mix as I made it up years ago and have been using the same pot ever since).
Based using GF9 fine basing material, GF9 static grass and GF9 large basing material.
So, if you learn nothing else from this, it is that I am really lazy at painting and love flesh wash
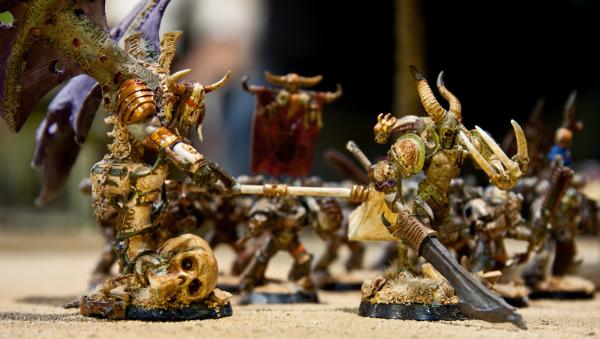
Anyway, as a final treat, here is a shot of him in action with his much smaller brother at the DakkaDakka meet at Warhammer World this August, taken by endtransmission when we had a friendly game on the Sunday vs his very nice IG.
If you like my DP, feel free to pop by my PLog and take a look at my other stuff
|
|
|
|
|
|
2010/09/26 01:32:35
Subject: Challenge - Write A Tutorial.
|
|
Thunderhawk Pilot Dropping From Orbit
|
And who do you challenge?
|
|
|
|
|
|
2010/09/26 08:40:39
Subject: Challenge - Write A Tutorial.
|
|
Avatar of the Bloody-Handed God
Inside your mind, corrupting the pathways
|
I've no idea... any suggestions?
Most of the people I look at already have most of their methods tutorialed :(
|
|
|
|
|
|
2010/09/26 09:13:35
Subject: Challenge - Write A Tutorial.
|
|
Ragin' Ork Dreadnought
|
In your own words - most - not all - and who knows what small tidbits they might be keeping from us that aren't massive tutorial worthy?
|
|
|
|
|
|
2010/09/26 09:26:36
Subject: Challenge - Write A Tutorial.
|
|
Nurgle Chosen Marine on a Palanquin
|
For instance endtransmissions hair oil tip is coming up tops for me! its kinda gross but it works
|
|
This message was edited 1 time. Last update was at 2010/09/26 09:26:50
BobtheInquisitor wrote:I tend to glue metal models with a combination of BSI cyanoacrylate and my tears of frustration.
|
|
|
|
|
2010/09/26 12:19:19
Subject: Re:Challenge - Write A Tutorial.
|
|
Bounding Assault Marine
|
Just wondered, if someone is challenged do you PM them to let them know? Sometimes I'm not on the forums for weeks at a time so they only way I would know is if an email arrived to say I'd been challenged. Just a thought
|
|
|
|
|
2010/09/26 12:20:17
Subject: Challenge - Write A Tutorial.
|
|
Avatar of the Bloody-Handed God
Inside your mind, corrupting the pathways
|
I got a PM to let me know (though I read the thread at the same time as the PM anyway)
Why, you want to be challenged?
|
|
|
|
|
|
2010/09/26 12:40:12
Subject: Re:Challenge - Write A Tutorial.
|
|
Thunderhawk Pilot Dropping From Orbit
|
Cypher871 wrote:Just wondered, if someone is challenged do you PM them to let them know? Sometimes I'm not on the forums for weeks at a time so they only way I would know is if an email arrived to say I'd been challenged. Just a thought
Yeah, it says in the OP that it would be best to PM the one challenged, for some massively good reasons
|
|
|
|
|
|
2010/09/26 16:33:12
Subject: Challenge - Write A Tutorial.
|
|
Bounding Assault Marine
|
gretar wrote:Cypher871 wrote:Just wondered, if someone is challenged do you PM them to let them know? Sometimes I'm not on the forums for weeks at a time so they only way I would know is if an email arrived to say I'd been challenged. Just a thought
Yeah, it says in the OP that it would be best to PM the one challenged, for some massively good reasons
 Whoops, that's embarrassing...must be my age I didn't see that bit first time round, hence my question.
SilverMK2 wrote:I got a PM to let me know (though I read the thread at the same time as the PM anyway)
Why, you want to be challenged?
I wasn't looking to put myself in the firing line but I guess I can come up with something to make up for my faux pas.
Does it need to be original or can it be something I've already posted on Dakka? I've done a few tutorials in the past that are probably hidden away at the bottom of a thread queue waiting to be dusted off.
|
|
|
|
|
2010/09/27 00:43:17
Subject: Challenge - Write A Tutorial.
|
|
Dipping With Wood Stain
|
gretar wrote:whalemusic360 wrote:Wow, I really cant think of anything to do. I just suck, lol. Does it have to be something no one has done before?
Nononono, as long as it isn't already in this particular thread, you can write it
Alas, Cypher, your faux pas's continue . Looking forward to seeing what you'll come up with.
|

DR:80+S+GM++B+I++Pw40k07#-D+A+/mWD300R+T(M)DM+ |
|
|
|
|
2010/09/29 02:55:31
Subject: Challenge - Write A Tutorial.
|
|
Bounding Assault Marine
|
.
|
|
This message was edited 1 time. Last update was at 2011/04/03 01:32:42
|
|
|
|
|
2010/09/29 03:13:41
Subject: Challenge - Write A Tutorial.
|
|
Dipping With Wood Stain
|
I knew that was a bad idea. Hrm.. well letsee.. my painting was pretty basic and is going through a rennaisance at the moment so I don't have a style, just experiments. Modelling has been mostly covered already, as has inspiration gathering. Fluff writing I do well but isn't really something that can be covered well in a tutorial. Aha! There is something else I do scarily well - organising! So, expect a tutorial on how to organise your work area, hints and tips and tricks on storage and how cheap household items can work nicely for keeping things in order. Would that be too much of a tangent?
|
DR:80+S+GM++B+I++Pw40k07#-D+A+/mWD300R+T(M)DM+ |
|
|
|
|
2010/09/29 23:29:17
Subject: Challenge - Write A Tutorial.
|
|
Bounding Assault Marine
|
LadyCassandra wrote:I knew that was a bad idea. Hrm.. well letsee.. my painting was pretty basic and is going through a rennaisance at the moment so I don't have a style, just experiments. Modelling has been mostly covered already, as has inspiration gathering. Fluff writing I do well but isn't really something that can be covered well in a tutorial. Aha! There is something else I do scarily well - organising! So, expect a tutorial on how to organise your work area, hints and tips and tricks on storage and how cheap household items can work nicely for keeping things in order. Would that be too much of a tangent?
Go for it.
|
|
|
|
|
2010/09/29 23:34:53
Subject: Challenge - Write A Tutorial.
|
|
[SWAP SHOP MOD]
Decrepit Dakkanaut
OH-I Wanna get out of here
|
My pile of boxes filled with.....40k stuff says that would be totally relevant.
|
|
|
|
|
|
|
 My blog
  Da Dark Angelz
 Arakasi vs Infinity
