| Author |
Message |
 |
|
|
|
|
Advert
|
Forum adverts like this one are shown to any user who is not logged in. Join us by filling out a tiny 3 field form and you will get your own, free, dakka user account which gives a good range of benefits to you:
- No adverts like this in the forums anymore.
- Times and dates in your local timezone.
- Full tracking of what you have read so you can skip to your first unread post, easily see what has changed since you last logged in, and easily see what is new at a glance.
- Email notifications for threads you want to watch closely.
- Being a part of the oldest wargaming community on the net.
If you are already a member then feel free to login now. |
|
 |
2015/12/09 06:42:58
Subject: Custom multi-level city terrain (12/07: armour rack, HK missile rack painted)
|
|

Pious Palatine
|
Painted armour rack looks brilliant.
I love the HK missile rack, looks amazing.
EDC
|
|
|
 |
|
2015/12/11 19:24:09
Subject: Re:Custom multi-level city terrain (12/07: armour rack, HK missile rack painted)
|
|

Dakka Veteran
|
Thanks guys!
THe "welds" are ahh.. liberal application of glue haha. The white plastic does NOT glue well (it doesnt seem to react to acetone, so superglue doesnt work as well, and neither does primer) so it basically came about as id glue it down, then try to get on another piece and the first piece broke so more glue.. and so on. But hey it worked out
there is more coming soon i promise! just been a bit swamped with non painting things and havent had a chance to take pictures as well, but there is a lot more work on the shelves and i finally got in the lego pieces to finish off the other tank lift.
These pieces, while brilliant, are less common and less cheap. But only needed like 15 or so so it wasnt so bad.
https://www.google.com/search?q=gear+rack+lego&safe=off&source=lnms&tbm=isch&sa=X&ved=0ahUKEwijyumCxNTJAhUL8mMKHUKVBEIQ_AUICCgC&biw=1909&bih=1040
|
|
|
|
|
|
2015/12/13 21:09:11
Subject: Re:Custom multi-level city terrain (12/13: shelves painted! )
|
|
Dakka Veteran
|
|
|
This message was edited 1 time. Last update was at 2015/12/13 22:18:24
|
|
|
|
|
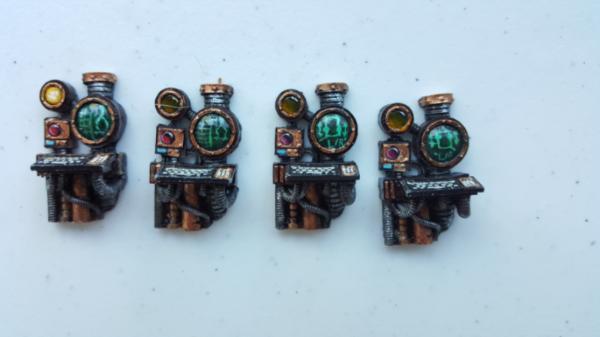
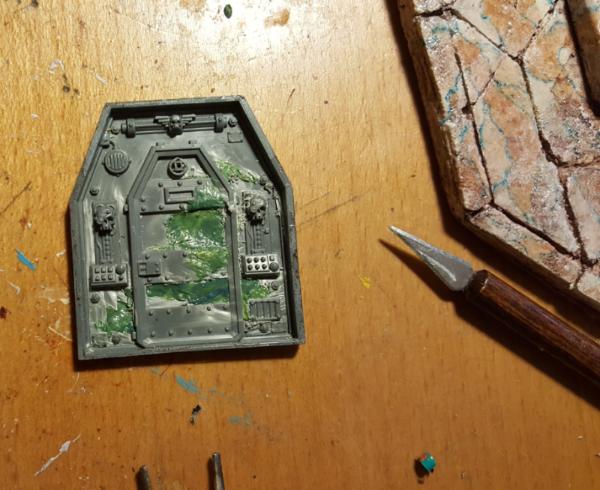
2015/12/15 19:41:21
Subject: Re:Custom multi-level city terrain (12/15: computer consoles painted)
|
|
Dakka Veteran
|
Computer consoles are up. I was concerned about the screens but i think it turned out pretty well! Also note the yellow light! I think it works, basically its either "off" or in the dark position or "on", and they're on when a crane is moving. I might need 1 more "on" but i'm not sure, it might seem a bit too on the nose then too.
|
|
This message was edited 1 time. Last update was at 2015/12/15 19:43:21
|
|
|
|
|
2015/12/15 20:04:23
Subject: Custom multi-level city terrain (12/15: computer consoles painted)
|
|
Rogue Inquisitor with Xenos Bodyguards
|
For polystyrene like the white plastic the local Wal-Mart in their model section should have Testor's plastic cement,(Blue is non-toxic and lemony scented), and does a good job for all of my minis from scratch or if they are plastics like GW or Dreanmforge, it just takes a bit to do it's plastic-to-plastic welding act.
|
"Your mumblings are awakening the sleeping Dragon, be wary when meddling the affairs of Dragons, for thou art tasty and go good with either ketchup or chocolate. "
Dragons fear nothing, if it acts up, we breath magic fire that turns them into marshmallow peeps. We leaguers only cry rivets!


|
|
|
|
|
2015/12/16 22:14:32
Subject: Re:Custom multi-level city terrain (12/15: computer consoles painted)
|
|
Dakka Veteran
|
I'll keep that in mind, thanks! I just like superglue haha. its easy and works for everything theoretically.
Anyways a brief break to talk about the table! SO this was my table before:
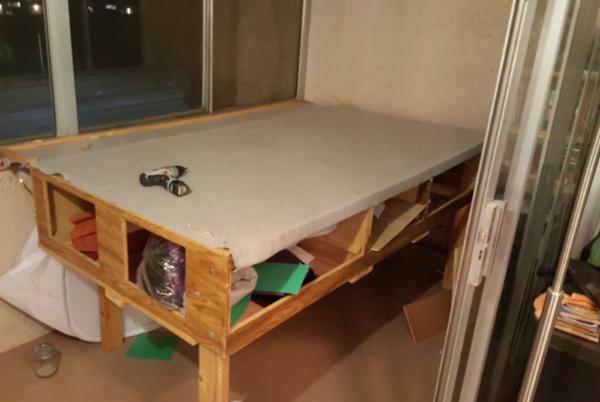
It was nice, had served me well but.. was a bear to move. And it's bulky and takes up ALL the room. Unfortunately that balcony is like 4 inches shy of being 6 foot wide, so it's just awkward enough to make everything difficult. Adding on top of that a giant heavy table was something that needed to be replaced. So I decided to buy 3 2x4 foldeing tables instead. They still hold like 1000 lbs each, are sturdy (at the medium height. The "gaming" height is.. not so sturdy, which is smoething i need to fix by bolting them all to each other) and can be used in multiple ways.
Unfortunately because my balcony isnt 6 feet wide if i wanted to actually free up space I needed to figure out a tile holder. Enter tile holder 1.0!
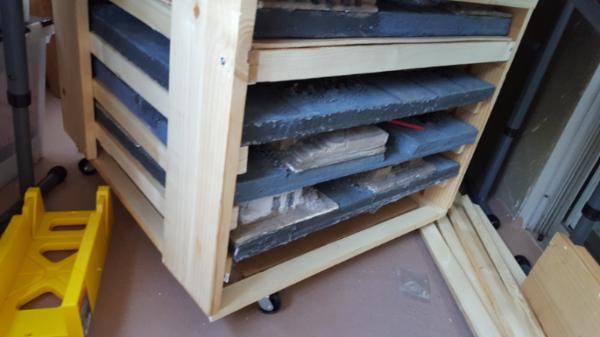
Pretty straightforward construction, just a frame and a lot of shelves out of wood to hold tiles. I was trying to be compact so i figured tiles would be no more than 3 inches tall buttt.. i was wrong, so i need to rebuilt it. Right now it can only fit 4 out of hte 6 which is pretty lame given how much room it takes up. But still im pleased and it gives me a lot more storage back:
In other news I'm just painting up the other crane/lift/etc.
Notice i DIDNT paint up the danger stripes on the upper grip areas, originally because i needed a break but as i look at it it's a lot less busy and helps hihglight the stripes on the tips of the crane, so I'll probably paint over the other crane's stripes as well moving forward.
|
|
|
|
|
|
2015/12/17 07:03:56
Subject: Custom multi-level city terrain (12/15: computer consoles painted)
|
|
Pious Palatine
|
Good progress. I really like the on/off light on the consoles.
EDC
|
|
|
|
|
2015/12/17 21:04:57
Subject: Re:Custom multi-level city terrain (12/15: computer consoles painted)
|
|
Dakka Veteran
|
|
|
|
|
|
|
2015/12/19 07:50:15
Subject: Custom multi-level city terrain (12/17: overall garage integration work, roof beam work)
|
|
Anti-Armour Yaogat
Cookeville, TN; USA
|
Excellent work man! Excellent work!
|
  
There are 10 types of people in this world; those that know binary and those that dont.
----->MANTIS MAKER COMPETITION <---- |
|
|
|
|
2015/12/22 02:32:33
Subject: Re:Custom multi-level city terrain (12/17: overall garage integration work, roof beam work)
|
|
Dakka Veteran
|
Thanks!
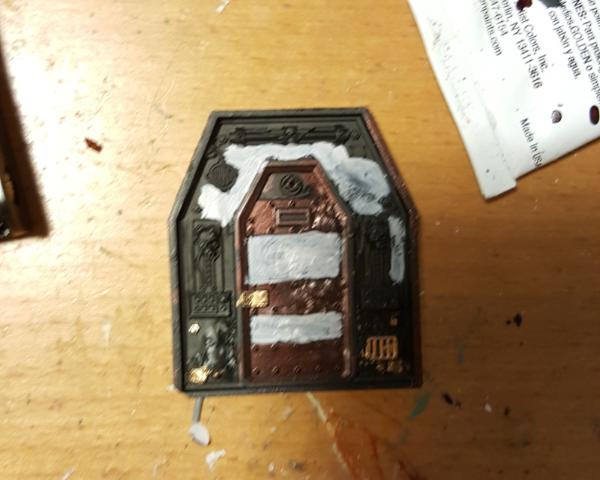
So I wanted to just show this one when it was done butitrs been taking a while so I figured id come out with an update.
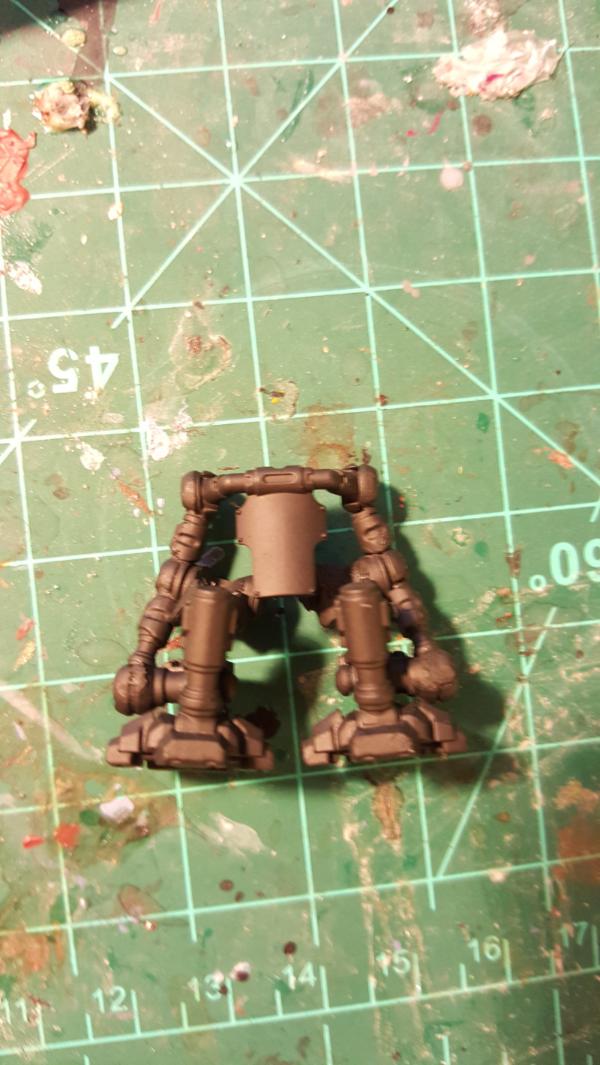
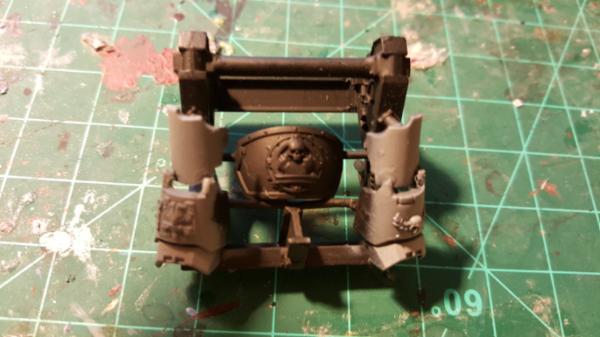
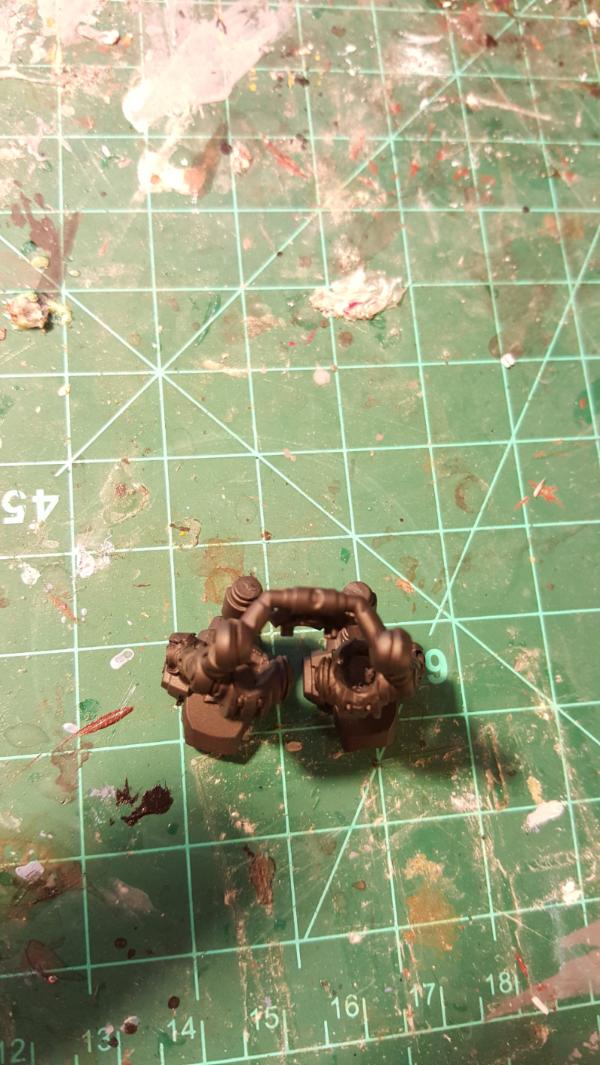
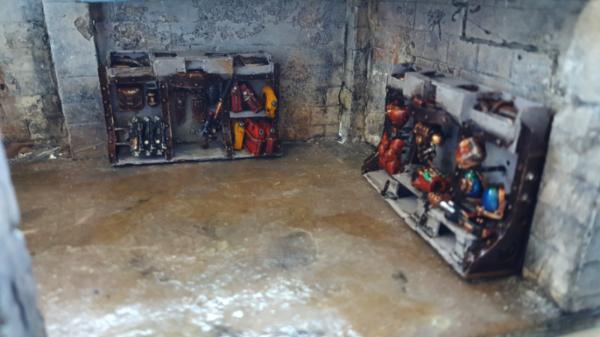
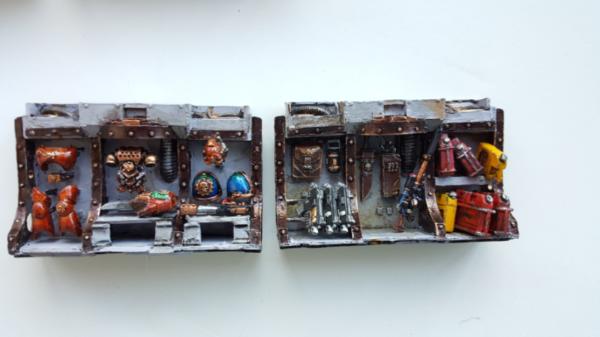
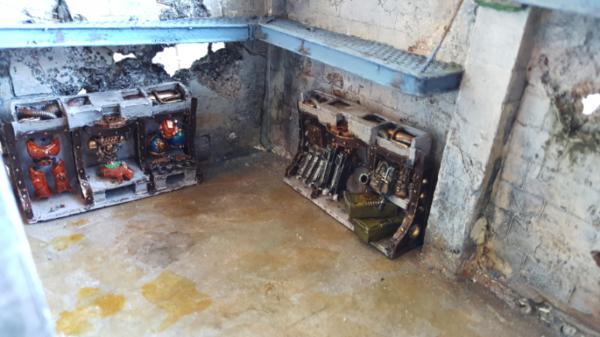
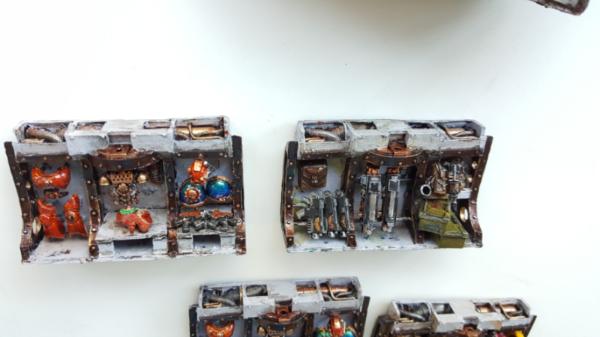
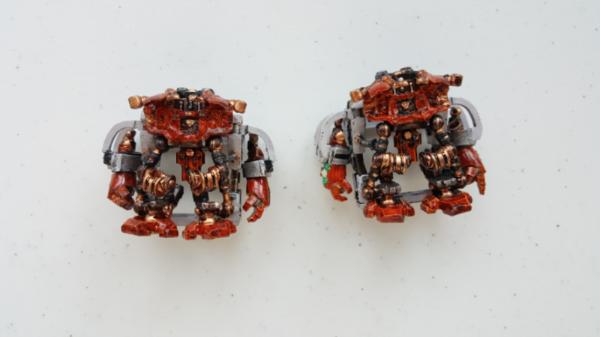
Orignally my thought for one of the 2 crane contents was a dissasembled dreadnought. Unfortunately the only dread i have remeining was a snap together and thus not really something I could take apart. However I do happen to have a full centurion box I was never going to use (not a fan of centurions all together, but their exoskeletons rock). So it's time for centurion armour racks!

|
|
|
|
|
|
2015/12/22 06:54:05
Subject: Custom multi-level city terrain (12/21: centurion armour racks)
|
|
Pious Palatine
|
Looks good. It's all those little details that are making this piece of terrain a masterpiece.
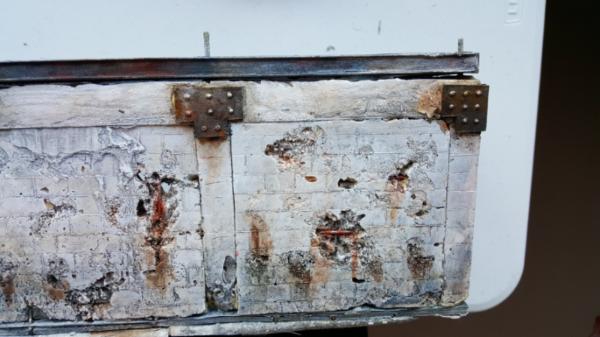
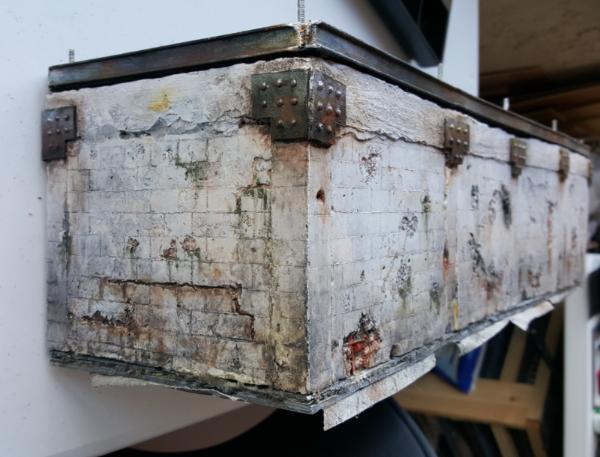
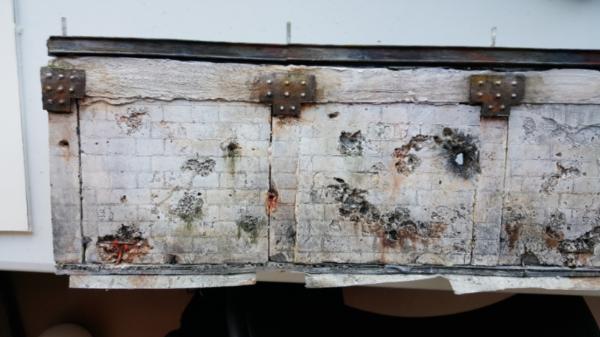
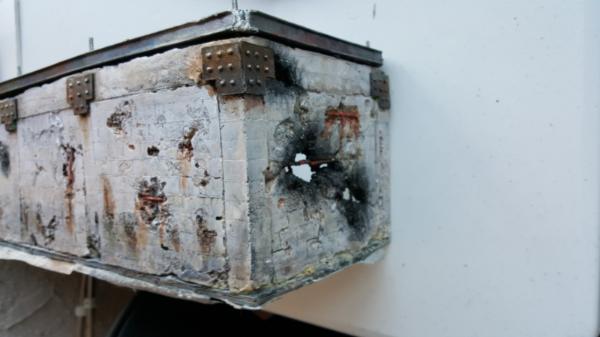
Love how you've weathered the main building, it's just mind blowing.
EDC
|
|
|
|
|
2015/12/24 00:00:31
Subject: Re:Custom multi-level city terrain (12/21: centurion armour racks)
|
|
Dakka Veteran
|
|
|
This message was edited 1 time. Last update was at 2015/12/24 00:08:25
|
|
|
|
|
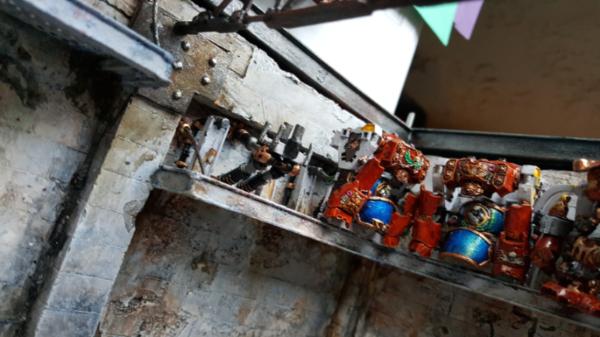
2016/01/02 22:02:30
Subject: Re:Custom multi-level city terrain (1/2: centurion armour racks, lifter arms)
|
|
Dakka Veteran
|
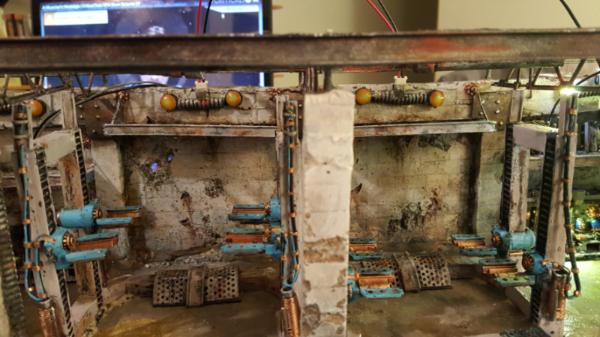
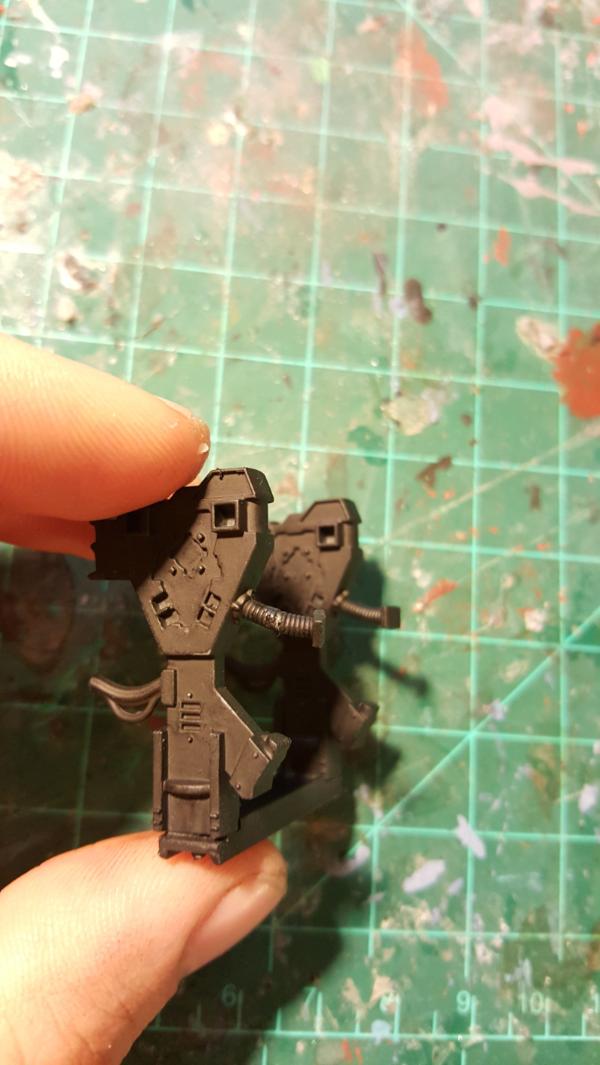
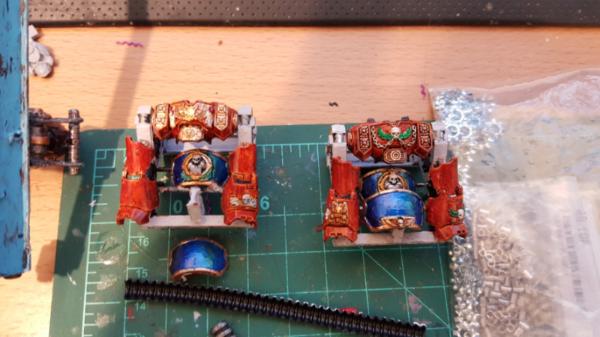
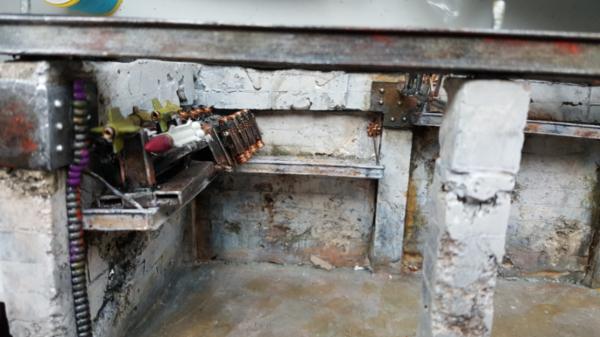
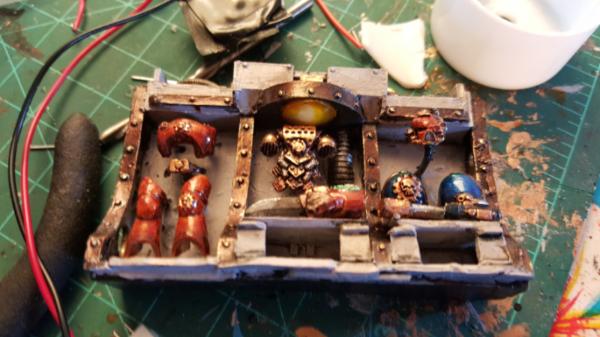
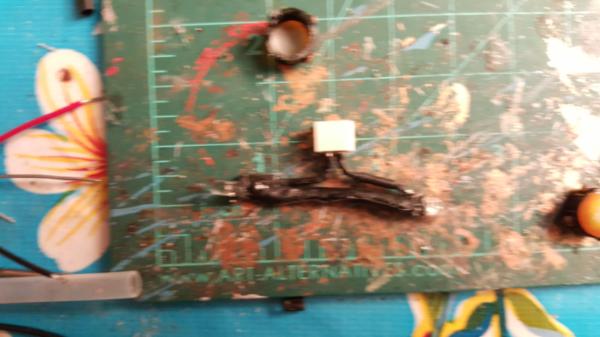
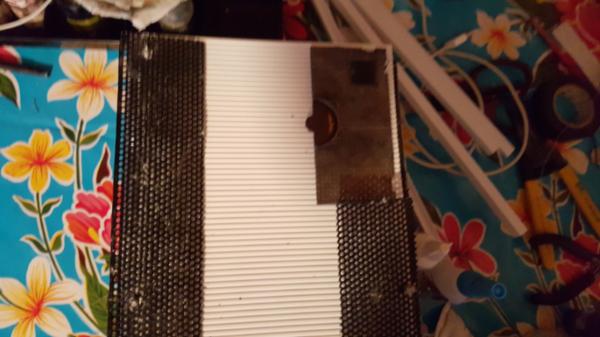
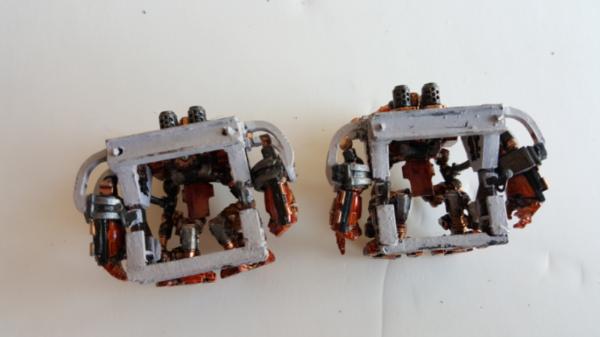
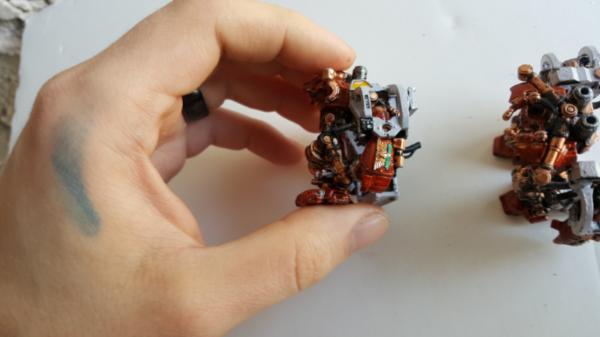
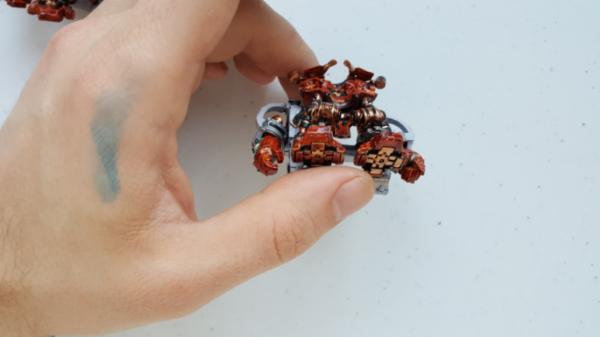
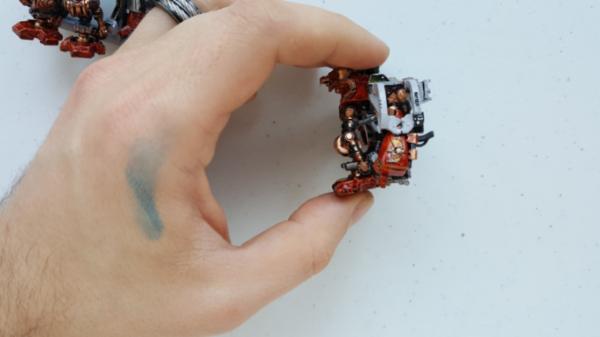
Happy New year! new year, new things! I'm back from xmas festivities with more work on my centurion racks.
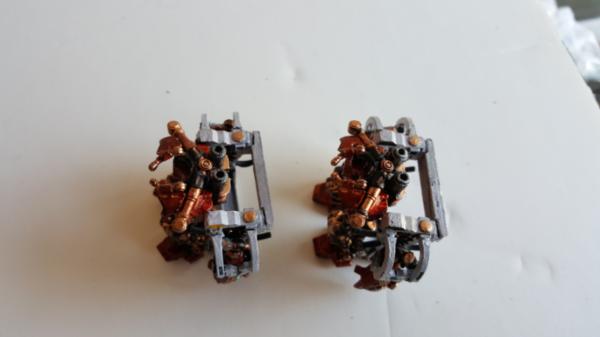
First up the other side of the armour racks!
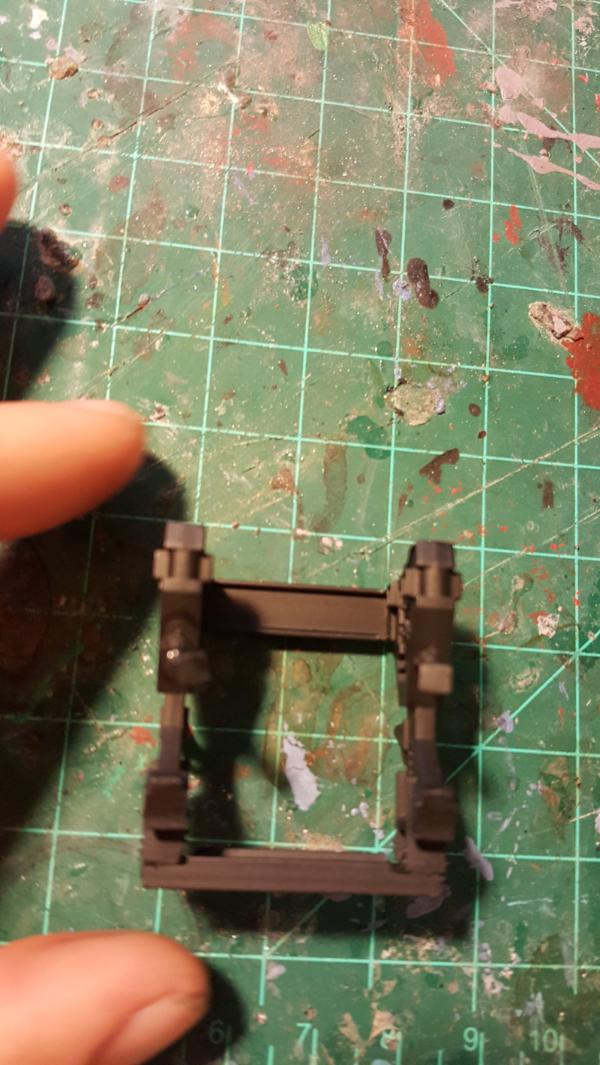
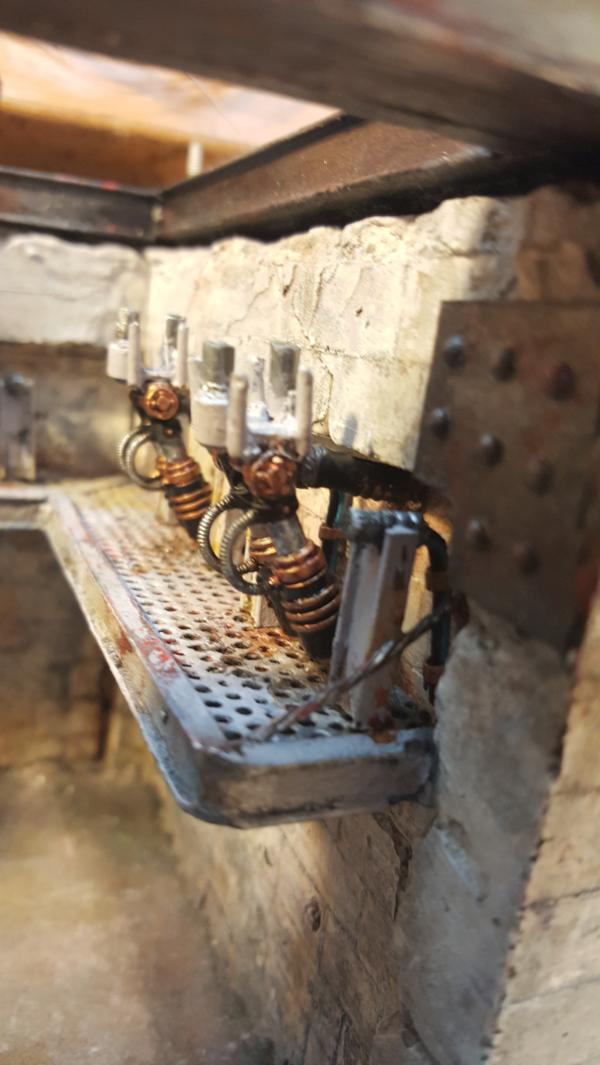
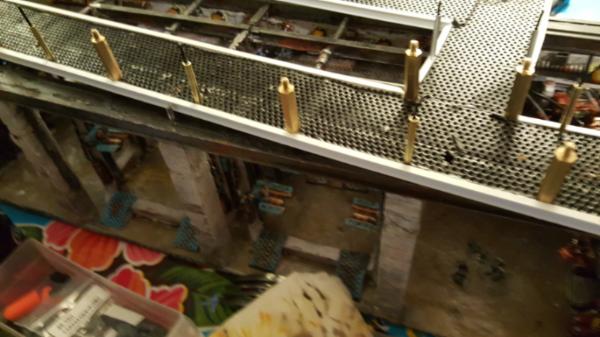
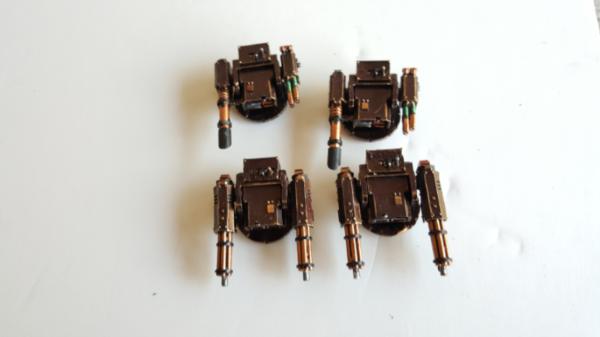
Seceondly I was pondering just how I wanted to connect these to the shelf. The drop pod had such lovely cabling alreasdy stretched out from the back, so it seemed a shame to waste it.
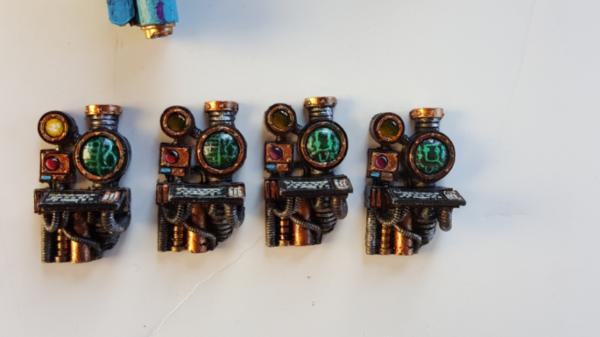
I figure then that the racks would have stations they hooked up too for power and such, and came up with these:
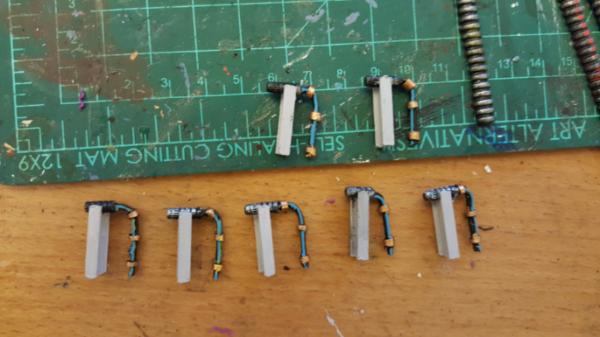
which worked nicely. However upon previewing it all together there still is one nagging issue:
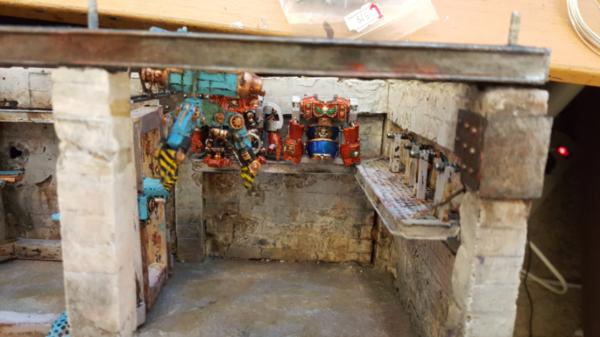
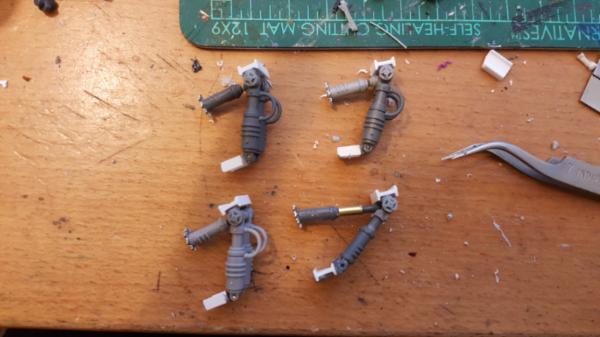
The darn crane is still not really situated to be able to tack them off their stations! its just a touch too low. I cant really fix this at this point by adding more hneight, so I had to get creative. That's when I hit upon the idea of each station having a small lifter arm to lower the whole rack down a bit and let the crane take over.
This actually made even more sense because the crane just sets it on the arm afterwords, so the crane/operator doesnt have to worry about lining up precisely with all the power connection points. So it solved my height problem and makes the overall system more complete (it also provides a way of holding the racks onto the shelfes more securely, so another plus!)
This is what ive come up with, the 4th is donw because thats the piece on the crane!
|
|
This message was edited 1 time. Last update was at 2016/01/02 22:03:10
|
|
|
|
|
2016/01/04 06:21:33
Subject: Re:Custom multi-level city terrain (12/23: centurion armour rack, armour lifters)
|
|
Focused Fire Warrior
|
So much fine work and detail. I envy it (and you.)
 
|
|
|
|
|
|
2016/01/04 07:28:57
Subject: Custom multi-level city terrain (12/23: centurion armour rack, armour lifters)
|
|
Pious Palatine
|
Nice racks 
Really though the attention to detail is stunning. The razor back turrets look great too.
EDC
|
|
|
|
|
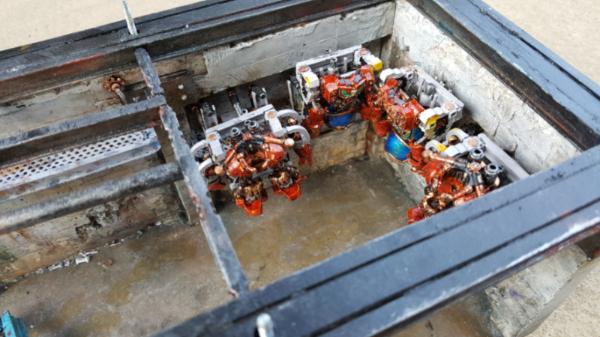
2016/01/04 21:03:31
Subject: Re:Custom multi-level city terrain (12/23: centurion armour rack, armour lifters)
|
|
Dakka Veteran
|
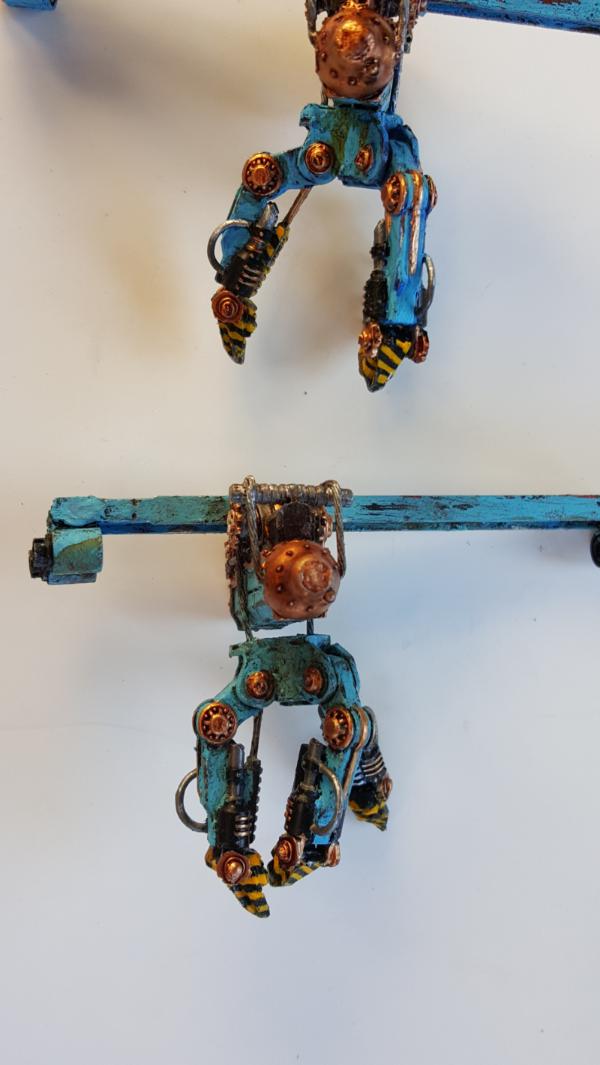
Thanks all! I just regret how long it all takes. Im just slow haha. I get distracted by the internet easily so i paint slowly. Le sigh. Still progress is progress, even if its not as fast as i'd like.
Anyways we have the lifter arms painted up and installed! I actually later changed my mind about the part that holds onto the rack, it needed more contrast/the grey blended in a bit too much. So when you see this with all the centurion racks install it'll be a bit more noticible.

|
|
|
|
|
|
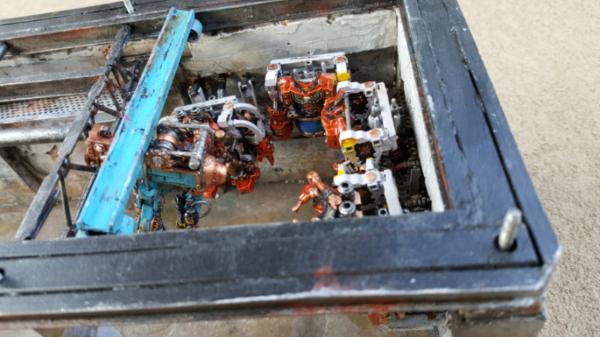
2016/01/06 01:26:42
Subject: Re:Custom multi-level city terrain (12/23: centurion armour rack, armour lifters)
|
|
Dakka Veteran
|
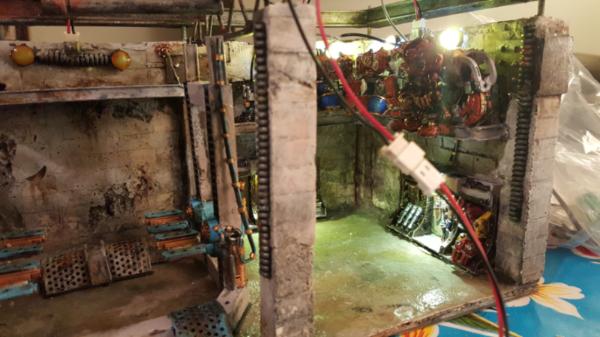
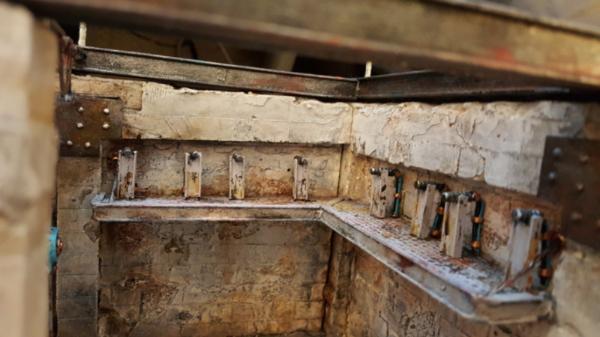
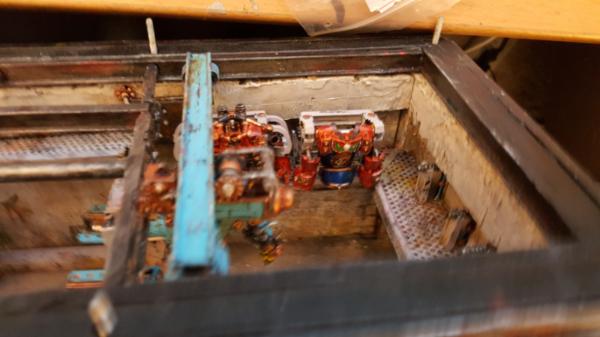
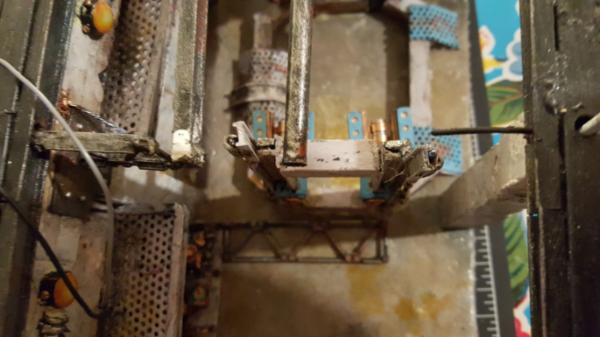
It's all comin together now! Unfortunately it all coming together highlights one important thing: man it's going to be cool if the roof comes off. There is just a lot of detail that's going to be lost once that roof is in place, so keeping it detachable is definitely ideal. This messes with the lighting up aspect a bit but I think I can make it work via adding connectors at that point so i can detach easily.
Note that the 4th armour rack isnt yet glued down. Im deciding where it should go (crane or on the rack). On the one hand it's nice on the rack because it clearly shows what the rack does and keeps the crane clear a bit (putting the rack on the crane might start to impact tanks below, we'll see), but it would be cool to have on the crane too and see the naked lifter... dunno. We'll see.
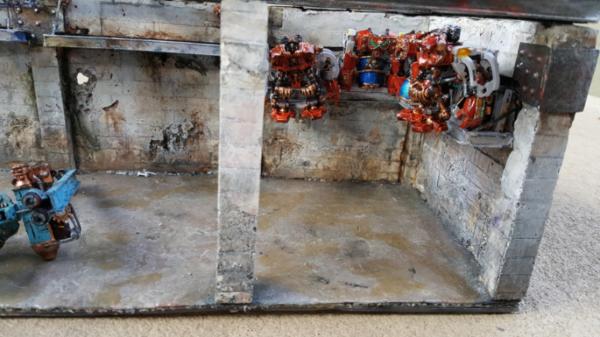
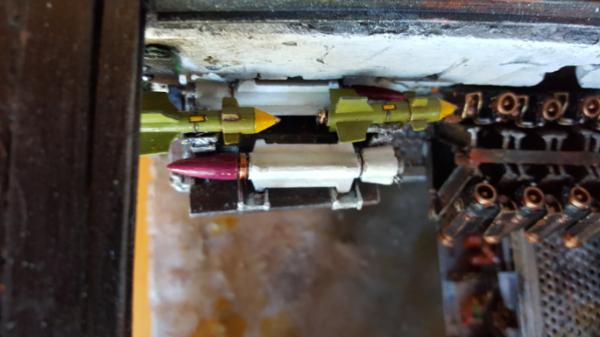
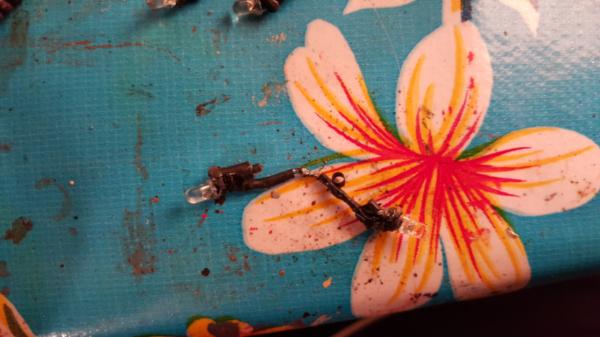
Whoops there is a second missile rack i made btw! Didnt actually show you guys yet i dont think, i'll post pics soon of closeups.

Test of the computer terminal with cabling! looking fun. The purple is.. unfortunate but fixable. The problem is that these are lego tubing so the primer didnt stick, so when i went to glue it the barest hint of glue on my hands just ripped off chunks. An easy repaint though
|
|
|
|
|
|
2016/01/06 08:24:23
Subject: Custom multi-level city terrain (1/5/16: installing garage details)
|
|
Incorporating Wet-Blending
Wales: Where the Men are Men and the sheep are Scared.
|
This looks awesome
|
|
|
|
|
|
2016/01/06 19:39:04
Subject: Re:Custom multi-level city terrain (1/5/16: installing garage details)
|
|
Been Around the Block
|
Loving all the work on this table
I'm in the planning / learning stages of trying to make a few larger terrain pieces myself, previously only having built small piecemeal sections of fencing and barbwire and small corner / straight wall sections, etc... basic stuff
a thought i had recently was trying to scratch build some random common scenery elements that I dont see used elsewhere
box's and barrels and fencing i see everywhere, but i wanted to make a list of more rarely seen elements I thought i thought i could find or scratch build to give more life to the terrain
so hoping you'll find any of the ideas useful here's what I've come up with and my thoughts and list of reference pics
dumpsters: *i'm pretty sure i could build the body out of plasticard, was going to hunt for a better material for lids but was thinking it may be possible with plasticard+putty to round the top with a couple strips of wire run down the length to give that familiar ridged look -maybe a heavy coat of elmers over it to blend the pieces together a bit
https://www.google.com/imgres?imgurl=https://img-new.cgtrader.com/items/48416/grid_trash_dumpster_3d_model_fbx_lwo_lw_lws_ma_mb_obj_max__b457e315-cae6-41e3-89b3-b8c7edd1c2d5.jpg&imgrefurl=https://www.cgtrader.com/3d-models/tag/dumpster&h=200&w=255&tbnid=EqxadsFw65ZjPM:&docid=f-wA_ZtkCWzsGM&ei=B2SNVpiWKYa1eaGFg8AD&tbm=isch&ved=0ahUKEwjYtdic75XKAhWGWh4KHaHCADgQMwgkKAgwCA
https://www.google.com/imgres?imgurl=https://i.ytimg.com/vi/55wsmDalESU/hqdefault.jpg&imgrefurl=https://www.youtube.com/watch?v%3D55wsmDalESU&h=360&w=480&tbnid=x1WrEm5FEMkTyM:&docid=EAdMLPEKrGQARM&ei=B2SNVpiWKYa1eaGFg8AD&tbm=isch&ved=0ahUKEwjYtdic75XKAhWGWh4KHaHCADgQMwhAKBowGg
https://www.google.com/imgres?imgurl=https://s-media-cache-ak0.pinimg.com/736x/0c/80/55/0c8055b62e3b29fbf47311ddee8b5a5d.jpg&imgrefurl=https://www.pinterest.com/pin/426364289696593684/&h=326&w=450&tbnid=iSkgWVi6heB1KM:&docid=kUtHgj4iJ0TOrM&ei=B2SNVpiWKYa1eaGFg8AD&tbm=isch&ved=0ahUKEwjYtdic75XKAhWGWh4KHaHCADgQMwg7KBUwFQ
freight cargo containers: was thinking the ribbed center sections of cardboard for the main walls and plasticard or even cardboard for the edges, I really dont think these would be difficult to make
http://s1183.photobucket.com/user/NarcissusCO/media/IMG_2272.jpg.html
http://g01.a.alicdn.com/kf/HTB18y6KHFXXXXXEaXXXq6xXFXXXP/Scale-plastic-Container-Model-Cargo-Container-Model-Marrsk-shipping-container-model-miniatures.jpg
pallets: I would prefer the plastic ones for my urban scenery (largely cause they would let me throw out splashes of color, blues and oranges) but either work, i've seen really nice scale wood pallets made of coffee stirs and I'm going to be making some platic ones out of... you guessed it plasticard
http://www.chep.com/assets/0/180/183/220/81735b32-c34d-45c7-b459-a6d7805cea16.jpg?n=4182
http://www.pallet.com/upload_cat/ico/plastic%20pallet%20by%20sizes%20europallet%20asia%20pallet%20eur%20euro%20epal%20paletten%20palletes%20palet.jpg
benches: they gotta sit sometime, i actually got lucky and had some at the perfect scale that went with a christmas train set that went bad this year, snipped them right off the base and set to resin casting  but i've seen them for sale elsewhere and dont think they'd be terribly difficult to scratch build if needed, lots of long thin planks and something fancier for the arm/leg pieces, maybe with something decorative made of floral wire
http://ecx.images-amazon.com/images/I/413kDZ%2BTHcL._SY300_.jpg
as a side note, i recently found these little guys http://g03.a.alicdn.com/kf/HTB1P0b0JVXXXXbiXFXXq6xXFXXXU/T191-Pixar-Cars-2-Pixar-Planes-Forklift-1-55-Scale-Diecast-Metal-Alloy-Modle-Toys-For.jpg
on a clearance rack for a couple bucks each... there were 4 left so i took them all... a little bit of filing off of the face elements, and filling in the mouth with a small bit of putty... followed by a decent paint job, they make amazing scenery props...
moral of that story, always check the clearance racks
once again, loving all the details your putting into your table, been checking your progress for a couple weeks now, excited to see the finished product
|
|
This message was edited 1 time. Last update was at 2016/01/06 19:49:14
|
|
|
|
|
2016/01/07 21:54:37
Subject: Re:Custom multi-level city terrain (1/5/16: installing garage details)
|
|
Dakka Veteran
|
Oh wow great reference! yeah those would all be fun additions. I really like the fumpsters with trash in it. Be a fun piece because you could make it big enough to climb into/give a minor cover save.
Cargo containers are definitely classic.
Pallets I actually made some more or less as bases for my missile racks. You just take square plastic tubing, cut it in half lengthwise (so its short like pallets are) and then make your structure. you can then cover the bottom again with plasticard or in my case i used tongue depressors and just cut them down quickly.
I'm still looking to maybe pick upt he tool kit I had linked too earlier, it should be the right size. I just havent yet gotten around to that, getting all the 40k details in has been top priority, and then if there is room left i pick up a tool kit set.
|
|
This message was edited 1 time. Last update was at 2016/01/07 21:55:03
|
|
|
|
|
2016/01/13 00:25:46
Subject: Re:Custom multi-level city terrain (1/12/16: installing tank lifts)
|
|
Dakka Veteran
|
Back again! So there was a brief break there to do some touchup work on those rhinos I painted earlier, but now we're back with garage work!
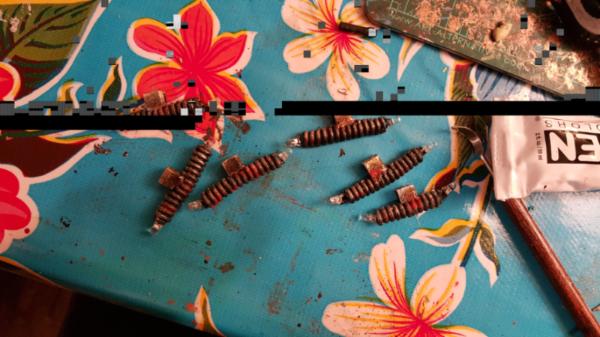
First up we have an alternate view of the secodn missile rack I made
Next we have installs for the tank lifts. Notice that there is wiring too! it stops and at that end point i plan to add a magnet so i can magnetically attach the roof's cables but still leave it all detachable

|
|
|
|
|
|
2016/01/13 07:03:04
Subject: Custom multi-level city terrain (1/12/16: installing tank lifts)
|
|
Pious Palatine
|
Nice missile rack. It's really coming together now.
EDC
|
|
|
|
|
2016/01/15 01:12:40
Subject: Re:Custom multi-level city terrain (1/12/16: installing tank lifts)
|
|
Dakka Veteran
|
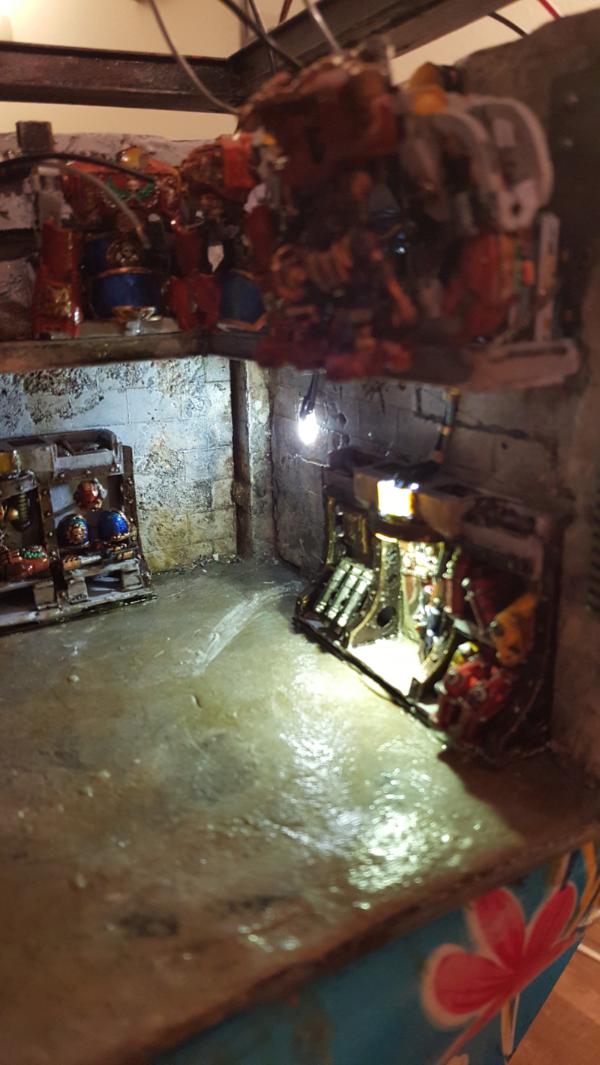
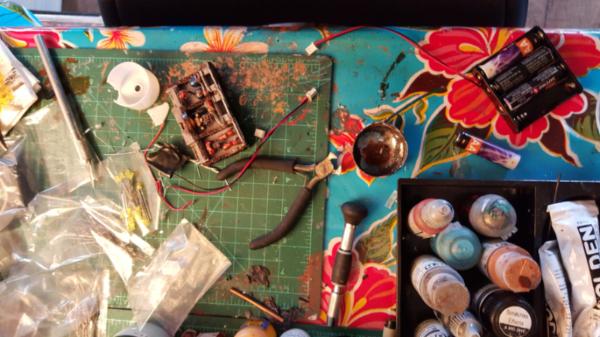
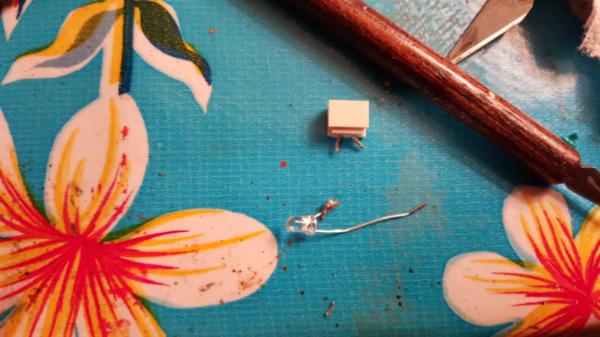
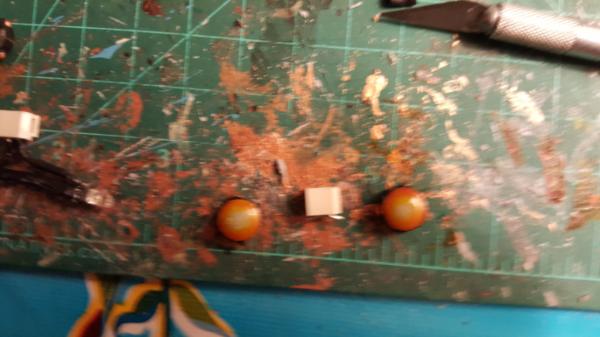
Now for the next fun/not fun part, wiring things!
So installing stuff has been halted so I could add in lighting. Once the roof is down this will also get.. very dark, so lights are key. Unfortunately i need about 14 of them so powering all this could get interetingbut for now i'm sticking with 4 AAs and hoping that it lasts a few hours.
THe leds I chose for the shelves are this very bright white lights, so i needed to diffuse them a bit, enter soda cups! those little button things you push are a perfect size and you just stack 2 on top of each other to get a nice diffused look. I then did a light yellow wash to tint my light.
Yay lots of loose wires..
|
|
|
|
|
|
2016/01/20 00:44:43
Subject: Re:Custom multi-level city terrain (1/18/16: LED work, doors, shelf installs)
|
|
Dakka Veteran
|
Woo big weekend for progress.
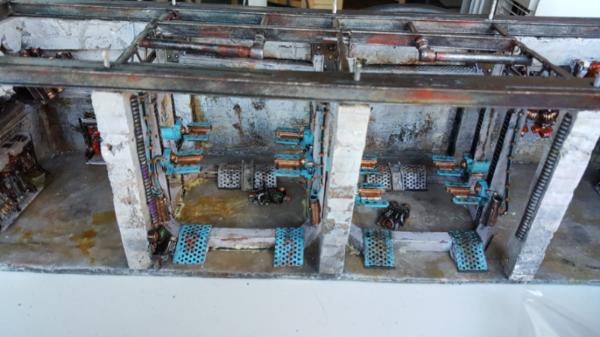
First up we have shelf installs! Yay!
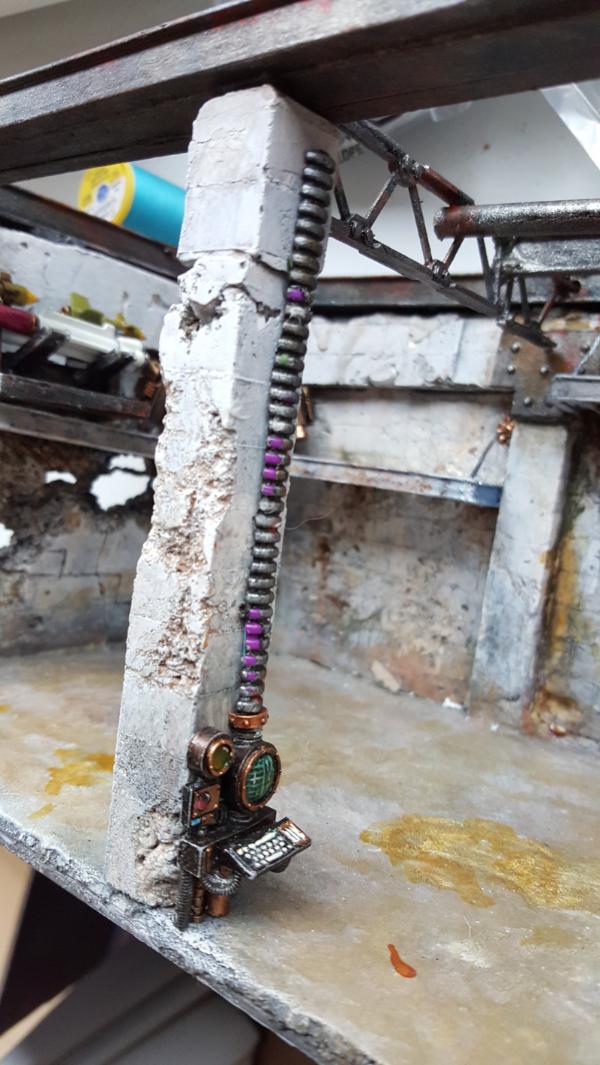
I soldered up some leds I got and added my little copper tubing to help snazz up the wiring. One thing to note is that I was originally using lego tubing for this purpose but it was too small for these wires. Fortunately shrink tubing fit just fine and was actually a LOT easier to work with to boot (lego plastic is no bueno with paint as we've already discussed, so the act of cutting up and threading the lego tubing ususally stripped it as well. Not fun)
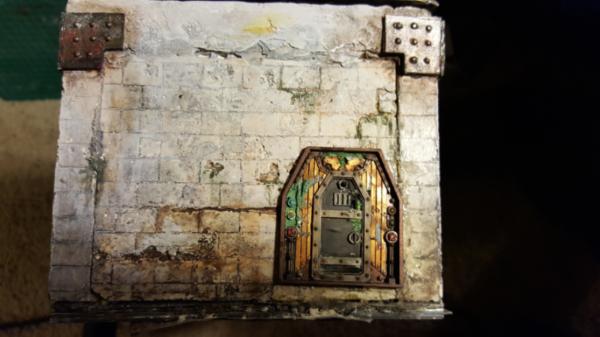
Next up I wanted to add a door for the marble. Given that the flak tower is a ways away I needed someplace logical to put my marble landing. While it's a bit wierd for a garage to have such a thing it wont be a permement install and I can just make up some stairs when it's no longer an issue.
To do it i figured id just cut a bastion door in half and use both side.. BIG HUGE MISTAKE. the toleranec is SO fine you end up with holes and it took me an hour just to get what i got. Just buy 2 and shave off each side. Seriously.
Still with some green stuff it'l get usable again. I also intend to add some LEDs here too to light them up cause.. why not!
Finally it was time to work on my wall lights. I Wanted lights all along the walls to just help light it up but also stay out of the way of the cranes. I stared by modelling the lights themslves andI'm happy wth the result:

Then there was the leds. these were much trickier to solder because they were so close together and I eneded a strong connection point between them so I can more reliable attach/detach the roof from them.
The base idea is this:
Originally I was hoping to have the wires themselves be clean enough to display but... the soldering was messy and very finicky.
Ugh, so i decided to cove rit up with more of the ribbed tubing i was using elsewhere.
Much better. Tomorow we'll have them installed and with their light covers glued down too!
|
|
|
|
|
|
2016/01/21 00:59:00
Subject: Re:Custom multi-level city terrain (1/18/16: LED work, doors, shelf installs)
|
|
Dakka Veteran
|
|
|
|
|
|
|
2016/01/21 05:46:04
Subject: Re:Custom multi-level city terrain (1/18/16: the LEDs work! )
|
|

Happy Imperial Citizen
|
Wonderful! The amont of detail on all of this is amazing!
|
|
|
|
|
2016/01/22 20:54:42
Subject: Re:Custom multi-level city terrain (1/18/16: the LEDs work! )
|
|
Dakka Veteran
|
Thanks!
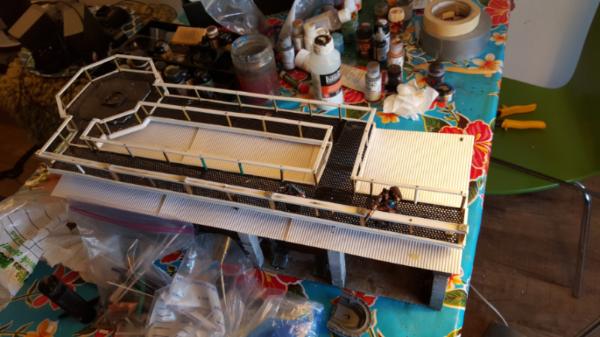
So next up i switched gears a bit to work ont he roof. I was doing some boring cleanup work and added in the inner door which.. the pictures turned out blurry so you'll see it eventually. Buuttt I really wanted to nail down the roof situation.
The thing is i want it detachable but where is the question. my original thought was do to the ibeam frame, but that is not something that's been coming on and off particularly well lets just say. One of my trusses broke and I have to fix it and all my concrete pillars get a lot less stable with the frame off.
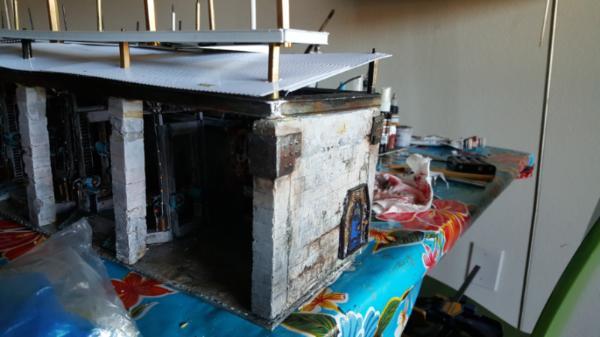
So the new thinking is i just glue the frame down and have just the roof/walkways be removable instead. But I wanted to make sure THEY could be strong enough to do that so i figured it was time to just stop with the small picture stuff to finish it off and figure it out.
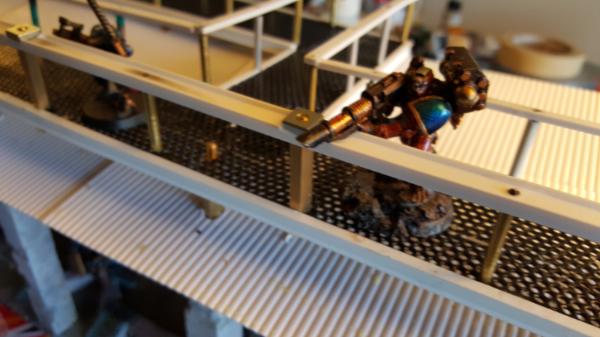
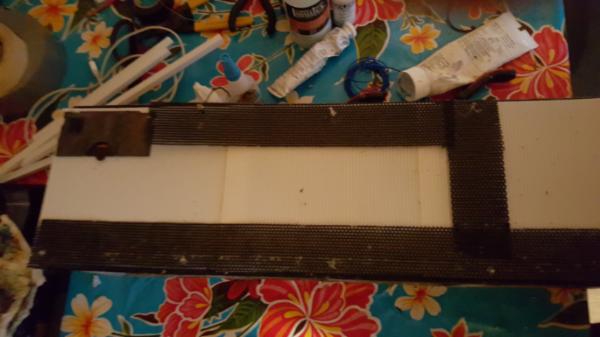
So here we go. I started with just corrugated plastic you can get from kitkraft. Pretty simple, cheap, looks good. Then on top im just working out the walkways. These ended up being a touch wider than i'd have liked but given the new base size + the size of railings it seemed that this would work best for model comfort/placement. It's going to make the eventual walkway bases somewhat interesting to make but i'll cross that bridge whe ni get to it.
|
|
This message was edited 1 time. Last update was at 2016/01/22 20:55:33
|
|
|
|
|
2016/01/25 21:30:18
Subject: Re:Custom multi-level city terrain (1/22/16: roof work )
|
|
Dakka Veteran
|
Busy weekend, not a lot of pictures because I was working on so many things!
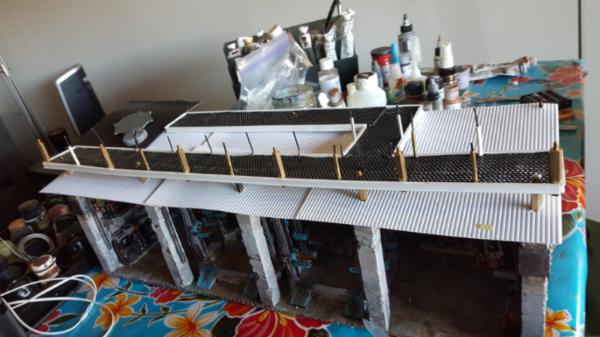
Basically it was about plotting exactly what was going on with the roof. After seeing the corurgated panels on the roof i.. really wanted them to be tilted. So then it became about just how to do that and so forth. I also finally figured out the final pieces for my frame so I can glue that down, as all the roof is dependent on that being glued and set.
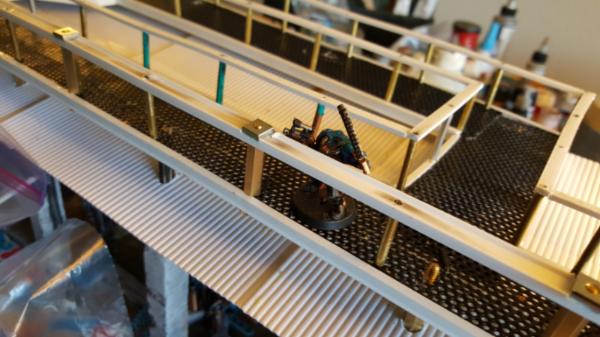
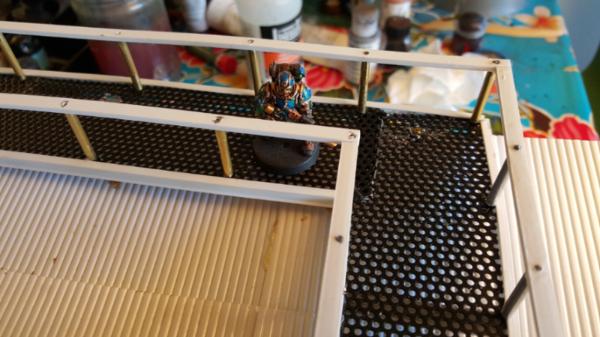
So first up we have railing and edging work for the walkways:
I also had to repair this mess:
Blergh
And then it was about adding in sprinklers! I figure that piping would be the sprinkler system, so I fashened up some spriklers and went with that as ma plans:
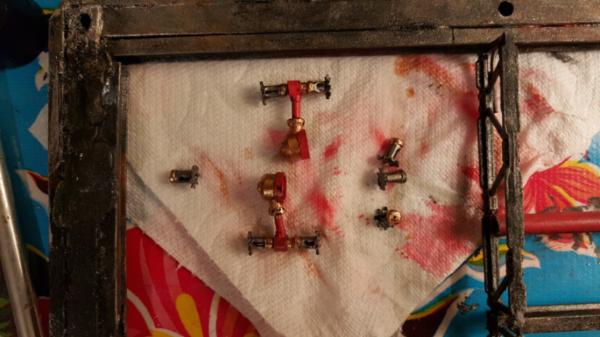
|
|
|
|
|
|
2016/01/26 22:10:04
Subject: Re:Custom multi-level city terrain (1/26: sprinkler system done, roof tests! )
|
|
Dakka Veteran
|
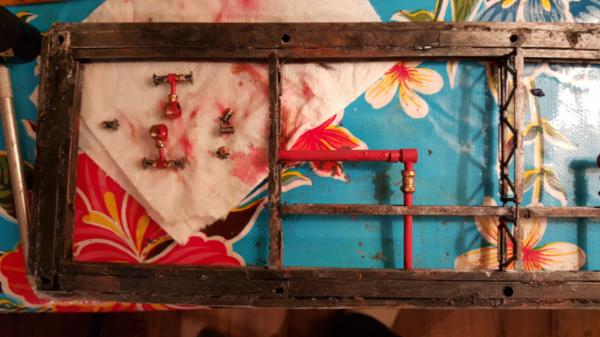
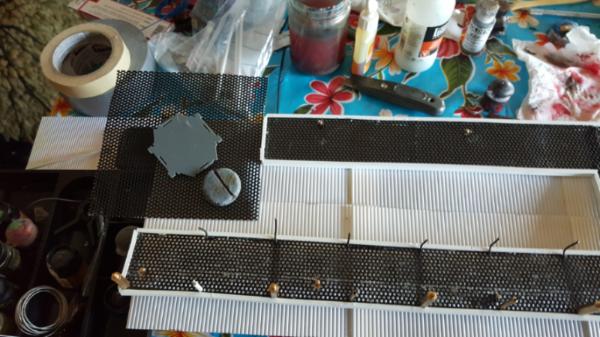
So we have the sprinklers finished and installed. Note that they go up! this is to avoid the crane in space and works really well becasuuuuseeeee
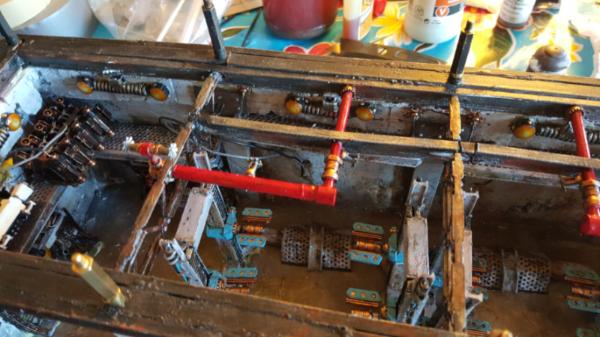
The ceiling is slanted! woo! I'm happy, now i just gotta add windows and such to the open gaps and paint it all.
We also have the beginnings of my offset turret platform. Still working on this but the size is there. Id love to make it octagonal though, we'll see.
|
|
|
|
|
|
2016/01/29 22:32:04
Subject: Re:Custom multi-level city terrain (1/26: sprinkler system done, roof tests! )
|
|
Dakka Veteran
|
|
|
|
|
|
|
|
|

 6th Skylight Patrol Contingent
 = 131
= 131