| Author |
Message |
 |
|
|
|
|
Advert
|
Forum adverts like this one are shown to any user who is not logged in. Join us by filling out a tiny 3 field form and you will get your own, free, dakka user account which gives a good range of benefits to you:
- No adverts like this in the forums anymore.
- Times and dates in your local timezone.
- Full tracking of what you have read so you can skip to your first unread post, easily see what has changed since you last logged in, and easily see what is new at a glance.
- Email notifications for threads you want to watch closely.
- Being a part of the oldest wargaming community on the net.
If you are already a member then feel free to login now. |
|
 |
2013/07/09 20:39:40
Subject: Homemade FW-style realm of battle terrain boards/buildings (7/9 - craters/foamcoat first layer)
|
|

Avatar of the Bloody-Handed God
Inside your mind, corrupting the pathways
|
Looking good.
|
|
|
|
 |
|
2013/07/09 21:30:37
Subject: Homemade FW-style realm of battle terrain boards/buildings (7/9 - craters/foamcoat first layer)
|
|
Battlefortress Driver with Krusha Wheel
|
This is excellent work so far and definitely inspirational. I'm looking forward to seeing how this turns out!
|
|
|
|
|
|
2013/07/09 21:51:44
Subject: Homemade FW-style realm of battle terrain boards/buildings (7/9 - craters/foamcoat first layer)
|
|
Lone Wolf Sentinel Pilot
|
Truly incredible work. Looking forward to future updates!
|
DR:90S+G+M++B++I+Pw40k00#-D+A++/mWD292R+T(M)DM+
FW Epic Bunker: £97,871.35. Overpriced at all?
 Black Legion 8th Grand Company Black Legion 8th Grand Company
 Cadian XV Airborne "Flying Fifteens" Cadian XV Airborne "Flying Fifteens"
 Order of the Ebon Chalice Order of the Ebon Chalice
 Relictors 3rd Company Relictors 3rd Company |
|
|
|
|
2013/07/10 20:07:34
Subject: Re:Homemade FW-style realm of battle terrain boards/buildings (7/9 - craters/foamcoat first layer)
|
|

Dakka Veteran
|
Thanks guys!
Work continues digging stuff to embed and applying the first coat. I ran out of my initital 3 pounds and all told,
without any testing, it probably would have normally covered abouuuut 4.25 tiles in a first coat. Not barring rubble coating and all that.
Just so you guys know, each first layer has taken abouuut a 1/2 cup ratio to do. So in other words:
1 cup of foamcoat, 1/2 cup grit/sand, 1/4th cup boost, 1/4th cup water, 1/8th cup (2 tablespoons) of latex paint.
Takes about 1-2 hours to really dry and harden, and there ususally is about 10% extra on the bottom,w hich i've been using to
start coating rubble to hopefully make that chip/fracture ina cool and realistic way:
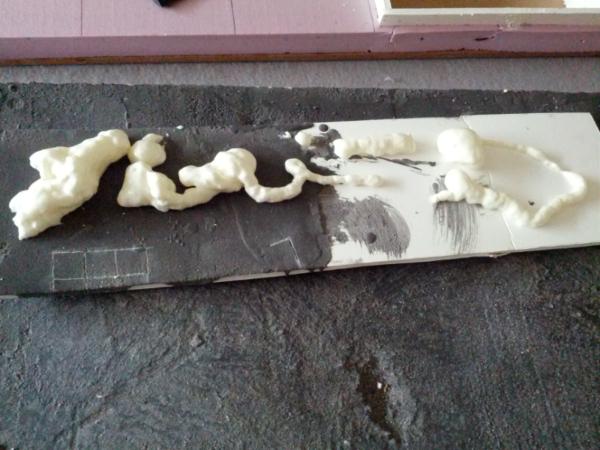
I also got a cheap bottle of expanding foam to try out. I'm hoping to use it near the areas where my tyranid infestation is.
|
|
|
|
|
|
2013/07/11 20:27:22
Subject: Re:Homemade FW-style realm of battle terrain boards/buildings (7/11 - starting second coat/rubble)
|
|
Dakka Veteran
|
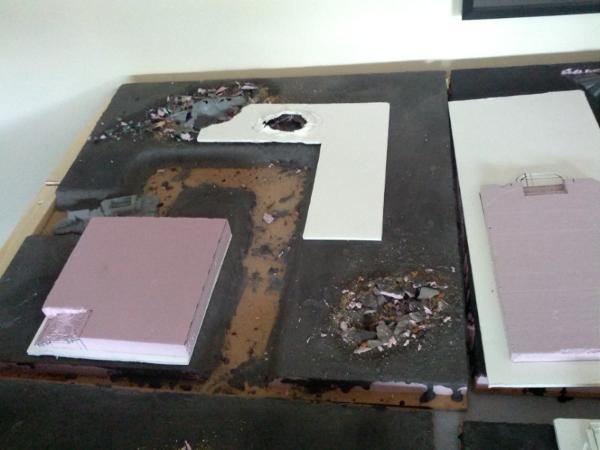
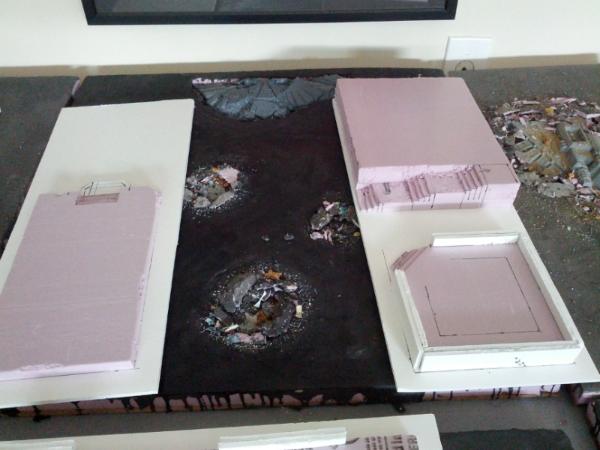
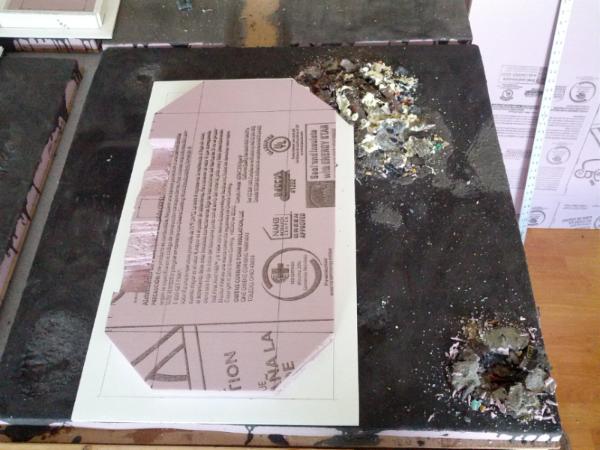
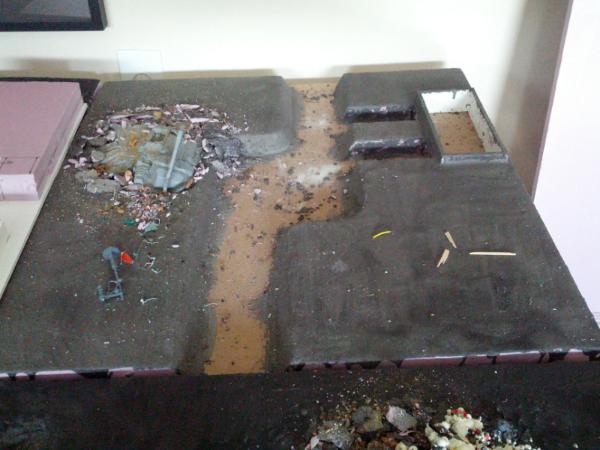
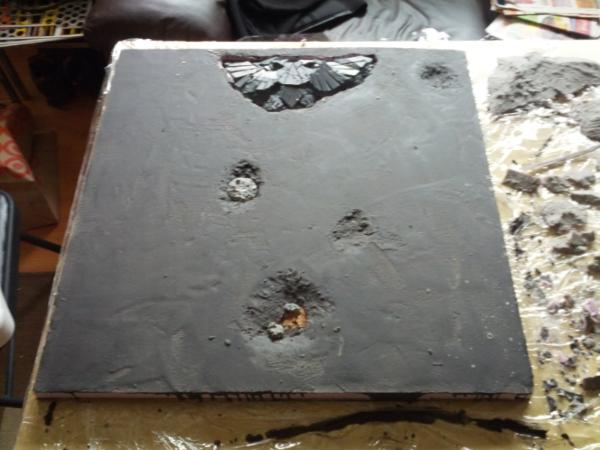
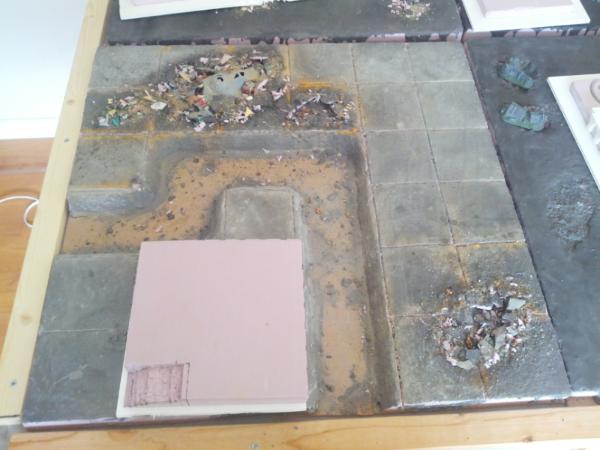
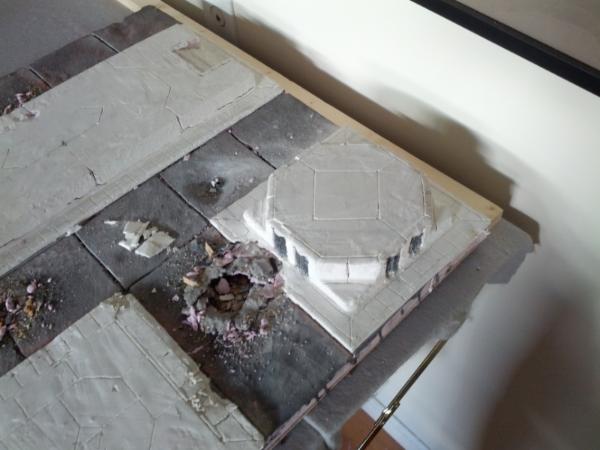
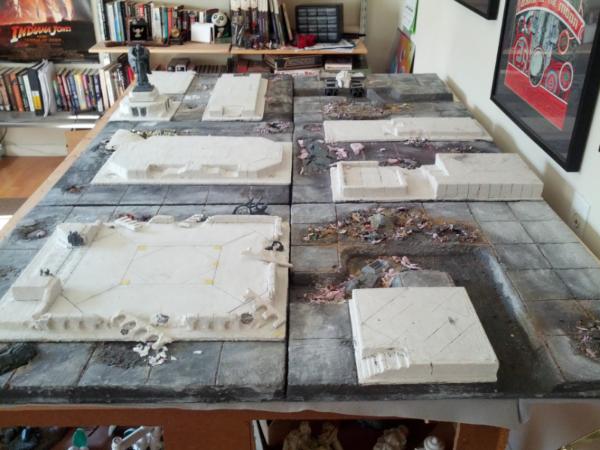
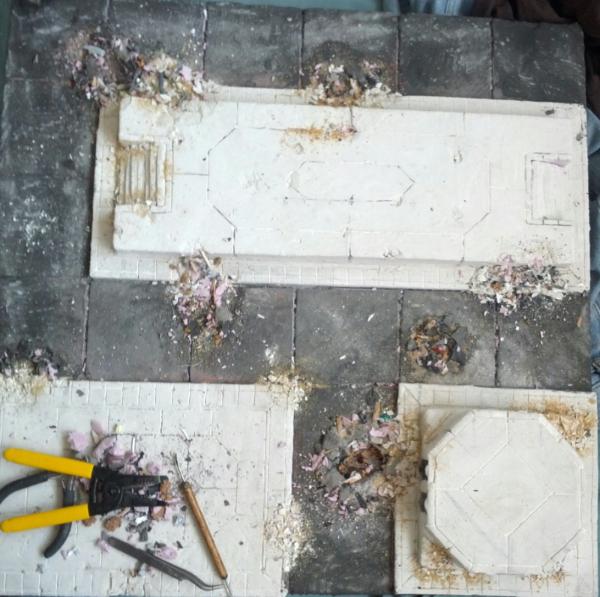
After a push last night to get everything coating we have all 6 tiles now with a first coat.. which means it's time for the second (and hopefully final) coating!
There is no more grit here, I want this coat to be much smoother in the bulk of the tile. One thing to note is that removing the grit-part has the effect of making
the overall solution more watery, which for my case is the plan since I wanted it to smooth out and be more likely to auto-level.
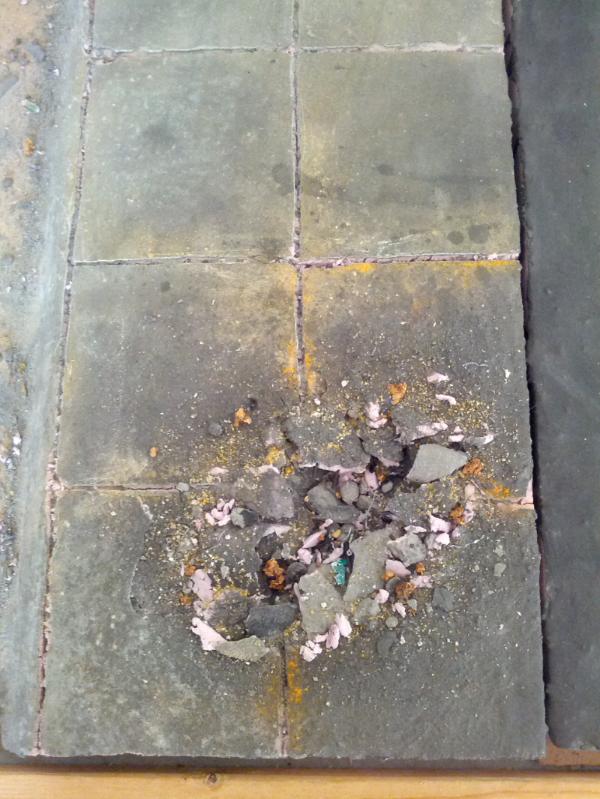
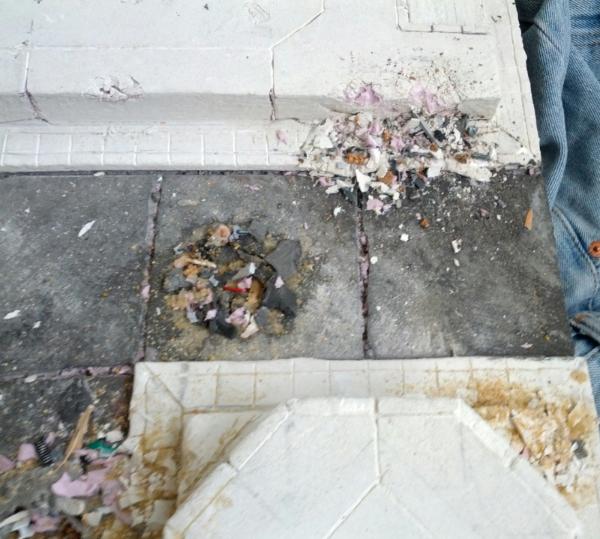
This is also the coat where I start adding the extra rubble chips ive been making and all in all I'm really pleased with the result:
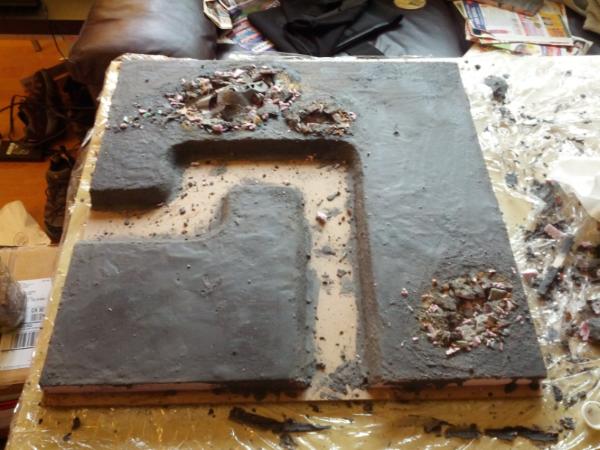
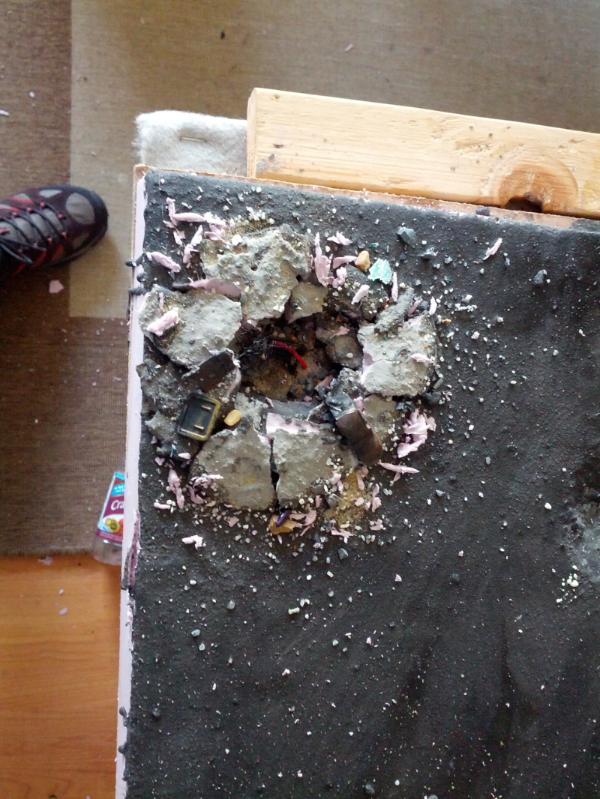
FOr the bigger crater i did it in 2 stages to try and layer it more. I still intend to add more surface/crash debris behind it but that's the general idea:
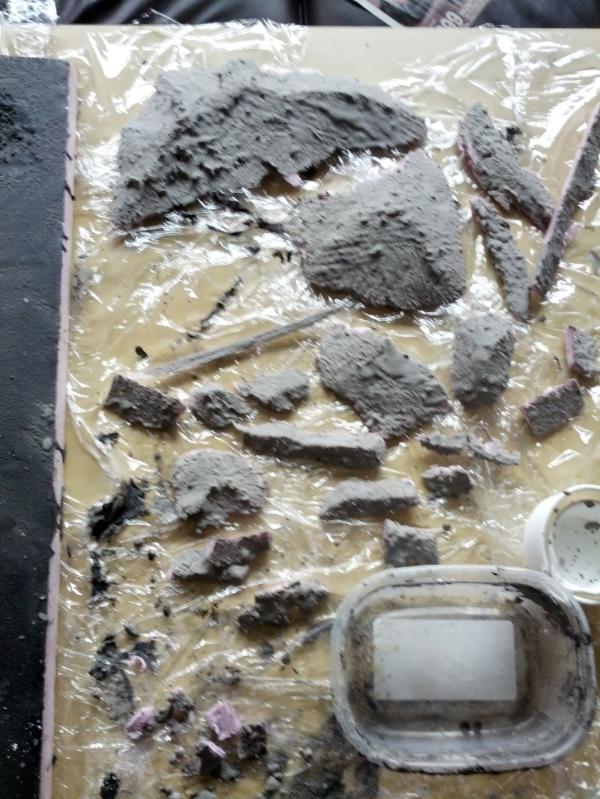
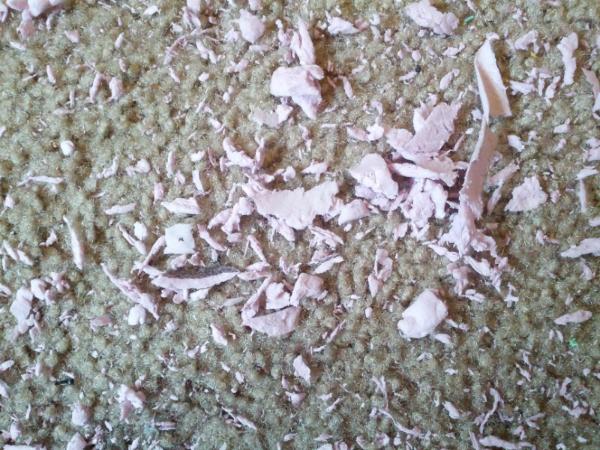
To generate my craters here is the kind of rubble i've been using/saving:
1. First and formost is obviously all foam chips that have been cut/sawed off in this process. I try to mix
in both coated chips (more sandy/rocky but less crack/hole detail) with uncoated ones (the opposite)
It's best to TEAR the foam chips instead of snapping or cutting them, this provides the best cracks/rough edges.
2. Cork! make sure to also tear it to again get rough edges, again these all come from me storing all small bits
that i've cut/torn from making my bases for the rest of my army.
3. Sand, lots of different grits
4. Do a lot of pinning? WHen you drill keep all those small plastic shavings. Also bits of wire you cut
to get the pins the right length
5. any cut plastic from sprues/forgeworld resin/those forgeworld stands that look like concrete slabs
6. Electronics! take them apart and cut the crap out of the boards evertyghing is mounted on
7. Mesh
8. The final bits have been small shavings of foam generated with this bad boy:
http://www.homedepot.com/p/Cooper-Tools-Nicholson-8-in-4-in-Hand-File-21860N/100134991#.Ud8QNkGsh8F
One of my now favorite tooles, the rough jagged side is great for roughening edges and when
applied to foam produces this:
Now the last step.. well i gotta glue all that down! My current plan is a watered down elmers sprayed/
dropped down, we'll see how well that works once the foamcoat finishes drying.
|
|
This message was edited 1 time. Last update was at 2013/07/11 20:29:40
|
|
|
|
|
2013/07/13 18:38:10
Subject: Re:Homemade FW-style realm of battle terrain boards/buildings (7/13 - second coat/crater rubble)
|
|
Dakka Veteran
|
|
|
|
|
|
|
2013/07/13 23:45:37
Subject: Homemade FW-style realm of battle terrain boards/buildings (7/13 - second coat/crater rubble)
|
|
Executing Exarch
|
looking really slick mankeep up the awesome work. I am intrigued about the shattered marble that you are making. at any rate looking forward to more.
|
|
|
|
|
2013/07/13 23:47:19
Subject: Homemade FW-style realm of battle terrain boards/buildings (7/13 - second coat/crater rubble)
|
|

Norn Queen
|
Really awesome, keep us updated 
|
Dman137 wrote:
goobs is all you guys will ever be
By 1-irt: Still as long as Hissy keeps showing up this is one of the most entertaining threads ever.
"Feelin' goods, good enough". |
|
|
|
|
2013/07/18 03:04:37
Subject: Re:Homemade FW-style realm of battle terrain boards/buildings (7/13 - second coat/crater rubble)
|
|
Dakka Veteran
|
sorry for the long delay, work started back up which has slowed me down.
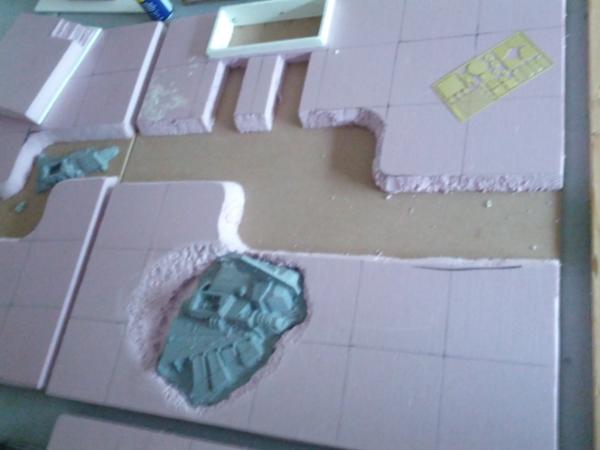
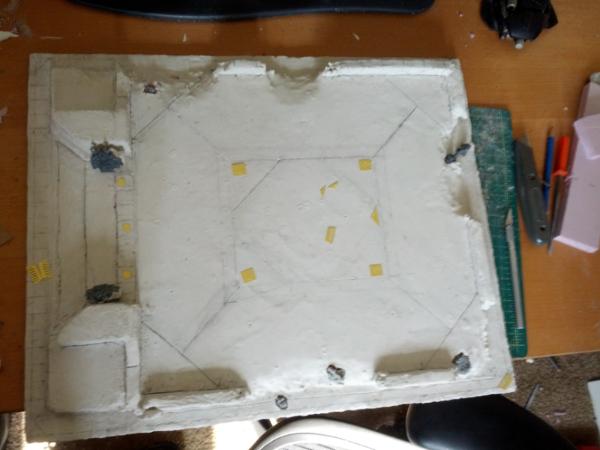
anyways now i'm working on carving the main lines, they definitely help add some structure to the boards.
 Automatically Appended Next Post: Automatically Appended Next Post: The next river section carved out.
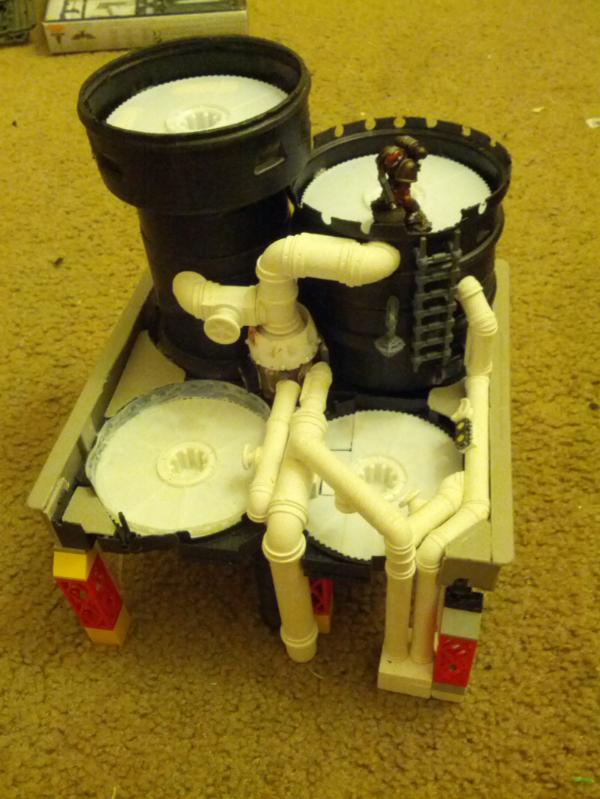
You can also see the beginnings of plans for the piping/ventilator area, though I think I might cut a section off of them to make them shorter

|
|
This message was edited 1 time. Last update was at 2013/07/18 07:13:29
|
|
|
|
|
2013/07/21 02:26:42
Subject: Re:Homemade FW-style realm of battle terrain boards/buildings (7/16 - carving lines)
|
|
Dakka Veteran
|
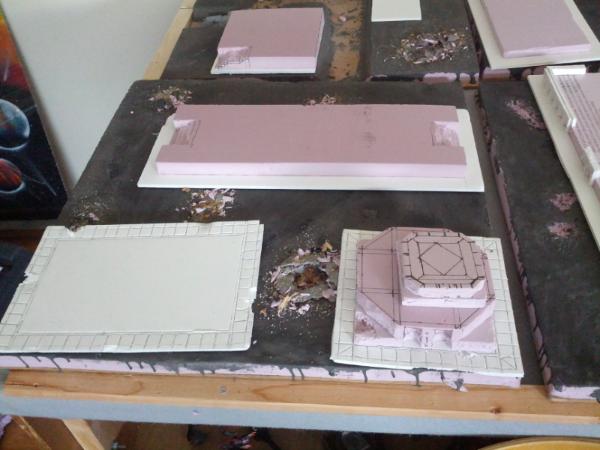
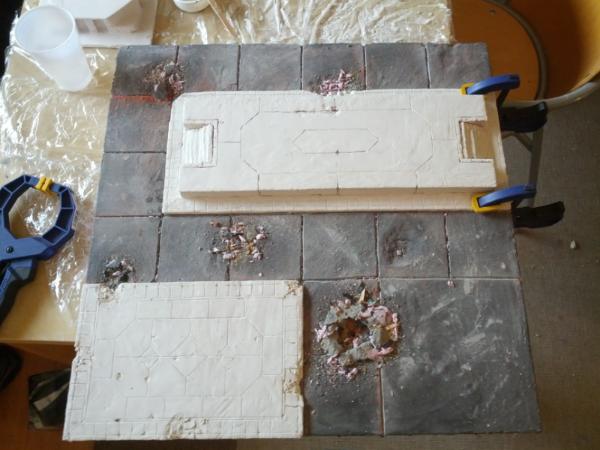
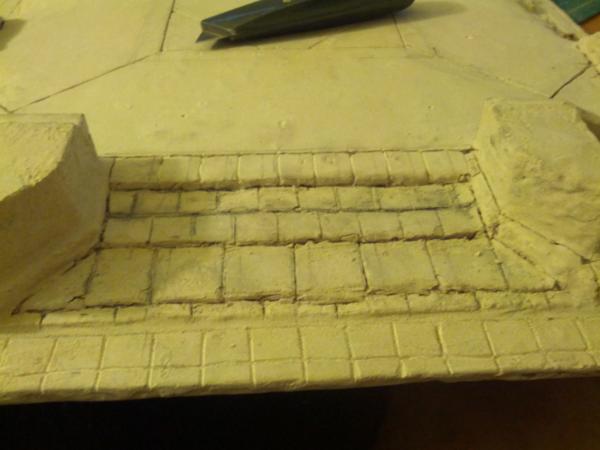
Update: all the big carves are now done!
A note about carving the lines: it DEFINITELY wears out your tools. expect to go through 1-2 \
exacto blades/similar ilk and wear down at lest 1 file/sawblade
So now I finally get to start working on coating up the foundations. Now the reason why I didnt glue/coat
them along with everything else is because of tha tfact that I plan to paint them more a marble, so my
base/mixing color is white instead of black for everything else. THe inspiration for this scheme comes from this:
http://thepaintingbunker.com/2012/12/26/forge-world-realm-of-battle-cityscape-shattered-plaza-finished/forge-world-realm-of-battle-cityscape-shattered-plaza-4/
An incredible paintjob that I think works quite well (tho possibly just a touch of too much contrast, but
I can easily fix that with drybrushing), and mirrors my ambition to learn how to paint marble.
Do I expect to be able to paint it all up this well? no, but i'll sure give it a shot and you guys can learn along with me!
|
|
|
|
|
|
2013/07/30 06:21:36
Subject: Re:Homemade FW-style realm of battle terrain boards/buildings (7/16 - carving lines)
|
|
Dakka Veteran
|
SOrry for the long delay guys! I've been busy just doing lots of the same thing.
Casting the foundations!
Each foundation, as with everything else, takes about 2 coats of foamcoat before
it really gets thick enough to get a decent carve out of (about 1/6th of an inch thick?)
As a result numbers wise I have all the foundations casted except the biggest and I've
burned through 32oz of boost or about 10 more pounds of foam coat.
ALl told the damage is:
40oz boost
10-13 pounds foam coat, with another 3-5 in sand. Why the discrepency? moslty because
all the foundations are sandless to provide a smoother more marbly/finished texture,
whereas the base of the tiles has lots of sand for more breakup.
not bad, and amaaazing stuff, but just go straight for 1 gallon of boost and 25 pounds of foamcoat
to really set yourself up for your own projects (easily 1 city/coating intensive table and another
flat/desert table or a couple of bigger pieces)
aside from that the next step has been drawing all the lines to carve mimicking the FW ones
to give it extra detail and then carving them out.
A HUGE note on carving: this takes FOREVER without the right tools. I initially tried to do this
by hand, but as previously mentioned foamcoat with boost is extremly tough, which means
it succcks for carving into. I was resorting to exacto blades for the initial lines (and thus a scratch
on using it for anything else afterwords) and then nails to just get it deeper so that it's a legit carving.
I was looking at 1 hour for the initial drawing and another 3-4 for the carving PER foundation.
So in other words a whole week of nights of carving.
AFter the first tile, however, I found our best tool ever: the dremel diamond wheel point engraver
http://www.dremel.com/en-us/Accessories/Pages/ProductDetail.aspx?pid=7134
This takes a week project and reduced to.. a couple ofhours. It chews through the foamcoat like
butter and is super easy to work with. you might say TOO easy because you keeping it straight is
a PITA (since you cant really use any guides or it'll just go through those as well), but with some
precutting to give it a groove to follow you can help it out. Furthermore with the time you save
in carving I can make those wobbly lines more broken/cracked or just coat them in sand or
something to break it up a bit.
WARNING: you MUST use a mask though if you decide to use electrical tools to engrave.
It spits up a HUGE amount of super fine dust that just seems like a super bad idea. Furthermore
you can't just stick with chinsy cheapo filter masks. ALthough I dont have a heavy duty mask, i did
spring for one of these:
http://www.homedepot.com/p/3M-Tekk-Protection-Sanding-and-Fiberglass-Valved-Respirator-8511HA1-C/202080145#.Ufda942sh8E
Which is about twice as thick as a normal filter mask and adheres to your face firmly so you have to breath through it
It's also a lot cooler than the normal mask so I feel much safer using it.
Finally once engrave it's time to mount it to the boards! First thing's first is pinning!
Pinning is crucial here because with the amount of glue needed here the more efficent option
is wood glue.. which in the end is kinda weak. Thus we help it out by using 8-10 pins per
foundation to really just nail it down. Once pinned and glue they seem super solid
(honestly i probably should have pinned my 1 inch foam to the MDF as well, and may still yet,
i've noticed that the liquid nails can fail just as well as it holds, ive reglued a couple of my boards
back down to the MDF in a few corners more than once)
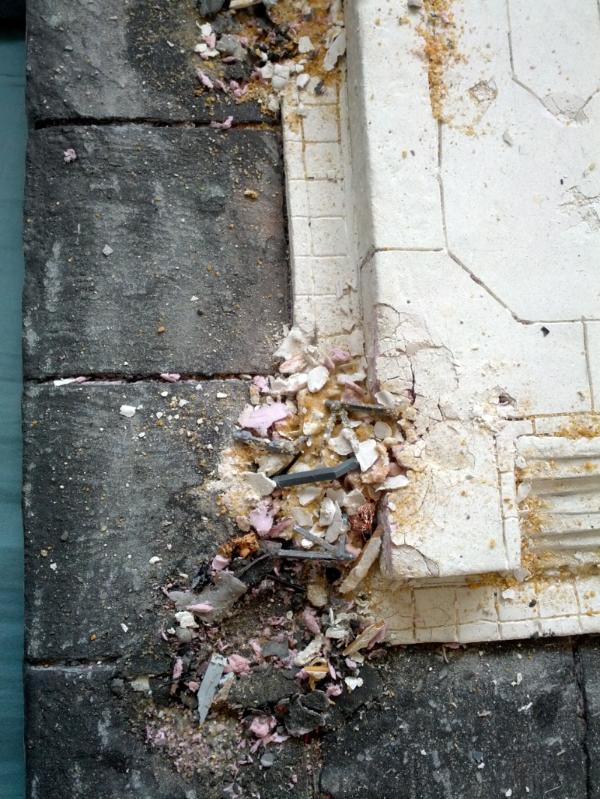
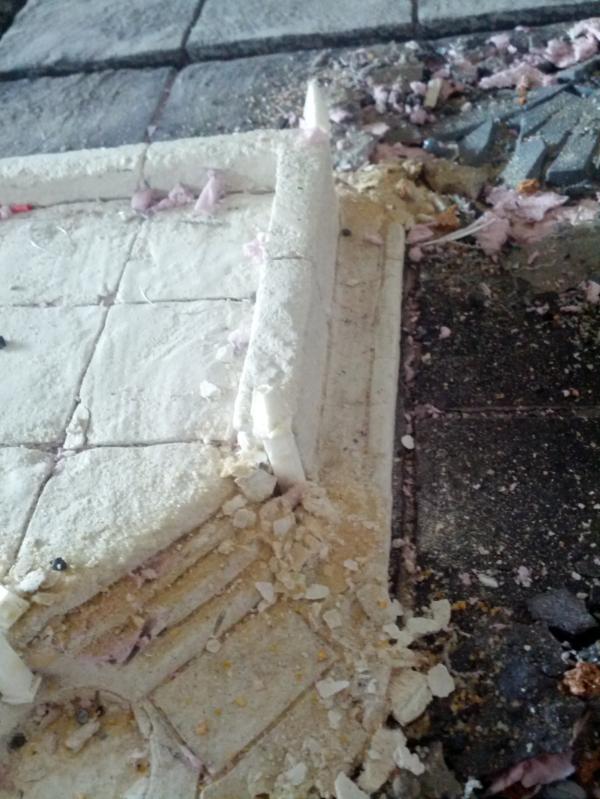
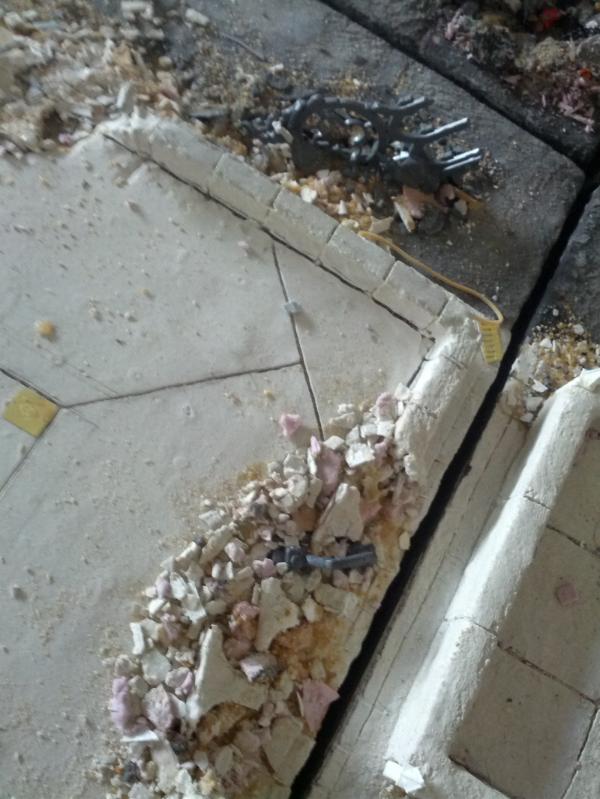
Also along with that we can finally start cracking and fracturing the foundations along the edges,
and let me tell you once it's carved it fractures in excellent ways, the carved "tiles" break off
realistically and you get a fantastic mix of big and little pieces that break off the foamcore.
|
|
|
|
|
|
2013/08/02 06:55:52
Subject: Re:Homemade FW-style realm of battle terrain boards/buildings (8/1 - foundation carving/mounting)
|
|
Dakka Veteran
|
Hello again!
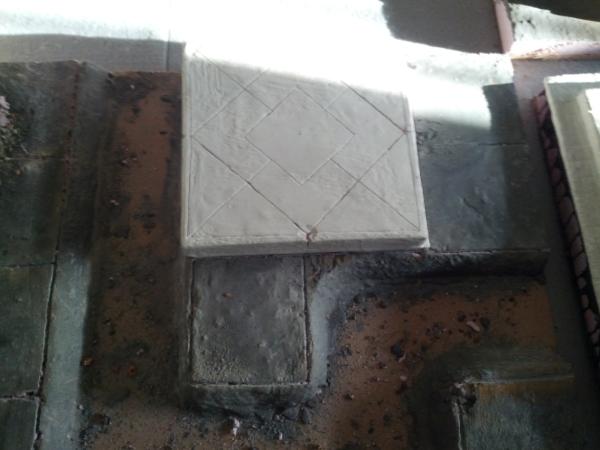
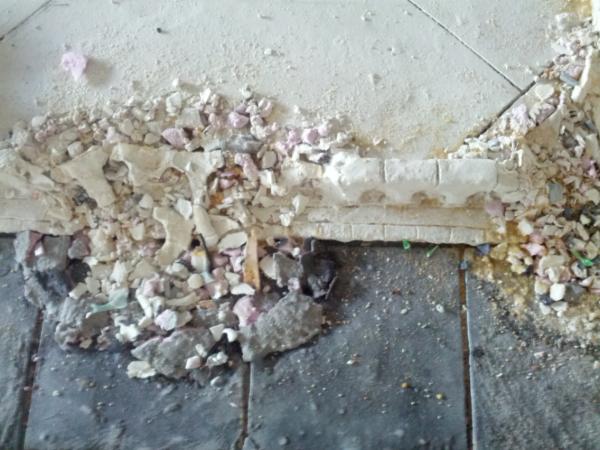
Carving/mounting continues, with every foundation now being mounted except the biggest one.
I took a break and started a bit on some of the detail work designed to bring the foundations
together with tiles and I think it's shaping up well.
Painting wise Im thinking that any exposed pink foam in the foundations will be a different color, so my current scheme is possibly:
about the same darks as currently for the base of the tile.
A rich brown for exposed dirt/cork
a whitish/salmon type marble for the tile on top.
a more standard concrete "grey" for exposed foundation
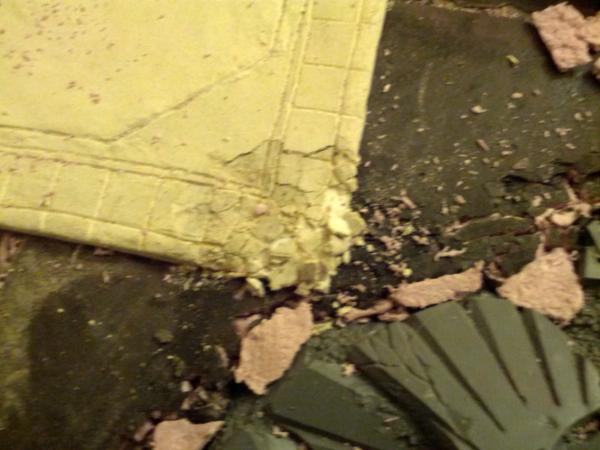
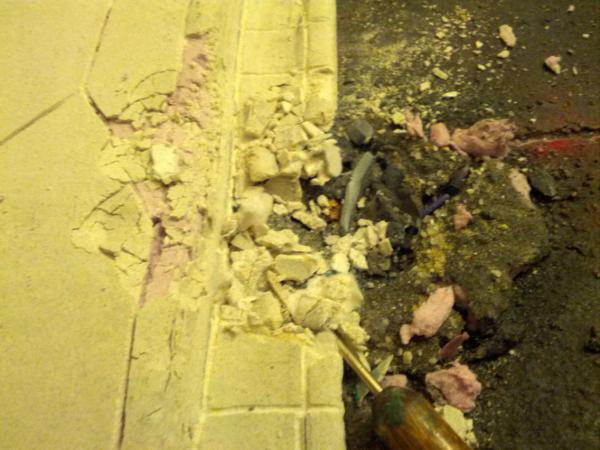
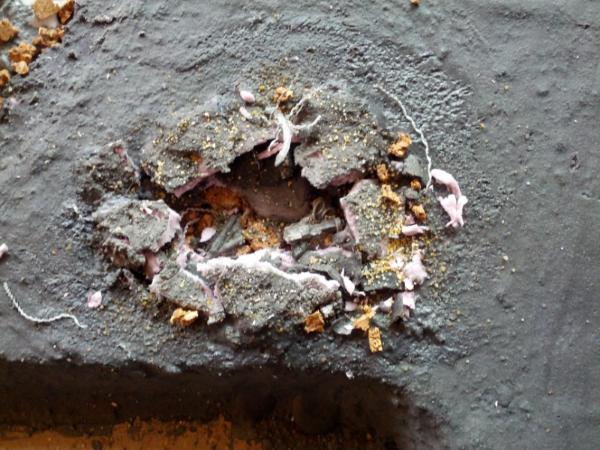
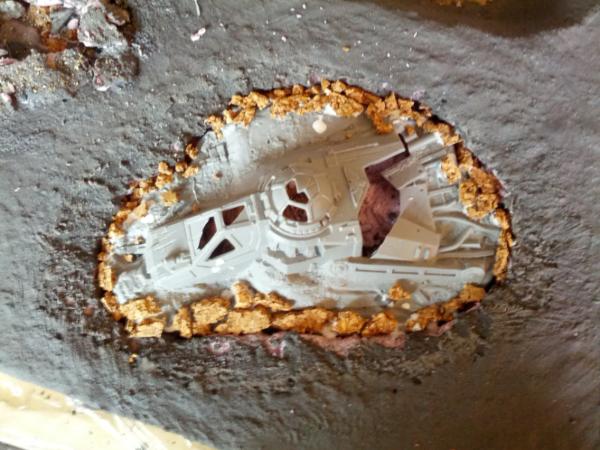
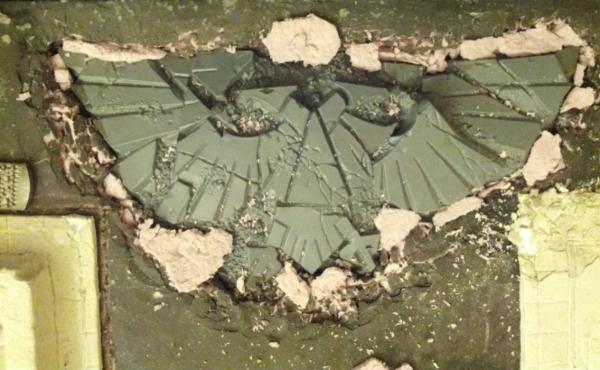
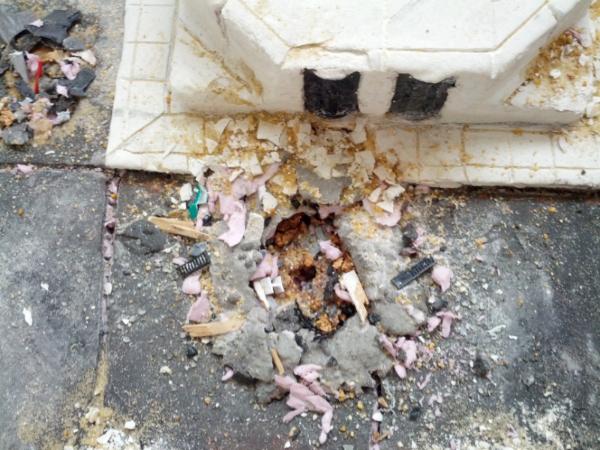
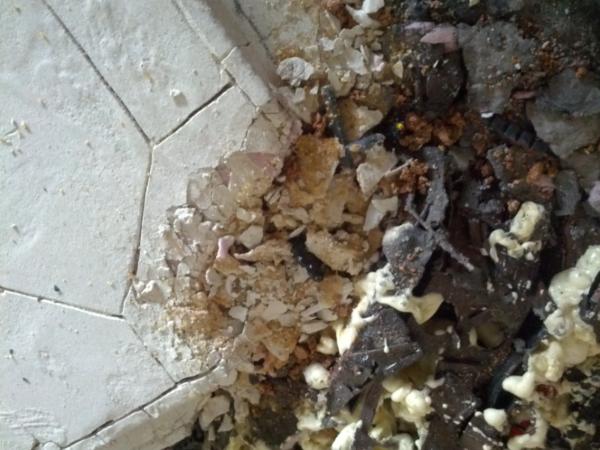
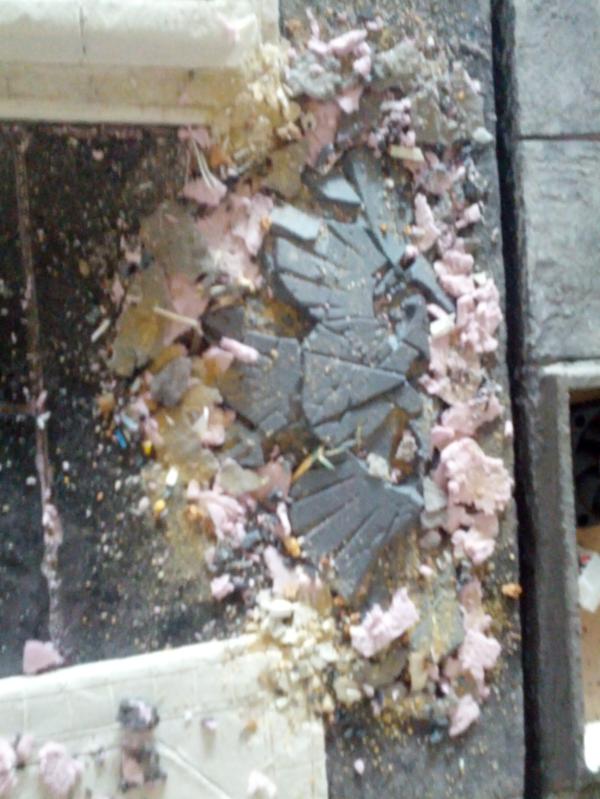
Im also finally starting to take a stab at integrating the embedded aquila into my base tile. It's tricky because
it's all broken up, so some pieces go below my base and others above, so it's hard to figure out just what exactly
caused this type of destruction and how best to break up the ground around it naturally.
My first step however is to start blurring the lines between the aqulia and ground next to it, so i basically just stabbed the foamcoat/foam
and just broek it up and pulled it into the line of the aquila. This allowes me to also push it down to match where that piece of the aquila
is height wise. Im hoping then by laying ont he slabs i have and bigger ones i can start to get a realistic breakup (with foamcoat on top of the
slabs of course)
|
|
|
|
|
|
2013/08/06 12:37:24
Subject: Homemade FW-style realm of battle terrain boards/buildings (8/1 - foundation carving/mounting)
|
|
Crazed Cultist of Khorne
|
Your making progress. This table looks nasty!!
Any progress on the standalone buildings?
|
|
|
|
|
2013/08/09 06:43:29
Subject: Re:Homemade FW-style realm of battle terrain boards/buildings (8/1 - foundation carving/mounting)
|
|
Dakka Veteran
|
Thanks!
Ithink the sandalones are in quite good shape (barring the flak tower)
The first page has some alternate angles.
THis week's progress:
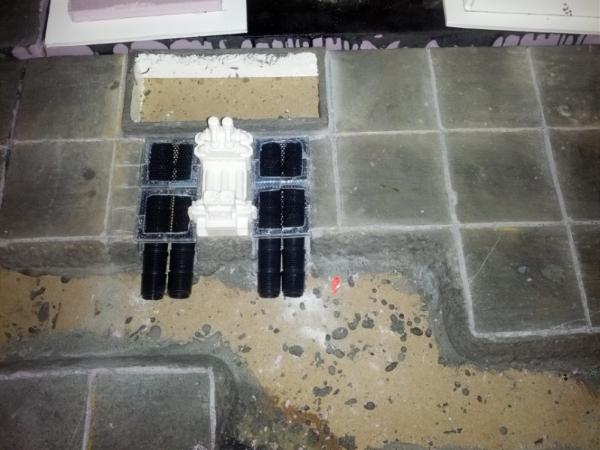
The statue foundation mounted:
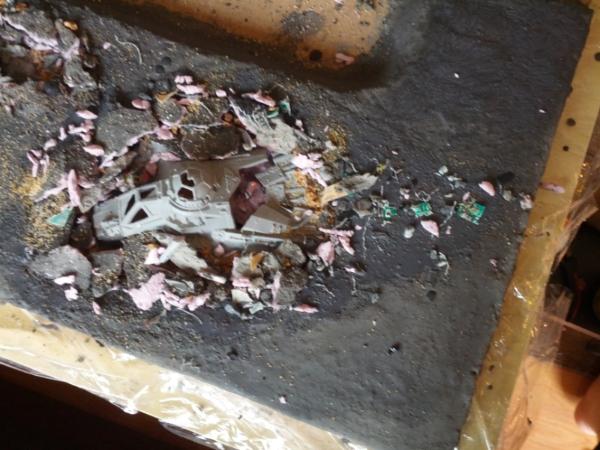
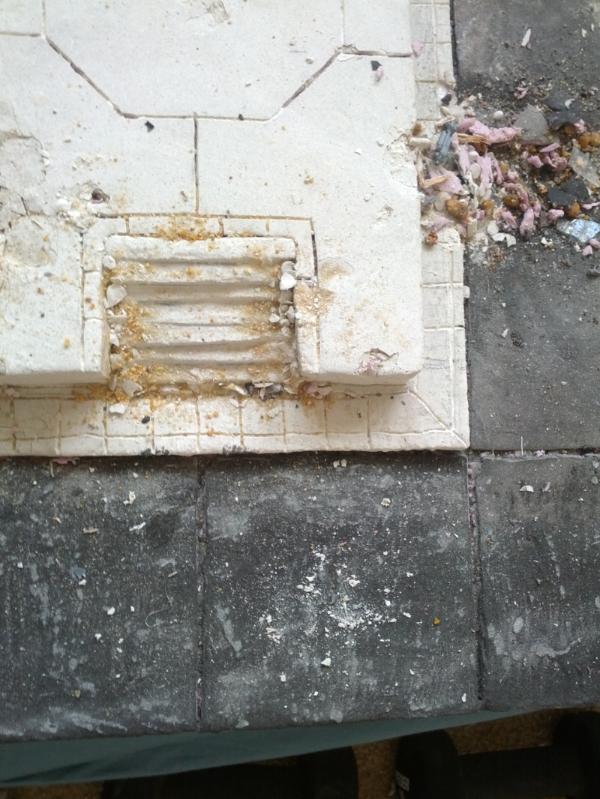
I also started to coat up the sides of the boards. I did this primarily because as i was moving them around I kept banging them on
door frames. ALthough nothing had yet bent or chipped, i figured the edges and corners could use some buttrassing. It was also
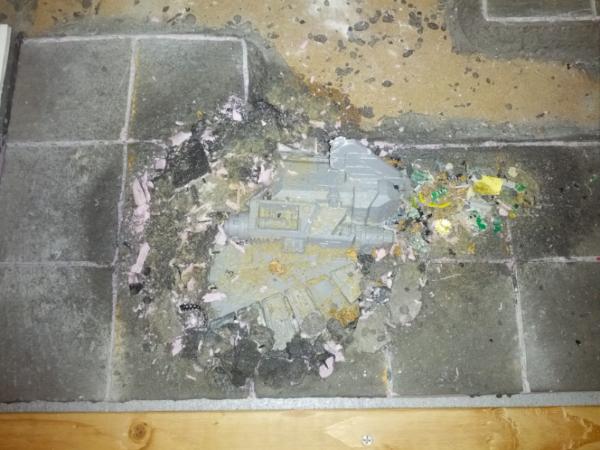
a good excuseto coat up the base of the rivers.

and get in some more of my crashed aquila bits:

Work is now pretty much focused solely on the last foundation, which is almost ready to be mounted.
|
|
|
|
|
|
2013/08/09 18:19:42
Subject: Homemade FW-style realm of battle terrain boards/buildings (8/1 - foundation carving/mounting)
|
|
Longtime Dakkanaut
|
This is looking really good so far. Keep on at it.
|
|
|
|
|
|
2013/08/12 00:25:55
Subject: Re:Homemade FW-style realm of battle terrain boards/buildings (8/1 - foundation carving/mounting)
|
|
Dakka Veteran
|
Thanks!
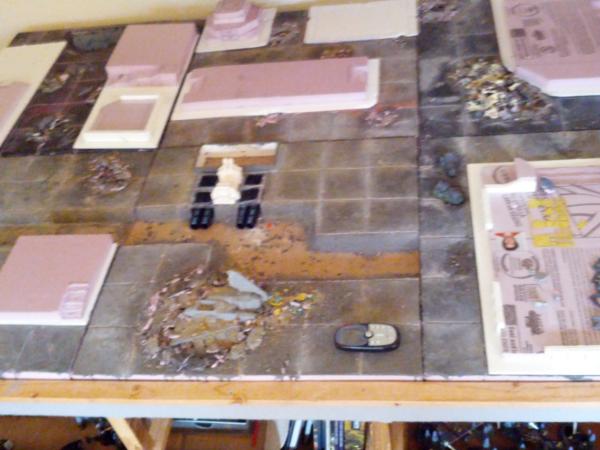
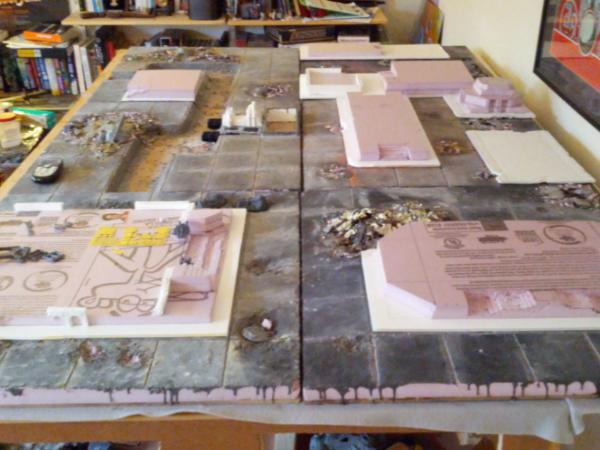
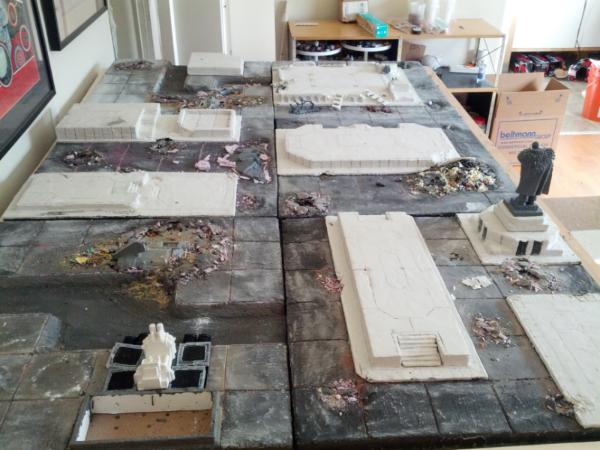
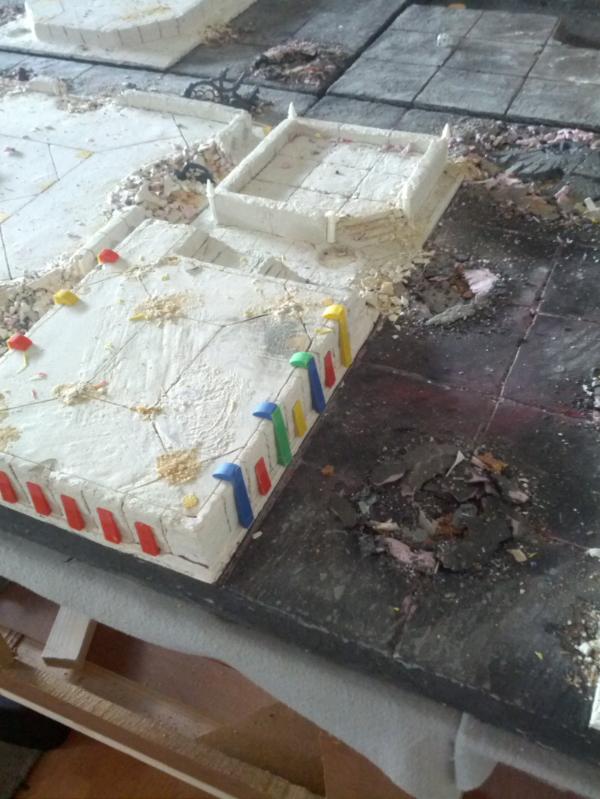
The main update is that the last foundation has been mounted to the board and all sides coated! woot!
As a result I now deem the table playable! Pretty exciting, and although I still only estimate i'm maayyybe
70% done with construction, it's still a nice milestone to hit. The table is looking great and im super pleased
with it. Next up is mostly to just integrate all the foundations with the base board with rubble piles/cracked tiles
and so forth, and finish off all the lights/fans If you look at the pics closely you can see the start of where im going
with that with the coated up archways which i'll shatter and break up in those relevent areas.
THe important thing though is that my mass foamcoating days should be over so i spent a lot of time just CLEANING,
although i love the stuff boy is it messy, especially coating the sides (definitely drips). So it's nice to have a living room
again, though the ikea rug may now be dead (yay for cheap disposable rugs)
Schedule wise i estimate another 3 weeks to really get the details in and glued down (there's still a lot of loose
stuff with my craters i gotta pin and glue down), at which point i'll reorganize all the main milestones onto the main page
and probably not really update the blog as frequently. My plan is to learn rust/paint chips/marble/large scale painting
techniques on some of my other smaller/test pieces before painting the board, so there will likely be smaller blogs
for a while to learn all that before I get back to this one.
until then though, more building!

|
|
|
|
|
|
2013/08/15 20:33:41
Subject: Re:Homemade FW-style realm of battle terrain boards/buildings (8/11 - board playable!)
|
|
Dakka Veteran
|
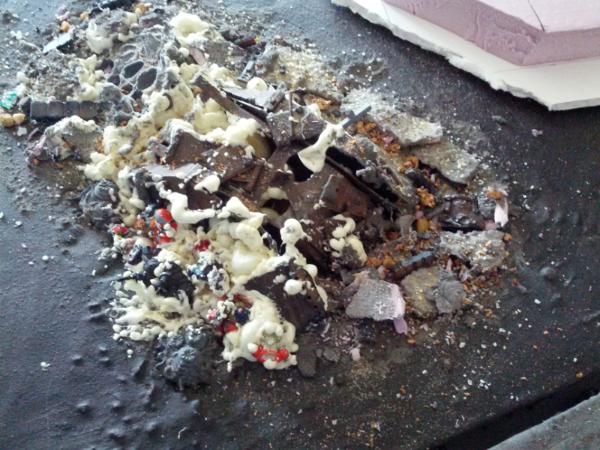
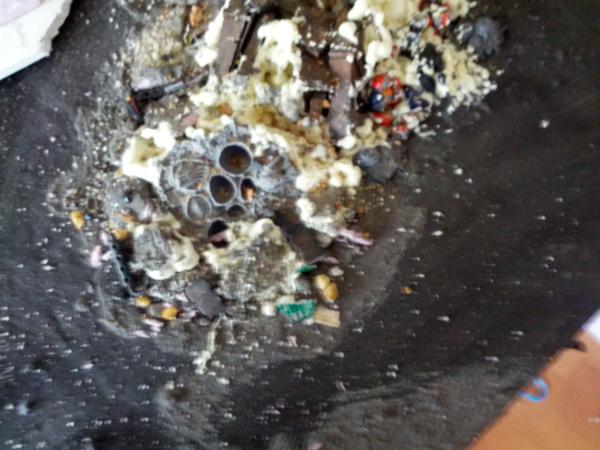
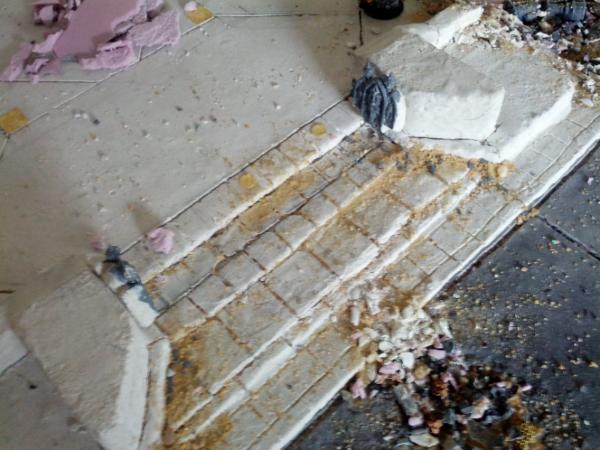
Starting on the detail work, fairly happy with how it's turning out i just might need more "big" chunks of rubble.
Also actually gluing it all down is tricky, so far it's a giant pool of woodglue on bottom which i just start piling "base" rubble into
and then a layer of plaster chips/adding my "hero" rubble and holding that down with an elmers/water spray and more wood glue.
Works but can leave chips behind, which alas just have to be glued by hand.
|
|
|
|
|
|
2013/08/15 22:38:54
Subject: Re:Homemade FW-style realm of battle terrain boards/buildings (8/11 - board playable!)
|
|
Fresh-Faced New User
|
The attention to detail you are putting in is inspirational.
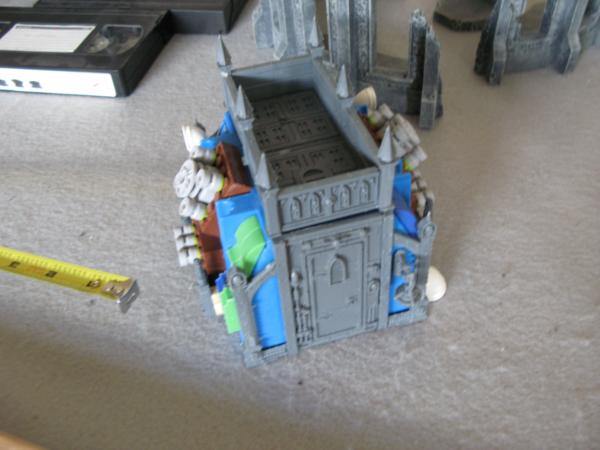
Question though, what are the struts sticking out of all of the flak towers for? they all seem to have them below the top parapet but what purpose do they serve, theyre not supporting anything . . .
Deffo inspired me to add a flak tower to my terrain collection!
|
|
|
|
|
|
2013/08/16 02:17:32
Subject: Re:Homemade FW-style realm of battle terrain boards/buildings (8/11 - board playable!)
|
|
Dakka Veteran
|
so those struts sticking out my reference of the geman flak towers, honestly im not entirely sure why they are there, maybe to stop really big ladders/grappling hooks and the like?
http://upload.wikimedia.org/wikipedia/commons/d/d0/Vienna_flak_tower_dsc01594.jpg
|
|
|
|
|
|
2013/08/20 04:08:52
Subject: Re:Homemade FW-style realm of battle terrain boards/buildings (8/11 - board playable!)
|
|
Dakka Veteran
|
Quick update:
not a whole lot of progress this weekend, mostly because of other chores/things in the way
I did however finally get to finish up the casting process and get some casts done i had started so long ago.
To recap the idea was to take a few terrain platsic pieces and see if i couldnt make molds of them and do some casts.
As a general note, were you to be doing this yourself I wouldnt actually suggest it unless you are planning on producing
in bulk (like 10-20 casts of it), because you have to buy not only the plastic (10-20 bucks ish for a lot of it) but ALSO
the casting material (another 10-20 bucks priobably), along with some sort of clay/whiteboard/etc.
The process I used was one which produced detailed casts, and is material cost wise cheaper but requires more tools to do,
I mainly did this because that's what my friend knew and he was the one showing me all this.
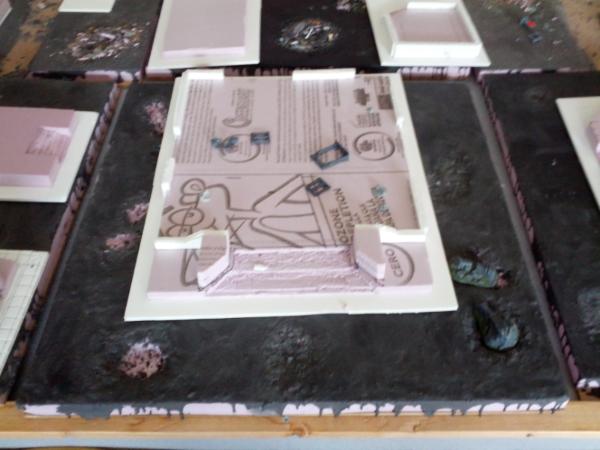
so step 1: embed the plastic halfway in clay (this takes a while), the plastic needs to be clean of any clay on the surface, but
your edges need to be met up with clay so no mold material sneaks under. The holes are "keys" so that the 2 mold
halves fit together uniquly later. the clay must always be kept slightly damp so it doesnt crack, as the cast will fill those cracks.
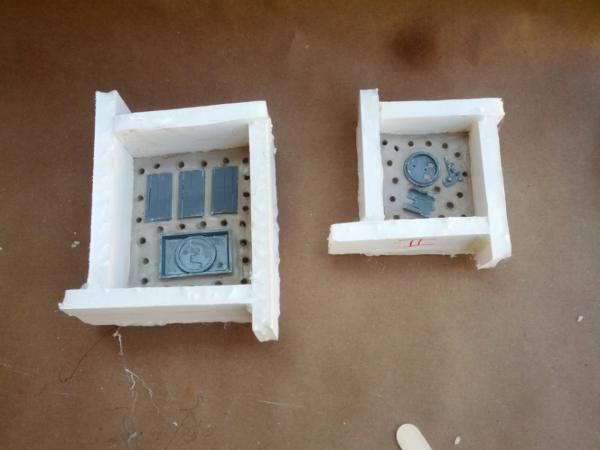
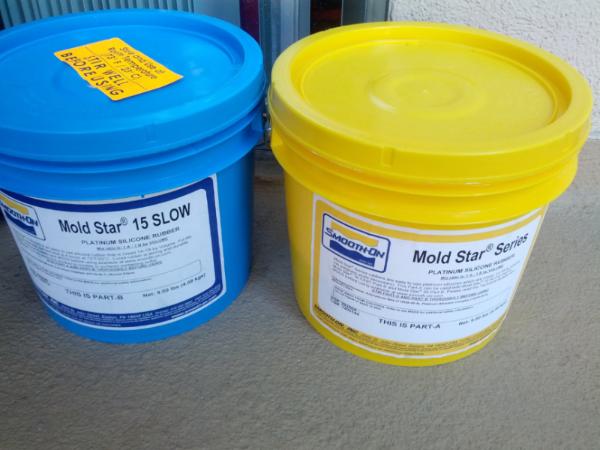
step 2: get out yer silcon rubber and make the first half of the cast:
2a: first take ur damp clay and fill it with rice, the goal is to get a volume estimate of material using something that
wont stick to the clay too much, hence rice. You want 1/2-3/4 or so inch of mold material above ur highest and
lowest points in the plastic so it holds together well (hence the super high walls abov ethe clay)
2b: split the rice into 2 clear cups and mark those halfway lines, empty rice.
2c: pour the first part into 1 cup, second part in the other.
2d: when ready.. mix away! we did a double pour type mix, which is you pour cup A into cup B,
mix as best as you can (getting all the walls mixed), then poiur the total contents of B back into and mix more.
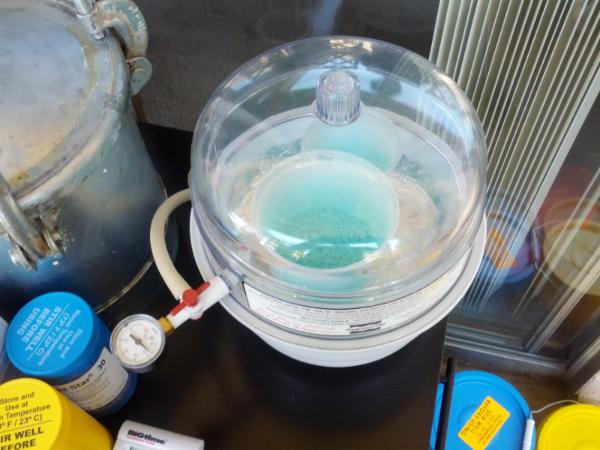
2e: next we take our mixture and put it into a vacumn chamber to get rid of bubbles, as it pressurizes it all sort of
bubbles up so you may have to release pressure so it doesnt boil over. at a certain point it "froths" and then falls back down,
that's when we start our timer (i believe 12 minutes)
2f: one done take our our nice bubble free cup and start pouring into the mould. The way to do it is you pour VERY slowly
in longgg thinn strands in one corner of the mold. The idea is to let it slowly flow over the plastic. The reason for the long thin
strands is that as the silcon falls it releases still more bubbles, so the longer and thinner if falls the less bubbly it will be.
NEVER switch corners once you start pouring.
2g: now wait! our molds took like 12 hours to cure NO TOUCHY until then.
Cleanup note: when closing back up ur plastic/silocon rubber containers, apparently putting just a hint of a blast of nitrogen (you can get the stuff in a can) makes it last a lot longer.
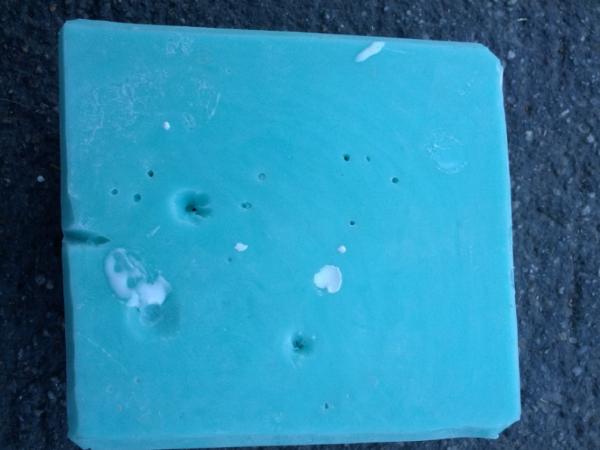
step 3: the other half. basically just remove our walls, remove clay carefully so you dont pop the plastic bits out of the mold, clean up plastic, make new walls, do step 2 again.
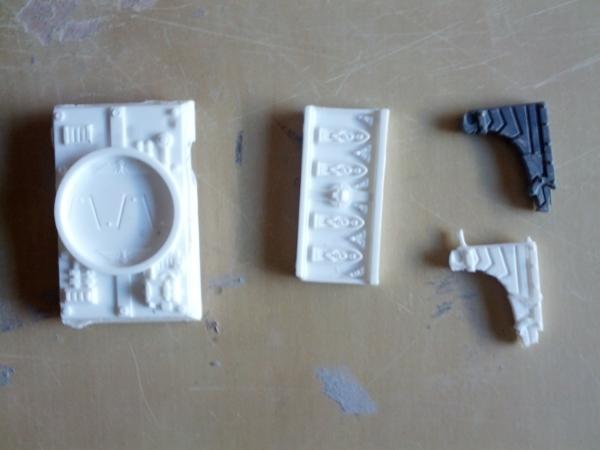
and now for the results of that!
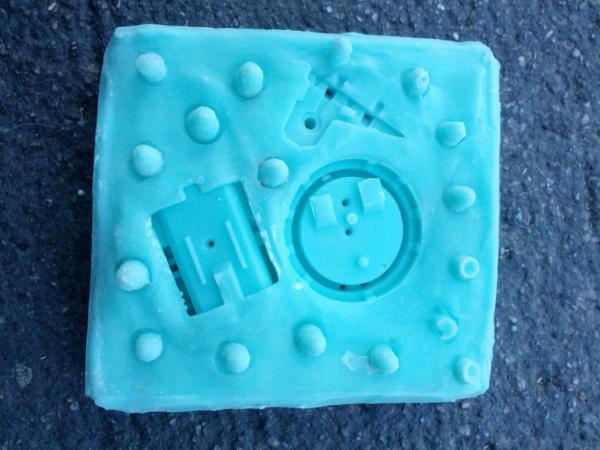
ohhhhhh ahhhhh, so pretty! so clean! THey were pretty much perfect molds. But we have a few steps left before making things.
Basically now we to poke holes in our mold (u know those attach points on sprues? yeah those). 1 of those holes is where we stick the syringe to actually fill this with plastic.
The other holes are for air. Baiscally we need to find those random crevasses where we expect air to get trapped and poke a hole there to stop that.
the bigger "craters" are the holes for the syringe, both so we know where to put it and so that it's easier to seat.
Once that's done we can now actually cast things!
step 4: casting
4a: first we gotta lightly coat our molds in talcum powder (baby powder), pretty much you coat it on, jigger it around then blow it off. SUPER light coating is enough.
4b: now we measure out our 2 part plastic in again 2 cups. since we're dealing with very little plastic precision is SUPER PLUS IMPORTANT. We used a 3 minute
setting plastic and one the first try I got the proportions about 1mm off and instead of setting in 3 minutes it set in about 30 seconds.
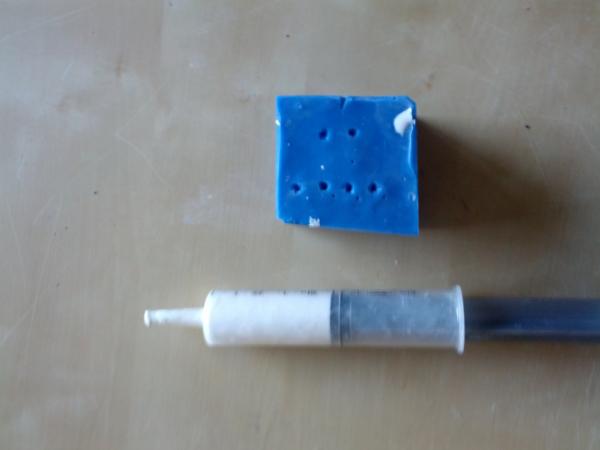
I now ahve a syringe of plastic as a memento of why precision matters.
4c: anyhoo, once measured, again do the double pour, mix it up (in my case really fast! but it requires less mixing because its a lot thinner),
pour it in the back of the syringe (holding down the front with my finger), add the plunger, FLIP it over and sloowwwly push the air out with the plunger.
once it's all liquid just jam it into the hole and push slowly but forcefully until plastic pours out of all your air holes and then move on.
These were some of my results:
ALl in all im happy. There were air bubbles introduced by using 3 minute plastic, but that's why I picked terrain stuff to copy, because some damage here and there
is a good thing. Furthermore I now have lots more wall sections and posts to play with and break.
Is it cost effective? probably not unless again ur doing a lot of casts for a huge project, but it's a good skill to know, especially when there is something
that cant be made anymore or is unique and real world you want to cast. Also dont sell casts of GW stuff because that woould be illegal. Dont sell molds
of their stuff either.. yadda yadda yadda, be smart guys.
Finaly notes: if this is intimidating yeah sorry it's a lot of steps! But I have been told there are other ways of doing this that doesnt require vacumn chambers
or anything of that sort, there are plenty of at home casting materials that are easy peasy to work with.
The downside is that they just cost more (material cost higher for less tools cost), but it can be done.
|
|
|
|
|
|
2013/08/20 04:30:27
Subject: Re:Homemade FW-style realm of battle terrain boards/buildings (8/11 - board playable!)
|
|
Contagious Dreadnought of Nurgle
|
An easy way to not over talc is to use a talc sock.
Ingredients
1 Old pillow case or a small square (6in by 6in) of fine woven fabric.
2 one rubber band
3 Talc
To make a talc sock
1take an old pillow case or some other tight woven fabric, Either cut off a corner of the old pillow case about 5-6 inches up to make a rough cone, or cut a rough square of fabric.
2a (if you have an old pillow case to donate to the cause...) Fill the cone with about 3-4 tablspoons of talc.
2b (If you just have fabric) Mound 3-4 tablespoons of talc in the center of the square.
3 Using a rubber band Seal the cone/square leaving a snug lump of fabric containing the talc, and a "tail" above.
4 Gently slap the talc sock against your mold and note the fine even amount of talc left behind.
|
Link to my Index Thread here on dakka


Find me on Twitter Sam Butler @Rivet_Zone
Winner "Best 40k Table" Daboyz GT 2010,2011
"Sic Vis Pachem Parabellum" - Publius Flavius Vegetius Renatus
Veni, Vidi discessi.-Galorn. |
|
|
|
|
2013/08/30 17:22:04
Subject: Re:Homemade FW-style realm of battle terrain boards/buildings (8/11 - board playable!)
|
|
Dakka Veteran
|
Ohh nice call! Hadnt thought of that.
anyhoo sorry again for the long delay guys, just doing more detail work.
I've now done an initial detail pass on all 4 of the main FW tiles, the river tiles were already
in pretty good shape (still need to work on the intact fan section tho)
One thing that was suggested is for some of the craters/collapsed areas I go back over
it with another layer of foamcoat to "blend" the edge between rubble and intact,
which I think will help (especially the aquila area)
U can also start seeing my casted pieces in action!
|
|
|
|
|
|
2013/08/30 20:31:11
Subject: Homemade FW-style realm of battle terrain boards/buildings (8/11 - board playable!)
|
|
Ragin' Ork Dreadnought
Deep in the Outer Boroughs of NYC
|
I really love your stuff. Your creative use of everyday items as scifi detail, you varied mix of media, and you explicit tutorials. It's all really inspiring! Great work!
|
|
|
|
|
|
2013/08/30 22:07:29
Subject: Homemade FW-style realm of battle terrain boards/buildings (8/11 - board playable!)
|
|
Hardened Veteran Guardsman
|
I'm loving this so far! Keep it up!
|
 Iron Lords Iron Lords
 For The Emperor! For The Emperor!
 Tau Tau
 Blood Angels Blood Angels
 Dark Angels Dark Angels
 Dark Eldar Dark Eldar |
|
|
|
|
2013/09/03 11:19:33
Subject: Re:Homemade FW-style realm of battle terrain boards/buildings (8/11 - board playable!)
|
|
Dakka Veteran
|
Thanks guys! Keeping this blog has definitely helped me stay motivated to get this all done.
Anyways it’s time for an update, now with some lighting!
I found these flickering tealights at michaels and upon taking them apart realized they would be a perfect way to add some led lighting to the city of death lamps that you get with every purchase. Although these particular lights on amazon arnt necessarily the same (i cant find them on the michaels site at the moment), the principles should hopefully still be there.
http://www.amazon.com/Flameless-Tealights-Flickering-LED-Batteries/dp/B0055DTVTS/ref=sr_1_1?ie=UTF8&qid=1377974556&sr=8-1&keywords=led+flickering+tea+lights
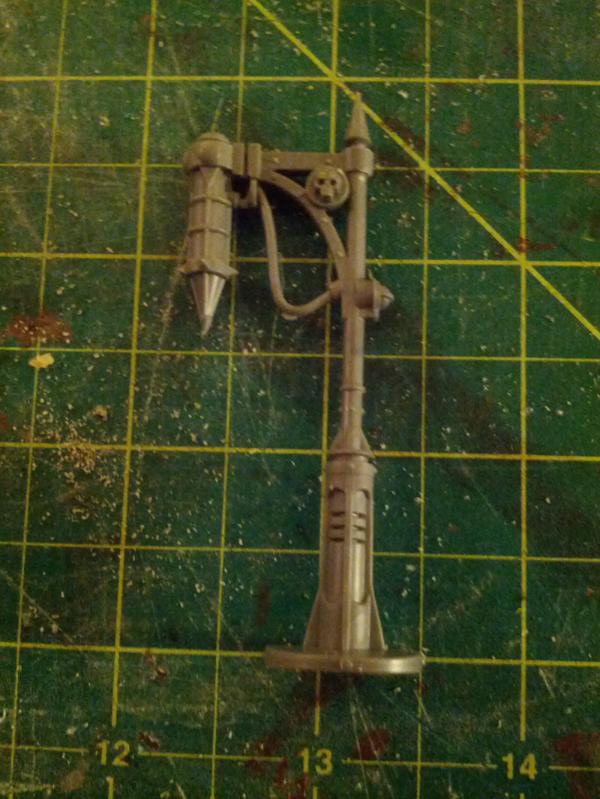
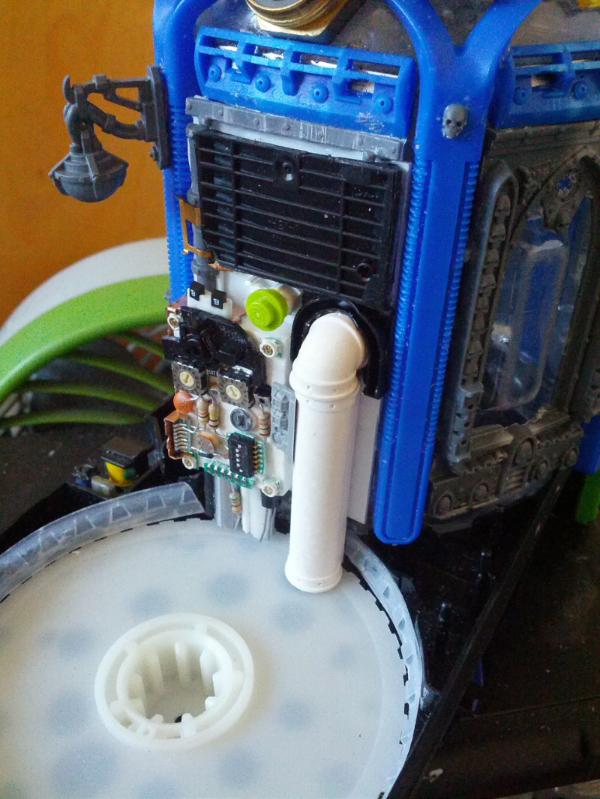
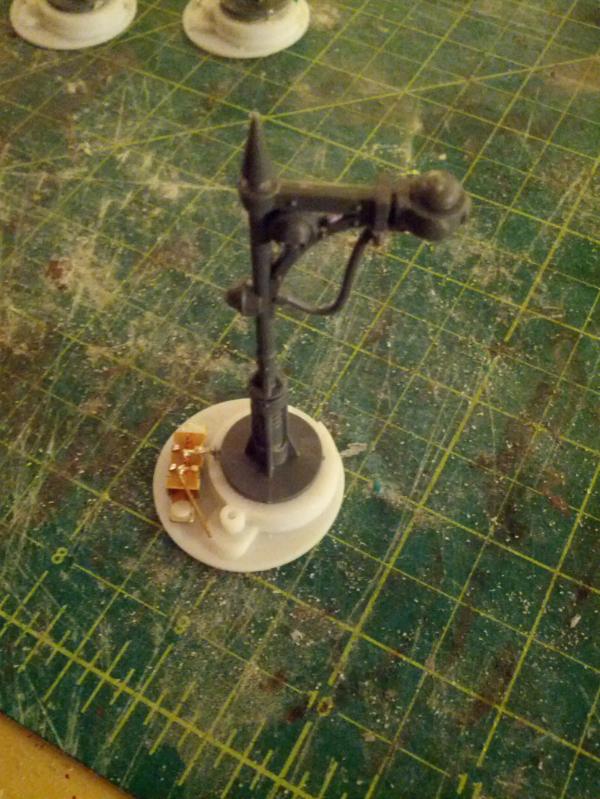
Step 1: Taking apart the tea light you get a nice plastic cylindrical case, the plastic flame, and this guy:
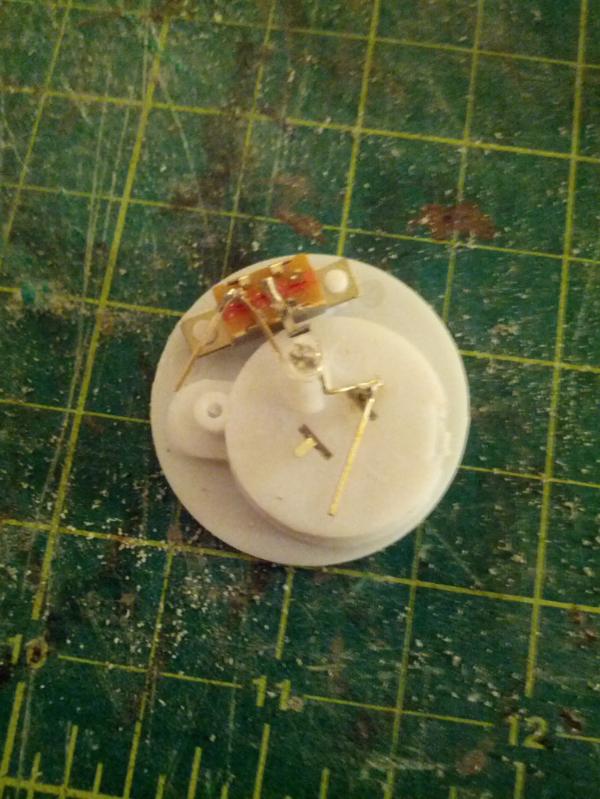
Our basic goal will be to cut off the LED, cut off the plastic bit the LED is attached too, and then glue down the lamp to the base, then re-hook it all up.
Step 1a: When cutting off the led make SURE not to cut off these black little specs/chips embedded in the wire. i’m farily certain these are what make the light flicker. Once you cut off the LED cut off the plastic peg it’s attached too.
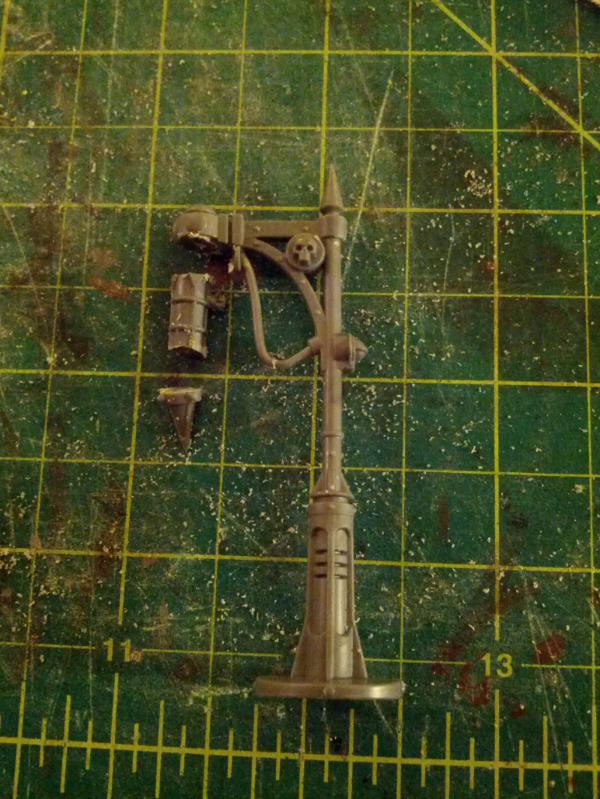
Step 2: Make some cuts to the lamp, saving all the peices (but especially the point bototm bit, we’ll reglue that back on later, the middle is just potentially useful elsewhere). Then glue it onto the base
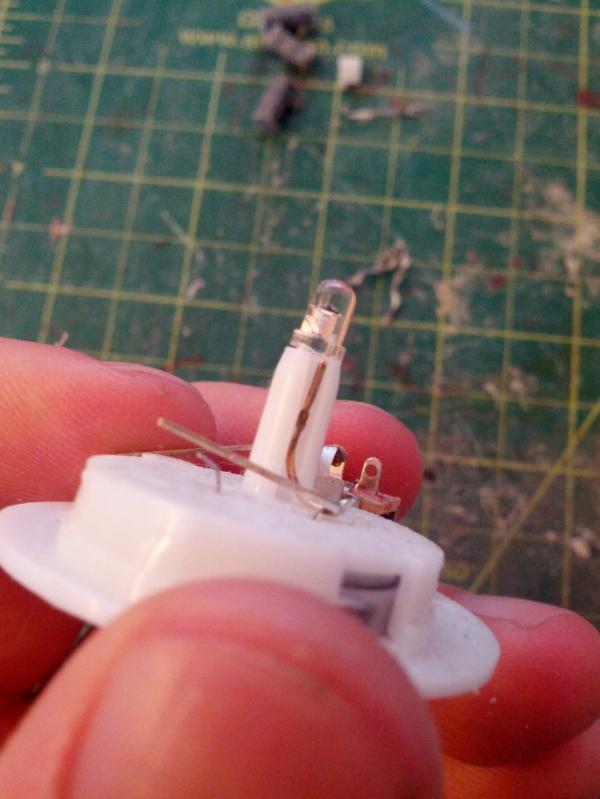
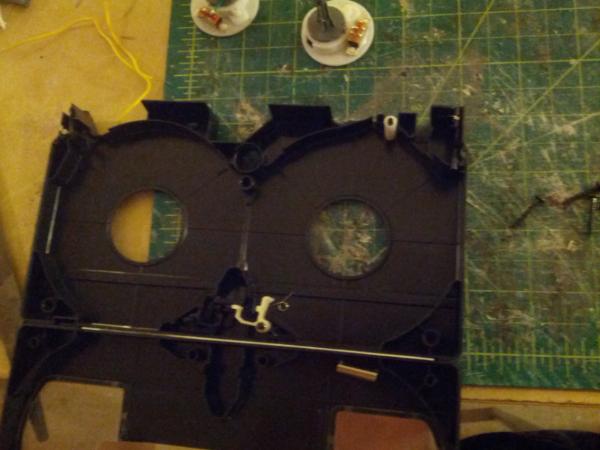
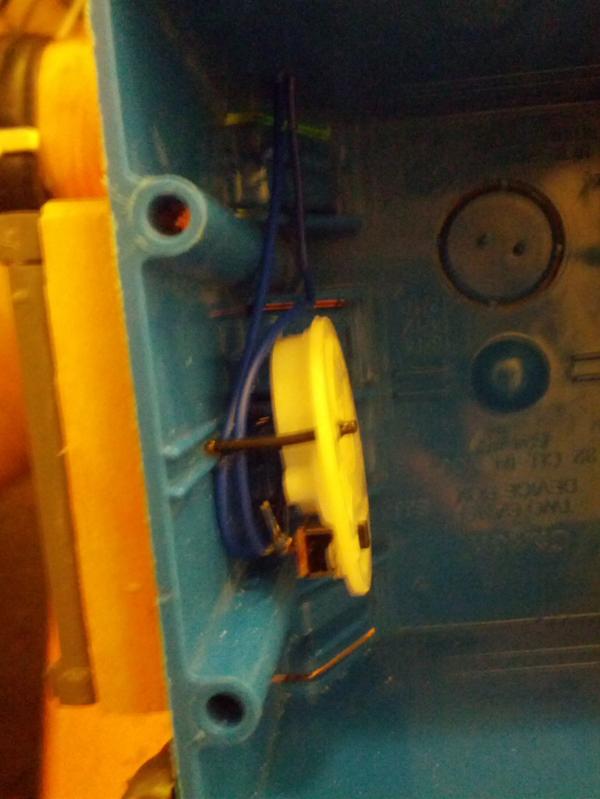
Step 3: If you had been following the building tutorials, you’ve already taken apart some VHS tapes, and if you were a good person you saved everything! More specifically this little translucent white plastic tube, which, as it turns out, perfectly fits over our LED and makes a great covering for it.
Step 4: Now we need to start hooking up the wire. Get 2 wires and solder them to the respective wire on the LED, being careful nto to solder too carefully to those tiny black chips embedded in the wire. If you dont know/arnt able to solder you should be able to instead twist botht he wire and the LED wires into little hooks and hook them together, though you might want to wait to do that until step 5. (In either case make sure to test all your connections first by hooking up the wire to the battery and light to make sure it, well, lights. Sometimes with wire, expecially solid core wire, you have to actually scrap the wire itself in order to make a solid connection). Note that I only shrinkwrapped one side, if you shrinkwrap both it can be very very difficult to get it thru the hole we will drill in a second.

Step 5: Drill a hole through the top of the lamp and feed the wires through it. Although not the cleanest method for doing this, it does make it pretty secure. I intend to cover up the hole a bit with moss/viney type stuff to show that the light is being grown over.
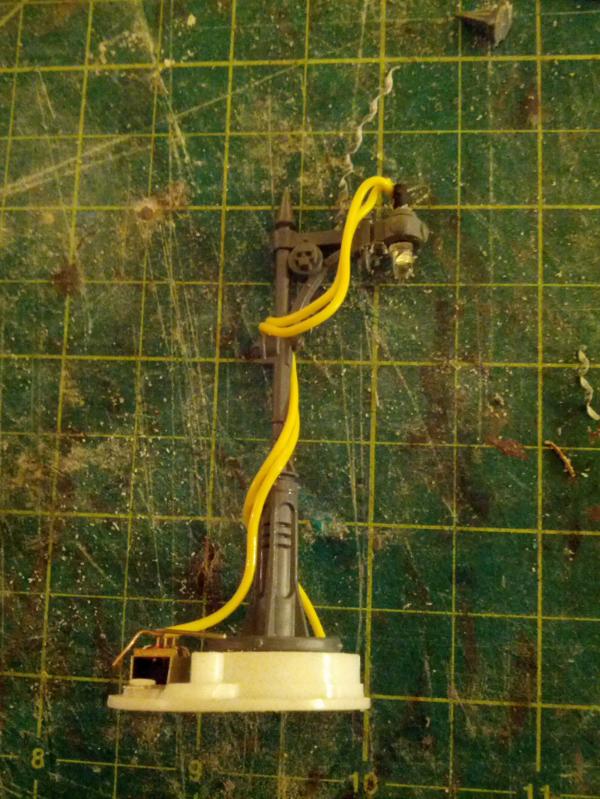
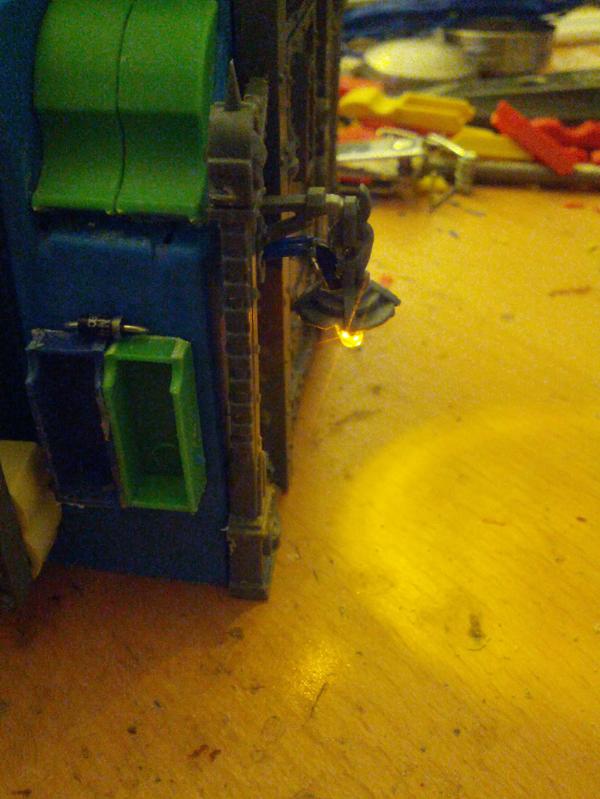
Step 6: after testing to make sure everything is working, solder the wire to the emptry terminal of the switch, and the other end to where the battery was making contact, glue up the clear plastic tube over the led and the pointy endcap on bottom and done!
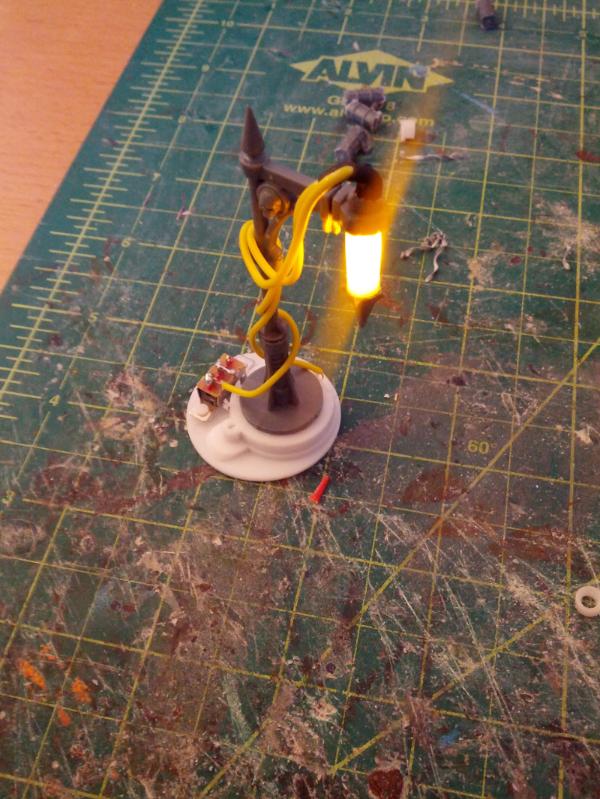
I also applie the same techniques to the side lights on my buildings, though I have yet to figure out what to make the shade out of.

|
|
|
|
|
|
2013/09/03 11:48:00
Subject: Re:Homemade FW-style realm of battle terrain boards/buildings (9/3 - adding LED lighting)
|
|

Regular Dakkanaut
|
This is great stuff!! I love what you did with the Honoured Imperium Aquila, I'm definitely taking some of these ideas with me to my own table project!
*subbed*
|
|
|
|
|
|
2013/09/03 12:00:58
Subject: Homemade FW-style realm of battle terrain boards/buildings (9/3 - adding LED lighting)
|
|
Executing Exarch
|
thats pretty clever thing you did there man. looks really good and seems simple enough to replicate.
thanks for the minitut to try
|
|
|
|
|
2013/09/03 18:32:51
Subject: Re:Homemade FW-style realm of battle terrain boards/buildings (9/3 - adding LED lighting)
|
|
Dakka Veteran
|
Thanks! It's also given me an idea for a custom scenario you can only see by the glow of the LED lights.
Im currently thinking that anything within radius 12 of an LED light is treated as being in nightfighting.
If a unit is outside that radius tho they cant shoot at all, and can only move d6 (essentially they are stumbling around in a dense fog) and all difficult terrain is treated as dangerous.
Barrage weapons could shoot tho, though with range guessing.
Could be interesting and make for a much tighter battle.
Anyhoo when I get back tonight I'll show a picture with all them lit up, really adds to the atmosphere of the board.
Also been doing some experimenting with fans and that's also looking pretty promising!
|
|
|
|
|
|
2013/09/03 18:34:19
Subject: Homemade FW-style realm of battle terrain boards/buildings (9/3 - adding LED lighting)
|
|
Norn Queen
|
Awesome stuff, love the light idea
|
Dman137 wrote:
goobs is all you guys will ever be
By 1-irt: Still as long as Hissy keeps showing up this is one of the most entertaining threads ever.
"Feelin' goods, good enough". |
|
|
|
|
2013/09/03 18:49:07
Subject: Homemade FW-style realm of battle terrain boards/buildings (9/3 - adding LED lighting)
|
|
Stoic Grail Knight
|
Awesome keep it up!
|
Hydra Dominatus
World Wide War Winner |
|
|
|
|
|
|