| Author |
Message |
 |
|
|
|
|
Advert
|
Forum adverts like this one are shown to any user who is not logged in. Join us by filling out a tiny 3 field form and you will get your own, free, dakka user account which gives a good range of benefits to you:
- No adverts like this in the forums anymore.
- Times and dates in your local timezone.
- Full tracking of what you have read so you can skip to your first unread post, easily see what has changed since you last logged in, and easily see what is new at a glance.
- Email notifications for threads you want to watch closely.
- Being a part of the oldest wargaming community on the net.
If you are already a member then feel free to login now. |
|
 |
2015/11/19 23:48:02
Subject: Re:Custom multi-level city terrain (11/18: making big cranes!)
|
|

Dakka Veteran
|
Thanks! they took a bit to figure out at first. Thats always the problem with this sort of thing, you have a pile of bits that you are trying to figure out which you need that will fit, and you have to make sure you have enough bits to make the quanitity needed. So you gotta hold all these bit images in your head while you piece it together. But the result is one that i think is both realistic and very greebly.
Next up tonight I try to make 2 tank lifst for the other 2 bays! I just gotta buy yet more i-beams...
|
|
This message was edited 1 time. Last update was at 2015/11/19 23:48:28
|
|
|
 |
|
2015/11/21 12:31:43
Subject: Custom multi-level city terrain (11/18: making big cranes!)
|
|
Anti-Armour Yaogat
Cookeville, TN; USA
|
This project is coming along quite well. I will want to keep up with your progress! =D
|
  
There are 10 types of people in this world; those that know binary and those that dont.
----->MANTIS MAKER COMPETITION <---- |
|
|
|
|
2015/11/21 13:37:36
Subject: Custom multi-level city terrain (11/18: making big cranes!)
|
|

Pious Palatine
|
Looks really great. I hope you continue to blow my mind!
EDC
|
|
|
|
|
2015/11/21 19:29:42
Subject: Re:Custom multi-level city terrain (11/21: tank life work!)
|
|
Dakka Veteran
|
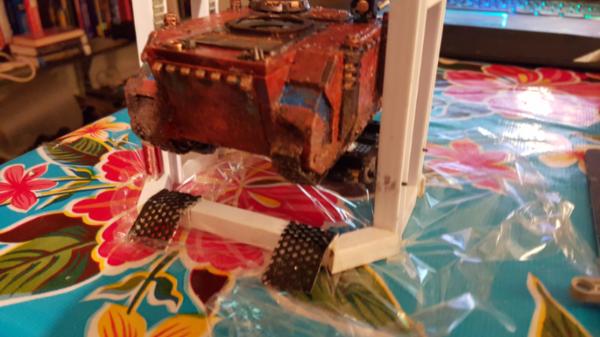
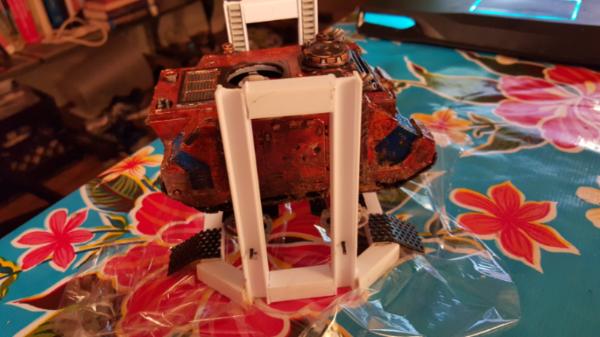
Bit of a gap because I took apart my table! Woot. It had served its' time well but was big, bulky, and very immobile. So we're replacing it with fold out 2x4 tables that I intend to stich togethe,r but that'll be another post once I finish a few pieces (mainly a little wooden tile holder so I only need 2 tables up at any one time)
Anyways back in garage land I've been working on the first tank lift! It's coming along well
|
|
|
|
|
|
2015/11/22 21:51:30
Subject: Re:Custom multi-level city terrain (11/21: tank lifts doneish, final layouts figured out for garage!)
|
|
Dakka Veteran
|
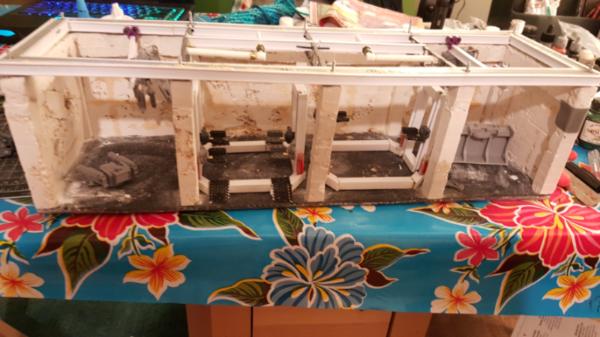
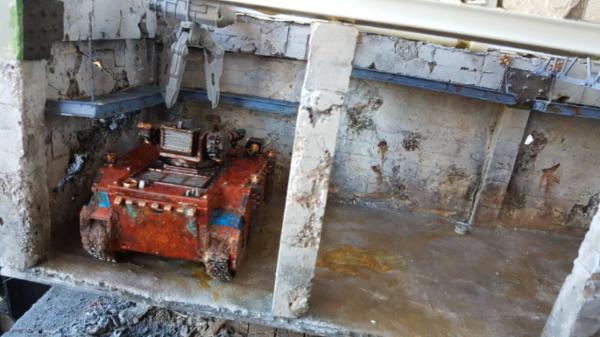
First up I got in more detailing in for the first tank lift. Im happy, it looks realistic and hainve the lift be on both sides of the ibeam added a lot to it. Also the tracks on the inner ibeam look great! hooray lego
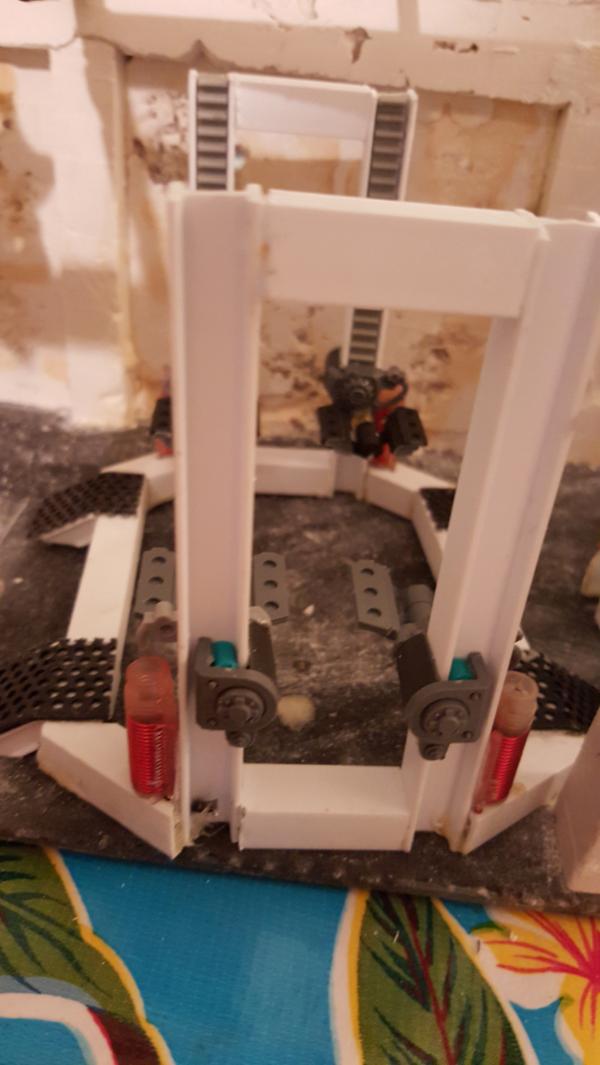
Next was mocking up the second tank lift. Unfortuantely I'm basically out of the bits i need to compelte the lift, but it was important to at the very least get the frame structure in place so I can figure out where these things are going. As you can see the answer is: in the middle. I had to change my plans a bit because they just didnt fit side by side on the end they were originally slated for.
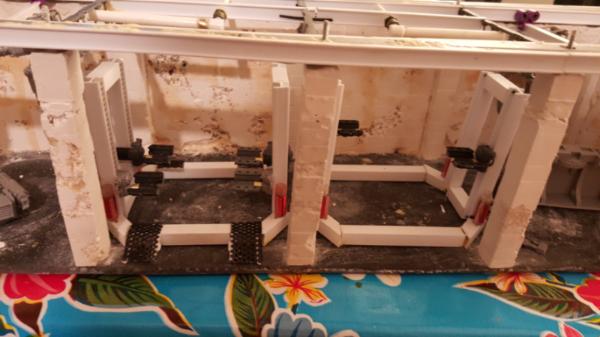
This meant my ceilings had to change:
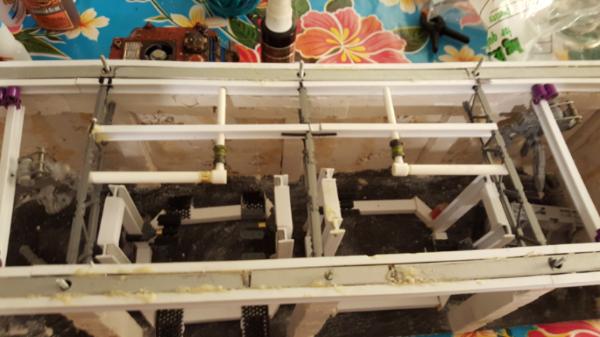

But was otherwise not a big deal.
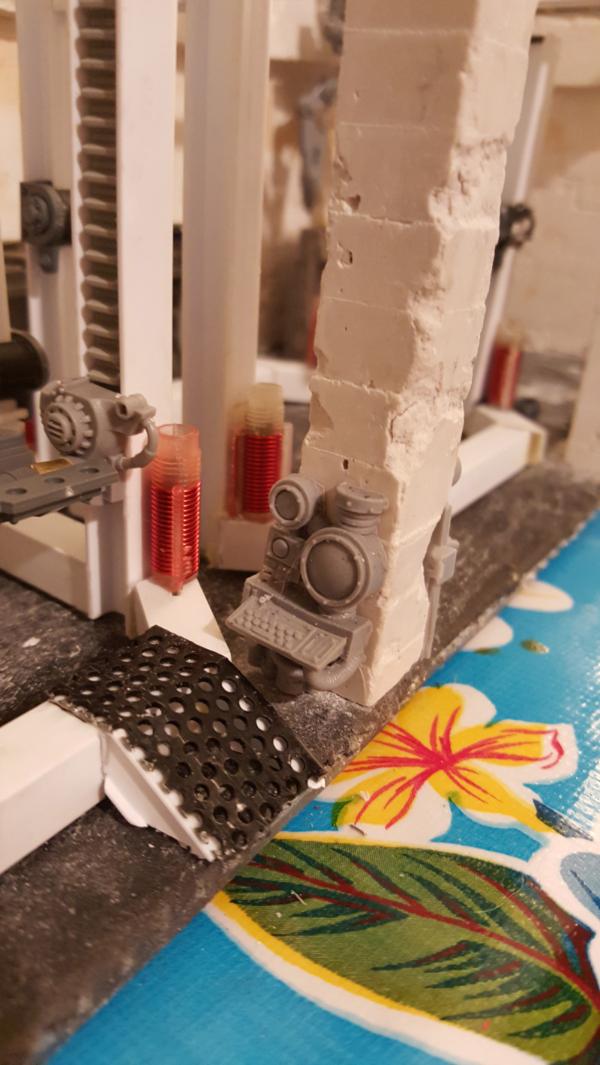
With all the big hero pieces figured out its time for final layout figuring out. The last piece to allt his were the computer terminals I snagged. These babies are pefect and, more importantly, will sell the ceiling even more. I have 4 computers for 4 bays/machines, and the top input to the computer will be the cabling from the machine. Cabling isnt necessarily sexy but I think it'll really sell thsi and add free "greebling" to my ceiling that's logical as I i string it all up and hook it to hte computer.
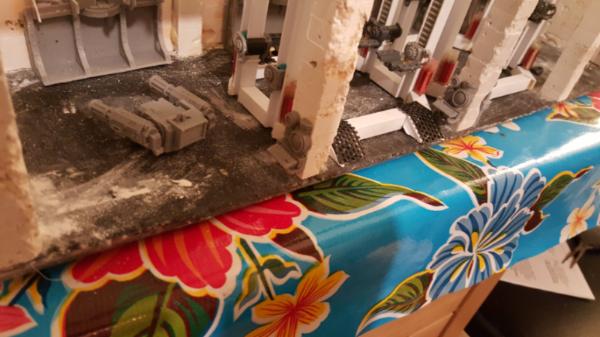
The bottom cables of the computer will run across the floor (protected by some plate) to the back wall where they dissappear into the "power" ether. Outlets of some kind or just the back of the bookshelves I have.
What this means is that it's finally time to start painting! I've reached the point where all freestanding structures are built or (in the case of the second tank lift) outlined, and as such to start finishing this thing off I need to paint the concrete up so that I can start attaching painted pieces to it (I still have a shelf to make full of "hero" pieces, lights to add, cables to string up, posters to add ,etc)
|
|
|
|
|
|
2015/11/23 23:23:24
Subject: Re:Custom multi-level city terrain (11/21: tank lifts doneish, final layouts figured out for garage!)
|
|
Dakka Veteran
|
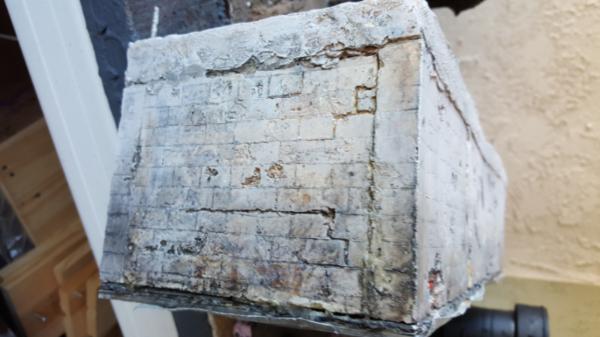
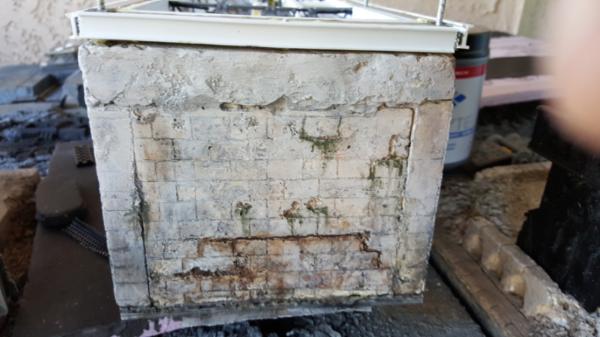
So this post will be longer than normal to show my painting progression, because.. this was hard. Starting with white made things.. very interesting.
Okay so here we have my basic source material:
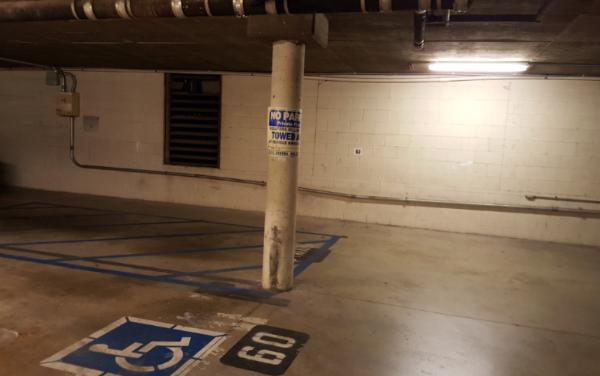
So a nice amber/oil soaked concrete floor and then whiter concrete for the walls/pillars. You get some contrast, but are still relatively muted and looks realistic. So I started with what I thought would be a fairly diluted wash of black and mud (something like 1 part in 10) wash to start getting darks in the crevasses. What I got was this:
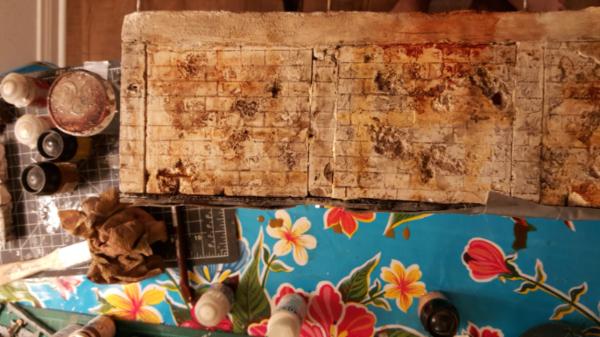
Holy crap we got dirty fast! That was super diluted too! Basically the white took ANYTHING and got super dark. I should have antiicpated this but it was hard to see just how it'd react on this level, and once you get one patch it of anywhere you kinda have to keep going so you dont get obvious brush marks permenently stuck on the white.
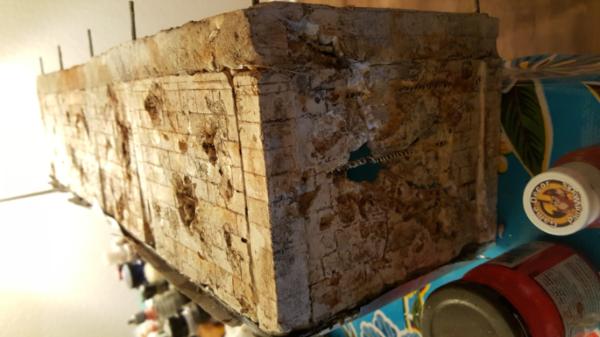
Yuck, so I kept add itand started drybrushing back on some white and cream colors: More specifically I focused on the upper third of the wall to try and get a gradient. One of the big lessons from the void shield generators is that they are a bit TOO dirty. There is no "clean" area from which to generate contrast, and im bordering on hitting that here too. SO i wanted that uppe rthird to feel cleaner.
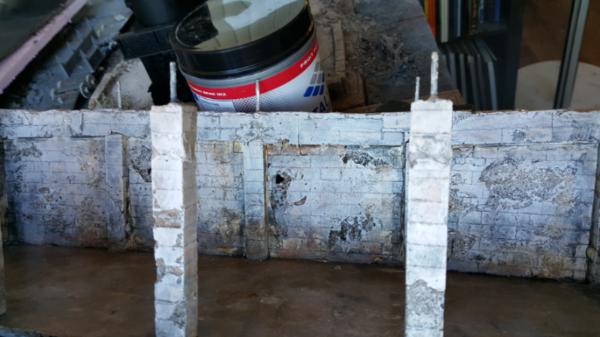

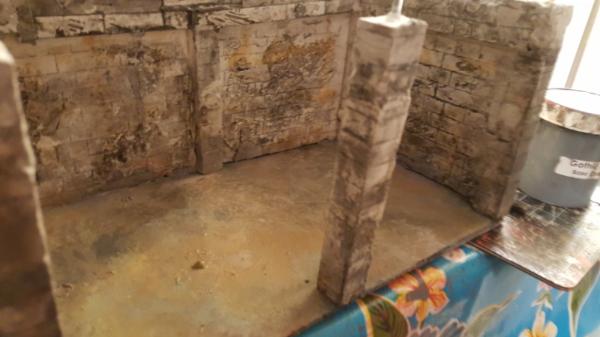
This is better but has it's own problem: this wierd grey/warm patchiness. The drybrushing would make that area of the concrete seem grey, but then right next to it would be this warmer look from the previous washing. THi was heavily exaerbated by the fact that the cast itself is SUPPER smooth in certain places so washes would roll right off ot it, creating those patches. Still it was better, but I wasnt quite happy. Then my wife had the idea of trying trying washes of white instead.
It took a good hour or 2, and very very diluted washes, but I was able to get to this result, which im very happy with.
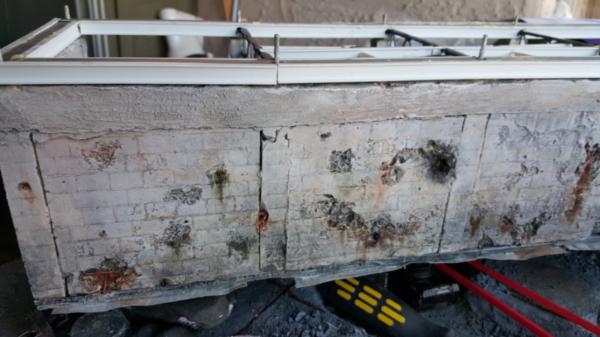
Now the floor it turns out was a lot easier, just add more layers. Also rotate every once in a while because you never know when paint is going to dry funny. I just sstarted wiht grey then did patche so fyellow/brick red and just started throwing on washes of grey, brown, red, yellows etc until it worked. Since I was doing this at the same time as the walls id be tilting everything and id get these wiered stain patterns on the floor which were cool and just.. wash wash wash layer layer layer of stuff. Sometimes it'd get too grey so id dab on some yellow and keep going. One key thing was the removal technique. I havent done this a lot but normally i just sponge on and go. But in this instance i would sponge/dab brush on and then actually use a paper towel to smooth it out and remove a lot of it. Sometimes it would also take out previous still drying layers too which worked. I dunno, i feel like i got to it via luck but either way it looks great. ANd then hit it with lots of gloss coats for that final sheen (fun fact gloss coat also dries funky too, so that became another layer. I just poured it on and spready it around and the execess gloss "clumpged" together into another fractal pattern, when that dried yo ucould peel it off to leave this whitish residue that looked great.
|
|
|
|
|
|
2015/11/24 07:51:06
Subject: Custom multi-level city terrain (11/23: painting white concrete! fact: its hard)
|
|

Executing Exarch
|
That looks brilliant! The weathering is amazingly realistic.
|
|
|
|
|
2015/11/24 23:47:35
Subject: Re:Custom multi-level city terrain (11/23: painting white concrete! fact: its hard)
|
|
Dakka Veteran
|
Thanks!
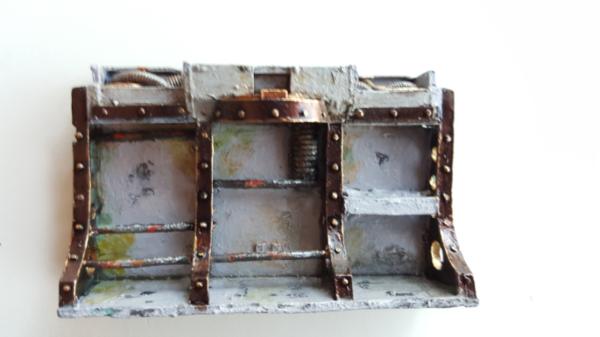
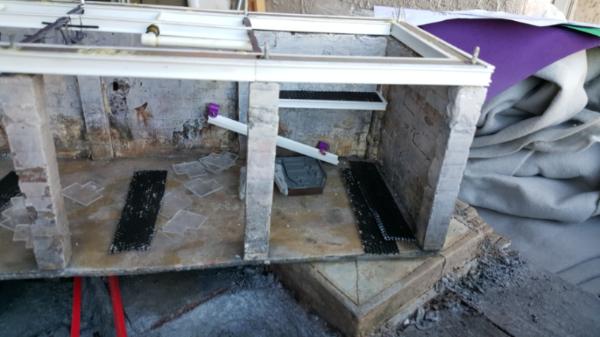
Now we get started on some detailing! First up are shelves which.. i dont have pictures for cause i forgot But basically think large ibeam shelves that will hold random garagey bits. 3.5 or so inches off the ground. It should let me keep the ground fairly clear but have realistic amounts of greebling as well.
Next up are some straps to help define the pillars and give some more detailing to the concrete.

So far its... okay. I started with the "standard" paint scheme for dark metal: tin bitz with gunmetal type drubrushed on it. Sure I could then add a rust pass and cover it up.. but i just dont like the base yet. I want that raw dark unfinished steel look, potentiallt then coated in chipping paint. Sure there would be some rust but not enough to cover it up.. so i dunno. It needs some experimentation
My ideal:
http://www.fauxwoodbeams.com/img_catalog/beams_general/design/timber/156.jpg
http://www.thefreshloaf.com//files/u18381/IMG_2249.JPG
http://brandnerdesign.com/wp-content/uploads/2013/10/Heat-Forged-Hot-Rolled-Steel.jpg
http://temcocontent.com/images/sheet_metal/AR500_infographic.jpg
|
|
|
|
|
|
2015/11/24 23:51:41
Subject: Re:Custom multi-level city terrain (11/23: painting white concrete! fact: its hard)
|
|
Anti-Armour Yaogat
Cookeville, TN; USA
|
The painting is going great and looks realistic to me.
Keep it up! Love how this is turning out.
|
There are 10 types of people in this world; those that know binary and those that dont.
----->MANTIS MAKER COMPETITION <---- |
|
|
|
|
2015/11/25 19:27:54
Subject: Re:Custom multi-level city terrain (11/23: painting white concrete! fact: its hard)
|
|
Dakka Veteran
|
Thanks! Yeah i'm just mildly obsessive which is why i worry about the metal coloring.
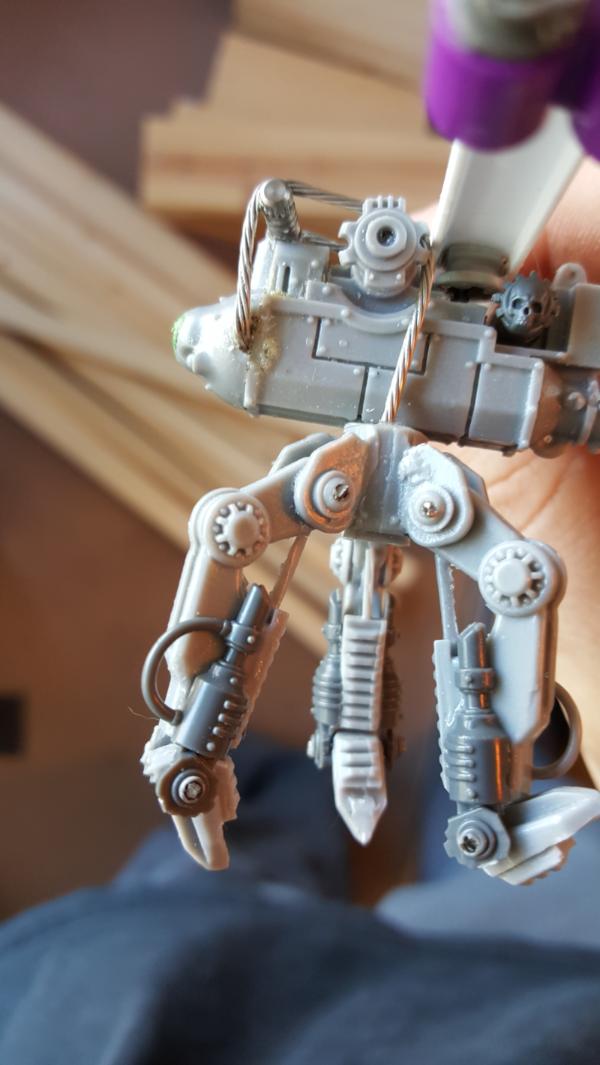
Case in point.. I redid the cranes. lol. THey were just too low! Sigh. I know it's silly but when I put in the shelves I realized the cranes could never actually interact with the shelves, which seemed.. not useful.
But I flipped the beam and made it level with it's horizaontal axis. Giving me like 3/8ths of an inch back and now the crane is a t a good height so it could actually pick something off the shelf.
I also did a quick test of putting in the tank lifst and that informed where i needed those shelves to be.. which is much higher. So now they are my "top" shelves that are rarely used and hold trophies/fun things/etc. So if they ever come out with say a mini-warlord, or some knight heads, etc. Just fun little knick knacks to put up there. I might also make them a touch thinner
The current latest layout. Expect the other side to have a similar corner just one that's been a bit more messed up by the impact hit. Moving the shelves to the corner works pretty well as well. The tank lift area I have to keep clear since it's already pretty cluttered and I still intend to potentially have the beta garage bits in there for more tool greebling.
|
|
This message was edited 1 time. Last update was at 2015/11/25 19:28:06
|
|
|
|
|
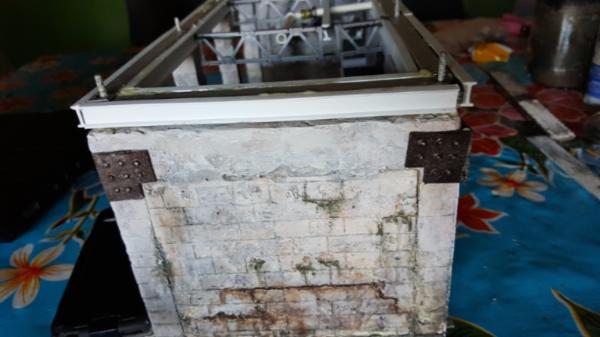
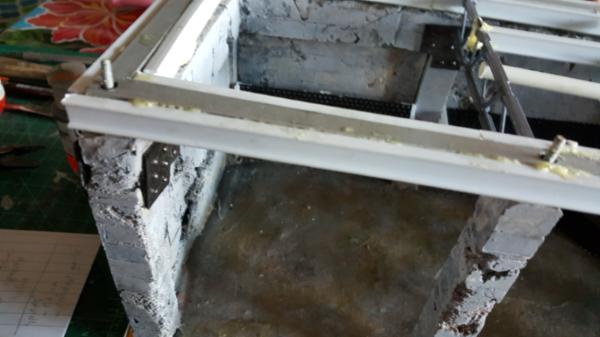
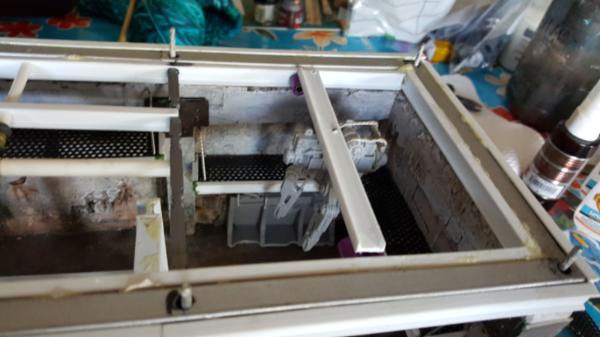
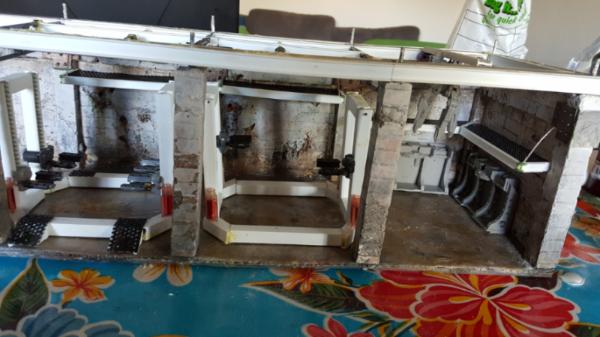
2015/11/27 22:13:20
Subject: Re:Custom multi-level city terrain (11/25: shelves, metal straps, layout work)
|
|
Dakka Veteran
|
The walkways are painted and isntalled! I ended up going with the chipping painted metal look because I figure all walkway type metals would be painted. Otherwise on the roof Id have a mass of raw metal walkway on top of a corrugated metal roof. Lotta the same look there.... Instead the painted metal sits a little back, but still has some ncie hi density detail. And then it'll match the tank lifts and other things which would also be a similar look (though potentailly different color)
 \
|
|
|
|
|
|
2015/11/28 22:42:16
Subject: Re:Custom multi-level city terrain (11/25: shelves, metal straps, layout work)
|
|
Dakka Veteran
|
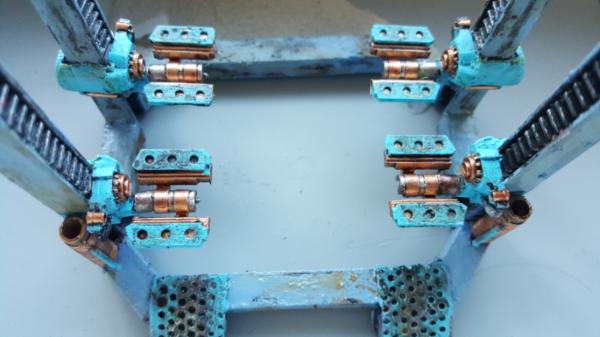
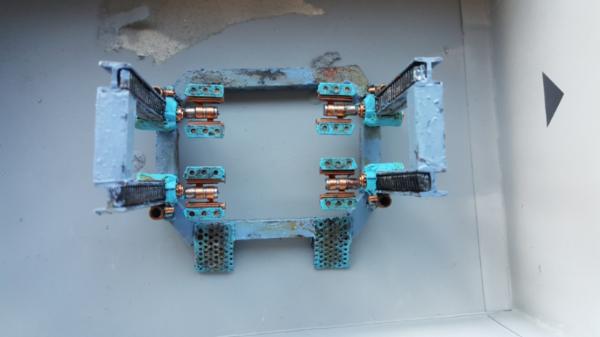
So I went back and added more detail to the cranes. Iw asnt originally intending to but as I kept doing these layouts I would test having the crane gripping the dreadnought/turret. And each time it would prove to be.. very difficult and the tips would typically not be helping grip at all. This combined with the fact that the crane shelves are justtt cresting the tips (intentionally, it looked better slightly higher up) It made sense logically taht they would also pivot. So I added some piston pivot thigns and now everything pivots! it looks great so it was worth the time.
|
|
|
|
|
|
2015/11/29 05:26:42
Subject: Custom multi-level city terrain (11/25: shelves, metal straps, layout work)
|
|
Anti-Armour Yaogat
Cookeville, TN; USA
|
Walkways looking good, but maybe add some rust stains on the walls where they meet a rusty area of walkway? Kinda running down the wall like?
And the details on the crane are looking great!
|
|
This message was edited 1 time. Last update was at 2015/11/29 05:27:40
There are 10 types of people in this world; those that know binary and those that dont.
----->MANTIS MAKER COMPETITION <---- |
|
|
|
|
2015/11/30 18:32:30
Subject: Re:Custom multi-level city terrain (11/25: shelves, metal straps, layout work)
|
|
Dakka Veteran
|
|
|
This message was edited 1 time. Last update was at 2015/11/30 18:36:02
|
|
|
|
|
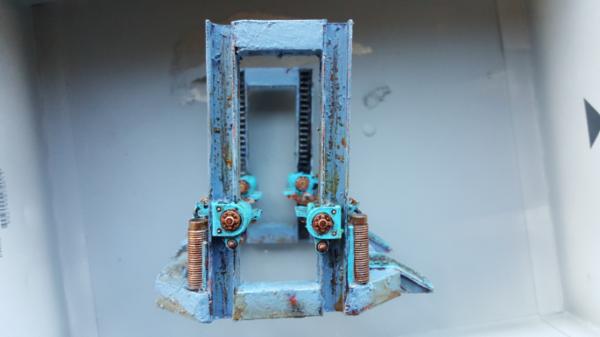
2015/11/30 22:57:50
Subject: Custom multi-level city terrain (11/30: painted industrial crane!)
|
|
Anti-Armour Yaogat
Cookeville, TN; USA
|
Wear and tear with the blue looks great.
Metals look really good, good amount of darkening in the crevices.
Might want to clean up the yellow and black caution lines a tad.
|
There are 10 types of people in this world; those that know binary and those that dont.
----->MANTIS MAKER COMPETITION <---- |
|
|
|
|
2015/12/01 22:04:48
Subject: Re:Custom multi-level city terrain (11/30: painted industrial crane!)
|
|
Dakka Veteran
|
|
|
This message was edited 1 time. Last update was at 2015/12/01 22:08:00
|
|
|
|
|
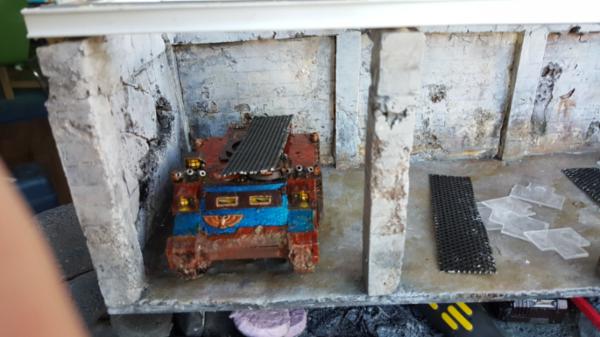
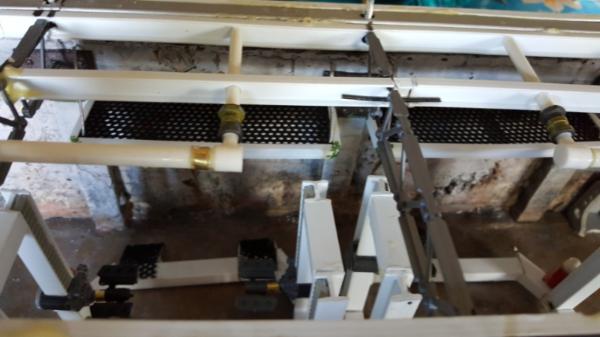
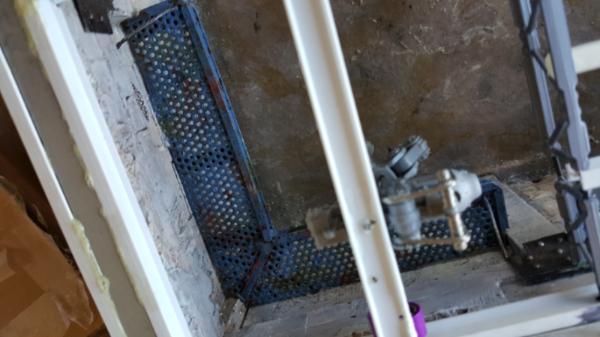
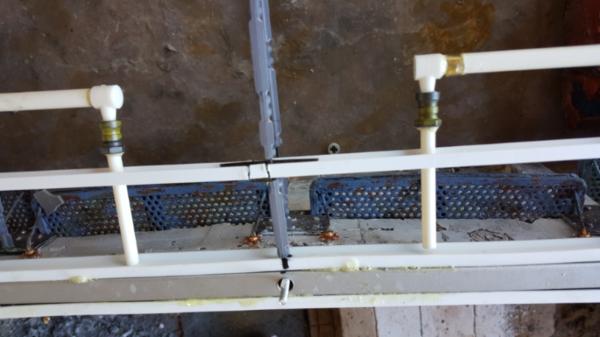
2015/12/02 21:28:59
Subject: Re:Custom multi-level city terrain (12/02: shelf detailing )
|
|
Dakka Veteran
|
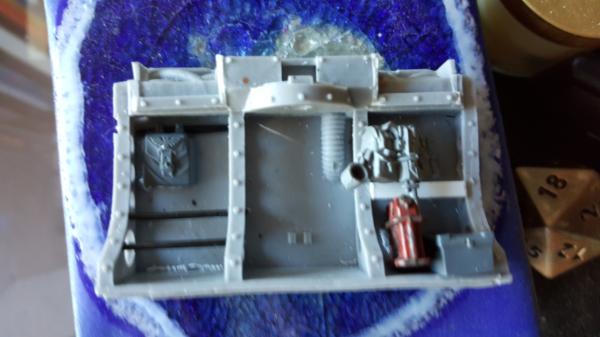
Working on laying out/planning out the shelves.
The first 2 are such. Havnet figured out what goes in the middle yet, some big gun haha.

You can see the metal rails I put in so the guns have something to rest on.
|
|
|
|
|
|
2015/12/03 06:20:27
Subject: Re:Custom multi-level city terrain (12/02: shelf detailing )
|
|
Anti-Armour Yaogat
Cookeville, TN; USA
|
Looking good!
Maybe these will give you some ideas what to do with empty spaces....
You could also hang some extra tank tracks, smoke launchers, etc....
|
|
This message was edited 1 time. Last update was at 2015/12/03 06:24:56
There are 10 types of people in this world; those that know binary and those that dont.
----->MANTIS MAKER COMPETITION <---- |
|
|
|
|
2015/12/03 21:36:38
Subject: Re:Custom multi-level city terrain (12/02: shelf detailing )
|
|
Dakka Veteran
|
Oh hey fantastic reference! I love it. Those things are definitely on my wish list, along with like mini manuals and posters (posters I'm definitely going to find room for, those schematic posters of tanks would be perfect in miniature).
dozer
The one problem with tank treads is you'd expect them to be flexible, hanging more balled up, which is a lot of work. I was thinking though of a hanging rack of dozer blades would be appropriate and be a good use of ceiling space.
There is still the beta tool kit I hop eto buy which will give me a set of tools at the very least. http://www.tsm-models.com/tsm/public/images/products/tsm13ac26/big/01.jpg
I was also thinking of converting a flamer into a welder to have laying around. Still for now I'm focuson on the bays and contents of the upper shelves.
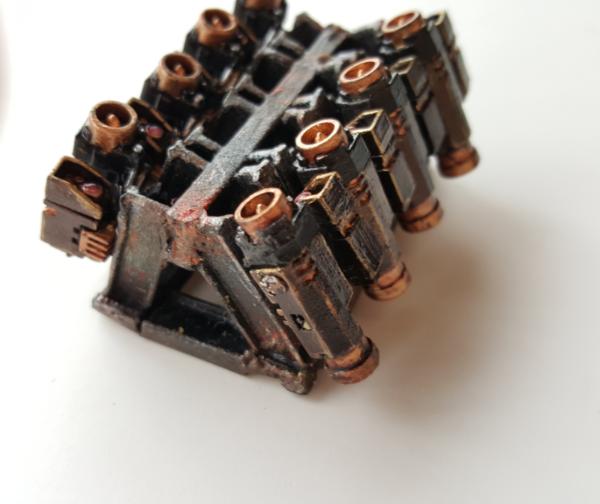
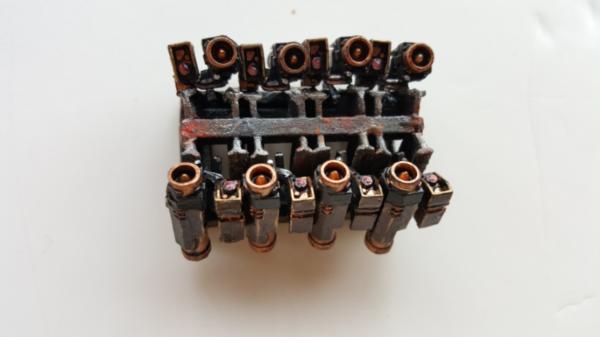
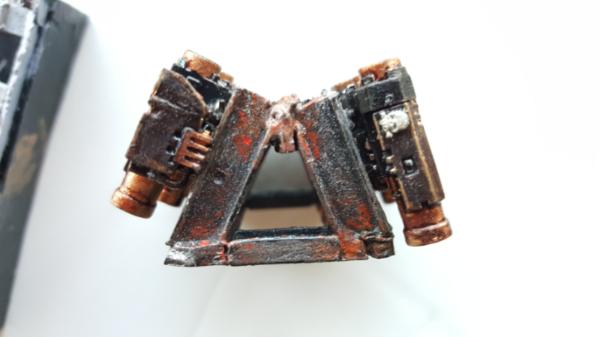
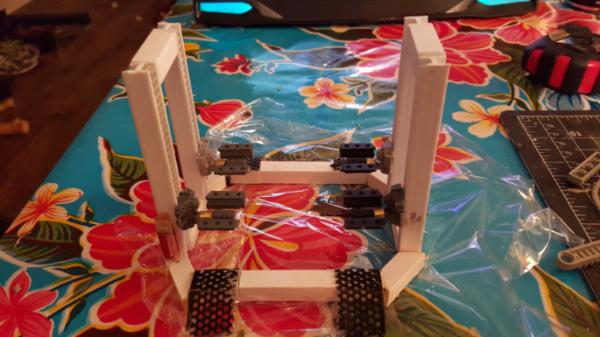
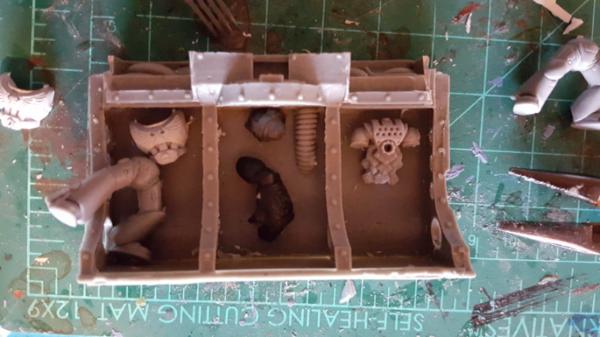
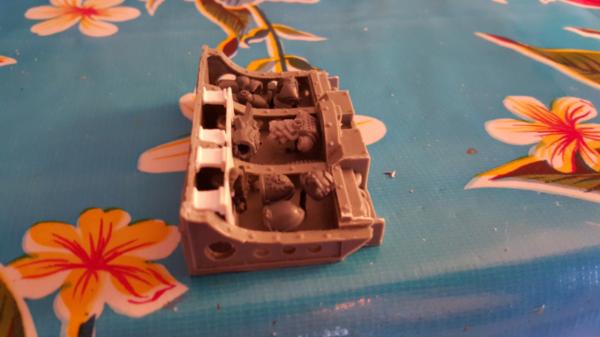
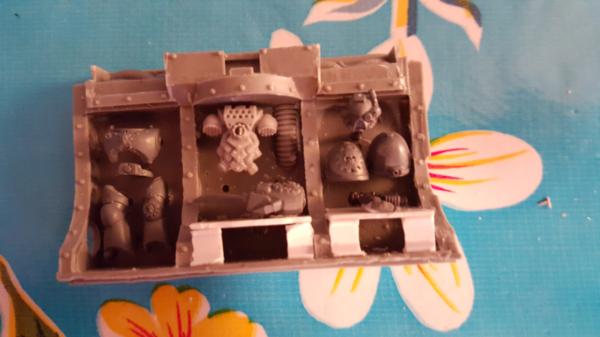
First up we have a rack of hunter killer missiles! This is just fun and well i wasng going to use them anyways, so something good for shelves I thought.

Next we have what I think would be a cool display: broken down power armour. I'm still working it out but I figure I use the power armour you get from pilots (straight legs, those mechanicum like gears adorning the armour, etc), and it makes sense that sets of those would be in the garage ready to put on and load up into the vehicles. I figure for the right 2 bays there would be low shelves where the shoulder pads/powerfist sat on (maybe I make some sort of quick cloth in green stuff to spice up the pfist shelf)
|
|
|
|
|
|
2015/12/04 00:00:41
Subject: Custom multi-level city terrain (12/02: shelf detailing )
|
|
Ragin' Ork Dreadnought
Deep in the Outer Boroughs of NYC
|
This project just keeps getting better and better.
|
|
|
|
|
|
2015/12/04 06:17:20
Subject: Custom multi-level city terrain (12/02: shelf detailing )
|
|
Anti-Armour Yaogat
Cookeville, TN; USA
|
I like how you made that rack. Looks really good, and time consuming. =P
|
There are 10 types of people in this world; those that know binary and those that dont.
----->MANTIS MAKER COMPETITION <---- |
|
|
|
|
2015/12/04 06:53:55
Subject: Re:Custom multi-level city terrain (12/02: shelf detailing )
|
|
Dakka Veteran
|
Yeahh... yeah... lets not talk about that (it definitely took a while)
One flaw of that white plastic, boy does it not glue well (or primer well, as previously mentioned. Ugh.) So making that was particularly painful since i was gluing white plsatic to itself and trying to get it all to line up as well. Still the result is nice and realistic so it should look good painted.
If i havent mentione this paint is a beauty. It's part of my quest to replace all my GW metallic paints with ones that dont split/are consistetly named/look WAY better/are hella cheaper. Tin bitz so far is the only one left and some remaining gold pots I havent finished off yet. Anyways I picked this one up as part of my quest to make dark uncoated metal and it works well
http://www.goldenpaints.com/products/colors/iridescent-colors/heavy-body-iridescent-colors/micaceous-iron-oxide
It's a great dark metal, AND has a texture to it, so it seems to hold better to the plastic than primer. It's not that much better but when ur tryign to scrape your paint job to make chips ever little bit of hold helps.
|
|
This message was edited 1 time. Last update was at 2015/12/04 06:54:08
|
|
|
|
|
2015/12/04 06:54:30
Subject: Custom multi-level city terrain (12/02: shelf detailing )
|
|
Pious Palatine
|
Amazing! I think your attention to details is extremely commendable.
It's gonna look totally boss when its finished.
EDC
|
|
|
|
|
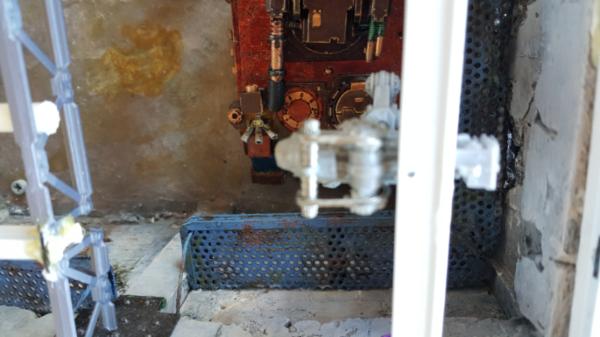
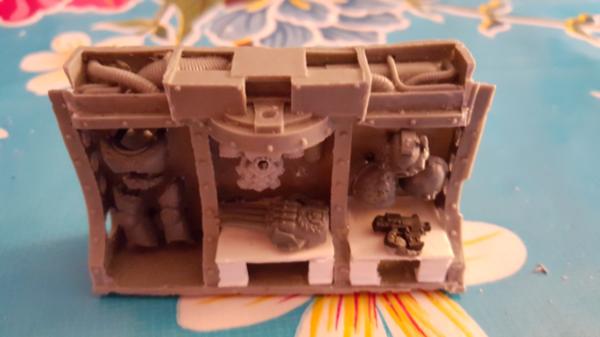
2015/12/04 22:22:09
Subject: Re:Custom multi-level city terrain (12/04: power armour rack)
|
|
Dakka Veteran
|
Thanks! I'm not looking forward to PAINTING all the detailing but hey one step at a time lol.
Anyways progress! first up i finished (minus the lego gearing) the other tank lift. Yay!
AND even better (and picture wrothy) is the first of 2 power armour racks I made fo rthe other shelves! I'm super happy with how they turned out, the offset floating look works well. The shoulderpads are sadly a bit awwkard since they are such a tight fit buttt everything else works so well im not sure what i'd do to change it.
|
|
|
|
|
|
2015/12/05 06:39:01
Subject: Custom multi-level city terrain (12/04: power armour rack)
|
|
Anti-Armour Yaogat
Cookeville, TN; USA
|
Good job separating the armor. Looks nice and clean.
|
There are 10 types of people in this world; those that know binary and those that dont.
----->MANTIS MAKER COMPETITION <---- |
|
|
|
|
2015/12/05 08:36:56
Subject: Custom multi-level city terrain (12/04: power armour rack)
|
|
Avatar of the Bloody-Handed God
Inside your mind, corrupting the pathways
|
Wow, amazing work since I last checked in! Love the tank lifts and all the detailing of the garage and PA rack. The paint effects you get on the walls are also just amazing.
To be honest, I think you could probably cast all the bits up and make a reasonable amount selling them 
|
|
|
|
|
|
2015/12/05 08:47:28
Subject: Custom multi-level city terrain (12/04: power armour rack)
|
|
Pious Palatine
|
Sweet. The armour rack is a work of art itself.
EDC
|
|
|
|
|
2015/12/06 09:19:05
Subject: Re:Custom multi-level city terrain (12/04: power armour rack)
|
|
Dakka Veteran
|
Thanks all! it's all coming together well so far. Now it's just about.. painting it! ugh. Still tomorrow there shall be pics of the beginnings of painted things! and yet another change in my grey (the back wall of the shelves i intend to be grey to help pop out everything else and keep it all light and well the blue just wasnt working then. so i gave up and switched to re-grey and you'll see the results)
|
|
|
|
|
|
2015/12/08 01:15:34
Subject: Re:Custom multi-level city terrain (12/04: power armour rack)
|
|
Dakka Veteran
|
|
|
|
|
|
|
2015/12/09 05:58:45
Subject: Custom multi-level city terrain (12/07: armour rack, HK missile rack painted)
|
|
Anti-Armour Yaogat
Cookeville, TN; USA
|
that rack looks really good. Appears to even have all the welds on it. =D
|
There are 10 types of people in this world; those that know binary and those that dont.
----->MANTIS MAKER COMPETITION <---- |
|
|
|
|
|
|