| Author |
Message |
 |
|
|
|
|
Advert
|
Forum adverts like this one are shown to any user who is not logged in. Join us by filling out a tiny 3 field form and you will get your own, free, dakka user account which gives a good range of benefits to you:
- No adverts like this in the forums anymore.
- Times and dates in your local timezone.
- Full tracking of what you have read so you can skip to your first unread post, easily see what has changed since you last logged in, and easily see what is new at a glance.
- Email notifications for threads you want to watch closely.
- Being a part of the oldest wargaming community on the net.
If you are already a member then feel free to login now. |
|
 |
2016/07/28 00:43:19
Subject: Re: multi-level city terrain, marine v nid bases (7/26: crashing a bike, marine spine, clawmarks)
|
|

Dakka Veteran
|
thanks!
Yeah lego has become somewhat invaluable at both roughing out a building design and for the casting process. Actually USING it in terrain is also neat though it's not necessarily cheaper if you are going for esoteric lego pieces. But its hard to argue with the fact that it's super strong and doesnt need to be cleaned.
|
|
|
|
 |
|
2016/07/28 20:06:52
Subject: Re: multi-level city terrain, marine v nid bases (7/26: crashing a bike, marine spine/guts done)
|
|
Dakka Veteran
|
I think he's dead jim
|
|
|
|
|
|
2016/08/01 18:47:20
Subject: Re: multi-level city terrain, marine v nid bases (8/1: moloc standing on bike)
|
|
Dakka Veteran
|


WOrking on Moloc! Pretty far along, but ran into a few snags. The first was getting the cape to stick on in any sort of sturdy way. I ended up adding a couple of pins straight into the body itself relatively well hidden, but that ended up havintg the cap be lower than normal, so I extended it a bit to make it all work.
|
|
|
|
|
|
2016/08/10 21:23:30
Subject: Re: multi-level city terrain, marine v nid bases (8/8: walkway platform bases)
|
|
Dakka Veteran
|
Gah! it helps actually finish the post. Whoops. ANyways so there was a bit of a gap while I wated for my genestealer patriarch to ship so I decided to try my hand at making some of the walkway bases.
and not bad!
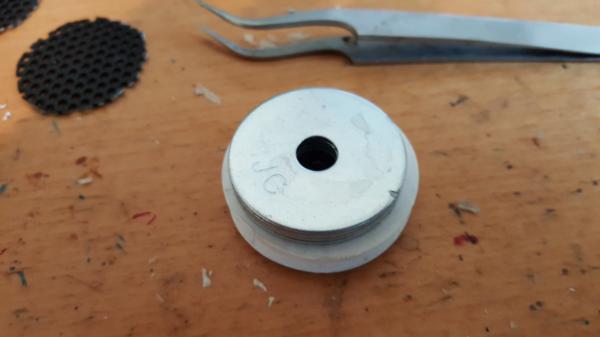
Now the basic idea is to get a pot of boiling saltwater, let the ibeam soak in for a bit, and bend it around something. I started by bending it around my 32mm metal bases I had stacked together
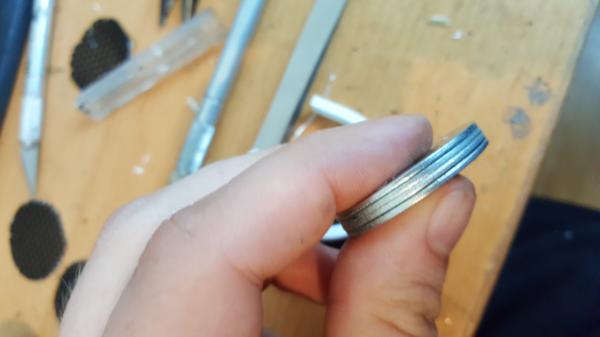
But when the base was all done i didnt think how big it would get...
The size I need it to be..
Oh well, its a "hero" walkway base. Anyways after you do the initial bend you still have to worry about the ends, and this is where it gets really tricky, becuase getting those final ends to curve even a little bit takes a lot of force without snapping the plastic. poking holes in it to use wire to pull it together helps a ton
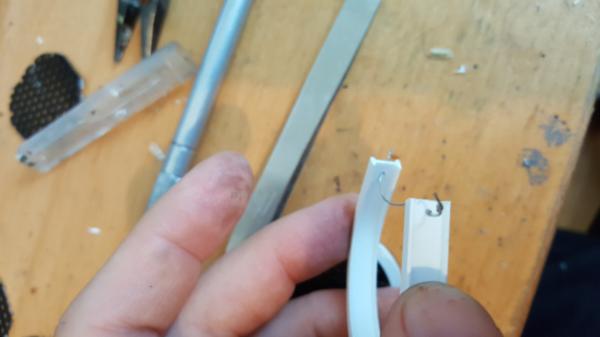
but doesnt give the curve. I tried "heating" it while it was wrapped around the discs and using clamps to forcibly curve it but the force of the clamps ended up warping the plastic as much as it curved the ends, so that wasnt a good solution. So Finally i just got as close as i could and hoped green stuff/selective snapping would get me the rest of the way. My current process:
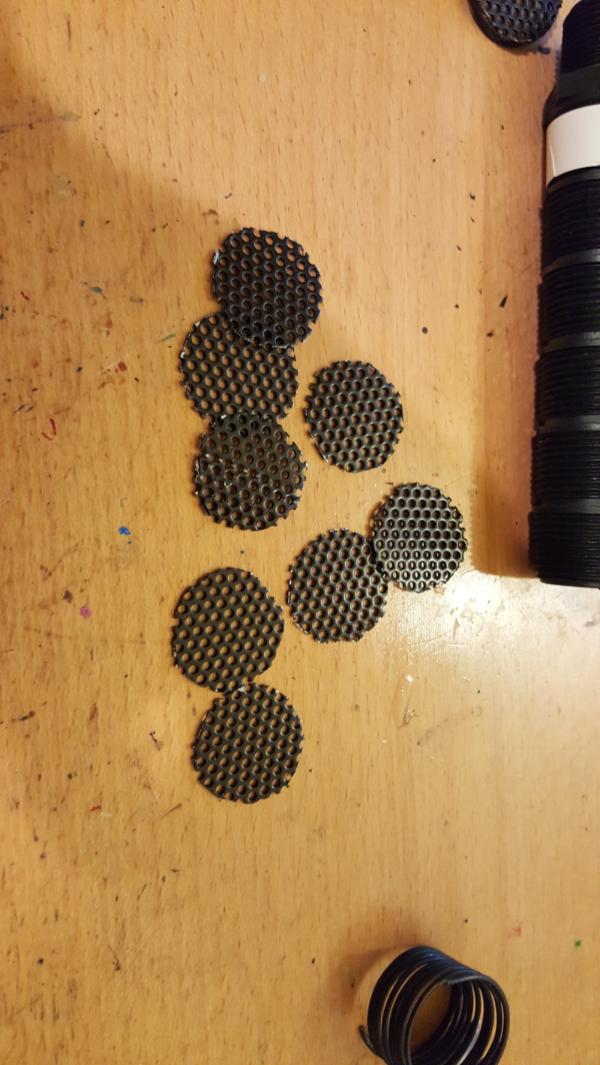
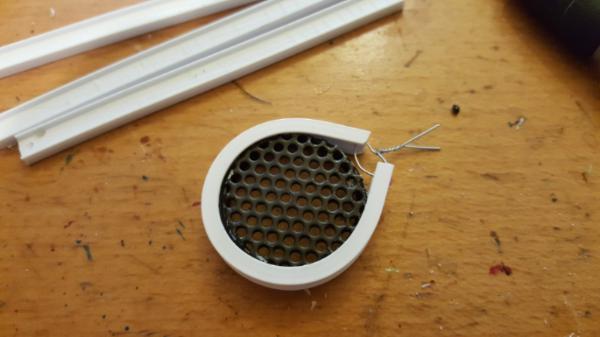
CUt out lots of discs
Make some loops of thick wire and stack 2 under my walkway discs
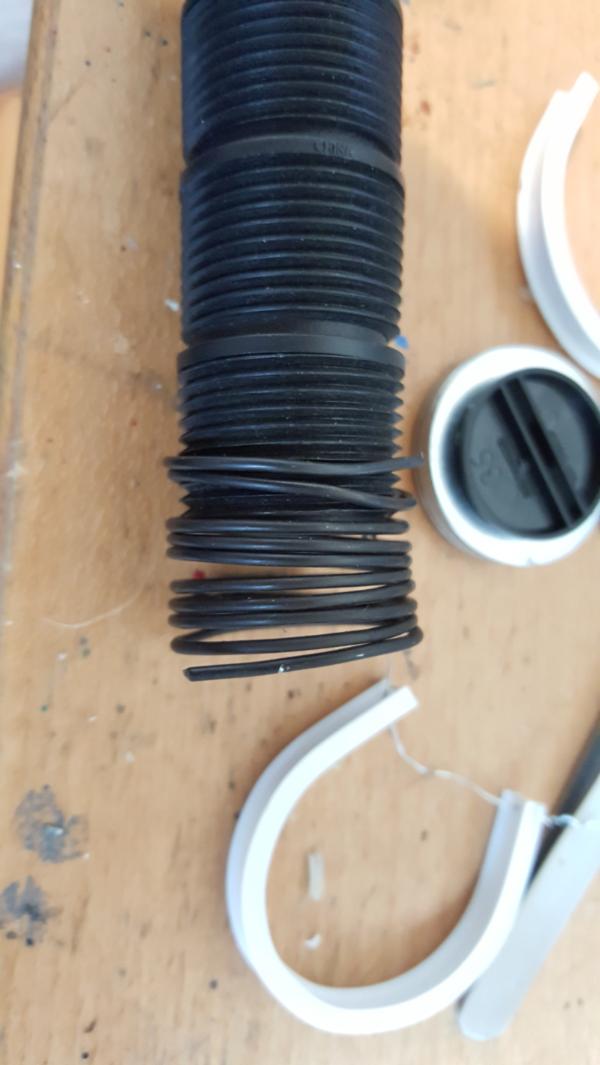
Do an initial bend around the big discs and then wrap it around its final companion and tie the wire:
Dip that in boiling water so when you cut the wire it doesnt immediatly spring back. Then while its heated very carefully bend the ends a bit with pliers. Score the inside of the ibeam prettttyy heavily and use gorilla glue (NOT superglue, no where NEAR strong enough, you need that expansion) and re-wwrap the ibeam around it, with more wire tied together.
|
|
|
|
|
|
2016/08/11 14:16:37
Subject: multi-level city terrain, marine v nid bases (8/8: walkway platform bases)
|
|
Sneaky Kommando
|
Cool idea for the bases. Never considered boiling plasticard! Sorry if you mentioned it previously but what are those discs from?
|
|
|
|
|
|
2016/08/11 17:37:00
Subject: Re: multi-level city terrain, marine v nid bases (8/8: walkway platform bases)
|
|
Dakka Veteran
|
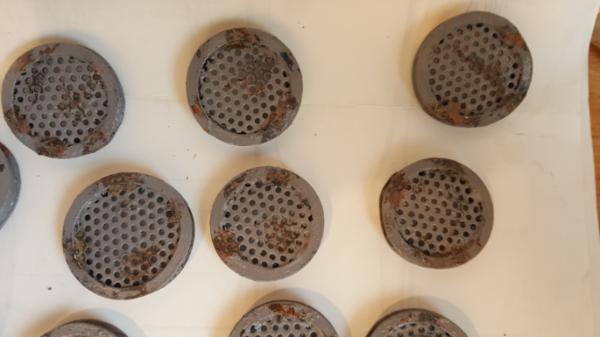
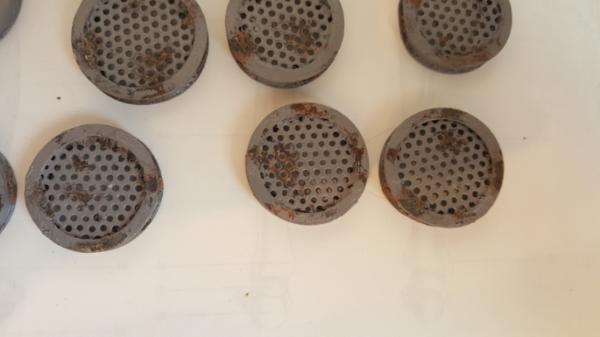
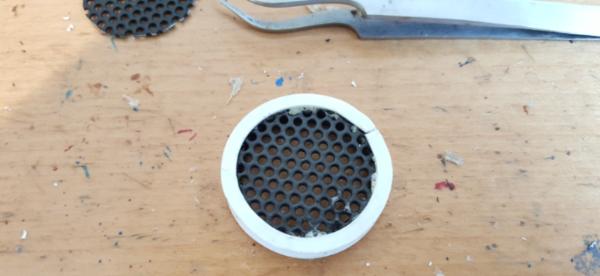
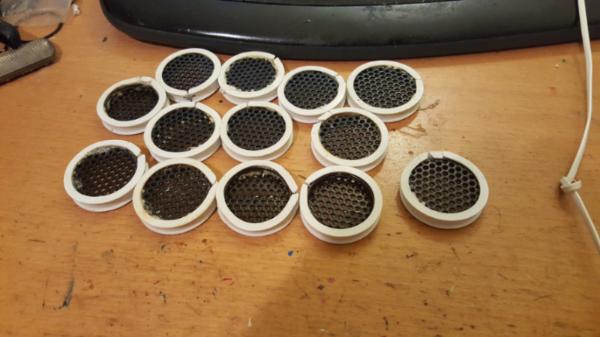
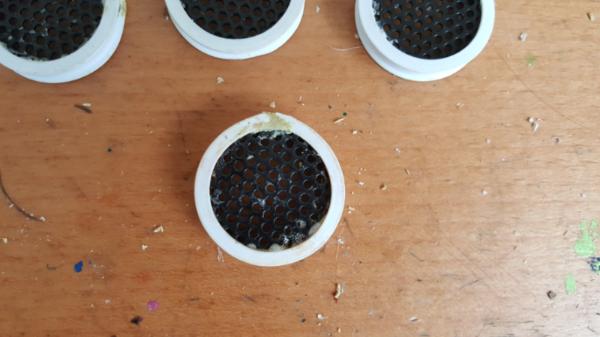
So the nickle washers are from home depot/general hardware store and are exactly 32mm in size (or whatever the new marine base size is)
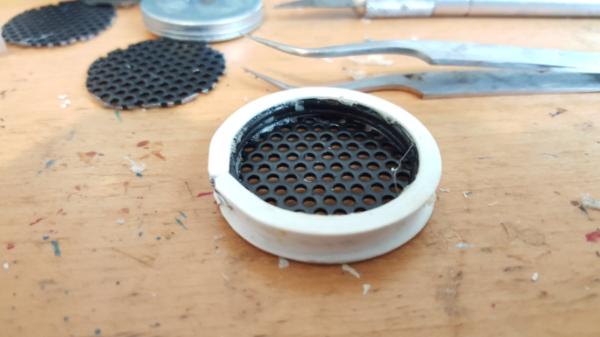
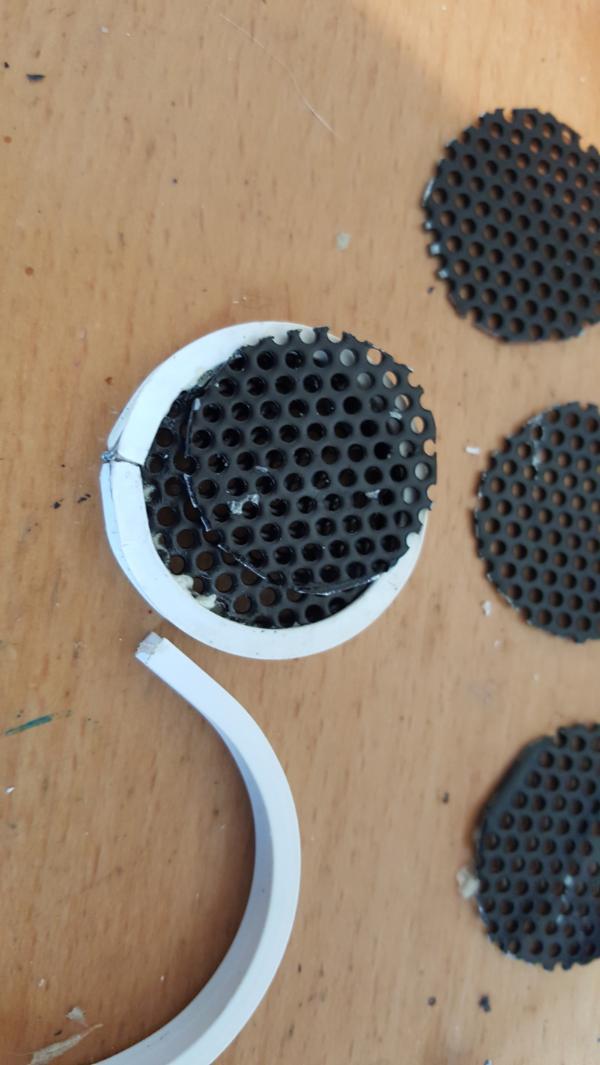
The walkway mesh is from large speaker grilles I found at a junk shop.
|
|
|
|
|
|
2016/08/16 00:31:11
Subject: Re: multi-level city terrain, marine v nid bases (8/15: walkway platform bases cont)
|
|
Dakka Veteran
|
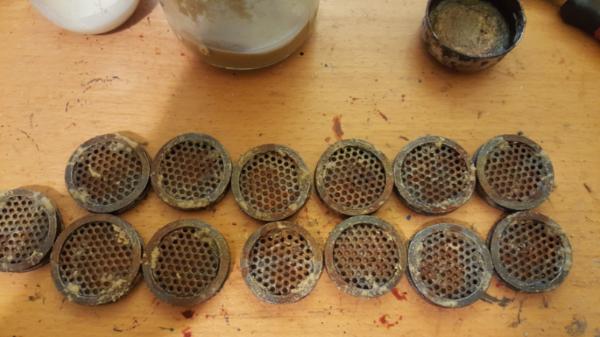
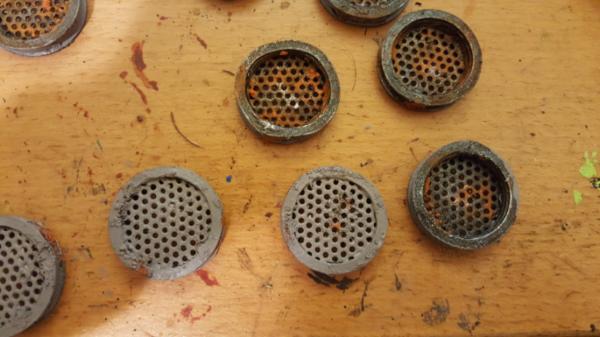
Do be do be do. Working on walkways:
First up some green stuff to round them out:

Undercoat rust/metal pass:
A paint chipping coat that doesnt need a pictureee
Top Coat pass:
|
|
|
|
|
|
2016/08/16 07:06:30
Subject: multi-level city terrain, marine v nid bases (8/15: walkway platform bases cont)
|
|

Pious Palatine
|
Excellent work. Those bases look great.
EDC
|
|
|
|
|
2016/08/16 20:44:50
Subject: Re: multi-level city terrain, marine v nid bases (8/16: walkway platform bases done, patriarch work)
|
|
Dakka Veteran
|
|
|
|
|
|
|
2016/08/18 23:03:46
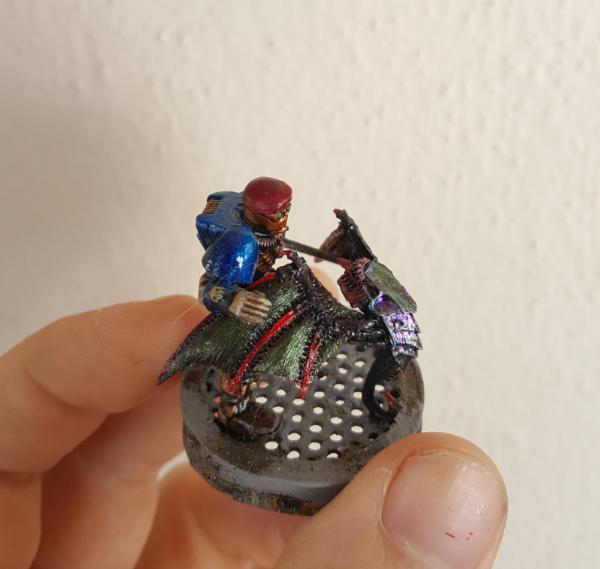
Subject: Re: multi-level city terrain, marine v nid bases (8/17: patriarch body mounted)
|
|
Dakka Veteran
|
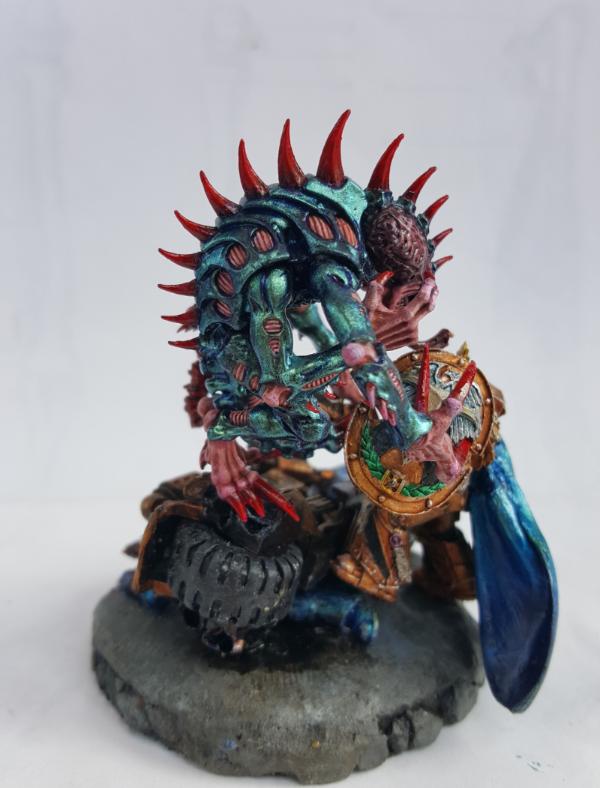
HUzzah he's mounted up! the brains got a bit dark but forgunately i can alcohol most of it off. Still, aside from that it's all coming together nicely
|
|
|
|
|
|
2016/08/19 11:05:17
Subject: multi-level city terrain, marine v nid bases (8/17: patriarch body mounted)
|
|
Pious Palatine
|
Patriarch looks awesome, I really like the shiny green, like a beatle carapace
EDC
|
|
|
|
|
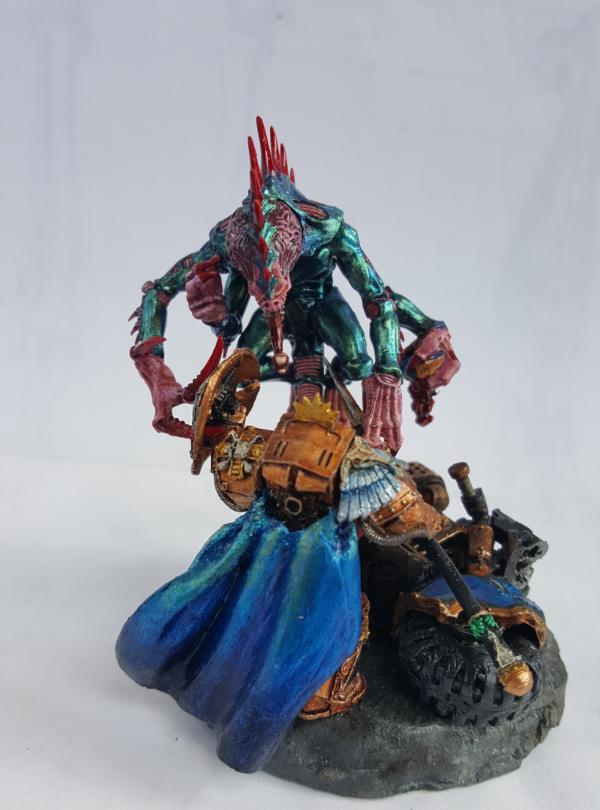
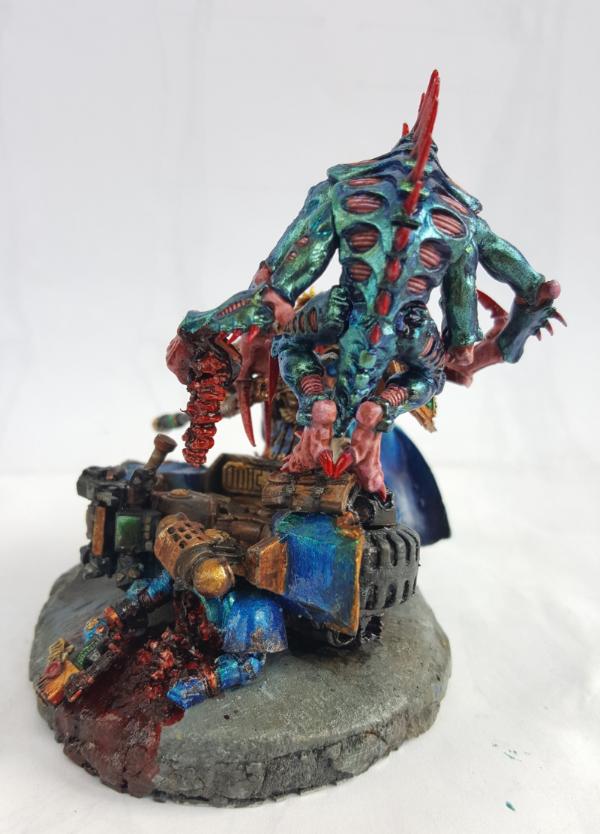
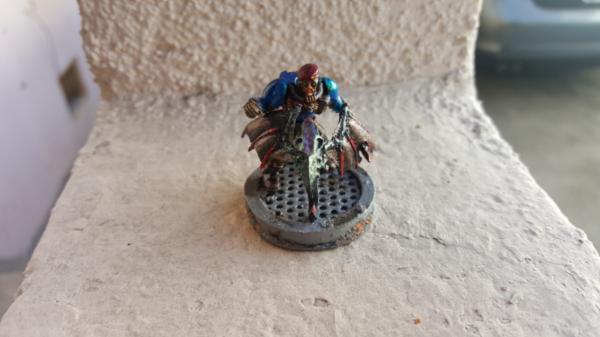
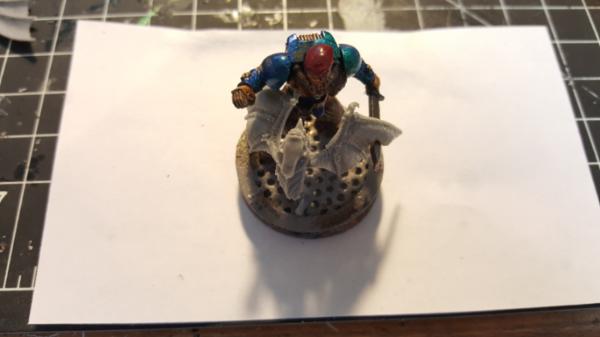
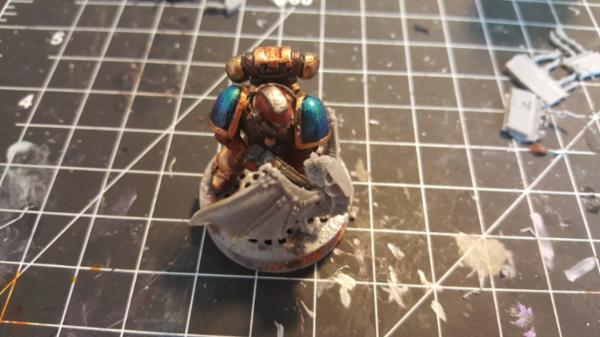
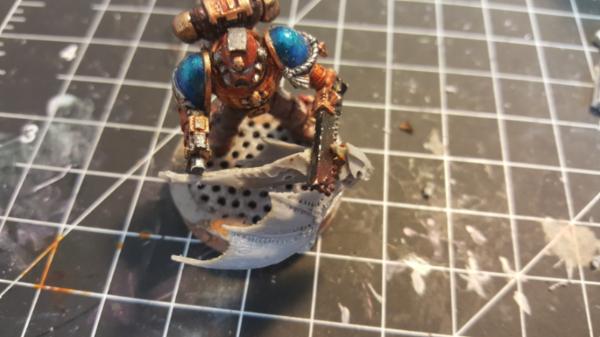
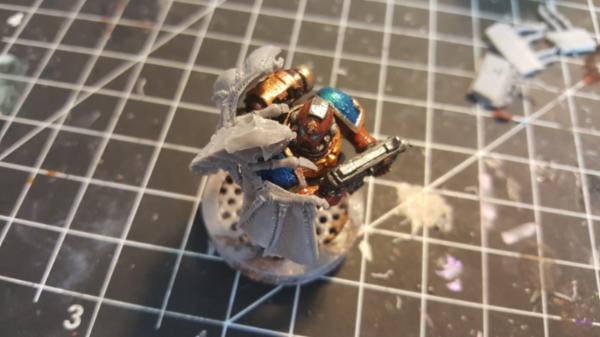
2016/08/23 03:46:40
Subject: Re: multi-level city terrain, marine v nid bases (8/17: patriarch body mounted)
|
|
Dakka Veteran
|
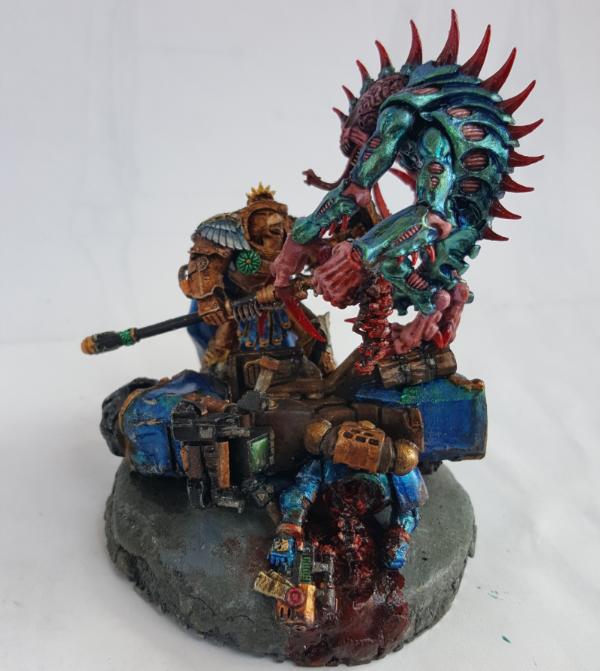
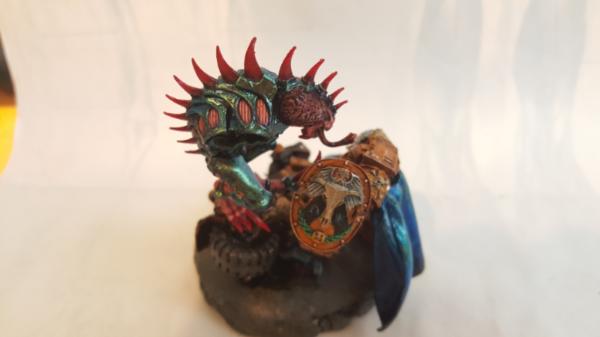
So a odd picture but interesting. Getting the arm and shield to link up was.. interesting. I needed them touching, to explain all the action, but i had to glue them down almost simultaneously so they could, together, be interlocked while also being pinned into their respective sockets.
Took a bit, and definitely scraped a bit off that claw, but it seems tow ork pretty well now. Just one of those things where painting beforehand was clearly crucial to ever get this amoutn of detail, but on the flip side it gets tricky figuring out how its all going to model together.
|
|
|
|
|
|
2016/08/23 05:53:44
Subject: multi-level city terrain, marine v nid bases (8/17: patriarch body mounted)
|
|
Pious Palatine
|
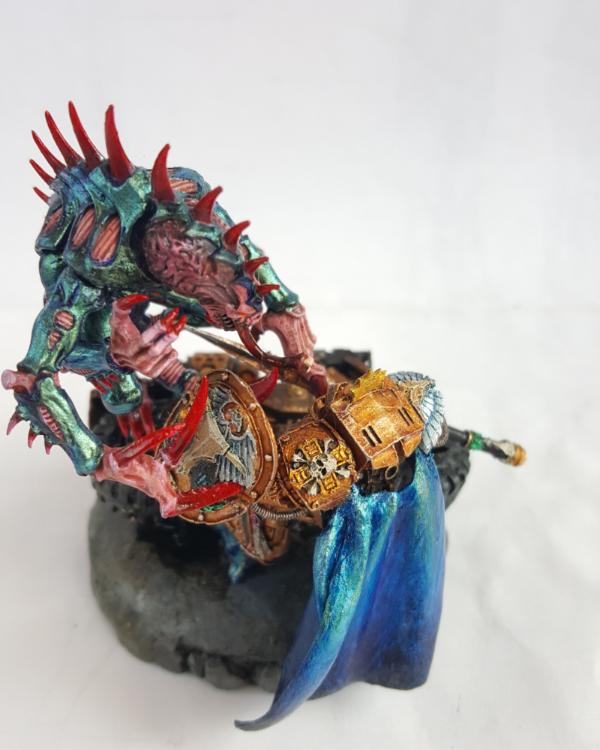
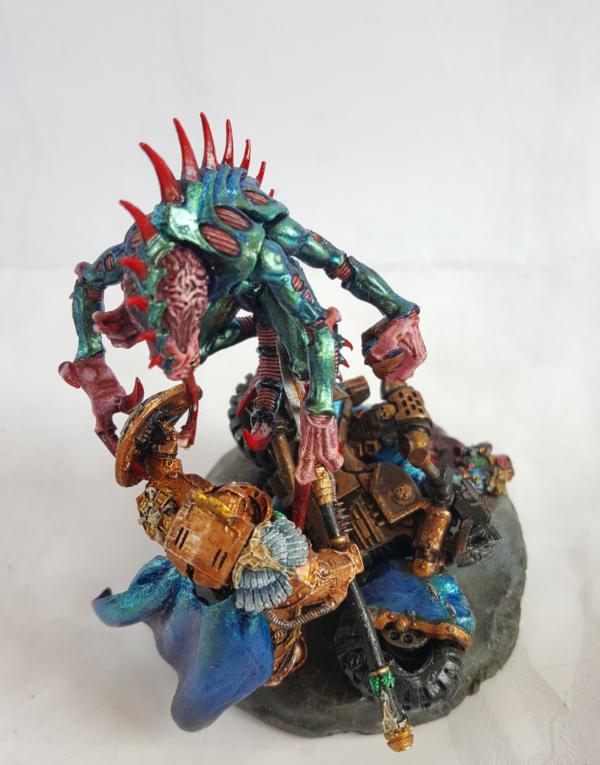
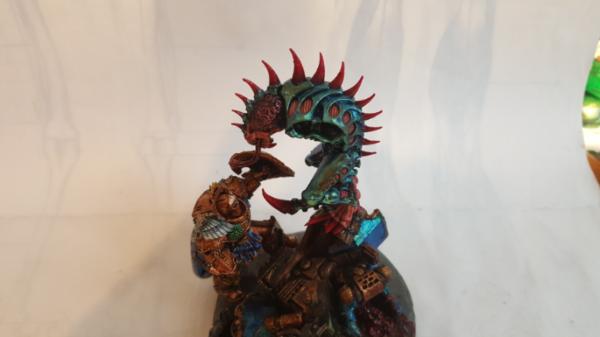
Nice work with the pose, looks like you've pulled off the desired effect. More pics from different angles?
EDC
|
|
|
|
|
2016/08/23 17:48:56
Subject: Re: multi-level city terrain, marine v nid bases (8/17: patriarch body mounted)
|
|
Dakka Veteran
|
I will once i get the last arm done! This one is trickier because it's the one that the head is attached too. Unlike my preivous spines I cant really hide half of it, so I have to figure out how to build the whole thing out. So far it's been tricky but there will be a post about it soon
|
|
|
|
|
|
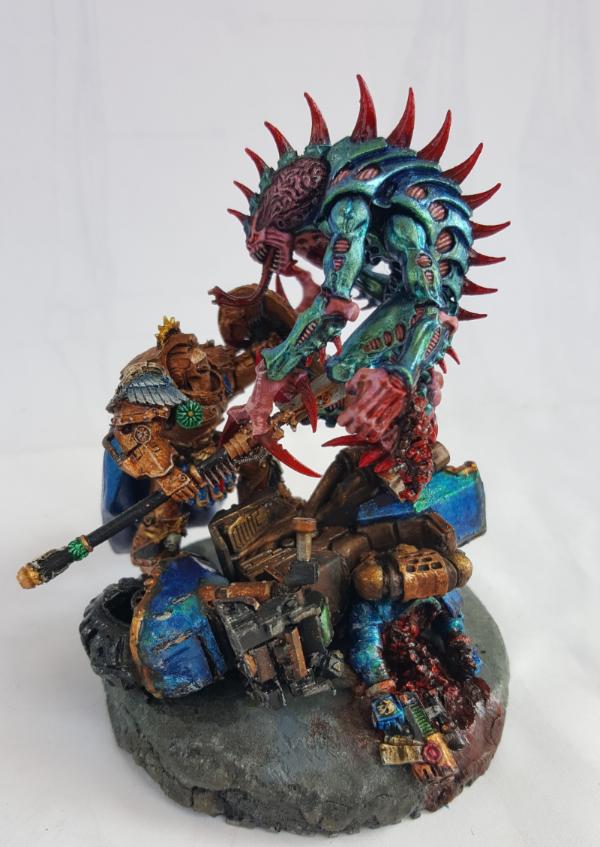
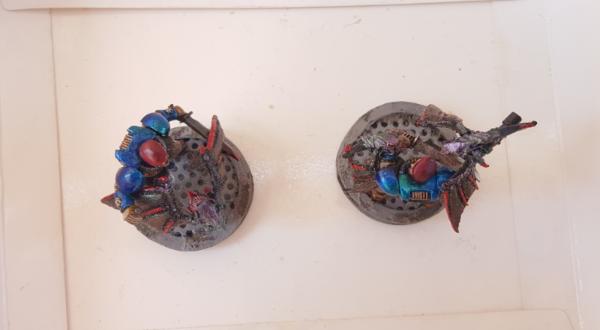
2016/08/25 23:19:44
Subject: Re: multi-level city terrain, marine v nid bases (8/25: head + spine)
|
|
Dakka Veteran
|
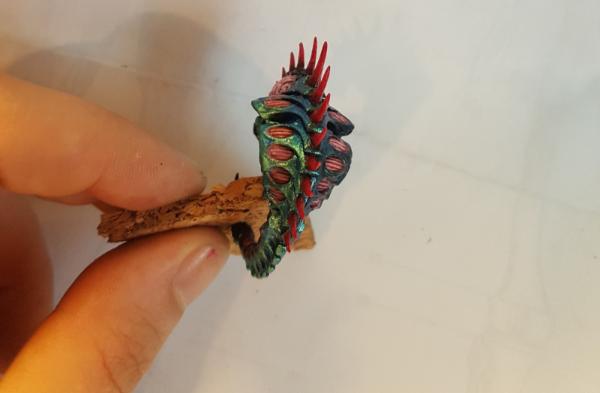
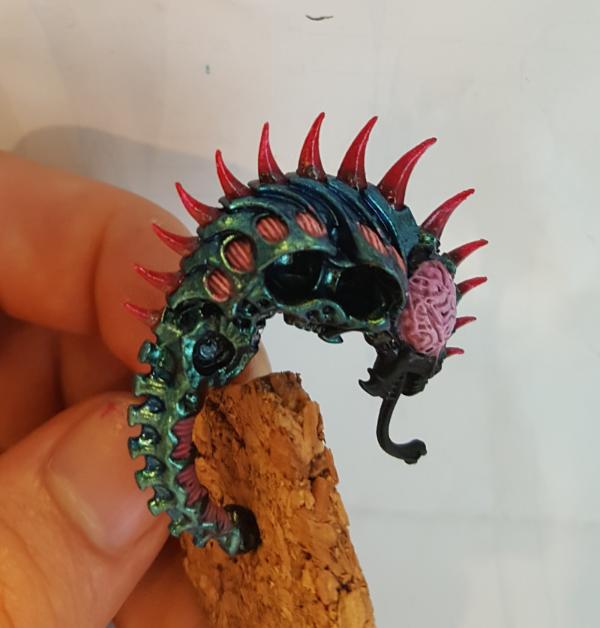
SO, spines. Ive done a few now but as previously mentioned only really half of one technically. To make aw hole spine it seemed like id need to be more fully round and then add the bits sticking out.
However the only thing close i had were 2 of these
and it made.. that
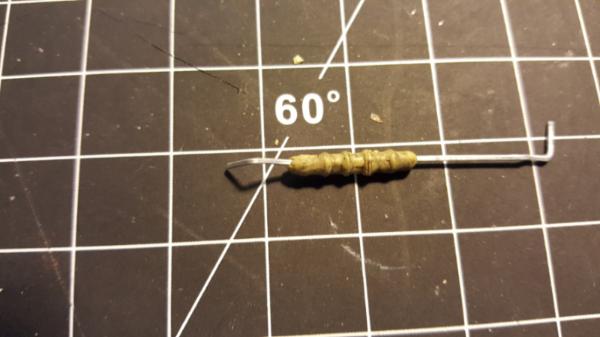
which, is both too long and too thick. Not a fun result. So I figured instead id start with 2 halves again and glue together like before, but they didnt line up so that was bunk. finally i did 1 half and then just built the other half on top of it directly, with spaces in between my vertebrae to give me room to work witht he tools. Then I cut them from each other and restrung the oens that were completed:
so i started with this:
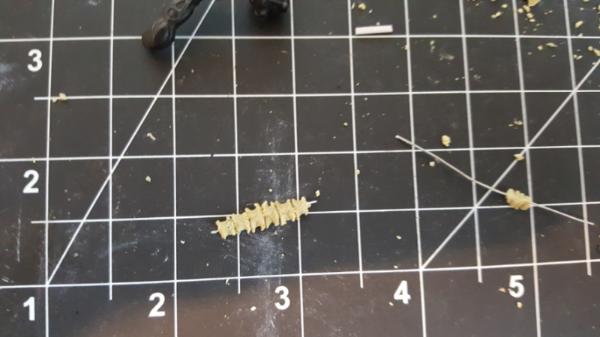
then added green stuff to the flat side every odd vertebrae, shaped it, ripped off the unfinished halfs, and scrunched them together.
lots of little bits later:
and not bad!
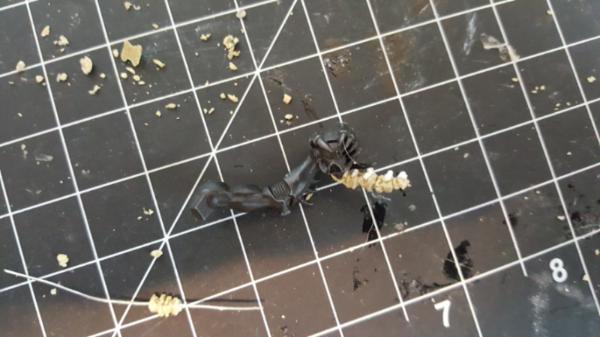
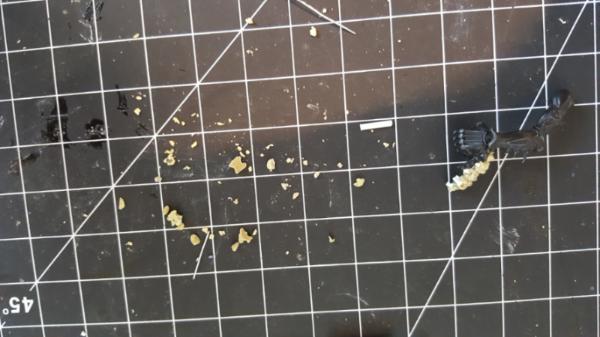
I figure with all the gore and blood still attached itll look just fine. So there we go, final arm ready to paint and finishing up this project!
|
|
|
|
|
|
2016/08/30 00:37:01
Subject: Re: multi-level city terrain, marine v nid bases (8/29: board planning!)
|
|
Dakka Veteran
|
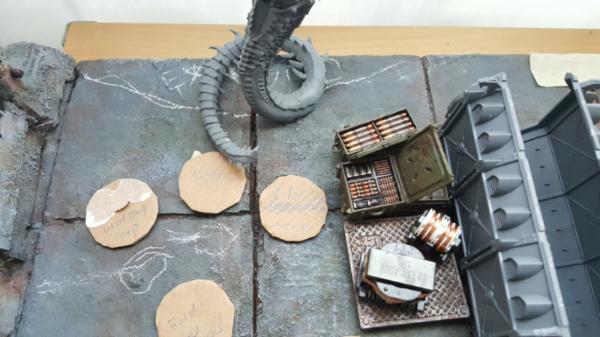
So there will be another delay in pictures of the completed primarch piece because, well, i saw some grey dust on it that i wanted to get rid of. I just cant get rid of it all! its annoying, i guess they are drill shavings from when I pinned it all together? either way I wanted to take another pass and cleaning that off and retake my pics.
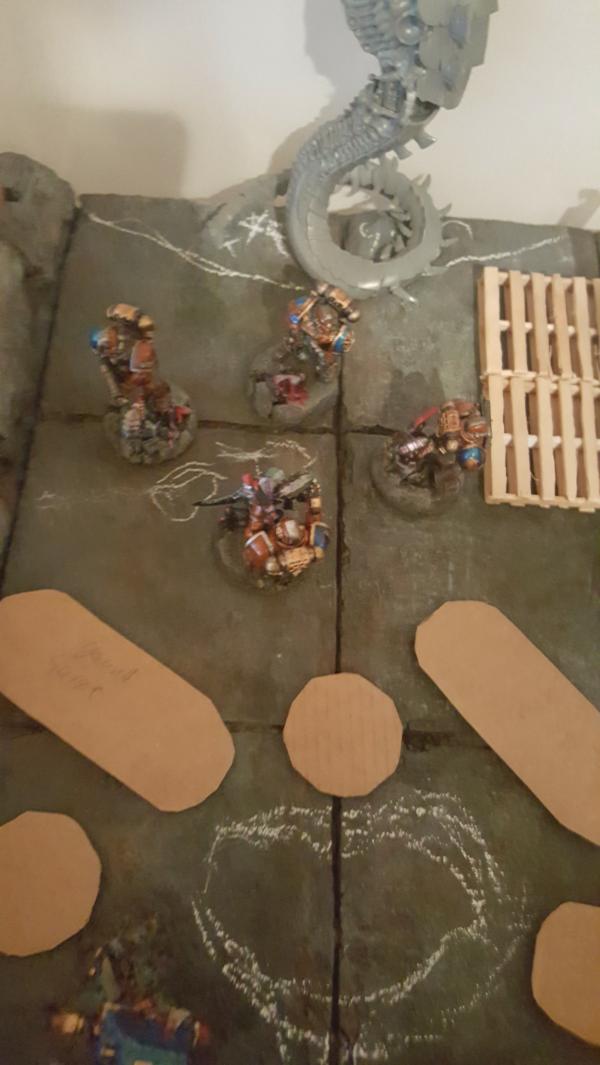
In the mean time this morning I decide to actually lay out the Zinge/entrance tile with all the bases i've built up. The paper squares are my guesstimate as to the size of the munistorium armour containers (i said 3x6). The idea is to have this area be the resupply/staging area for the larger base behind it. So its connected to the garage (walled) which is tile 2 and said garage tile has entrances to further in the base which isnt shown. Anyways so that means some containers! It'll give the tile some height and sell it better insteado f having it blank. I figure i also have pallets of supplies scattered in the back corners where the stealers are moving in to hide. Furthermore the Neurothrope/khan battle is it having burst out of a bio container it was being kept in, so it got loose and detailing the interior of that container should be fun.
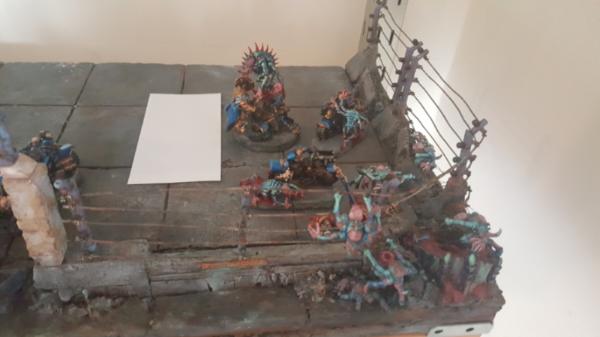
you can see on this left side that the holes where gaunts would be popping otu of the ground form quite naturally and convincingly. So ill crater out those areas and make them into dig eruption sites, gives me a way to add more of the swarm feel without needing room on the edge. Story wise now its the gaunts, unable to penetrate the fence, are relying on the fex or tunnels to get in but hit the bulk of resistance. The stealers on the other side are cutting the fence and swarming into an area with less resistance, being led by the primarch.
|
|
This message was edited 1 time. Last update was at 2016/08/30 00:37:19
|
|
|
|
|
2016/09/01 23:52:40
Subject: Re: multi-level city terrain, marine v nid bases (9/01: scouts vs skyslashers)
|
|
Dakka Veteran
|
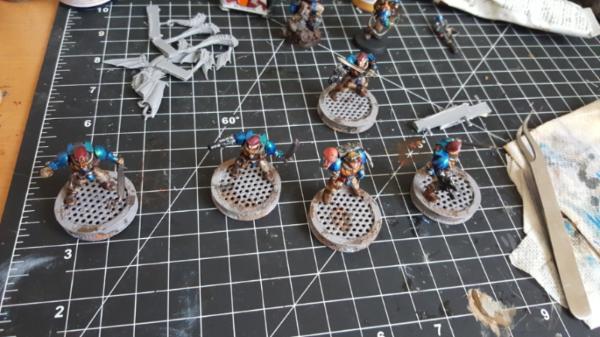
So still no pics of th efinal patriarch, that will probably wait till the weekend when I can wait around for optimal lighting conditions. Until then im working on my scouts using the new platform bases.
|
|
|
|
|
|
2016/09/02 22:20:21
Subject: Re: multi-level city terrain, marine v nid bases (9/02: scouts vs skyslashers posed)
|
|
Dakka Veteran
|
Working on getting them posed, since the resin resists the heat so mucu better than plastic its pretty easy to heat it up and bend it without deforming it, nifty! If you go too far with heat it mostly just snaps, which is easily fixable.
Id prefer it be conssitent with plastic of course, but, still useful to know.


|
|
|
|
|
|
2016/09/06 17:52:16
Subject: Re: multi-level city terrain, marine v nid bases (9/06: genestealer patriarch final pics)
|
|
Dakka Veteran
|
|
|
This message was edited 1 time. Last update was at 2016/09/06 17:52:42
|
|
|
|
|
2016/09/07 20:46:55
Subject: Re: multi-level city terrain, marine v nid bases (9/07: first scout vs skyslasher)
|
|
Dakka Veteran
|
|
|
|
|
|
|
2016/09/08 21:33:21
Subject: Re: multi-level city terrain, marine v nid bases (9/08: marines vs skyslasher poses)
|
|
Dakka Veteran
|
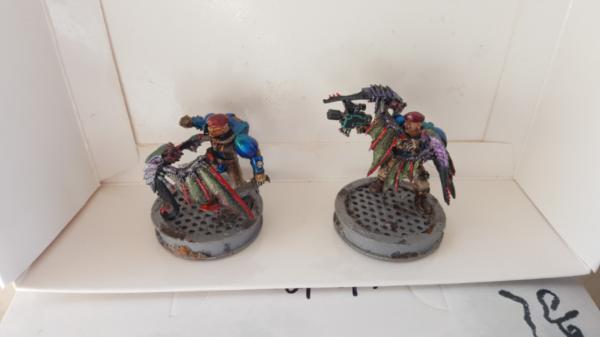
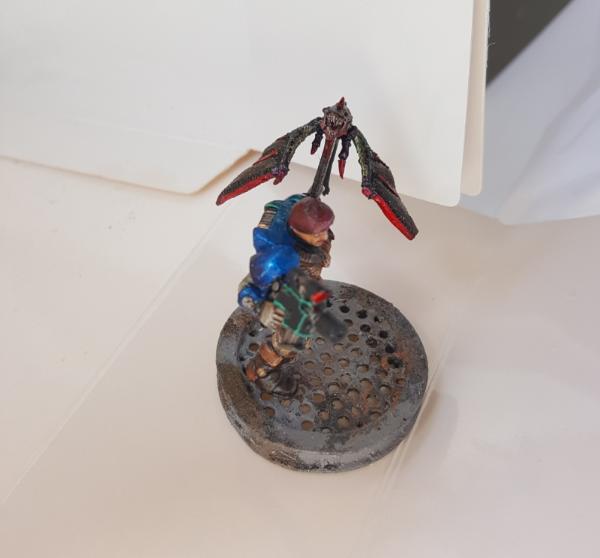
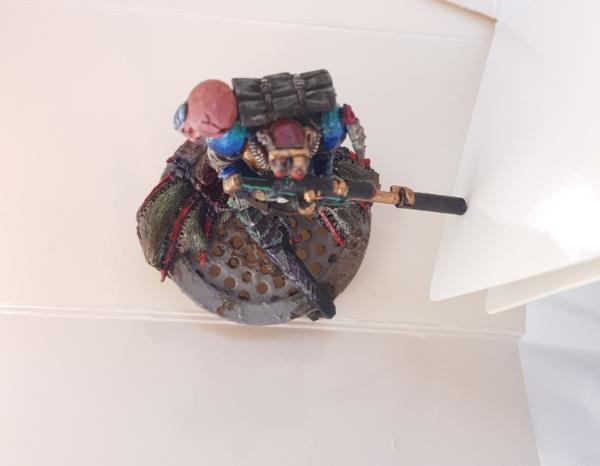
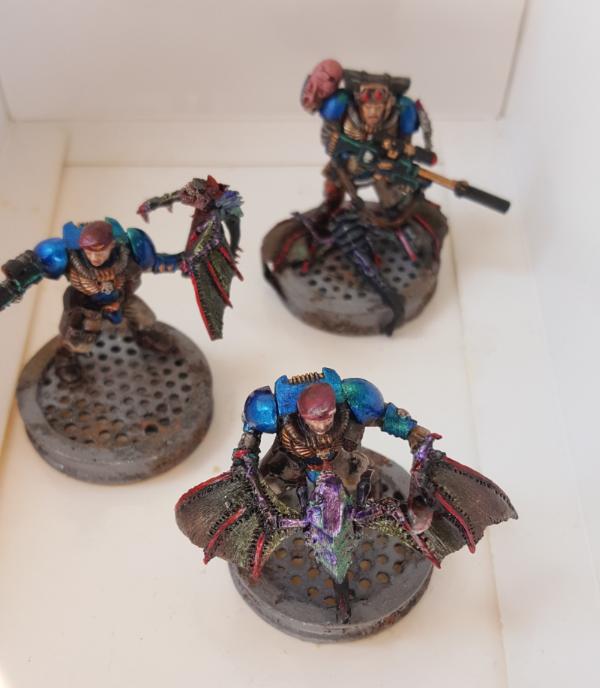
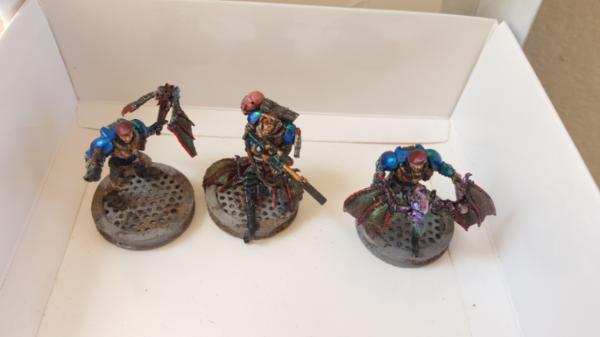
Scouts are coming along but first i figured id post some of the marines: After all there is a dev squad thats going to be up there too! makes sense that the guys NOT firing the big guns would be also fighting skyslashers.

|
|
|
|
|
|
2016/09/09 21:40:53
Subject: Re: multi-level city terrain, marine v nid bases (9/08: marines vs skyslasher poses)
|
|
Dakka Veteran
|
|
|
|
|
|
|
2016/09/26 21:12:48
Subject: Re: multi-level city terrain, marine v nid bases (9/26: wooden pallets)
|
|
Dakka Veteran
|
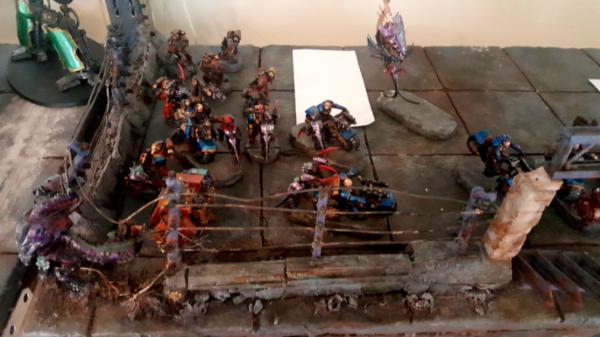
So I managed to get some vacation time nad have been working furiously! I have the marines vs skyslasher bases in pretty good shape and will have pics tomm. But first its time for some terrain work! So as previously mentioned I wanted to spruce up this tile:
So more nids attacking, and also more "stuff". As this is is the outer area of my base it would make sense for various supplies/crates/etc to be laying around. There are 3 key things I wanted to add:
1. Pallets of ammo boxes and the like and shipping crates on the right stealer side
2. A seperate shipping "biohazard" crate which formerly contained the neurothrope that broke out. So inside would be one of those clear cylindrical bio-containment units somehow broken. Possibly messing with liquid spilling out of it too.
3. A middle Imperial Knight that was wrecked/crashed against some of the right side shipping crates. THe idea being if (hopefully) there are any future plastic primarchs (COME ON GW LETS DO THISSSS) he would be on said wreckage fighting a big bad of the stealer world (probably a swarmlord)
4. On the left side collapse tunnels with gaunst/warriors pouring out, providing the source of all of the gaunt bases for my marins and bikes.
To make this all work out I actually wnet ahed and posed everything, trying to nail down the layout. I really want this to fit properly so I dont want to take any chances trying to fix something after the fact.
Note that the mawloc wont actually be there, I was just guesstimating the rubble radius of his attack on the other tile (my plan is to have him take out an entire wall, freeing up visual space to see the innards of the garage so that isnt lost)
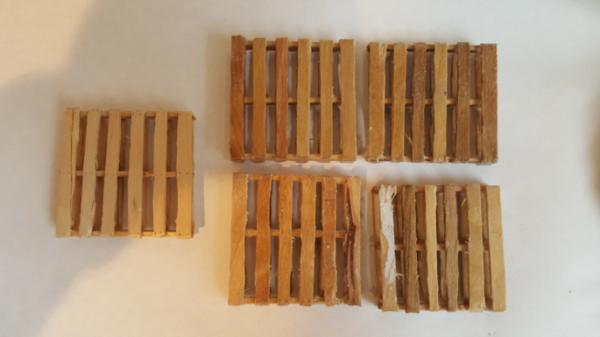
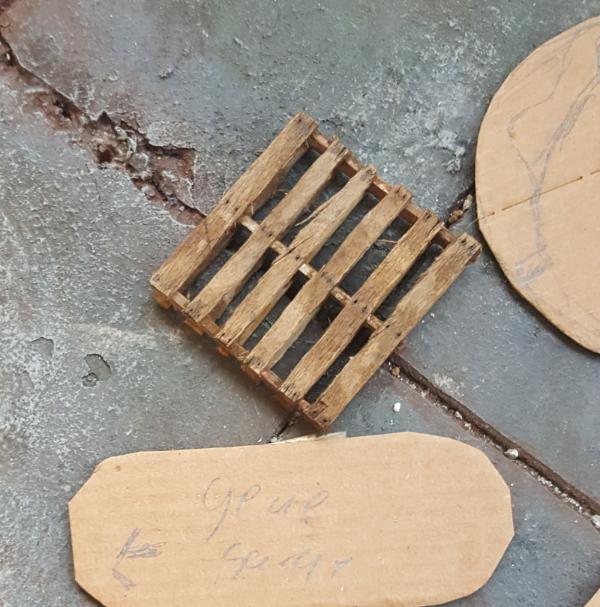
Thats a lot of stuff! So first up was making the wooden pallets:
Pretty straightforward, just get your standard popsicle stick (which is what, 2-3/8 wide?) cut it planks of the right length (about 2 inches?) and then cut each plank in half. I used my straight line nippy cutters and it worked pretty well. A big problem is the popsicle sticks do split not necessarily along the straight line you wanted them too. So often I had to go back with my xacto knight and carve the planks I cut a bit straighter, but its mostly covered up so its not a *huge* deal.
I needed 6 pallets so that was a lot of cutting and fixing but assembly is easy, just lay them out, super glue them up, and then add wood glue dabs at your joints after the fact. The superglue sucks at actually holding the wood down, it generally just breaks right off. But its good enough to get the structure in place, and then as pieces break off or get loose you just add dabs of wood glue and let it set.
|
|
|
|
|
|
2016/09/27 18:04:26
Subject: Re: multi-level city terrain, marine v nid bases (9/27: wooden pallets staining)
|
|
Dakka Veteran
|
Next up is painting! Now oen thing I did before painting after they were assembled was take my smallest/most needle like tool and poke nail spots in the pallet. It looks great! until you paint it.. then the water of the paint causes the wood to expand and fill in the holes. So do it after you paint the first coat (it doesnt seem to expand much after the first pass) and not before, otherwise ull hae to re-do work.
Anyways I figured id start by trying this "aging" technique ive heard of where you combine backing soda and water and just dunk the pallets into it. When i first did it was like WOAH THIS IS PERFECT:
(the one on the left is raw, right 4 are drying)
and then it dried...
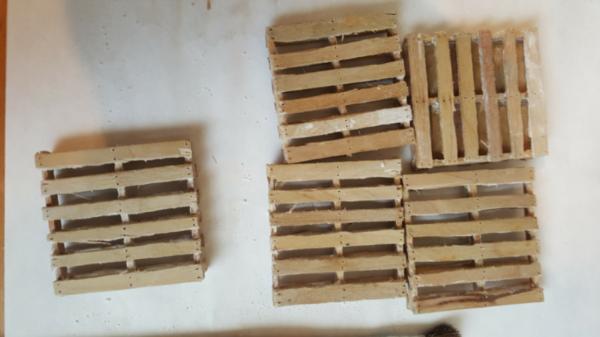
d'oh! yeah one theme is that the wood dries and gets a LOT lighter than while wet. They still looked slightly aged from the treatment and took the curse off the raw wood look, but not enough. So I started just directly using washes and such to darken it further, which was magnified again because its tough to know how far to go when while wet it either looks perfect or waayyy too dark but dry its back to a lighter form.
final result was something like this:
|
|
|
|
|
|
2016/09/28 23:29:14
Subject: Re: multi-level city terrain, marine v nid bases (9/28: tile layout, ammoboxes painted)
|
|
Dakka Veteran
|
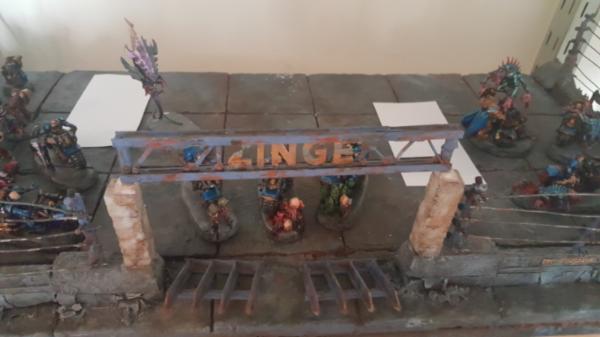
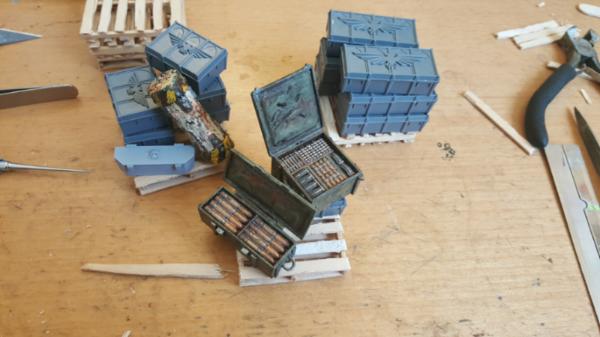
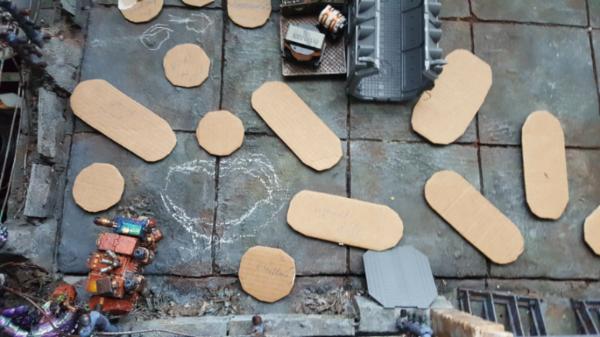
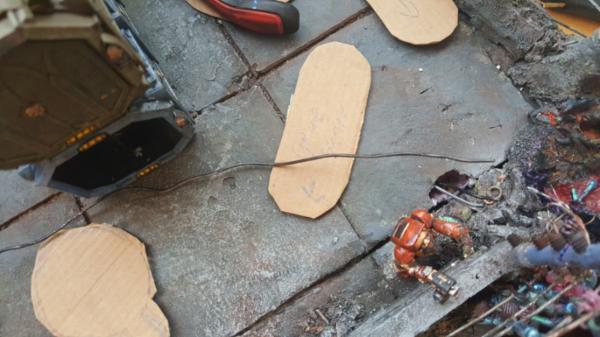
So some of the pics previously hinted at it but here it is: the tile has an initial layout!
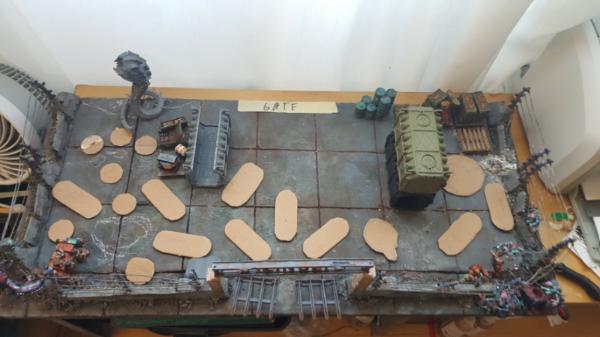
Every marine and bike is in there, woot.
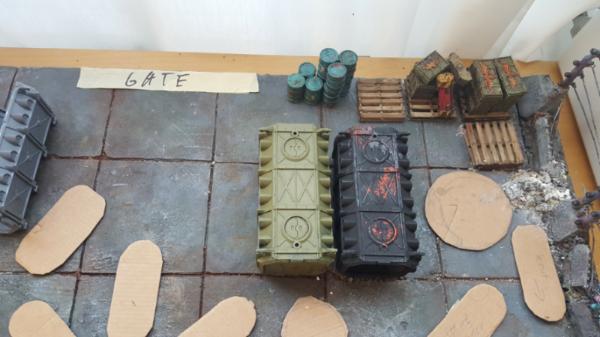
We also have some of the barrels and ammo boxes painted and pinned into the tile on their pallets. Forms a natural looking barrier to prevent models from falling off the edge and is helping to make that area a bit more stealer claustrophobic
We also have my pondering whether or not I want to double up on the shipping containers. 1 lone stack of 2 just seems.. off. The bio container on the left side makes sense, as youd want it isolated, but hte other guys need company.
And then the left side! Im trying to figure out what to do with the metal platform, those are good bits for generators so it seems a shame not to use them, but now? powering the bio container? maybe? i dunno yet.
The white is the pit where warriors/gaunts are pouring out.
|
|
This message was edited 2 times. Last update was at 2016/09/28 23:30:10
|
|
|
|
|
2016/09/29 18:52:54
Subject: Re: multi-level city terrain, marine v nid bases (9/29: painting shipping containers)
|
|
Dakka Veteran
|
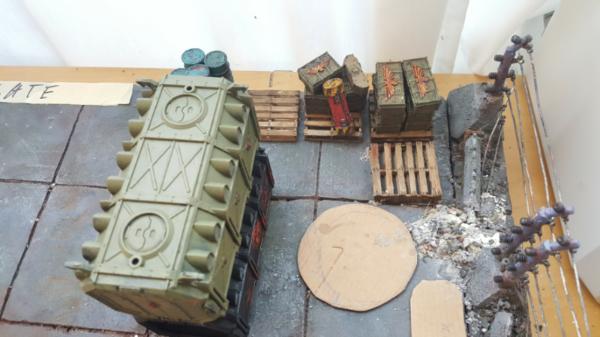
next up painting my shupping containers!
Pretty standard, undercoat thats dark metal/slightly rusty followed by chipping fluid followed by overcoat. then the aging wash also is when i chip stuff off.
Im adding decals though which is fun! i want to add a few more like number and such but I needed to move on to other things before I get sucked into decal world (i figure the containers might be a good opportunity to test out posters too)
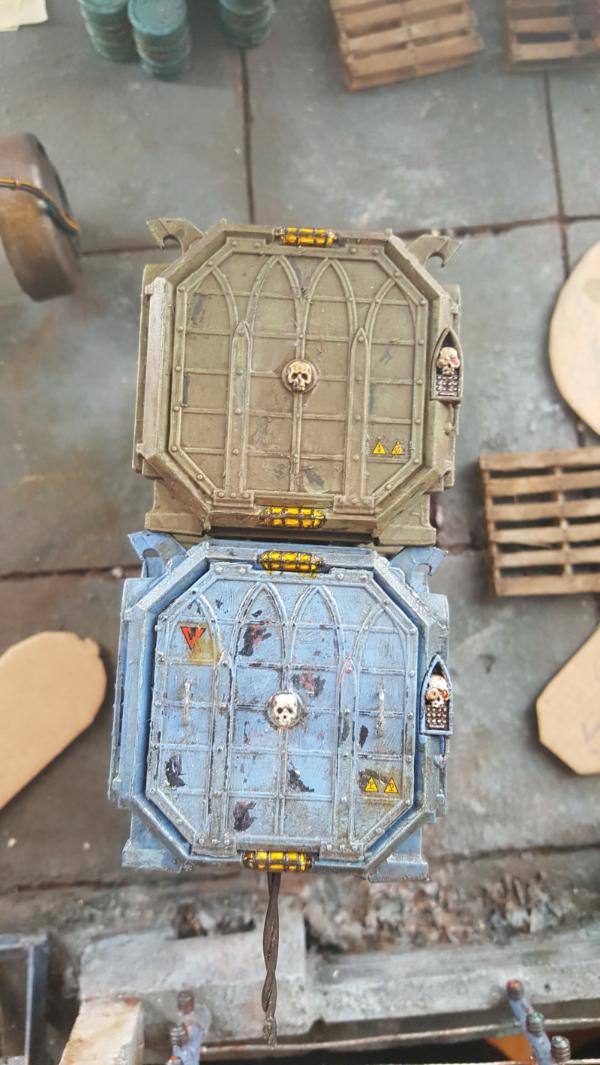
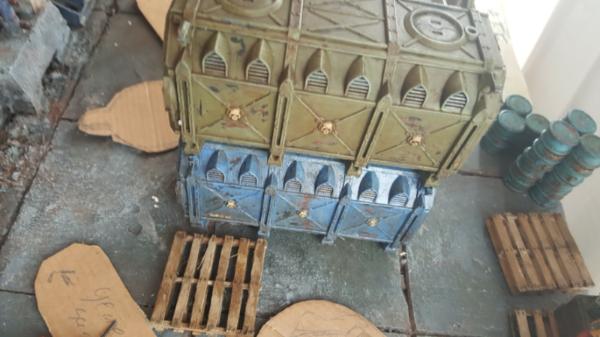
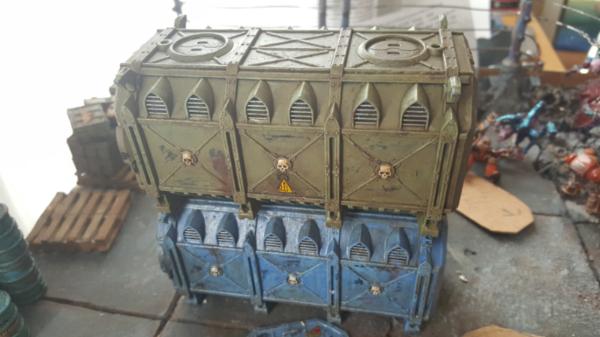
you can see the giant pints i have running up these things, as I expect them to get knocked around a bit over time and i want them really firmly in the board.
|
|
|
|
|
|
2016/10/03 04:53:25
Subject: Re: multi-level city terrain, marine v nid bases (9/29: a lesson in ovens, how to dig underground)
|
|
Dakka Veteran
|
So first up, time to dig underground.
Here's the problem: On the right side with the terminators I really want to try experimenting with el wire and making a lit flame thrower effect. Its a natural inclusion there and will be a good tutorial for future flamethrower effects that have less room. So I figure I hid the battery/transformer in my crate and hide the wires underground to the marine. Easy peasy
The trick is making the HOLE underground. First I punched a hole below the crate, no problem. I made a smaller hole below the marine I can alter fill with rubble and cover up, to connect them i started by just taking wire and trying to force it through the foam.
This worked.. for about 2 inches. After which point the density of foam built up in front of the wire was too much to be safe/not wreck things. So I figured, okay, heat the wire! I started by trying to apply the soldering iron directly to the wire while itw as in the hole and.. the heat dissapated too fast, not enough contact. So instead I took the wire and basically had it touch the entire length of the soldering iron so the whole wire got hot at once, then quickly jammed it in the hole to melt foam before it cooled down. Repeat for.. ugh, an hour? and voila! digging underground:
Voila! Not bad. I was pretty happy. Now for the lesson in ovens.
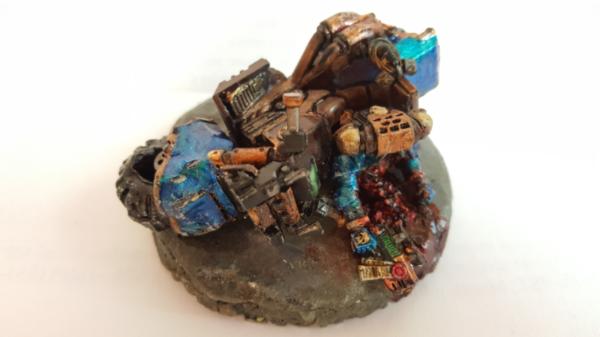
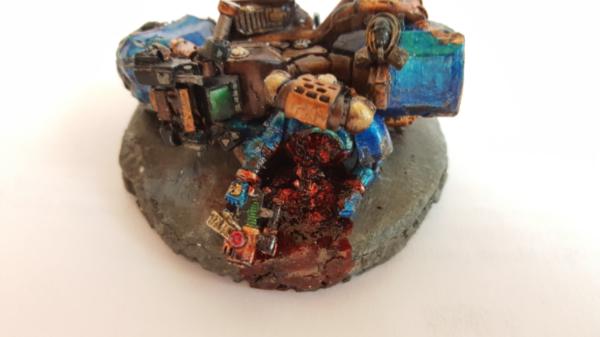
Okay so for the crate that the neurothrope breaks out ( SL) I wanted about half ot it blown off/around/etc. General feeling of lots of bent metal as this neurothrope, PISSED, breaks out. The cover of the container holdeing him is blown off into a psyker trying to contain him and the crate end is also just trashed. So I figure, okay, I partially build this container and stick it in the oven at a low temperature. I know plastic melts theoretically at 450 and water boils/softens it at 260 or whatever, so 250 and voila, it'll be pliable for a bit and i can bend the ends that are weaker and arnt glued.
as soon as it barely gets to 250 well.. this happened:
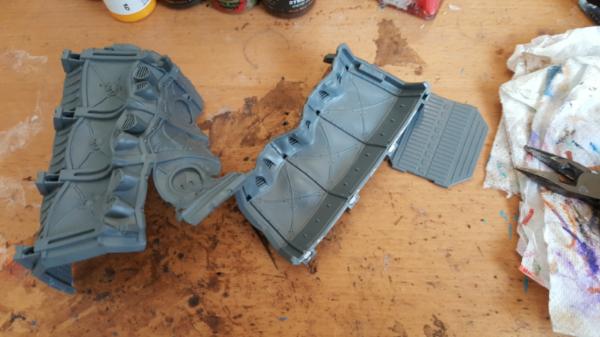
I've never quite ruined something before so completely, but boy did i now. It just.. shrank. nothing usable, nothing I can bend back into shape just a shriveled little mess. Sigh, well, now im out of crates, as is my local store so now I need to do something else while i wait a while for a new shipmant...
|
|
|
|
|
|
2016/10/03 05:20:23
Subject: multi-level city terrain, marine v nid bases (9/29: a lesson in ovens, how to dig underground)
|
|
Pious Palatine
|
Awesome looking diorama, your wooden pallets looks great, did you build them yourself?
Ii think the melted container looks cool, like the metal of the container has been bent out if shape by some psychic force, I'm sure you could use it for something.
EDC
|
|
|
|
|
2016/10/03 18:47:38
Subject: Re: multi-level city terrain, marine v nid bases (9/29: a lesson in ovens, how to dig underground)
|
|
Dakka Veteran
|
Yep built the containers myself. nott oo difficult, just a lot of cutting popsicles in half.
Yeah im not going to toss the scrap plastic, its just not what I need right now for the neurothrope bursting out diorama.
|
|
|
|
|
|
2016/10/04 17:16:14
Subject: Re: multi-level city terrain, marine v nid bases (10/3, making a bio-containment unit)
|
|
Dakka Veteran
|
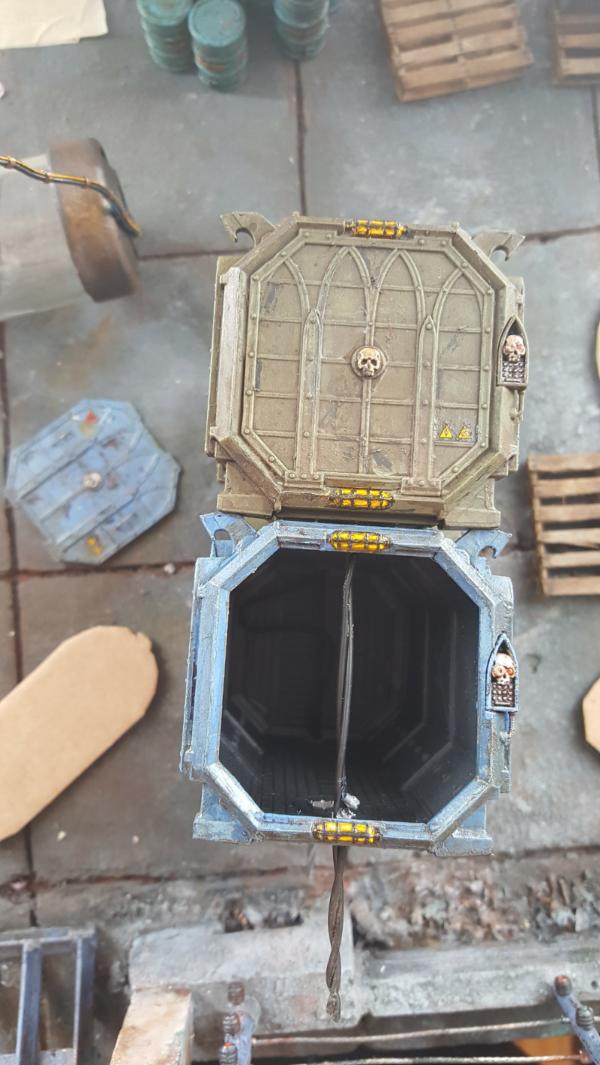
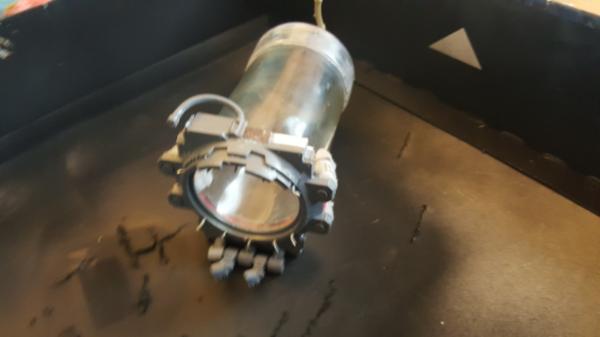
So, as I wait for my store to get more munitorum armoured crates its time to work on something else. First up is the bio containment unit that formerly contained the neurothrope.
The most important piece to this is the container itself. I need it to be clear (as they always are) and as wide as it will get and still fit within a crate. But it cant be too long as I want about 1/3rd of the crate left over for electronics and things.
This turned out to be a tricky one, as most plastic bottles were too small. Anything the right size (like a pill bottle) wasnt clear. The only thing I had was a spice bottle made out of glass that was correct, but it didnt seem like it would be a good idea to cut glass. Half a day of searching later and yeah, still the only option. So cutting glass we go!
Few thoughts:
1. its tough. Basicalyly you get a glass cutter or some other very sharp thing and draw a straight line all the way around the glass. This was probably the trickiest part, because the glass is so smooth it slips often and any slips means it cracks down the slip instead of the line, not fun.
2. have more than 1 bottle tot ry this one. I totally botched the first one, but the second attempt was much better and by the 3rd I had something I was happy with.
3. once you cut the glass get 2 pots ready. One with salt to boil, the other with ice. basically you just dip the bottle up to the line of your cut in one for abit, then dunk in the other for a while. Do that back and forth untily ou hear it crack and pull off the excess glass.
4. The good news is that if you have leftover jaggies or other chunks of glass you can use pliers to just crush it directly, its pretty brittle on on the edge.
Next up the rest o the day was figuring out the apparatus around containment, and thankfully the lid of my bottle (spice bottle) was semi-convex and perfect as an endcap, and I had some plastic laying around which also made a nice front faceplate, after that it was just filling in detail! Design wise im happy with the result, basically the idea is that the front coverplate was designed to only be removed once the creature was safely in it's new laboratory, so it just screws in directly to the frame, with even more clamps on the bottom to hold it on. The neurothrope was.. angry.


|
|
|
|
|
|
|
|