| Author |
Message |
 |
|
|
|
|
Advert
|
Forum adverts like this one are shown to any user who is not logged in. Join us by filling out a tiny 3 field form and you will get your own, free, dakka user account which gives a good range of benefits to you:
- No adverts like this in the forums anymore.
- Times and dates in your local timezone.
- Full tracking of what you have read so you can skip to your first unread post, easily see what has changed since you last logged in, and easily see what is new at a glance.
- Email notifications for threads you want to watch closely.
- Being a part of the oldest wargaming community on the net.
If you are already a member then feel free to login now. |
|
 |
2011/01/26 05:55:56
Subject: The MajorTom StormRaven Blog: Painting Complete! OSL, Oil Filters and Plasticard... oh my! June 6th
|
|

[DCM]
Acolyte of Goodwin
|
Alright boys, I have been receiving PMs asking if I was actually going to do this:
The answer is: YES
Now, here is the thing. I would really like to do it and document it so that when I am done, I can upload a pdf whomever wants to can use as a template to mod their own in the same way. I am sure many people will do many different things with it, but the one thing I think we can all agree on, this chick is all boob and no butt, and adding an extended fuselage and something resembling an actual dread bay would go a long way on this wonky but still from some angles enticing bird.
BUT
I will be learning the intricacies of Plasticard-Fu as I go, this will be ambitious for me. I hope to channel a tiny portion of some of the great Plasticard-Sensei's of Dakka:
Machinator. Commisar Khaine. Inquisitor Earl. Proiteus. Hits_the_spot. Hyena Joe. elotsip. Skrall. a94marbo. Klaus, not Santa. Foda_Bett. silveroxide.
So many others too, each of them a huge inspiration in their own way. If you haven't seen their work before, do a search on them. Incredible stuff, all of them do insane conversions/scratchbuilds.
The place I started is here in order to brush up on things I knew would be a concern, angled cuts to avoid gaps in non-90 degree edges, rivets, thickness etc.
Foda_Bett was generous enough to provide an awesome post with some handy, little known tools of the trade -
http://www.dakkadakka.com/dakkaforum/posts/list/510/205219.page#top
Now is the time for me to research and learn the pitfalls and tricks of vehicle modeling, so if you have any, please share! Thing will begin in earnest when I receive the model in the next few weeks from Empchild over at Battleroad games (he gives a great price on his stuff peeps!)
Cheers to all! Will post anything interesting I come across in the meantime -
|
|
This message was edited 10 times. Last update was at 2011/06/06 04:00:28
|
|
|
 |
|
2011/01/26 06:03:33
Subject: The MajorTom StormRaven Blog, calling all plasticard masters!
|
|

Longtime Dakkanaut
|
Good luck Tom, though I won't be of any help to you... My plasticard-fu is reduced to a few tiles for basing individual minis...
|
My WiP  -affiliated Traitors - War on Tranch : Renegades -affiliated Traitors - War on Tranch : Renegades
The World Tree's offsprings - Various WIPs : Skavens, Tzeentch & Nurgle CSMs, Marine Swap
My first tutorial - Object Source Lighting
What will I achieve in 7 months? : Radio Omid is online
"Squat Hulk- in space no one knows you no longer exist." - Gitzbitah
"Now you're just being silly, everyone knows red paint tastes fasta." - monkeytroll
"Both servers are on different continents so space meteors or thermonuclear war will not be enough take out dakka hopefully." - legoburner
Please remember to tick the "Disable Voting" box, if the pics you are uploading do not deserve votes (ie. early WIP, blurry pics, batreps, ...) Thanks in advance. |
|
|
|
|
2011/01/26 06:11:23
Subject: The MajorTom StormRaven Blog, calling all plasticard masters!
|
|
[DCM]
Acolyte of Goodwin
|
Still more than most bud  . Mine isnt much more than that at the moment either, but design school involved a lot of precision cutting and measuring, so I hope that will serve me well!
|
|
|
|
|
|
2011/01/26 06:55:08
Subject: Re:The MajorTom StormRaven Blog, calling all plasticard masters!
|
|

Guard Heavy Weapon Crewman
San Francisco Bay Area, California
|
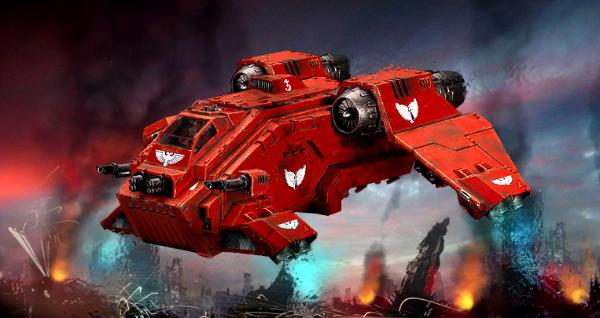
GW sent their "Black Box" to my FLGS. Inside was the Storm Raven and the new Blood Angel Dread. The Storm Raven is easily converted into this by not attaching the turret and bit behind it. The turret fits into the top like the Predator or Leman Russ. The Awkward tail is also easy enough to not attach, however the dread is "held" by what looks to be a winch that ends in some magnetic grappler. (I want to loot one of these for my orks and have a destroyed dread as my wrecking ball!)
The only area that really needs to be built up is the extended passenger cab.
|
|
This message was edited 1 time. Last update was at 2011/01/26 06:57:35
|
|
|
|
|
2011/01/26 07:09:46
Subject: The MajorTom StormRaven Blog, calling all plasticard masters!
|
|
Avatar of the Bloody-Handed God
|
I want to call it Blood Orca :<
|
Paused
◙▬▬▬▬▬▬▬▬▬▬▬▬▬
◂◂ ► ▐ ▌ ◼ ▸▸
ʳʷ ᵖˡᵃʸ ᵖᵃᵘˢᵉ ˢᵗᵒᵖ ᶠᶠ |
|
|
|
|
2011/01/26 07:46:34
Subject: The MajorTom StormRaven Blog, calling all plasticard masters!
|
|

Khorne Chosen Marine Riding a Juggernaut
|
Glad to see this is going through!
If it goes successfully... will you be accepting Commissions on building them? 
|
|
|
|
|
2011/01/26 11:40:14
Subject: The MajorTom StormRaven Blog, calling all plasticard masters!
|
|

Owns Whole Set of Skullz Techpriests
Versteckt in den Schatten deines Geistes.
|
Good luck Tom!
*flight of Chibi-Hawks zooms overhead in salute of your efforts*
|
|
|
|
|
|
2011/01/26 12:24:25
Subject: The MajorTom StormRaven Blog, calling all plasticard masters!
|
|
Rampaging Reaver Titan Princeps
|
Will you put links when you start the project? Either here or on your SH blog please! On the various scratch builds i've done i just tend to wing it with the plasticard, cutting by eye, so im not going to be much help!! Sorry. I do intend to do a MajorTom pattern Stormraven though, but i have a whole valkyrie to loot!
|
|
This message was edited 1 time. Last update was at 2011/01/26 12:24:46
|
|
|
|
|
2011/01/26 16:57:16
Subject: The MajorTom StormRaven Blog, calling all plasticard masters!
|
|
[DCM]
Acolyte of Goodwin
|
It will be on here, I am hoping one of the plasti-greats will be kind enough to come on and share some wisdom!
Right now, I am going to need a mat cutter, this is a cutting board with an x-acto on rails essentially, that can do 90 and 45 degree cuts. This is helpful as it lets you make angled corners with no or greatly reduced gaps.
I also would love to the a precision punch and die set, but damn those thing are expensive!! Boda Fett recommends the waldron precision set, so far I have found it for 60 bucks at the absolute cheapest!
Next thing for me to look up will be best thicknesses of plasticard to use, how best to re-enforce them to maintain good solid structural integrity.
I can't start planning too indepth until I have the thing in hand to take really precise measurements, but I might post up some sketches of how I see the back end. I definitely want servo arms and more obvious dread holding bits, it will be a matter of figuring out what to do about the back door... maybe the door on the bottom, so marines could just drop through the opening while the raven hovers? mmmm....
|
|
|
|
|
|
2011/01/26 21:36:37
Subject: The MajorTom StormRaven Blog, calling all plasticard masters!
|
|
Ultramarine Land Raider Pilot on Cruise Control
|
I'll be keeping an eye on this.
Your photo shop is actually first in my "How to fix the storm raven" folder. I can't decide if I want to go for a total overhaul or try to keep it minimal so I can keep it inside of Romeo's new trays.
I think I'll keep an eye on this to decide my course of action.
|
|
|
|
|
|
2011/01/26 21:40:25
Subject: The MajorTom StormRaven Blog, calling all plasticard masters!
|
|
[DCM]
Acolyte of Goodwin
|
Hmm... a little foam cutting to accomodate the bum should do it, otherwise, should be an identical sillhouette... I will probably leave the front thrusters as is, since this mock-up was done while that part was not visible... then again, if the are nice and seperate and easy to extend, could be interesting to mount the 'turret' stand ins there, possibly with some means to traverse them lower too!
Btw, thanks for your advice, I have ordered all the gadgets you suggested, although I had to go larger on the mat cutter, friskars paper cutters do not have any functionality to make bevel cuts!
|
|
|
|
|
|
2011/01/27 06:18:21
Subject: The MajorTom StormRaven Blog, calling all plasticard masters!
|
|
Owns Whole Set of Skullz Techpriests
Versteckt in den Schatten deines Geistes.
|
Well if anyone can do it Tom, it's you.
And if there's anyone who could make a second one and send it to me for free, it's you as well!
|
|
|
|
|
|
2011/01/27 06:22:13
Subject: The MajorTom StormRaven Blog, calling all plasticard masters!
|
|
[DCM]
Acolyte of Goodwin
|
Will a template with instructions do? 
|
|
|
|
|
|
2011/01/27 07:26:21
Subject: Re:The MajorTom StormRaven Blog, calling all plasticard masters!
|
|
Sadistic Inquisitorial Excruciator
Preston/England/United Kingdom
|
Hi Tom,
I've never built a vehicle using plasticard, I've only ever used it for basing and backpacks etc. But since you were asking for advice I'd throw my limited experience in...
Make sure the plasticard you've buy is square. I bought a piece once and assumed it was square...cut it to find the two edges I was working from were fine, the other long edge had been cut at an angle  .
Anyway good luck with the project, I look forward to seeing more of the dread area. I saw the model in the flesh the other day and the tiny mag grapple for the dread looks laughable.
Peter
|
|
|
|
|
2011/01/27 17:11:37
Subject: Re:The MajorTom StormRaven Blog, calling all plasticard masters!
|
|
Morphing Obliterator
The Frigid North of Minneapolis
|
i like your version better, and your desecription is apt. i'll be checking this out to see how you pull it off, since, if i decide to break down and play Marines again, it will almost certainly be BA, and i'll probably want a Stormraven...
-C6
|
|
|
|
|
2011/01/27 17:31:36
Subject: Re:The MajorTom StormRaven Blog, calling all plasticard masters!
|
|
Regular Dakkanaut
|
Great project MajorTom11, I've recently started using plastikard myself (even made my avatar out of the stuff!), and so will be watching your progress very closely. (subscribed). And thanks for the very useful links too, lots of great information there for me to digest!  !
|
|
|
|
|
|
2011/01/27 20:01:07
Subject: The MajorTom StormRaven Blog, calling all plasticard masters!
|
|
[DCM]
-
|
As noted, the biggest challenge is going to be in extending the passanger section - other than that, you're golden by just leaving off the offending parts!
You can do it!
And, you can help the rest of us do it too!
|
- |
|
|
|
|
2011/01/27 20:22:32
Subject: The MajorTom StormRaven Blog, calling all plasticard masters!
|
|
Phanobi
Canada,Prince Edward Island
|
Major Tom, you are a lifesaver! I knew that someone was going to make a 'how to make a decent SR' and you have my best wishes in this project.
'salutes'
|
|
|
|
|
|
2011/01/27 20:22:51
Subject: The MajorTom StormRaven Blog, calling all plasticard masters!
|
|
Stalwart Tribune
|
Sir, yes sir! Reporting for duty.
I'd be happy to pass on some of my knowledge if it will help you out. Where do you want to start?
|
|
|
|
|
|
2011/01/28 02:50:09
Subject: Re:The MajorTom StormRaven Blog, calling all plasticard masters!
|
|
[DCM]
Acolyte of Goodwin
|
Machinator wrote:Sir, yes sir! Reporting for duty.
I'd be happy to pass on some of my knowledge if it will help you out. Where do you want to start?
Awesome! Machinator is here boys!
My first question to you in particular Mach would be what advice you would give in terms of joining and reinforcing odd angle edges.
For example, if you have a mat cutter, you can cut 45 degree bevels into your edges, so you have the means to create both 90 degree seamless joins with two beveled pieces, or, make a solid 45 degree join by joining a bevel and regular cut piece.
Since you seem to be able to pull of joins other than 45 and 90, what is your suggestion/technique when approaching shape building and planning? Or, am I mistaken and you plan carefully around using a majority of 45 and 90's?
I was really hoping to see you here, this will be awesome! My biggest hope for starting this thread early was to build up a base of knowledge not only for myself, but for others interested in pulling off this type of conversion as well. Hopefully, we will have some truly awesome info from Plasti-Sensei's before I even get the model in my hands!
PDH wrote:Hi Tom,
I've never built a vehicle using plasticard, I've only ever used it for basing and backpacks etc. But since you were asking for advice I'd throw my limited experience in...
Make sure the plasticard you've buy is square. I bought a piece once and assumed it was square...cut it to find the two edges I was working from were fine, the other long edge had been cut at an angle .
Anyway good luck with the project, I look forward to seeing more of the dread area. I saw the model in the flesh the other day and the tiny mag grapple for the dread looks laughable.
Peter
Sound advice my friend... Sometimes, especially before painting it is damned hard to see the stuff in certain lights. In the case of most projects, precision is everything when it comes to having something that will fit together right!
catharsix wrote:i like your version better, and your desecription is apt. i'll be checking this out to see how you pull it off, since, if i decide to break down and play Marines again, it will almost certainly be BA, and i'll probably want a Stormraven...
-C6
Well even if you don't, hopefully this will be a good place to learn a few tricks anyhow!
Boyz "R" Us wrote:Great project MajorTom11, I've recently started using plastikard myself (even made my avatar out of the stuff!), and so will be watching your progress very closely. (subscribed). And thanks for the very useful links too, lots of great information there for me to digest! !
So far, I haven't contribute much, Foda Bett is the one to thank, and hopefully, shortly Machinator too!
Alpharius wrote:As noted, the biggest challenge is going to be in extending the passenger section - other than that, you're golden by just leaving off the offending parts!
You can do it!
And, you can help the rest of us do it too!
Yup, that will be the only tricky part. I know I can do it, but I want to pull it off really well and seamlessly. It needs to look like it 'works' if you know what I mean. No afterthough winch and circle for the Dread!
Commander Cain wrote:Major Tom, you are a lifesaver! I knew that someone was going to make a 'how to make a decent SR' and you have my best wishes in this project.
'salutes'
Thanks bud, hopefully I won't embarass myself here lol!
|
|
|
|
|
|
2011/01/28 04:26:15
Subject: Re:The MajorTom StormRaven Blog, calling all plasticard masters!
|
|
Stalwart Tribune
|
MajorTom11 wrote:Machinator wrote:Sir, yes sir! Reporting for duty.
I'd be happy to pass on some of my knowledge if it will help you out. Where do you want to start?
Awesome! Machinator is here boys!
My first question to you in particular Mach would be what advice you would give in terms of joining and reinforcing odd angle edges.
For example, if you have a mat cutter, you can cut 45 degree bevels into your edges, so you have the means to create both 90 degree seamless joins with two beveled pieces, or, make a solid 45 degree join by joining a bevel and regular cut piece.
Since you seem to be able to pull of joins other than 45 and 90, what is your suggestion/technique when approaching shape building and planning? Or, am I mistaken and you plan carefully around using a majority of 45 and 90's?
I was really hoping to see you here, this will be awesome! My biggest hope for starting this thread early was to build up a base of knowledge not only for myself, but for others interested in pulling off this type of conversion as well. Hopefully, we will have some truly awesome info from Plasti-Sensei's before I even get the model in my hands!
Hey Tom, I'm glad to be of help. So let's get started tackling the first question.
For more complex cuts between 0 and 90 degrees this is a must:
http://www.amazon.com/General-Tools-Square-Head-Protractor/dp/B00004T7TB/ref=sr_1_11?s=power-hand-tools&ie=UTF8&qid=1296185870&sr=1-11
As I am an engineer by trade my knowledge of trigonometry is of great help but with the right tools you will do just fine. It's best to draw out what you're planning as you can actually use the drawing to determine your angles. Just adjust the protractor above to the lines drawn and you can use it as a straight edge to cut your piece. Also you can get a mirror image by adjusting the protractor to the same angle on the other side. If you're unsure if the piece will fit you can always cut it out of paper first before using the plastic. Don't worry about getting the cuts perfect, you can always go back and trim things later.
The best way to reinforce the joint is to have a piece of plastic cut to the correct angle that's glued perpendicular to both of the pieces on the inside of the joint (Don’t worry about beveling the two edges, as long as they overlap or butt up to each other you can get a clean joint). This not only helps reinforce the joint but will make sure the piece stays at the right angle as the glue dries. I also reinforce the joint with some super glue along the inside seam. This not only helps hold it together but it can also act as filler for any small gaps. Next I smear on some Squadron Green putty to fill in any remaining gaps along the outside seam. Once everything dries trim off any high edges with a knife, give it a light sanding (Emory boards for fingernails work great), and it's good to go.
Hope this help!
|
|
|
|
|
|
2011/01/28 04:48:44
Subject: The MajorTom StormRaven Blog, calling all plasticard masters!
|
|
[DCM]
Acolyte of Goodwin
|
It does indeed! Another question though if you don't mind -
Squadron green, I am reading up on it and it mentions that white has a finer texture, and sands a bit better. Several reviews mention it shrinks a bit too, both of them.
(Note, I just spent 3 minutes figuring out how to word the next question correctly LOL, it was at first simply after 'shrinks a bit too,' and there was no specific remention of squadron putties LOL)
Do you run into shrinkage issues with squadron putties?
Also curious why you use green instead of white?
Thanks! p.s, check news and rumors for a new press molding product that looks pretty crazy! or just go to coolminiornot.com it is at the top... very promising product if it works as advertised!
|
|
|
|
|
|
2011/01/28 05:49:03
Subject: The MajorTom StormRaven Blog, calling all plasticard masters!
|
|
Stalwart Tribune
|
MajorTom11 wrote:It does indeed! Another question though if you don't mind -
Squadron green, I am reading up on it and it mentions that white has a finer texture, and sands a bit better. Several reviews mention it shrinks a bit too, both of them.
(Note, I just spent 3 minutes figuring out how to word the next question correctly LOL, it was at first simply after 'shrinks a bit too,' and there was no specific remention of squadron putties LOL)
Do you run into shrinkage issues with squadron putties?
Also curious why you use green instead of white?
Thanks! p.s, check news and rumors for a new press molding product that looks pretty crazy! or just go to coolminiornot.com it is at the top... very promising product if it works as advertised!
Yes, it does shrink but only if you use a lot of it. For the stuff you're doing all you need is a skim coat to fill in the gaps so the shrinkage should be minimal. If the gap is more than a 1/16 of an inch best to use some green stuff or a sliver of plastic to fill the gap before putting on the Squadron Green.
As for why I use green? It's because I can see it against the white of the plastic and when I'm sanding I know that when the green color gets feathered out that the area is smooth. Plus I've always used it so I know what to expect
Thanks for the heads up on the press mold. That is a cool new product!
|
|
|
|
|
|
2011/01/28 06:19:27
Subject: Re:The MajorTom StormRaven Blog, calling all plasticard masters!
|
|

Liberated Grot Land Raida
|
Sounds interesting, and your stormraven looks nice . Reporting for duty, sir! Just let us know what you need - though I feel humbled by the company I'm in... It seems Machinator is the pro here though, I just use a gradient, a steel ruler and a good modelling knife  .
Just a simple trick to get things going: if you're using plastic glue, cut a tiny bit 'outside' the template (0.5 mm or so); the plastic glue will melt this, allowing for a strong, gapless bond. I suggest you check out The blackadder's work as well, since he built a brilliant warhound out of plasticard and added lots of tips in his posts. Also, Teek is the ork convertin' master, so he's worth checkin'out as well.
The best way to reinforce the joint is to have a piece of plastic cut to the correct angle that's glued perpendicular to both of the pieces on the inside of the joint (Don’t worry about beveling the two edges, as long as they overlap or butt up to each other you can get a clean joint). This not only helps reinforce the joint but will make sure the piece stays at the right angle as the glue dries. I also reinforce the joint with some super glue along the inside seam. This not only helps hold it together but it can also act as filler for any small gaps.
+1; I do the the same thing.
I'll add in a tip for linked rotating bits, which might come in handy for the lascannons: if you measure correctly, you can drill a hole on each side of the hull. You then fit in a tube of the exact same diameter. Afterwards, you pass a second tube through to which you attach the lascannons. If you want to magnetize, just add magnets tot he end of the tube and presto, two lascannons moving in sync .
You can also make additional reinforcements this way for bits that can come apart: you glue a tube of the appropriate size to one part of the bit, and a rod that fits inside to the other one
If you want working pistons to hold the dread, just let me know and I'll try to explain how I do it.
|
|
This message was edited 1 time. Last update was at 2011/01/28 06:19:38
A Squeaky Waaagh!!
Camkhieri: "And another very cool thing, my phones predictive text actually gave me chicken as an option after typing robot, how cool is that."'
Meercat: "All eyes turned to the horizon and beheld, in lonely and menacing grandeur, the silhouette of a single Grot robot chicken; a portent of evil days to come."
From 'The Plucking of Gindoo Phlem' |
|
|
|
|
2011/01/28 06:33:56
Subject: The MajorTom StormRaven Blog, calling all plasticard masters!
|
|
[DCM]
Acolyte of Goodwin
|
Awesome guys thanks! Is there any chance of a quick set of pics showing the proper way to make a non 45/90 corner? I am a little confused by how the corners would contact each other enough to get a firm hold?
I know that is a request for work, I totally understand if you guys don't feel like it! Just want to make sure I am clear on the terminology of the instructions.
Mach, just ordered Squadron green!
CK, I have a vague sketch of an idea of attaching a set of rails to the top of the underside (make sense??) of the tail, after suitably building it up of course. I would then attach a rolling gantry of some kind to those rails but not glue it, along with clasps/ servo arms that would appear to drip the dread, when in reality a small R.E magnet would be used to hold it up, located in the central sliding gantry/dolly? I like the idea of tucking the dread back a bit, and then having him launched off the back by a pneumatic launch, assumedly to arrest the momentum the SR has while fling, allowing the dread to fall more or less straight down at any speed. This area would be encased by the hull extensions, but also open-air at the very back and halfway through the bottom section. Once the dread deploys, then the back is open and the marines can pop the hatch and also drop out the back.
The trick here will be to design it in a way that enough of the details are visible that they are worth doing, but also not compromising the solidity the build is meant to impart to the model...
#1 issue of course, is whether a dread would fit under there at all without having to widen the entire central hull...
|
|
|
|
|
|
2011/01/28 11:41:30
Subject: The MajorTom StormRaven Blog, calling all plasticard masters!
|
|

Dakka Veteran
Midland, TX or Wellington, New Zealand
|
Cool Stormraven mod, can't wait to see what you do with the physical kit! You're well ahead of me when I was at this stage!
|
|
|
|
|
|
2011/01/28 12:30:32
Subject: Re:The MajorTom StormRaven Blog, calling all plasticard masters!
|
|
Sadistic Inquisitorial Excruciator
|
Ground Control to MajorTom...
I'm in! Your Stormraven is far more interesting than the GW version, and I'd be proud to help you!
Have you already started to gather plasticard materials ?
|
|
|
|
|
|
2011/01/28 12:51:50
Subject: Re:The MajorTom StormRaven Blog, calling all plasticard masters!
|
|

Longtime Dakkanaut
|
I also intend to kitbash one - I think getting rid of the top junk and the chicken leg landing gear will make a huge head start!
Looking forward to what you come up with.
|

“Of the fabulous hydra it is said, cut off one head and two will grow in its place”
- antique proverb
LEGION of PLASTIC blog |
|
|
|
|
2011/01/28 13:58:24
Subject: The MajorTom StormRaven Blog, calling all plasticard masters!
|
|
Rampaging Reaver Titan Princeps
|
Wow, already this blog is turning out some wicked tips of the trade! Thans Tom for starting it and for the others who are contributing
MajorTom11 wrote:I like the idea of tucking the dread back a bit
 I read that 't' wrong for a minute there, quite funny 
|
|
|
|
|
2011/01/28 14:05:01
Subject: The MajorTom StormRaven Blog, calling all plasticard masters!
|
|
Mysterious Techpriest
|
this thread already sounds promising.
may I suggest it be called the "Magos Tom-XI" pattern stormraven
|
|
|
|
|
|
|


 scratch-build projects here: