Forum adverts like this one are shown to any user who is not logged in. Join us by filling out a tiny 3 field form and you will get your own, free, dakka user account which gives a good range of benefits to you:
No adverts like this in the forums anymore.
Times and dates in your local timezone.
Full tracking of what you have read so you can skip to your first unread post, easily see what has changed since you last logged in, and easily see what is new at a glance.
Email notifications for threads you want to watch closely.
Being a part of the oldest wargaming community on the net.
If you are already a member then feel free to login now.
2013/09/24 16:33:12
Subject: Ancient Enemies Battle Reports_Adepticon Primers [Post Adepticon]
Below, I will be compiling a list of links to battle reports as practice for the upcoming 2014 Adepticon for the Warden's Ancient Enemies Coalition as well as to provide a forum for feedback for my Dakka fellow team mates:
Thanks JY2, but I felt bad coming into the matchup and even worst after turn 2. I should have worked with them in developing thier lists as well as providing more pointers throughout the game to provide a greater challenge and make it more enjoyable for them. The point of the game was to take apart our lists and expose our weaknesses, which I know thier are plenty .
Anyways, moving the Battle Report now:
Battle Report 1:
Team Warden (our lists):
Necron Detachment: HQ: (Warlord) Overlord in CCB, war scythe, MSS, weave (2+ save) - 210 pts
Royal Court - 2 Lance Teks - 70 pts (Each attaches to a troop unit)
TP: 5 Warriors in Scythe - 165 pts
TP: 5 Immortals in Scythe - 185 pts
FA: 5 Wraiths, 2 whip coils - 195 pts
HV: Doom Scythe - 175 pts
Total: 1000 points
**We are subbing 2 ripper swarms for the wraiths w/ lash coils and two empty flying stands for NS.
Tau Detachment: Yep, shamelessly taken from the ETC HQ: Commander w/ Vectored Retro-thrusters, DC, OG, CCN, Puretide Chip, MSS, Iridium Battlesuit – 178 pts
Troop: 10 Kroot with Hound – 65 pts
Troop: 10 Kroot with Hound – 65 pts
Elite: Riptide w/ Ion Accelerator, TL Fusion Blaster, VT, and EWO – 210 pts
Elite: Riptide w/ Ion Accelerator, TL Fusion Blaster, VT, and EWO – 210 pts
Heavy: 3 Broadsides w/ TLSMS, TLHYMP, TL, and 5 Marker Drones – 270 pts
Total: 1000 points
**We are subbing a Mawloc for a Riptide
The Enemy:
Tau Detachment: HQ: Commander w/ Vectored Retro-thrusters, DC, OG, CCN, and MSS – 132 pts
Troop: 6 FW with additional Shas’ui armed w/ ML and TL – 88 pts
Troop: 5 FW with additional Shas’ui armed w/ ML and TL – 79 pts
Elite: Riptide w/ HBC, TLPG, VT, and Stimulant Injector – 235 pts
Elite: 3 Crisis Suits w/ each having 2 FB and one having a Shield Generator – 206 pts
Heavy: 3 Broadsides w/ TLSMS, TLHYMP, TL, 2 Velocity Trackers and 1 SG – 260 pts
Total: 1000 points
Raven Guard Detachment: HQ: Captain (Warlord) – 90 pts
Troop: 10 man tac squad – 140 pts
Troop: 10 man tac squad – 140 pts
Heavy: 10 man Dev Squad w/ 4 Lazcannons – 220 pts
Heavy: 10 man Dev Squad w/ 4 Flak ML – 240 pts
Elite: 5 Legion of the damned w/ MG and DP
Mission:
Deployment: Vanguard. The relic is placed at the center of the table.
Terrain: Each team takes turns placing a terrain element, starting with the team that selected sides first, until all terrain has been placed. Terrain must be placed on your coalition’s table half, though it can straddle the center line. This table has two ruins, 2 - AV 12 buildings that can hold a unit of 20 each, 5 forests, and a hill.
Twist of Fate: Each team gets two Twist of Fate Tokens which can be spent to reroll a reserves, outflank, warlord trait, mysterious objective or mysterious terrain. In this mission it may also be used to give a unit Adamantium Will. You gain a point for each twist of fate unspent at the end of the game.
Primary Objective 1: The team with possession of the Relic at the end of the game earns 15 points (Draw is 7 points each).
Primary Objective 2: You earn a VP for each unit your coalition destroys. Team with the most VP gains 10 points (Draw is 5 points each)
Secondary Objectives: Slay the Warlord, Line Breaker, First Blood. Each is worth 1 point.
*If you table your opponent then you get max points.
Pregame:
Spoiler:
Pregame Thoughts: Great…relic. Our army has nothing capable of grabbing the relic and surviving to keep it early in the game. That means our default strategy is to blow up any enemy unit that tries to lay their grubby mittens on it…then come turn 4-5 we use a night scythe to drop a warrior squad on it. Thankfully, our opponents don’t have a lot invested in strong troops, no 10 man paladin squads to laugh off crazy amounts of firepower or CC, just 20 marines. Their biggest threats to our flying transports are the Missile Dev Squad, the Broadsides, and the Riptide. Surprisingly, the riptide lacks interceptor and the enemy commander lacks the Iridium Armor. All three are weak against my overcharged ion accelerators, but the Dev Squads and the Broadsides are much squishier, so I will probably target them first and leave the Riptide unmolested for most of the game. Then you have the Lascannon Squad and the Crisis Team which can pop our warlord barge for First Blood or kill off our Wraith and Tau units. Thankfully, the blasters have short range and I have interceptor on the off chance he chooses to DS the Crisis Suits, so they will not be a priority target during the early part of the game. The Lascannon Squad, however, will need to go quickly.
Warlord Traits: We elect to have the Necron Overlord be our warlord on the off chance he rolls the reserve trait. This is a bit of a risk as the CCB is a pretty easy target (AV 11 after the first pen, 3 HP and Open Topped), and could net our opponents First Blood & Slay the Warlord. My chip commander is much more resilient, but the traits don’t benefit my detachment nearly as much as the Necron’s reserves rolls. We roll acute senses (boo-hiss) and use a Twist of Fate to reroll our warlord trait, scoring the reroll to reserves! They get the one that adds +1 to the combat resolution when their Warlord is in CC.
Night Fighting: 1st turn
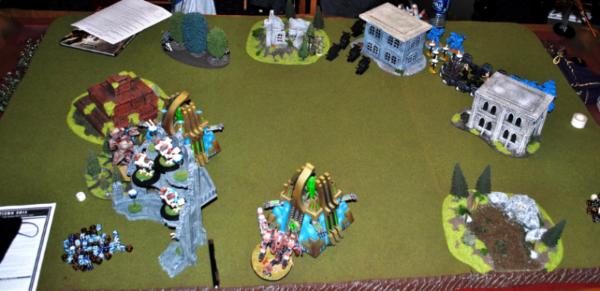
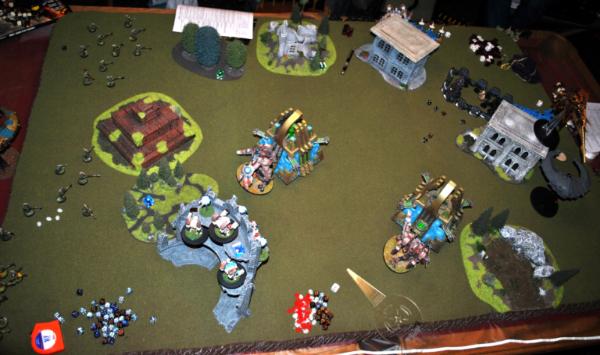
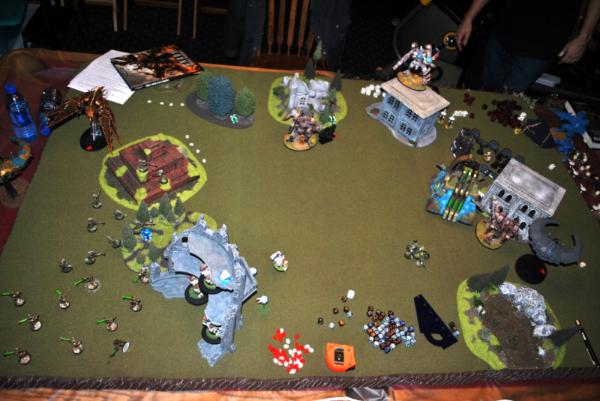
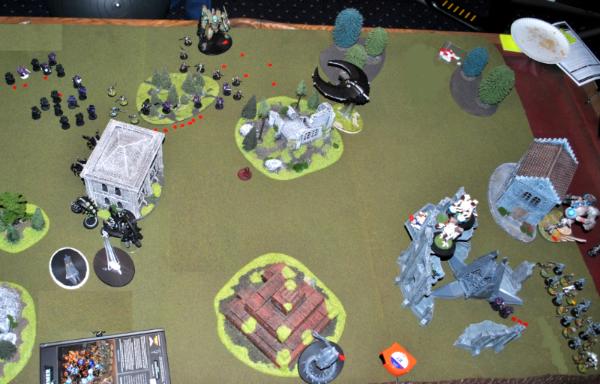
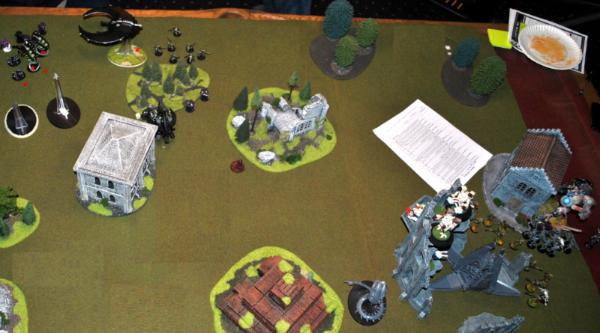
Deployment: The picture below shows our respective deployments after scout moves.
We win the roll to deploy first and choose to do so. Night fighting doesn’t affect my Tau and I want the chance to soften up the Enemy Broadsides and Troops. We set up the riptides behind the building and the hill. The Chip-Commander attaches to the broadsides and deploys within the ruins to rain havoc on any enemy troops that get near the relic. Wraiths are placed behind the hill but in front of the riptide. Everything else is in reserve.
Our opponents place their two devastator squads and the riptide behind the building; the lascannon squad is in front of the missile squad. I think the reasoning for this is that they didn’t want the devastator squads shot up by the riptides. It is true that I can’t see them…but then they can’t see or threaten my Tau who are now free to shoot up the other half of the board with much less retaliation; this mistake could easily cost them the game. The rest of the army fans out to the right with the 2 tac squads up front and hugging terrain, ready to scout forward. Surprisingly, they choose to deploy the crisis team far in the backfield…another mistake. The Legion of the Damned will be DP in on turn 1. The SM all scout forward and the enemy fails to seize.
Turn 1: Team Warden
Spoiler:
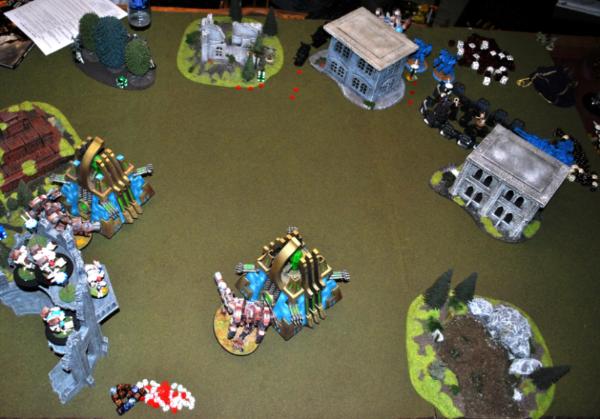
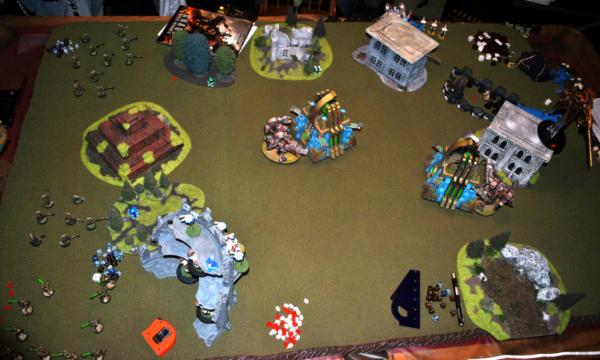
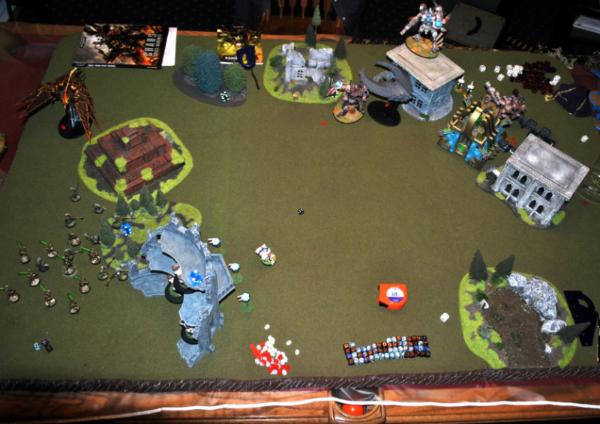
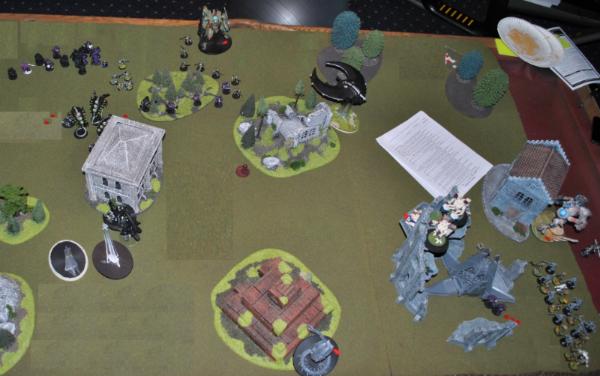
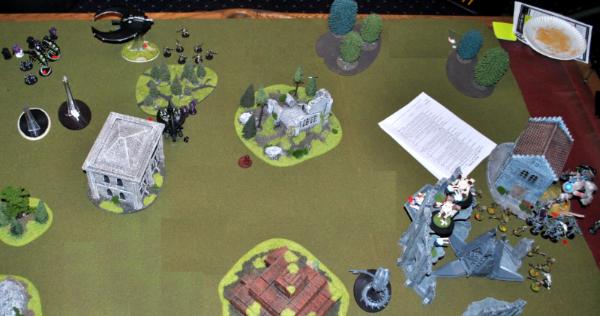
The picture below was taken after the end of our assault phase. The red skulls are enemy dead. I chose not to nova charge either riptides; my weapon didn’t require it and the enemy will be out of range to threaten my riptides. In the shooting phase, my marker lights targeted the Enemy Broadsides, scoring 5 hits, while my Broad Sides shot into the closest TAC squad, scoring 16 wounds but only killing 3 marines. Unfortunately, our opponent’s luck ran out as he failed his leadership test and ran off the table, scoring us First Blood. Both riptides overcharged their ion cannons. One would overheat, though the wound was saved; the second however landed true, scoring 3 wounds and slaying 2 Broadsides, including the one with the shield. The wraiths jumped and ran in front of the building, where they could threaten the center while being safe from the enemy devastators as well as the crisis suits whom were deployed too far back. We debated a little on whether to move the wraiths towards my riptides so as to counter assault the Legions when they arrived…however, our opponent had provided us with an excellent opportunity to threaten the center with little chance of retaliation. Riptides shuffle backwards during the assault phase.
Turn 1: Enemy
Spoiler:
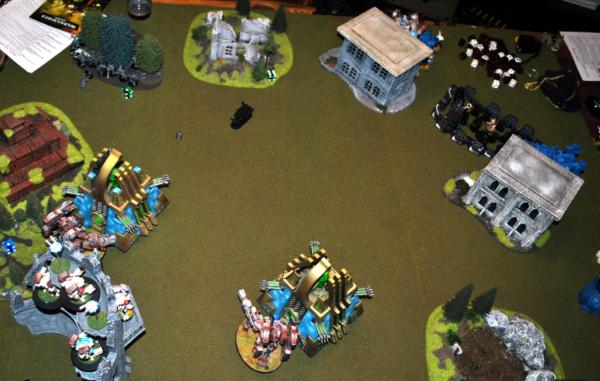
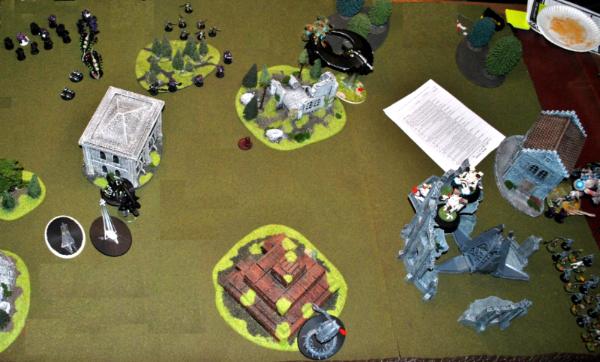
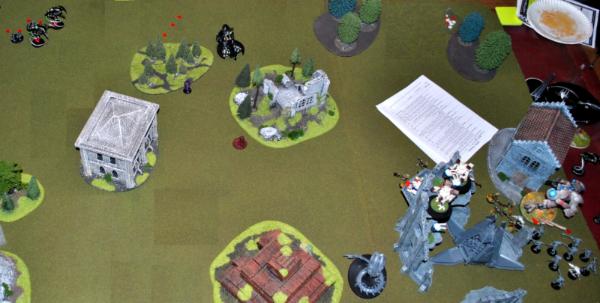
The picture below was taken after the end of the enemy’s assault phase. The Devastator Squads move and run backwards away from the building and the wraiths it is concealing, the lascannon squad sadly rolls low on their run check. The TAC squad stumbles out of the carnivorous forest and fires into the wraiths inflicting a single wound. Riptide moves out to the side of the building and fails its nova charge, losing 1 wound in the process. Crisis Suits jump forward and are joined by his Commander. Fire Warriors shuffle forwards and along with the riptide and remaining broadside shoot into my Broadside unit inflicting 2 wounds on my Chip-Commander and a wound to a Broadside. The legion drops into the center of my Tau’s deployment and fire into the Riptide scoring a single wound. I elect to intercept with both my Riptides, firing a Fusion Gun (which fails to pen the DP) and an overcharged ion accelerator (which scatters harmlessly). Shooting with the cannon was not a good idea given that the legion had a 3++ and I could have better used the cannon during the shooting phase against the Tau suits.
Turn 2: Team Warden
Spoiler:
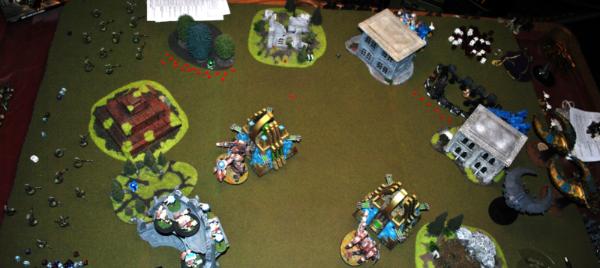
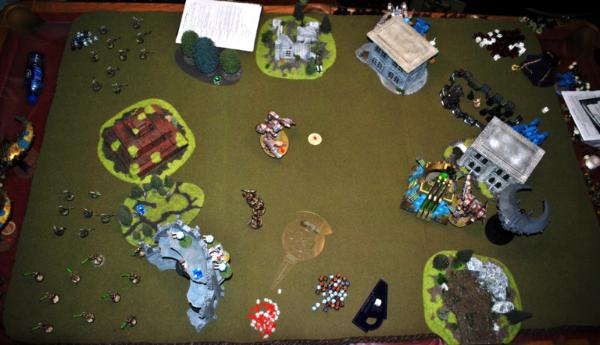
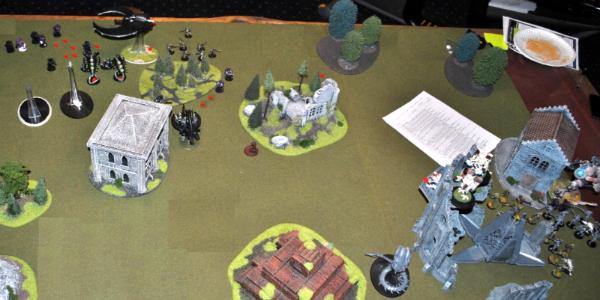
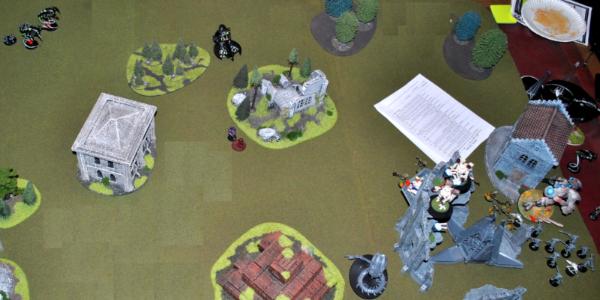
The picture below was taken after the end of our shooting phase. Everything came in from reserves thanks largely to the Necron rerolls from the warlord trait. Both Kroot units, assisted by acute senses from the hounds, outflank onto my short edge and rapid fire into the Legion, slaying 3. I make a big mistake here as I should have bubble wrapped my Kroot around my right most riptide (this is a mistake that would cost me a game in most cases). The Death Scythe zooms over to his blob of suits and slays 2 crisis suits and the Broadside. The 2 Night Scythes Zoom over towards the Devastator Squads and both fire into the missile squad, slaying 4 (including two missiles). CCB moves and flat-outs behind the building. Wraiths jump into assault range of the Lascannon Squad and a nearby FW squad. Broadsides fire into the remaining crisis suits and slay his commander and the remaining suit (he chooses to “lookout sir” the wounds back to the crisis suit in an attempt to keep his commander alive). My right most riptide only has its fusion gun to shoot and I failed my nova reactor roll to increase its jump distance, I elect to stay put and fire (missing) at the enemy DP. The other riptide gets out of dodge and with marker light assistance and an overcharged ion accelerator slays 7 TAC marines.
The picture below was taken after the end of our Assault phase. The wraith unit combo assaults the FW and Lascannon Squad with an 8” charge and shrug off 4 overwatch wounds (1 being ID)…my partner’s wraith saves were hot all game long. 2 devastators and a fire warrior are slain and both units successfully fall back…not good, we were hoping to stay locked in. The right most Riptide gets a 6” assault move…not enough to clear the building…oops! Note: the wraiths haven’t consolidated forwards yet.
Turn 2: Enemy
Spoiler:
The picture below was taken after the end of the enemy shooting phase. The FW squad fails to consolidate and flees off the board… that is the second time this has happened to our opponents. The Space Marines regroup and the two Devastator Squads & TAC Squad (2 missiles, 4 lascannons and several rapid firing bolters) fire into the wraith unit, slaying one and putting a wound on another…BTW, that is our first casualty of the game. A Nova Charging Burst Cannon and Plasma from the Riptide as well as the Fire Warrior’s pulse rounds unload into the Death Scythe…doing…1 HP from a single glance (believe it or not it was the fire warriors that scored the HP). His Legionnaires advance towards the Riptide.
The picture below was taken after the end of the enemy assault phase. The Legionaries assault into the Riptide as the overwatch whiffs…and tie him up. The Riptide jumps forward right in front of my broadsides. I ask him if he wants to be that close to my Broadsides and he nods yes, hoping that his riptide will draw all my firepower and survive.
Turn 3: Team Warden
Spoiler:
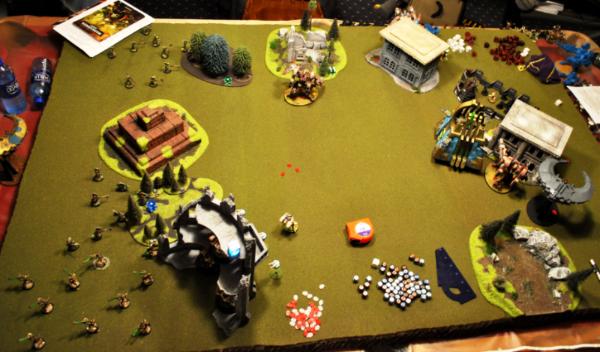
The picture below was taken after the end of our shooting phase. The Doom Scythe and Two Night Scythes Fly over towards the remaining Devastators and slay a total of 6 marines from the two squads, including 2 Lascannons and a Missile Launcher. The wraiths move up to assault the surviving lascannon squad. The command barge moves towards the TAC Squad and fires its Tesla, killing 2 marines. Monster Slaying Broadsides (from the Chip Commander) and the Marker Light Buffed Riptide combine to take out the Enemy Riptide, inflicting 2 wounds each. One Kroot Squad moves towards the Legionaries to help out my Riptide.
The picture below was taken after the end of our assault phase: The CCB charges into the TAC Squad and puts a wound on the commander. Captain’s warlord trait grants +1 to the CC results so combat is a tie. We played it that so long as the CCB was alive, there was no consolidation…as you can’t lock a chariot in combat and you can’t normally consolidate after an assault with a vehicle. Wraiths assault the remaining lascannon squad and wipe them. Wraiths consolidate towards the missile squad. Kroot assault the Legionaries but succumb to fear; Riptide stays locked.
Turn 3: Enemy
Spoiler:
The picture below was taken after the end of the enemy assault phase: The Fire Warriors and missile squad fire into the Doom Scythe putting another HP on it. The TAC squad assaults into the CCB using their krak grenades and inflict a HP on the CCB. The Necron Lord slays the Captain in return for Warlord. Lastly the Riptide finally slays a Legionnaire...but remains locked.
Turn 4: Team Warden
Spoiler:
The picture below was taken after the end of our shooting phase. The CCB sweeps the TAC squad, slaying a marine and then shoots into the FW, killing 4. The remaining marine survives the Riptide’s normal attack as all three shots whiff. The flyers fly off the table.
The picture below was taken after the end of our assault phase. The riptide finally slays the last Legionnaire. The wraiths assault and wipe the last Devastator Squad. The command barge assaults and wipes the fire warriors.
Turn 4: Enemy
Spoiler:
The last TAC marine moves and runs right in front of relic. Can the little man stand up to 1965 points of pain.
Turn 5: Team Warden
Spoiler:
No...no he can't. We kill said valiant marine and wreck the drop pod, tabling our opponents. That paragon of a marine, the only one to touch the bloody relic, will forever be remembered and missed.
Closing Thoughts:
Spoiler:
Well, I can’t really give any concluding thoughts about the strength of our army list. The game was pretty much over after turn 2 due almost entirely to our opponent’s poorly deploying the 2 Devastator Squads and the crisis suit team. Furthermore, while our opponent’s list had some threats, it wasn’t optimized by any means…I was very surprised by the absence of a second riptide as well as the lack of interceptor in the list. Got to hand it to our opponents, they kept on playing with smiles and laughter the whole time.
Warden’s MVP: Goes to our opponent’s deployment and the building they placed in their table half.
This message was edited 5 times. Last update was at 2013/09/24 21:22:13
Kingsley wrote: Can Legion of the Damned even take a drop pod?
Lol...not sure in the slightest. They have the scatter reroll regardless so my opponent could have saved some points there. This was the first game with the new marine codex for all of us and I was kind of expecting my opponent to bring Draigowing instead.
Edit: Phew...all pictures posted. These Batt Reps are hard work.
This message was edited 3 times. Last update was at 2013/09/24 21:26:24
How did the CCB put a wound on the marine Captain in assault without IDing him? Was it a wound from the charging barge as opposed to the overlord?
Interesting game... my thoughts at seeing my army played (yet remaining an observer)...
- necron troops might have deployed at the end, however points spent on crypteks and immortals appear to have had no influence on battle
- doom scythe seems an effective use of points (for the extra punch of its gun I mean)
- having better control over the reserves seemed pretty influential in helping the bury the game early
This message was edited 2 times. Last update was at 2013/09/24 23:17:12
Anvildude: "Honestly, it's kinda refreshing to see an Ork vehicle that doesn't look like a rainbow threw up on it."
Gitsplitta wrote: How did the CCB put a wound on the marine Captain in assault without IDing him? Was it a wound from the charging barge as opposed to the overlord?
The warscythe grants +2 str, Ap 1, Armourbane. As the overlord in Str 5, his CC attcks would be Str 7 vs the Captains T4.
In this instance this is an example that going first was an advantage. Your Opponent had no flyers to counter attack upon reserve as well so once pressure was on the ML the flyer had free unopposed reign .
Secondly you went for the kill as opposed to the Objective. The NS could have dropped their troops and grabbed or covered the relic. Leaving one troop to cover the others retreat. This would have eliminated the lone yet valiant Marine earlier.
Could the riptide just jump out of CC. due to the JP? Not sure the rules for Tau.
This message was edited 1 time. Last update was at 2013/09/25 12:39:34
2013/09/25 12:48:22
Subject: Ancient Enemies Battle Reports_Adepticon Primers
As a raven guard player, that marine list was not very ravenguardish (yes thats a word), he needed some scouts and a few jump packs, but oh well, good job at exploiting poor deployment.
This message was edited 1 time. Last update was at 2013/09/25 12:49:32
2013/09/25 16:01:26
Subject: Ancient Enemies Battle Reports_Adepticon Primers
Gitsplitta wrote:Ah... got it. Didn't the old iteration of the war scythe tend to be more fatal than that? Or am I mis-remembering?
Nope the only thing that changed is the warscythe wnet from "ignoring armour saves" to AP1.
Solar_lion wrote:Could the riptide just jump out of CC. due to the JP? Not sure the rules for Tau.
No, Riptides don't have hit and run. This was just a bone headed move on my part not bubble wrapping or move & skooting my riptide out of the way. In a tournie this mistake would lose me the game.
sever14 wrote:As a raven guard player, that marine list was not very ravenguardish (yes thats a word), he needed some scouts and a few jump packs, but oh well
His list was originally labeled "Imperial Fists" . He decided to change his chapter after we rolled up the mission as he thought scouting would be more useful as well as the first turn stealth (not realizing that my army can ignore cover). I allowed the swap.
Gitsplitta posted up a Battle Report here featuring his 1000 point Necron Detachment against an Ultra Marine list featuring Tiggy and 6 Centurians. How will the necron fliers fare gainst a ream of prescienced firepower? Will the CCB be the first to die?
This message was edited 2 times. Last update was at 2013/10/10 14:40:46
Team Warden (Gits and a friend subbing my Tau list):
I wasn't in much of a picture taking mood sorry
Necron Detachment: HQ: (Warlord) Overlord in CCB, war scythe, MSS, weave (2+ save), 3++ save
TP: 5 Warriors in Scythe - 165 pts
TP: 5 Warriors in Scythe - 165 pts
FA: 6 Wraiths, 2 whip coils
HV: Doom Scythe - 175 pts
Tau Detachment: HQ: Commander w/ Vectored Retro-thrusters, DC, OG, CCN, Puretide Chip, MSS, Iridium Battlesuit – 178 pts [Warlord]
Troop: 10 Kroot with Hound – 65 pts
Troop: 10 Kroot with Hound – 65 pts
Elite: Riptide w/ Ion Accelerator, TL Fusion Blaster, VT, and EWO – 210 pts
Elite: Riptide w/ Ion Accelerator, TL Fusion Blaster, VT, and EWO – 210 pts
Heavy: 3 Broadsides w/ TLSMS, TLHYMP, TL, and 5 Marker Drones – 270 pts
Total: 1000 points
The Enemy:
Nid Detachments: HQ: Flyrant w/ Dual Devourers [Warlord]
Troop: 10 guants
Troop: Tervigon w/ 3 powers, TS, AG, and Pie Plate
Elite: 8 Ygmarls
Elite: Doom
Heavy: Mawloc
HQ: Flyrant w/ Dual Devourers & HC Troop: 13 guants
Troop: Tervigon w/ 3 powers, TS, AG, and Pie Plate
Elite: 3 Zoes
Fast: 16 gargoyles
Fast: 16 gargoyles
Mission:
Deployment: Hammer and Anvil.
Terrain: Each team takes turns placing a terrain element, starting with the team that selected sides first, until all terrain has been placed. Terrain must be placed on your coalition’s table half, though it can straddle the center line. This table has two ruins, 2 - AV 12 buildings that can hold a unit of 20 each, 5 forests, and a hill.
Twist of Fate: Each team gets two Twist of Fate Tokens which can be spent to reroll a reserves, outflank, warlord trait, mysterious objective or mysterious terrain. You gain a point for each twist of fate unspent at the end of the game.
Primary Objective 1: You earn a VP for each unit your coalition destroys. Team with the most VP gains 15 points (Draw is 7 points each).
Primary Objective 2: 5 Mysterious Objectives worth 1 VP each. Team with the most VP gains 10 points (Draw is 5 points each)
Secondary Objectives: Slay the Warlord, Line Breaker, First Blood. Each is worth 1 point.
*If you table your opponent then you get max points.
Pregame:
Spoiler:
Pregame Thoughts: Nid's plan is to deploy some LOS blocking terrain in the center for the Flyrants to hide behind end of turn 1. Nid's are also going to group their 3 objectives together in the enemy deployment area. VP is the primary and they only have two NS, so nids will go first, reserve majority of my army so they have little to shoot turn 1 and then have the entire army drop top of turn 2 directly at the Tau gates. That gives the Tau Crons 1 round of shooting to take out nearly 2000 points of nids before a turn 3 organized assault (and hopefully one key unit will be locked in combat or destroyed by my ygmarls). I expect that the Tau will castle while spreading out thier 2 objectives on the sides and far from my grouping to capitalize on the outflanking kroot and superior mobility of the night scythes.
Warlord Traits: Neither of us get anything useful.
Night Fighting: 1st turn
Deployment:
Terrain: Nids win the roll of to set up the first piece of terrain. Tau/Crons make the mistake of allowing the Nid player to place two LOS blocking terrain pieces. Tau/Cron Board half has two sets of ruins along the short board edge and 2 forests and hill between the ruins and the center line. Two small blocking buildings are at the center line with majority in the nid board half. 2 forests and a hill form the nid's backfield.
Objectives: Nids clump 3 near the center of the Tau/Con . Tau/Cron wisely place 2 in the nid back field to encourage me to split my force.
Psychic Powers: One HT has Enfeeble and Iron Arm. Warlord HT has endurance. One Zoe has endurance. One tervigon has endurance. Outflanking tervigon keeps codex powers (ie catalyst). Rolls are Meh: Only 1 iron arm, 1 enfeeble, 2 endurances.
Nid's Deployment: Nid's choose to go first. 2 Flyrants in Backfield. One gargoyles up front centerleft. 10 man guant center right. Tervigon in front of guant line 6" or so from building. Mawloc in backfield. Gargoyle brood & Doom DS. Ygmarls hidden in multi-tier ruins. 13 man guants in reserve. Tervigon out-flanking.
Tau/Cron Deployement: Riptide, Broadsides + Commander go in left ruins. Wraiths set up behind the broadsides. CCB and 2nd Riptide are placed in behind ruins. Kroot pack goes in forest center front of ruins. 2nd kroot elects to outflank. 2 NS and DS are in reserves. It is night fighting and they elect not to sieze.
Nids Turn 1:
Spoiler:
Nids cast powers. Mawloc burrows. Flyrants swoop infront of buildings and out of LOS. Tervigon moves and runs up to building blocking LOS. Guants sweep around. Gargoyles jump around building failing 3 out of 5 dangerous terrain checks and failing all 3 FNP.
Tau/Cron Turn 1:
Spoiler:
Riptides shuffle forwards. CCB moves slightly to get jink. Kroot fall back twards front lines. Left most riptide fails its nova charge. Second riptide nova charges its assault jump. Shooting reduces gargloyles to 5 man and reduces gaunts to 1. Riptides shuffle behind ruins.
Nids Turn 2:
Spoiler:
Nids cast powers, Tervie behind building perils (double 1s).
Reserves: Doom fails to come in...damn. Mawloc rolls a 9" scatter and goes off the board and into ongoing reserves...double damn. Ygmarls show up and move to within 1" of riptide to deny the blast template. Guants move on back board edge and advance towards objective. Gargoyles DS and scatter away from the planned forest drop...dropping just in front of his kroot. Tervigon outflanks near ygmarls and casts catalyst on itself.
5 man Gargoyles jump forward behind hill. Lone guant embarks in building to deny first blood/KP. Tervigon spawns 13 guants and moves out behind building towards the the right flank. Warlord Flyrant swoops and runs up to the top of the multi-tier ruin. Iron Armed Flyrant moves behind gargoyle blob. Note: stupid me, I should have moved both Flyrants to shoot at the wraiths to statistically bring them down to half (3).
Intercept: I am hoping that the bunched gargoyles will make a decent target for a pie plate, but he elects to shoot at my outflanking tervigon in hopes of it scattering onto the ygmarls. One riptide gets hot and the other pie plate scatters off the outflanking tervigon to kill a ygmarl. Tervigon suprising made his 4+ cover save.
He's blown both pie plates so no need to scatter, 16 gargoyles elect to shoot at the Kroot...and roll only 1 wound...damn. Tervigons both take aim at Kroot and both pie plates miss. Hive tyrant takes aim at kroot and scores only 3 wounds. Kroot make thier LD 6 test. In assault, ygmarls roll in with 28 attacks and score 4 rends but the Riptide makes his LD5 test...sigh.
Tau/Cron Turn 2:
Spoiler:
Reserves: DS and NS come in on right board edge. Outflanking Kroot come in the nids back field and capture the right objective.
Wraiths jump to get between ygmarls (assuming they bust loose) and broadsides...at 11" they fail to charge the ygmarls. Riptide in combat nova charges for 3++. Left Riptide nova charges for ripple fire on its fusion blaster and moves within range of the Warlord Flyrant up in the ruins. CCB sweeps over my outflanking tervigon but I actually make a FNP save. DS kills off the 5 man gargoyles for first blood. My warlord proceeds to fail his first Downing test and then proceeds to fail 4 out of 4 FNP tests. They gain slay the warlord. In assault, the CCB charges my tervigon...who proceeds to fail his LD test and 3 out of 3 FNP tests. Riptide kills 2 ygmarls.
Nid Turn 3:
Spoiler:
Nids cast powers. Flyrant cast enfeeble on wraiths but they DTW...stink. I was hoping to catalyst the Gargs for FNP and then charge them into the wraith who would be str 5. Guess I will cast catalyst on something else.
Reserves: Doom lands next to Riptide and Broadsides with the spod blocking LOS to riptide. Mawloc scatters 9" again but not off the board.
Intercept: Riptide decides not to ripple fire the pod.
Tervigon near ygmarls spawns 16 guants and taps out. They along with the 13 gaunts spawned last turn advance on the Kroot. Tervigon moves towards ygmarls to join that assault and hopefully stay alive. HT jumps to shoot at CCB's 11 back armour and hopefully save my Tervigon. Gaygoyles jump to tie-up wraiths. Tervigon near building spawns 8 guants which advance towards the CCB. The Tervigon then back peddles to shoot at the kroot in my backfield. Shot scatters and kills only 1 kroot. Gargoyles roll only one wound against the wraiths, which is saved. Hive Tyrant downs the CCB. Holy crap...Doom's leech ability draws 5 wounds from the Riptide (though he saves two of them) and downs a marker drone...could my luck be changing?!? Doom then fails to hit with Psychic Shriek...nope just an anomoly. 16 + 13 guants shoot into his kroot but only score 6 wounds...he then makes his LD 7 test. In assault,16+13 guants attempt to charge into the remaining 2 kroot. They fail a 5" charge and a 7" charge respectfully. I check to see if the Tervigon can fit between a ygmarl and the Board Edge...I am off by 1mm...damn, should have been more careful with my assault moves. If he doesn't get in combat he is toast next turn, so I hessitantly assault the Overlord. 8 Guants charge in as well, but I only roll 4" so only one makes it to B2B, since MSS will go off first and therefore be random, I was hoping to get more guant body's in there. I send in the HT as well. I have MSS go off first before challenges. I have a 66% chance of not rolling my Tervi...we roll and he gets the tervie. I have a 50% chance of making my LD10 test...nope fail. Tervie inflict 2 wounds (3 max hits and smashing for 2 - which I now know isn't allowed...but heah, with my rolls I would likely have wounded myself 3 times) and I fail both FNP checks...because that is how I roll tonight. As an aside, I am getting royally pissed. Fine...my Flyrant can smash his Overload before he ganks my Tervie. HT whiffs all 3 times. Overlord smacks the Tervie and I fail my FNP test...again...that is 6 out of 7 FNP saves that he has failed. 15 of 24 guants nearby die. Out of 15 attacks (+1 attack) Ygmarls fail to wound riptide even once. 15 Gargoyles assault into wraiths and slay 1, losing 10 in the process...oh, with my tervie gone they are out of range of synapse and fall back.
At this point I conceed the game.
Closing Thoughts:
Spoiler:
Reflections: Dice rolls aside.
Bottom of turn 1: I would have had the Tau player nova charge for ripple-fire to prep for intercepting the Doom next turn. Farthest one pie-plates to kill the spod if not in ripple fire range, closest one ripple fires the exposed Doom. Then next turn you can use 1 or more ion accelorators to blast a Flyrant or Tervigon with marker support. I also would have had the Tau and Crons flood the smaller ruins with bodies (to ensure no ymargls popping out of them) while wrapping the flank facing the multi-tier ruins with wraiths...and gotten the hell away from the multi-level ruins.
Turn 2: I should have flown both Flyrants dead on towards the wraiths in turn 2. The combined firepower would have resulted in 5-6 unsaved wounds, statistically, cutting the wraith squad in half and dealing a significant blow to the available counter punch. Having a tanking D-Lord in front would cut that down to 2 wounds on the D-Lord and a dead wraith. I also should have been more careful with my assualt/pile in moves with the ymarls...though to be honest I figured the riptide would have been easily swept by 8 ygmarls.
CCB is just too easy to pop due to open-topped rule and is a good way to grab first blood. Also when you assault with the CCB, you can't get locked in, which leaves it vulnerable during your opponents shooting phase, leaving your lord foot slogging it or tarpitted. For almost the same points you can get a destroyer lord body + stuff, an annie barge or 3 wraiths.
Turn 3, I would have had Tau intercept the spore pod with ripple fire from his fusion blasters.
Warden’s MVP: Goes to my nid's dice rolls...and runner up to beefy cakes overlord
This message was edited 11 times. Last update was at 2013/11/01 07:40:24
Some good closing thoughts from the Gitsplitta yanked from another forum!
Gitsplitta wrote:So, I never did give any thoughtful commentary on the last game vs. Fox's Nids. It was an interesting test given that the Nids were in the wire in force on turn 2. I'm not going to comment on the Nids directly as that really wasn't the purpose of the game & his bad luck with the dice pretty much rendered any strategies he employed null & void.
Board Set-up & Deployment:
I'm not a fan of the Adepticon terrain set-up rules as it's very easy for the person who wins the roll off to dictate the make-up of the battlefield to their great advantage. I guess I didn't see the necessity of making sure I took one of the sight blocking terrain as there would be so much terrain on my half of the field that it would functionally make no difference. We always had plenty to shoot at (and it was night fighting in turn 1 in any case). I thought it more important to give us some elevated firing points and tall cover for the riptides and battle suits. By the same token, changing our deployment of troops in order to try and block the yarmgrls didn't seem to be the wisest thing to do. There was so much terrain on our side of the board that we couldn't have possibly blocked off it all, especially given the movement range of the 'stealers, and then if we wanted to use that terrain as cover we'd have been firing over an intervening unit, granting a 4+ cover save to any targets. I guess you'd have to say that our terrain placement & deployment was more proactive than reactive. I took my two objective markers and placed them all the way in the Nid rear, hoping that they'd draw off a little pressure. If I put them in OUR rear it plays right into the Nid's all-advance strategy. Our outflanking kroot unit walked over to one when they came in, and I think firing from them along with a warrior drop from a night scythe would have secured the second as well (it was being held by gaunts).
Shooting:
In general, shooting was fairly effective. The tau battle suits are certainly formidable and can put out a prodigious amount of fire power. The riptides were pretty meh, but they're scary and imposing and suck up a lot of firepower & attention, which has very definite benefits in battle. Their tendency to wound themselves and/or mess up when they overload their weapons makes them a bit less or a real threat than their imposing stature would dictate.
Air Power:
For the single turn they acted, the Necron planes did well. Shooting was effective. God I love the tessla destructors. Got 2 out of 3 to come in on turn 2 (as you'd expect).
Assault:
The riptide held up better than anyone thought... due in no small degree, to poor dice rolls by the 'stealers... still, T6 with 6 wounds and a good save is nothing to scoff at. Wraiths were decent too. They'll benefit greatly from an attending D-lord and the 3 pistols so they can at least pretend to get some overwatch in (just no better way to spend the points).
OL in CCB:
As I mentioned before... very fragile. Still, effective and a headache with the MSS. He was made more vulnerable than usual by the fact that I jumped him into the middle of a number of Nid squads and then turned his ass (AV 11) to face the Nid advance. I still think a CCB can still be effective in the right circumstances and in the right list. And once they kill the barge, your MSS carrying, war scythe wielding overlord is still rocking his assaults.
So, short though it was... I still learned some interesting things.
The list I've decided to go with for the next set of games replaces the CCB with a D-lord (WS, weave, MSS), 8 warriors per squad (instead of 5) and 3 particle casters for the wraiths... for giggles. This makes the wraiths considerably better and the warrior squads more robust. Both good things to have.
Automatically Appended Next Post: Some reflections on my part
Gitsplitta wrote:(it was night fighting in turn 1 in any case).
Most tau units ignore night fighting either by being able to take cheap wargear or by having the night fighting rule pro bonus. WOOT! Tau also have tools to ignore cover saves all together either via marker lights or the command and control node wargear!
I thought it more important to give us some elevated firing points and tall cover for the riptides and battle suits.
Definately! Here is the thing, FMC, Jump Infantry, Jet Infantry, Jet Bikes, Skimmers, and Flyers can all land on impassible terrain! Yep, perfectly legal...however they have to make a dangerous terrain check if they are not Swooping FMC or Zooming Flyers. MC auto pass difficult terrain tests BTW. Since most buildings and towers that I'vs seen have flat roofs they make perfect landing spots with high panaramas for Jet Infantry like Tau Riptides who can dive back behind them and out of LOS during the assault phase. The next game I post up will show how a Tau opponent of mine used this very same tactic to give me no end of grief!
I took my two objective markers and placed them all the way in the Nid rear, hoping that they'd draw off a little pressure. If I put them in OUR rear it plays right into the Nid's all-advance strategy.
Brilliant strategy that plays to the Necrons strength. Bonus points for putting them on the side lines where the kroot could outflank onto! I simply had the convenience of having 3 objectives grouped together in your deployment zone where I could flood them with scoring guants. That allowed me to effectively ignore those 2 backfield objectives while I hemmed in the Tau fire power.
Normally however you would want a single objective in your deployment zone so that if (and usualy when) a NS gets blown up, they can walk on and secure it in the later rounds of the game. This time was diferent though...no way you wanted yet another objective in your backfield.
The riptides were pretty meh, but they're scary and imposing and suck up a lot of firepower & attention, which has very definite benefits in battle.
Well that was part of the nid's strategy. Those riptides excell at killing MC, FMC, and other high point heavily armoured units. Only problem is they can't ignore LOS and they can get tarpitted and, even worst, swept in combat as they lack fearless. Turn 1 I denied them shots at my TMC and left them only guants and gargoyles to shoot at. I was able to get one riptide singled out and tied up top of second turn while closing in on the second.
For the single turn they acted, the Necron planes did well. Shooting was effective. God I love the tessla destructors. Got 2 out of 3 to come in on turn 2 (as you'd expect).
It was also a wise move on your part to have the NS target my warlord first for the chance that I was successfully grounded. That allows the broadsides, which lack Velocity Trackers to take effective aim with thier excellent fire power...and with hank hunter they should score 4 wounds on average against a typical TMC without endurance.
your MSS carrying, war scythe wielding overlord is still rocking his assaults.
Yeah, I really wanted to get more guants into that assault...nothing more aggrivating than having one of the better beat sticks in the game wasting his time smacking 5 point fearless models. I definately could have done a much better job of positioning my units.
I'm not set on my list by anymeans and will be trialing a few variations in the upcoming weeks.
This message was edited 6 times. Last update was at 2013/10/23 20:44:31
I greatly appreciate your comments on my comments WyFox. I'm still pretty unfamiliar with Tau so the sublimes are completely lost on me. All things (dice rolls) being equal, I think you would have rolled us up by turn 4, but as it played out we were able to try some things that normally we wouldn't have.
Horrible dice rolls happen, some times all at once. It's the nature of the beast.
Anvildude: "Honestly, it's kinda refreshing to see an Ork vehicle that doesn't look like a rainbow threw up on it."
Assault:
The riptide held up better than anyone thought... due in no small degree, to poor dice rolls by the 'stealers... still, T6 with 6 wounds and a good save is nothing to scoff at. Wraiths were decent too. They'll benefit greatly from an attending D-lord and the 3 pistols so they can at least pretend to get some overwatch in (just no better way to spend the points).
Riptides have only 5 Wounds.
Been out of the game for awhile, trying to find time to get back into it.
2013/10/23 21:03:18
Subject: Ancient Enemies Battle Reports_Adepticon Primers [Update: Tau/Necrons VS Double Drop Nids 10-21-13]
Normally, you can only allocate wounds to models that are within LOS and range.
And I recall a BRBFAQ that allowed a weapon with a limited range to allocate wounds based on the furthest range of a weapon in said unit (though I can't seem to find it anymore?). Example: Bolters were allowed to wound models more than 24" away and up to 48" away as long as the bolters in question were within range of 1 enemy model and the unit had a missile launcher.
SMS have ignore LOS 30". HYMP have a 36" range. Does that mean that you can allocate SMS wounds to models that are both out of LOS and over 30" but within 36"?
This message was edited 2 times. Last update was at 2013/10/23 21:06:54
A unit can be allocated wounds to the longest range weapon in the unit. Thus, having 1 lascannon would allow the other 9 bolter marines to wound and kill models up to 48" away, as long as each bolter was within 24" minimum.
So the answer to your question is yes, as long as one model is within 30" of SMS, all the models up to the HYMP range of 36" can be wounded by it too.
Been out of the game for awhile, trying to find time to get back into it.
2013/10/23 21:32:29
Subject: Ancient Enemies Battle Reports_Adepticon Primers [Update: Tau/Necrons VS Double Drop Nids 10-21-13]
page 4 of the rulebook FAQ wrote: Q: When making a Shooting attack against a unit, can Wounds
from the Wound Pool be allocated to models that were not within
range of any of the shooting models when To Hit rolls were made (i.e.
half the targeted model are in the shooting models’ range, and half
are not)? (p15)
A: No.
It states the rule as above. Wounds cannot be allocated past the maximum range of any firing models - which means the longest range in your unit dictates which of the enemy models can die, while each firing model relies on their own personal range to see whether or not they can fire at all.
Been out of the game for awhile, trying to find time to get back into it.
2013/10/23 22:37:10
Subject: Ancient Enemies Battle Reports_Adepticon Primers [Update: Tau/Necrons VS Double Drop Nids 10-21-13]
This game took place prior to Battle Report # 3 (the Drop Nid Fiasco) and was against a Chaos and Tau Coalition: For fun and giggles, we are bringing a Necron detachment with 2 monoliths to see if they have a place in our list.
Battle Report 4:
Team Warden (our lists):
Git’s Necron Detachment: Played by my opponent’s 11 year old son.
HQ: (Warlord) Illuminator Szeras - 100 pts
TP: 5 Warriors in Scythe - 165 pts
TP: 5 Warriors in Scythe - 165 pts
TP: 5 Warriors in Scythe - 165 pts
HV: Monolith – 200 pts
HV: Monolith – 200 pts
Total: 995 points
Wyomingfox’s Tau Detachment: HQ: Commander w/ Vectored Retro-thrusters, DC, OG, CCN, Puretide Chip, MSS, Iridium Battlesuit – 178 pts
Troop: 10 Kroot with Hound – 65 pts
Troop: 10 Kroot with Hound – 65 pts
Elite: Riptide w/ Ion Accelerator, TL Fusion Blaster, VT, and EWO – 210 pts
Elite: Riptide w/ Ion Accelerator, TL Fusion Blaster, VT, and EWO – 210 pts
Heavy: 3 Broadsides w/ TLSMS, TLHYMP, TL, and 5 Marker Drones – 270 pts
Total: 1000 points
Chaos Space Marine Detachment: HQ: Chaos Lord w/ Bike, MoN, Black Mace, Combat Familiar, 4++
Troop: 20 cultists
Troop: 5 Plague Marines w/ Plasma Pistol and 2 Melta Guns
FA: Helldrake with Bale Flamer
FA: 5 Bikes w/ 2 Melta Guns, MoN. I had suggested to bring a second helldrake + Typhus
Elite: 3 Terminators w/ 2 Lightning Claws, 1 Power Axes, and 1 Combi-Melta
Fortification: ADL and Quad Gun
*We made a mistake here as you can’t take both a fortification and a second Fast Attack Slot.
Mission:
Deployment: Hammer & Anvil.
Terrain: Each team takes turns placing a terrain element, starting with the team that selected sides first, until all terrain has been placed. Terrain must be placed on your coalition’s table half, though it can straddle the center line. This table has two ruins, 2 - AV 12 buildings that can hold a unit of 20 each, 5 forests, and a hill. They win the roll off to set up terrain. I make the mistake of allowing the opposing Tau player to select both LOS blocking buildings…Bad Wyomingfox no Riptides for you. Instead I grab the 3 tier ruins so that my broadsides & ML will be able to see over the LOS blocking monoliths as well as to split them up between levels so that his IA can't one shot my Broadsides all at once. To make matters worse I deployed the ruins too far back. I should have deployed on the line so that my Broadsides could threaten more of the table. As it is, I can’t even reach the enemy’s quad gun at 36” without jumping out of the ruins with my Marker Lights. Thankfully, my marker lights are jetpacks to at least they can move closer, fire, and then jump back during the assault phase.
Twist of Fate: Each team gets two Twist of Fate Tokens which can be spent to reroll a warlord trait, mysterious objective or mysterious terrain. In this mission it may also be used to give a scoring unit the ability to contest and control and objective on their own. You gain a point for each twist of fate unspent at the end of the game.
Primary Objective 1: The team that controls the most table quadrants earns 15 points (Draw is 7 points each). To control a table quadrant each detachment must have a scoring unit in that quadrant. In order to contest a table quadrant, each detachment must have a denial unit in that quadrant.
Primary Objective 2: You earn a VP for each scoring unit your coalition destroys and 2 VP for each non-scoring unit your coalition destroys. Team with the most VP gains 10 points (Draw is 5 points each)
Secondary Objectives: Slay the Warlord, Line Breaker, First Blood. Each is worth 1 point.
*If you table your opponent then you get max points.
Pregame:
Spoiler:
Pregame Thoughts: Table Quarters and we have 3 of the most mobile troop units in the game. Whereas our opponent’s kroot and cultists are all on foot making them easy targets for our coalition's 4 pie plates. Even if we lose a few night scythes, our advancing monoliths can teleport our warrior squads across the board on the last turn. To further take advantage of our versatile warriors, we elect to expend both Twist of Fate token to make two warrior units scoring on their own. On our opponents side they need to kill off our Night Scythes and then terminate our necron troops. They have tools to do so considering the Hell Turkey can Vector Strike and both the HBC riptide and Quadgun have both interceptor and skyfire (Oh and if he fires the Quad Gun with one of the commander's marker drone it will be at BS5, ignores cover during thier turn, and tank hunter). After our NS are down, the hell turkey and Ion Accelerator Riptide can clean up our troops. So those “skyfire” enemy units should be our top priority. Though we have 2 ion accelerators that can kill off his HBC riptide, we won’t get the chance simply because our opponents are going to shoot and scoot behind those LOS blocking buildings. However, we do have 5 units with skyfire to smack their bird out of the sky. To threaten their backfield and hopefully distract those riptides, we will advance the LOS blocking bricks (monoliths) up the table with the riptides jumping behind them. Eventually there will be a reckoning.
BTW, I wasn’t aware that the Broadsides had Velocity Trackers going into the game. I instead thought they had Target Locks so that the Broadsides and Markerlights could shoot at different units…woops!
Warlord Traits: We elect to have Illuminator Szeras be our warlord on the off chance he rolls the reserve trait. We roll the re-deployment trait. Chaos elects to have their bike lord be the warlord and they roll a worthless one that I can't recall.
Night Fighting: 1st turn
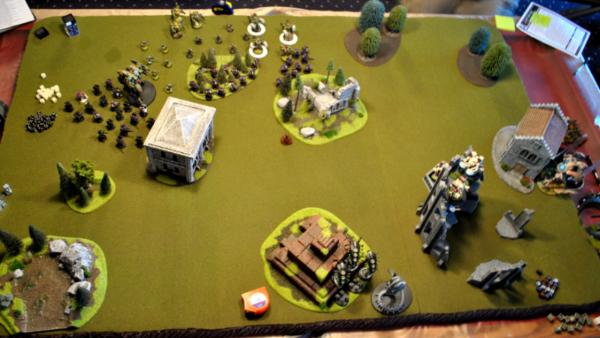
Deployment: The picture below shows our respective deployments.
We (team warden) win the roll to deploy first and unwisely choose to do so. I was wondering how much damage a single hell turkey can do especially with all the skyfire our lists are packing? Past the interceptors, you could hardly consider their single Turkey a Beta Strike…right? Their troops are horribly static and should be wiped well before the end of the game. Oh well, we gave up the beta strike and the last say in objectives. We set up the monoliths in front and on the line with both our riptide behind. The Chip-Commander attaches to the broadsides and deploys within the ruins to rain havoc on any enemy troops that get near our table half. Warriors are in Night Scythes. Our warlord attaches to one of the single scoring warrior squads. Everything else is in reserve.
Our opponents place their riptides behind the buildings; the commander joins the broadsides and they attempt to hide behind the left most building. The PM (which they made single scoring) are hiding out in some ruins front and left. Bikes are on the line out front and in the open with warlord attached. Cultist blob hides behind the ADL for 2+ cover saves. The Kroot Infiltrate into the forest left of our deployment. The second kroot unit (which they also made scoring) outflanks. Turkey is in reserves and terminators are deep striking.
Turn 1: Team Warden
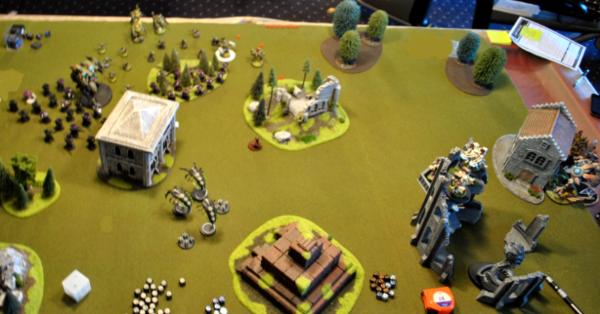
Spoiler:
The picture below was taken after the end of our assault phase. The red skulls are enemy dead. I choose not to nova charge either riptides; the two monos advance up the board and the riptides scuttle around to try and get shots past our own units…lol. At this point I am thinking about disengaging my chip commander from the broadside unit and having him join a riptide. If I am going to do it I need to do it now as the riptides are going to need to advance all the way up the board to threaten his hiding units and will thus get further away from my broadsides. I choose not to, however, and it makes the game much more difficult for me later on. In the shooting phase, my marker lights target the Plague Marines, while my Broad Sides shot into the bikes slaying 1. Both riptides overcharged their ion cannons. One would slay 3 plague marines (2 with meltas) with a marker light directed hit. The second was in position to focus fire on his broadsides, potentially killing 4-6 drones and a Broadside that was not obscured. I scatter and end up only wounding three times, slaying 3 sniper drones. One Mono targets the exposed bikes and slays 2 more, including one melta gun. The second one lobs a pie plate at the cultists who g2g for a 2+ and no one dies. The gauss arrays open fire as well but due to the snap shot rule for firing ordinance, they do nothing.
The picture below was taken after the end of the enemy’s assault phase. Bike lord detaches and moves behind the building. Other bike with meltagun moves up and fires but is outside of 6” and does nothing. Marker light drones shuffle and light up my left most mono (2 hits). Both riptides jump up onto the top of the buildings where given the increased height, they can see my riptides. HBC Riptide fails its Nova Charge and shoots at a riptide but does nothing. IA Riptide activates ripple fire on its fusion blaster in anticipation of NS interception next turn and is joined by Tank Hunting Commander. IA riptide while outside of 9” still strips 2 hull points off my left most Mono thanks to all the crazy bonuses. Kroot advance through the forest. PM hide in the ruins and take pot shots at my riptide. Bike lord turbo boosts over to the quad gun to get ready for interception.
Riptides jump down behind buildings and out of LOS.
The picture below was taken after the end of our assault phase. Everything unfortunately comes in. Both kroot units outflank near short edge…I figured if they showed up on theirs they would just get blown by the broadsides and cultists who have nothing better to shoot at. We position all three night scythes behind the line of sight blocking terrain to either block LOS or get a 4+ cover save from the building.
The ploy works as the HBC, Quad Gun, and Ripple Fired Fusion Blasters only manage to score 2 HP on the lead NS. Well, I am feeling pretty good. They just blew all of their nasty skyfire. Should be smooth sailing from here…
I choose not to nova charge either riptides; the two monos advance up the board and the riptides scuttle around. ML drones shuffle out of the ruins and light up the cultists. Broadsides and my kroot open fire on the enemy kroot squad and one survives and passes his leadership save. We make a couple mistakes in our opponents favor.
1) We allow the PM to go to ground. I forgot that they were fearless. One monos pie plates them but only one dies due to 2+ cover and 5+ FNP.
2) For ML, we only applied the “ignores cover” rule for the enemy unit that had the expended marker light counters. Instead what you are supposed to do is apply the ignore cover rule to the unit that expends the ML counters and fires at the enemy target. In the case of a Riptide pie plate, any model regardless of unit would have lost their cover save if they took a wound. One riptide w/ ML support and a mono fire into the cultists and we score 6 dead cultists, 2 wounds on the Bike Lord and a wound on the Quad gun. Second Riptide is forced to shoot the last bike, scoring us first blood. NS all fire into the HBC riptide and score a single wound.
Both of my riptides jump behind the monos during the assault phase. I can’t hide them from the Riptides but I can hide them from the Broadsides at least.
The picture below was taken after the end of the enemy assault phase. The Hell Drake comes in and flys on top of the building in such a way that it has moved over the lead NS and its wings partially over the other two (so he could choose any NS to vector strike I guess). Enemy kroot outflank next to my lower right kroot squad.
I make a mistake and intercept the hell turkey with my fusion blasters…no ripple fire or ML support…and outside of 9”. I do nothing. My other riptide kills 4 kroot in my backfield with an overcharge.
Turkey get max hits but only one pen and the lead NS loses its last HP. The HBC Riptide fails its nova charge for a second time. Buff Commander jumps to join the broadsides and selects Tank Hunter. They then inform me that the Broadsides have velocity trackers instead of target arrays. I thought my opponent was mirroring my own list…my bad. I should have focused more on those Broadsides last round! Another NS goes down. The riptides combine to strip a HP off my last NS housing Szeras and shake it. Wow, forget about smooth sailing! My mistakes are really piling up tonight. His out flanking kroot were going to shoot at my Broadsides when I reminded them that primary was table quarters. They shoot at my kroot instead and slay 4 but I pass my leadership. Lastly Bike Lord hides behind the building.
The picture below was taken after the end of our assault phase. Both our warrior squads come in near our short edge. Night Scythe zooms off the table due to being shaken. My lower right kroot and the ten warriors open fire on the enemy kroot squad that outflanked last turn, slaying them all. My upper left kroot squad rapid fires into my opponent’s sole remaining kroot that is hiding in the forest, slaying him even after going to ground for a 2+ cover save. Only the lower right nova charges activating his 3++ (as I sadly used my FB to intercept last turn). The upper left is out of range to shoot anything. The lower right (who would have been in perfect range to smack the turkey with ripple fired FB!) moves around instead to get a clear shot of my opponent’s Broadsides while keeping the commander in cover (focus fire!). Both Monos advance up the board one to fire at the Broadsides and the second to fire a pie plate into the cultists whom, after going to ground for a 2+, lose only a single cultist. I now noticed we placed the lower right mono in front of my riptide in order to get a shot at his broadsides as well!... Crap…the monos aren’t supposed to block my LOS! Riptide instead fires at the Hell Drake with its IA along with my Tank Hunting Broadsides and together score a meager 2 HP…but we did manage to shake his beasty who had failed his demonic 2+ save to ignore shaken/stunned effects.
Upper left Riptide hides behind the mono is the assault phase and my lower right riptide with the 3++ jumps out in the open to hopefully draw a lot of fire power.
Question: Can Markerlights attached to Broadsides activate thier jet packs in the assault phase to scoot around?
The picture below was taken after the end of the enemy assault phase: Terminators deep strike in front of Broadsides.
My upper Riptide intercepts with his FB but fails to hit.
Hell Turkey zooms off the table…to become a royal pain in my butt later on. HBC Riptide nova charges its HBC and IA riptide ripple charges its Fusion Blasters. Both jump up on the buildings with the Commander joining with the IA Riptide and granting the unit Tank Hunter. (Really wish my commander wasn’t in my backfield right now). IA Riptide targets our wounded mono and explodes it. HBC Riptide is tempted by my 3++ riptide and unloads everything at him…scoring 0 wounds.
Riptides jump behind the buildings in the assault phase.
Rule question: Can a model make a “It will not Die” test to regain back a HP if it left the table and is in strategic reserves? We ruled that it could not.
The picture below was taken after the end of our assault phase. NS enters in and hides behind the building to deny intercept.
Upper left Riptide fails to nova charge his 3++ and advances towards the ruins and opens fire on the lone Plague Marine who continues to g2g for a 2+ cover save. Second riptide ripple fires his FB and jumps on top of the building to slay successfully our opponent’s HBC Riptide. The remaining mono moves towards the ADL and fires a pie plate into the cultists who g2g to sustain no casualties. Broadsides kill off the terminators.
In the assault phase, the upper left riptide fails his charge distance to assault the last PM. The lower right jumps behind my mono.
The picture below was taken after the end of the enemy assault phase: Hell Turkey arrives and wipes out 9 out of 11 kroot in the upper forest, getting max vector strikes again and then burning another 5. The kroot fall back. I’m out of range to intercept.
Our opponent’s IA riptide jumps up onto the building and remains joined by the now monster hunting commander; he fires at my exposed Riptide doing 2 wounds.
Bike Lord moves out from behind the building and assaults the same riptide, with my over watch failing to hit. He wounds numerous times but I make all my saves and we remain locked, in return I wound once but he makes his save.
His riptide rolls snake eyes for his jump move and stays on top of the building! Turkey regens a HP.
The picture below was taken after the end of our assault phase: The 2 kroot fail to regroup and run off the board. NS moves over and fires at the PM slaying him. Monolith immobilizes itself on the ADL. It then pie plates and uses its portal of exile to suck cultists through, bringing them down to 3. They all pass their leadership checks. My lower right riptide and Broadsides open fire on the Turkey but net only a single HP. Wow, am I glad he hadn’t brought 2 of these pesky things.
In the assault my Riptide slays his warlord and moves in front of the building.
Question: Can the monolith use its portal of exile, which doesn’t roll to hit, on the same turn it uses its ordnance weapon?
I forgot to take pics from here on. Turkey vector strikes the second kroot squad and scores max hits, slaying 4. The remaining 2 survivors fall back. It then flames the single scoring warrior squad but 1 manages to get back up. Meanwhile my opponents are making lots of squawking sounds. IA Riptide fails its nova charge and jumps up on the building. With the attached Commander’s Tank Hunter USR, it scores a pen with a shaken result on our NS.
Cultists and broadside unit charges into the riptide in their deployment. He charges the cultists in first to draw over watch, losing 1. My riptide focuses on the Broadside unit due to their lower WS and scores 2 wounds, slaying the marker drones. I win comabe but only the Broadsides flee. Cultists stay locked. Enemy riptide jumps behind the building. Turkey regains a wound. Game goes on.
Kroot continue to fall back. NS flies off the table and into ongoing reserves. We could have dropped off the warriors + warlord but with a very mobile riptide + commander, they would have died shooting + assault. So we chance a turn 7 for all the points. We move the lone single scoring warrior out of vector strike range. In an attempt to free my riptide, Monolith targets the quad gun with its particle whip with hopes of scattering and uses its Portal of Exile. Particle whip hits and does a wound to the quad gun, portal of exile slays a cultist. Broadsides and Riptide both fire on the Turkey but score only a single HP. Man that thing is unreal.
In the assault, my riptide finishes off the cultists and consolidates next to the quad gun.
Broadside unit falls back off the table. In order to kill both our kroot unit and the single scoring warrior, the Turkey is forced to drop into hover mode and flame them. He does succeed in taking out both units. Their riptide ripple fires his FB, jumps on top of the building and unloads on my wounded riptide but scores only a single unsaved wound.
Enemy riptide stays on top of building to intercept. Turkey regains a wound.
If game ends here they will tie primary and win secondary…due to our NS + Warriors + our Warlord being off table and netting an additional 5 total points. If the game goes on we will likely win both primary and secondary.
Table Quarters: Warden 0 Taos 0
VP: Warden 12 (First Blood, Slay the Warlord) Taos 9 (14 and Slay the Warlord if the game ends!)
Turn 7: Team Warden
Spoiler:
Game goes on with a roll of a 6+. NS flies on and drops the warrior unit (who are single scoring by the way) immediately behind the lower right building and out of line of sight of the enemy riptide.
Riptide’s interceptor fire downs the last NS but it doesn’t explode.
Marker Lights shuffle out of the ruins so that 3 can get within range of the enemy Riptide and light him up. Tank Hunting Broadsides finally down the hell turkey. We position our riptides so that they are closer to the enemy riptide in their riptide-commander unit. Our riptides' fire power with ML support slays the riptide.
They then both charge the enemy chip commander. Thier Commander strikes first with the onager gauntlet and slays our heavily wounded riptide. The commander is slain in return by my remaining Riptide who smashes for a single str 10 wound.
Opponents are tabled and the gamble paid off.
Table Quarters: Warden 1 Taos 0
VP: Warden 18 (First Blood, Slay the Warlord, Line Breaker) Taos 13
Closing Thoughts:
Spoiler:
Well plenty of mistakes to go around that nearly cost us the game. 1) I should not have given them both LOS blocking terrain for them to hide both their riptides behind. 2) I should have deployed the ruins farther forward so that the Broadsides could have better range…no idea why I didn’t; just wasn’t paying attention. I guess in the end, our opponents fed them enough units to keep them busy anyways. 3) I should have chosen to go second and used our NS to beta strike the annoying Hell Drake as well as better protect my troops on the late game drop. 4) I should have had my commander with one of my riptides where monster hunting and tank hunting skills could have been used better on the Hide and Seek Riptides and the rampaging Hell drake. 5) I should not have intercepted with the fusion blaster against the Hell Drake in turn 2 and should have instead waited till turn 3 to both ripple fire and buff the fusion blasters with Marker Lights. On the plus side, we did use the buildings effectively to block and mitigate interceptor fire.
As for the Monoliths, they were a big meh. In a world of 2+ armor saves and 2+ Go to Ground Cover Saves, a 200 point, short ranged, AP3 pie plate that doesn’t ignore cover just isn’t meaningful. Moreover, the numerous gauss arrays are rendered ineffective due to ordinance induced snap firing. Basically it suffers from high cost and very little damage output which allowed our opponents to ignore them most of the game (which is not what we wanted). To make matters worse their blocky nature inhibits our team's LOS just as much as it inhibits the enemy's.
In regards to our opponent's list. we messed up on the ADL and they also wished they had brought a second Hell Drake. As for the game and given that we were going first, they should have better deployed the bikes preferably out of sight or at least in cover rather than being up front and out in the open. They also made the mistake of deploying/outflanking both of thier single scoring units and thier second kroot squad so close to our firebase. However, they did a great job of using terrain to block LOS to their riptides as well as jump the commander into various Tau units at the need arrived. They also made the right choice with the hell drake, dropping it into hover so as to kill off our scoring units on our board edge.
Warden’s MVP: Our riptides for slaying the 2 enemy riptides, most of the PM, the broadsides, half the cultists and the Tau commander as well as soaking up a decent ammount of firepower.
Enemy’s MVP: Backaw! It almost won them the game by eating all of our troops
This message was edited 10 times. Last update was at 2013/11/01 19:40:29
Well, we cooked up the dual monolith list just on a whim anyway. Not quite as imposing as we'd hoped but I suppose it's consistent with the opinion of a mutual friend who would dearly love to use monoliths in his list but hasn't figured out how to do it effectively yet.
I'm comfortable falling back to the wraiths & flyers list. It's not very imaginitive but it should be solid under a variety of battle conditions.
This message was edited 1 time. Last update was at 2013/11/01 20:11:12
Anvildude: "Honestly, it's kinda refreshing to see an Ork vehicle that doesn't look like a rainbow threw up on it."
1) Can Markerlights attached to Broadsides activate thier jet packs in the assault phase to scoot around?
2) Can a model make a “It will not Die” test to regain back a HP if it left the table and is in strategic reserves?
3) Can the monolith use its portal of exile, which doesn’t roll to hit, on the same turn it uses its ordnance weapon?
4) Can units engaged in CC be affected by the portal of exile?
Automatically Appended Next Post:
Gitsplitta wrote: Well, we cooked up the dual monolith list just on a whim anyway. Not quite as imposing as we'd hoped but I suppose it's consistent with the opinion of a mutual friend who would dearly love to use monoliths in his list but hasn't figured out how to do it effectively yet.
Well Norbu could go back to playing 3rd Edition
This message was edited 1 time. Last update was at 2013/11/01 20:33:43
This weekend, Gits and I attended the Rumble in the Tundra Tournement in Green Bay, which was held in a confence room within Curley's at Lambeau Field. Nothing like having drinks and food served right at your gaming table throughout the day!
This was our first Adepticon Primer and so we were looking to see how well our lists might match up againts the more traditional Eldau, DoubleE, and Taudar. Suprisingly, there was a lot of guard at this event, so we only faced off against 1 double eldar opponent.
Had the pleasure of playing an escalation league game that is a buildup/practice for the Good, the Bad and the Ugly Tourniment in Milwaukee. This week was a 1400 point match against Deamons.
Tau Dar list: Utilizes my core with some small tweaks with a 400 portion of Yellow Beard's eldar
Fate Weaver: Misfortune, Flickering Fire, Pyromancy Nova, Hemmoreage (Warlord Trait: Reroll Warp Storm)
Slaneesh Deamon Prince: 3+ armour, Wings, LVL 3, Whip, + 1 wound and IWND, LVL 3: Iron Arm, Enfeeble
Tzeech Deamon Prince: 3+ armour, Wings, LVL 3, + 1 wound and IWND, Grimiore, LVL 3: Iron Arm, Life Leach
Keeper of Secrets: Portoglyph
Pink Horrors w/ Standard
Pink Horrors w/ Standard
Mission: King of the mountain. At the end of each game turn calculate the number of UNITS from each side within 12" of the center of the board. Player with the most units earns 1 VP that game turn. For a unit to score, the majority of the unit's models rounded up must be within 12". 12" area from the center counts as diificult terrain to all units. Zooming Flyers and Swooping FMC may not be within 12" of the center.
Deployment: Hammer & Anvil
Pregame:
Spoiler:
Terrain: Player placed terrain. 2 LOS blocking pieces in Deamon's table half near the 24" deployment line and a forest. Massive forest 4" by 2' long in the center. Multi level ruins and forested hill in Taudar table half near the 24" deployment and a ruins.
Night Fight: Turn 1
Tau Deployment: I win the roll to deploy first. Commander + Farseer + Broadside Unit combine and are placed in the 2nd and 3rd story of the ruins centered on my deployement line. 1 Riptide to the left and 1 riptide and Wraith Knight to the right of the ruins. There is a LOS blocking tower in front of me so my riptides are positioned so that at least one can look around the tower. Bikes are hiding behind the hill. Kroot infiltrate: 13 man unit goes in the center forest spread out. 10 man unit goes in front of the ruins.
Deamon Deployment: He DS both Horror units. KOS goes behind the tower near the front center of his deployment zone. Fateweaver and 2 DP are back a little farther hiding behind a large LOS building that is to my right.
Tau Turn 1:
Spoiler:
Deamons fail to seize. Riptides both fail thier nova charge. I cast prescience and 4++ on wraith knight and jump him forward to shoot at the KOS. I cast guide on the right riptide. Riptides and Wraith Knight jump forward. Commander selects MH and joins the guided riptide. The forest ends up being a brainleaf forest that slays 2 kroot. Only wraith knight and guided riptide can see the KOS everything else is out of range or LOS. KOS makes his 2+ cover saves against the wraith knight. HBC fires at the KOS and score 6 wounds. KOS fails his invulnerable saves even with a reroll and dies giving up FB. Riptides jump back into cover. I should have assault moved my farseer closer to my wraith knight so that he could buff him next turn.
Deamons Turn 1:
Spoiler:
Fate weaver is forced to reroll the grimiore and it goes off. All 3 FMC swoop forward 24" and just right of the center forest. Both DP cast Iron Arm +3. He chooses to reroll his warpstorm and scores snake eyes but all three deamons make thier leadership. Fate weaver casts flickering fire and one DP cast life leach on the kroot who G2G for a 2+ cover save and pass. At end of game turn I control the Mountain.
Taudar: 1 Deamons: 0
Tau Turn 2:
Spoiler:
I cast guide on the wraith knight and prescience and 4++ on the right riptide. Left Riptides nova charges his HBC and right riptide fails his nova charge. Riptides and Wraith Knight jump back behind kroot screen. Commander selects MH and joins the Broadsides. Kroot in forest pass their leadership. Jetbikes move and flat out behind some ruins in the deamons table half within 12" of center board but to the left. Both kroot fire into the swooping Slaneesh DP who fails his 2nd grounded check even after a reroll from fate weaver. Buffed Broadsides and ML fire into the grounded deamon prince slaying him. Both riptides unload into the Tzeech DP who takes one wound from being grounded. Would have been nice to have my WK within assault range of the grounded DP, but I wasn't expecting to ground both DP and I didn't want Fateweaver tieing up my only assault unit that could take on his second DP. Also my WK lacked both prescience and forewarning this turn. In the assualt phase I juggle my ML drones in the broadside unit around so that he can't single out my farseer with flickering flame from DS horrors.
Deamons Turn 2:
Spoiler:
Both horrors come in. One deepstrikes in back of the forest next to the jetbikes. Second one drops just over 12" right of the center. Fate weaver is forced to reroll the grimiore and it goes off. Fateweaver rolls boxcars on misfortune. DP cast Iron Arm +2. He chooses to reroll his warpstorm and slays two kroot in the forest. DP cast life leach on Wk and gains a wound back. Fate weaver and horrors casts flickering fire on the kroot who G2G for a 2+ cover save and pass. Horrors near bikes cast flickering fire on the bikes who make thier armour saves. Fate weaver assaults the kroot and sweeps them. DP fails his charge on the wraith knight and takes a wound due to over watch from the broadsides and a riptide. DP regenerates his wound back from IWND. At end of game turn I control the Mountain.
Taudar: 2 Deamons: 0
Tau Turn 3:
Spoiler:
I cast prescience and 4++ on the wraith knight and guide on a riptide. Both Riptides fail thier nova charges. Riptides move away from the FMC. Commander selects MH. 3 remaining kroot from the smaller squad move and run towards the forest. I make a real bone headed move and forget to move my wraithknight towards his FMC. Jetbikes move out of the ruins and shoot at the horrors near them killing several. Buffed Broadsides, marker lights, and both riptides fire into the Tzeech deamon prince putting only a single wound on him :shock:. My wraithknight has a 9" assault to make due to my forgettfullness but I get lucky and roll a 4 and a 5 :shock: . In assualt, my WK takes two wounds after failing both saves and the DP takes only one in return. My bikes assault the horrors and I lose one bike while bringing his squad down to two guys...he loses another horror to instability. Riptides move away from the FMC.
Deamons Turn 3:
Spoiler:
Fate weaver is forced to reroll the grimiore and it goes off. Fateweaver casts misfortune on the wraith knight who fails his Deny the Witch. DP casts Iron Arm +3. He chooses to reroll his warpstorm which wipes out the 3 remianing kroot. Fate weaver moves though the Brainleaf Forest towards the jetbikes and fails his leadership test wounding himself 3 times but he passes all his saves. Horrors casts flickering fire on the Broadside unit and I make my saves. Fate weaver assaults the jetbikes, kills 1 and sweeps them, bailing out the lone horror. DP causes two wounds to the wraith knight who fails both his 4++ even without the reroll. In return, the DP takes 3 wounds and is slain. WK moves towards Fate Weaver. At end of game turn Deamons control the Mountain.
Taudar: 2 Deamons: 1
Tau Turn 4:
Spoiler:
I cast prescience and 4++ on the wraith knight and guide on a riptide. One Riptides fails his nova charges; I don't bother nova charging the second one. Riptides move up. Commander selects Stubborn and his broadside unit moves down the ruins. WK moves towards fate weaver. Snap firing Broadsides, marker lights, and both riptides fire into the Horrors in order to wipe them out. Wraithknight assaults Fate Wever and is slain. In the assualt phase I juggle my ML drones in the broadside unit around so that they are in range of the center.
Deamons Turn 4:
Spoiler:
Fateweaver casts misfortune on the broadsides and perils with double ones. Broadsides fail thier Deny the Witch. He chooses to reroll his warpstorm which does nothing. Fate Weaver moves through the forest and makes his leadership test. Fateweaver casts flickering fire on the Broadside unit and slays a maker drone. At end of game turn Deamons control the Mountain.
Taudar: 2 Deamons: 2
Tau Turn 5:
Spoiler:
Both Riptides move up to within 12" of board center. Commander selects MH and his broadside unit kills Fate Weaver. One riptide slays the loan horror. The world is cleansed of the foul deamon presense. At end of turn Tau control the Mountain.
Taudar: 3 Deamons: 2
Tau win mission objective and score First Blood and Slay the Warlord.
This message was edited 2 times. Last update was at 2013/12/20 23:11:36


 .....Bay Area Open GT 2013 - Best Tyranids
 .....LVO GT 2014 Team Tournament - Best Generals
 .
.


 . He decided to change his chapter after we rolled up the mission as he thought scouting would be more useful as well as the first turn stealth (not realizing that my army can ignore cover). I allowed the swap.

 . Since most buildings and towers that I'vs seen have flat roofs they make perfect landing spots with high panaramas for Jet Infantry like Tau Riptides who can dive back behind them and out of