| Author |
Message |
 |
|
|
|
|
Advert
|
Forum adverts like this one are shown to any user who is not logged in. Join us by filling out a tiny 3 field form and you will get your own, free, dakka user account which gives a good range of benefits to you:
- No adverts like this in the forums anymore.
- Times and dates in your local timezone.
- Full tracking of what you have read so you can skip to your first unread post, easily see what has changed since you last logged in, and easily see what is new at a glance.
- Email notifications for threads you want to watch closely.
- Being a part of the oldest wargaming community on the net.
If you are already a member then feel free to login now. |
|
 |
2020/03/17 08:36:31
Subject: Mac's P&M Shenanigans-- 3/15: LoER contest foam terrain nearly ready for paint
|
|

Longtime Dakkanaut
|
Nice work on the terrain, excited to see it painted up.
|
|
|
 |
|
2020/03/17 18:35:17
Subject: Mac's P&M Shenanigans-- 3/15: LoER contest foam terrain nearly ready for paint
|
|

Fixture of Dakka
|
MacPhail,
That is going to be quite the set of terrain when it is finished...which reminds me I have to get going on the LoER project asap.
Cheers,
CB
|
|
|
|
|
|
2020/03/17 19:59:35
Subject: Mac's P&M Shenanigans-- 3/15: LoER contest foam terrain nearly ready for paint
|
|

Ancient Venerable Dreadnought
|
Awesome work Mac! The broken icons are amazingly produced. Even more so given you built their pieces separately rather than finishing then cutting up!
|
Goberts Gubbins - P&M Blog, started with Oldhammer, often Blackstone Fortress and Void Panther Marines, with side projects along the way |
|
|
|
|
2020/03/19 04:45:28
Subject: Re:Mac's P&M Shenanigans-- 3/15: LoER contest foam terrain nearly ready for paint
|
|

Preacher of the Emperor
|
Thanks, everyone... this turned out to be a monster project (and it's also a proof-of-concept for an even bigger Battle Sanctum), but it's really enjoyable work, the more so for all of Dakka's support.
MeerCat, there's a scene in one of those campy Mummy remakes where the kid topples a room full of columns... this was my work table every time I bumped it with my knee.
Viterbi... paint this weekend, stay tuned!
Captain, your blog is my next stop... I can't wait to see how you bring all that plastic junk together!
gobert, I realize now I wish I'd cut one of the icons on the opposite angle so the two pieces mirrored each other in profile... next time, I guess. If good intentions were free time, I'd make one for each of my group with the iconography of their preferred faction.
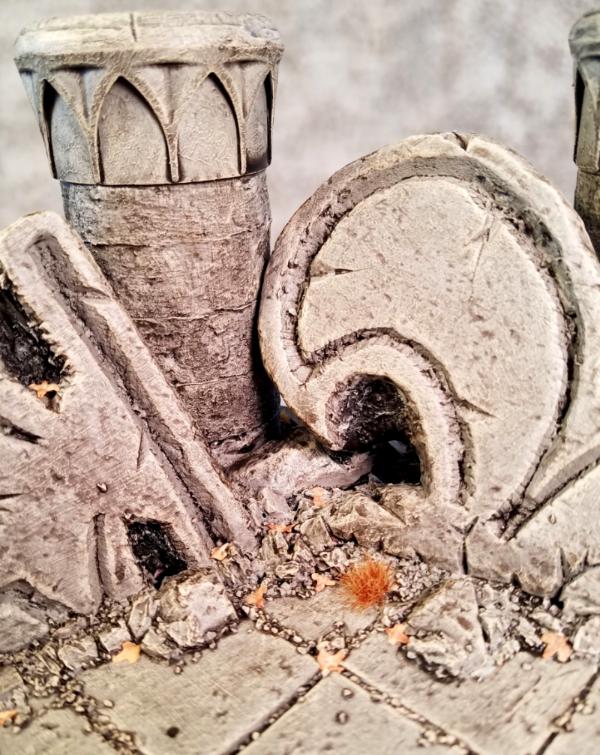
I know I keep saying "ready for paint" but I can't stop building. Here's the foamed PVC discs cut, glued to the Tropicana lids, beveled with a Dremel grinding wheel, beat with a rock, "cracked" with a sharp hobby blade, sanded, and painted... yet I'm still not happy. I should have used a glue that would fill the gaps better, so I'm tempted to smear some Green Stuff around the edge of each one before I paint them. I'm actually really happy with the way the texture of the stone and the carved cracks came out, and I'm really glad I didn't try the foolishness of making the icons out of the same stuff and trying for that texture on a large scale.

|
|
|
|
|
|
2020/03/19 17:39:48
Subject: Re:Mac's P&M Shenanigans-- 3/15: LoER contest foam terrain nearly ready for paint
|
|
Fixture of Dakka
|
You know MacPhail...it is only a model for a game with toy soldiers on it.  I imagined an image of a MacPhail hulk shouting "MacPhail Smash!" with all your pillar tops around you. 
Cheers,
CB
|
|
|
|
|
|
2020/03/20 16:43:33
Subject: Re:Mac's P&M Shenanigans-- 3/15: LoER contest foam terrain nearly ready for paint
|
|
Speed Drybrushing
|
|
|
|
|
|
|
2020/03/20 17:34:34
Subject: Mac's P&M Shenanigans-- 3/15: LoER contest foam terrain nearly ready for paint
|
|
Preacher of the Emperor
|
To be fair, it was a very small rock. My days of smashing things with big rocks are mostly behind me. It's just nice to get in touch with my inner tool-using ape.
|
|
This message was edited 1 time. Last update was at 2020/03/20 17:34:45
|
|
|
|
|
2020/03/21 16:27:49
Subject: Re:Mac's P&M Shenanigans-- 3/15: LoER contest foam terrain nearly ready for paint
|
|
Preacher of the Emperor
|
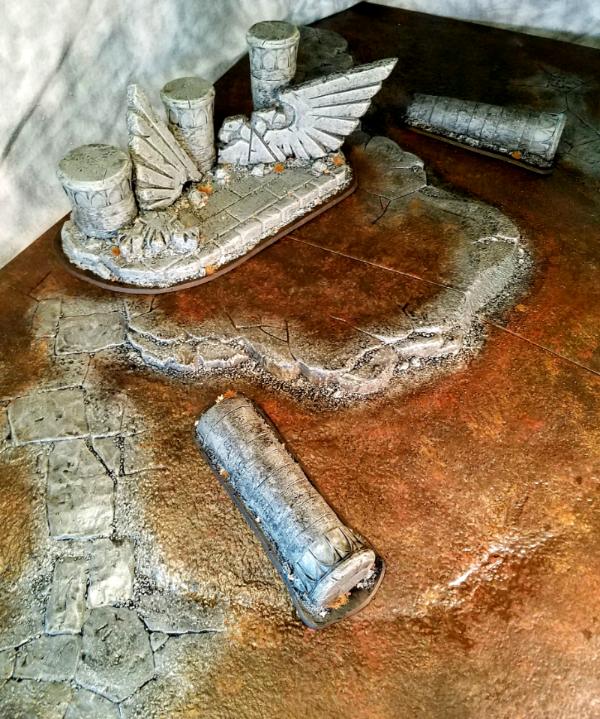
I finished up the texture on the LoER contest entry last night. I used the scrap foam to cut big irregular blocks to eat up empty space on the back. Crumbled bits of cork got sprinkled in between those and along the edges of the base. Finally two different weights of model railroad ballast (I collect all the mixed scraps from basing models) got scattered across everything. I used an old brush and a combination of gravity and vibration to settled the ballast into the recesses.
The MVP of this phase was definitely the glue mix I used to bind everything, which is 1:1 ModPodge and water (PVA glue would work as well) with a few drops of dish soap as a flow aid. I made two passes, once after the cork and once after the ballast, soaking everything with an eyedropper. The glue pulls itself along through the materials, locking everything down without shifting it too much and without pooling or beading. Where I overdid it, a dry paper towel wicks it right up. I had a small fan running on the table as I worked from one piece to the next, drying them enough to cycle quickly through them.
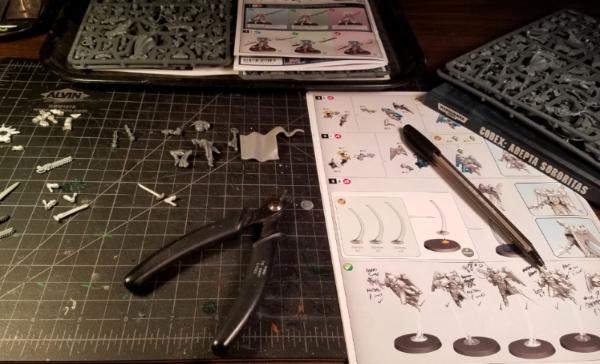
Tools and workspace:
Foam and cork glued down:
Dry ballast settled into place with gravity and gently drumming my fingers on the base, with a little fine-tuning with an old paintbrush:
Action shot, moving left to right... the glue mix is drawing itself down into the texturing materials:

|
|
|
|
|
|
2020/03/22 09:49:30
Subject: Mac's P&M Shenanigans-- 3/21: detailing terrain with foam, cork, and ballast
|
|
Longtime Dakkanaut
|
I would not have the patience for this, but your terrain is looking better and better with all that gravel!
|
|
|
|
|
2020/03/23 22:04:02
Subject: Mac's P&M Shenanigans-- 3/21: detailing terrain with foam, cork, and ballast
|
|
Crushing Black Templar Crusader Pilot
|
 Viterbi wrote: Viterbi wrote:I would not have the patience for this, but your terrain is looking better and better with all that gravel!
Hear hear! I am always amazed at the patience of you terrain crafters!
|
  
Relapse wrote:
Baron, don't forget to talk about the SEALs and Marines you habitually beat up on 2 and 3 at a time, as you PM'd me about.
|
|
|
|
|
2020/03/24 02:59:51
Subject: Mac's P&M Shenanigans-- 3/21: detailing terrain with foam, cork, and ballast
|
|
Fixture of Dakka
|
MacPhail,
How do you intent to protect the pink foam from the accelerant in spray primer?
CB
|
|
|
|
|
|
2020/03/24 04:26:33
Subject: Mac's P&M Shenanigans-- 3/21: detailing terrain with foam, cork, and ballast
|
|

Ragin' Ork Dreadnought
|
Came for the white paint, stayed for the terrain. The LoER contest terrain is looking really good (this and the previous ones.)
|
|
|
|
|
|
2020/03/25 15:25:35
Subject: Mac's P&M Shenanigans-- 3/21: detailing terrain with foam, cork, and ballast
|
|
Preacher of the Emperor
|
 IGtR= wrote: IGtR= wrote: Viterbi wrote:I would not have the patience for this, but your terrain is looking better and better with all that gravel!
Hear hear! I am always amazed at the patience of you terrain crafters!
Thanks! I've grown less patient over time, and it's for the better. I really have to force myself to use the three-foot rule and not get bogged down in detail. If I don't move fast this stuff never gets done. A lot of my technique development lately has been all about speed and efficiency... on this project, using balls of foil to weather the foam, using sprinkling + gravity to settle the cork and ballast rather than doing it by hand, and getting that glue recipe right so I can just hose the whole thing down have been the big successes. Most nights I can make one pass with a single technique over all four pieces in an hour of two after the kids are in bed.
 Captain Brown wrote: Captain Brown wrote:MacPhail,
How do you intent to protect the pink foam from the accelerant in spray primer?
CB
That would be nice, but the actual answer is... I don't. On previous projects I've messed around with PVA glue, ModPodge, latex paint, and a sort of stucco made of glue, paint, and sand. I had limited success, but noting was so good that I'd feel safe spraying down a carefully carved piece of foam like the ones in this project. When I built those sections of chain link fence several pages back and used foam as the base for piles of rubble and gravel, I layered on several coats of PVA, ballast, and paint before spraying, and still got some corrosion. It didn't matter for the level of detail that piece had, but it would have ruined this one. So I quit trying... now I just paint by hand. I used big tubes of art store acrylic paint, usually thin a little with water, and slather it on with a big cheap brush or roller. With the paint thinned, it tends to dry smooth, but lets the pink show through. Without thinning, it covers pretty well but can leave some brush strokes. I use a mix of both and make 2-3 passes.
 Arakasi wrote: Arakasi wrote:Came for the white paint, stayed for the terrain. The LoER contest terrain is looking really good (this and the previous ones.)
Wow, thanks! As I said in the Space Marine painting contest thread, I'm super impressed with your bone armor. I know mine can't really measure up, but it's been progressing somewhat since I started. Once I get this terrain on pace I'll be turning to my White Scars Tactical Squad (what was I thinking choose two white armies?) for the contest, and the approach will be much simpler with cheap spray primer and Contrast paints. Anyway, I'm glad you stopped by and flattered that you like the terrain!
|
|
|
|
|
|
2020/03/26 11:41:06
Subject: Re:Mac's P&M Shenanigans-- 3/21: detailing terrain with foam, cork, and ballast
|
|

Krazed Killa Kan
|
I couldn't wait and be satisfied with only the teasers
Those two main pieces look amazing with your broken up carvings on them.
|
|
|
|
|
|
2020/03/31 04:15:48
Subject: Re:Mac's P&M Shenanigans-- 3/21: detailing terrain with foam, cork, and ballast
|
|
Preacher of the Emperor
|
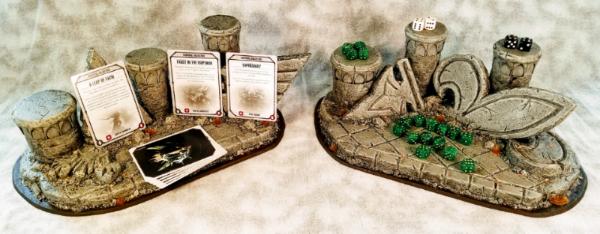
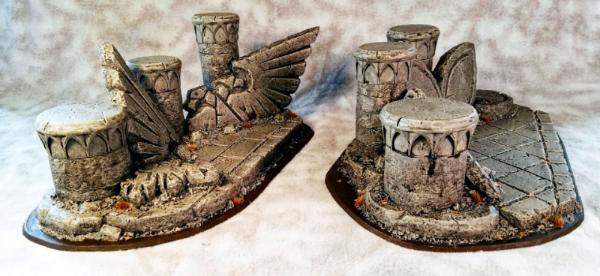
Okay, here's the final entry for this round of the League of Extraordinary Riveters Terrain Contest. This was an awesome fun time... bigger than I'd expected or planned, but also fast and efficient in odd ways. Thank goodness I left the plastic carving to a minimum (the tops of the columns) and worked mostly on foam, or I'd have ruined my hands and never gotten it done. I'm pleased with the integration of the thematic beverage container lids. I wish I'd had a little more time for detailing... there's some paint I'd touch up if I could. At some point I'll write up a full analysis, but now I've got to hustle and get the Space Marines done in time for the monthly painting contest. Here's the pics!
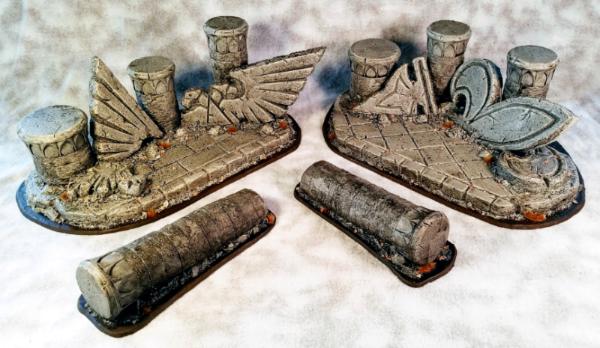
Required views (front, rear, left, right, top)
Detail views:
Size reference, table setup:
Finally, in use as a game aid: both pieces are designed to hold cards (Tactical Objectives, Sacred Rites, Stratagems) and dice (Miracle Dice, CPs, VPs).
|
|
|
|
|
|
2020/03/31 14:13:54
Subject: Re:Mac's P&M Shenanigans-- 3/30: LoER Terrain Contest entry complete
|
|
[DCM]
Boom! Leman Russ Commander
|
Very nicely done, Mac! Extremely professional looking pieces you could take anywhere and get admiring glances. It is amazing what one can do with a little pink foam insulation, a little patience and a lot of imagination. You've got the necessary requisites. 
|
"He fears his fate too much, or his desserts are small, who will not put it to a single touch; to win- or lose- it all."
Montrose Toast

|
|
|
|
|
2020/03/31 16:01:29
Subject: Mac's P&M Shenanigans-- 3/30: LoER Terrain Contest entry complete
|
|
Fixture of Dakka
|
Great terrain there MacPhail. There is no way to tell what those statues were made from originally. Practical for gaming as well. Good luck in the competition.
Exalted.
Cheers,
CB
|
|
|
|
|
|
2020/04/01 12:04:24
Subject: Mac's P&M Shenanigans-- 3/30: LoER Terrain Contest entry complete
|
|
Preacher of the Emperor
|
Thanks, guys! These were a lot of fun. A friend just built the Battle Sanctum and will get me some exact measurements so I can start laying out my scratch built one to match these, plus a few more pieces as well to do a whole table in this theme. I think the tricks I learned this time will help me move even faster on the next ones. Time to drink some more juice!
|
|
|
|
|
|
2020/04/01 12:26:15
Subject: Mac's P&M Shenanigans-- 3/30: LoER Terrain Contest entry complete
|
|
Longtime Dakkanaut
|
Nice work on that terrain, really cool seeing it finished!
|
|
|
|
|
2020/04/02 05:18:09
Subject: Re:Mac's P&M Shenanigans-- 3/30: LoER Terrain Contest entry complete
|
|
Preacher of the Emperor
|
Thanks viterbi, you gave some good vibes when it was all pink foam, so I'm glad the paint didn't disappoint!
|
|
|
|
|
|
2020/04/02 19:17:42
Subject: Mac's P&M Shenanigans-- 3/30: LoER Terrain Contest entry complete
|
|
Ancient Venerable Dreadnought
|
Nice job Mac, really cool that the can double as game aids as well as being great terrain pieces! Looking forward to the table of similar terrain you’ve promised 
|
Goberts Gubbins - P&M Blog, started with Oldhammer, often Blackstone Fortress and Void Panther Marines, with side projects along the way |
|
|
|
|
2020/04/03 12:04:24
Subject: Mac's P&M Shenanigans-- 3/30: LoER Terrain Contest entry complete
|
|
Preacher of the Emperor
|
gobert, a previous themed round of the LoER contest was "Double Entendre" where each entry had to have two modes or functions, and some of the entries were game aids. That got me thinking, and Sisters players now have Miracle Dice and Sacred Rites to manage during the game, so here we are.
The fun test will be how much bigger and faster I can go on the next round. The foam is messy, so I'll probably wait til summer so I can work in the garage. But I'm thinking Battle Sanctum, two quarter round or half round ruins that will link up in a sort of centerpiece temple, and maybe four or six pieces of LoS blocking or scatter terrain. Yay pink foam!
|
|
|
|
|
|
2020/04/04 06:18:45
Subject: Re:Mac's P&M Shenanigans-- 3/30: LoER Terrain Contest entry complete
|
|
Preacher of the Emperor
|
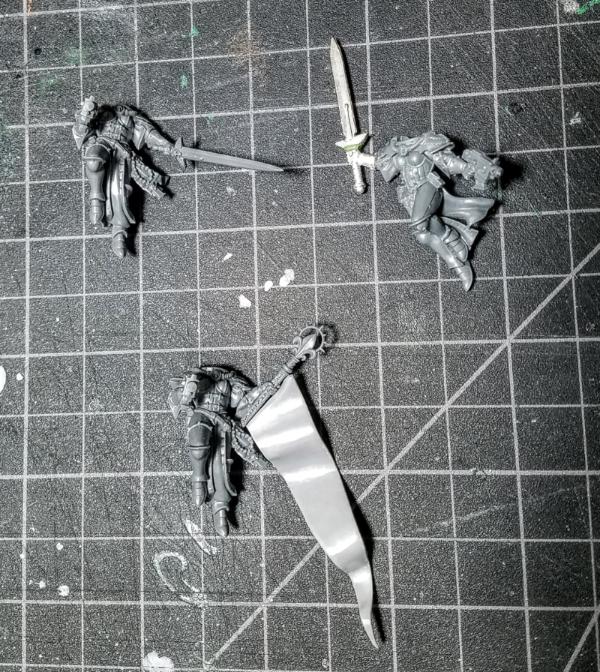
Now that the terrain and painting contests have wrapped for the moment, its time to get moving on the Sororitas boxes I bought. I'm going for five Zephyrim conversions (the Seraphim from the army box), two Imagifiers, and a selection of special weapons to fill out Celestians and Dominions in my new-look list building.
I did some planning and bits-scrounging... I'm still short a good power sword option.
I started with the decisive Zephyrim element, the pennant. I found an old Empire banner in my bits and cut it down to match the Rod from the army box Canoness left over from my chainsword conversion.
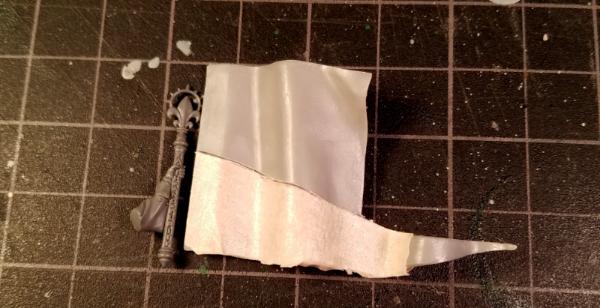
I got the pennant roughly assembled, but with some fiddling left to do. She'll get a sheathed power sword. The second one got the sword from the Sisters box Superior options. The changes sort of break up the monopose symmetry, but not really. Heads I'm going to do some thinking on.

|
|
|
|
|
|
2020/04/04 14:57:05
Subject: Mac's P&M Shenanigans-- 4/3: Zephyrim conversions underway
|
|
Grisly Ghost Ark Driver
|
If you extended the rod somehow behind her, it could look like she was holding a larger flagpole high on the pole, which could be an interesting variant to the (still currently awesome) short-handled pennant.
|
|
|
|
|
|
2020/04/04 15:08:35
Subject: Mac's P&M Shenanigans-- 4/3: Zephyrim conversions underway
|
|
The Marine Standing Behind Marneus Calgar
|
 Gwyn chan 'r Gwyll wrote: Gwyn chan 'r Gwyll wrote:If you extended the rod somehow behind her, it could look like she was holding a larger flagpole high on the pole, which could be an interesting variant to the (still currently awesome) short-handled pennant.
Or add more above the hand, or both.
Right now that’s a lot of flag for a little stick.
|
|
|
|
|
|
2020/04/04 19:29:52
Subject: Mac's P&M Shenanigans-- 4/3: Zephyrim conversions underway
|
|
Ancient Venerable Dreadnought
|
I’d have to agree with Nevelon and Gwyn, it’s a lot of flag for such a short pole. An alternative could be to trim it to be narrower at the pole end?
|
Goberts Gubbins - P&M Blog, started with Oldhammer, often Blackstone Fortress and Void Panther Marines, with side projects along the way |
|
|
|
|
2020/04/04 19:44:51
Subject: Mac's P&M Shenanigans-- 4/3: Zephyrim conversions underway
|
|
Preacher of the Emperor
|
Thanks for the ideas! I think extending the pole is the best option, and maybe trimming the banner a bit. I dont want to get into repositioning the hand, especially because the detail on the rod is so cool. Theres a pretty narrow slot between the jump pack and the purity seals, so the arm positioning is really limited. I think I can heat and bend the banner so it isn't quite so prominent... Automatically Appended Next Post: Here's the other one for size...
https://www.warhammer-community.com/wp-content/uploads/2020/03/cd1afcf6.jpg
|
|
This message was edited 1 time. Last update was at 2020/04/04 19:46:17
|
|
|
|
|
2020/04/08 04:10:00
Subject: Re:Mac's P&M Shenanigans-- 4/3: Zephyrim conversions underway
|
|
Preacher of the Emperor
|
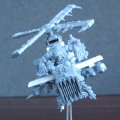
Okay, I think I managed to act on some of your good advice. I trimmed the banner's 'height' (top edge to bottom edge) and also angled the end where it mounts to the pole so it hangs lower. If I can also heat and bend it (hot water?), I may even be able to glue the tip of it to the base for extra strength and stability. I won't go too much smaller because I have an etched brass fleur de lis to mount on it (freehand is not my thing). So she's almost done.
Also, I did another one. With all these glorious plastic kits, did I stop hacking, filing, drilling, pinning, and green-stuffing metal-to-metal joins? No I did not.
Three (almost) down, two to go! One of the remaining ones will also be a metal sword yet to be harvested from a classic Sister Superior model, but I've got an extra chainsword to give her anyway. The last one will be the Seraphim Superior who keeps her sword but surrenders her plasma pistol now that somebody else has a pennant.
|
|
|
|
|
|
2020/04/08 06:20:09
Subject: Mac's P&M Shenanigans-- 4/7: Zephyrim conversions making progress (3 of 5)
|
|
Longtime Dakkanaut
|
Conversion is looking good. Hope you can get it slightly bend to glue on the base.
|
|
|
|
|
2020/04/08 22:43:15
Subject: Mac's P&M Shenanigans-- 4/7: Zephyrim conversions making progress (3 of 5)
|
|
Fixture of Dakka
|
Higher rod to the stand will resolve that little problem.
While I have bent polystyrene pipe with heat from a candle...sometimes you get burnt and I would not risk it with that model or the flag. Hot water has not worked for me all that well either.
CB
|
|
|
|
|
|
|
|
 Finished Tau Sept Cadre
  Alaitoc Eldar Warhost
  Finished Order of Our Martyred Lady - Sisters of Battle
  Finished Necromundian Imperial Guard Regiment


 Da Dark Angelz
 Arakasi vs Infinity


 Ultramarines, 3rd Co. and friends, 16k+
  4k
4k  4k Points
 Competition Index