Disgusting. And brilliant. Honestly incredible work, you should be very proud.
I know there was a little debate, but I think blue for the plasma was the perfect choice - as you said, somehow adds some realism to have a colour outwith the tight scheme.
Quoted for rollover:
Dr H wrote: Thanks Gits', and I got it to work in the end.
Thanks Meph. They're not all matt, there are a few glossy and satin finishes to certain parts... for added "eww!"
If I had weathering powders, I may have tried them. But some brushing over it seems to have worked fine.
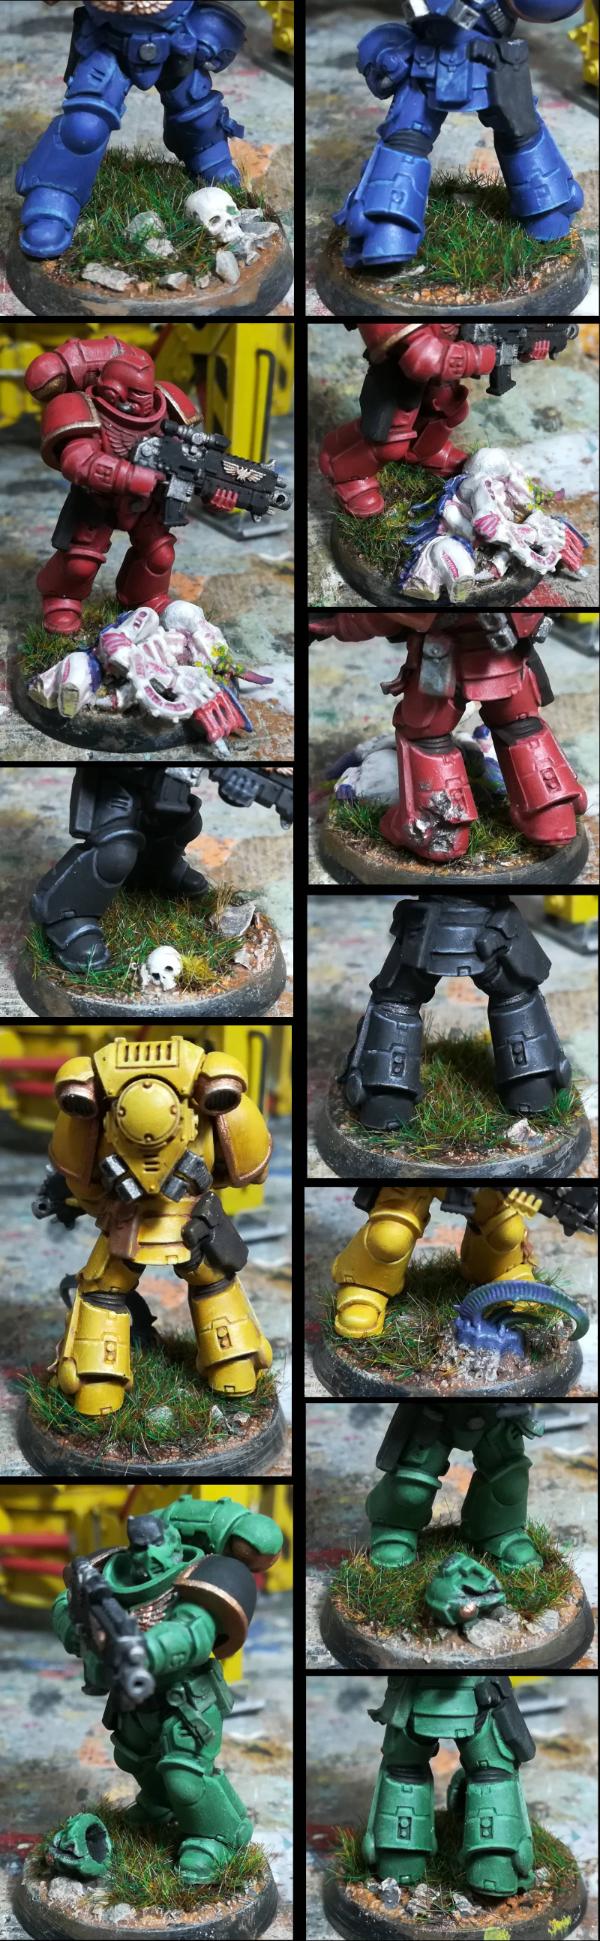
Thanks York'. Yes, that was the idea. This is why I added the grass in two steps.
The "dead" grass now looks distinct as I brushed over it with some brown and then "bone" paint. This may have also removed some of the "summer" grass that might have stuck to the "dead" grass when that was sprinkled on (and therefore making it more green). Whatever it was, the grass now looks like I intended; dying around the marine's feet and leaving bare, dead earth behind.
Somewhere close to 70 photos later, the final show is ready (I went through the photos so you don't have to see all 70)...
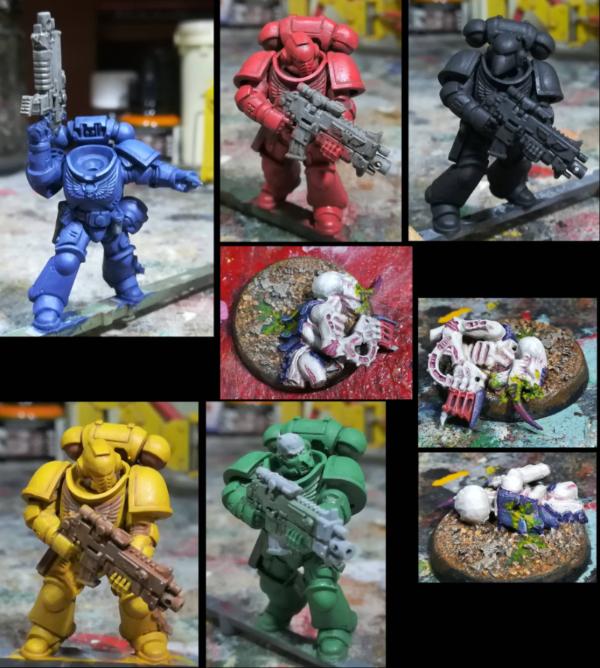
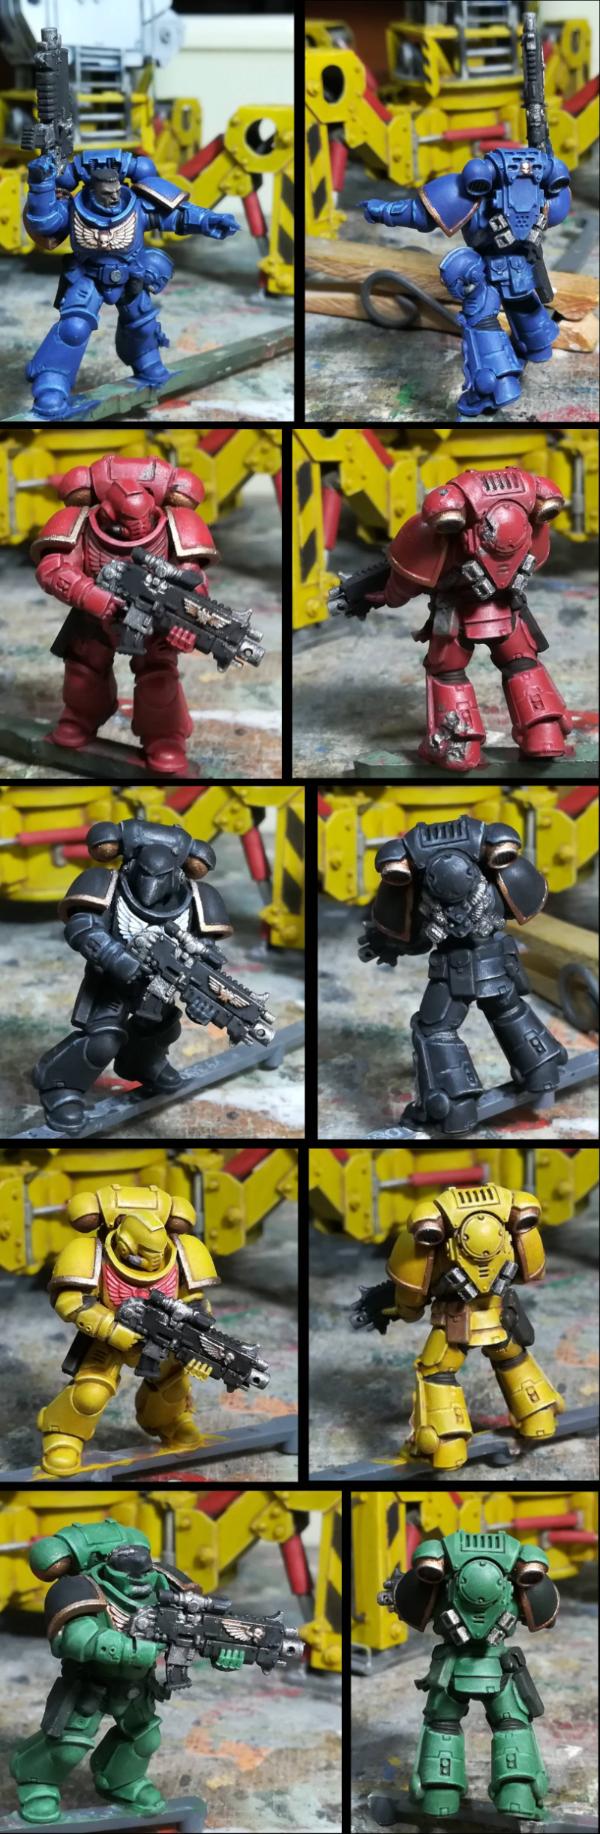
The squad:
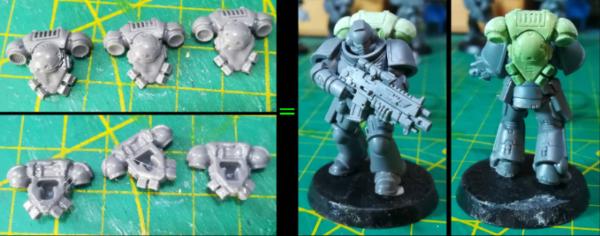
#1; the grenade guy.
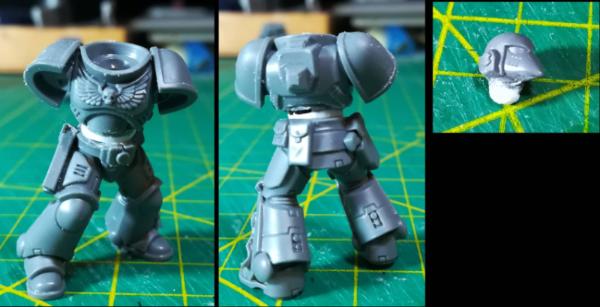
Mostly minor changes; fixes to casting limitations (something done to pretty much all of them, as was adding / improving the damage to their armour), added a 3rd "eye", some smoke for his grenade, and changing the metal tabard for part cloth.
One thing my mum said while I was showing her the grass was "is that a cigarette butt under his foot?"
If you look under his rear foot, there is something that looks just like a butt. Not intended, but it just goes to show how disgusting these guys are; not only are they filthy, disease-ridden, plague carriers, they also smoke and litter with reckless abandon.
#2; the champion.
Quite a few changes; the fly was moved from attached to a horn to sitting on his shoulder, the things dangling from his hood were removed and many tentacles added, and his arm was reposed.
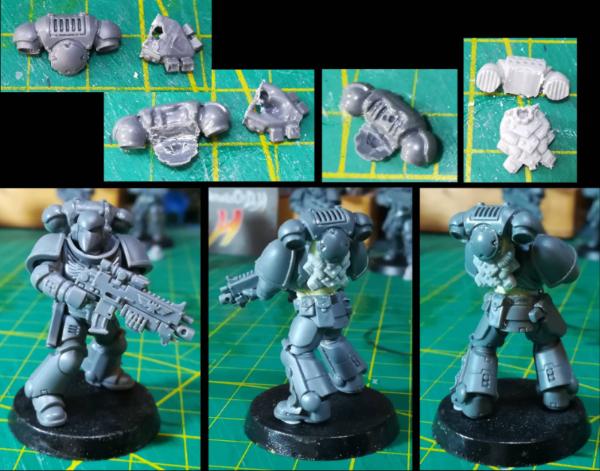
#3; "there goes the hernia" guy.
Repositioned the gun arm to be aiming, changed the tentacle / tongue from the belly to spilling flesh and removed the teeth from the armour break, changed the smiling face on the left shoulder to a skull, and added some tentacles.
#4; bell guy.
Reposed the sword arm, added a tentacle and swapped backpack to make him less bell orientated.
#5; plasma guy.
Added plasma flame, swapped backpack, moved sword, and added tentacles.
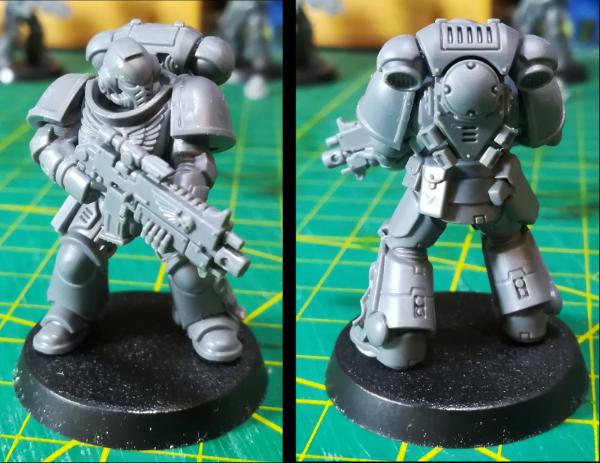
#6; Spiky dave.
Changed tongue from shoulder pad mouth, changed tentacle on left leg, added tentacle with bell to backpack, moved sword to stick through (new) hole in cloak, and changed horns on helmet for spikes.
#7; Smokey pete.
Moved a few minor things, and added smoke.
And there you go. My first nurgle miniatures ever, with my first use of static grass.
The second set of models from the Dark Imperium set, there'll be something primaris next time.
Let me know what you think, zoom in on the photos, and vote on them (it doesn't take long to click on 10 and 10).
I'll have these up in my Etsy shop soon, so dust off your wallets.
inmygravenimage wrote:Spiky Dave rules! Love them. Charge what you would bro. Lots of work there.
Thanks Graven'. Yeah, once you start giving them names, you're going to get a Dave eventually. Well, something is only worth what someone will pay for it. We will have to see if someone else thinks they are worth it.
shasolenzabi wrote:Awesome work! Those guys look like if you pick them up they will give you some form of disease, and add Tetanus with all that rust!
Thanks Shas'. That was the aim.
Red Harvest wrote:Well, I'm thoroughly revolted...
... iin the best possible way
Thanks Red'. Good to hear.
Scarper wrote:Disgusting. And brilliant. Honestly incredible work, you should be very proud. I know there was a little debate, but I think blue for the plasma was the perfect choice - as you said, somehow adds some realism to have a colour outwith the tight scheme.
Thanks Scarper.
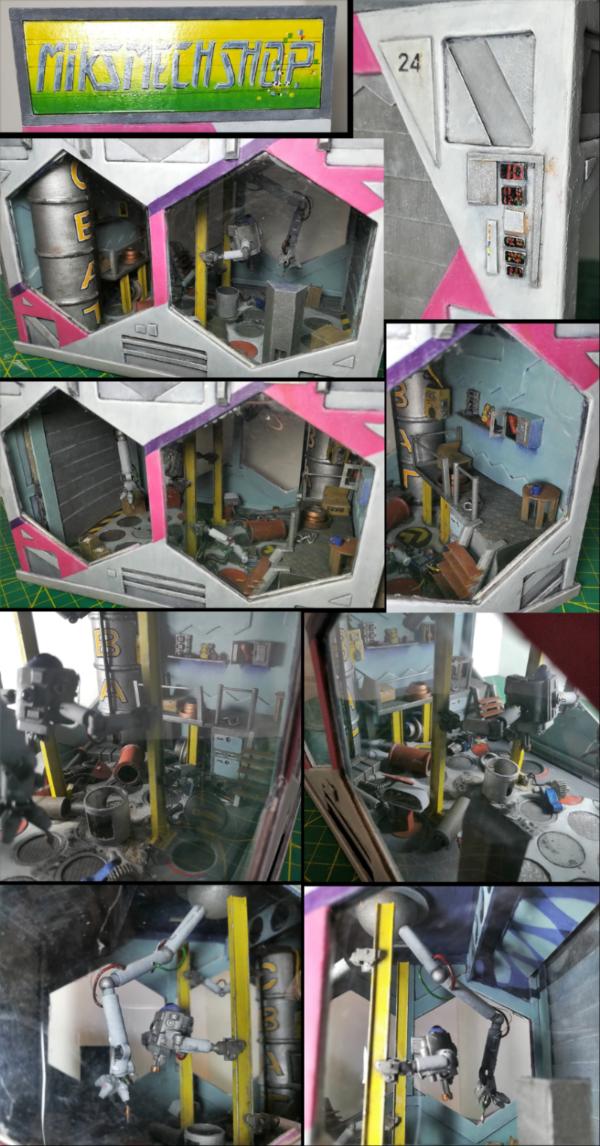
I've been tidying and rearranging my room as I had quite a few piles of "that'll be useful" items.
I'll be heading over to my army's thread soon to finish the Tau suit, and then I'll be back here to finish off a project before starting on something marine-y from the DI box.
In tidying, I've found 5 different projects that are all in the planning and "collecting bits" stages (except for the garage that actually has a form built). I don't like having unfinished things laying about, even if they haven't been started. Get them done and it'll free up a bit more space.
So, Tau suit painting, and then I'll be back here for some random terrain pieces. Stay tuned.
I've been scratching my head over how to finish the flooring off, and have now settled on using some textured plasticard for the majority.
And I've added a couple of your hatches, OMN.
The part circles will be mainly filled in / covered over / open for access to ... things... power plugs... tbc...
In other news: I popped out to see the new Blade Runner. I liked it. Takes it's time, not for the younger "instant" generation. Pretty. Likes it's bass for sound effects and music. Worth seeing.
Finished filling in all the holes in the floor.
Some are hatches, 3 with just "handles" glued on, and one open. There will be some trailing cables attached to it in time.
I also made a console to be used to control / monitor things. I'm going to do the dials the "easy" way and use some transfers I have, rather than spend time cutting and placing disks and rings and squares and blobs to make my own. Viewed through the windows, it'll be fine.
I've also been playing about with the plans for the central garage hoist thing... expect that soon.
Nice progress! The different levels and patterns of discs will definitely add some interest, and the control panel is a nice realistic touch. I always struggle between adding to much cluttery detail for the sake of realism and space for actual gameplay, but I think you're getting a great balance.
Thanks Scarper. I don't intend for much gameplay to be going on inside this. I'm only leaving the top removable in case repairs are needed in the future. There will be much more clutter, but I may leave room as Infinity does seem to like enter-able buildings (there will also be roof access). But no, large windows so that the roof does not need to be removed to see the details, and disclaimer that it's not meant to be removed, so don't blame me if you break something taking it off (but you can if you want to fix something).
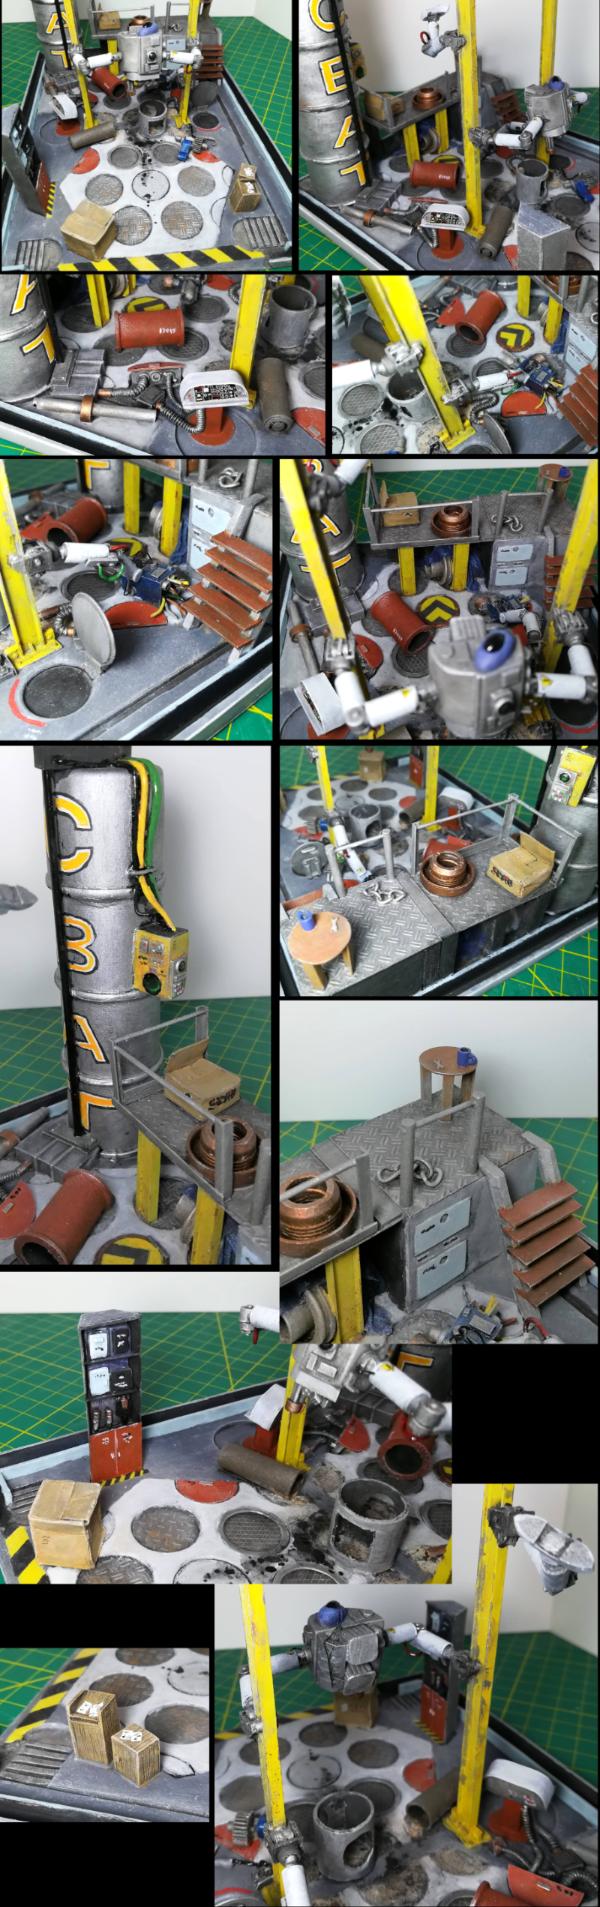
Every garage needs a hoist, and this one is no exception. But for Infinity, it can't be a simple up-and-down job... it needs... robot arms...
Painting will make it more apparent, but the arms are attached to the uprights and are holding the block between them (it's not a legless robot climbing up).
There will also be another pair of arms on the other side of the uprights that will balance out the structure (hence the scalpels weighing it down at present, it's not glued down yet).
This is basically a clever way to hold the (otherwise unsupported) uprights at a fixed distance as it's glued polystyrene all the way across. I may have one of the other arms picking something up off the floor to add another attachment to the floor...
There will be more details added in time; wires, cables, etc.
Thanks Graven'. I hadn't given much thought to what colour anything will be, but there may have to be some high-tech' white on those arms.
and in answer to the question literally no one asked; how do you make those?
Brief explanation:
Take a rectangle of plastic and glue 2 large and 2 small disks of sprue to either side of it (these are the circular injection points from injection moulded sprues, I have quite a large collection of these already cut off); make sure they are all flush to one side of the rectangle.
Glue that side to the side of your chosen upright (I'm using I-beam).
Glue 2 smaller disks each side, within the I-beam (try to make it half the width of the internal space of the I-beam, so that 2 may pass each other), lined up with the upper "wheels" of the above piece.
File these all down so that they are all the same level.
Glue a triangle on top of them so there is a point for each "wheel", cut off the corners to make it look more industrial.
Add rectangles to either side that extend out as far as the far side of the first rectangle (see below).
Add one final rectangle that spans across these two pieces and contacts the central rectangle.
Add rivets.
Add your preferred arm to the middle of this piece.
And these are the additional arms.
The whole piece now stands by itself.
Some wires to be added and then I'll glue it down solidly and add the last cables.
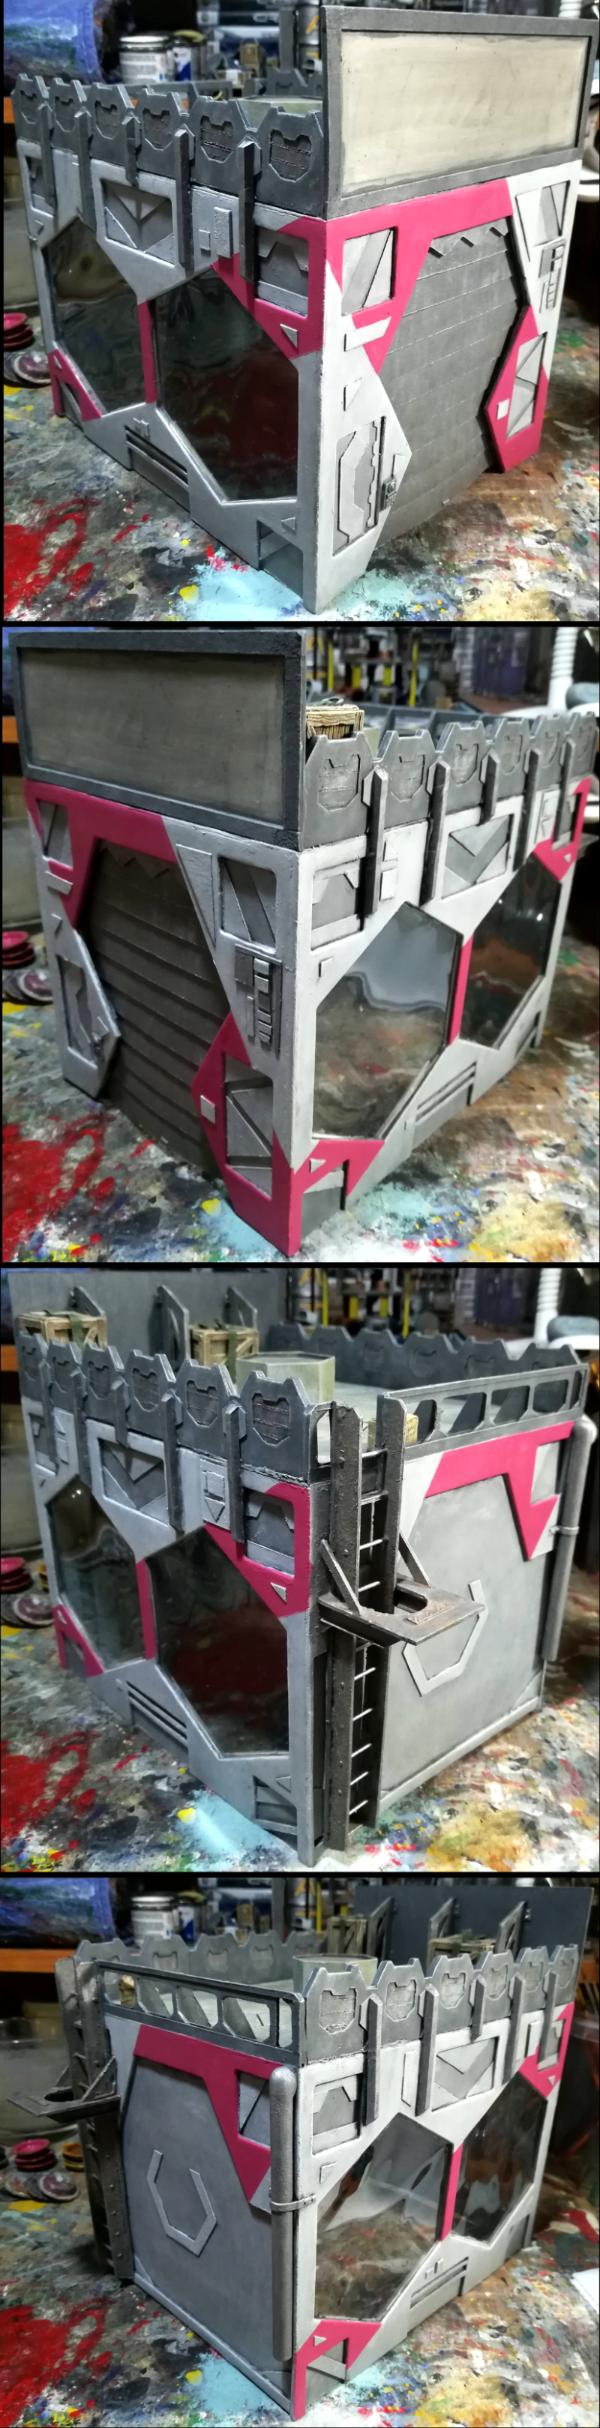
Some wires and some cables added, and I've built up some of the rear of the shop.
I have to keep reminding myself that this is only meant to be seen through the windows.
The rear of this stuff is all rough and open as you can't see it through the windows. The foamcore box in the corner (with the steps on) only has the front face covered in plastic (as well as the textured plastic top, obviously). I'm learning... slowly...
Thanks LT. Good to hear, they're pretty easy to make and can be used at any scale; use larger wheels and they can be the wheels of a mono-rail train... Or a rollercoaster... That should give you some inspiration to go with the idea.
Thanks OMN. Your bits are making many parts of this much easier.
Here's a few close-ups of what we've already seen and few new additions.
Every garage needs a small reception desk, and a small cupboard for the keys and paperwork.
Dr H wrote: I also made a console to be used to control / monitor things. I'm going to do the dials the "easy" way and use some transfers I have, rather than spend time cutting and placing disks and rings and squares and blobs to make my own. Viewed through the windows, it'll be fine.
Hey Doc, if you decide the transfers don't look right, find some console images that you can print out. I've found that to simulate a glass screen a piece of transparent packing tape like this http://www.gorillatough.com/gorilla-heavy-duty-packaging-tape place over the print-out works marvelously. Just have a care about fingerprints. Practice a bit first. This would give the console a touchscreen look, IMHO.
Also, add some sort of joystick controller, or two, to the console?
Dr H wrote: I also made a console to be used to control / monitor things. I'm going to do the dials the "easy" way and use some transfers I have, rather than spend time cutting and placing disks and rings and squares and blobs to make my own. Viewed through the windows, it'll be fine.
Thanks Dave. Not maddening to me, yet. Wait until I get to the things that will hang from the ceiling...
Thanks Gits'.
Thanks Shas'.
OMN; they are ever useful, I'm forever thinking "I need a little console / control panel here, what have I got in my box, oh yes, a big bag from OMN".
Good call on the emergency stop buttons... Thanks.
Thanks Red'. The main reason I considered transfers is because I have a load of spare cockpit transfers from many previous model kits. I've just not found a use for them, so this is the use I've found. Good ideas. Ta.
And now for something completely different...
This was a little side project I've had on the go, in secret, as a present.
More earrings.
This time based on an artist's representation of an inferred description of the possible common ancestor for all flowers. It's what the first flower looked like. More can be read about it here: http://www.bbc.co.uk/news/science-environment-40780491
And this is what I made (with the article's picture included).
Nice little project. Of course, I wonder what the first flower smelled like, given that some of the older plants out there are, hmmm, rather odiferous.
Thanks Gits' and Red'. Recipient liked them too.
You can't really see the green and yellow in the centre of them IRL, so they work as off-white earrings that can go with anything.
For an idea of scale, the earrings are less than 1 cm across (point to point).
On smell, yeah I'm not sure where you could gather any information on the smell compounds involved, archaeologically.
But many would have said that about colour a few years ago, and then they found a way to tell the colours of dinosaur feathers...
And then the above depiction is "inferred" rather than dug-up.
Someone's probably working on what they smelled like from ancestors and trends...
Thanks Comrade.
I have another secret project to get done this week, but I may be able to show some of that and/or I may still get some done on the garage too. Stay tuned.
In other news: I indulged another of my hobbies yesterday; climbing. Had a nice couple of hours bouldering over in MK at Big Rock (climbing centres always have such imaginative names, I used to climb at "The Rock Face" in Birmingham).
Having not climbed for many years it's good to know that I still can. I managed routes up to a V3 (or 6a) which is not bad,, although I don't know much about bouldering grade scales to compare with what I've done in the past.
But I certainly noticed a lack of finger strength though. I'll have to work on that more before I go again.
So no progress for today, and I'm slightly stiff and aching all over.
There's quite a story to go along with the subject of this build, but I will save the telling until the reveal next Tuesday. Although, don't get your hopes up for an epic tale, it's no Hollywood blockbuster.
While the nature of the subject will become apparent very quickly, it will also remain a mystery until the reveal as there is only some minor paintwork to do on it. it's already surprisingly neatly painted and just needs some "realism" added.
Instead, I'll be documenting the building and painting of the display base.
For the subject, I need a base of about 70x80mm.
I started with 4 pieces of foamboard and formed them into a rectangle (should have made it 80x80, then I could save time by calling it a square). I even interlocked them at the corners.
I then added a few other pieces of foamboard to strengthen the rectangle and give a firm base to the centre (the subject is heavy for it's size).
Thick card was glued to the base (of the base) and cut to size.
The majority of the base was then filled in with plaster (to give it a nice heft. (see the first photo below)
The two length of foamboard are just along the top and rest of the cross piece in the middle that rests on the base. All three and now supported by the plaster.
A strip of card was laid across the FB strips to give a flat centre-line to the base. The rest of the base will be slightly angled from back to front. (2nd photo below)
A strip of thick paper was then wrapped around the base to give a clean finish. (3rd photo, see my cute new tiny clamps)
...
There is then a brief gap in the photos.
The spaces either side of the centre were filled in with polystyrene foam pieces (held in and together with PVA/plaster) to give an uneven surface.
...
The rear of the base was covered with my usual basing mixture of dried paint etc. It was also sprinkled with some brown flock that I found in my searches (that will be documented in the reveal)
The front of the base was covered with a piece of felt/grass-on-paper that was found with the above flock. This was pressed onto the uneven surface to give a nice rough field look.
I added a line of "dead" static grass along the edge of the field.
The surrounding paper was then cut away to reveal the 1st photo below.
The track (you know what the subject is now, and yet you don't know what it is) was then glued to the flat centre and the "gravel" was added around it.
Some patches of green flock (found with the above) was added here and there. (final photo)
I'll now paint what's there; the mud at the back, the gravel/ballast, and the wooden things (dyslexic block on the word)...*quick wikipeadia*... Sleepers.
Then I can build the platform piece at the back.
Thanks Scarper. Well, "no paint" is not a problem when the "grass" is already green, the "mud" is already brown, the tracks are already metal, and the sleepers do have some paint on them.
But now, with paint.
I've also included a couple of low-angle shots to try and show the texture of the grass from the uneven surface below.
I'm not building the platform, more research needed...
HO scale? Take me way back. Although we never had static grass BITD. Hmmm, things were not better back then. Looking at the size, I'm guessing a handcar will go on it?
Or a damsel tied to the tracks?
The clamps, FTW! One never, and I mean never ever, can have enough clamps. Old woodworker's adage. True for scratch-builders too.
Ta Comrade. You would then be on a (rail)road to nowhere.
Thanks Gits'. Didn't know you had one. I'm always available to create things for people (it's the whole purpose of this thread, after all).
Red Harvest wrote:Haha, Doc is a Gandy Dancer.
Had to google that. Yes indeed, makes a change from architect, mechanical engineer or disease vector...
HO scale?
N gauge. For those not in the know (and that I had to look it up anyway) that's 1:148 scale or about 12mm for figures (with the tracks at 1:160 or 9mm width).
Take me way back. Although we never had static grass BITD. Hmmm, things were not better back then.
The felt/grass-on-paper that I used is from quite a way back (early '80s at least). But yes, no need to stick to classic methods when new things are available.
Looking at the size, I'm guessing a handcar will go on it?
Or a damsel tied to the tracks?
You will have to wait and see as to the subject. I may have to remember the damsel on the tracks for the future though.
The clamps, FTW! One never, and I mean never ever, can have enough clamps. Old woodworker's adage. True for scratch-builders too.
LT: One of the highest compliments that can be directed at a model is that it looks to be a larger scale. Thanks.
Theo': lol Very true.
And one last wip for you lot. It's all done to be revealed tomorrow. But here's the tiny figure, complete with shading and highlighting, and a new pound coin for scale (for those that know how big the new pound coin is...).
The timetable behind him will get a bit more work on it to tidy it up (coz' I can't leave well alone).
Stay tuned for the full piece with the mystery subject tomorrow.
I have no idea how big a pound coin is, but I do know N scale. I have a few N scale train cars. (RR stuff was much more popular when I was a kid. Now it is all but dead. Sic transit gloria viae ferreae? Latin is not my strong suit, so this could be wrong.)
Am I seeing glue residue around the gandy dancer's feet? He's getting a tool in that hand, no?
Smaller than a Ningi. For a better idea of the size, the base is 80x70mm. The whole thing will fit on the palm of your average hand.
...but I do know N scale. I have a few N scale train cars. (RR stuff was much more popular when I was a kid. Now it is all but dead. Sic transit gloria viae ferreae? Latin is not my strong suit, so this could be wrong.)
I know nothing of Latin; have never been taught it and I don't have much of a grasp of language in general (can blame the dyslexia for that), although I did get 'C's for English and German GCSEs, so I ain't totally not clever wiv words like.
Google, however, gives me a satisfactory answer (didn't have that when I did my GCSEs).
Am I seeing glue residue around the gandy dancer's feet? He's getting a tool in that hand, no?
We can assume it is glue, although I used liquid poly' to glue him down. I didn't see it until I'd painted the concrete. Not to worry, a bit of white paint and it's now a bit of rubbish that he's stood on.
Hadn't thought about putting something in his hand, I just see it as him gesturing at the train. Or maybe he just dropped the piece of trash.
...That's what she said. Much to our hero's dismay. ...
OneManNoodles wrote:... I know how bloody tiny that scale is, I'm impressed I know I shouldn't be by now but ...
... you even added weeds to the grass!
Of course. Can't have a flat (even if I've made it not "flat") expanse of ground without some areas of interest.
Now I'm left to wonder why there is a man in a green hat leaning on an imaginary bar, should we call the transport police?
Always keep your distance from crazy people. I'll just get my gingham dress.
Right then, it's all done and handed over.
I promised you a story (and warned you it wasn't exciting), and this is a personal tale.
First, the subject reveal: You all knew it would be a train (or train related), it is in fact a Shunting engine.
Why a shunting engine? Because it doesn't have any associated carriages that would need to be updated to match it. It's a stand-alone engine that would sit nicely on it's own, on a base.
I had intended to completely update the paint-job, but as it turns out it was actually pretty tidily painted. So I've only updated the paint work: Shading with a wash, highlighting with a dry-brush, the black areas and the white hand rails.
Why is this such a personal item?
When I was in single figure years, a visit to one set of my grandparents meant one thing (amongst other advantageous things for a grandchild), and that was trains. Across the bottom of their garden was a train track, so occasionally you would get a close-up view of a train going by. But upstairs was the real treat; in their bedroom was a door to what most would have used as storage, Granddad used it for something else (as well as some storage).
Upon stepping through the door you would enter a space that ran the length of one side of the house, but was the width of a corridor, there were no windows and it was lit by a series of bare lightbulbs. It always felt, to me, as a secret or hidden space, and inside was the largest model train layout I’ve ever seen in person. A tabletop ran along the wall, the full length of the house and was about 2 foot in depth. The back wall was covered with paper backdrops showing rolling hills etc. The area was fully contoured with hills and rivers and over and around these were roads and, of course, train tracks; snaking back and fourth across the landscape and even passing through a thin dividing wall to a store room via tunnel entrances. The landscape was covered with cars, boats, houses, shops, churches, everything you need. I could have watched it all for hours.
After my Granddad died, Nan moved nearer to us and the trains were boxed up. They were then inherited by my parents when she died.
My Dad intended to build his own layout and started with a table getting as far as the basic layout of the terrain, but life (as so often) gets in the way and the trains stayed in their boxes for years, until last year… or so I intended.
Dad had retired, and I thought it’d be a good idea to kick-start him back into the hobby if I pulled out a train and gave it a fresh lick of paint with my new found skills.
However, we couldn’t find the trains. Dad was sure that they were in the loft, many of the buildings and the track were found in the garage, but no sign of the trains or their rolling stock. In the end we had to assume that one of the many contractors that have been in the house over the past decade or so, laying loft insulation, installing solar panels, etc. had stolen them. They were all gone, and what we were left with was worthless without them.
Spoiler:
You will have seen the small hut I painted up at that time and nice as it is, it felt a bit worthless as it was never to be used with the trains I intended it to be used with.
Until last week;
Mum and Dad were away and I decided to track down another abandoned project of my Dad’s, a cast resin chess set. I knew we’d found one piece while looking for the trains previously, so I just had to dig it out of the garage, clean it up and paint it (with a view to sculpt future ones to create the set; the moulds have long since degraded and been thrown out).
What happened while I was looking for that?
I found the trains.
All 19 engines, all their rolling stock, more buildings, some other larger scaled trains, and all the vehicles and little people for the terrain.
The plan changed and the birthday present became this, a display base for a single engine and the news of the found trains, thought stolen.
The morals of the story?
If you are looking for something, look for something else.
If you can’t find something where it should be, look for it where it definitely shouldn’t be.
If someone says that what you are looking for is in 2 boxes, ignore them and look in any and all containers.
And with that, the photos:
Arty angles.
All-round, with and without engine.
Spoiler:
and some close-ups.
Thanks.
Now it's back to the garage (again) and lets see if I can finish it before I need to start on Christmas presents... place your bets now...
Now I feel a compulsion to go rooting around in my basement for my old train stuff. Maybe this week-end...
Wrong moral though. The moral is: keep looking until you've found the thing, or until you have looked everywhere. ( a moral that I have, alas, had to re-learn more than once )
Thanks Theo'.
I've seen you mention your train table... not seen any pictures yet... Yeah, it was an amazing layout (and even more so stuck in my memory from childhood) that was even more special the way it was hidden away in a secret cupboard.
Thanks Gits'.
Thanks Red'. Yeah, do it, build something, show us...
Ha, yeah but looking everywhere is so much work. I prefer to store things in places where I know that's where I'd store it if I wanted to store it.
Back to the Workshop (I have been distracted trying to finish my latest FO4 settlement build, so no major progress).
A pop-up tool and storage shelf:
The thought being that it can drop all the way into the floor, hopefully the piston in the back and the top being painted to match the floor will help tell the story.
Just some scattered parts (for the thing being built) and small details (a mug of coffee etc.) to add and then on to the roof-hanging things (as yet unknown) before moving back outside.
Dr H wrote: Ha, yeah but looking everywhere is so much work. I prefer to store things in places where I know that's where I'd store it if I wanted to store it.
I prefer to do so too. However, there are those <glances over shoulder to make sure SWMBO is not around> who relocate things without telling me.
Been keeping an eye on the train and want to say how great it turned out. The picture with the Ork made me laugh, reminded me of an old Godzilla movie.
Garage is really shaping up. Keep up the good work!
Apologies, I've been neglecting my hobby space and you all. There is a reason, see below. First some replies:
Red': Yeah, other people are such a pain sometimes.
Thanks York'. I did consider using a Tyranid for scale, but they are all in need on a touch up on the paint... one day. More on the garage soon.
Thanks LT. I'm glad you all liked the story, it was quite the personal project. More to come in time.
Thanks Graven'. Floor will be painted to show the areas... how will be decided later...
So yes, no model progress... But ...and that's a big "but"... I have completed a build elsewhere. Where? In the virtual world of Fallout 4.
My Vault 88 build is finished. I've recorded a tour for YouTube and I've uploaded the blueprint to the Nexus for anyone to download to their game (you will require a long list of DLC and mods for it to work). The vault is very large and so the tour is quite long, so I recorded it in 4 parts: The setup and recording, checking, recording, etc. not to mention the building, has taken a great many hours, so I appreciate any and all views.
And the link to the Nexus mod: https://rd.nexusmods.com/fallout4/mods/27830 Also, there are quite a few screenshots on the Nexus page, so you can just pop in there to have a look at those even if you don't have the game. ... I wonder... Large-tastic pictures...
That, Gits', is the glory of mods. That tv is the same asset that is used in the pre-war home at the start of the game.
I then glitched that into a table that is itself glitched into a rug that I've positioned to hide the slanted ground beneath. All with console commands.
I find it very similar, in a way. It's just a matter of arranging pieces to create a unique whole project.
2 major differences: In-game, nothing is set in stone, you can always move something later.
Unlike modelling, you can't cut anything. So while I can push the back table legs into the ground and hide them, I can't do something similar next to a thin wall if I can see the other side.
Thanks Comrade.
The problem with adding music to YouTube videos is that if you're not careful someone will file a copyright claim and monetise your video, and that means adverts (and I really hate adverts). If anyone's going to get money from my effort, it's going to be me.
The way I see these videos is you can add your own music by playing something in the background. It's what I'd do. You may not like what I choose (it'd be your bad taste, but that can't be helped )
Also extra sweet train stop. Just a perfect 8cm. With excellent detail.
Thanks.
Progress on the workshop (delayed due to the other project below...).
I've added another robot arm, this time hanging from the ceiling.
This is the arm that does the work; welding, cutting, etc... so it has many attachments and a greater range of motion than the arms on the rails.
It's not glued to the ceiling yet, just press-fitted into the ring (that is glued to the ceiling). It's position may change slightly.
There will be an associated box on the roof above it when I come to it. That large ball is meant to penetrate the roof and be able to fully rotate. It's just easier to glue it on this way.
In other news:
You know when you get an idea for a project that just won't leave you alone and you must do it so that you can stop thinking about it?
I had one of them.
So the garage was put to one side for a few days (again).
This was not modelling though. It's a functional 1:1 project in wood.
After my visit the other week to the (not so) local climbing centre, I found that the main problem I had was a lack of finger strength. There were many holds that I could have used back in the day that I could no longer grip.
So I wanted a way to train my fingers.
I have dumbbells and a chin-up bar that I can train my arms with, and I can squat etc to train my legs, but fingers...
Well, I do have a pair of sprung finger strength training things, but they're not doing the job to the level I want.
I wanted something I can hang from, comfortably, by my fingers. To use my bodyweight to train my fingers. After all, they need to be able to take my bodyweight for climbing.
Research led to fingerboards: A board or block that has various sizes of slots, rails, holds that you hang from with your fingers.
While I could buy a fingerboard, they are not cheap.
I did find some that were made of wood, and that led to making my own from the wood in the garage (our real garage, not the one above... that has no wood in it).
One thing led to another, and 3 days later I have this:
(large facebook pictures ahead)
Spoiler:
That's 3 rows of various thicknesses and various hold profiles.
A lot of screws the hold it all together, the holds on to the boards, and the whole thing to the doorframe (together with wedges between it and the walls).
I'll also position my chin-up bar above it so I can climb up the board to the bar, do a few chin-ups, and climb down.
Closer, side view:
Spoiler:
And some hold examples (I am cheating with these photos, I'm still standing on tip-toe, not hanging):
Spoiler:
I can't currently use all of these, especially the smallest, but the aim is the improve enough to use them all.
I'll have to start thinking Christmas presents soon, so the garage my be put aside again before the finish, but more to do on it soon.
I've got the scattered junk in and I've moved the robot arm (now glued in as I have a cunning plan to paint it).
View through the windows:
And without the roof/walls:
Also a view of the shelf brackets I've added to the rear wall (shelves to be added after painting them) and the table with coffee cup (to be filled) and spanner.
That actually appears to be the interior done... on to the roof then...
Man Dr. H, you have been so busy, I have not checked here for a bit and you have all these projects going at once. First, very cool that you do rock climbing my brother used to do quite a bit of that years ago. He wanted me to give it a go but I never took him up on it. Second, that garage is such a great piece of terrain with all the customized goodies in it I cant wait to see it finished.
Bit of ADHD going on here :O the building, the computer things, and the climbing aid. All very cool.
Krazy Koalas they are.
Question is about internal access to the building. How durable will the removeable roof be with that arm on it? Can the arm also be readily removed? I see it breaking during a game.
Another point to consider in making it *playable* terrain. Whenever there is a large raised surface area, like that on your building, players are going to be rolling dice on it. Some sort of barrier -- a railing perchance?-- to keep dice from rolling off the roof might be an attractive feature. Or fill the roof with enough greebles that players are not tempted to use it as a rolling box.
Can't wait to see paint go in that interior.
Intrigued by the way you joined the floor with the walls. It's a method that I've not used in ages. And then for making wooden boxes, not terrain. I see it as useful now, for perhaps making wall sections removeable for internal access.
Sign-of-life-post.
Went boozing at the weekend, so no progress on anything.
Yorkright wrote: Man Dr. H, you have been so busy, I have not checked here for a bit and you have all these projects going at once.
Yeah, I like to have one thing at a time, from start to finish, before starting the next. But life can throw a wrench into any plan. There's only 4 projects sitting to my side that I want to finish before starting something new; you've only seen 2 of them (this garage, and the Mononoke wolf rider conversion). The other 2 are in no state to be shown yet.
However, Christmas is attempting to sneak up on me and I'll need to start on the presents for this year soon (this week) so I don't have to rush anything.
First, very cool that you do rock climbing my brother used to do quite a bit of that years ago. He wanted me to give it a go but I never took him up on it.
I've enjoyed climbing since I first tried it back in Cub Scouts, went every chance I had. Then at Uni', I was going every week and got pretty good.
But when I started my PhD, I didn't have much free time to go and most of the people I used to go with moved away (and the climbing gym I used to go to closed).
So I've not been climbing (apart from one random visit) for 8-10 years.
I found a YouTube channel that shows the climbing world cup events and that sparked my interest again, and now that I've got myself down to a good weight again I started exercising to gain the strength I knew I'd need, checked the local climbing gyms and went climbing again. My gear was older than some of the youngsters climbing there.
As soon as I walked in the door and could smell the climbing (literally, the smell of chalk), I knew I'd missed it.
Can't go as often as I'd like, but some more training and I'll pop in every now and then.
Second, that garage is such a great piece of terrain with all the customized goodies in it I cant wait to see it finished.
Thanks. You may need to wait a while, but this one has been ongoing for quite a while anyway, what's a few extra weeks...
Red Harvest wrote:Beheld!
Bit of ADHD going on here :O the building, the computer things, and the climbing aid. All very cool.
Yeah, life finds a way... to complicate things...
Thanks.
Krazy Koalas they are.
Good to know I'm not wrong then.
Question is about internal access to the building. How durable will the removeable roof be with that arm on it? Can the arm also be readily removed? I see it breaking during a game.
I don't intend the interior to be used in-game, hence it being quite filled with details. However, if someone wanted to take the roof off to use the interior, they can.
The join between the walls and the floor seems to be pretty durable already and it's not painted or sealed yet (so taking it off and on is not much of a worry). If you slot the rear wall of the roof piece into the rear of the floor piece and "hinge" the rest onto the floor there's no problem with anything colliding with the arm... except for any mini's you may put in there.
The arm can't be removed (won't be removable once I've glued that roof piece on), but is pretty durable. I've not broken it yet, and I usually break things during building, especially the number of times the roof has been on and off (it's a pretty good test ).
I wouldn't let a child do it, but anyone that cares for their figures shouldn't have a problem with replacing and removing the roof.
Another point to consider in making it *playable* terrain. Whenever there is a large raised surface area, like that on your building, players are going to be rolling dice on it. Some sort of barrier -- a railing perchance?-- to keep dice from rolling off the roof might be an attractive feature. Or fill the roof with enough greebles that players are not tempted to use it as a rolling box.
There are plans for the roof. There will be a railing (I've been looking up reference shots for the style I need to fit in with Infinity), and a ladder up the back of the building and things for mini's to hide behind and snipe. I'll be sure to make the railing sturdy.
Can't wait to see paint go in that interior.
Don't we all. Just the roof to finish off and then painting will happen. Christmas to do first though...
Intrigued by the way you joined the floor with the walls. It's a method that I've not used in ages. And then for making wooden boxes, not terrain. I see it as useful now, for perhaps making wall sections removeable for internal access.
Idea stolen borrowed.
Ta. Good to hear. I chose this method for a few reasons.
1. to make the walls into a solid structure I wanted to join them with something and that became the roof.
2. I wanted the floor separate from the walls so that I could go in and detail the interior without them getting in the way.
3. I didn't want to make a "base" for this piece so that it can be used with the city terrain mats that seem popular for Infinity (and other games). This can be placed on any street corner and fit in perfectly.
4. The lip around the base serves to orientate the roof piece, hide the rough lower edges of the walls, and look like the siding of many buildings.
You just have to put in some thought about how things are placed inside so that the walls can be easily put on and off without catching on something. The inside lip helps keep things away from the edge.
Again, it's all made up as I go. Learning for the future.
Climbing is awesome. People too often these days let their bodies ride through all the stress witbout using them. Bodies tend to wear away like that. Go climb more.
I like your garage a lot. Fancy and busy.
The answer is dr. To make your own music. I will be waiting. Vault raise the ceiling.
cormadepanda wrote: Climbing is awesome. People too often these days let their bodies ride through all the stress witbout using them. Bodies tend to wear away like that. Go climb more.
Yeah, more climbing for everyone. And it's not all in the body; You have to use your brain too. They are not called "boulder problems" for nothing.
I like your garage a lot. Fancy and busy.
Thanks Comrade.
The answer is dr. To make your own music. I will be waiting. Vault raise the ceiling.
I have dabbled with making music, electronically (people tend to take instruments off me quickly) in the past. I have some software to make music; but it only runs on windows xp and I couldn't get it to run on 7, nevermind 10. :( I could fire up the old xp PC, but it would require some work to wire it up and get it running.
But then, making music, that'll be even more time that I don't have, and I have lots of spare time...
Anyway. I made a thing.
I would like to think many of you will recognise it, even if it's not a perfect replica.
I realise that I didn't include any scale reference. It's about the size of a small chicken egg...
I have plans for a second... stay tuned.
Now don't start that again, or we'll end up with all kinds of llama comments. Good to hear though.
Yorkright wrote: Looks a bit like a face huggers condo.
It does indeed.
Gitsplitta wrote:That's an impressive sculpt. Very true to type.
Thanks. The tentacles are a bit more eggs-agerated than they should be, but were necessary(-ish) to create the flat base.
The bulk of the first egg was built upon a "failed" attempt of the not-faberge egg I created a while ago. Just a plaster cast of basic egg shape.
The texture of the surface was pretty easy; just adding small lumps of putty and smoothing them into the surface. Random sizes and placement.
The lips were the only really challenging part, but they are just strips of putty laid on and blended in.
The next stage for this project was to make a mould with Oyumaru (have I told you how much I love this stuff...?) and cast up a hollow version. I then glued in some polystyrene foam (as it was on hand) to give me a base for the "filling". That was produced with PVA and superglue dripped on as it dried.
And I've just added the open lips (there's a bit more stringy-goo texture to add between them yet).
The bottom will be filled in and be flat.
There's also an inhabitant to sculpt...
I do have 2 other projects on the go at the moment, but can't show them. And two more in the planning stage... (not to mention the garage that's been put to one side again).
In other news: I have also migrated my PC over to an SSD from an old SATA II HD (that was about 4 times over the average HD lifespan). Very easy and painless process in the end. In case you haven't noticed, my PC is my personal money sink. Some people travel the world, other's may improve their homes, for many of you it'll be this hobby... I upgrade my PC.
Gitsplitta wrote:... Should put a face hugger launching out of there.
Dr H wrote: ...There's also an inhabitant to sculpt...
It's almost as if you read my mind... See below.
Thanks Comrade'. Glad to hear they are recognisable and that I am horrifying.
Progr-eggs-s...
The legs are lengths of 0.75mm plastic rod and blobs of superglue (to hold and to form the knees).
Not much more to do on this, will see how it looks with primer on it and fix anything that shows up.
One other project also done (but can't be shown).
One project part done (and can't be shown).
Two more to start... and will likely be shown...
Thanks Graven', Gits' and York'. (you could start a band with a name like that )
Egg's been primed and black-ed. I'm happy enough with it to not fiddle with it further.
You can now see the blobs of glue at the leg joints better.
And the next project is underway.
Internet points for whoever can guess what this is going to be...
I cut holes in those internal supports to save on plastic. Not something I've remembered to do before.
Apologies for not dropping in on everyone's blogs for a while. Just a bit busy at the mo.
More blocking in the shape (to be covered with putty to give the final shape). Rough is fine at this stage.
And paint on the eggs:
It's interesting that upon actually studying screenshots, the eggs are not a dark as many people appear to think (if you look at the eggs for sale).
Looks like a car from the new blade runner movie, not seen the film, just stills that appear to fit with the design direction of the original movie somewhat.
Beautiful work so far.
Fantastic work on the xenomorph eggs as well, they make me want to play samarost 3 again for some reason, must be the texturing.
Sorry Graven'. It's in the strict definition: I see "Spinner" as the make of flying car, like Ford or Peugeot. In the new film they are Peugeot's Such is marketing.
Yeah, it's the new Peugeot Spinner from BR2049
Thanks York'. Here's another photo to creep you out.
The eggs are pretty much done, but you'll have to wait until after Christmas to see them in all their glory.
Thanks OMN.
Internet points to you for being slightly more specific than Graven'.
And minus internet points for not seeing the film. I would recommend it.
The not-spinner has had it's first addition of putty, now starts the slow process of adding and waiting...
Didn't scare me off (perhaps a shiver ). Egg and contents look great, can't wait to see them all. PUG is definitly coming together, especially since I know what is.
Progress on the Pug.
Carving out the windows and made use of one of my new Dremel engraving bits for the recesses at the front (coz if was new and I'd forgotten to cut the hole before gluing).
Oh yeah, I've got to do one of the bottom too... *sigh* Deep breath...
Really like the current hover car... your sculpting skills have really developed - browsed the last 63 pages while burning some down time in the office today.
kernbanks wrote:Really like the current hover car... your sculpting skills have really developed - browsed the last 63 pages while burning some down time in the office today.
awesome work and an inspiration.
Great to hear. Welcome to my little corner of DDakka. Good effort on making it through what must be quite a random assortment of projects spread over 63 pages. Thanks for taking the time.
If you're bored next week I have another blog that's even longer...
inmygravenimage wrote:Looks really slick chief.
Thanks Graven'.
Ruglud wrote:Alien eggs are excellently gross - great job. Looking forward to the bladerunner hover car (i haven't seen the new film yet)
Thanks Ruglud. Yeah, not enough people have seen the film. True, it's not for everyone, but I'd recommend it, and I don't recommend many films.
Progress on the Pug.
We're on to details now, not a huge amount of work left to do. Although, I do have to mount it on a base to match the previous one... still thinking about how to do that (as in where I should attach it, rather than the method).
Some small lights and some vents to do, and then the basing...
I've also started on the final present project. Not worth showing yet.
Thanks Comrade.
The dilemma I had for this one was that there's no thruster fire or even smoke emitted from the Pug in the film. Unlike in the original BR where there's a nice puff of smoke when one takes off that was the inspiration for that model.
But I felt to link the two models together It'd be nice to have them both flying at about the same height as they are about the same scale, and as I dislike the clear-ish flying stands I need to hide them. So smoke it is.
However, slight change: The Spinner model has the smoke straight out the bottom as it was in BR where it takes off vertically.
The Pug though, is a faster, more dynamic-looking vehicle, so I'm angling the stands and will have the smoke trailing behind to give it some motion.
The last details added (lights mainly) and the stands fitted (not glued to base for ease of painting... I am learning, see).
That mongrel of a base will be covered with "smoke".
And the last Christmas project is some terrain... at N-gauge.
I had a rummage in the recently found terrain and picked out a Switching house (or whatever they may be called, if it is actually meant to be one in the first place...).
It looked like it had seen better days and so was prime for a rescue attempt.
Here you can see that it's quite rough in places and has some excess glue that's discoloured much of the brickwork (see the light patches).
I started with scraping off the excess glue, which led to a couple of walls breaking off (hence the "exploded" view ).
I also attempted to re-scribe the brickwork in the cleaned up areas and they are looking ok, but better. Will see how it looks when painted and I may need to hide some with plants.
Then I decided to add "glass" to the windows.
So why have I left the final wall off?
Well you can't have windows without an interior can you... From the glue line inside it looks like it did have one originally.
Next job then, to scratch-build an N-gauge interior... with a line of track switching levers and whatever else is supposed to be in there... Yeah, no problem... maybe.
Thanks Graven'. It's turned out to be a pretty effective way to acquire presents for the family. Why buy something that anyone can have, when I can produce unique items.
Ha, no fidget spinners were harmed in the making of this not-spinner.
Ha, Ruglud. While I know it's possible... it just wouldn't match the previous Spinner.
Progress on the Switching house.
And a scale shot.
Levers to add along the front edge of the floor (which is currently removable) and then a scattering of small items to give it a lived-in look.
You can also see that the Pug has started to be painted; primed and black-ed.
There's me waiting to see what you all think of the levers I've added to the switching house, and then I notice that I'd not added those photos to a post for you all to see...
So, progress has progressed beyond what I was going to show you... but is now up to date...
Switching house.
I'm not going to go mad with the painting of the interior as it's only going to be "visible" through the windows. It's just important to give things contrast so that they show up.
And the Pug.
Those that have seen the film (or at least the trailers or maybe just some pictures) will understand the colour choice for the windows here.
As another example of why I dislike the clear flight stands, they have both broken off at the top and I've had to pin them. Good thing I'm covering them up then, isn't it...
Thanks Graven'. I stopped short of making the switches from plastic rod with a piece of wire for the release lever. I thought about it, but it won't be seen.
Thanks York'. Had not heard of that movie, so no.
I think I can call the interior done.
Many angles and lighting conditions to show everything.
Now to close it up, mount it on a base and paint the exterior.
Hmmm, what happened to Doc? He would have carved those bricks in that switching house from sprue, instead of using the pre-formed stuff.
I've found clamshell packaging makes for better windows than old CD cases, but it takes a bit of fiddling to get it right. It's rather resistant to glue. It often needs some sort of mechanical fastener.
Red Harvest wrote: Hmmm, what happened to Doc? He would have carved those bricks in that switching house from sprue, instead of using the pre-formed stuff.
Ha. Consider it a restoration job, not a scratch-build. I like the idea of breathing new life into my Granddad's things. There will no doubt be opportunity to scratch-build some things to go along with them one day.
I did have to re-scribe quite a bit of the brickwork though. That's nearly carving.
I've found clamshell packaging makes for better windows than old CD cases, but it takes a bit of fiddling to get it right. It's rather resistant to glue. It often needs some sort of mechanical fastener.
I'm certain it will all be superb.
This was something similar to clamshell packaging. I have a box full of "useful clear things"; I don't know exactly where most of it has come from.
As it wasn't going to be seen from inside, I made do with a rough job of attaching it. The excess plastic allowed me to glue it away from the visible areas and avoid smears/fogging where I didn't want it.
Thanks.
Next year, build a(n) N scale locomotive.
We have plenty of trains already. There will be plenty more things to build at this scale in the future.
The windshield on the spinner is just right.
Thanks. Turned out well. Took many layers, all blended into the previous layers. The first 2 or 3 layers were not smooth at all. Probably about 7 or 8 layers in total, and 3 of varnish.
The day approaches,
Have a good and merry Christmas, Dakka'.
Hope Santa (or Satan) brings you all that you desire (or at least something nice).
And here's the final photos.
In no particular order...
The N-gauge switching house:
Robin Earrings:
Eggs:
and with more light and angles...
and scale shots...
The Pug, Not-Spinner:
More angles...
And there we have it for another year.
I'll be returning (again, again...) to the garage soon.
I'm acquiring another desk soon to expand my work area. This will require rearranging my room to accommodate it and make best use of the space. Expect delays.
Thanks for sticking with me for another year, welcome to the new arrivals, and I hope you stick around for the next year.
So many projects, so many ideas, so little time...
I hope you learnt something useful from my posts.
Very nice job on the Pug and I love the basing! I messed about with cotton balls trying to make smoke for Napoleonic Royal Horse Artillery rocket troops- this that you've done is very well execured and gives the car a sense of motion and speed.
No pictures today.
I'm about to rearrange my room to fit in the new desk. This involves unplugging all cables, moving everything (mostly) out of the room, moving current desk, building new desk (without instructions), and moving everything back into the room... Room-Tetris... Go!
Some replies before I unplug the PC:
Thanks Meer_Cat. Yeah, the smoke on this on turned out well. The trick... don't mess with it too much. I spread glue over the base and stands and then poked on the cotton wool with the intention of arranging it once the glue had dried. In the end, I only teased a few bits out to make it fluffier, the rest was as it appears above.
The angle of the stands and the tailing smoke was to give it that sense of motion. Glad it worked out.
Thanks Red'. I have some stuffing too. But for this scale, what I have is too coarse. Cotton wool only just cuts it.
Glad you liked the earrings.
Red Harvest wrote:... Even if those really are not properRobins
Bah, certain iterations of Google would disagree with you. Yeah, everyone was happy indeed.
Thanks Graven'. Well the earrings needed a scale comparison. I think she looks happy with her earrings...
Thanks York'.
I'll see you all on the other side of Room-Tetris.
Room-Tetris is mostly complete. The final small pieces will find their place with use.
Not the desk I would have chosen, but it was free and it does double the available work space.
Before and after photos below (in true form for before/after photos, the after photo is better lit and has had more care over it's presentation )
I now have a dedicated building area (left desk, with new cutting mat... Oooo!) AND a dedicated painting area (right desk).
The main light can swing around to either area.
Will this make me more productive?
Who knows, we'll have to see...
Red Harvest wrote: That " before" wallpaper disturbs me. It made me think of the only 1:1 scale tabletop miniatures game, Fairy Meat.
Had not heard of that game. Amusing. The picture in question is titled "Butterfly Girl". Can't say where I got it from exactly, but was likely looking for Butterfly images for reference.
A quick google brings up a cropped image of the original:
Spoiler:
She's not scary or disturbing in any way...
Purely a nice, but safe, picture to post on here (unlike some things that show up on my desktop).
I could not possibly work in such a small space. Hell, I don't think that I could fit into it, given my height.
Kudos for making it work. I'm always impressed when folks do things beyond my abilities.
There's plenty of headroom, but not much legroom. I have no problems at 5'11"
If I had more space, I'd just fill it to the same degree. I had a whole flat to myself in the past, I still had piles of boxes and things about.
You work with what you have, and this is what I have.
Speaking of things I have... I have started back on working on the Garage.
Took a while to remember where I was and what was next. So I started on the railings for the roof.
Didn't show earlier as I didn't know where I was going at the time. Now I've gone there I can share.
Layered card and some sprue attached via some plasticard. More details to be added in time.
My only Infinity fig' for scale. I'm assuming she is small for the range and so is mostly covered by the railing/fence/barrier.
The idea being that these sides give good cover, the front of the building will have a sign that will completely block LoS, and the rear will have a railing that does not provide cover (and a ladder).
There will also be some boxes and things to climb on or hide behind for those of the short or tall variety.
Dr H wrote: The picture in question is titled "Butterfly Girl". Can't say where I got it from exactly, but was likely looking for Butterfly images for reference.
A quick google brings up a cropped image of the original:
Spoiler:
She's not scary or disturbing in any way...
Except that she is a twinkle magic using cannibal. I do have a copy of the game. Very tongue in cheek. To be expected, considering it is from Kenzer & Co.
Anyway, current Infinity stuff is "32mm" --scare quotes intentional. If that mini stands 34mm tall, it's close enough.
Infinity players (some) do like ladders on the sides of buildings. Maybe more than one? Or even something fire-escape like?
I used to do a lot of woodworking. Clutter is a bad thing when there are so many sharp, sharp things around. One learns very quickly. I can empathize with the space change. I used to have the spare bedroom as my hobby room. Now, I've been relegated to the Basement-- more room, but it's unfinished space and the HVAC unit is there. Hard to listen to music with the furnace a-roaring. C'est la vie, as the Portuguese say.
Red Harvest wrote: ...Except that she is a twinkle magic using cannibal...
But she's sooooo adorable. Anyway, cannibals are not a problem if they're a different species (unless they diversify).
Anyway, current Infinity stuff is "32mm" --scare quotes intentional. If that mini stands 34mm tall, it's close enough.
That, she is; 34mm tall / 32mm to the eyes (base included).
Infinity players (some) do like ladders on the sides of buildings. Maybe more than one? Or even something fire-escape like?
With how tall this building is (see below), there does need to be some kind of way to get on the roof.
But in this case it's only for storage for the workshop. Without anyone regularly working up there it's a bit much to have a fire-escape, and that would extend the building's footprint more (I'd like to keep it to what it is and not have to add a messy extension).
Maybe the shop has some kind of forklift mech' to place and retrieve boxes/pallets...
...maybe I'll build one as a companion to this. Infinity games seem to like scattered vehicles and the like...
I used to do a lot of woodworking. Clutter is a bad thing when there are so many sharp, sharp things around. One learns very quickly. I can empathize with the space change. I used to have the spare bedroom as my hobby room. Now, I've been relegated to the Basement-- more room, but it's unfinished space and the HVAC unit is there. Hard to listen to music with the furnace a-roaring. C'est la vie, as the Portuguese say.
No danger of me tripping as I move about this space, my chair has wheels.
Progress.
Rear railing on.
Ladder to be added next.
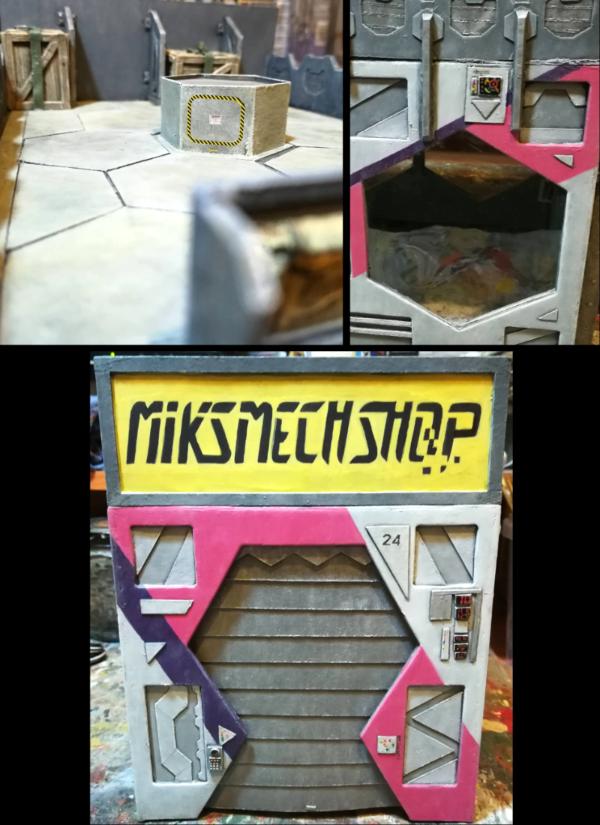
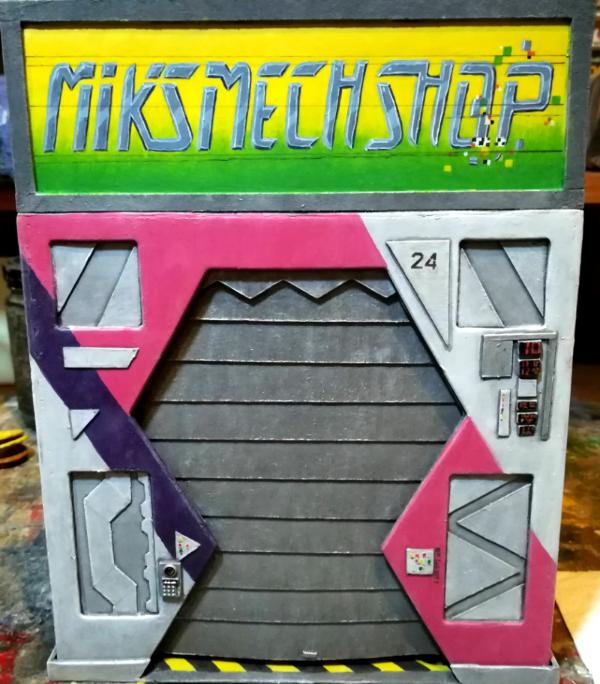
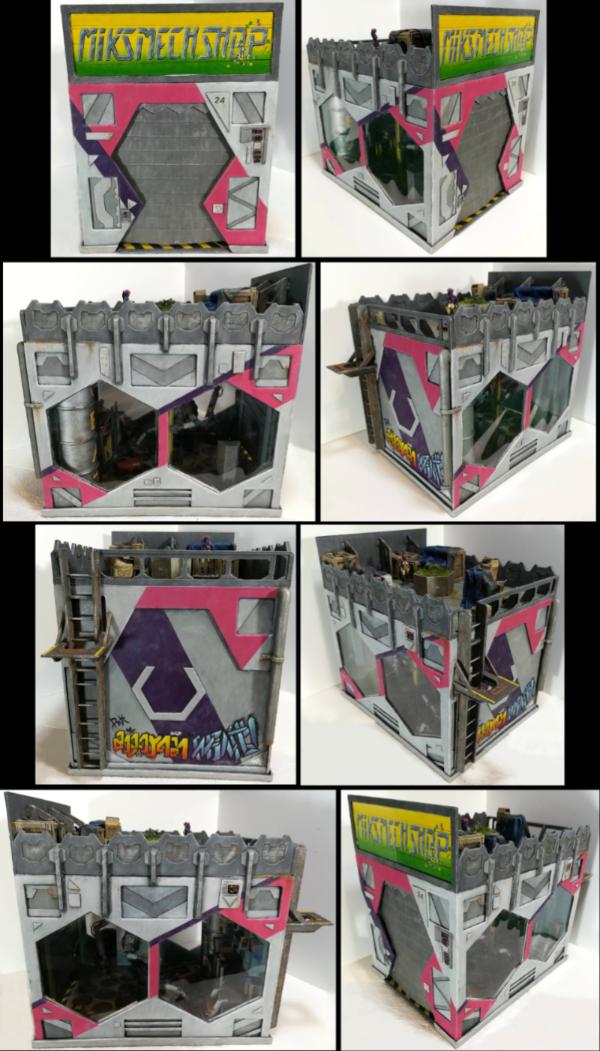
And I've framed the shop's signboard. (Not attached yet)
Also took the opportunity to show the scale of this building.
Not sure yet how I'll fill in the sign yet; painted, printed, peeling, loose boards, electronic screen... Thoughts welcome on that front. To fit the above board space.
Red Harvest wrote: ...Except that she is a twinkle magic using cannibal...
But she's sooooo adorable.
See: Manic Pixie Dream Girl. Maybe you're taking it a bit literally?
No more off topic. Help an old man remember. What is that material you are using in the railing? It reminds me of something called illustration board. There was a fellow on the old Infinity forum who used it extensively.
Printed will work for the sign. Maybe with the potential for some raised letters. I'm thinking of those nice mdf letters Graven used on his donut shop.
Big H: Ha, yes. Picked up the cheapest A2 board that had more than just squares to protect the new desk.
Red Harvest wrote:...No more off topic. Help an old man remember. What is that material you are using in the railing? It reminds me of something called illustration board. There was a fellow on the old Infinity forum who used it extensively.
Mmm, Pixie dream girl... hm? oh yes, ern...
It appears to be recycled card, y'know obviously recycled; you can see the bits.
I think it came as some packaging for something, a divider in a box. I have one large sheet of it in my collection of card pieces.
It was about the right thickness for my purposes.
Sands quite nicely, goes very fuzzy as you do it but that brushes off.
Can't give more information than that.
Printed will work for the sign. Maybe with the potential for some raised letters. I'm thinking of those nice mdf letters Graven used on his donut shop.
It's a thought. Not too "low-tech" for the Infinity universe?
Oh yeah, and progress:
Supports for the sign and the ladder on (went for a "gaming terrain" ladder rather than realistic with the spacing)
Red Harvest wrote: Ladder will do fine. Maybe a ledge ~4" up for a mini to rest. Movement in Infinity is usually in 4" increments.
Oh really... *he says stroking his beard*
I can do that: Also started to think about the clutter on the roof. You'll also spy the start of a drainpipe for the flat roof. I'll putty the corner on later. Left a space at the bottom for painting water streaks etc...
I'm not going to add a railing to the platform as that'll just hamper placement of mini's on it. The little rectangle of diamond-plate should serve to "lock" into the bases of larger models to reduce the risk of them falling off. 4 inches to that platform, 5.5" to the roof as it happens.
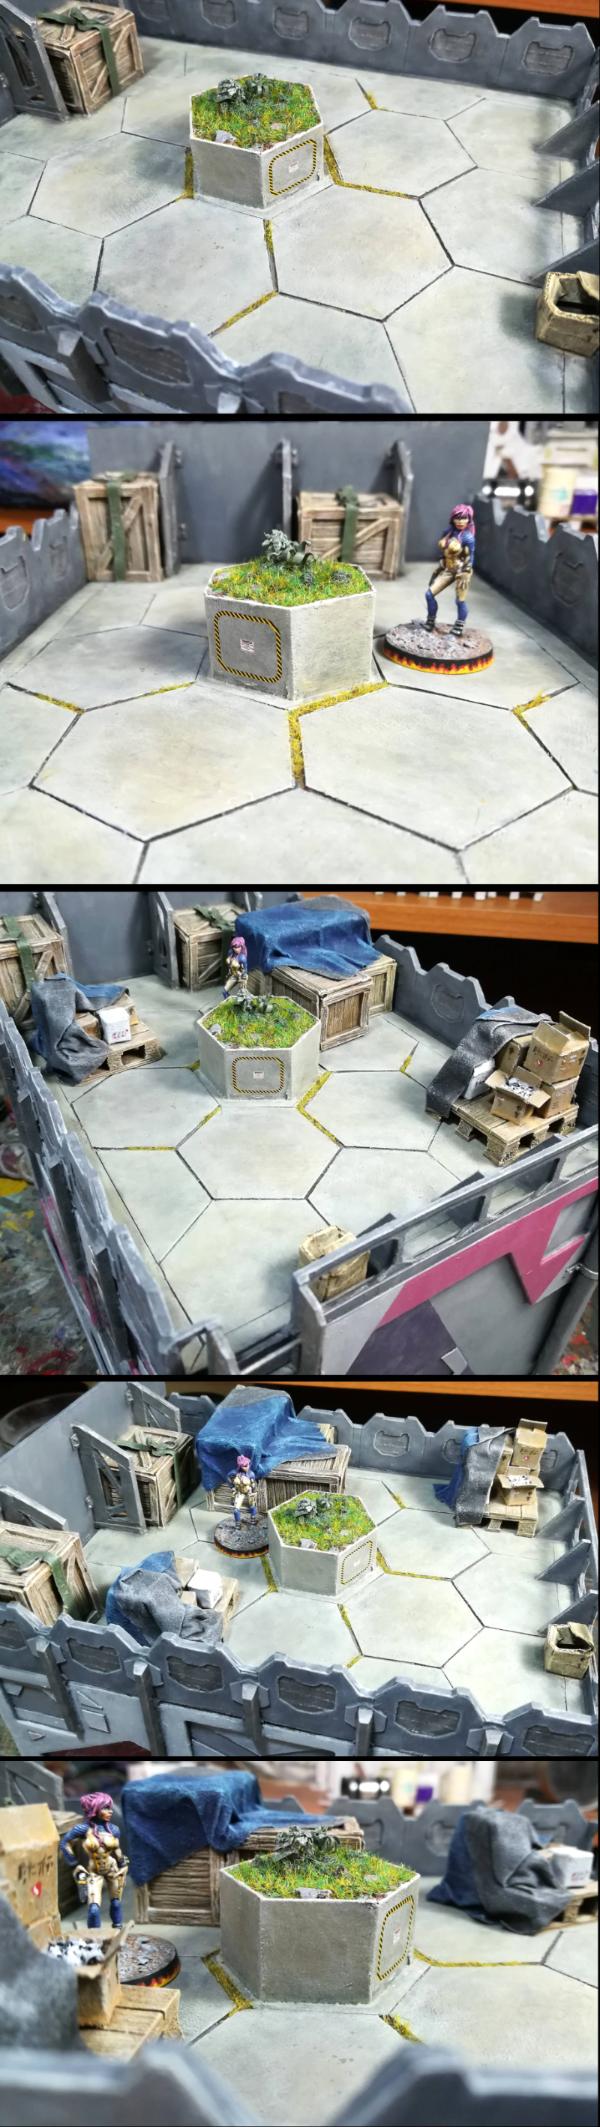
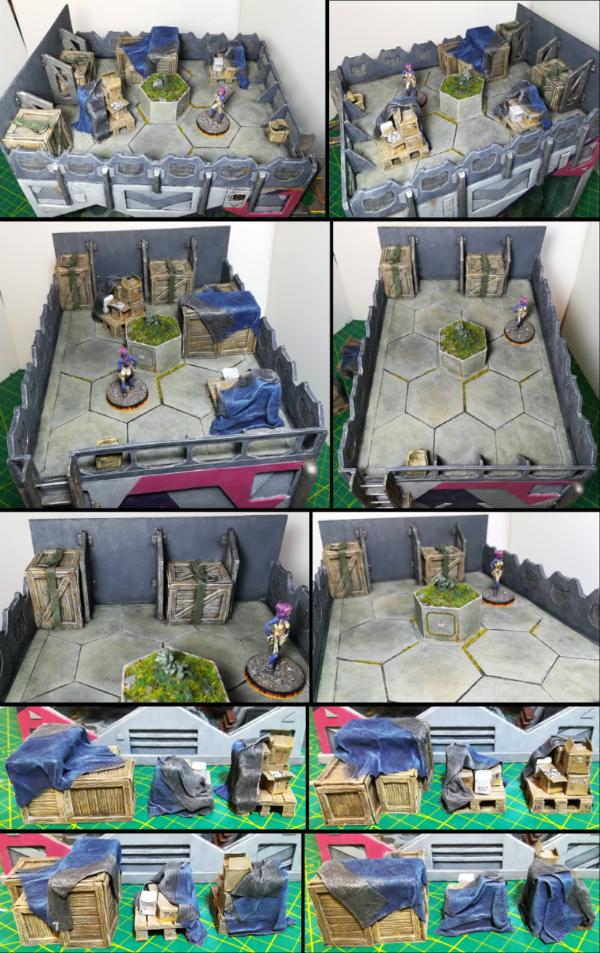
Now to make some pallets and various sizes of cardboard box. And I'll add some slings to the wooden boxes for them to be crane-d in. They do look quite large to manhandle next to her there.
_THAT_ is a really clever way to allow movement in the 4" or so increments (whatever is allowed under one's ruleset of choice) _and_ look like a normal, functional part of the build. Wow!
Thanks Red'. Borrow away, that's why I post these things.
Thanks Meer_Cat. I'm all for keeping everything looking like it should / would / could be there in-universe on my models.
I've been scattering away on this and I think I have enough... (any more and there won't be room more the miniatures )
These aren't glued down yet (and most will have to wait until I've re-glued the roof part that I've left loose for painting), except for the 2 behind the sign.
The block of wooden boxes are glued together as one as they are made from spare parts and don't have the full compliment of sides.
And the cardboard boxes are glued to their respective pallets.
Pallets will get more details to make them more "woody", and they will get some tarp's to partially cover them (as they are on the roof they may get rained on).
Positions of the various boxes are not set, as you will see below. I'd like some input on miniature movement through cramped spaces: How large of a gap is required? What rules are there for climbing over obstacles? Any problems you can see in these particular layouts?
Pictures will have numbers for ease of reference:
1.
2.
3.
4.
I'll now turn to detailing the exterior surfaces (a few rivets here and there, some futuristic panels everywhere else...)
You didn't think I'd leave it so flat and clean, did you?!
I have been waiting to see if you were going to get back to this project, looking very smart Doc. Glad you added the lass to the pics gives me a better idea how large the building is.
Thanks York'. Ja, She also helped me get the size of the railings right. Might as well keep her in the photos.
Still looking for thoughts on how game miniatures will interact with the above clutter arrangements. Any game, I know not of any of them, not just Infinity.
Progress: Surface details, and tidying up some edges (and cleaning the windows of PVA-smears). Including rivets.
Not sure there is much more to do on this now. Will have to have a think and then it may be painting time... Obviously, there is putty work.
Stunning as is standard from you. Brilliant work, beautiful realistic scatter. I have no idea really on the game side of things, but have always taken a rule of thumb as mucking about with at least 2x 40mm based models, something like a couple terminators see how they "fit", can they get base to base? Also nothing wrong with leaving the scatter loose, just put it on the equivalent to a 8x4 of plywood, standard protection procedure for all roofing.
agree with Cam, leave it loose - that'd be my druthers, would also allow it a bit more modularity instead of "Oh it's that building again" syndrome.
Love the ladder, and the ladder rest. Also totally stealing that idea - this is an issue my son and I have a lot as a) I like to make terrain b) he likes to perch c) we're never entirely 100% sure how to get models in games TO said perching spots 'legally' and that idea would likely completely solve this (yay!)
Movement, just make sure there is enough space for the base of the mini to rest flat on the surface. For cover, a mini needs to be in base contact with the piece to claim cover.
Exceptional work as per usual..; Every time I come in here, I think to myself: "I should really work on some terrain". Then I get distracted by minis of course, but still...
I had considered leaving them loose, I just didn't want to colour opinions if the gaming world had other ideas. But as we few agree, the rest of the world will have to make do.
Thanks Cam'.
Thanks Guild'.
Glad you also liked the platform. As it's so useful I'll leave some of my thoughts on it here.
This was the first thing I thought of when Red' mentioned having a platform for miniatures to move to, these things exist IRL for this purpose.
Width was a matter of ladder width plus a bit.
I then cut the hole, rounded as that is common. It ended up slightly off centre of the piece of card I was using (planned to cut down afterwards) and thought that a larger step to one side would be a good feature; will be painted to reflect this. The size of the hole was to be smaller than a miniature base but wide enough for the ladder or the miniature person (sans base) to climb through.
Then I cut the card to length/depth. Chosen to be long enough for a model's base to fit on enough to support the mini'. Larger bases may overlap, but should still support the model.
The section of diamond plate was a piece I had laying about and serves to give the impression of grip on the surface and could either lock into a miniature's base or lean the model into the building reducing the risk of falling off.
The rest is just supports to show it can take the weight and to make it sturdy enough to not be knocked off of the model.
No railings so that models can be placed on regardless of size of miniature or base.
Thanks Red'. Yeah, I have read over the rules for Inifinity as I have read the 40K rulebook. But it's no substitute for having played the games. I like to hear what actual players think of things (at least for the things I plan to sell, I can go over the top with my own models).
Thanks CK. I keep thinking "I want to go back to a miniature for a change" and keep finding excuses for building terrain.
There will be miniatures soon, unless I build the "forklift / loader" to go with this workshop...
I've now added the putty work and further details to these boxes etc.
Found some nice fabric-type stuff in my box of "material/fabric" things. I was looking for tissue, but this is more hard-wearing if these are to be left loose and therefore handled.
And I added ribbon to use as lifting straps on the two fixed boxes. Bit of a mess to work with in the way I tried, but should do the job.
I think this is all the modelling done on this.
It may be time to prime...
Need to find a good way to protect the windows. may be a combination of tape, card and blu-tack.
Brilliant stuff Dr. H, all those little crates and boxes.. so good. In the Tim Burton Batman movie Joker asks where does he get all those wonderful toys, I want to ask how does he make all that wonderful terrain.
Thanks CK. I keep thinking "I want to go back to a miniature for a change" and keep finding excuses for building terrain.
There will be miniatures soon, unless I build the "forklift / loader" to go with this workshop...
You realize the forklift counts as both, right? WOuld love to see you have a go at it, btw!
I love all the little details that make this build come to life...The open boxes are a touch of genius!
Catching up.
Priming is in progress, but taking time; it's a bit big for the airbrush hood, and airbrushing the inside is not possible without getting a face-full of paint.
Thanks Graven'.
Thanks Gits'. I was going to use tissue for the tarps but I found a sheet of some kind of fabric. I think it came from some packaging. Lots of crisscrossing fibres.
Soaked in PVA/water and laid over the boxes. Then a few bits of PVA to stick down the more unruly corners.
No worries Gits'. Sorry I don't have a name for the material.
Enough is enough... time to paint.
Hexagons of paper and Tamiya tape should be enough for the windows.
Primed and "blacked" as is usual.
Outside/roof:
Inside and scattered bits:
I almost forgot lights for the inside. So I knocked up a couple of small strip-lights with plasticard around a piece of the side of a CD case (that had been chopped up for other reasons). You may just be able to see the ridges.
The random shelf and box (with phone) will be attached on the back wall, inside, after painting them.
The many individual bits should mean that I can keep swapping and changing to keep painting without needing to wait.
Also, with my new, separate, building area I've started the next project...
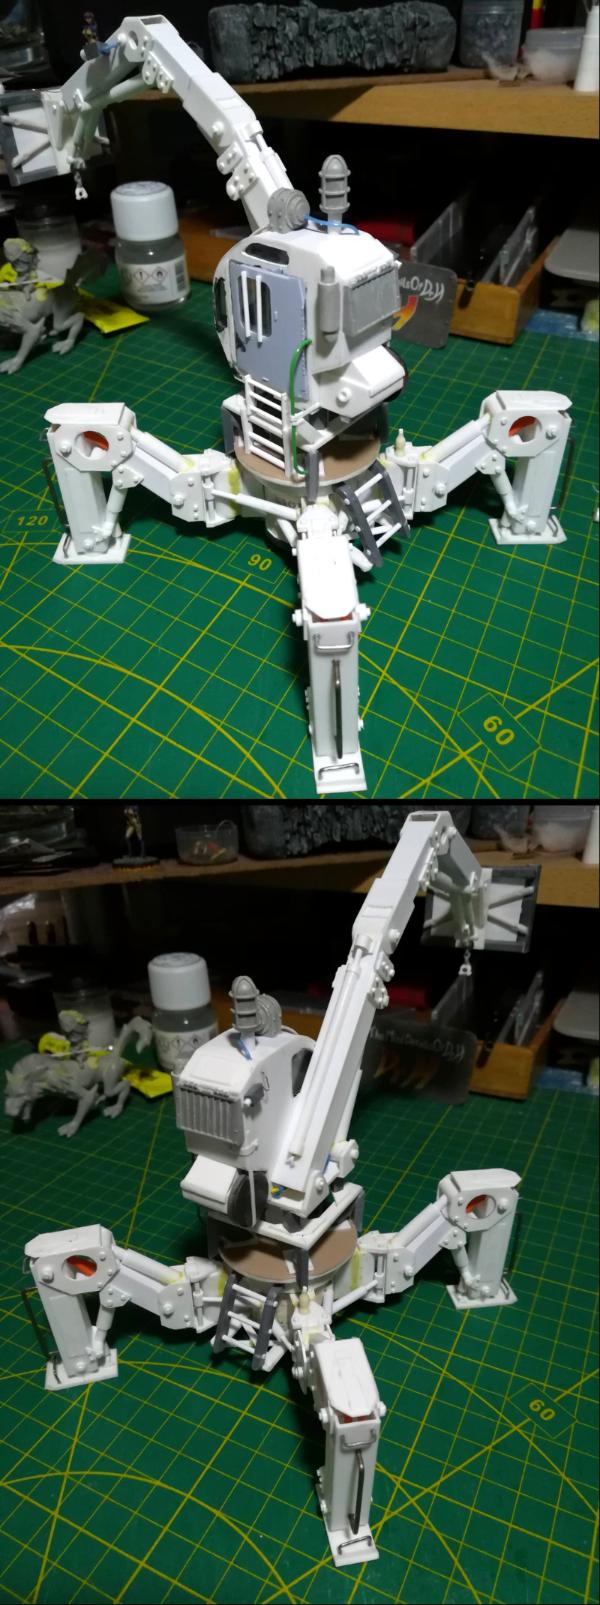
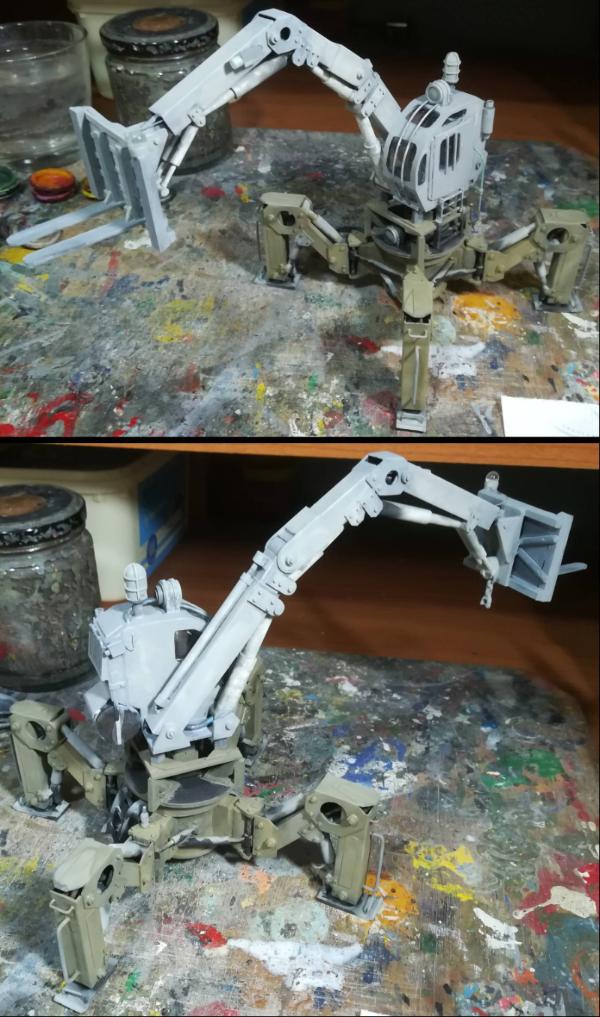
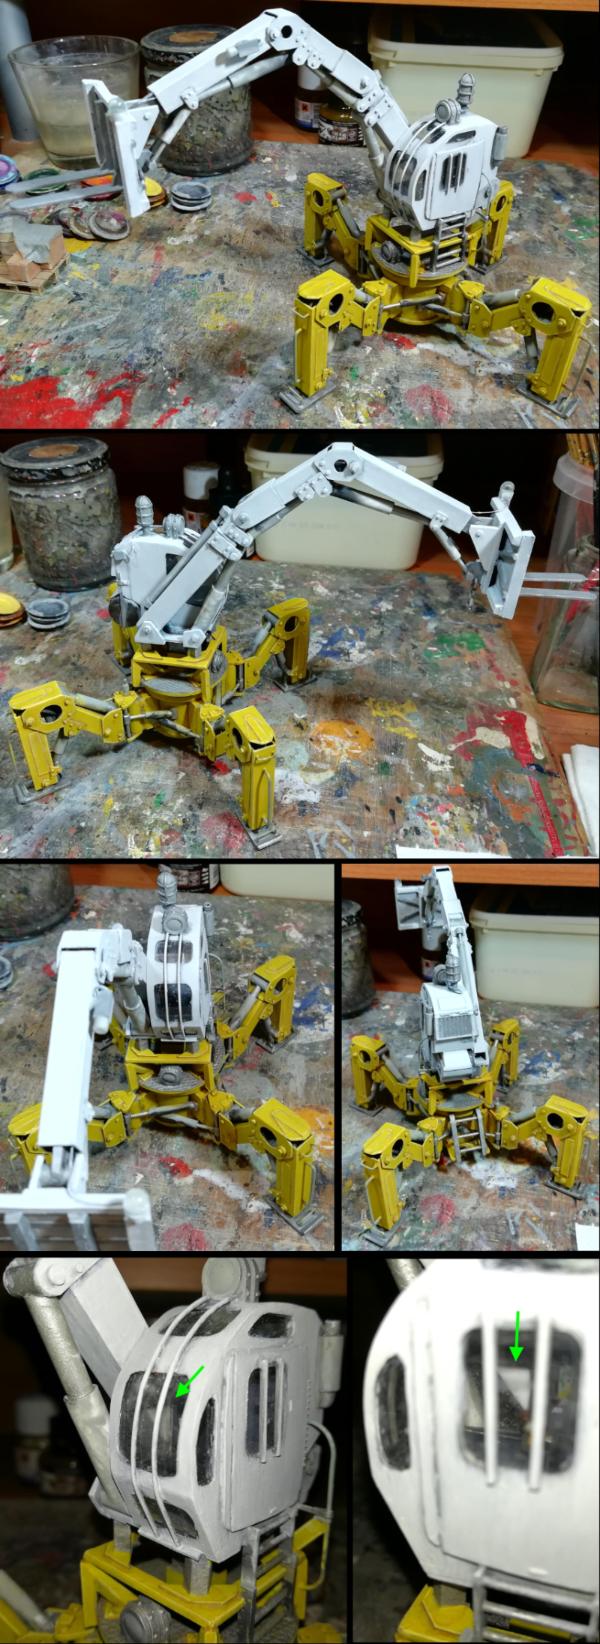
...It's a forklift, obviously. I didn't need to tell you that. This is the "hips" of the thing and will have 4 legs sprouting from those protrusions. I have some plastic-tubes incoming to build them with.
Using an old paint pot for the main bulk, it's been filled with plaster and should give it a low centre of gravity to avoid it being knocked over.
The legs are pinned into the paint pot (a Dremel and a drill bit made short work of that), you can see the ends sticking out there.
Being made of metal I had the idea to attach the top half to the hips and legs with a magnet. It'll be able to swivel if nothing else.
The magnet still needs to be fully installed into that top piece so it looks a little loose at the moment ('coz it is, like).
Blocking in colours is taking it's time. Looking a bit garish at the mo', that will change. So much to do...
And progress on the forklift is more dramatic: A few things of note...
I did start on a cab for the driver, but didn't like where it was going so will start that again at some point.
The legs have started from where we were above and then; I attached plastic tube (7.9mm) to the pins and capped them with plasticard. Then attached the 2 triangular pieces (per leg) to work as the hinges for the "hips" swivel motion. (not actually working, this is a stationary model) The above were pre-drilled for the 2 thin (1.6mm) plastic rods (each). The rods were pushed through both triangles and a section of plastic tube (3.2mm) was threaded on them before gluing. The pistons were then added to match these pieces of tube and glued.
...I started with the shorter pistons, and even though they do have enough room for the legs to swivel sufficiently, I thought a bit of extra range of motion was required and added the longer pistons for what has been dubbed the "front"...
Then the vertical hinge was built for each "hip" joint. A piece of square tube (7.9mm) and a length of round tube (4.8mm) were sandwiched between the side pieces and rivets added. A length of square tube (7.9mm) was added for the "thigh" of each leg. Pistons were made above them and attach to the wip "knee" joint that will attach to upright "shins" (made of 9.5mm square tube) that will go to the feet on the ground.
The waist, pictured at the bottom there was finished before all this, but I had forgotten to take any photos of it's creation. A couple of strips of thin plasticard was glued around to pieces of sprue above the "hips" and small pieces of plastic rod were glued on to the upper piece to "ride" within this circle and centralise the rotation about the magnet. The blackening there is pencil lead to act as a lubricant.
Great work! These draped up crates look really good, making me forget that I first wanted to comment on how too many hexes there are on everything! And that lift thingy is looking very promising, can't wait to see it in the next stage of construction/assembly. Cheers!
Just to be able to say something, the tarps look dark, maybe a hint of green just to break up the colour.
Being silly there in case you didn't know. Watching with interest, so much inspirational work.
Thanks. How about some blue? See below.
CommissarKhaine wrote:Lol so muich for a simple forkligt :p. Amazing work, and the paintjob's coming along nicely as well
Thanks CK. Even the simplest of things can become a home to wondrous complexity when you look closely enough. I suppose wheels would have been simpler to do, but that's just not "future" enough. It has perhaps, ended up larger that expected. But legs take up a lot of space as it turns out.
But then, it is intended as terrain, so it needs to be big enough to hide behind.
Wirecat wrote:Great work! These draped up crates look really good, making me forget that I first wanted to comment on how too many hexes there are on everything! And that lift thingy is looking very promising, can't wait to see it in the next stage of construction/assembly. Cheers!
Thanks Wirecat. Infinity is the inspiration for this piece, so hexagons are the thing.
Gitsplitta wrote:Finished tarps look fantastic!
Not totally finished yet, still more painting to do.
Painting progress first:
Slowly deciding on colours for things and giving texture and highlights to others.
Tarps have gone blue on the outside and, I think, I'll go black for the inside so you can see where it's been pulled back.
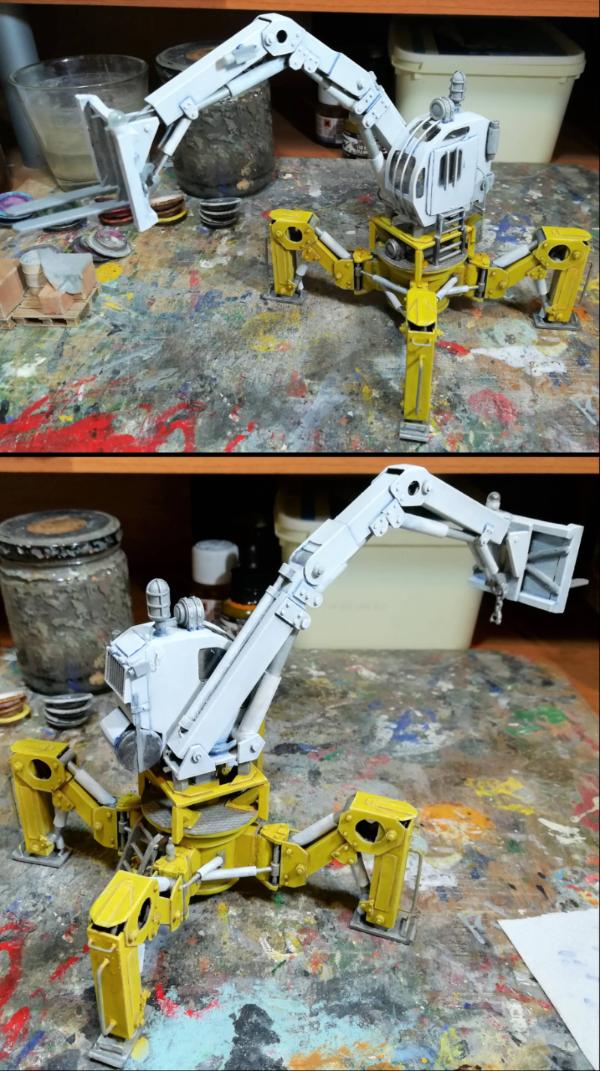
And the forklift now has the basic structure of the legs done (of course there'll be more details in time...).
Thanks Red'. Yep, although I went with a more industrial look to them rather than the streamlined "military-grade" walkers of Infinity. This is built for one job, and as cheaply as possible (I'm fairly sure pistons would be cheaper than synthetic muscles or whatever is used in that universe), as any forklift.
Speaking of forklift:
Cab in progress. No front on it yet, been keeping access to the interior free.
And got the pilot in there for scale purposes.
There will be ladders and handrails.
Front to be added and then some putty work all over.
Then I'll paint the interior of the cab and seal it up with windows and the door.
Then the arm...
Speaking of painting... Things in the workshop are slowly being ticked off.
Those boxes are done now (apart from markings/lettering).
Thanks York'. There's got to be some brightness to draw the eye about as it is intended to be viewed through the windows. Contrast contrast contrast. Although I'm conscious of not making it a mess of colour. I usually manage so not worried yet.
Thanks Red'. I hadn't thought velvet, but can see what you mean. Just dry-brushing to bring out the texture of the cloth I used.
I do have some pictures of those in my "inspiration" folder, but have not looked at any during this project. The shape is similar yes, but they don't seem to have pistons exposed and are of the "futuristic leg joints moved by some unknown future tech" look. That's what I mean my a more low-tech / industrial look to this forklift. Yep, very basic plates of metal for feet; cheap and easy to replace.
Thanks Gits'.
Thanks CK.
Thanks OMN. Counterweight is a good concern. Would have thought of that as I came to the arm. That can be be added, there is space under the cab's engine (the lump at the back). Most of the hydraulic workings are within the frame, but you know I like small details... Thanks. Oh yeah, I'd forgotten about those. May have to make one some day.
The cab now has a front on and I've started painting the interior. The windows may not look large enough for good visibility, but I've added computer screens to the interior and those are mostly what are to be used for the driver to see. It's the future yo, there's probably some AI in there too.
Once the inside is painted, I'll start on the arm and hopefully remember the counterweight.
Inside painted and windows in.
I may add some strips on the inside of the windows if they don't hold in well.
On the whole, the inside isn't very visible through the "glass" so I'm not going to add any more finer details. Getting photos of it will be a nightmare once done...
Done some small details in the workshop, nowt worth showing at this stage.
Painting progress on the workshop first. Still minor details... still more to do...
And more excitingly, the forklift comes together...
The arm "can" extend above the first piston, and with it reaching up with the legs and the full height of the arm it should be able to easily reach over the workshop.
And maybe the cab can also raise from the hips/legs section too. That was the original concept.
Next job is to make the fork... I have a plan.
Once that is done I'll have an idea of how large to make the counterweight (I've not forgotten) so it looks like it'll counterweight the arm.
Thanks CK. It's mostly just a series of telescoping tubes. The difficulty is in the planning; where should this piston start, and how long should the larger part of that piston be. The building is fairly easy in comparison, hence the speed this has come together.
That said, no, none of the joints move. If I was building for myself (or I had a customer that wanted it) I probably would have made it move. But that would have used twice the plastic (the overlaps are minimal instead of full length piston rods, for example), and taken much more time (joints would all need to be drilled and pinned straight and properly), and the final product would have been less durable than this fully glued example. All of that would just drive up the price for little advantage: as cool as it would be.
The top does rotate about the "waist" where it is magnetised on to the legs.
Thanks Graven'.
Thanks Dave. An' all those rivets...
Thanks Cam'. Yeah I know, if you'd have built it, it'd have lights and a motor and would walk by itself. And you would have found an excuse to set fire to some part of it too.
Thanks Klaus. Nice to hear.
Thanks Red'. Yeah, I'm certainly leaning towards selling this separate from the Workshop (with links between the two) as together they may set a price that would put many off.
A forklift is not a forklift without a fork... to lift... with.
This took the most thinking about to get it looking as if it can work.
It needed a mechanism to keep it flat as the arm raises/lowers, and I wanted to show that the prongs of the fork can be adjusted for different widths of load: Looking at modern day forks they just have the prongs (as L-shaped pieces of metal) hanging from a horizontal rod that they can be slid along to set the width. I wanted a more high-tech' approach that would be easier to build and more durable for use in-game.
Here's what I ended up with and examples of things it can currently* hold:
*I will make a functional counterweight that will allow it to hold more.
I also set the forks apart to fit the previously made pallets of the workshop. I will make one more for the forklift that doesn't have tarp that sticks out at the bottom.
Counterweight to do, some steps/ladder, and all the cables/wires and other little details...
I am afraid the forklift outshines the workshop bud, that is a truly masterful build. Forks look perfect. Only thing I keep looking at is the weight of that solid sheet for the backing, in real terms the weight of the forks would be kept to an absolute minimum. Not trying to nitpick, just the only thing I keep seeing that bothers me. It looks absolutely perfect really.
Thanks CK. It's mostly just a series of telescoping tubes. The difficulty is in the planning; where should this piston start, and how long should the larger part of that piston be. The building is fairly easy in comparison, hence the speed this has come together.
That said, no, none of the joints move. If I was building for myself (or I had a customer that wanted it) I probably would have made it move. But that would have used twice the plastic (the overlaps are minimal instead of full length piston rods, for example), and taken much more time (joints would all need to be drilled and pinned straight and properly), and the final product would have been less durable than this fully glued example. All of that would just drive up the price for little advantage: as cool as it would be.
The top does rotate about the "waist" where it is magnetised on to the legs.
Ok thanks for the explanation. I've made the odd moving piston myself, and was just curious if you had done it as well. They look so lifelike, you could easily believe they all work. Great eye for movement! And the pic with the mini could come right out of some 'mercs and guns' magazine. Love it
Thanks Meer_Cat. Good to hear, I like to spread some inspiration about.
Thanks Cam'. The workshop still has some tricks left in her yet, don't pick favourites yet. The backing for the fork is really thin; I used 0.25mm plasticard for it to maintain the lightweight-ness of it. I was originally planning to leave it open but it was looking a bit fragile so added the backing to strengthen it, and give me somewhere to stick those strips to for the fork adjustment mechanism.
You've been missing out then, Dave.
Those would do, Cam'. I've been looking at pictures like this for inspiration: It appears to be called a Telehandler.
Red Harvest wrote:Nothing beats a great pair of legs, Dave
2 pairs even...
Agreed with Cam. Forklift > Building.
Doesn't have as many hexagons though...
Bundle the forklift with appropriate scatter. Crates, pallets, rolls of stuff and that sort of thing.
Yeah, that is a thing.
One could always add the auxiliary stabilizers(?) to it too. Those things which extend out to balance the device.
That's what the legs are for. And I really don't have space to add any more.
Thanks CK. I like my models to look like they work, so it's good to hear that it comes across.
Thanks Gits'.
Painting progress on the workshop. Much thought been going in to this and it's still rough at the moment. OSL-ish effect on the roof. Just doing the shadows though the holes there, the rest of the walls will mainly be the sky blue colour. Going for the triplet of shadows, single light, and both lights as they overlap (this is where all the thinking has come in).
And the forklift has some steps/ladders to get into the cab with: Split into 3 sections where it needs to split as the cab moves around or up.
And I filled the rear of the cab and the added counterweight section with plaster and still working on that area. But it does now counterweight the arm: the cab can stand on it's own now.
Progress on the lighting effect in the workshop:
Still some work to do on some of those shapes and to tidy up some of the changes.
And better views of the counterweight of the forklift.
Yes, that is a lump of metal stuck to the side. I also made it look like another could be added to the other side for heavy lifts (will be emphasised with painting a clean spot).
And proof that the top can stand by itself and is balanced.
Lighting effects.
Counter weight, though I might add some more "false" weights, to make look a little more solid.
Project is just amazing, and level of detail again off the charts bud.
It might be fine without more counterweight since I'd imagine it'd have to retract the arm to draw the load towards it to prevent it falling over as it moves, as well as swinging the arm in order to walk at a safe pace.
Now I want to make a walker again, ugh. lol
good to see someone doing light sourcing right for a change
Thanks. It's not quite as "perfect" as I'd like, but I could be fiddling with it for hours and hours and still not be happy with it. It'll have to do... with a couple of minor fixes to do.
Counter weight, though I might add some more "false" weights, to make look a little more solid.
I don't know if I can add more to the counterweight area without using smaller and smaller items (which would look less and less convincing). With the engine just above it that helps with the weight (of the model as well as in-universe), everything behind the rear of the door is counterweight effectively.
Project is just amazing, and level of detail again off the charts bud.
Still more details to go. You know me.
inmygravenimage wrote:The attention to detail in that lighting is astonishing. I honestly thought it was leds creating spots.
Thanks Graven'. I've probably been looking at it too long. I used my phone's torch to assess where the light should go for each light source and each hole. Then chose the paint colour on where they overlapped or where there was no light. Once you get the separate shapes lined up about right you start to see the illusion and can refine it.
OneManNoodles wrote:It might be fine without more counterweight since I'd imagine it'd have to retract the arm to draw the load towards it to prevent it falling over as it moves, as well as swinging the arm in order to walk at a safe pace.
Thanks. Yeah, it's not exactly made for heavy tonnage loads...
...oh, I just remembered I need to add a hook (this should remind me not to forget it again)...
...Just simple boxes and pallets, but up to significant heights. Different machines for different uses.
Now I want to make a walker again, ugh. lol
Do it... do it...
good to see someone doing light sourcing right for a change
Thanks. Glad you think so.
Not a huge amount done over the weekend, but I do have some pallets done for the forklift: Some cardboard boxes, a couple of barrels (from a pen lid and plasticard) and a couple of spools of "wire" (cheap cotton bobbins and a couple of layers of "silver" thread; plastic stuff for sewing with, I assume).
A tarp for one (as before), the spools will get some "metal" fasteners for the straps, and the last, full, pallet will be wrapped in clingfilm once painted.
Lovely pallets - cling film huh - will be interesting to see how that works (I hate using clingfilm at the best of times, but making it work for scale models could be beyond my patience levels)
Thanks Ruglud. The idea of the cling film is that many pallets are delivered wrapped in cling film. Plan is to just wrap it around... We'll see how it turns out.
Can't say I've had any major problems with cling film.
Though having experienced parafilm in the chemical lab', cling film is a distant second in "films to seal containers with". (ignoring pricing). Parafilm's' amazing.
Thanks Gits'.
More on the workshop today:
There's been pin-washes and highlights in the upper section (getting photos while the windows are masked is not ideal. Hoping it does look ok once revealed).
I finished the shadows for the shelf and cupboard on the back wall.
Little details inside and on the boxes,
A garage is not a garage without an oil spill...
And a big sponsor logo on the "compressed air" tank (that's how I view it anyway). Letters don't mean anything in particular (your could say Corvus Belli Air Tank if you like), they were just relatively simple letters to paint in an awkward area.
The door was painted in metal,
and the bottom of the walls (on the base piece) were painted to match the walls.
No major progress on the forklift. I do have a pile of "cables and hoses" waiting next to it for the next stage.
Red Harvest wrote:Yah, parafilm. Only 25¢ for ~30" x2" piece. Not too pricy. If you buy in bulk.
We had huge rolls of the stuff in the lab. Should have nabbed one when I had the chance. I've seen that parafilm is also good for masking clear plastic pieces, such as canopies.
Guard-rail on those stairs, Doc?
I did think about that while building, but I couldn't see a good place to put it as the arm was already in place. I then decided to add dirty hand-prints to the window next to it. Safety in the workplace
Photos seem a bit underlit.
An amazing piece.
Do they? I suppose they are missing the front-on lighting. There will be better lighting for better photos at the end (it's getting close).
Thanks.
Thanks CK. Nearly finished? Well the inside may be. I'm now on the outside; much more left to paint.
That seems like a word to me, Graven. Thanks.
Thanks OMN.
Progress.
The outside of the workshop has had many layers. I'm aiming for a light off-white that will then get bright green and pink accents to get that "future" look.
The upper railing etc. will be darker as I like how they look here untouched (from the black layer everything gets).
Layers, shading, dry-brushing and highlights here on the grey.
I may even remove the masking soon. It should look better then.
And the forklift has some more details.
A handrail for climbing into the cab (the door opens forward so that's the other side of the ladder).
And a hook for lifting the boxes with the straps (and when I say "hook" I mean one the those screw a bolt through a C-shaped thing).
Sign of life post, not much progress over the weekend.
Thanks CK. Yep, open for "lightness", but also helps to show the workings.
Thanks Meer_Cat.
Red': Yeah, I see that. Hopefully less so in the later photos. Still getting used to the new layout of my workspace. Mirrors, no. a) no space, b) little visibility from inside the cab, c) it's the future man... I'll likely add some cameras about the place to go with the monitors inside the cab. Hence the monitors in the cab (I had thought about it). Ta.
Thanks, York'. Yeah, it's not small.
As I said, minimal progress. But I can show the roof of the workshop.
Dark railings, wooden boxes (undecided on the strap colour as yet), and concrete tiles.
You will notice the unevenness of the tiles (I don't like to be too perfect with these things), the larger gaps will get some weeds when I come to it.
Rear view cameras will work. We've got those now on SUVS and such.
Roof works nicely. Hard to get those hexes evenly spaced though. Nearly impossible over large areas without some sort of template. Then again, it looks more interesting this way. I've always been willing to 'cheat' a bit and trim the edges of the hexes to get even spacing. The minor size differences in the hexes are less noticeable.
Really looking excellent bud, always amazes me how you manage to work with paint you have and produce such wonderful effects. I used to use it, still got some somewhere, but would not even attempt what I do with my acrylics with that stuff.
Oh and you worry too much, no one will notice the spacing on the tiles unless you point it out of course.
Thanks Gits'. It happened on account of trying to avoid right-angles and keep the hexagons going for the Infinity feel.
Thanks Red'. Yeah these hexagons are not truly even all round. Didn't worry me too much until I ended up with the large gaps. I did do some minor trimming to fit. I could have got them perfect, but I wanted the laid concrete slab look and those are never perfect after a while.
Thanks CK. I hold myself to a high standard, keeping that up is not a problem, I have a little devil whispering in my ear all the time. Speed is my weakness. Can't knock out a model quickly to save my life.
Thanks Cam'. I know nothing else when it comes to paint. I've used enamels for years and know how they work. It's just finding the things that work for you and then you can push the boundaries. That concrete is exclusively dry(ish)-brushing. In layers from a mixture of "sand" (Humbrol 63) and mid-grey (64) up through pale stone/ light grey mix (121 + 147) to a light grey/off-white (147). A wash of black in the crevices. Brushing in swirls and aiming to not evenly cover the lower darkness.
I'm not worried too much about other's noticing the gaps, I've noticed the gaps.
Progress on the forklift: Cameras on; 3 in total, one on the arm for overview, one at the back, and a fish-eye / ball at the fork for close-in pallet-poking and wall-missing.
Also, protective and sacrificial rails on the legs to avoid dents from stationary objects that get in the way and not getting smaller chunks stuck in awkward places. and some other detailing on the legs.
I'm reaching the point that I can't think of much else to add to this, so it may be reaching the end of the build. One last hard stare at it and then it'll move desks...
Meanwhile on that other desk... no major changes since the above, but I have taken the masking off the windows and thought you'd like to see. The final photos of this are going to be a nightmare to get nice...
The windows at are a great addition. Even clean as they are at the moment there is a real sense of motion going on the shop floor. I also like the roof style, and as Cam pointed out no one would notice the hex joins if you hadn't said, although I understand entirely your reply of 'I saw them'. I really like the idea of adding the weeds.
And the forklift, what can I add? A truly realistic and amazing build.
A bit late but got to say the roof on the building looks great, love the paint job really looks like concrete. Was not sure how it was going to work out with clear acrylic window but the effect is very realistic.
Photographing reflections from the glass... yee-ouch. Lots of indirect lighting. That's the only way I can think of. But I'm a garbage photographer.
The forklift. Hmmm Ah, maybe a few... LEDs Kidding aside, lights of some sort, and possible flashing lights like on emergency vehicles. it is fairly standard on such equipment.
Camkierhi wrote: Oh and you worry too much, no one will notice the spacing on the tiles unless you point it out of course.
I noticed. But then I've a bit of experience setting out hexes like that. I expected to see the gaps. Doing these things by eye, it is inevitable. It also makes the piece more 'characterful'.
Might I suggest a photo shoot with the interior illuminated and no strong lighting on the camera side of the piece. Not in the dark, but no direct light to reflect.
I'm always telling other's to add some plant-life to their models. It gives terrain some "age".
Thanks York'. I got some good practice for concrete when I did my UFO crash piece. It's mostly just a matter of adding a little "sand" to a grey scale paint-job.
Red Harvest wrote:Photographing reflections from the glass... yee-ouch. Lots of indirect lighting. That's the only way I can think of. But I'm a garbage photographer.
Yeah, it'll be a gratuitous use of white plasticard and careful angles to give "plain" reflections and even lighting.
The forklift. ...and possible flashing lights like on emergency vehicles. it is fairly standard on such equipment.
Oh yeah, good catch. Added a light, see below.
Thanks LT. Reflections are just a bugger when you are trying to capture the things inside.
Thanks Graven'. I hope it does match the Infinity universe once I've finished.
Thanks Cam'. Yeah, I've thought that too. Similar to the light-through-the-window shots I did for Graven's bell tower.
Thanks Pacific. High praise. I hide or sand the rough work I do. I can't cut a straight line to save my life.
As Red' said, the forklift was missing a flashing orange light.
I also added a bottle of coke to the side of the steps/ladder to give it a bit of a disused look.
That's probably it until it's primed and ready to paint.
Before that, I've got to move the workshop...
Speaking of the workshop...
Some magenta lines.
Soon to be joined by some purple lines...
Apologies, I had no idea this was here. Subbed and will keep up going forward. Brilliant work on the scratch build. For some reason Baba Yaga popped into my head when i saw it.
Thanks Skalk. It'll give you something to read through when you're not busy. This blog is the reason my "army" blog seems so quiet for long periods.
Not heard of Baba Yaga before, so can't say why it came to you.
Workshop, now with added purple:
Some grey dry-brushing over this to give it realism, then smaller details, the sign, the plants, and then weathering left to do...
Thanks Cam'. Well Infinity is set in that special distance into the future where everything is brightly coloured and strongly contrasting.
Thanks Shas'.
Red Harvest wrote:Not heard of Baba Yaga? Amazing. Acquaint yourself with the Myth/Folklore. It's Ukrainian, but has seeped into pop culture by way of RPGs, D&D mainly.
Yeah, the internet told me some of that.
Much like my lack of playing any tabletop games, I've not played D&D either...
...well that's not entirely true, but it might be: I did play some kind of rpg game when I was 12. I created a character (a Dwarf, as I tend towards heavily armoured when that is an option), and a group of 3 of us crept into a cave of some kind. The only thing I remember from that game was our group walking into an opening and a large tentacled creature rose from a pool of water. I was up first after this and chose to say "well there's something you don't see every day".
I have however recently discovered Critical role on YT (via board games) and am working my way through the first series.
A few bright neon color splashes, a good call. Infinity players like a bit of brightness on the table. Signage incoming too?
I thought so. And yep, see below.
Some smaller details added and the main sign started:
The sign is going to have a yellow to green blend from top to bottom and undecided coloured lettering.
I'm aiming to have it appear to have some digital signal breakup on the right there. Once the background colour is done it'll be clearer (with yellow squares in the green and vice versa). So that it looks like a screen and not a painted billboard.
Thanks LT. I've not seen or read John Wick either...
Anyway, sign-of-life / sign progress:
The yellow/green fade was really kicking my behind, so it is what it is.
It'll get a gloss varnish over it (and maybe a section of clear plastic too) so that should help it look better.
Don't look too close as many of the lines are also rough and horrible.
I'm generally happy with the digital breakup though, so there's that.
Thing to remember for future projects. If the roof is large enough, leave space so that a CD (yeah, remember those: 120mm dia. for those who don't ) can fit flat onto the surface somewhere.
Well of course you've heard of her. Wikipedia tells me she lives near Leicester. Leicester is close to everything else in Great Britain, from looking at the map-- right smack in the center of the island. So she's not far from you. Sleep lightly
I am inlove with the mech fork lift. Constructuon never looked so fun. Am i the only one who wonders why the future is hexagons when squares are the most efficient use of space.
The shop is well painted the transitons are on point and the splash of colors is refreshing.
I like the roof top garden very much, it augments the look of the 'weeds' growing in the roof tile cracks.
I think the building must be from an earlier period, when the town had some civic pride, before the fighting. Perhaps the owner/operator also had living space in the same building. Maybe it wasn't always a workshop (with all the window square footage, maybe it was a shop of a different sort). One way or anther, the town had a higher aesthetic goal, which has become overcome by a the need to either support the war effort, watch out for raiders, or both.
In any event, the resources/time/labor no longer exist for whatever the 'grander' look was, now only the center piece remains, tended on an 'as can' basis so that something green exists amongst the containers of parts and other mundane requirements of a nation at war.
Thanks York'. I said I had plans for the larger cracks. When have you ever seen a tiled area that doesn't have something growing between the cracks?
Red Harvest wrote:Thing to remember for future projects. If the roof is large enough, leave space so that a CD (yeah, remember those: 120mm dia. for those who don't ) can fit flat onto the surface somewhere.
I have over 350 CD albums. It's one of my collections. What do they use that for in Infinity?
Well of course you've heard of her. Wikipedia tells me she lives near Leicester. Leicester is close to everything else in Great Britain, from looking at the map-- right smack in the center of the island. So she's not far from you. Sleep lightly
She's nearer than you might think. That's the neighbouring county; about 25-30 miles to the county border from where I am. That's simultaneously close and a long way over here.
Thanks Comrade'. Ah well, hexagons are actually a very efficient use of material. Have a look at a collection of bubbles next time you are near some; see what shape you can see on the interior faces where the bubbles intersect. Also, consider bee hives; they build the honeycomb as round holes in wax and then warm it to melt into an efficient shape...hexagons.
Squares/cubes are just easier to pack from a lazy human point of view though. I should know, I've packed shelves in a shop.
Thanks 'Cat. Yeah, the grass seeds have to come from somewhere. Good thoughts.
Although the "bump" in the roof is to house the mechanism for the central arm inside, it could have been there before.
I like the leave these sort of thoughts to the viewer, as I mentioned in your thread, so long as I build with a sense of logic that is picked up by the viewer and they can come up with their own rationale.
We shall immediately derail this thread into a good old talk about structural integrity and surface area coverage.
Hex's are a strong structure for pretty much anything. Great for building up. However if you wanted to maximize living space size most efficently to wall raito a square is best suited. And circles make great windows.
Thus geometry is whatever. Architects are awesome.
I am merely interested in how hexagons became assoicated with high tech and sci fi in culture among as far as i can speak uk, usa, and europe. Its a fun thing to ponder. I am far to young to know when the fad really began.
Looks great dude, the garden is obviously the overgrown ashtray, as everyone goes up on the roof for a cigarette (cigarette for your yanks) .
And as any bee knows hexagonal is the best use of space for strength and coverage. Squares are square!
I thought Baba Yagga was a profit, like Nostradamus, but actually more accurate, but yeah an old hag from outer Siberia or somewhere. Kids very scared of the thought of her.The reference in John Wick is to the boggyman, as in the one you get to kill the boggyman. Off to check out the Brit...
Anyways fantastic work DrH, about time you got some paint on that poor forklift.
Edit, funny the autocorrect on Dakka would not let me type a slang word for cigarette!
Because it is a very derogatory term for a homosexual man here in the USA. So to is the term for a burning piece of wood, the cig term plus -ot. Ah well, I can say fanny all day long and nobody gets upset.
The circular template in Infinity is the size of a CD. There is a type of airborne trooper that uses it to determine where it lands. It cannot land where the template doesn't fit flat on the terrain.
And to paint a forklift you go, Mr. Doc, sir. Fantastic piece that it is.
I have a few "garden" pieces for my Necromunda terrain. Gangers gotta eat, even if it is nutri-slime and fungi. We've played some some Raid games where the objective was destroy the gardens. Flamers are brutal.
I'm used to derailment; my other blog went off on a string of Llama puns for 4 or 5 pages at one point.
I can't really remember the exact quote, but hexagons are supposed to use the minimum amount of material for a given space... hence the bubbles and bees examples.
They do, however, differ from construction of buildings. Cubes are easier to build when it comes to architecture. It's a different kind of efficiency.
As for why hexagons mean "the future". I think it's due to "now" being all based on squares and cubes we see the shapes made from hexagons being more advanced as they are "different" or exotic, and more always give the impression of better; you could stick with 4 walls, but you could have 6, how much better is that!
Kind of the same way that the boxy past has been replaced with curvy "now"... even if that kind of goes back on what I was saying...
Thanks Cam'. Yeah, that would definitely end up being the ash tray.
I spent ages trying to see if there was a spelling difference between the two "cigarette"s that are shown. Thought my dyslexia was playing up. It's a shame that people can't be grown up enough to not need policing for words that are as useful as cigarette when it's used in the correct context. What's the world come to when you can't go for a cigarette and have to go for a cigarette...
As Red' said, it's used as a derogatory word by some people that need their own derogatory word, instead of for a cancer stick.
Forklift will get paint once the workshop has vacated the space on the painting desk.
Red Harvest wrote:...So to is the term for a burning piece of wood, the cig term plus -ot.
Ah well, I can say fanny all day long and nobody gets upset.
But we over this side of the ocean have a whole different view of what you're talking about here. Good replacement for the 4-letter c-word, but slightly friendlier...
The circular template in Infinity is the size of a CD. There is a type of airborne trooper that uses it to determine where it lands. It cannot land where the template doesn't fit flat on the terrain.
I see. Without the raised garden piece a CD would fit on the roof (without even taking it out the box). That piece can't be removed though and it'd look a bit empty without it. I'm getting there with gaming terrain, I just like details...
And to paint a forklift you go, Mr. Doc, sir. Fantastic piece that it is.
Thanks. It'll be next up.
Sounds good, Skalk.
Progressing, but not worth showing yet. Stay tuned.
Oh, and sad to see the passing of Stephen Hawking. What a mind. I salute you.
Remember, we have fanny packs here in the USA. Ladies wear them, and put things in them all the time. Stop giggling you Brits, you.
I thought the English (UK-English) word for the "C" word was quim. Not a word used here in the US. Also not used in the same sense, growler.
Not an appealing entree that, Doc.
RE: hexagons. Get a handful of drinking straws, and squeeze them together. They will form hexagonal shapes.
For an interesting use of cubes, and related shapes, in buildings, see the works of Paul Rudolph, maestro of Brutalism.
Don't worry too much about the CD fitting. Not every roof needs to be a LZ. Variety is a good thing in terrain. The one other thing is that players may want to place a scatter piece or two, like a dumpster or such, against a wall, to break up the sight lines a bit. It looks like you left space for that.
I vote we straight up use octagons then! way more exotic especially in cone form.
But where will it stop? One day we'll all be living in dodecahedrons and Icosahedrons, and D&D players will become feng-shui specialists...
Let me know when its worth showing. I will be dancing in my thread.
See below. No dancing.
Thanks Graven'. There'd have been grass even if the cracks were even, you know me.
Thanks CK. It's these little things that can add far more realism than any number of bling or skulls.
Red Harvest wrote:Remember, we have fanny packs here in the USA. Ladies wear them, and put things in them all the time. Stop giggling you Brits, you.
How could we forget. Do people still use these? I've not seen any since the '90s.
I thought the English (UK-English) word for the "C" word was quim. Not a word used here in the US. Also not used in the same sense, growler.
I've not knowingly heard anyone use quim. I've heard growler. My small circle of friends are fine with using the c-word in a friendly way.
Not an appealing entree that, Doc.
I didn't say that it was, just that it exists. It's the first thing I think of when I hear that word, even if I can't tell you what's in it.
RE: hexagons. Get a handful of drinking straws, and squeeze them together. They will form hexagonal shapes.
For an interesting use of cubes, and related shapes, in buildings, see the works of Paul Rudolph, maestro of Brutalism.
Ah ha, can see where you get some of your ideas.
Don't worry too much about the CD fitting. Not every roof needs to be a LZ. Variety is a good thing in terrain. The one other thing is that players may want to place a scatter piece or two, like a dumpster or such, against a wall, to break up the sight lines a bit. It looks like you left space for that.
If the players are friendly enough they could agree to use this roof as a LZ, or not if they use all the boxes and such.
Yep, that and the possibility of placement on a battlemat type thing, is why I didn't add any surrounding terrain to this one. A change from my usual form.
And with that, all done (to the extent that it will be):
All very zoomable and votable.
Mik's Mech Shop.
Who's Mik?
Why'd he/she/it decide to open a Mech shop?
and where'd they go?
These and many more questions will go unanswered below...
Outside overview:
Internet cookies for those that can decipher the 2 main bits of graffiti.
Roof and loose pieces:
Closer views outside:
Separating the piece:
Closer views inside:
There'll be more views of this once I have the forklift to show with it.
Generally happy with it. A good challenge for a change in my usual style and approach. Happy to see the end of it (this has gone on far too long with all the breaks) Many many things I could spend hours more on perfecting, but time to call it.
Time to get back to the DI models before they are out of date completely...
And the forklift has now moved on to the painting desk.
Excellent work. The scatter pieces from the roof can also be placed along the walls too. Versatility: A Good Thing. It will look very nice on the table. Especially with one of those urban game mats that are all the rage.
Future reference: a way to affix a skybridge/catwalk/w/e they are called.
There used to be an Infinity forum member called T e h Mik. I had to space the letters to avoid the forum auto-correct. I cannot for the life of me imagine that a mis-spelling of the definite article holds any power to cause one to take umbrage. Which of course means that it probably does. Meh.
The forklift is next. A truly magnificent bit of work, that.
Yes, fanny packs are still used. Men have them too. Oh, grow up. Stop the tittering. Yes, I said tittering. Why has it intensified.... bah!
I wish I had a dance party. Instead, I got a no dance party.
Thinking outside the box Dr. Always requires new angles of perspective, and perhaps even more sides!
Lovely piece completed. I do find it amazing how we just have to stop painting otherwise we could paint ourselves into forever smaller and smaller details.
Totally with you on the"gotta stop" bit. I manage to call it a bit sooner than you, mind you. Unbelievable level of detail, excellent execution. Some very lucky soul will have this on the table for every single game they play, I am sure I would. So pretty. Well done bud.
Well it was all going so well... and then I poured half a bottle of poly' cement over the intercessors...
More on that later, first replies:
Thanks Heretic Tom.
Thanks Red'. Yeah, I like versatility in the models I produce, hence the design on the wooden hut and wooden boxes I (try to) sell.
I did briefly consider something to do with a skybridge. Making a universal connection point is probably better for multiple pieces; a single building like this is not going to match anything else out there. Maybe next time. Is there a set width of walkway that is universally used?
Thanks Gits'.
Thanks Graven'.
Thanks Comrade. The painting desk is not going anywhere without the rest of the room being moved first.
Thanks Cam'. The perfectionism is strong with this one. But I can at least spot when it's time to stop before I start circulating over the same things.
So yes, I had a boo boo.
Was just smoothing over some details with the poly cement I knocked the bottle over while returning the brush/lid to the pot.
It could have been worse. I did have all the marines standing up on their bases.
You can see here they are together:
So what happened?
The bases got the worse of it, but without fine details on they are fine.
Two of the marines were out of shot and were untouched.
One had his arms and gun laid out already glued in position; the underside of the arms were melted. That is mostly hidden against his body.
One has his left heel and lower leg melted. That will become battle damage.
But worst of all, three of their backpacks (which were laid out and not attached) were mostly cleaned of all details.
Therefore, a day later after calming down, I set about ways to replace the backpacks.
The squad leader has just had a straight replacement from my stock of SM parts. I'll worry about replacing that lost backpack at a later date.
I've rotated his gun arm up as the stock pose just looked odd. Otherwise he's unchanged.
This shows the state of the the three backpacks and #2 with a cast of one of the untouched backpacks.
I nearly showed the mould and state of the cast before removing mould lines, but it's a bit too close to re-casting and would likely be removed (well, it is recasting, but I am doing it as a replacement not to create extra).
You may also see his melted leg that will become battle damaged.
Strangely enough, he's more balanced with the putty backpack...
Number 3 is where things get interesting.
Originally he was an exact copy of #2 (there are 2 pairs of SMs in this squad, I have to have them unique). So I swapped his legs with #5.
This involved sawing the back of the body from the legs and the belt from the front of the body.
The belt was glued on to the legs and the bodies were glued together and had a piece of plasticard glued to their base; this was shaped to fit into the new legs.
The gaps were then filled in with putty after the accident.
I also decided to give this chap a head swap for a beakie, which needed the neck lengthening to allow him to use the helmet. More on this later...
His replacement backpack is made from a combination of the top of the least melted backpack at the bottom of an old SM backpack
A sprinkle of uniqueness.
#4 is stock and is here for reference as a comparison to #5 below.
And the other half of the leg swap, #5
He's also had his arms raised so that at least one of the squad is aiming for a shot.
Also a head swap. He has a helmet to be placed on his base, to be damaged.
So what's all this about the beakie?
The plan is, for this squad, to paint them up as separate chapters. Brought together as a quick response squad, staying true to their origins.
I believe it's in a book, where they keep their armour colours and have a grey square over their chapter markings...?
The question is, for those of you still reading, what chapters do each of the above look like?
In their posing etc.
Or just suggest what chapter you'd like one of them to be.
The squad leader is likely to be Ultramarines, they are the best after all #2 with all the battle damage, some chapter that likes to get stuck in?
#3 chapter that likes beakies? And maybe something to do with old tech, due to his backpack.
#4 Up for grabs, I've got nothing special here.
#5 More aggressive. Likely to keep going after having his helmet damaged...
A happy accident, then, in the end #1 #2 Iron Fists. Weathered yellow should be fun.
#3 Raven Guard.
#4 Rainbow warriors. Do it. Or Mentor Legion, but done properly, with an Owl #5 Salamanders. Rock the dark skin tones.
Thanks Graven'. I can't say I'm happy with the accident, I'd have rather chosen to vary the backpacks then have 3 melted ones.
All good options.
Thanks Big'.
Big H wrote:...make people change there basing to fit your terrain
Or they could pay me to change it for them, I'm fine with that.
No idea on the Chapter per se, but the melted bits could be nicely explained as tyranid damage, a "facehugger" on the helmet or something.
Ta. I am considering themed basing for them, so a dead 'nid is a possibility.
Forklift has been primed and basecoated.
Going to be two-tone in theme. Mainly because the top half (or at least the arm) has to be white and I don't want to paint the whole thing white.
Why does the top have to be white?
You can see part of the arm through the cab's windows and there's no way to paint that side of the white plastic. Showing my lack of planning ahead... sometimes you just have to build...
Still looking for input on what chapters these Intercessors should be.
Thanks Comrade. There's some agreement between you and Graven'. Anyone else with opinions on what chapters seem to fit the individual Intercessors?
Thanks Ruglud. There's a couple of chapters... or at least one that's white and green?
Most SMs are a set of wings away from Buzz. Might be a bit of a tough sell to the usual marine buying crowd though. Although my mixed squad might be a step too far anyway...
Thanks York'. I can put them together again, no prob'. I'm just peeved at the loss of time and glue.
While contemplating the basing of the Intercessors (that may be informed by their possible chapter choices, of which opinions are welcome), the forklift continues:
Many layers later, we have yellow:
Now I just need to match that in "white" for the top half... *sigh*
Good lord, Dr. H, I've missed a lot on this thread whilst I've been away. That forklift is incredible - I was about to ask where you'd bought the kit (as I really want one), only to find two pages back that you've scratchbuilt the damn thing. Really, really impressive detail work - hadn't even considered that it wasn't a kit.
Need to delve back further now and see what else is in here!
p.s. can I please ask your recipe for the aged wood effect on your recent painted pallets? I'm working on something similar, and it's something I'd love to replicate
CommissarKhaine wrote:Nice yellow! will you be adding danger stripes as well? Oh, and is there a reason the interior couldn' thave a different colour than the exterior?
Oh yeah, there'll be hazard stripes all over the place, I have plans for 2 flavours at least (yellow/black and red/white), as well as different piston colours for top and bottom.
You mean, in reference to why I'm painting the top half white? That's not to do with the interior colour of the cab (that is dark grey), it's to do with the bit of arm that is visible through the windows of the cab; you can (just barely) see plain white plastic and I couldn't live with myself it the colour of the arm didn't match that bit.
I should have left the arm separate, but forgot while having problems with the hinge and glued it on.
cormadepanda wrote:Caution stripes on the legs are needed.
Good luck on your white.
There will be stripes. It's construction equipment after all. Ta.
Scarper wrote:Good lord, Dr. H, I've missed a lot on this thread whilst I've been away. That forklift is incredible - I was about to ask where you'd bought the kit (as I really want one), only to find two pages back that you've scratchbuilt the damn thing. Really, really impressive detail work - hadn't even considered that it wasn't a kit.
Thanks Scarper, that's the highest of praise.
Well, you have 3 options for a forklift like this: Buy this one when it's finished, Pay me to build one for you, or follow along with my wip and build your own.*
*you only need some plasticard, various plastic tubes and a couple of square plastic tubes for the bulk of the build.
Need to delve back further now and see what else is in here!
There are helpful links to all finished projects in the OP. You just have to scroll backwards to see the wip.
p.s. can I please ask your recipe for the aged wood effect on your recent painted pallets? I'm working on something similar, and it's something I'd love to replicate
My wood method is covered in my Sprue hut tutorial, complete with varieties of wood, many photos, and translations from my paints to GW paints.
That can be found here: https://www.dakkadakka.com/dakkaforum/posts/list/545398.page#5935106 About half way down that first post.
I tend to choose the quantities of each colour by eye, and will occasionally use a slightly different paint for the base, mid or highlight to give variation to different pieces of wood.
It's mostly dry-brushing from a black layer to mid-brown, light brown to cream then white.
You mean, in reference to why I'm painting the top half white? That's not to do with the interior colour of the cab (that is dark grey), it's to do with the bit of arm that is visible through the windows of the cab; you can (just barely) see plain white plastic and I couldn't live with myself it the colour of the arm didn't match that bit.
Oh, ok, missed that bit. Wouldn't it be possible to slide a piece of paper or thin cartd next to the window so as not to mess it up and then basecoat the crane arm?
Being the Klutz that I am, I've knocked my liquid glue over often enough to lose the lines on my cutting board and to melt my keyboard together, big blobs of blue tack are my solution.
Mentors Legion is green & white, as graven says.
Howling Griffons, Crimson Fists and Raptors are some of my favourite schemes. Blood Ravens like "acquiring" old tech.
Hate painting yellow yet? It looks good so far, quite utilitarian, if yellow can ever be called that.
I have a quick question, what do you recommend using to make a tarpaulin, like you have used on your pallets?
CK. That would be fine for the sides of the arm next to the windows. But I'm talking about the side of the arm that is flat against the window; there's no getting to it (without breaking the model apart).
Thanks Red'. There will be a manufacturer or hire company name somewhere on it.
Ta OMN. Yeah, I've got a huge section of my new cutting mat that no longer has any markings on it. And yes, I've added blue tack to my bottle too.
Good thoughts on the chapters.
I have no major problem with painting yellow. It's a matter of layers, and I tend to use many layers for any colour I paint, so it's no different.
OneManNoodles wrote:...I have a quick question, what do you recommend using to make a tarpaulin, like you have used on your pallets?
Normally, I'd just use tissue and have not thought about possible alternatives. However, for these I found a sheet of material in my box of "useful potential fabric pieces" and gave it a shot. I don't know where it came from, exactly. I believe it was some packaging for something. It feels like fabric, seems to behave like cotton, doesn't really appear to have a structure to the fabric though, it pulls apart fairly easily so is not woven cloth, maybe pressed... Can't really say more about what it is.
I'd say, you can use whatever you want for tarp's. Soak it in PVA/water as you lay it on and the main trick is to get it laying right. If it has creases in the "right" places and appears to be affected by gravity, then it'll look "real". Hopefully, that helps in some way.
While I layer on the paint for the white sections of the forklift, I've made some progress on the Intercessor's bases: Starting with the usual mud n' rocks, they've all got one piece of flavour terrain. A couple of them just have skulls; Mr Ultramarine I'm the best squad leader, and Mr Raven beakie. Melted leg guy (with the replacement backpack), has part of a dead 'nid (made from a cast of a Hormagaunt body, a Termagant arm, and a genestealer's head.. with the acid maw...) and I've added his leg damage with a dremel. Blood angels are particularly linked to the 'nids aren't they?! Vanilla guy got a chaos bit (from my chopped up Helbrute), so that may inform his chapter choice: what chapter really dislikes chaos? And the helmet-less chap now has a damaged helmet on his base. The bases will get a layer of grass and won't just be plain mud. This'll be not quite entirely war-torn battlefield look. These will be painted then the grass added and the chaps glued on.
Still looking for thoughts on which chapter should each chap be, based on their poses (and now basing).
Thanks CK. Yeah, I thought I'd read something about the Blood Angels being attacked.
CommissarKhaine wrote:...If the forklift arm is flat against the window, no can do.
Yeah, photos below to show what I should have shown before to make it easy.
As to the intercessors chapters, I think the decision has been made. I had a look over the various suggestions to see what personalities fit and the colours of the squad as a whole... this led to a revelation which means less than exciting schemes, but a coherent squad concept.
Starting with the squad leader, he was always going to be an Ultramarine since that thought struck me.
#2, with the dead 'nid and battle damage; Is a good argument for Blood angels.
#3, the beakie; Seems to fit the Raven guard well.
#4 was open until the end...
and #5, Mr aggressive; didn't get a better suggestion than Salamanders.
And so we come back to #4, and many suggestions. However, many of the suggestions had to be discounted as their chapter colours matched one of the others already chosen; Blue, Red, Black, and Green... (can you spot what's missing?). Some of the other suggestions were more complex schemes, which when standing next to the above 4 would also look out of place; they are all plain, single colours... Therefore I took a look at the chapter poster and noticed a link between the above chapters that didn't match any of the other suggestions... They are all, top row, first founding chapters. Can't throw in a random child chapter into the mix...
And what's left after all that ... first founding, single colour, and fits the Blue, Red, Black and Green... The Yellow of the Imperial Fists. (Had he been another beakie, I'd have gone White scars).
There you have it, the most boring, obvious choices, arrived at by the longest, most complicated route. That sums up so much of my life in a way...
They are now glued to their painting sticks and will get primed tomorrow ready to move over to the painting desk...
...Where the Forklift is progressing. Mostly white, still need to do the black-lining (which may not actually be with black) and highlights (if they actually show up). You can also see some angles to show how close the arm is to the side of the cab, and views through the cab (I thought I'd done a better job of keeping those windows clean than I apparently have) with arrows to show the arm. Should also get on with the pallets too, they've been part-done for a while.
I'm studying how you apply 'grime' to a working vehicle without burying it in dirt. Sometimes I want to do 'the subtle', but to get away with it you have to have a good, tight structure underneath. Some of my stuff requires a bunch of trim to hid the sins of the father.
Love the painting stick trick- hadn't seen that before and will give it a try on the _next_ set of figures I do (the Raging Heroes are already mounted on their bases).
Thanks M'Cat.
I do tend towards subtle grime rather than covered in mud for my models. I'll try to remember to talk through my process when I get to the weathering.
Yeah, the first step is to paint up a "clean" surface. It's not easy to plan exactly where the weathering will go, and it's just easier to paint the whole thing rather than try and "miss" some areas: I'm a "paint on the paint chips" kind of person, rather than use salt/hairspray or chipping fluid. Nothing wrong with those techniques, I've tried the hairspray technique before (without salt lumps), but it wasn't particularly successful. Dave (dsteingass) did a good tutorial for this technique recently. And if you're looking into painting on your paint chips, I'd look at the tutorial done by bebopdrums2424; lots of good advice for making them look 3D.
But for subtle grime, stick around and I'll try to show how I go about it.
Meer_Cat wrote:... Some of my stuff requires a bunch of trim to hid the sins of the father.
I'm pretty sure that most of us hide more sins than you realise. I know I do.
For example, the extensions I added to the forklift's kneecaps are there to prevent you seeing down into the lower leg and noticing that the cables don't go all the way down.
There's also quite a few not-quite-straight bits on this forklift. These will be highlighted with weathering, rather than hidden; if you can't fix it or hide it, make it a feature.
...Love the painting stick trick...
I've seen a few people use a similar technique for groups. Theophony has done it on a large scale with lengths of wood wrapped in tape for huge sections of armies, never mind squads.
I don't always use a painting stick, and when I do it's often just for the basic paint work and they'll end up on their bases for the little details.
It's more useful for bulk priming, zenithal highlighting and basecoating type work.
The purpose is to give you a way to hold the mini' without touching it. If nothing hangs off the base then being glued to the base is not much of a problem (although it can get in the way of some painting angles).
An alternative is using these painting handle things; they clamp on to the base (typically) of a mini' and give you a more comfortable way to hold it. But they only hold one at a time... a stick can hold many.
Use a dot of superglue on one foot to stick them to the stick. They are then just snapped off once you've finished with it.
Camkierhi wrote:Excellent. Are you thinking deep rust brown is the new black for the lining?
Thanks Cam'. Not for the lining (see below), but there will be some rusty areas like that later as part of weathering.
I went for a dark blue for the black-lining to give the white that really clean, whiter than white look. To contrast with the yellow.
Once the weathering is on some areas will look less blue.
You'll also notice that I've coated the pistons with white in preparation for their final colour; bright blue for the upper and bright red for the lower.
The highlighting does show on the white... if you look closely...
It does work IRL, I don't know how well it'll come across in photos.
Now to finish off the metal bits and then the various other things (lights etc) and then signs/symbols etc. before the weathering can begin.
And the Intercessors have their bases done up to the "pre-grass" stage.
Although the 'nid and the tentacle will get some goo added. And the discarded helmet of Mr. Salamander will be painted as he is.
And I need to remember the brass shells on Mr. Raven's base...
Leviathan appeared to be the hive fleet in question for the Blood Angels woes, so that's what I went for.
The actual Intercessors have had their recesses darkened, next to do is the proper basecoating (well except for Mr Raven who is black... obviously).
A table full of scenery will be tricky as I don't have that much about (nor a mat to fill in between them).
But there will be photos with both the forklift and the associated workshop.
Maybe whoever buys it will supply photos...
Just a quickie to show the Intercessors basecoated:
And a photobomb by the forklift...
Thanks Shas'. They'll certainly stand out as a squad.
Thanks CK.
Glad to help OMN. Look forward to seeing your results.
Thanks Theo'.
More on the Intercessors:
Next layers of paint to give their base colour some depth.
Some of them will get a bit more lightness and then it's highlighting all the edges...
And I added the goo to the 'nid base.
Thanks Complex57, Graven', Comrade', M'Cat, Azalle, and Theo'.
Yeah, when compiling that picture I was hit by the realisation that they are a very... striking and familiar combination of colours. A rainbow squad.
As to Voltron, Power (armoured) rangers, Captain planet... I'm sure there are many more examples of groups that... :
Originated from different backgrounds,
Utilise different methods/powers,
Represent their differences by each picking a colour from red, blue, yellow, green, black (occasionally using a variation of one or two of those colours, e.g. pink),
Have personalities that perfectly match their differences,
Are brought together to fight a common enemy,
Teach that the whole is greater than the sum of it's parts,
Are ultimately a good way to sell toys to children...
I may use E, F, A, W and V instead of the usual squad markings for them because of this (the roman numeral V being a useful decal for the fifth member of the group).
But who is who? Is the red Blood angel "fire" or is that the Salamander? This raises so many more questions...
Anyway, highlights done:
I'm thinking of giving them gold trim to unite them a little...
And it makes me think of this:
Spoiler:
And now we can have a several page discussion on your favourite group of colourful individuals that learn that they are stronger together after one of them is kidnapped / trapped / injured / leaves after becoming disillusioned or seduced...and sell toys to kids...
The only color group stronger together to sell children's toys is the great crusade under the emperor and his 20 legions. You got the purge the xeno in every color needed and not needed.
I mean power rangers wouod be better with chain axes.
Thanks Gits'. Yeah, went more "minty" than "radioactive" with him.
Thanks CK. There's more to do about the battle damage when I come to it.
Necessity breeds invention. I'd have just liked to choose to do damage, rather than be forced. Although I'm still more annoyed at the waste of glue than anything else.
Thanks comrade.
Thanks Theo'. Yeah, those pretty much make sense.
And now with metals (and a few other bits):
There's some touching up to do (as always), but I'm about to mount them to their bases ready for the smaller details.
And you will notice the forklift hanging around the background.
That has had a little work done.
Primaris are looking good, that battle damage on BA fits right in with the model. I am kinda itiching to put mine together and start painting them now.
Hazard stripes are very neatly done, do use tape to do that or is it all done by eyeballing up the lines?
You really are being a colorful person right now with those marines and the forklift. Maybe do the company name on the boom of the lift in green with black edging to the letters to get even more of the rainbow out there.
Thanks York'. And you'd probably finish the whole army before I get these finished. The only tape I used for the hazard stripes were on the legs: The large stripes are on a raised rectangle and I placed a strip of tape off one side and painted towards it. The actual stripes are all freehand.
I do use my finger and/or a blunt scalpel (otherwise known as my universal poking device) to carefully wipe/scrape off excess paint or to neaten lines.
Thanks Graven'.
Thanks Theo'. Yep, there will be some kind of name on the boom, as well as a few other places. One of the last jobs.
And bases attached:
Due to focusing the camera on the bases the rest of most of the marines are out of focus, so here's a lot of base photos...
Not the most exciting, but you may see the blood from the 'nid is killing the grass on the BA base.
Is the helmet on the salamanders base his or his friends. If it’s his then he is wearing a second breathing apparatus as there is still the one on the helmet maybe paint it as another chapter that didn’t make the grade to get a new shiny primaris marine....like black space wolf (you don’t have a grey model, or white scars)


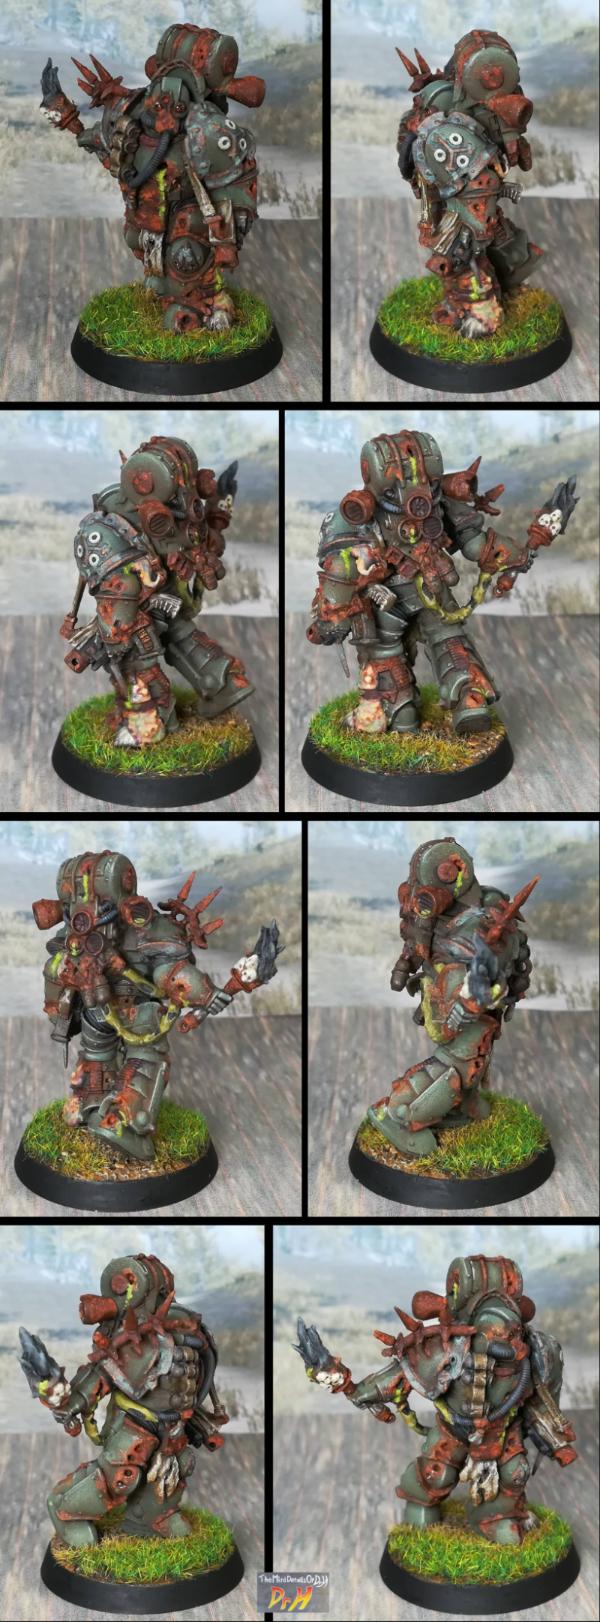


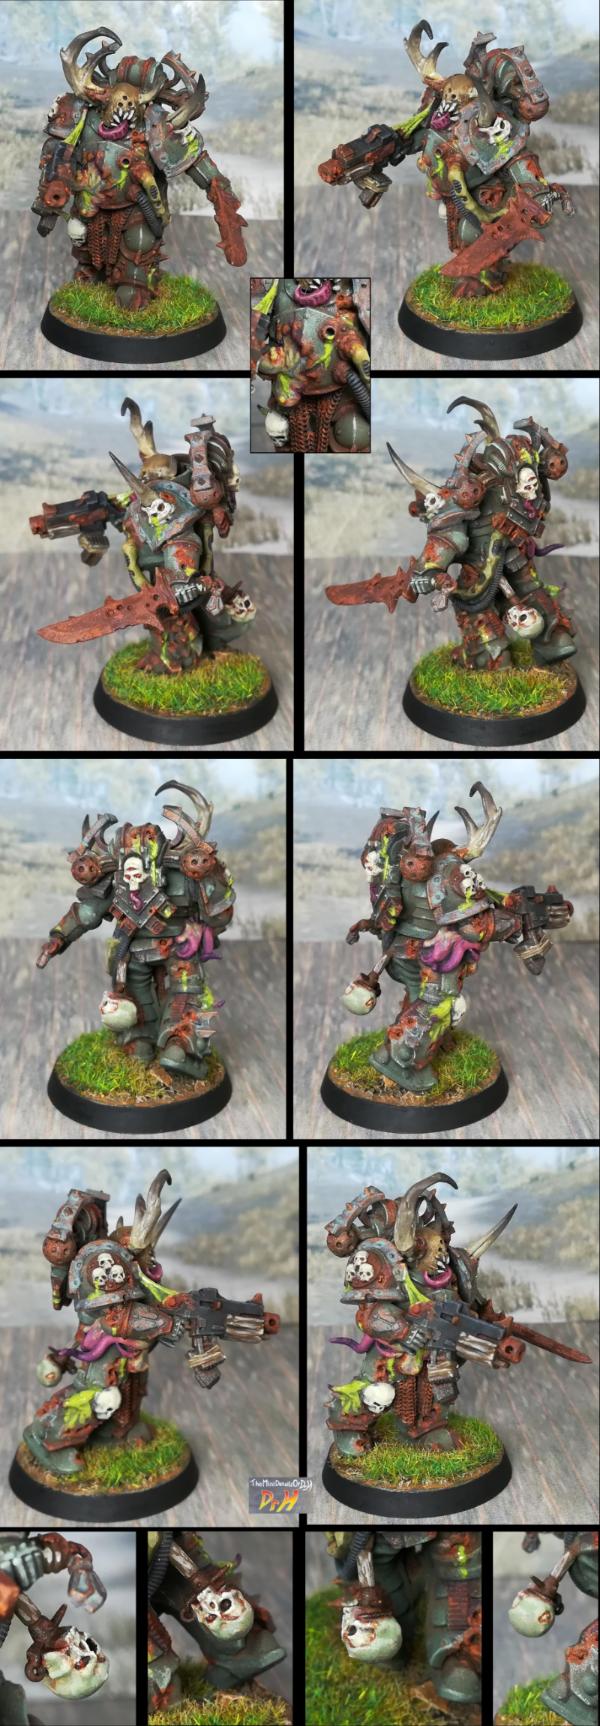
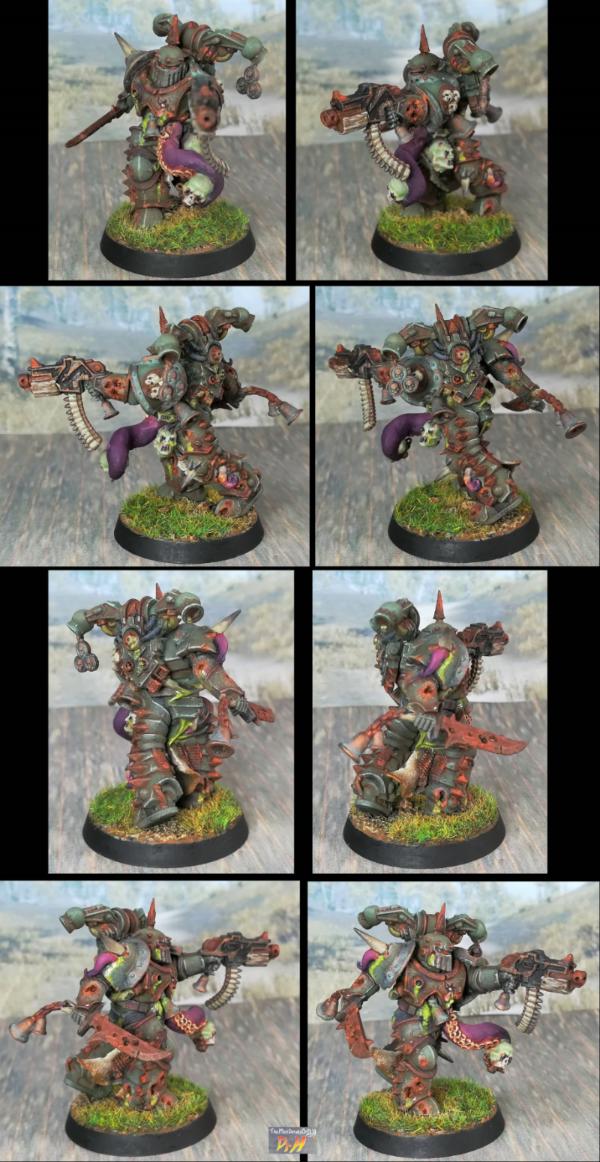
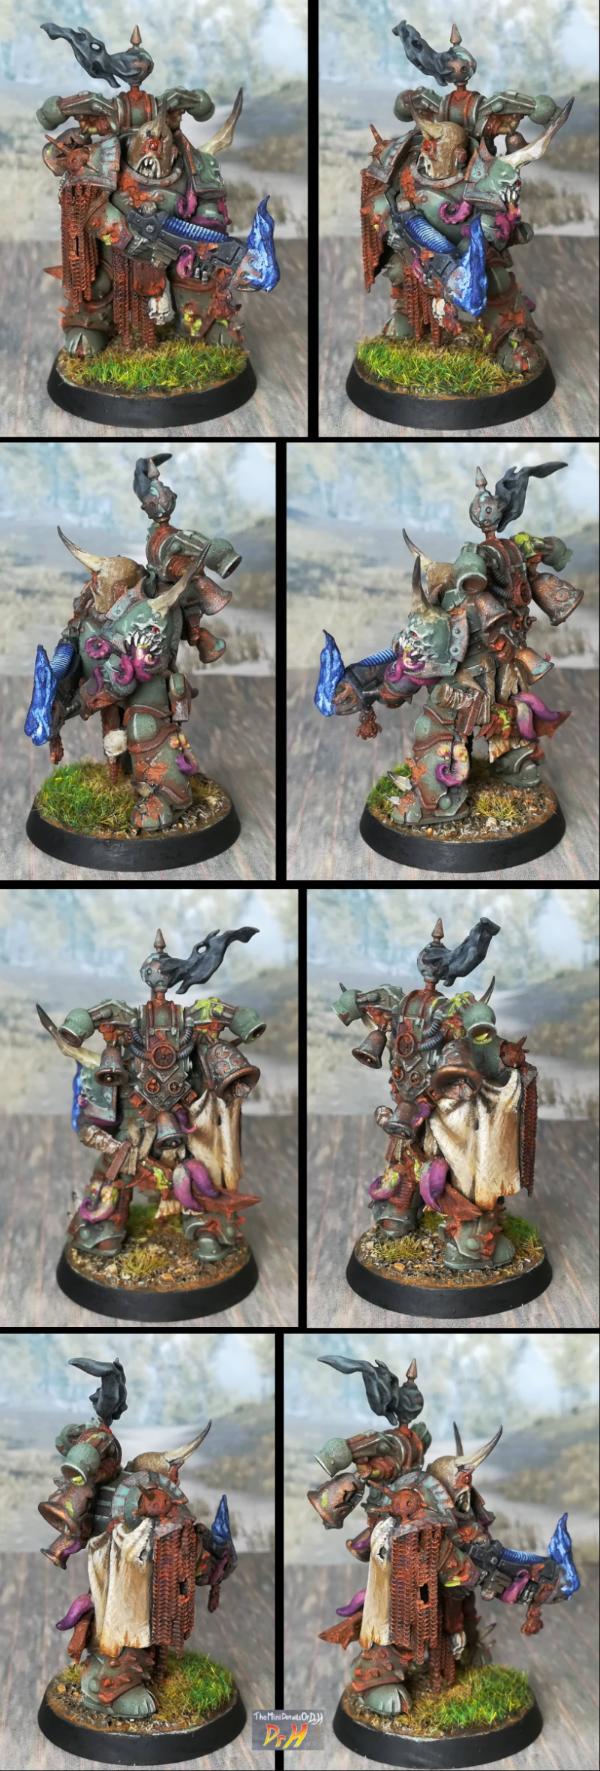


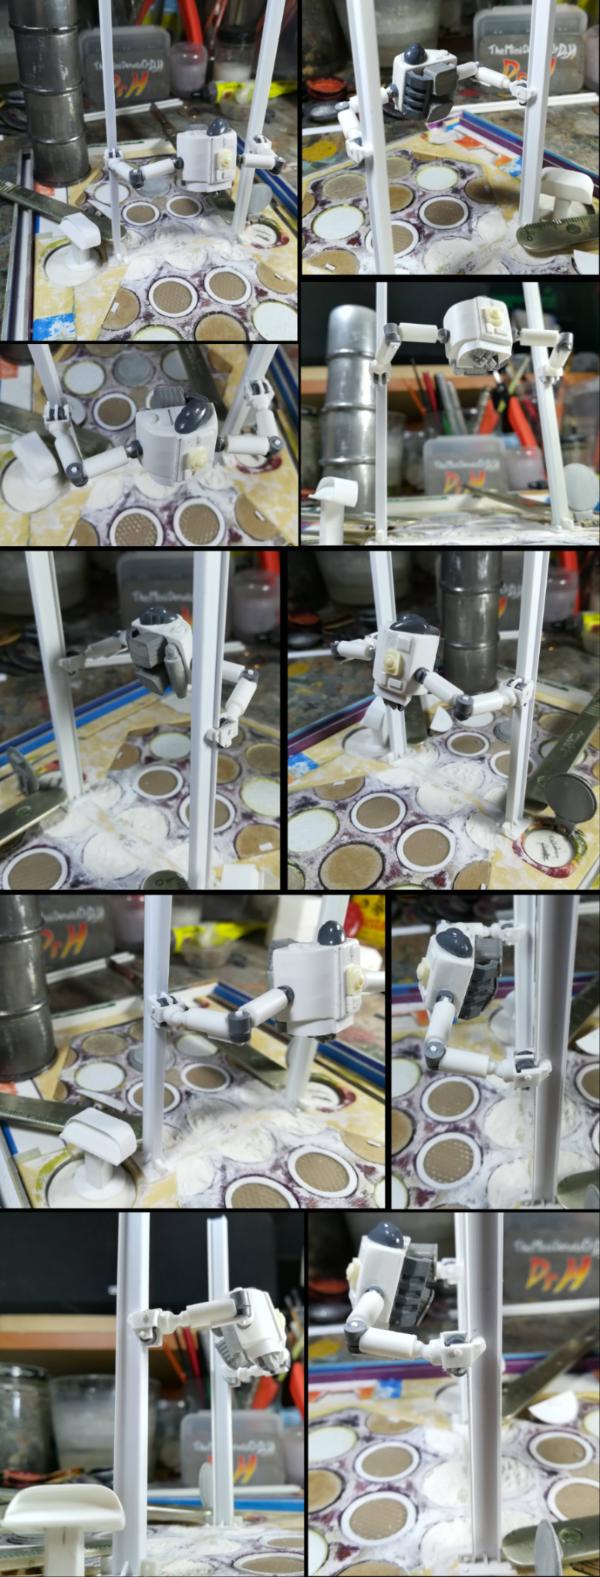


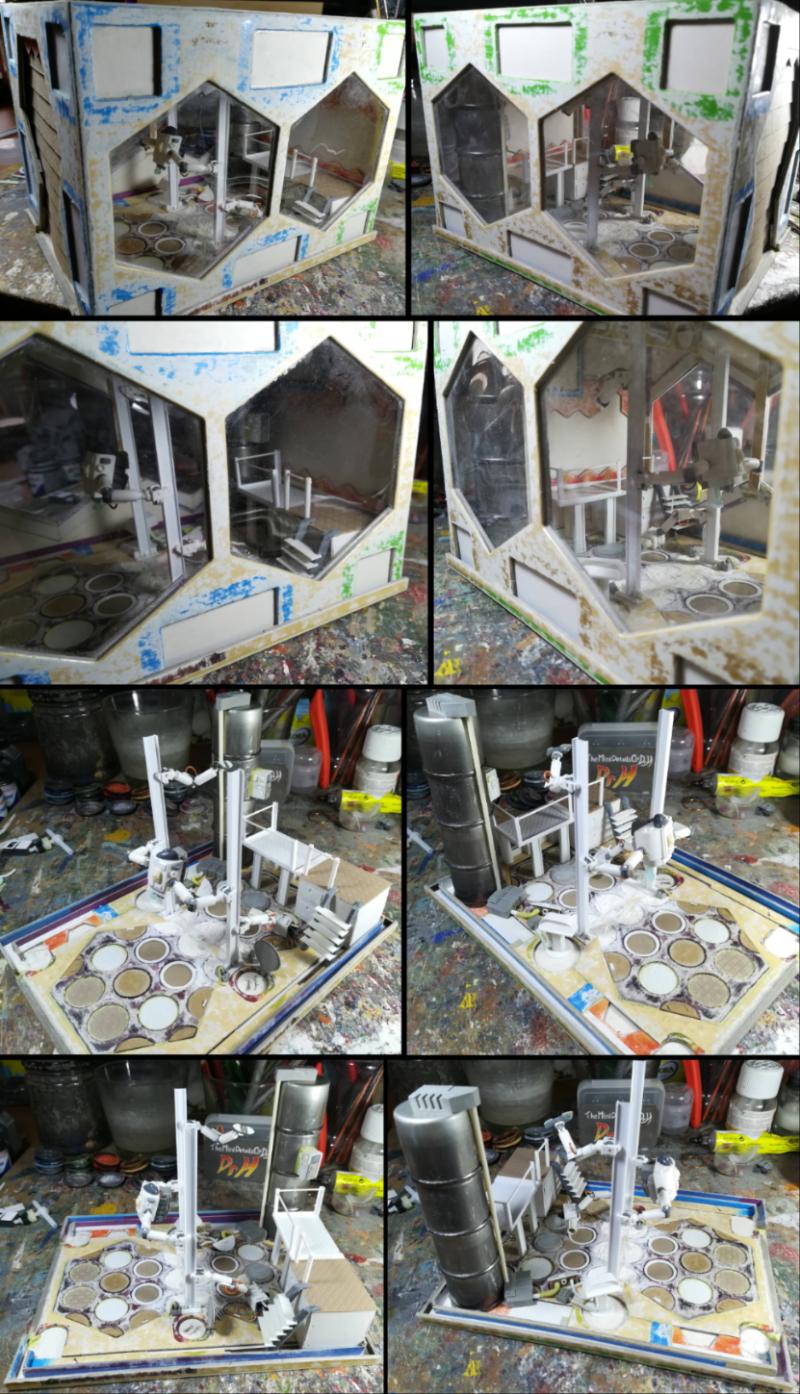
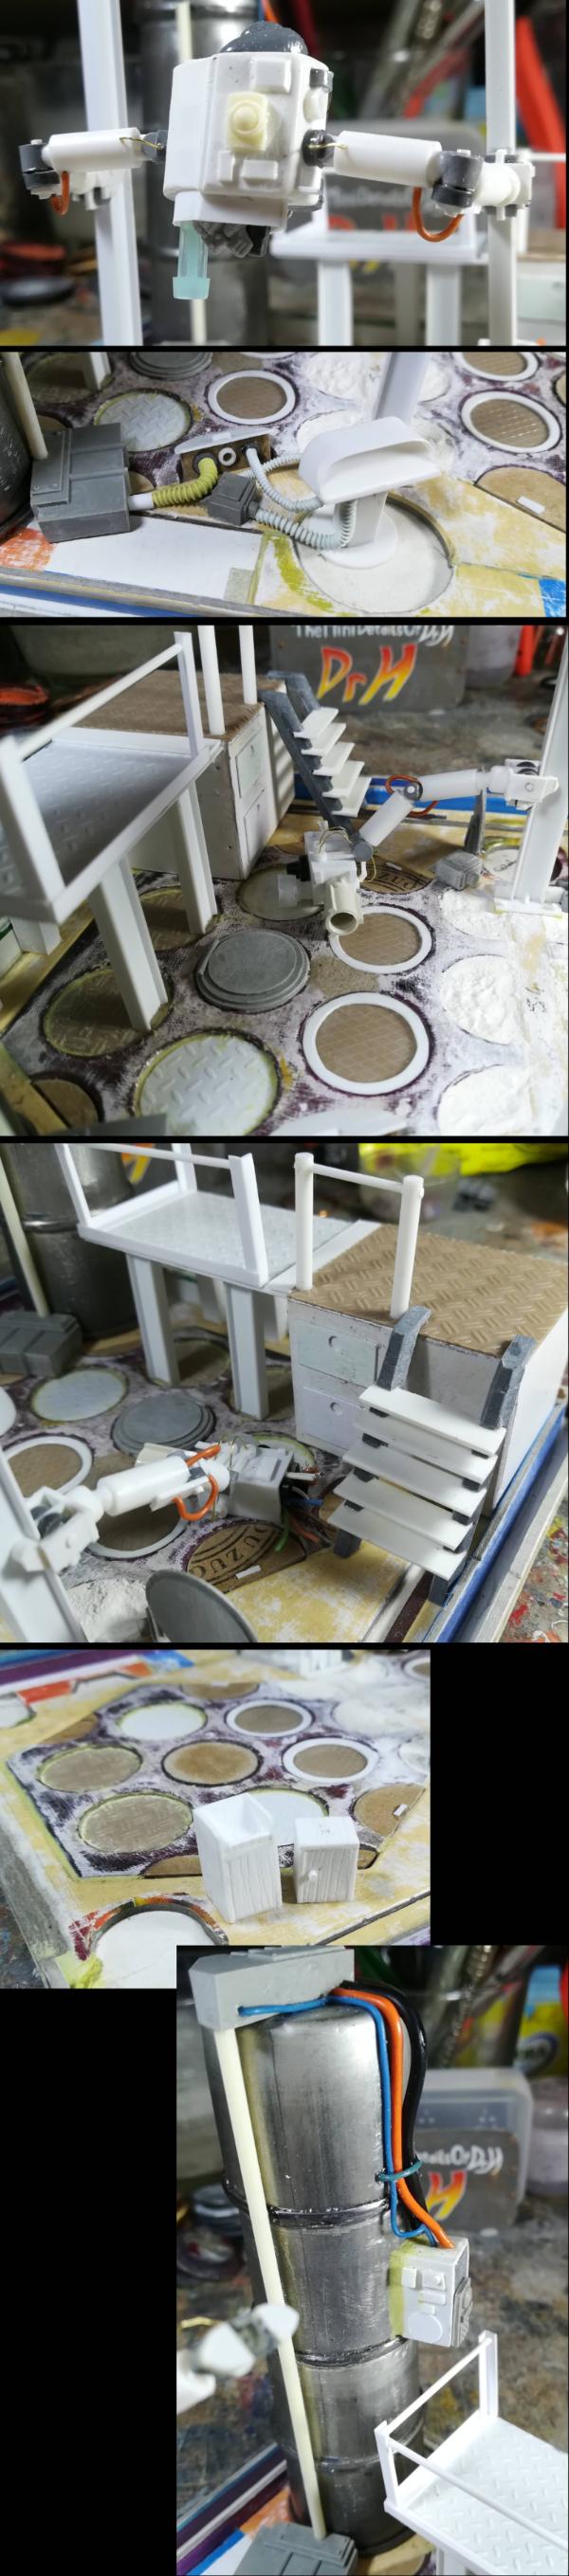


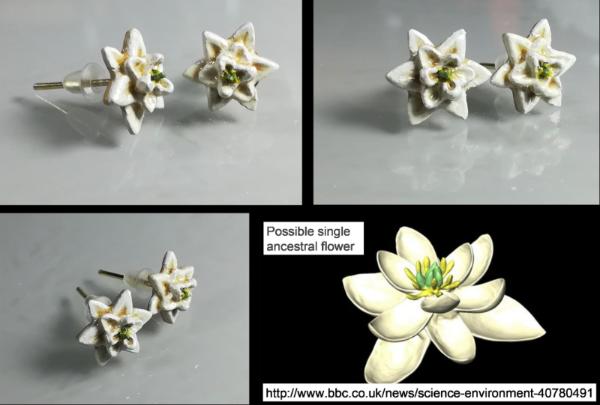
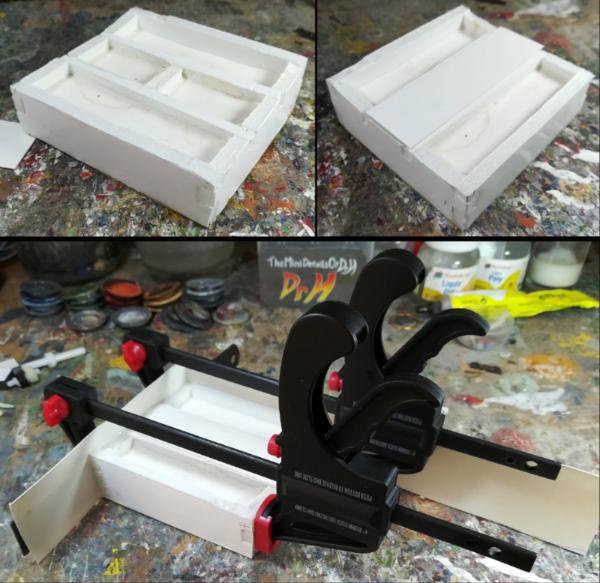

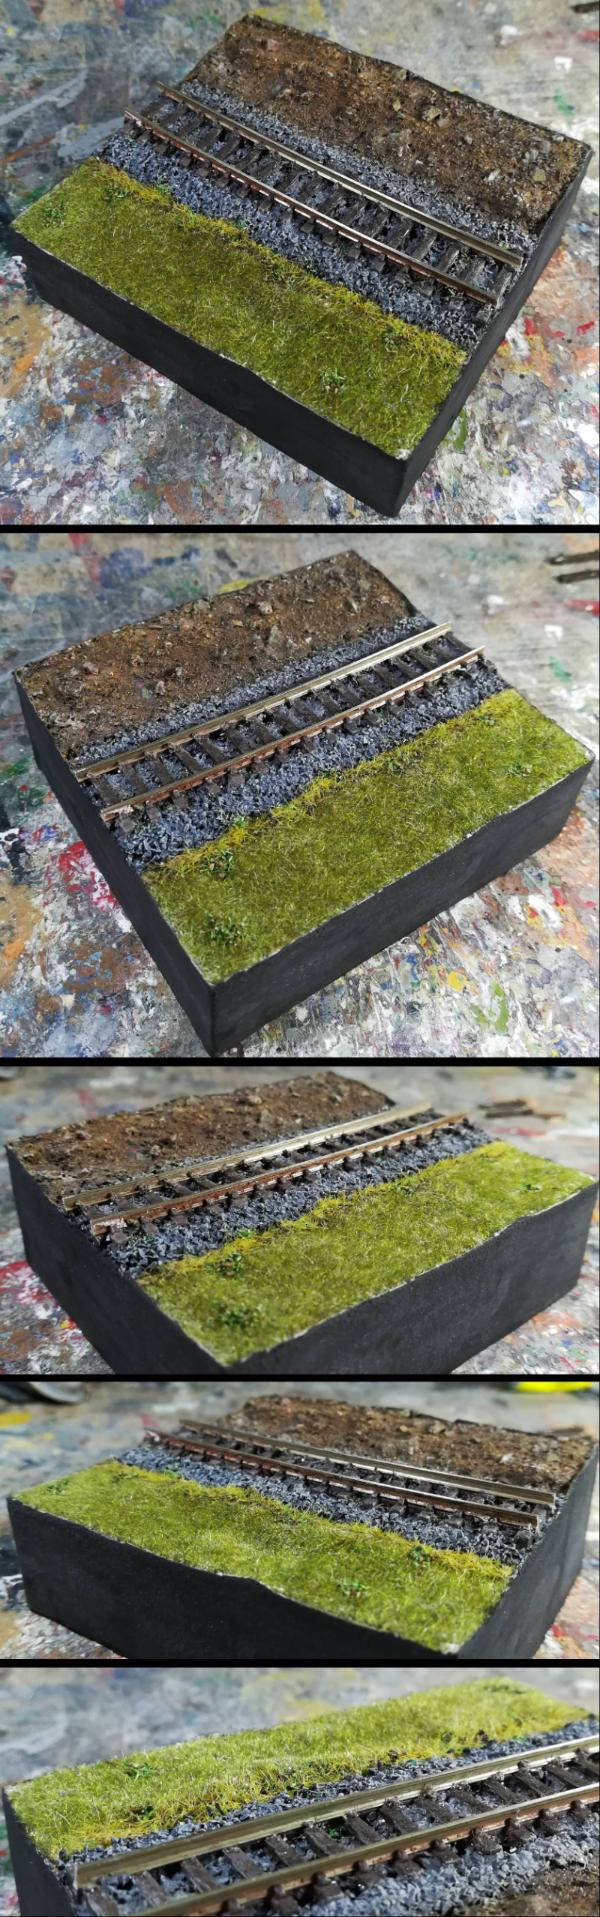
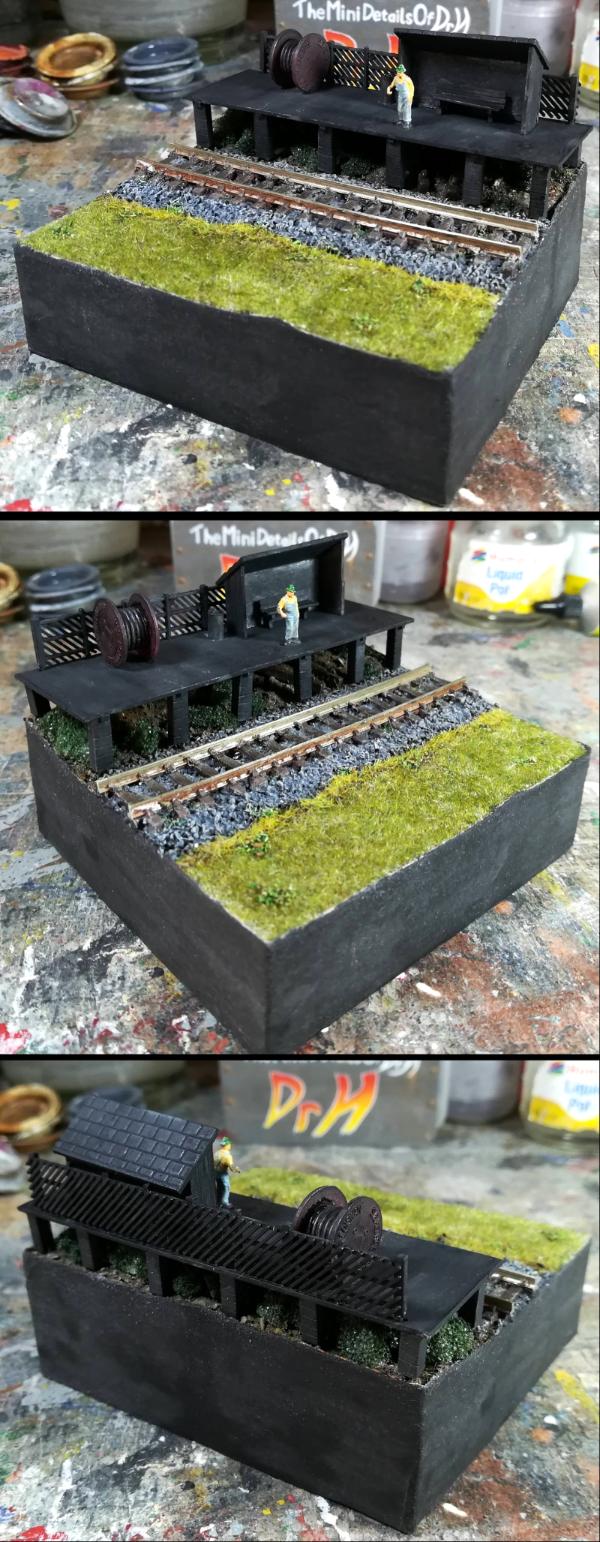
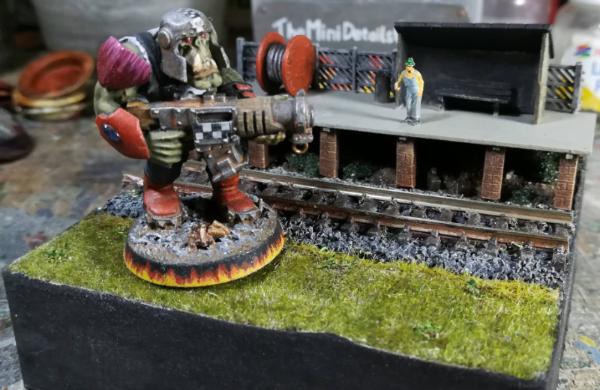

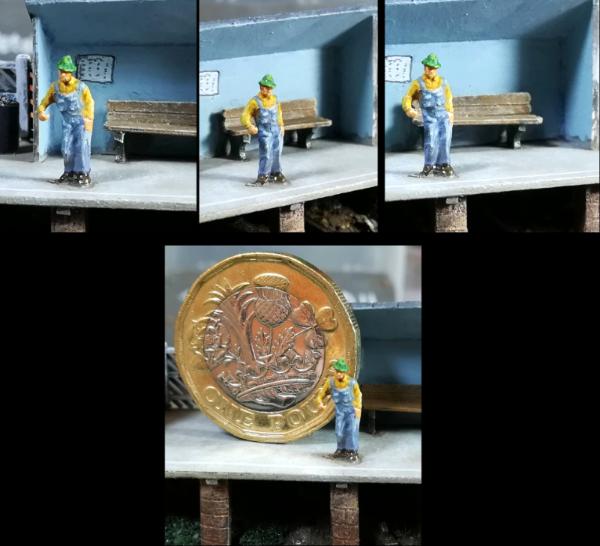


 Can't have a flat (even if I've made it not "flat") expanse of ground without some areas of interest.
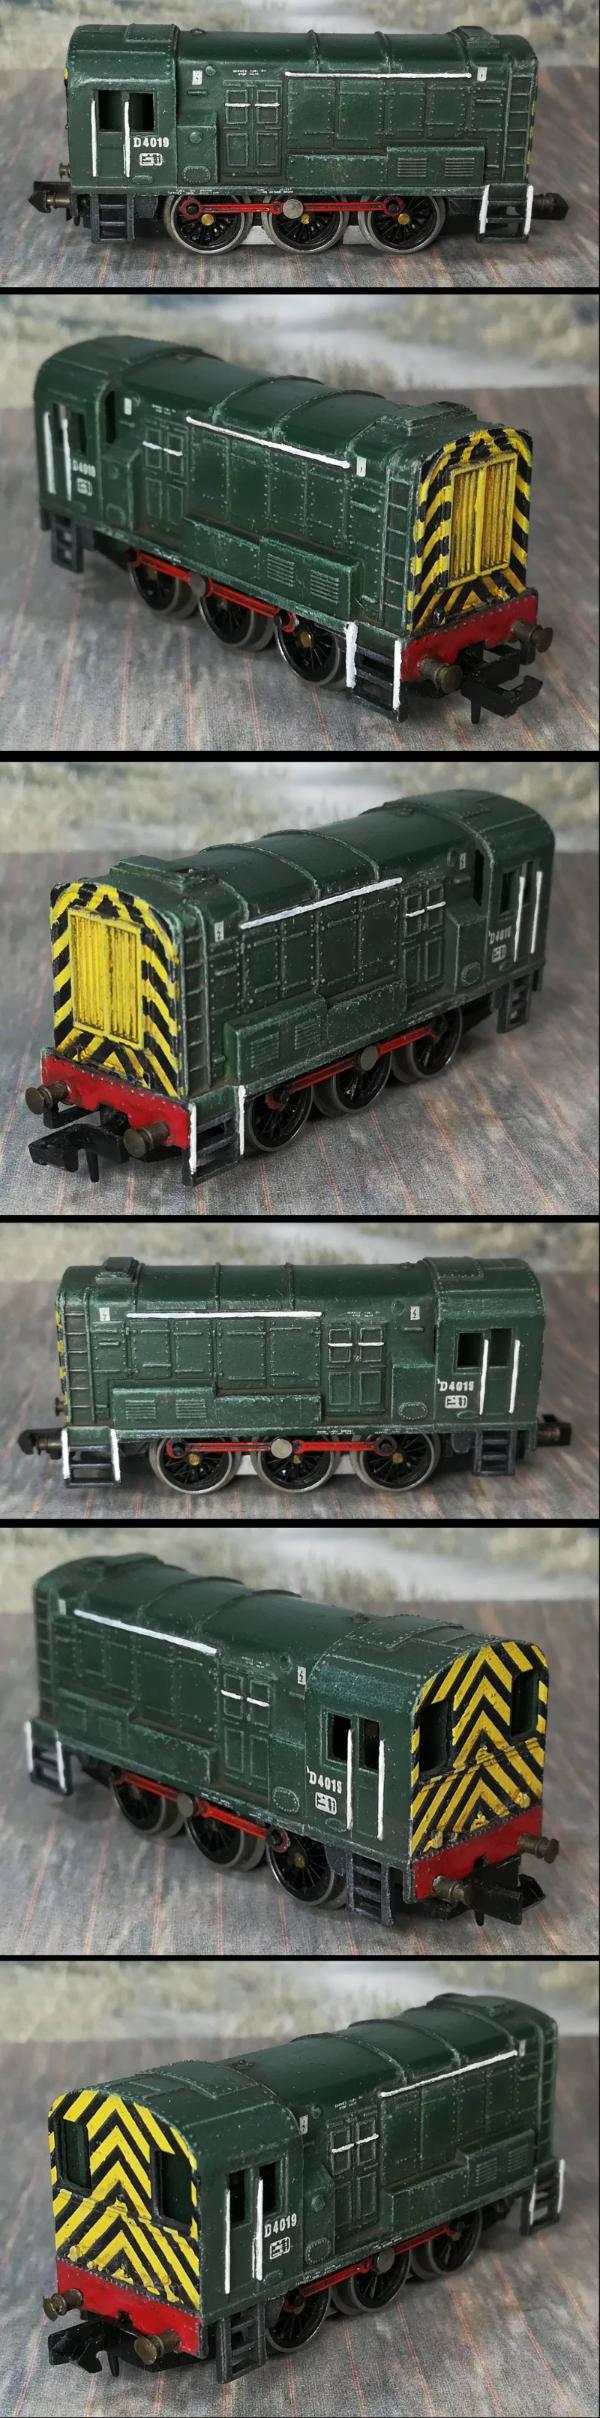
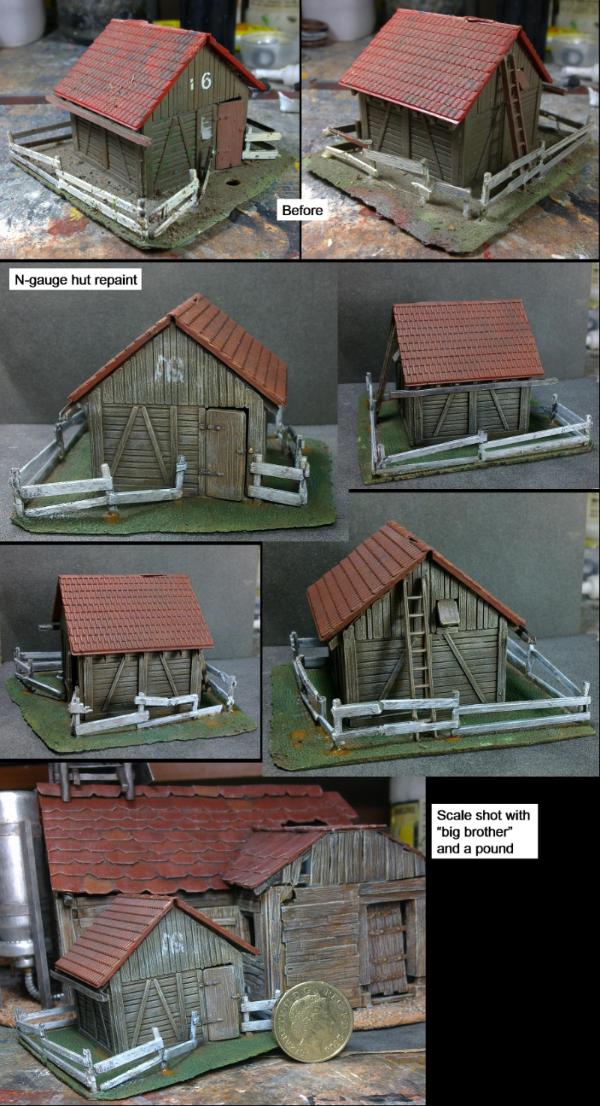


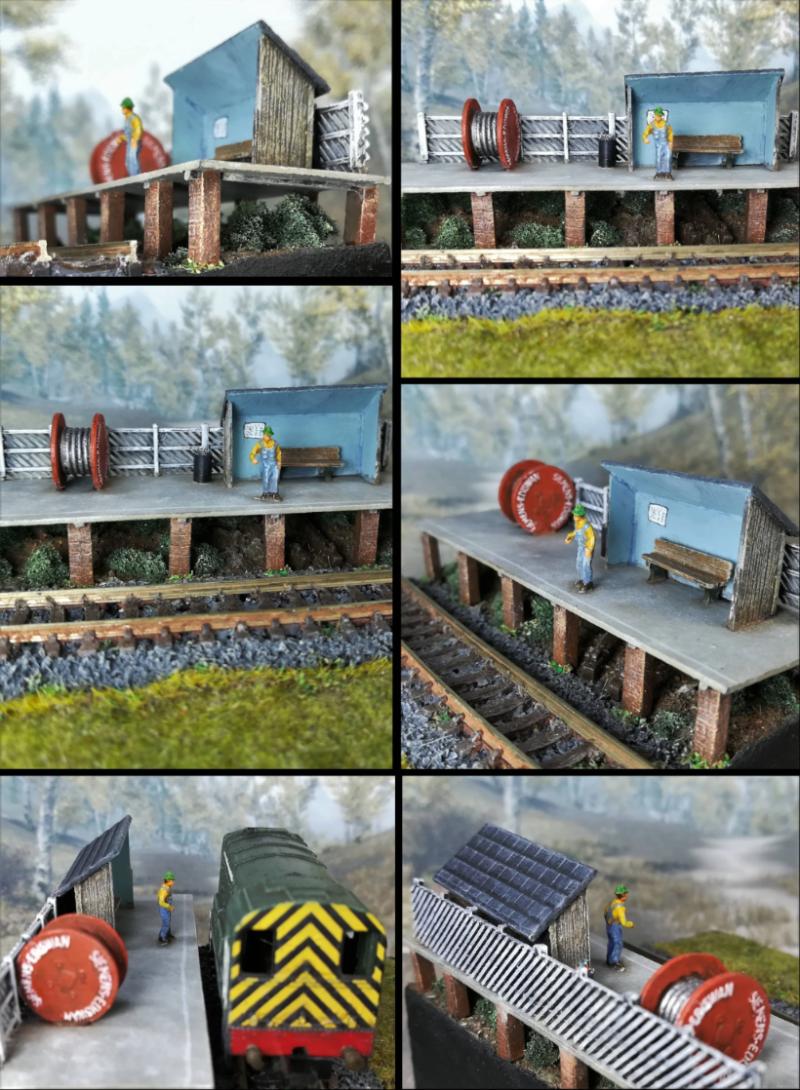

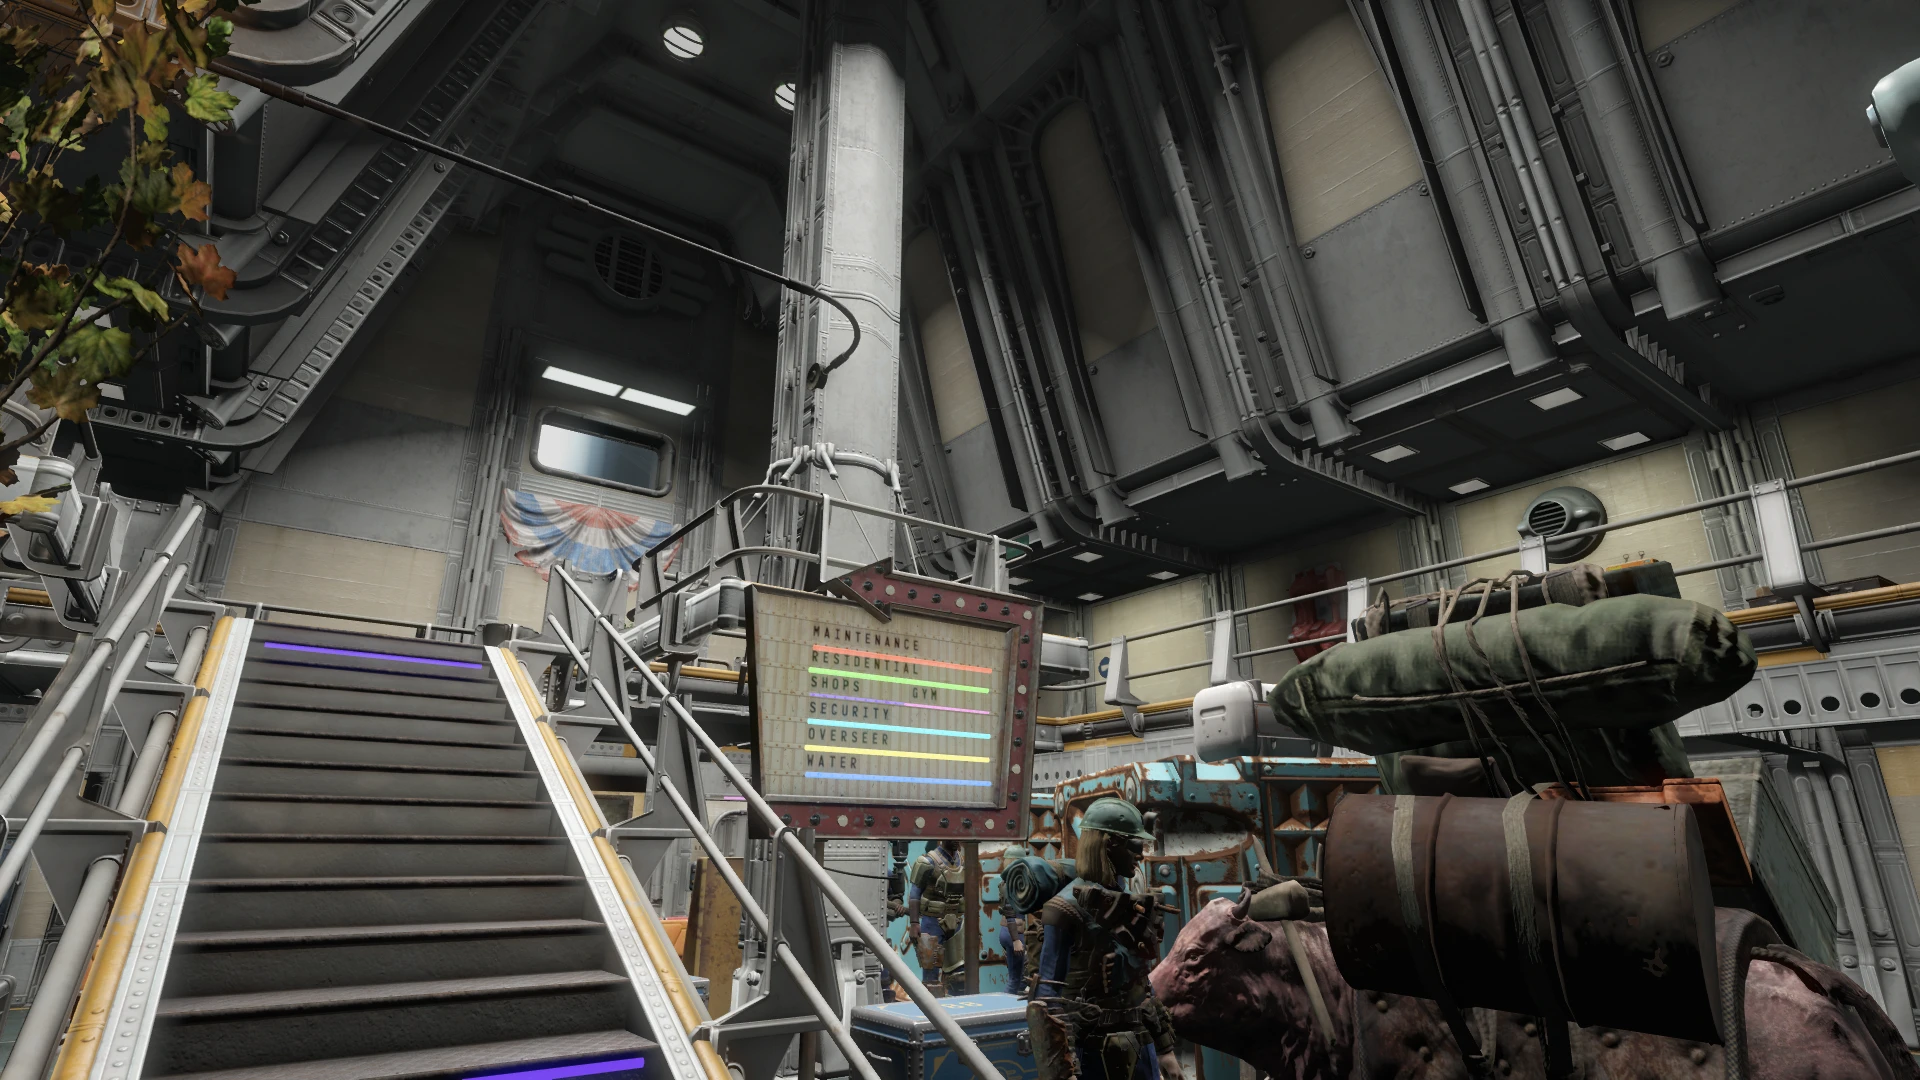
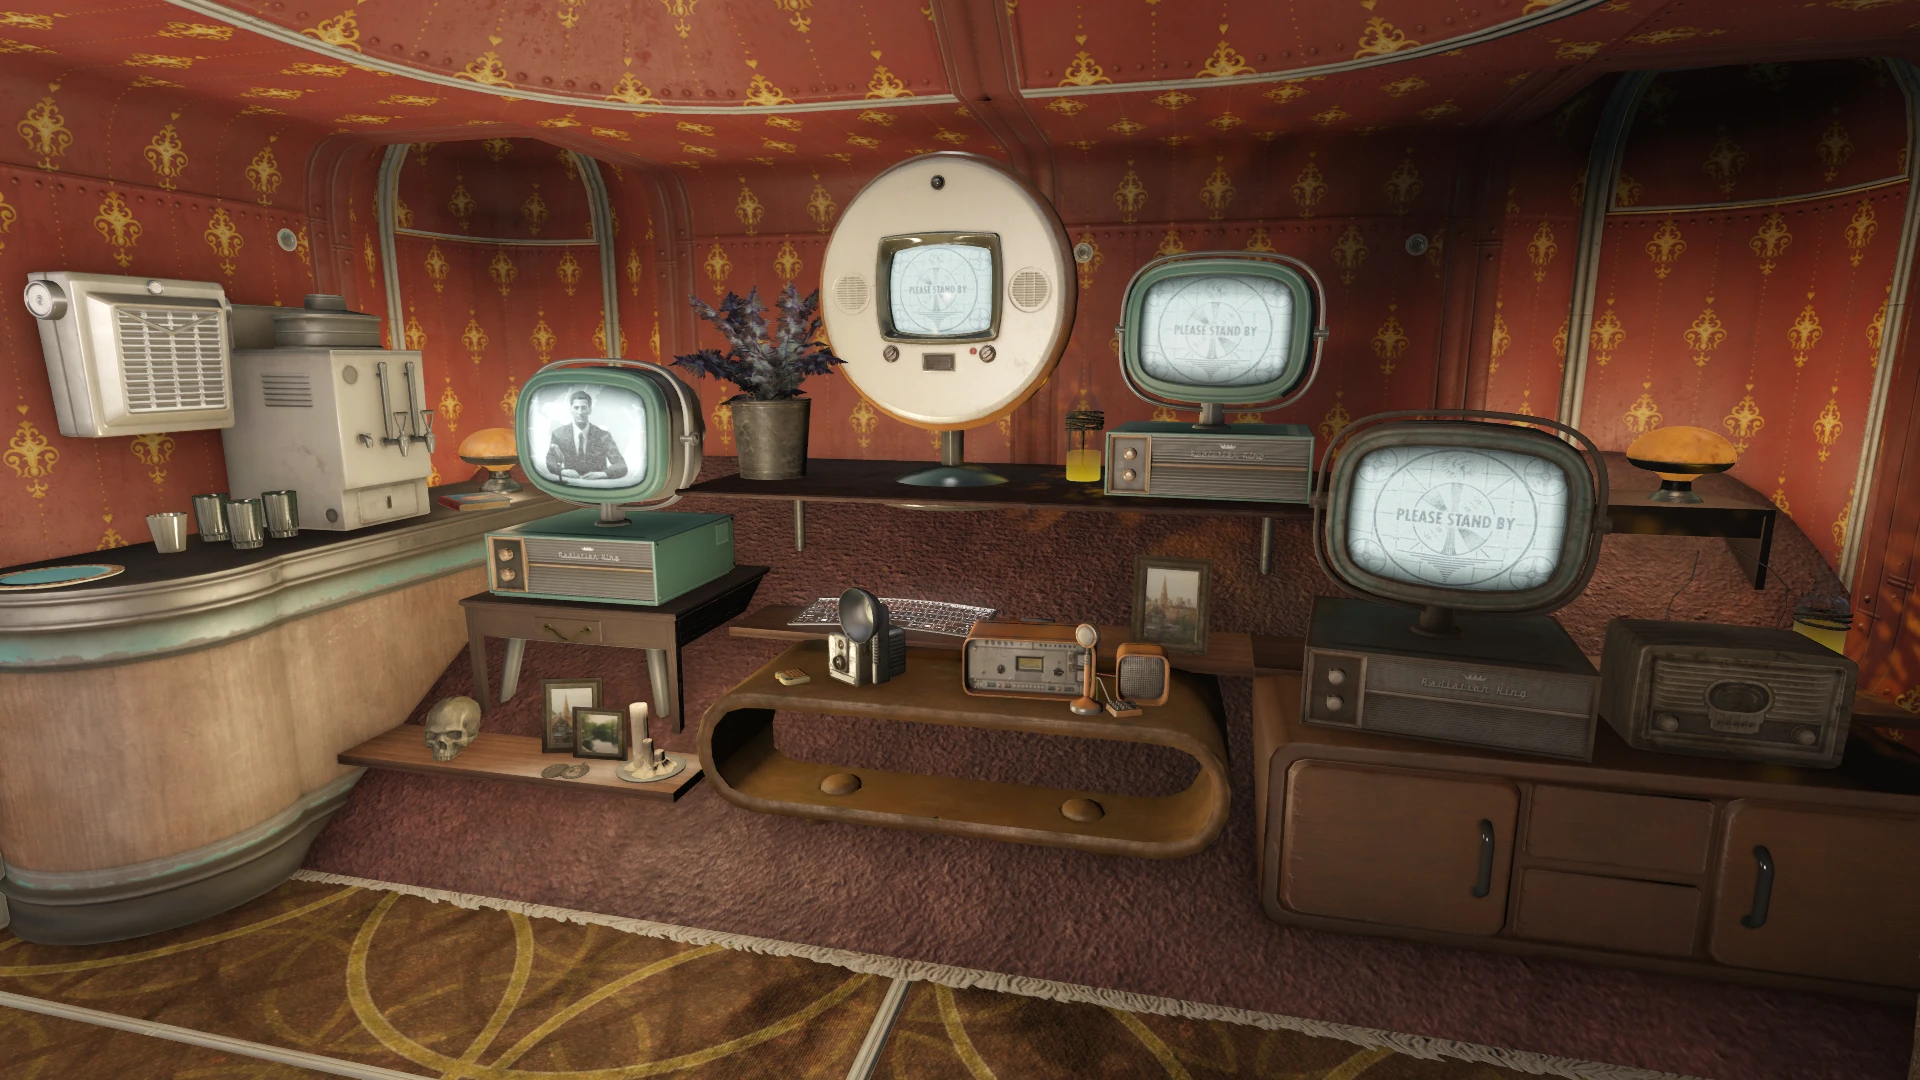
 )
)
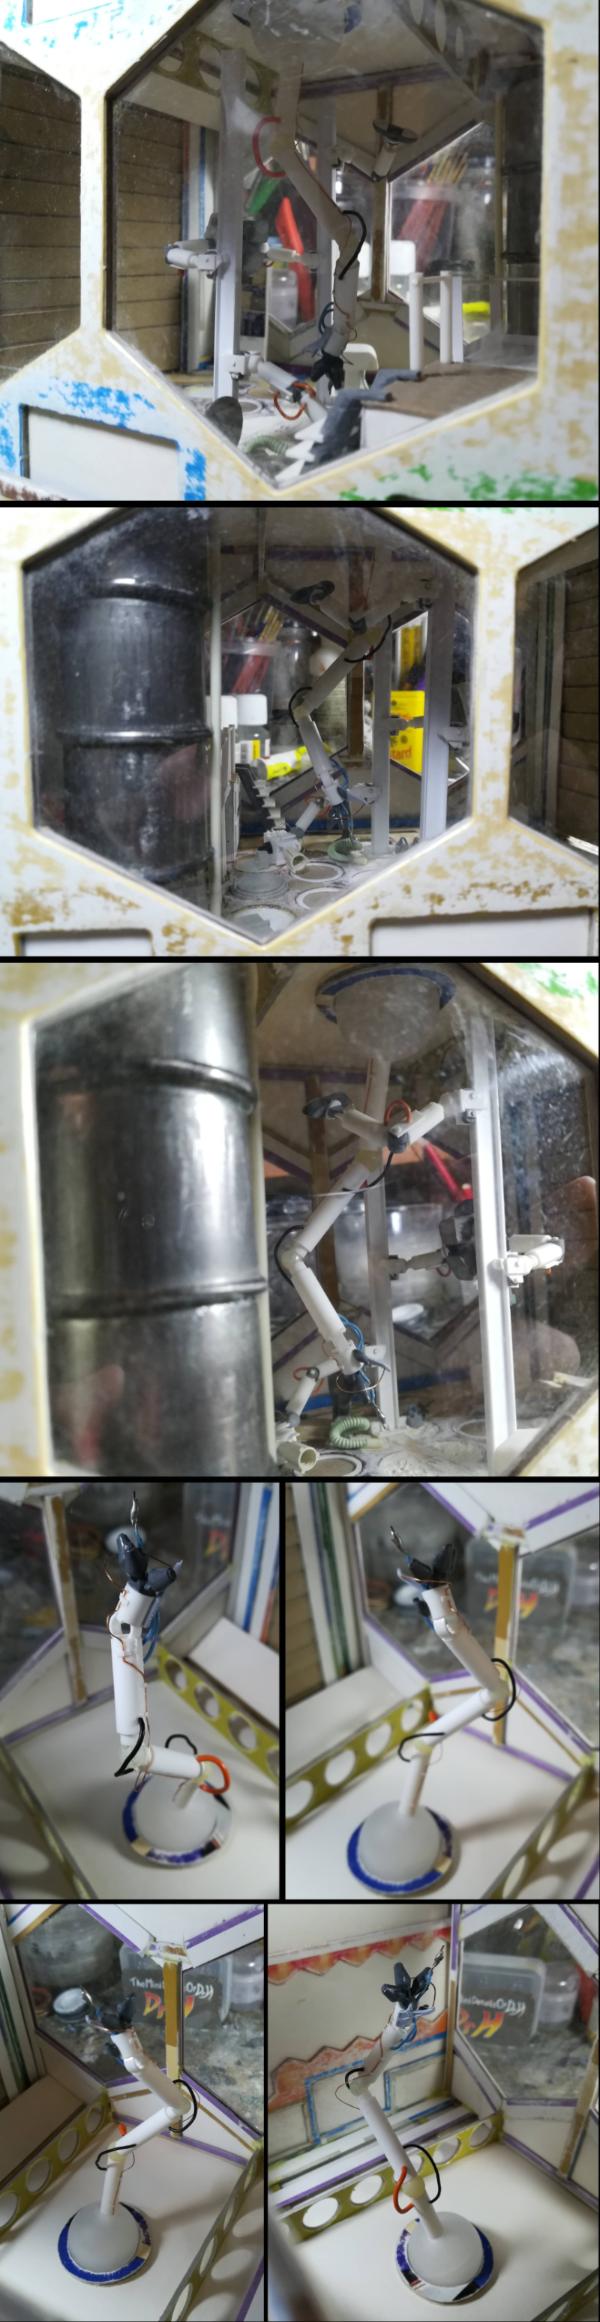


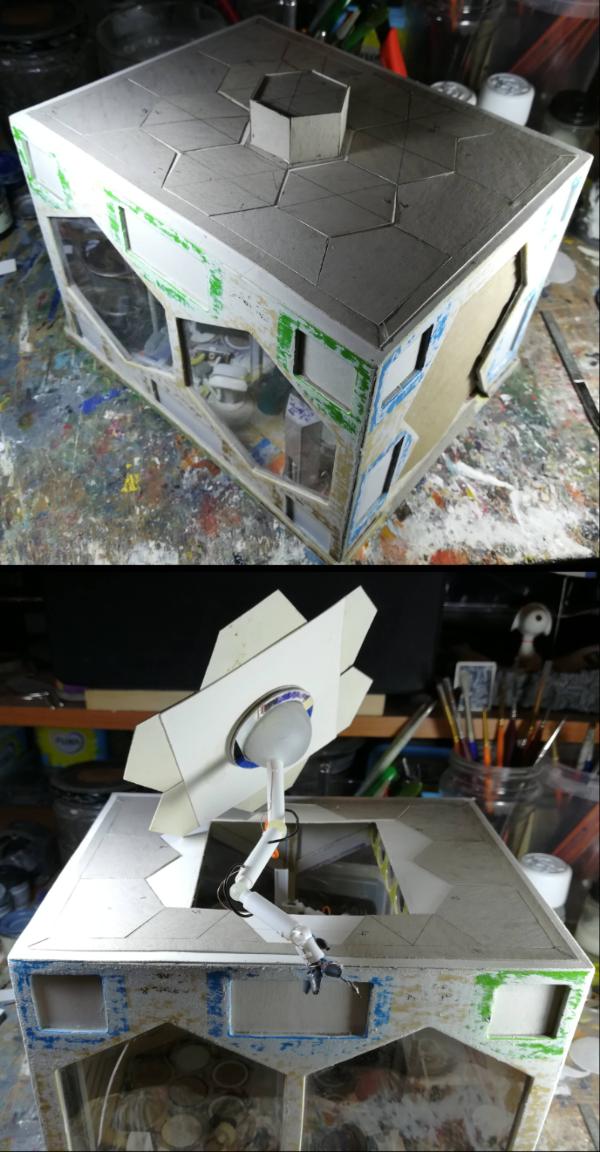
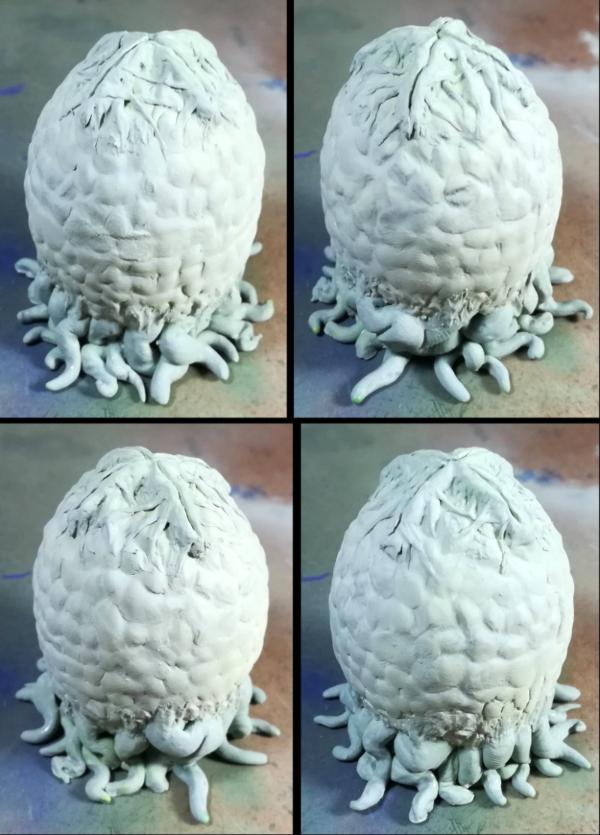

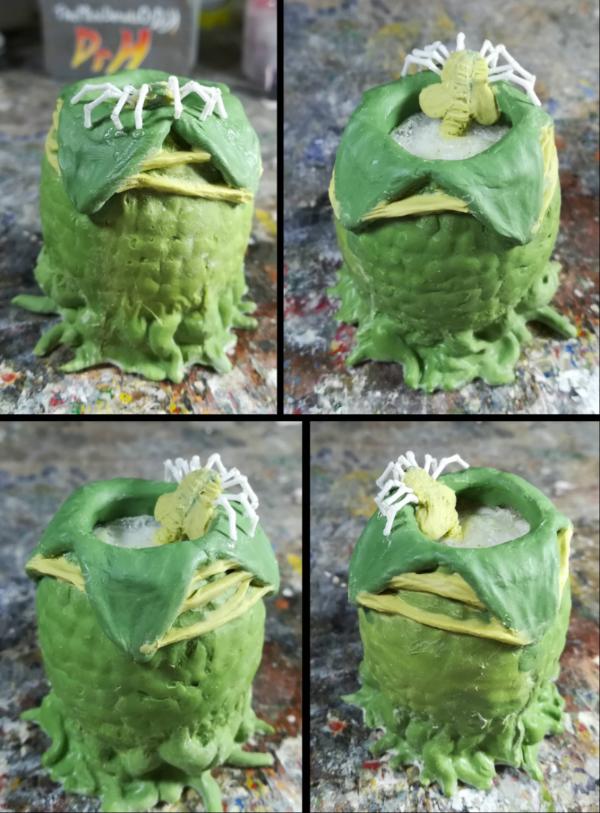
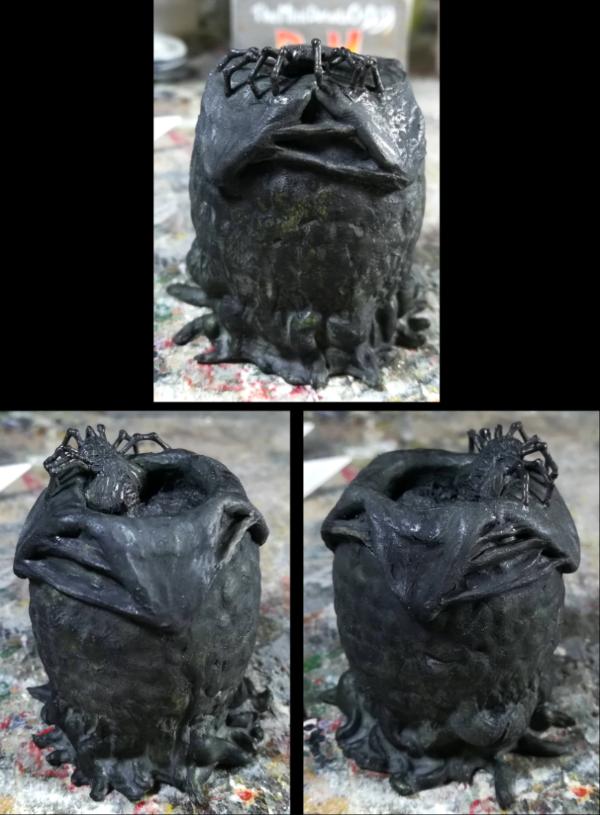
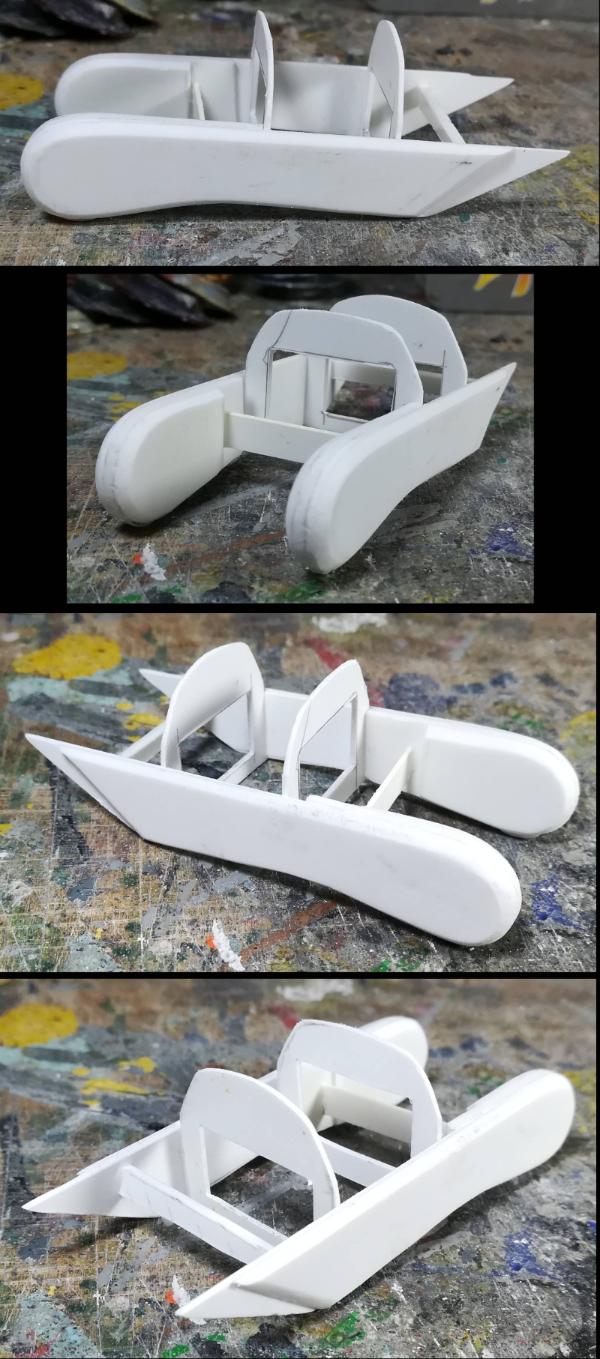
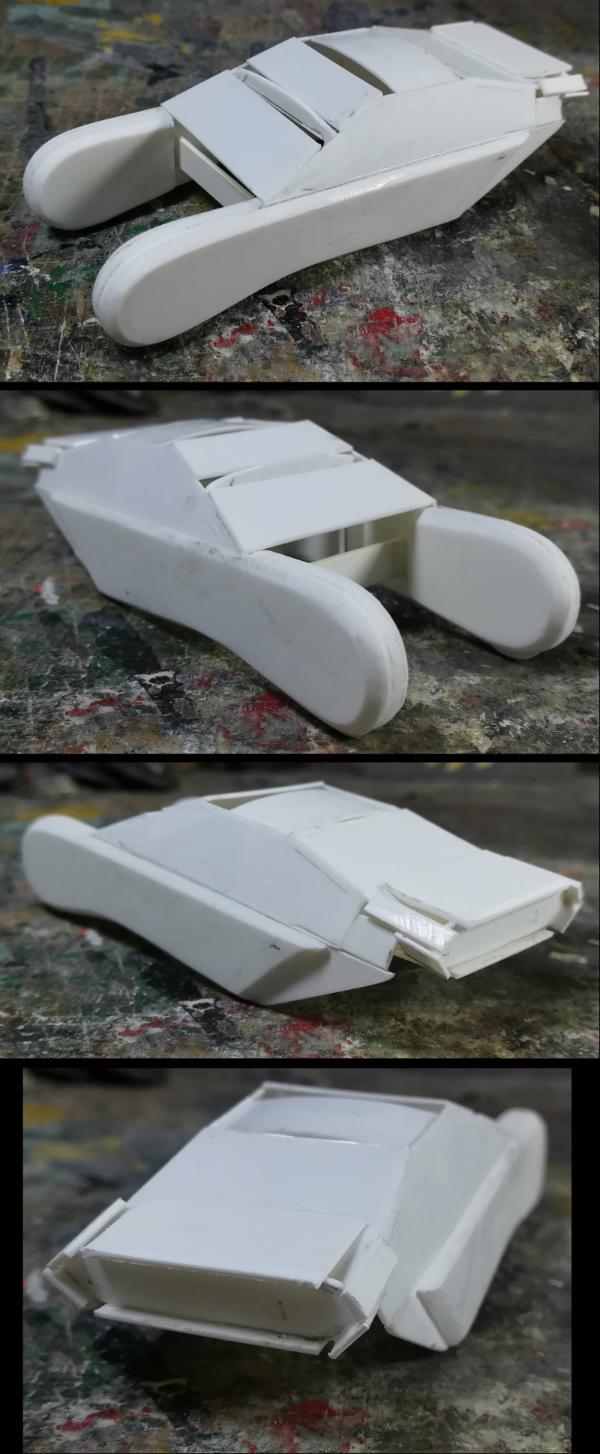
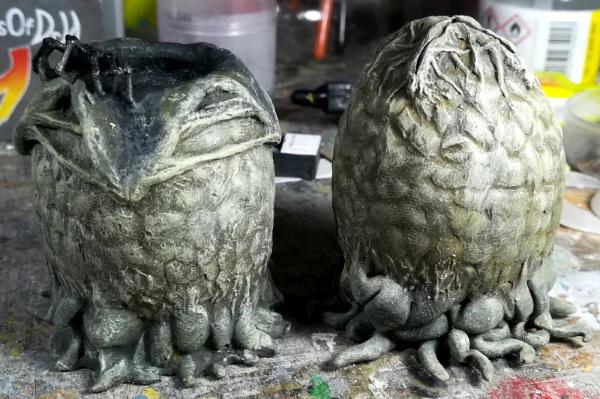
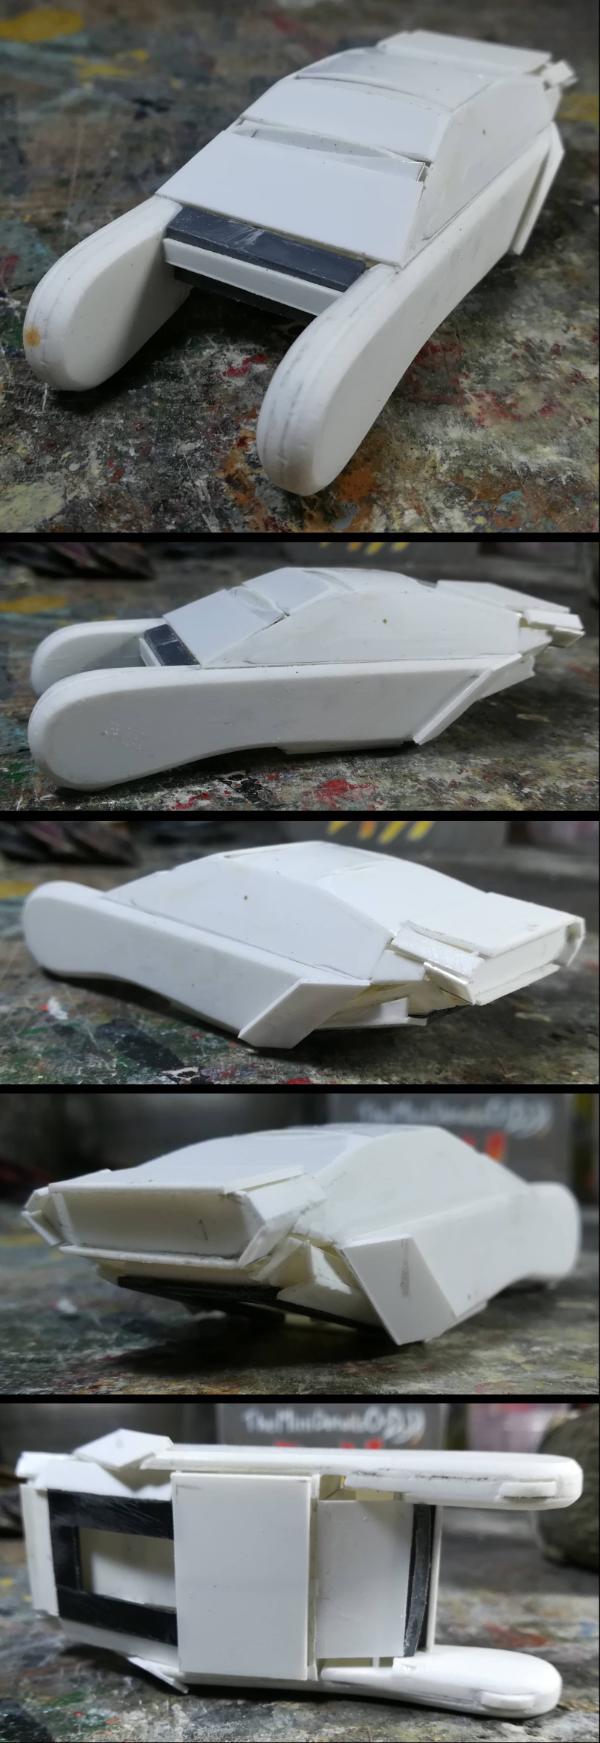

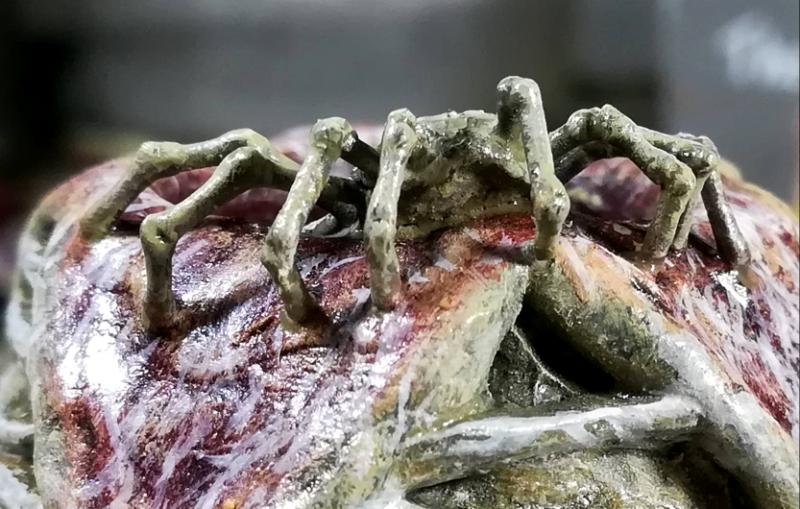
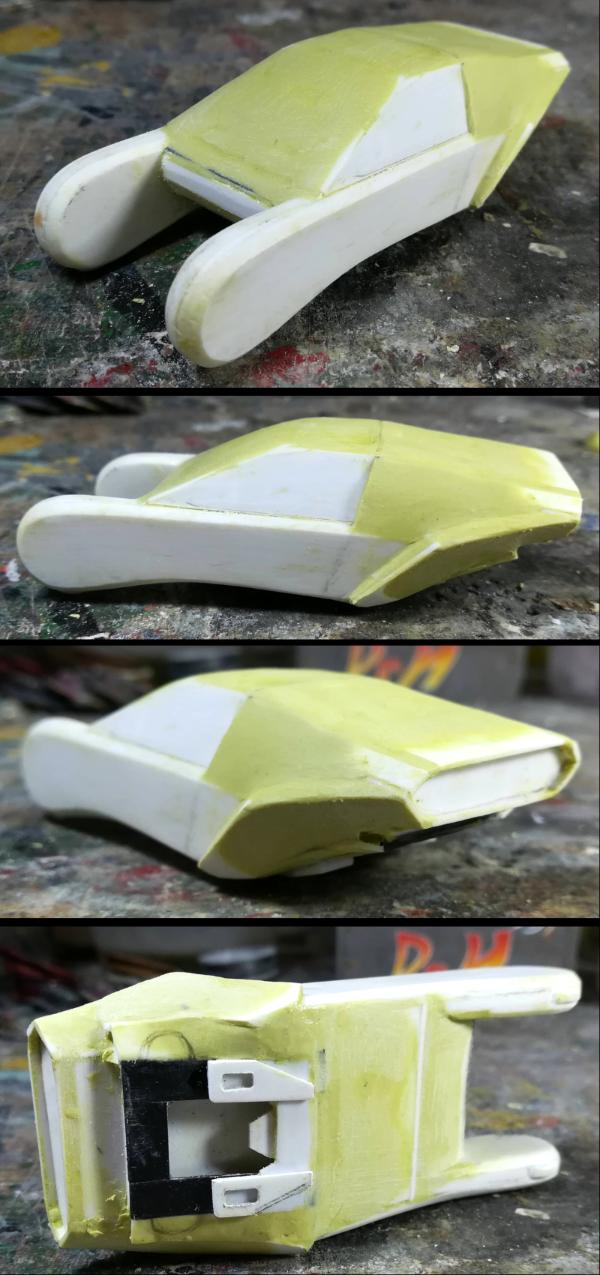
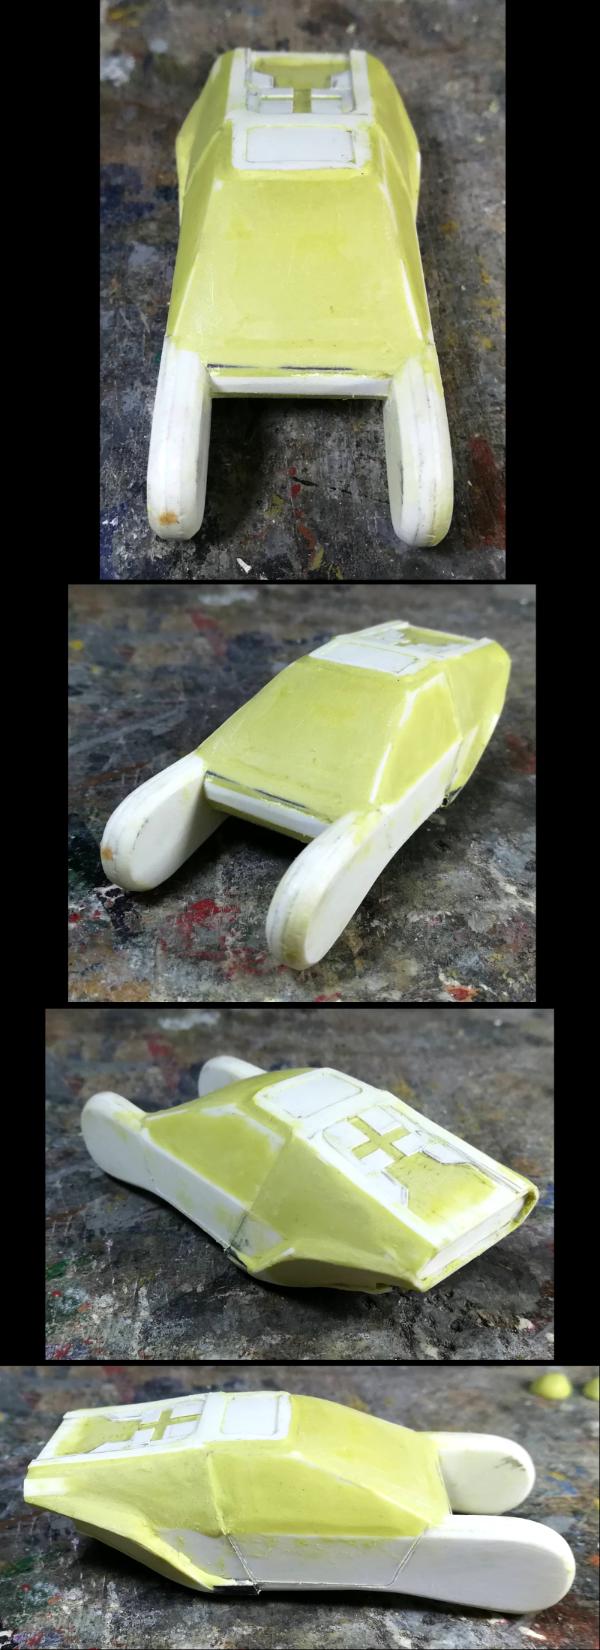
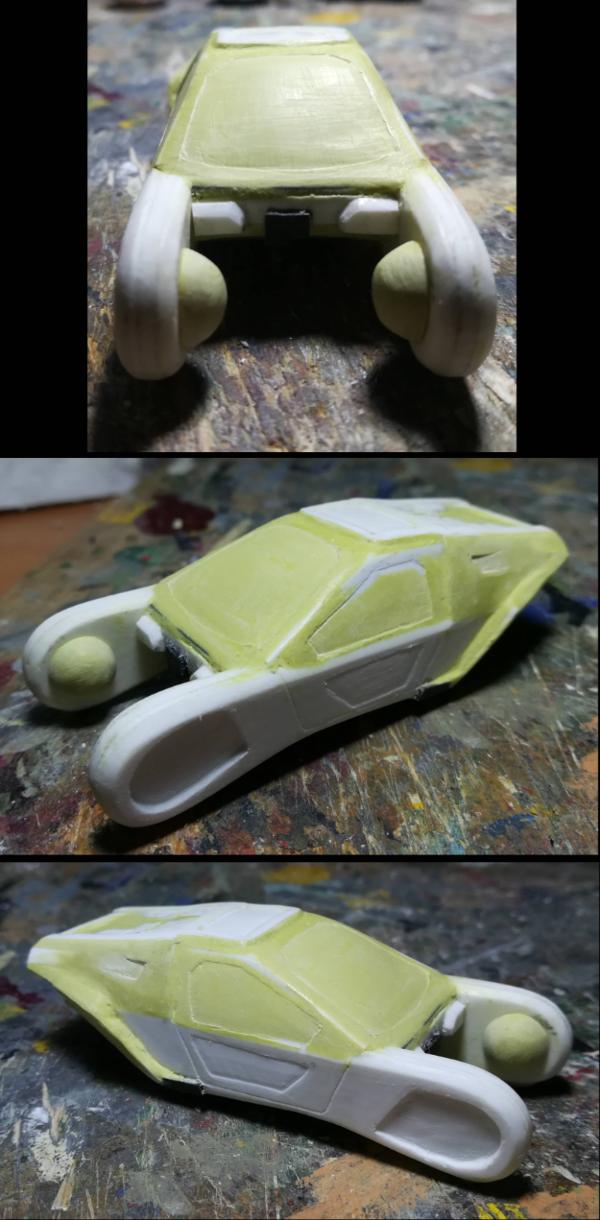


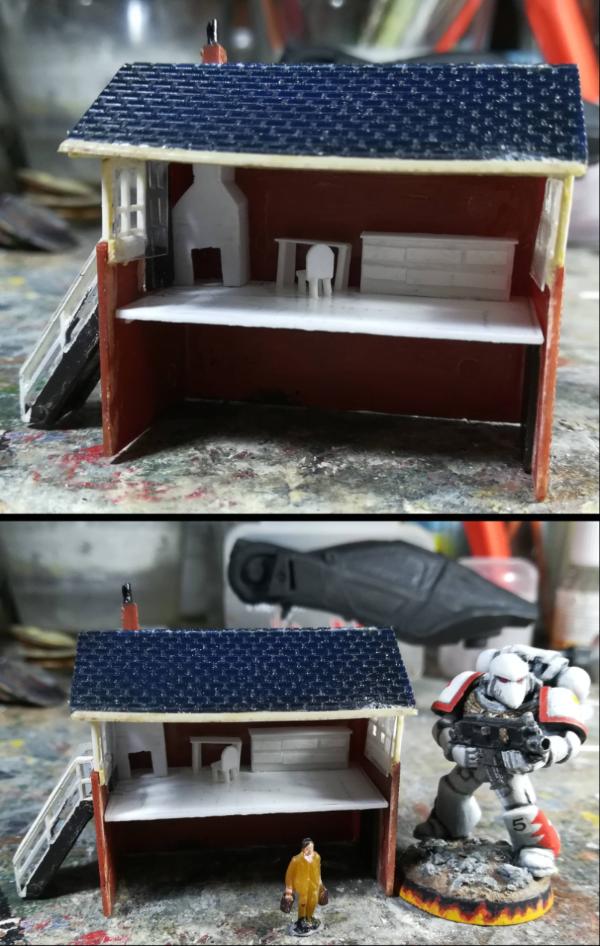


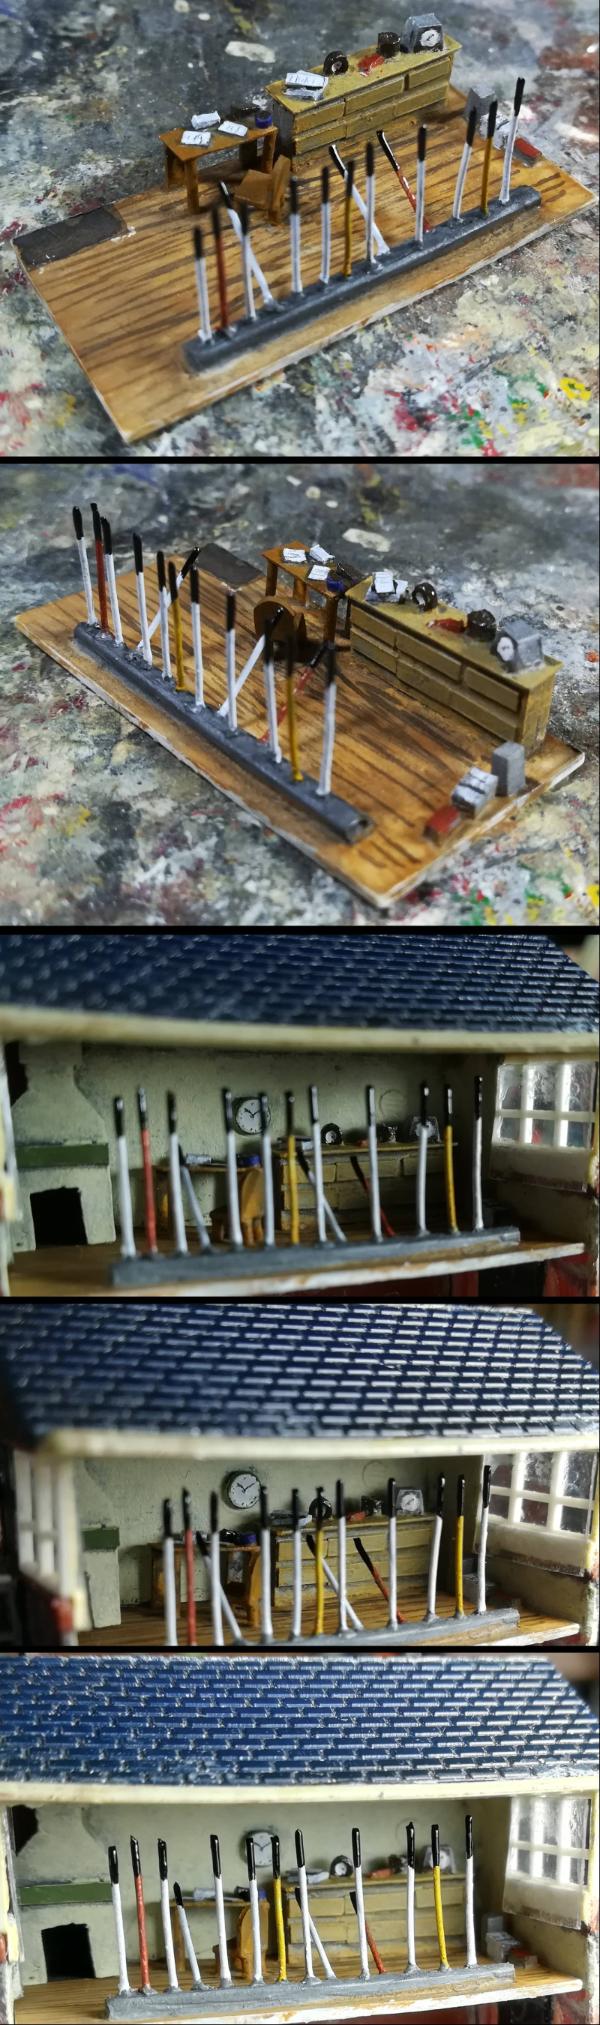


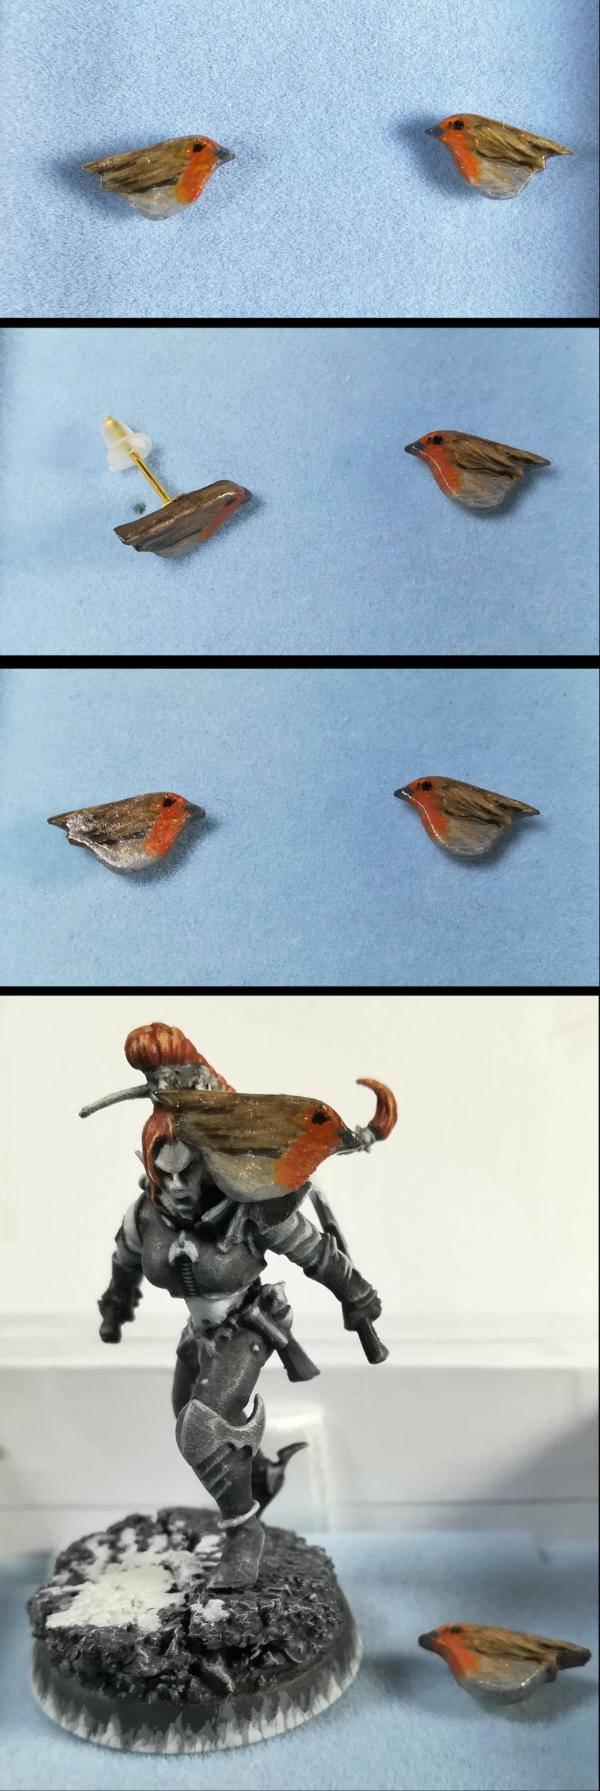


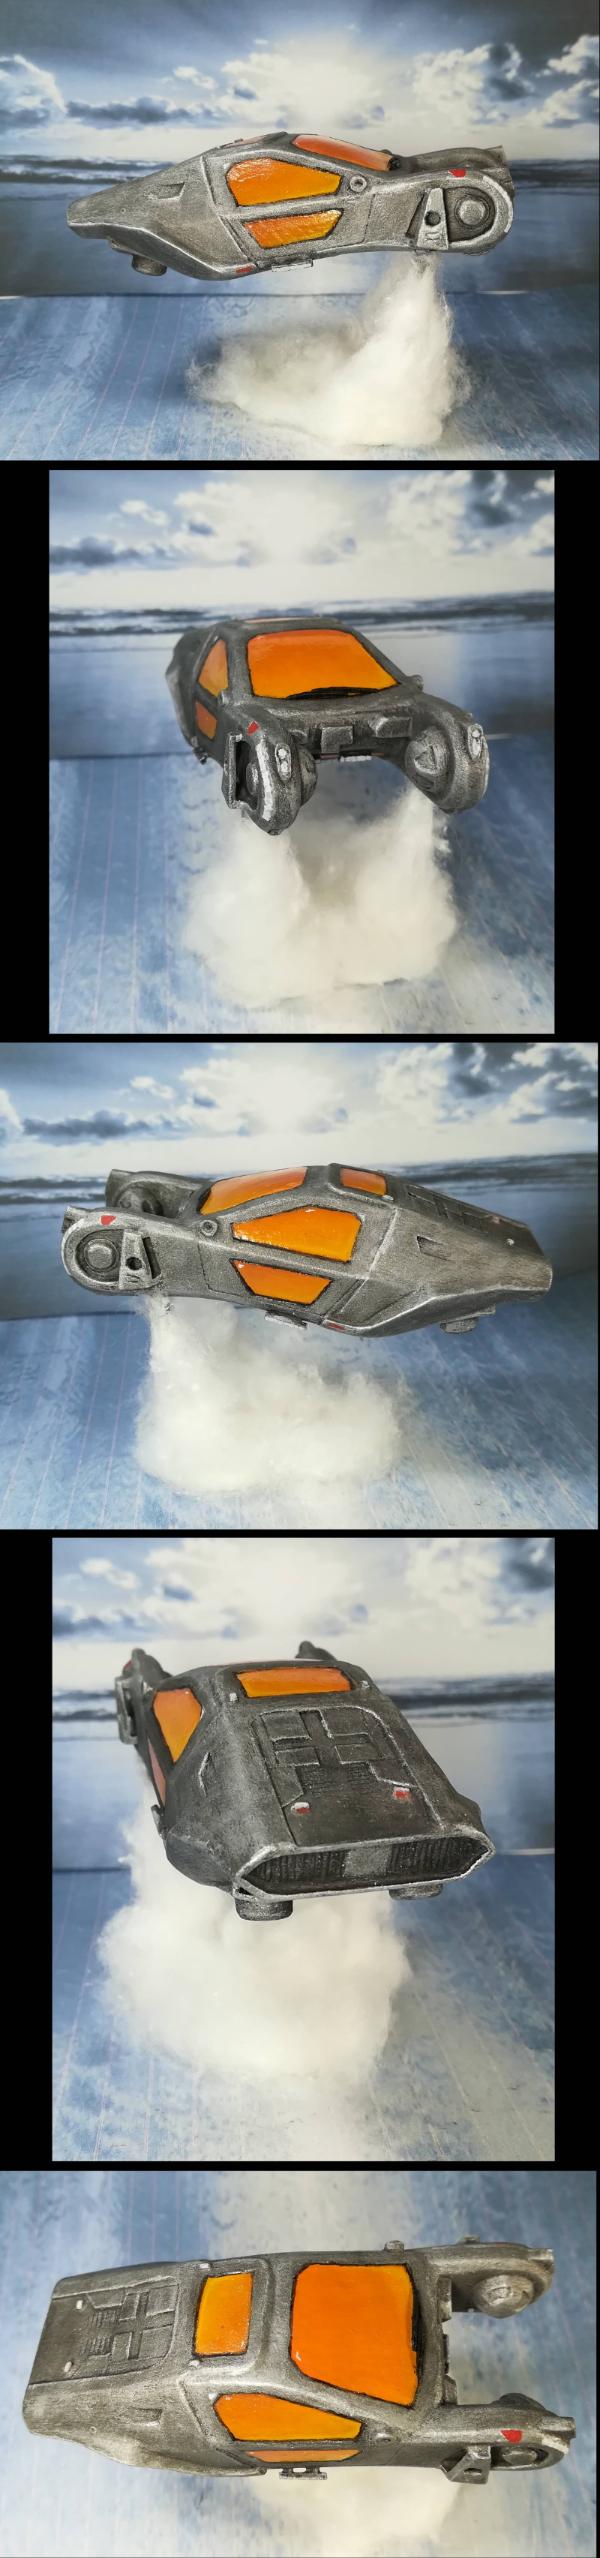

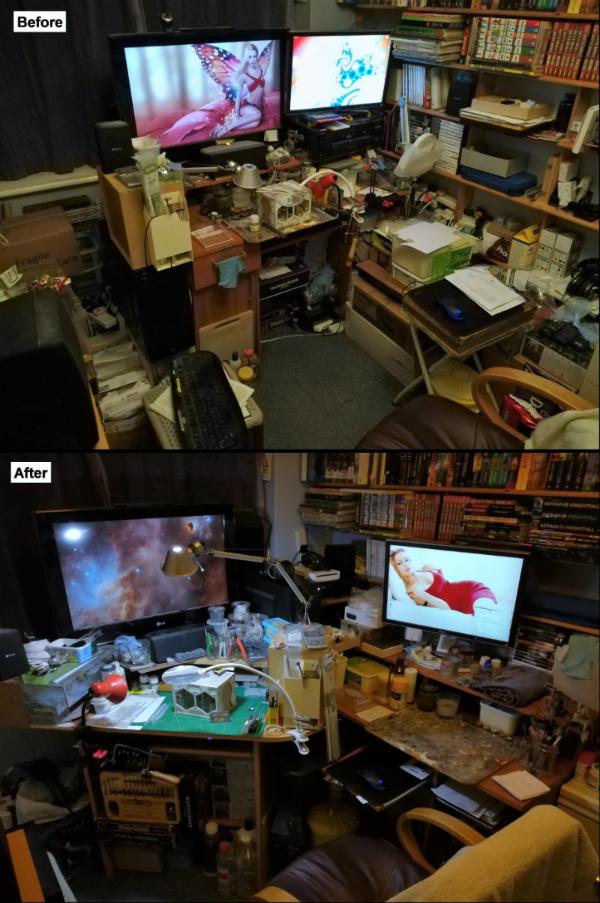


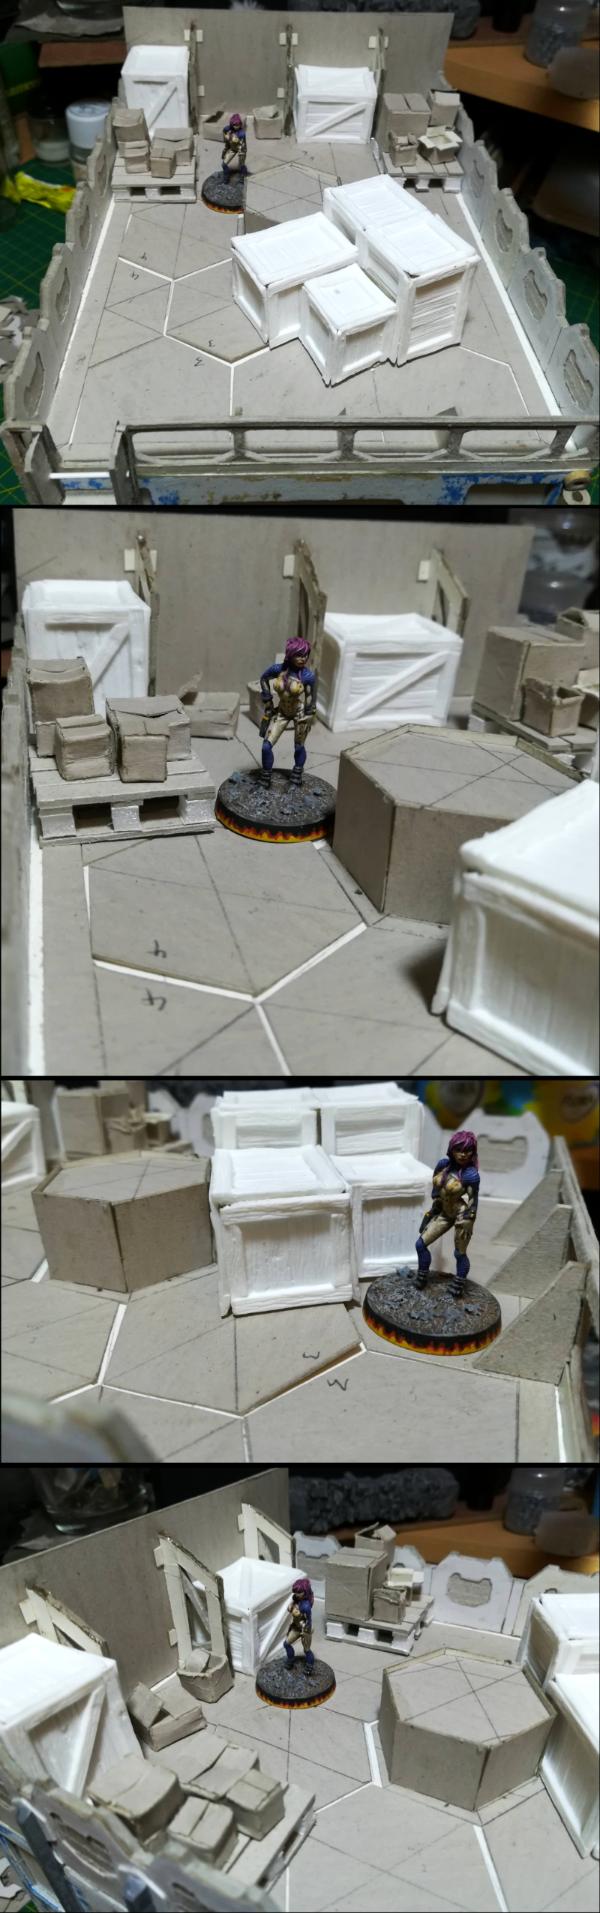
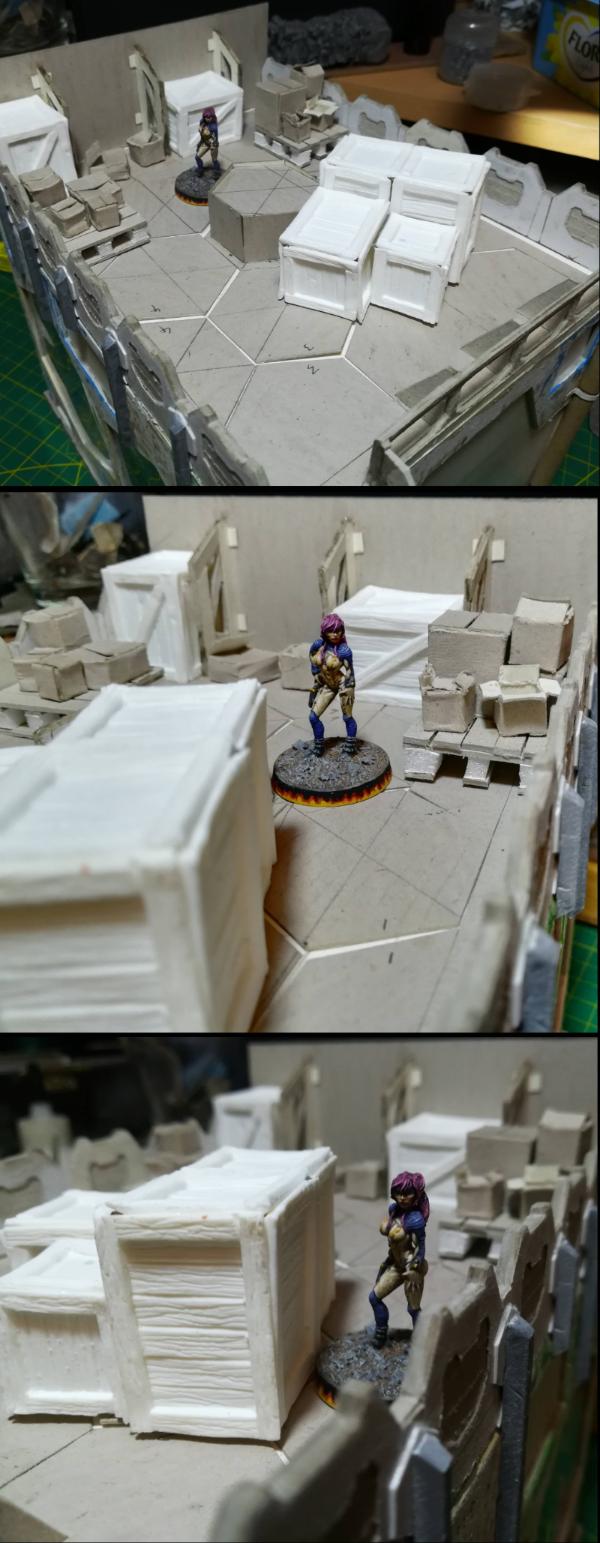
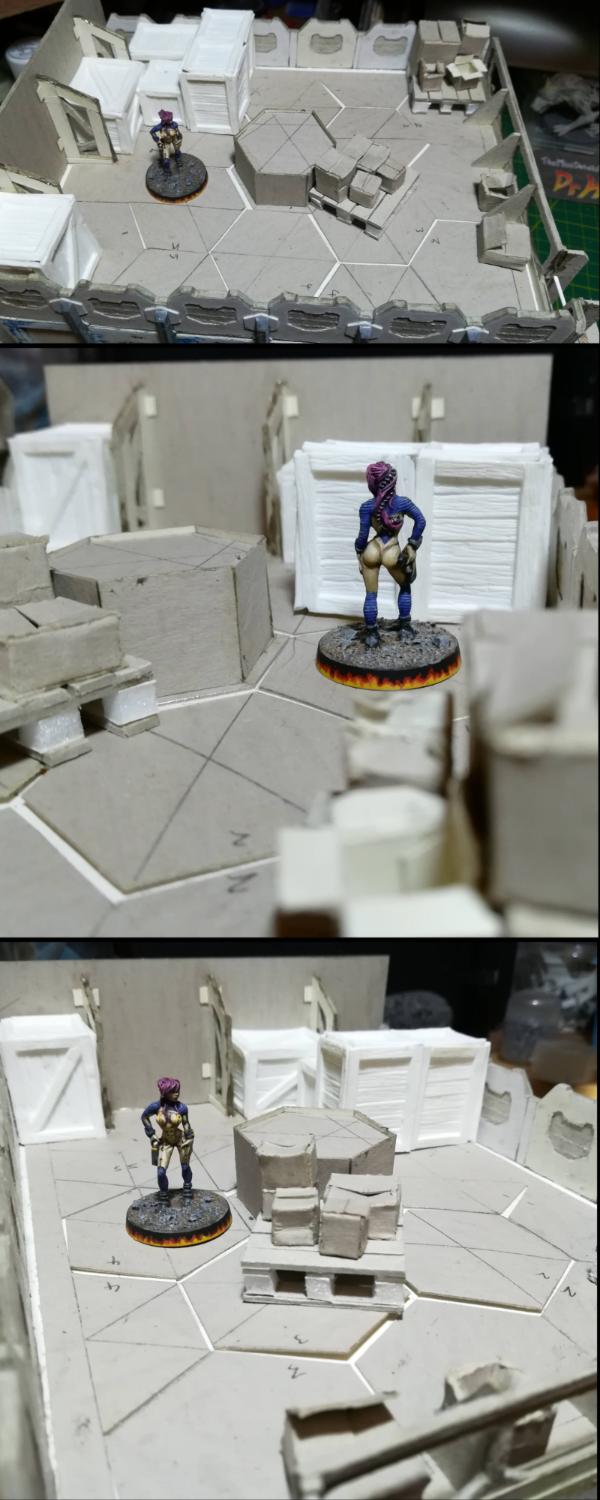
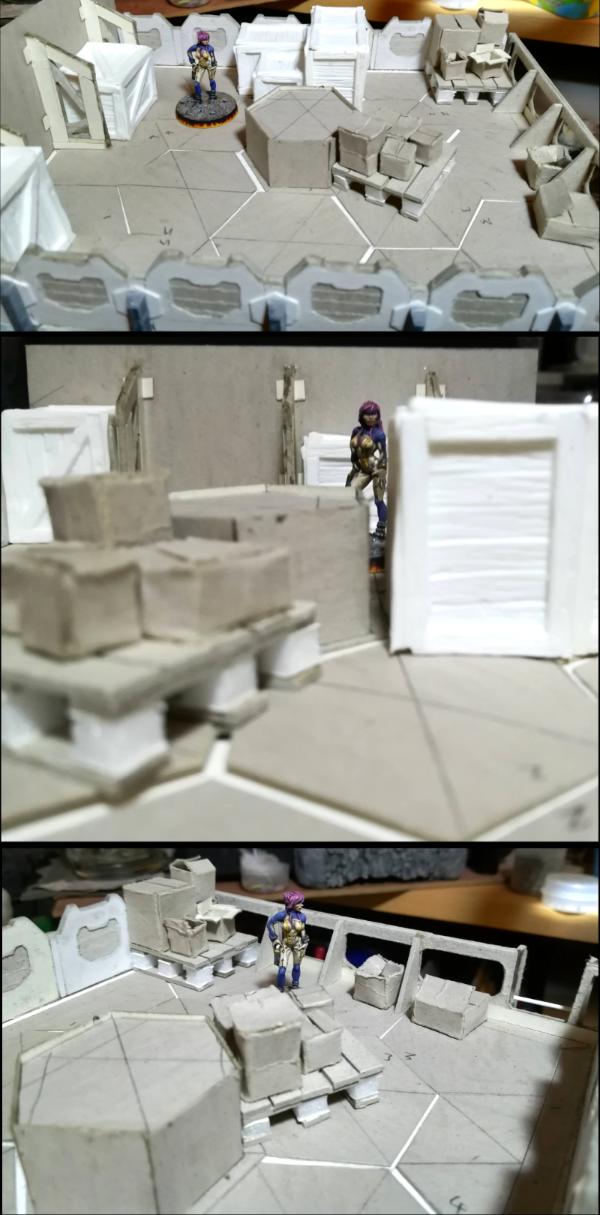


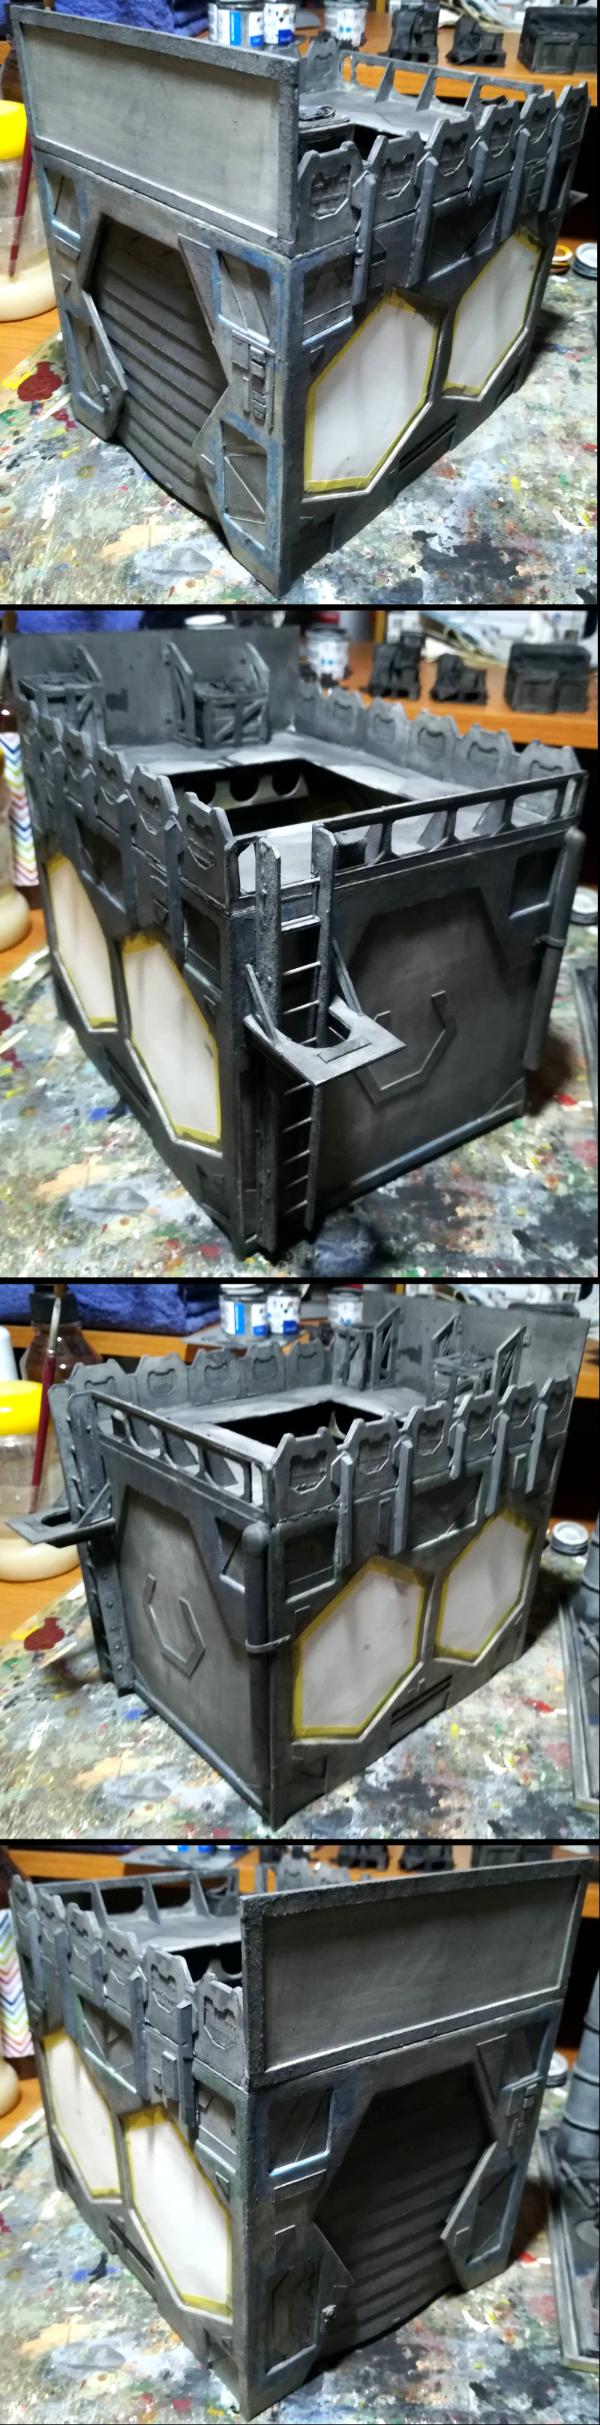

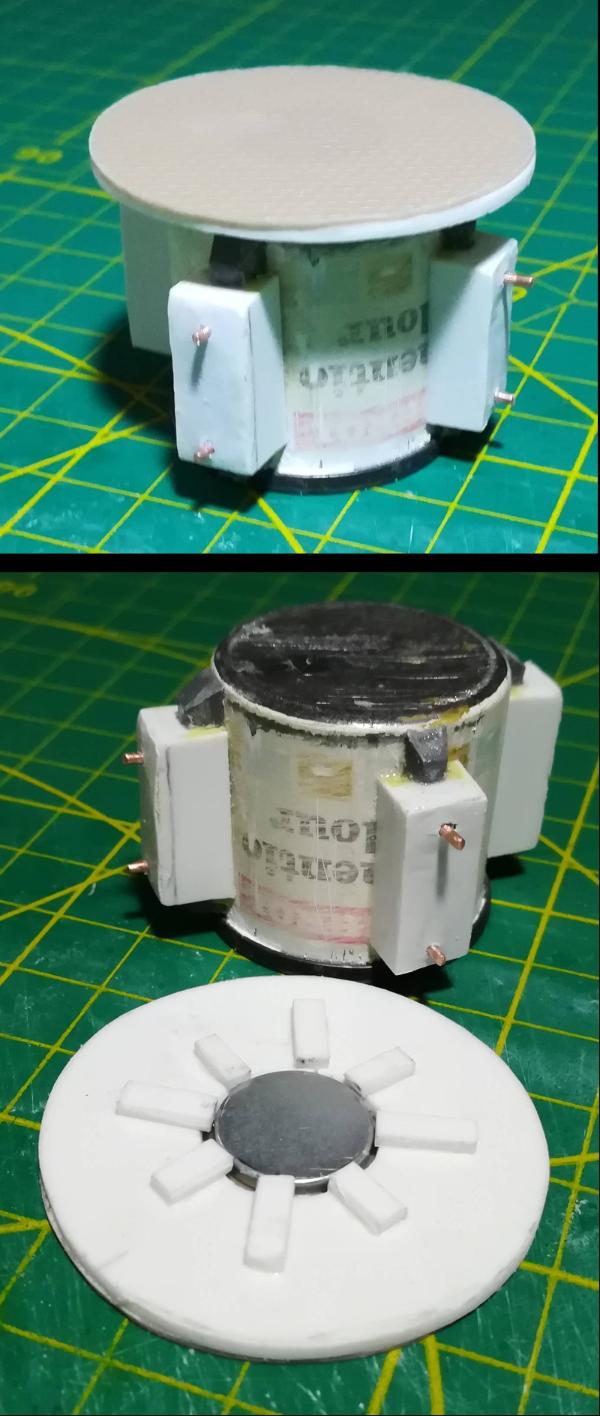
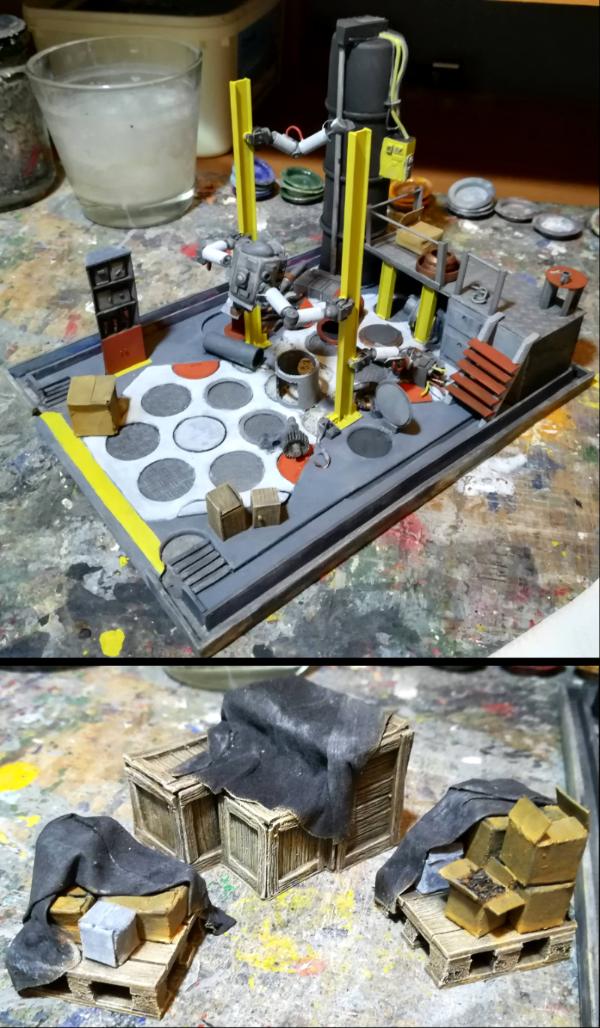
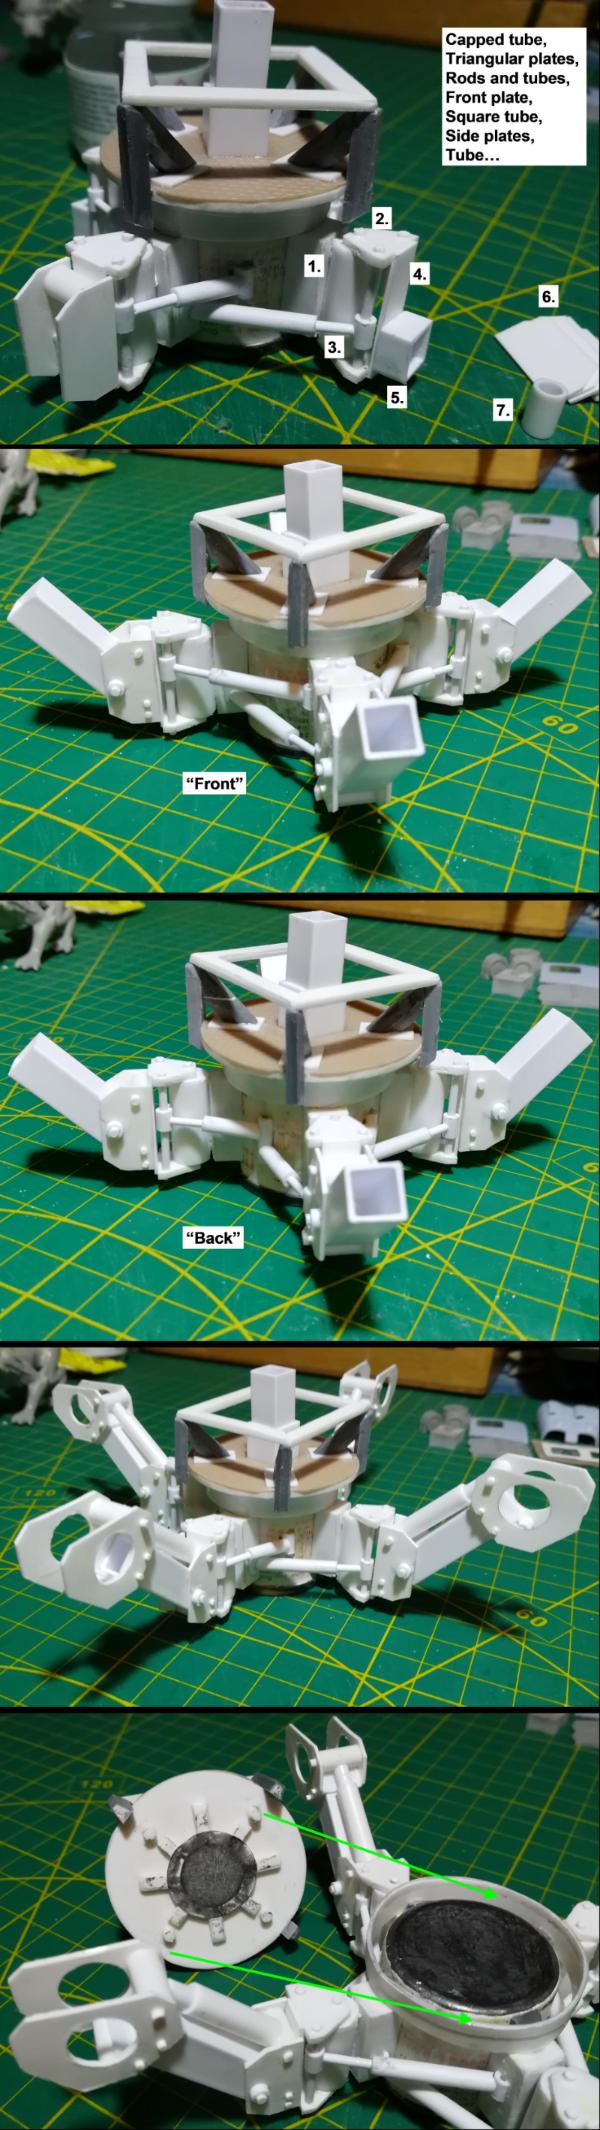
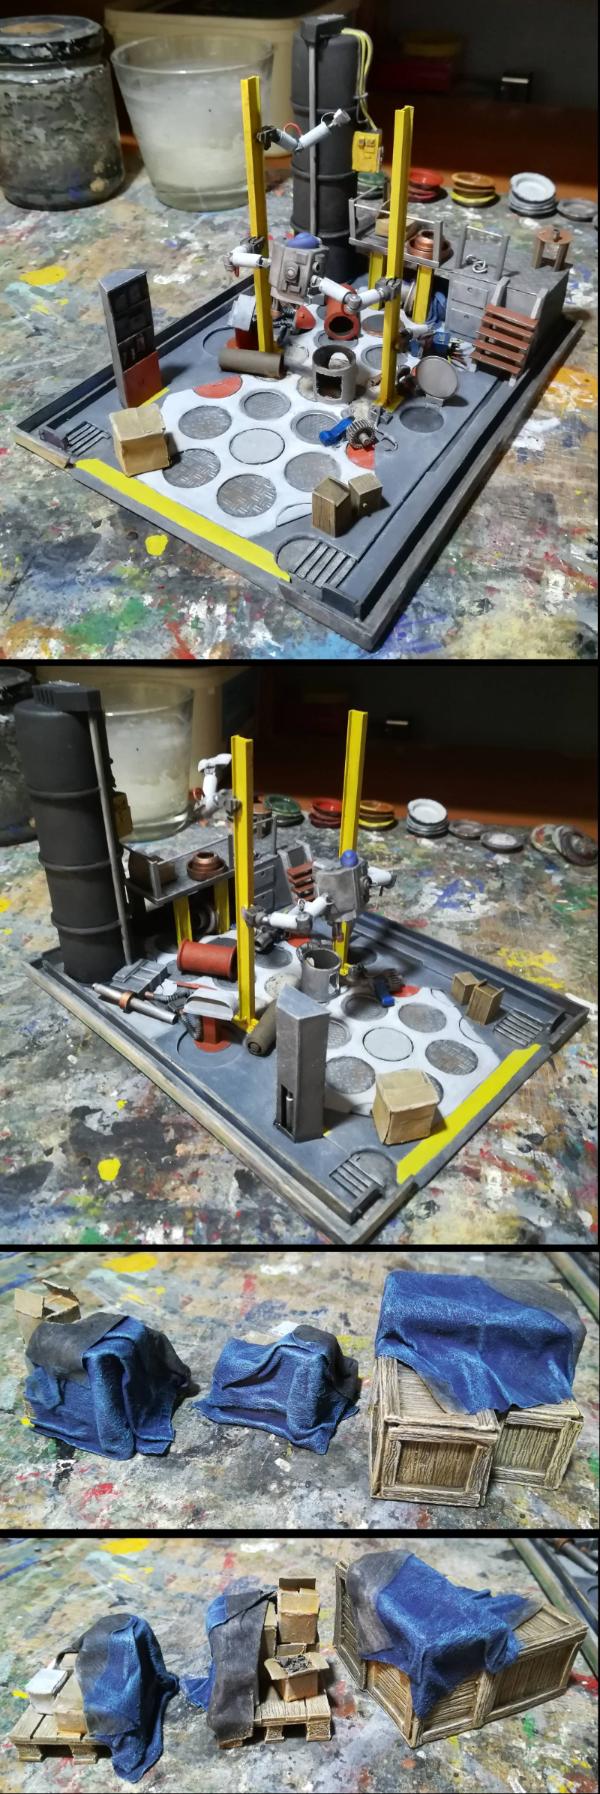
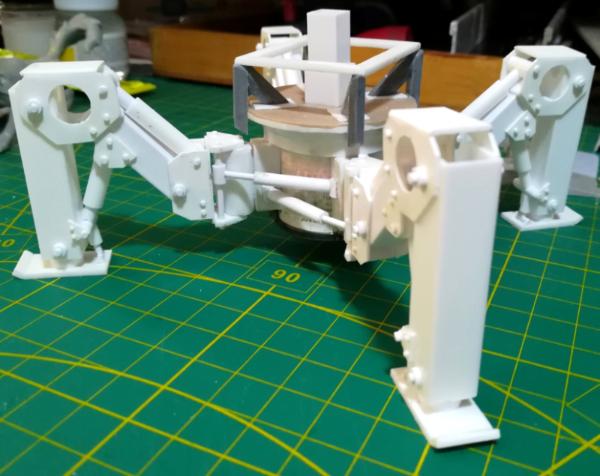
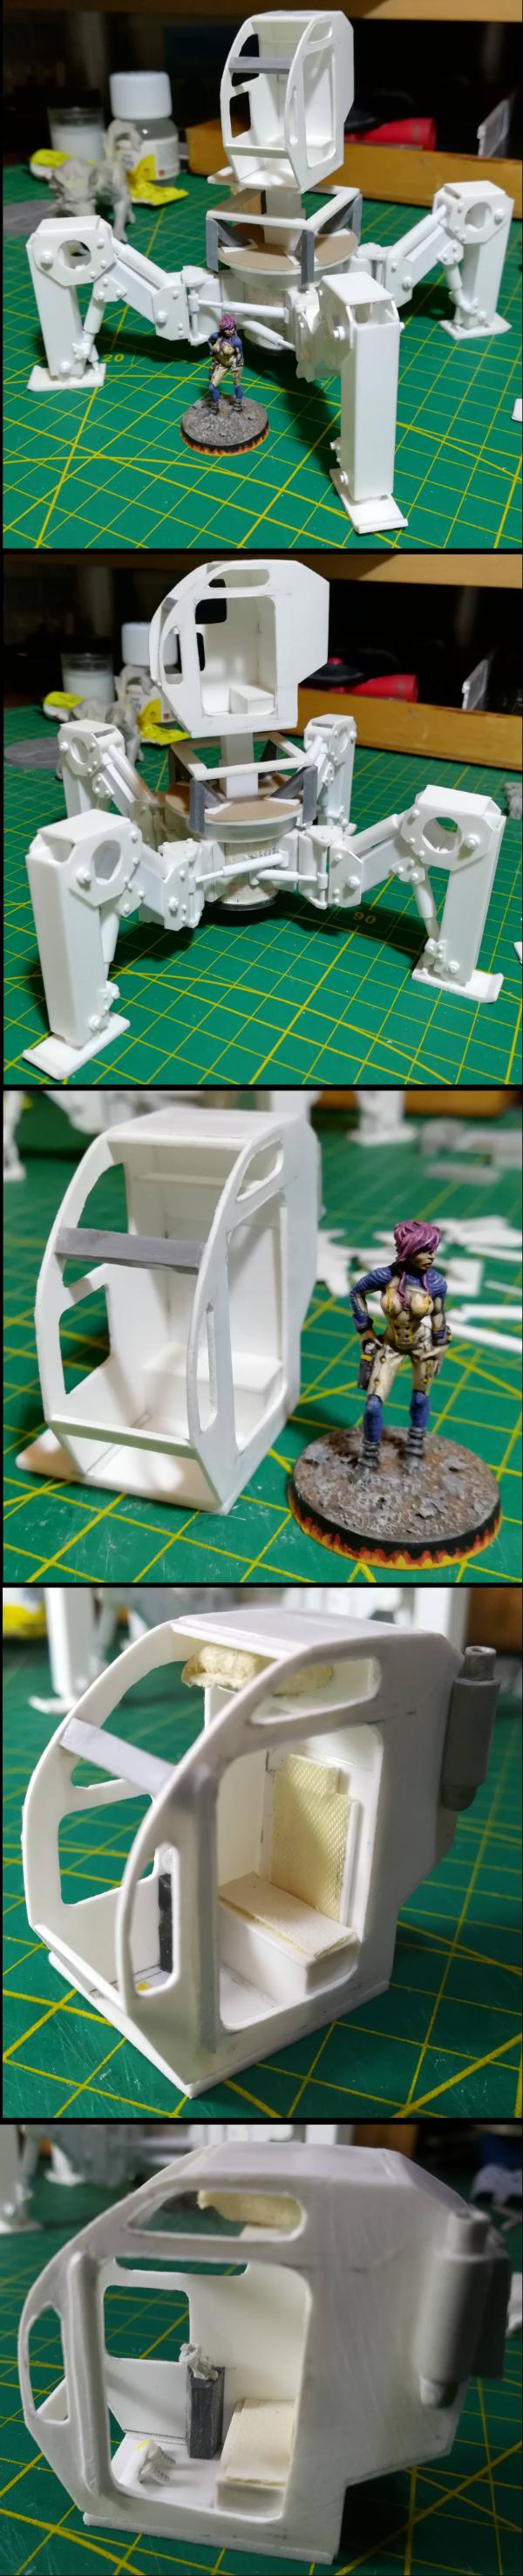

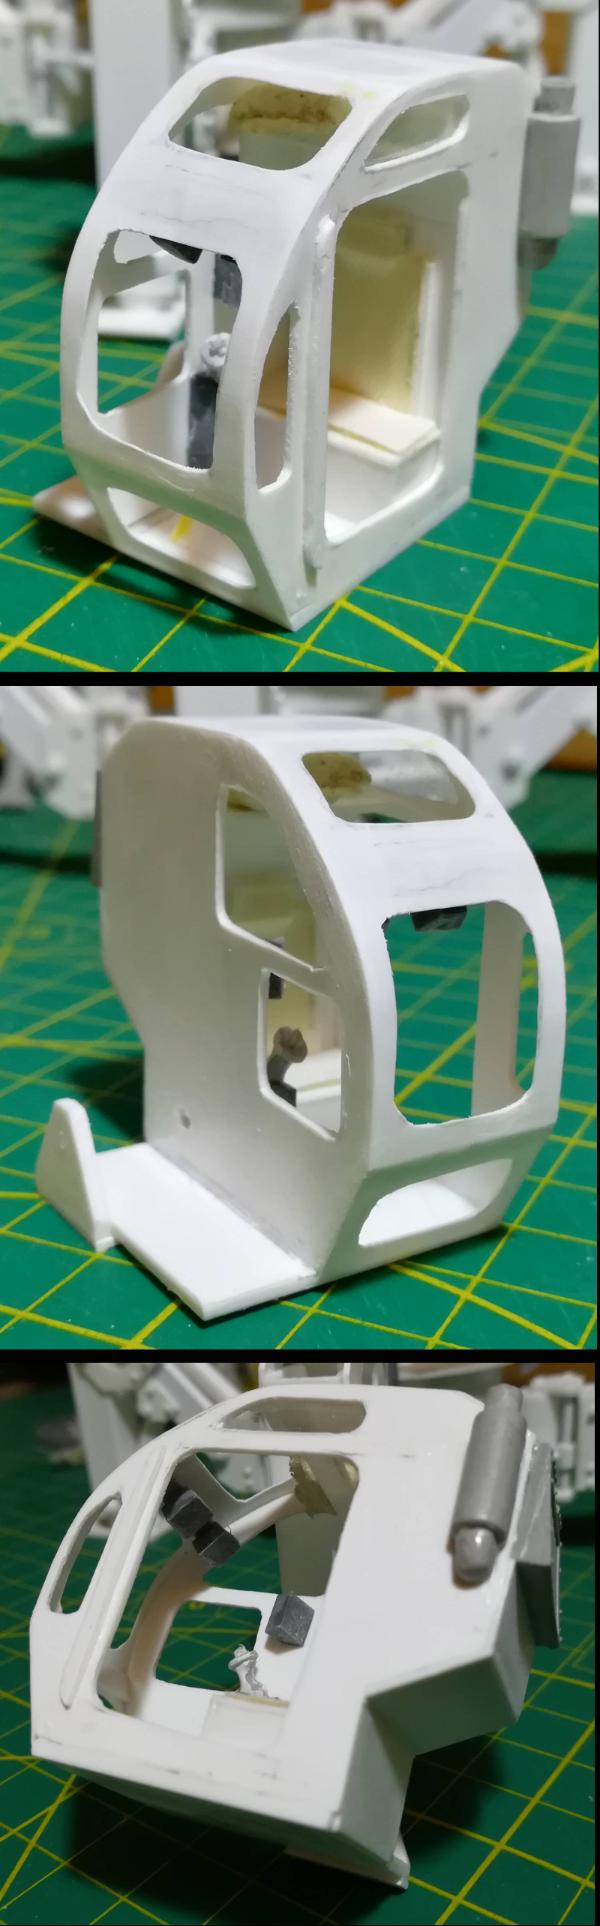
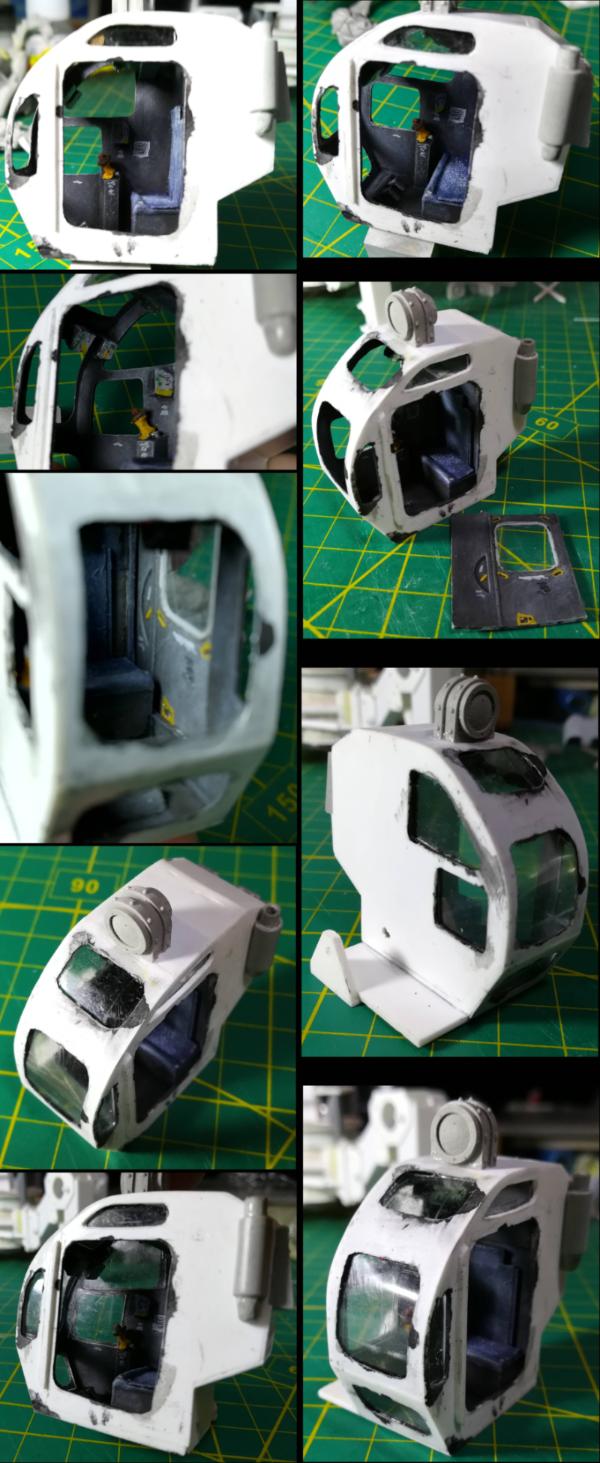
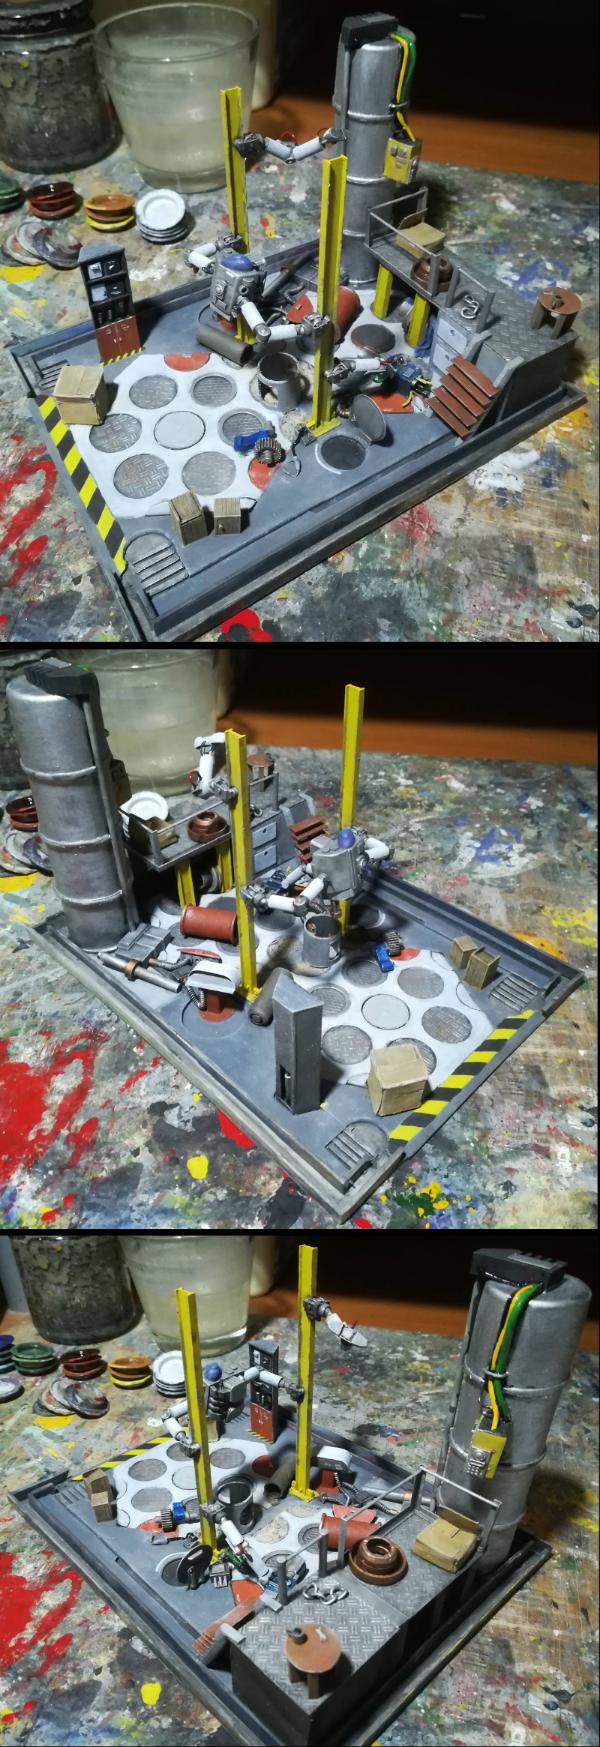
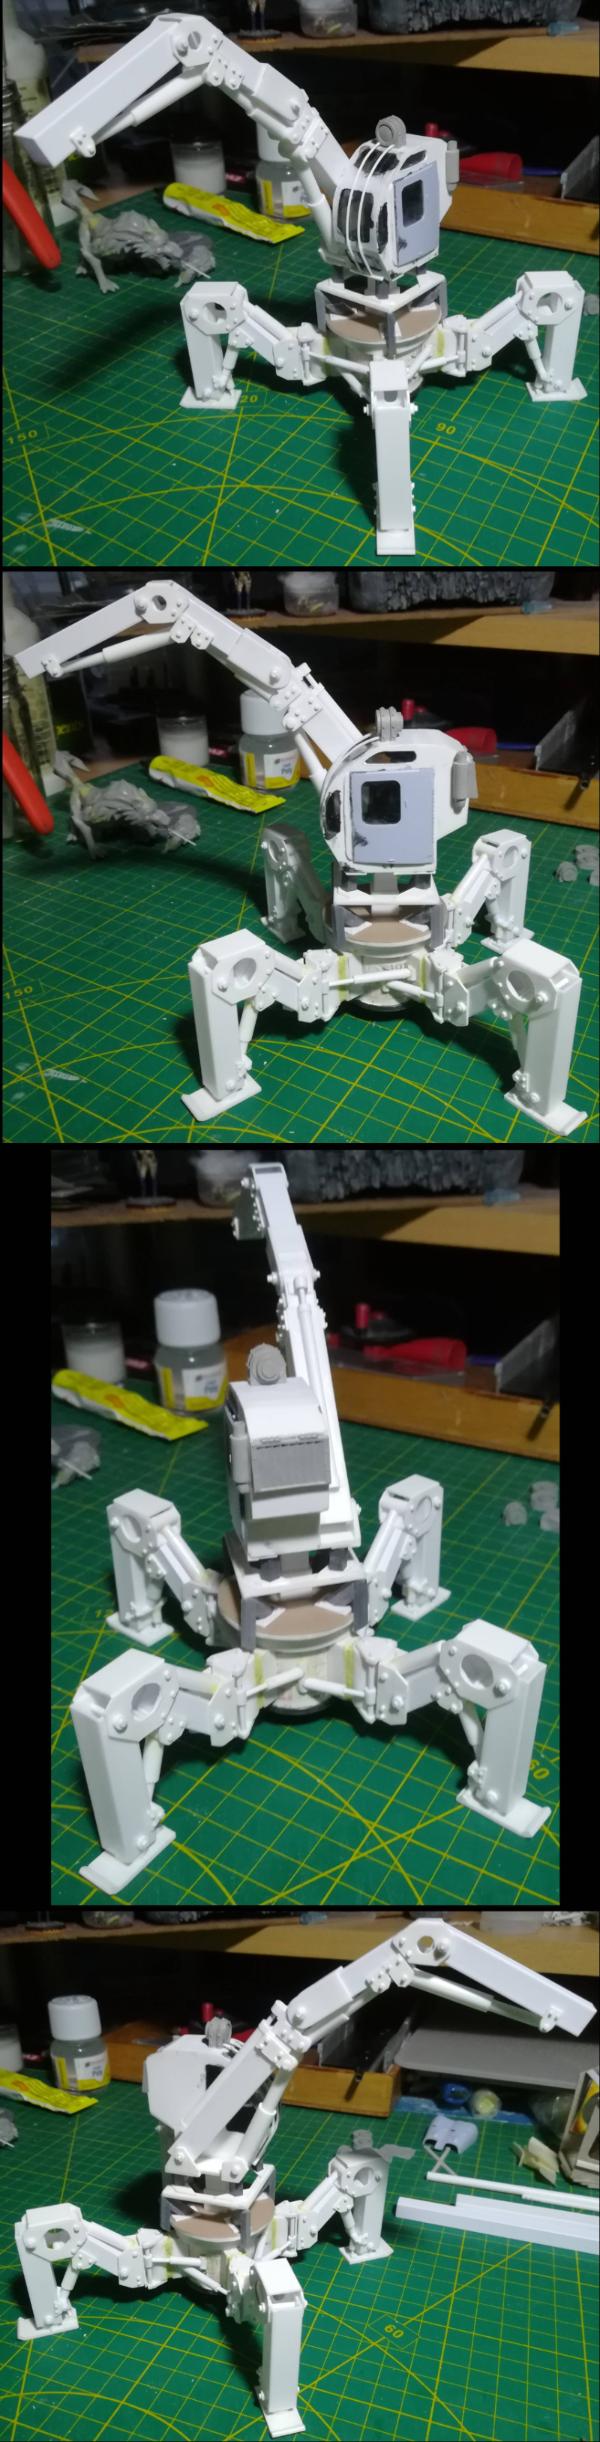


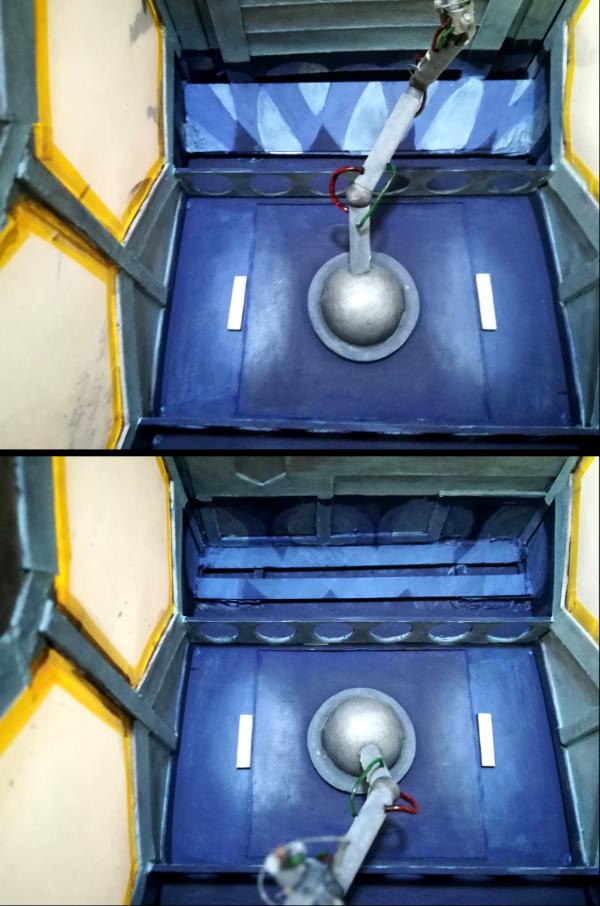
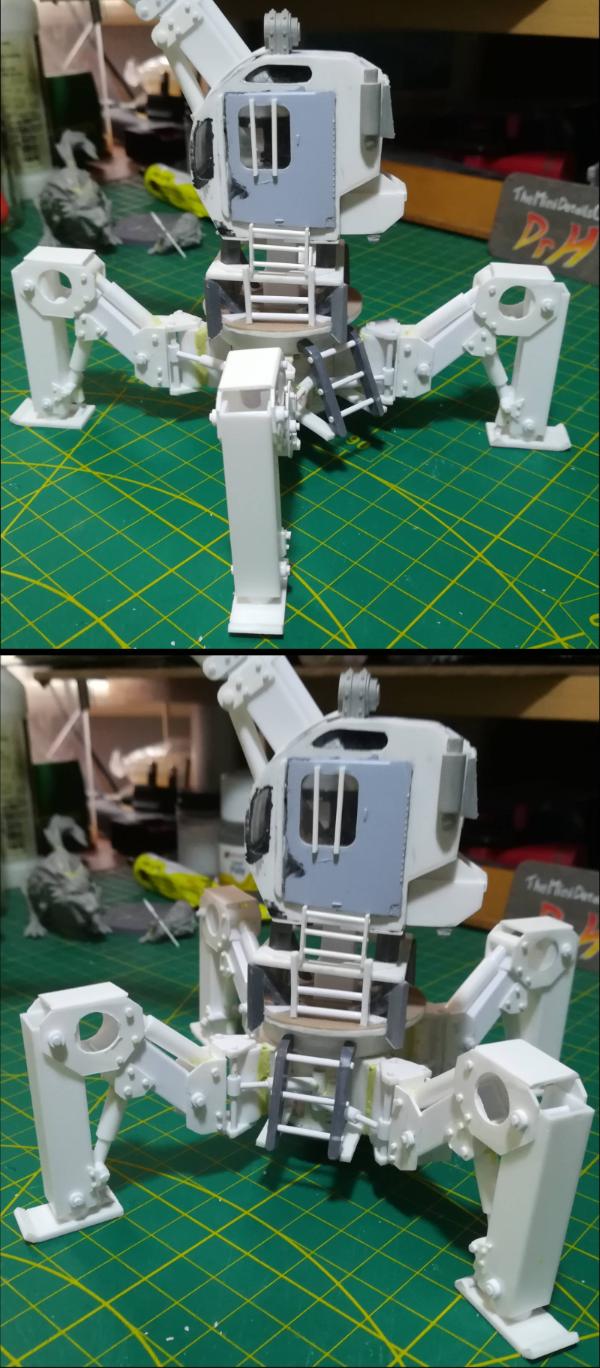


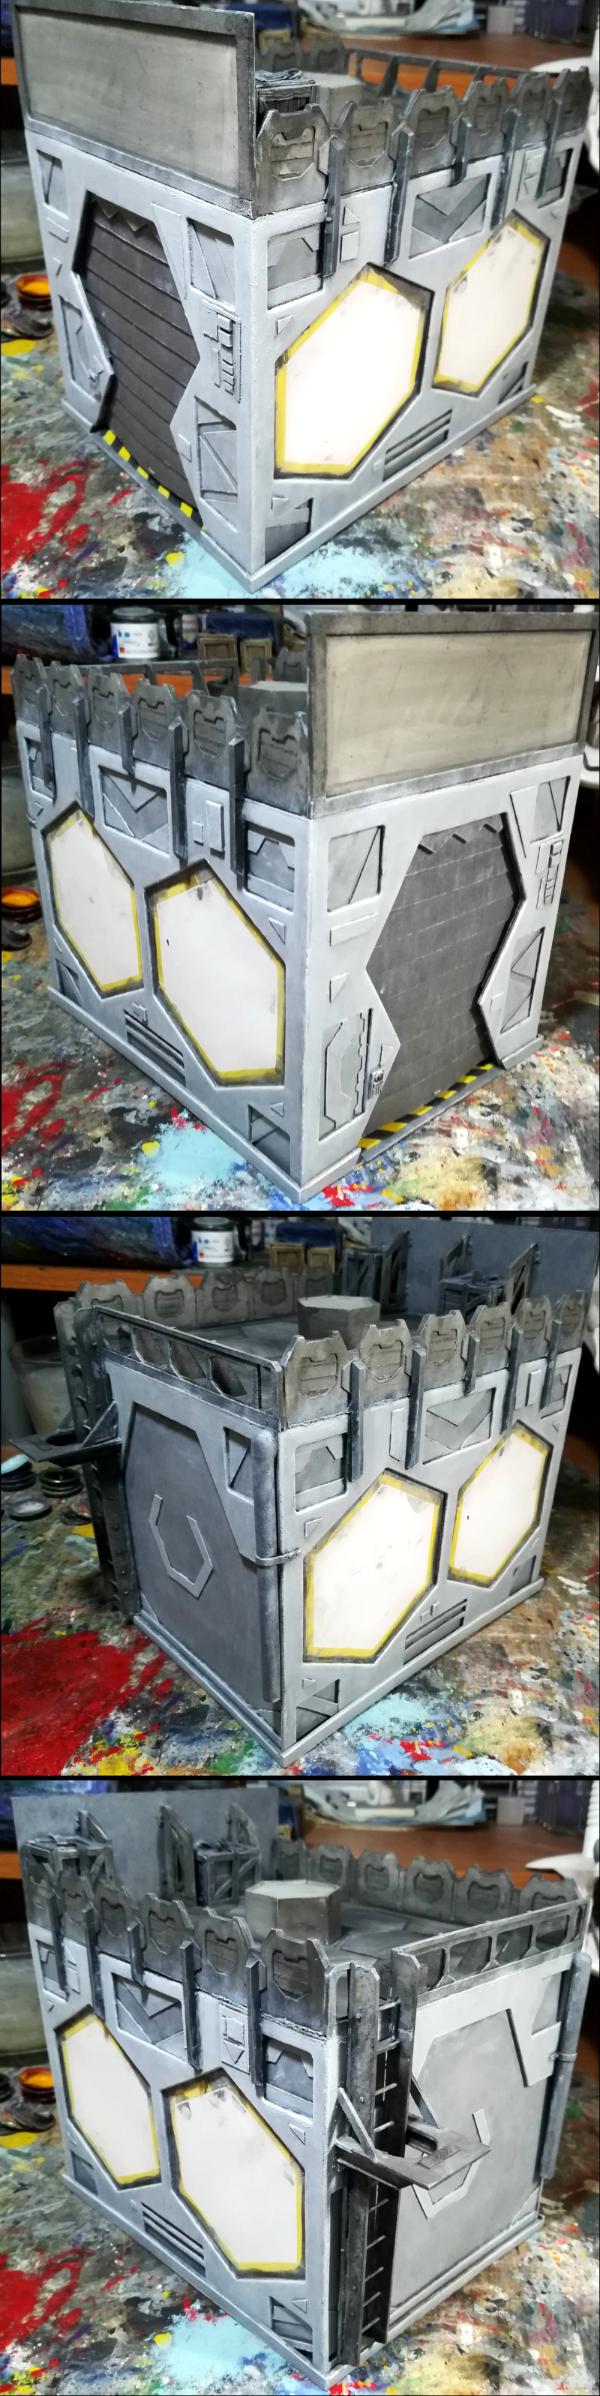
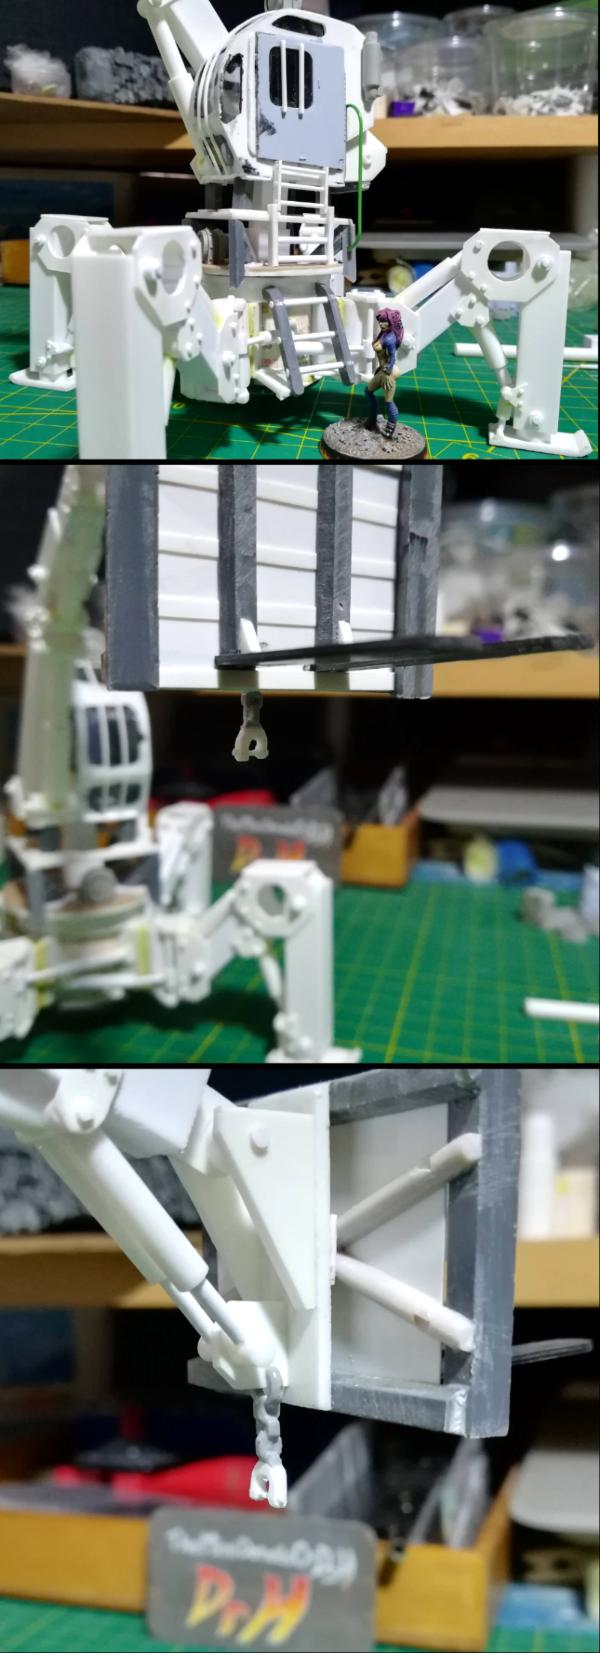

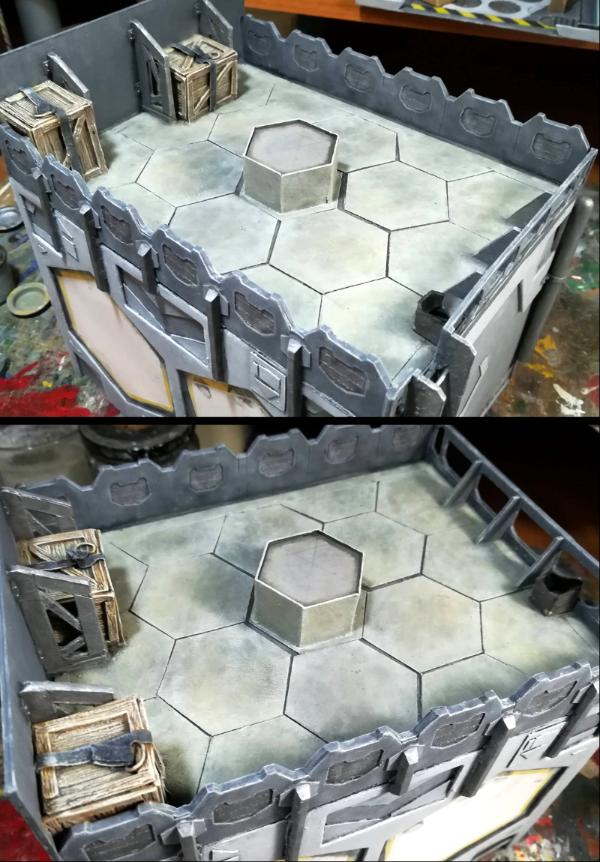
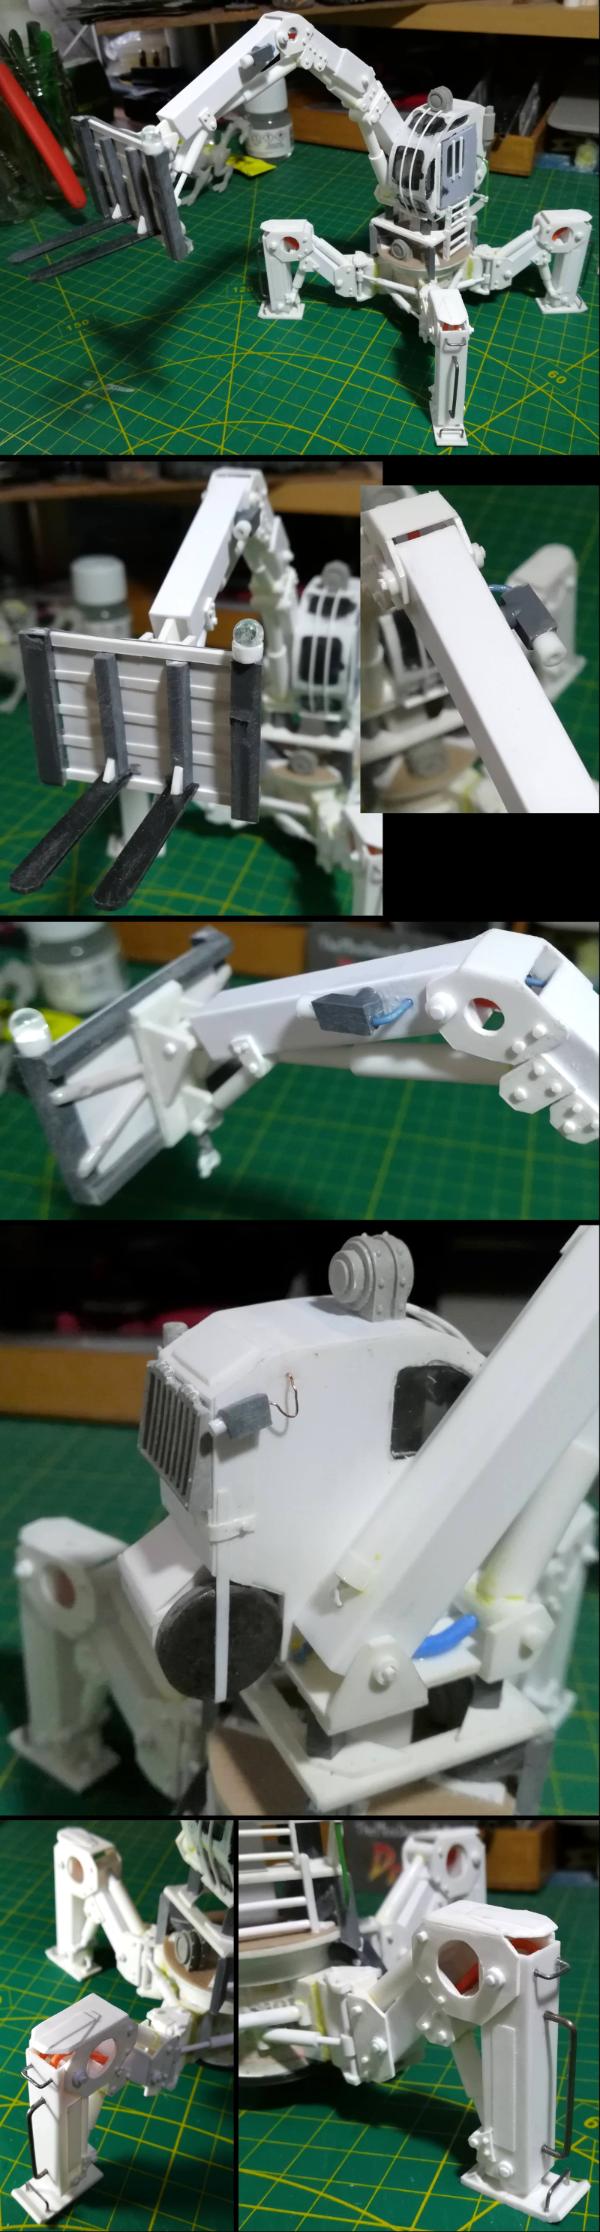
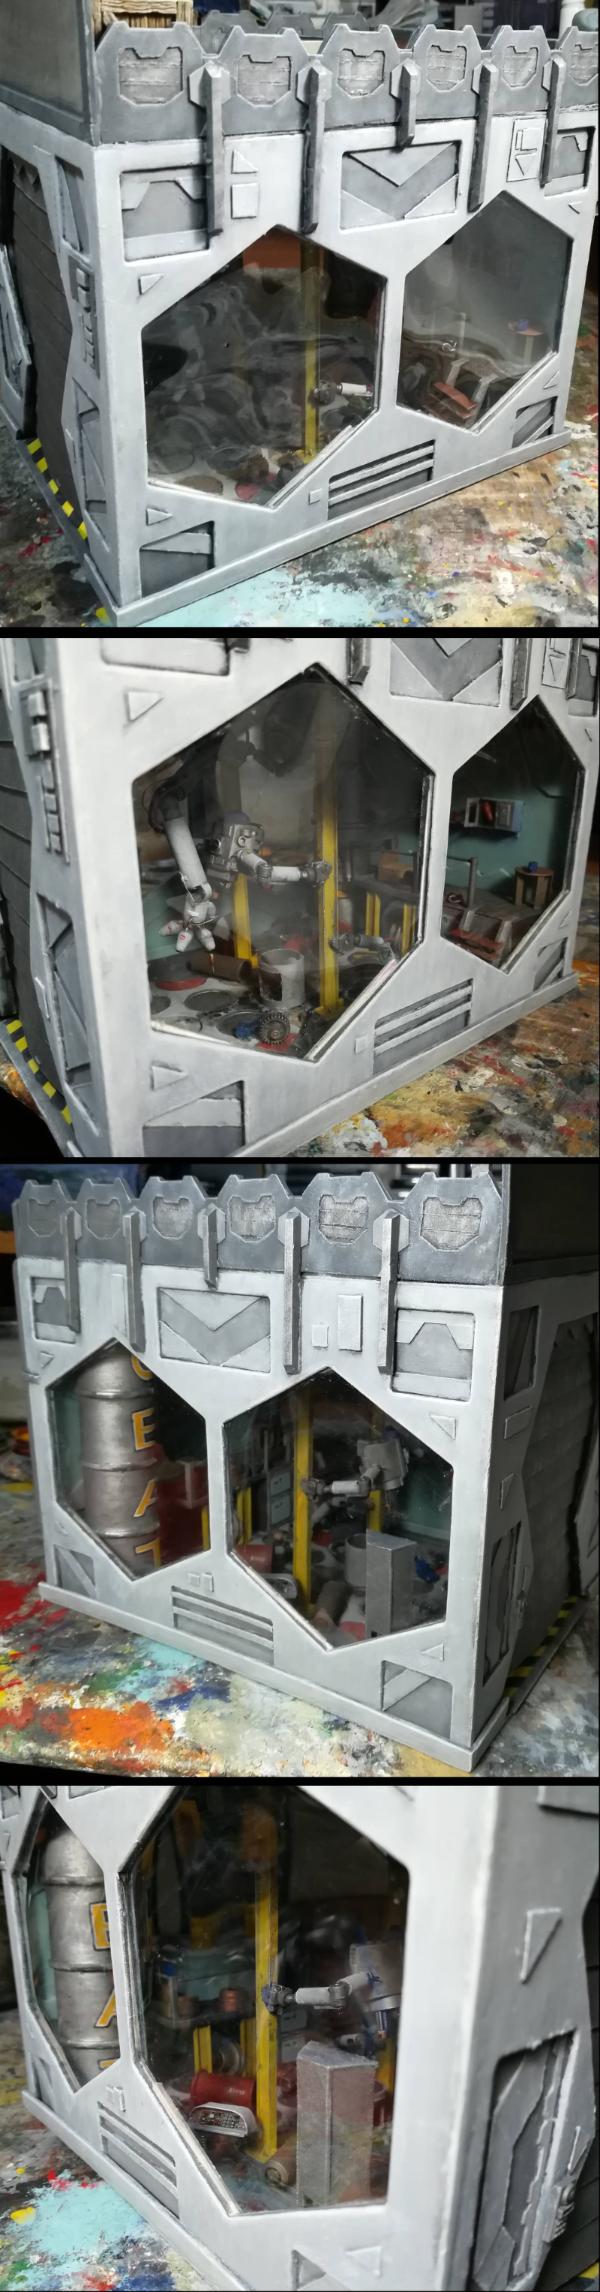
 Kidding aside, lights of some sort, and possible flashing lights like on emergency vehicles. it is fairly standard on such equipment.