This being my first P&M blog I'm not sure how many images to post right off the bat, I've been working on these guys for approximately two months now so I have a ton of pictures of the progress.
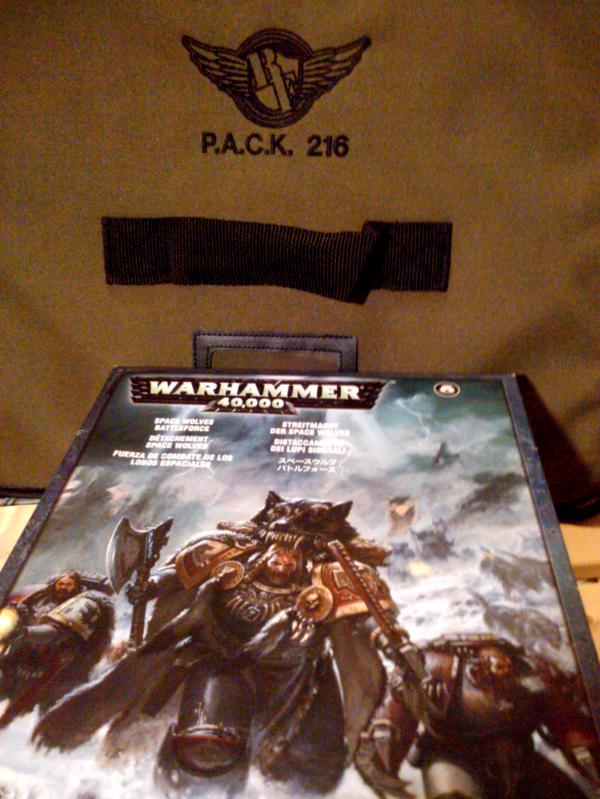
The Mordian Iron Guard box I purchased which had approximately 60 models in it. I'm excited to get to paint these up, the story behind the models is an interesting one. The previous owner/gamer passed away and these sat in a garage for a long time after being passed to a family member, then they were brought in recently to Aero Hobbies in Santa Monica so that others may have the opportunity to enjoy them. I hope to do them justice and paint them up well.
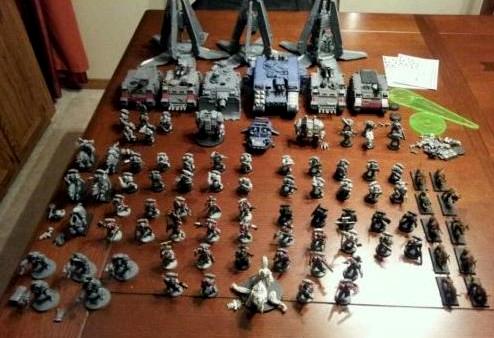
So far after scrounging around the internet, buying off of ebay and purchasing through Aero this is what I'll have when everything gets together.
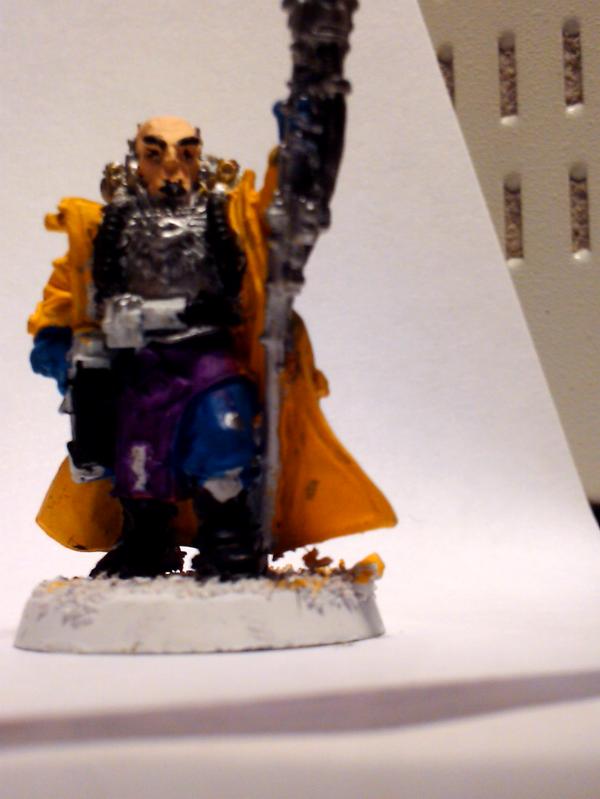
1 Commissar Yarick
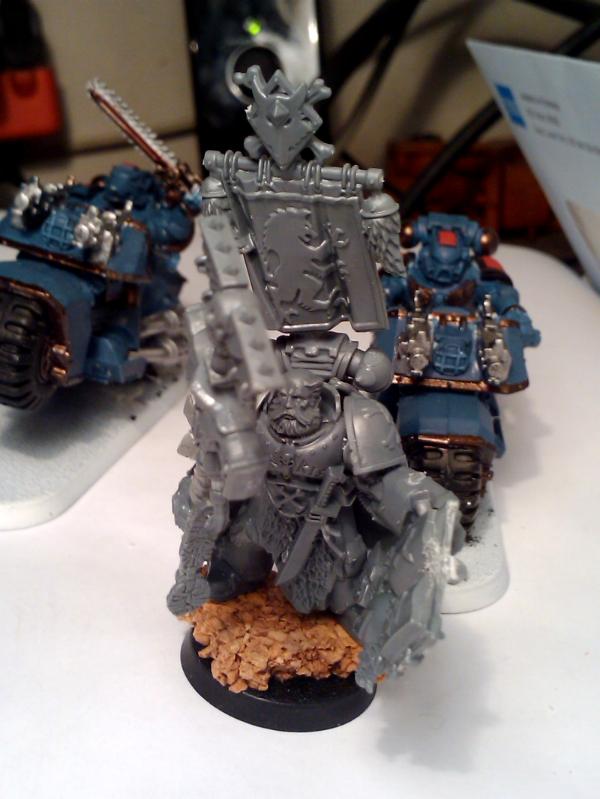
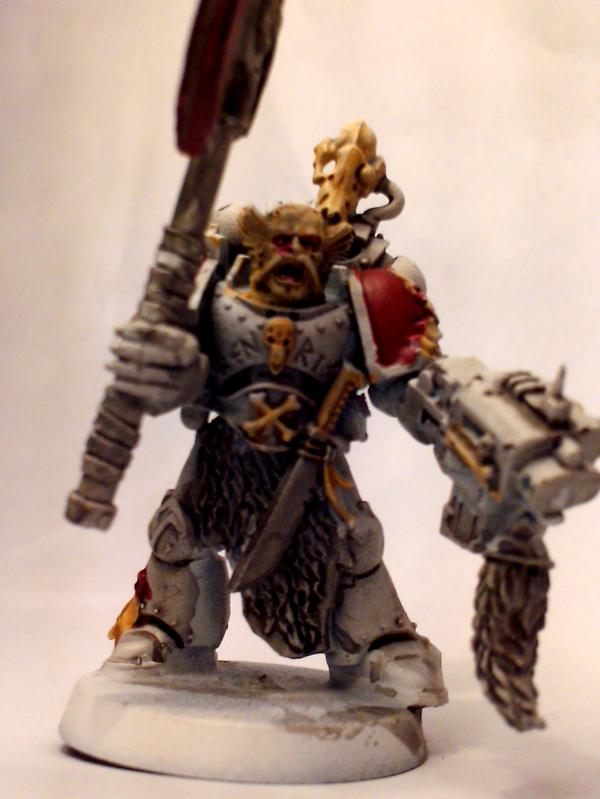
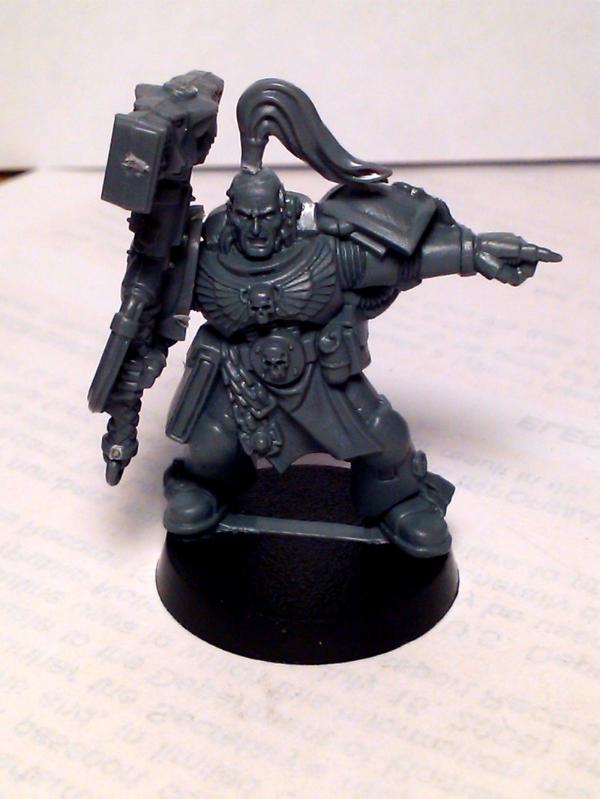
1 Lord Commander Creed conversion
1 Sergeant Kell
1 Commissar Lord
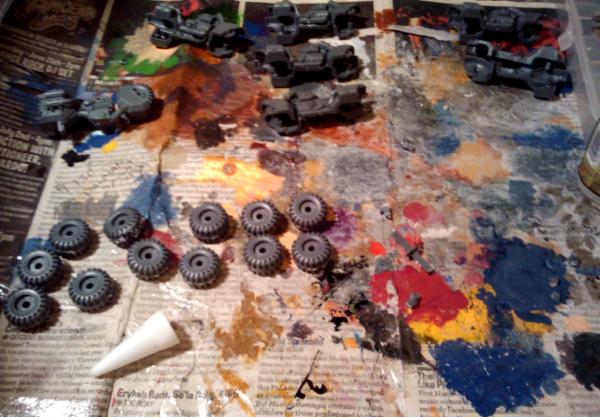
4 Chimera (beat up, but salvageable) - these will need a lot of work.
1 Leman Russ Demolisher kit - full magnetized
1 Sentinel kit - still in box
1 Baneblade Superheavy tank conversion/fully magnetized & primed
I'm looking for additional vehicle suggestions, I think I should have some more tanks, or a combination of fast attack and tanks. What do y'all think?
Next step is to begin priming the models and then to paint up an example model to work from.
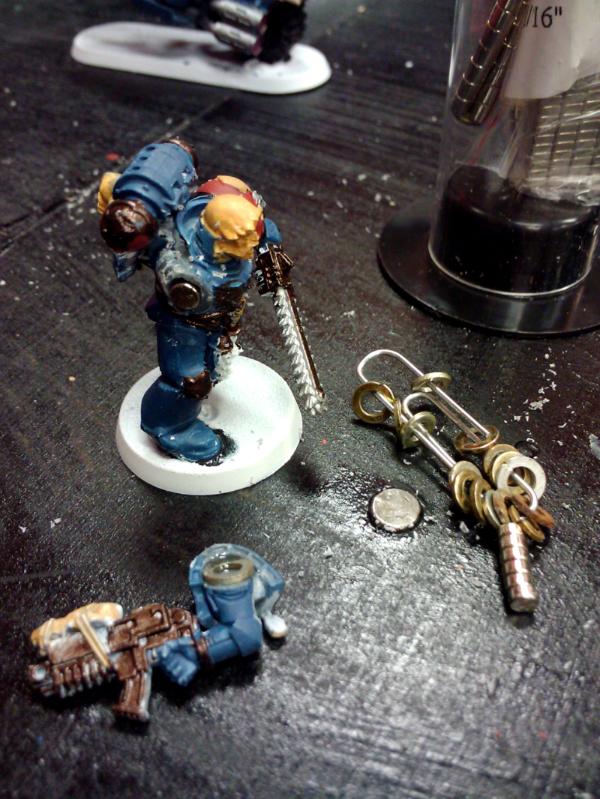
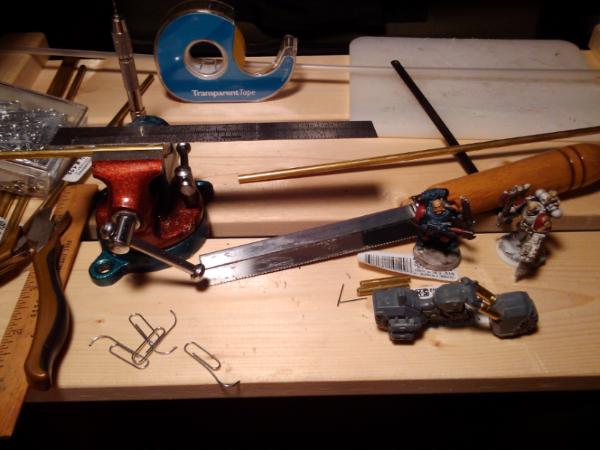
This is a plasma gun conversion. The Mordian Iron Guard models did not come with Plasma, therefore I've taken to removing the majority of a lasgun from this model by using a combination of a saw, xacto knife and file to smooth it out. Then I cut a portion of the plasma gun off at the base and back of the gun. This took a lot of extra work and I was worried I'd carve too much out of the model.
The following models are easier to convert as they have their weapons upraised and separated from the model.
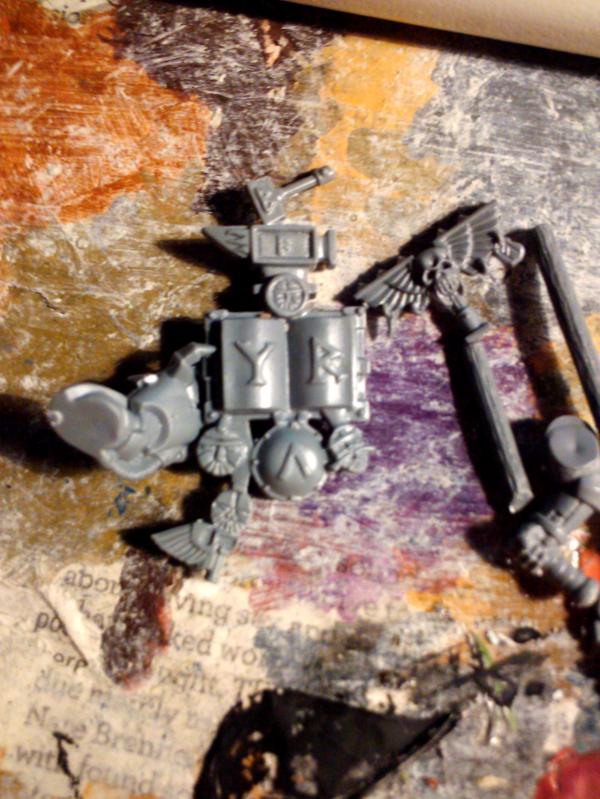
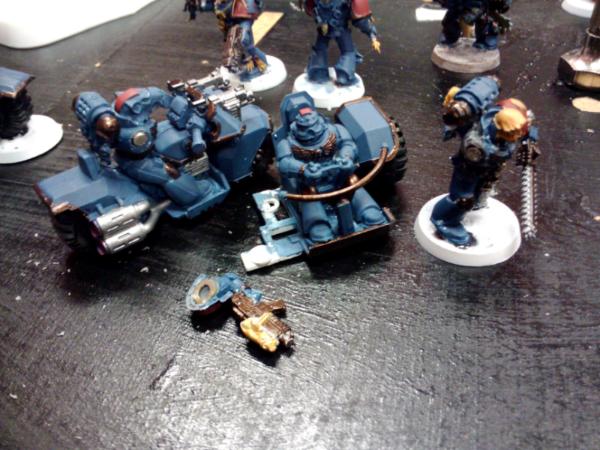
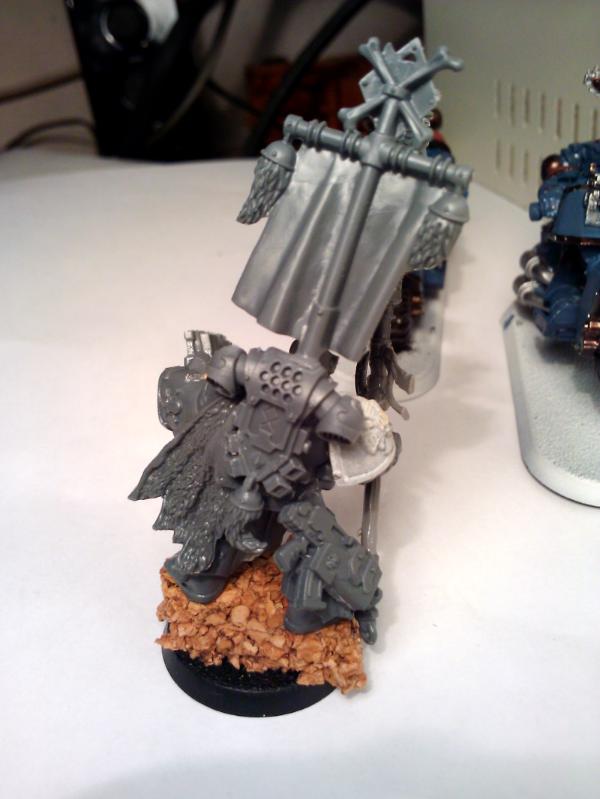
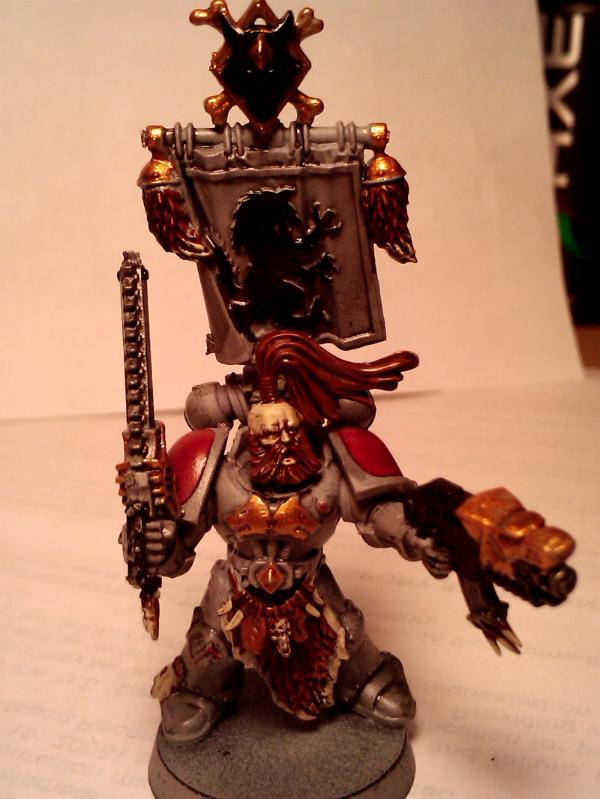
Converted Mordian Iron Guard to hold the standard (Flag) for the unit. This model is from the Mortar team. The Standard was donated by Jeremy at Aero Hobbies in Santa Monica, Ca. I cut the arm away in sections using a small saw and an exacto knife, later I added grenades to cover up the scraped portion of the model where the hand rested.
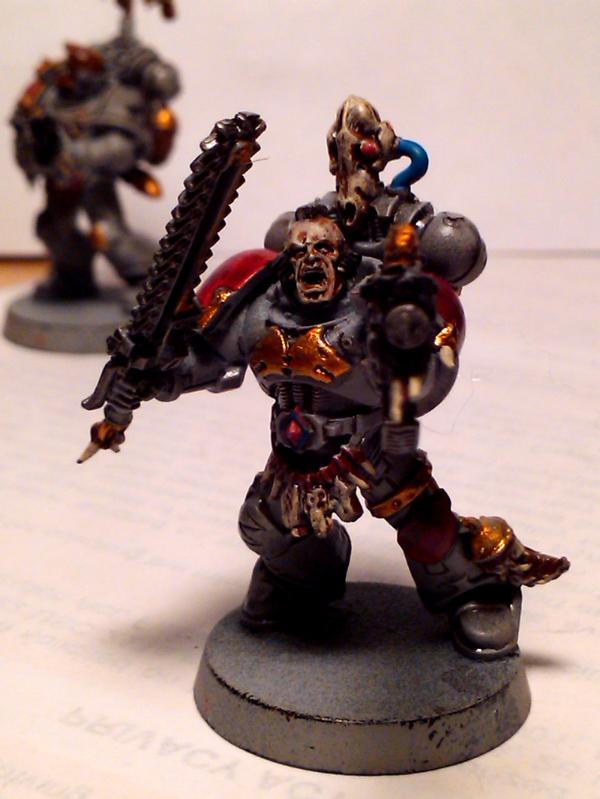
Converted the other Mordian Iron Guard model to hold a chainsword rather than a fire switch for the mortar team.
Lasgun model to sniper conversion process.
Cut the end of the gun off and part of the thumb on the model to create a flat surface.
Next trim the top of the rifle's sight off to create a level top to the rifle. You barely need to trim anything off, be careful as you'll be working close to the head of the model.
Next cut a similar path in the sniper rifle. cut just after the left hand and then below the scope. The plastic is easier to cut than the metal so go slower.
Everything should line up, there may be some gaps, but nothing a little greenstuff or superglue won't fill in. Before super gluing the model make sure to trim off any excess plastic and smooth it out.
Automatically Appended Next Post:
bebopdrums2424 wrote:Well hello sir glad you started this finally
Dude! How are your Catachans & Tau coming along? I'm still in the process of unpacking after the big move from Cali to Tx. Trying to find a good hobby shop/game store near here to hang out/game at.
Rogue Wolves wrote:im interested i've never seen anyone do mordians before
Thank you, I hope to do them justice. I've got a lot of ideas, but I don't want to go too overboard. I've got more pics than what I've posted up and have been trying to keep a log of what I do for the conversions and painting. I don't have an army list built for them yet as I'm still relearning the game after being away from it for almost 12 years.
Mordian Iron Guard Standard conversion. I cut the hand holding the standard from just after the arm. Then I cut the hand from the Mordian Iron Guard model. Ideally, you'd want to pin the new hand/standard to the model, but I don't have any pinning supplies. So I settled for super gluing at the hand and on the back leg as a second point of contact.
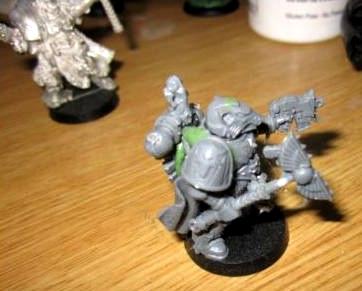
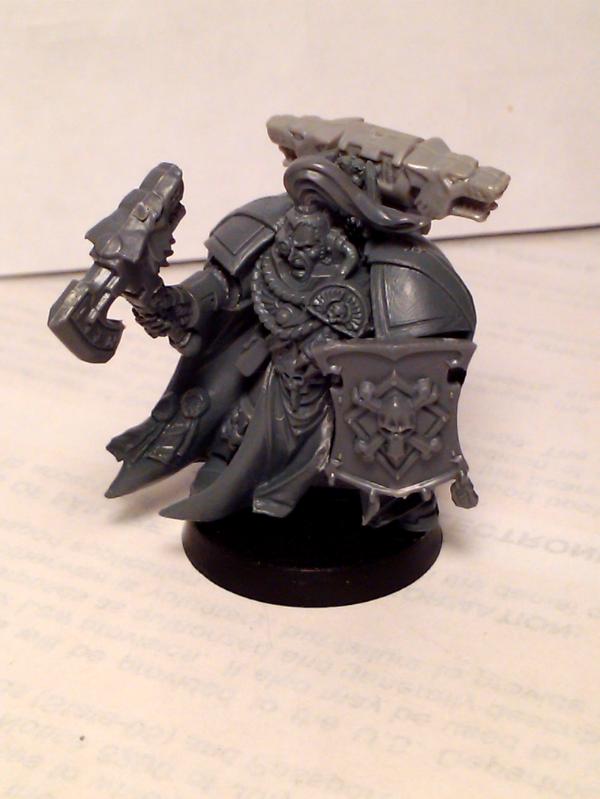
I picked up the Cadian Command squad box and Lord Castellan Creed and went to work converting his head and a Cadian Officers head into a Mordian Looking Creed. I kept the officers head on the sprue and cut it from there. Then I shaved a small sliver off of Creeds head, set the hat on, eyed it, then cut some more.
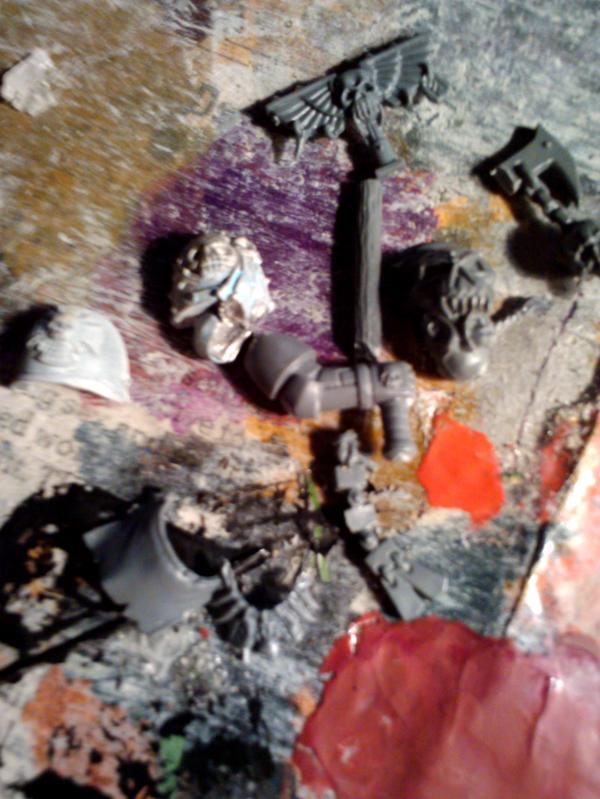
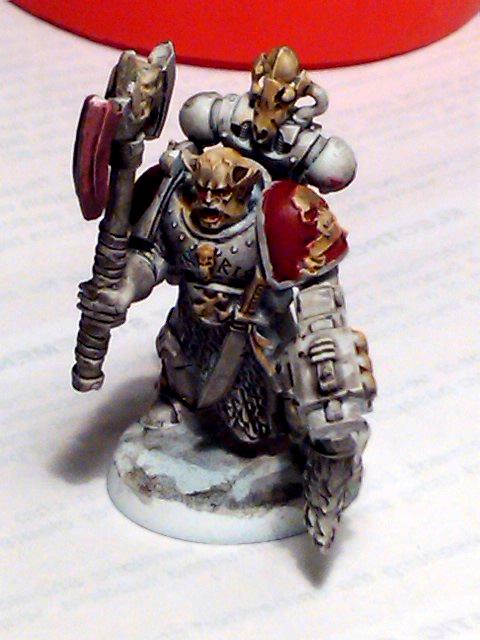
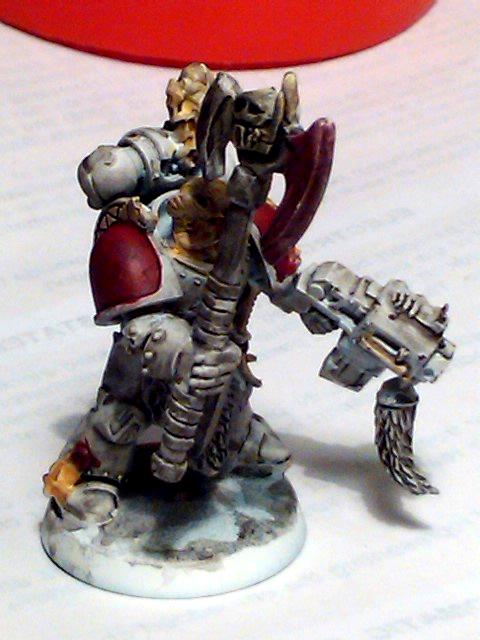
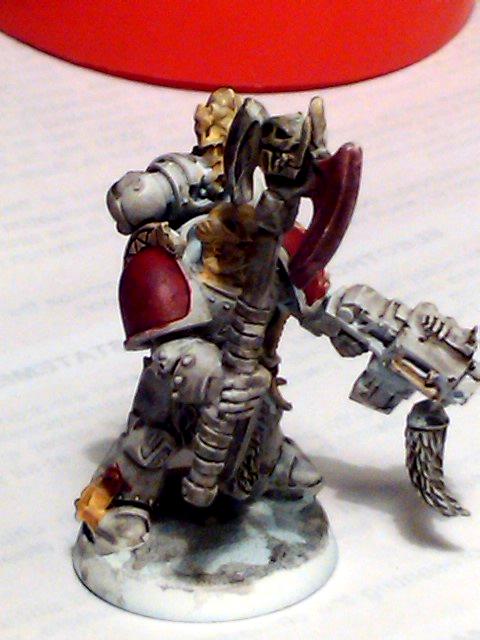
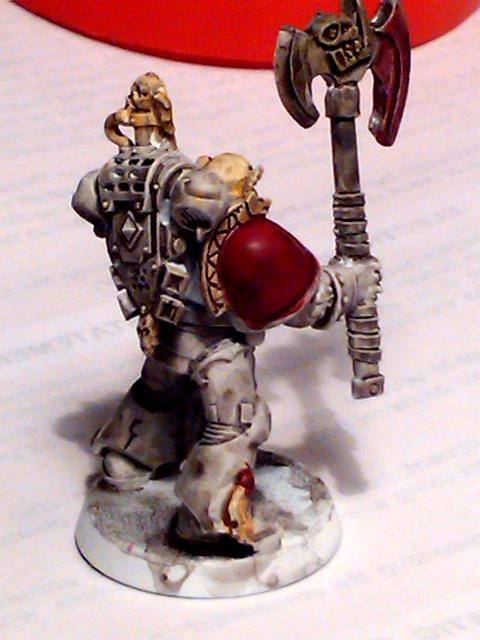
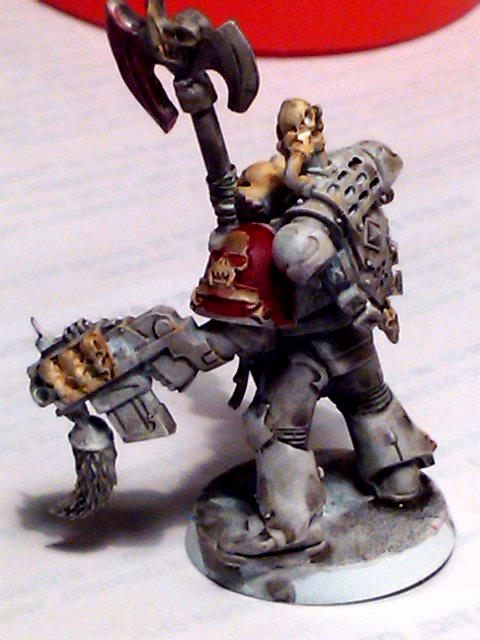
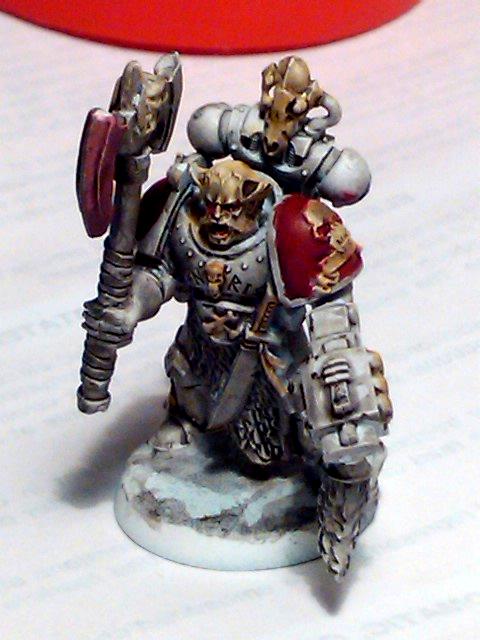
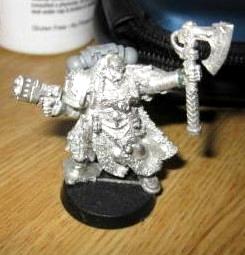
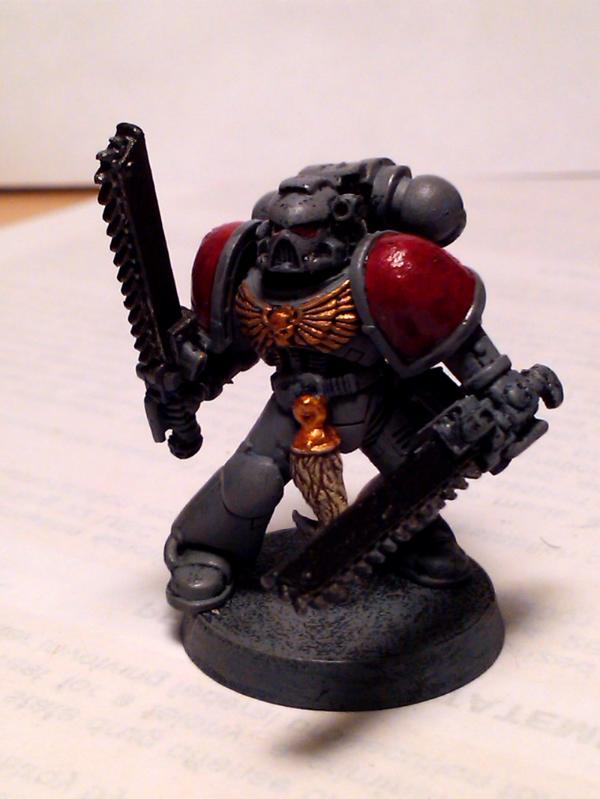
Mordian Iron Guard, Veteran Sergeant Power fist conversion. This is the power fist from the Cadian Command squad sprue, I needed to cut the arm off the metal model and file the surface flat. After this I lined up the power fist and trimmed off the shoulder armor piece leaving the upper arm longer than necessary. lined that up and then trimmed it down to where it looked okay. I think the arm could have been repositioned in a more dynamic matter, yet I think it came out well.
Mordian Iron Guard Heavy Flamer weapon conversion. I began by cutting most of the lasgun away as well as a portion of the heavy flamer weapon. I used a combination of an xacto knife and hack saw with a vice to cut down the metal.
Tried to green stuff the hose, but the green stuff was too sticky and came out all messed up. superglued the gun in place and then attached the back pack.
Basing in progress. Basing is a combination of beach sand, gravel, some cork board and probably some rocks and cement from the parking lot outside of Aero.
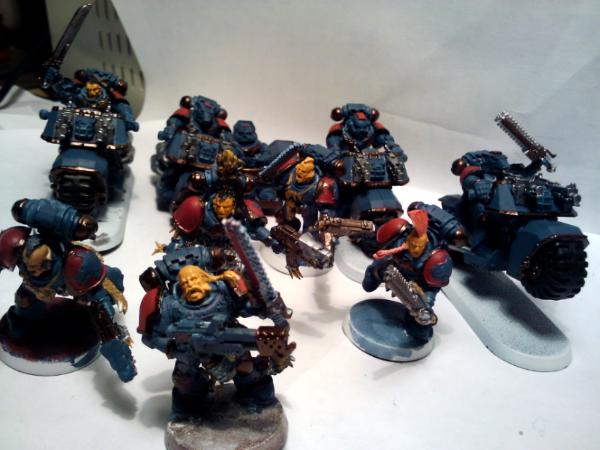
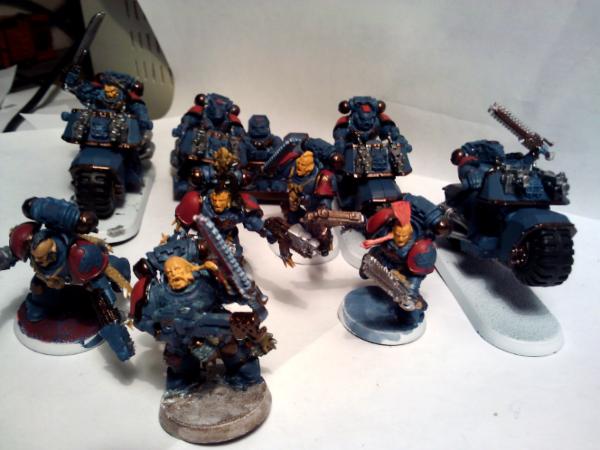
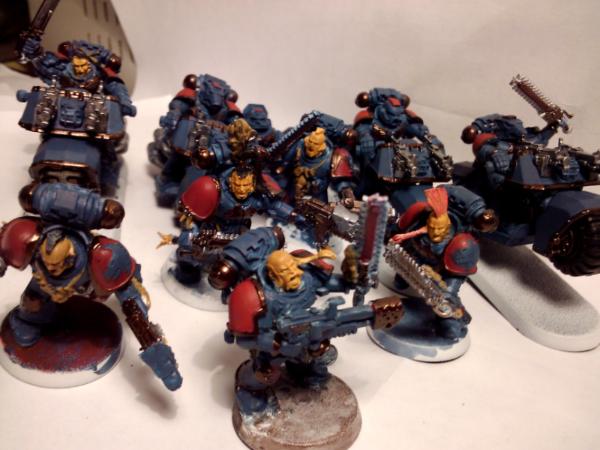
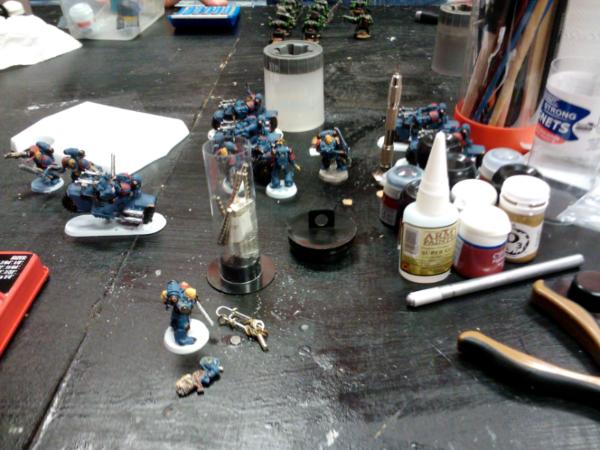
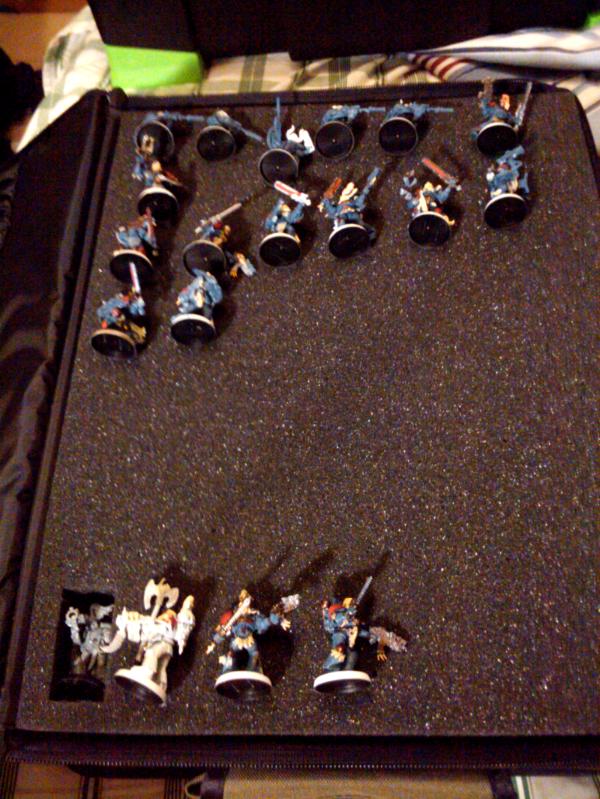
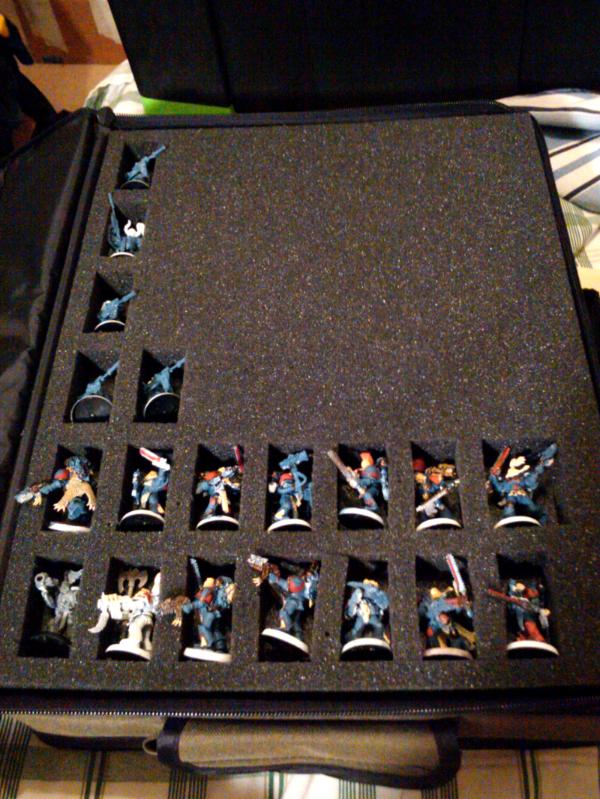
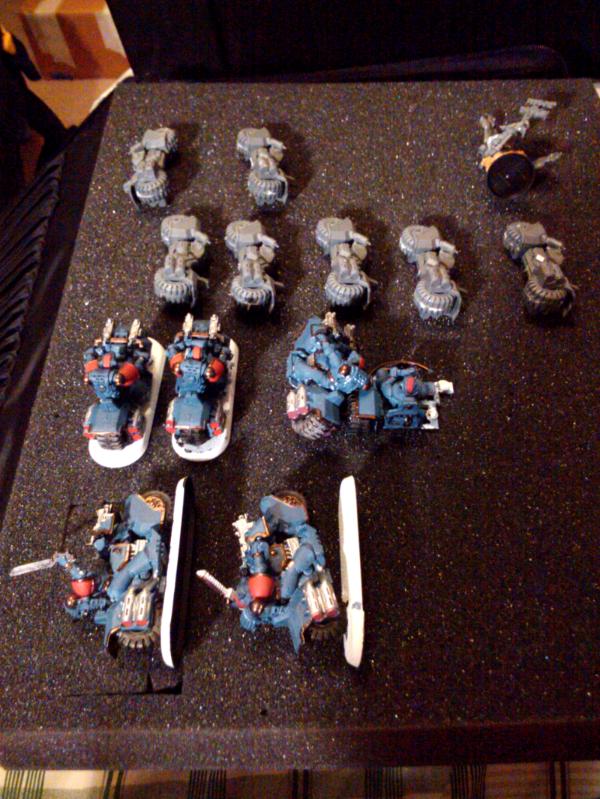
The following images are of the models I had prior to leaving Los Angeles, CA and moving to Houston, Tx. I have since doubled the amount of models.
Pics I haven't uploaded yet are of the Hellhound, Leman Russ Demolisher and a few hundred more of the Mordian Iron Guard. As always, thoughts, comments, suggestions and anything else are always welcome!
Blacksails wrote:Really liking the blog so far. I've got a Mordian army too, and you've definitely shown some good ways of converting plasma guns that I will try.
Looking forward to more!
Awesome! Glad to hear you like my conversions and that you also field Mordians. I'll definitely be interested in any conversion ideas you might have!
Automatically Appended Next Post:
bebopdrums2424 wrote:Look at the link on my sig dude...I'm working on a new army of...catachans. Seriously.
Ahaha, You just can't get away from the Catachans! Those Genestealers look great man and congrats on winning the RTT, I really wanted to be there and see how it went.
Briiliant work Hmelrose, love these guys , glad you posted , i havent seen a Mordian blog before , hwta colour scheme are you thinking , and are you going to bother with fluff?
this is not Modernization but this is MoRdernization.
frankly. GW should do plastic versions of this. i've heard that GW began to replace any 'metal' troops with plastics due to the increasing-price of pewter materials.
Very cool project. Always liked the mordians a lot. Thought about getting a dremel? Is probably worth it when you are working with so much metal miniatures
neil101 wrote:Briiliant work Hmelrose, love these guys , glad you posted , i havent seen a Mordian blog before , hwta colour scheme are you thinking , and are you going to bother with fluff?
I have a color scheme in my mind, yet I'm still working out the color combination. As far as fluff, again, I'm still working that out, I don't know if I should base it off my own experiences while in the military or to create something new.
Viktor von Domm wrote:thanks for the P&M blog link mate... will keep an eye out for your progress^^
Thanks for stopping by!
Lone Cat wrote:this is not Modernization but this is MoRdernization.
frankly. GW should do plastic versions of this. i've heard that GW began to replace any 'metal' troops with plastics due to the increasing-price of pewter materials.
You can get Valhallans, Tallarn, Steel Legion as well as some other out of print models. They don't really cost that much more than an equal size squad of plastic Cadians, though they are all metal and require a little more ingenuity and elbow grease to convert to current rule sets. The Mordians didn't have plasma weapons, so I've had to convert models to that as well as a heavy flamer, snipers, standard bearers and more. I'm working to have a lot of models converted up to current weapon and vehicles.
Illumini wrote:Very cool project. Always liked the mordians a lot. Thought about getting a dremel? Is probably worth it when you are working with so much metal miniatures
What color scheme have you planned?
I'm still getting back into the hobby and a lot of tips/tricks have been lost over time so having knowledgeable people who are willing to share their skills has been awesome. I've just made a big move across the U.S. from Ca to Tx and I miss the camaraderie and level of skill that exists at Aero Hobbies in Santa Monica, CA, bebopdrums2424 and all the others there have a level of skill with painting, modeling, converting and plasticard that is beyond amazing. All the armies in the store are painted well above tabletop quality.
As far as purchasing additional tools, I'm on a slight holding pattern for that due to the move. The metal is soft enough that I can work with it using a saw and xacto knife, but something with more precision would also be nice.
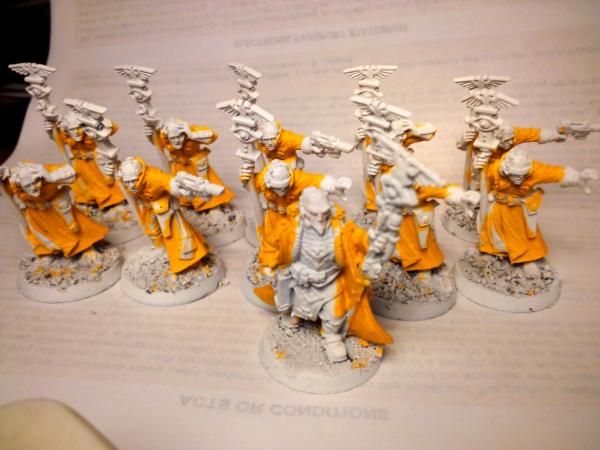
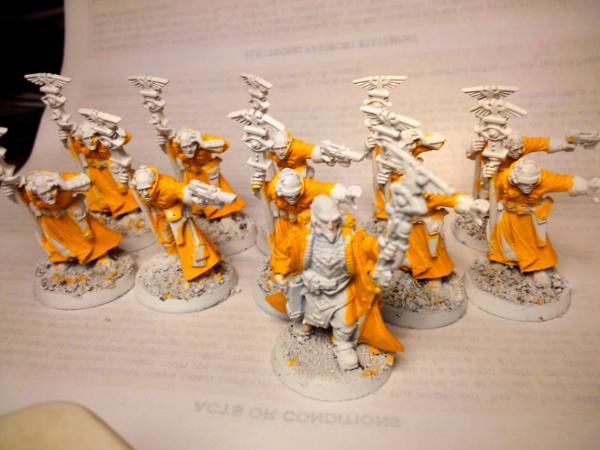
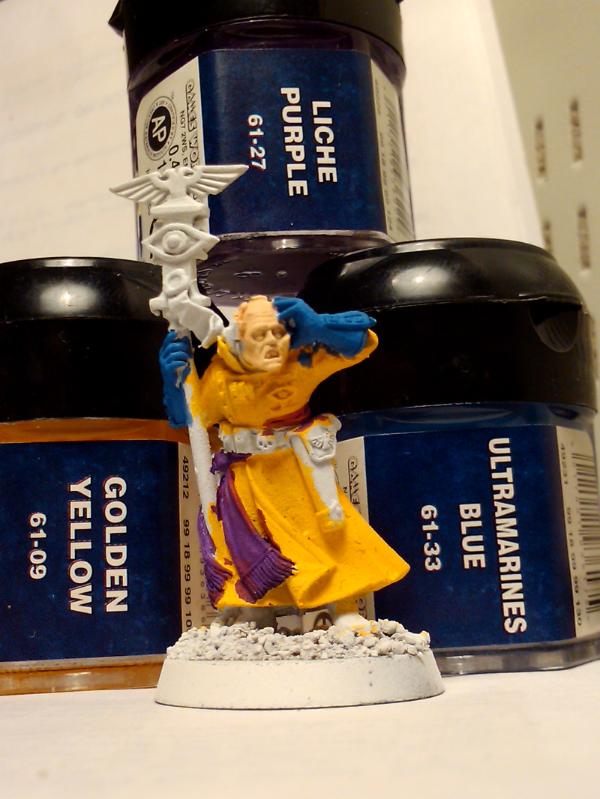
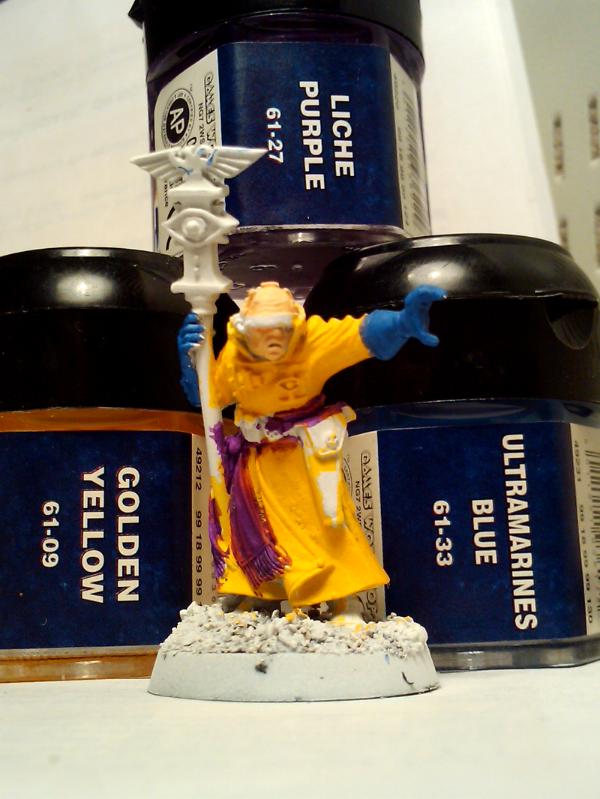
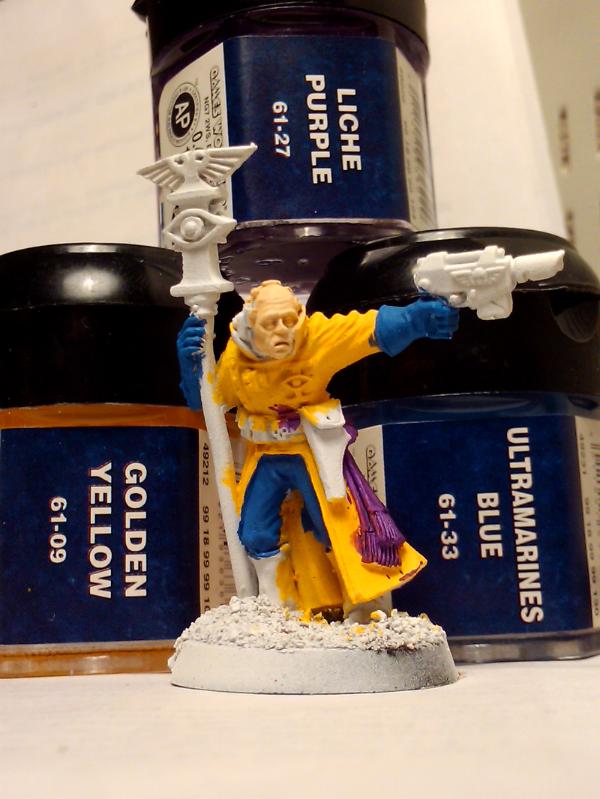
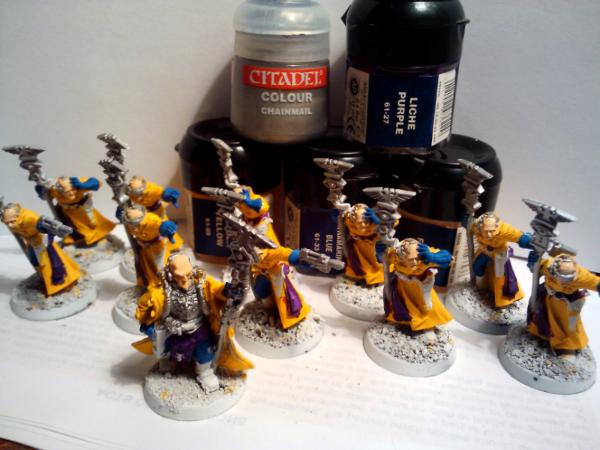
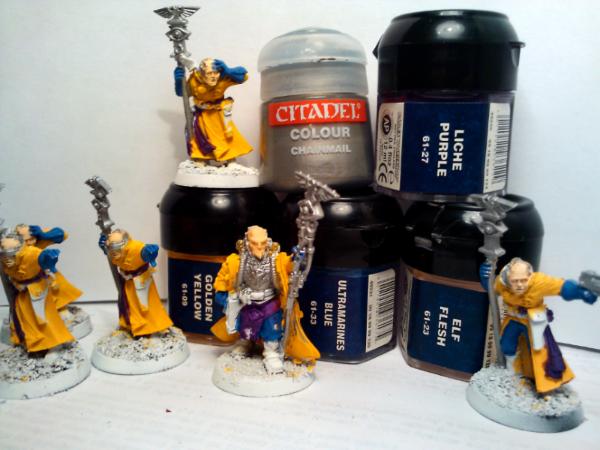
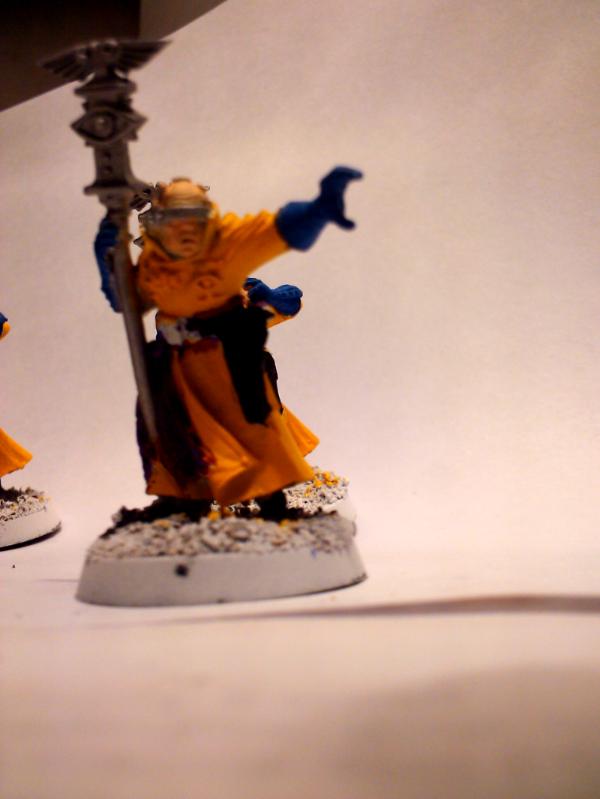
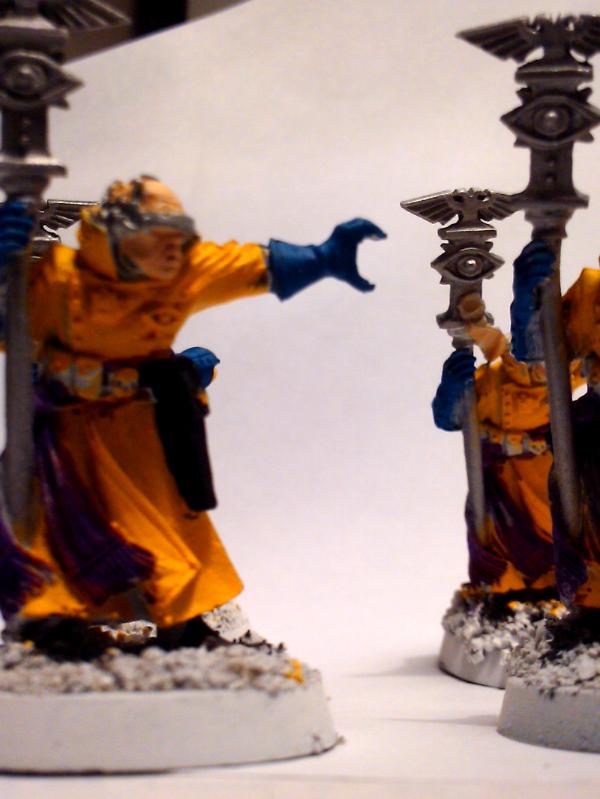
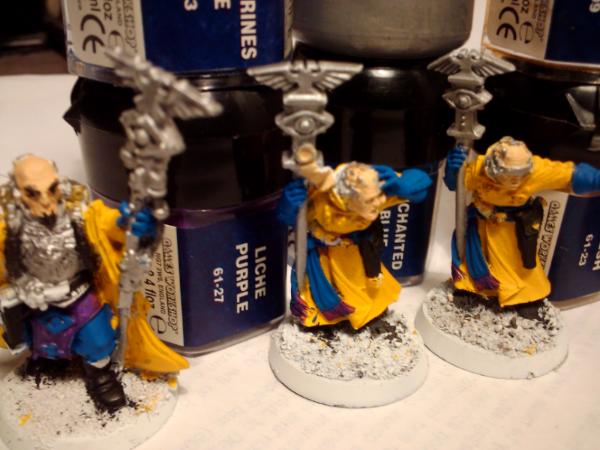
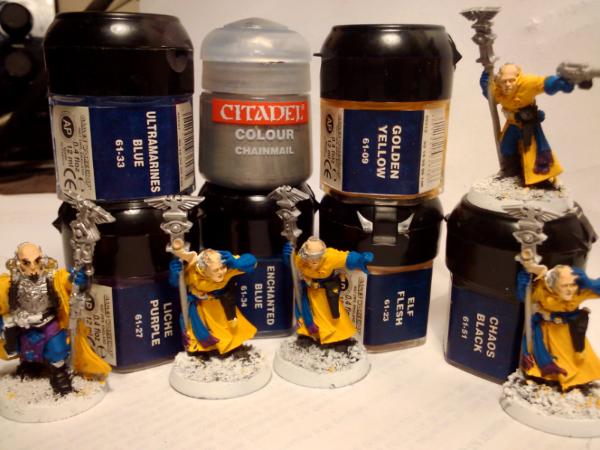
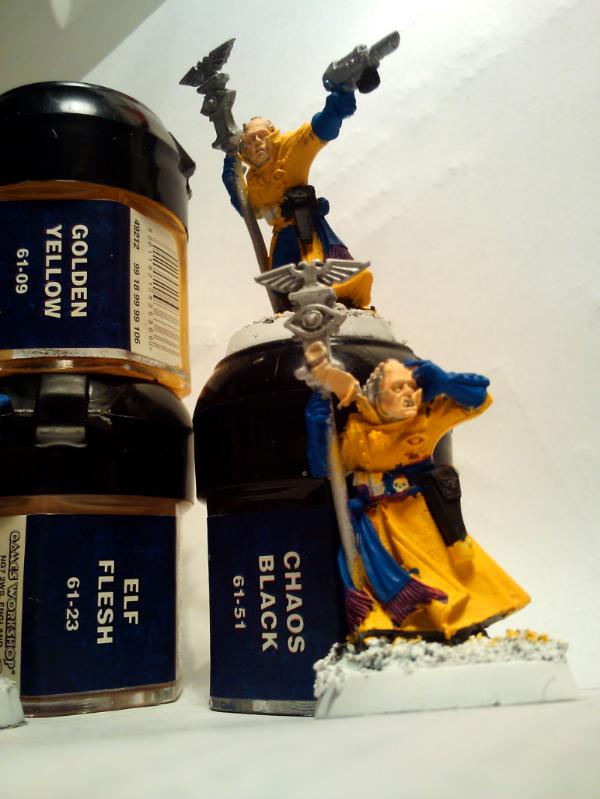
I've been working on the paint scheme and trying to get a single model painted to the colors that I had thought I'd like, yet it just seems to me that there is too much yellow on the model. However, I was shooting for an Army dress blue style of uniform (I was in the Army for a long time). I'm evaluating what I can do to change it up. I think the combination of colors will work out nicely.
Coat: Mordian Blue (currently, yet I think I'm going to go with a either a different blue or even black)
Pants: Mordian Blue
Shoulder boards and leg stripe of yellow (not sure of the color), yet reminiscent of early Army Cavalry colors.
Boots: Chaos Black
Hands: I'm debating on dress gloves, either white, black or just a plain flesh tone.
This isn't the latest, but its the one I do have of the paint scheme:
Automatically Appended Next Post: A shot taken last night 7 Nov 2011 of all the models I've got to work with.
Llamahead wrote:I like the idea of the gloves myself. A nice practical idea that isn't seen on many models.
Thank you! I thought it would both add to the dress uniform feel as well as reduce the amount of flesh I'd have to paint.
c0un7_z3r0 wrote:It's nice to see these old chaps again! Nice weapon-swaps!
zerosevensevenzero wrote:Wow, haven't seen these guys in ages! I'm really liking the arm-swaps, very inspired!
Yes, seeing that box come into the store was like a wave of nostalgia hitting me as I had some of these models when I was a lot younger. I'm glad people are enjoying the arm/weapon swaps conversions. Its been an interesting challenge to convert the metal models and I'm trying to see what other ideas or modes I can come up with or find on the internet.
I've been progressing with the basing and creation of large bases for the Heavy weapons teams from thick cardboard. I need to apply some more glue or adhesive to keep the particulate gravel/cork board /cat litter / basing mix on the bases. Over time I believe they'll separate and fall off. Though once I've primered, then painted the bases I think that will add a layer to keep the rest of the stuff from falling off.
Automatically Appended Next Post: This conversion uses the sling piece and the catachan flamer gun to create a model using both a lasgun and the potential of another flamer. I'm going to try this with some melta & plasma guns for a greater versatility of model/troop types.
This is another image of my Creed conversion, I picked up the Cadian Command squad box and Lord Castellan Creed and went to work converting his head and a Cadian Officers head into a Mordian Looking Creed. I kept the officers head on the sprue and cut it from there. Then I shaved a small sliver off of Creeds head, set the hat on, eyed it, then cut some more. He's now been primer'd with P3 White.
Take a look at Colonel Gravis's Praetorian Blog on here. For cavalry personally I'd have a look at historical models. The Perry's French Napoleonic Cavalry would fit in perfectly or with a head swap be a great source for bodies. For a more irregular look there Union cavalry mgiht be the way to go....
Llamahead wrote:Take a look at Colonel Gravis's Praetorian Blog on here. For cavalry personally I'd have a look at historical models. The Perry's French Napoleonic Cavalry would fit in perfectly or with a head swap be a great source for bodies. For a more irregular look there Union cavalry mgiht be the way to go....
I was looking at his praetorian rough rider conversion kits he has made, which is essentially the Mordian Iron Guard uniform with a different head. The mount is going to be the thing and he has a few suggestions and I'll be reading his P&M blog for more ideas!
i really like your conversions... that creed version of yours is looking bad ass!!! and the paintscheme now that i see it, is very crisp looking! all thumbs up mate!
Llamahead wrote:Take a look at Colonel Gravis's Praetorian Blog on here. For cavalry personally I'd have a look at historical models. The Perry's French Napoleonic Cavalry would fit in perfectly or with a head swap be a great source for bodies. For a more irregular look there Union cavalry mgiht be the way to go....
I looked up those Perry miniatures and they look sharp and 14 mounted figures right out of the box!. Their legs don't have the stripe, but the upper torso is perfect. I could use Cadian Officer and Tank Commander heads for the swap fairly easily. Then some 50mm pipe + something for lance head..hmm.. I'll just need to pick up a large bits order.
Now, I just need to find a US wargame store that is selling them.
Viktor von Domm wrote:i really like your conversions... that creed version of yours is looking bad ass!!! and the paintscheme now that i see it, is very crisp looking! all thumbs up mate!
Thank you! I'm still working out the paint scheme, but it won't deviate too much from what I've posted.
yep Catachan or SM Flamethrowers are more convertible than ones Cadian uses.
actually Catachan flamethrowers are based on original GW flamethrowers. just with its nozzle changed into zippo ones.
I like the glove hand thought Mordians look like they have classy and classy dudes where gloves to take one off and smack the opponent to challenge them to a duel. haha great work on the conversions to.
Llamahead wrote:Take a look at Colonel Gravis's Praetorian Blog on here. For cavalry personally I'd have a look at historical models. The Perry's French Napoleonic Cavalry would fit in perfectly or with a head swap be a great source for bodies. For a more irregular look there Union cavalry mgiht be the way to go....
I was looking at his praetorian rough rider conversion kits he has made, which is essentially the Mordian Iron Guard uniform with a different head. The mount is going to be the thing and he has a few
Col Gravis did cast resin many of Praetorian heads and some other bits. ones that originally not available, not even by GW mew!
this is as good as it goes.... but don't forget to check out Cadian command section boxset. there's commander head with hard cap. ones that may make a modernized Iron Guard
this time they ain't no Line Infantry anymore are they?
Llamahead wrote:Yep Perry's are a range I've been promising myself to pick up unfortunately theres other projects to be done first. Glad to be of assistance
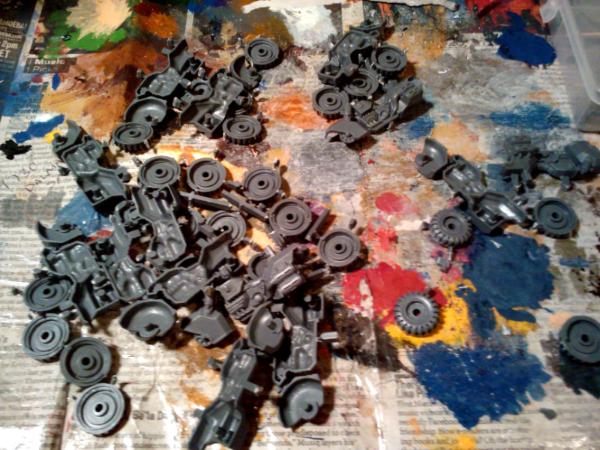
I tend to go all out when I build an army, gathering everything up, building it all, priming and then painting it all in succession. As can be seen in this pic where I Primed 100+ Mordian Iron Guard & some Warmachine models after assembling, converting, based them all:
I found a local (bout 75miles away) retailer online with the models and have placed an order, I also ordered some Cadian Officer & Capped Tank Commander head bits online. I still need to figure out what to use for the lances. I do have some plumbing/welding steel wire from a hardware store that I could cut down. Its fairly cheap, $1.00 u.s. for three 3 foot lengths.
Lone Cat wrote:yep Catachan or SM Flamethrowers are more convertible than ones Cadian uses.
actually Catachan flamethrowers are based on original GW flamethrowers. just with its nozzle changed into zippo ones.
assembling Cadian flamers are a bad experiences.
Indeed, though you can see from the earlier flamer conversions those are Cadian as is the Heavy flamer. I just need to figure out a better way to incorporate them into the model without too much work. Cutting up slings for weapons seems to be the easiest and fastest.
Aboucher wrote:I like the glove hand thought Mordians look like they have classy and classy dudes where gloves to take one off and smack the opponent to challenge them to a duel. haha great work on the conversions to.
I like the idea of gloves on a dress uniformed mini as well as the other models like Cadians, I for one wouldn't want to go to war on an inhospitable planet without gloves.
dark6spectre wrote:Nice to see some old minis having a fresh life, can't wait to see some more!
Glad y'all're enjoying my work! I have a lot ahead of me, but I believe in this project and will be having fun completing it. Thank you and as always suggestions, comments are welcome!
Received this model from Polonius, I didn't alter the arm, but I like the possibilities here!
Boxing the Mordians up to go to the local GW store in Spring,Tx(essentially North Houston, Tx) and work on them. There are now over 150 Mordian Iron Guard in my collection.
Automatically Appended Next Post:
Lone Cat wrote:
Col Gravis did cast resin many of Praetorian heads and some other bits. ones that originally not available, not even by GW mew!
this is as good as it goes.... but don't forget to check out Cadian command section boxset. there's commander head with hard cap. ones that may make a modernized Iron Guard
this time they ain't no Line Infantry anymore are they?
=^.^=
I have been looking at his work for awhile now and have been amazed at the possibilities as well as he is selling conversion kits and Yes, The Cadian Officer head is an excellent Mordian Capped head as is the Tank Commander Cap head. I've bought two of the Cadian Command section box sets, which is what most of the conversions are from above.
After I am done with the Mordians, they'll be more than a force to be reckoned with.
Blacksails wrote:I used to think I had a lot of Mordians.
Then I started watching this blog.
I can't wait to see more.
Thank you! I'm still actively searching for them, especially the ultra rare Plasma Rifle Mordian, I was lucky enough to come across two lots of 50+ models and grabbed them up quick, the rest have been donations from friends who have had them sitting in a box for years or purchases online through places like ebay.
Post up your pics! I'd love to see what you've done with the Mordians you have!
If I had any painted. I'm probably one of the slowest painters ever and I'm trying to get through painting all my tanks first. Then I have to paint 3x 30-man blobs with three 5-man PCS, and a CCS...so...110 Mordians. Plus spares and some lascannon teams. Maybe your painting will get me off my arse and paint a batch.
If I had any painted. I'm probably one of the slowest painters ever and I'm trying to get through painting all my tanks first. Then I have to paint 3x 30-man blobs with three 5-man PCS, and a CCS...so...110 Mordians. Plus spares and some lascannon teams. Maybe your painting will get me off my arse and paint a batch.
Nice! I know the weight of all those models must be heavy on your mind and I can fully understand taking your time and completing projects. I've got a lot ahead of me as well and the plan is breaking it up into chunks of assembly line painting. The scheme I'm working towards is constantly being reworked in my head.
I'm going to try Regal Blue on the coat, to keep it still blue and break up the colors of blue on the model.
I've been working on my models more today.
Assembling and basing the new models, getting them ready for priming.
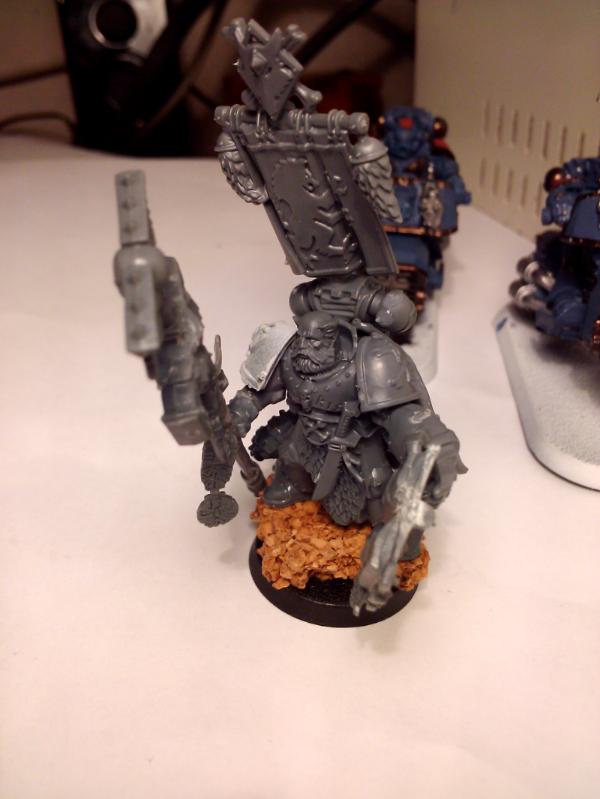
Mordian Iron Guard Melta gun and Standard Conversion created using the Sergeant model. I removed the chain sword and laspistol, then trimmed and superglued a meltagun to the sergeants pistol hand. For the Standard, I drilled into the hand and the flag cut by a friend, clipped a small paperclip for pinning and superglued the whole thing. I may add a pistol holster and/or a sword in the sheath to this model.
Mordian Iron Guard Melta gun and Standard Conversion. Sergeant model for comparison.
Mordian Iron Guard Flamer Conversion
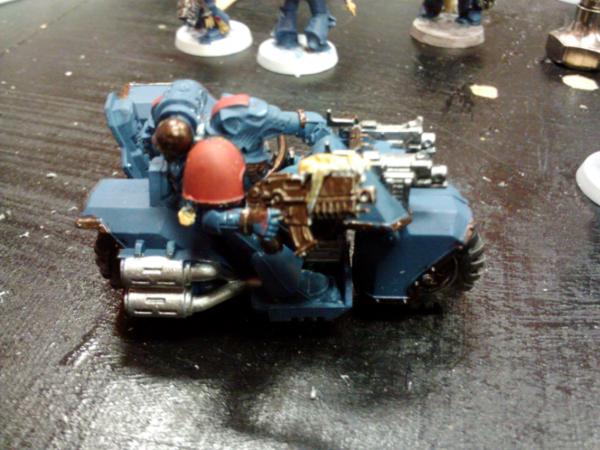
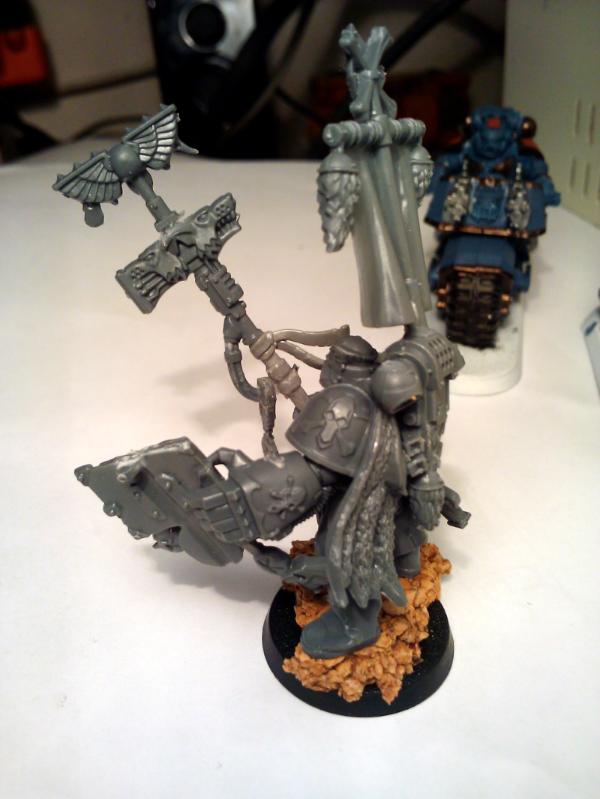
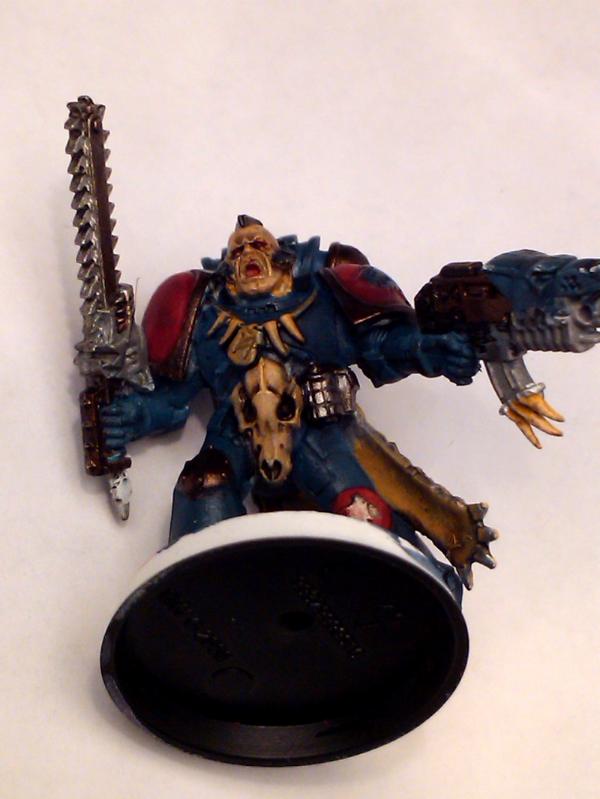
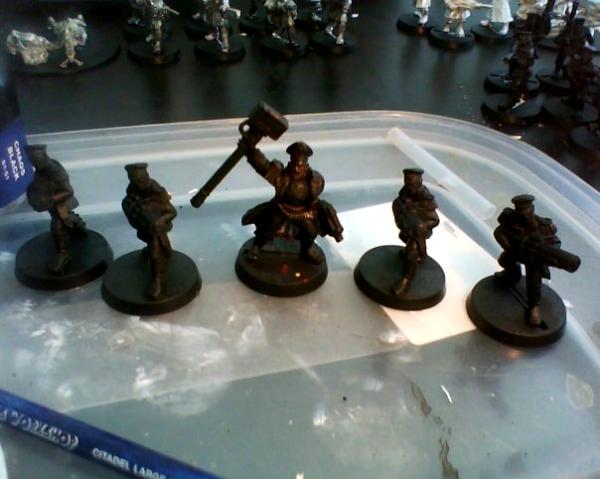
Mordian Iron Guard Tank Commander Conversion. The inspiration for this guy came from the Tank Commander mem "Drive me closer, I want to hit them with my sword!" I'm hoping this came out well.
I plan to use the autocannons from this to make a Hydra conversion using either a Hellhound or Chimera as the base model. I'll magnetize the guns so they can be used on other models/conversions.
for the meme commander i would not have used the stick arm... the sword arm is quite a good choice... empire one? i would have chosen the yelling arm from the HW team...
but a classic meme and a brilliant conversion that will be much fun on the table
Thank you! I'm trying to work out different ideas and its been an interesting journey.
Viktor von Domm wrote:for the meme commander i would not have used the stick arm... the sword arm is quite a good choice... empire one? i would have chosen the yelling arm from the HW team...
but a classic meme and a brilliant conversion that will be much fun on the table
Thanks! Comments are always welcome, thats how I learn about new bits and pieces as well as techniques. I didn't know there was a left handed pointing arm in the heavy weapons team.
I was going to use the yelling arm from the cadian command sprue, yet it was right handed and the arm from the meme is a left handed pointing arm. I haven't picked up any other kits for bits as I'm trying to hold off on purchasing plastic Cadians, if I do get any, they'll turn into conscripts or whiteshields. I almost put a pair of binoculars in his other hand, yet felt that a 'swagger stick' in his left hand would add to the awesomeness of the model.
The sword hand was a bits donation from a friend at Aero Hobbies, so I'm not clear on which faction it came from. It was armored w/chain mail showing, the sword itself has a kind of fleur de li on the blade, but that just may be part of the design.
I may expand on this with future Tank Commanders, I'll be trying to get him to look more Mordian.
that way he would not be pointing but more yelling to the crew...
or you could take this arm here:
and cut off a hand from wargames factory if you have, cause they have this poining arm...:
or
but anyway... he still looks cool...as for making him look even more mordian i would simply raise the collar of his jacket...i think this would then fully look the part! o course epaulettes would also be nice...
Viktor von Domm wrote:the arm i meant was this one:
that way he would not be pointing but more yelling to the crew...
or you could take this arm here:
and cut off a hand from wargames factory if you have, cause they have this poining arm...:
but anyway... he still looks cool...as for making him look even more mordian i would simply raise the collar of his jacket...i think this would then fully look the part! o course epaulettes would also be nice...
I see what you mean and I had taken a look at that arm (the one minus the hand) I just couldn't find a left hand pointing at the time. There is an tutorial for greenstuffing epaulets/shoulder boards, I'm just not there with my green stuff skills yet.
Perry Miniatures Heavy Cavalry models will be used as the foundation for my Mordian Iron Guard Rough Riders. This kit arrived fast! It has 14 models in it, so I've got mounts and troops ready to be converted. I'll need to craft lances and utilize the Cadian Officer heads I've ordered as conversions. I like that there is a trumpet model, I may just add/convert that arm into one of the generic Mordian lasgun models.
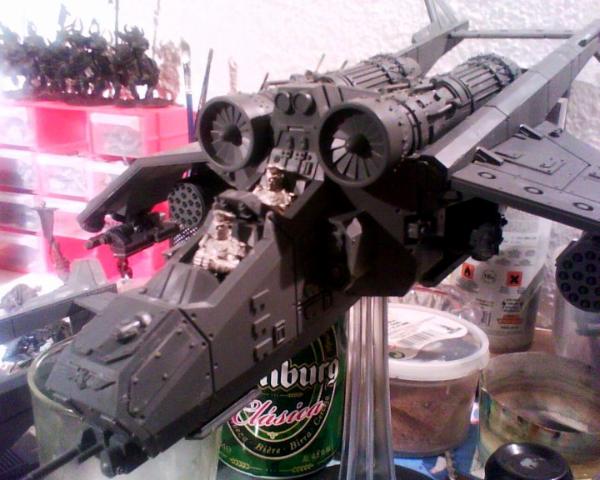
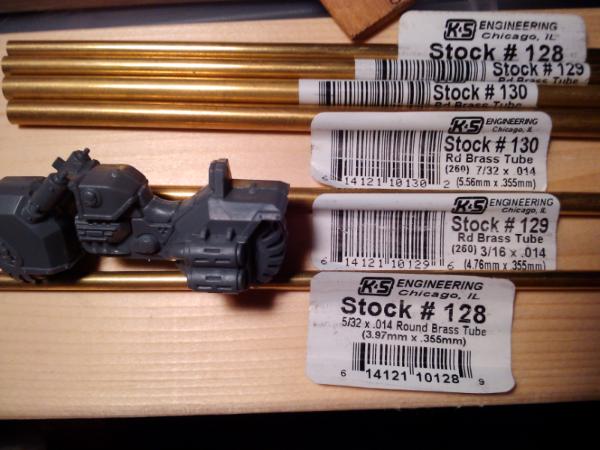
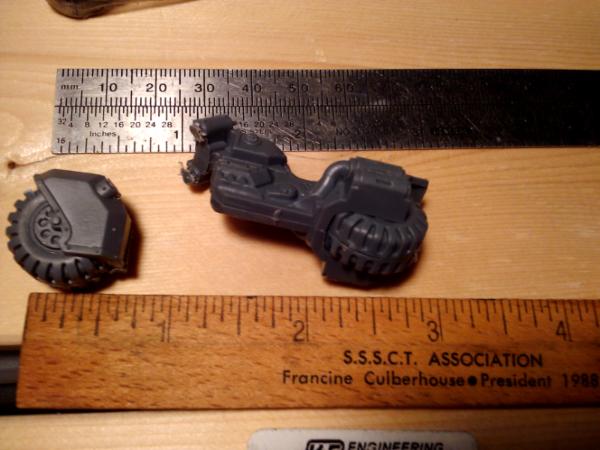
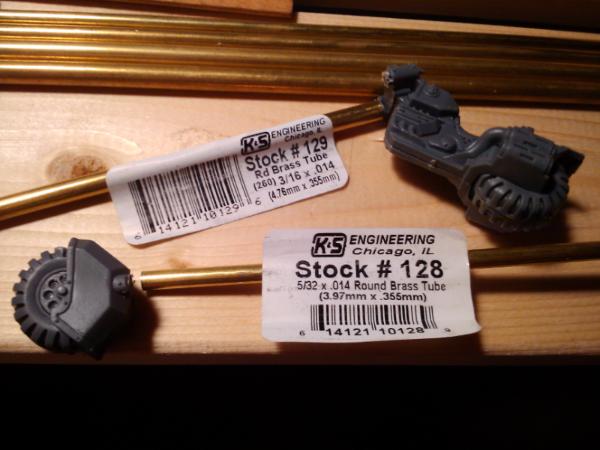
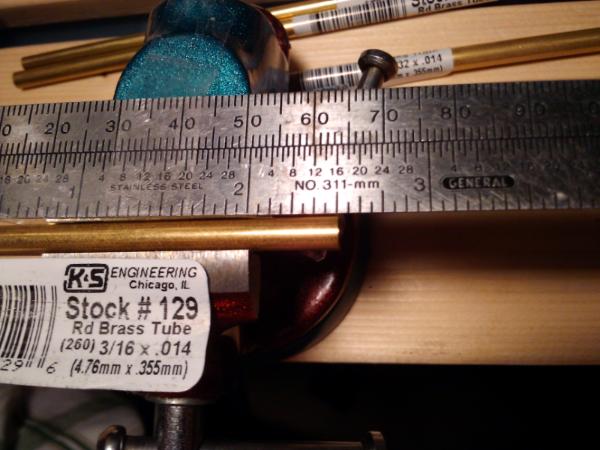
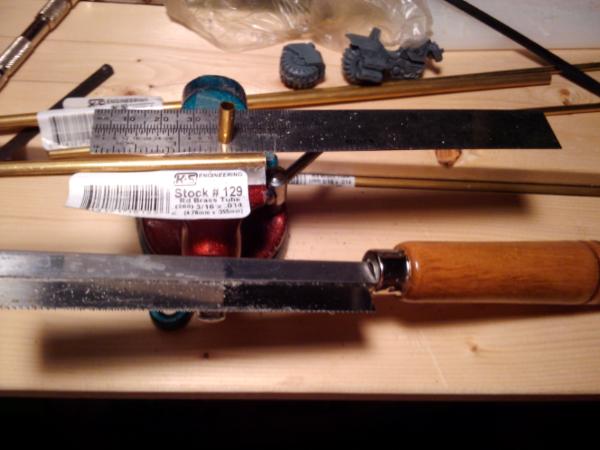
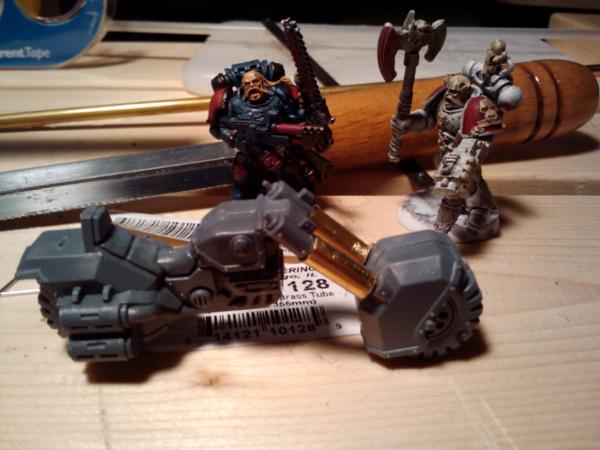
Now, this next bit might cause some players to groan, but I've been looking at options for vehicle conversions. Take a look and let me know what you think. This is the company for both the Demolisher proxy and my Hydra conversion, these are cheap 1:32 or 1:35 scale tank/halftrack I bought for $12.
This was a cheap 1:32 or 1:35 scale tank I bought for $12 and cut down a piece of plastic tubing to create a Leman Russ Demolisher proxy.
I've put it next to a chimera chassis and a Mordian Iron Guard model for scale comparison.
I've put a Mordian Iron Guard model from the heavy weapons team in the drivers seat for scale comparison.
Quad Autocannon turret system from the Aegis Defence terrain set. I'll be using this to simulate a hydra.
I've put the Quad Autocannon turret system from the terrain set. I'll be using this to simulate a hydra. I added the terrain pieces as armor for the vehicle, yet I'm not sure if it needs it.
The base of the turret is magnetized to the model, so this can be removed and used elsewhere.
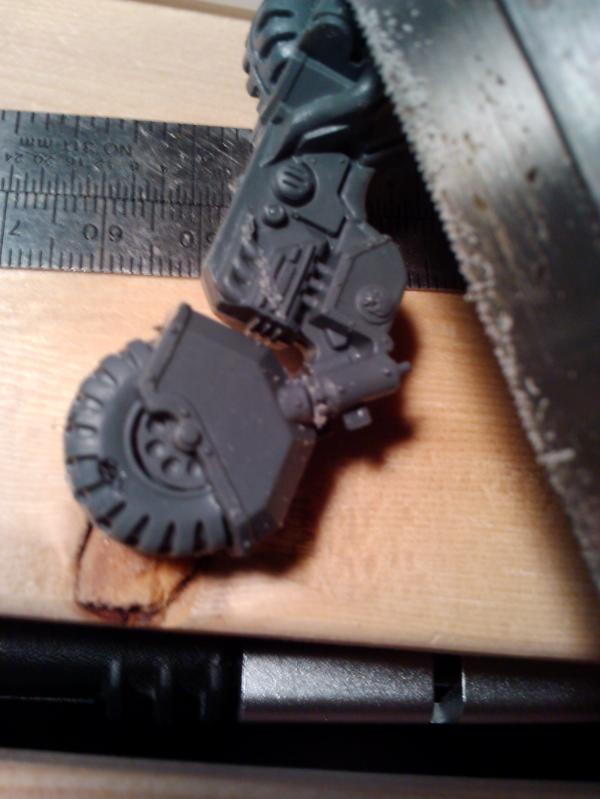
Sentinel Scout Conversion Process: I received this sentinel in a trade today at Fat Ogre a local game store (near The Woodlands, Texas), I was looking forward to getting a sentinel and to pick one up I could take apart was pretty dang awesome.
I'll be using the top half of this Mordian Iron Guard Heavy Weapons model as the pilot of the Sentinel.
I began by clipping the cage from the model. I'll set that to the side and will use a pair of pliers to pull the pilot apart and out of the vehicle. I felt like I was using the jaws of life on this guy and then I tore him apart.
I began by clipping the cage from the model. I'll set that to the side and will use a pair of pliers to pull the pilot apart and out of the vehicle.
I got this Sentinel today and will be making some adjustments to it to convert it to a Mordian Sentinel. I began by clipping the cage from the model. I'll set that to the side and will use a pair of pliers to pull the pilot apart and out of the vehicle. I pulled the head off, then the left arm, then right arm and finally I was able to get a grip on the torso to pull that out of the sentinel cockpit.
I cut the pilot torso in half to keep the legs and set the Mordian Iron Guard Heavy weapons model top torso on top of the legs, then set him inside the cockpit.
I cut the pilot torso in half to keep the legs and set the Mordian Iron Guard Heavy weapons model top torso on top of the legs, then set him inside the cockpit. Then I set the cage back on top to get a look at the model.
I also picked up a slew of models of named characters (Straken, Marbo), some Psykers to complete my squad of 10, Ratlings for the fun of it, Servitors, Missionary, Regimental Advisors set and maybe some other models and hobby gear.
As always I welcome your comments and suggestions! Thank you all for being awesome.
Nice sentinel conversion. Sentinels seems to fit the mordian fluff very well IMO.
Brace for some "constructive-but-harsh" critisism
Not loving the WW2 pieces. At this point, it is too obvious that they are just historical models with a new weapon. The halftrack looked better with the aegis roof, but it still needs more 40k-ification IMO.
The sherman is my least favorite. The cannon looks like a circus cannon. It is too big, and not at all integrated in the hull.
Good to have some brothers-in-arms with "mostly metal" armies out there. You have some great conversions (I particularly like the sentinel with the Mordian driver swap!)
Though I love most of what you've got here, I do have to agree with Illumini on the WWII stuff.
Lone Cat wrote:can you compare the size of Leman Russ and 1:35 Sherman?
Yes, I'll take some pics of them together. I can tell you the Sherman is a little longer, while the LR is wider.
Illumini wrote:Nice sentinel conversion. Sentinels seems to fit the mordian fluff very well IMO.
Brace for some "constructive-but-harsh" critisism
Not loving the WW2 pieces. At this point, it is too obvious that they are just historical models with a new weapon. The halftrack looked better with the aegis roof, but it still needs more 40k-ification IMO.
The sherman is my least favorite. The cannon looks like a circus cannon. It is too big, and not at all integrated in the hull.
Thank you! I appreciate all comments, criticism, suggestions and tips/tricks, its how I learn and how we all learn.
I can agree with you on the WW2 models, I didn't like the way the Sherman/Russ came out, but for $12 and an old plastic tube, you can't really beat that for a proxy piece. The Halftrack is a better looking model and I agree it needs more 40K'ing, I magnetized the Aegis with magnetic tape to the same post that would house a similar weapons array. I was thinking of using plastic card to build an armored hull around the model, then a leather punch on plastic card to punch out rivets to be used on strips of the card. I've seen this done many times at Aero Hobbies in Santa Monica, Ca (There are some Wizards with plastic card there). I'll keep working on it and hopefully it will come out better, but then I may have spent so much time adding to the model, that it might have been okay just to get the original in the first place. We shall see.
Rawson wrote:Good to have some brothers-in-arms with "mostly metal" armies out there. You have some great conversions (I particularly like the sentinel with the Mordian driver swap!) Though I love most of what you've got here, I do have to agree with Illumini on the WWII stuff. Besides that, keep up the great work!
Rawson
Thank you! I shall try.
Briancj wrote:Mordians were my first love, keep up the awesome work!
Been a bit busy seeing old friends and surfing the boards out here. This is what I've got for y'all today:
My attempt at converting a 1:32 scale Half-track to something more 40K
Put bits from the Aegis defence system on the truck to make it look bigger and bulkier.
Then I just went a little nuts.
In the end, I think I liked the original better and all this stuff on it makes it look more like an Ork truck than an IG truck. I'll admit the truck wasn't as bulky or 40K like, but it was a decent kit for the price. I might try my hand at some plasticard building and see how that goes. Does anyone have any experience with plastic card? I've seen it done, but haven't worked with it much myself.
Also, does anyone know what would be a good mold making company? I've seen alumilite at a local hobby shop, but wanted to do more research before making a purchase. The same goes for an air brush, I've seen a cheap testors kit for $30.00 at the hobby shop, but didn't want to buy it because I don't think it will hold the citadel or P3 paints I use and I'm not sure what the comparison of testors paints to citadel/p3 is.
After sitting in simple green for about a 10 days its time to strip these Mordian Iron Guard models. I'm using a simple steel wire brush, though some prefer a tooth brush. This is a soft steel wire brush and it didn't get into all the small sections or between the legs, so I'd had to get another tool in there to get the paint out. This brush was .99 at the hardware store and did not scratch the metal models.
Rawson wrote:I think you were on the right track with 40k-ifying the half track. Right up until you "just went a little nuts"
I agree with your ork wagon assessment. If it's possible to back up a little bit, I think it would turn out better.
Good luck!
Rawson
Yeah, I had the feeling I went too far, now I'm not sure I can back it up without damaging the vehicle. The amount of time I've put into it as well as the work on carving up the aegis defense system walls may have just equated to the same price of purchasing a new vehicle direct from GW, i.e. $23 + $12 = $35 + the time tearing everything up and gluing it together to make it look more 40K.
Here are some new additions to the Mordian Iron Guard Possibilities:
Marbo - I have these thoughts in my head of cutting his head and arms off and then doing something similar to a Mordian model and then converting them together to create a Mordian Marbo... I may have a conversion bug in my system.
Colonel Strahkov
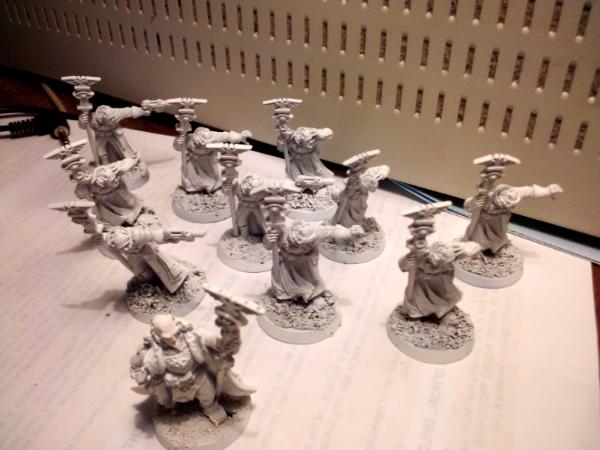
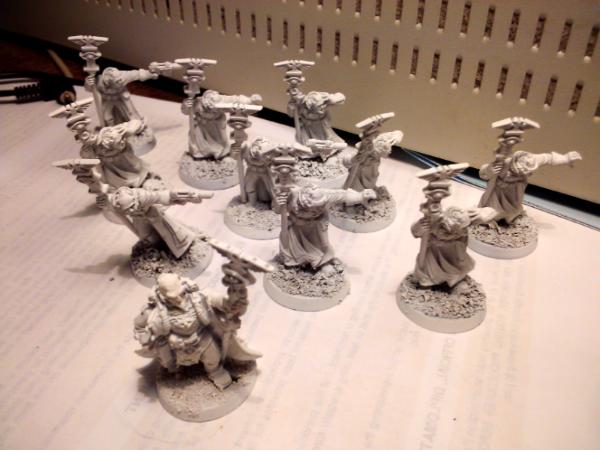
Psyker Squad
Regimental advisors:
Commissars with power weapons: I like that this guy has shoulders with the epaulets similar to Mordians
Servitors
Missionary
Ratlings
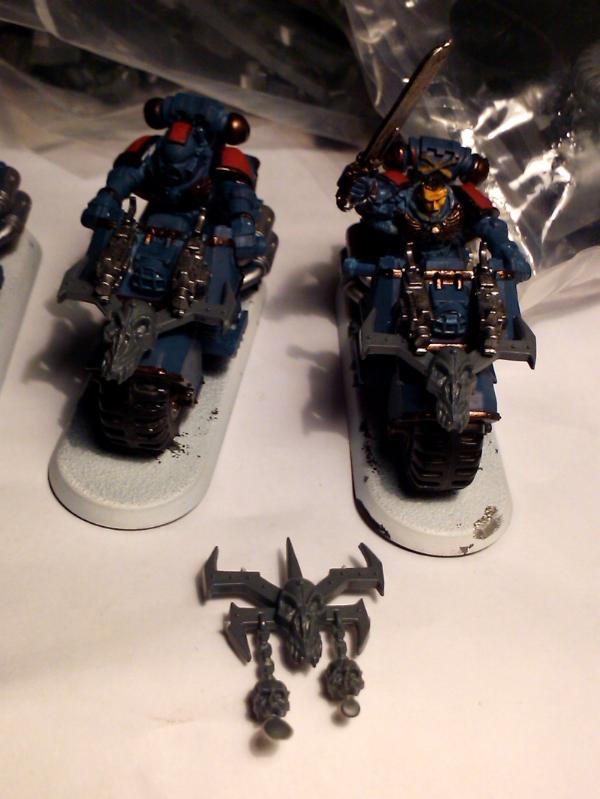
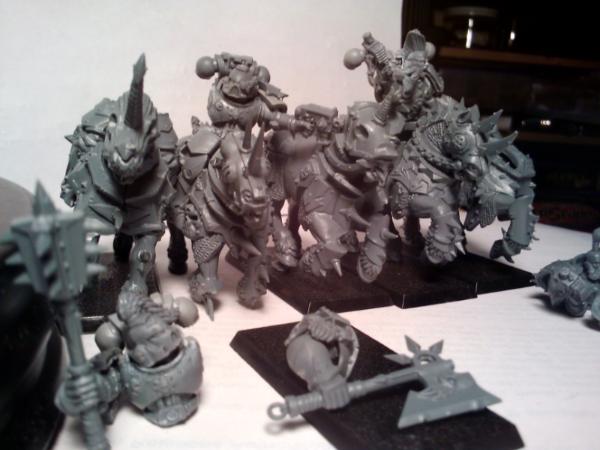
Mordian Iron Guard Rough Rider Conversion using the mounts from Perry Miniatures French Heavy Cavalry and Tank Commander & Cadian officer heads. All the horses go together no matter which two halves of the body type you choose. There is one exception and that horse looks a little different than the others. There are enough bodies to create more than 14 bodies. The 40K heads and the neck slot have to be reworked/cut/trimmed down so that the head will sit on the body. The right arm from the sprue is holding a sword, so I'll find a lance or piece of pipe, trim that out and create rough riders. I might mount a lasgun or similar weapon to the saddle or gear on the horse to complete the image.
This also shows the addition of the top torso from the Mordian Iron Guard Heavy weapons crew member.
Automatically Appended Next Post: This is my Master of Ordinance conversion on the left versus the regular Master of Ordinance version on the right. You make the call.
Glad the tip for the Perry Miniatures models worked out. Unfortunately for me I'm not currently doing a project that can really use them currently. I've got a couple planned for the grim distance of the far future when I have money and time. For the airbrush thing if colour comparison is what your after http://www.paint4models.com/paintchart/paintconversionchart20100101c.html# may be useful. I mainly use it for converting citadel to vallejo as I swap over.
I have to say I agree with you that the Halftrack looked better originally. Personally I feel that subtle look was fine. The guard aren't as baroque and elaborate as the full on 40k gothic of the Grey Knights or Sisters.
One of the Dakka peeps here made an App called "Paint Converter", available for Android and iOS. It is a GREAT little app, and the developer is quite responsive to constructive feedback.
Llamahead wrote:Glad the tip for the Perry Miniatures models worked out. Unfortunately for me I'm not currently doing a project that can really use them currently. I've got a couple planned for the grim distance of the far future when I have money and time. For the airbrush thing if colour comparison is what your after http://www.paint4models.com/paintchart/paintconversionchart20100101c.html# may be useful. I mainly use it for converting citadel to vallejo as I swap over.
I have to say I agree with you that the Halftrack looked better originally. Personally I feel that subtle look was fine. The guard aren't as baroque and elaborate as the full on 40k gothic of the Grey Knights or Sisters.
The horses from the Perry miniatures line look great! and the bodies for the troops while slightly different, I think will work out well.
As for the air brush, Its not the paint I'm worried about, I'm looking for an affordable airbrush itself. There are a few at the local "Hobby Lobby" and I was trying to talk to the guys at the local GW store about them and they were trying to push the Citadel version on me.
I'll admit I could have done a better job with the halftrack and I went a little overboard with it. I'm working to change it back to a more original state.
Briancj wrote:One of the Dakka peeps here made an App called "Paint Converter", available for Android and iOS. It is a GREAT little app, and the developer is quite responsive to constructive feedback.
-B.
Thanks for the tip Briancj! I'll look it up.
Todays work has included some more basing and priming of more than 50 Mordian Iron Guard models, objective markers, a Leman Russ tank and some random weapon systems all sitting on a tupper ware container filled with a simple green solution holding four chimeras, a tank and a truck.
hugh...you are an insane man...haha...but seriously i think your stuff is gonna look great on the table! I agree with the sentiment that the original half-track was better and the rough riders are awesome!
Looks like a promising project. I did an Iron Guard army a little while back. Take it from me you will be very pleased with the result. Those Rough Riders are great, cant wait to see them painted up. Good luck.
Tortured-Robot wrote:Grand stuff going on here, the mordians look great on mass, I do get a bit bored of cadians all the time.
Good job.
Thank you! I can agree that Cadians look a bit to standard and I'll be happy to put these on the table. At the local store I've been hanging out at a lot of the younger gamers never knew there were other legitimate Guard armies from the other worlds in the 40K universe, its been fun showing them and telling them of Mordia, the Tallarn, Valhallans, Steel Legion and how there are so many other possibilities for converting models, using nonstandard vehicles and equipment. Its like opening the world of possibilities to them.
Cave_Dweller wrote:Whoa awesome conversions! And I love seeing those old models getting some love.
Thank you! I appreciate you stopping by, These models need a lot of love and the conversions, at least some of them, were inspired by fellow gamers here and elsewhere on the web, yet several are of my own design. I like converting models almost as much as I like painting them.
Antman677 wrote:hugh...you are an insane man...haha...but seriously i think your stuff is gonna look great on the table! I agree with the sentiment that the original half-track was better and the rough riders are awesome!
Anthony, always glad to have you stop by, your work is awesome and I'll be happy to see more of it. I'll do my best to make these guys look awesome. I think the rough riders will come out looking great and the suggestions I get from other gamers/hobbyists on here is helping to make this project even better.
40kFSU wrote:Looks like a promising project. I did an Iron Guard army a little while back. Take it from me you will be very pleased with the result. Those Rough Riders are great, cant wait to see them painted up. Good luck.
Thank you! Do you have any images of your Iron Guard? I'm doing some work on the rough riders tonight, still having a bit of trouble locating something to be used as a lance.
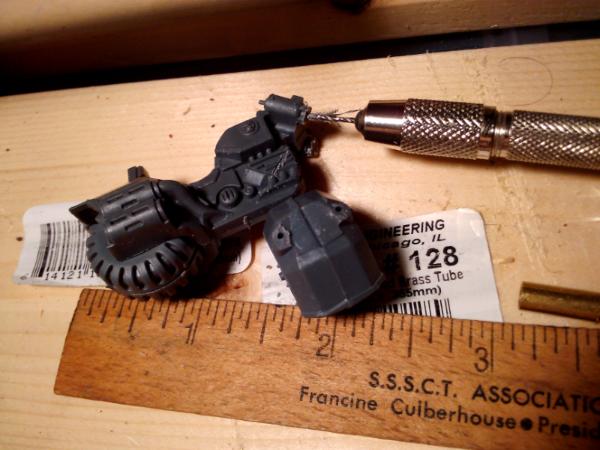
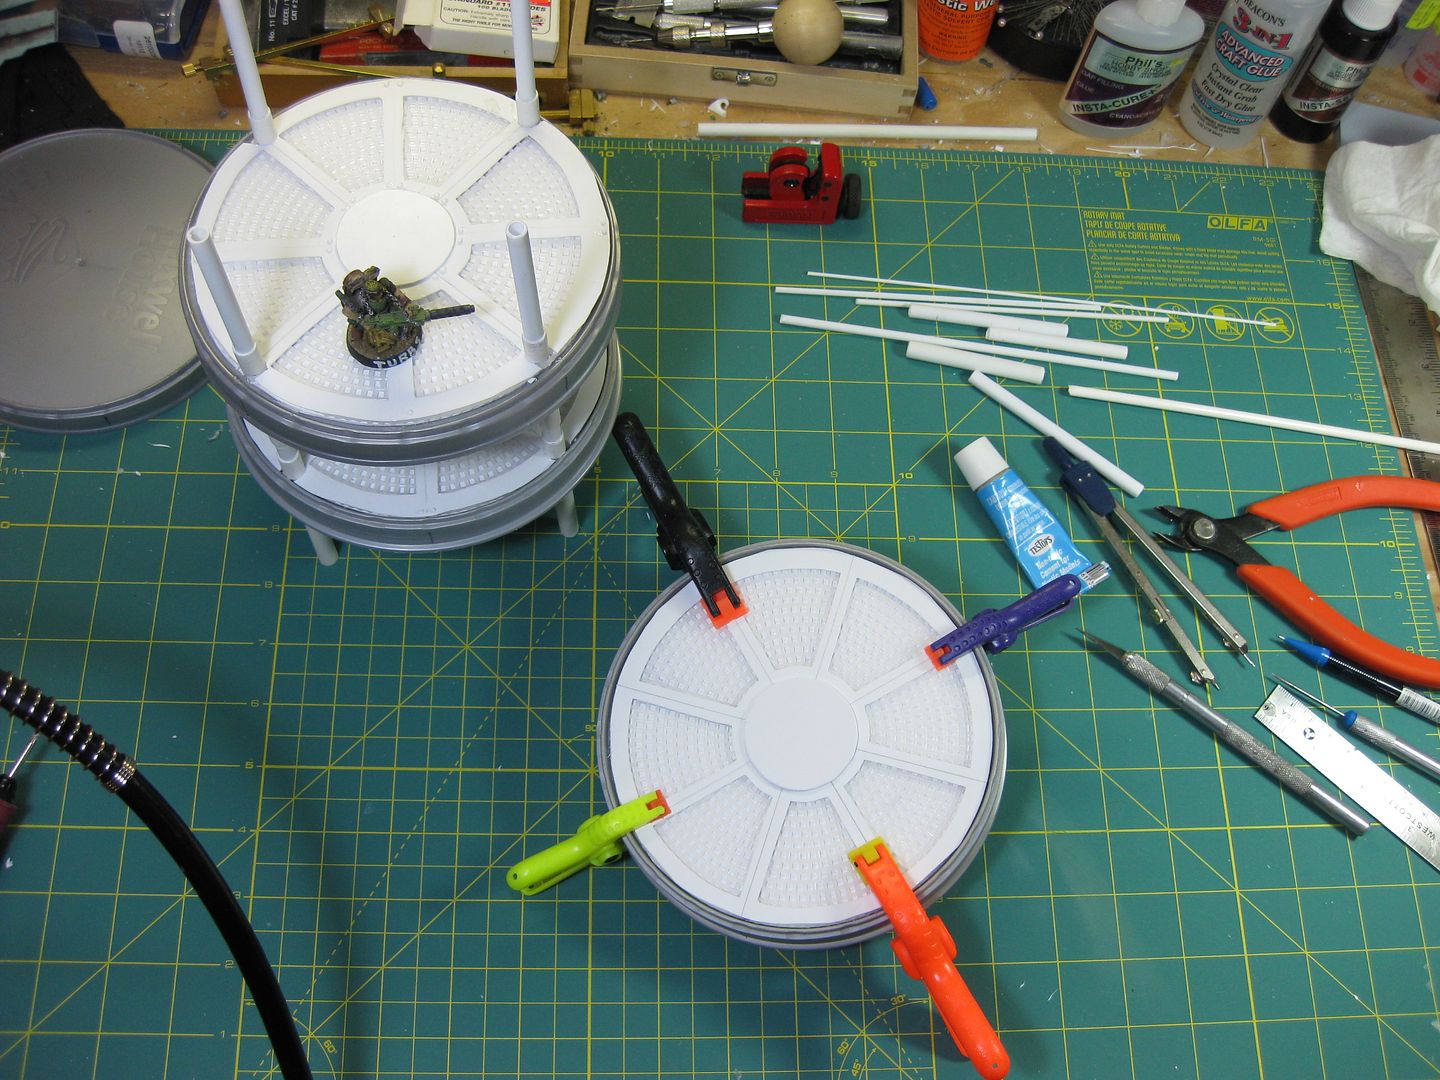
Todays project consists of magnetizing a sentinel for multiple weapon options.
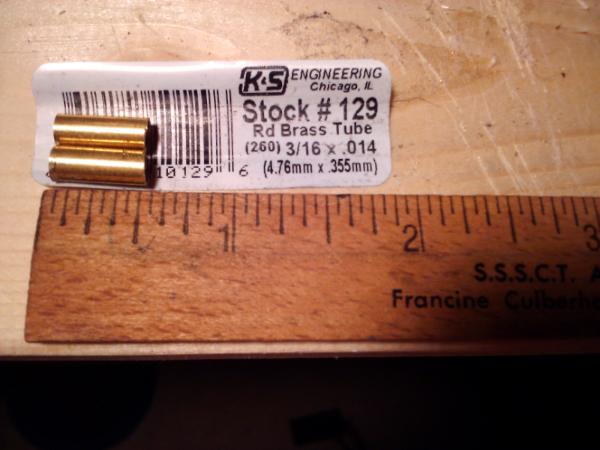
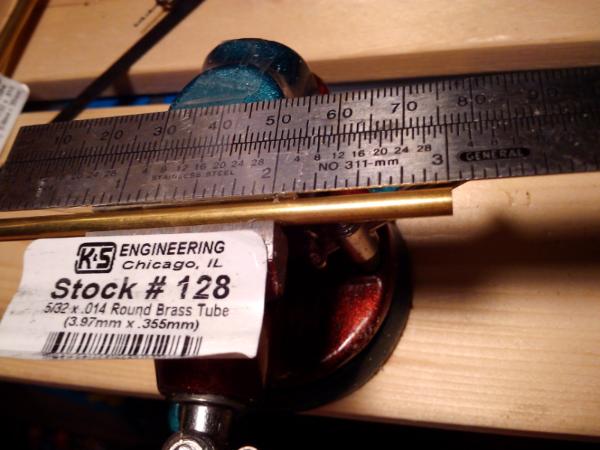
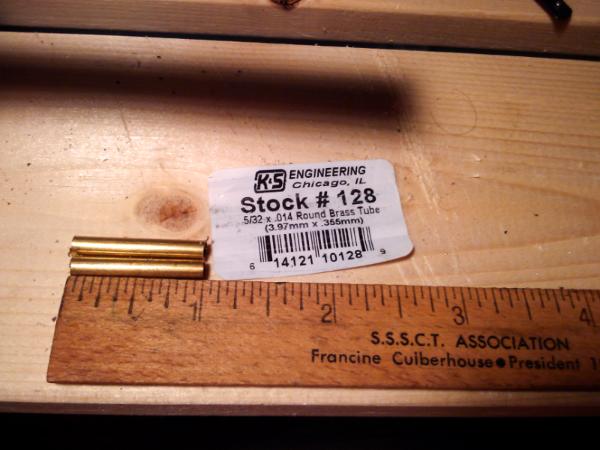
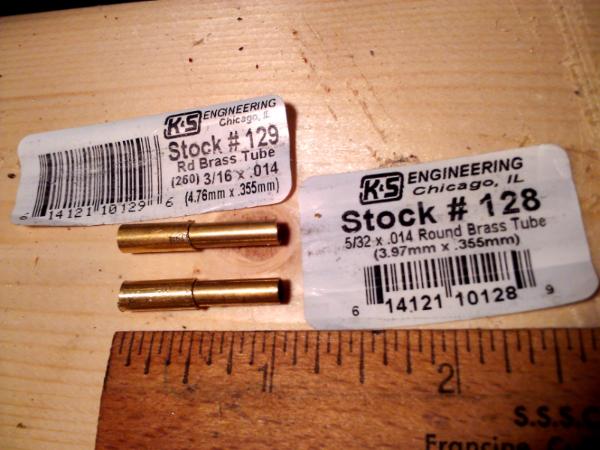
I'm using rod magnets from magcraft (part #NSN0658/N40) Diameter - 0.125"(3.2mm) Length 0.125"(3.2mm) and a 1/8 drill bit. Line up and drill out the hole where the weapon slot is, go slow. Then use at least 10 rod magnets attached together to keep the polarity correct when magnetizing the weapon.
Keep the magnets together & after putting a bit of superglue into the drilled hole, slide the rest of the magnets away.
Clip the tab off the weapon and slowly drill a hole into the weapon body. line up the magnets similarly to the pic, put superglue into the weapon body and slide the magnets away.
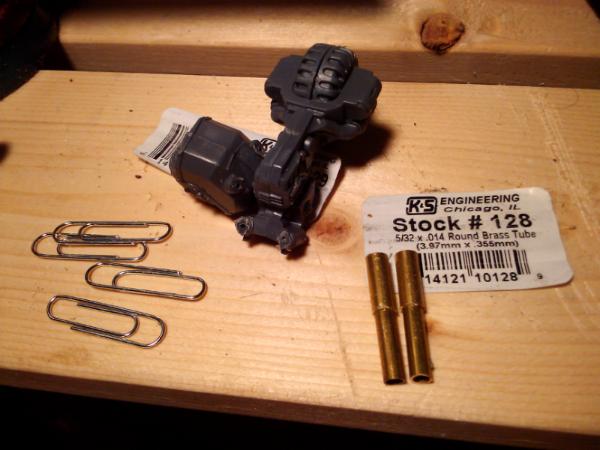
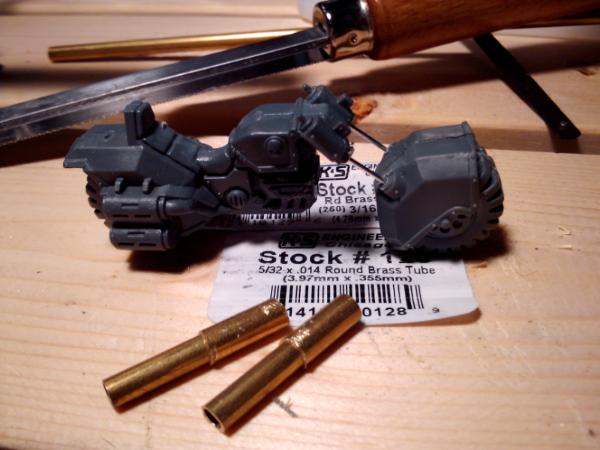
Here is another pic of the magnet process. By keeping several together like this you can minimize the chance you'll put two magnets in with their polarities reversed. The other option is to simply insert a piece of metal into one of the two parts, a small screw, bolt or washer/nut could serve the same purpose as another magnet.
Magnetizing models gives me the opportunity to field a wider variety of vehicle/weapon combos. I magnetize a ton of models for both 40K and Warmachine.
I dont have any Rough Riders, but many pictures of my Iron Guard in my gallery. Many years ago I did a Space Marine army with spears and shields. I used High Elf bits, they may work here.
40kFSU wrote:I dont have any Rough Riders, but many pictures of my Iron Guard in my gallery. Many years ago I did a Space Marine army with spears and shields. I used High Elf bits, they may work here.
Dude, these mortars of yours are awesome! How did you make them?
High Elf Spears or Lances might work, I'll have to dig up some images and see if I can locate a bits order for them from somewhere.
swampyturtle wrote:this is just cool! and ive been following with great interest I love the tank commander and the rough riders. Keep up the great work All this talk of Mordians made me think of this from Final Liberation:
Thanks! I'm glad you're enjoying my work.
And, now for the latest!
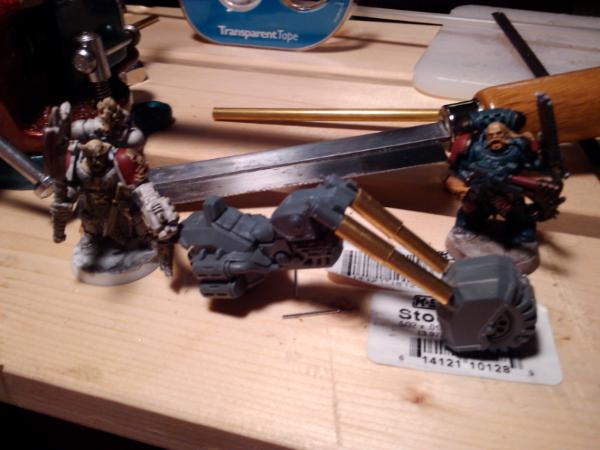
This shows the magnet placements and the use of small washers which will allow me to switch between all weapon loadouts for this sentinel, which includes the weapon tanks as well. I've also magnetized the chainsaw attachment and made a few adjustments to the chassis.
40kFSU wrote:I dont have any Rough Riders, but many pictures of my Iron Guard in my gallery. Many years ago I did a Space Marine army with spears and shields. I used High Elf bits, they may work here.
Dude, these mortars of yours are awesome! How did you make them?
Doh! I should have known! Thanks for the heads up and linkage
The Grundel wrote:I love the mordians! You are doing a good job converting. The mordian driver on the sentinal is great.
Thank you! I'm kind of fond of them as well. The Sentinel was one of the easiest conversions to make! I'm trying out a few others, yet I've got to slow down and complete some of these projects before I pick up others. There is so much to do and so many more possibilities.
Leigen_Zero wrote:Well I can officially say after 2 pages of posts I'm convinced I need to subscribe to this p&m!
Excellent stuff going on, can't wait to see some of the painted minis
Thank you! I've got a lot of work ahead of me, I just hope my painting skills are up to the task. I love figuring out the conversions and making them happen.
neil101 wrote:Nice work with the perry minis i did the same thing , they are lovely minis in my opinion and perfect for the prets or mords.
Thank you! I like them as well. Big Thanks go out to Llamahead for pointing me in the direction of the Perry Miniatures, their heads would go well for Praetorians as well imho and you get a lot in the box, enough for more than a full squad. I'm still working on figuring out an option for a lance.
I picked up a cool tip regarding camo/checkered patterns by using a mesh/sponge dish mat that is generally for either putting in cabinets or something similar. Hold the mat away from the model and spray through it. I haven't tried it yet, but I'm discussing the technique with the guy. I've got the four chimeras sitting in a solution of simple green so that I can strip the paint from them in a few days.
I've got a couple other picture albums with work progress. I'm uploading images to them as well.
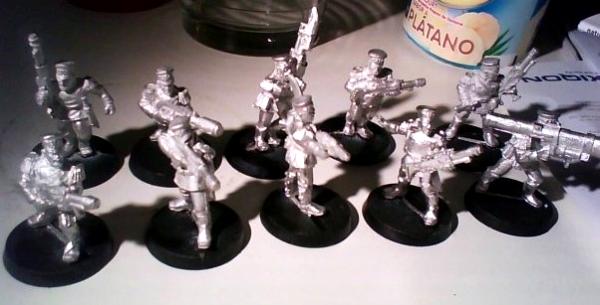
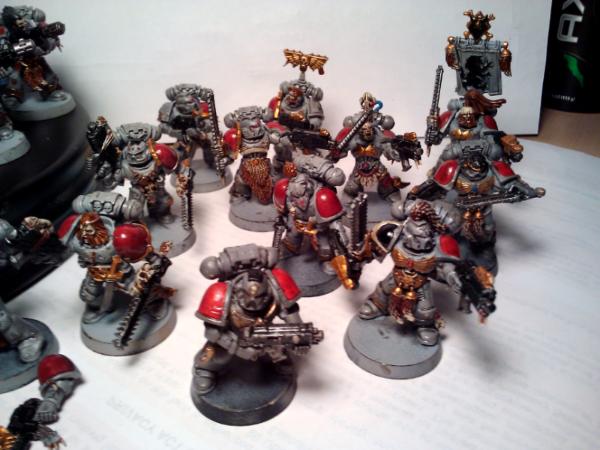
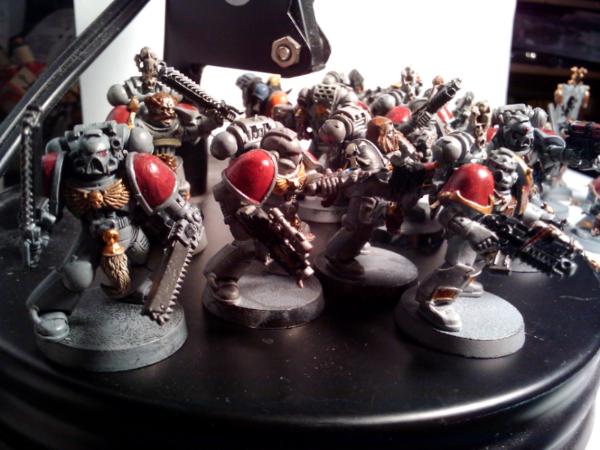
Warmachine: Cygnar
neil101 wrote:The warmachine minis look the bees knees.
Thank you! I painted 22 Cygnar Long Gunners in about 24 total hours of painting, the blue base is the result of the primer I used. Army Painter Blue. I wanted to use that since Cygnars prime color is blue, yet in the end I wound up hiding most of the blue below a layer. Most of that is simply a basecoat & wash.
Antman677 wrote:hey hugh! wow yea those cygnar/trolls look awesome...the blues work out really well, nice and poppy...
Anthony! Thanks man, that means a lot coming from you, your work is top notch. I've tossed some other pics up on here that I grabbed off my facebook album. I keep forgetting that we only had the one game and you didn't see the rest of my painted army. I'll try to get some more stuff up with pics of them in their appropriate categories.
Work is progressing on the Mordian Iron Guard. I found an interesting tank base in a $0.25 bin at a garage sale, I'll take a pic and post it later.
Antman677 wrote:sweet looking forward to more cygnar...if you take more pics id recommend using a bigger light (;
Most of those were taken at my apartment or Aero Hobbies, the troopers were done at the apartment and the lighting there sucked.
Here is more on the Mordian Iron Guard! This was all done today at Fat Ogre Games & Comics located in The Woodlands, Tx. As always comments, suggestions and criticism are welcome!
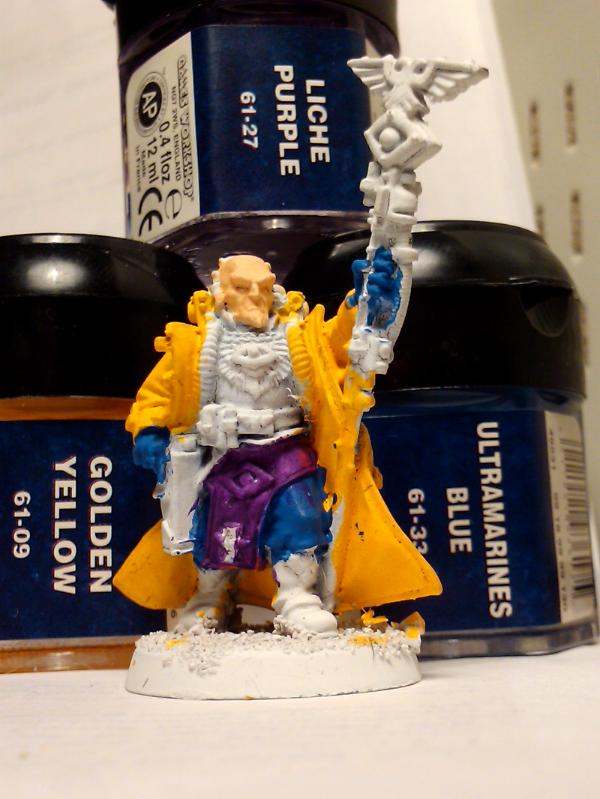
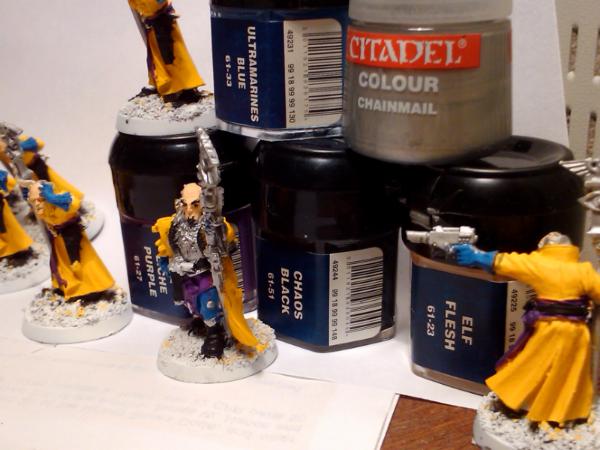
My paint scheme process:
I used a citadel fine tip brush. I'm not sure of the size, I'll look for that later and add it to this.
Primed with P3 White primer then base coat with Citadel Foundation Mordian Blue.
Then I hit the weapon with a layer of Chainmail.
Chaos Black was used on the boots, belt, weapon ammo pouch and hat brim. I cleaned up the missed spots later on in the process.
Next, P3 Rucksack tan used for the face only. I Like the flesh tone color of the Ruck sack tan the most out of either the citadel or P3 paints I've got.
Next, 2 layers of Regal Blue was used on the jacket. I wanted the jacket to be a darker blue than the pants, so that it would offset all the blue.
Next, Skull White was used to clean up some brush stroke slips and layer over the gloves for a dress uniform look. I've been wanting to do dress gloves on these guys and was undecided between white or black gloves. I went with white for this one. What do you think?
Next, Golden Yellow was applied to the trim, stripe, shoulders and hat band. I was trying for a U.S. Army Dress Blue look, but I think I got more of a U.S. Army Cavalry classic look.
Shining Gold was used on the double Eagle emblems & scabbard. The gold on the hat band tends to blend in a bit too much, Any suggestions on how to bring that out would be welcome.
Dark Flesh was used for wood on the stock. I wanted some wood, but didn't want to go either too light or too dark. I think Dark Flesh gives it a Mahogany look.
Back to Chaos Black for some touch ups.
Adeptus Battle Grey was used with water to paint the basing.
Adeptus Battle Grey was used with water to paint the basing then painted over with a washed down Scorched Brown. I may hit it with some green grass flock for a little color later.
Devlan Mud wash was applied to the weapon stock, the shoulders and the face. I wanted to get some shading easily done and to bring out the facial features better. The shoulder boards need the shading to help individualize the strands.
Badab Black applied to the uniform black & Blue & gold portions. Easy shading technique = Base coat + Black Wash.
Started work on a third model before closing up for the night and heading home.
Found this cheap little tank body in $0.25 bin, might try to use it for a vehicle conversion or if that doesn't work out then I'll use it as part of a terrain piece. It's a little longer than the average 40K tank, but it is just as wide and seems to be a decent size. I'd have to add some plastic card to the front of the model and the back as well as a turret/weapon.
Lots done today! Got to meet some great gamers and discuss painting techniques as well as learn about games, game types and upcoming events in the area. Good times.
Automatically Appended Next Post: 40K vehicle scale is 1:35 / 1:48 right? I've been looking for some vehicle options for the Mordians, something a little more military yet will fit with the chimera, Russ and Sentinels that I already have. Thoughts?
40kFSU wrote:I dont have any Rough Riders, but many pictures of my Iron Guard in my gallery. Many years ago I did a Space Marine army with spears and shields. I used High Elf bits, they may work here.
Dude, these mortars of yours are awesome! How did you make them?
but it comes with Kriegsche crew and it seems you need FW rulebook for it. correct?
If you use it as the heavy mortar, then Yes, I think you do. If you simply proxy it for regular mortars, then No. And, while I know that they're a lot larger than regular mortars, they still look pretty damn nice.
Automatically Appended Next Post: Painting process for my Mordian Iron Guard. Primed with P3 White primer then base coat with Citadel Foundation Mordian Blue, then I hit the weapon with Chainmail. Chaos Black was used on the boots, belt, weapon ammo pouch and hat brim. P3 Rucksack tan used for the face only. 2 layers of Regal Blue was used on the jacket. Skull White was used to clean up some brush stroke slips and layer over the gloves for a dress uniform look. Golden Yellow was applied to the trim, stripe, shoulders and hat band. Shining Gold was used on the double Eagle emblems & scabbard. Dark Flesh was used for wood on the stock. Back to Chaos Black for some touch ups. Adeptus Battle Grey was used with water to paint the basing. Devlan Mud wash was applied to the weapon stock, the shoulders and the face. Badab Black applied to the uniform black & Blue & gold portions. Dwarf Bronze used on the weapon site. I used a citadel fine tip brush.
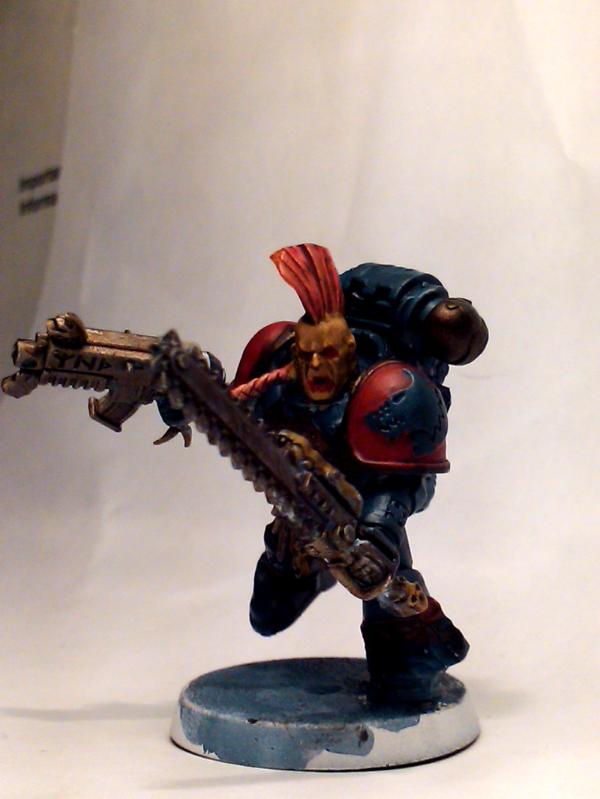
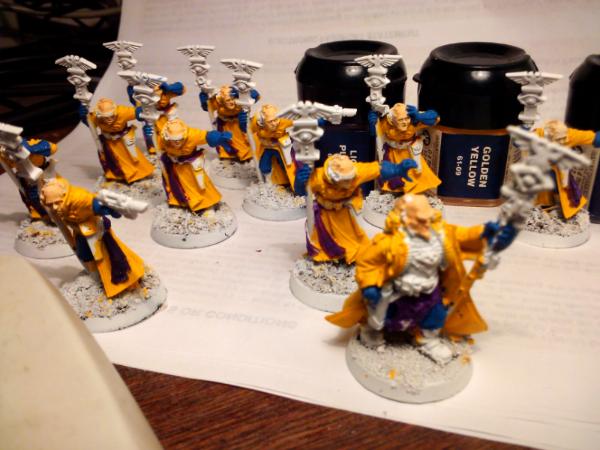
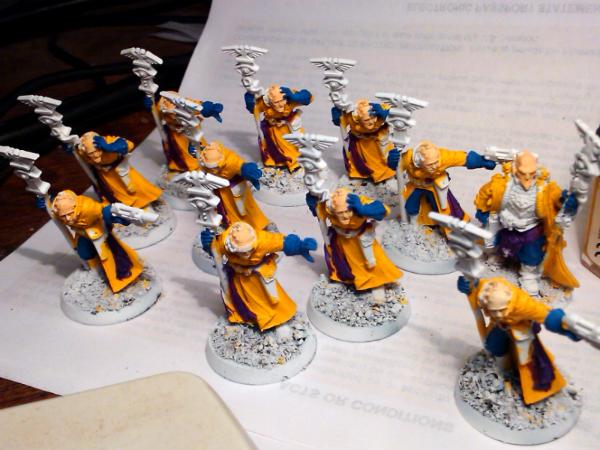
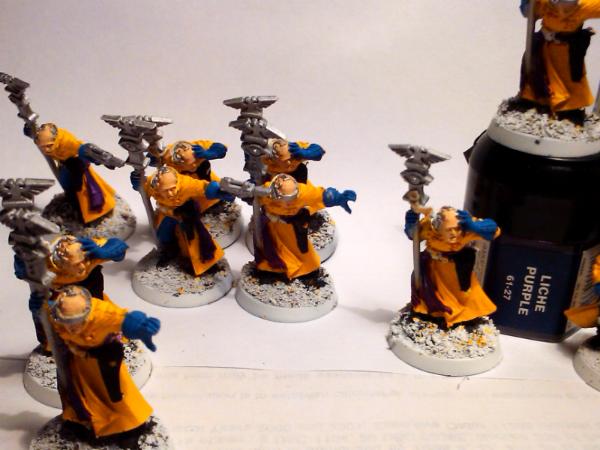
Mordian Iron Guard Paint scheme. The first three in progress.
Fully loaded out magnetized Sentinel with all the options! Tons of fun with magnets.
Automatically Appended Next Post:
3 getting close to being done, I'm working on different things on each, but the center most with the lasgun is what I'm looking at as the closest to a finished model.
I keep wanting to paint the skull on the flag bright red, as in the "Red Skulls of Mordia" but I don't think I'll be able to get more decals that are red skulls unless I figure out a decal print out technique and make my own.
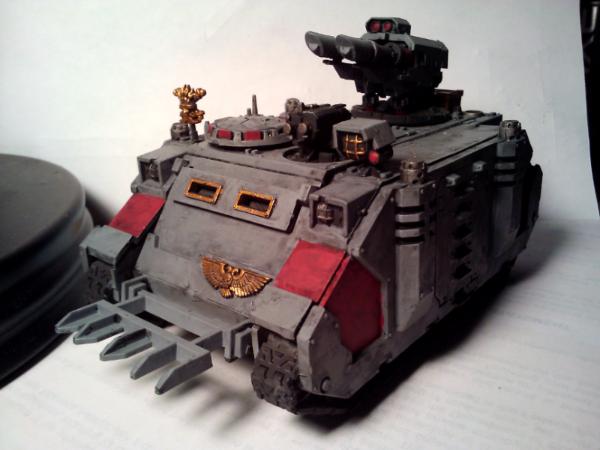
A little more work done. Sorted some more of the Mordian Iron Guard. Its day 5 of soaking the chimeras received from ebay. I may check on them in the morning and see if I can start stripping the paint from them. Several have their lasguns from missing and so I've been keeping the lasgun barrels from my conversions and am going to attempt to pin the old metal barrels to the plastic bases/portions of the lasguns that are still attached to the chimeras.
My plan of attack on them is to strip the paint using simple green and either a soft steel wool scrub or the soft steel wool wire brush I used on the miniatures. Then prime white and paint the vehicles up in a codex grey or other light grey color. I think this will make the Mordian Iron guard models that are mostly blue stand out a bit more. Also, when playing on a green surfaced playing mat both the tanks and the Mordians will 'pop'. I'll also be using the Yellow & Blue as accent colors on the tanks/chimeras.
As an additive to the basing, I've got some of the old bright green dust like grass flock which I'll add to the grey/red colored basing I have currently. I've had to change up my basing mix due to a mishap. I was using a combination of gravel, beach sand and I was going to add some ash from a small BBQ pit, but I added too much. I've since added some sawdust to try to thicken the mix back up and make it more gravelly/particulate.
I still have something like 30 Mordian Iron Guard to add to bases, then base, prime and begin painting as well as the Rough Rider conversions. I've looked for lances for the Rough Riders and have an idea that the Warhammer Fantasy High Elf Silver Helms Regiment Cavalry
lances seem to look like the best option. I think someone on here suggested those as good lances, the hands of the elves holding the lances are gloved, so they'll best match the Mordians gloved hands I'm thinking.
I need to work out an assembly line technique for painting all of these guys. As it stands I'm using 15 different colors and more than that many steps in the process.
For the Psyker Squad I'm thinking of reversing the colors and having the primary coat color be yellow and the trim/accent work be blue. Its an idea I'm tossing around in my head, but I've also got Dr. Emmett Brown from Back to the Future in there too.
Hopefully y'all continue to enjoy what I'm putting out as much as I'm enjoying creating it.
--- In AeroBoyz@yahoogroups.com, wrote:
>
> I agree with your comment that after adding all that stuff to the half track, it looks more Orky than Imperial.
>
> I love how the army is coming along. It's one of those armies that is starting to look so good, that 'I can only hope the paint job measures up to the build.'
>
> I understand what you're doing with the WWII vehicles, but I wonder, as nice as your army is starting to look, if you wouldn't be better served by sticking with Citadel's outrageously priced tanks? It would suck if you had a great looking army and the weak point was your vehicles.
>
> Also, I like the green jacket on some of your models. Have you changed your color scheme?
>
> HEC
>
Yes, I agree with your assessment I was trying to figure out a cheaper way to get vehicles for 40K, yet after spending $25 on the aegis defense system and another $12 on the half track I could have spend a little more and gotten a legitimate vehicle from GW.
The half track may be torn apart and repainted, or it may just be given to my nephew to tear apart. The aegis defense system may be used in another conversion or I might try my hand at building some terrain.
I wanted to throw some interesting Military vehicles into the mix of the army, I took a look at a jeep for a command vehicle, the sherman tank and the half track. They might work eventually, but not currently. The sherman is longer than the chimera, but not as wide, so it is disproportionate to the Leman Russ it would sit beside. The Half track again is longer than the chimera and a bit Ork'd up. Those boyz might make their way into my next force, but thats for another time.
As for the green jacket, I was looking at trying to do the Army green dress uniform and I have a couple as tan/khaki as well, those are sitting in some simple green already or are primer'd white. The Army Dress blue/cavalry colored models are what I'll be going for.
The chimeras should be ready to be scrubbed and assessed, then fixed and re-primer'd to be painted the codex grey or light grey color.
I still have the Hellhound/Banewolf combination to finish putting together/magnetizing.
Also, I needed some more bits so I've picked up a Cadian Battleforce box and will most likely use the Sentinel as either another armored one or a scout with the mordian conversion. I need more Plasma in my force as I have tons of Melta/Flamer & only 2 plasma gunners. The rest of the Cadians will be used as bits/whiteshields and I could set up the heavy weapons as Mordian Missile crews.
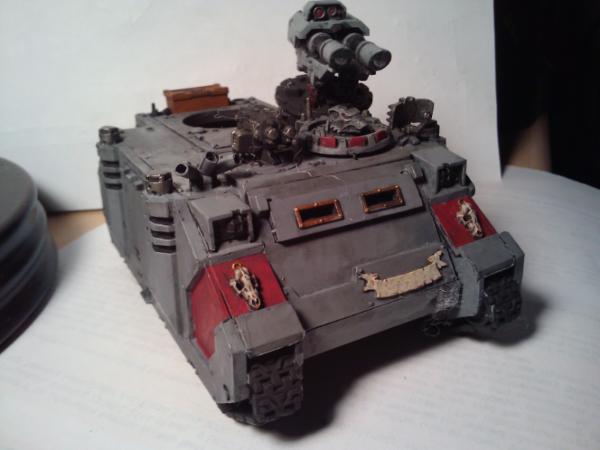
I purchased four chimeras off of ebay, they arrived in really bad shape and already heavily coated in primer and other paint schemes. I've had them soaking in Simple Green for a little more than a week. I used a board and some rocks to weight the models under the solution. I'm going to pull them out and begin stripping the paint off them with a simple soft steel wire brush.
Here you can also see some Mordian Iron Guard models I've had soaking as well.
Here you can see how even after a week in Simple Green the paint will almost just fall off the model.
I've pulled them out and will begin stripping the paint off them with a simple soft steel wire brush. Here you can also see some Mordian Iron Guard models I've had soaking as well.
I wear a glove designed to prevent/slow down cuts. Sometimes I slip with the wire brush and it can tear skin. I also use this same glove when I prime my models, this way I don't get paint all over my hands. I've considered switching to a heavy leather work glove, but I need to find one which gives me the same amount of grip and dexterity that this type of glove does.
Here you can see that purchasing used models off of ebay isn't always the best choice. This model seems to have been at least two other colors under the paint job that was on it. There is a balance between purchasing new and purchasing used + time to fix/recover a model back to a state where you can work with it into the scheme you want.
This was the best looking model, but its not the paint scheme I want for my army, so its getting stripped.
After spending hours scrubbing these models, there is still layers of paint on them. These need to go back into the Simple Green and soak some more, perhaps another week.
I think in the future I'll need to be more careful with purchasing used models, the condition of these four chimeras is bad. All four have broken lasguns on the rear of the models if not all of the lasguns. I'm going to have to cut up lasguns from my recent purchase of a cadian battalion box. As well they all have Heavy Bolters on the front, I might change those out or magnetize the slot so I can switch between weapon sets.
The other thing is, when you get used models, you don't get all the extra bits and additional weapon options and you might just wind up spending the same amount on another bits purchase to get those missing bits. Its a thought I've been toying with in my head while working on the conversions for the Mordian Iron Guard Rough Riders. If I purchase 10 lances at approx $2 each + shipping & handling, then I could have simply purchased the Warhammer High Elf Silver regiment box for $35 and gotten the extra bits to maybe trade with someone later.
As always comments, suggestions, criticisms, remarks, but not heretical statements will be welcomed!
i like the yellow and blue and the white and blue also...
can you leave some white in there somewhere? a white/blue/yellow scheme would be cool
Thank you! I'm planning to paint the gloves up as dress white gloves, I don't have any plans to leave much white elsewhere on the models. I might add purity seals to models to make them look like medals. Additionally, I'm toying with adding a design to the solid blue flag that is on the Meltagun model, on this same model I've thought of adding a pistol holster as well as a chain sword on the hip, to kind of give him options as the badass he is.
I'm looking at putting a big "M" on the standard or putting a template of stencils together to write "Mordia" or "Mordian" I still haven't come up with a unit identifier or any fluff for it.
The Skull on the Cadian flag keeps tempting me to paint it bright red as in the 'Red Skull' from the Marvel universe of comics. Of course, that might force some conversions to happen on certain models that I might not want as I'm using Yellow & Blue for most of my color scheme and not a red/black themed force. Although a Red Skull Cadian officer conversion would be easy. Even Red Skull Commissars.. hmm.. the possibilities..
But no! I'm not revising the paint scheme.
I'm maintaining them as an Army Dress uniform look that somehow reflects Cavalry/Dragoon set up. I think it will work as an Armored/Mechanized Dragoon force. But it will have many more options, its a big universe after all.
Automatically Appended Next Post: Mordian Iron Guard Rough Rider Conversion using the mounts from Perry Miniatures French Heavy Cavalry and Tank Commander & Cadian officer heads. All the horses go together no matter which two halves of the body type you choose. There is one exception and that horse looks a little different than the others. There are enough bodies to create more than 14 bodies. The right arm from the sprue is holding a sword, so I'll find a lance or piece of pipe, trim that out and create rough riders. I might mount a lasgun or similar weapon to the saddle or gear on the horse to complete the image.
The 40K heads and the neck slot have to be reworked/cut/trimmed down so that the head will sit on the body.
are you sure that Sentinel lascannon is now two-part, are you sure that you don't drill its barrel?
=^.^=
I did not need to drill any of the barrels for the sentinel
Flying Pooo wrote:This is a great blog. I'm loving all the Mordians here, the conversions here are quite inspiring, they add so much character to your army.
Thank you! I'm trying to make it fun as well as look good. I love hobby craft and am having some serious fun coming up with these alterations as well as getting tips/tricks from fellow gamers on here and through my old hobby shops online yahoo group. I never would have known of the Perry miniatures unless someone on here had mentioned them. I might have gone with the Warhammer Empire Pistoliers or Outriders
http://www.games-workshop.com/gws/catalog/productDetail.jsp?prodId=prod20058
sgtspiff wrote:Looking so good. Feels alot swedish with that paint scheme. Also can you place the rough riders next to a infantry standing so you see the scale of the horses.
Really? Swedish? I'll have to google up some images. Might give me some more options for fluff. Thank you! I'll append pics to the bottom of this for the size comparison. Perry is primarily a 28mm miniature range.
40kFSU wrote:Man those Rough Riders look cool!
Thank you! It was a really easy conversion, though shaving off the back of the Cadian officers head was a bit tough due to the small size of the piece.
I wanted something different for the Officer of the unit and I was happy to come across the Tank Commander model pieces for my Hellhound/Banewolf. I wanted a different/unique head for it and I think that fits. I'm thinking I should have used the torso from the piece as well instead of the armored chest from the Perry Miniatures line. I trimmed off the left shoulder board to add the skull shoulder armor to the model and the marine power sword on the right arm is a little large, but I don't mind it too much.
I'm debating gluing the riders to the horses, but will wait til I get the arm conversion done with the lance as the weight of the lance may be the deciding factor.
The gloves are the closest thing to Mordian Iron Guard gloves, everything else has an armored fist and I'd have to get a bit creative.
Size comparison with normal Mordian Iron Guard models.
The arms on the Perry miniatures may be a bit too small, but I'm not sure if I could/should cut out/craft left arms for the models. I'll have to wait and see when I get the lances.
Those really do look great. I wouldn't sweat scale differences too much between them it's usually not that obvious until you get right up close. I'd also have to agree with you on 2nd hand stuff. I always reckon metals are worth buying second hand but I prefer to assemble my own plastics.
Blacksails wrote:The Perry miniatures look great. Definitely one of the better rough rider conversions I've seen.
Stop being so awesome...and give me some of your motivation!
Thank you! I'll keep working on them! As for motivation what are you working on? What kind of army? Where is your build plan and design? Get it out and do it.
Honestly though, I'm just having fun with this. I really enjoy the hobby craft portion of any game. I like projects and keeping busy. This is keeping me busy.
Llamahead wrote:Those really do look great. I wouldn't sweat scale differences too much between them it's usually not that obvious until you get right up close. I'd also have to agree with you on 2nd hand stuff. I always reckon metals are worth buying second hand but I prefer to assemble my own plastics.
Thank you! Metals are easier to work with second hand, you can strip the paint and then repaint, its all too easy. The plastics tend to retain and hold onto the paint longer/harder and you have less options for conversions or putting the model together the way you want to do so.
I might just go ahead and purchase new chimeras simply because I don't like all this extra work. So I'll be out the money I had spent to purchase these.
Today, I picked up the lances/Silver regiment box and a Space wolves battalion/brigade box + codex due to a deal the game store was having. I've got a ton of old stuff in storage or being held at an old friends house. I love the space wolves heads and have thought about cutting down a Cadian officers head for the hat and trimming up a few of the Space wolves heads with the great mustaches and making some interesting Mordians out of them. I only wish I had thought of this for the rough riders. I could have given some of them badass facial hair.
The next few days are big here in the states with Thanksgiving and everything happening. I may be able to get some work done, but then I may not. So wherever you are and whoever you're with I am thankful for you being awesome, for sharing this hobby and game as well as you just being alive. Thanks!
sgtspiff wrote:Looking so good. Feels alot swedish with that paint scheme. Also can you place the rough riders next to a infantry standing so you see the scale of the horses.
Really? Swedish? I'll have to google up some images. Might give me some more options for fluff. Thank you! I'll append pics to the bottom of this for the size comparison. Perry is primarily a 28mm miniature range.
Yeah Swedish grenadiers from 17th and 18th century hade the same colorschemes.
Failed hard against norway and marched home over the mountains with their dead king (top picture in the link is a painting that's one of swedens most famous ones).
Hey, 'rose! I'll buy those Chimeras off of you. I'm building an ancient tank battle terrain board, and I need wrecked Imperial vehicles! PM me and let me know, I'll cover your original purchase price and the cost of shipping them to me.
I can also send you IG bitz if you're looking for something in particular.
sgtspiff wrote:
Yeah Swedish grenadiers from 17th and 18th century hade the same colorschemes.
http://sv.wikipedia.org/wiki/Karoliner Swedish wikipedia about the Karoliner. Regulars under the king f sweden between 1680-1750ish.
Failed hard against norway and marched home over the mountains with their dead king (top picture in the link is a painting that's one of swedens most famous ones).
Thank you! I had to look them up on the English portion of the site. The Enlgish portion only has the 1 picture, but I see what you mean. Their story is an interesting one and it might just work into some great fluff for my Mordians.
http://en.wikipedia.org/wiki/Caroleans
Briancj wrote:Hey, 'rose! I'll buy those Chimeras off of you. I'm building an ancient tank battle terrain board, and I need wrecked Imperial vehicles! PM me and let me know, I'll cover your original purchase price and the cost of shipping them to me. I can also send you IG bitz if you're looking for something in particular.
--Brian
Briancj, thanks for commenting on my page as it led me to the links in your gallery and your P&M blog, your work with plasticard is awesome and inspiring. The Chimera's may be a possibility, I've put a lot of work into recovering them and will have to think on it. I too buy vehicles off of ebay to save money and to have something I can craft up into something unique. The extended Russ you have is awesome.
Blacksails wrote:The Perry miniatures look great. Definitely one of the better rough rider conversions I've seen.
Stop being so awesome...and give me some of your motivation!
Thank you! I'll keep working on them! As for motivation what are you working on? What kind of army? Where is your build plan and design? Get it out and do it.
Honestly though, I'm just having fun with this. I really enjoy the hobby craft portion of any game. I like projects and keeping busy. This is keeping me busy.
No problem, you do great work.
Sadly all my 40k stuff is halfway across the country for the next few months, but this blog has certainly inspired me to get off my ass and finish mine, once I'm reunited with my stuff.
I can't wait to see a whole mass of perfect blue and yellow/gold uniforms. Keep the good stuff coming!
Hmelrose wrote:I purchased four chimeras off of ebay, they arrived in really bad shape and already heavily coated in primer and other paint schemes. I've had them soaking in Simple Green for a little more than a week. I used a board and some rocks to weight the models under the solution. I'm going to pull them out and begin stripping the paint off them with a simple soft steel wire brush.
Here you can also see some Mordian Iron Guard models I've had soaking as well.
Here you can see how even after a week in Simple Green the paint will almost just fall off the model.
I've pulled them out and will begin stripping the paint off them with a simple soft steel wire brush. Here you can also see some Mordian Iron Guard models I've had soaking as well.
I wear a glove designed to prevent/slow down cuts. Sometimes I slip with the wire brush and it can tear skin. I also use this same glove when I prime my models, this way I don't get paint all over my hands. I've considered switching to a heavy leather work glove, but I need to find one which gives me the same amount of grip and dexterity that this type of glove does.
Here you can see that purchasing used models off of ebay isn't always the best choice. This model seems to have been at least two other colors under the paint job that was on it. There is a balance between purchasing new and purchasing used + time to fix/recover a model back to a state where you can work with it into the scheme you want.
This was the best looking model, but its not the paint scheme I want for my army, so its getting stripped.
After spending hours scrubbing these models, there is still layers of paint on them. These need to go back into the Simple Green and soak some more, perhaps another week.
I think in the future I'll need to be more careful with purchasing used models, the condition of these four chimeras is bad. All four have broken lasguns on the rear of the models if not all of the lasguns. I'm going to have to cut up lasguns from my recent purchase of a cadian battalion box. As well they all have Heavy Bolters on the front, I might change those out or magnetize the slot so I can switch between weapon sets.
The other thing is, when you get used models, you don't get all the extra bits and additional weapon options and you might just wind up spending the same amount on another bits purchase to get those missing bits. Its a thought I've been toying with in my head while working on the conversions for the Mordian Iron Guard Rough Riders. If I purchase 10 lances at approx $2 each + shipping & handling, then I could have simply purchased the Warhammer High Elf Silver regiment box for $35 and gotten the extra bits to maybe trade with someone later.
As always comments, suggestions, criticisms, remarks, but not heretical statements will be welcomed!
Thank you!
Does EBAY purchase + paint stripping chemicals cheaper than buying a new, unpainted models (Iron Guard IG and Chimaera)? so you invested your efforts into paint stripping of the purchased ones.
=^.^=
neil101 wrote:The cav look cool . the commander Head is very nice indeed.
Thank you! I've been thinking of adding some green stuff around his shoulders and neck to fill him out. I might also craft a cape or something similar for him just to dress him up a bit more.
I'm looking at adding lasguns, holster'd pistols and swords to the models kits, I've got some blades from the Silver Helms box and the long knives from the space wolves battalion box. The horse for the musician doesn't have a developed saddle so I'll be crafting something up from bits & equipment.
Adding the lance arm to the model, I've glued a pennant to the lance for another standard. As you can see I've used a pin vise and small drill bit to drill out the shoulder and arm of the piece. I'm going to use the paper clip as a pin to secure a stronger connection between the two pieces as well as add support.
I unfold the paper clip or other material that I'm going to use for pinning and hold both sides down with thumb and forefinger so that when I cut the piece of metal with the clippers either piece doesn't shoot off and get lost on the floor somewhere or in my eye. I like being able to see.
Always make sure the two halves of your pin line up, else you're going to have to redrill and thats not easy, the other option would be to green stuff or carve the model so that your two pieces line up.
I haven't super glued the riders to the mounts yet and I'm hesitating to do so due to painting requirements as well as the conversions that are still in process.
Let me know if you have any suggestions, comments, or critiques! They're always welcome!
Automatically Appended Next Post:
Blacksails wrote: No problem, you do great work. Sadly all my 40k stuff is halfway across the country for the next few months, but this blog has certainly inspired me to get off my ass and finish mine, once I'm reunited with my stuff. I can't wait to see a whole mass of perfect blue and yellow/gold uniforms. Keep the good stuff coming!
Thank you! I'm trying, I've had a lot of great help from good friends and talented Hobbyists when I was living in Los Angeles, I know I keep touting the level of skill at Aero Hobbies in Santa Monica, Ca, but their stuff is amazing as well as the skill of the players/hobbyists that go to that store to game or just hang out. Whether it be Warhammer fantasy or 40K, Warmachine, Flames of War, the level of detail and ability just blows my mind. I know one guy who actually wrote legible words in a book held by a 30mm Warmachine Cryx model! They have a couple of plasti-card master craftsmen there its amazing. A couple of them build tanks and other vehicles for 40K as well as one guy who sculpted his BFG ship fleet out of plasticard and it looks just like the GW models if not better.
I'm just plugging away and seeing how it comes out. I'm happy with some of the results, yet some I wish I had done better (like the hose on the heavy flamer weapon model).
Lone Cat wrote:
Does EBAY purchase + paint stripping chemicals cheaper than buying a new, unpainted models (Iron Guard IG and Chimaera)? so you invested your efforts into paint stripping of the purchased ones.
=^.^=
Purchasing models off of a service like ebay or through a swap shop connection is at times cheaper and you can get great deals for this expensive hobby we all have.
if you don't include the time and effort it will take to make them match the army scheme in your head then I got a decent deal.
Though, I'm pretty sure I've spent in time, cleaning supplies, scrubbing tools, tupperware container, etc.. the difference in what I would have paid had I simply purchased new.
I'm a bit of a nut when it comes to some things, I want these chimera to look beautiful next to my Mordian Iron Guard on the table, so stripping off the old paint rather than spraying primer over it is important to me.
Hmelrose wrote:Briancj, thanks for commenting on my page as it led me to the links in your gallery and your P&M blog, your work with plasticard is awesome and inspiring. The Chimera's may be a possibility, I've put a lot of work into recovering them and will have to think on it. I too buy vehicles off of ebay to save money and to have something I can craft up into something unique. The extended Russ you have is awesome.
Thanks for the kind words!
I made the offer because I didn't want you to feel 'stuck' with the Chimeras, if the paint stripping doesn't work out for you.
How do you feel the Perry Miniatures horses stack up? Are they about the right size? I need about 20 Horses for my Pretorian Rough Riders...
--B.
Thank you, I really appreciate that! I'm going to plug away at the chimeras a little bit further and make a decision in about a week. I can send you a screen shot of what I paid for them and we could go further from there. I'd still need to locate four more at minimum to add to my force, whether it be ebay or game store.
The Perry miniatures are 28mm vs GW's 30mm-ish models, They're close enough that I don't see a problem with using them. Of course, the only GW horse I have to compare them to/with is the High Elf Silver regiment horse/mount.
Now on to the conversions!
I wanted a standard for my Rough Riders and liked the look of the Catachan flag from the Catachan command sprue, but I needed it on a Mordian Style arm. The officer arms from the Cadian Command sprue have the correct sleeve type, though the wrong shoulder
You can see where I've made the cuts with an xacto knife and then used a pin vise to drill out a portion of the hand and arm so I can pin it with a bit of clipped paper clip to add stability to the join.
I wanted to give the Rough Riders more weapon options and so I've attached to this guy a Catachan 'long knife' from the Command sprue. I drilled a hole in the hip and through the sword so I could pin it to the model.
I'm mounting a lasgun to 10 of the models and a plasma or melta gun to two of the models so that I can have a WYSIWYG style of force with the optional weapons for Rough Riders. You can see I've done a similar drill/pin job here. Its simple and creates a strong join/bond for the two pieces.
I think they're coming along nicely and I might try to run two units of 7 in a 200pt Kill team tournament at my local GW store, they'll probably die fast, but will look good on the table doing so!
I love the conversion, but if I can nitpick a moment, the ONE Cadian shoulder pad in the entire unit kinda throws it off. Mayhaps a tank commander arm or an officer arm would have been better?
I know, I'll shut up now.
Also, that 'kill team' event looks sweet. Dunno if they can drag it out for a full year.
Briancj wrote:I love the conversion, but if I can nitpick a moment, the ONE Cadian shoulder pad in the entire unit kinda throws it off. Mayhaps a tank commander arm or an officer arm would have been better?
I know, I'll shut up now.
Also, that 'kill team' event looks sweet. Dunno if they can drag it out for a full year.
--B.
Thank you. I know I know, I was trying to get the conversion done. At the time I didn't have another option for the arm. I could have trimmed off the Cadian shoulder pad and then tried to green stuff a Mordian Shoulder board. I've been trying to gather bits and bits, my only real options are to purchase new kits to get bits/weapons and other items I need for conversions. I'm hunting up plasma rifles like a madman, but they're very popular with players around here.
I'm trying to figure out a kill team list with either the Mordian IG force I'm building or with the Space Wolves Battleforce box I picked up for bits on a whim. I've thought about using the rough riders in two squad force of 7 models each, i.e. 1 Sergeant + 4 Regular lance/lasgun + 2 additional w/ special weapons (lance/plasma or Lance/meltagun).
Not sure how effective they'd be, but I think I could take the conversion/paint categories.
basing in progress, used Gorilla Glue and a mixture of gravel, sand, sawdust and other particulate matter.
After checking on this later in the day, the basing material seems to have sunk below the gorilla glue used on the bases, so instead of a gravelly base, I've got this raised glue smooth slighty gritty bases. I've thought about carving it off and starting over using basic super glue and the basing to see if that comes out better.
I've located a retailer in Houston that carries plasticard and am excited about that, both Fat Ogre in the Woodlands and Larry's Hobbies on FM 1960 near I-45 carry plasticard, though larry's has a bigger selection as it is more of a train/plane & RC car shop. There is another store in Spring, TX simply labeled 'Trains' on the outside that I haven't been to yet, but I have hopes for the hobby tools available there.
I've been tossing around some ideas in my head for varying up my IG models. I've got the Space Wolves battle force box, two boxes of the High Elf Silver Helms, a Cadian Battle force box and some Catachan bits. Some of the space wolves heads aren't Space marine size, they're more of a normal IG model size. So I was looking at creating a squad or platoon of Fenris IG conscript/veteran models with Cadian Legs, the Torso armor from the High Elf Silver helms, arms from the Catachans and the head from the space wolves. These guys would then need some more wolf iconography and some greenstuff fur. Its an idea I've been tossing around in my head as well as using a similar body combination with the Perry Miniatures French army heads to create a Roman style of IG. I could even use the High elf helmeted heads for a conehead squad. Heh.
I love converting models and finding new and creative ways to build them.
that new idea of yours i find really intriguing... i would love to see the described fenris IG...would be nice to see a test model of yours for this...
For Fenris IG I'd probably just use Vikings there are several manuufacturers who do them in Plastic. Have to admit High Elf Lances on IG caused me to smile I used one as a banner in my Catachan army way back when.
Viktor von Domm wrote:that new idea of yours i find really intriguing... i would love to see the described fenris IG...would be nice to see a test model of yours for this...
Thank you, I will work on a test model and see how it comes out, it may take me a few days to complete as I've got a few things going right now. I can picture it in my head, but actually making a working model will be different.
Llamahead wrote:For Fenris IG I'd probably just use Vikings there are several manuufacturers who do them in Plastic. Have to admit High Elf Lances on IG caused me to smile I used one as a banner in my Catachan army way back when.
Yes, I can see that Viking models would work, but I don't think they'd have the wolf iconography that the Space wolves will give them. The High Elf lances were not part of my suggestion, someone else suggested them to me and after looking through the available GW options, those were the cleanest and most accurate with what I was trying to produce. I'm glad you like them.
Flying Pooo wrote:Those bases look really nice. That's a nice texture you were able to create there.
I am happy with the particulate I had before for basing, yet I tried to stretch it out by adding ash/dust/grit from my BBQ pit, I think this has decreased the 'grit' and weight of the basing, so while at first it looks good, when used in combination with the Gorilla Glue, it sinks below the glue and thus is a smooth'd top basing with a little grit from what sticks above the glue. I don't like that. I'll take a picture some time tomorrow and see how it has ended with more than 12 hours of drying time.
can picture it in my head, but actually making a working model will be different.
hah! who doesn´t face realism on that battlefield...yep...totally with you there!
Indeed! I've got so many ideas in my head, that I'd want my first test mini on this to be awesome, but making it so will be a challenge. I know the first part of that will be the High Elf chest torso, it is a hollow bowl on the bottom rather than a flat surface similar to a 40K catachan or cadian torso, so I might wind up using the cadian torso since I have so many of them, but then it will look like a Cadian/Catachan mixed model with a space wolf head and maybe some more space wolf bits.
Here are some pics I took tonight of the Gorilla Glue + basing mix I had previously posted about, you can see how the glue seems to rise up above the particulate grit basing, I'm not sure if this is an expansion aspect of the glue or if the basing was too light to cause it to sink. I'm leaning towards an expansion of the gorilla glue. I'm not sure if trying to dilute it or spread it around thinner on the model would help.
if i make a suggestion... GS the bottom of the chest of the elven and not use any cadian or catachan parts... the cross between those two is all to often seen around here... heck i just work with a squad of those myself for some highlanders too...
Viktor von Domm wrote:if i make a suggestion... GS the bottom of the chest of the elven and not use any cadian or catachan parts... the cross between those two is all to often seen around here... heck i just work with a squad of those myself for some highlanders too...
but that is just my 2 cents...^^
I feel the same exact way! Everyone wants something new and unique when it comes to IG models. There are currently only three options: Cadian, Catachan or Cadachan/Catian. If you want something that looks different you're going to have to get creative or try to purchase a lot of the older models via ebay/swap shop/or GW's collector series.
The Space Marines have a larger diversity of forces and yes, I can see the draw of massive power armored marines, but some players enjoy fielding our massive gun line blobs of starship troopers and vehicles. Thousands of worlds in the Imperium, give me some diversity!
So we will convert, rebuild and create newer human type models in the hopes that we'll be allowed to play them.
I was looking at the space marine scout legs with the high elf silver helm torso, but I've only got 5 of those with the battle force. The high elf chest/torso is what I really want to use with the space wolf heads or the perry miniatures heads, its just a slightly different armored chest piece that is unique. I was thinking I'd need to locate some axes and other bits, so I'm looking for Viking kits as well as barbarian kits, I don't want to get too far away from GW bits so it will most likely be chain swords and lasgun/etc arms from catachan bits with some GS in there for bracers & fur effects.
Eiríkr wrote:I think you may need to thin your paints a little, chap.
Thank you, do you have a specific painted model/image in mind? I haven't tried to thin my paint before using it, I generally wet the brush and then paint it on thick. I'm brutal on brushes like that, but I think I get the job done faster.
If you have tips/tricks or techniques to share I'm always on the lookout to improve and develop mine.
I'm still progressing with the Mordian Iron Guard conversions and working to complete that force. This is a Fenris IG Concept, I came up with an idea to use some heads from the space wolves sprues with high elf chests or cadian/catachan chests to create a unit of Imperial Guard from the Space Wolves home world of Fenris. I'm looking for axes and planning to green stuff some fur on these guys as well as trim down the symbols from the high elf armor.
Though after looking at the High Elf armor torsos, they look like they'd be better served on a 'female' IG model as opposed to a large burly viking/norse type of male IG model.
The fluff would be that during the high heat of the summer an IG force was traveling near Fenris and rather than loose potential conscripts/troops they swooped in and saved a Fenris longship crew from a fiery molten death and have since thrown them into battle for the Empire.
i think the bits look very good even now... the heads i am a bit split about... the pony tail i think could work...maybe heat it slightly and then bend it to be rather like hanging then standing upright... the iro hairdo of the other two ones i think is a bit too much...but that is just my taste here... if you go for a more viking look i would rather use bald or really hairy heads...
Viktor von Domm wrote:i think the bits look very good even now... the heads i am a bit split about... the pony tail i think could work...maybe heat it slightly and then bend it to be rather like hanging then standing upright... the iro hairdo of the other two ones i think is a bit too much...but that is just my taste here... if you go for a more viking look i would rather use bald or really hairy heads...
fluffy bit is also quite good!
Viktor, you always have such great advice and comments, I really appreciate it. What do you mean by iro hairdo? For fluff wise, I was thinking of going with a lost vikings/crazy loaded/equipped out berserker IG Veteran squad.
I utilized primarily Space Wolf Heads, Catachan torso & arms and Space marine scout legs, Also the bits were scavenged from our local GW store's unofficial bitz bin, I grab a lot of fantasy dwarf bits and a few others as their axes and shields I thought could fit the theme.
I'm still debating Green stuff'n some fur on the models, reading around dakka to see if I can find a good tutorial or at least some hints to point me in the right direction.
i didn´t remember the right word for the hairdo... no i know... i menat mohawk...
and this guy is the only one i think looks actually good with that hairdo...
but your current work looks very good and sound to me!!! i would maybe just trim the hair of the last portrayed guy a bit... and then you have a very cool force with you...
the only force i know to be using fur on imperial minis is the vostroyans... and if you look into
Viktor, yes please remove those images, they are indeed hideous. lol well, all except Mr.T
leohart wrote:Is there some SW heads that you can use for those mohawks? I remember seeing some ads on DakkaDakka where there are studios that sell resin heads. Anyway, keep up the good work sir.
Thank you for the compliment, Leohart, yes those are almost all space wolf heads from the battle force box, I'm not sure if they exist on the other SW sprues, but I'm sure they do. There are other companies that sell heads for all types of GW models, the amount that is out there is awesome for customization and conversion.
James23105 wrote:Awesome work, I'm loving the Mordians!
Thanks James! I need to get back to work on them and stop creating more work with all these conversions.
Rogue Wolves wrote:looks awsome man, i can see some empire bits in there and i love it
Oh yeah, there are bits from all over on those Fenris IG guys, Empire, Dwarf, High Elf, Cadian, Catachan, Space Wolf, Space Marine etc.. its been fun bashing these bits together to create something unique to put on the table.
I've picked up some alternate tanks again to try some kit bashing with the chimera treads, some plasticard. The chimeras have been sitting in the simple green solution for a couple of weeks now, hopefully they're still good to go, but they are beat up.
I'm still up in the air about buying new chimeras over trying to rebuild/rework these old ones.
For the Mordian Iron Guard, I need to convert more lasgun to plasma rifle to have those models available. I've also looked at making a couple more sniper rifle conversions, again just to have the models available.
I've got a ton of Cadian and Catachan bits as well to throw some more figures together for force diversity. I will most likely try and pick up at least a squad from each of the other IG forces and paint them up at a later date. I really need to finish up the Mordian Iron Guard.
Waiting on my Battlefoam 1520 XL to arrive, in the mean time this is how my models are traveling. All this sliding around is causing the basing to come off and the primer to chip a bit, luckily I can just touch it up with some Skull White. I've thought about cutting cardboard up to create slots like an egg carton or a bottle case so that the models don't bounce around so much. I've got a lot of family stuff going on right now so my hobby time is limited.
I was able to get in some paint time tonight and at first I was only going to try to work out my assembly line technique on about 5 to 10 models, but I wound up hitting about 29 models before I started to pay attention, I kept getting too much paint out and needed to thin it up with a bit of water which then created more paint to work with. I hit the models with a base coat of Mordian Blue.
I'm beginning to realize I need better lighting and a better camera, I've been using my cel phone for all of my pictures and without a flash or good lighting, then my pics are sucking hard.
I've separated the painted models from the just plain primer'd models both for drying and preventing them from getting chipped. I'm definitely reconsidering the cardboard tray option now that I'm starting to paint multiple models.
If you look closely at the banner in the image, I've painted the skull on the flag Red. I just couldn't help myself and have started thinking of these guys as the "Red Skulls of Mordia" Though this may take some time to sink in and create fluff for. My use of yellow in the color scheme now instead of the standard Red is mentally causing me to pause.
And, lastly I've picked up a couple of cheap tank kits to attempt to help with salvaging the chimera body kits, We shall see if I can utilize the tops of these tanks with the chimera tread bottom and the bottom of these tanks with the chimera top, thus spreading out my 40K vehicle kits.
the batchpainting looks better than mine^^
i would search for those big eggtrays for at least 24 eggs each... do your stores sell loose eggs too? if that fails i bet the cardboard box idea you described is doable...
the idea of red skulll force sounds quite cool...tho i think if you mainly think of your guys as a marine /navy force...then the archenemy of america..red skull could get tricky... but that guy would make an exellent leader or evn a good commissar! maybe get yourself one mini and make a headswap... i bet there are pics of that idea around...
the tanks look very suitable for your scheme...nice idea to use old WWII american tanks if i see correctly...
Viktor von Domm wrote:removed the `orrible pics as requested!
the batchpainting looks better than mine^^
i would search for those big eggtrays for at least 24 eggs each... do your stores sell loose eggs too? if that fails i bet the cardboard box idea you described is doable...
the idea of red skulll force sounds quite cool...tho i think if you mainly think of your guys as a marine /navy force...then the archenemy of america..red skull could get tricky... but that guy would make an exellent leader or evn a good commissar! maybe get yourself one mini and make a headswap... i bet there are pics of that idea around...
the tanks look very suitable for your scheme...nice idea to use old WWII american tanks if i see correctly...
Thank you for removing those images, they were 'orrible.. Haha
Great Idea for the egg tray/carton! I just finished off cooking a batch of eggs for breakfast right before reading this post, so I rescued the tray from the trash and will be using that once it dries and I can clean it up a bit.
I'm pretty sure my batch painting devolved from careful brushing to just slapping the paint on as the night progressed. But Thank you!
I agree with the difficulty of using a 'Red Skull' theme for the force with the U.S. Army Cavalry colors would be a bit difficult, yet I see a skull and I want it painted red! I've looked up some images on Google and there are some red skull commissar conversions out there.. It is very tempting, I'd have to create a steve rogers/Captain America conversion as well. So dang tempting!!
As for the tanks, I keep looking for interesting ways to convert models for use with my force, I want it to look unique and cool on the battlefield as well as save a few bucks, if anything I can cut them up and use the pieces to add to existing GW models for a new effect. Not every world in the Imperium builds the same.
Lone Cat wrote:is skull white priming easier to paint than chaos black ones?
I primed with P3's white primer, I just like how it goes on. The reason for this color choice was mainly due to the fact that I was going to use yellow on the model. For me, its easier to build up to the yellow I want from a white primer base than it is from a black primer base. Yet, I know painters that can do yellow on a black primer'd model.
ohah...cap and red skull side by side... that would be the very thing^^ i have seen at least some pulp minis that are cap... but a nice cap done using scout bitz or possibly even catachan bitz seems highly possible...and a cool commissar conversion to look like red skull...hmmm... maybe i do that when i will one day building my counterforce to the britsih guys i am currently doing... those then will be some choasy germans... they could be led by a red skull all right^^
Viktor von Domm wrote:ohah...cap and red skull side by side... that would be the very thing^^ i have seen at least some pulp minis that are cap... but a nice cap done using scout bitz or possibly even catachan bitz seems highly possible...and a cool commissar conversion to look like red skull...hmmm... maybe i do that when i will one day building my counterforce to the britsih guys i am currently doing... those then will be some choasy germans... they could be led by a red skull all right^^
Yeah, that would be an interesting conversion, scout bitz definitely, a different chest, but the legs would work..hmm.. so many conversion possibilities..
leohart wrote:P3's white primer versus GW white primer?
I prefer P3's primers both white and black to GW's Primers. In my experience they flow better, they spray on smoother than GW. Its what I like to use, but I'm having difficulty finding them in North Houston and I'm getting close to empty on my P3 primer.
P3 primer? There are quite a few over in Asgard last time I went there. Hey do you mind if I try your P3's white primer? Their price looks rather nice. As long as the performance is as good as GW.
leohart wrote:P3 primer? There are quite a few over in Asgard last time I went there. Hey do you mind if I try your P3's white primer? Their price looks rather nice. As long as the performance is as good as GW.
Sure, I'll toss it in my tool kit for when we next run into each other. I'm spending a lot of time on the North side, up in The Woodlands,Tx so I don't know when I will be close to Asgard.
I'll check around on the Northside and see if anyone has any P3 primer.
leohart wrote:P3's white primer versus GW white primer?
I prefer P3's primers both white and black to GW's Primers. In my experience they flow better, they spray on smoother than GW. Its what I like to use, but I'm having difficulty finding them in North Houston and I'm getting close to empty on my P3 primer.
Neither do I use GW spray primer. 'cos a Thai grognard advised against it with the same reason. instead he told me that Leyland F14 'matt black' is better (and it's what I'm using now)
also it's easier to buy ones here.
Lone Cat wrote: Neither do I use GW spray primer. 'cos a Thai grognard advised against it with the same reason. instead he told me that Leyland F14 'matt black' is better (and it's what I'm using now) also it's easier to buy ones here.
There is a similar company here in the states that some people use called, Krylon, they utilize the flat matte black color, but I'm not sure of any other colors used, but a lot of spray paint/colors used on cars/trucks are similar and a lot cheaper than hobby company paints/primers.
The same can be said for the hobby tools. GW brand tools have a huge markup over the same tool purchased at a local hardware or other discount tool store.
There is a paint tool someone created on here to show which paints from which companies match. I will try to locate that and repost it here.
I have had a lot of luck with the Walmart brand spray primer, and it's only 98 cents a can. I have used the flat black, white and grey. Works great, and cheap
also to Hmelrose
Love what your doing with the Mordians, great work keep it up.
Mr. S Baldrick wrote:I have had a lot of luck with the Walmart brand spray primer, and it's only 98 cents a can. I have used the flat black, white and grey. Works great, and cheap
also to Hmelrose
Love what your doing with the Mordians, great work keep it up.
Thank you sir! Much appreciated.
Do you have a name brand for that walmart primer? Or is it just walmart? I could stop by on the way home tonight and check it out.
Totally sorry dude it is called “ColorPlace” fast dry spray paint. I also picked up a can of Kelly Green for DA vehicles, but I haven’t used it yet. However I have been using the flat black, white, and grey for years and have never had a problem. I don’t think I have bought GW primer since it was $8.99 a can.
Also are those rough riders you have from the Perry Twins?
Mr. S Baldrick wrote:Totally sorry dude it is called “ColorPlace” fast dry spray paint. I also picked up a can of Kelly Green for DA vehicles, but I haven’t used it yet. However I have been using the flat black, white, and grey for years and have never had a problem. I don’t think I have bought GW primer since it was $8.99 a can.
Also are those rough riders you have from the Perry Twins?
Its totally alright dude! Thanks for the info! I'll have to stop by and check it out. I don't want to overspend on GW products either.
Those rough rider conversions are mostly from the Perry Twins miniature company 'Perry Miniatures' There are pieces on them that are GW, such as the High Elf Silver Helm Lances and the Cadian Officer heads as well as the bits added to the models. They're 28mm so slightly smaller than GW's 'heroic scale' of 30mm, yet I think they work out nicely.
Thanks a lot. I am looking for some good rough rider stand ins myself. I am working on a praetorian army and the current GW riders do not fit well with them.
Mr. S Baldrick wrote:Thanks a lot. I am looking for some good rough rider stand ins myself. I am working on a praetorian army and the current GW riders do not fit well with them.
If you're doing Praetorians, you might want to check out Col. Gravis P&M Blog, he's got some sculpts for Praetorian rough riders: http://www.dakkadakka.com/dakkaforum/posts/list/208605.page If I didn't go with the Perry Miniatures sculpts, I was going to get some of his sculpts. I'd suggest shopping around there are a lot of miniature companies with similar style uniforms. They just need to be uniform/dress uniform similar.
Capitansolstice wrote:Nice
Thank you sir!
Update: Picked up another Leman Russ Demolisher kit, a Catachan battleforce kit (for the bits!) and a GW Fantasy Chaos Marauders box set as I think I can use Catachan arms with the Marauders to create some similar Fenris IG models to the ones I've already created with a bunch of bits. With all these extra models I have and the conversions I've been seeing on here, I may just put a few more interesting squads together for some diversity on the battlefield. Also, I think it would just look cool.
I'm planning to give the LR another Tank Commander, but I need to get creative with this one, I want him to look Mordian and I may be able to achieve the "Drive me closer, I want to hit them with my sword" internet mem joke model I was going for. I've also received some magnets so I can demonstrate how I magnetized my current LR's sponsons.
I'm also working on a Hellhound/Banewolf kit, but want to magnetize the pieces so that I can switch out with not only the Hellhound/Banewolf combo, but also with other models that use that same vehicles base chassis.
The four chimeras I purchased are still sitting in the green stuff, I'm not sure when I'll get back to them and due to recent temperature drops, I've had to move them from the back porch to the garage.
I've got the Space Wolf Battleforce box to figure out what to do with, I'm wondering if I shouldn't just put them together for fun, but then what should I build?
In the meantime I'm clipping bitz and sorting them into plastic slotted storage containers, trying to maintain some sense of order.
I've also missed the deadline for the Kill Team tournament to get my force viewed/recorded/painted and modeled. I've had some family health issues come up and its going to be a long road before anything is resolved.
Thanks again everyone, you're all awesome and remember comments/suggestions/statements/heretical remarks are always welcome!
Hay man this is the primer from Walmart I was telling you about. In my area there are 3 Walmarts and the price differs from 96-98 cents a can. It works great I have used it on every army I have worked on for about the past 6 or 7 years with out any problems. I have used the flat black, white, and grey. The green in the photo I have not gotten a chance to use yet.
Mr. S Baldrick wrote:Hay man this is the primer from Walmart I was telling you about.
Thanks! I recognize the cans! 3 walmarts? You must live in the South, I've got about the same amount within 5 miles of me. I will check it out tonight!
Lord Gearhart wrote:Sweet man the sherman looks a bit awkward but the half track looks good. maybe you could have a custom chimera
Thank you! The sherman may go to my nephew, I'm still debating it. The halftrack will need some work and to that end I visited a train hobby shop and picked up some sheets of styrene (also known as plastic card). I found 12" x 24" sheets for $3 each as well as a sizable bag of gravel (mainly used for model train rail road beds) for $3.50.
I'm still debating the alternate tank kits. I've been fairly busy and haven't been able to work on my models, yet I'm hoping to find some time soon.
I think the question is do yo feel the alternate vehicles will add something? Do they add something thematically? Do they add something to cost effectiveness? Do they add something aesthetically?
If they don't go back to GW vehicles. To me personally the use of scratchbuilt cardstock 40k vehicles means I can field an army faster and spend my hobby money on other projects. Admittedly I still use normal templates.
Personally I fealt the halftrack worked and added something I'm less sure about the Sherman although if you like it who am I to tell you otherwise?
Llamahead wrote:I think the question is do yo feel the alternate vehicles will add something? Do they add something thematically? Do they add something to cost effectiveness? Do they add something aesthetically?
If they don't go back to GW vehicles. To me personally the use of scratchbuilt cardstock 40k vehicles means I can field an army faster and spend my hobby money on other projects. Admittedly I still use normal templates.
Personally I fealt the halftrack worked and added something I'm less sure about the Sherman although if you like it who am I to tell you otherwise?
Those are some of the questions I've been asking myself. I want the force to look unique, the Mordians are an older/different style of IG force and there aren't going to be many of these armies out there. I want the vehicles to be just as awesome, but I don't want the vehicles to detract from the overall forces look.
I liked the simplicity of the halftrack conversion, but since I "went a little nuts" on it, its going to need some work to bring it back in line. I may use the plasticard and create a cab for it.
Also, I don't want to spend an arm & a leg purchasing at least 3 chimeras, 3 LR, 3 Vendetta/Valkyrie, etc etc..
I really need to come up with an army list for these guys..
I'll do an inventory of my models tonight when I get home and post up the count.
Viktor von Domm wrote:have you tried ebay? i bet there are some sellers on...
There are indeed, I just have to figure out if I want that model to represent my Valkyries or not.
In the meantime here is a Leman Russ Demolisher kit with magnetized sponsons!
I'll keep this one simple as its late for me here
Take a look at the assembled, unpainted side of this LR Demolisher kit, pay attention to the area where the sponsons would normally be glued on. Especially, the two rectangles of plastic between the two door/hatches.
In this image you can see a larger flat rectangle on the side of the LR Demolisher, that is actually a flat rare earth magnet glued to the side of the tank, additionally there is another one on the inside of the tank wall to add to the strength of the bond. If you then look at the sponson laying on its side, you will see a piece of plastic sprue has been glued in place and another magnet has been glued in place. You'll need to have lined up the magnets and sponson to the body/hull of the tank before gluing, This is important because you don't want swapped polarities.
I ran out of flat rectangular rare earth magnets and had to use my rod magnets and carve out a bit of sprue to hold the rod magnet in place:
This is an example of how I lined up my magnets to assure that I would get the polarities correct. Its also how I was able to line up the magnets on the sides of the model and in the sponson so nothing would be crooked or out of place.
The magnetized sponson then can be attached or removed as needed!
Some random action shots:
And as a last note, I love these new track guides! Whomever designed them is awesome!
Eiríkr wrote:I think you may need to thin your paints a little, chap.
Thank you, do you have a specific painted model/image in mind? I haven't tried to thin my paint before using it, I generally wet the brush and then paint it on thick. I'm brutal on brushes like that, but I think I get the job done faster.
If you have tips/tricks or techniques to share I'm always on the lookout to improve and develop mine.
Sorry for the late reply!
Do you have an old ceramic plate or tile that is spare for use? I simply add a drop of water for every drop of paint used, 1:1 basically. You will most likely have to add a second coat to it but the paint applies cleaner and, after the second coat, will have a real vibrancy to it that you won't find otherwise. It's also much easier to 'push' the paint around the model. This is especially true if you are using white primer, which you are. Try it out on a model! See if you like it.
Eiríkr wrote: Sorry for the late reply! Do you have an old ceramic plate or tile that is spare for use? I simply add a drop of water for every drop of paint used, 1:1 basically. You will most likely have to add a second coat to it but the paint applies cleaner and, after the second coat, will have a real vibrancy to it that you won't find otherwise. It's also much easier to 'push' the paint around the model. This is especially true if you are using white primer, which you are. Try it out on a model! See if you like it.
Thanks for the reply, no need to apologize we all get busy. I will definitely have to try that! I'll see about stopping by a hardware or tile store and getting a 'sample' of tile for use with this. I've experimented with thinning paints, but thats mainly been with keeping the brush wet and dropping excess water onto the paint I've put on the newspaper I use as a protective mat while doing my hobby work.
leohart wrote:Looking awesome Hugh. I agree with the track guides making it much harder to mess up track placements.
@Hmelrose: I got a full bottle of Liquidtex Flow Aid, just get a dropper bottle. I will bring it to GW next time so you can mix it with distilled water and have ready to use solution for thinning your paint. It works better than water and on a ceramic tile/plate, it is wonderful.
I'll have to try Eiríkr's suggestion first, but then I will definitely like to sit across the table and swap hobby tricks & tools with you.
I stopped in an old train hobby shop in Spring,Tx yesterday, the place is a bit of a mess, but the owner knows his stuff. I got this bag of basing material for $3.25! It'll go a long way if mixed with some beach sand and just plain roadside gravel. Get yourself a tupperware container with a good lid that seals tight, you want the container to be as big as the biggest model you plan to add basing to, so a 60mm base can fit in it. I've tried different types of glue on the base of the model and find that superglue works the best.
Here is a pic of some of what I'm dealing with on my hobby table:
More Mordian Iron Guard waiting to be converted, based & primed, then painted!
You can see the chimeras and other vehicles swimming in the simple green solution on the right.
I know I have close to 200 Mordian Iron Guard models, I just need to get a count of what types.
12 Lascannon HW team
1 Autocannon HW team
4 Heavy Bolter HW team
1 Missile launcher HW team
2 LR Demolisher kits ( one built, one on sprue )
4 Chimera (badly used and sitting in simple green)
1 Armored Sentinel (Fully magnetized)
1 Sentinel Scout
2 Sentinel Kits to be built
1 Hellhound/Banewolf kit
Cadian Battleforce box
Catachan Battleforce box
Several Cadian & Catachan well used command box sprues/kits
14 Rough Rider conversion models
12 Psykers
1 Primaris Psyker
4 Commissars
1 Lord Commissar
1 Creed
1 Kell
2 sets of Regimental advisors, one set of which are my own conversions.
2 Servitors
1 Fenris IG squad conversion
1 Box of Chaos Marauders (to be converted using Catachan bits to Fenris IG)
Several alternative vehicle possibilities.
1 Super Heavy Tank kit (fully magnetized)
Oh and a SW battleforce box,
Space marine Scout box (minus the legs)
1 Space marine Bike
Lots of bitz scavenged or dug up out of old boxes in the garage.
I may need more superglue.
I picked up the Walmart brand of paint as well as a can of Citadel Skull White primer and will be doing a test run/comparison on 3 of my models with them versus the P3 White Primer.
THere was and imperial guard regiment called the Nordic Berserkers, and they basically wore the Mordian uniform, without the Shoulder things, and with Fur Capes (think WoC capes) and what looked to be Marauder Horsemen heads.
Viktor von Domm wrote:wow... that is huge...and needs lots of paint^^ also great way of doing magnetized sponsons... i really like that idera and it looks very good when not using the sponson!!!
Thank you! I can't take credit for it, the idea was given to me by Keith, the owner of Aero Hobbies in Santa Monica, he showed me how to do it and I shared it with y'all.
leohart wrote:@Hmelrose: awesome, waiting to hear more from you regarding the experience with the White primer from Walmart versus GW.
I need to make time and prep some models to make this happen!
Llamahead wrote:Nice thats a lot of metal.
No kidding! Haha, I kind of went a bit overboard, but also got lucky acquiring two big lots of Mordian Iron Guard of over 60 models in each lot. The rest have come from either purchasing new threw my FLGS or by ebay & even a few were donated by friends!
Brotheralexos wrote:THere was and imperial guard regiment called the Nordic Berserkers, and they basically wore the Mordian uniform, without the Shoulder things, and with Fur Capes (think WoC capes) and what looked to be Marauder Horsemen heads. Just a thought.
Sounds interesting! Do you have a link to the info or fluff?
Worked on some more Fenris IG models tonight just for the heck of it. I've got about 23 of those little buggers, take a look at these few images and then hit my gallery for more!
I call this guy the Fisherman, cause he's using a lance as a harpoon.
ok i can understand to go hrned helmeted vikings from a romantic point of view...but for true fighters...a definte fashion no go^^ also i have to say tho cool looking the spear or rather lance is i think it is posed akward as is... the main wight is beyond the holding capabilities of that guys strength...tho it will be sin to trim that lance in any way...^^
and the credit also goes to you for sharing a learnd thing as to how to magnetize the sponsons that way^^
Viktor von Domm wrote:ok i can understand to go hrned helmeted vikings from a romantic point of view...but for true fighters...a definte fashion no go^^ also i have to say tho cool looking the spear or rather lance is i think it is posed akward as is... the main wight is beyond the holding capabilities of that guys strength...tho it will be sin to trim that lance in any way...^^
and the credit also goes to you for sharing a learnd thing as to how to magnetize the sponsons that way^^
I think they're interesting, similar to horned Catachans. So I think they'll be good looking on the battlefield as a veteran squad or two. Something different to field rather than the standard Catachan / Cadian mix. They have a Lasgun + close combat weapon and several have the option of saying they have more with the inclusion of grenades and the catachan sheathed sword.
Yes, the lance is oversized, but I think thats part of his charm.
I'm always happy to share tips, tricks and how to's that others are willing to share with me.
I still watch this in gripping anticipation waiting for more Mordians to be painted up and sent off to the front lines to kill the enemies of the Emperor.
Blacksails wrote:I still watch this in gripping anticipation waiting for more Mordians to be painted up and sent off to the front lines to kill the enemies of the Emperor.
More excellent work, keep it up!
I am working on them as well! Upload some pics of yours! Even if they're unpainted.
I'm working on a couple of plasma rifle conversions as I need more plasma in my life. Also I need to inventory the amount and types of models I have.
Automatically Appended Next Post: Did a quick inventory
122 Lasgun models (note this includes the models from the heavy weapons teams)
15 Flamer models
1 Heavy Flamer conversion
2 Sniper Conversion models
8 Meltagunners (2 conversions)
2 Plasma gunner conversions
13 Grenade Launcher models
1 Lasgun w/chainsword conversion
1 lasgun w/grenade & standard/flag conversion
1 lasgun w/standard/flag conversion
1 lasgun w/power fist conversion
4 lasgun w/vox
Heavy Weapons: (This includes original metal and the new plastic heavy weapons on sprue)
16 Lascannon
9 Heavy Bolter
5 Auto cannon
10 Mortars
6 Missile
1 Quad Autocannon
1 Lord Commander Creed conversion
1 Sergeant Kell
1 Commissar Lord
1 Commissar Yarick
4 Commissars
1 Colonel Stracken
1 Marbo
5 Ratling Snipers
10 Psyker
1 Primaris Psyker
6 Regimental advisors (original metal and plastic conversions which could be rolled into a Cadian force)
1 Missionary
1 Vindicare Assassin
2 Servitors
Vehicles
4 Chimera (beat up, but salvageable) - these will need a lot of work.
2 Leman Russ Demolisher kit - (1 fully magnetized )
1 Hellhound/Banewolf
1 Scout Sentinel
1 Armored Sentinel
2 Sentinel kit - still in box
1 Baneblade Superheavy tank conversion/fully magnetized & primed
3 Tank/vehicle possibilities
Have bits will convert:
23 Fenris IG conversion vets/models
? Cadians ( from 3 Command Sprues + 1 Battleforce box )
? Catachans (from 3 Command Sprues + 1 Battleforce box )
? Space Wolves ( Battleforce box )
? Space Marines ( Scout Snipers & Bike )
I've probably missed some and I'm still in negotiations to get my old models back from a friend that I'd given them to years ago. They've stopped playing and from what I hear they're sitting in boxes.
That is a lot of models. Since I am not that good with IG, maybe we can try looking at the Army List sub-forum and see if you can get one of the better list in place.
Indeed! And, still growing. I just picked up a Valkyrie & Vendetta kit last night. Trying to work out how I can give it Mordian Iron Guard Pilots! I'm thinking of either doing a Cadian Officer head conversion or actually using the top torso from the Mordian Iron Guard Heavy Bolter team, but this would mean purchasing more top torsos or cutting some of my current models in half, which I am hesitant to do.
leohart wrote:That is a lot of models. Since I am not that good with IG, maybe we can try looking at the Army List sub-forum and see if you can get one of the better list in place.
I've been looking all over and have some options. I'd appreciate the help!
Capitansolstice wrote:It would make more sense to do a cadian conversion imho
It would be easier and cheaper to do a Cadian officer head or Tank Commander head conversion yes, but having the full Mordian Iron Guard torso would be pretty effin rad, its similar to what I would be doing when creating a scout sentinel group, I'm doing 3 of those with Mordian Iron Guard drivers.
Hmelrose, love the Fenris guard they look realy good if you ever needed inspiration for them, check out Battle of The Fang by Chris Wraight, I read it a while back and the Fenris PDF featured heavily and when i saw this on the homepage it just popped up. Hope thats of some use?
Shado.Raith wrote:Hmelrose, love the Fenris guard they look realy good if you ever needed inspiration for them, check out Battle of The Fang by Chris Wraight, I read it a while back and the Fenris PDF featured heavily and when i saw this on the homepage it just popped up. Hope thats of some use?
No worries, glad to be of service by the by any chance you're gonna use Wulfen? (possible Count-As Ogryn?) as in the novel they are used as a heavier alternative cc troop by the thrall/SW.
The marauder based guard are looking good especially as you've managed to avoid them looking renegade. It's always nice to have a hefty lead stash its the discipline to paint them up which is most important however! Good luck.
Shado.Raith wrote:No worries, glad to be of service by the by any chance you're gonna use Wulfen? (possible Count-As Ogryn?) as in the novel they are used as a heavier alternative cc troop by the thrall/SW.
I may do a mixed SW & Fenris IG / Thrall force or simply have these guys fluffwise been recruited from a down SW cruiser/ship by another IG force or be troops from the planet of Garm, which is where the Spear of Russ resides.
Llamahead wrote:The marauder based guard are looking good especially as you've managed to avoid them looking renegade. It's always nice to have a hefty lead stash its the discipline to paint them up which is most important however! Good luck.
Thank you! I was a bit worried that I went a little too far. I wanted something simple, i.e. Viking head + Axe + lasgun, nothing too crazy. Yet I still got the converting bug in me and went a little nuts.
I have a ton of Catachan torsos that the remaining Marauder bitz might work with. However, I used a lot of the lasgun arms with the marauder models so I will have to make some conversions happen.
Capitansolstice wrote:Isn't there a cadian torso in the command squad box set that looks like a mordian one?
Yes. the Officer or Commander Torso is similar, yet it doesn't have the shoulder epaulets/boards the normal Mordian Iron Guard have as well as the winged double eagle. Very similar and if I can get the green stuff down, then I can convert shoulder boards for them.
Rogue Wolves wrote:D: i know i had this subed! where did it go!!! well now that im here again, i really like what you did for the fenris ig, those are cool
Haha, Welcome back! Thanks all for subscribing to my little blog!
I have to admit I've unsubscribed from my own posts several times when cleaning up my "threads subscribed too"
Lots has been going on, been hanging up at Fat Ogre in The Woodlands, Tx. Got a good game of Warmachine Cygnar vs Cygnar in. Picked up some more paints and have been prepping/putting together more models/conversions. I need more Mordian Iron Guard Plasma rifle soldiers!
I'm still here and working on the Mordian Iron Guard models!
Lots has been going on and with some family health issues as well as the holidays happening I just haven't had much time to work.
I've got a new can of P3 primer white ($9.99 from Fat Ogre) as well as the Citadel skull white primer ($19.99) along with the walmart brand white spray paint for ($0.98) so I will be doing a primer comparison fairly soon.
I'm happy to report that my battlefoam 1520XL & Pack 216 arrived. Now I just need to figure out how to get the dang zipper to work so they'll attach to each other. The 1520XL is huge, like luggage you'd have to check at an airport and withe Pack 216 its more like a fat kid trying to wear a hat.
I think I will stencil "Fat Kid" onto the 1520XL, that would be hilarious. Though then people might think that's my nickname. :/
Probably not a good idea after all..
I've been working with friends on facebook as well as google groups and yahoo to create gaming clubs for both Warhammer 40K & Fantasy as well as Warmachine & Hordes in the Houston area and in Southern California (where I was previously living/gaming)
Dat! Haha, I will try to do it tonight. I've got wrapping of presents as well as my games at Fat Ogre in the Woodlands and most likely I'll skip wrapping presents til tomorrow and go out drinking with my buddies tonight. Gotta get some of that holiday cheer in me!
Lucky you having a garage -_-. When I get my garage, I am gonna have my airbrush station setup. Until then, I guess I will stick with spray can at the store.
leohart wrote:Lucky you having a garage -_-. When I get my garage, I am gonna have my airbrush station setup. Until then, I guess I will stick with spray can at the store.
I'm going to want to mess around with that airbrush station dude!
Working on a 200pt Kill Team for local easy play as well as to get something on the field faster than 200 IG, I've got the Space Wolves battleforce and Space Marine Biker bitz, still tossing around a kill team sized list, so I'm putting models together and seeing where we can go from here.
Laying out the legs and arms, trying to get an image of what I want the models to look like in my head.
All the legs are pretty much static stances, I want them more dynamic, so I cut the leg with a thin saw blade, then drilled with a pinvise and pinned using a clipped piece of a small paperclip and some super glue.
Running, minus the shoulder armor. I forgot to put that on before taking the picture.
From the side.
Next to the bike that Andrew up at Fat Ogre in the Woodlands, Tx gifted me! That store and the people who work their are awesome.
This bike will be converted to be a space wolf bike.
I'm not sure if its available separately or with any other models.
leohart wrote:I think I saw Andrew put together that bike from his Ravenwing box.
You just might have Leohart (Dat). I was on the fence with making a bike purchase and he calmly and friendly gave me an extra ravenwing bike he had to kind of help me along with my purchase.
Haha. Now I have to make the force!
I briefly thought of making a 200pt Kill team force of Space wolf bikers. I'm still debating it. haha.
Automatically Appended Next Post: More work on the Wolves of Fenris:
Added the missing shoulder armor and took a better picture with my cel phone cam as Santa didn't see fit to bring me a digital one this year... the judgmental bstard.
I have some Reaper miniatures weapon accessory packs and thought it would be cool to add a big axe to a model, here is my conversion:
Cut the axe handle with a thin saw blade, then used a pin vise to drill a hole through the hand and into the handles of the axe, I cut a bit of the axe handle off to make it look like a portion was in his hand.
Finished dude! Well I need to do some creative basing, but he is close!
Here are some of the other Space Wolf models.
It wasn't until after I had this model converted to running that I noticed his leg was kicked out too far. I'm not sure I like it like that, but my only option would be to cut through the plastic + superglue + paperclip pinning the leg together. I'm hoping a creative basing solution comes to me so I can fix it.
The initial 7 Space Wolves minus the Bike model, which I removed the dark angels ravenwing feathered icon from the bike. I'm contemplating replacing the head with a SW head or something similar. He's fairly generic as he is now, so I could do almost anything to him.
Capitansolstice wrote:Yeah, but if you have dark photos it is great!
True, but if you take photos with just enough light, then the brightness is too much!
Not satisfied with my Wolves, I took these tonight:
Worked on the Bike Squad a bit:
I wanted to incorporate the metal models as well as the SM bitz that came with the SM Bike squad pack as well as get them to look like Space Wolves on bikes, shoulder pieces and I'll be adding some other effects to the bikes themselves.
I wanted them to have some dynamic poses, so this is my attempt at a wheelie, its all superglue on the wheel and I used saliva as a quickener. Most people aren't aware that saliva will cause superglue to bond faster.
Four bikes = 100pts + power weapons, What do y'all think?
I'm still progressing on the Mordian Iron Guard, I'm painting and assembling as well as converting more models. I'm out of Plasma rifles and so I'm going to have to find some more. Also I'm trying to figure out how to magnetize some more vehicles so they're even further customizable. More to come!
Flying Pooo wrote:Nice looking space wolves! You achieved some really dynamic poses. Now lets see some paint on em'.
Thank you! It's my first time working with the plastic wolves and the leg idea just seemed obvious to me. I wish I could have some more creative bases, been thinking of getting some spackle and sculpting up an ice sloped type of base, then hit it with white primer, then simply a light blue wash for effect. Still debating though. I'm also worried about the single leg poses strength of attachment to the bases.
Capitansolstice wrote:Are you going to add pelts to the bikes?
They're a couple of things I've been tossing around. The SW battleforce comes with some wolf skulls & tails. I was going to put the skull on the front of the bike and then attach / hang the tales from the skull antennas that come for the back of the bike. Just working out the details about how I could greenstuff and drag lines through it to simulate fur on the bikes. I'm not that familiar with GS and so I want it to look good. I've seen one person roll out GS in thin strips then overlap them for fur. I've also got some capes left over from the Chaos Marrauders I'm looking at adding to the mix. We shall see if it comes out looking good or if I just 'fraggle' it all up.
Hmelrose wrote:[Thank you! It's my first time working with the plastic wolves and the leg idea just seemed obvious to me. I wish I could have some more creative bases, been thinking of getting some spackle and sculpting up an ice sloped type of base, then hit it with white primer, then simply a light blue wash for effect. Still debating though. I'm also worried about the single leg poses strength of attachment to the bases.
That base idea sounds great. I'd say give it a try. Just do a test on one base and see if you like it. Or if you want to go the extra kilometre (metric system FTW) do this with your bases. Catattafish has lots of other awesome tutorials too! Also maybe try pinning to strengthen the one legged pose.
The bikes look awesome btw. I will try to post some pictures of my finished bikes. I have mixed metal models as well so I know the pain of working with them. The models keep falling to one side due to the weight imbalance.
Regarding purchasing bikes, you should check on ebay or dakka swap shop first. The reason is bike is very underrated so getting them brand new at 50% off or more is very easy.
Hmelrose wrote:[been thinking of getting some spackle and sculpting up an ice sloped type of base, then hit it with white primer, then simply a light blue wash for effect.
That base idea sounds great. I'd say give it a try. Just do a test on one base and see if you like it. Or if you want to go the extra kilometre (metric system FTW) do this with your bases. Catattafish has lots of other awesome tutorials too! Also maybe try pinning to strengthen the one legged pose.
Yeah, I got to thinking today and I'm not sure of the life cycle of spackle how crumbly it would be, I got to thinking that air drying clay or a similar substance might work better and I don't want to make the base too high or crazy. I think an uneven white block might work, as it would be ice like, yet then it wouldn't be interesting enough.
The link above sends me to an error page, is the username right? I'll do a search for him.
I was thinking of pinning the one leg to the base as well as doing something similar to the bikes. Pin them using something large like a nail or screw.
leohart wrote:The bikes look awesome btw. I will try to post some pictures of my finished bikes. I have mixed metal models as well so I know the pain of working with them. The models keep falling to one side due to the weight imbalance.
Regarding purchasing bikes, you should check on ebay or dakka swap shop first. The reason is bike is very underrated so getting them brand new at 50% off or more is very easy.
Thank you, Thank you.. lol, I was looking at getting the Ravenwing battleforce (but it has all those dang wings) or picking up some bikes from ebay. The SW's get some interesting bonus's for their swift claw bikes, you should keep adding to your P&M blog dude, I'd love to see your work.
I was thinking of the weight issue with half metal/plastic models and I think that adding weights to the bottom of the model, similar to those used for pinewood derby or just washers would give the base more weight itself versus the model on top of it. Right now I don't have the issue of weight to deal with, the one model I have seems to be well balanced.
I looked on ebay and there are some good deals, but I'm holding off. I need to complete this before I go adding to it and build up a list:
SW Battleforce box set = 20 SW ( 7 built to be Grey Hunters w/ Boltgun + Chainsword ) + Drop Pod + Scouts
Add to that 1 SM Scout Sniper box set - not assembled
4 Swift Claw bikes ( 1 w/ Power Sword ).
I think I have 1 SM Attack bike in a box somewhere, but I'll have to find it.
Not sure what my next purchase should be, Termies or a Rhino/Razorback or more bikes.
Hmelrose wrote:[been thinking of getting some spackle and sculpting up an ice sloped type of base, then hit it with white primer, then simply a light blue wash for effect.
That base idea sounds great. I'd say give it a try. Just do a test on one base and see if you like it. Or if you want to go the extra kilometre (metric system FTW) do this with your bases. Catattafish has lots of other awesome tutorials too! Also maybe try pinning to strengthen the one legged pose.
If you want a different air drying clay type thing, why not try Milliput ? Yeah, I got to thinking today and I'm not sure of the life cycle of spackle how crumbly it would be, I got to thinking that air drying clay or a similar substance might work better and I don't want to make the base too high or crazy. I think an uneven white block might work, as it would be ice like, yet then it wouldn't be interesting enough.
The link above sends me to an error page, is the username right? I'll do a search for him.
I was thinking of pinning the one leg to the base as well as doing something similar to the bikes. Pin them using something large like a nail or screw.
Link not working? Here is a direct link to the Youtube video.
I think termies, razorback or bikes are all good options. Most people who run SW do run Wolf Guard (termies) with long fang (devastator squads).
Now, if you don't like the extra wings stuff, do buy that box anyway since it is the cheapest option to get all those stuff. The wings and stuff is on a separate sprue and I will be very interested in trading some of my bits for those since I need them to spice up my bikes. Even if you don't need them, selling them off on ebay will recoup a couple of dollar each so.
Anyway, I made a post in my P&M blog. Now I need to finish some more bikes.
That youtube video was epic. I've been working with cork board and looking at resin for casting miniatures, yet I never thought to use it as a basing material! That was awesome!
I was looking on the swap shop and saw this post: http://www.dakkadakka.com/dakkaforum/posts/list/415347.page#3732709 the basing looks very similar, but I don't think the asking price is low enough, looks to me he's asking just about list price for all of that, I might as well buy it new. hmm..
leohart wrote:I think termies, razorback or bikes are all good options. Most people who run SW do run Wolf Guard (termies) with long fang (devastator squads).
Now, if you don't like the extra wings stuff, do buy that box anyway since it is the cheapest option to get all those stuff. The wings and stuff is on a separate sprue and I will be very interested in trading some of my bits for those since I need them to spice up my bikes. Even if you don't need them, selling them off on ebay will recoup a couple of dollar each so.
Anyway, I made a post in my P&M blog. Now I need to finish some more bikes.
I was thinking a Fast Attack SW force, so the bikes and land speeders from the Ravenwings would be good, but I'm still up in the air. I know I'd need some armor at some point. Termies are slow, so I need to get them into the fight fast whether by Drop pod or something else I'm not sure. I need to play a few games with these guys and see how I like the game and where I want to go with them.
Its good to know the Ravenwing portions come on a separate sprue, makes the decision to buy the box set easier and if you have some SW bitz then I'd happily do some trades with you.
I saw the pics you posted on your P&M blog! Very nice!
I don't have SW bits but I know that Max (also at GW Tomball) is getting rid of his NIB Ravenwing Battleforce. So, you can totally grab that box from him for cheap. No need to strip or anything.
Either that or get even more bikes (no land speeder or attack bike) from Trevor. You need some heavy stripping and rebuilding though since his stuff is painted and plastic-glued.
I say, pass by on a crowed day and see Max to see if you can get that Ravenwing box from him. I need to recheck my current inventory to make sure I am not over-buying (which seems to be the case given that my entire desk is now filled to the brim with unbuilt models). :( Dang ebay and dakka.
leohart wrote:I don't have SW bits but I know that Max (also at GW Tomball) is getting rid of his NIB Ravenwing Battleforce. So, you can totally grab that box from him for cheap. No need to strip or anything.
Either that or get even more bikes (no land speeder or attack bike) from Trevor. You need some heavy stripping and rebuilding though since his stuff is painted and plastic-glued.
I say, pass by on a crowed day and see Max to see if you can get that Ravenwing box from him. I need to recheck my current inventory to make sure I am not over-buying (which seems to be the case given that my entire desk is now filled to the brim with unbuilt models). :( Dang ebay and dakka.
I'm still thinking about it, need to check my finances and I just got the word that I'm getting all my old models + some extra back from friends I had gifted them to about 6 years ago.This is happening tomorrow! So I'll need to do inventory and let you know. I used to have IG, Space wolves, Dark Angels, Blood Angels and Nids. Then with Fantasy I had Brettonians, Mercs, etc.. I'll just have to see what I get. I know they had Chaos and more, so I may be getting all their old stuff as well. Its exciting!
Played two 200pt Kill team Scenarios with my Space wolves versus LeoHart ( Dark Angels ) & with Luna Havoc observing/helping out. Big thanks go out to both of them for helping me to relearn this game at Fat Ogre Games & Comics in The Woodlands, Texas. Before this I hadn't played a game of 40K in almost 12 or more years, 2nd edition.
desperatly i wait for more mordian goodness... i don´t want to sound unthankfull for these nice spacewolves...but well they are no match for the coolness of mordians...eh?^^
Viktor von Domm wrote:desperatly i wait for more mordian goodness... i don´t want to sound unthankfull for these nice spacewolves...but well they are no match for the coolness of mordians...eh?^^
You're right, I need to get back to the Mordians. I just needed to get some models on the table and play some games. I have the bad habit of having too many ideas and then I go for it. I have a ton of projects going on right now:
All of these models are in various stages of paint and assembly. I've got a lot going on and I need to spend a day or two taking pictures of my other models and uploading them to Dakka. Not to mention all the models I'll hopefully be picking up later today, which should include more of the above and hopefully my old Space Wolves and IG which just so happened to include a bunch of Praetorian Guard.
Then I'll just need to take more pictures, create more albums on here and upload them all. lol.
i totally can recommend making differnt albums for the gallery... makes it easier for you and us to follow your stuff...and if needed look it up back later on...
yep i know such backlists... somehow sometimes the amount of projects puts a serious damper to my own wanted productivity...
also looking forward to see those much talked and less seen warmahcine stuff of yers...as it is perhaps known...i have that thing with rivtes and steam going on^^ and those are quite the cool incarnations of both most of the time^^
Viktor von Domm wrote:i totally can recommend making differnt albums for the gallery... makes it easier for you and us to follow your stuff...and if needed look it up back later on...
yep i know such backlists... somehow sometimes the amount of projects puts a serious damper to my own wanted productivity...
also looking forward to see those much talked and less seen warmahcine stuff of yers...as it is perhaps known...i have that thing with rivtes and steam going on^^ and those are quite the cool incarnations of both most of the time^^
I need to get a better camera and better lighting, I've been using my cel phone and some desk lamps or the kitchen table lights. Its not ideal for taking good pics of models.
Nice Terrain piece from the Aquarium set at a local pet store, lots of buildings and interesting terrain pieces can be found as reptile or fish aquarium pieces. All those plastic plants can be used for foliage, basing, terrain, forests etc.
thanks hmelrose, like the many different galleries...specially the hobby conversion bitz one... they actually let you take pics in the petshop? lol... bet they thought you were weird^^
but you showed some very inspirational stuff right there! and for that price a true icing on the cake... boulders or hills are something i will truly not bother now to built my own out of styrofoam... it is much easier to just walk and pay for the lot...
Viktor von Domm wrote:thanks hmelrose, like the many different galleries...specially the hobby conversion bitz one... they actually let you take pics in the petshop? lol... bet they thought you were weird^^
but you showed some very inspirational stuff right there! and for that price a true icing on the cake... boulders or hills are something i will truly not bother now to built my own out of styrofoam... it is much easier to just walk and pay for the lot...
I do what I want!
Haha, I take pics wherever I want to and if they ask I tell them I'm trying to get ideas for my aquarium setup at home (Which I don't have). They can only ask me to leave and I doubt they'd want that. I don't mind if people think I'm weird, if I see something cool I could use for the hobby and get cheap, then I take a pic of it, go home, and look at it next to my models or online for a more indepth info/review. If its looks good enough then I'll consider it. That Aquarium sand is a no brainer for basing material and comes in several different colors.
These glass beads are usually sold for double the price if not more at hobby shops, people use them as counters or to notate wounds or play with in Magic The Gathering or for Focus in Warmachine, buying a large bag from a pet store, then reselling the excess to friends is a great way to recoup the money spent and make everyone happy.
Glad you like the galleries. I've been working on trying to upload more pics, but Dakka's 10 pic per upload limit is tough to work with, especially if I have these images already uploaded elsewhere. All that copy/paste of data tends to get old after awhile. And, I haven't even uploaded pics of all my games I've played! So many images to upload/take as well as models to paint/convert.
Thank you for all your input and for just being awesome!
leohart wrote:Those Warmachine Menoth models look sweet. I am a sucker for awesome painted models versus competitiveness. :(
If I ever start WarMachine, it is probably Menoth.
Menoth has a lot of cloaks and religious zeal/look to them, similar to your Dark Angels with Robes. They also have a lot of continuous fire effects which can be pretty brutal in the game. They have a lot of cool looking models, but so do all the factions in Warmachine.
mate see my pics count in my gallery... 1.1k pics... and i don´t even have a good upline... so that has costed me numerous hours for upload...sometimes i just wnat to push everything so slow does it feel...argh^^
yeh those glasbeads...saw them used here and there...
by the way... why not take an old mini of yours...preferably metal always with you (as in it doesnt bend or crack that easy) ... for instance referrence pics... that would make later on the decisions way easier for you...
Viktor von Domm wrote:mate see my pics count in my gallery... 1.1k pics... and i don´t even have a good upline... so that has costed me numerous hours for upload...sometimes i just wnat to push everything so slow does it feel...argh^^
yeh those glasbeads...saw them used here and there...
by the way... why not take an old mini of yours...preferably metal always with you (as in it doesnt bend or crack that easy) ... for instance referrence pics... that would make later on the decisions way easier for you...
I completely understand the frustration with the slow uploading of pics to Dakka, I'll definitely check out your galleries again. The glass beads I've seen used to denote counters and wounds on models as well as focus/fury for Warmachine stuff.
I see what you're saying, you want me to have a metal model in the picture for scale when I take pictures of alternate terrain at the random places I go. This I can start doing, though if a girl happens to ask me if thats a marine in my pocket or if I'm just happy to see her... my reply will still be Yes!
Coming up this month (at GW Tomball Crossing ) will be a Kill Team League, Blood in the Badlands campaign and Lucky 13 Apocalypse campaign. I'll need to concentrate on my Space Wolves Kill Team modeling to get ready for the Kill Team league. I'm not sure the Mordians are anywhere close to being ready to participate in an Apocalypse game. Be sure to check out my local stores facebook page and click 'Like' It'll help them out.
http://www.facebook.com/groups/295114300504938/#!/GWTomballCrossing
Lukas the Trickster conversion using bits from the space wolves battleforce box and a furred cloak piece from the Chaos Marauders. You can see the Lightning claw and plasma pistol arm from the sprue and a regular head from it as well, this conversion fits the requirements of the Lukas model in the book and can easily be made from any SW Squad sprue.
I decided to forgo the dynamic leg poses in order to get more Wolves ready for battle faster.
Wolves with heads! Now, what weapons?
Trying to decide how I want these guys to all come together. I prefer WYSISYG modeled forces, that helps me to lessen confusion among all parties.
Space Wolves Progress Bike Conversion! Choppers! By cutting with a jewelers saw at the join of the wheels after they're glued together you can then use plasticard tubing to extend the front fork of the bikes. I filled the tube with Green Stuff, then after it set I pinned them to the bikes for extra support. You'll want to tape the tubes together when you cut them so you get the exact same length each time. You will need to trim up the triangle angled plastic piece on the bottom of the twin boltguns so that they point forward. As well you'll need to angle the torso of the model forward so they're sitting upright. I added a powerfist for awesomeness!
Awesome sauce on those bikers and everything else as well. I have found WYSIWYG works awesome against people who value WYSIWYG (like me). For others, not so much.
Powerfist is the way to go (all the time). If you are getting power weapon for your sergents, go for powerfists. It deters their special characters from charging and he cannot be singled out and thus will last for as long as necessary.
Hmelrose
I have wanted to ask you about stripping tanks in simple green. I have a few tanks myself that need repainting, and have seen that you have some experience with it. How long did you leave them in the green? Did it cause any damage to the models? Any help you could give would be much appreciated
Worked on creating some 60mm bases out of cardboard and several layers/coats of PVA glue, I used dense cardboard and a sharpie as well as a regular plastic 60mm base from GW bases kit to trace out the circle. I cut out the circle and began layering PVA glue onto the cardboard. Then I used superglue to attach cork board and gravel to the base. Hopefully after another layer of glue from the Elmers Spray PVA glue and some coats of primer then paint these will be ready for the Heavy weapons teams to be attached.
leohart wrote:Awesome sauce on those bikers and everything else as well. I have found WYSIWYG works awesome against people who value WYSIWYG (like me). For others, not so much. Powerfist is the way to go (all the time). If you are getting power weapon for your sergents, go for powerfists. It deters their special characters from charging and he cannot be singled out and thus will last for as long as necessary.
Thank you! I actually sold those bikes to a guy for almost triple what I paid for them O.o I'm getting some cash and bitz in trade. This conversion is so simple and easy to do, I don't understand why people don't just do it themselves. I even found an easier way to do a similar conversion! http://www.bolterandchainsword.com/index.php?showtopic=118757
I didn't know there were different rules for specific power weapons! I just put the power fist on the model cause I had that one extra from a bunch of bitz I had lying around.
I like the idea of a WYSIWYG Army, even though it means I will have many more models than I really need. Speaking of that, I need to start working out how to magnetize the arm slots on my Space Wolves. It shouldn't be that hard to drill a small hole into the torso after its glued and then insert some GS and then glue a magnet into place. I'd then use a small washer ( the kind used on tiny screws ) and glue that to the SW arm. Then I could have less models and more weapon options.
Mr. S Baldrick wrote:Hmelrose
I have wanted to ask you about stripping tanks in simple green. I have a few tanks myself that need repainting, and have seen that you have some experience with it. How long did you leave them in the green? Did it cause any damage to the models? Any help you could give would be much appreciated
It is rather simple ( no pun intended ) You'll get some Simple green, a tupperware container or similar plastic container, pour it in, put the model in, wait a week ( at least I wait a week ) remove, scrub with brush.
I also have a pair of thick gloves I wear when scrubbing the models, this helps protect my hand from being torn up by the bristles and keeps the paint flecks/crap off of them. Simple Green will not harm plastics or metal models. Its going to take time and some elbow grease. So much so that you'll wish you had bought the models new.
I hope this helps!
Automatically Appended Next Post: So much more work to get done on the Space Wolves, I wanted to just concentrate on the Kill Team sized force, but I got to messing with the bitz and well, here they are!
Can you imagine being hit in the head by a hammer from a guy on a speeding attack bike? O.O I'm working out how to magnetize the side car on the attack bike. That way I can either have a regular bike or add on the side car. I need to figure out how to magnetize the weapons on the side car as well.
Space Wolf Scout Sniper squad: You'll no doubt notice the use of Catachan legs, SW & Chaos Marauder heads with the SM Scout box set. I find this makes them unique and helps get me more models on the table as I can make 6 Scouts out of the SM Scout box rather than the set of 5 the box is set up to make. Why do they give you more heads, weapons, arms, torsos, but not enough legs to completely use the whole kit sprue? Now, I'm going to have to beg borrow and steal legs from other kits/sprues and friends. So with the 5 that come in the SW Battleforce box and these 6, I'll have 11 SW Scout models.
We'll start with close up of the big gun:
And now, the rest of the team:
Automatically Appended Next Post: A Side view of the Swiftclaw bike with Hammer
Now for some Grey Hunters and some Wolf Guard kit bashed models as well as a Long Fang Conversion way down at the bottom!
The entire group! Well, most of them anyway. The SW Battleforce box doesn't come with a flamer weapon, so I had to appropriate one from the Catachan IG bits I had. On a side note the Catachan bitz and weapon sprues are better than the Cadian for conversions, they have a lot of loose weapons not attached to hands and I appreciate this detail very much! You'll see a Thunder Hammer / Storm Shield Wolf Guard model as well.
For some reason, the superglue would not set on this model, but here he is with Flamer at the ready!
With a little converting this models head could easily become a Ragnar Blackmane conversion
Long Fang Conversion utilizing the Missile arm from the SM Scout sprue kit that I purchased
First off, I wanted an arm to hold a pewter weapon from the Reaper miniatures weapons accessory kits. I chose an unused arm from the SM Bike squad which is outstretch and has an open hand. The problem with this arm/hand is it is set up to hold handlebars and not a weapon. I used the thin blade from my jewelers saw to cut the arm just in front of the elbow, this will allow me to rotate the forearm and then drill & pin the hand into the appropriate position. Pics to follow:
Apologies for the blurry picture ( You can see my thought process here) :
I've already attached the SM Scout Missile arm to the SW model. I probably should have waited til I chose the offhand weapon, but its on now! This is all still a learning/design process. We'll have to see how it goes. You can see my weapon options as well:
After pinning and supergluing the arm has been attached and is ready for a weapon!
Polearm has been fitted to the slot, but not glued in place. Now that I see it I was thinking I could put a standard in place here as well. I still have the Chaos Marauder banners as well as a few Dwarf banners, The possibilities are exciting! Though I think handling a missile launcher and a standard might be a little awkward for even a SW.
Everyone piled up under the lamp, minus the models I had previously built. I need to get an army shot together, then prime and paint the kill team models.
Here is a preview of the next set of Space Wolves!
As always C&C ( Comments & Critiques ) suggestions, remarks, heretical statements.. all are welcome and will be summarily dealt with in accordance with the appropriate protocol.
Thanks for reading/following and for just plain being awesome!
mate you have oh so much to paint later on... i am the same...assembly is so much fun... but for me then later on all those assembled minis put quite a stress on me to paint them... and then when i am painting it soon gets boring... the assembly is my major love here.,..
Viktor von Domm wrote:mate you have oh so much to paint later on... i am the same...assembly is so much fun... but for me then later on all those assembled minis put quite a stress on me to paint them... and then when i am painting it soon gets boring... the assembly is my major love here.,..
Oh yeah, don't I know it! Between my Warmachine and my GW40K models, I've got more than 300 to paint! 200 of which are tied up with the Mordian Iron Guard IG Force thats slowly getting done. I need something to put on the battlefield so I can play, which is why I've created the Space Wolf Kill Team force, I just went a little overboard with finishing out the bitz from the rest of the battleforce box set.
I love assembly and conversions. I also love painting and trying to figure out new techniques to paint. It is daunting to see all the models arrayed out on my hobby table waiting to be painted. I think I should put up all but 20 or 30 of the Mordian IG and paint those up. Once they're finished put them away and pull out 10 or so more, possibly while throwing in a Warmachine Cygnar model as well.
I can't even imagine how much more work will be ahead of me if I choose to build up the Space Wolf Force to something like 2000 pts. Lets see, right now I've got:
1 Lukas the Trickster Conversion: 140pts ( note this model could be a Wolf Guard w/ Plasma Pistol + Lightning Claws 43pts )
9 Grey Hunters Bolter & Chainsword = 135pts
1 Grey Hunter w/ Flamer = 15pts
1 Long Fang w/ Missile Launcher 25pts
4 Swift Claw Bikers (+1pwsword) 115pts - 6 more bikes enroute = 150pts = 265pts
1 Swift Claw Attack bike (+1Power Weapon Hammer) 30pts
5 SW Scouts w/ sniper rifles = 90pts
5 SW Scouts w/ boltgun = 75
1 SW Scout w/ Hvy Bolter = 20pts
SW Wolf Guard Pack (1w/ TH & SS = 68pts) + (1w/ Storm Bolter & Frost Axe = 41pts)
Total: 789pts ?
Viktor von Domm wrote:mate you have oh so much to paint later on... i am the same...assembly is so much fun... but for me then later on all those assembled minis put quite a stress on me to paint them... and then when i am painting it soon gets boring... the assembly is my major love here.,..
Later on?! I've got to get it painted soon! That Kill Team League/Tournament is coming up soon!
by the way... what scheme will you make them in? or have i missed that earlier on?
For the Wolves? I'm still up in the air with that, I'm not too keen on the light blue traditional coloration, but I want it to be easily replicated and yet stand close. I was thinking of priming black, then adeptus grey and boltgun trim. Not sure. Still tossing ideas around.
Viktor von Domm wrote:somehow the B&C painter doens´t work atm with me... somehow my pc is not working properly...
but from what you said...scheme does sound nice!
I'm still working it out in my head, I want a grey-blue with coppery/tin shiny-ness to it, to go with the red/yellow accents. still thinking about it all.
leohart wrote:Army painter for first coat, wash, relayered, details. Done. You can crank out 250 pts everyday like that.
been reading the past couple of days worth of your thread, and I must say, you're making some good progress! And on the issue of the attack bike side car, have you thought of putting some small magnets on the underside of the bike, to connect with the side car? I've been thinking about the same thing, since I too have an attack bike which I'd be able to use as a regular bike if the sitch calls for it, but, away from my main base of operations, have been unable to act upon this just yet
Viktor von Domm wrote:skalks stuff is pretty nice! have you looked into dsteingass thread about necromunda terrain too?
I definitely need to take a look around for more terrain options for when I build my table. I want to do it custom and look good too.
Lord Kaesar II wrote:been reading the past couple of days worth of your thread, and I must say, you're making some good progress! And on the issue of the attack bike side car, have you thought of putting some small magnets on the underside of the bike, to connect with the side car? I've been thinking about the same thing, since I too have an attack bike which I'd be able to use as a regular bike if the sitch calls for it, but, away from my main base of operations, have been unable to act upon this just yet
Show us some more Mordians! Kaesar II
Thank you for stopping by and checking my work out! I'm a mad man, there are too many dang projects going on, but primarily I'm torn between the Mordians and the Space Wolves. I love them both. I need to finish this Kill Team sized force for the league/tournament which is coming up. I can't participate if I don't have painted models
I'm working out how to magnetize the side car on the attack bike. That way I can either have a regular bike or add on the side car. I have a set of small flat rectangular magnets that I'm either going to attach to the bottom of the bike or the top of the tab on the side car and then a small thin washer to the bottom of the bike or side car, it should be simple enough to do with some super glue. I've been debating cutting into the model to set the magnet flush with the frame, but I haven't gotten up the nerve to carve up the bike yet.
I need to figure out how to magnetize the weapons on the side car as well. I want to be able to switch between the Heavy Bolter and the Multi-melta easily. I don't want to destroy the guns by carving the front halves off and then drilling out the main part and magnetizing it that way, but that may be my only option.
You have been busy, so many space wolves in such a short time.
If I were magnetizing an attack bike to have two weapons I'd just buy another side cart from a bits store. That's cheating though and may even take more time. I'm new to magnetizing myself but I'm sure there is some easy way to do it. I'm sure you will find out. Good luck!
Flying Pooo wrote:You have been busy, so many space wolves in such a short time.
If I were magnetizing an attack bike to have two weapons I'd just buy another side cart from a bits store. That's cheating though and may even take more time. I'm new to magnetizing myself but I'm sure there is some easy way to do it. I'm sure you will find out. Good luck!
Thank you! Yes, I have been very busy with the assembly, not so much the painting! Which is what I need to get to next!
I think I just figured out how to magnetize the weapon. I was looking at the part of the weapon that clips to the bar and thats not where the magnet should go. The magnet or metal piece should go where the controls are between the gunners hands. I can either put a magnet there by drilling out the control handle or place a small bit of metal there and then drilling a hole in the bottom rear of the heavy bolter & multimelta and installing a small magnet there. This will allow the weapon to still clip onto the bar and be held on by the magnetic part in the handle.
Now I just need to figure out if I can actually make this happen!
You asked for more Mordian Iron Guard, here you go!
Automatically Appended Next Post: Oh Yeah and these guys:
Automatically Appended Next Post: Big day for priming models!
Psykers, Commissars and the Fenris IG with a couple of Mordian Iron Guard sneaking into the pic. So much to do and paint!
The often controversial Fenris IG / Planetary force or just plain Space wolf recruits/blood claw possibilities (though I'd need to do more conversion work to make them so). I might just wind up keeping them and building a sort of Traitor/Chaos Guard Army out of them at a later date. Right now, they're going to get primed and set aside in a case as I have too much going on with my Mordian Iron Guard and the Space Wolf Kill Team Project.
Automatically Appended Next Post: My project table in the garage is just overflowing with miniatures to paint. I seriously need to kick this pig into high gear.
Painting a test miniature right now for the SW Kill Team, using Citadel Fenris Grey for the armor and tin bitz for the trim.
Now to write up how I magnetized the side car for the SM Attack Bike:
This is how the side car normally lines up on the bottom of the Attack bike. Pretty nifty, but we can try to do better!
We want our vehicles to be multipurpose and for that we use magnets and other doodads. The bottom of the bike has a conveniently centered mold marked circled on the bottom, which is where we will place the first magnet. Remember the inside of the bike is hollow so go slowly with the drill or other tool or else you're going to wind up filling a hole you just drilled.
You can see I used a 9/64th inch drill bit. Basically a size slightly larger than the magnet I'm going to insert into the model. You want the hole to be bigger so the magnet + glue + GS will fit snugly. I found that the plastic was soft enough that I could turn the drill bit by hand and still make my hole. You can also see the small washers I use looped onto a paperclip at the bottom of the image. I find that having a piece of metal there gets me around that pesky magnetic polarity issue. Though some models will need both magnets for the strength of the bond.
I drilled the hole, superglued the magnet and washers into place, waited for it to dry and tested the strength of the bond. It was at this time I noticed the washer was a bit larger than the plastic I glued it to, so I carve a bit of the plastic out of the bottom of the bike with a hobby knife and then it fit just fine. I also notice that the strength of the bond wasn't strong enough and the back of the bike sagged, so I lined up the side card and drilled a second hole and glued in a second magnet and washer.
Now to test alignment and strength:
Fits and looks good!
The view from the bottom:
Strength test! The bond holds!
Now to Prime & Paint!
I'm still working on how to magnetize the weapon on the side car. I still think a magnet in the end of the gun handle and a piece of metal on the marines control hand will work out best. Stay tuned!
Automatically Appended Next Post: I don't sleep. So I've got a lot of time to work on my models, conversions and now.. finally some paint.
I didn't want the happy go lucky Space Wolves light blue. That color never said Wolves or fearsome to me. It comes off as too happy, too bright, very Spring season.
Not my idea of Fearsome, bestial, Wolves from a Frozen Ice World.
So here we go, color choices are key. Fenris Grey, Scab Red, Tin Bitz. The image also shows P3's Greycoat grey, which I used on the miniature to the left as I was testing out the grey/blue-grey I wanted for the armor color. I want to go dark with these guys, so I didn't like that grey over the white primer. I've been thinking I should have gone with a black primer, but there isn't much I can do about that now.
Far from complete color scheme, yet you can see my thought process and where I'm going with the dark grey-blue armor and Scab Red / Tin Bitz accents.
That side car magnetization is awesome. Now I need to get my magnets for my Dreadnought.
The wolf scheme looks pretty good so far. I do like the original scheme though because although it looks to springy, it is a cold color (like their ice world). Do a full sample model so we can all chime in :-)
leohart wrote:That side car magnetization is awesome. Now I need to get my magnets for my Dreadnought.
The wolf scheme looks pretty good so far. I do like the original scheme though because although it looks to springy, it is a cold color (like their ice world). Do a full sample model so we can all chime in :-)
Thank you! Magnetizing models is definitely the way to go! I need to start magnetizing all of these wolves arms and weapon combos, yet I hesitate at the prospect of the work ahead of me. I think all my future plastic wolves will be magnetized though.
The Space wolves blue is nice, yet its not for me.
While working I had washed down some adeptus grey and over the white primer it looks pretty nice as well. Tempted to do a test model in that scheme as well to see how it comes out, but then that would certainly mean snow bases.
Capitansolstice wrote:THUNK* did you hear that? That was my jaw dropping
Would you care to elaborate sir?
Automatically Appended Next Post: Instead of painting... I know I know.. I will get to it, I took pics of some of my other models and added them to my galleries:
Automatically Appended Next Post: ebay makes it really difficult to justify supporting a local game store when you can find deals like this: 6 SM bikes for $25.00 + Shipping for something like $30.00, which in store is a $90.00 + tax value.
This is the second time I've read through the thread all week, and I have to say I love what your doing with the old Mordians and giving them a new lease on life. I'm also a big fan of the conversions your doing with the Space Wolves. I look forward to seeing it all finished
orkboy232 wrote:This is the second time I've read through the thread all week, and I have to say I love what your doing with the old Mordians and giving them a new lease on life. I'm also a big fan of the conversions your doing with the Space Wolves. I look forward to seeing it all finished
Thank you! I really appreciate you stopping by and taking the time to write. I'm hoping to get back to the Mordians soon.
Stay tuned!
Automatically Appended Next Post: Been working on the Wolves, primarily using a watered down Fenris Grey and on the shoulders is Scab Red.
I'm still working on the shoulders and will be progressing into the tin bitz colored accents. Not sure if I'm going to add any additional colors to the models yet.
i like the scheme... that red and blue are working quite good together... tho i have to say that livery metal is way to shiny now for that scheme... darker...way darker one is needed...
and that is one hell of a nice price for those bikes...!
Viktor von Domm wrote:i like the scheme... that red and blue are working quite good together... tho i have to say that livery metal is way to shiny now for that scheme... darker...way darker one is needed...
and that is one hell of a nice price for those bikes...!
As Always I appreciate y'all taking the time to read and comment on my blog, You're awesome!
Yes, indeed the Scab Red and the Fenris Grey over the P3 white primer are coming together well. I'm going to have to assume by "livery metal" you mean the Tin Bitz color? These models are still in the process of being painted. I haven't added any washes to them, its all been a watered down base coat of each color. I will hit them with either a Badab Black or Devlan mud, I'm still debating that choice.
I have added Chaos Black, P3 Rucksack Tan and Citadel Chainmail colors as well as have worked on more of the Tin Bitz accents. I'll take some pics and upload them soon of each individual model.
Yes, the bike deal was too good to pass up, but as Leohart pointed out, they had a deal for the Ravenwing battleforce for about $66 and that could have been a better deal. I'm thinking of getting more bikes and making a bike list to compete with his bike list. I think it would be interesting and fun.
He's got all those dang land speeders though. haha.
leohart wrote:Dude, you need bikes, grab them from me because now I have extras stuff new on sprues -_-.
Anyway, bike army is fun. We should get a game in some time this week. Especially now that my battlefoam has arrived. :-)
I may be able to do a game and I would be open to talking to you about those extra bikes. I'm also working on a terminator deal and a few other options.
Viktor von Domm wrote:i meant to write silver...... and then i looked up what livery could mean...lol... it isn´t even that cruel of a mistake^^
the one running/falling over^^ wolf...does he have a silver/metal cape?
Heh, I'd only just started using some Citadel chainmail on the models last night. As for the cape/fur I was trying to get an washed down Adeptus grey fur look to it and didn't realize I still had the chainmail out til after I took the pic.
More work done on the 200 pt Kill Team worth of Space Wolves. Still working on the paint scheme:
Armor: Fenris Grey - I've been diluting this with water and applying layers of it, while I think its a great color, I'm not sold on it. I have some washes and think that will help to change my mind or at least cement the likely hood of painting an entire force in this scheme.
Accent: Tin Bitz - This is a good metallic, but I'm not sure if its right for this scheme, I think it blends in too much, how to make it pop?
Shoulder: Scab Red (Though last night I added a layer of Foundation Mechrite Red to the shoulders to try to help brighten up the red, I'll need to go back over the shoulder armor with Scab Red or even a Blood red, but I'm worried that might be too bright.
Still working out the colors on the weapons and other accents. Should I paint the front shield on the bike red? I'm thinking the bike might need more color.
I personally think that tin-bits doesn't give the highlights I want. Bolgun metal after a wash of badab black has a very interesting dirty texture look. After line highlighting it further with chainmail and a touch of mithril silver, the metal pops.
For tin bits, I don't know what other color can be used as highlights for it.
For the Fenris Grey, I think the base color is good, I would use a wash of Asurmen Blue and then layer it up leaving a ridge of the wash. Here is the tutorial that I use
The red shoulder pad looks cool if you layer it with a shade of lighter red. I always start with Mechrite foundation since it covers 100% in one coat, then scab or blood. Line highlight with Blazing Orange will make it pop.
Also, do you like those Space Wolves guys looking like Asian skin tone? :-p . If not, why not try a very pale color, like Elf Flesh? It works with the ice scheme.
leohart wrote:I personally think that tin-bits doesn't give the highlights I want. Bolgun metal after a wash of badab black has a very interesting dirty texture look. After line highlighting it further with chainmail and a touch of mithril silver, the metal pops.
For tin bits, I don't know what other color can be used as highlights for it.
For the Fenris Grey, I think the base color is good, I would use a wash of Asurmen Blue and then layer it up leaving a ridge of the wash. Here is the tutorial that I use
The red shoulder pad looks cool if you layer it with a shade of lighter red. I always start with Mechrite foundation since it covers 100% in one coat, then scab or blood. Line highlight with Blazing Orange will make it pop.
Also, do you like those Space Wolves guys looking like Asian skin tone? :-p . If not, why not try a very pale color, like Elf Flesh? It works with the ice scheme.
Thanks Dat ( Leohart ) I know I can always rely on you for helpful links and good advice
Which I'm going to try on a couple of my newer bikes along with adding some bitz from my chaos marauders to make the bikes a little more Space Wolf like.
Here is an example:
I'm also working on a Rune/Wolf Priest conversion and here are some bitz I've tossed together to try and figure it out:
The torso of the model can be a normal SW Power Armored model, its the icons that really make the Rune/Wolf Priest.
leohart wrote:That link has some awesome conversion.
.
Yes, it does!
Automatically Appended Next Post: Work work work... I feel I'm getting close on these Wolves.
Magnetizing arm sockets is a good way to get versatile models. Drill it out with a small 1/8" drill bit by hand and the superglue a small magnet into the socket. Use a small bit of metal on the arm inside of the shoulder pad and bam, multipurpose model!
Oh and here's a little preview of my next project after the Mordian Iron Guard:
I can't seem to focus on my projects, lots of stuff going on at home. Been a rough start to the New Year, last year wasn't so great with its ending either.
I'd been tossing around the idea of a Rune Priest or Wolf Priest conversion after seeing some on here as well as other places online. In my previous post you can see me lining up bitz to get an idea of how the staff / weapon would work out. Here is my Rune / Wolf Priest Conversion. I used a combination of Space wolf, Fantasy Dwarf and Chaos Marauder bitz to create this model. I might have gone a little overboard, but at least he'll be noticed on the battlefield!
I may use him as a Lone Wolf model as well, paint him up bright and shiny, lots of flash and highlights. This way opponents will target him first or at least he'll provide a good solid distraction.
I've recently acquired a large amount of models from ebay and trades and I'm still in negotiations to get my old models back from friends. I'm debating the paint scheme on the Space Wolf Kill Team and painting up some alternate miniatures to see how something different might work.
I've got a lot going on so I'm going to try to keep progressing with the Kill Team as it is the closest to being done and the Kill Team League is starting up soon.
As always, thoughts, suggestions, comments, criticisms, tips, tricks and what the eff's are always welcome. So post away!
That's one kitted out Rune Priest! He looks great, the rest of your kill team is looking rather fine too. The fantasy Dwarf bits on your SW are a really nice touch. Keep up the good work!
Thats a nicely eecuted plastic priest although a bit ornate for my taste. The darker wolf schemes looking fine in my opinion although possibly boltgun metal might work better for the worky bits.
Flying Pooo wrote:That's one kitted out Rune Priest! He looks great, the rest of your kill team is looking rather fine too. The fantasy Dwarf bits on your SW are a really nice touch. Keep up the good work!
Thank you Flying Pooo! I'm trying to maximize on the bitz/models I've got through the SW Battleforce and I think the Dwarf bitz fit rather nicely. I may tweak him a bit.
I'm still tossing around the color scheme, I think the tin bitz looks good, but I was thinking about going over it with Dwarf Bronze or Shining Gold to brighten it up a bit.
I've settled on Mechrite red with layers of Scab Red over it.
I've got the layering of Fenris Grey down, debating on a wash of Asurmen blue and/or Badab Black.
They're lots of little bits on the models that need colors as well, like fur, bone, teeth, etc. Trying out different things for that.
leohart wrote:Rune Priest looking great there. Let us make this Kill Team thing happen.
Thanks Leohart, we shall definitely need to get some games in. My schedule is crazy though, I'm working over night and then sleep through the day, I can only get out to a store in the afternoon/evening timeframe.
dsteingass wrote:Looks great! Not over-done at all! But the smart-ass in me means that I am obliged to point out the mold lines on the top of the winged skull
Thanks dsteingass! I wanted him to be a little over done and unique. I needed to use the cork board to raise the model up so the staff didn't look too long, haha.
There are mold lines and other things I need to clean up on the model. You may not be able to see it, but the right forearm is actually two pieces pinned together. I wanted an open hand to hold the staff so I cut off the right forearm of a biker model and pinned it to an arm I had removed the Hammer from originally. I tried to get the wire to bend back under/around to the underside of the arm again, but it broke and I didn't want to try and pin it. Which led me to drill/pin that dwarf bit suspended in the handle. There are some other parts that need work. The book for example, I need to fix that up so its cleaner, though I may make it look battle damaged as well.
Llamahead wrote:Thats a nicely eecuted plastic priest although a bit ornate for my taste. The darker wolf schemes looking fine in my opinion although possibly boltgun metal might work better for the worky bits.
Thank you Lamahead, I was going for a bit over the top so he wouldn't be mistaken for a normal space wolf model and I was trying to cover two different types of SW Priest, the Rune / Wolf Priest model. I think he's just got that bit more over the top that will prove to be his best asset as a distraction/target.
Are you saying Boltgun Metal on the weapons rather than the tin bitz? Which "worky" bits are we talking about?
Thank you again all! I've begun working on some chopper bike conversions, but unfortunately the family dog decided that my plasticard tubes were his nice new chew toys. Luckily, he didn't eat the bikes.
leohart wrote:My bikes against your bikes. We should have a racing game designed for them.
I believe there are rules for a 40K racing game. They may have been designed with Orks in mind though. I think it was called Gorka Morka?
I'm sure there are rules out there somewhere.
In other news I spent some time last night painting more SW models and this morning I plucked foam from my Battlefoam P.A.C.K. 216. Which is supposed to hold 216 models, yet I think it falls far short of that mark.
Time to grab some shuteye! See y'all on the flipside of the lids!
The P.A.C.K. (Personal Army Combat Kit) 216 can fit 4 inches (102 mm) of foam. Its rugged olive canvas exterior protects a hard plastic interior built for strength and durability. Its design includes a zipper on the bottom to allow for attachment to the P.A.C.K. 1520 XL. It was also designed for airport travel and meets all FAA regulations for carryon luggage.
This bag comes with 4 inches (102 mm) of pluck foam, which breaks down to 1x 1 inch (25 mm) tray and 1x 2 inch (51 mm) tray. The pluck foam pieces are 1/2 inch (13 mm) squares.
At times, pluck foam trays may require an exacto blade to cut through portions of the foam. Custom text is not available on this product.
Bag Dimensions - 16W x 12L x 4H" (406W x 305L x 102H mm)
Pluck foam isn't anything to be afraid of, though the custom foam is pretty dang awesome, You just have to line up the models and get an idea of what foam you want to pluck out. Keep the pluck foam in a big plastic bag, whats cool about pluck foam versus custom foam is that if my army changes, I can simply re-insert the plucked out foam apply superglue to the sides and its back to its original state of awesomeness.
As you can see, the 1 inch (25 mm) tray foam can hold about 42 models in the setup I have put together. There is still an edge of pluck foam on the right side which can be removed for a slightly larger sized model. My Bikes won't fit into this layer unless I put them on their sides.
The 2 inch (51 mm) tray foam is (obviously) slightly thicker and deeper, yet not really deep enough for a bike model with an arm upraised with chainsword/Power sword. I'm going to have to lay him on his side which will take up valuable foam real estate. Line them up, then pluck out the foam.
So its a good kit for a small force. I'd say this would be better for a standard small skirmish game army like Warmachine, Infinity or Malifaux, but not large scale games like 40K which require hundreds of models. This is a good addition piece to the other battlefoam bags as it has a zipper which will attach it to another bag, so if you need just a little more space and you have a battlefoam bag, then it would be good for that. Its a last piece type of bag though, meaning if you attach it to a larger bag, this is the last one that can go on the bag as it doesn't have a zipper on top of it.
My piece of advice is to never buy the small bag, your army will always grow and you'll be buying storage for awhile.
Automatically Appended Next Post: Applied some more layers of Fenris Grey and Mechrite Red to my models last night. As well, I applied a layer of Asurmen Blue, but thought that turned the Fenris Grey too blue, so I hit it with a layer of Badab Black, let me know what you think!
I kind of like this color pattern. This is simply P3 Primer with a Badab black wash over it and Mechrite Red on the shoulders as well as a P3 Khaki/Flesh tone color that is escaping me.
Okay, here's a small update on the Mordian Iron Guard:
New Troops arrived and have been assembled:
Small Command Squad Idea with a slight conversion on the Lieutenant model, turned his Chain sword into a Power Hammer! I'm also trying to prime with black and see how this color goes with the blue and yellow.
Last, but not least! Mordian Iron Guard Air Force! This is a simple conversion y'all have seen before. I've simply used the top torso from the Heavy Bolter weapons team seated gunner. What do you think?
That Lieutenant in the Command squad is rather awesome looking with his thunder hammer and all! I love all the conversions in your Mordian force they are mostly quite simple, but pure genius and they look great.
leohart wrote:Looking awesome. All these metal models will be super heavy on the Battlefoam case.
Thanks! I uploaded/posted new pics last night / early this morning. I agree the Battlefoam case is going to be heavy, luckily the one I purchased comes with luggage wheels. Good thing I've got a truck as well!
I went by a RC Car/Plane hobby shop close to my house today and picked up some brass rod and plastic tube for my bike conversion idea. I'm Holding off on completing the bikes while I work out this newer conversion process. I need to look up whats good for cutting brass rod without bending it.
Lots of thoughts going on with my paint scheme. I hit a model, that I'd primed with P3 White, with a few basic colors, i.e. P3 Rucksack Tan and then Citadel Elf Flesh and Mechrite Red (shoulder armor). Then just on impulse I Washed the whole model with Citadel Badab Black and I'm really liking how it came out. Also, I'm liking how simple and easy it was to do and am seriously considering doing this for the rest of my force.
What are y'all's thoughts on this?
Automatically Appended Next Post:
Flying Pooo wrote:That Lieutenant in the Command squad is rather awesome looking with his thunder hammer and all! I love all the conversions in your Mordian force they are mostly quite simple, but pure genius and they look great.
Awesome work man!
Good morning Mr. Pooo! Thank you, the conversions do seem simple, but they're making big impacts! The torso from the heavy bolter team allows for so many possibilities when it comes to vehicles, I've got several legs left over though, lol.
The Hammer was simple and I wanted to change up the look of some of the Officer models and I have all these nice SW and other bitz lying around to give me ideas.
Do you have any suggestions for conversions? I may get back to painting these guys soon, but these dang Space Wolves keep pulling at me too.
Automatically Appended Next Post: 10000 Views! Amazing!!
Thank you everyone for stopping by and checking this little blog out!
Good Morning? It's 12AM here! LOL. I Need to get to bed...
Anyway... I love the test SW mini! If you think it is easier to paint and you think your force will not look worse off because of it then I'd say use this paint scheme for the rest of your force. My only criticism is That you can see that the Badab Black has pooled in some places. When using washes It is actually better to thin them! Crazy I know they are already quite thin, but you will see it make a difference if you do water them down. Instead of one thick wash try a couple thin washes instead. I'd say around 1:1 Wash to water. That way you will get a lot less pooling and your minis will look sharper and cleaner.
As for Conversion suggestions... Do you have a Sly Marbo yet ? Every IG army should have him as he is just a BEAST. I would like to see a Mordian counterpart. Maybe those spare gunner legs might make a nice crouch position...
Flying Pooo wrote:Good Morning? It's 12AM here! LOL. I Need to get to bed...
Anyway... I love the test SW mini! If you think it is easier to paint and you think your force will not look worse off because of it then I'd say use this paint scheme for the rest of your force. My only criticism is That you can see that the Badab Black has pooled in some places. When using washes It is actually better to thin them! Crazy I know they are already quite thin, but you will see it make a difference if you do water them down. Instead of one thick wash try a couple thin washes instead. I'd say around 1:1 Wash to water. That way you will get a lot less pooling and your minis will look sharper and cleaner.
As for Conversion suggestions...
Do you have a Sly Marbo yet ? Every IG army should have him as he is just a BEAST. I would like to see a Mordian counterpart. Maybe those spare gunner legs might make a nice crouch position...
The seed has hopefully now been planted...
12 AM IS MORNING! Hahaha, its almost 09:00 a.m. here, I need to get to bed, this nocturnal living is messing with my social life.
The test mini is easier! Its just the white primer and a wash of badab black! I did thin the wash a bit, but I haven't been doing it evenly, I think the pooled wash just gives the armor a dirty grey look, Wolves aren't meant to be shiny and clean... I do need to find some small bottles to mix my paints in and store easily. I'm also considering how easy painting vehicles would be if I went this route.
Ah Marbo.. Yes, I have an original Marbo model and had already discussed some conversion ideas. Wherein I was going to carve up two models to make 1 model from a Marbo & a Lieutenant.
Hmelrose wrote:
Here are some .. Mordian Iron Guard Possibilities:
Marbo - I have these thoughts in my head of cutting his head and arms off and then doing something similar to a Mordian model and then converting them together to create a Mordian Marbo... I may have a conversion bug in my system.
Though I think I could probably do something with an Cadian Officer Chest, Catachan or Cadian officer legs & Arms and maybe a Cadian Officer or Tank Commander head.. Kind of give him the uniformed look with torn dress uniform.. He'd mostly be Cadian with Catachan arms.. or I just cut the head off a Mordian Model and cut the head off Marbo and then glue them together. I could salvage the Marbo body with a Catachan head easily enough.
I'd use the above model. Remove the head and place something that looks like a demo charge in his hand. What do you think?
leohart wrote:More psykers, those guys are awesome.
Everything I've heard tells me they are! I think I have 10 to 12 Psyker models and one Primaris Psyker model sitting on my table waiting to be painted. There should be pics earlier in the blog or in the image gallery linked below.
Yep. 9 psyker dudes casting Weaken Resolve making my squad Leadership 1. Then if I lose 25% of my squad in one shooting phase, I have to roll double 1s to stay. Otherwise, I will have to run (unless I have some special rules like Fearless or Stubborn).
leohart wrote:Yep. 9 psyker dudes casting Weaken Resolve making my squad Leadership 1. Then if I lose 25% of my squad in one shooting phase, I have to roll double 1s to stay. Otherwise, I will have to run (unless I have some special rules like Fearless or Stubborn).
Not fun at all. -_-.
Viktor von Domm wrote:wow... love that lieutenant is looking super cool with that hammer... very cool idea!
Yeah, Leohart Pyskers can be brutal, I almost took them all for my Kill Team for the league..lol.
Thanks Viktor! I appreciate the compliment! I wanted him to look different than the other Officer models. I'm happy with the way he came out.
Automatically Appended Next Post: Since there was talk of the Psykers, I decided to pull them out:
And, while I had them out, I decided to grab a little Citadel Golden Yellow and paint their coats up similar to an image of Doc Brown from Back to the Future
I've got some more pics of my work on a Space marine Bike conversion to a chopper motorcycle using brass rod to upload.
I used the hacksaw to cut just above the fender on the bikes front wheel. Watch the angle of the cut as you'll probably do what I did here and cut into the bike's body. Angle it and rotate the bike as you'll have to cut each portion of the front fork individually.
And, the front wheel cut off:
Lining up the brass tube to see which would work the best, looks like 129 for the top and 128 for the bottom, good thing these two sizes will slide into each other. Now to cut.
I used scotch tape to tape a small ruler to my vise to help me keep the length of pipe I cut the same. I measured out 0.5" for the 129 pipe and cut two pieces, this will be the top of the fork on the bike.
Here is the 128 Pipe, I decided since this was going to slide inside of the 129, then I'd cut it a bit longer for support purposes and to stretch out the front wheels further.
The two pipes pushed together:
Used my pin vise to drill out holes for pinning, this is also for additional support. I used paperclips for pinning, they're affordable and strong, yet easy to cut with a set of wire snips.
Quick shot with just the pinning in place:
Shot with both pipes put together, I'm thinking they may be a little long, so I might cut the 129 down to 0.25" and the 128 to 0.5" lengths.
This is with just the 129 length at 0.5" long. The pipe would need to be filled and GS around it.
Last shot of my work area.
All in all, I'd have to say that I had a bit of a tough time working with the brass pipe and I'm not entirely sold on it. I'm going to try to locate some plasticard tube at a local train/hobby shop as I think that would be easier to work with. I think this is a good start to figuring out brass pipe though. More work will need to be done to the bike to make it more presentable.
The remaining pipe can be used to dress up my IG vehicles a bit. We shall see.
So you already have thought about a Mordian marbo, awesome. Those Psykers look great too! I thought the gunner legs were crouching, that could have been something, but your ideas sound great!
Also that chopper two thumbs up! Awesome work there. Brass rod is a little harder to work with than plastistruct type stuff but you did very well!
Oh and on a side note, I was digging through the garage today and came across some old Bretonnian Spearmen! Now, what to do with these guys? Try to sell/trade them or convert them into a four man squad for use in my ever evolving IG madness?
Now I've been tooling around with some sketches on how to create a gaming table that would be good for both Warmachine and Warhammer 40K games. This portability just adds icing to the cake! The table would need to be 4' x 6' in length at minimum to accommodate both game sizes. I like the inclusion of rare earth magnets to help with sticking smaller pieces of terrain or buildings to the board when it is situated.
The only problem with this design is that the table would still require a table or playing surface to sit on( possibly some saw horses would work as well), but it would be pretty easy to do an outdoor version! you just need variable terrain in foam sizes, a lot of watered down PVA glue and some sand. Then you'd paint the table with the PVA glue mix, pour sand on it, let that dry, then paint more PVA glue on it in thicker coats. Afterwards, Spray Green and brown as desired. Rare Earth magnets could be used for Forests or boulders/hills.
You would still need a separate box for buildings and terrain as well as carrying cases for your army, so this after building it, would involve a significant day of gaming to make use of its awesomeness. Yet, having the ability to put the table up and out of the way and not have it look too bad would be a boon to many a gaming family.
If your stuch deciding on what to do with the Bretonnian Spearmen you could always give them to me!
Joking aside, I don't know how you could use them in an IG force, maybe they regimental advisers or something? I'm sure you could come up with a crazy awesome conversion using them but if you can't I don't see why you cant sell them.
Also that board in the link is amazing. That makes me want to make one too!
Flying Pooo wrote:So you already have thought about a Mordian marbo, awesome.
I thought the gunner legs were crouching, that could have been something, but your ideas sound great!
Also that chopper two thumbs up! Awesome work there. Brass rod is a little harder to work with than plastistruct type stuff but you did very well!
Thank you, the chopper is still a work in progress. Brass rod sucks, I can only use the hack saw on it. I'm going to do my best to find plasticard stryrene tubing tomorrow/later today. I may work the larger 130 pipe into the exhaust on the bikes at an angle to extend them up \
I also thought about drilling out two holes in the sides of the top of the seat and clipping a paperclip so that I could give that big elongated horseshoe back support look to it.
The work as always, progresses!
Automatically Appended Next Post:
Flying Pooo wrote:If your stuch deciding on what to do with the Bretonnian Spearmen you could always give them to me!
Joking aside, I don't know how you could use them in an IG force, maybe they regimental advisers or something? I'm sure you could come up with a crazy awesome conversion using them but if you can't I don't see why you cant sell them.
Also that board in the link is amazing. That makes me want to make one too!
Haha, sure come on by and pick them up! hahaha.. I could clip the spear tips and make them IG or SW Psykers/Priests with an Aquila mounted on the top of the spears, lol.
That board is amazing, Gamers are such awesome and creative people. It really is an unsung art form.
Wow Mhelrose! You are getting a helluva lot done over here! I lve the bike conversion! BTW, don't get frustrated with the copper tube, it will be your friend in time. I use a cheap, Taiwan-made pipe cutter like this:
It works great, and only cost me $4 at Menards. Probably the same at any Lowes or Home Dpot-type place.
dsteingass wrote:Wow Mhelrose! You are getting a helluva lot done over here! I lve the bike conversion! BTW, don't get frustrated with the copper tube, it will be your friend in time. I use a cheap, Taiwan-made pipe cutter like this:
It works great, and only cost me $4 at Menards. Probably the same at any Lowes or Home Dpot-type place.
Thanks! Yeah, I've got a lot of time on my hands + I don't sleep = plenty of time for hobbies!
The brass pipe is a little frustrating, but its not something I can't work with. It might not be the right thing for this conversion. Which item in that pic is the pipe cutter? Is it the red thing?
Yeah the little red thing. I also bought a so-called "Hobby-Grade" pipe-cutter just like it for a lot more, but it is plastic, and isn't as good as the cheap-o. It works simply liek a bigger one, put the pipe in, tighten it, spin it, tighten, spin, tighten, and soon it makes a nice flush, and not sharp cut in any pipe, metal or plastic. I have a better picture of them both, I just need to find it.
I used the hacksaw to cut just above the fender on the bikes front wheel. Watch the angle of the cut as you'll probably do what I did here and cut into the bike's body. Angle it and rotate the bike as you'll have to cut each portion of the front fork individually.
And, the front wheel cut off:
Lining up the brass tube to see which would work the best, looks like 129 for the top and 128 for the bottom, good thing these two sizes will slide into each other. Now to cut.
I used scotch tape to tape a small ruler to my vise to help me keep the length of pipe I cut the same. I measured out 0.5" for the 129 pipe and cut two pieces, this will be the top of the fork on the bike.
Here is the 128 Pipe, I decided since this was going to slide inside of the 129, then I'd cut it a bit longer for support purposes and to stretch out the front wheels further.
The two pipes pushed together:
Used my pin vise to drill out holes for pinning, this is also for additional support. I used paperclips for pinning, they're affordable and strong, yet easy to cut with a set of wire snips.
Quick shot with just the pinning in place:
Shot with both pipes put together, I'm thinking they may be a little long, so I might cut the 129 down to 0.25" and the 128 to 0.5" lengths.
This is with just the 129 length at 0.5" long. The pipe would need to be filled and GS around it.
Last shot of my work area.
All in all, I'd have to say that I had a bit of a tough time working with the brass pipe and I'm not entirely sold on it. I'm going to try to locate some plasticard tube at a local train/hobby shop as I think that would be easier to work with. I think this is a good start to figuring out brass pipe though. More work will need to be done to the bike to make it more presentable.
The remaining pipe can be used to dress up my IG vehicles a bit. We shall see.
What do you think?
it reminds me on the bike i had unfinished on my desk, lol! the fork isn't a bit too large!? IMO
btw......love the work you had done whit the building! tehy are amazing!
dsteingass wrote:Yeah the little red thing. I also bought a so-called "Hobby-Grade" pipe-cutter just like it for a lot more, but it is plastic, and isn't as good as the cheap-o. It works simply liek a bigger one, put the pipe in, tighten it, spin it, tighten, spin, tighten, and soon it makes a nice flush, and not sharp cut in any pipe, metal or plastic. I have a better picture of them both, I just need to find it.
Ooh yeah, I see what you mean in your other post above, very nice. I'll have to look for one soon.
leohart wrote:Those psykers look great. Hey if you ever pop into GW and I manage to be there, I can help you finish them up. I am pretty good with pipelining now .
The link to the display board is ridonculous. :|
Go Go IG + SW. Give us MOAR.
Thanks Leohart! I always appreciate help with painting and the hobby in general. Yes, that gaming board is beautiful. I've been working out the design on my own. I would go with a full city scene like he created, but maybe a flat surface with some felt or colored sand and some loose terrain stored inside when the table is folded shut.
I'm working on it all at the same time! Haha, I'll do my best to keep it all coming.
dsteingass wrote:There is no such thing as too large in 40k! You do need a steel ruler though, that wooden one will soon be destroyed
Not too large, but maybe too long for the front fork, it is only 1" in length, but I'll need to work on finishing the conversion before I can make the judgement. I can always have the back wheel off the ground and the front wheel kicked out into the air similar to my other bike.
I take it you missed the steel ruler in the pics? The one I had next to the wood ruler and then later taped to the vise where I was cutting the pipe?
dsteingass wrote:Here it is:
Oh yeah, very nice! I will have to shop around for that and a miter board. I think I might have better luck at a hobby lobby or Michaels, both are sort of generalist hobby/craft stores that tend to cater more towards scrapbooks soccer moms, but also have plastic model kits in 1/48 & 1/35 scale as well as train hobby terrain kits, some airbrush equipment and clear plexi glass as well as brushes and stencils. I've been looking for a wolf stencil to use on the sides and/or tops of my Space wolf vehicles. Though I might just have to order or make one from a picture and some card stock. I'd also got some lettering stencils to add words to my Mordian Vehicles.
And, while I had them out, I decided to grab a little Citadel Golden Yellow and paint their coats up similar to an image of Doc Brown from Back to the Future
lol...i like the contrast idea you are going for with those psykers...as oposing the scheme from your mordians...that makes them stick out from the crowd quite nicley...
and dave... now that i have come to terms with that PC dillema i had before i think i need that tubecutter soon too...it is always a pain for me to cut tubes with precision...
Now I've been tooling around with some sketches on how to create a gaming table that would be good for both Warmachine and Warhammer 40K games. This portability just adds icing to the cake! The table would need to be 4' x 6' in length at minimum to accommodate both game sizes. I like the inclusion of rare earth magnets to help with sticking smaller pieces of terrain or buildings to the board when it is situated.
The only problem with this design is that the table would still require a table or playing surface to sit on( possibly some saw horses would work as well), but it would be pretty easy to do an outdoor version! you just need variable terrain in foam sizes, a lot of watered down PVA glue and some sand. Then you'd paint the table with the PVA glue mix, pour sand on it, let that dry, then paint more PVA glue on it in thicker coats. Afterwards, Spray Green and brown as desired. Rare Earth magnets could be used for Forests or boulders/hills.
You would still need a separate box for buildings and terrain as well as carrying cases for your army, so this after building it, would involve a significant day of gaming to make use of its awesomeness. Yet, having the ability to put the table up and out of the way and not have it look too bad would be a boon to many a gaming family.
For this 4'x4' Gaming table it looks like he just used 1"x6" boards with a sheet of plywood underneath "There is a 9mm plywood on the bottom".
I'm thinking you would need four 2'x1"x6" boards for the inside and two 4'2"x1"x6" boards for the long outside edges. Though if you were making a 4'x6' playing surface then the cut of the boards on the outside edges would be 6'2"x1"x6"
The plywood would be two pieces of 4'2"x2'1". Though if you were making a 4'x6' playing surface then the cut of the plywood would be 6'2"x2'1"
I'm not sure how much that cover piece for the fold is, but I think its going to be slightly longer than 12" due to the hinge fold and the 6" from the edge of the 1"x6", though now that I think about it, if the scissor hinge folds the two halves up to where they meet, then the bottom gap is 12".
The hinges he says are "Scissor hinge or Knife hinge" and a quick google search shows that the knife hinge is more accurate. I'm not able to find them on lowes or home depot website so might need to try a more traditional hardware store.
The rest of it would be simply sanding and staining the wood. Brackets/latches should be easy enough to find. I'd keep the stryrene terrain inside removable and in sections so you could alter it a bit. Possible use of pegs to help keep it in place might work.
Another option would be to line the bottom inside with felt or flat sheets of sand paper so you could remove the foamboard terrain from the equation and just have a solid green playing surface. Or I could buy this and cut it in half and glue it to the bottom inside of the box
http://www.zuzzy.com/dr-tf-001_terra_flex_gaming_mat.html
Automatically Appended Next Post:
Flying Pooo wrote:That's some great painting going on there. Those Psykers are shaping up nicely.
Thank you Mr. Pooo!
Automatically Appended Next Post: Here is my first attempt to reverse engineer that folding / portable gaming table, I quickly realized my measurements were a bit off.
So here is my second attempt, albeit with less sleep behind me and more hours ahead of me:
This may be closer and more accurate to the build, but I won't know til I actually build the thing. You'll notice that I noted the boards at 1"x6", when after reviewing the pictures, I think that Pake actually used 1"x4" boards, so that changes some things.
Automatically Appended Next Post: A little more work was done on the Psykers as well. Chaos Black was added to the belt, holster and boots of the models as well as an additional layer of Golden Yellow and another of Chainmail and some Elf Flesh to the heads. They're still progressing and should be done in another day or so of painting.
And, I was wondering which scale, in model railroading, is used with 28mm figs? This is in regards to buildings and after some searching I learned that it was either S or O scale
At 1:48 scale the US is smaller than the 1:43 popular in the UK, but be careful as there is a considerable margin of error in a lot of O scale stuff.
"I think O Scale has a different meaning in Europe than in the US"
"O" isn't a scale, it's a gauge. It sort of represents regular gauge track at about 1:43 – 1:48 or narrow gauge for 1:32
The track doesn't actually really match up to any scale properly being either too narrow or too tall depending on which way you look at it.
In Britain, people have standardized around 7mm to the foot – about 1:43.5 as the "normal" scale to go with it.
In America, the use of O evolved through the O27 scale which puts 3/16inch to the foot scale trains on O gauge track. 3/16:foot is 1:64, at which scale a 6 foot person is about 28mm tall… and hence US O is pretty much spot on.
1:64 with proper scaled rails is known as S scale, but S scale stuff is bonkersly hard to get hold of – most S modelers have to build their own rolling stock… Grandt Line (TM Terrain are a UK stockist) do S scale structural parts.
HO (half-oh), however is both a scale and a gauge; Trains are 3.5mm to the foot (1:87) running on scale rails; 16.5mm apart = standard gauge 4' 8.5"
In Britain, people run OO (double-oh) scale trains (4mm to the foot, 1:76) on HO gauge track; meaning the trains are actually running on slightly narrow rails.
P4 is the gauge correct for OO scale – it's 18mm wide…
Plasticville buildings are a good match.
http://www.tandem-associates.com/plasticville/plasticville.htm Plasticville buildings are halfway between O and S. They were originally intended to go with Lionel's O27 sets, but they were deliberately made a bit small to be usable with American Flyer S sets as well.
O Scale for buildings and cars.
S Scale for people.
Miniatures are not scaled correctly, and it's absurd to try and quantify them that way.
An O Scale figures head fits perfectly on a 28mm-30mm miniature and looks great. However, a complete O Scale figure is far too tall to use with 28/30mm.
And here's some added new loot for my troops:
Automatically Appended Next Post: More work done on the Psykers for the Mordian Iron Guard force. I decided I didn't like the Liche Purple for the sash and went over it with a few layers of Enchanted blue as well as lightened up the Ultramarines blue with the same color. I did some touch ups with the Golden Yellow and generally worked to get these models a little cleaner.
Thank you for stopping by! Does anything pop out at you? Do you have any suggestions/comments/critiques? I'd love to hear more about what you think of my work
leohart wrote:I love the enchanted blue + purple. Maybe the camera is not helping but did you wash then layer up that blue? It looks a bit flat.
I painted over Liche Purple with a few layers of thinned out Enchanted blue, other than that, no washes yet. I need to actually read the painting manuals I've acquired.
i hope you are feeling better? these days my wife has the blues too...i guess it is the lack of sunlight with her...i bet we should get those daylight bulps soon...
also i have to say that plan/sketch for that foldable table looks rather sound...when will you start to work on that project?
im a bit angry because it seems that when ever i subscribe to this it never goes through so then i dont visit it because i assume it is with all my subed ones, but now that i found it again it better work because i do love what you have going here, some nice guardsmen indeed
Viktor von Domm wrote:i hope you are feeling better? these days my wife has the blues too...i guess it is the lack of sunlight with her...i bet we should get those daylight bulps soon...
also i have to say that plan/sketch for that foldable table looks rather sound...when will you start to work on that project?
Thank you Vik, Its not just me thats down it is the whole family. Its just not a good time for us. But Thank you for caring enough to care about how I'm doing, It really means a lot to me.
The table Idea I'm still working on, I need to make sure the design is sound before I 1) make the final sketch, 2) purchase materials, 3) Build it.
I've been tossing the idea of modular mdf/foam board terrain pieces of about 12"x12" and 2" to 4" deep depending on the outside boards I use for the table. I want a terrain detail on both sides of the square so that it can be flipped over and used as a different piece. On a 6'x4' playing surface that would give me 24 tiles to alternate from. Some could be craters, trenches, lakes or ponds, one long river piece going through it, or a variable dirt terrain on one side and a lava or ice world on the other side. Its something to think about. The pieces could be pulled out and flipped, rotated and rearranged to change the battle board.
I could even paint the bottom inside of the table green or use sand paper sheets and glue them down then color them for a third option for the board.
I have too many ideas and little time to do them all in! I need to focus!
Rogue Wolves wrote:im a bit angry because it seems that when ever i subscribe to this it never goes through so then i dont visit it because i assume it is with all my subed ones, but now that i found it again it better work because i do love what you have going here, some nice guardsmen indeed
Welcome back Rogue! Please take a deep breath and go find a Yoga studio, I prefer Bikram Yoga, but you should find the style that suits you. Then go to a class. I generally find that hot, sweaty college aged girls who are very bendy make for great stress relief.
All that aside, Thank you! I'm really trying to do these Mordians and Space Wolves up right. Lots of work has been done and I've uploaded well over 150 images of some of my older models today into the Space Wolves Photo Gallery: http://www.dakkadakka.com/gallery/images-50179-22471_Space%20Wolves.html
I'd post the pics here, but I think that would fill up this forum way too much. I do need to work on them and update them to my current paint scheme/style. These are some of the models I gave to a friend to hold almost 5 years ago and that I'm slowly getting back or finding in my parents garage.
Flying Pooo wrote:Those AOBR Sace marines are some awesome kit-bashes they look great! I also like those SM Calvary. Nice Rhino and Razorback too!
Thank you! I'm a big sucker for kit bashes and getting the most out of the most basic of models. That SM Cavalry will double as my Thunder Wolves Cavalry, Space Wolves on Horses.
If you look closely, thats four different Rhino/Razorbacks The top of each comes off to become a Razorback.
So it is 2 Rhinos and 2 Razorbacks! This defiantly shows how unobservant I am. Some of those SW look a little shiny, maybe you should try using a thin coat of matt varnish to take of some of that shine. Ignore this if it was just the lighting playing tricks as they are some really nice minis!

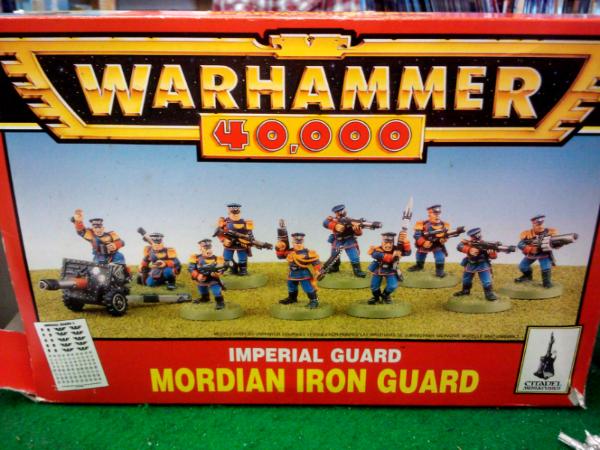

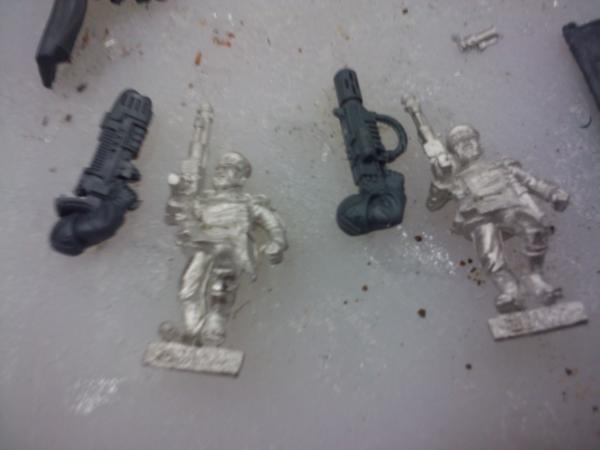
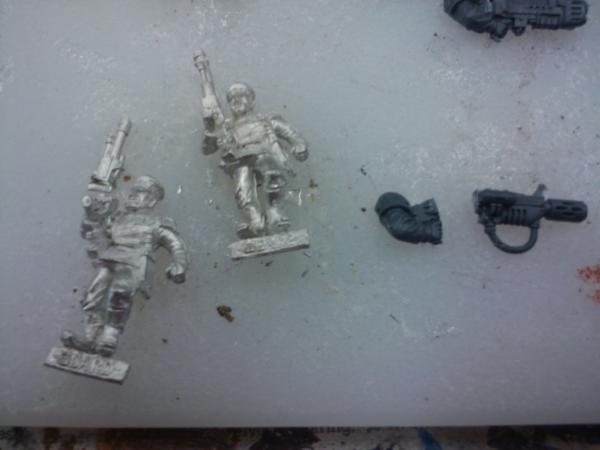
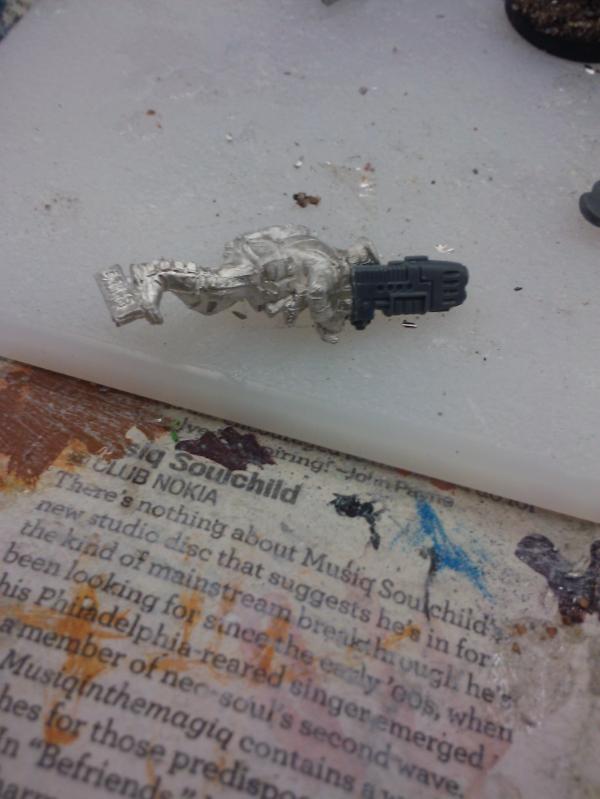
 glad you started this finally
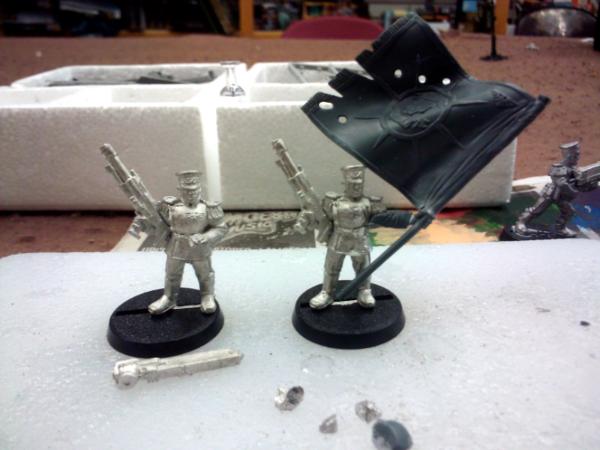
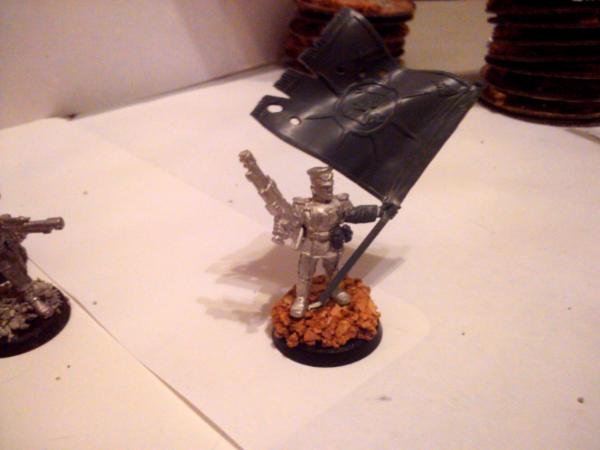
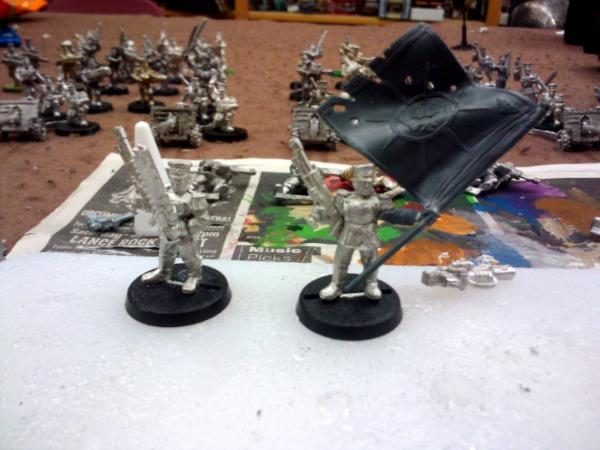
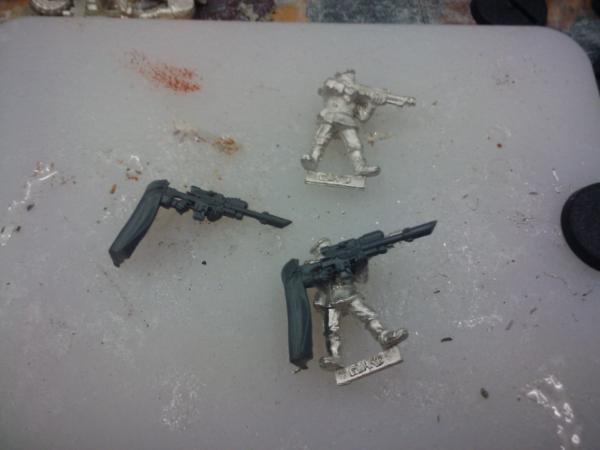
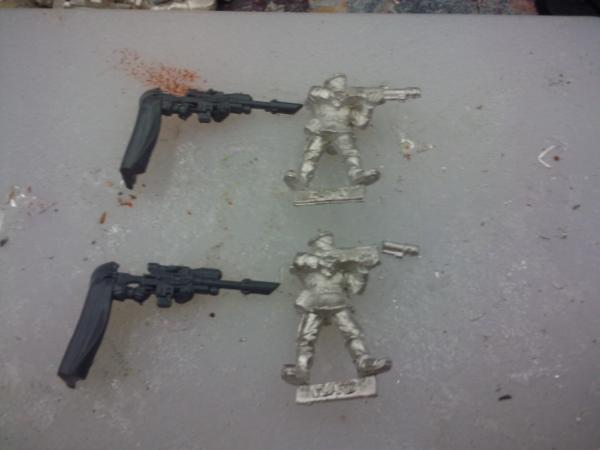
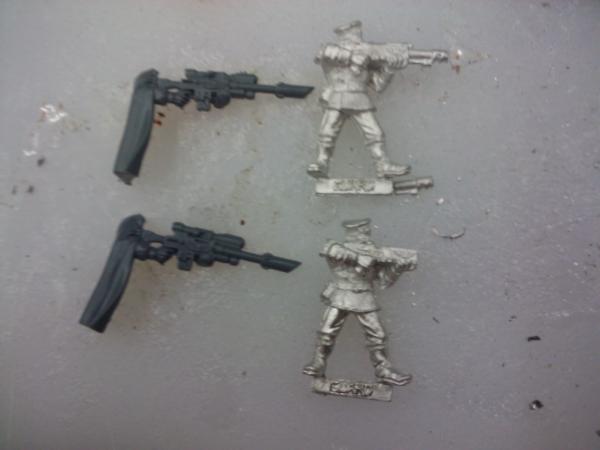
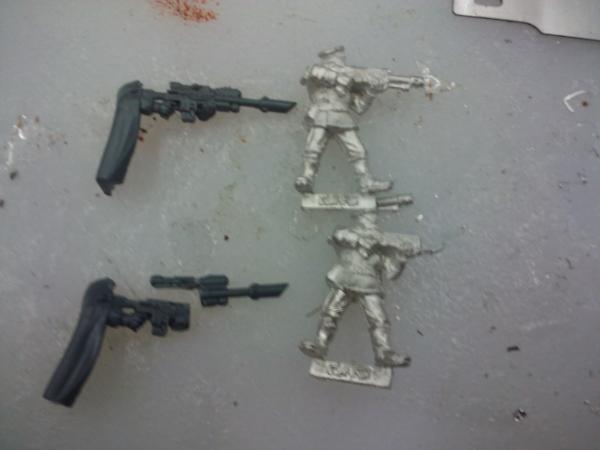
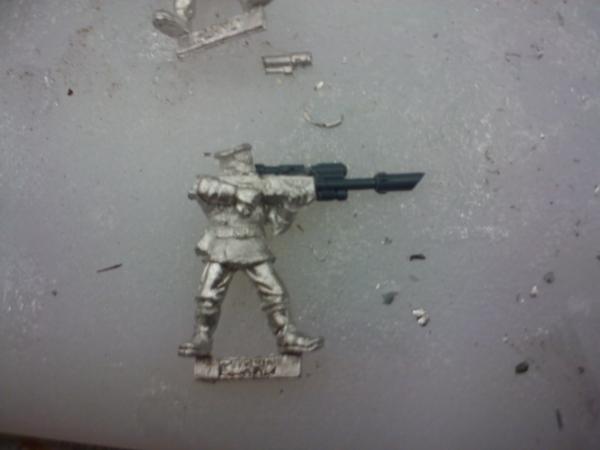
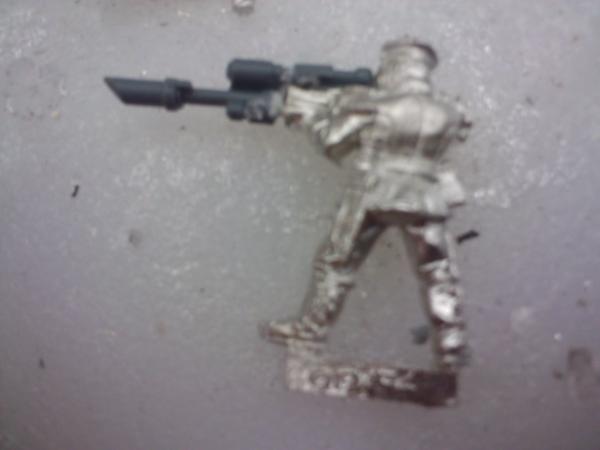
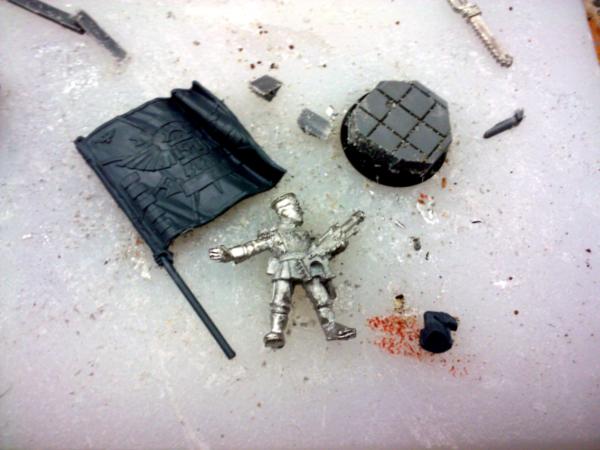
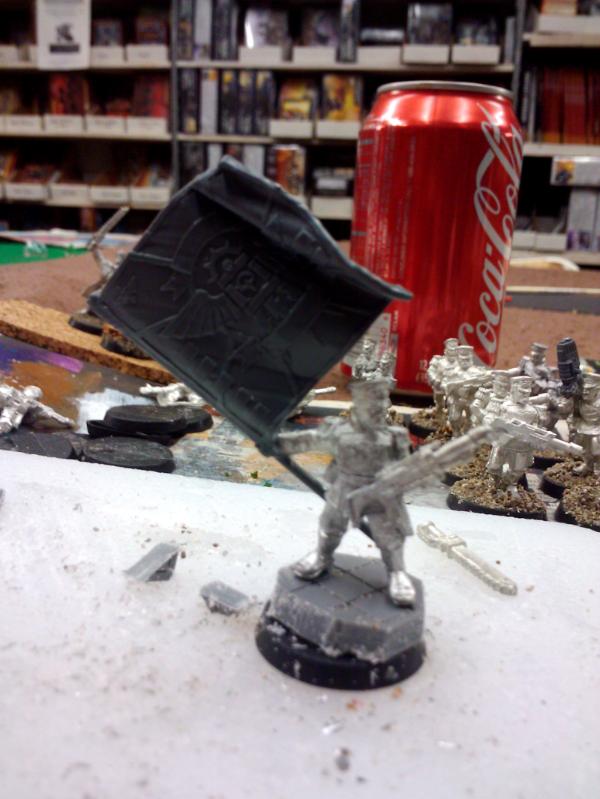
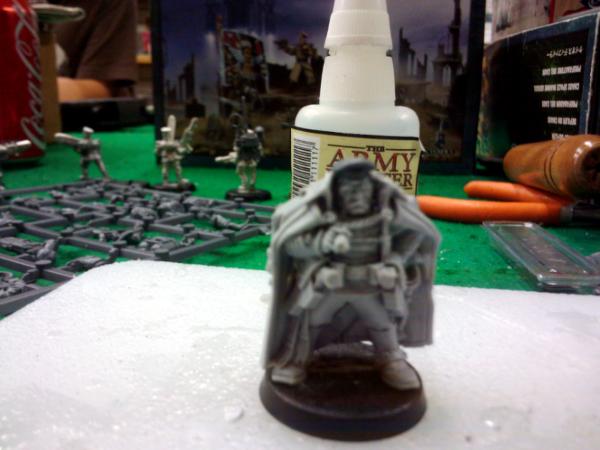
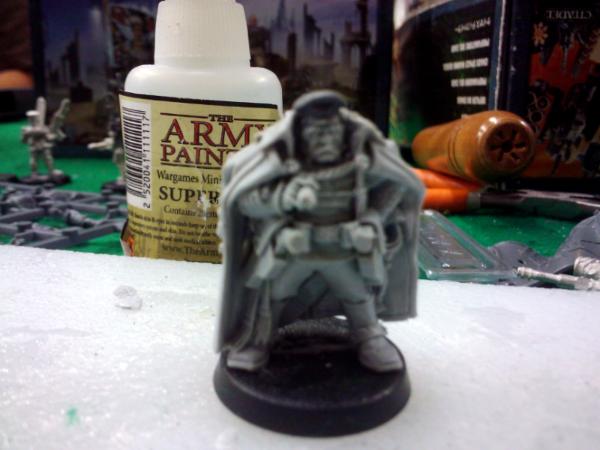
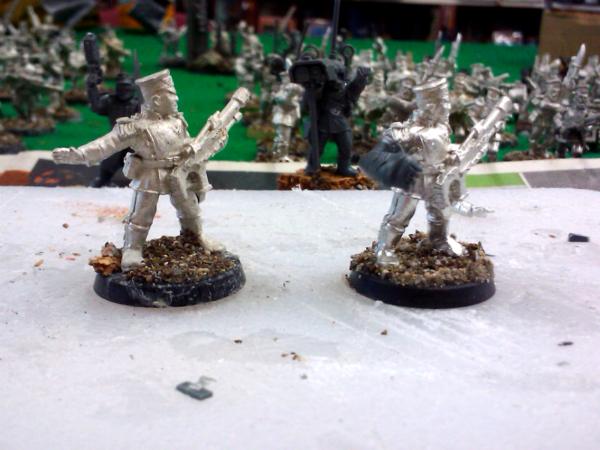
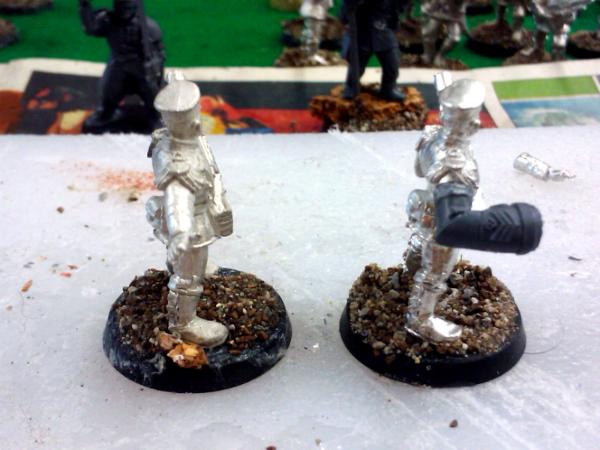
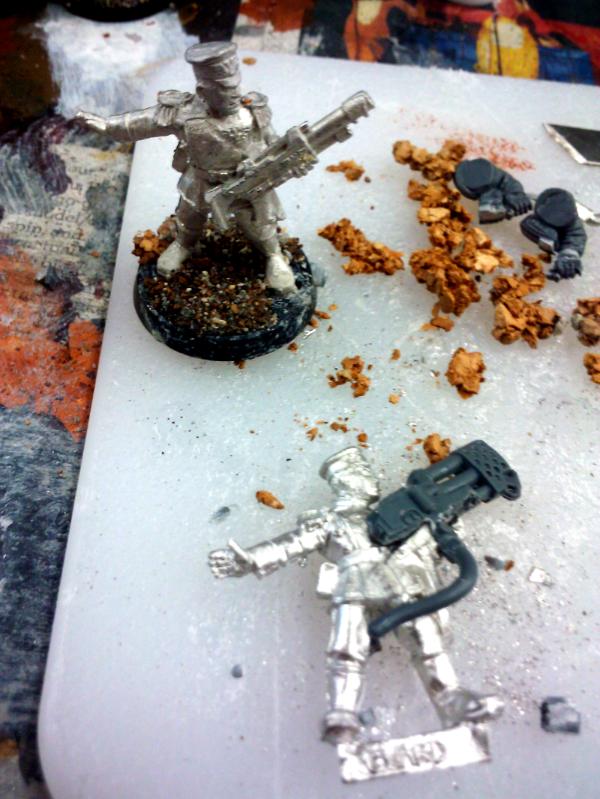
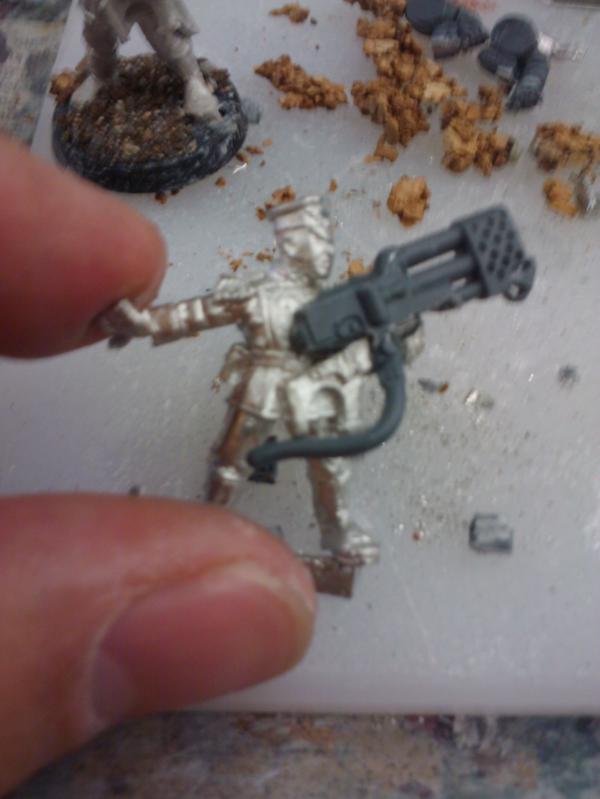
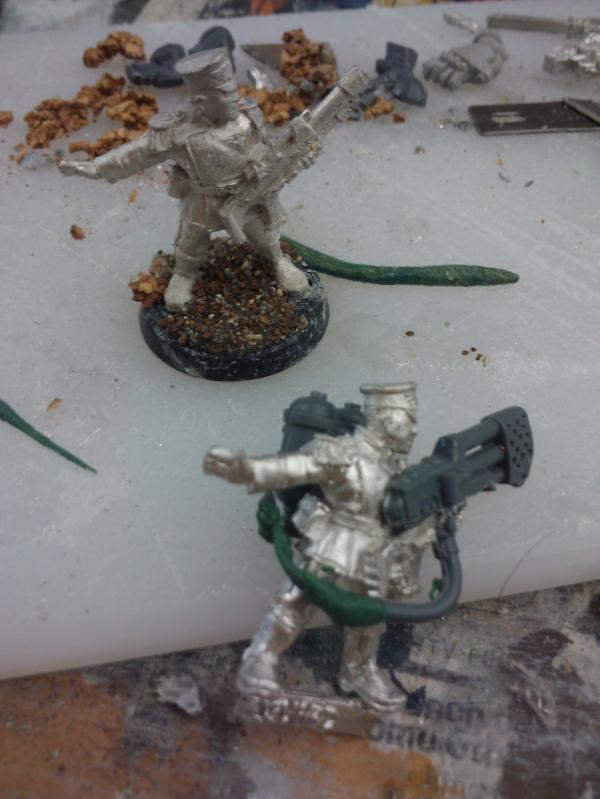
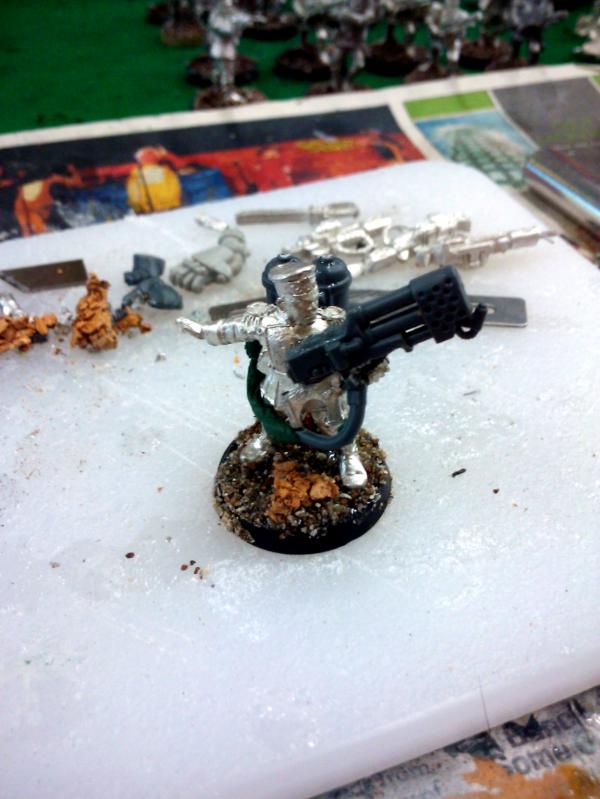
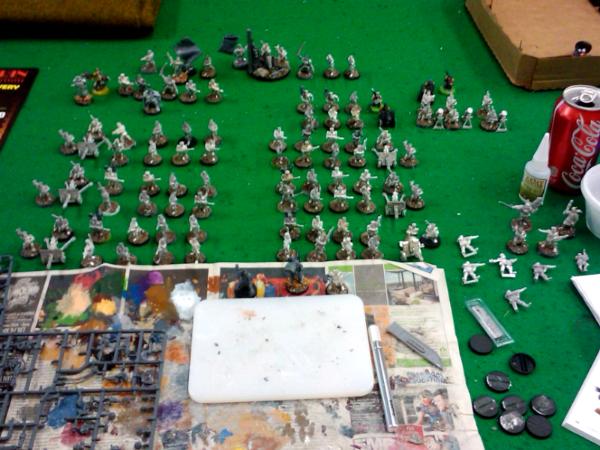
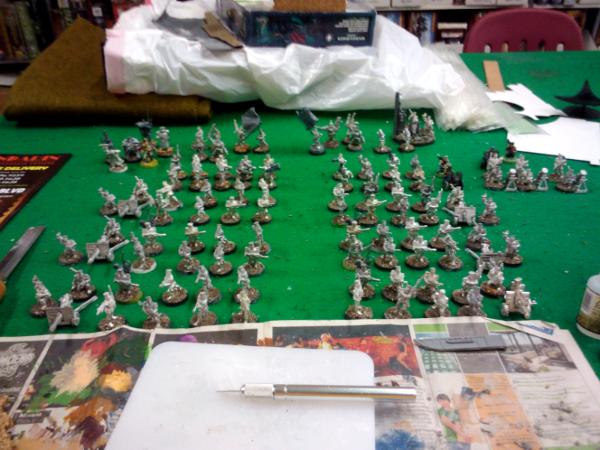
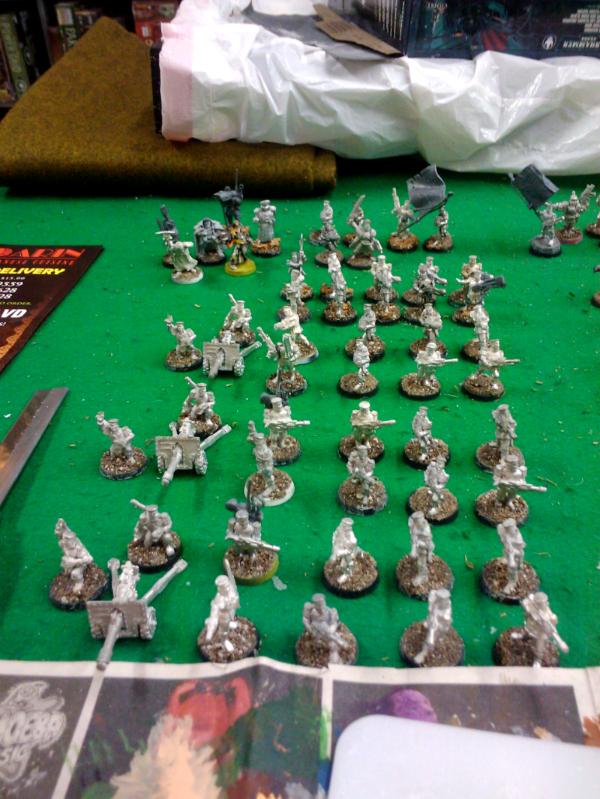
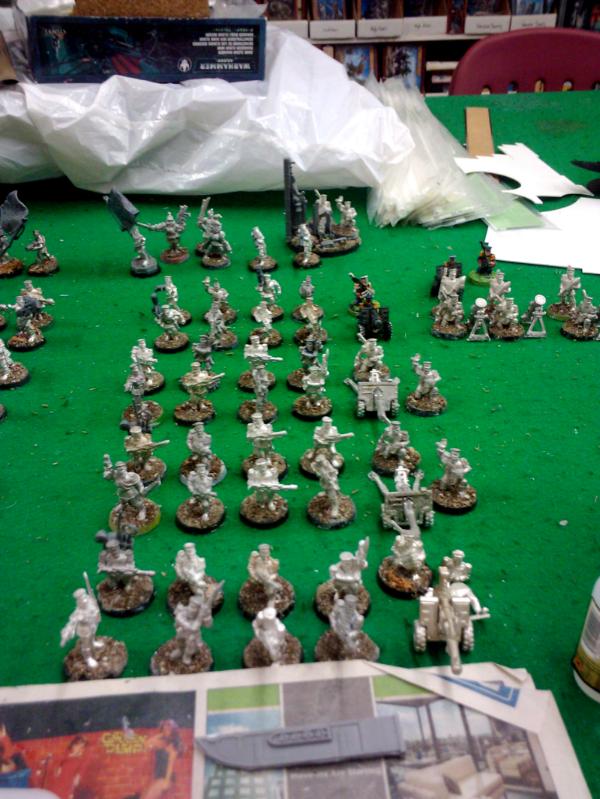
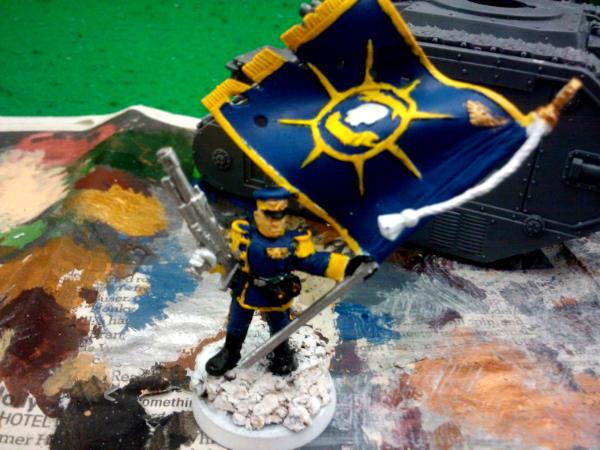
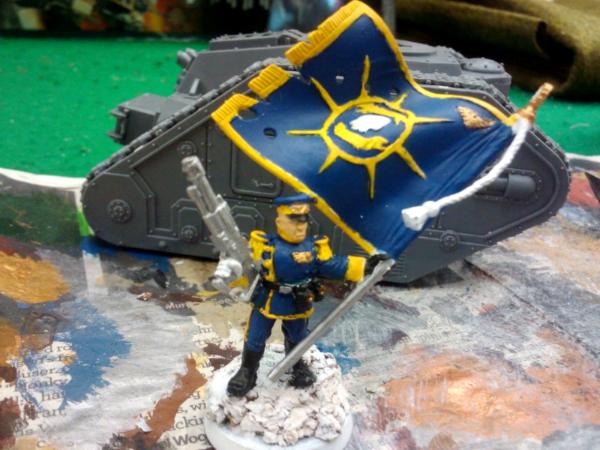

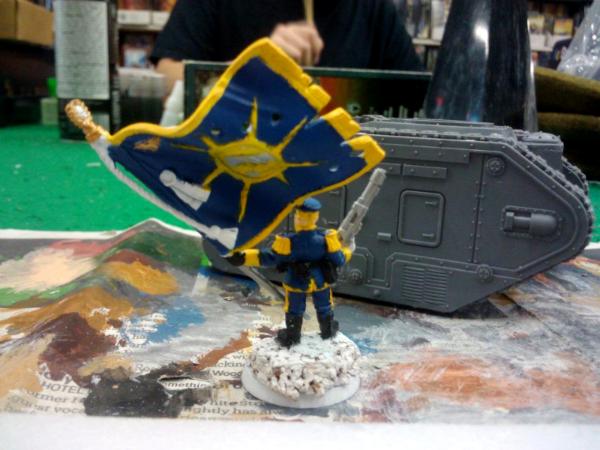
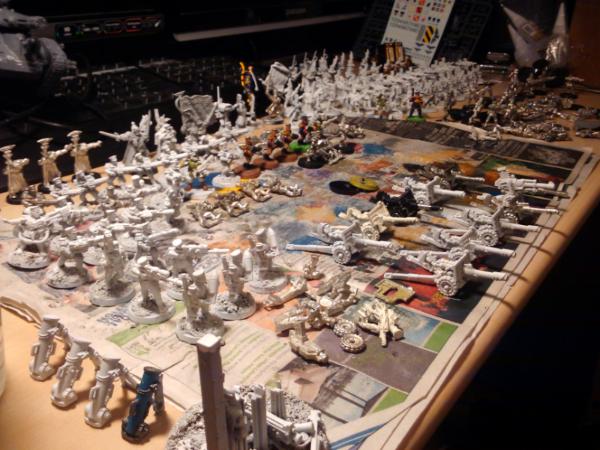
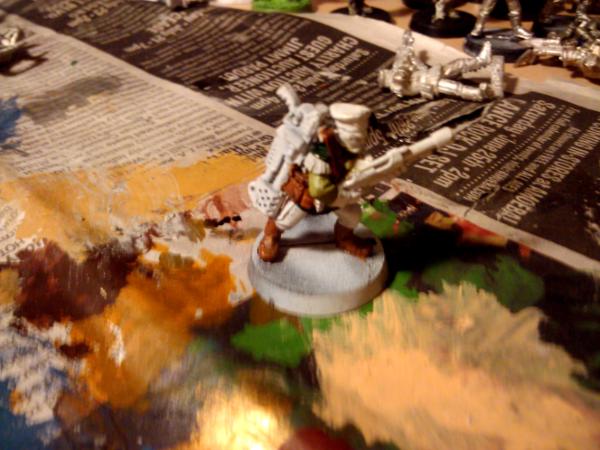


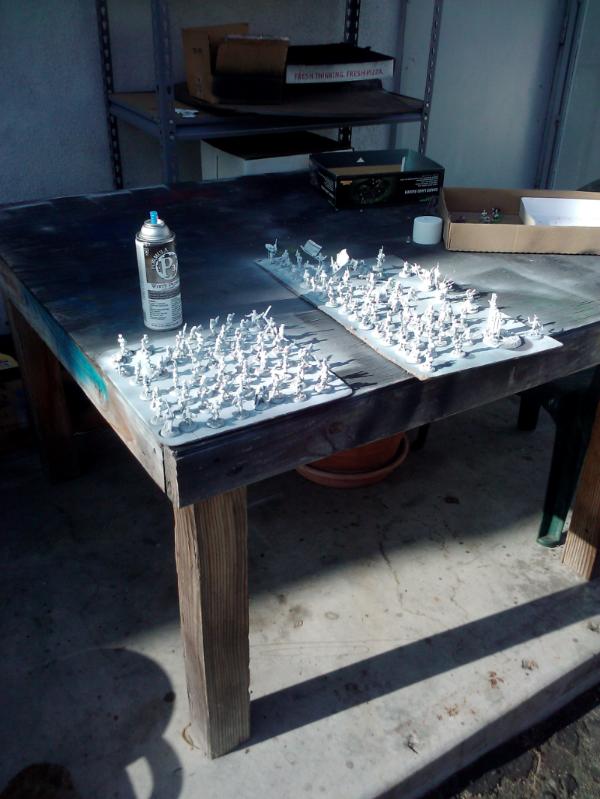
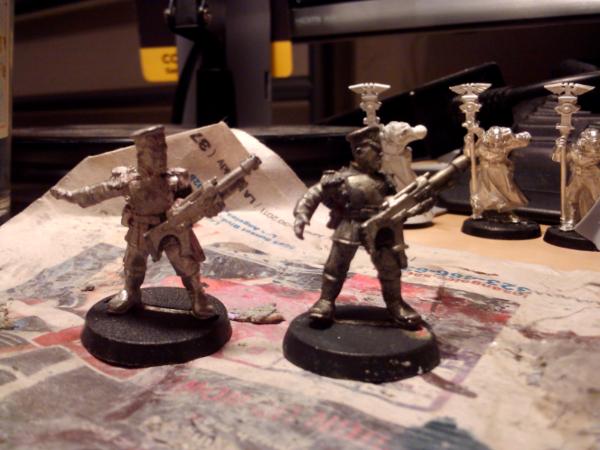
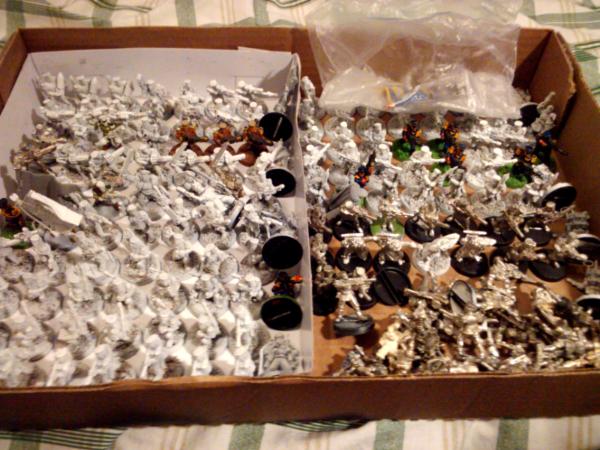
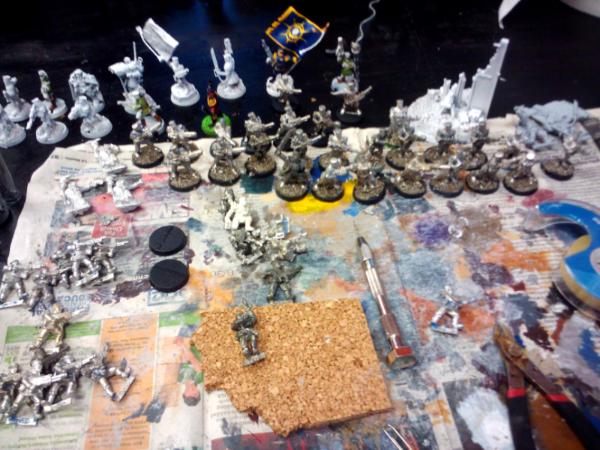
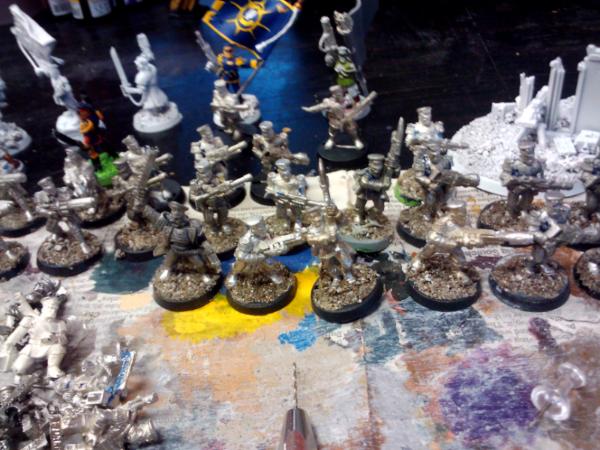
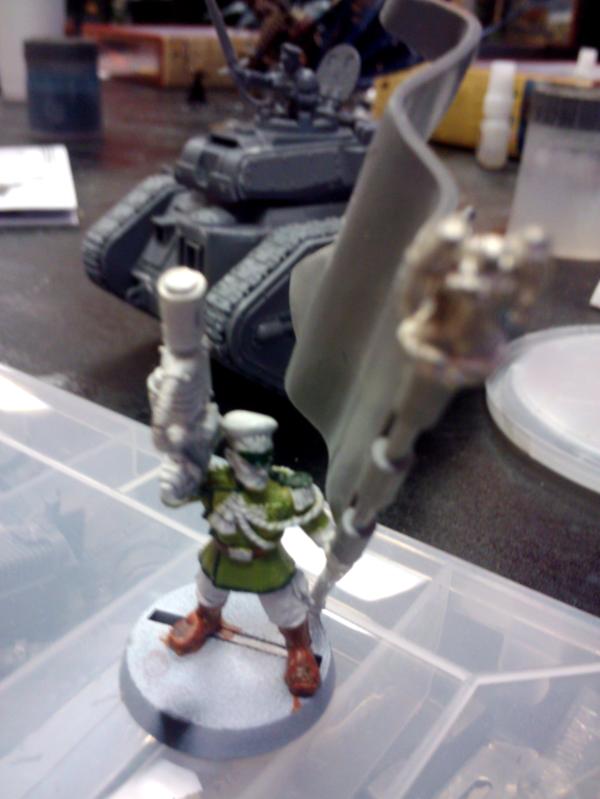
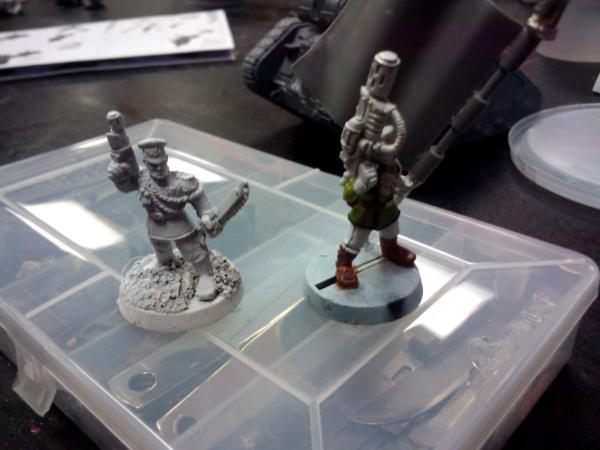
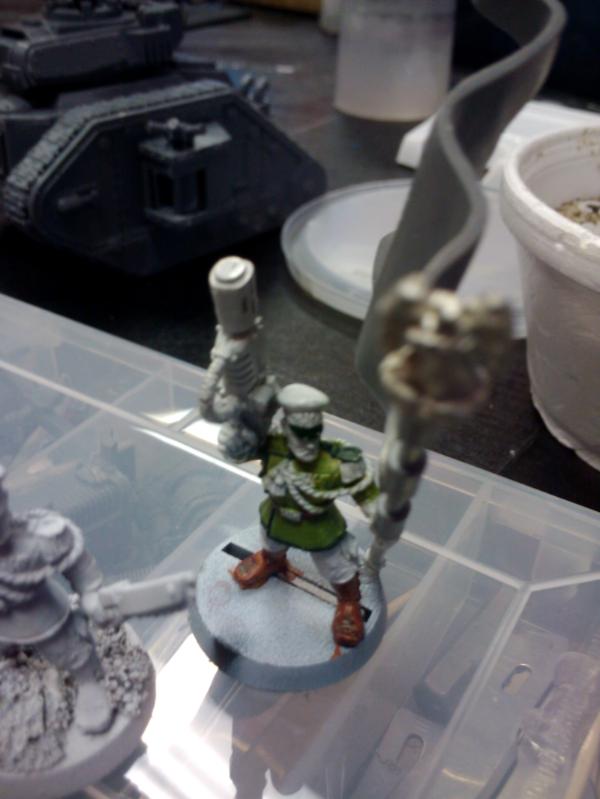
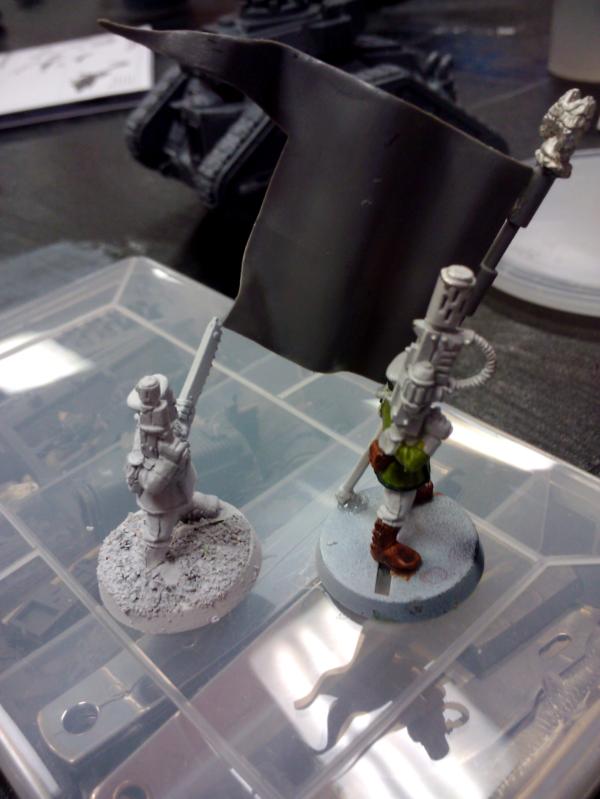
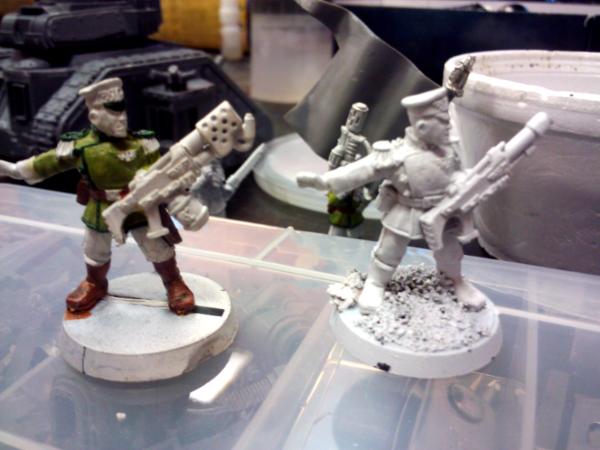
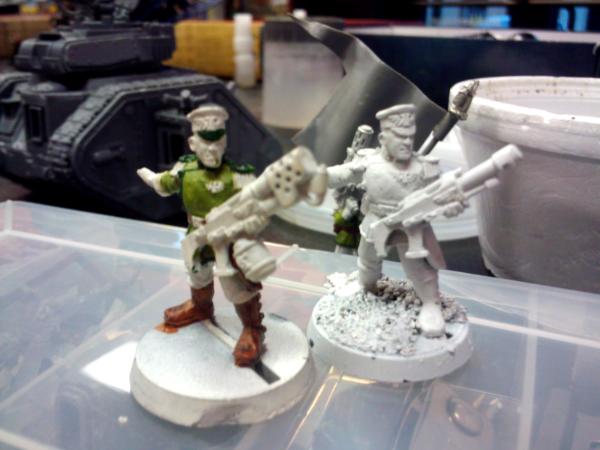
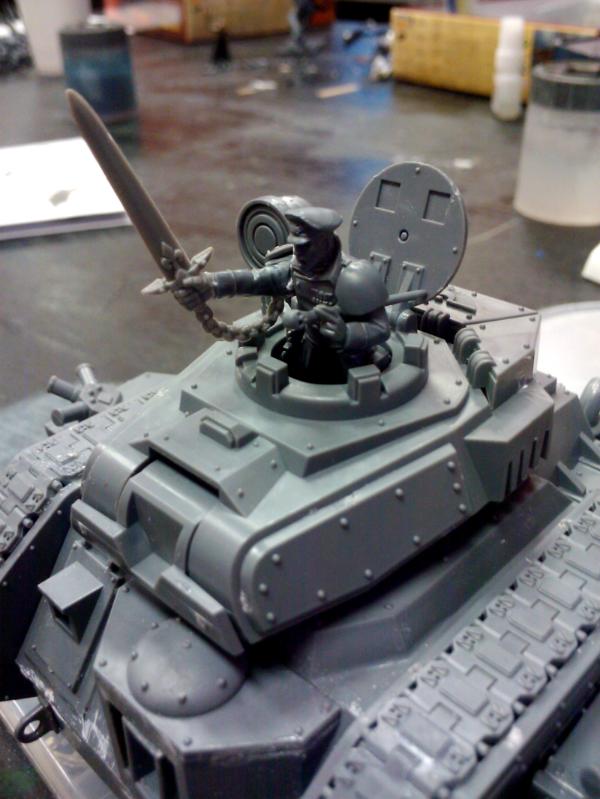
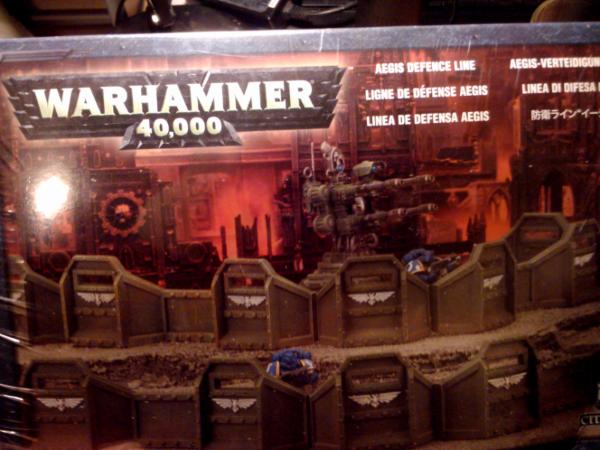
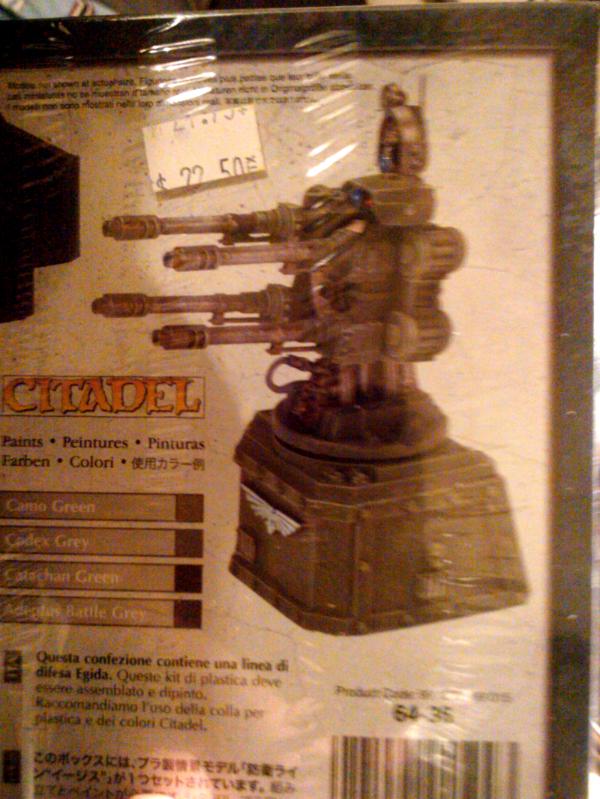

 and cut off a hand from wargames factory if you have, cause they have this poining arm...:


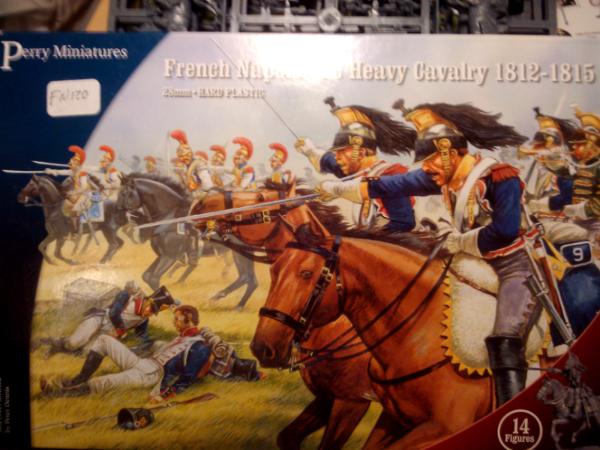
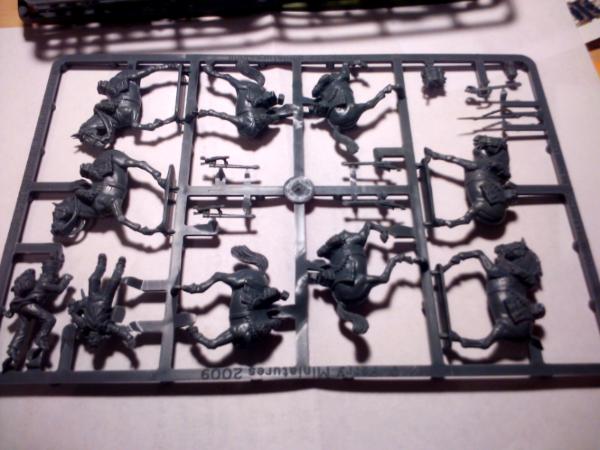
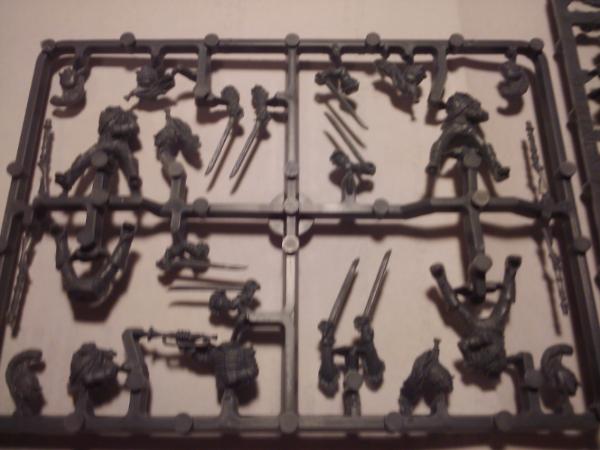
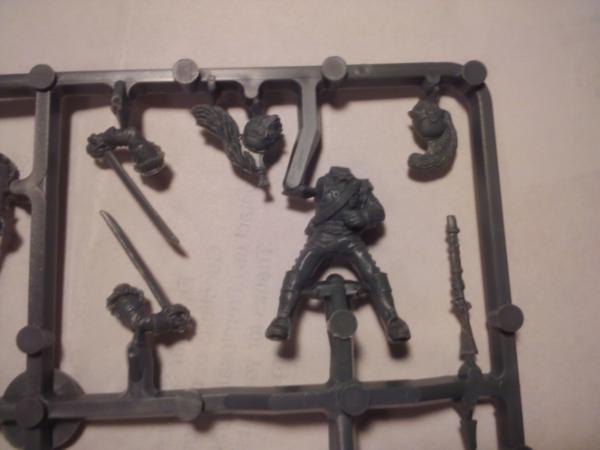
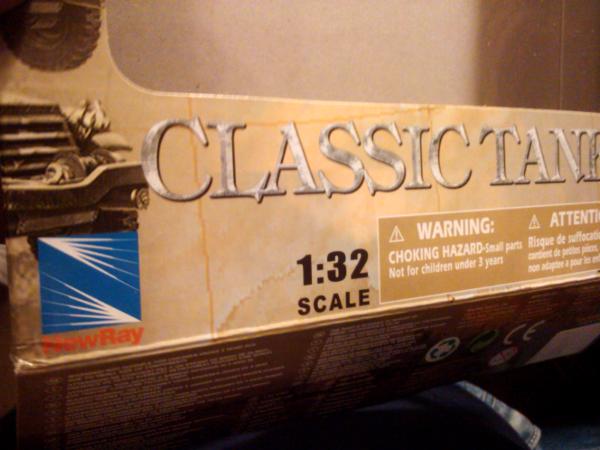
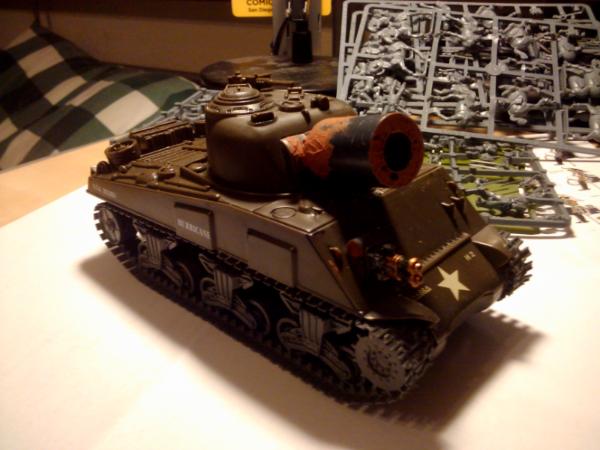
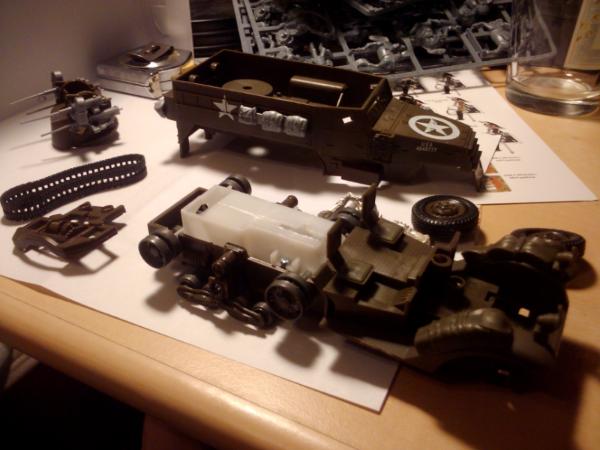

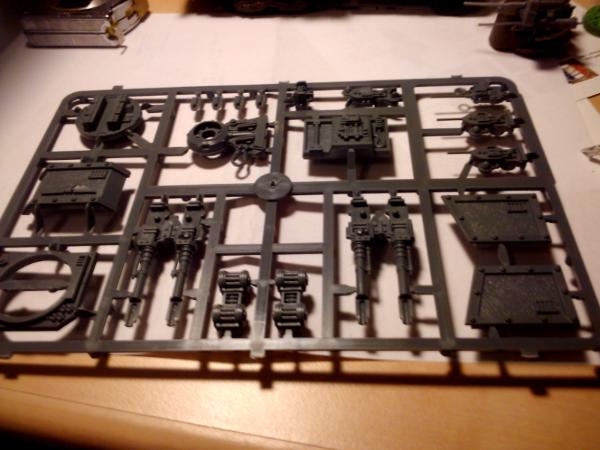
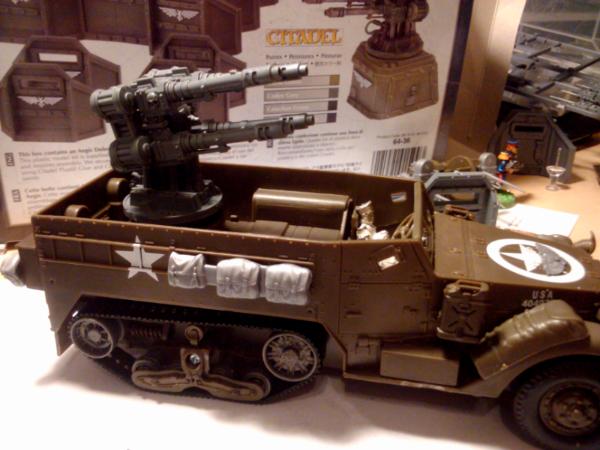
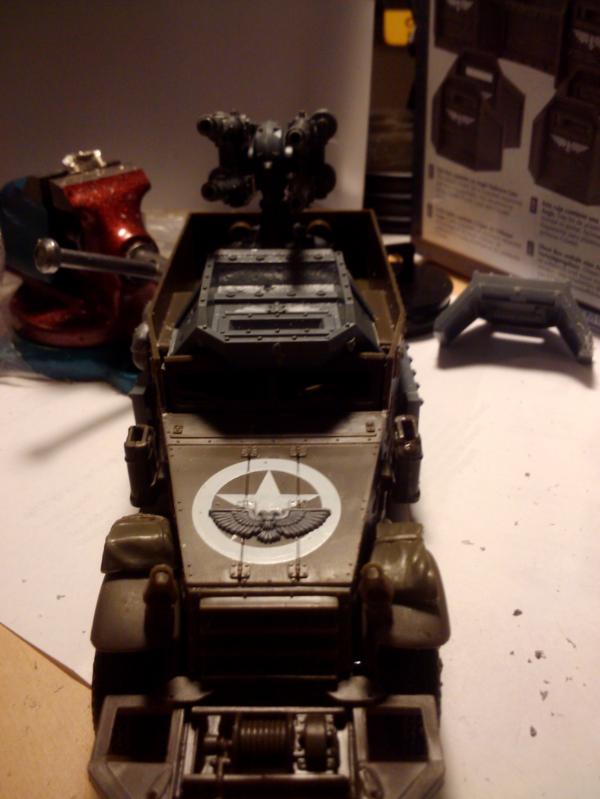
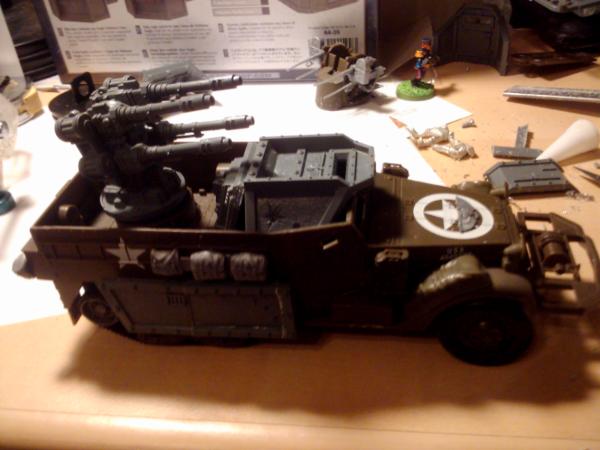
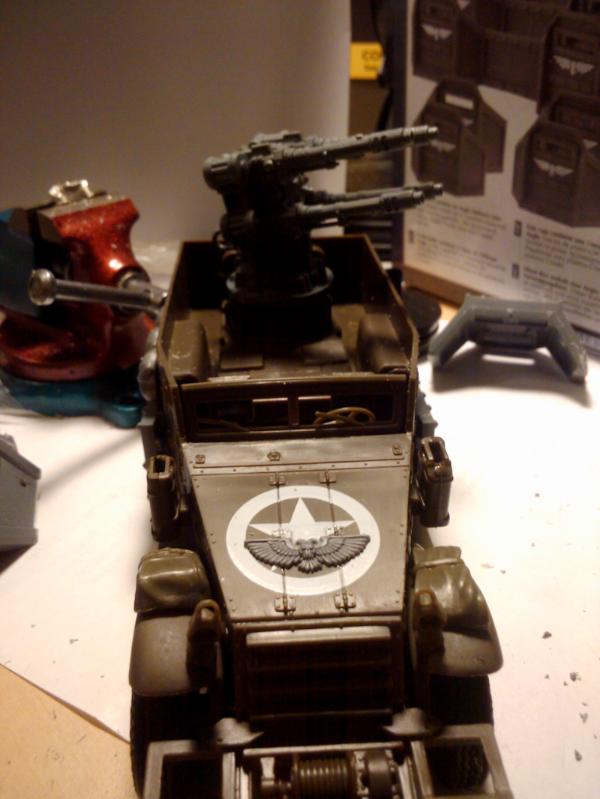
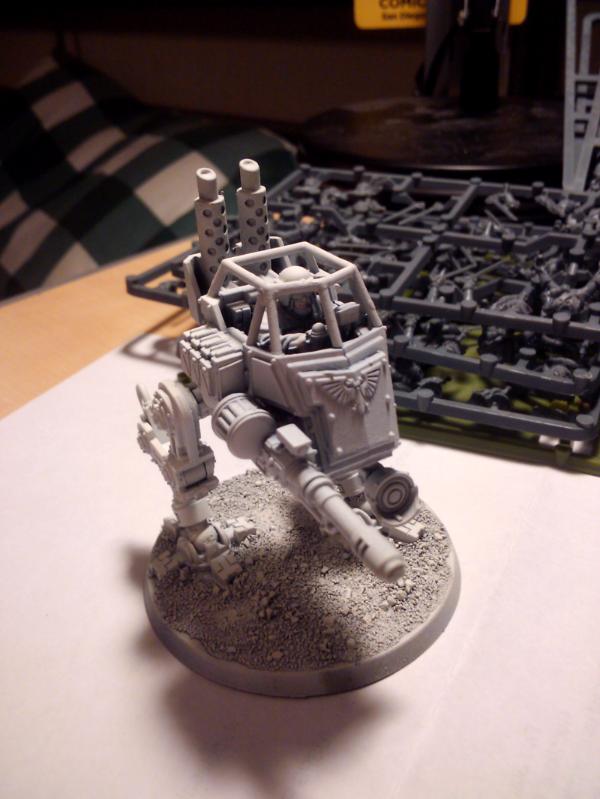
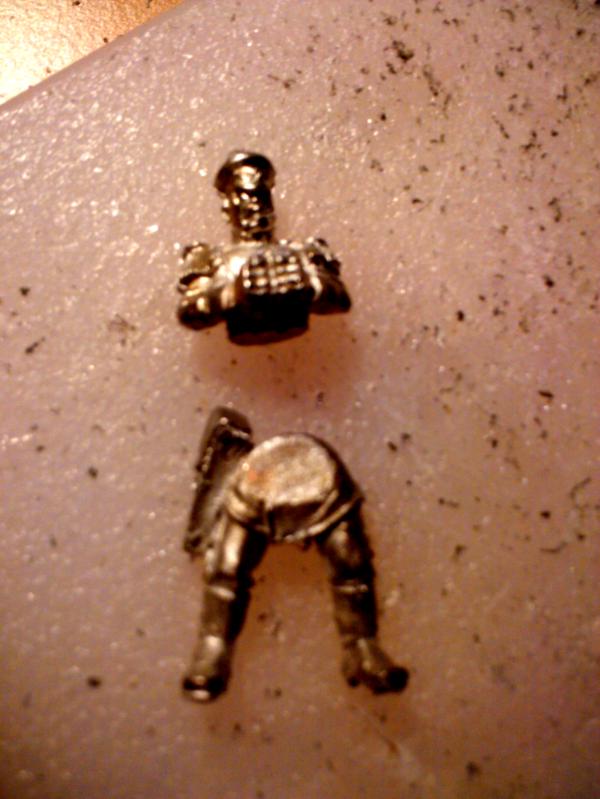
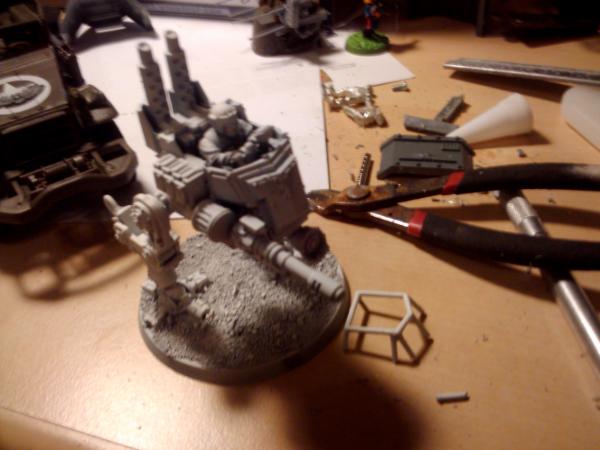
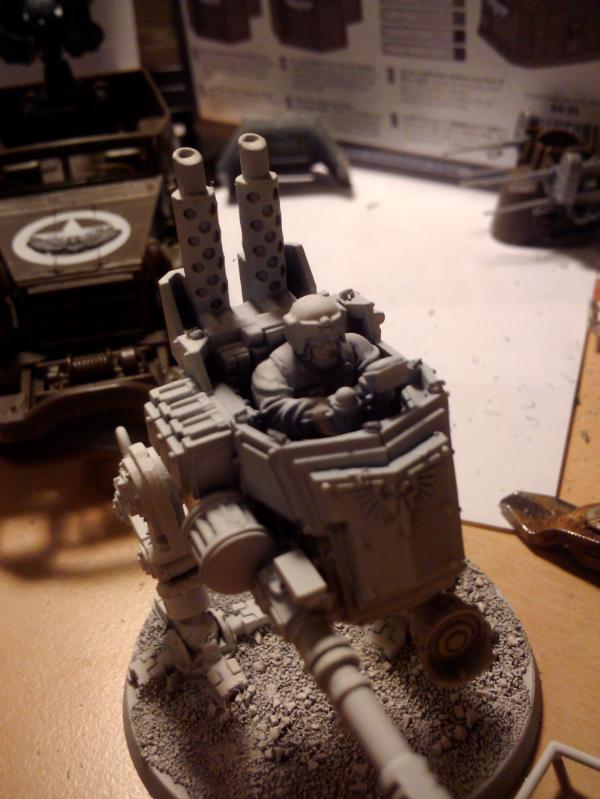
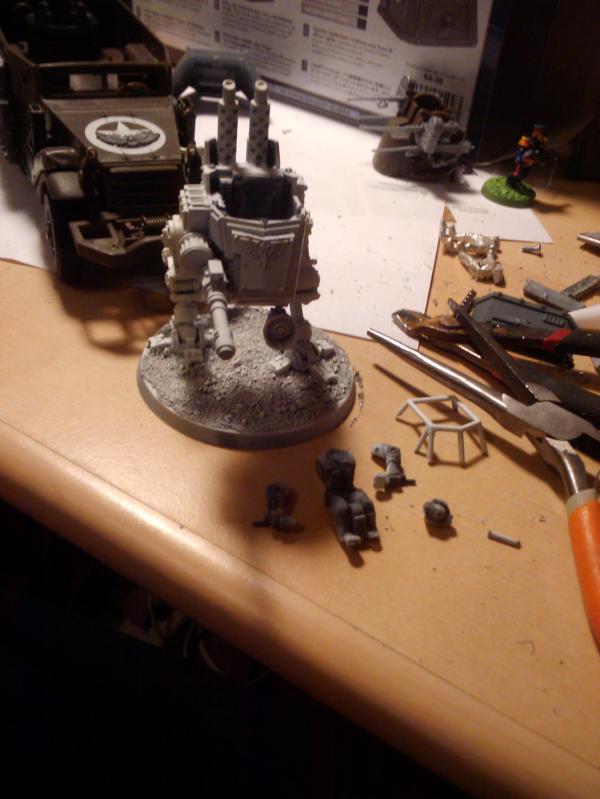
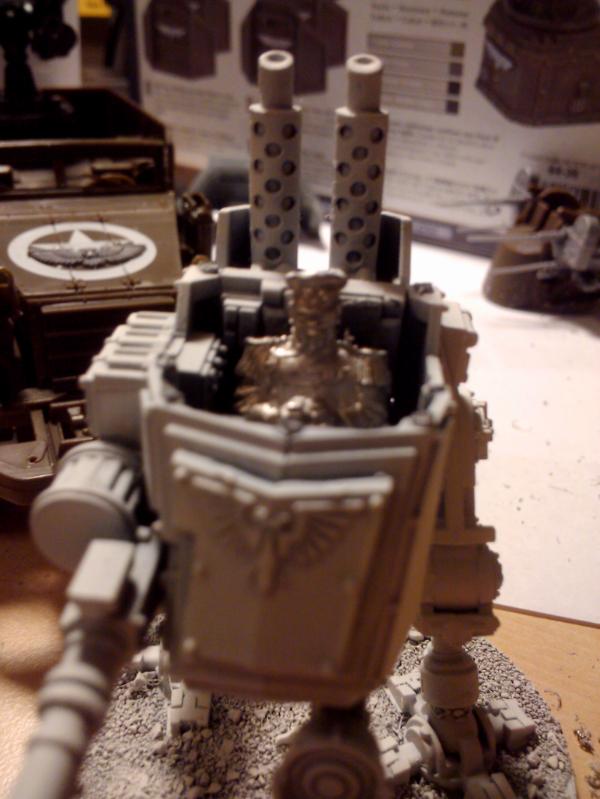
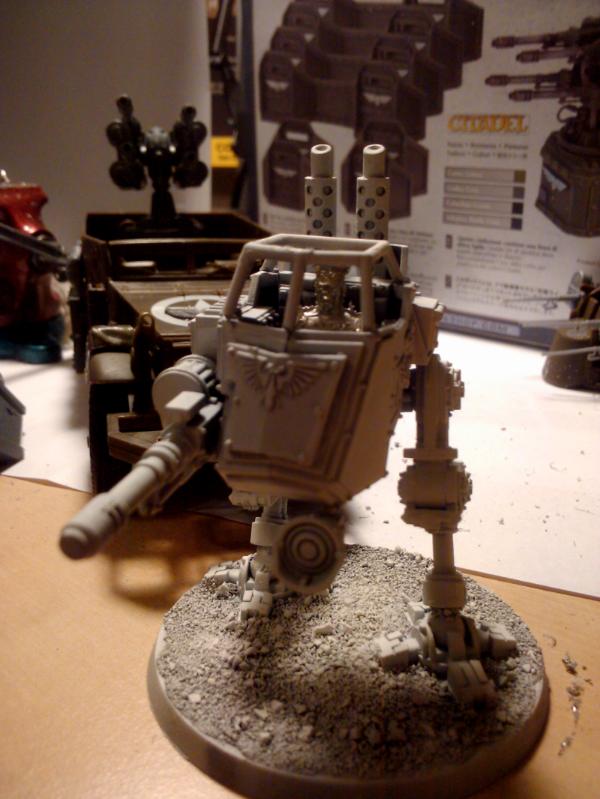
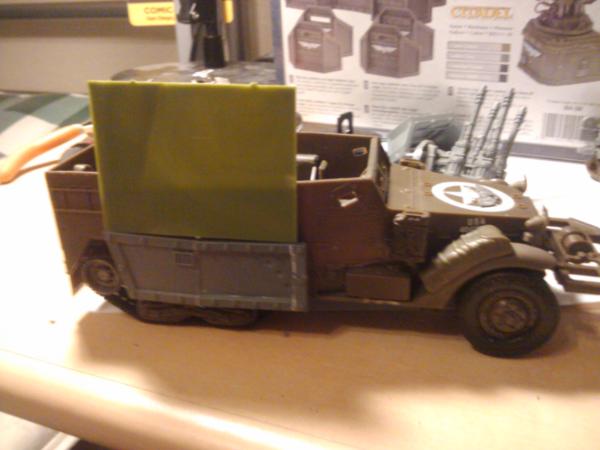
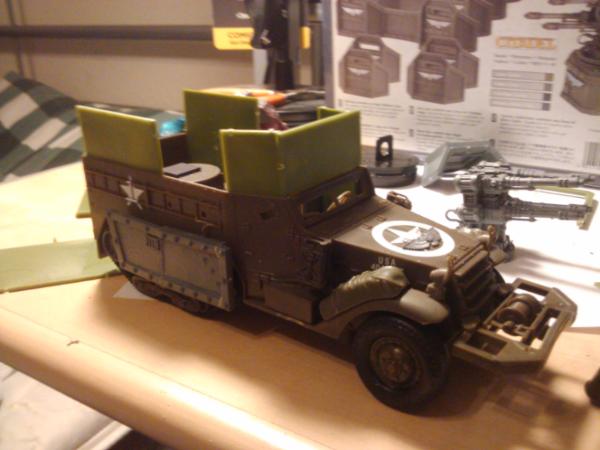
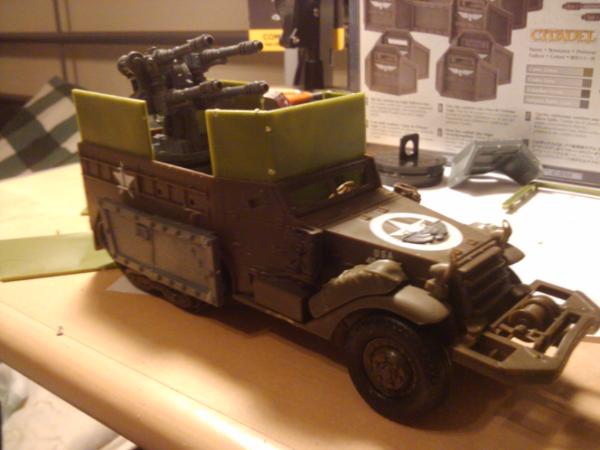
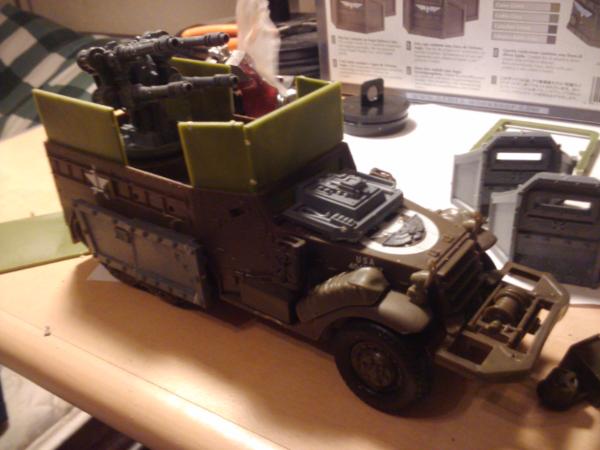
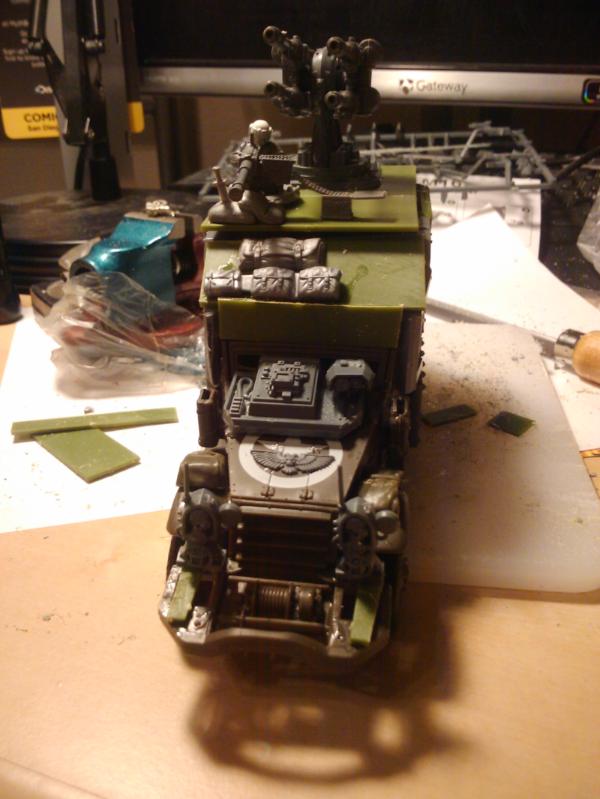

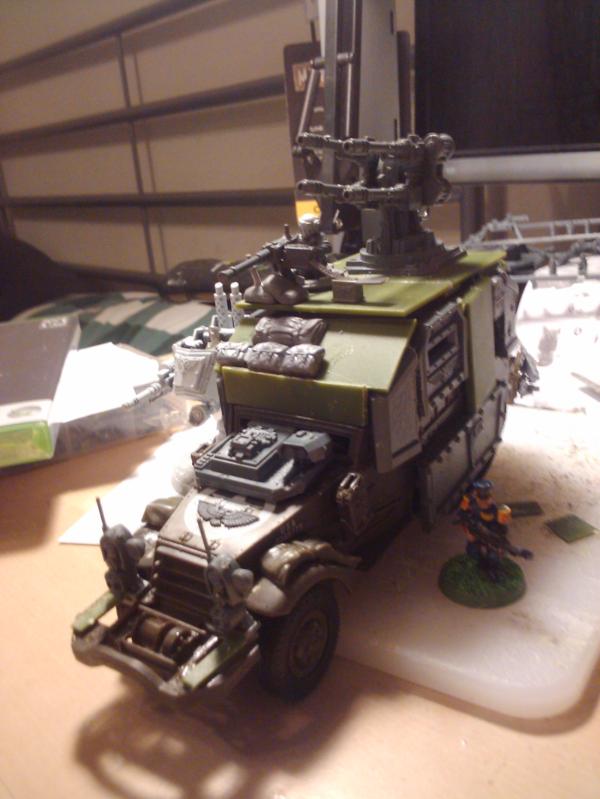
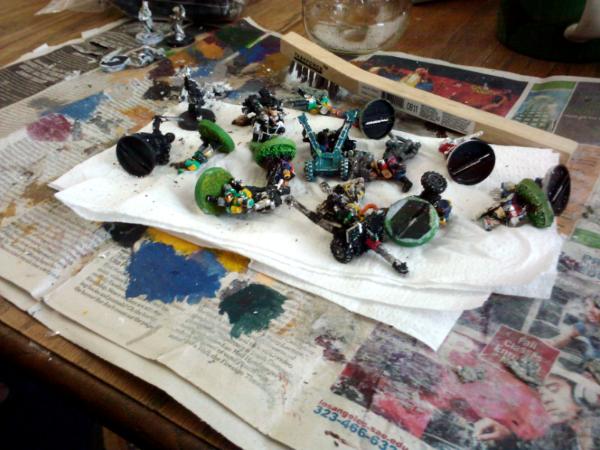
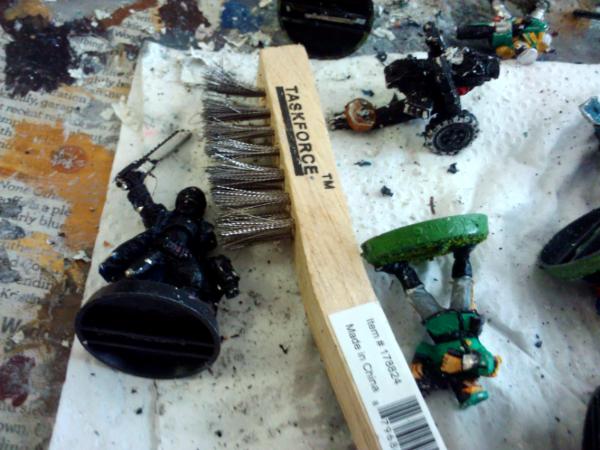
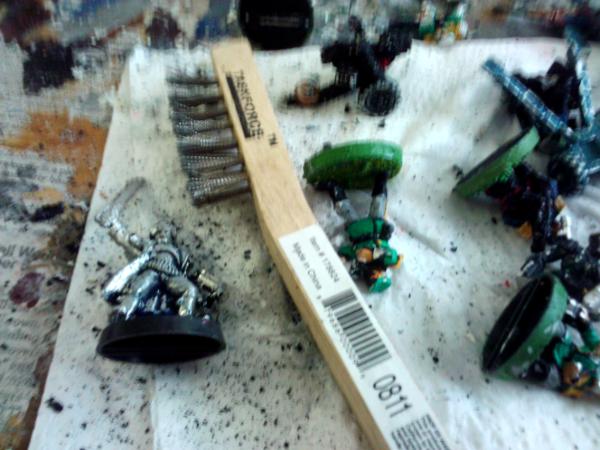
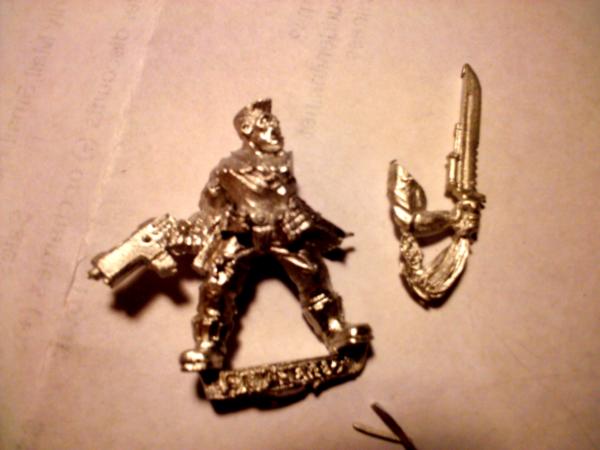
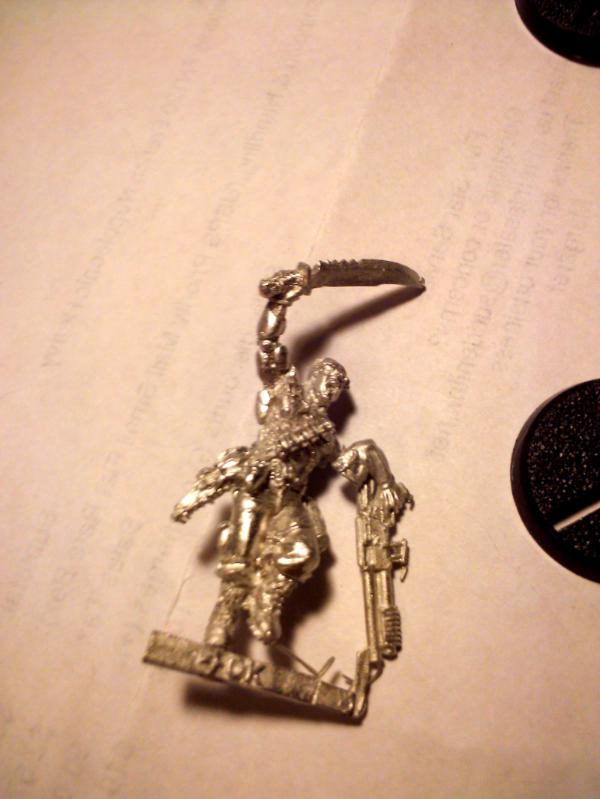
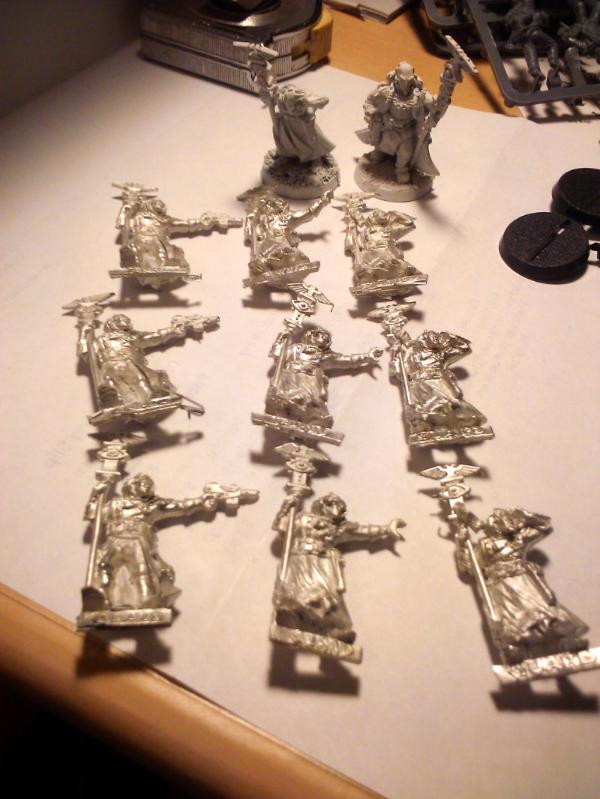
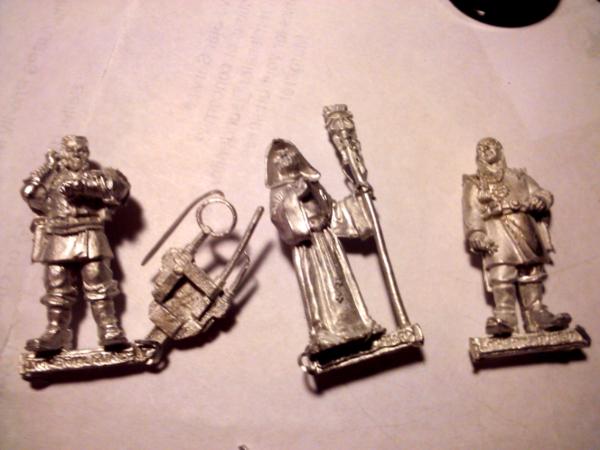
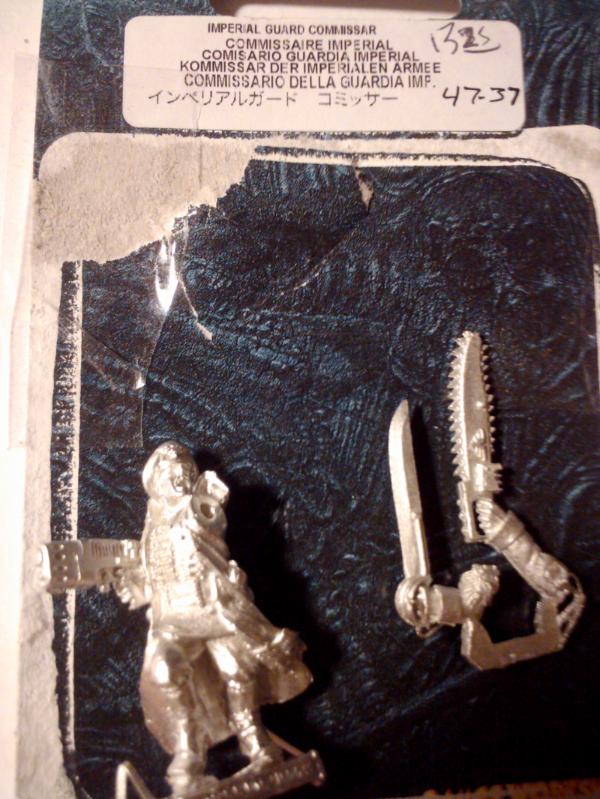

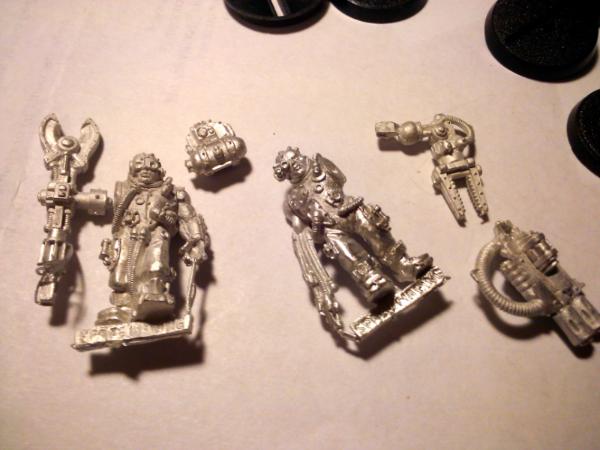
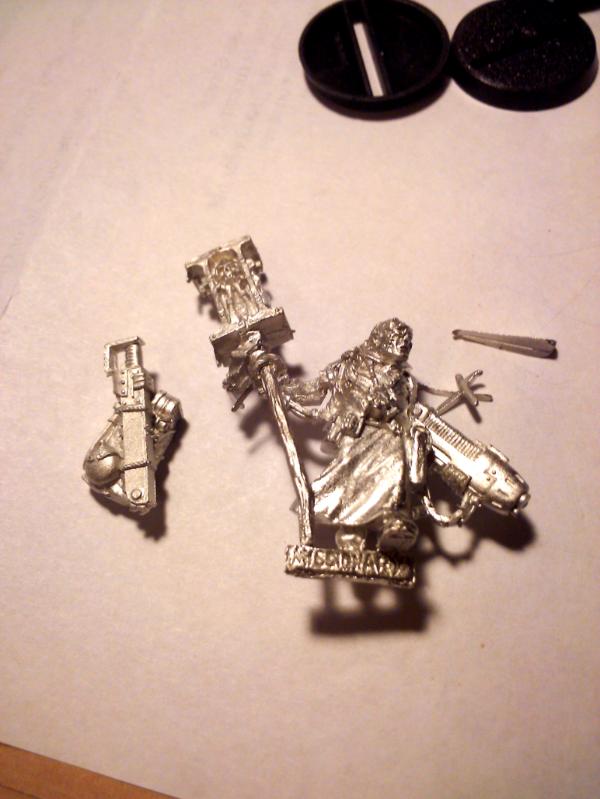
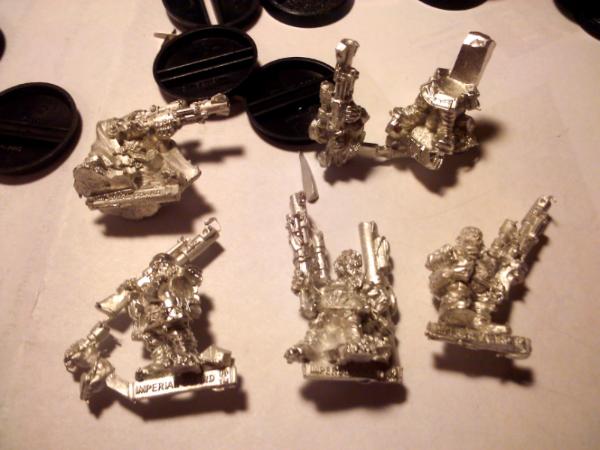
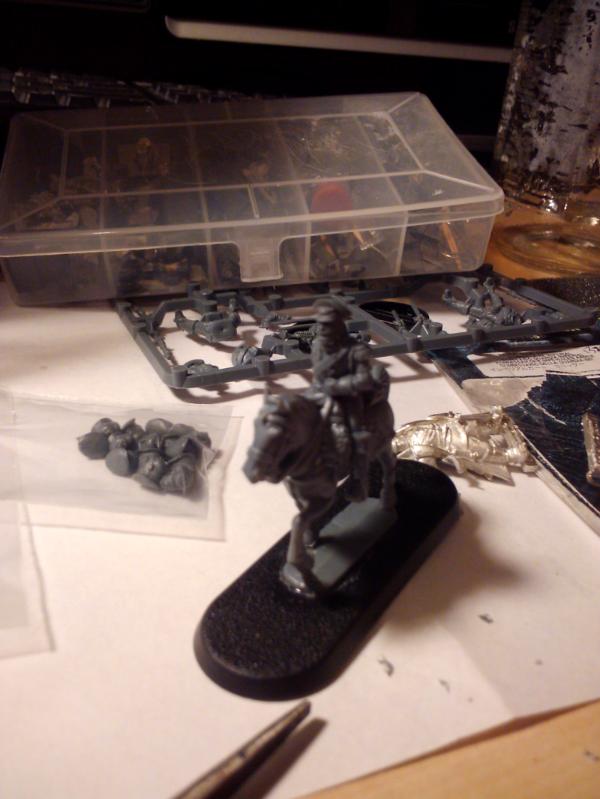
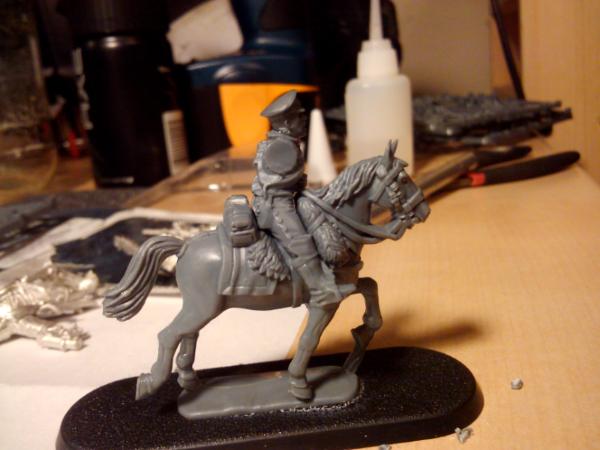
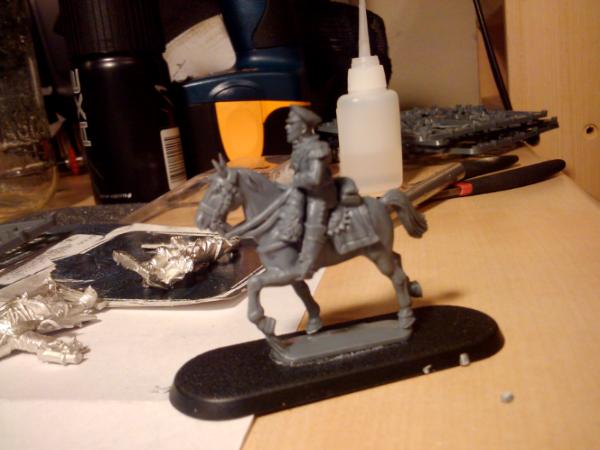
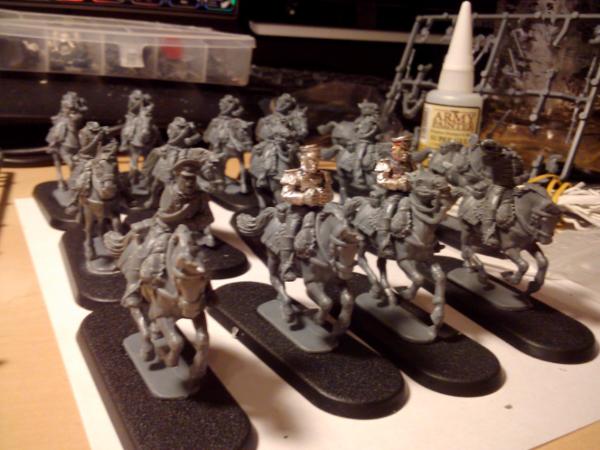
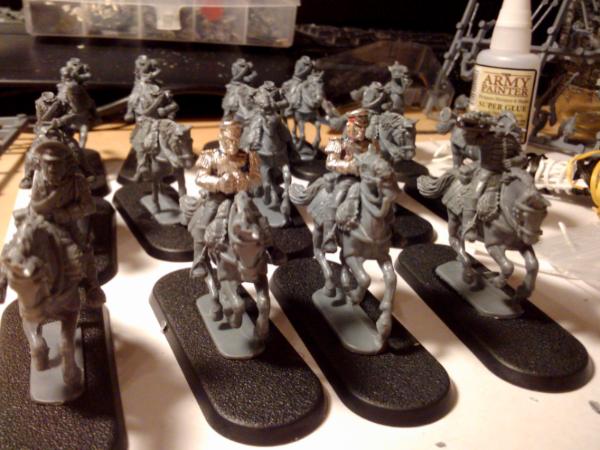
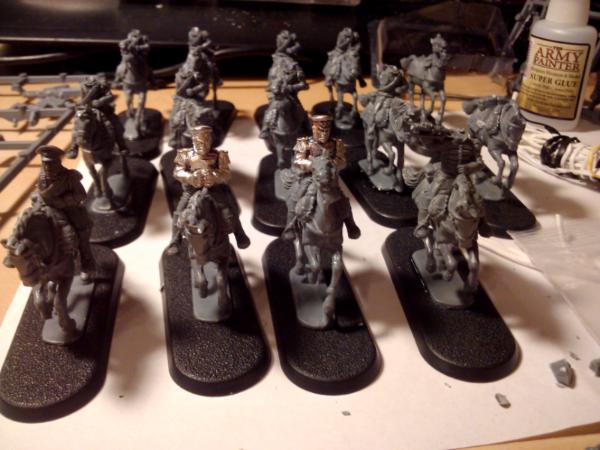
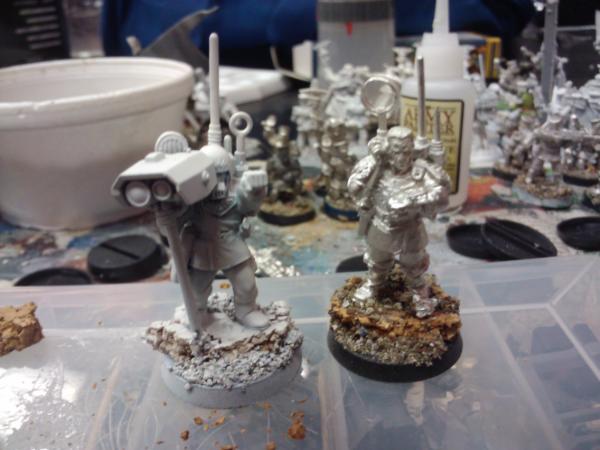
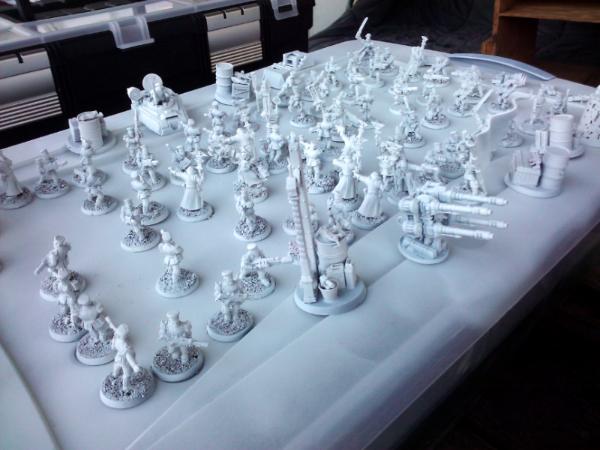
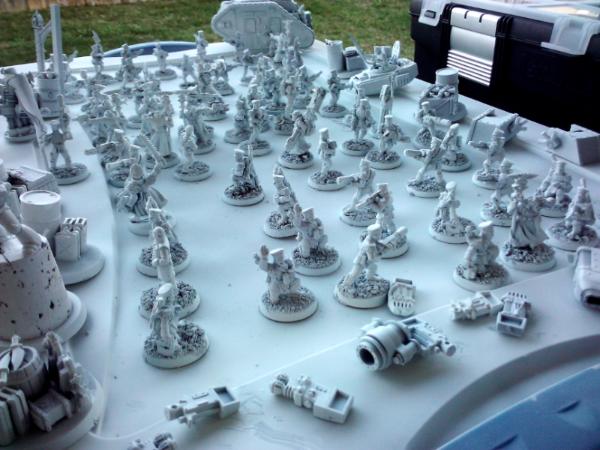
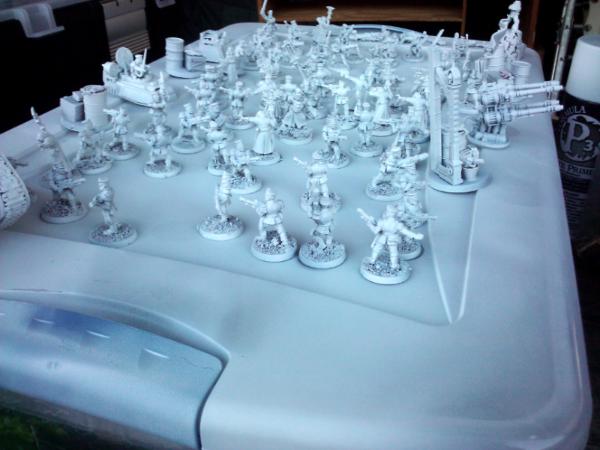
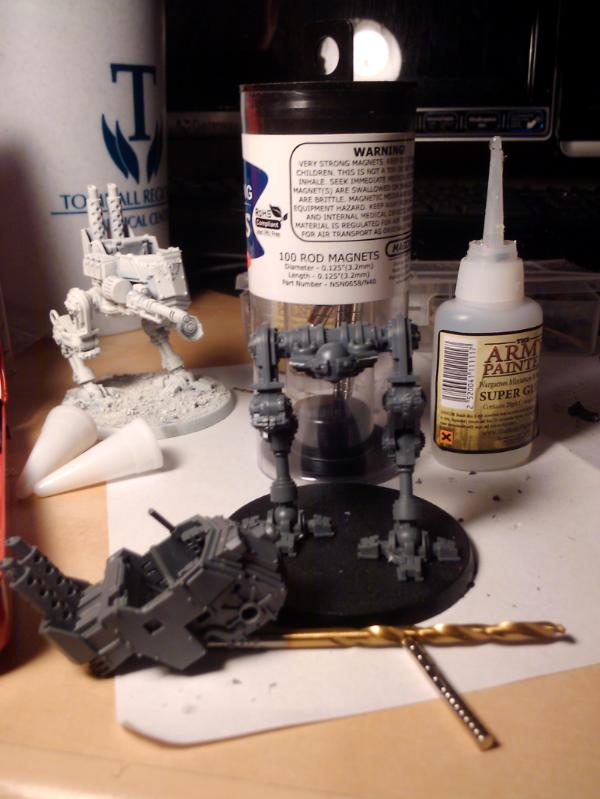
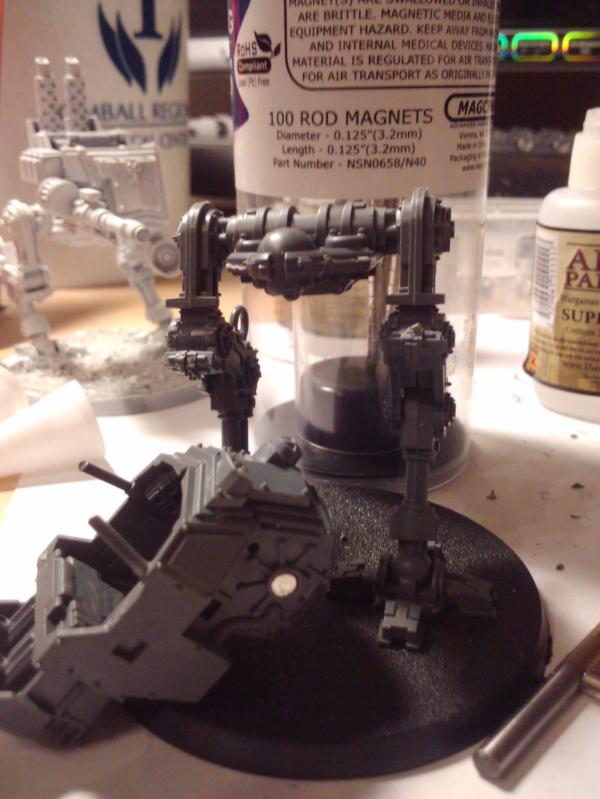
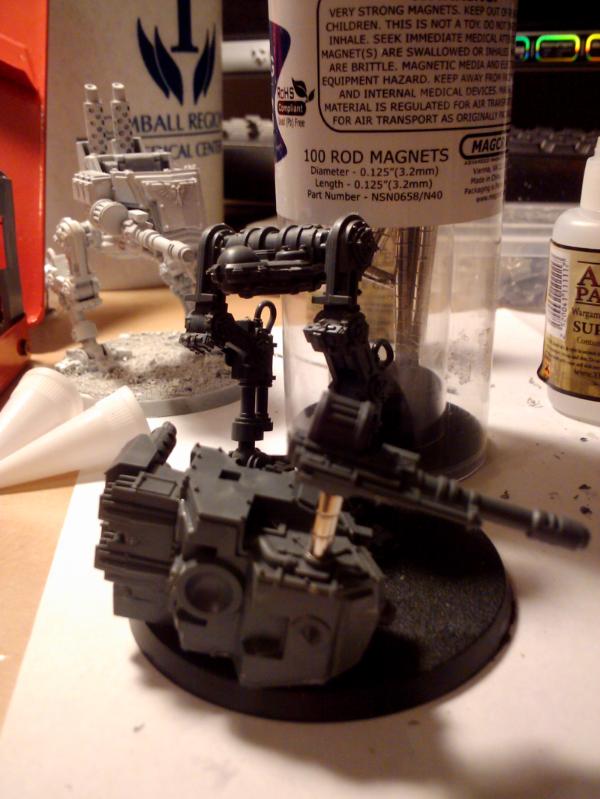
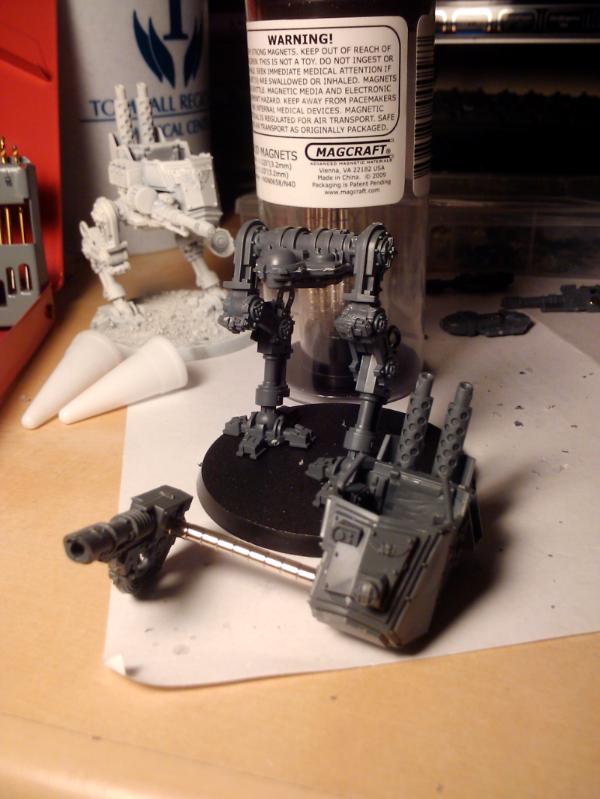
 I love the tank commander and the rough riders. Keep up the great work
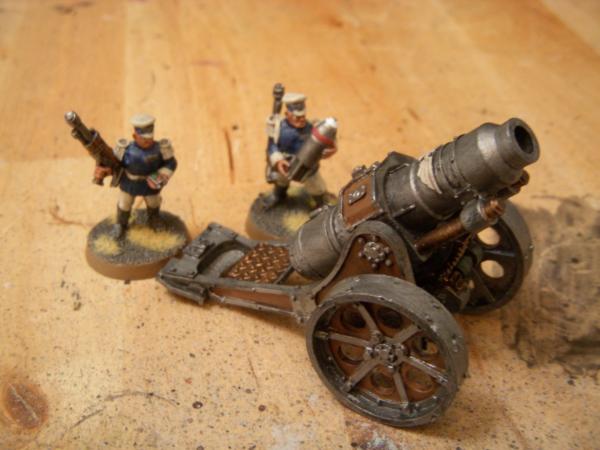
 I'm glad you're enjoying my work.
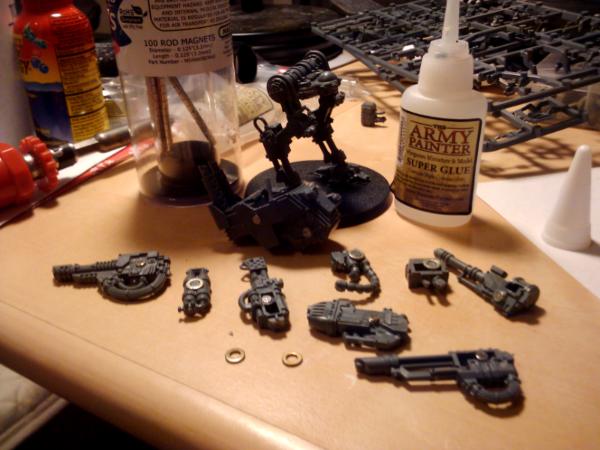
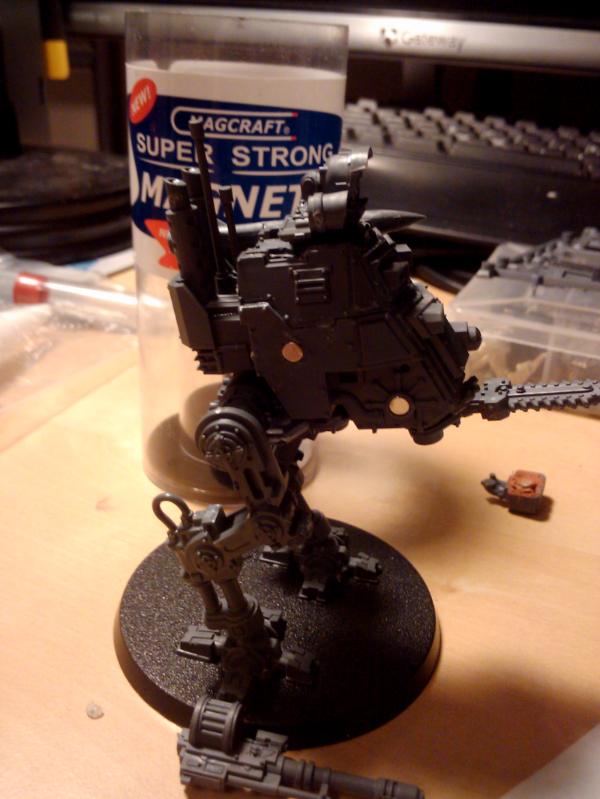
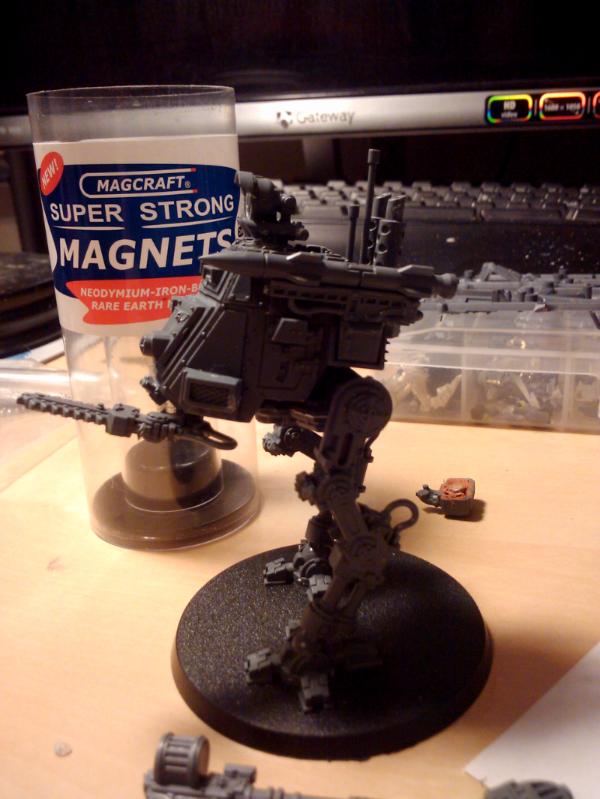

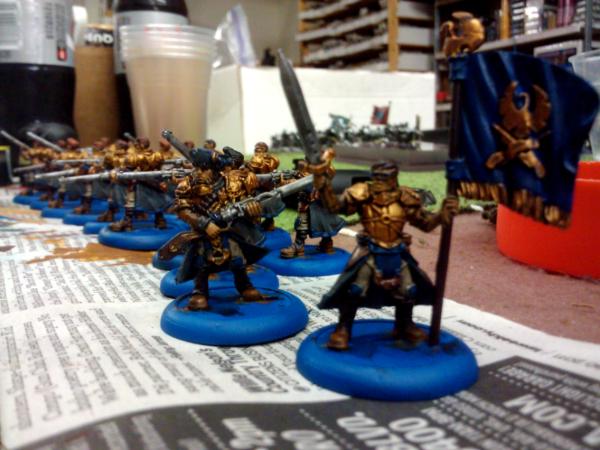

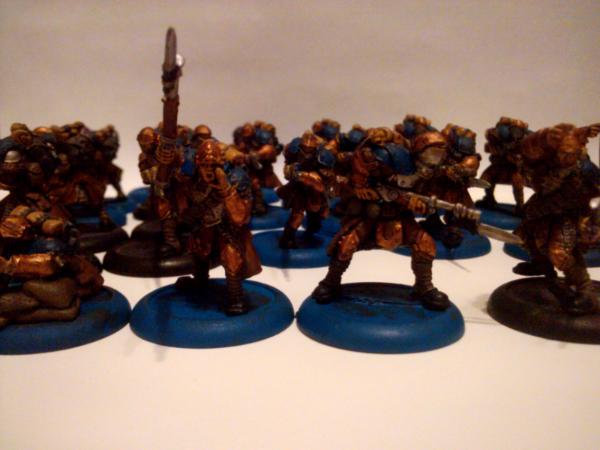
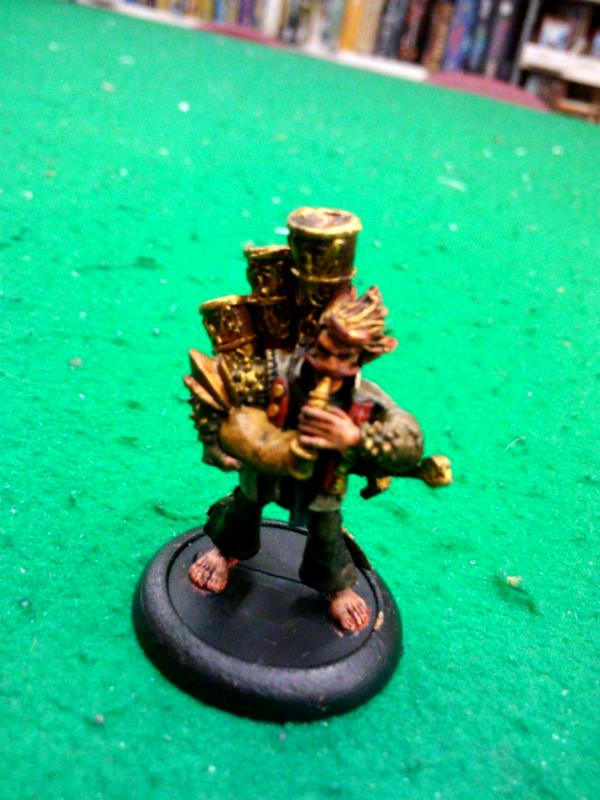


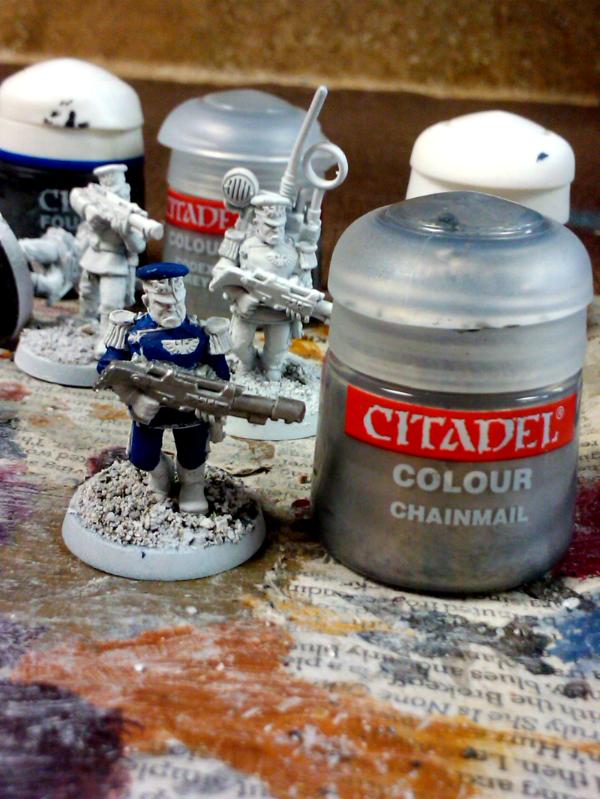

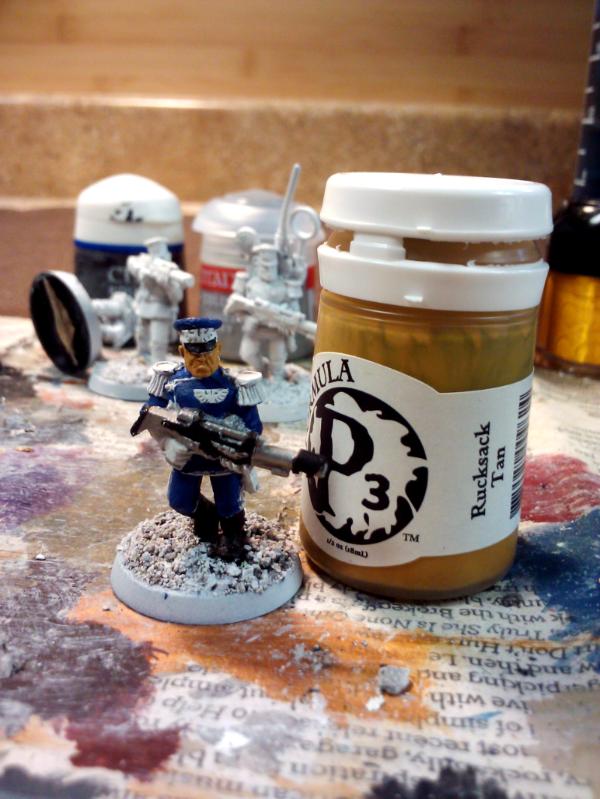
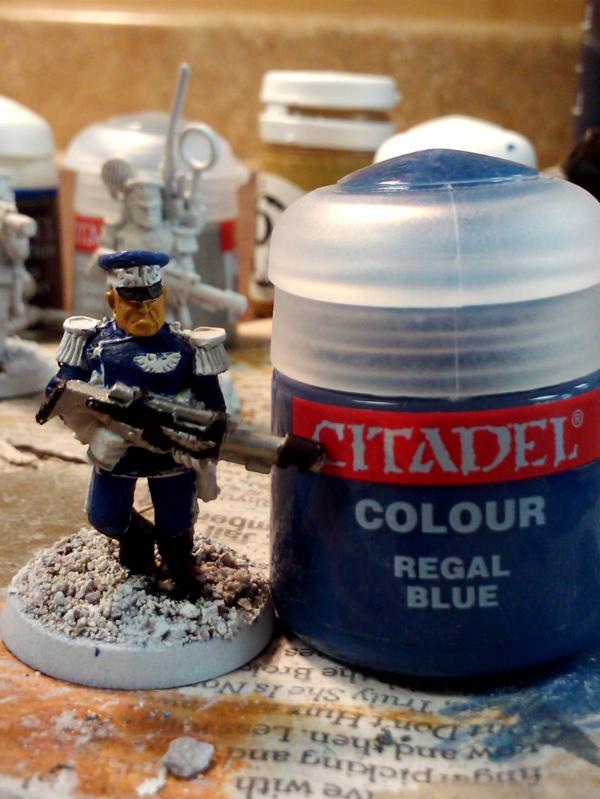
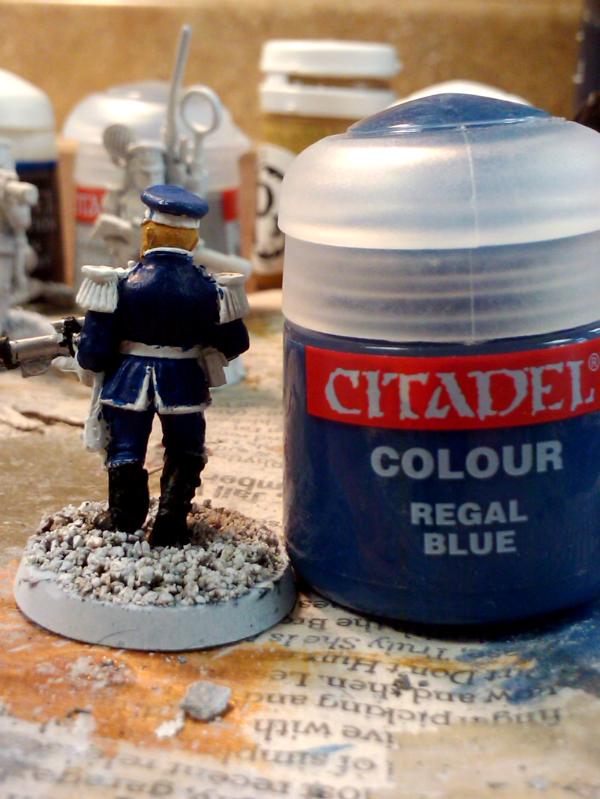
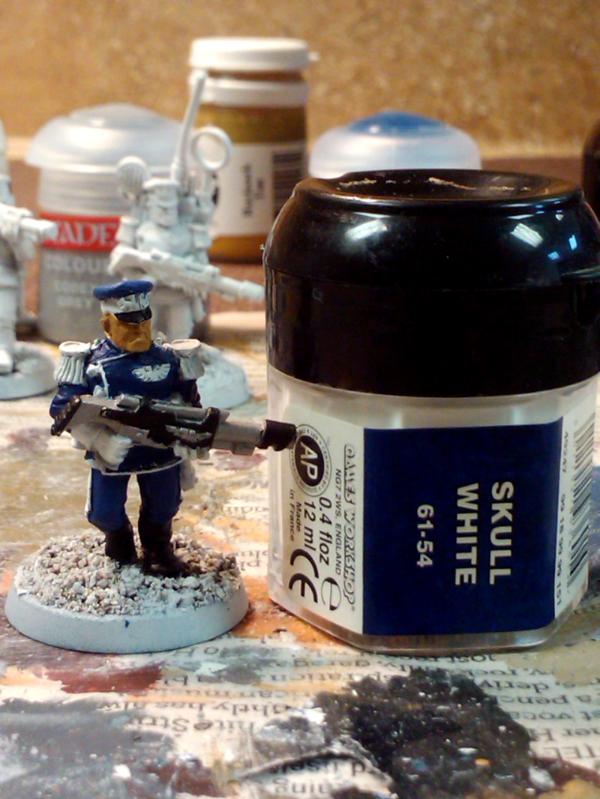
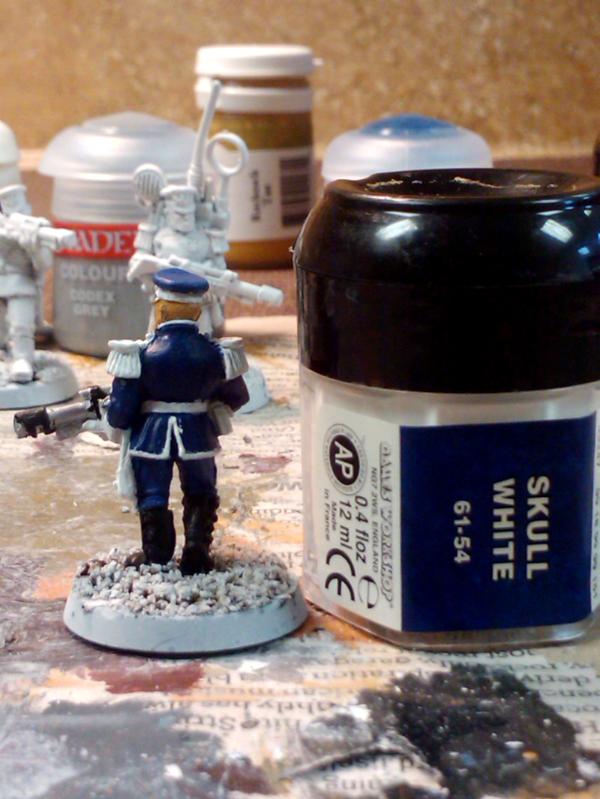
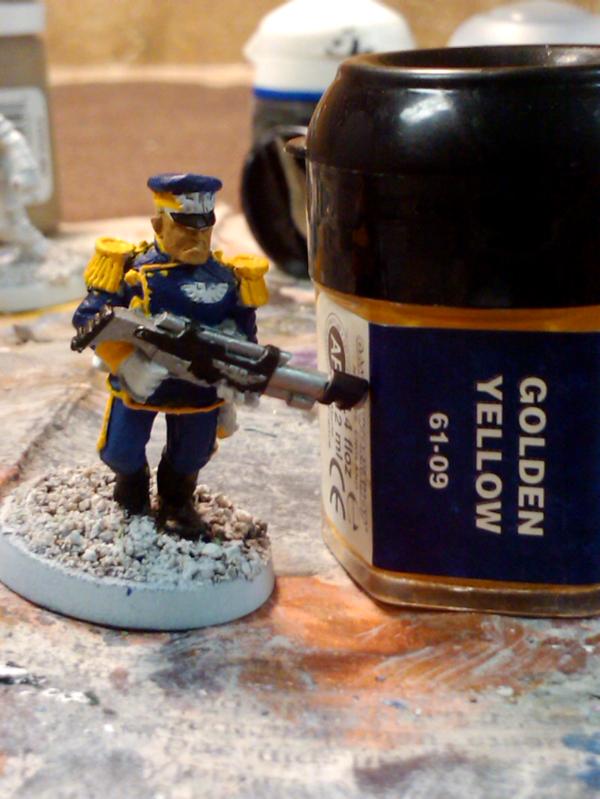
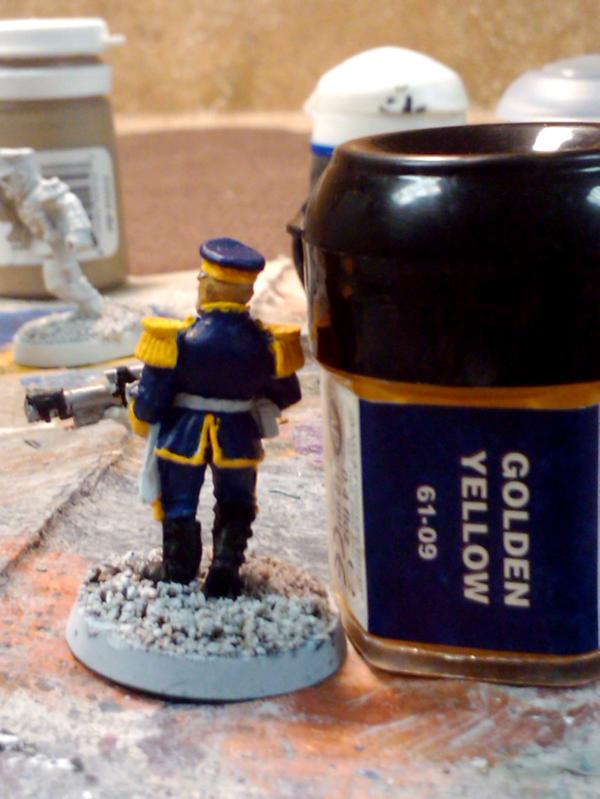
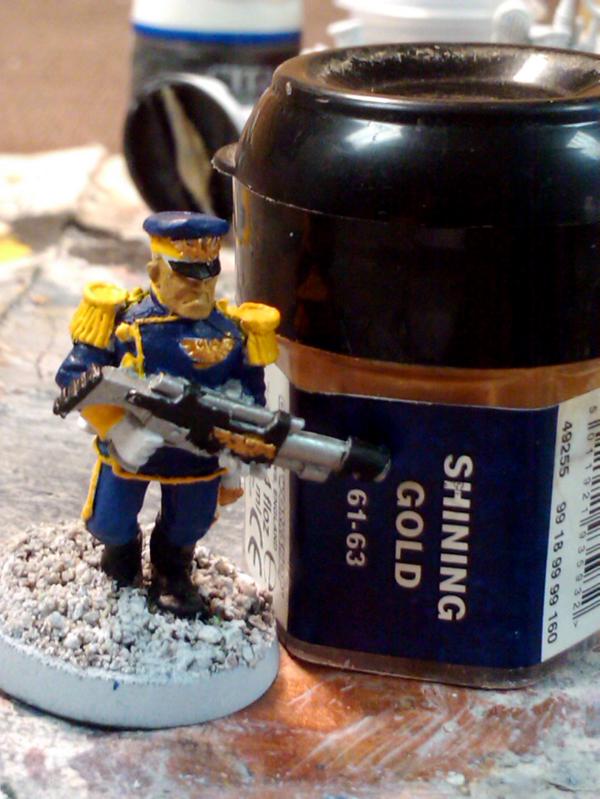
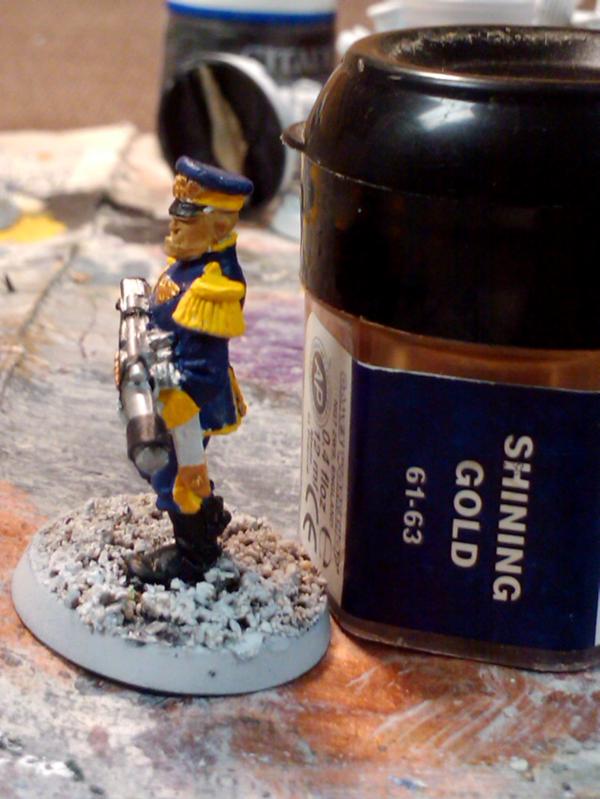
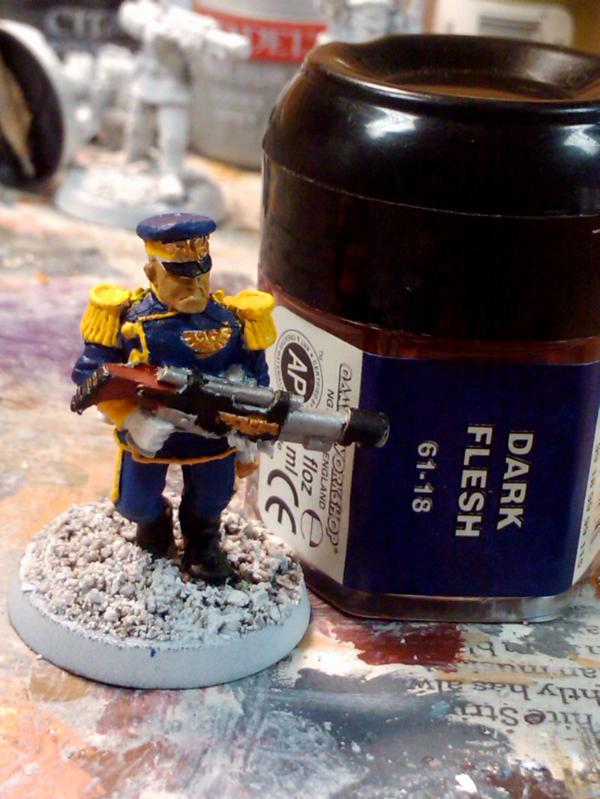
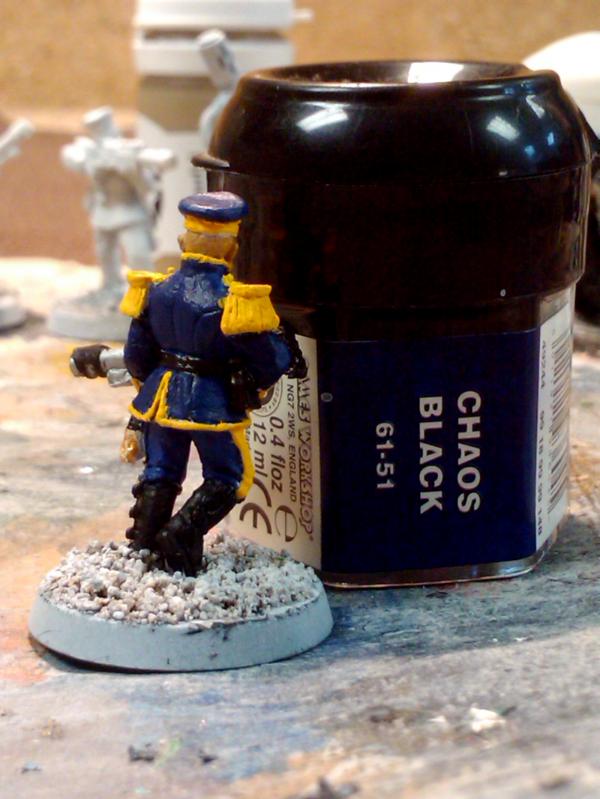
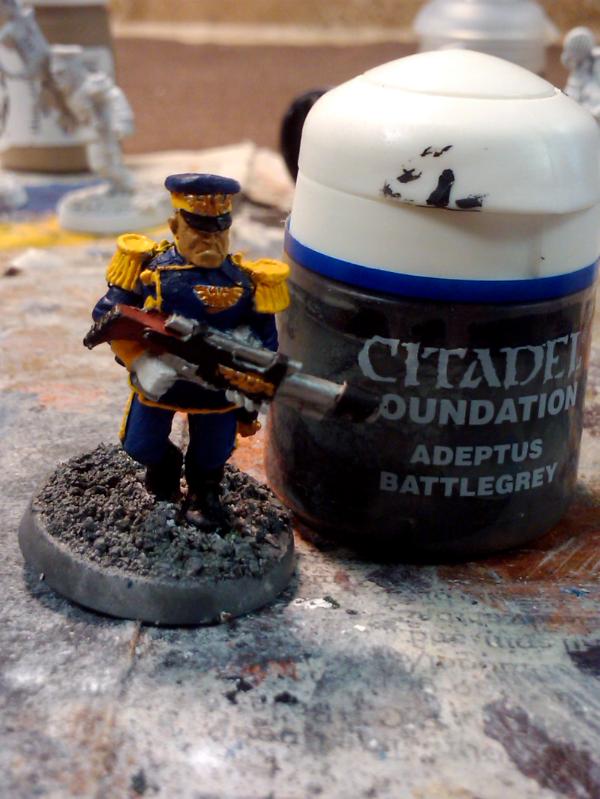
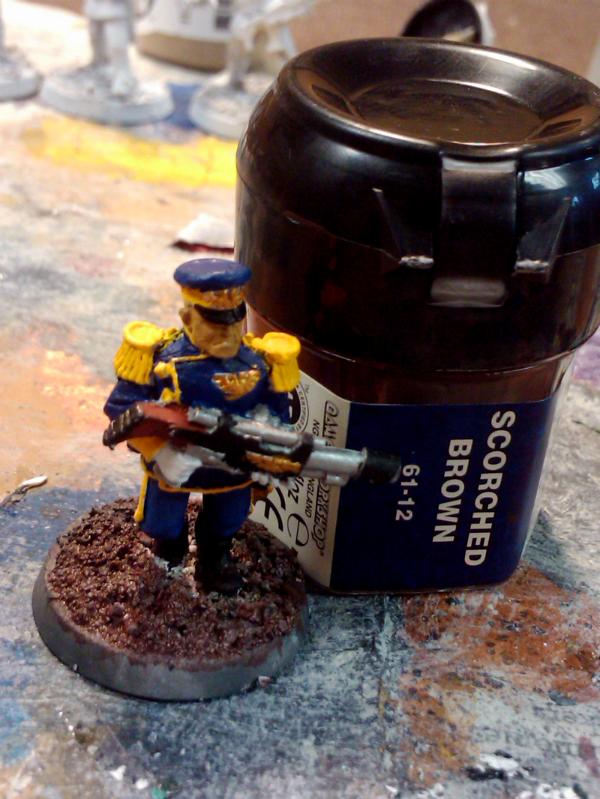
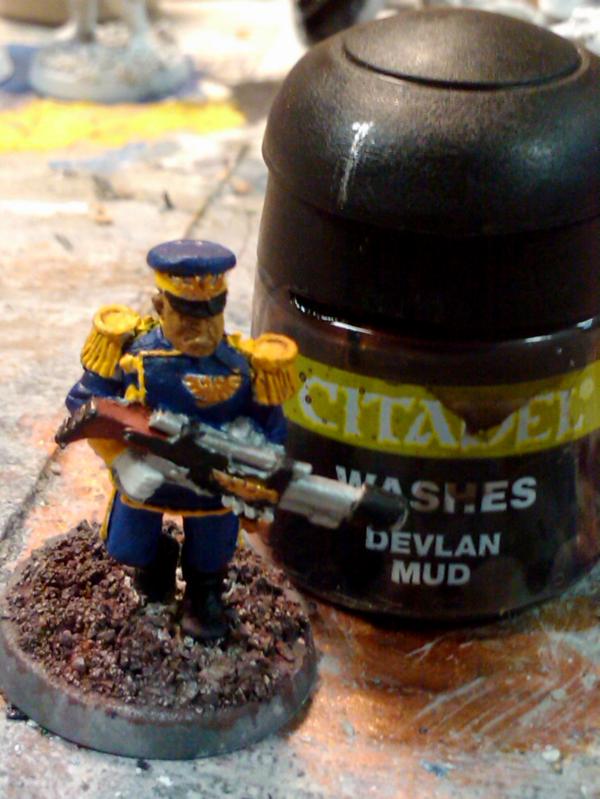
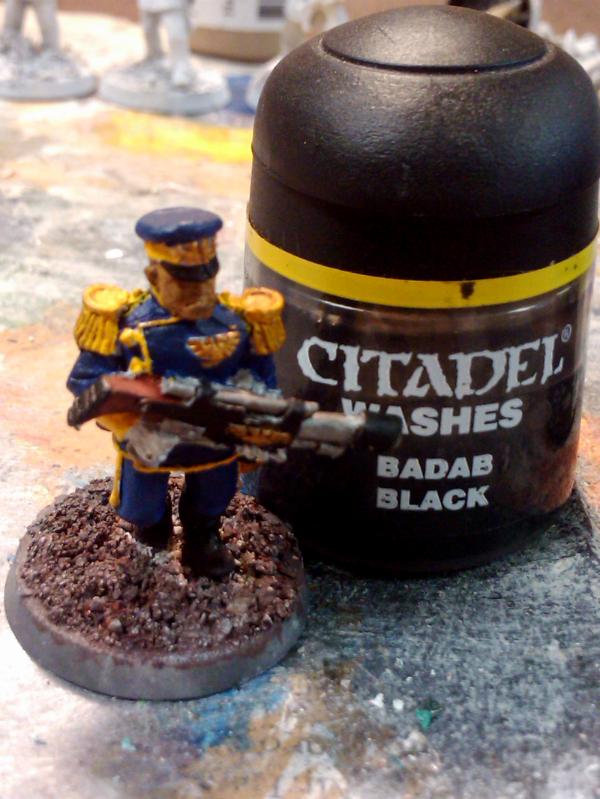
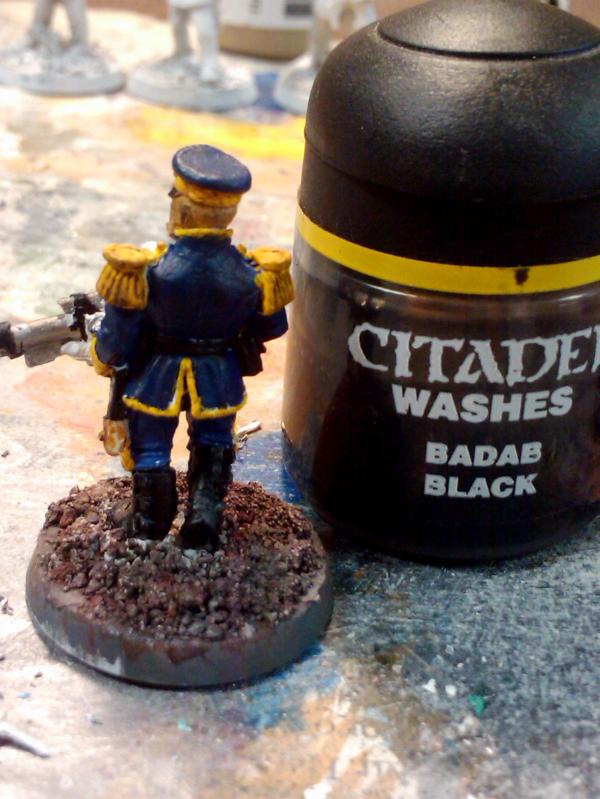
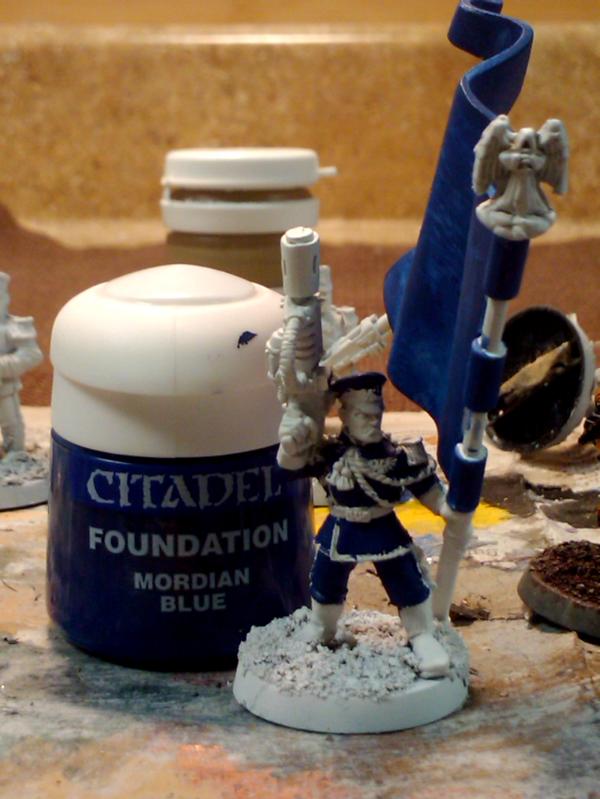

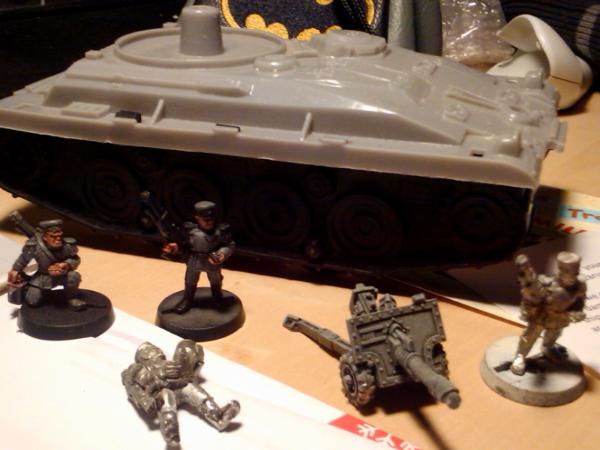
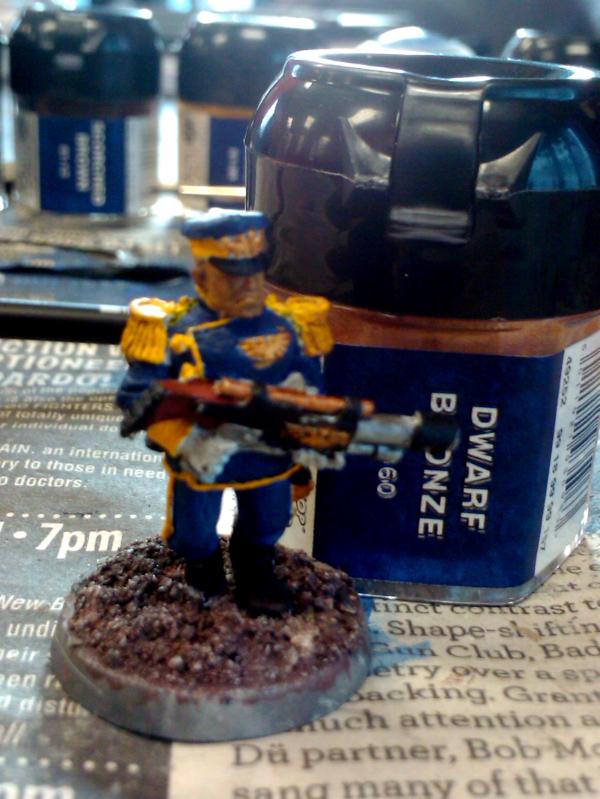
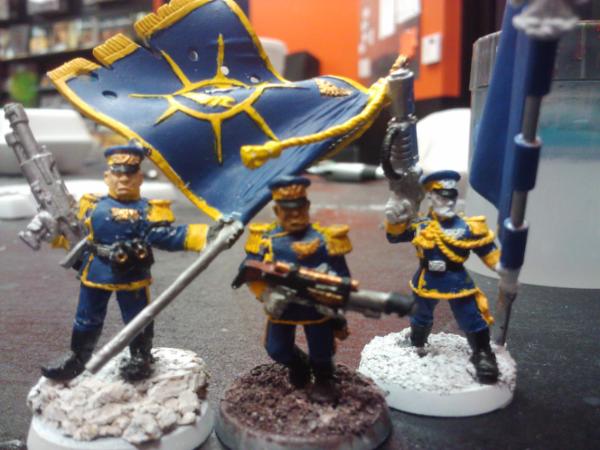
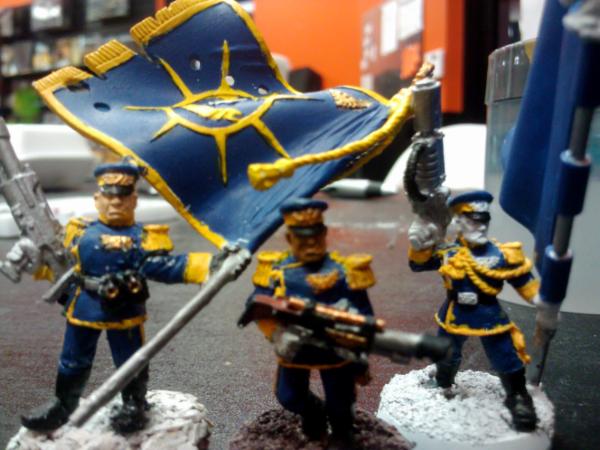

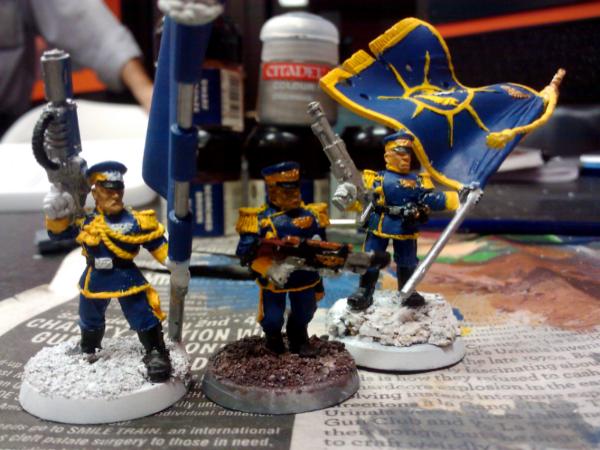
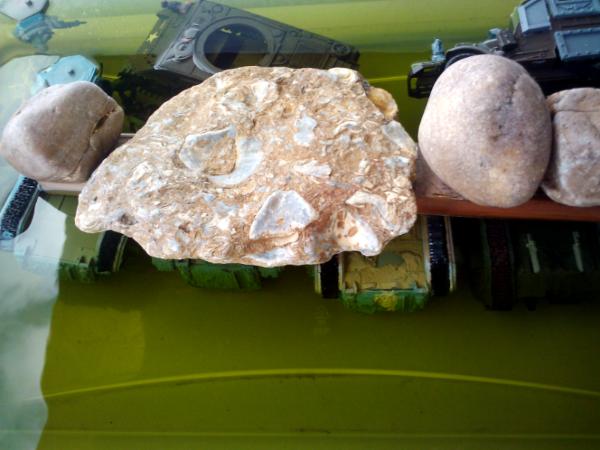
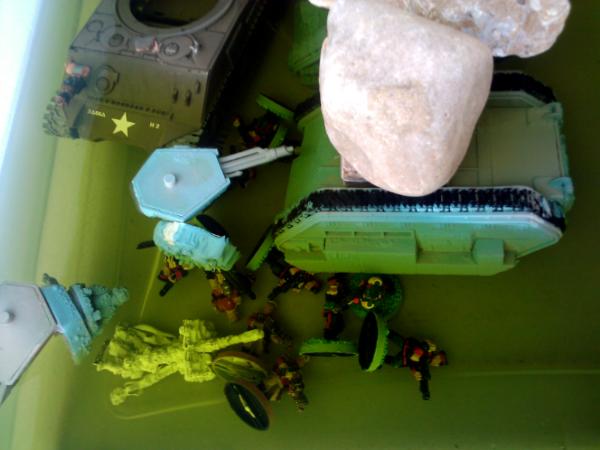
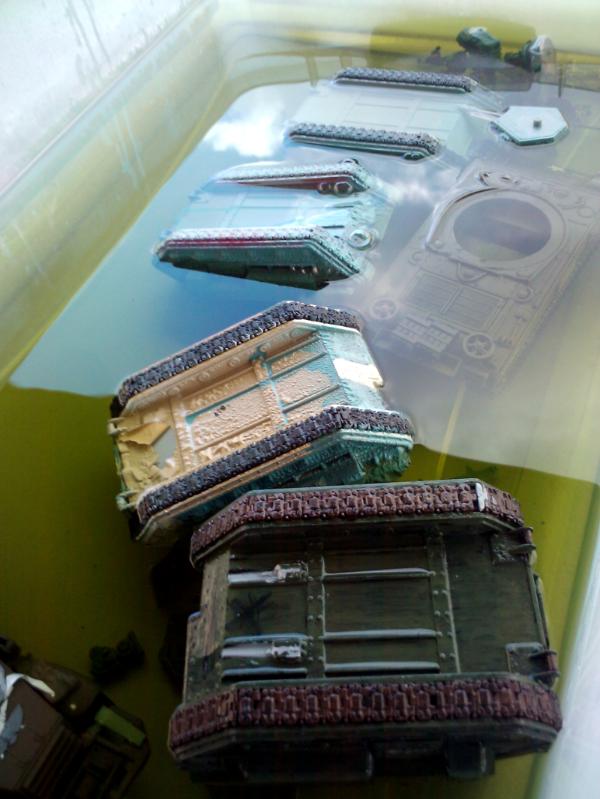
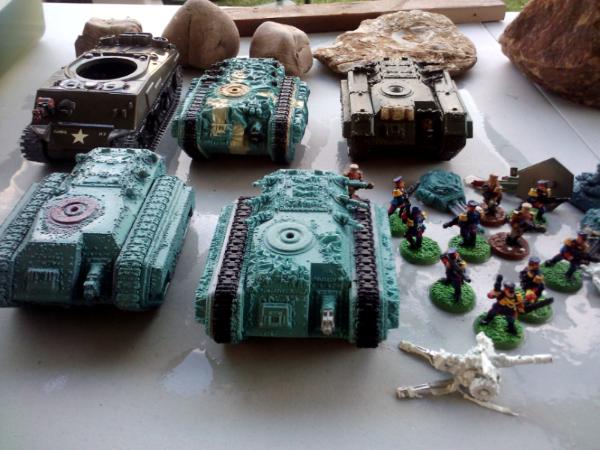
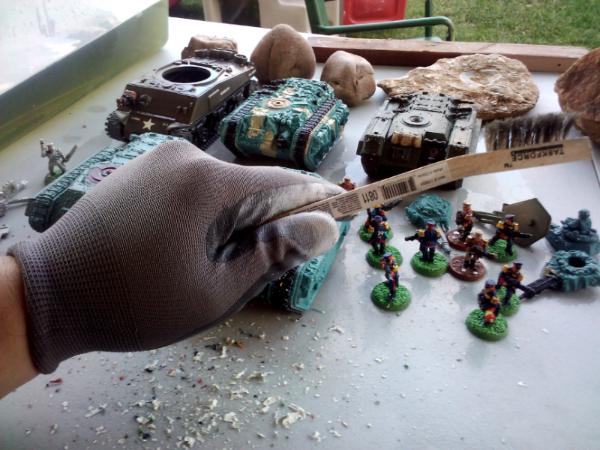
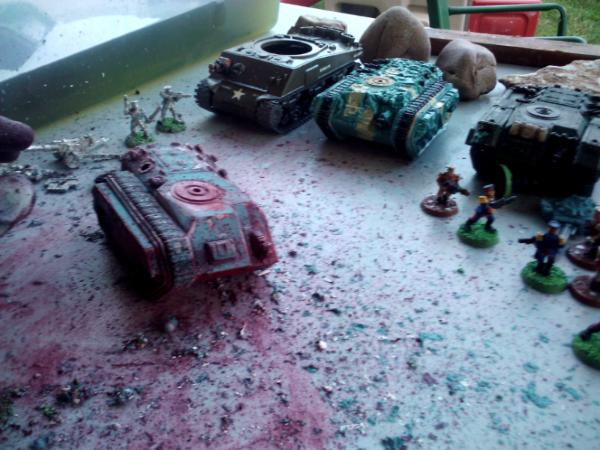
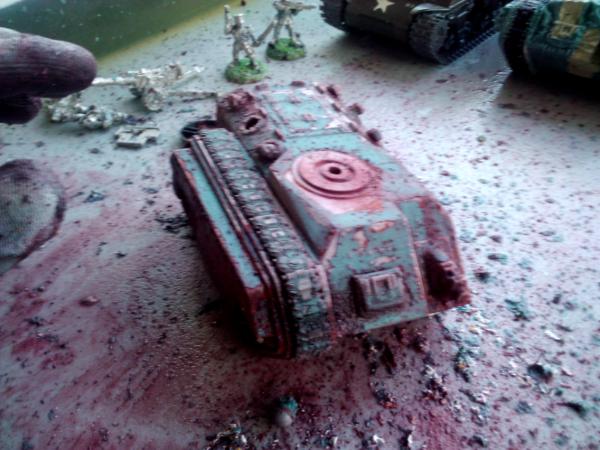

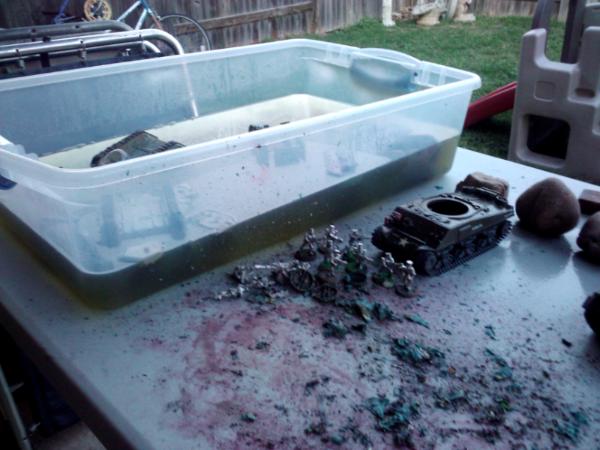
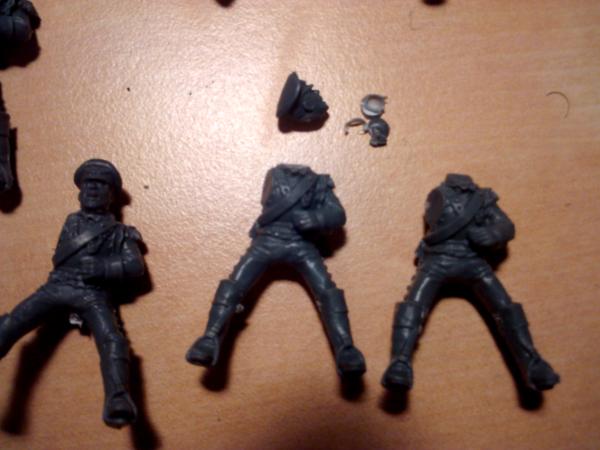
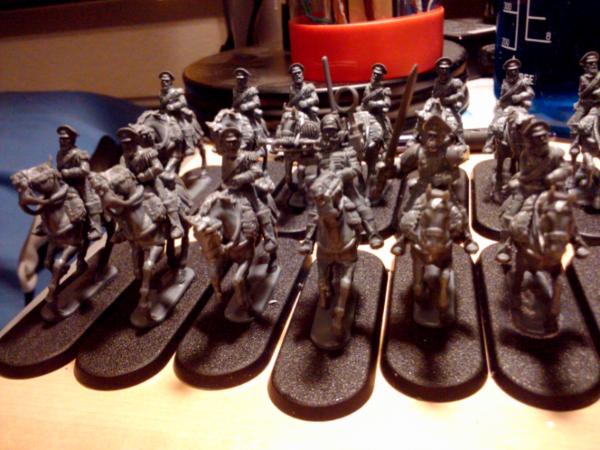
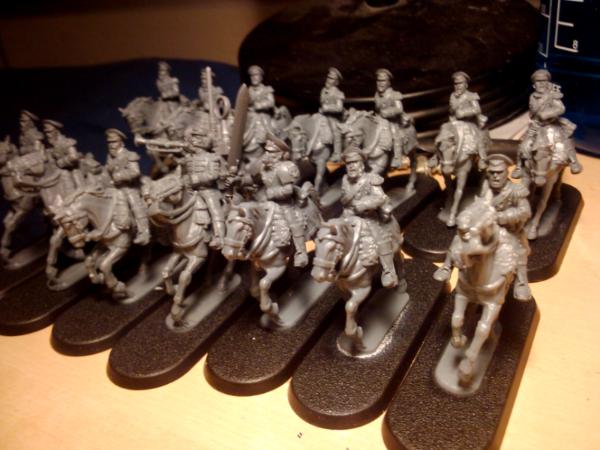
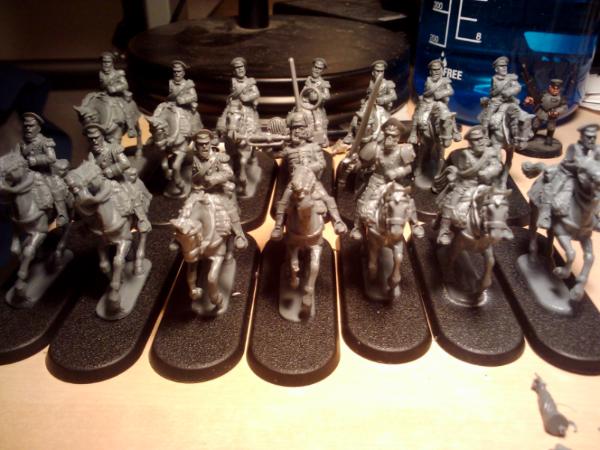
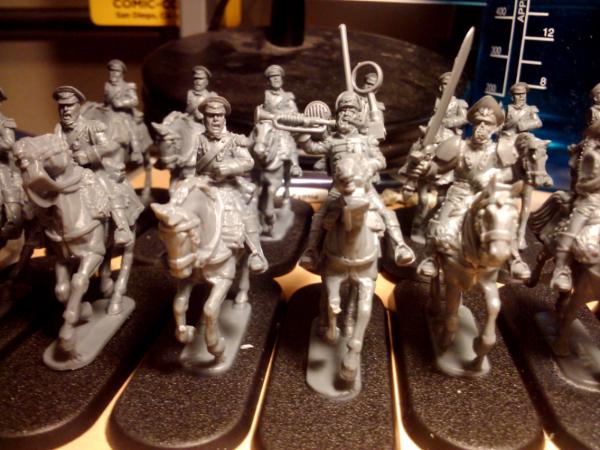
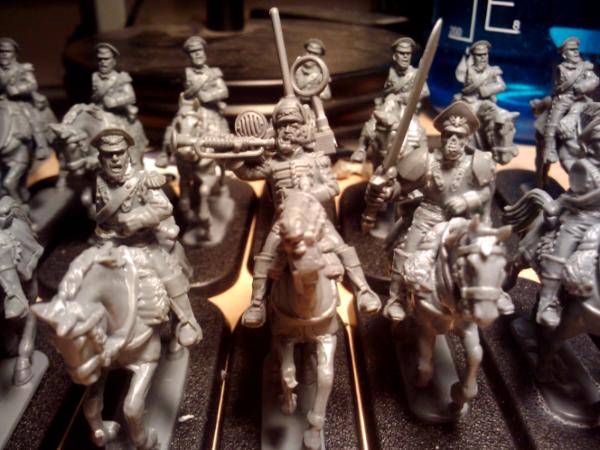
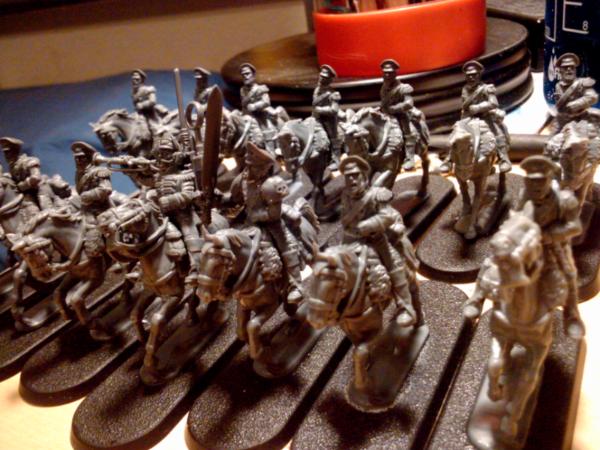
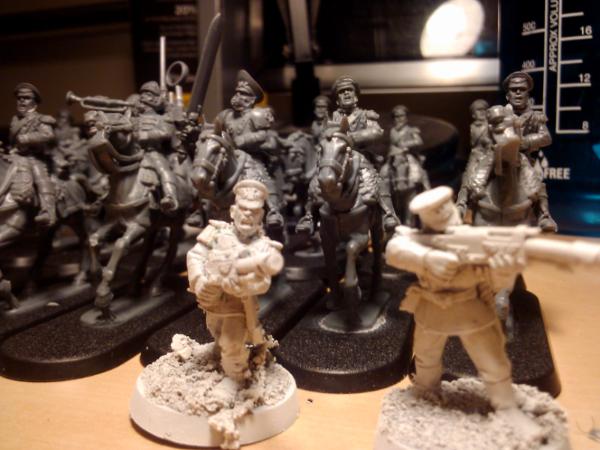
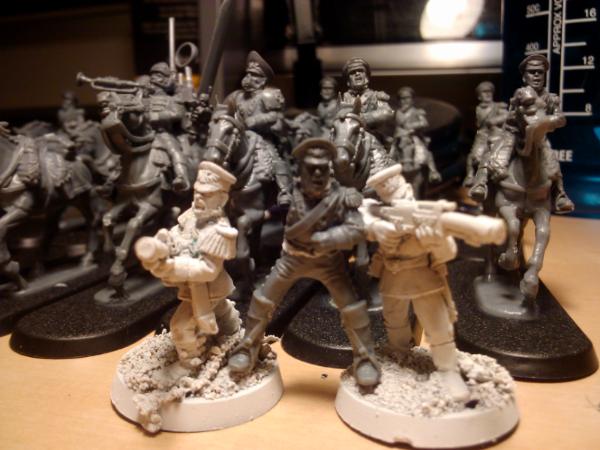
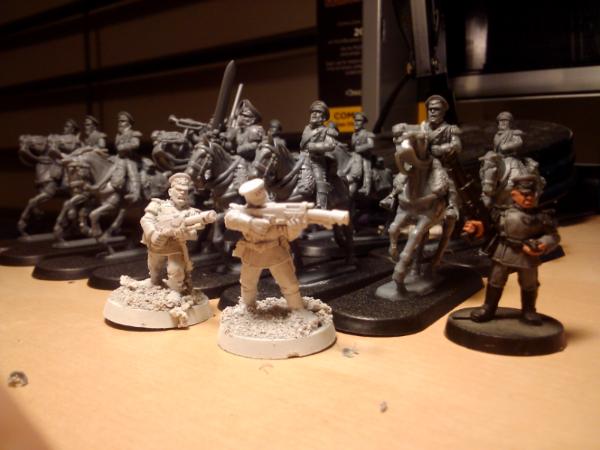
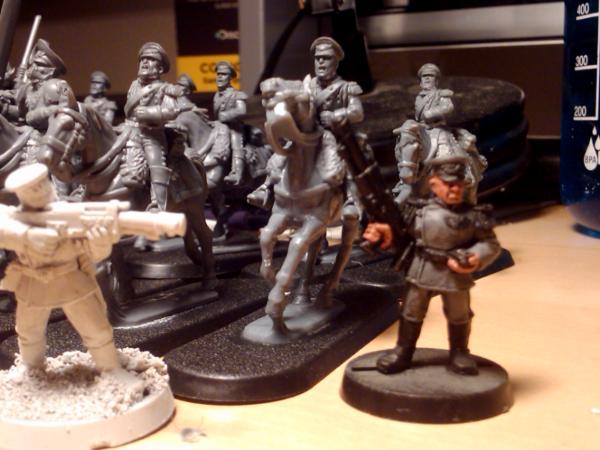
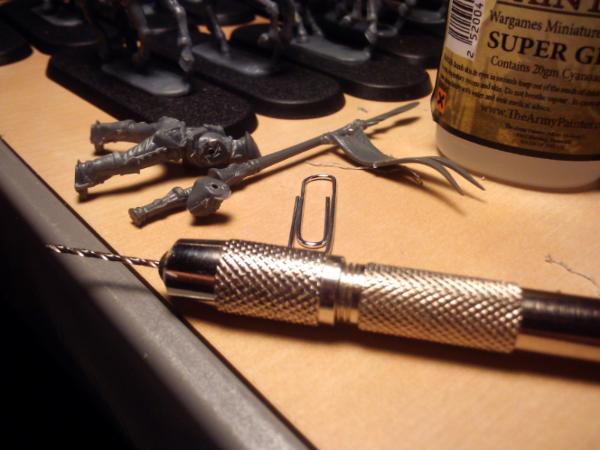
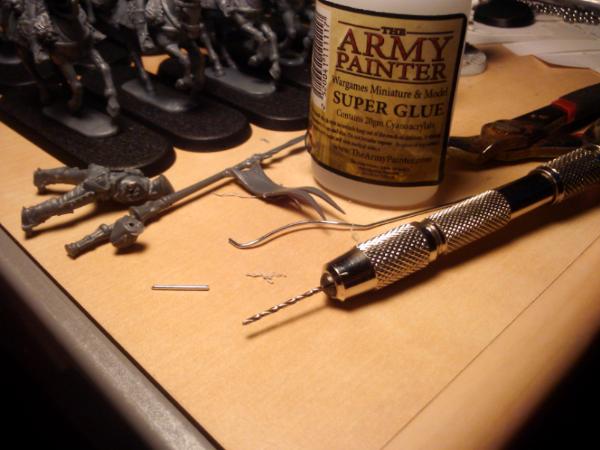

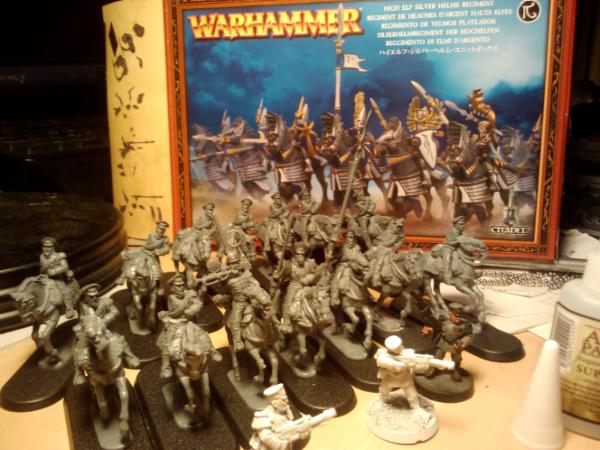
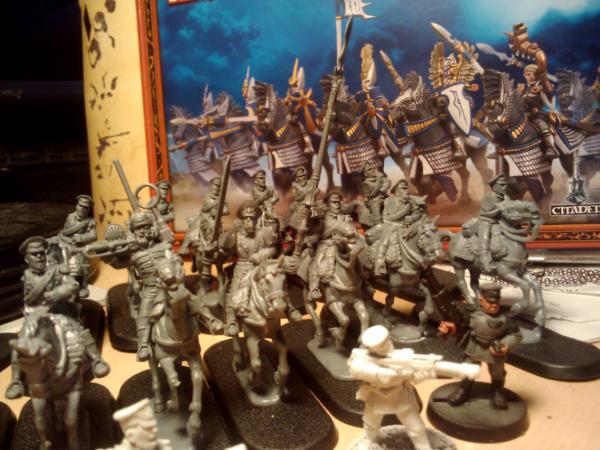
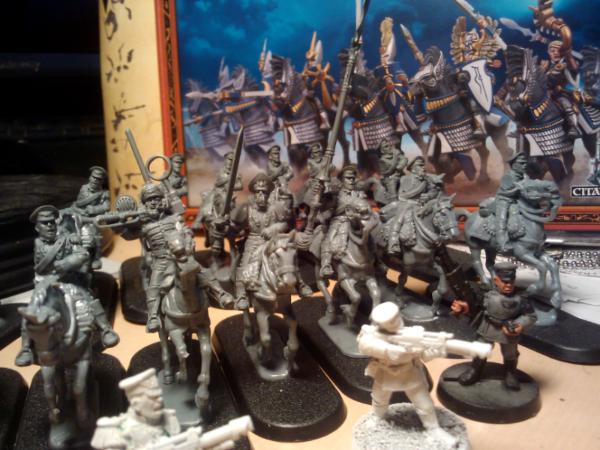
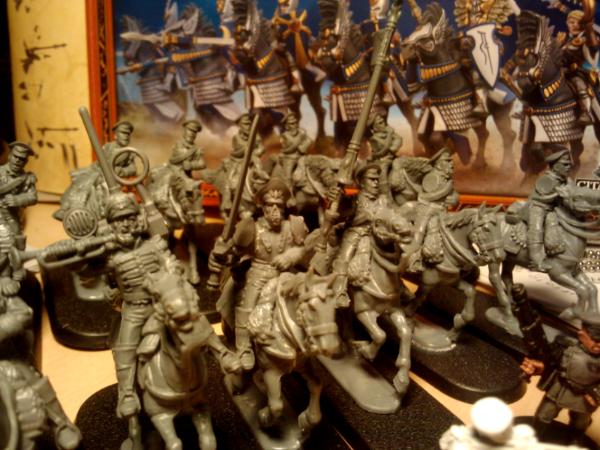
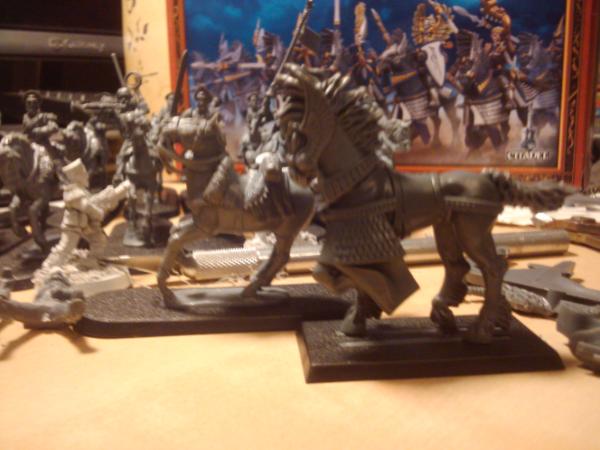

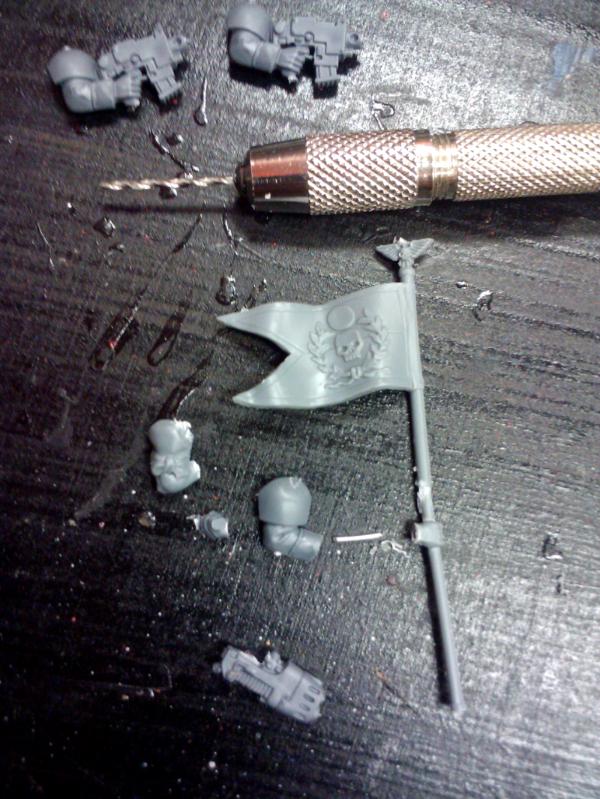
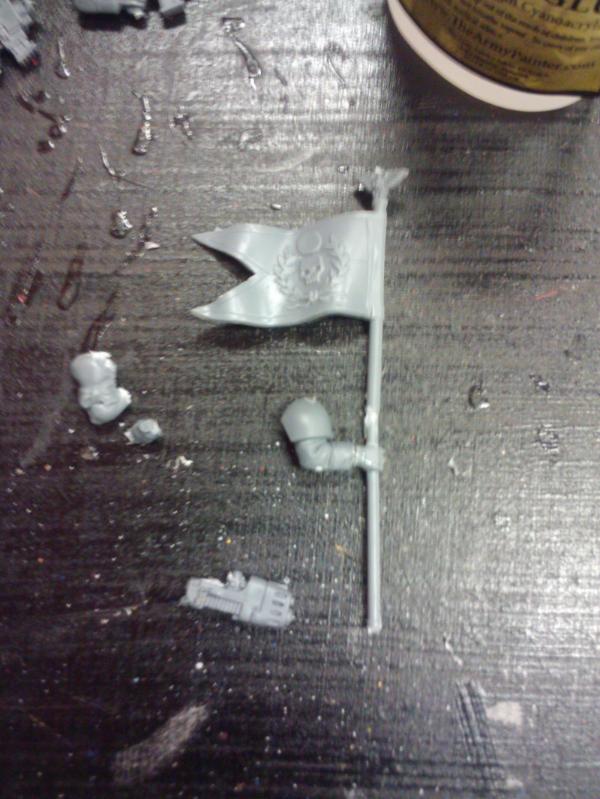
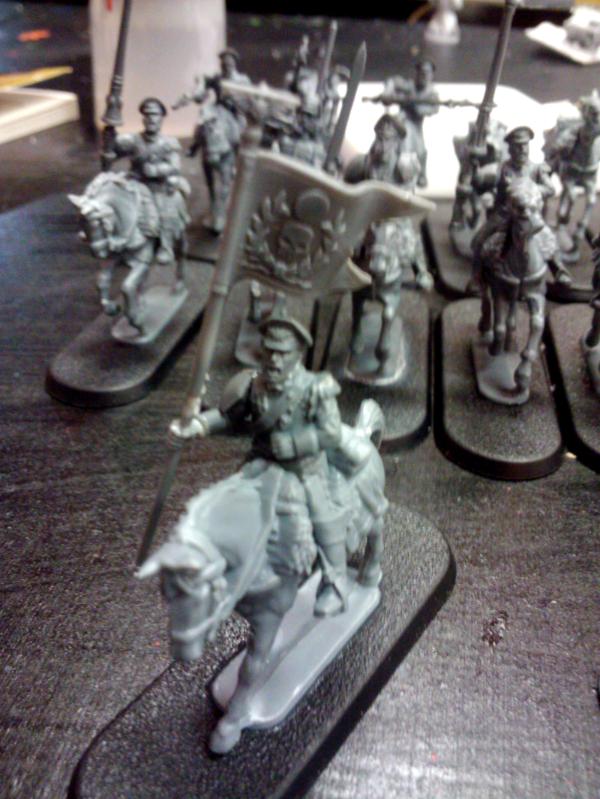
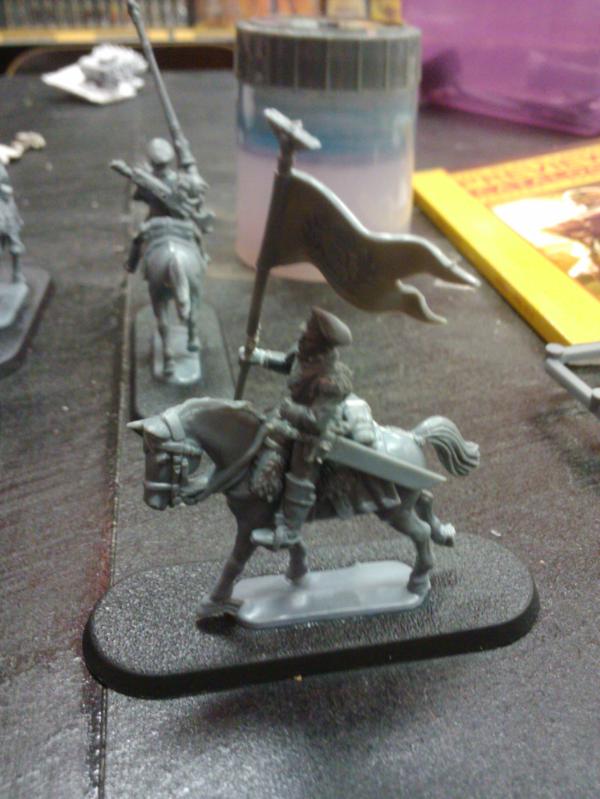
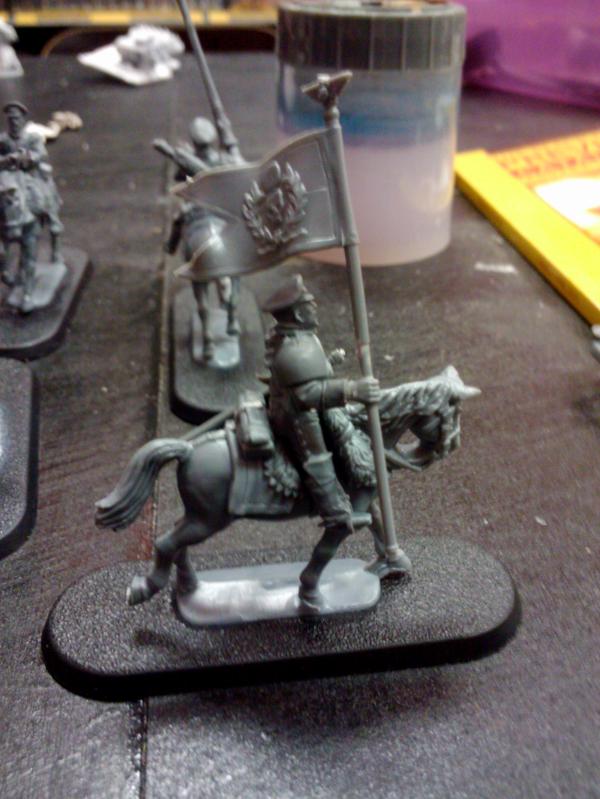

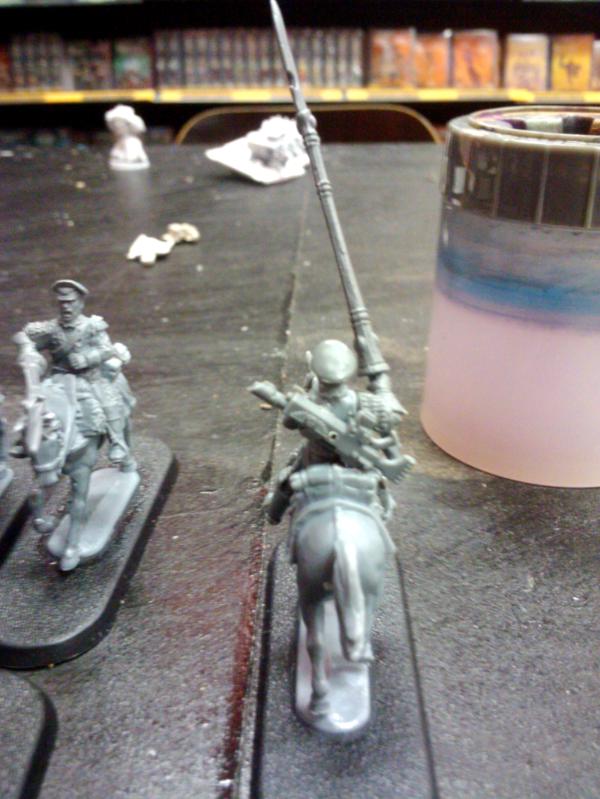

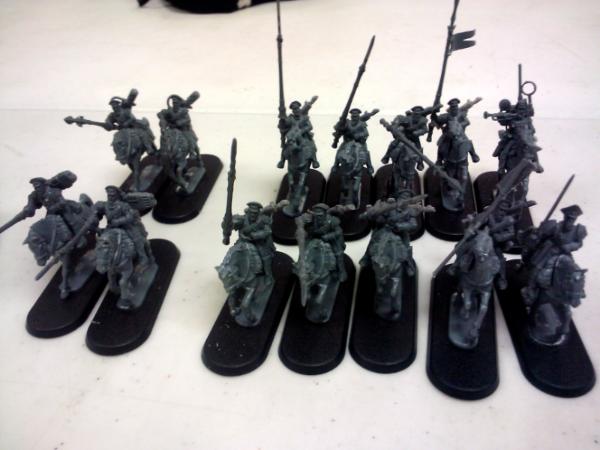
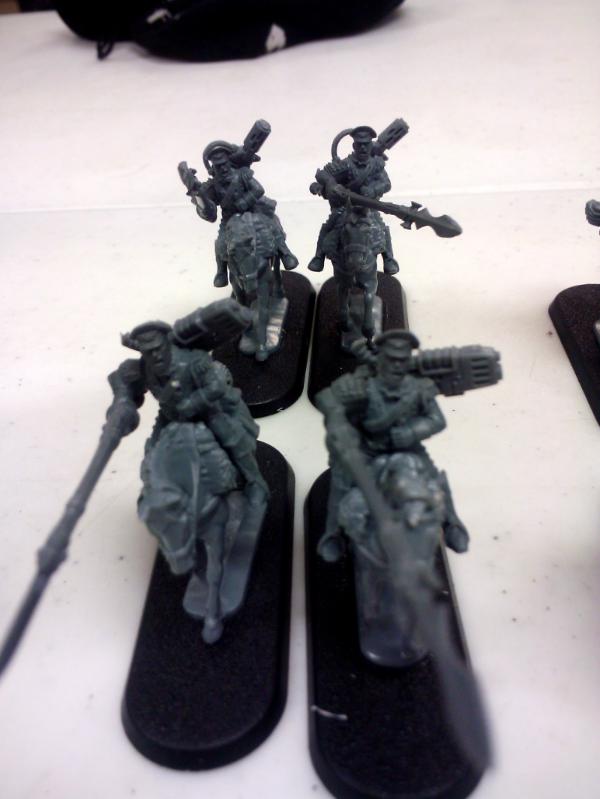
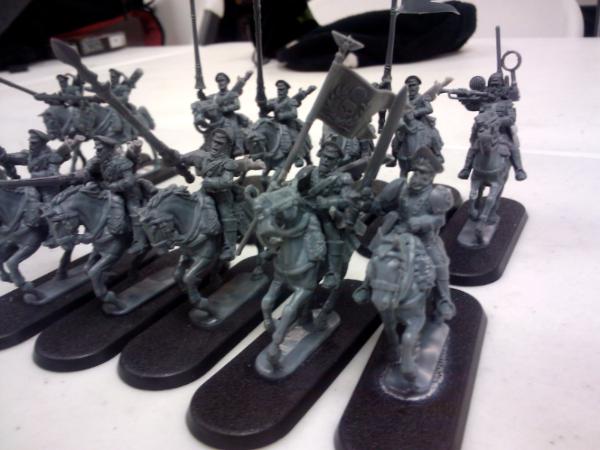
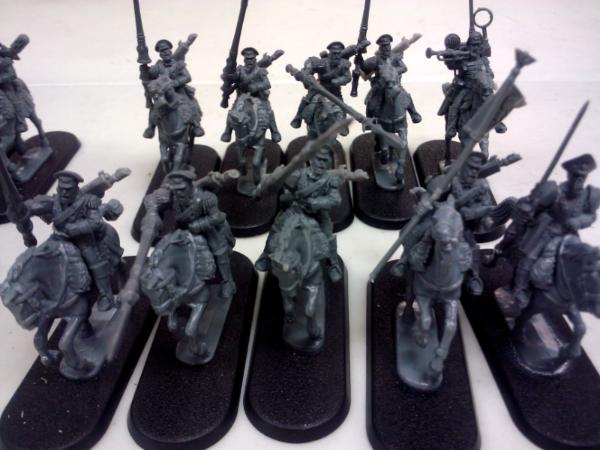
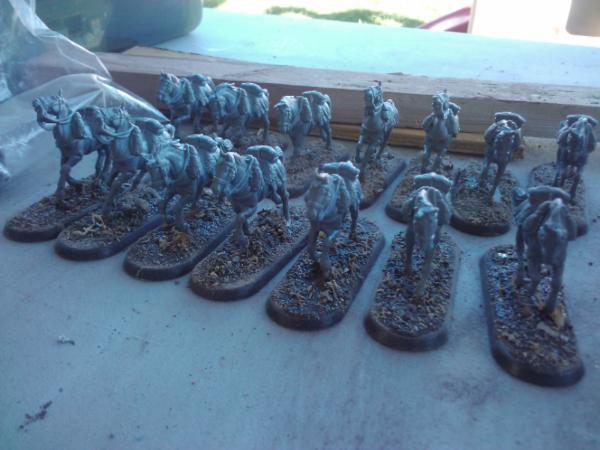
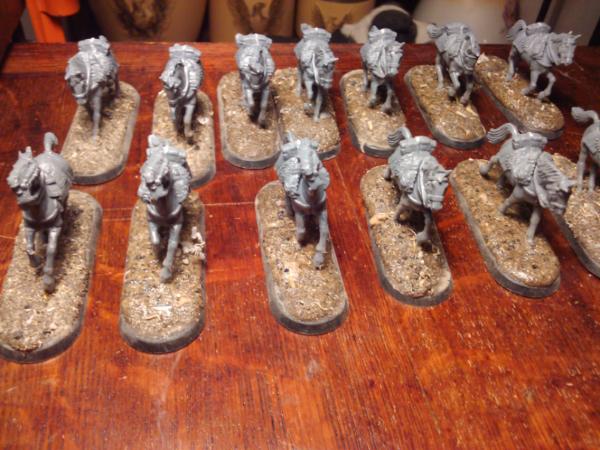
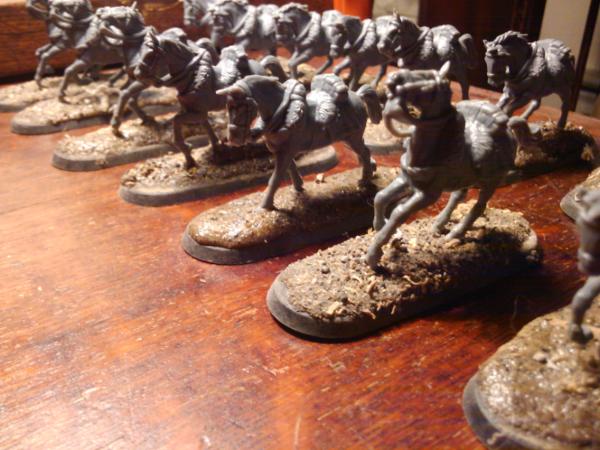
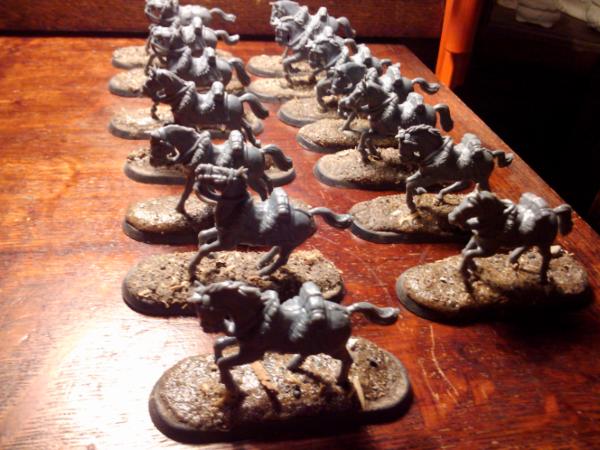
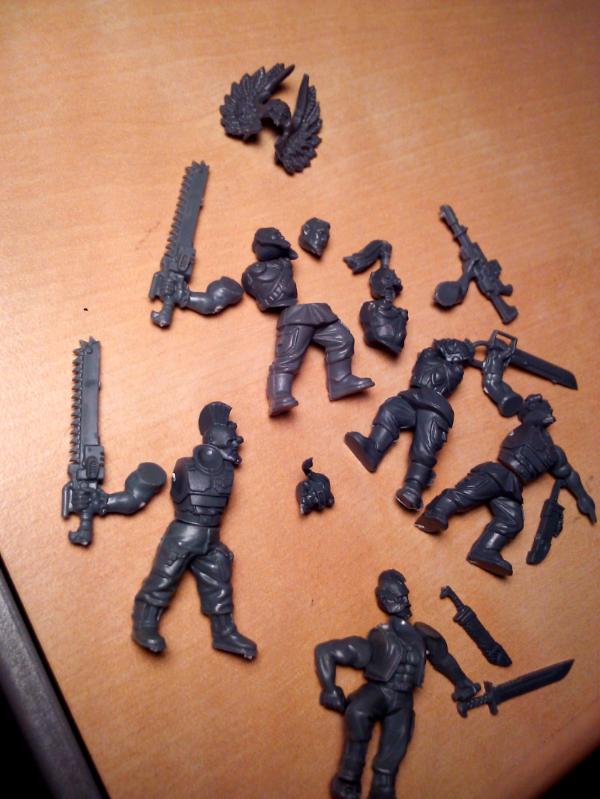

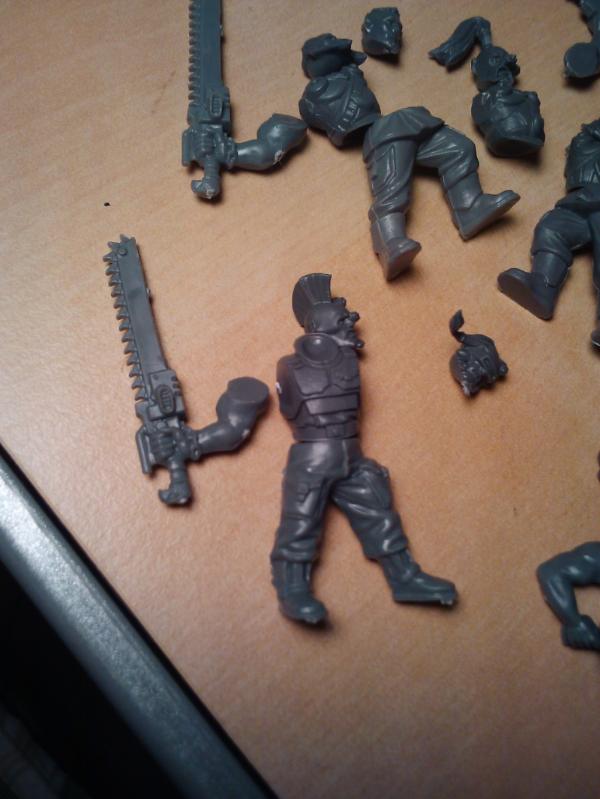
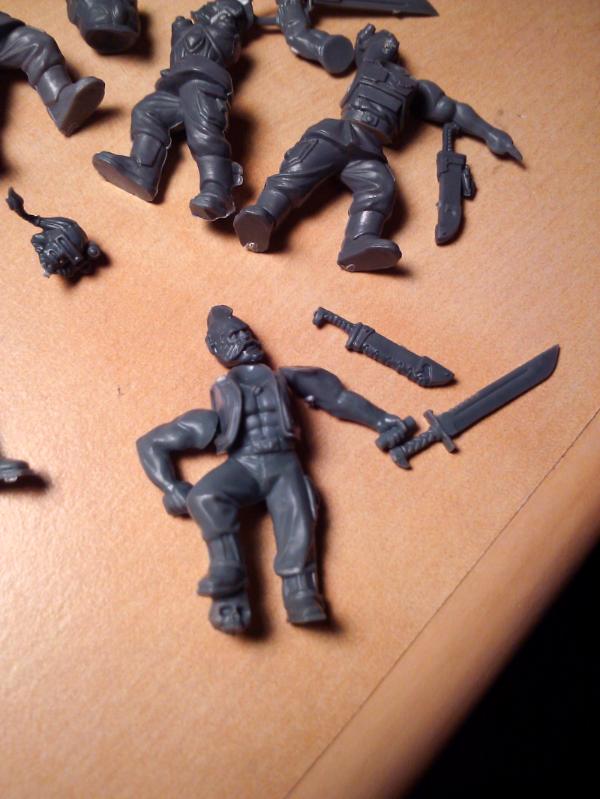
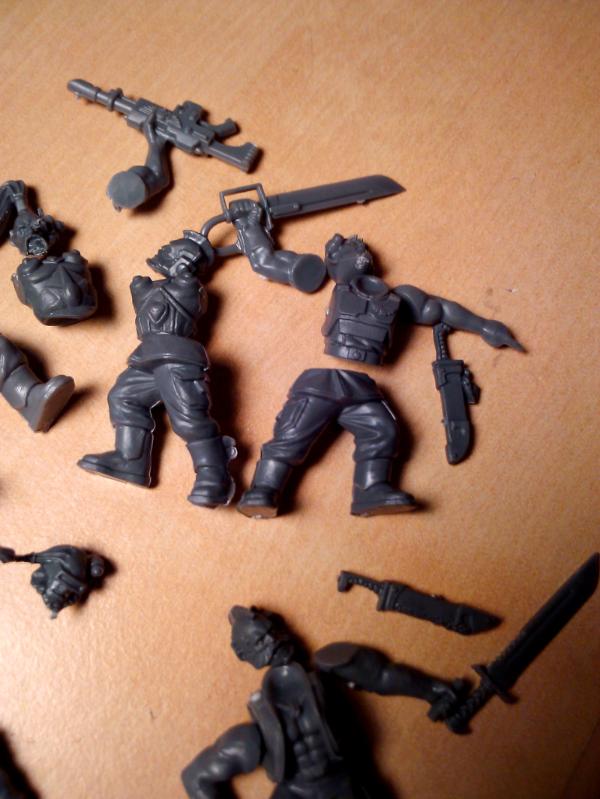
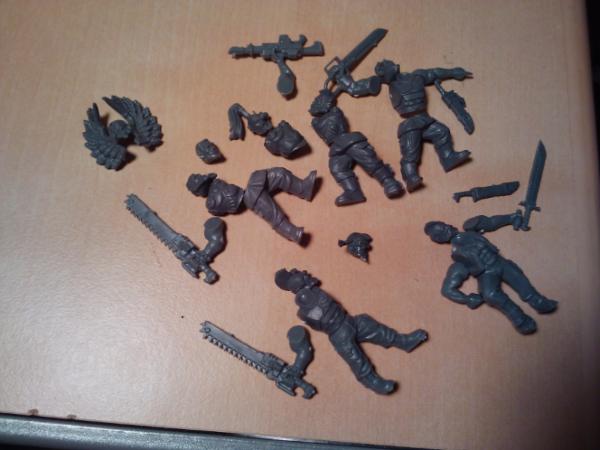
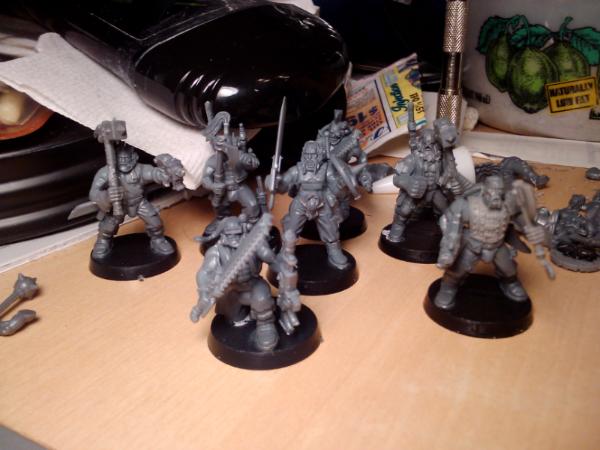
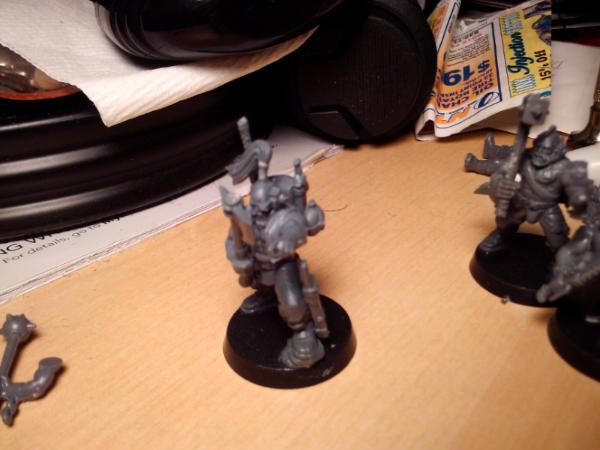
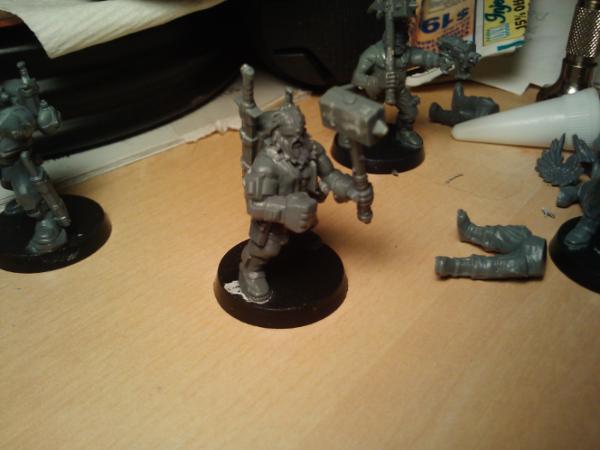
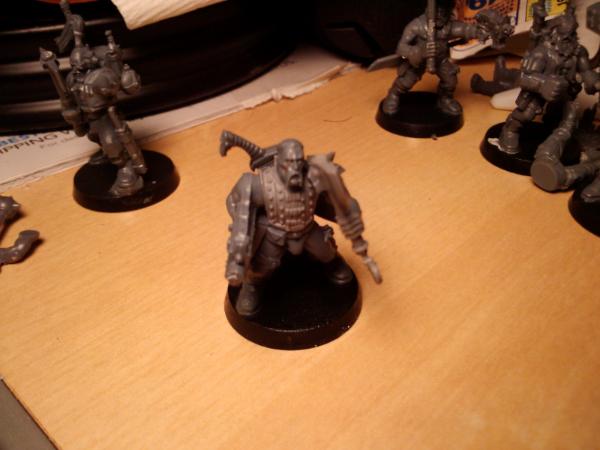
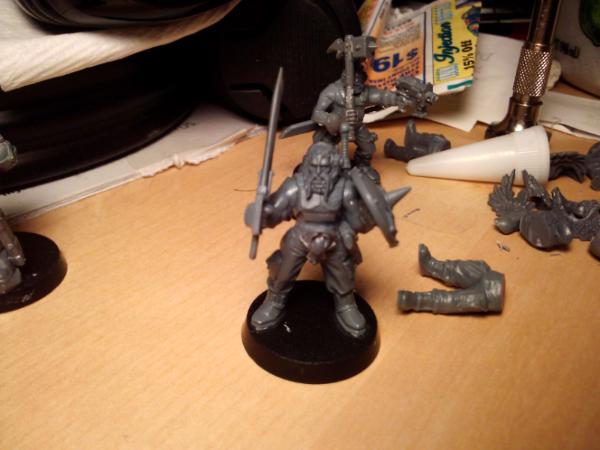
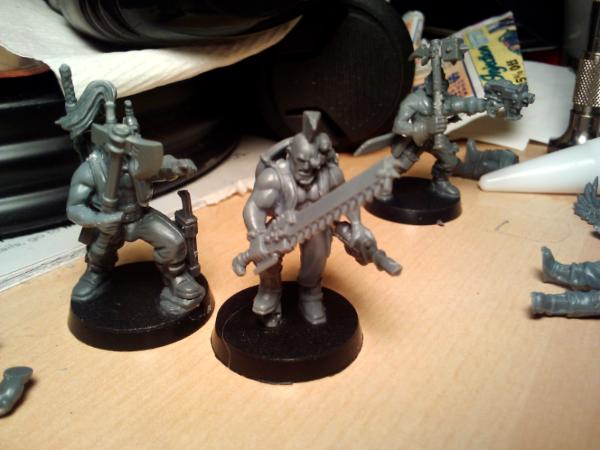

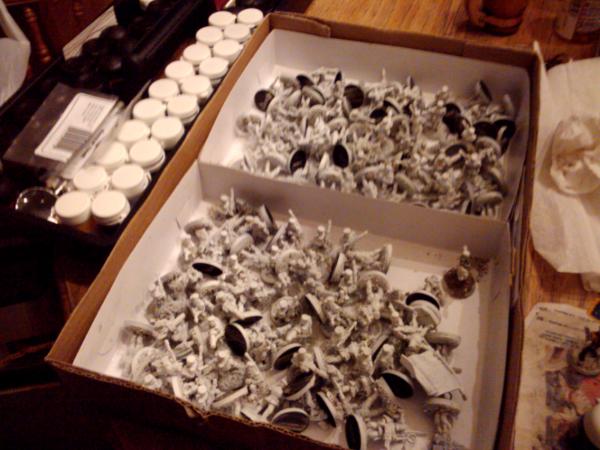
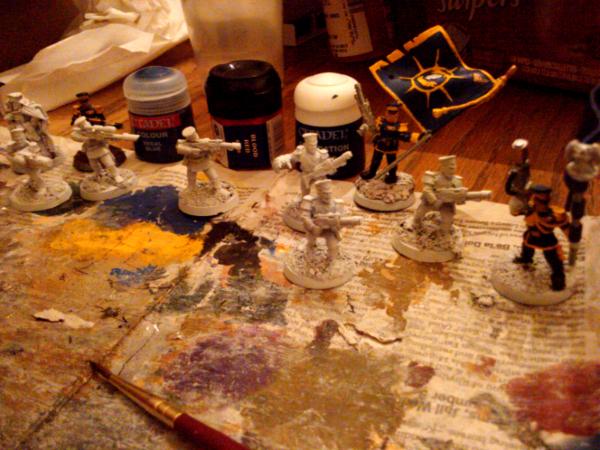
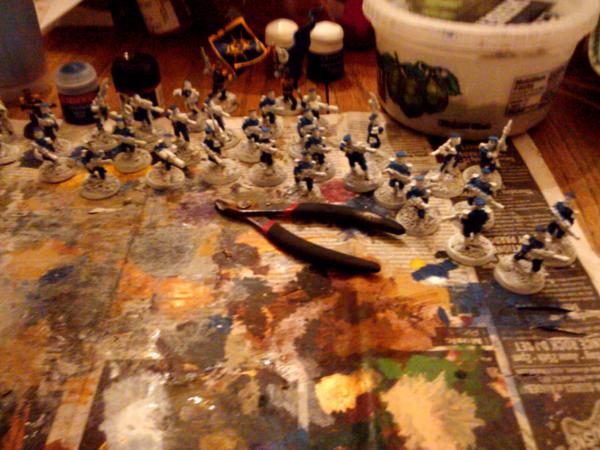
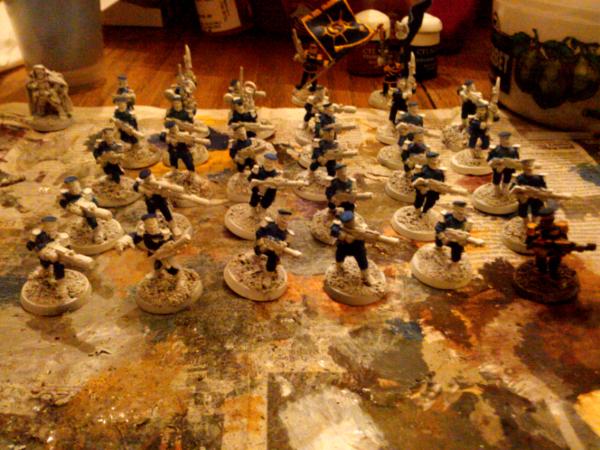
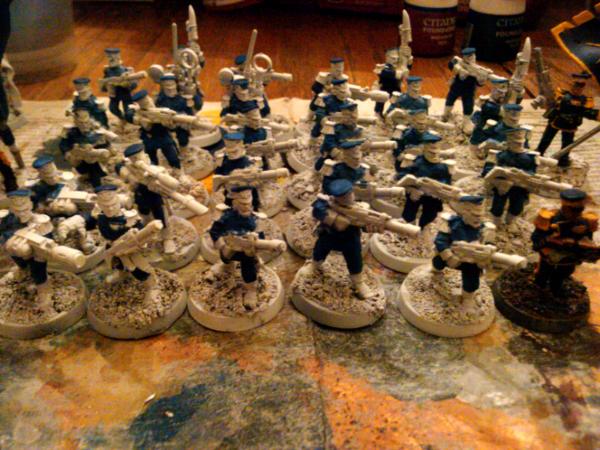
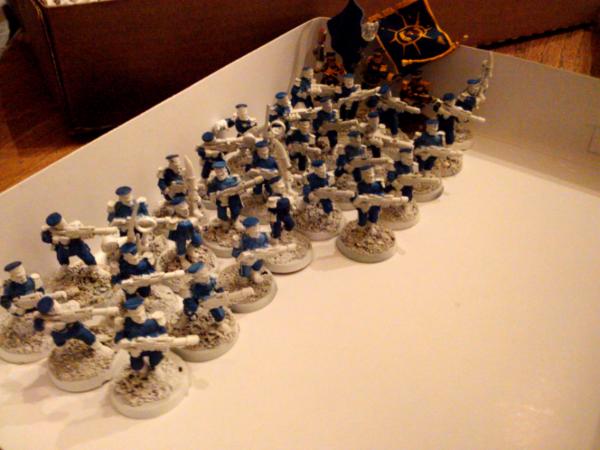
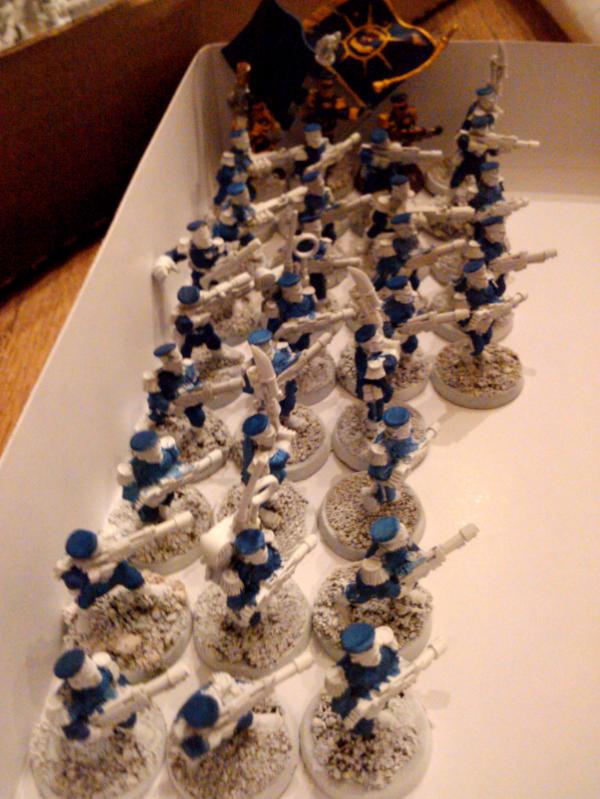
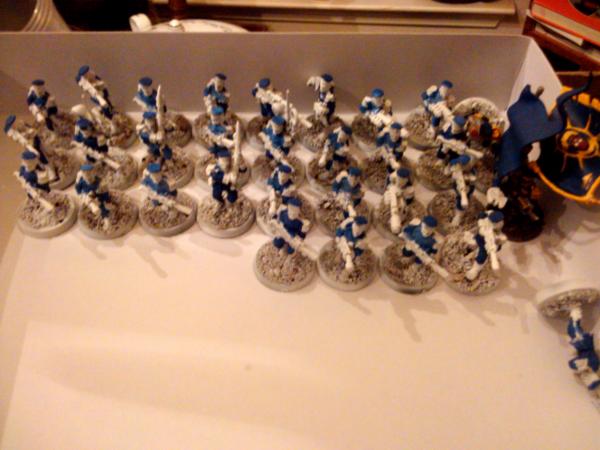
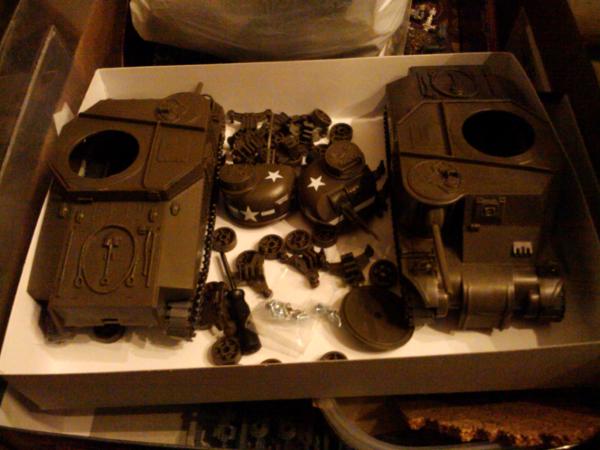

 'orrible.. Haha

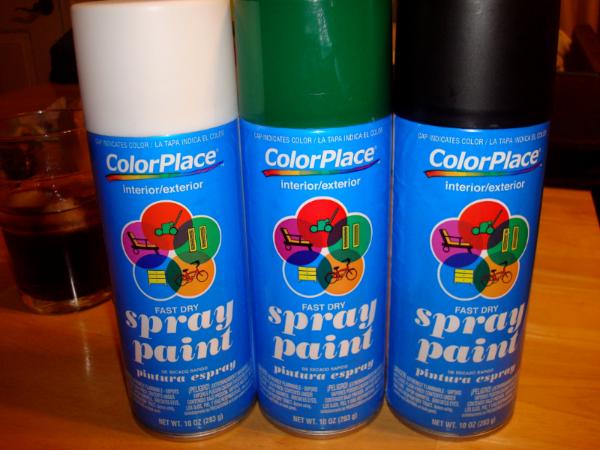
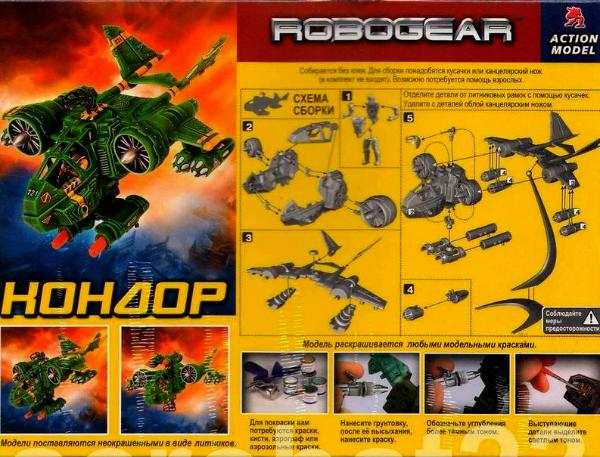
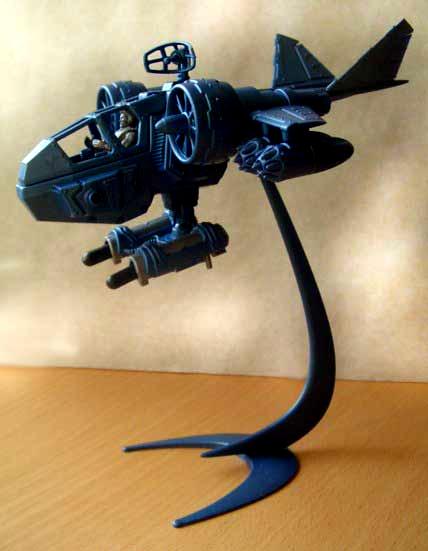
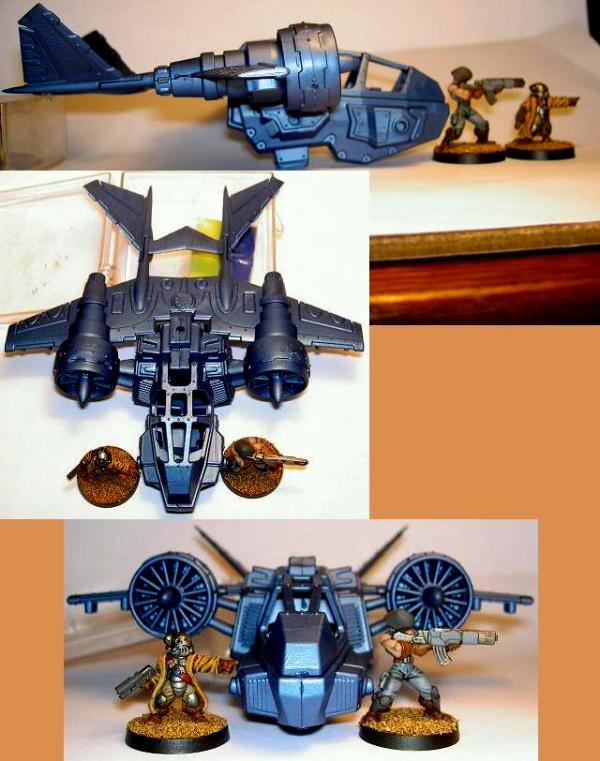
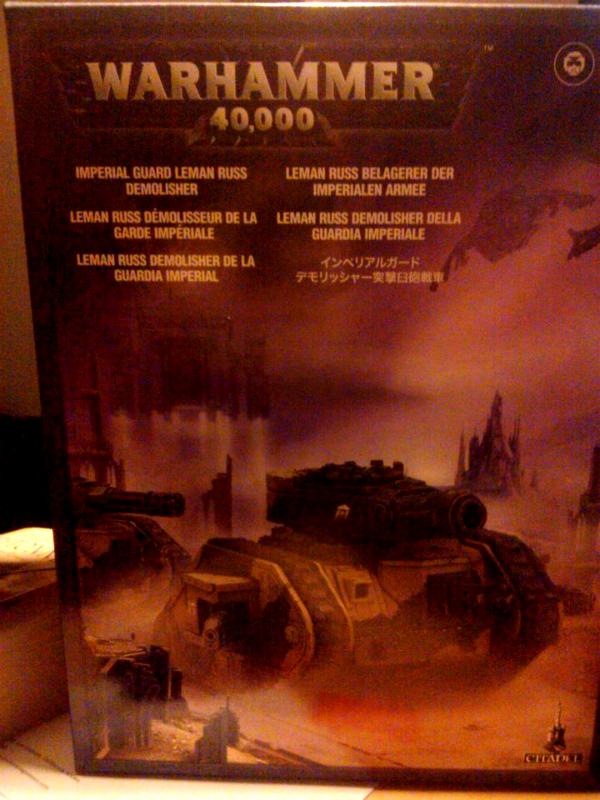
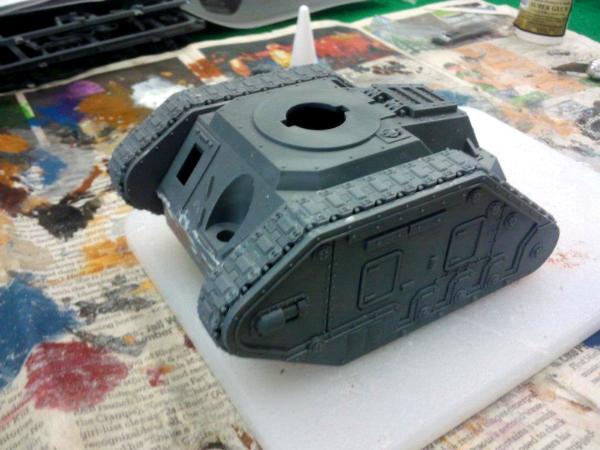
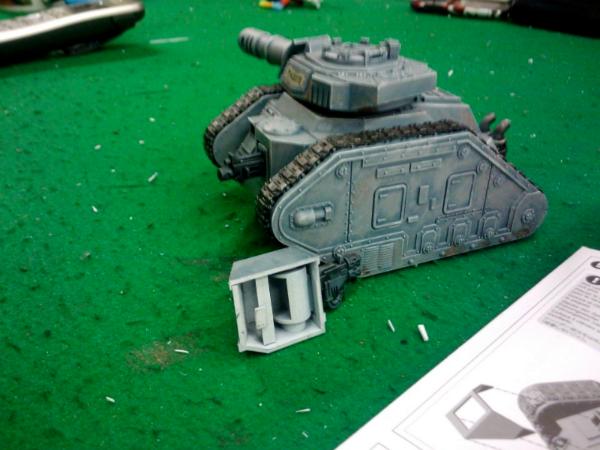
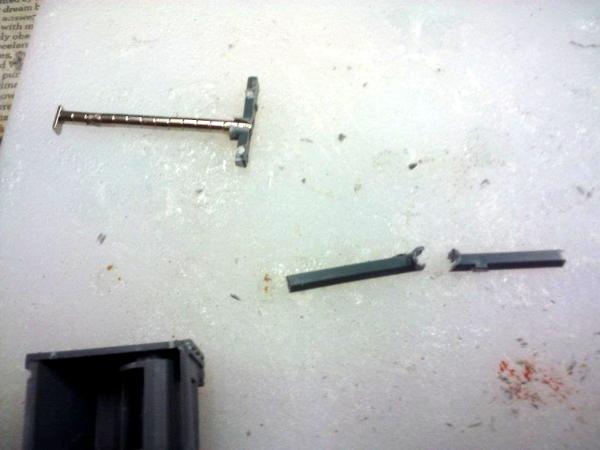
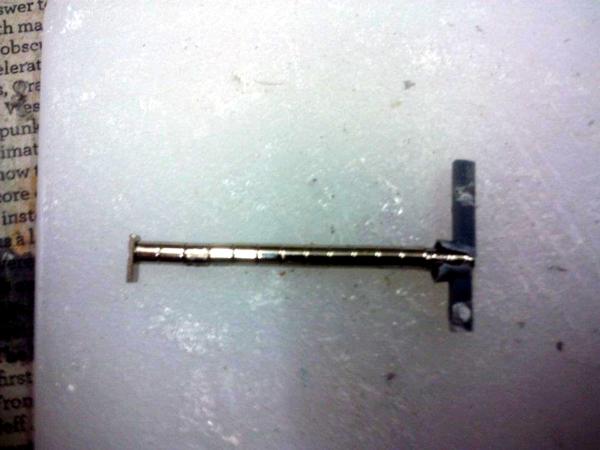
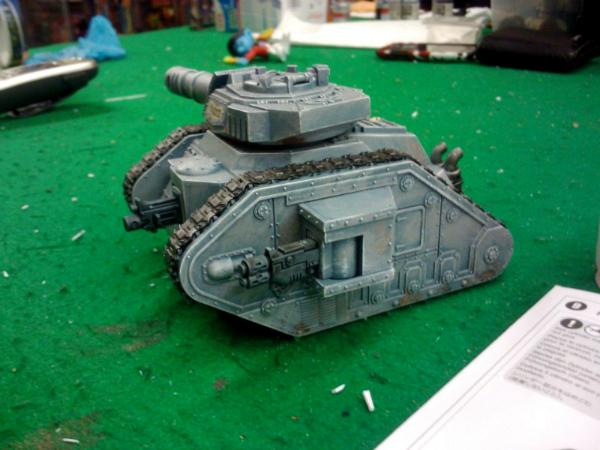
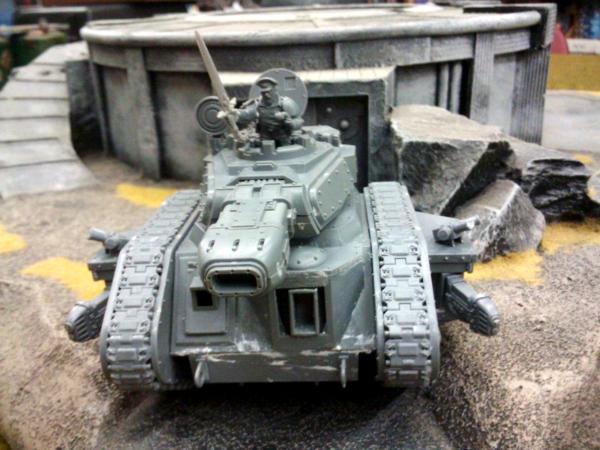
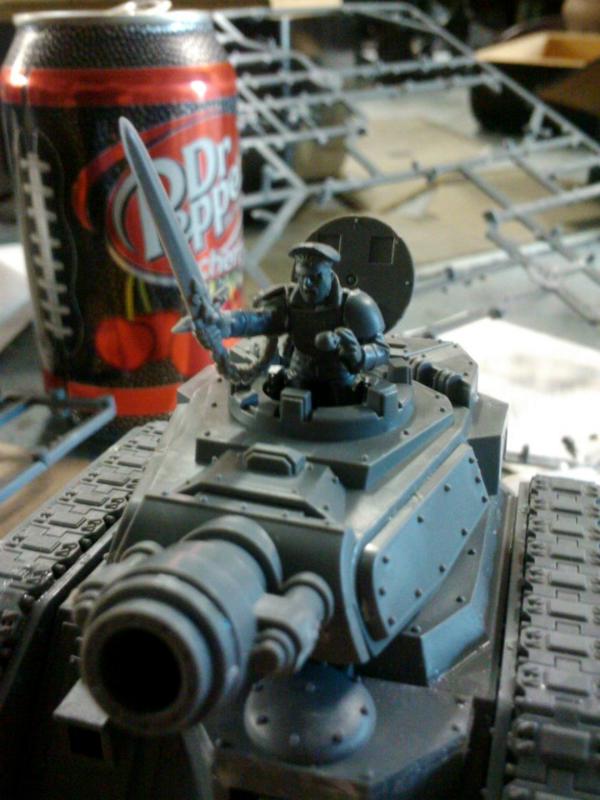
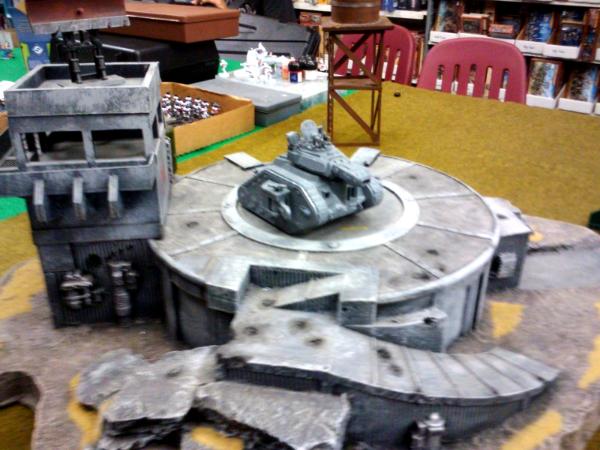
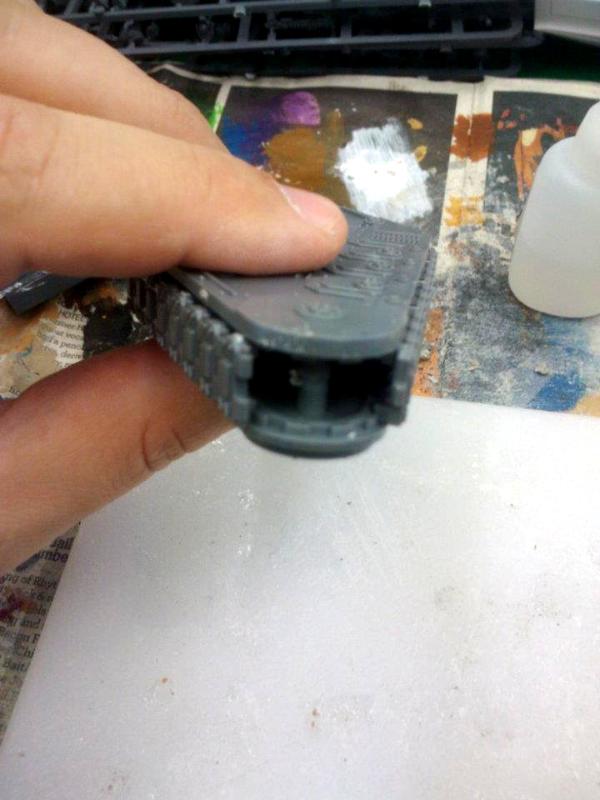
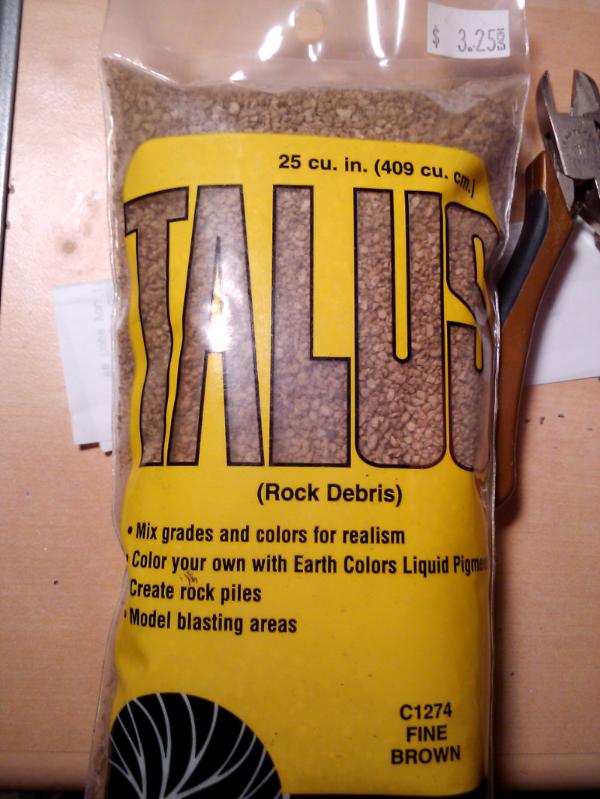
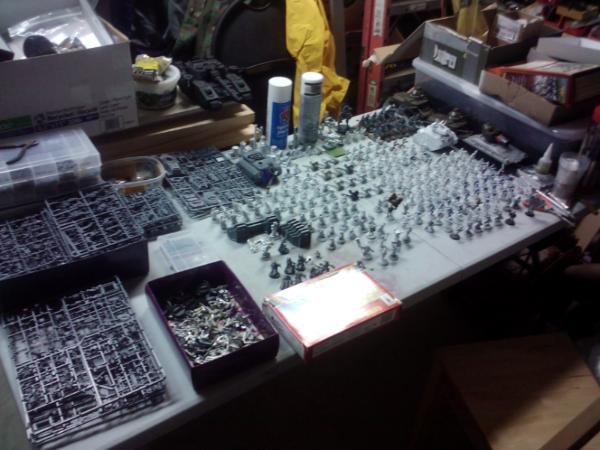
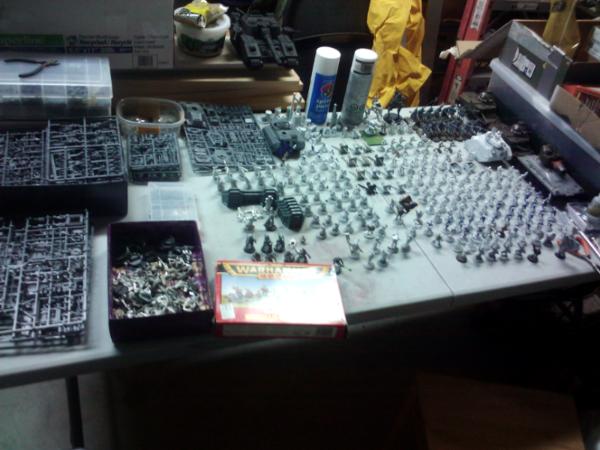
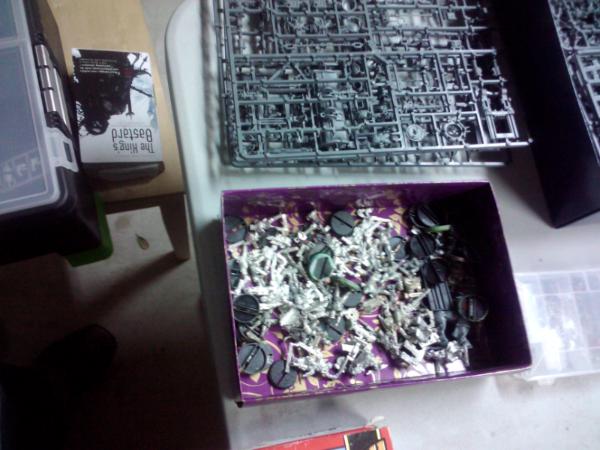
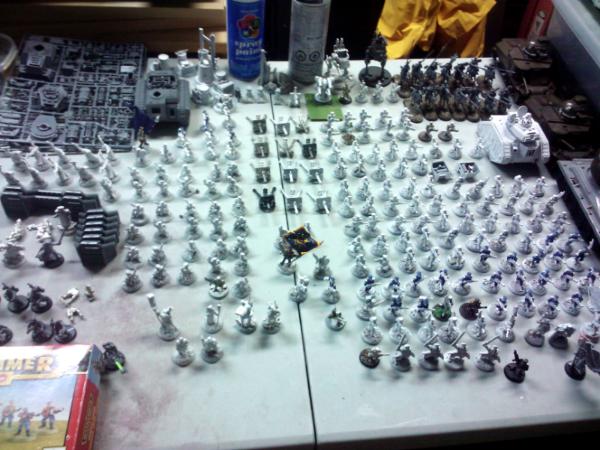

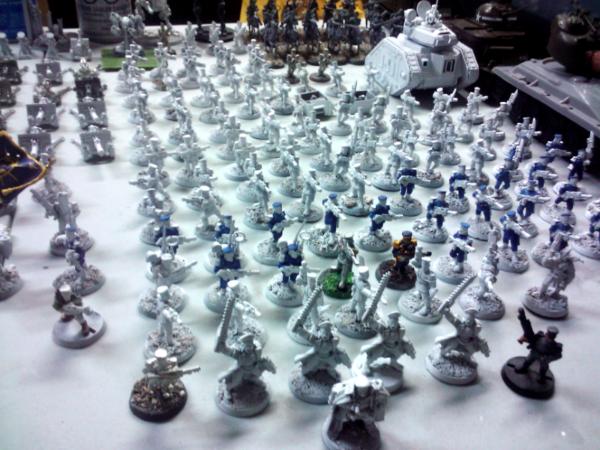
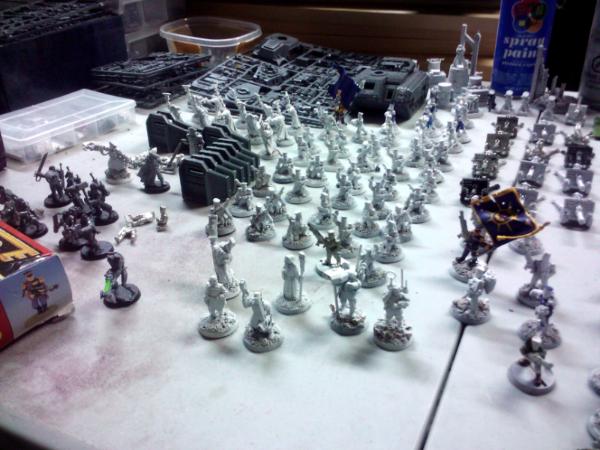
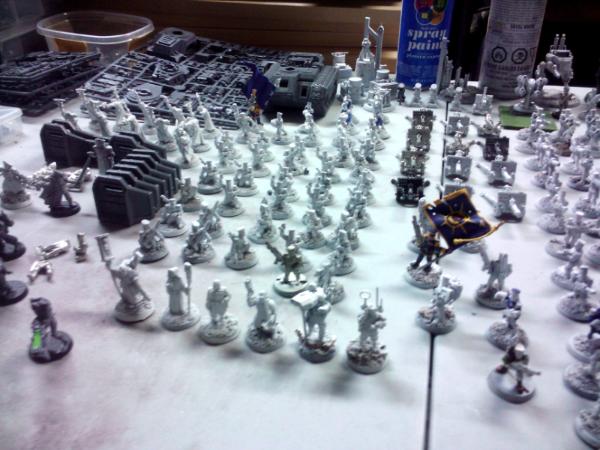
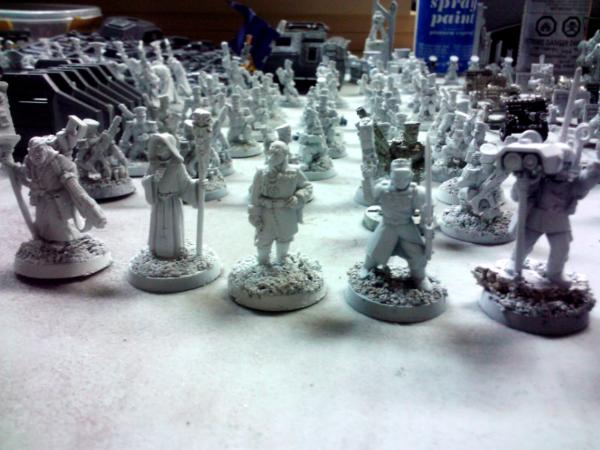
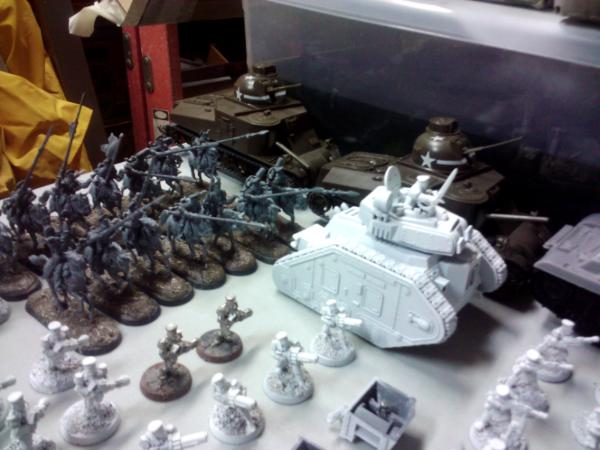
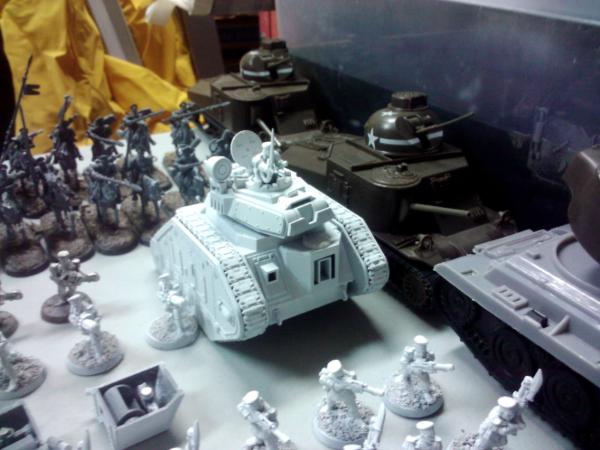
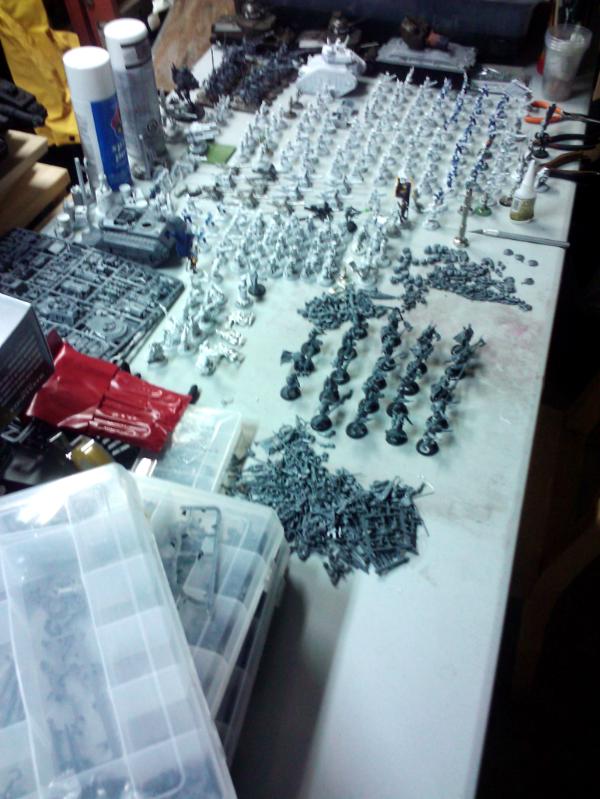
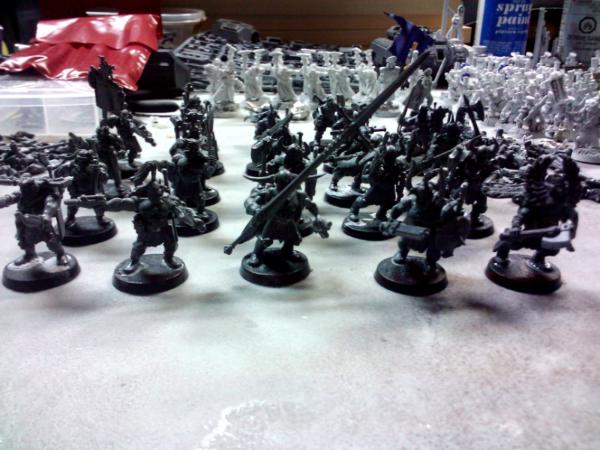
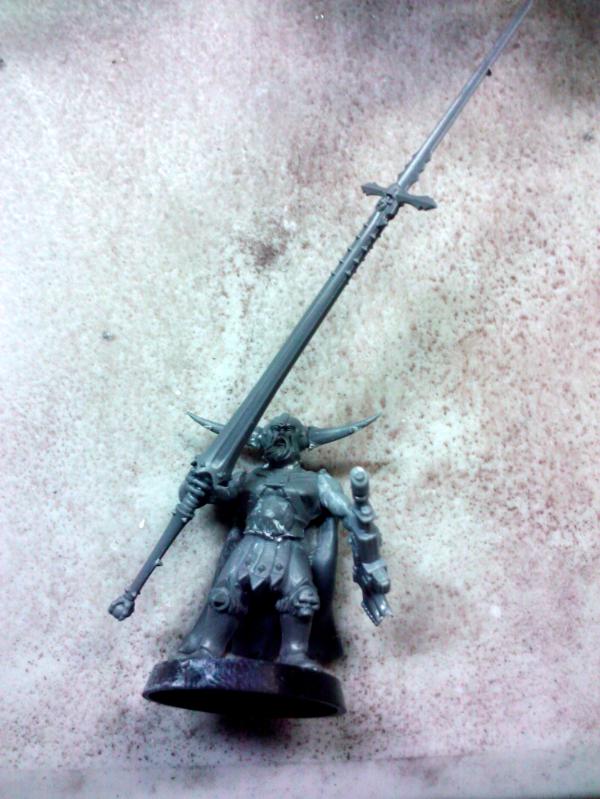
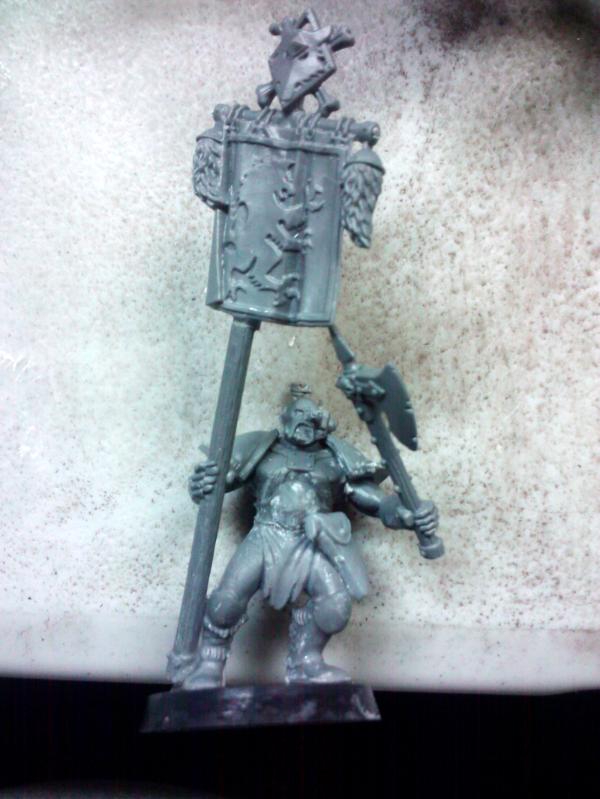
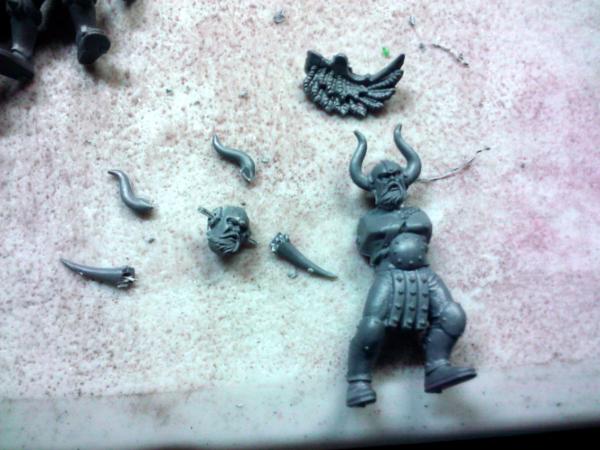
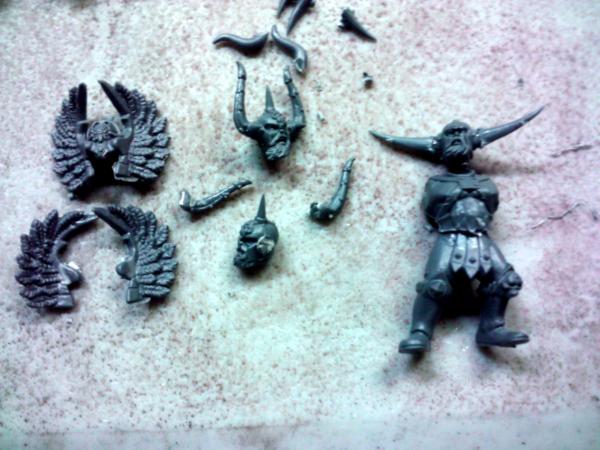
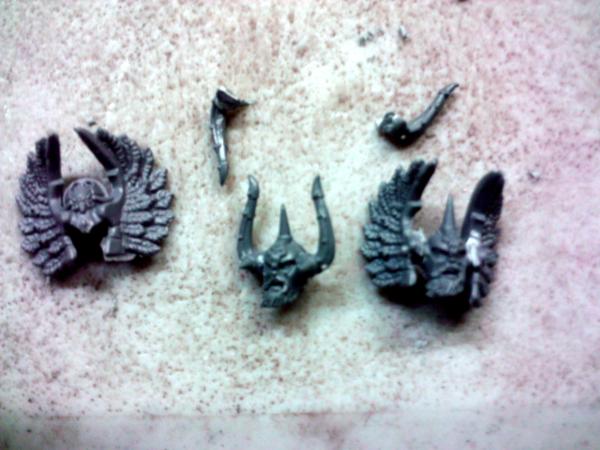
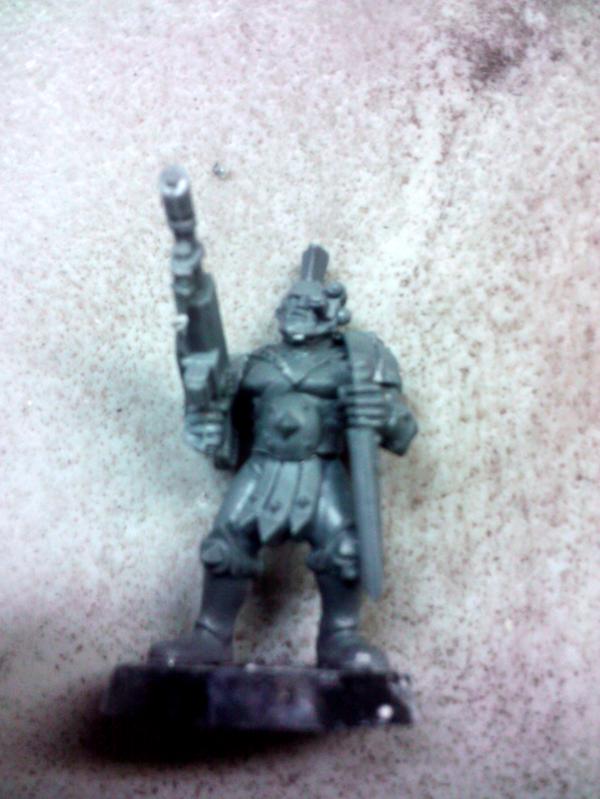
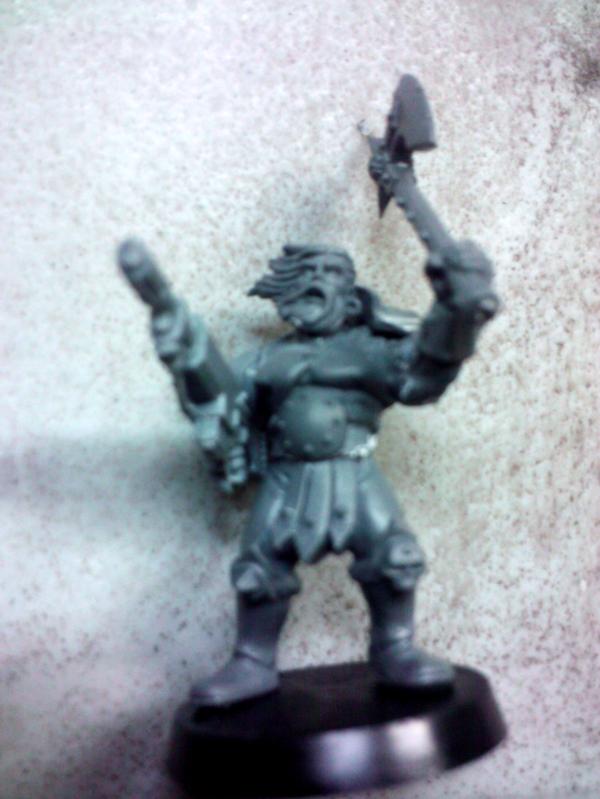
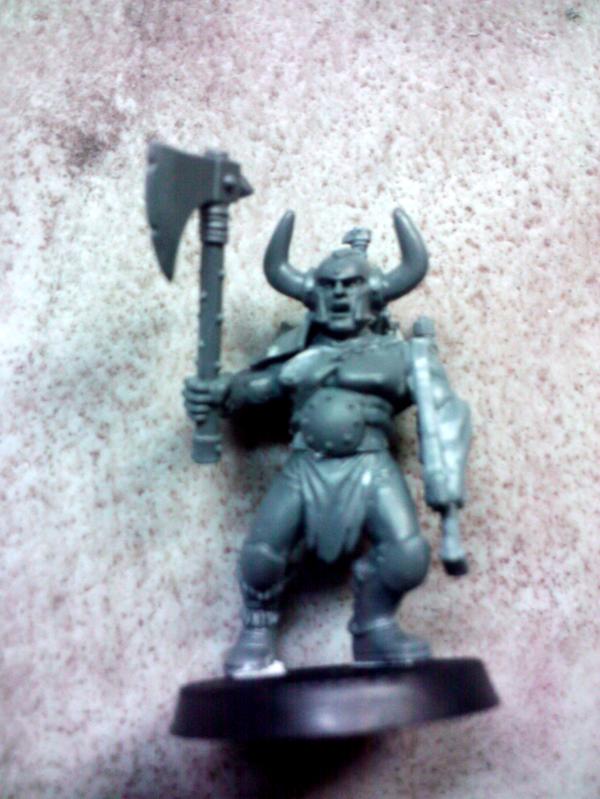
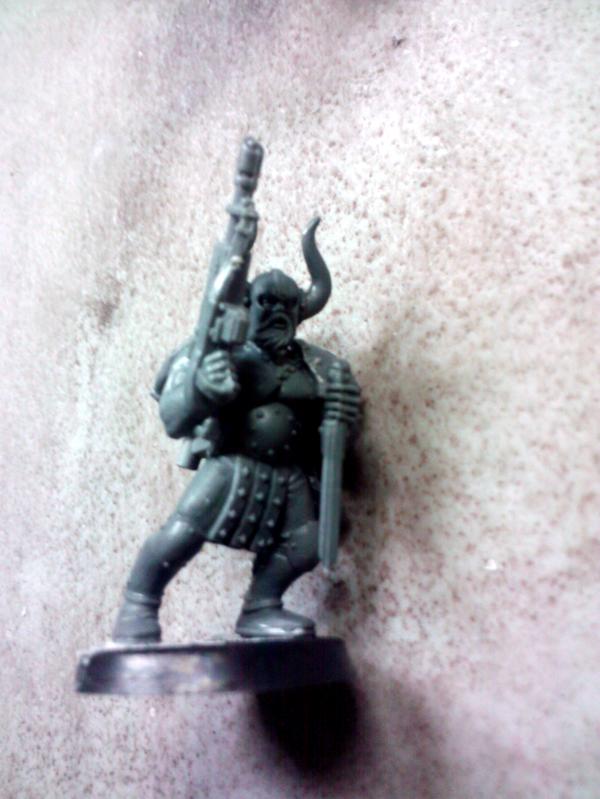
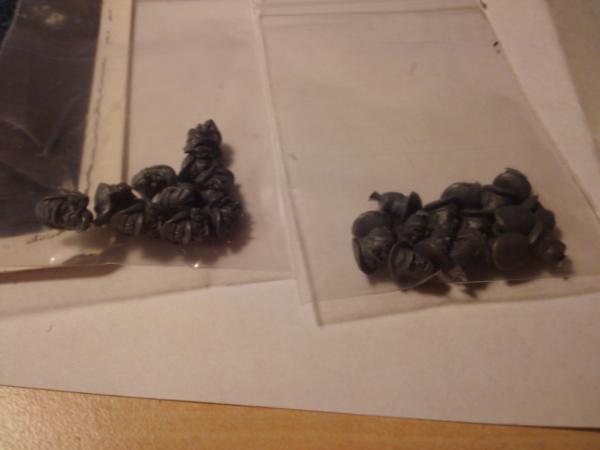
 by the by any chance you're gonna use Wulfen? (possible Count-As Ogryn?) as in the novel they are used as a heavier alternative
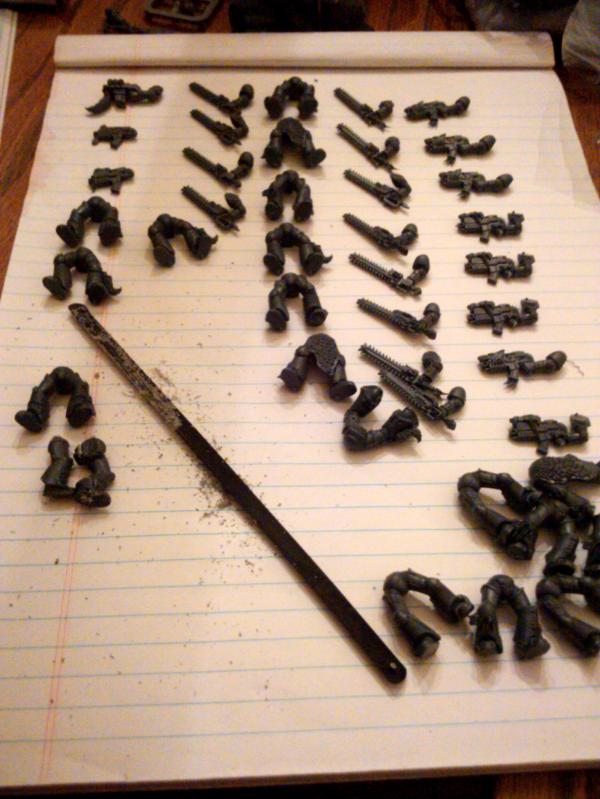

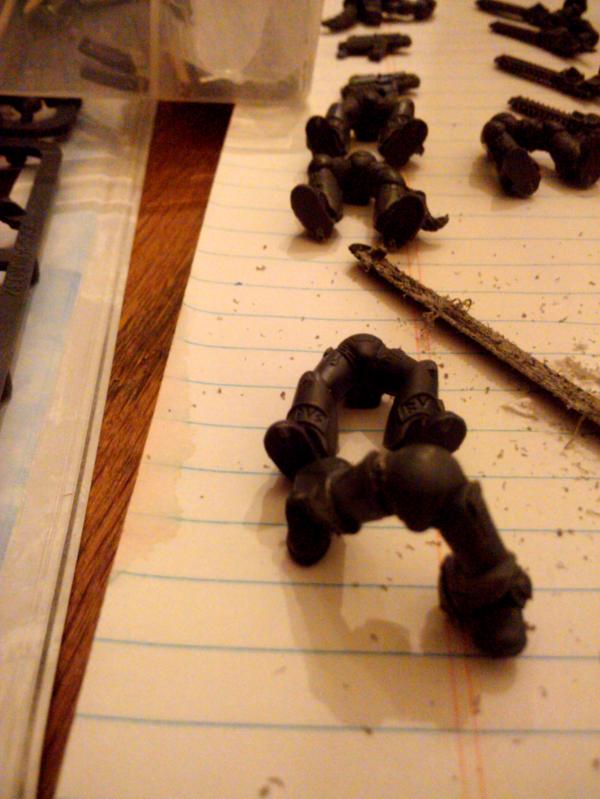
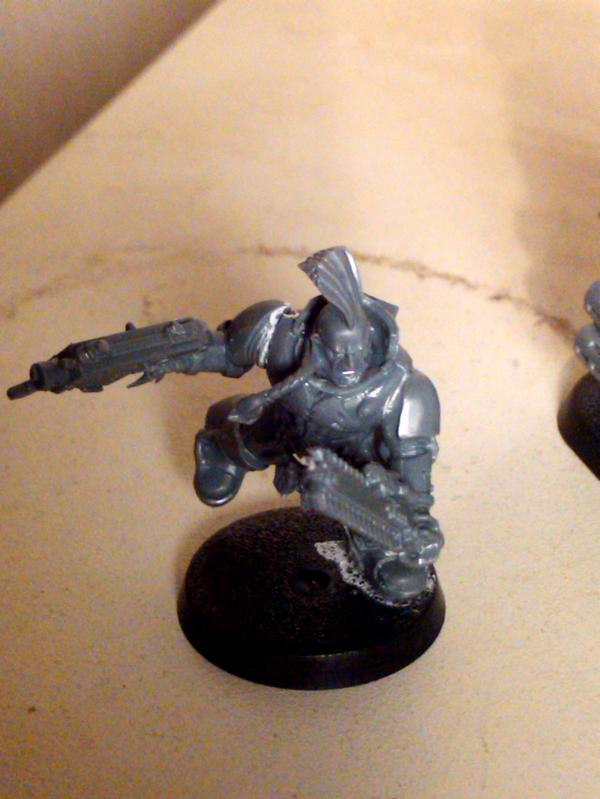
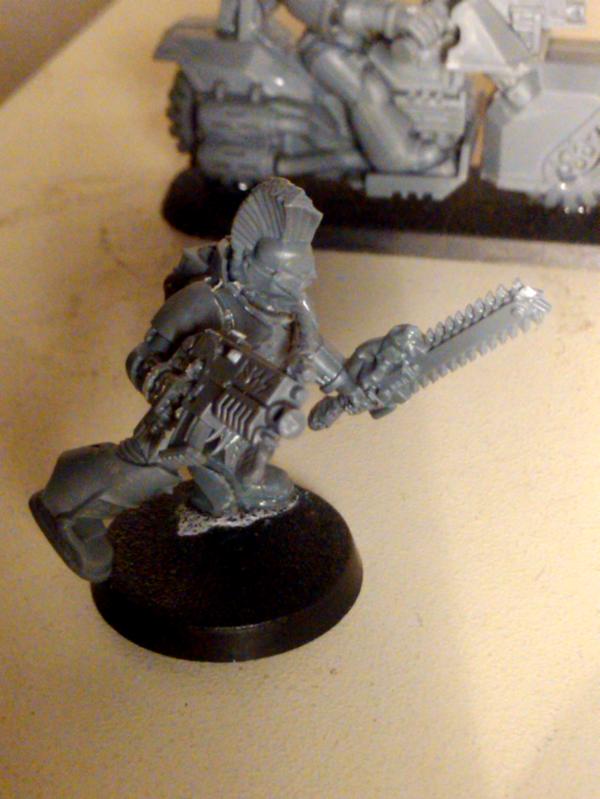
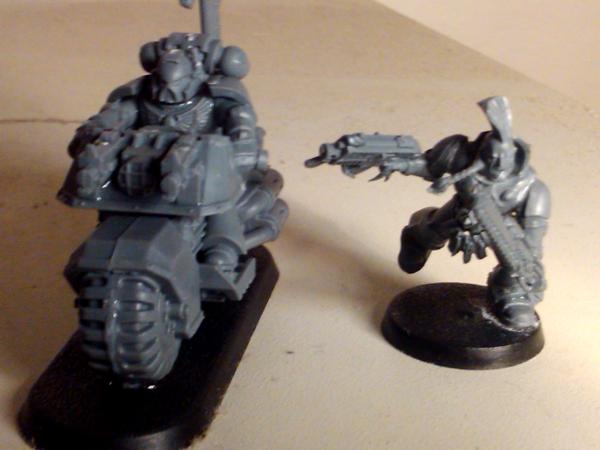
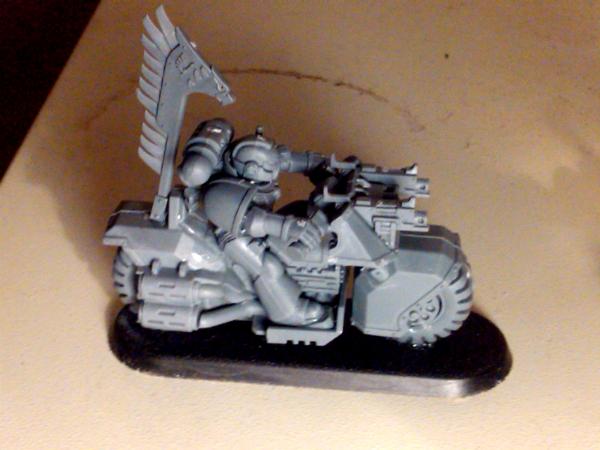
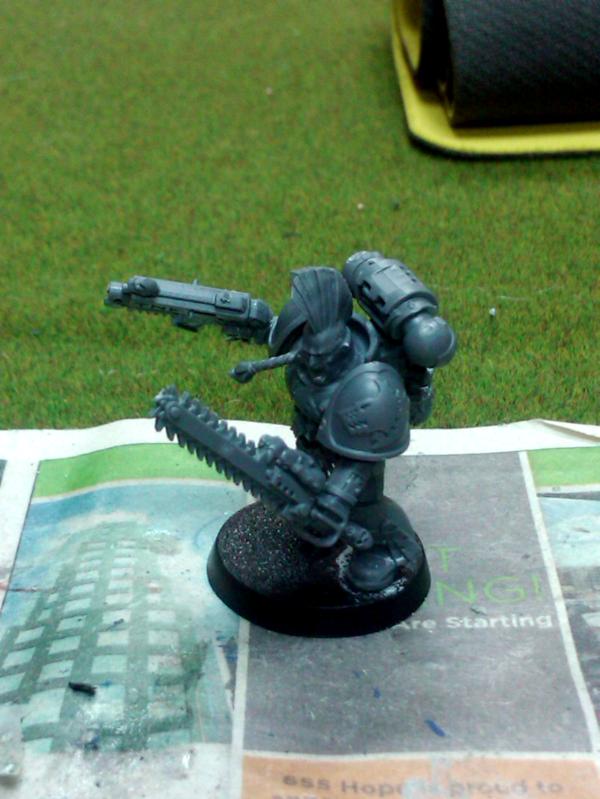
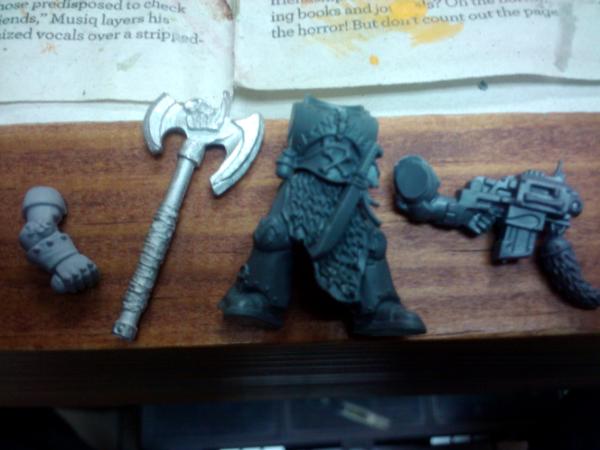
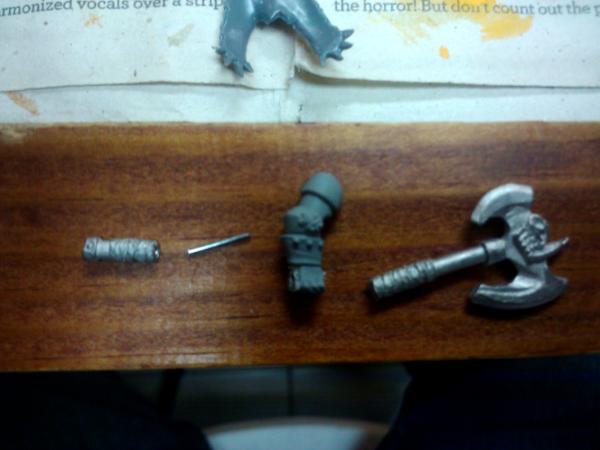
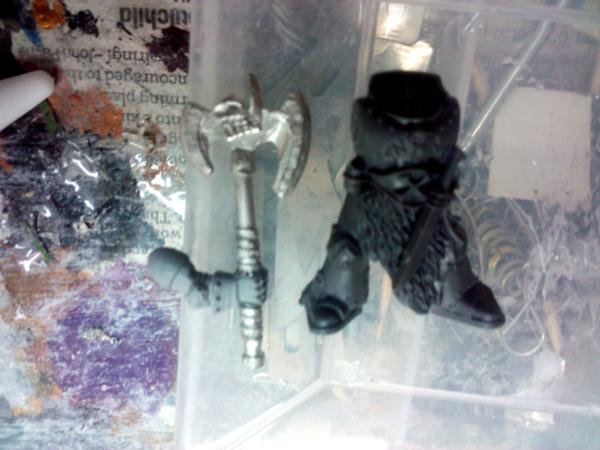
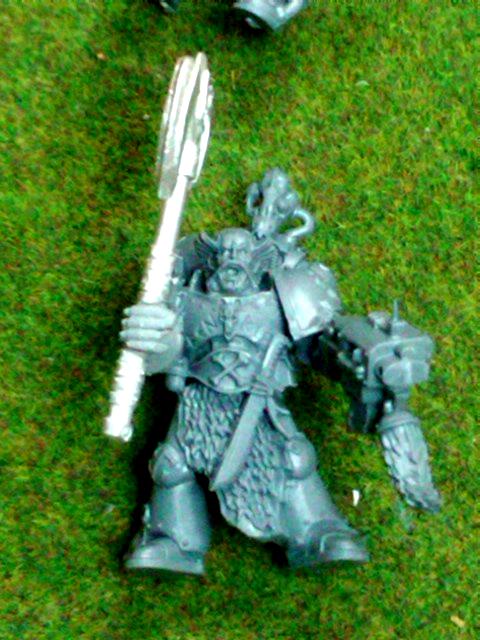
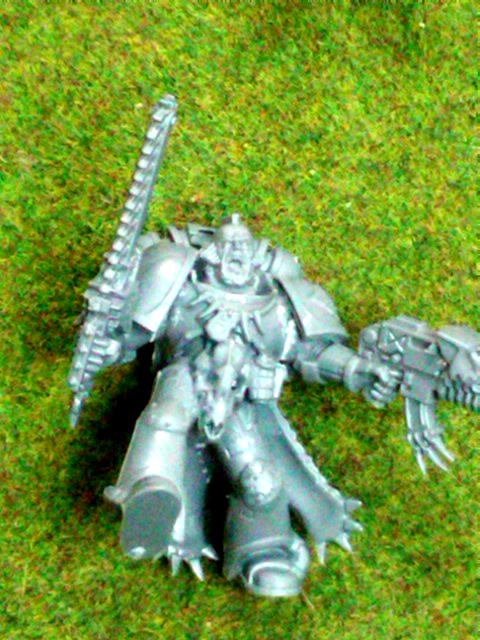
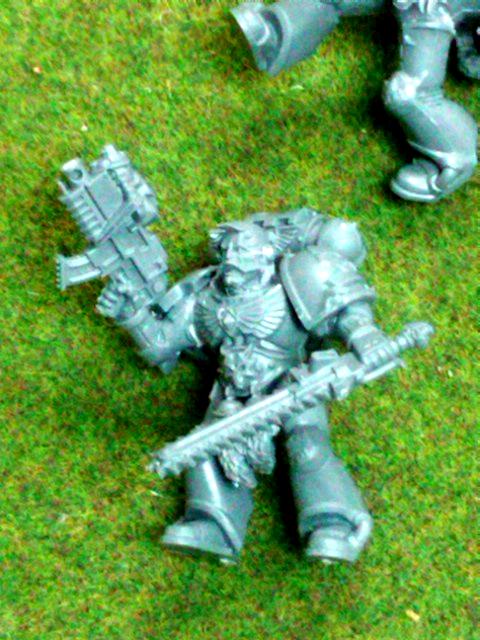
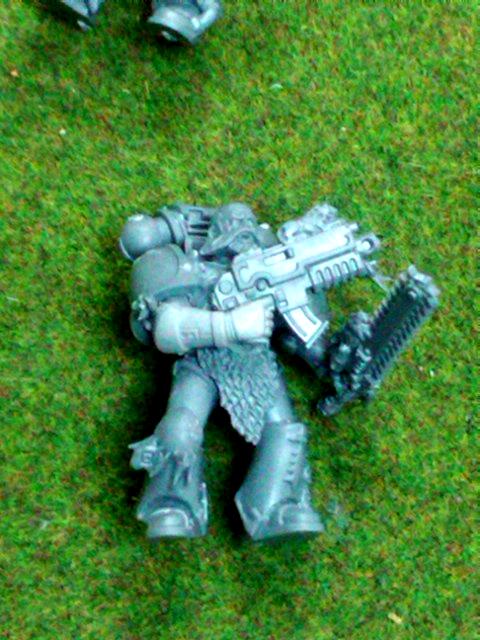
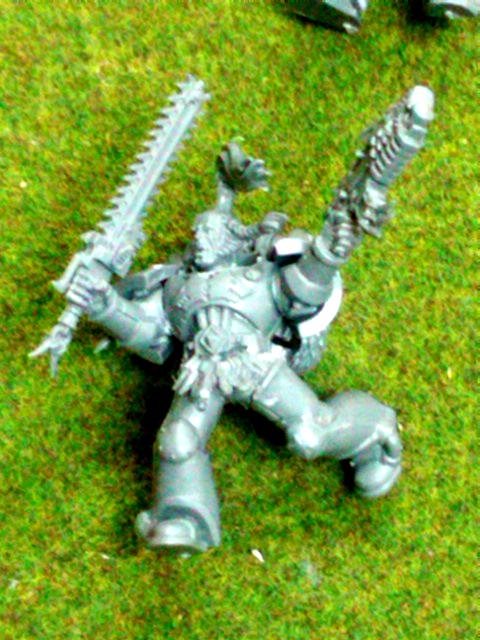

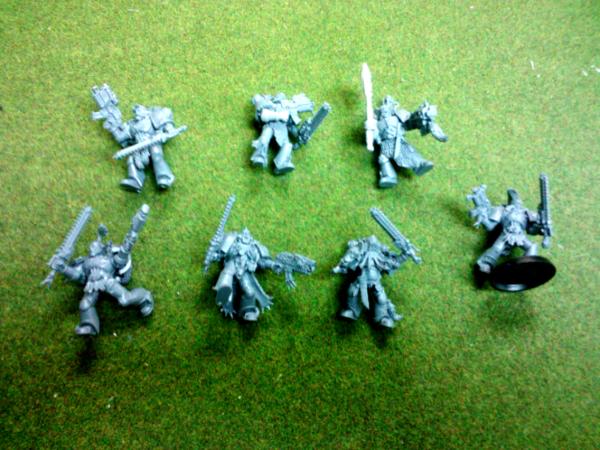
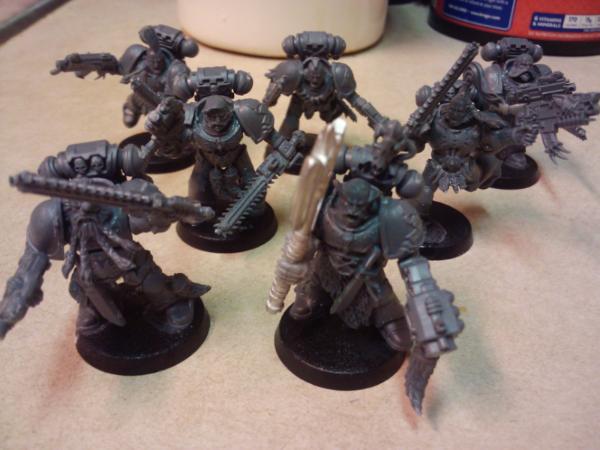
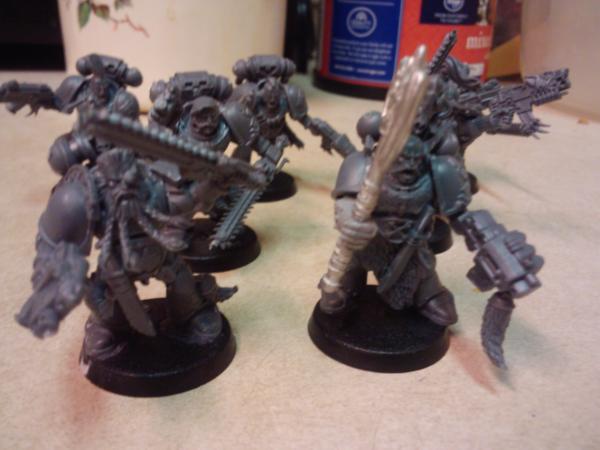
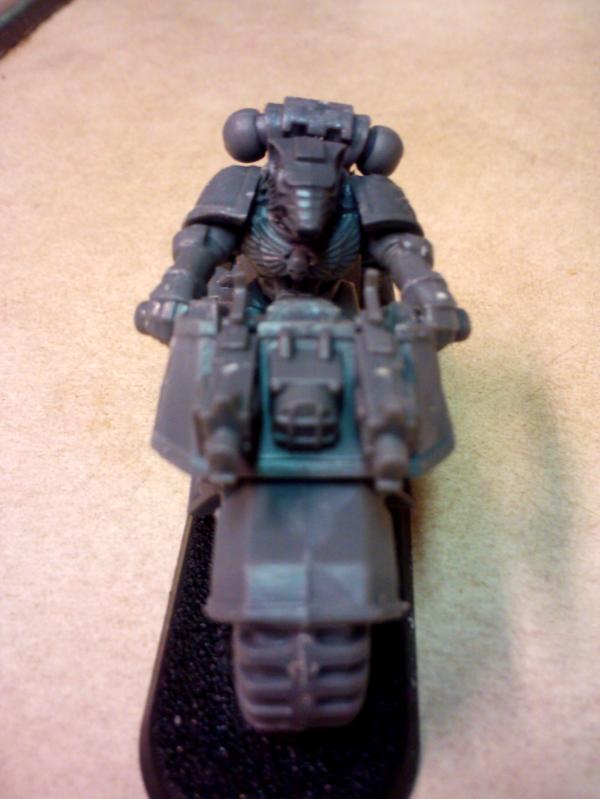
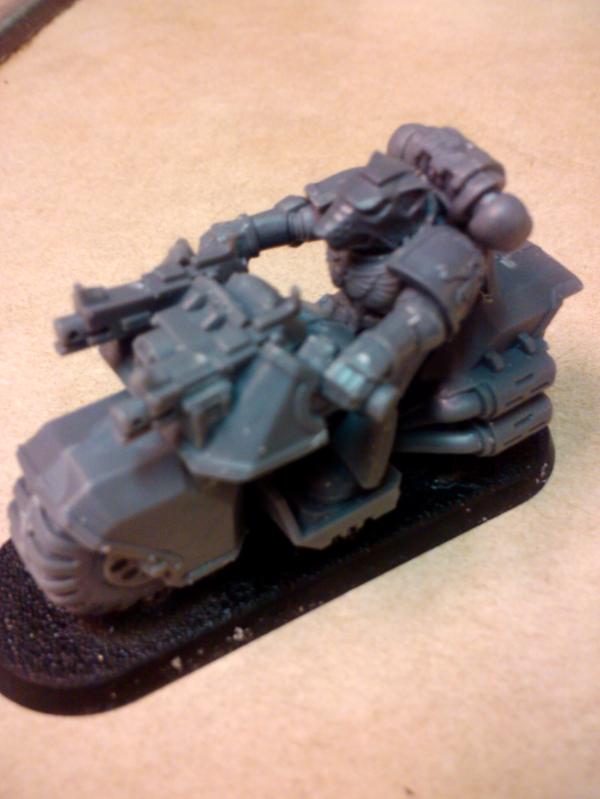

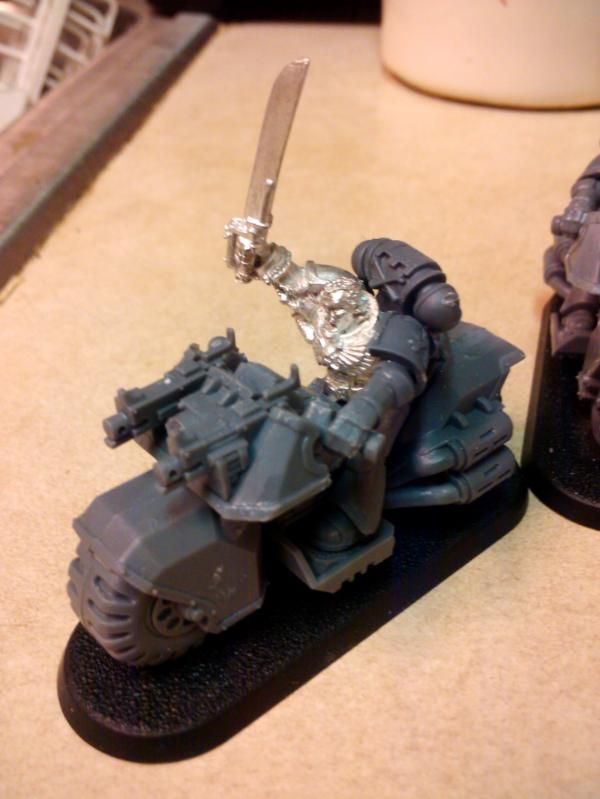
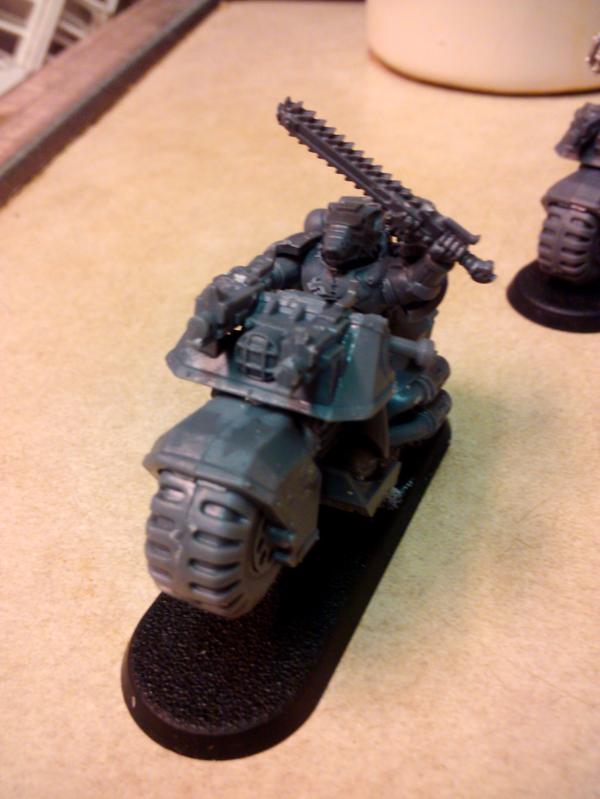
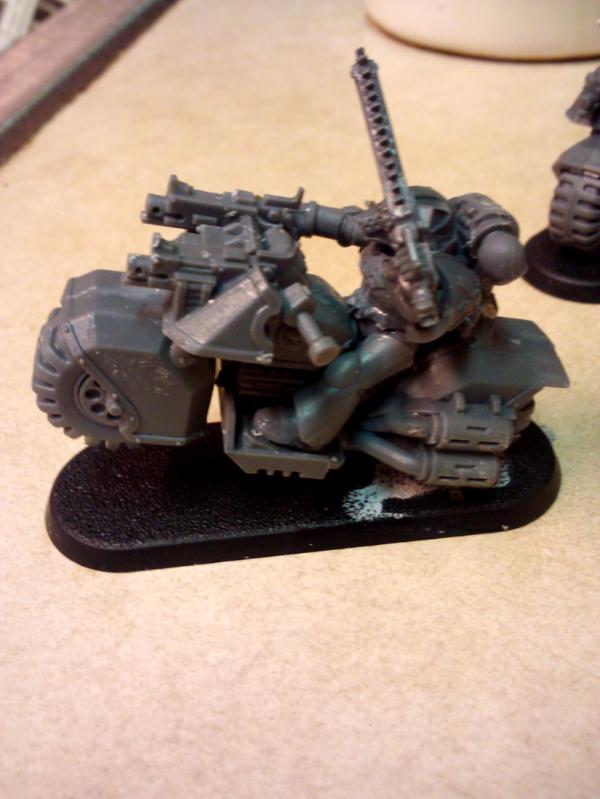
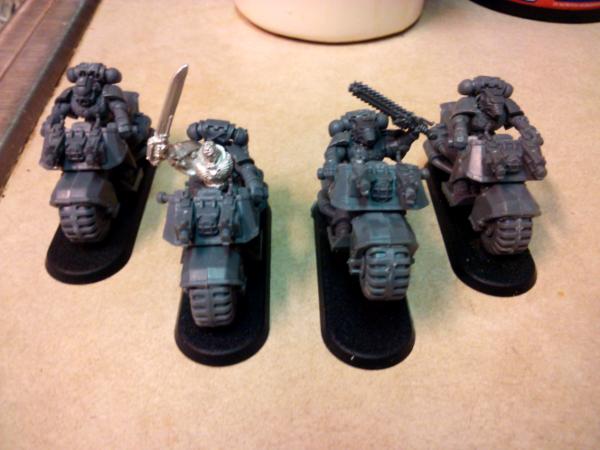
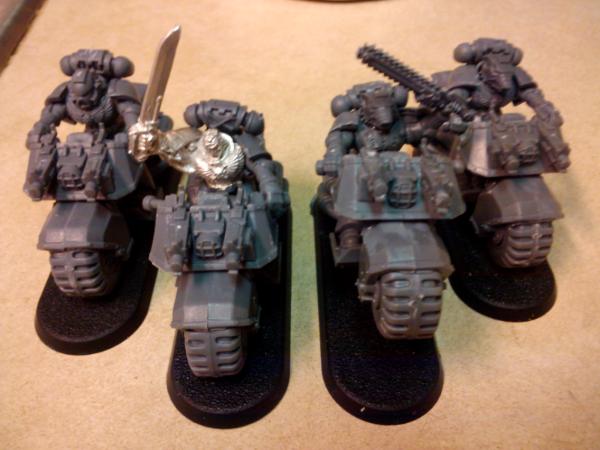
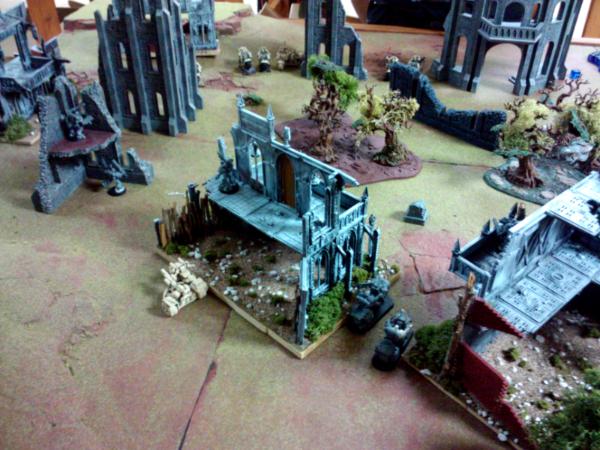
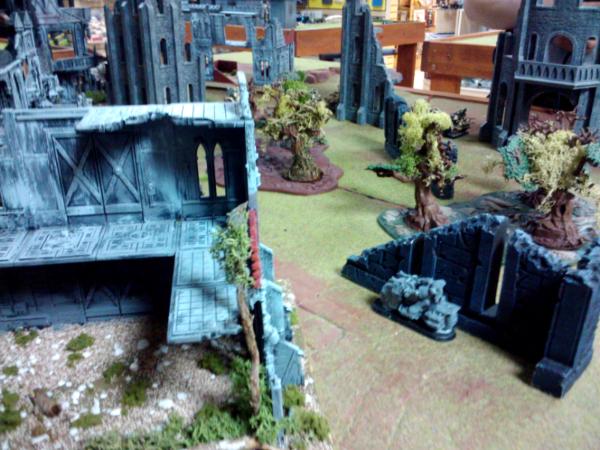
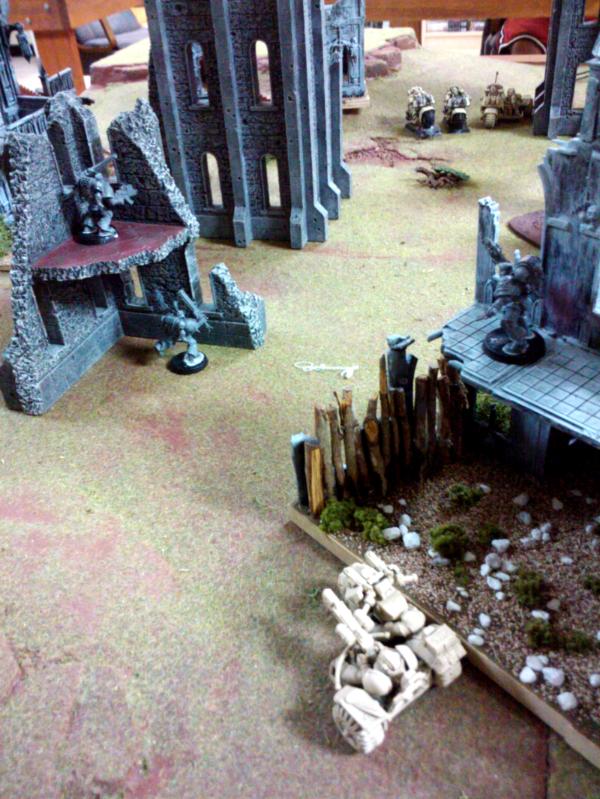
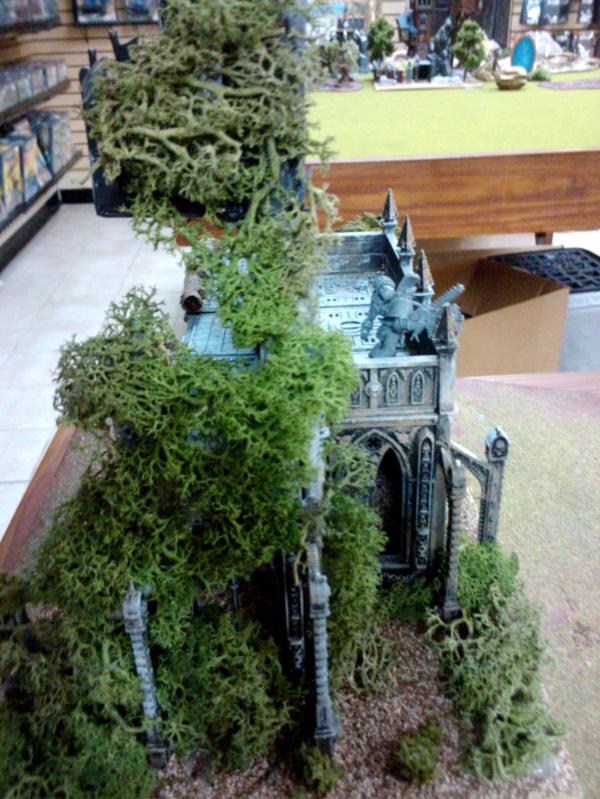
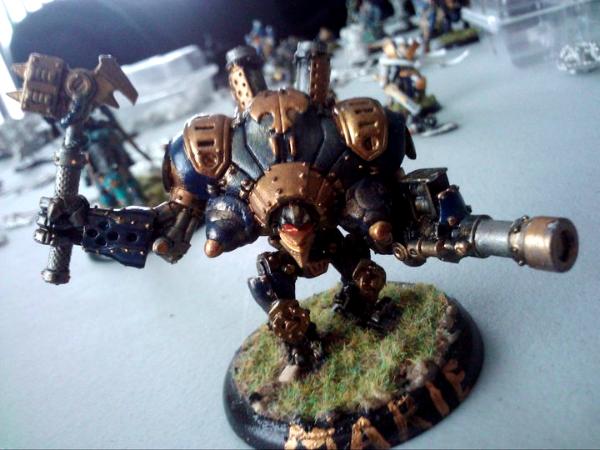
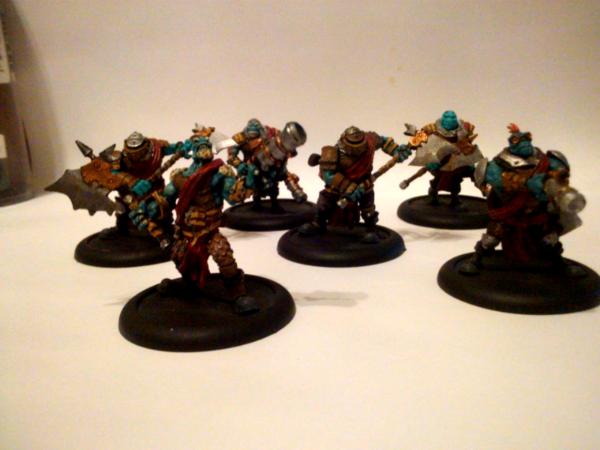
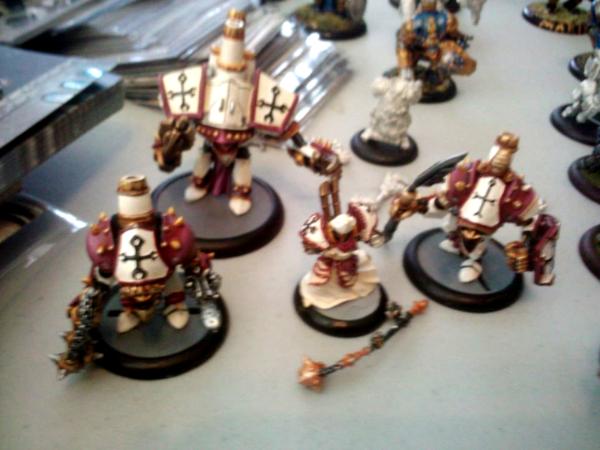
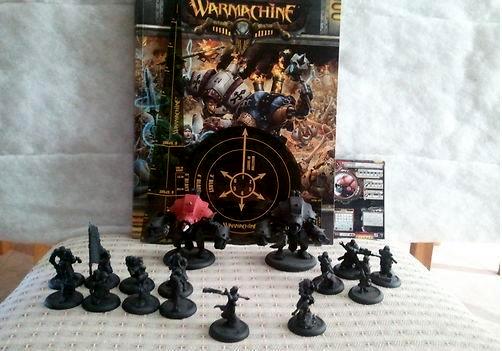
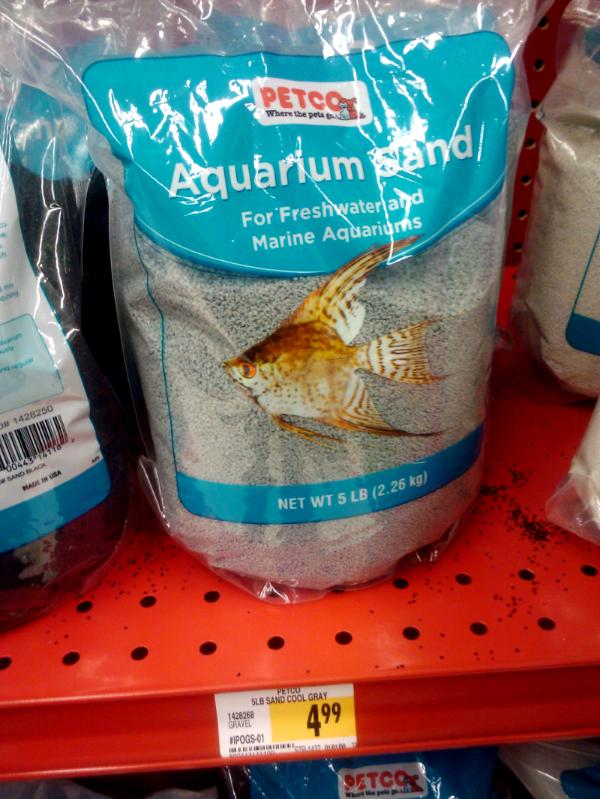
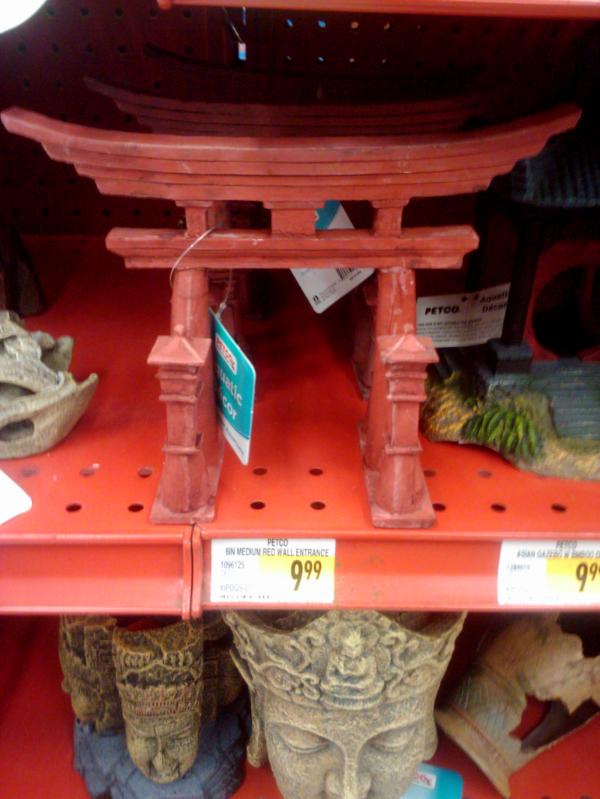
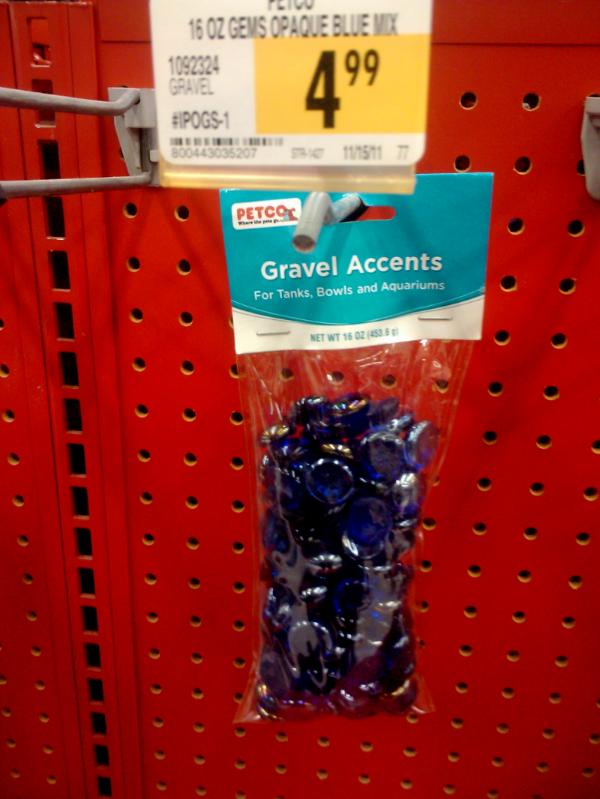
 effects which can be pretty brutal
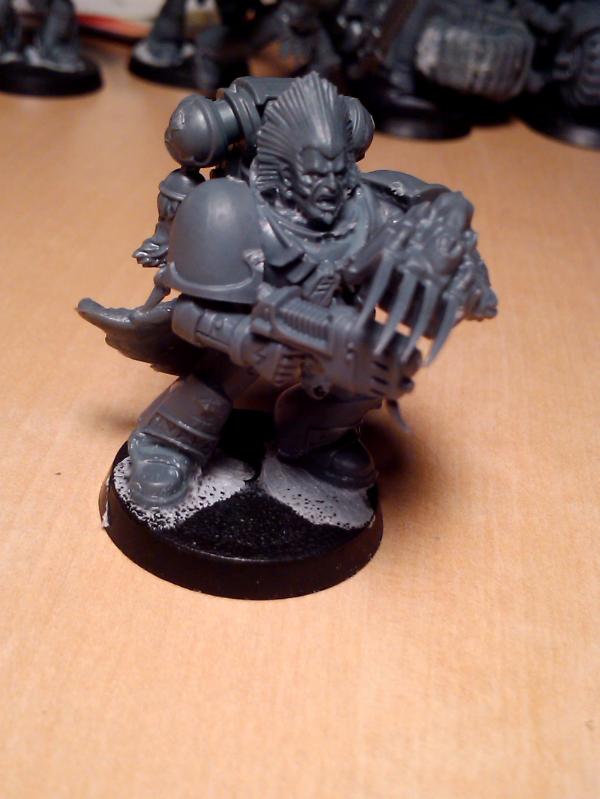
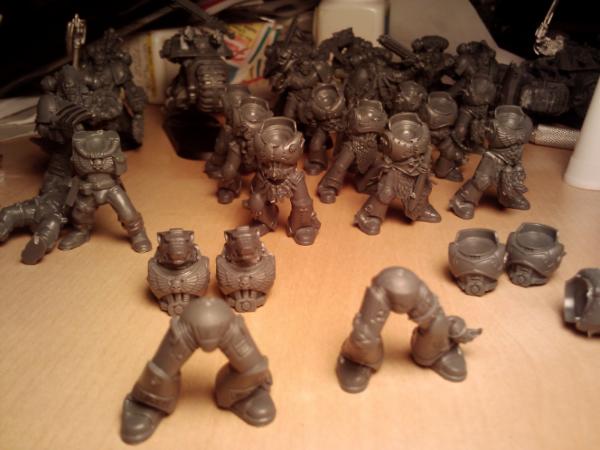
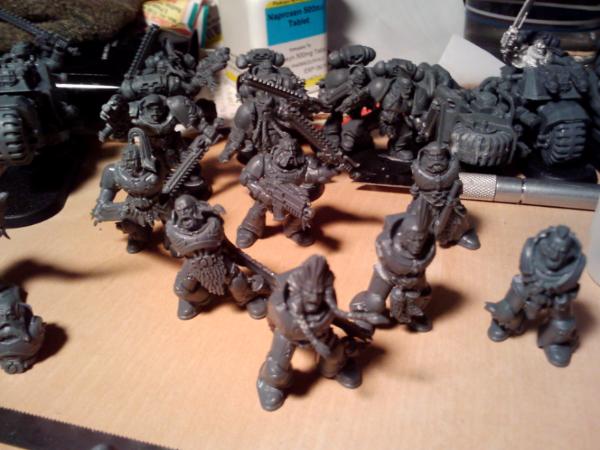
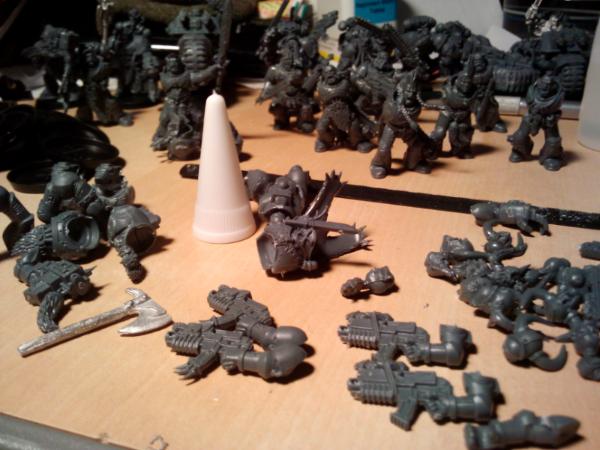
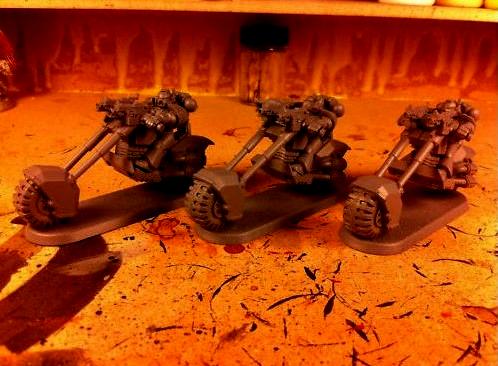
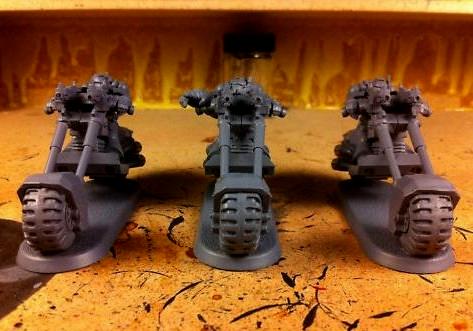
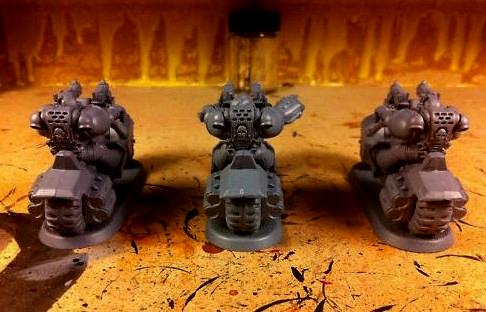
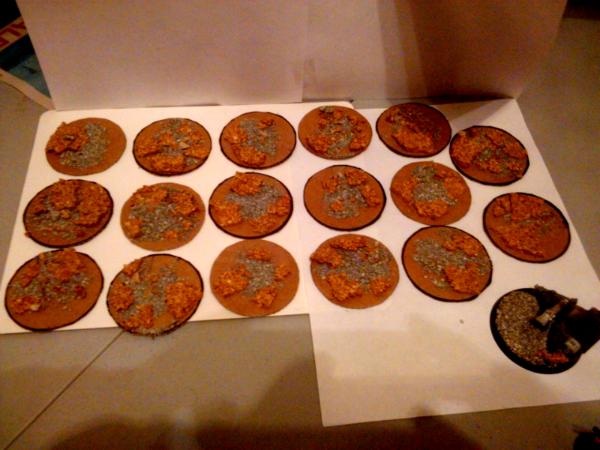
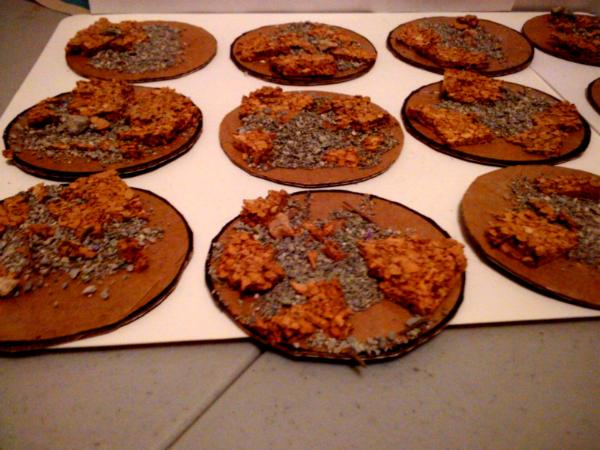
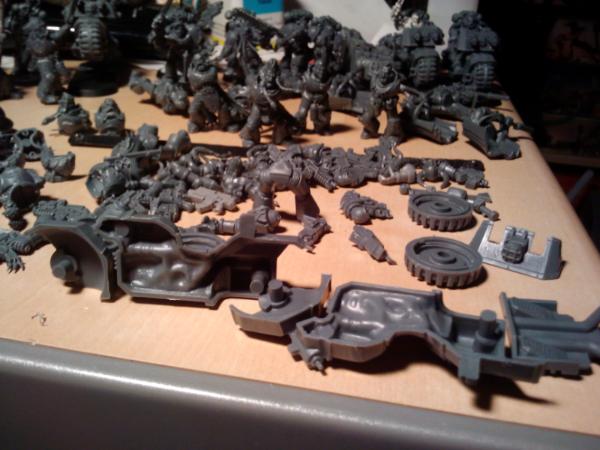
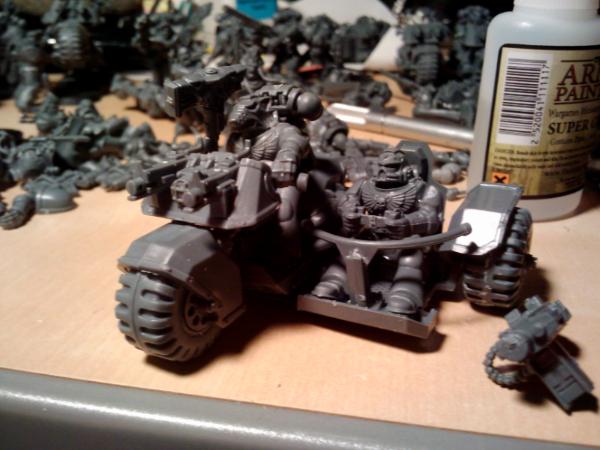

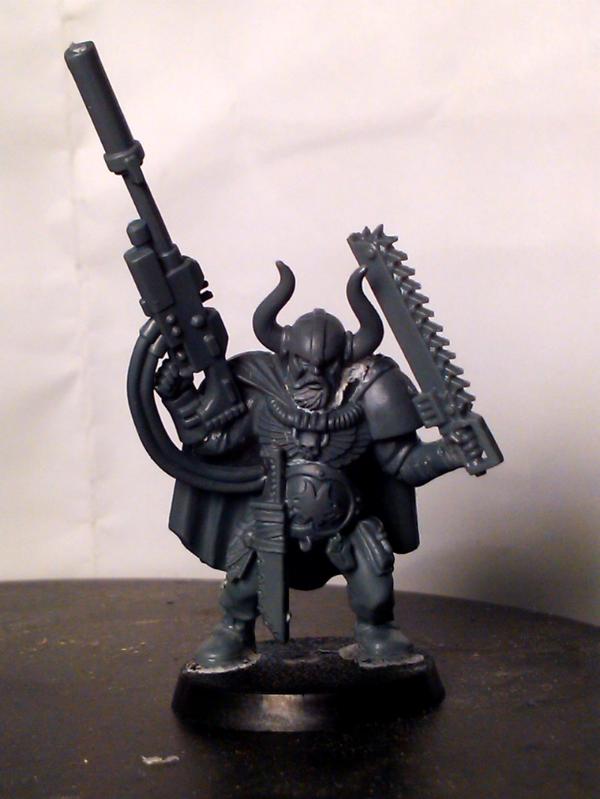
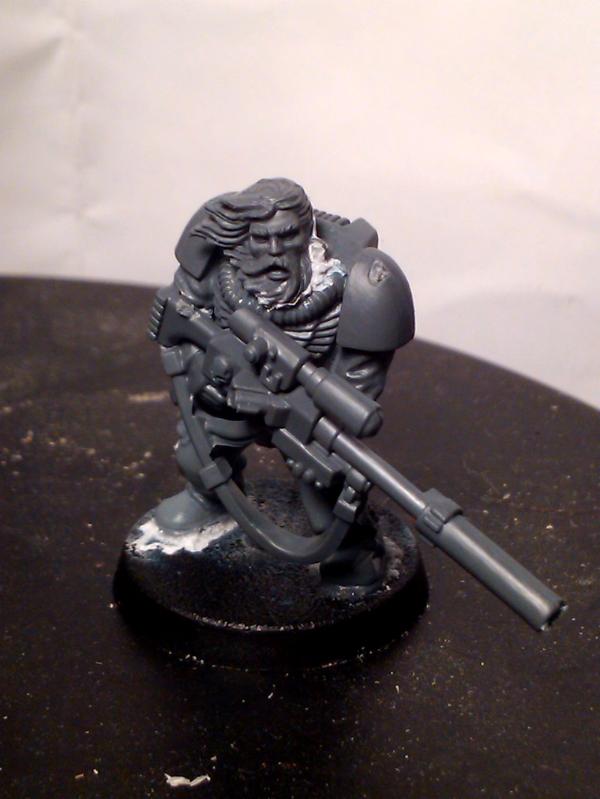
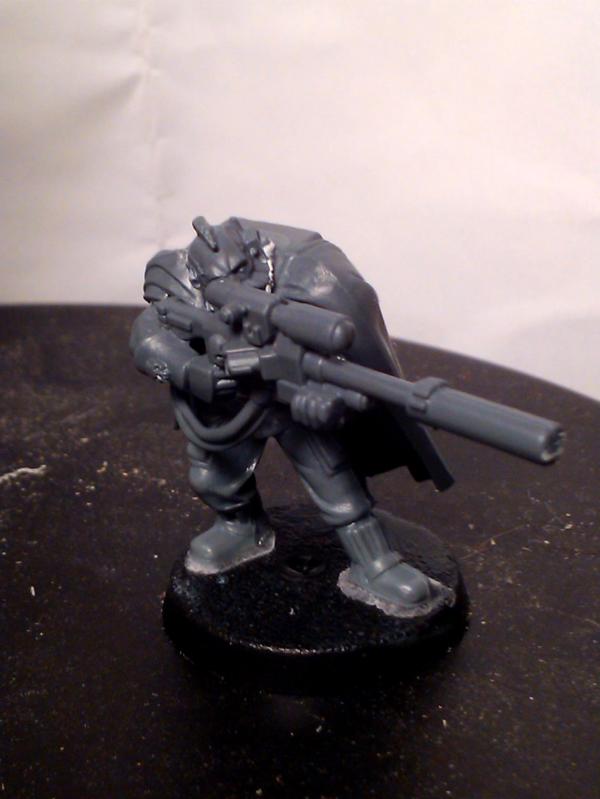
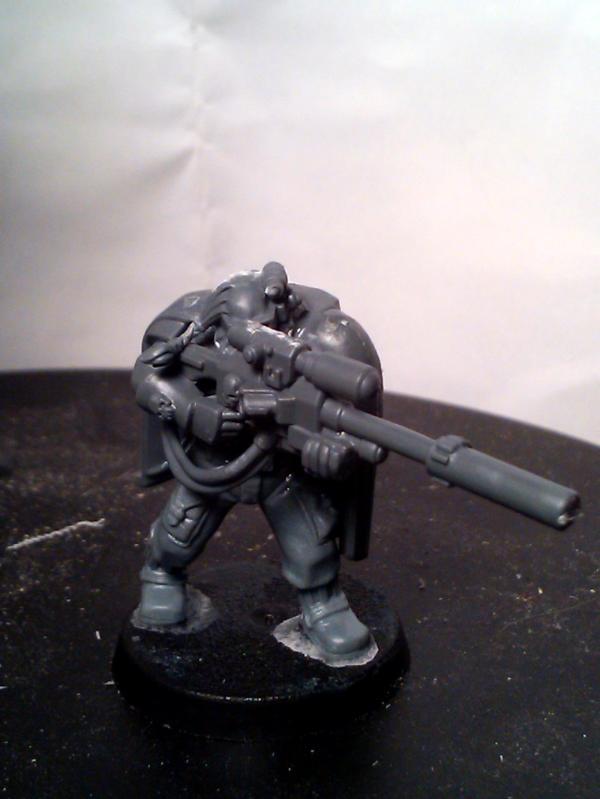
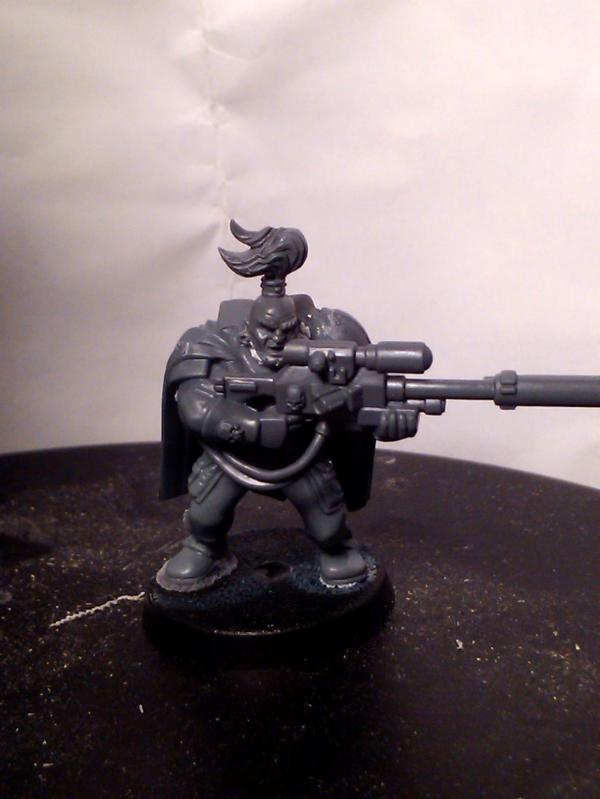
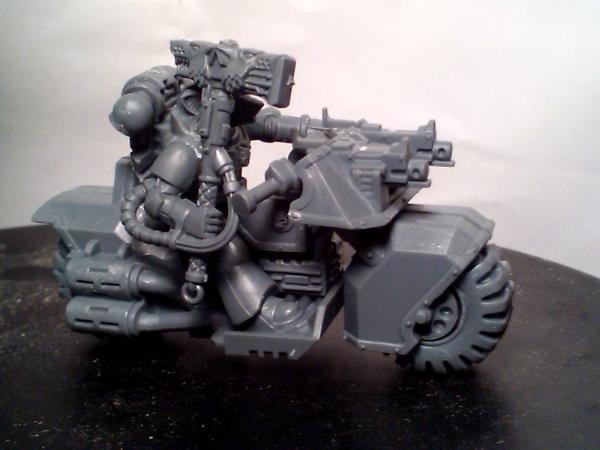
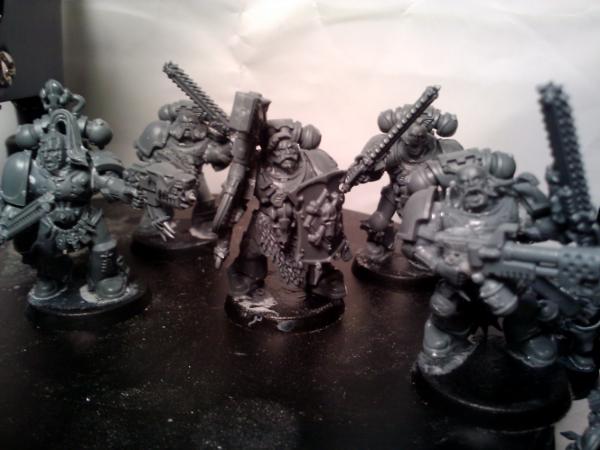
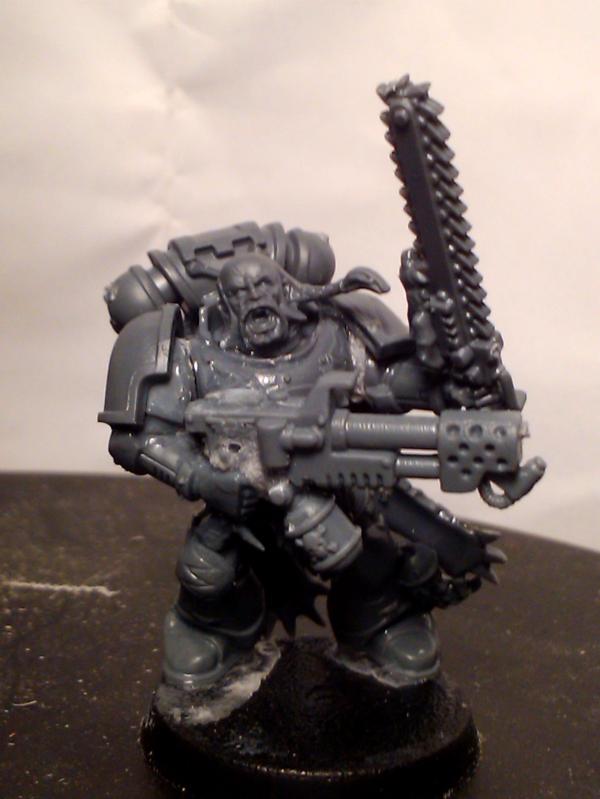
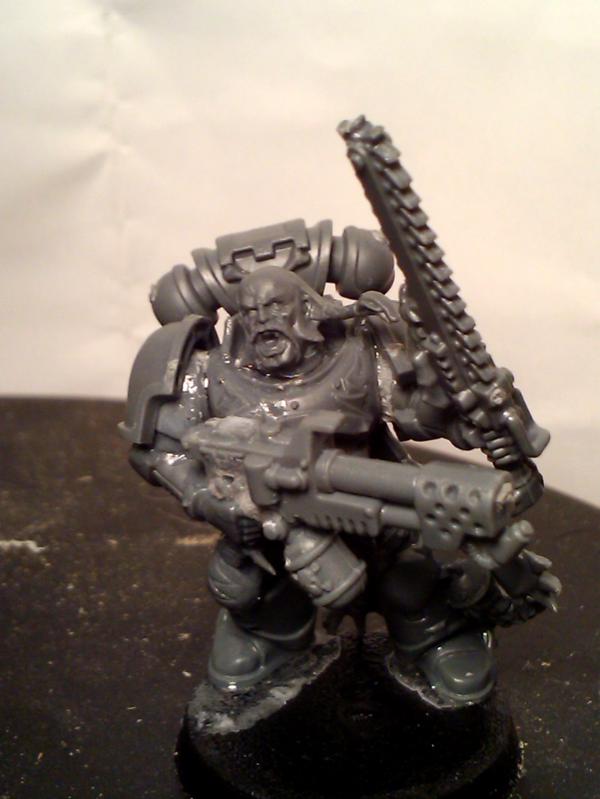
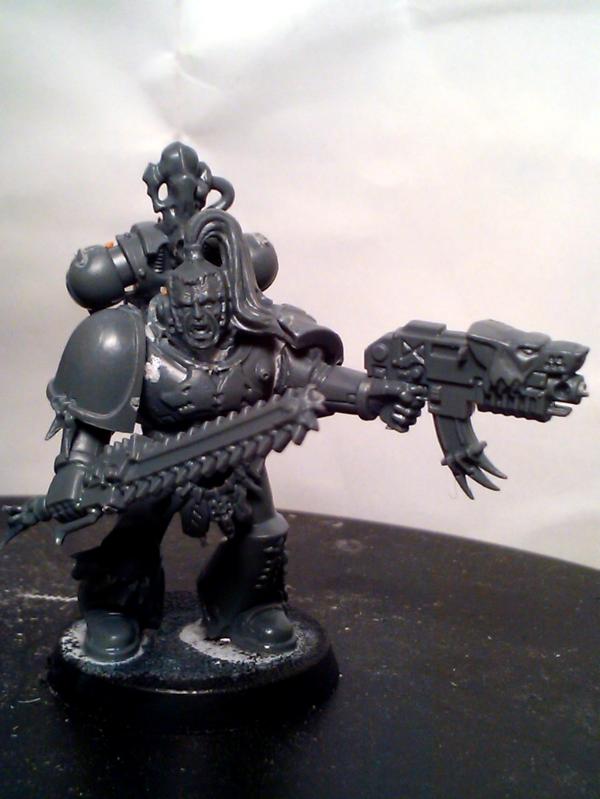
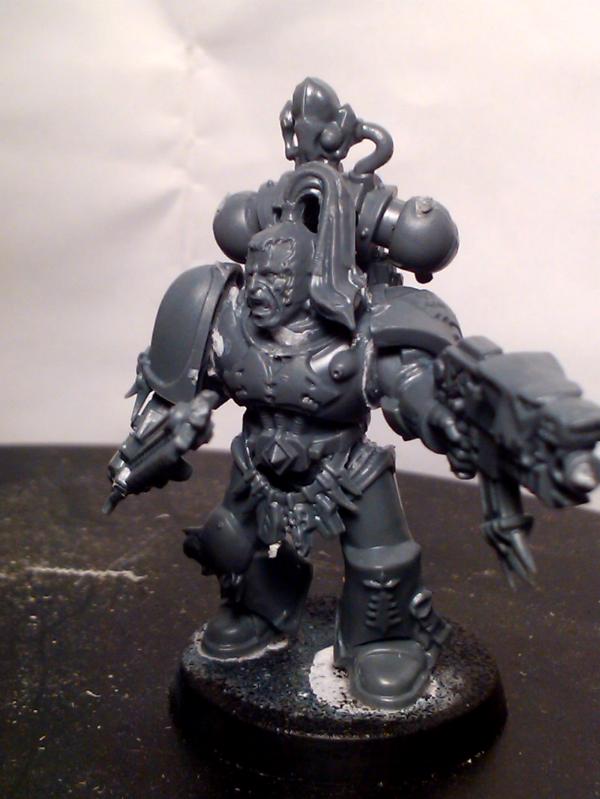

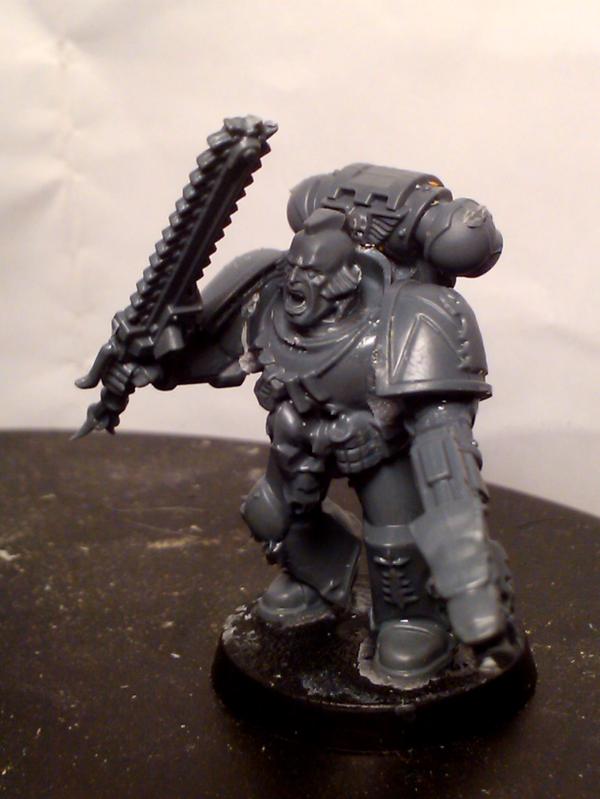
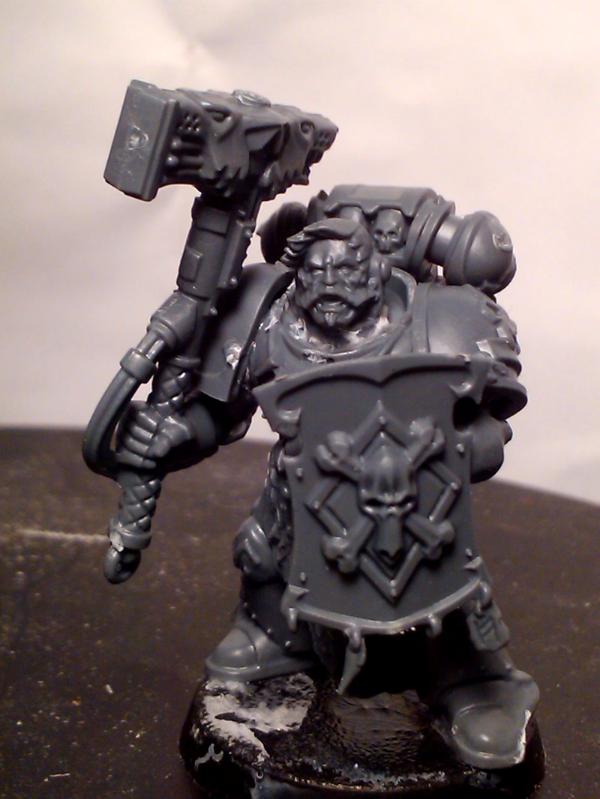
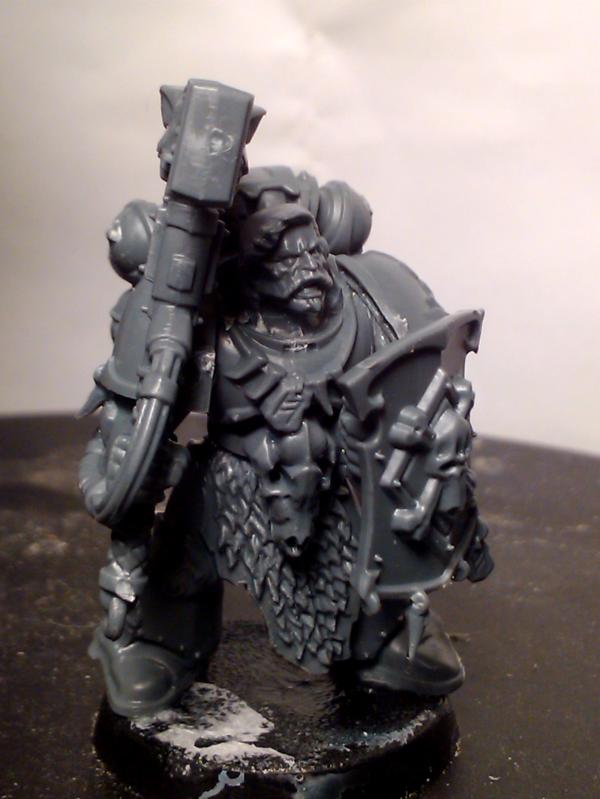
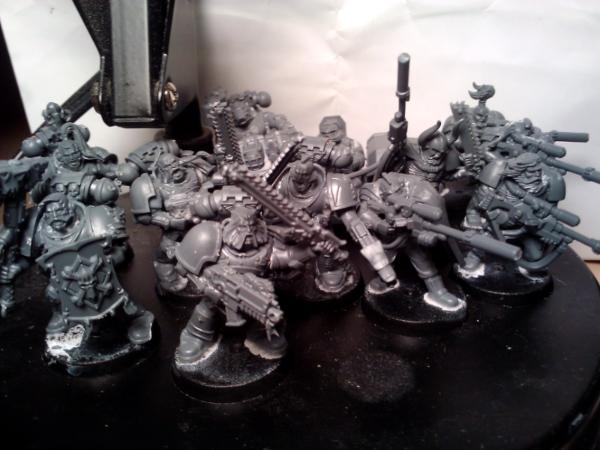

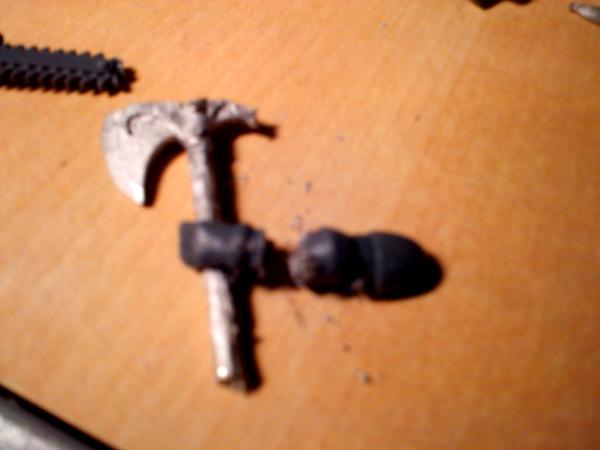
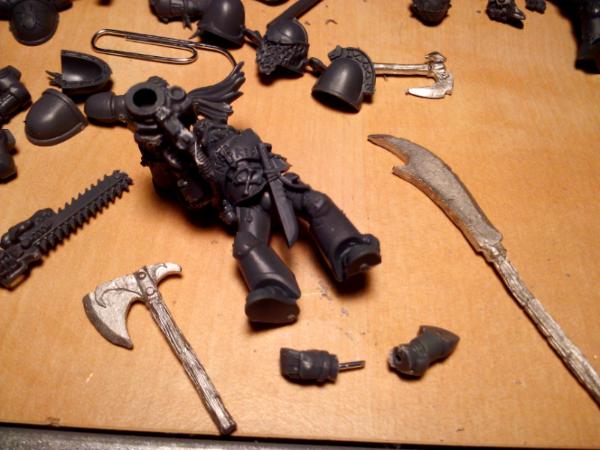

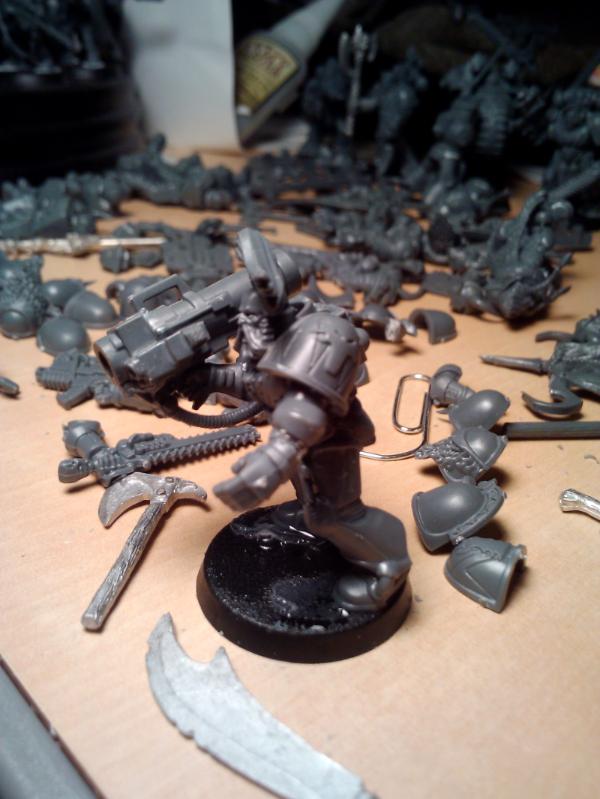
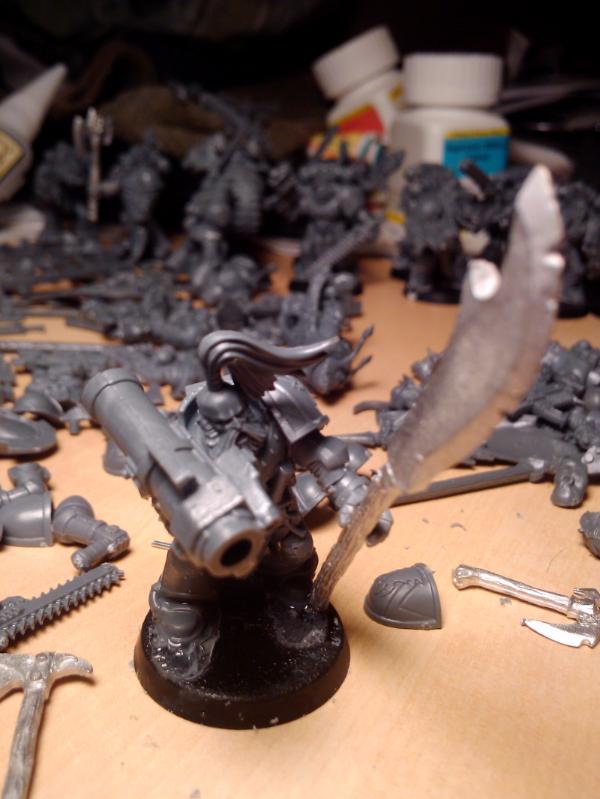
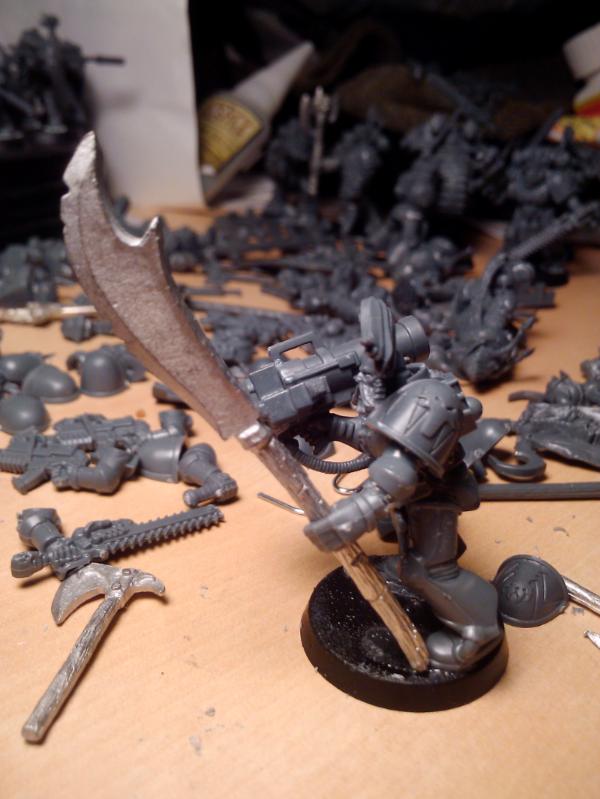
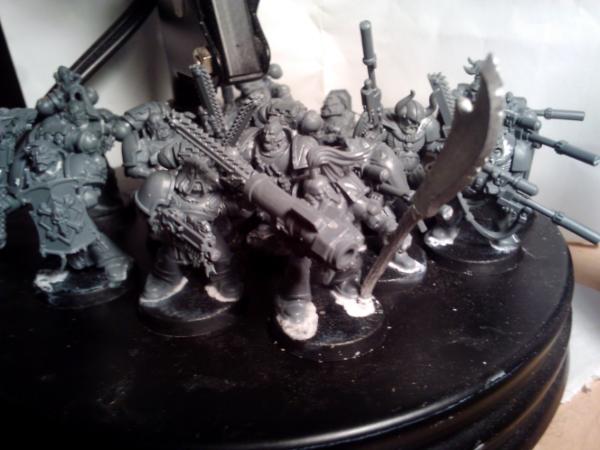
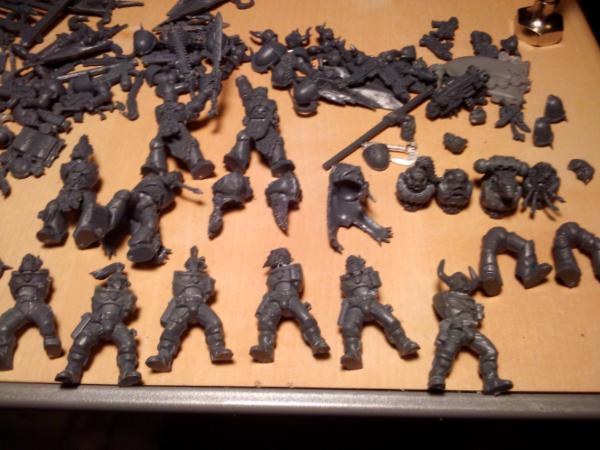
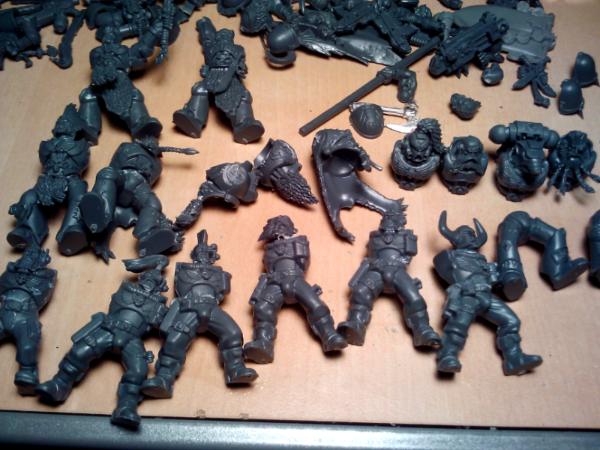
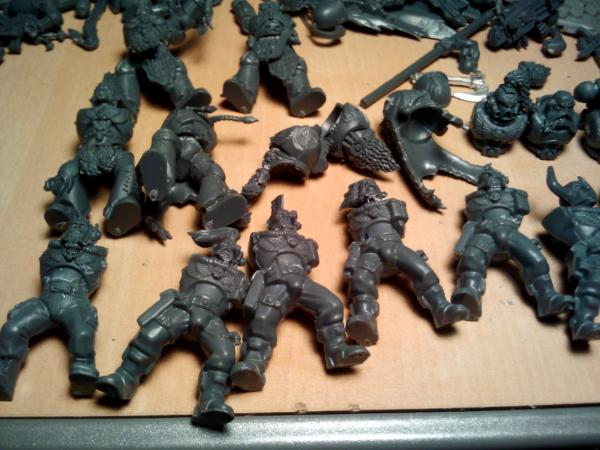


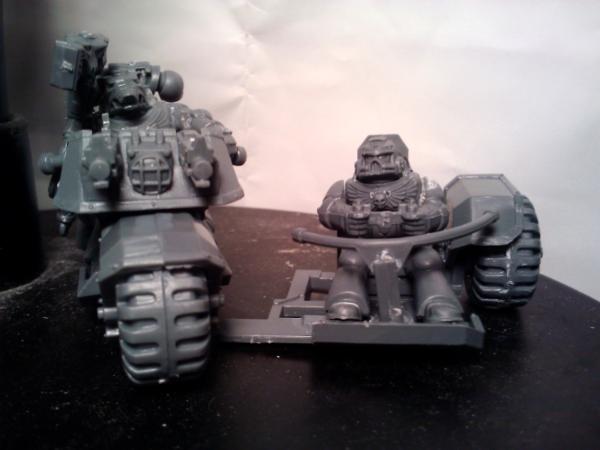
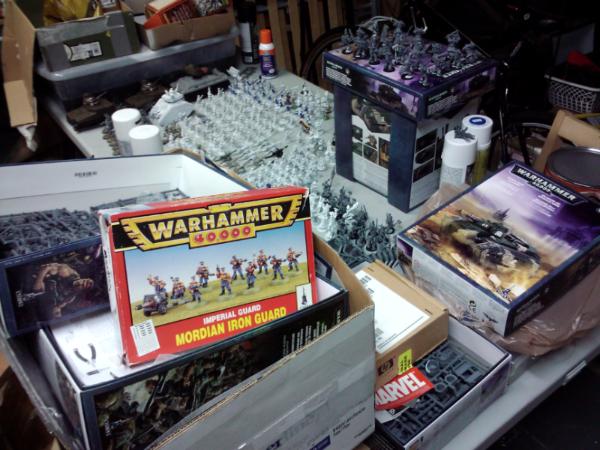
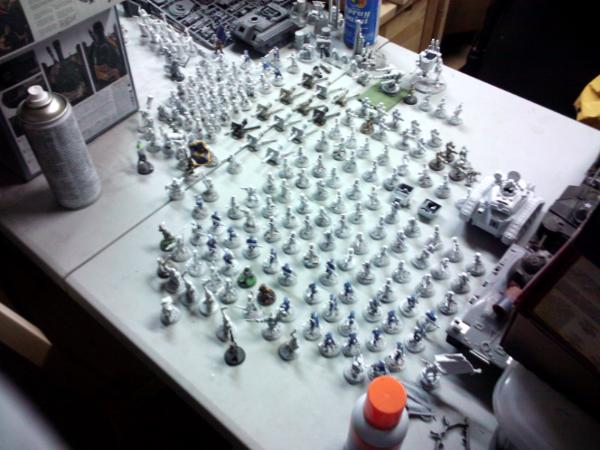
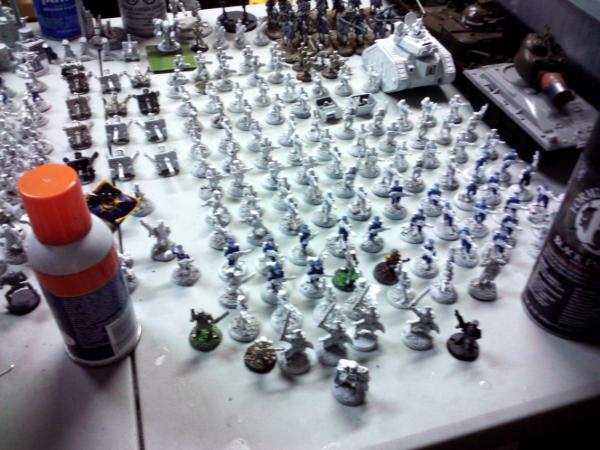

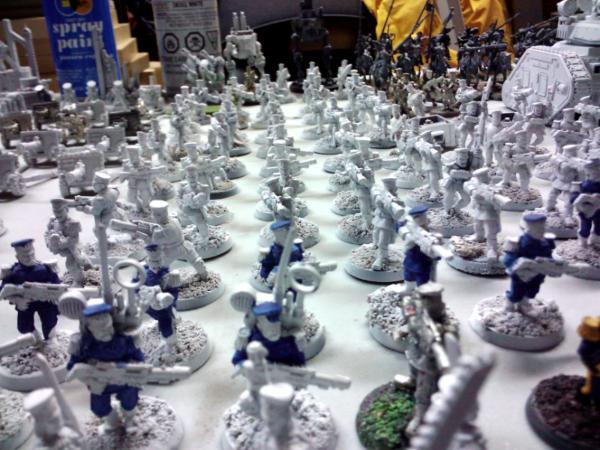
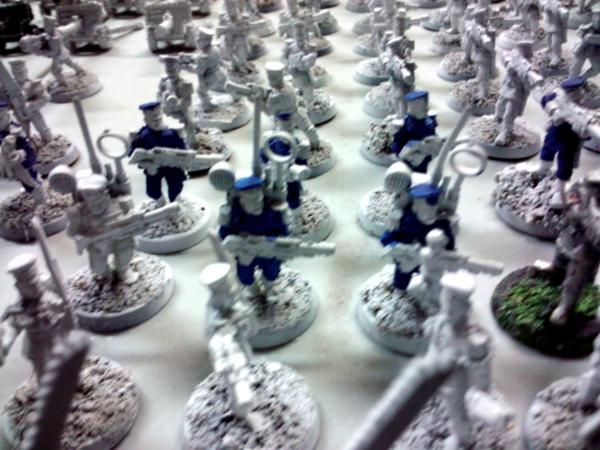
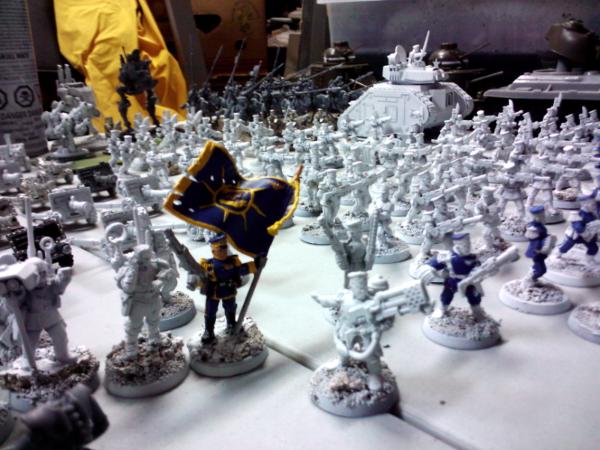
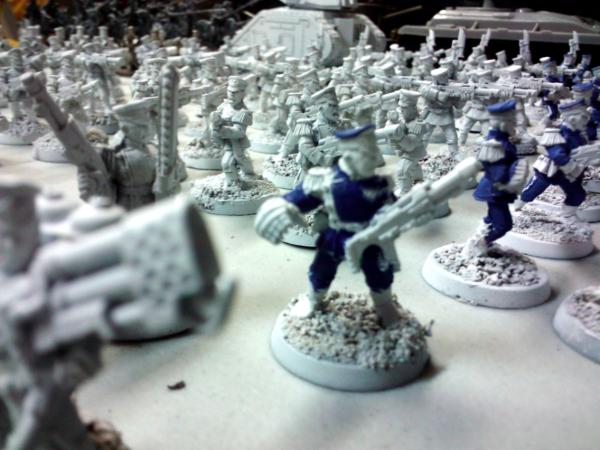

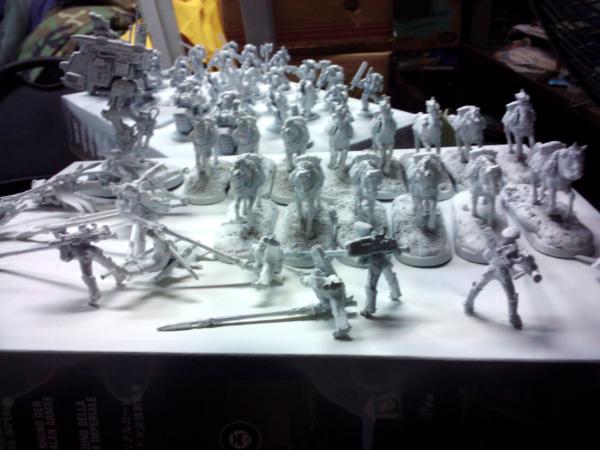
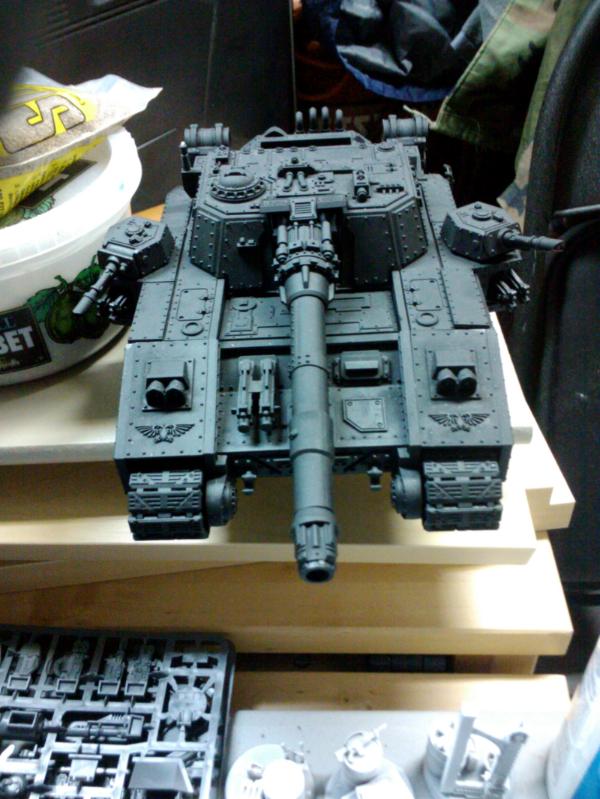
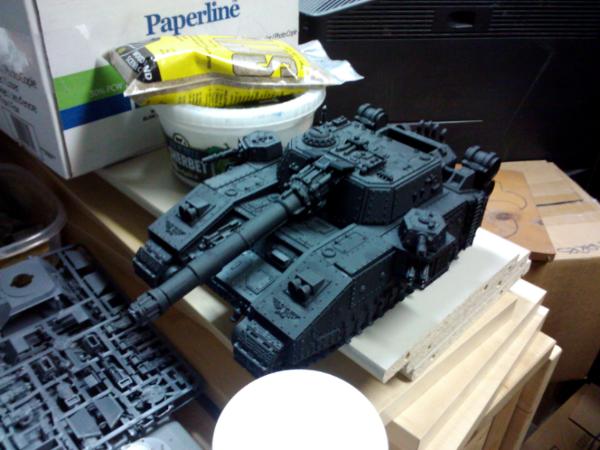
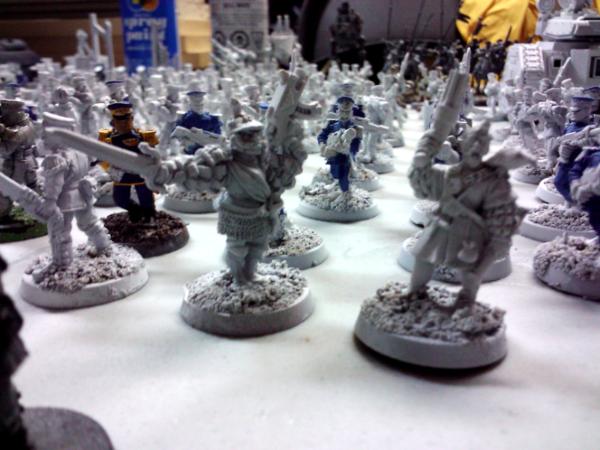
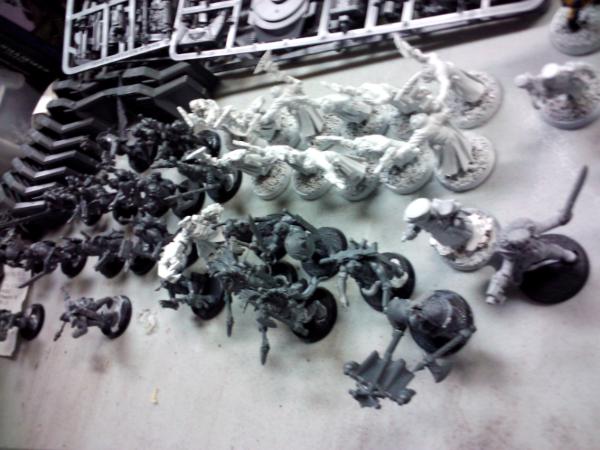
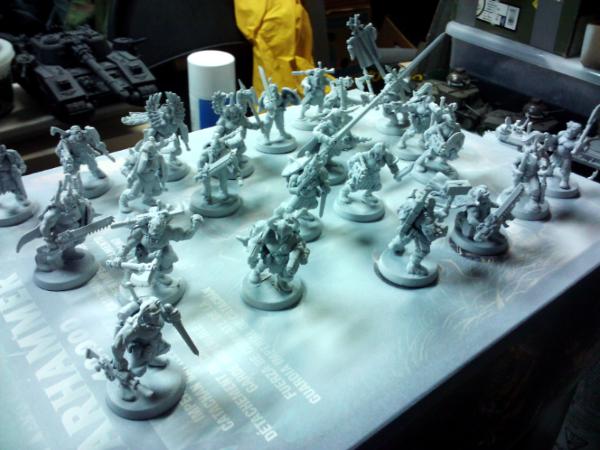
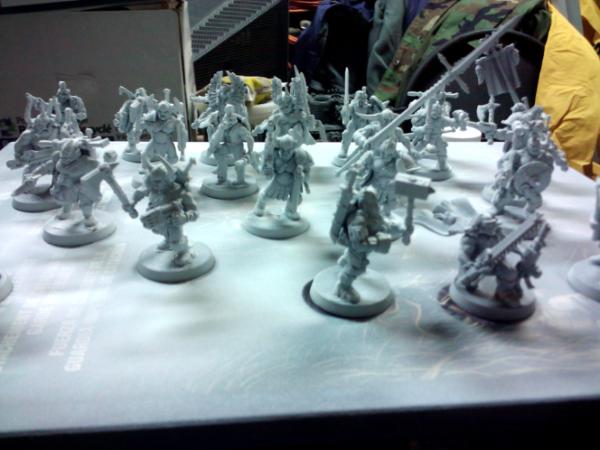
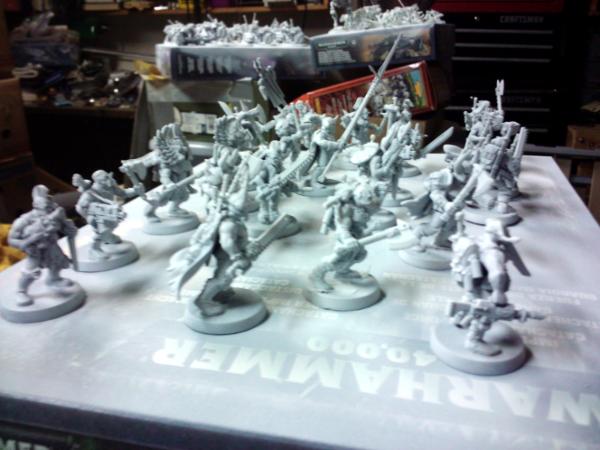
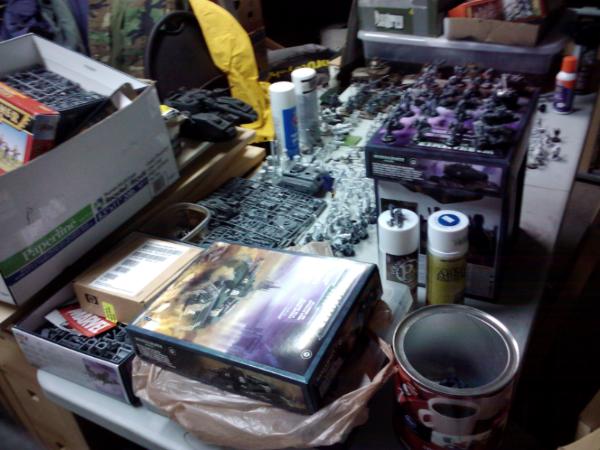
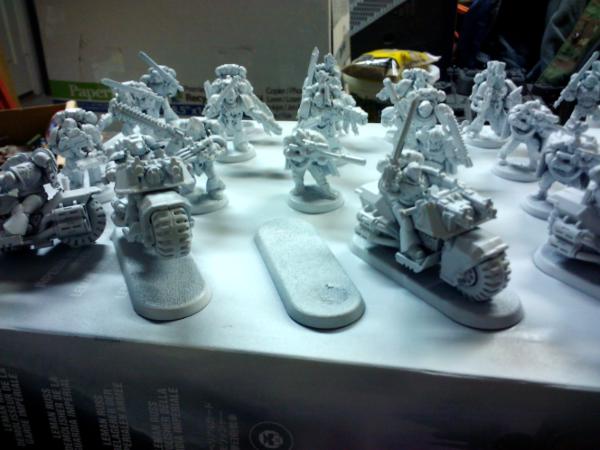
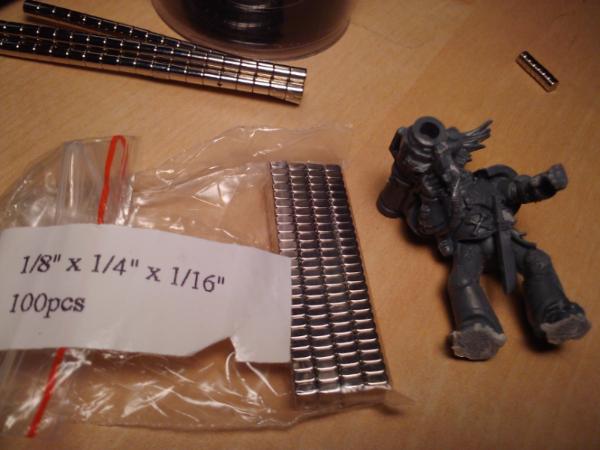
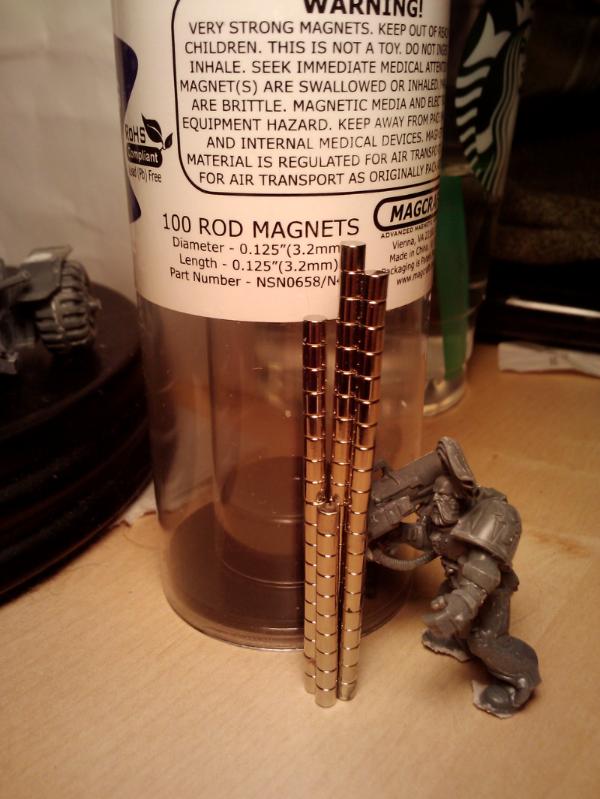
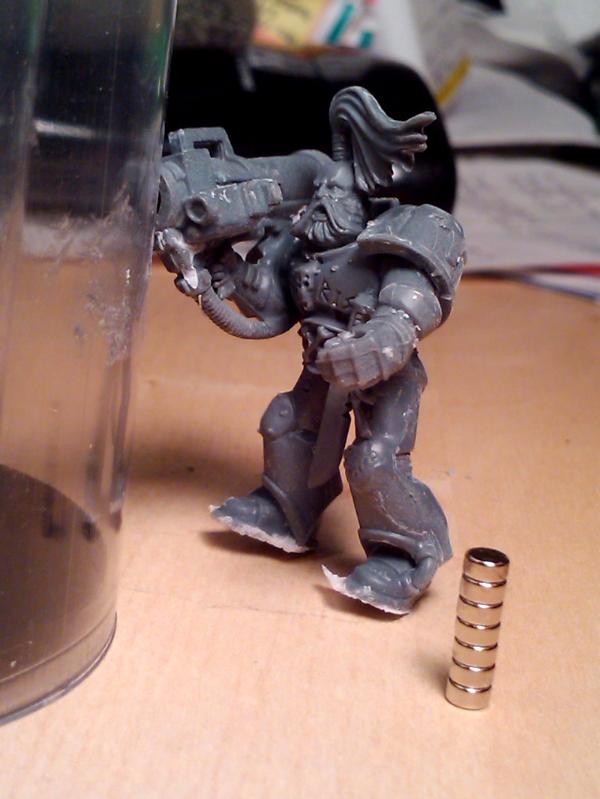
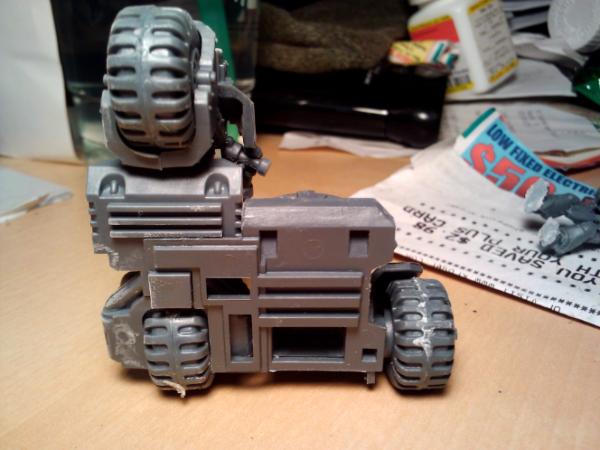
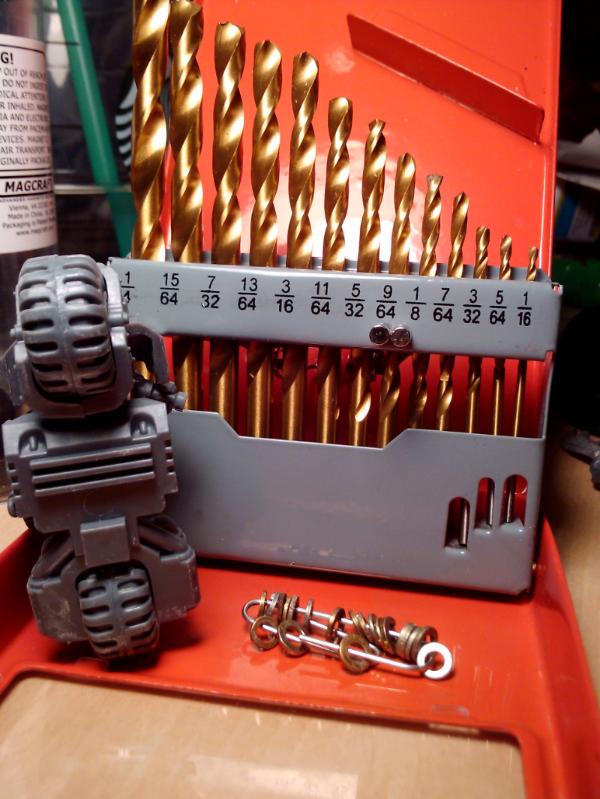

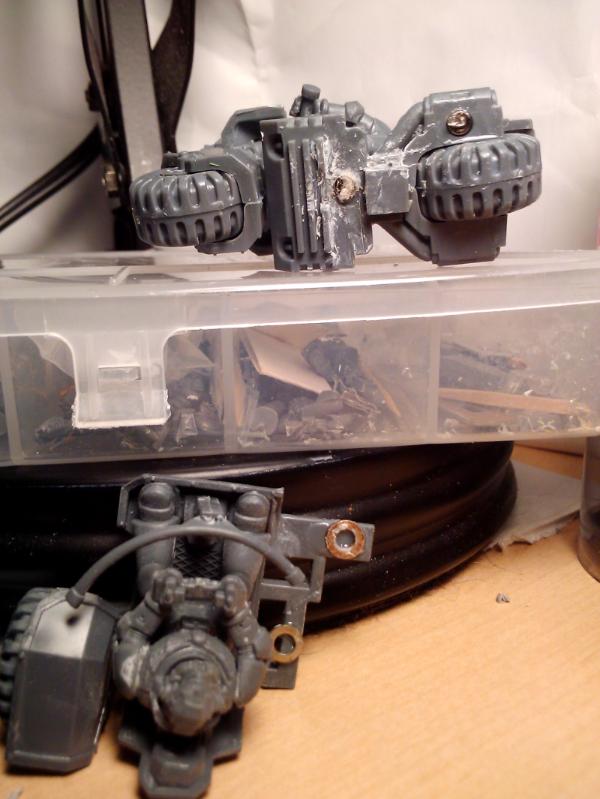
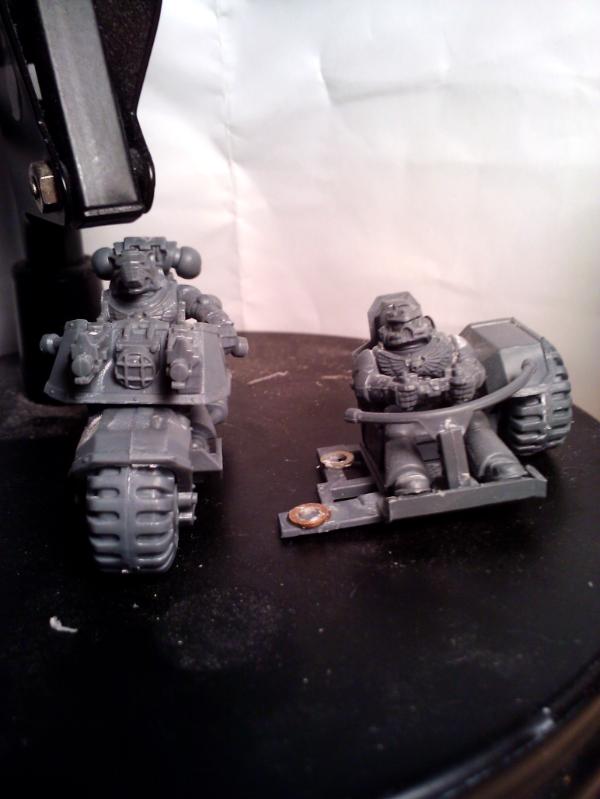
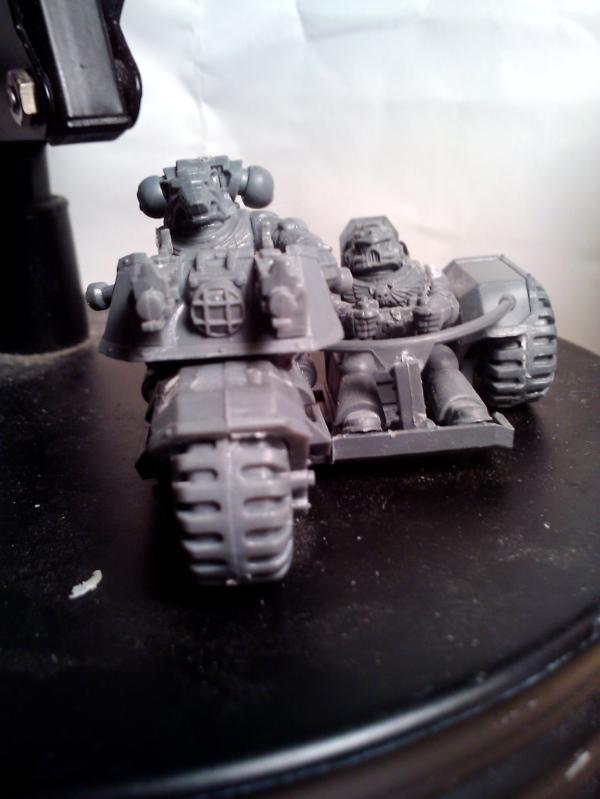
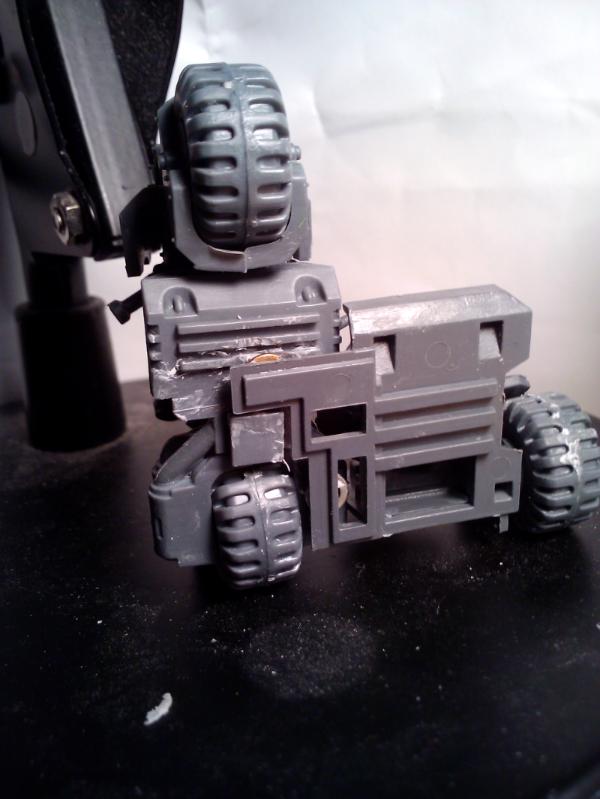

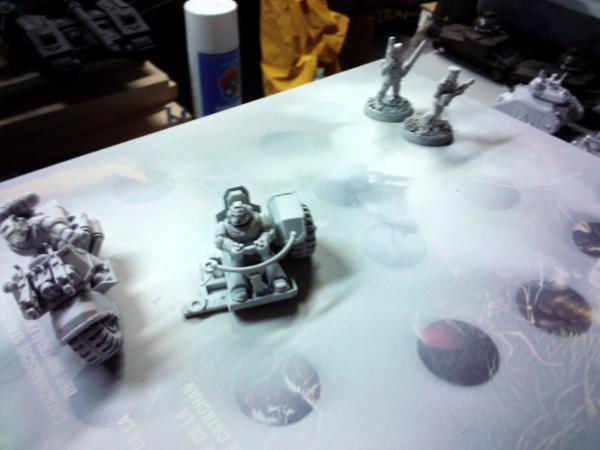
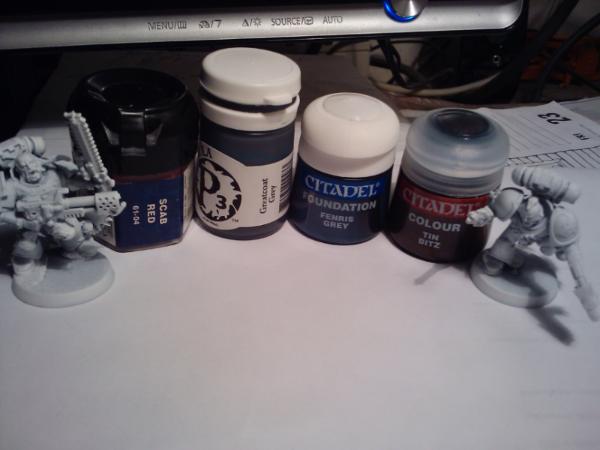
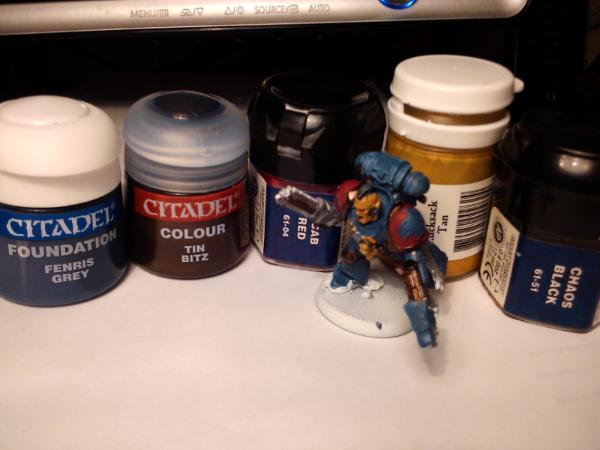
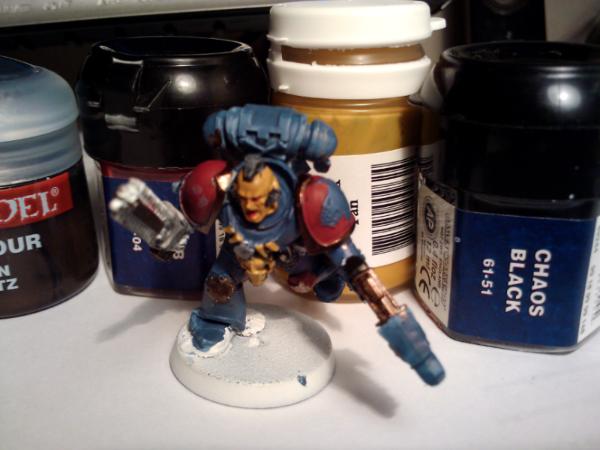
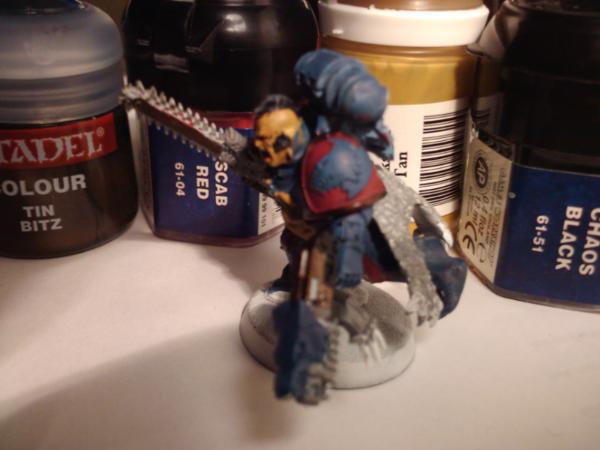
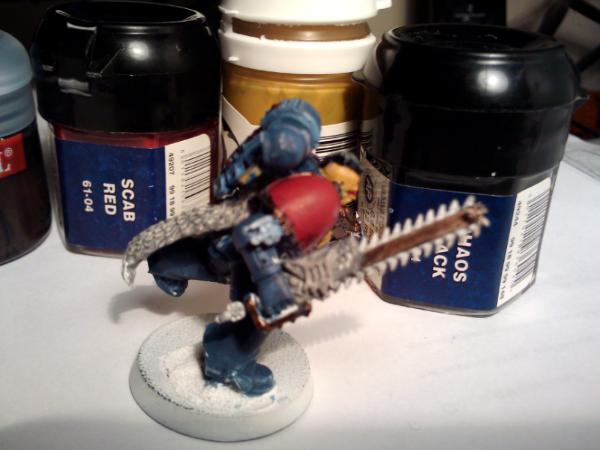
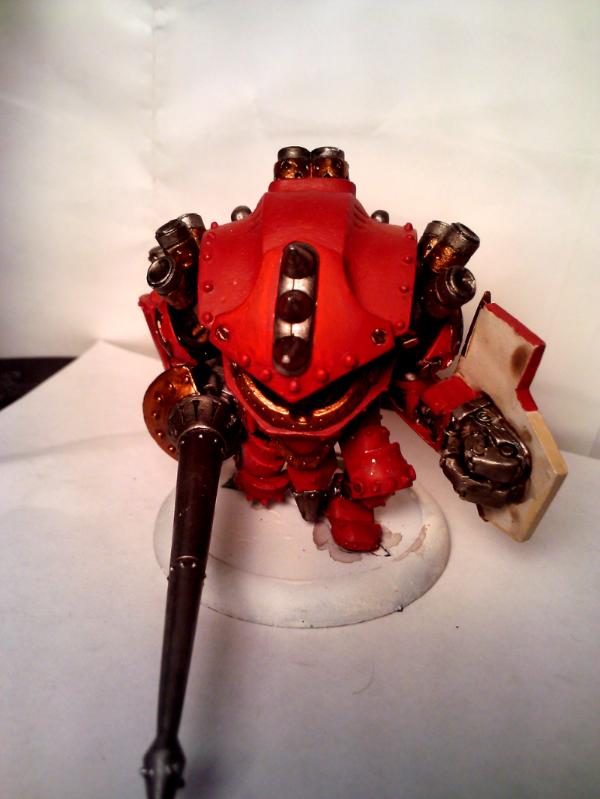
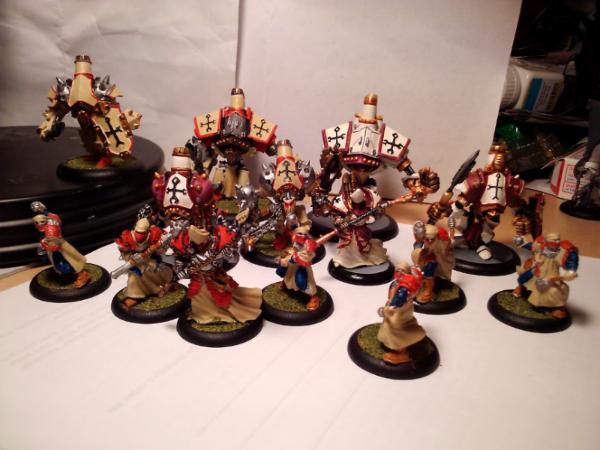
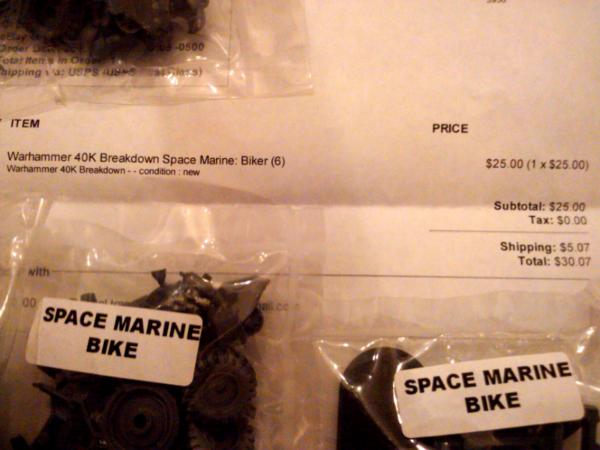
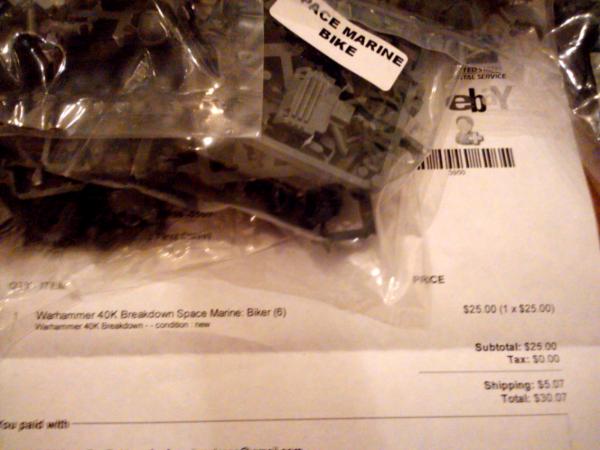
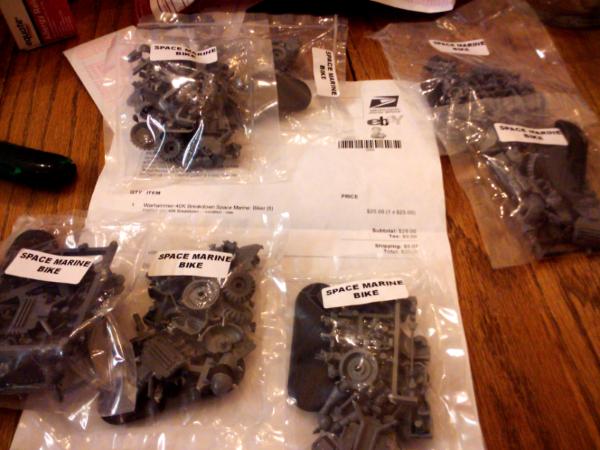
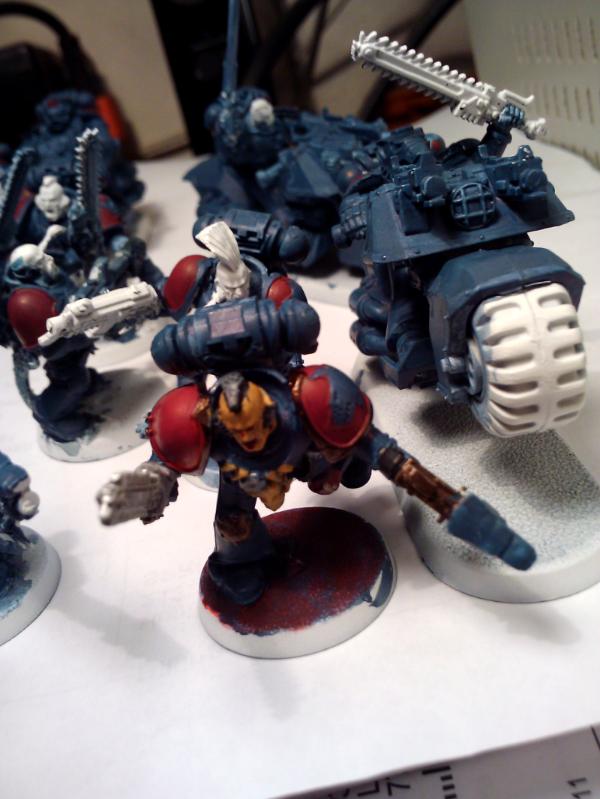
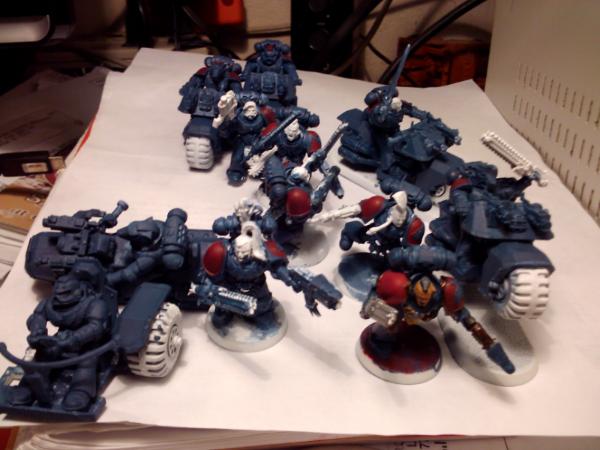
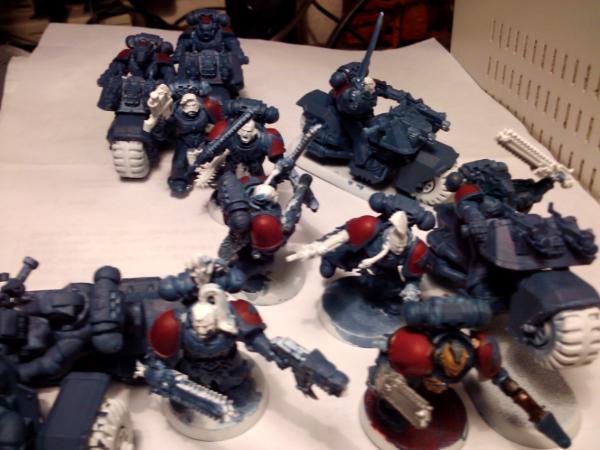
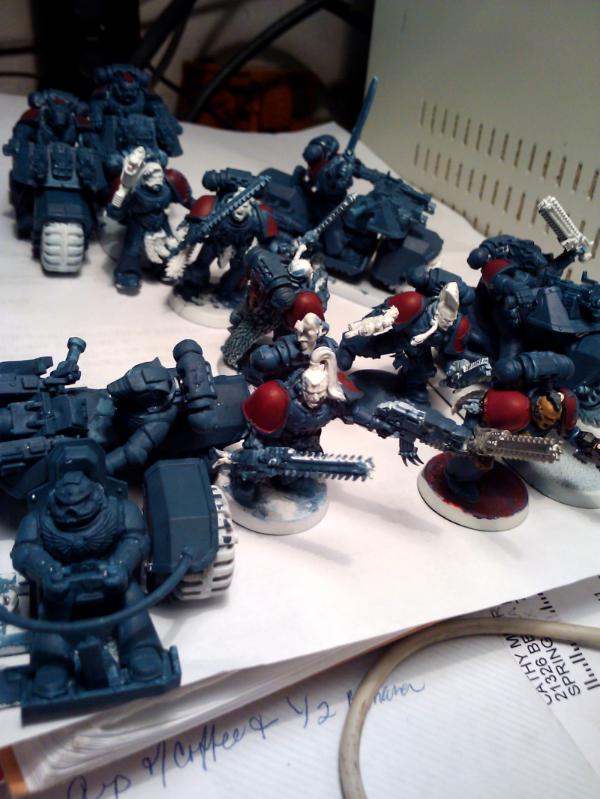
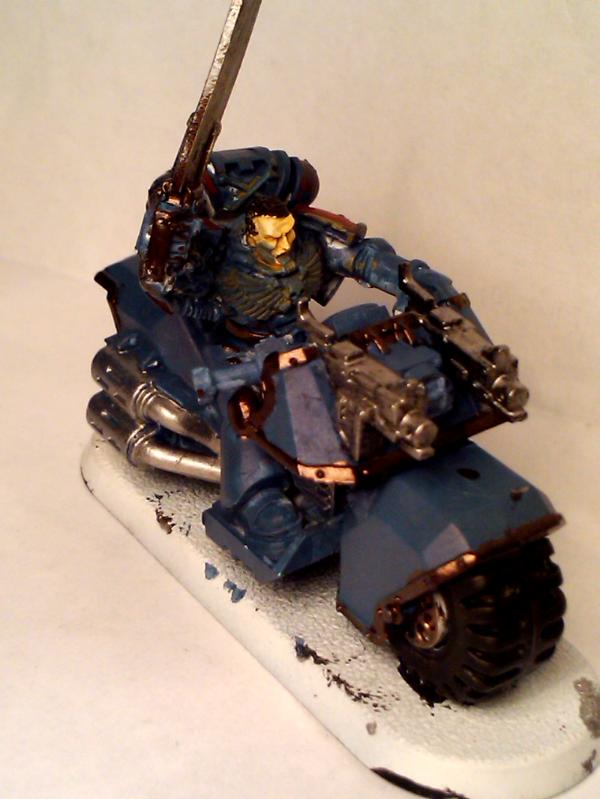
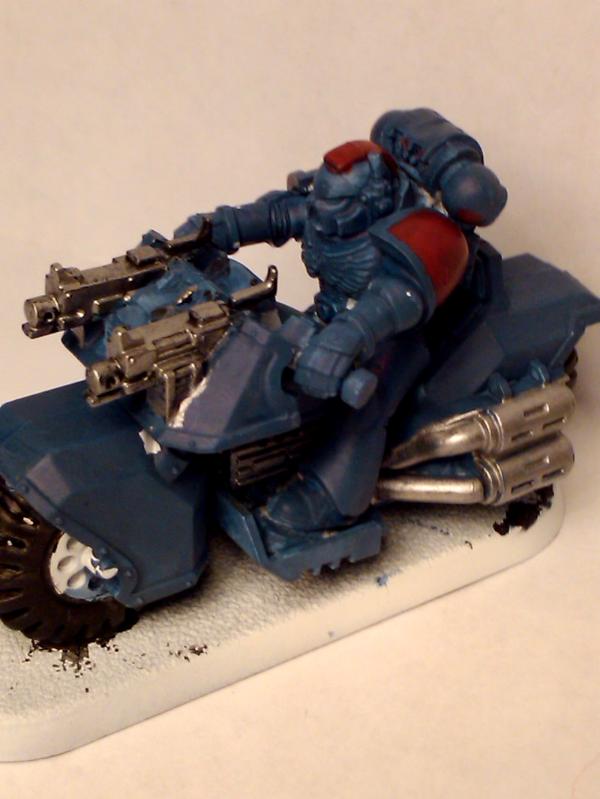
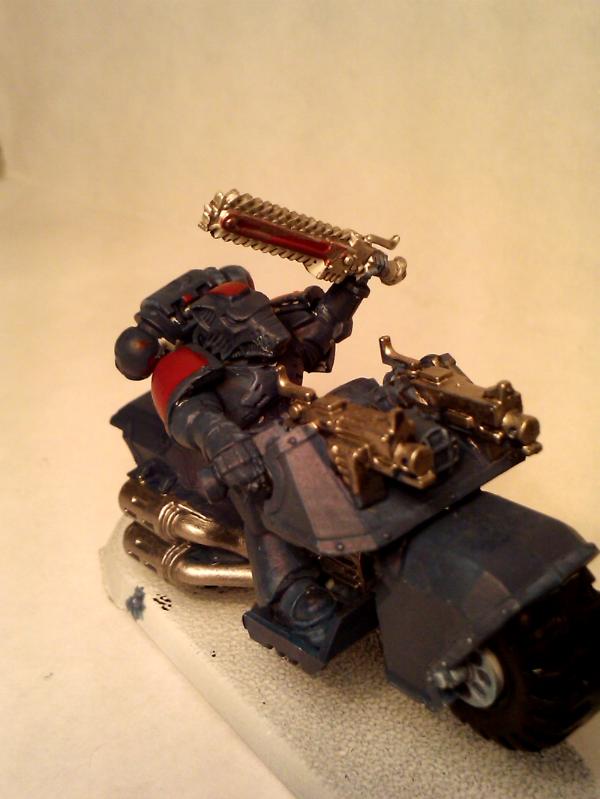
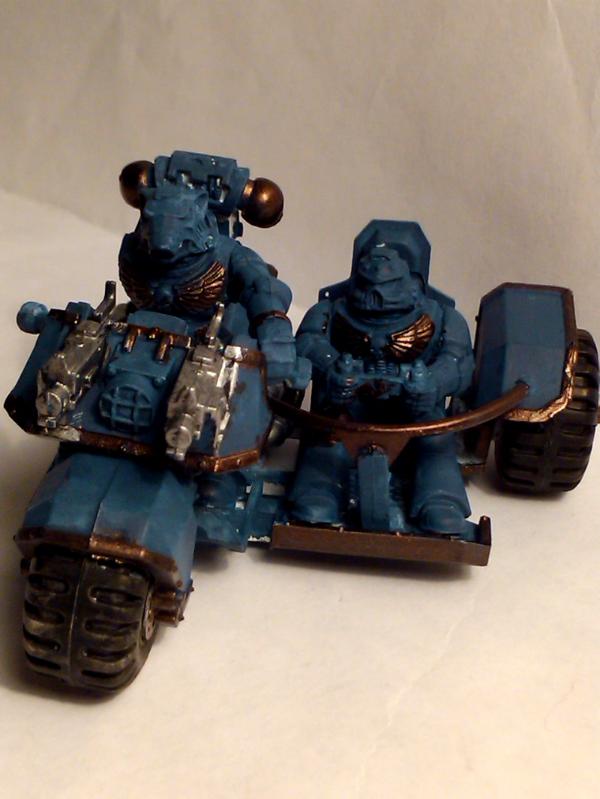
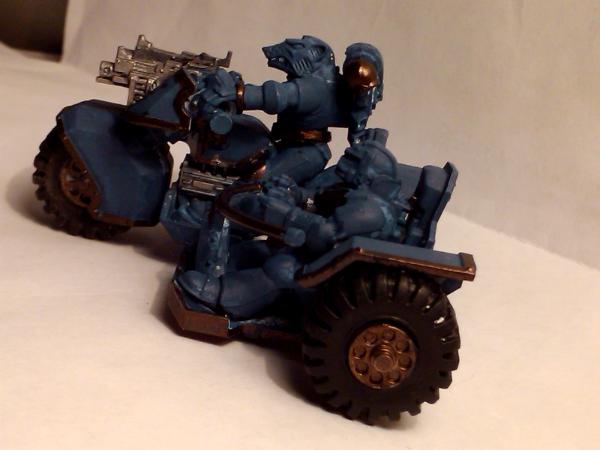
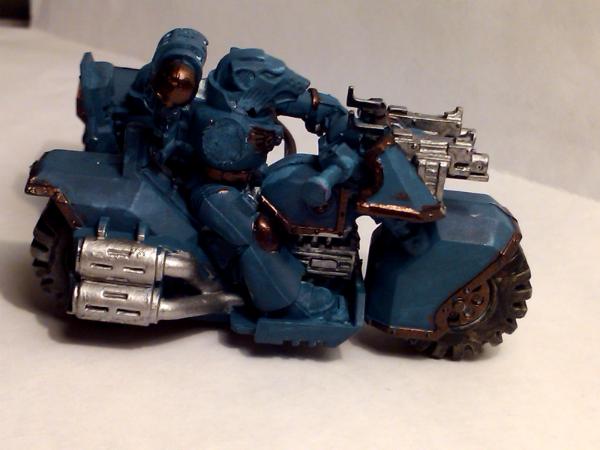
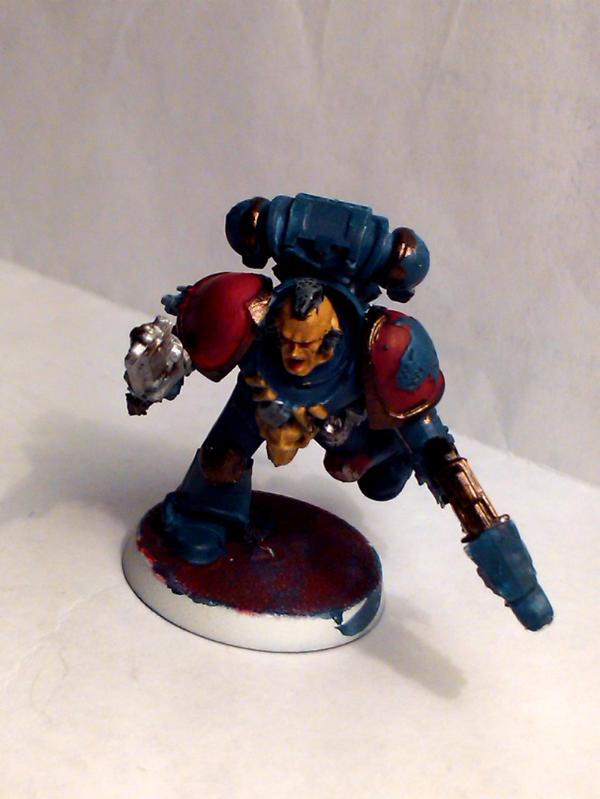
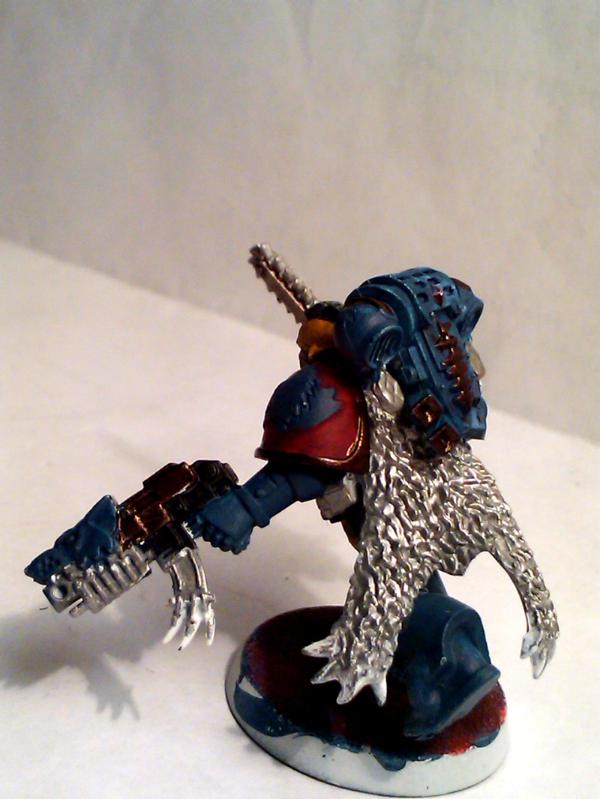
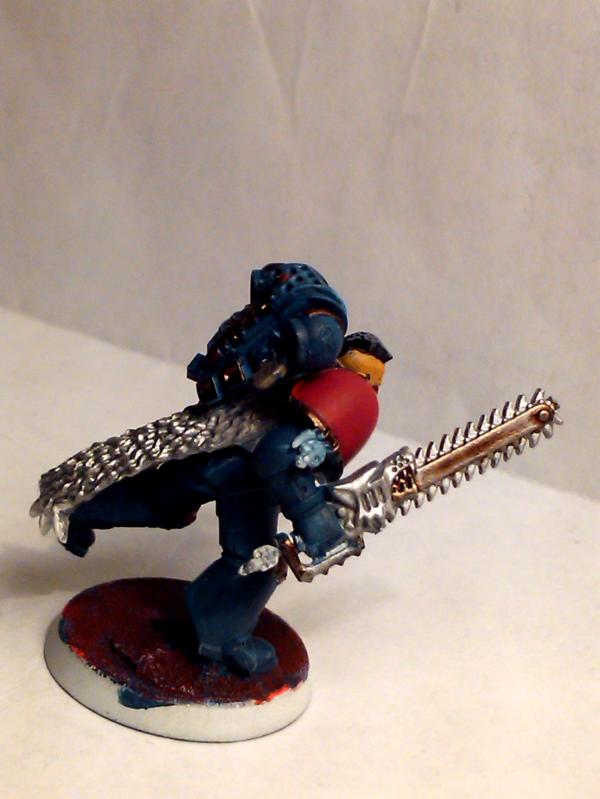
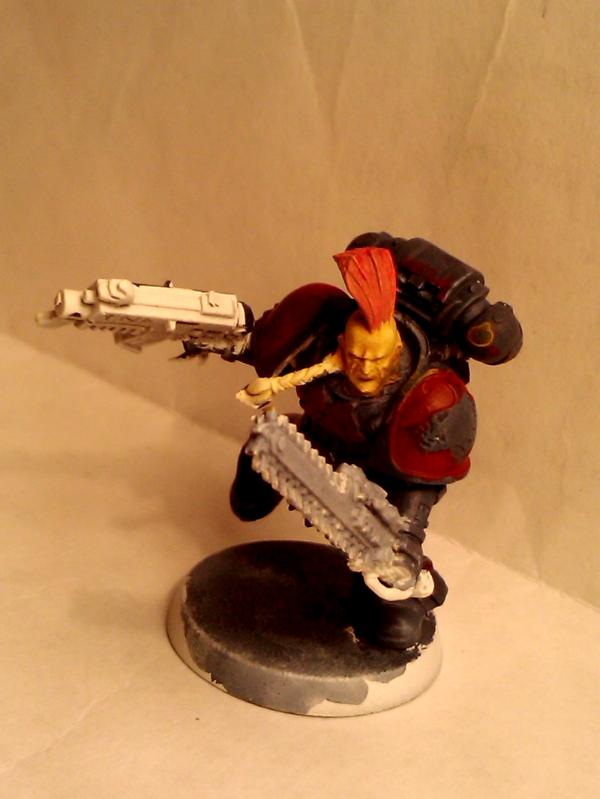
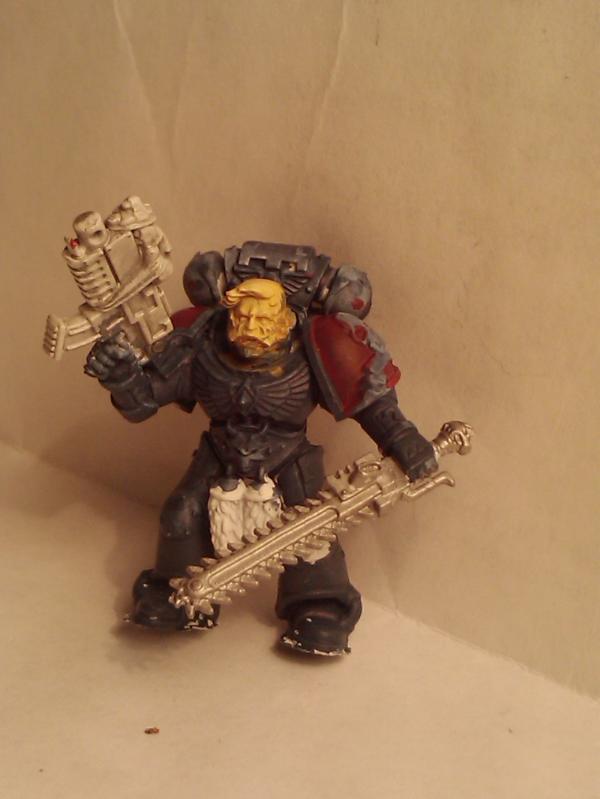
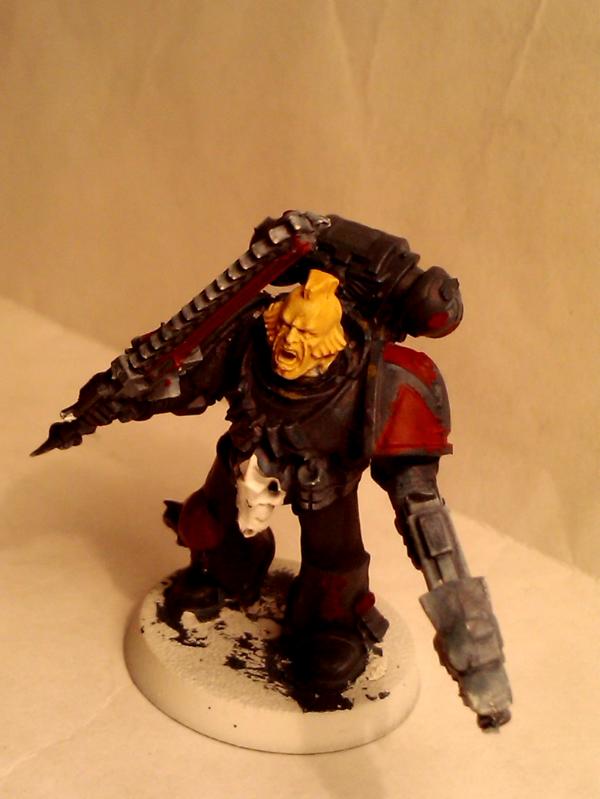
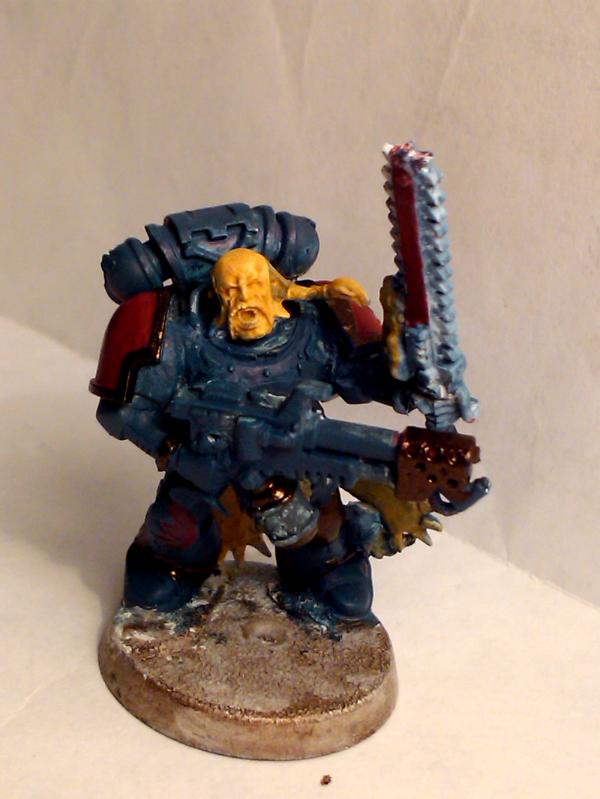
 ... and then i looked up what livery could mean...