| Author |
Message |
 |
|
|
|
|
Advert
|
Forum adverts like this one are shown to any user who is not logged in. Join us by filling out a tiny 3 field form and you will get your own, free, dakka user account which gives a good range of benefits to you:
- No adverts like this in the forums anymore.
- Times and dates in your local timezone.
- Full tracking of what you have read so you can skip to your first unread post, easily see what has changed since you last logged in, and easily see what is new at a glance.
- Email notifications for threads you want to watch closely.
- Being a part of the oldest wargaming community on the net.
If you are already a member then feel free to login now. |
|
 |
2011/09/21 07:38:07
Subject: Re:EndTransmission and Arakasi Learn 3D Modelling
|
|

Ragin' Ork Dreadnought
|
Update!
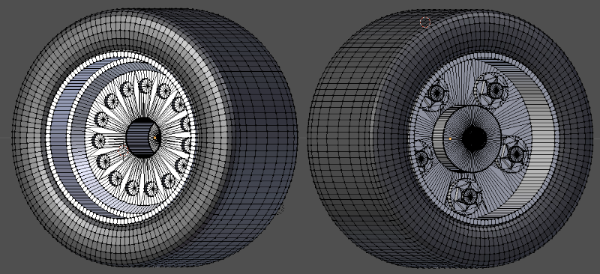
I have been battling some Blender tutorials, and finally decided to have a go myself - first attempts at modelling wheels:
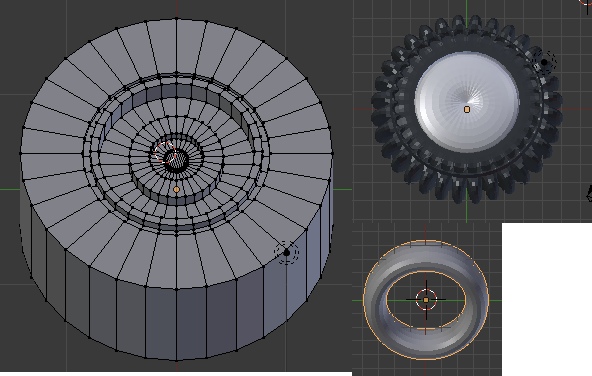
Left was my first attempt, and is based on Ork Trukk rear wheel - which is meant just for practise, not to actually replicate. Not very smooth, and no rivets or details, but I am just coming to terms with manipulating the software at this point. This was also based on one "Blender Unit" = 1cm. Top right is following a Blender wheel tutorial I found *after* the left version. Learnt some more things which will be helpful for redoing the left wheel - but I doubt the result will make a great actual model (the tyre surface is quite rough). Bottom right is following the same tutorial, but using a slightly different method that ended up in a smoother looking tyre...
I figured it was worth putting up these early "attempts" - to show progress and to later show "where I came from"  I resisted putting up a picture of a solid cylinder
|
|
|
|
 |
|
2011/09/21 08:10:29
Subject: Re:EndTransmission and Arakasi Learn 3D Modelling
|
|
Calculating Commissar
|
Great minds think alike. I've been working through various tutorials as well, so this morning I started piecing together a Chimera chassis.
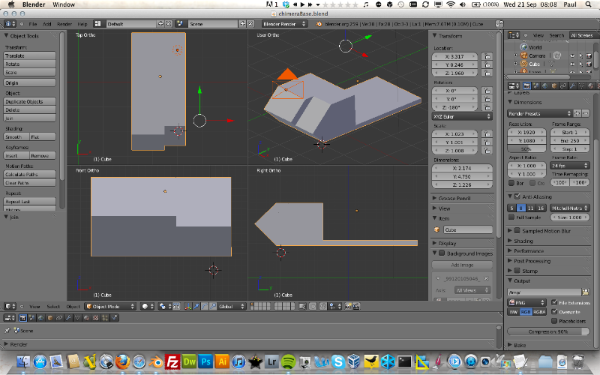
Obviously this is really basic at the moment, but the aim is to use it as a guide when designing the various tank ideas I've got in my head rather than ever print it, so it might stay very basic to use as a simple guide block. Next up is to work out how to generate guide blocks for the track units.
I think my favourite discovery so far was the background images for each view so I can get the alignment and angle of pieces correct.
My only query so far is about the top right view. I can't work out why this view is showing a step in the back edge of the cab section. Is this just because it's in 3d, or is there something I can't see in the other three views?
|
|
This message was edited 2 times. Last update was at 2011/09/21 08:39:09
|
|
|
|
|
2011/09/23 15:15:23
Subject: Re:EndTransmission and Arakasi Learn 3D Modelling
|
|
Ragin' Ork Dreadnought
|
Try 4 - By no means a "clean" model yet, but hopefully you can see I am progressing! (Mostly getting used to Blender and really basic modelling...)
Need to work on the treads next (as well as working towards a cleaner model...) for try 5...
|
|
|
|
|
|
2011/09/23 15:36:29
Subject: Re:EndTransmission and Arakasi Learn 3D Modelling
|
|

Elite Tyranid Warrior
East TN
|
Watching this like a hawk. I really want to learn to use these tools. If I stay unemployed for long I figure I can get a good hold on the techniques and concepts.
|
|
|
|
|
|
2011/09/23 16:01:28
Subject: Re:EndTransmission and Arakasi Learn 3D Modelling
|
|
Calculating Commissar
|
Arakasi wrote:Try 4 - By no means a "clean" model yet, but hopefully you can see I am progressing! (Mostly getting used to Blender and really basic modelling...)
Need to work on the treads next (as well as working towards a cleaner model...) for try 5...
Looking good. For try 6 you should look at keeping the tyre and hub separate so you can make lots of different sets more easily. Besides which.. you need piles of just the tyres for your race track.
|
|
|
|
|
|
2011/09/23 16:58:31
Subject: EndTransmission and Arakasi Learn 3D Modelling
|
|
Ragin' Ork Dreadnought
|
Who says they weren't separate in try 4?
|
|
|
|
|
|
2011/09/23 17:28:05
Subject: EndTransmission and Arakasi Learn 3D Modelling
|
|
Manhunter
|
Well, best of luck to you guys!
|
Lokas wrote:...Enemy of my enemy is kind of a dick, so let's kill him too.
"Without judgement there is no obstacle to action." ~ Kommander Oleg Strakhov
|
|
|
|
|
2011/09/30 08:12:50
Subject: Re:EndTransmission and Arakasi Learn 3D Modelling
|
|
Ragin' Ork Dreadnought
|
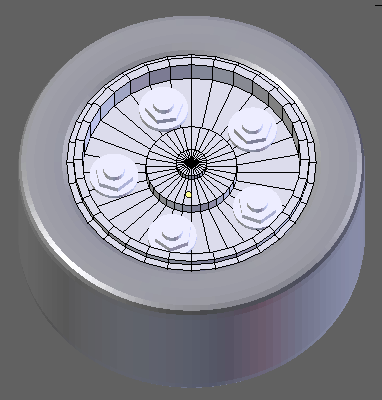
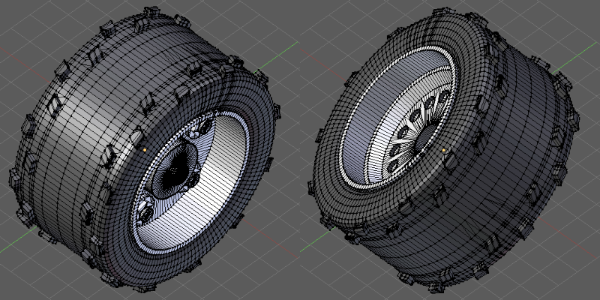
Update!
Right, the model should be clean, both sides are done, just need to add tread...
Things I have learnt so far...
1) Background images are great for sizing - thanks endtransmission for putting me on to that! (it was only a tutorial or two past where I had got to...)
2) Inverting selections and hiding vertices (of course I made the outside tyre first...)
3) Using the 3d cursor to insert surface circles at the same level as the containing circle (after trying to originally move a cylinder to line up with an existing surface and then attach...)
4) Filling in the plane after adding the interior circles - so I'm not removing previous work...
5) Duplicating and rotating around a centre point by fixed degree amounts - perfect for lining up all of those holes and bolts (if not very Orky...)
Looking forward to finishing the treads and perhaps starting on discovering the issues with 3d printing...
Oh - the above is supposed to be a replacement for the Ork Trukk rear tyre - part of the fun I guess will be getting the end print out scaled correctly, and then seeing if I have the connection hole right... any thoughts or tips here (or anything up to here, or past here - well - anything really!) would be appreciated!
|
|
|
|
|
|
2011/09/30 08:33:16
Subject: EndTransmission and Arakasi Learn 3D Modelling
|
|
Calculating Commissar
|
That's looking good. You've got a lot further than I have... doh!
Then again, you're following tutorials, which is probably my problem as I'm just trying to look things up as and when I need them... which isn't going all that well.
My main problem is I keep hitting something that blanks out all the views and I can't for the life of me work out how to undo that without losing the work I've done on a model.
|
|
|
|
|
|
2011/09/30 11:35:42
Subject: EndTransmission and Arakasi Learn 3D Modelling
|
|
Decrepit Dakkanaut
|
That looks like a real tire Arakasi... you sure you don't work for an auto company as a designer?
|
|
|
|
|
|
2011/09/30 15:41:51
Subject: Re:EndTransmission and Arakasi Learn 3D Modelling
|
|
Frenzied Berserker Terminator
|
Arakasi, that looks great! You should print that tire right there, and if you (or a customer) wants a more ordinary or "IG" type tire, you have it. And if you want it more Orky, just add some "metal" plates, rivets and spikes, and it's done!
Just my $0.02.
Then again, I don't know what kind of tread you are thinking of.
|
|
|
|
|
|
2011/09/30 18:18:06
Subject: Re:EndTransmission and Arakasi Learn 3D Modelling
|
|
Fixture of Dakka
|
Looks good so far, I'd love to offer some critical advice, but I know bugger all about 3D design, so I'll just hang around, nod knowingly and pretend I know what you're talking about 
|
|
|
|
|
|
2011/09/30 19:00:07
Subject: EndTransmission and Arakasi Learn 3D Modelling
|
|
Ragin' Ork Dreadnought
|
@endtransmission: Ha! Once you do one circle, duplicating is easy!  I have *no* idea what problem you are having though... save often?
@Gitsplitta: That was the idea and not last I checked...
@RSJake: The thought had crossed my mind... I want to do the tread first, and then I'll probably look to only have one tyre done initially - so I figure with a bit more detail I might learn a bit more about the whole process in one go. Once I have any kinks in the process sorted, I can get as many printed out as I like (well, that is the plan...). The tread is needed to bring the tyre to the correct size too... (though that should just be a matter of scale? The only thing that is particularly important is the connection point...)
@monkeytroll: Glad to have you following along! I'm sure you will have *lots* of critical advice and ideas to stretch my learning when it comes to adding more Orkiness (ie the modelling side, not necessarily the 3D side )
|
|
|
|
|
|
2011/09/30 19:30:39
Subject: EndTransmission and Arakasi Learn 3D Modelling
|
|
Drop Trooper with Demo Charge
|
Wow this looks pretty interesting. I've always tinkered in SketchUp for fun/projects but this looks like a much more powerful system. Downloading it now!
+++Edit+++ Which tutorials are you using? The ones from the website?
|
|
This message was edited 1 time. Last update was at 2011/09/30 21:20:13
|
|
|
|
|
2011/09/30 21:14:38
Subject: EndTransmission and Arakasi Learn 3D Modelling
|
|

Pyromaniac Hellhound Pilot
|
The improvement between versions is pretty amazing! By the end of this thread you'll both be offered jobs as 3D animators somewhere
|
 The 104th Vostroyan Mechanized The 104th Vostroyan Mechanized
 Rawson's Reboot Rawson's Reboot

Viktor von Domm: nope... can´t do that for the sake of all lving creatures that dwell on earth....
dsteingass: That's like saying "I forgot to tell you who your real father is"
nerdfest09: Rawson speaks the truth! |
|
|
|
|
2011/10/01 07:04:29
Subject: EndTransmission and Arakasi Learn 3D Modelling
|
|
Ragin' Ork Dreadnought
|
@Maj.Winters: I started with the Blender 3D: Noob to Pro - but realistically, that wasn't quite as much help as I was hoping for. There are differences between versions that can get a bit confusing the first time through. Also, I wasn't really interested in tutorials on textures, lighting and animation (but may be later...) The actual Blender Videos on the other hand, at least all the ones I have watched, have been really good!
@Rawson: Thanks! That would be funny...
|
|
|
|
|
|
2011/10/01 07:31:46
Subject: EndTransmission and Arakasi Learn 3D Modelling
|
|
Drop Trooper with Demo Charge
|
Arakasi, yah I've had good luck with the blender videos off the site. They seem to do a good job of getting you into the program. Can't wait to start making some stuff!
|
|
|
|
|
|
2011/10/05 21:34:26
Subject: Re:EndTransmission and Arakasi Learn 3D Modelling
|
|
Ragin' Ork Dreadnought
|
...and fifth attempt:
Here you can see the start of the tread. There is supposed to be more (of a different design/pattern) running down the middle - but I seem to have modelled myself into a corner so to speak. As expected, the tread posed new challenges, challenges that I think may be better solved with a rethink/restart.
Modelling the inside tread, duplicating it and rotating it was easy. Connecting it back in to the tyre was tedious. The outside tread likewise - though i didn't quite get the angle of it correct (it was meant to be vertical) - but I also figured at the size, it might not even be visible (and still looks fine anyway). Mirroring the tread to the other side - not so easy - as apparently I need to keep the pieces I want to mirror as separate objects... Instead I duplicated, rotated, deleted the original and reconnected the duplicate - very tedious... (and probably error prone...)
No, I think the two big things to take to my next attempt are:
1) Planning the tread better. Specifically, determining the optimum number of edges to the circles to support it without cutting and splicing randomly all over the place.
2) Do the tread and the tyre first. Do one side of the tyre and tread and using the mirroring feature to generate the other side.
Minor thing - I may keep the pieces as separate objects more and combine at the end - I was sort of caught out by not working out how to mirror a selection rather than the entire object  (This should be good for retaining the connection components once I am happy with them too...)
I was hoping I could muddle through this one to a test print, but I think I'll just be happier redoing it - it's all good practise anyway! I think I'll see if I can work to a scale of 1 Blender Unit (BU) = 1cm too. I should still be able to use the background images - just need to scale them to my circle rather than the other way around...
Until next time/update!
|
|
|
|
|
|
2011/10/05 22:15:39
Subject: EndTransmission and Arakasi Learn 3D Modelling
|
|
Calculating Commissar
|
Can you not create the inner tread design as a separate object and merge it into the current tyre?
I seem to be spending my spare time actually painting rather than learning Blender... which is both a good thing and REALLY annoying as I've got loads of ideas I want to make and print :/
|
|
This message was edited 1 time. Last update was at 2011/10/05 22:16:26
|
|
|
|
|
2011/10/05 22:32:41
Subject: EndTransmission and Arakasi Learn 3D Modelling
|
|
Ragin' Ork Dreadnought
|
Hmmm... I could.... maybe I will give that a go first to "stay on target" as it were...
I'm the opposite (time on Blender, not painting) - mostly due to not having my free time back in order yet or a proper work area set up, close to da Boss but safe from da cat... (but my laptop can go anywhere...)
Just means I'll get to the fun of printing before you (perhaps). But then you can help me with the casting
|
|
|
|
|
|
2011/10/05 22:36:46
Subject: EndTransmission and Arakasi Learn 3D Modelling
|
|
Calculating Commissar
|
I've got an idea for a new chimera top plate that should be pretty easy to piece together in Blender once I've worked out measurements properly... which is handy as I've got my eye on a few more chimeras soon so I can try out an Armoured Fist platoon against you at some point
|
|
|
|
|
|
2011/10/05 22:52:02
Subject: EndTransmission and Arakasi Learn 3D Modelling
|
|
Drop Trooper with Demo Charge
|
How are you sculpting the treads? Because I know there is a "mirror" setting that you can set for different axis'. Might help with cutting your work load in half.
|
|
|
|
|
|
2011/10/07 02:19:45
Subject: EndTransmission and Arakasi Learn 3D Modelling
|
|
Lord Commander in a Plush Chair
California + Philidelphia
|
wow i look away for about 4 hours and BAM multiple updates im loving the speed on this thread i will be watching...always
|
 [ [
"Don't worry, Vik! You have all of your internet friends to keep you company! And, as everyone knows, internet friends are at least one step above imaginary friends "-Rawson
"Does an Ork shiiiit green?" "...Rogue! -you rock!" "Damn you too Rogue!""[TTFN]... That means tittyfething right?""Yep, that's me, a two-dollar whore"-Dsteingass
"... but if we all fail together we can make it look like we´ve won actually.." "...to all killers out there...: my face will hit your fist so hard it´s gonna bleed...your fist that is...""lol....OMG... you are a serial""he knows no pain...nor fear^^ he is a riveteer""yep... some of the dakka chaps here sure made the joints of my jaw quite loose...""er... emailsex... now that at least sounds like the perfect safer sex... but i like mine a bit more...wet""do you know what they call a quarter pounder of a buckte full of rivets in france?" "No...what?" "Rivitz royal"-Viktor von Domm
" I expected to hear gak like that from RW, not you Vik... for shame Sir, for shame"-AnUnearthlyChilde
"We are Vik's private collection of muses for the monkey on his back.....""you, guys are worse than my children......"-mxwllmdr
"Singling one out as odd in a =][_= thread is like going into an asylum, pointing at someone at random and saying "that person's insane""-Shrike |
|
|
|
|
2011/12/19 22:47:48
Subject: EndTransmission and Arakasi Learn 3D Modelling
|
|
Mekboy Hammerin' Somethin'
|
I'm loving this thread... subed and exalted for sheer bravery of learning in such a public forum.
|
|
|
|
|
|
2011/12/19 23:32:26
Subject: EndTransmission and Arakasi Learn 3D Modelling
|
|
Ragin' Ork Dreadnought
|
endtransmission and I really need to get back to this. Too many other projects I almost can't believe it's been over two months since my last update! Maybe if I complete endtransmission's challenge to finish something over Christmas/New Year, I can revisit this. Some Trukk wheelz would really help my other neglected thread - the 2012 Trukk Rally...
|
|
|
|
|
|
2011/12/20 12:17:50
Subject: EndTransmission and Arakasi Learn 3D Modelling
|
|
Calculating Commissar
|
you're right... we really do need to get back to it.
Darn work/life getting in the way :/
|
|
|
|
|
|
2011/12/20 18:00:17
Subject: Re:EndTransmission and Arakasi Learn 3D Modelling
|
|
Tail Gunner
|
I am somewhat familiar blender, sketch-up, and the basic Autodesk interface (I use Inventor in class). If you have to make a basic shape, stick with inventor. Anything past working with 90 degree angles seems to get annoying in sketch-up though. I love blender for organics and it doesn't do terrible with other things either. If I was going to make a boltgun type weapon for example, I would probably make most of it in sketchup and maybe export to blender to finish it up.
Also, if you are looking for a good 3d printing service, I heard http://www.shapeways.com/materials/material-options is good, but they appear to operate out of the US.
EDIT! okay, it looks like you guys are getting good at blender fast so screw sketchup and its baby talk and stick with blender. (Now I need to go brush up because there is no way I can still do some of the stuff you are)
|
|
This message was edited 1 time. Last update was at 2011/12/20 18:03:52
1 loss
0 wins |
|
|
|
|
|
|
 Imperial Knights: The Avengers Initiative
 Da Dark Angelz
 Arakasi vs Infinity
 31,600 points
 38750 points before upgrades


 - in progress