| Author |
Message |
 |
|
|
|
|
Advert
|
Forum adverts like this one are shown to any user who is not logged in. Join us by filling out a tiny 3 field form and you will get your own, free, dakka user account which gives a good range of benefits to you:
- No adverts like this in the forums anymore.
- Times and dates in your local timezone.
- Full tracking of what you have read so you can skip to your first unread post, easily see what has changed since you last logged in, and easily see what is new at a glance.
- Email notifications for threads you want to watch closely.
- Being a part of the oldest wargaming community on the net.
If you are already a member then feel free to login now. |
|
 |
2015/02/15 00:07:06
Subject: The (Mad) Scientist and his Army of the Second Law: Beware of the Jet Bike!
|
|

Mounted Kroot Tracker
|
Super cool projects you have goin on Dr H! I love that speeder especially...you've got so much goin on I really need to spend some time catching up to where you're at!
|
|
|
|
 |
|
2015/02/15 00:52:53
Subject: Re:The (Mad) Scientist and his Army of the Second Law: Beware of the Jet Bike!
|
|
Wise Ethereal with Bodyguard
Catskills in NYS
|
I'm liking it, keep up the good work. 
|
Homosexuality is the #1 cause of gay marriage.
 kronk wrote: kronk wrote:Every pizza is a personal sized pizza if you try hard enough and believe in yourself.
 sebster wrote: sebster wrote:Yes, indeed. What a terrible piece of cultural imperialism it is for me to say that a country shouldn't murder its own citizens
 BaronIveagh wrote: BaronIveagh wrote:Basically they went from a carrot and stick to a smaller carrot and flanged mace.
|
|
|
|
|
2015/02/15 01:35:01
Subject: Re:The (Mad) Scientist and his Army of the Second Law: Beware of the Jet Bike!
|
|

Da Head Honcho Boss Grot
|
|
|
|
|
|
2015/02/15 07:48:44
Subject: The (Mad) Scientist and his Army of the Second Law: Beware of the Jet Bike!
|
|
Decrepit Dakkanaut
|
The jet bike gas totally come together, impressive job indeed. Love the crazy spaceship, it looks so... alien, in the strictest sense.
|
Theophony"... and there's strippers in terminator armor and lovecraftian shenanigans afoot."
Solar_Lion: "Man this sums up your blog nicely."
Anpu-adom: "being Geek is about Love. Some love broadly. Some love deeply. And then there are people like Graven.  |
|
|
|
|
2015/02/15 19:11:03
Subject: Re:The (Mad) Scientist and his Army of the Second Law: Beware of the Jet Bike!
|
|

Painting Within the Lines
Hamburg Germany
|
I wonder how long it will take until this pic goes onto it's long journey through the more braindead side niches of the net as "evidence" in spite of the clear and definite photoshop blurr... 
|
|
|
|
|
2015/02/18 17:55:08
Subject: The (Mad) Scientist and his Army of the Second Law: Beware of the Jet Bike!
|
|
Mastering Non-Metallic Metal
|
bebopdrums2424 wrote:Super cool projects you have goin on Dr H! I love that speeder especially...you've got so much goin on I really need to spend some time catching up to where you're at!
Thanks BB. I've always got something on the go. Hope you like what you find.
Thanks Co'tor.
Thanks LDD. As always, primer pulls a model together (as well as showing any lumps and gaps). We will all have to wait and see what paint gets thrown at it...
Thanks Graven. Glad you think so.
lone dirty dog wrote:...Love the photo shot and it looks more realistic than the ones you normally see on those conspiracy shows,...
Hruotland wrote:I wonder how long it will take until this pic goes onto it's long journey through the more braindead side niches of the net as "evidence" in spite of the clear and definite photoshop blurr...
I was tempted to post just that picture on some quiet corner of the internet and see what happened. It has shown me how much effort is required to make a "good" UFO picture though. I may do a better photo when it's painted, probably in-camera as well (there's plenty of open countryside around here, may as well put it to some use).
So, I have been busy with the next stage in this build and have come across various problems. What follows is a series of pictures that show what I've been doing in a very make-it-up-as-you-go way.
First problem was rigidity. I wanted to use polystyrene foam as a base of the crater/ground as I have loads of it laying about. However, it's not the strongest of materials and is not going to get any stronger when I cut a large crater in it... I therefore investigated the garage and found some wood (it may be MDF, I don't know, it was flat and rigid and that was all I needed to know). Solid base... check.
Second problem was how to tie this piece of terrain into what will become my fully modular gaming surface that only exists as a concept at the moment. One of the ideas I have for my table is that there will be a depth to it, in the most literal way. This will allow me to dig down into the surface to create craters and trenches etc... As well as space for battery compartments, wires, pots for bonsai trees, etc. to fit in. That's all in the far future though, when I have money and space.
This means that I don't have to worry about trying to taper the edges of this piece to meet the table surface as it will eventually be inserted into the table. At present, it now serves as a diorama with a thick base. Depth... check.
Third problem, size. I don't want this to become too big, as I'll have nowhere to put it. But, it needs to be big enough to accommodate the UFO, it's crater and the wall/fence that I wanted to add from the previous competition that I never started and will help to give the piece a little context.
This came from laying it out and seeing what I could get away with. While the dirt from the crater gets quite close to the edge, I think it'll be fine and I still have space from the wall and anything else I may add. Size... check (see below).
The first piece of polystyrene you see at the top is actually one long piece, cut in half and glued together. This is softer foam than what I have surrounded it with as I thought that may help with the crater digging stage... and the rest of it would be solid enough to support the wall etc...
That was all glued down to the piece of wood and then surrounded with some plastic (from an old flexible chopping board) to give it a neat edge.
Then I carved out the crater and used the bits removed to make the surrounding mound.
I'm seeing what happened as the UFO (after crashing thought the wall that has yet to be built) landed tail end and created the long gouge before the front end slammed down to make the crater it rests in. Hence the build up in front of the more spherical blob that sticks out from the top/bottom/side (of your choice).
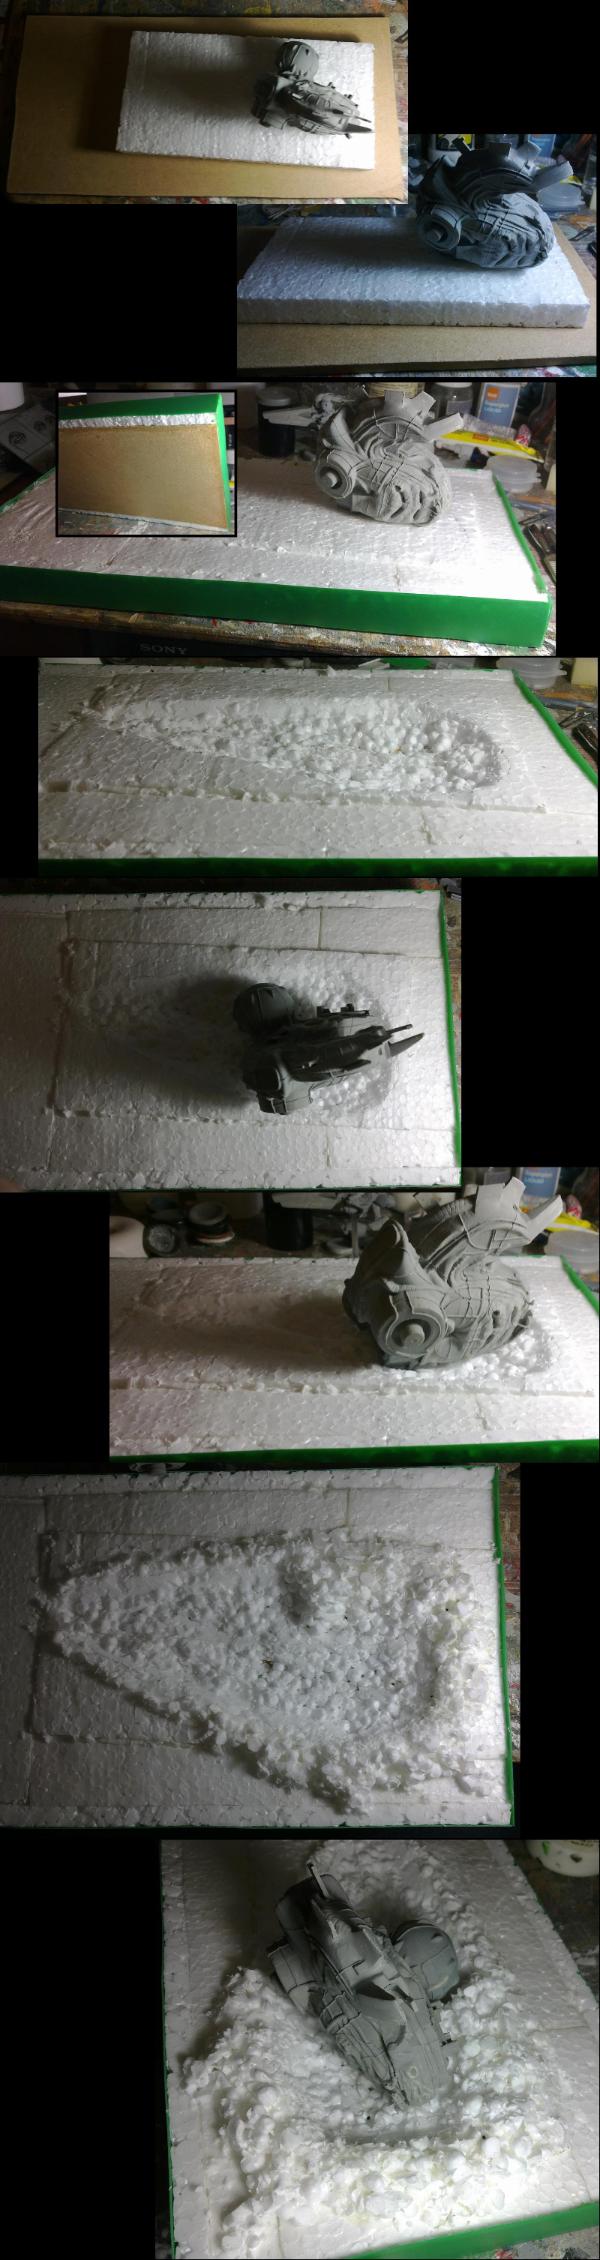
This will now get a coating of tissue paper/PVA to tie it all together and give a nice base for my basing material.
|
     Mastodon: @DrH@dice.camp Mastodon: @DrH@dice.camp
The army-                   ~2295 points (built). ~2295 points (built).
 
* -=]_,=-eague Spruemeister General. * A (sprue) Hut tutorial *
Dsteingass - Dr. H..You are a role model for Internet Morality!  // inmygravenimage - Dr H is a model to us all // inmygravenimage - Dr H is a model to us all
Theophony - Sprue for the spruemeister, plastic for his plastic throne! // Shasolenzabi - Toilets, more complex than folks take time to think about! |
|
|
|
|
2015/02/18 18:52:30
Subject: Re:The (Mad) Scientist and his Army of the Second Law: Beware of the Jet Bike!
|
|
Painting Within the Lines
Hamburg Germany
|
I just imagine a little green man exiting, then vomiting, then grinning into the surveilance camera, making thumbs-up-signs and shouting "Nothing's happened, I'm allright, all's good!"
|
|
|
|
|
2015/02/18 22:59:03
Subject: Re:The (Mad) Scientist and his Army of the Second Law: Beware of the Jet Bike!
|
|
Combat Jumping Ragik
|
Looks like it crashed in Boston (Boston is under many feet of snow ATM)
I've tried the tissue paper over styrofoam. You need several layers of something to harden it too. Perhaps use a spackle then apply the tissue paper/pva combo?
|
|
|
|
|
|
2015/02/19 00:31:43
Subject: Re:The (Mad) Scientist and his Army of the Second Law: Beware of the Jet Bike!
|
|
Mastering Non-Metallic Metal
|
Hruotland wrote:I just imagine a little green man exiting, then vomiting, then grinning into the surveilance camera, making thumbs-up-signs and shouting "Nothing's happened, I'm allright, all's good!"
I have considered adding some footprints coming from the crater, weaving about and leading to a stunned alien that has just walked into the wall. Time permitting, I may add an alien, so no promises yet.
Red Harvest wrote:Looks like it crashed in Boston (Boston is under many feet of snow ATM)
Do you want to build a snowman?
I've tried the tissue paper over styrofoam. You need several layers of something to harden it too. Perhaps use a spackle then apply the tissue paper/pva combo?
I assume you refer to the potential for problems stemming from adding a thin, fragile, brittle layer over something that is soft and squishy. It's a good point and there is absolutely no reason not to do this...
...except that I have already added a couple of layers of tissue/PVA.
I'll see how it behaves tomorrow, after it's fully hardened, and then throw something at it (probably plaster as I have loads of it hanging about) and cover that with more tissue/PVA...
|
Mastodon: @DrH@dice.camp
The army- ~2295 points (built).
* -=]_,=-eague Spruemeister General. * A (sprue) Hut tutorial *
Dsteingass - Dr. H..You are a role model for Internet Morality! // inmygravenimage - Dr H is a model to us all
Theophony - Sprue for the spruemeister, plastic for his plastic throne! // Shasolenzabi - Toilets, more complex than folks take time to think about! |
|
|
|
|
2015/02/19 03:22:04
Subject: The (Mad) Scientist and his Army of the Second Law: Beware of the Jet Bike!
|
|
Rogue Inquisitor with Xenos Bodyguards
|
Biker primed looks good, wonder what colors will be used?
UFO pic in sky is cool, now to see how many Ufo watchers mistake it for a real image?
|
"Your mumblings are awakening the sleeping Dragon, be wary when meddling the affairs of Dragons, for thou art tasty and go good with either ketchup or chocolate. "
Dragons fear nothing, if it acts up, we breath magic fire that turns them into marshmallow peeps. We leaguers only cry rivets!


|
|
|
|
|
2015/02/19 21:51:55
Subject: The (Mad) Scientist and his Army of the Second Law: Beware of the Jet Bike!
|
|
Combat Jumping Ragik
|
I'm in Washington DC, so I have the Arctic temps -- currently -8C-- but just a sprinkling of snow :( So no snowman, just bitter cold.
The one time I did tissue paper ( green tissue paper) over white syrofoam, it proved very fragile. OTOH, those giant hills I made, pix somehwere in my thread, are white styrofoam with a skim coat, a very thin skim coat of spackle-- which is similar to plaster but it has some additives-- and they have endured over a decade of use. They have a sanded texture embedded in a thick layer of housepaint too. A bonus is that they are easy to repair
Plaster or Plaster of Paris is not as good for this sort of thing as spackle or joint compound, in my experience. But then I like to build for durability. I hate it when things break.
It'll be interesting to see how well the PVA tissue paper holds up for you. If nothing else, layers. Lamination always works in the end
|
|
|
|
|
|
2015/02/19 21:59:22
Subject: Re:The (Mad) Scientist and his Army of the Second Law: Beware of the Jet Bike!
|
|
Fixture of Dakka
|
Like the look of it so far
Be interesting to see how the papier mache over polystyrene holds up.
As Red says, enough layers of PVA soaked tissue will gain strength  A bit of plaster in between layers should help too.
|
|
|
|
|
|
2015/02/19 22:50:55
Subject: The (Mad) Scientist and his Army of the Second Law: Beware of the Jet Bike!
|
|
Mastering Non-Metallic Metal
|
Thanks Shas. The bike will be in Feisar colours. The rider will be painted afterwards so that I don't pick something that doesn't work with the bike.
I would hope that even the most avid of UFO watchers (even that bloke with the hair) would realise that the photos of the model attached to that picture mean that it's a "fake" picture and not a real UFO...
Red: I'm using dental plaster, as I picked up a load cheap and have been looking for uses...
I'm also one to build things to last, so this won't be a fragile piece if I can help it. 
Thanks MT.
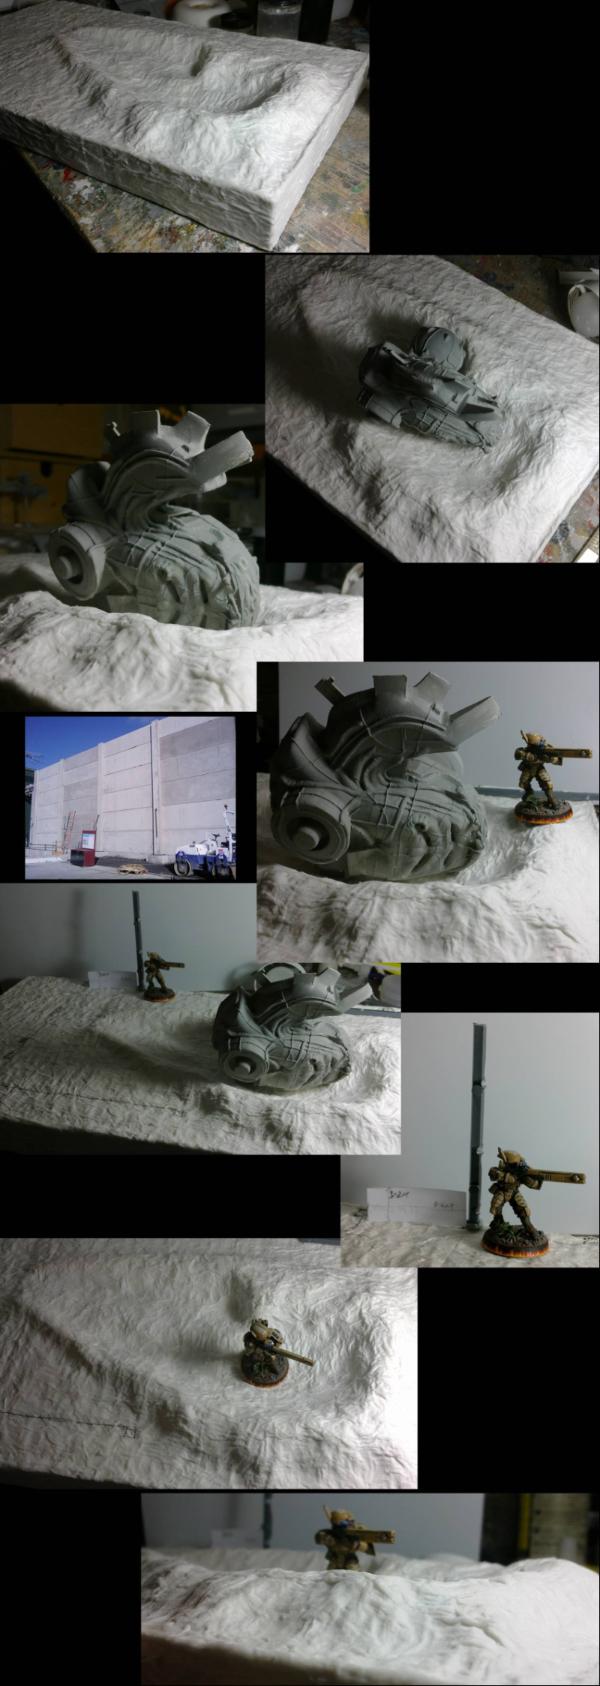
So, this morning (read; afternoon, but it's morning for me) I had a poke at the Polystyrene that had been covered with 2 layers of tissue/PVA (this is bog-roll though, so that's 6-8 layers really). It felt like a kind of hard rubber; pretty tough, but with some slight give to it. Not a bad start.
This has now had a layer of plaster and another layer of tissue, and will get at least one more layer before I move on.
I've decided to cover the sides with the tissue also, just to make it all "one" and I may paint that to be the mud under the surface (as if it's a cross-section). I may not, we will see.
Also, remember that this is just the base shape, it's all going to be covered in my usual basing mixture of crushed dried paint (probably with some water filter carbon thrown in) and lots more PVA. It should be pretty solid by the time I've finished.
|
Mastodon: @DrH@dice.camp
The army- ~2295 points (built).
* -=]_,=-eague Spruemeister General. * A (sprue) Hut tutorial *
Dsteingass - Dr. H..You are a role model for Internet Morality! // inmygravenimage - Dr H is a model to us all
Theophony - Sprue for the spruemeister, plastic for his plastic throne! // Shasolenzabi - Toilets, more complex than folks take time to think about! |
|
|
|
|
2015/02/19 23:03:26
Subject: Re:The (Mad) Scientist and his Army of the Second Law: Beware of the Jet Bike!
|
|
Fixture of Dakka
|
Ooh ooh ooh....if it's a cross-section will we see some fossils, tunnels, moles or badgers? Maybe even a little wormie....
|
|
|
|
|
|
2015/02/19 23:08:09
Subject: The (Mad) Scientist and his Army of the Second Law: Beware of the Jet Bike!
|
|
Mastering Non-Metallic Metal
|
I had thought about it.
|
Mastodon: @DrH@dice.camp
The army- ~2295 points (built).
* -=]_,=-eague Spruemeister General. * A (sprue) Hut tutorial *
Dsteingass - Dr. H..You are a role model for Internet Morality! // inmygravenimage - Dr H is a model to us all
Theophony - Sprue for the spruemeister, plastic for his plastic throne! // Shasolenzabi - Toilets, more complex than folks take time to think about! |
|
|
|
|
2015/02/19 23:23:05
Subject: Re:The (Mad) Scientist and his Army of the Second Law: Beware of the Jet Bike!
|
|
Fixture of Dakka
|
Yippee
|
|
|
|
|
|
2015/02/19 23:28:56
Subject: Re:The (Mad) Scientist and his Army of the Second Law: Beware of the Jet Bike!
|
|
Is 'Eavy Metal Calling?
|
 monkeytroll wrote: monkeytroll wrote:Ooh ooh ooh....if it's a cross-section will we see some fossils, tunnels, moles or badgers? Maybe even a little wormie....
Or a last hold out in his bunker . Everything's looking awesome as usual Doc . The Jetbikes is great. Also amazing work on the UFO.
|
LOL, Theo your mind is an amazing place, never change.-camkierhi 9/19/13
I cant believe theo is right.. damn. -comradepanda 9/26/13
None of the strange ideas we had about you involved your sexual orientation..........-Monkeytroll 12/10/13
I'd put you on ignore for that comment, if I could...Alpharius 2/11/14 |
|
|
|
|
2015/02/20 05:14:41
Subject: The (Mad) Scientist and his Army of the Second Law: Beware of the Jet Bike!
|
|
Rogue Inquisitor with Xenos Bodyguards
|
Gonna hit -7 here, the week of chilling has stopped water to our house.
Cool about the bike, good strategy, and the UFO if it shows up in some MUFON like expose` would be funny
|
"Your mumblings are awakening the sleeping Dragon, be wary when meddling the affairs of Dragons, for thou art tasty and go good with either ketchup or chocolate. "
Dragons fear nothing, if it acts up, we breath magic fire that turns them into marshmallow peeps. We leaguers only cry rivets!
|
|
|
|
|
2015/02/20 17:24:27
Subject: Re:The (Mad) Scientist and his Army of the Second Law: Beware of the Jet Bike!
|
|
Mastering Non-Metallic Metal
|
Theo! Good to see you about these parts. Thanks.
That sounds cold and inconvenient, Shas.
Thanks. Yes it would be amusing.
So, the surface is pretty much solid. It should stand up to normal use (which for the foreseeable future is sitting on a shelf), therefore I shall move on to the next major component of the piece... the wall.
I was concerned, at first, when I started researching the type of wall I wanted to build as they didn't seem to be made as high as I would have to go to make it worthy of a model (and not look like a picket fence). After a short while I did find that they can be built high and I started calculating how large the pieces for the model will need to be.
This is the type of wall I'm going for, a concrete fence:

Why? Well I've not seen any made for a model, although I'm sure someone will immediately come in to show that they have been done before...
Those slabs of concrete can measure ~5x15ft and in scale that's ~23x70mm. (If my maths is right)
I want to place the wall across the ground and along the back (parallel-ish to the crater). This will then act as a nice, in-built, backdrop for photos, and probably leave room for future photos of single models.
However, making the sections as large as mentioned above, two would span the width of the base and both sections would be damaged/destroyed by the UFO, leaving nothing but the end posts still standing.
Therefore, I decided on 3 sections across the width, minus the post thickness and some wiggle-room at the edges, each section will be about 40mm long. Which made the 23mm thickness too much, and that was therefore reduced to 15mm. (see below).
I also needed the wall to be a reasonable height for the UFO to have crashed through and not just clipped the top. As the UFO sits about 80mm high, the wall needed to aproach that height and I settled on just that. (see below) This will make the posts just taller than 5 fence sections (at 15mm each).
As this will mean the walls will need 40 fence sections (yes I was planning on making all the wall sections separate and then building the walls as they would be in real life...), I think I'll make the rear (long) wall in one piece and only do separate sections for the broken wall. I may even make the rear wall removable for photo opportunities...
Enough talk, more pictures...
This shows where I have got to with the tissue coverage.
Also, I've thrown in some scale shots to show how large the UFO is and how large the crater is. Firewarrior #1 for scale.
I'm currently thinking of using plasticard for the walls, texturing them with sandpaper (pressed on with a vice) to look like concrete, but I may do the separate sections in milliput and then they will break realistically... maybe...
Thoughts and Ideas welcome.
|
Mastodon: @DrH@dice.camp
The army- ~2295 points (built).
* -=]_,=-eague Spruemeister General. * A (sprue) Hut tutorial *
Dsteingass - Dr. H..You are a role model for Internet Morality! // inmygravenimage - Dr H is a model to us all
Theophony - Sprue for the spruemeister, plastic for his plastic throne! // Shasolenzabi - Toilets, more complex than folks take time to think about! |
|
|
|
|
2015/02/21 10:11:07
Subject: The (Mad) Scientist and his Army of the Second Law: Beware of the Jet Bike!
|
|
Gargantuan Great Squiggoth
|
Sorry not been around.
Looking fab as always.
Are you after smooth concrete or the poured shuttered type? If you are after the poured shutter type, why not make a mold lined with lolly sticks or stirrers, that way you get the texture imprinted onto the sections. If smooth, then make a simple pour mold of the size you need ad add some aggregate to the resin/plaster. I would use plaster, with some sand in. that way it is actually very close to the real deal and will break and crumble naturally.
Sorry going back into hiding now.
|
|
|
|
|
|
2015/02/21 15:48:29
Subject: Re:The (Mad) Scientist and his Army of the Second Law: Beware of the Jet Bike!
|
|
Mastering Non-Metallic Metal
|
Thanks for stopping by, Cam. Good idea, I'll keep that in mind for the next wall.
Yes, "next" wall. I've finished (well, minus any battle damage etc.) the first wall.
Here's a series of pictures that should explain all you need to know:

You may need to zoom in to see the texture, but the wash brings it out all right.
I will have to be gentle with the painting so as not to fill in all the detail.
My thumb hurts now after all that screwing...
|
Mastodon: @DrH@dice.camp
The army- ~2295 points (built).
* -=]_,=-eague Spruemeister General. * A (sprue) Hut tutorial *
Dsteingass - Dr. H..You are a role model for Internet Morality! // inmygravenimage - Dr H is a model to us all
Theophony - Sprue for the spruemeister, plastic for his plastic throne! // Shasolenzabi - Toilets, more complex than folks take time to think about! |
|
|
|
|
2015/02/21 17:32:19
Subject: Re:The (Mad) Scientist and his Army of the Second Law: Beware of the Jet Bike!
|
|
Da Head Honcho Boss Grot
|
Nice job again Doc looks the part and cool idea for the texture
O yes if your thumb hurts from screwing your doing it wrong
|
|
|
|
|
2015/02/21 18:58:27
Subject: The (Mad) Scientist and his Army of the Second Law: Beware of the Jet Bike!
|
|
Ragin' Ork Dreadnought
Deep in the Outer Boroughs of NYC
|
Wow, I have not been to this blog in ages. I have no idea what's going on. It all looks awesome, though. The spaceship looks like a mechanical heart. I really like the barricade wall. Gives the crash site a sense of place. Necron bike is really cool, too.
|
|
|
|
|
|
2015/02/21 22:06:00
Subject: The (Mad) Scientist and his Army of the Second Law: Beware of the Jet Bike!
|
|
Combat Jumping Ragik
|
G-Clamp? Or C-clamp? Would the impressions be better if you had used a stiff backing on the sandpaper-- like a small block of wood, and on the other side of the clamp to distribute pressure. It is something done routinely in woodworking, generally to avoid impressions in the wood.
And save your thumbs, get a clamp like this
You can never have too many clamps
Excellent idea for a homebrew press. I suspect that one could employ the technique to imprint all sorts of things into plasticard.
|
|
This message was edited 1 time. Last update was at 2015/02/21 22:06:46
|
|
|
|
|
2015/02/21 22:45:51
Subject: Re:The (Mad) Scientist and his Army of the Second Law: Beware of the Jet Bike!
|
|
Mastering Non-Metallic Metal
|
lone dirty dog wrote:Nice job again Doc looks the part and cool idea for the texture O yes if your thumb hurts from screwing your doing it wrong
Thanks. I read about it somewhere on DDakka and remembered it on this occasion. So not my original idea, but spreading the knowledge. Warboss_Waaazag wrote:Wow, I have not been to this blog in ages. I have no idea what's going on. It all looks awesome, though. The spaceship looks like a mechanical heart. I really like the barricade wall. Gives the crash site a sense of place. Necron bike is really cool, too.
Thanks Warboss. Good to see you about again. The UFO crash is for a competition ( LoER terrain comp') and the bike is for my army. Red Harvest wrote:G-Clamp? Or C-clamp? Would the impressions be better if you had used a stiff backing on the sandpaper-- like a small block of wood, and on the other side of the clamp to distribute pressure. It is something done routinely in woodworking, generally to avoid impressions in the wood.
Looks like a G to me. I did try wood and two clamps (so that I'd be able to do a larger area at a time), but got no impressions as the wood soaked up some of the pressure. You really need a lot of pressure to get this to work. There's sandpaper on both sides of the wall. It's a two-sided wall, details and texture. I also tried with one of those squeeze-the-handle quick clamp things, but could not get enough pressure from that either. And save your thumbs, get a clamp like this You can never have too many clamps Excellent idea for a homebrew press. I suspect that one could employ the technique to imprint all sorts of things into plasticard.
That wood make life easier indeed.
|
|
This message was edited 1 time. Last update was at 2015/02/21 22:47:21
Mastodon: @DrH@dice.camp
The army- ~2295 points (built).
* -=]_,=-eague Spruemeister General. * A (sprue) Hut tutorial *
Dsteingass - Dr. H..You are a role model for Internet Morality! // inmygravenimage - Dr H is a model to us all
Theophony - Sprue for the spruemeister, plastic for his plastic throne! // Shasolenzabi - Toilets, more complex than folks take time to think about! |
|
|
|
|
2015/02/24 00:12:38
Subject: Re:The (Mad) Scientist and his Army of the Second Law: Beware of the Jet Bike!
|
|
Mastering Non-Metallic Metal
|
The wall is up.
I decided that the long wall will be stuck down (and not removable), as it makes life easier and it doesn't really block that much of the other side of the UFO (due to the convenient holes).
You can also see that I have plenty of stuff to scatter about once I've added the ground (mud, rocks, gravel).
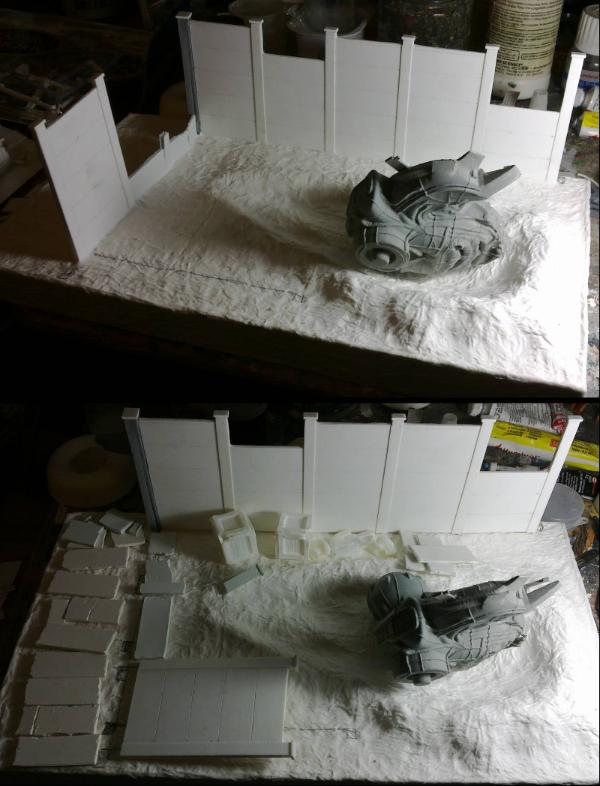
The wall is pinned deep into the base at most of the posts.
The corner post is made from 4 lengths of sprue, glued together and then shaved/sanded into a square cross-section. There are two lengths of 0.5mm plasticard on the outer sides that have been textured as was the wall.
The lone standing section of wall is also plastic, but the two broken sections and all their (to be) shattered and scattered pieces are either plaster or milliput.
I'm thinking that "inside" the wall, the ground will be gravel.
Inside the crater however, will be mud, therefore giving a nice contrast between the two.
Outside the wall, there will be more plant-life and my usual basing (mud and rocks).
|
Mastodon: @DrH@dice.camp
The army- ~2295 points (built).
* -=]_,=-eague Spruemeister General. * A (sprue) Hut tutorial *
Dsteingass - Dr. H..You are a role model for Internet Morality! // inmygravenimage - Dr H is a model to us all
Theophony - Sprue for the spruemeister, plastic for his plastic throne! // Shasolenzabi - Toilets, more complex than folks take time to think about! |
|
|
|
|
2015/02/24 08:11:19
Subject: The (Mad) Scientist and his Army of the Second Law: Beware of the Jet Bike!
|
|
Combat Jumping Ragik
|
I tested the pony clamps with sandpaper and plasticard. The pressure is spread too much to make much of an impression. So, not too useful unless you have something to focus the pressure on a smaller area. There is another style of clamp I have that I can try, maybe tonight.
The walls look like the noise barriers we have along the interstate highways near residential areas. Hmm, If a UFO crashes behind a noise barrier and nobody hears it...
Good progress.
|
|
|
|
|
|
2015/02/24 13:37:26
Subject: The (Mad) Scientist and his Army of the Second Law: Beware of the Jet Bike!
|
|
Mastering Non-Metallic Metal
|
Yeah, you need quite a lot of pressure to make an imprint, AND coarse sandpaper (this probably helps with the pressure issue being force / area).
I found that 80 grit did nothing, but 60 grit is what I used in the end. Coarser grits may even be better.
For reference, the clamp I've been using has a 20mm contact surface.
You could also try brushing on some liquid poly' cement on the surface beforehand, to soften it a little.
Thanks. lol
About to start throwing mud and rocks at it...
|
Mastodon: @DrH@dice.camp
The army- ~2295 points (built).
* -=]_,=-eague Spruemeister General. * A (sprue) Hut tutorial *
Dsteingass - Dr. H..You are a role model for Internet Morality! // inmygravenimage - Dr H is a model to us all
Theophony - Sprue for the spruemeister, plastic for his plastic throne! // Shasolenzabi - Toilets, more complex than folks take time to think about! |
|
|
|
|
2015/02/24 16:15:16
Subject: The (Mad) Scientist and his Army of the Second Law: Beware of the Jet Bike!
|
|
Never Forget Isstvan!
|
Lovely terrain. I would build up more along the base of the wall where the debris from the blast landed/flung.
|
|
|
|
|
|
2015/02/24 23:29:30
Subject: Re:The (Mad) Scientist and his Army of the Second Law: Beware of the Jet Bike!
|
|
Mastering Non-Metallic Metal
|
Thanks S_L. Most of the mud from the crater has been thrown away from the wall (as I see it happening). Most of the side of the crater nearest the wall has been pushed up and not flung out.
These pictures may help show what I mean:
 De
De-saturated, as the green tinge to the mud might confuse things.
The light areas are mud and the dark areas are gravel.
Along the trench, the sides are pushed up and out.
On the far side of the crater there is a large bulge where the protrusion of the UFO has come to rest after being dragged through the ground and pushing the ground up in front of it (therefore gravel is on top).
Around the end of the crater the mud has been flung up and out as the bulk of the UFO slammed down (therefore mud is on top).
There's more to do here. There will be a build up of gravel along the base of the walls as tends to happen. There are a few patches in the gravel where there will be mud showing though (and some grass growing up), just to show that it's unkempt (and a crashed UFO can go unnoticed for a while). The edges also need some tidying up. And the base of the crater may be smoothed out a little more as I don't want it too rocky.
|
Mastodon: @DrH@dice.camp
The army- ~2295 points (built).
* -=]_,=-eague Spruemeister General. * A (sprue) Hut tutorial *
Dsteingass - Dr. H..You are a role model for Internet Morality! // inmygravenimage - Dr H is a model to us all
Theophony - Sprue for the spruemeister, plastic for his plastic throne! // Shasolenzabi - Toilets, more complex than folks take time to think about! |
|
|
|
|
|
|


