| Author |
Message |
 |
|
|
|
|
Advert
|
Forum adverts like this one are shown to any user who is not logged in. Join us by filling out a tiny 3 field form and you will get your own, free, dakka user account which gives a good range of benefits to you:
- No adverts like this in the forums anymore.
- Times and dates in your local timezone.
- Full tracking of what you have read so you can skip to your first unread post, easily see what has changed since you last logged in, and easily see what is new at a glance.
- Email notifications for threads you want to watch closely.
- Being a part of the oldest wargaming community on the net.
If you are already a member then feel free to login now. |
|
 |
2014/02/08 17:02:58
Subject: Re:Homemade FW-style realm of battle terrain boards/buildings (1/31 - painting buildings)
|
|

Dakka Veteran
|
|
|
|
|
 |
|
2014/02/19 16:45:31
Subject: Re:Homemade FW-style realm of battle terrain boards/buildings (2/17 - Another building)
|
|
Dakka Veteran
|
|
|
|
|
|
|
2014/02/20 02:02:34
Subject: Re:Homemade FW-style realm of battle terrain boards/buildings (2/17 - Another building)
|
|

Lone Wolf Sentinel Pilot
|
Beautiful palette! Really inspiring, all around 
|
|
|
|
|
|
2014/02/20 10:26:16
Subject: Re:Homemade FW-style realm of battle terrain boards/buildings (2/17 - Another building)
|
|

Ambitious Space Wolves Initiate
|
These are amazing, really inspirational scenery
|
|
|
|
|
|
2014/02/20 10:31:35
Subject: Re:Homemade FW-style realm of battle terrain boards/buildings (2/17 - Another building)
|
|
Member of a Lodge? I Can't Say
|
This thing blows my mind!
the grimey and dirty / broken wasted feel is awesome! REALLY convincing as the dark future!!
Love it!
|
|
|
|
|
|
2014/02/20 17:54:37
Subject: Re:Homemade FW-style realm of battle terrain boards/buildings (2/17 - Another building)
|
|
Dakka Veteran
|
Thanks guys! i'll probably have a couple of more final pics tomorrow. I made some of the front grime more green and generally have been working to clean up the windows and things, and more washes.
Once i get the lights/ladder done i'll probably stop for now and move onto something else
|
|
|
|
|
|
2014/02/24 16:31:07
Subject: Re:Homemade FW-style realm of battle terrain boards/buildings (2/17 - Another building)
|
|
Dakka Veteran
|
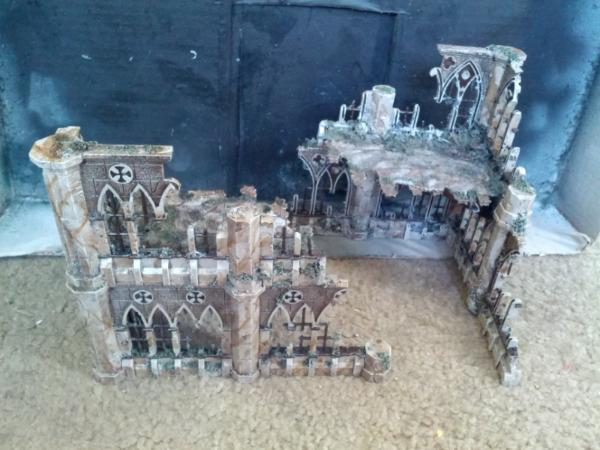
Quick update: i took a break from the big guy to go ahed and move the other half of my gothic ruins to the new scheme.
I also drybrushed over my coliseum into the new colors as well. I still may try marbling up the floors but it still is great to see the scheme working for the different buildings.
|
|
|
|
|
|
2014/02/25 20:29:25
Subject: Re:Homemade FW-style realm of battle terrain boards/buildings (2/24 - colesium)
|
|
Member of a Lodge? I Can't Say
|
Colour choices here are spot on!
|
|
|
|
|
|
2014/03/27 03:39:15
Subject: Re:Homemade FW-style realm of battle terrain boards/buildings (2/24 - colesium)
|
|
Dakka Veteran
|
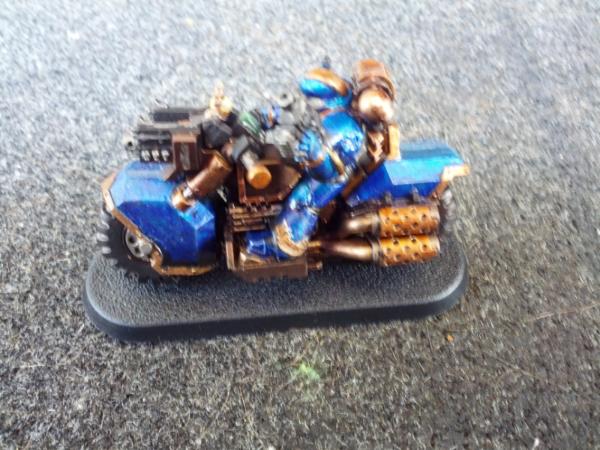
I promise i havent been idle! it's just i switched over to working on some bikes and i have yet to figure out a good way to poist pictures. the idea was a carpaint blue which transitions from blue to turqoise that's shiny and metallic, surrounded by very steampunky brass and copper bits.
so once if igure out how to take the picture ill post it lol
either way ive also been working on my buildings, and quality images aside (ugh they suck too, i promise better ones soon) im really happy with how it's turning out. it really looks like it is 500 years old and just barely holding on.
obv there are still a lot of details yet but that's the general idea
the undercoat for the undone side:
|
|
|
|
|
|
2014/03/29 07:18:48
Subject: Re:Homemade FW-style realm of battle terrain boards/buildings (3/25 - super corrosion!)
|
|
Dakka Veteran
|
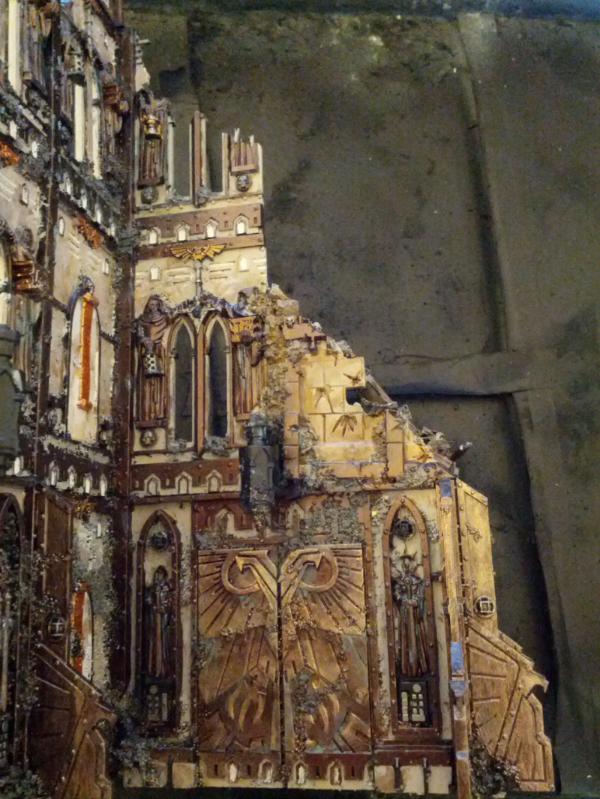
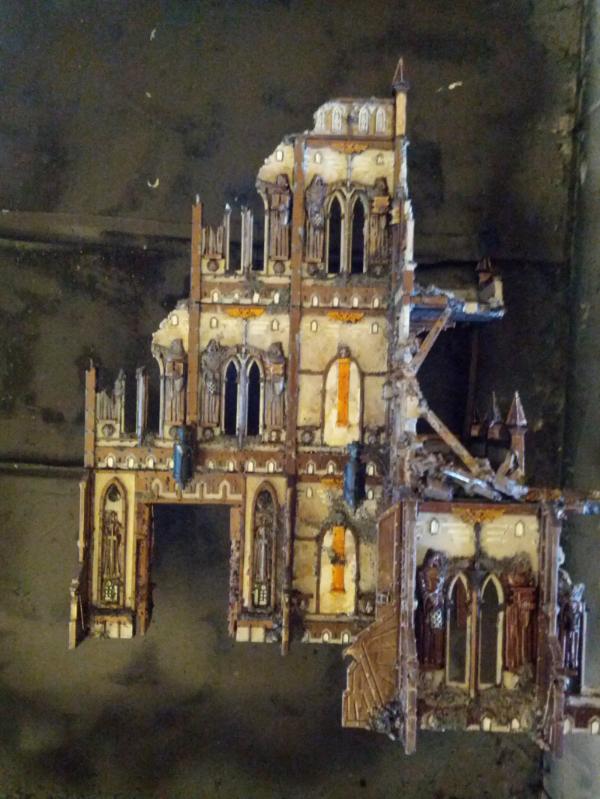
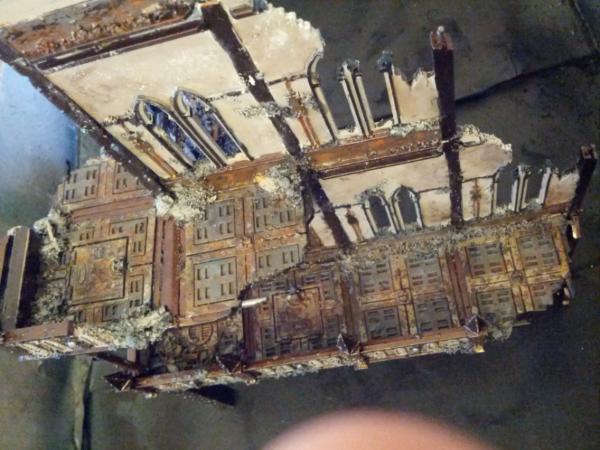
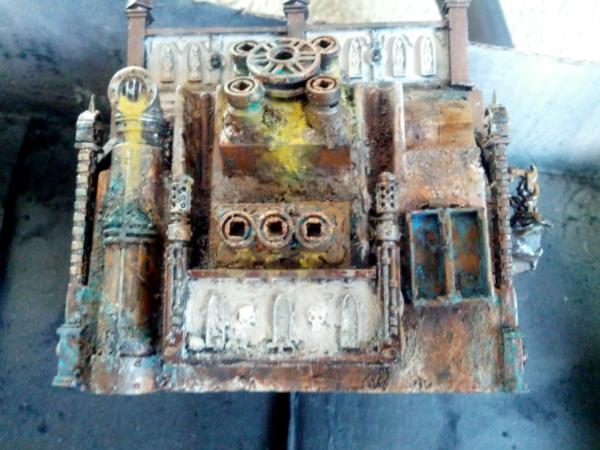
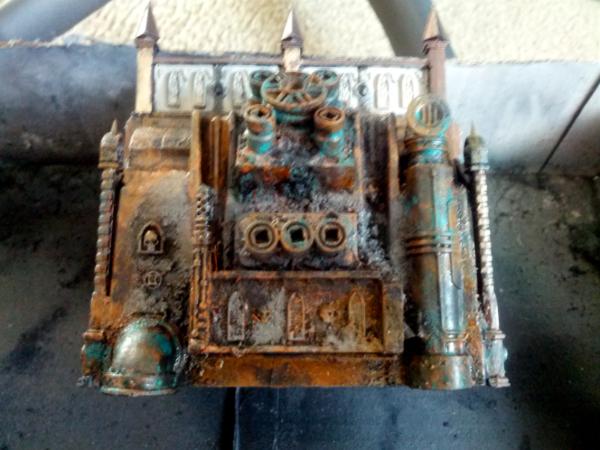
Some better images, including getting in the giant fuse detail things!
|
|
|
|
|
|
2014/03/29 07:54:47
Subject: Homemade FW-style realm of battle terrain boards/buildings (3/25 - super corrosion!)
|
|

Longtime Dakkanaut
|
Cool colour scheme mate , robbing some ideas (particularly like the fuse's ) for my Zone Mortalis !
|
|
|
|
|
|
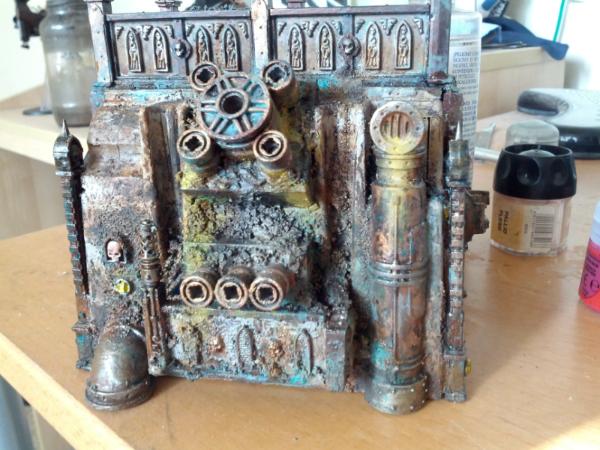
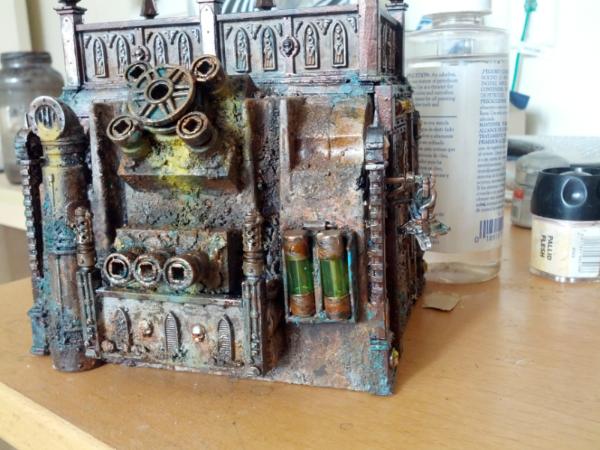
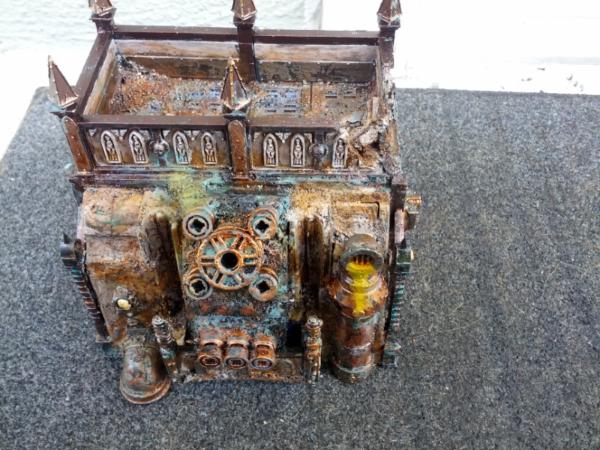
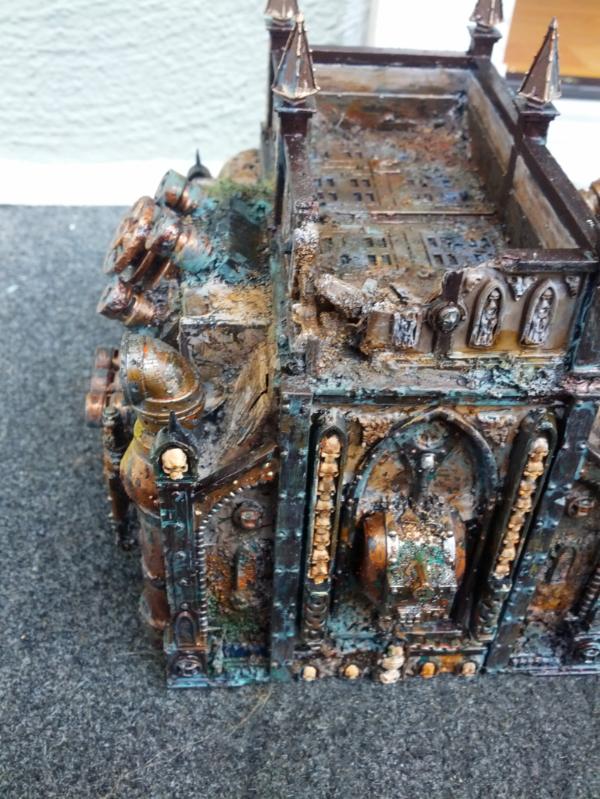
2014/04/21 08:23:46
Subject: Re:Homemade FW-style realm of battle terrain boards/buildings (3/25 - super corrosion!)
|
|
Dakka Veteran
|
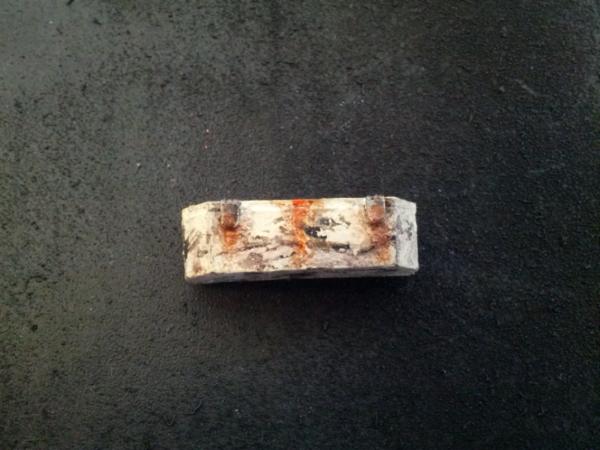
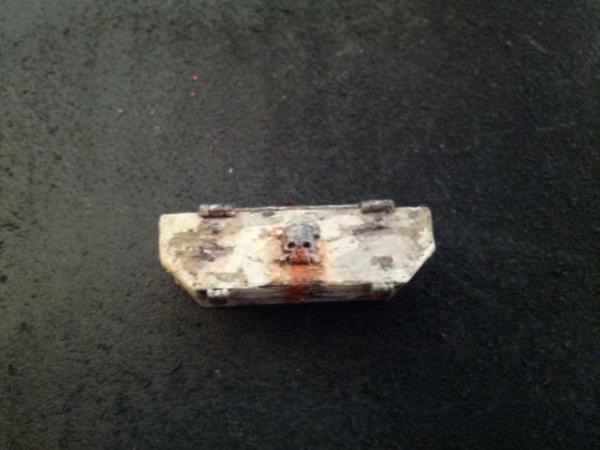
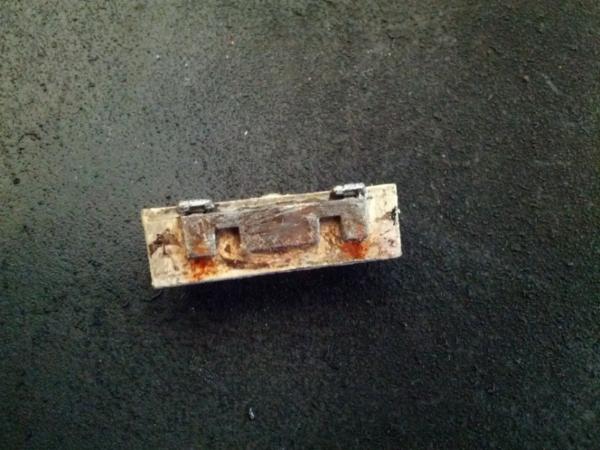
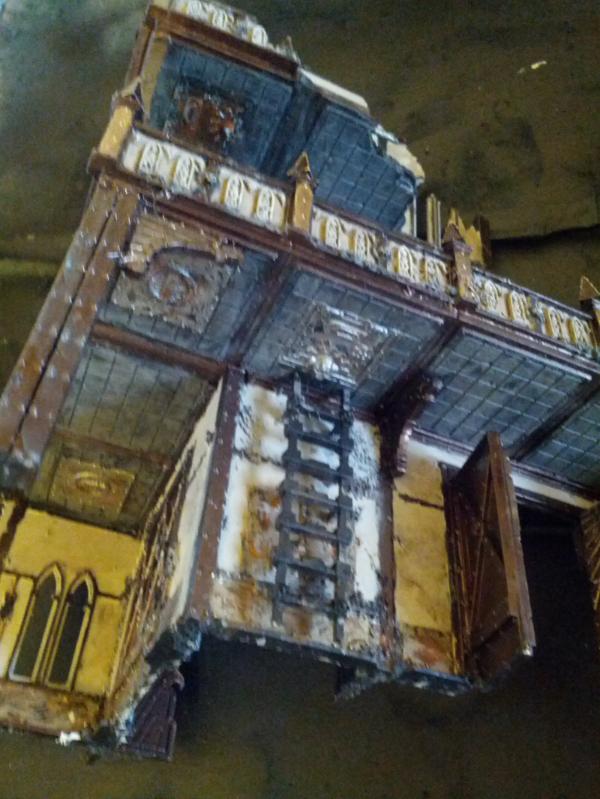
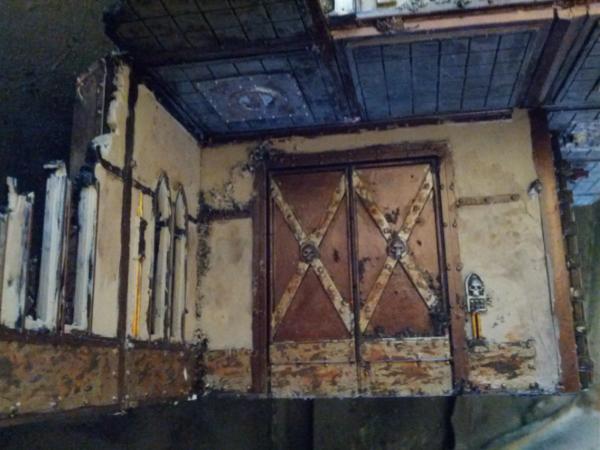
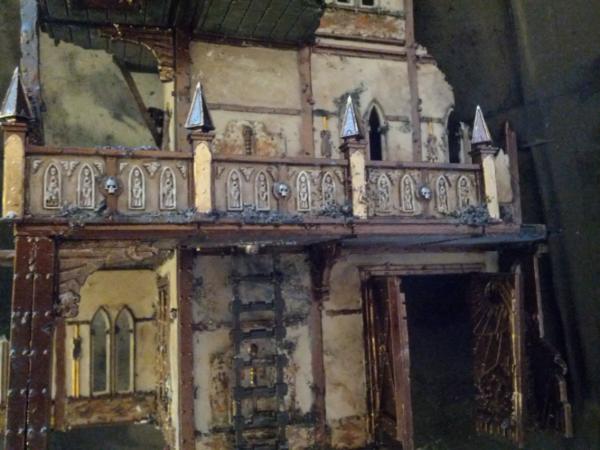
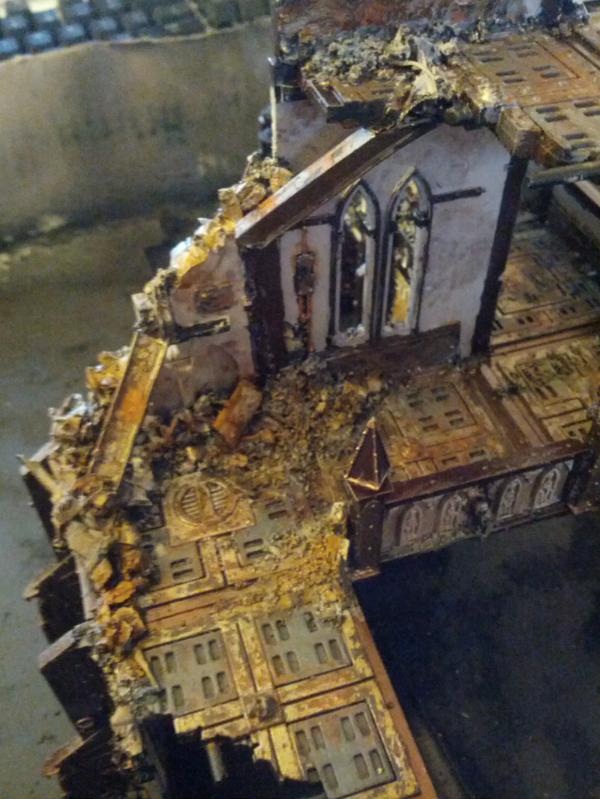
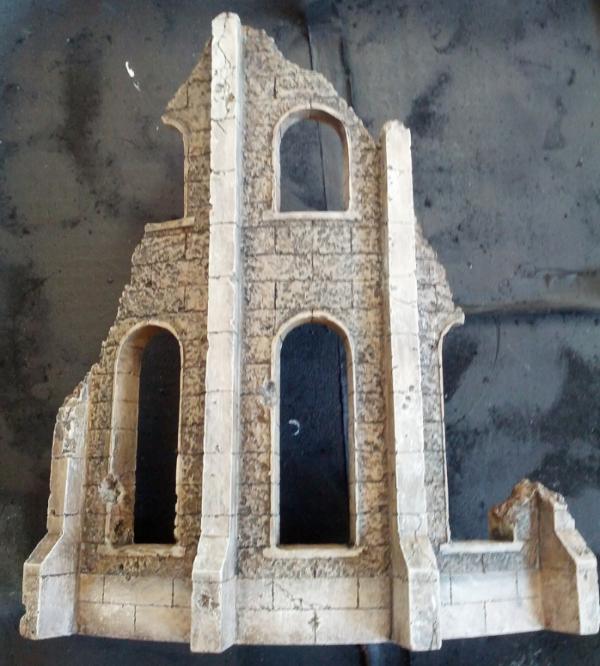
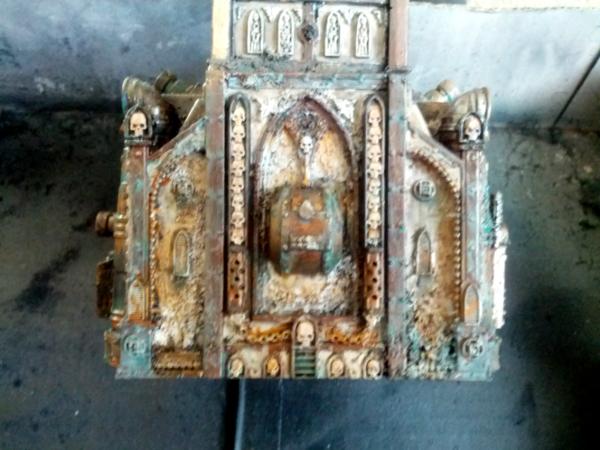
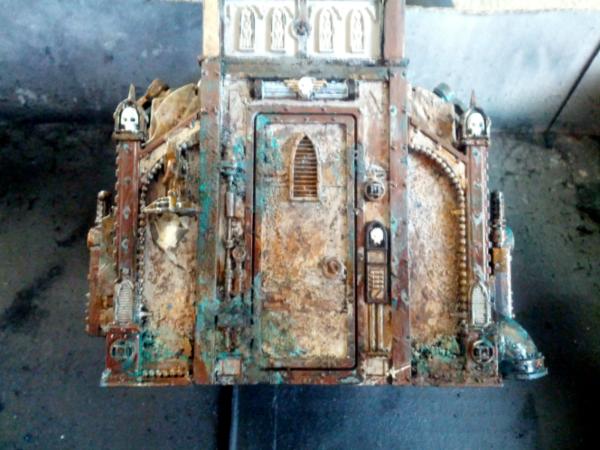
Okay so these are better pictures, a bit more color accurate. Not quite right yet but someday i'll figure out a good way to do this. Mostl yjust a better camera and possibly a lightbox.
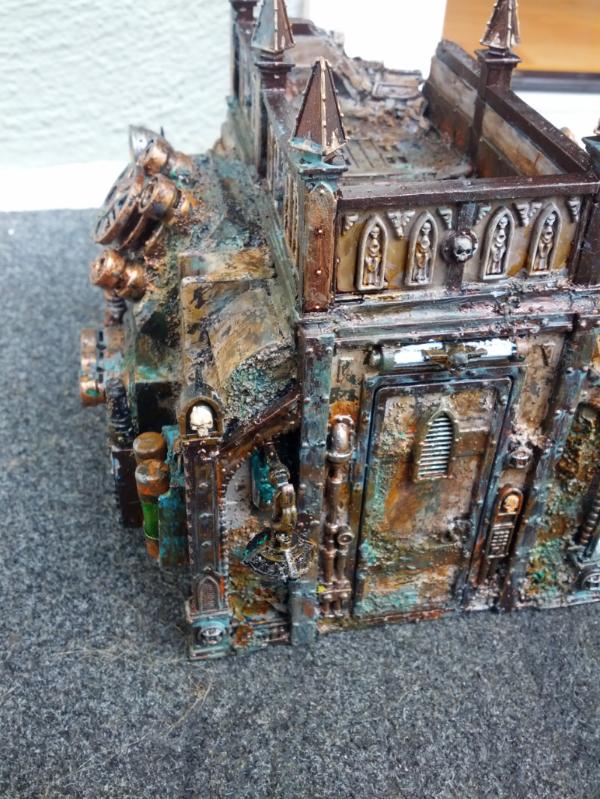
One thing I think i want to do is un corrode up the top half ot he building a bit. Its so corroded that we're losing contrast and a sense of the original color of it. so i want to simplify it a bit so it forms more of agradient of clean at the top (where there wouldnt be much damage anyways) and then suuupper dense corrsion at the bottom near all the pipes/generators/etc.
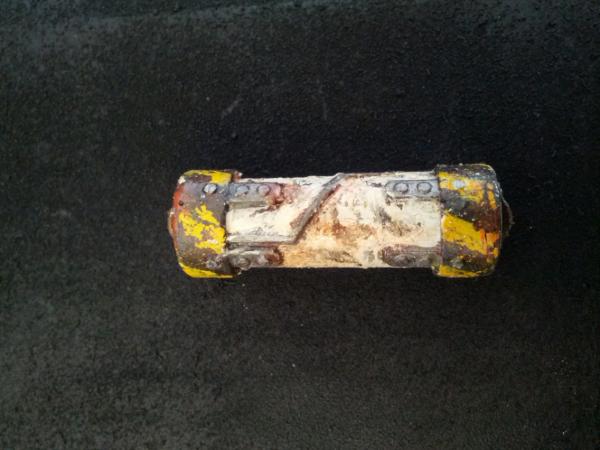
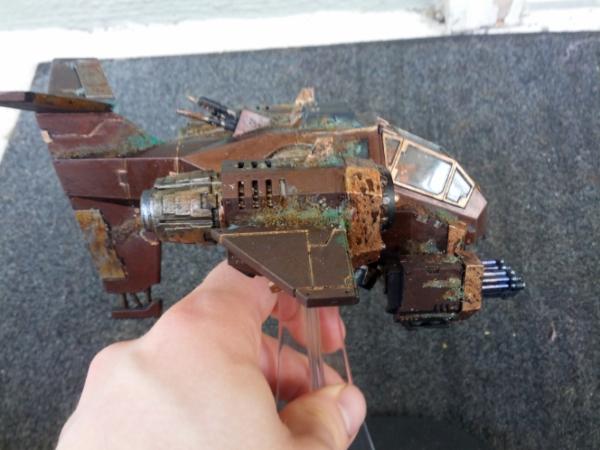
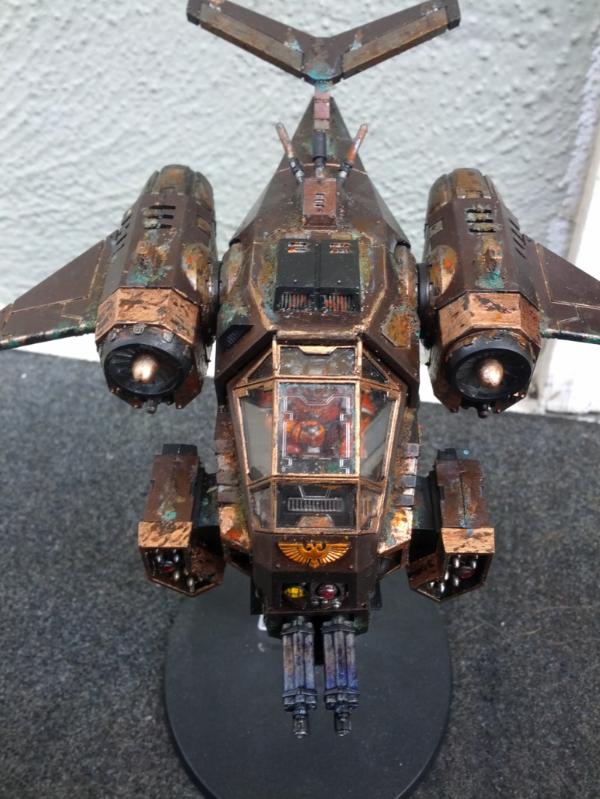
Either way i havent been idle! just been working on other things other than the board. I had to get some storm talons ready for the monthly event at game empire so focused on that a bit. My original scheme is complicated but jlets just say for more elite vehicles it's highly tin bitz based, and now im experimenting with some old brass highlights as well and other rusting. The idea behind is is that it's seen heavy combat and use over the centuries. In order to enhance the corrosion i took the technique from the buildings of first adding the finest grain sand i have as part of the dripping. It helps give that "crusty" feel without being too overwhelming i think. Then it's jsut a matter of the Vigris wash that GW has along witha are ust wash and orange and yellow washes as well. Finally I highlight with some richer jade green at the "source" of the corrsion. So far Im pretty happy with the result. As always I may have gone a bit much with it on the other first plane but i think this one is fairl ywell balanced and makes sense. we'll see how i feel over tiem!
|
|
This message was edited 1 time. Last update was at 2014/04/21 08:27:24
|
|
|
|
|
2014/04/21 08:45:17
Subject: Re:Homemade FW-style realm of battle terrain boards/buildings (3/25 - super corrosion!)
|
|
Member of a Lodge? I Can't Say
|
Mmmmmm crustyness!!
that last terrain piece looks brilliant! as if there has been an acidic atmosphere raining on the building for about a millenia!
|
|
|
|
|
|
2014/04/22 00:04:26
Subject: Re:Homemade FW-style realm of battle terrain boards/buildings (3/25 - super corrosion!)
|
|
Dakka Veteran
|
thanks! i may still clean it up on the top have justtt a smidge for more contrast, but overall im really happy with how they turned out. they really do just look OLD.
|
|
|
|
|
|
2014/04/22 01:11:15
Subject: Homemade FW-style realm of battle terrain boards/buildings (3/25 - super corrosion!)
|
|
Ragin' Ork Dreadnought
Deep in the Outer Boroughs of NYC
|
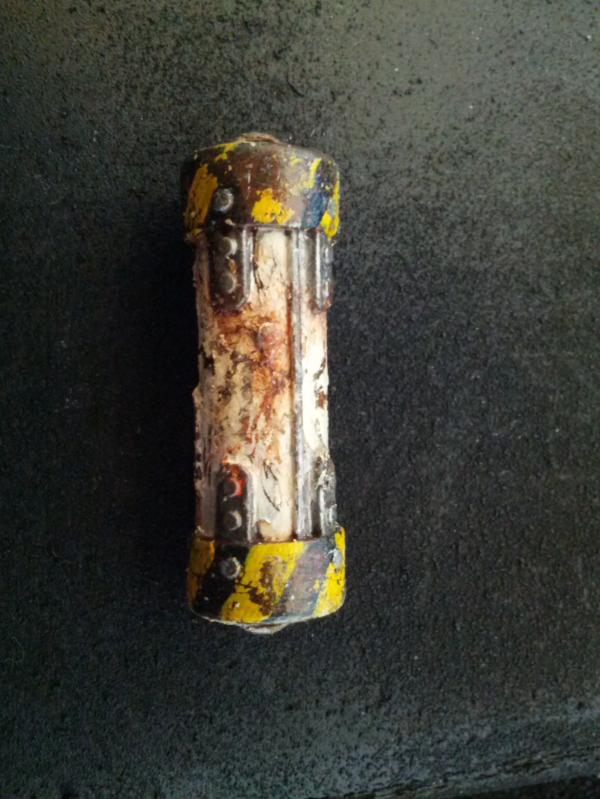
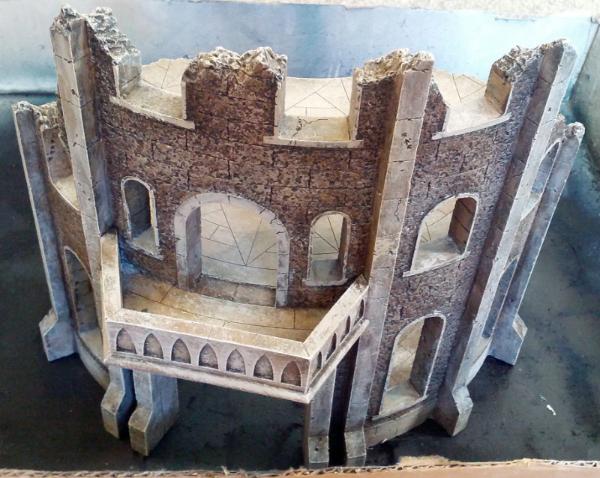
Your corrosion work is truly inspiring. I also really dig the the two riveted pillars stuck together as a support for the balcony/walkway. I might just loot that idea.
|
|
|
|
|
|
2014/04/22 05:41:23
Subject: Homemade FW-style realm of battle terrain boards/buildings (3/25 - super corrosion!)
|
|
Huge Hierodule
United States
|
I have to agree. The weathering looks spot on and stunningly realistic. Fantastic job.
|
|
|
|
|
|
2014/04/25 04:43:41
Subject: Re:Homemade FW-style realm of battle terrain boards/buildings (3/25 - super corrosion!)
|
|
Dakka Veteran
|
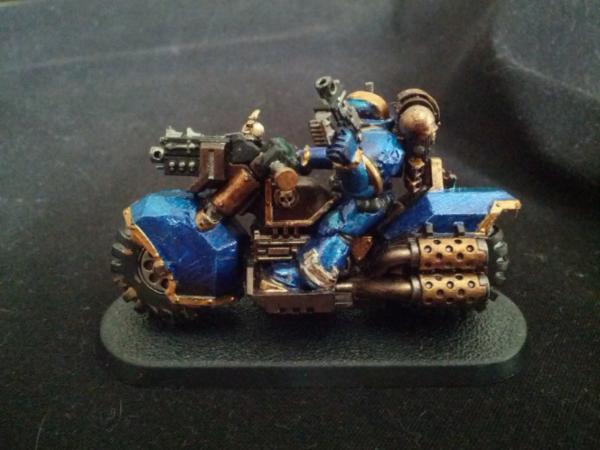
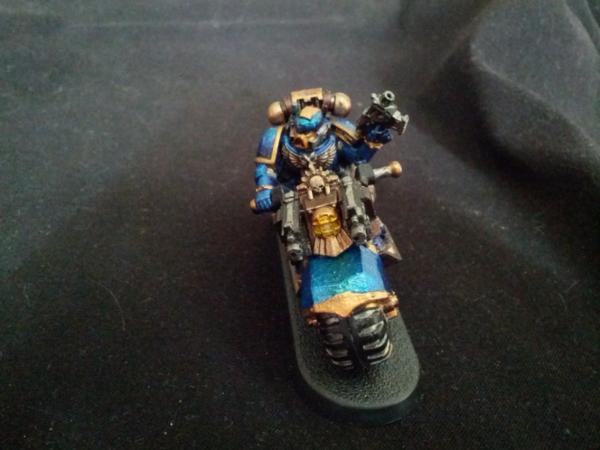
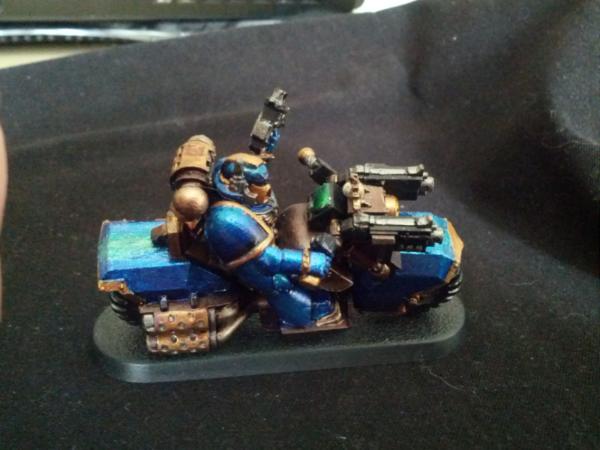
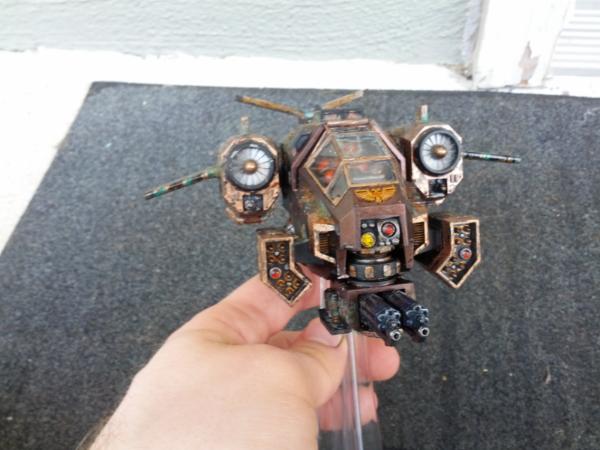
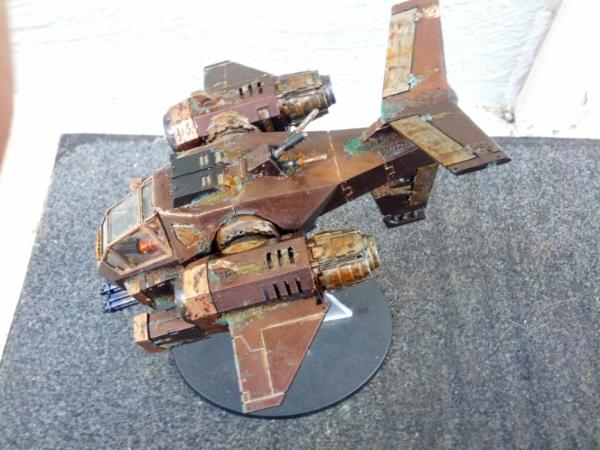
Thanks guys! And here is blurry sneak peak of something else i've been working on! Bikes!
the basic idea is a steampunk type coloring with brass/tin bitz/etc, and then a carpaint type dual color scheme for the bike/armour.
Once if igure out hwo to take a picture of it you'll get a non blurry version but the two tone works preetty well.
|
|
|
|
|
|
2014/04/28 21:45:41
Subject: Re:Homemade FW-style realm of battle terrain boards/buildings (3/25 - super corrosion!)
|
|
Dakka Veteran
|
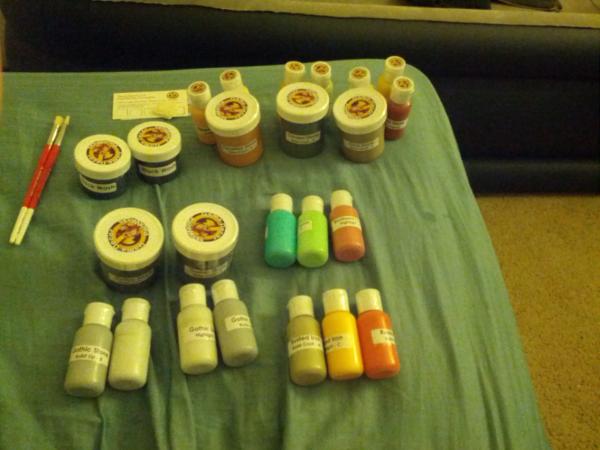
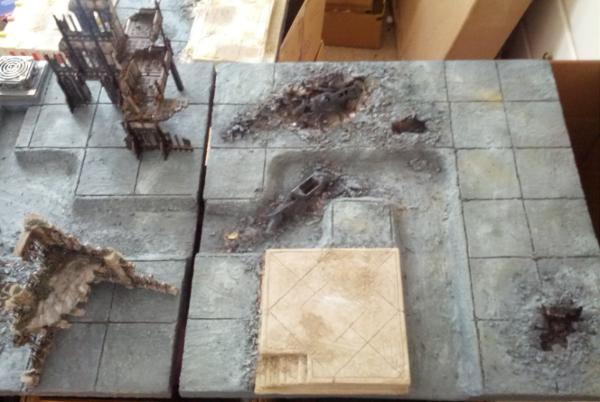
Yeah still trying to figure out how to do decent pictures of it. On the plus side finally got in my terrain paints! So I can finally start basecaoting the tiles!
|
|
|
|
|
|
2014/04/29 23:00:14
Subject: Re:Homemade FW-style realm of battle terrain boards/buildings (3/25 - super corrosion!)
|
|
Dakka Veteran
|
|
|
|
|
|
|
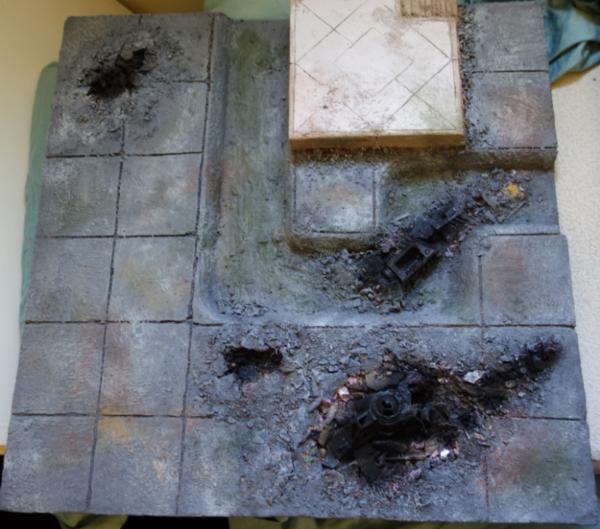
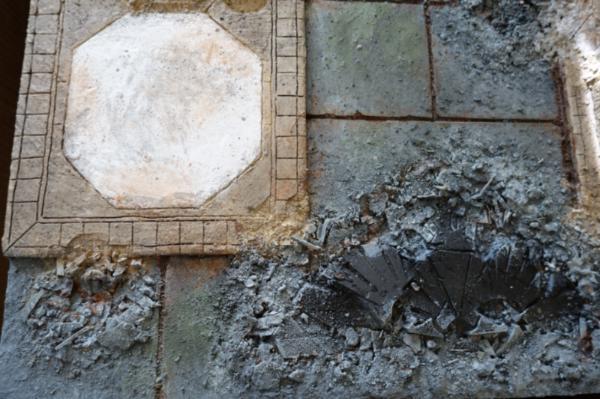
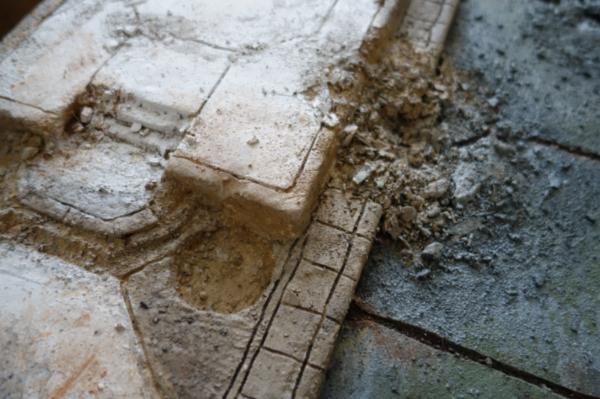
2014/05/05 05:07:47
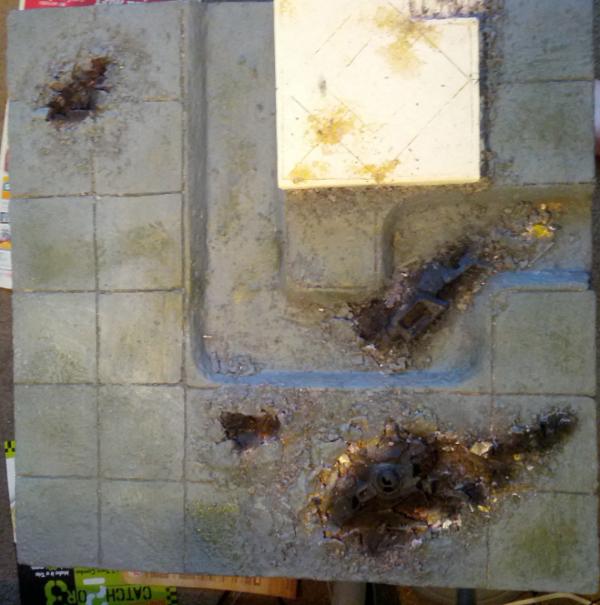
Subject: Re:Homemade FW-style realm of battle terrain boards/buildings (5/4 finally painting the tiles)
|
|
Dakka Veteran
|
Yay basecoating!
|
|
|
|
|
|
2014/05/05 05:19:11
Subject: Homemade FW-style realm of battle terrain boards/buildings (5/4 finally painting the tiles)
|
|
Boosting Space Marine Biker
|
*crys*
This is what I want my cathedral to look like when it's done - am in awe of you Largo!
|
|
|
|
|
2014/05/06 17:11:07
Subject: Re:Homemade FW-style realm of battle terrain boards/buildings (5/4 finally painting the tiles)
|
|
Dakka Veteran
|
Thanks!
More basecoatingggg
I promise the blue isnt that strong in the light lol, its just how this stupid phone camera decides to whitebalance things.

|
|
This message was edited 1 time. Last update was at 2014/05/06 17:11:47
|
|
|
|
|
2014/05/06 17:31:58
Subject: Homemade FW-style realm of battle terrain boards/buildings (5/4 finally painting the tiles)
|
|
Ork Boy Hangin' off a Trukk
|
How much does that cost compared to the standard Forge World board?
|
Oh da grand ol' Duke of Ork
'e 'ad ten fousand boyz.
'E marched 'em up to da top ov da hill
an den dey made some noise!
An wen dey woz up dey woz up!
An wen dey woz loud dey woz loud!
An wen dey woz both up an loud
dey made all da grots go deff! |
|
|
|
|
2014/05/06 18:18:22
Subject: Re:Homemade FW-style realm of battle terrain boards/buildings (5/4 finally painting the tiles)
|
|
Dakka Veteran
|
If you know what you are doing... it's gonna be a lot cheaper. If you dont.. probably comparable. On the flip side tho making it yourself gives you the freedom to really explore the depths of the tiles.
The forgeworld tiles are gorgeous, but dont really have a lot of DEEP craters, or exploded tanks/impacted planes/etc,
Furthermore there were for a while only 4 of them, and no tile has any sort of river system. So while the costs are this point are probably about the same, Im getting a lot more of the stuff that i wanted to see in my tiles.
IN general though here are the costs you're looking at:
6 2x2 MDF tiles ~ 25 bucks
1 4x8 sheet of 1 inch corning foam ("pink foam") - this for me at the time was 75, which suddenly made the costs more comparable. However they seem to be on for general sale again, which drops the price down to like 20, so this is a big area where it gets more or less expensive than the FW tiles.
A whole lot of foamcoat . - i wanna say about 100? You need 25lbs of it, with 12 lbs of superfine sand/grit/whatever (they sell a grit that works well, otherwise just get superfine sand) and then the foamcoat strengthener stuff and a lot of latex paint.
1 4x4 or so sheet of 1/2 corning foam - agian like 15 in theory
some normal 1/4 thick foamboard - 20 bucks?
all the paints to cover this - 50 bucks
the "intangibles" like tank bits/rocks/broken things/plane bits/etc. Uhh ebay is ur friend here, look for bits piules, or just have a colelction already. Also scour hardware stores for stuff you like and then break it! lets say 50
so all told that's what, 300 or so? Then factor in the "oops im new at this" factor and say more like $450-500. vssss 75lbs per city tile and then an additional 90 pounds each for 2 more of the new tiles or about $800, say $850 for similar "oops im new at this" and also paint and whatnot costs, since you still have to spraypaint it all and whatnot.
|
|
|
|
|
|
2014/05/09 16:42:12
Subject: Re:Homemade FW-style realm of battle terrain boards/buildings (5/4 finally painting the tiles)
|
|
Dakka Veteran
|
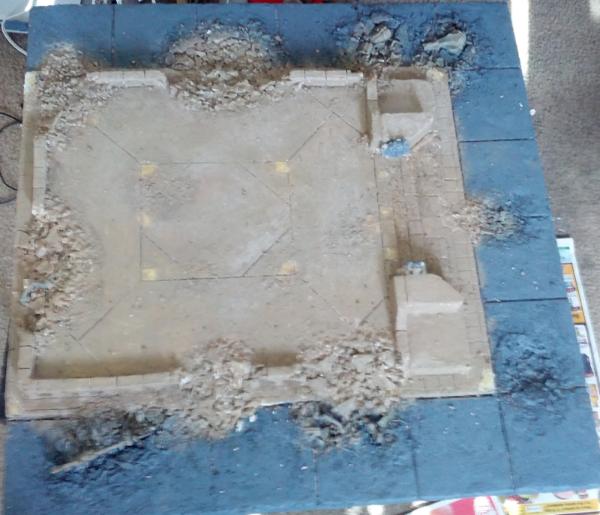
So still just working on the basecoat and some initial layering. Overall the terrain coat paint is working quite well, and really is a good balance of paint consistencies. A few things i've noticed:
The bulk of the inital work is just gluing down those last pieces of rubble, and brushing off the pieces you dont care about. I covered the whole table in multiple coats of a glue wash, and spray on adhesive, and i still had about 10% loose when i started to brush on it
The relative delicacy of the rubble piles means you have to dab on the paint as well, instead of brushing. Otherwise even if it is glued down the hairs of the brush can get caught in the rubble and just rip bits straight off. As a result painting these tables are brush killers! You're brush will end up poof and.... pretty much only good for drybrushing (but it'll be amazing for drybrushing!)
So get el cheapo brushes! use those 50 second 1 inch brushes from home depot, dont using anything nice here until much later!
|
|
|
|
|
|
2014/05/11 20:49:33
Subject: Re:Homemade FW-style realm of battle terrain boards/buildings (5/4 finally painting the tiles)
|
|
Dakka Veteran
|
|
|
|
|
|
|
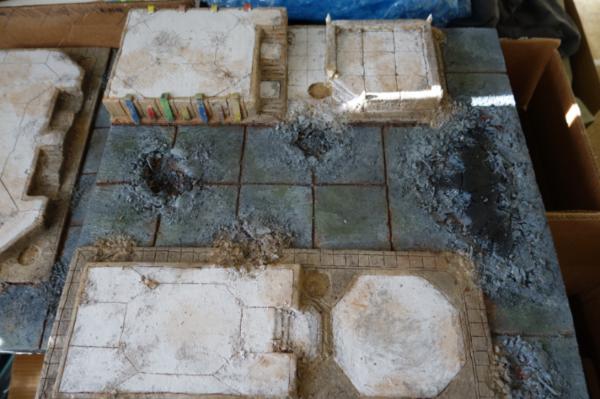
2014/05/12 17:15:54
Subject: Re:Homemade FW-style realm of battle terrain boards/buildings (5/12 base coating and washes)
|
|
Dakka Veteran
|
|
|
|
|
|
|
2014/05/12 18:07:56
Subject: Homemade FW-style realm of battle terrain boards/buildings (5/12 base coating and washes)
|
|
Mysterious Techpriest
|
Coming along really nicely.
If you plan to make it all look as good as that little corroded building, it's going to look really awesome.
|
|
|
|
|
|
2014/05/12 18:46:33
Subject: Re:Homemade FW-style realm of battle terrain boards/buildings (5/12 base coating and washes)
|
|
Dakka Veteran
|
that's the plan! first up is getting the marble effect on all the white areas, and then detailing up the wreckages
|
|
|
|
|
|
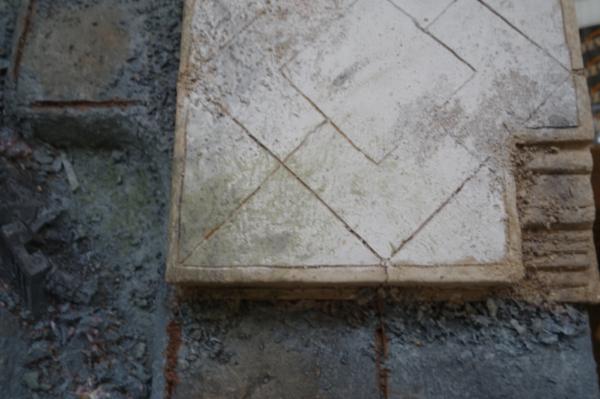
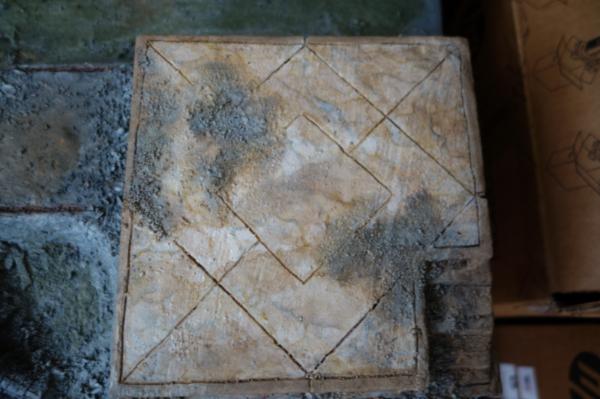
2014/05/13 16:20:10
Subject: Re:Homemade FW-style realm of battle terrain boards/buildings (5/12 base coating and washes)
|
|
Dakka Veteran
|
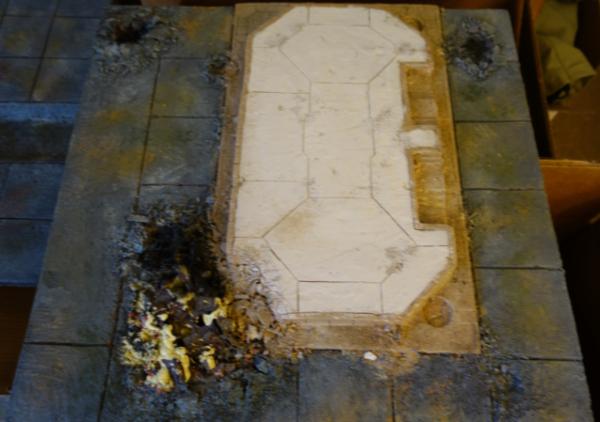
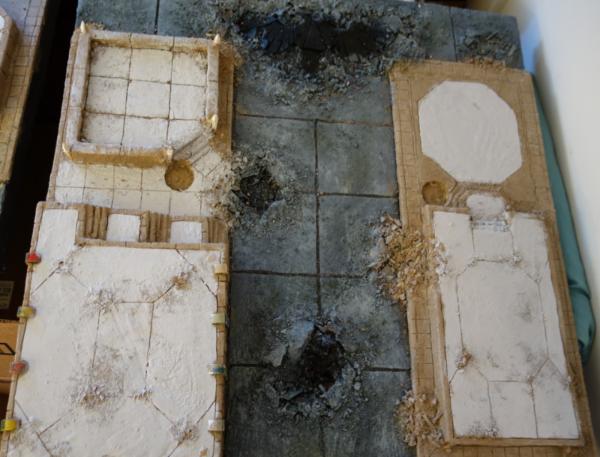
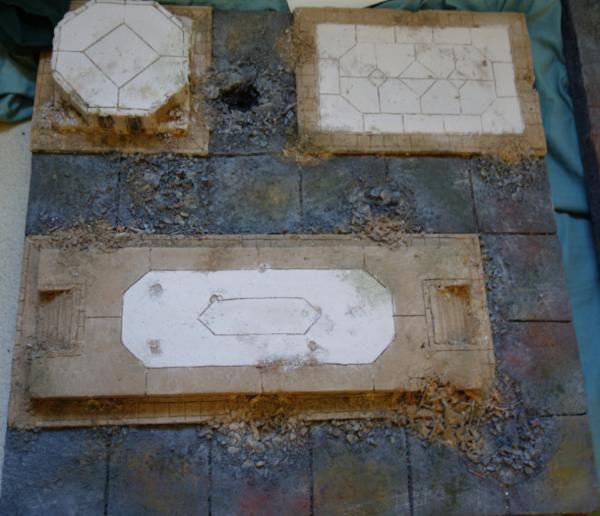
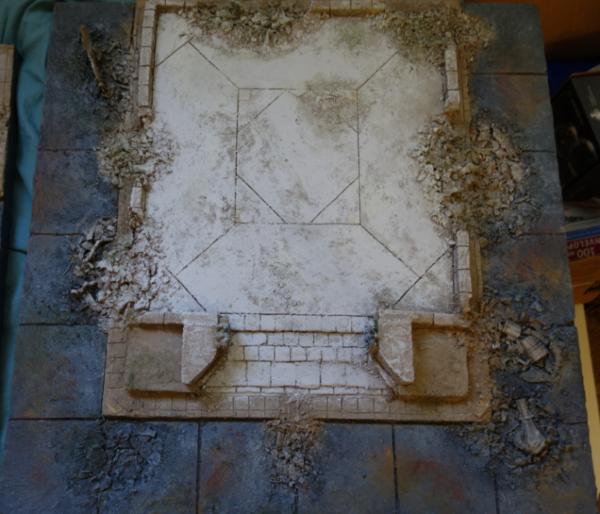
The first of the marbles! It's definitely coming together now. The veins/detailing is a bit off scale but im still happy with the result.
Also sponges! sponges. Seriously the key to this. That and it's rpetty easy to redo if you mess up (if i really feel like i need to rescale it it's not a big deal for example). You just hit it with a wash of your white and do over.
But yeah get one of those natural art sponges made of real spong, then rip it up to make it jagged, and use that to dab the washes on. Then just find some of the natural lines the spone made after it all dries and hit it harder with your wash color of choice, followed by touches of blue ink. Black would also work well too.
This tutorial has been invaluable:
http://chestofcolors.com/how-to-paint-marble-bases/
One thing i have been doing on top of it tho is to do a very diluted wash of my initial cream color over the whole thing after i do the veining. While I love those bases on this scale it gets a bit too dark and contrasty, so by doing a light cream wash over everything it just tones it back a bit. Then Im adding ard-coat and high-closs varnish on top to really seal the polished marble deal.
Colors I've been using for my wash stains (think all those flesh washes):
so a yellow flesh wash (coat d'arms 133 ink wash flesh)
ogryn flesh
seraphim sepia
a brown middier wash i mix up from black ink and a rust color game ink.
|
|
This message was edited 2 times. Last update was at 2014/05/13 16:28:24
|
|
|
|
|
|
|