Forum adverts like this one are shown to any user who is not logged in. Join us by filling out a tiny 3 field form and you will get your own, free, dakka user account which gives a good range of benefits to you:
No adverts like this in the forums anymore.
Times and dates in your local timezone.
Full tracking of what you have read so you can skip to your first unread post, easily see what has changed since you last logged in, and easily see what is new at a glance.
Email notifications for threads you want to watch closely.
Being a part of the oldest wargaming community on the net.
If you are already a member then feel free to login now.
2021/02/13 11:20:06
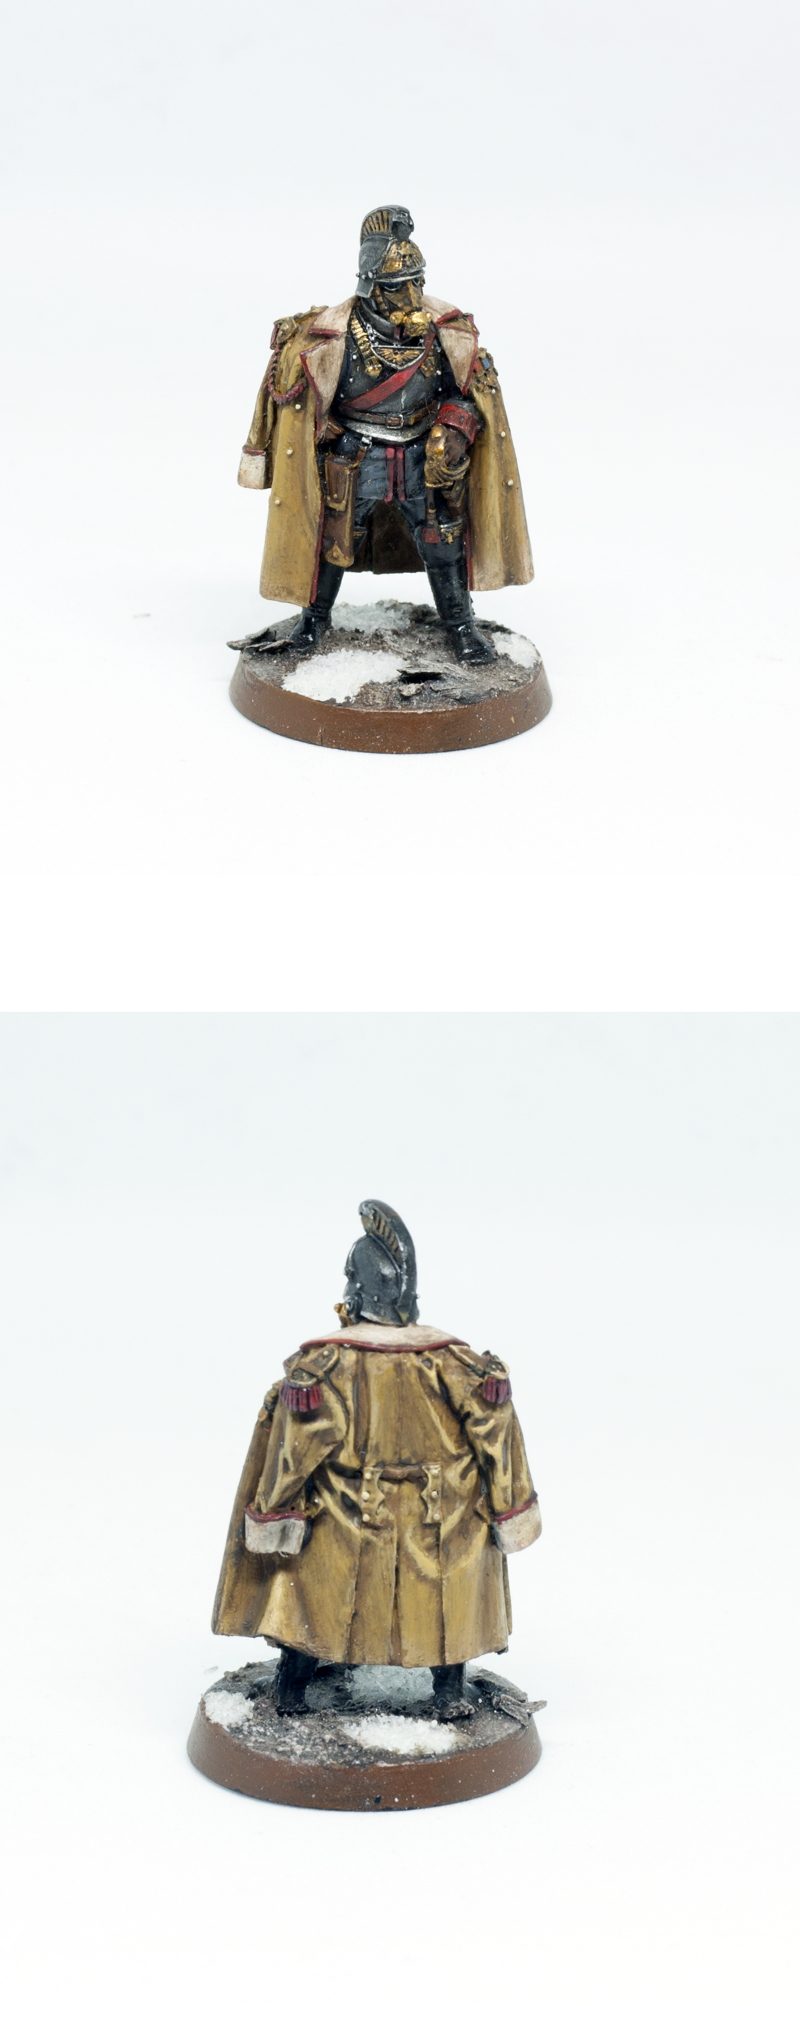
Subject: Ezki's hobby thread: New year, new ideas! Death Korps of Krieg Sentinel conversion
Thank you kindly for the comments theCrowe, Tyranid Horde, Gwyn chan 'r Gwyll, ph34r, Captain Brown, DJJazzyJeff and gobert!
Got a few hours of hobby time most nights during this week, so I was able to get these pretty close to completion!
Just need to finish the bases and touch some things up a bit.
I might have been a tad bit faster if I would not have jumped back and forth with different colors. And my focus seems to be jumping all over when painting two models at the same time. Need to work on that process!
I think I'm able to finish the bases before the game tomorrow, so I can gladly see them get blown up. As the "first game syndrome" demands.
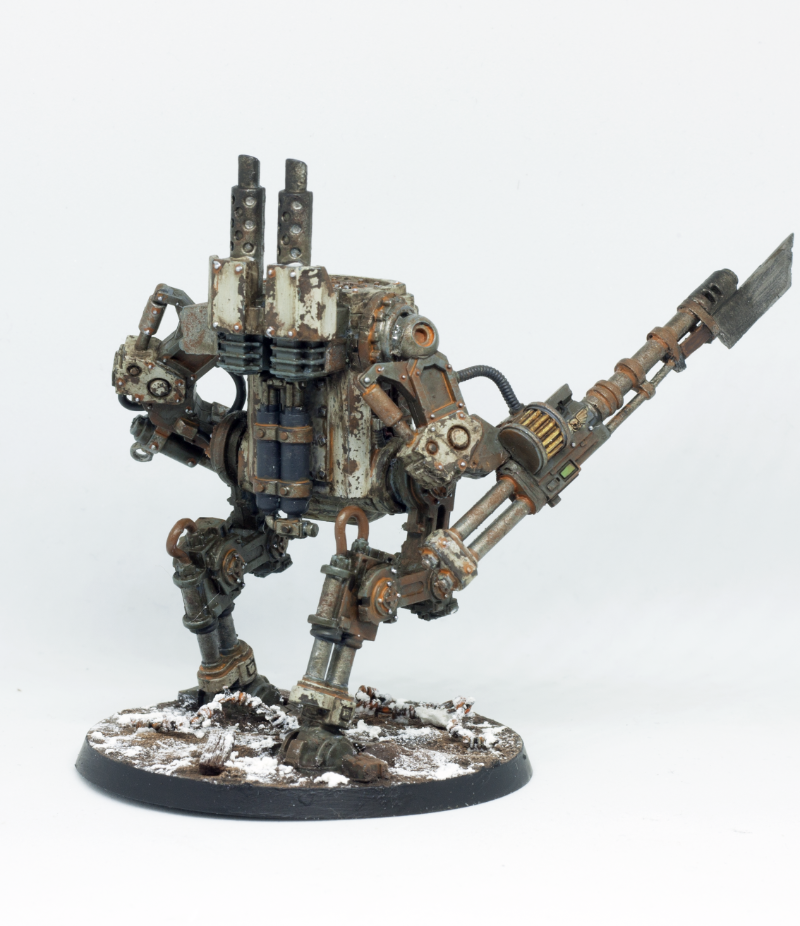
For those who are interested in the weathering steps, I also took some step by step pics this time.
Now a small disclaimer: there are dozens of ways to do this kind of weathering, and my technique with the enamels is... a bit messy. And probably far from the best way to use them. But hopefully these pics can offer at least some guide how I achieved the results.
First the model was base coated with a dark brown (Rhinox Hide) from all the areas I wanted some chipping.
Then I stippled some lighter brown tones on it (maybe a waste of time on a small surfaces like this).
I could have covered smaller areas, but I was not sure about the amount of chipping at this point.
Then using a sponge I added the liquid mask. It's not very visible in the picture, but you might spot it around the edges on the front.
Then ~three thin layers of light grey, which will be the "final" color of these areas.
The surface looks horrible at this point, as the liquid mask shows through the paint a bit.
Using a rubber glove / old toothbrush the mask was removed. The longer it is left there, the harder it is to remove.
I left the mask probably for a day, which is a bit too long. An hour or two is more than enough I think.
At this point, the whole model was covered quite thickly with an enamel wash (AK Interactive track wash). It was thinned just a little bit, but that's most likely not necessary.
Also added some base colors for some of the details and inserted the Aquila transfer. Transfers actually get hidden pretty well with the enamel wash.
Then, using a cotton stick and a brush, I "wiped" some of the enamel wash away with white spirit.
This is where things usually get a bit messy, and I tend to go back and forth I played around with different consistencies of the enamel paint on my palette and applied a few thicker layers where the streaking effects were done.
Then using a brush, I sort of like "dragged" the paint along the surface and wiped the edges to make them narrower. Hard to explain
The composition of enamel and acrylic paints is different (derp), so the acrylic base colors do not suffer from the white spirit.
Some paint might be removed from the hard edges and corners when a wet cotton stick rubs against it, but it's not a big deal to fix later. Just be careful around those areas.
Using a coat of varnish before applying the enamels could help. Not tried it yet, so can't say for sure.
If you mess up with the weathering, you can start the enamel step over by wiping all of the paint away with white spirit (or a similar chemical). Don't use acetone though, as the plastic suffers.
Here I jumped a bit forward, as I got excited and forgot to take the picture before assembling the model (and doing other detail work).
But to increase the rust and weathering effect, I thinned down some acrylic orange (Trollslayer Orange) and reddish brown (Skrag Brown) to a wash consistency and applied them to the recesses. Some of the brown was also applied over the chipped areas, to increase the rust effect.
I hope these steps made sense.
Gonna go and finish the models and take the final pictures soon.
Until then!
Thanks for looking.
This message was edited 1 time. Last update was at 2021/02/13 14:12:23
If you want a different "streaking" medium, I find that an "antiquing" staining medium will take whatever paint you give it, and it "streaks" really naturally (better for oil stain than rust stain I think though because it's fairly gloss)
Fantastic weathering there Ezki and thanks for doing the step by step process. One little niggle is that the transfer looks a little too neat, are you planning on adding a few chips to it?
2021/02/14 00:32:57
Subject: Ezki's hobby thread: New year, new ideas! Death Korps of Krieg Sentinel conversion
Gwyn chan 'r Gwyll wrote:If you want a different "streaking" medium, I find that an "antiquing" staining medium will take whatever paint you give it, and it "streaks" really naturally (better for oil stain than rust stain I think though because it's fairly gloss)
Thank you for the suggestion! I'll be sure to look into that.
Maharg wrote:Fantastic weathering there Ezki and thanks for doing the step by step process. One little niggle is that the transfer looks a little too neat, are you planning on adding a few chips to it?
Thank you Maharg! You are correct, and when you mentioned it I payed more attention to the aquila. I will add some chipping to it, but alas, I went ahead and took the pictures before realizing this.
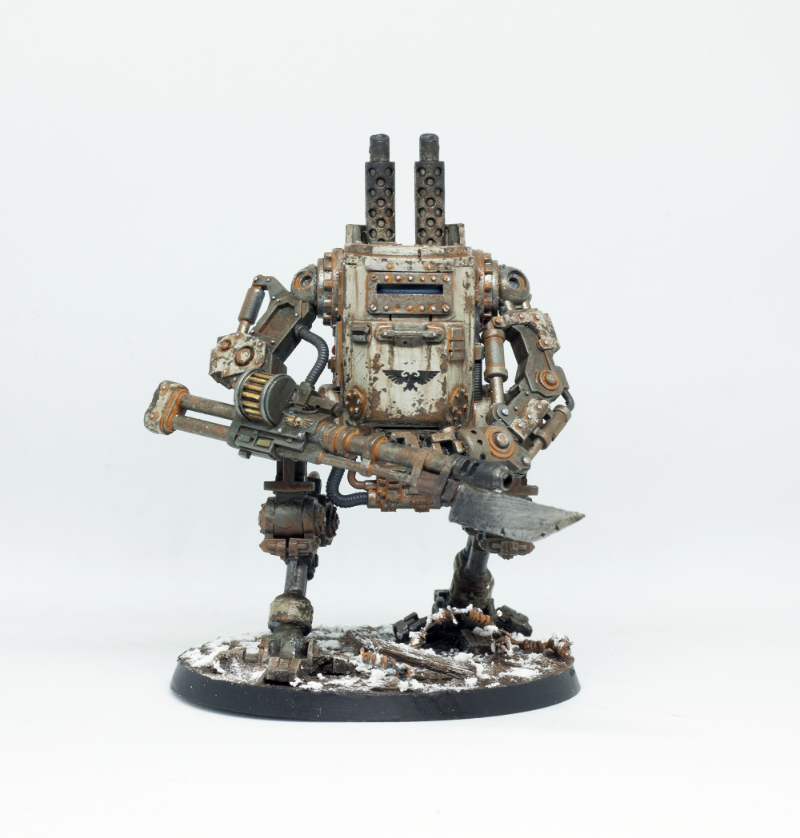
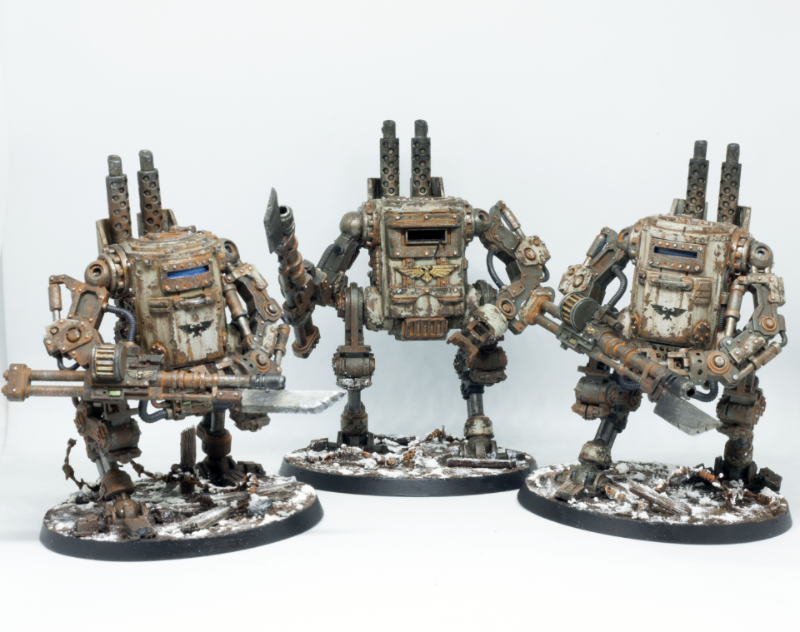
And boom! They are done.
The last steps felt a bit like rushing. Not just because I wanted them done for the game, but three similar vehicles in a row is bit of a stretch after all.
I'm always very eager during the early and mid stages of a project, but during the final steps my patience sometimes runs out. In this project, it shows on the small details like the machinery parts etc.
But I'm still very happy with the overall look
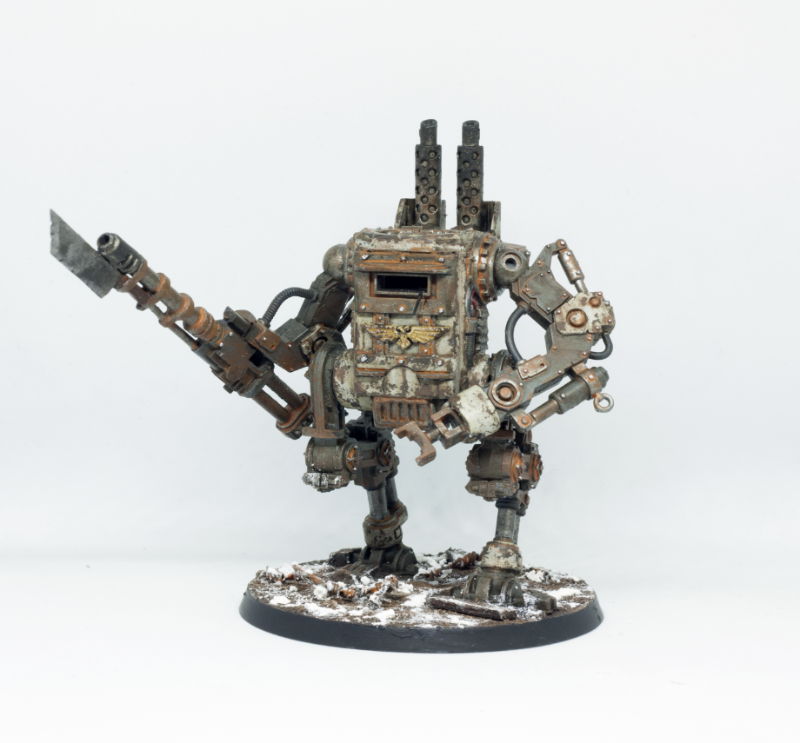
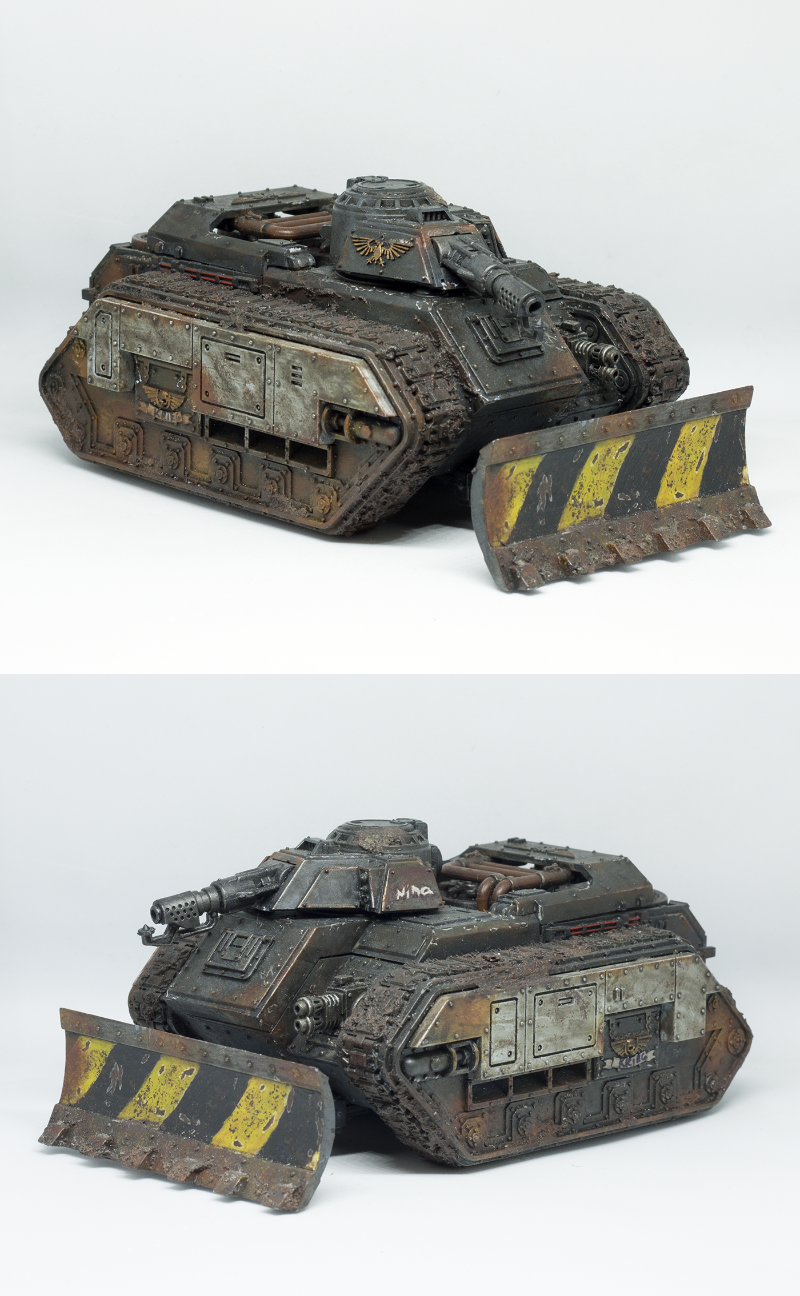
First up a very similar build and paint job to the last one.
Only differences are the hatch, gear on the back and slight color changes on a few areas.
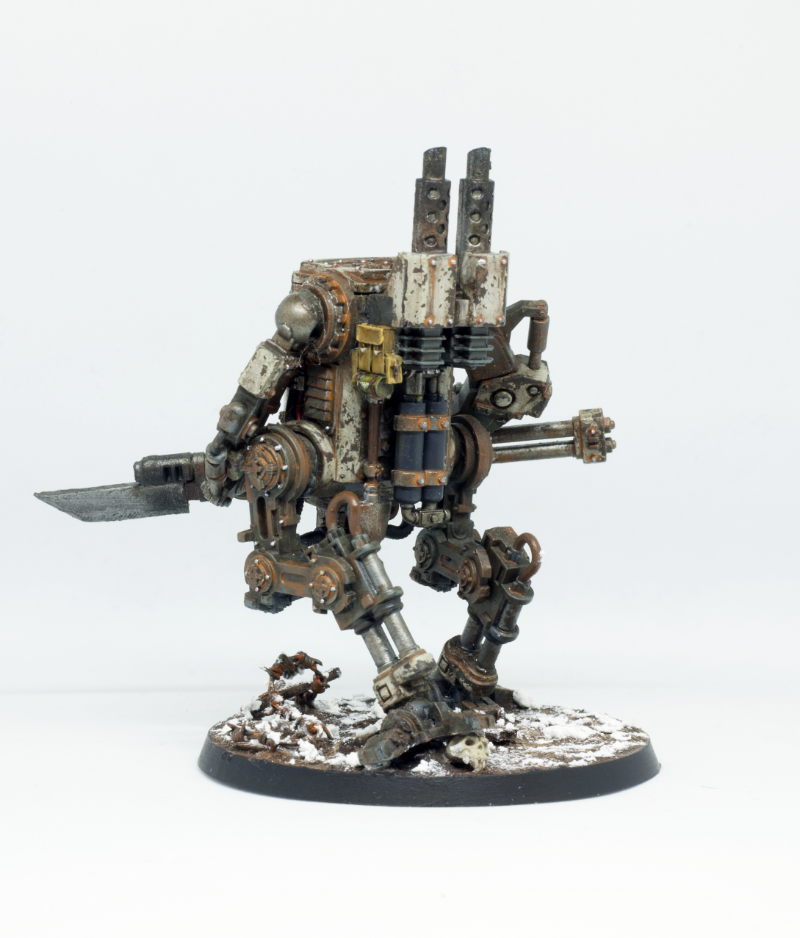
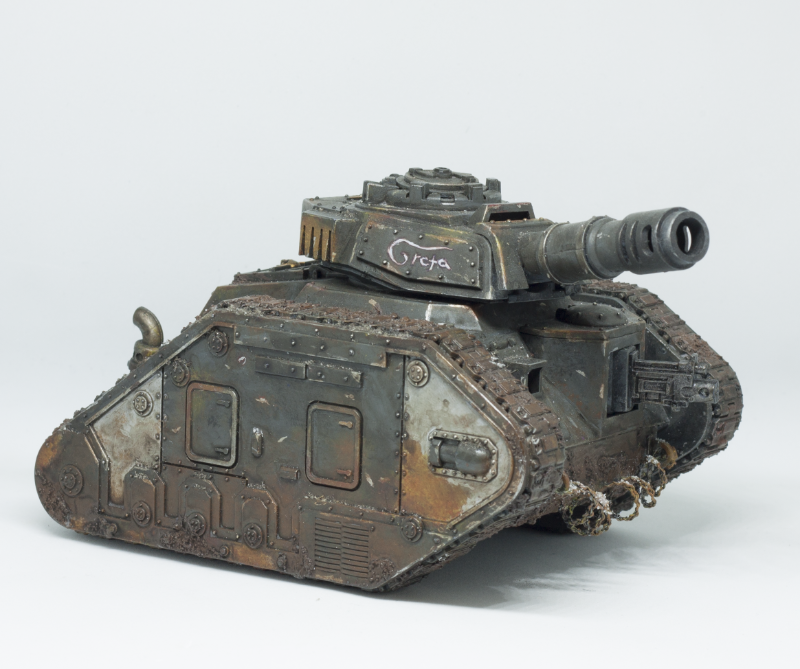
The second (third) one is the "earlier model":
And here's all of them in a squadro.:
From left to right: MK Ausf. F "Gertie", MK Ausf. E "Kristin" and MK Ausf. F "Birgit"
Really glad they are done. One would have been a bit weird, so it's good that I found the parts for two more.
I'm eager to see them blow up in their very first game tomorrow to the first shot targeted against them
Got to fight the urge to build more similar stuff. Not sure where I would use them, but I might still come up with similar ideas.
No promises though
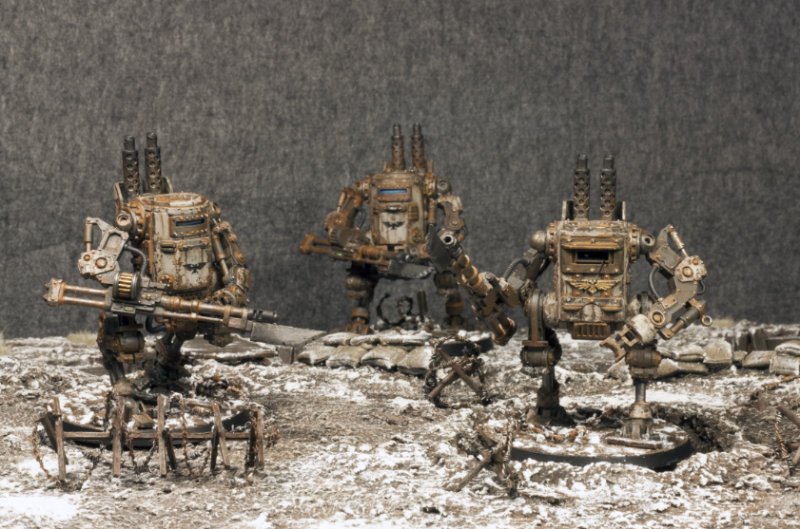
As I was taking the pictures from these, I got the idea of taking some action shots using the old display board from my cabinet.
I actually had to remove the cabinet door to get it out
Took some pictures from older Krieg vehicles as well.
I did not have a camera of my own when I painted them, so the only good pictures I had were a few action shots by a friend.
I will post some of those pictures when I'm done sorting and post processing them!
Thank you for looking!
PS. Don't mind the possible typos or if I lost the train of thought. It's currently 4AM and I really really should be sleeping already
Very cool detailed tutorial und all three together look amazing! And yeah, they will probably blow up turn 1 in your game, but that is the curse of freshly painted miniatures
2021/02/14 21:18:44
Subject: Ezki's hobby thread: New year, new ideas! Death Korps of Krieg Sentinel conversion
Awesome results and thank you for sharing the process to get to the final stage of the weathering through the masking stages. Always interesting to see how things develop
Thanks for sharing
Relapse wrote:
Baron, don't forget to talk about the SEALs and Marines you habitually beat up on 2 and 3 at a time, as you PM'd me about.
nareik wrote: Perhaps it is a lube issue, seems obvious now.
2021/02/16 23:36:08
Subject: Re:Ezki's hobby thread: New year, new ideas! Death Korps of Krieg Sentinel conversion
Thank you for the comments and compliments everyone! As always, I truly appreciate them.
Glad you liked the step by step pictures. Sharing is caring, so I'm very happy if anyone can use the different techniques as a reference.
Viterbi: Funnily enough, only one of the sentinels were destroyed. Then again, they did not take too much fire their way. My tank commanders were more tempting targets.
So, I finally managed to go through all the pictures I took using the display board.
Taking it out of the cabinet was not the easiest task though. The measurements are so thight, that I had to remove the door in order to get it out
Before going to the pictures, I have a couple of shots from the game.
It has been a while since I've posted any. The quality is what you would expect from a phone with a cracked lens.
Spoilered below:
Spoiler:
2000 points of gas masked goodness!
First time using the four Death Riders I painted back in 2019. I really need to get more of these guys!
Taking their vengeance to the Broadside responsible of taking out the Leman Russ Greta.
Without fear of death, the last remaining rider fought until his end!
Gertie and Kristing taking the fight up close and personal. I think I should buy the melee weapon for these guys next time.
My friend kept asking me "how hard do those Sentinels hit in close combat?", only to laugh it out when I rolled only one die per model
The game was really tough!
By turn three, I was sure I was going to lose. I kept losing my guys, but felt like not doing enough damage to the Tau forces.
Decided to fix my bayonets and just keep going towards the objectives. In the end, the game ended with scores 78 - 77 for the favor of Krieg.
What I really like about 9th edition, is that the games seem to be closer than ever before.
Not once have I played a game in this edition, where one of the players stomped the other. Then again, I've only played like four games so far. Need to work on that!
As has become a tradition of mine, I like to link a song to go along with the pictures to enhance the overall feeling.
This time the song is from Sabaton, which inspires me so much when painting these guys. I must have listened their "Great War" album at least a dozen times whilst painting the Sentinels.
I think this song in particular, captures the Death Korps of Krieg really well. Somewhat with it's lyrics, but especially with the theme.
Disclamer: I don't own this song nor any part of it.
As always, some of them are spoilered to prevent this post from getting way too lengthy.
The pictures are pretty huge, so I could not post them here full sized.
I recommend opening the ones that are in the gallery. Word of warning though, they might take a while to load.
"There’s a thunder in the east
It’s an attack of the deceased"
"And that’s when the dead men are marching again"
"Osowiec then and again
Attack of the dead, hundred men
Facing the lead once again
Hundred men
Charge again
Die again"
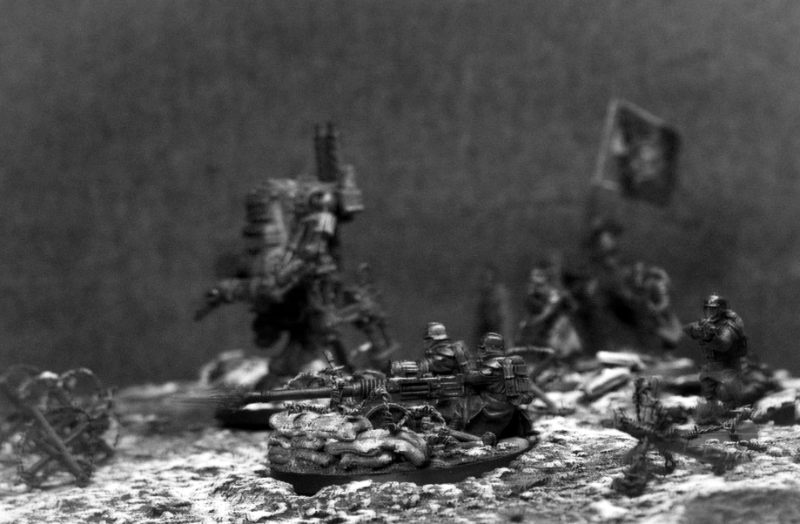
Just for fun, I did a few quick "WW1" era edits with a black and white filter, some grain and blurring to imitate the longer shutter speeds.
It was a fun experiment, so I could try to learn how to make them look a bit more realistic.
Spoiler:
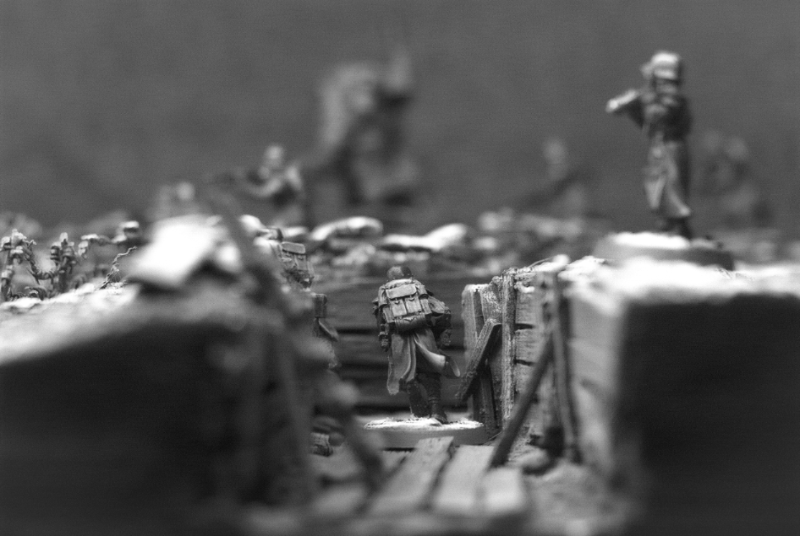
1. Trench near the front lines, M41. As the trench whistle is blowing to coordinate the attack, a nameless guardsman is making haste to his firing position.
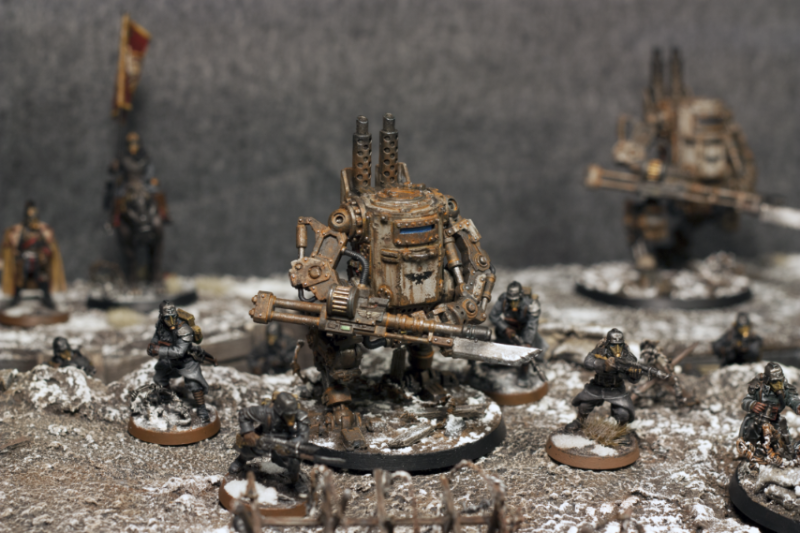
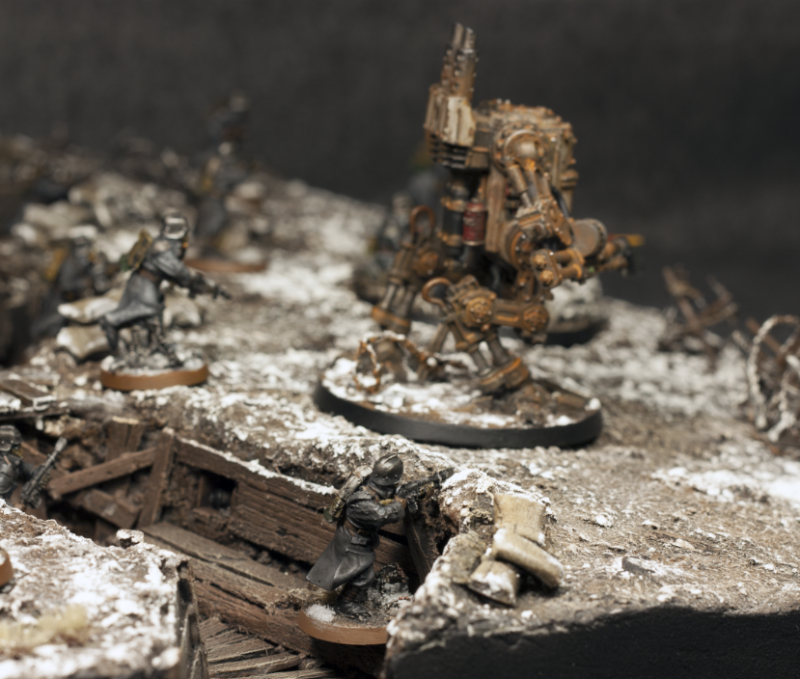
2. A nameless guardsman taking aim with his las powered rifle, while a mechanized scout "MK Ausf. F" is advacing in the background, M41.
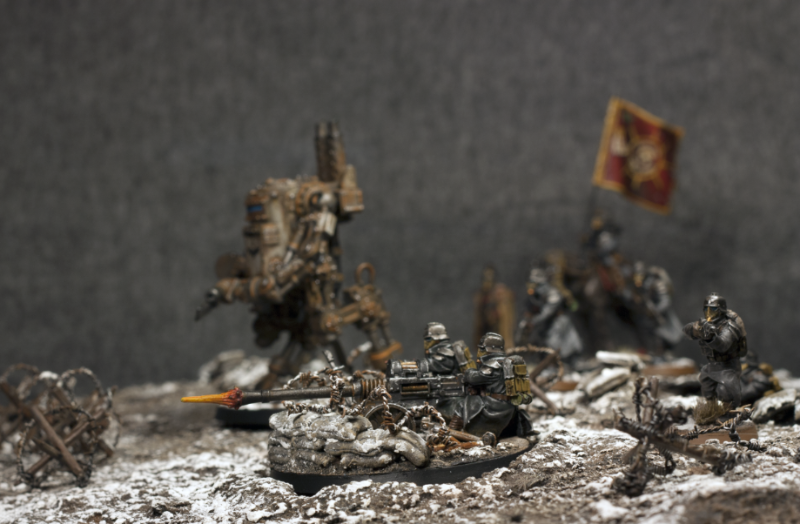
3. A team of heavy weapon specialists providing covering fire to the advancing troops with the heavy caliber Autocannon.
The marshal leading the assault force can be seen in the background (it is debated whether the silhouette belongs to Karis Venner himself).
4. A makeshift artillery dugout in the front lines, M41. Two guardsmen are loading a quad launcher artillery gun, also known as the "thudd gun", while the third observes the landscape for possible targets.
I also took a few pictures from couple of my older Krieg models.
I did not have a proper camera nor the lightbox when I last photographed these. They are painted somewhere between 2013-2016.
Spoiler:
Thank you for looking!
This message was edited 1 time. Last update was at 2021/02/16 23:39:19
Wow! That was an epic post! The action shots from the game were really cool, but the board is just awesome. I love that you played with filters to give them more of a WWI vibe, as others have said it really works well for the Kreig. I need to get on with my Panthers’ board
Goberts Gubbins - P&M Blog, started with Oldhammer, often Blackstone Fortress and Void Panther Marines, with side projects along the way
2021/02/23 12:17:51
Subject: Re:Ezki's hobby thread: New year, new ideas! Death Korps of Krieg action shots!
Beautiful pictures Ezki! I really like how you wrote captions for each picture like you would find in a book for your WW1 style pictures. Very nice all around.
Nice battle pics. And I too have the feeling that games with the new objective scoring tend to be very close. And those glamour shots are just glorious, magnificent work!
2021/02/28 10:59:56
Subject: Ezki's hobby thread: New year, new ideas! Death Korps of Krieg action shots!
Thank you very much everyone! Taking the shots was so much fun and I'm glad you liked them.
Need to do that more often. I also should build some backdrops or other boards for different armies.
Storing them somewhere is the biggest issue though!
Tyranid Horde wrote:Great shots! Now I need my own board for something like this!
I agree, you should build a board! Would love to see that! Maybe a board full of poker chips for the space elves?
gobert wrote:Wow! That was an epic post! The action shots from the game were really cool, but the board is just awesome. I love that you played with filters to give them more of a WWI vibe, as others have said it really works well for the Kreig. I need to get on with my Panthers’ board
Cheers gobert! The Void Panthers will look even cooler on a board. Can't wait to see it!
Syro_ wrote:Beautiful pictures Ezki! I really like how you wrote captions for each picture like you would find in a book for your WW1 style pictures. Very nice all around.
Thank you Syro_. I took inspiration by browsing some old WW1 era pictures and after seeing some captions, I figured it would be fun to play around a little.
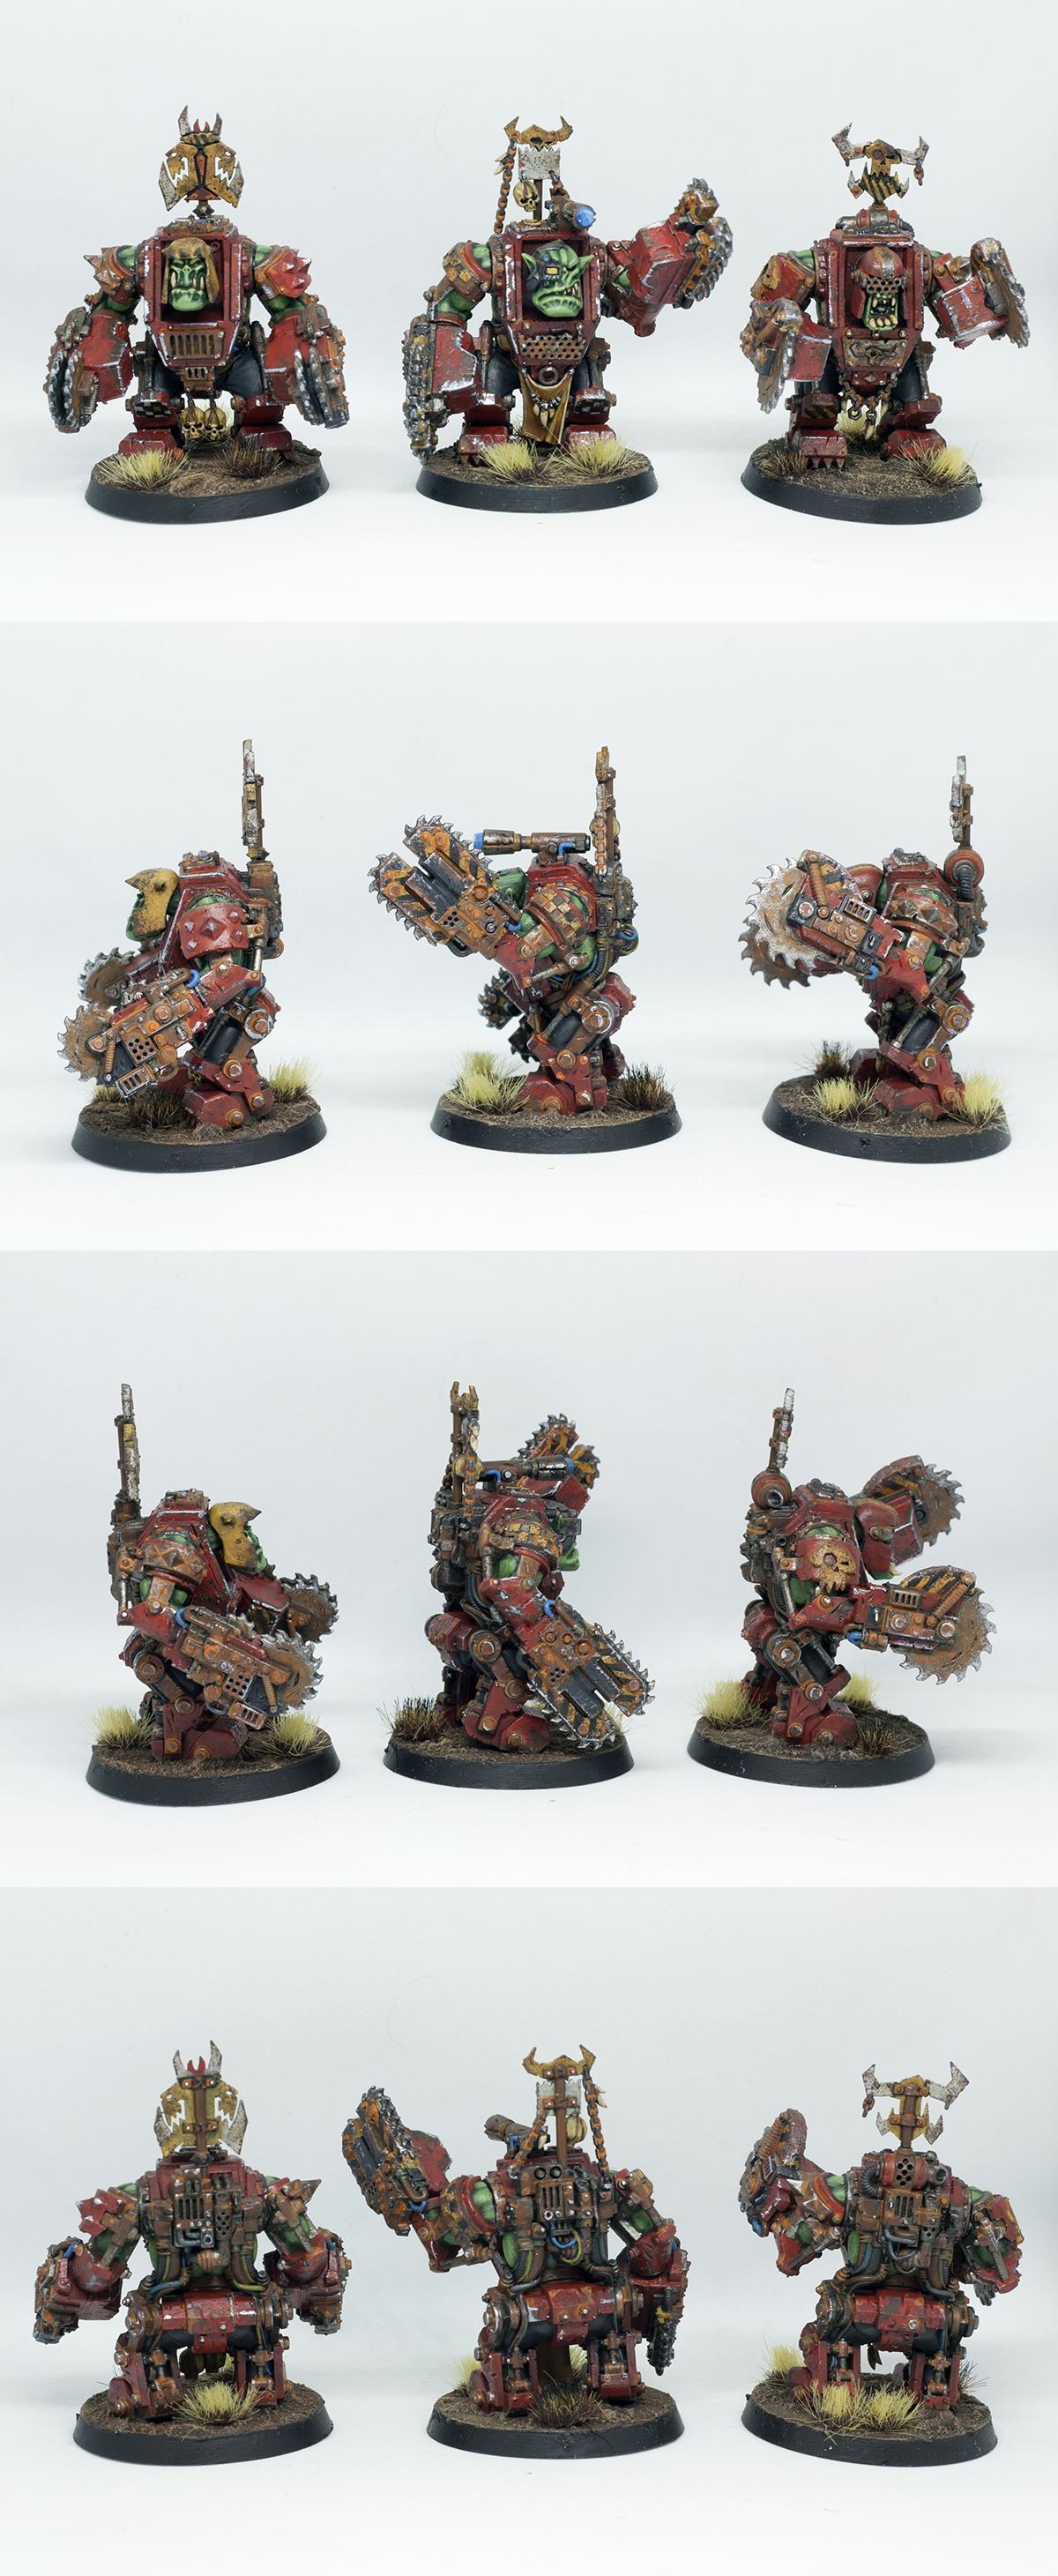
Been quiet for a while, but I have spent my hobby time during the last couple of weeks to paint some Meganobz to clear my backlog.
They had been waiting for their turn for a couple of years.
I also played another game with Krieg, this time against a speedy Slaanesh host. Game ended to Krieg victory, but this time the score gap was a bit bigger.
My opponent did the grave mistake of putting too much of their army into reserves as all my artillery was too daunting. Coming in two waves, the brave guardsmen were able to repel the attacks.
Every infantry squad was wiped out, but the vehicles survived: the optimal outcome for the Krieg mindset. Life is cheap, machinery is not.
Alas, I don't have any pictures this time I'm afraid.
Previously I did not much like how the Krieg army played, as it felt so static compared to Orks and Eldar, but lately I've been warming up to them.
I'm hoping the new Astra Militarum codex would bring even more toys for the guys in masks.
Anyhow, here are the Meganobz I finished the other day:
I started doing the chipping with the same liquid mask technique as with the previous models.
Noticed however that it takes so much time compared to just sponging the chipped areas, and the result is not much different on a small surfaces like in these models.
I tried to paint them in a couple of evenings just to get them done quickly, but they took a bit longer than I expected.
I.e. I could have achieved the same results with half the time spent if I were to plan out the process a bit better.
I'm not sure what I'll be cooking up next. I have a few project ideas though.
One is that I should really figure out the color scheme for my Dark Eldar and get some of them painted before the new codex arrives. I really want to finally field them.
I have been thinking about painting them dark red instead of purple, but that's just how I feel right now. The color schemes in my head change weekly.
The other project I might jump into is making some more Necromunda / 40k terrain with the new MDF kits I got a month ago.
Thanks for looking!
Will get back when I start cooking something up again, which might be sooner or later.
The MegaNobz were worth the wait. Their skin looks particularly great. I have to admit that all your weathering is making me want to do some, perhaps my Poxwalkers need to up the rust?
Goberts Gubbins - P&M Blog, started with Oldhammer, often Blackstone Fortress and Void Panther Marines, with side projects along the way
The photoshoot was epic. I played the song while scrolling to get into the vibe of it. The lyrics you included throughout were incredibly well-paced. I was looking at your trench shots and would scroll to a new set of lyrics right as they were being sung. All three times. Totally awesome.
I want to build a Krieg army now. "Fix bayonets! Bodies to the front! Life is cheap, Machinery is not!"
Seriously, your display board is super cool looking, and all those gas-masked soldiers running around it and pouring fire into no man's land look really fantastic.
It's been a little while since I've caught up with your thread, but, wow - the Krieg and the Meganobs look great. I especially love the photos of the Krieg on the trench diorama/display board, very well done indeed. The ground textures work fantastically with the basing.
Also, +1 on the Sabaton reference! Great song, that.


 Finished Forge World Elysian Army
  Finished Tau Sept Cadre
  Finished Ork Waaagh |
  Alaitoc Eldar Warhost
  Finished Order of Our Martyred Lady - Sisters of Battle
  Finished Necromundian Imperial Guard Regiment


 ~7510 build and painted
 1312 build and painted
 1200
1200 


 Da Dark Angelz
 Arakasi vs Infinity