| Author |
Message |
 |
|
|
|
|
Advert
|
Forum adverts like this one are shown to any user who is not logged in. Join us by filling out a tiny 3 field form and you will get your own, free, dakka user account which gives a good range of benefits to you:
- No adverts like this in the forums anymore.
- Times and dates in your local timezone.
- Full tracking of what you have read so you can skip to your first unread post, easily see what has changed since you last logged in, and easily see what is new at a glance.
- Email notifications for threads you want to watch closely.
- Being a part of the oldest wargaming community on the net.
If you are already a member then feel free to login now. |
|
 |
2014/04/27 22:32:09
Subject: Mechanica Australis - Industrial Scratchitecture
|
|

Gargantuan Great Squiggoth
|
Well that looks great so far.
If it was me I would use two methods.
I would use formers, ie. shaped ribs at 90 degrees to the surface of curvature.
I would also use my trusty heating method, slow careful heat and gentle forming of the shapes.
Just suggestions.
|
|
|
|
 |
|
2014/04/28 00:23:35
Subject: Mechanica Australis - Industrial Scratchitecture
|
|

Decrepit Dakkanaut
|
Pretty cool LT! Curious where you go next...
|
|
This message was edited 1 time. Last update was at 2014/04/28 03:25:02
|
|
|
|
|
2014/04/28 01:41:36
Subject: Re:Mechanica Australis - Industrial Scratchitecture
|
|

Lone Wolf Sentinel Pilot
|
@Vik: So am I. As to the how, I'm sort of cheating in this case, as I have access to an official model, alongside a template from Patoroch, that I do no think I'll use more than as a reference for some pieces.
Regarding the flying cut-offs, I do mean it; galvanized steel mesh (as the one I have), when cut with pliers, has a lemon-juice-like tendency to go straight against unprotected eyes, and can reach far.
@Camkierhi: Thanks, and please keep it coming, I'm all ears. Shaped ribs, .5mm styrene and heat are indeed plan A. A gas torch would probably yield a thinner, more focused heat, allowing for more control, the hot air gun runs on the safer side (and is actually available in my case!), will see how it works out.
@Gits: It'll go somewhere, only don't be holding your breath in the meantime, just in case it takes longer to get there than expected  !
Cheers.
|
|
|
|
|
|
2014/05/02 16:28:25
Subject: Re:Mechanica Australis - Industrial Scratchitecture
|
|
Lone Wolf Sentinel Pilot
|
Front hull update:
After a few try-outs, I came along with a working template for the curved sides:
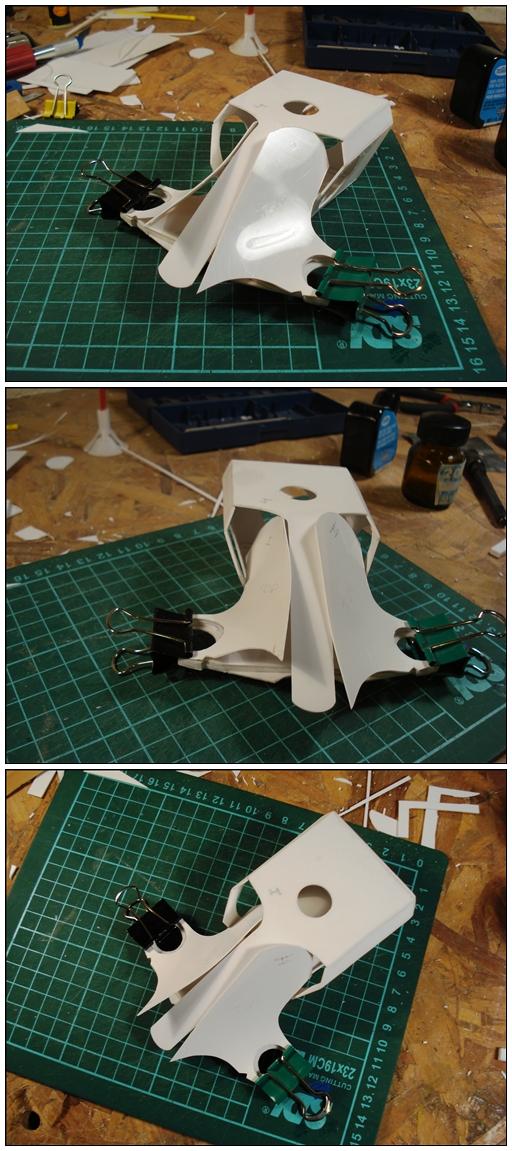
And trying to convince it to stay put:
Glue is setting as I type, I just hope it doesn't spring out when I unclamp it.
Heat forming the piece took more than one attempt: Gets Hot! screws up the best of plans, both in and outside the gameboard!
In between gluing stages, the main gun is starting to get (curvy) shaped as well:
C&C are always welcome.
Thanks for stopping by.
|
|
|
|
|
|
2014/05/02 16:35:28
Subject: Mechanica Australis - Tau Scratchmerhead in the making
|
|

Shroomin Brain Boy
|
I can only imagine how much swearing that probably involved...
tho...shaping up pretty well... 
|
|
|
|
|
|
2014/05/02 16:46:13
Subject: Mechanica Australis - Tau Scratchmerhead in the making
|
|
Crushing Black Templar Crusader Pilot
|
 Viktor von Domm wrote: Viktor von Domm wrote:I can only imagine how much swearing that probably involved...
tho...shaping up pretty well...
Sailors blushed. That much swearing.
Has to be.
|
|
|
|
|
|
2014/05/02 17:02:19
Subject: Mechanica Australis - Tau Scratchmerhead in the making
|
|
Shroomin Brain Boy
|
^that...and a half... 
|
|
|
|
|
|
2014/05/02 17:07:32
Subject: Re:Mechanica Australis - Tau Scratchmerhead in the making
|
|
Lone Wolf Sentinel Pilot
|
It was certainly enough to earn a serious frown from the Ms! (Guess who is doing the dishes today...) But on the side of worth it, I'd say: 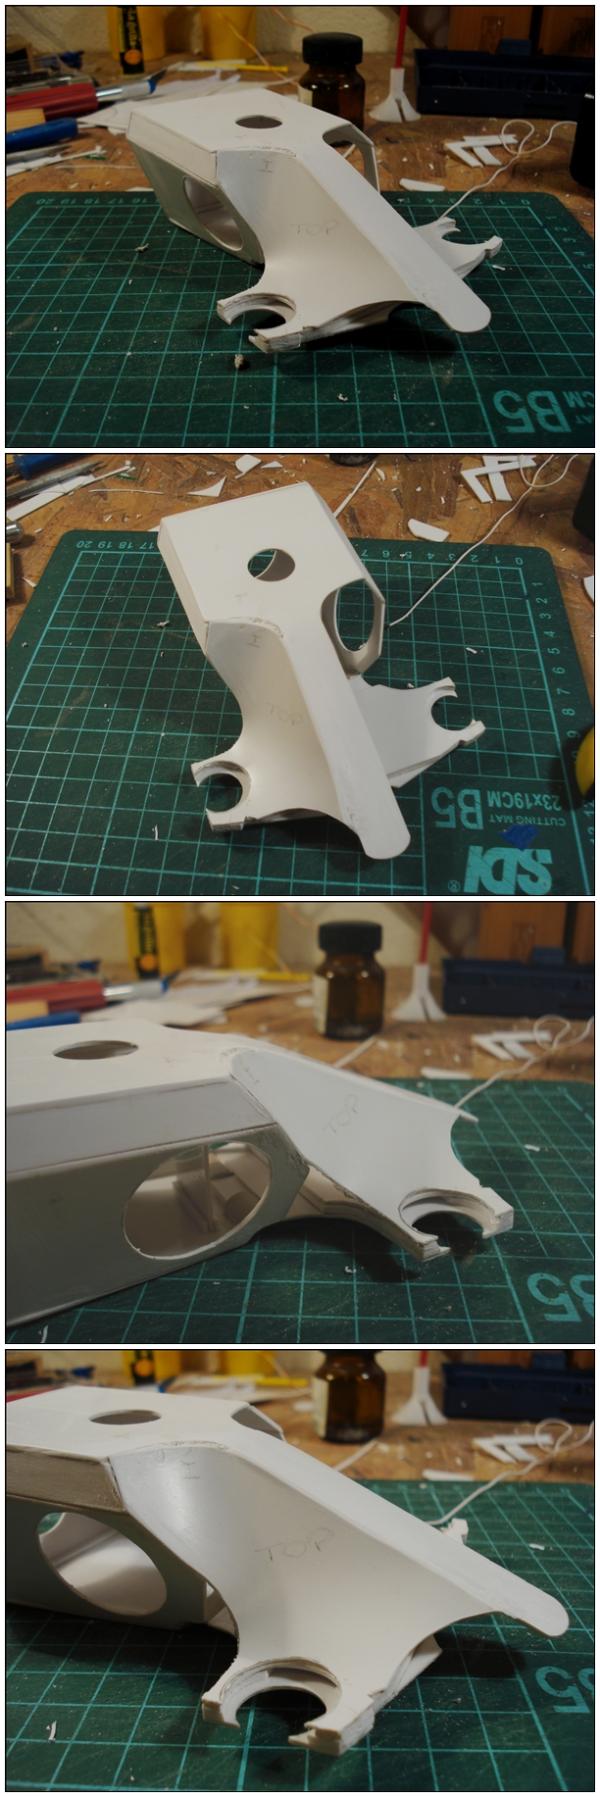 As expected, lots of sanding in the foreseeable future... Cut the new piece for the other side already, will go on to gluing and clamping later today. Cheers.
|
|
This message was edited 1 time. Last update was at 2014/05/02 17:07:53
|
|
|
|
|
2014/05/02 17:26:19
Subject: Mechanica Australis - Tau Scratchmerhead in the making
|
|
Mastering Non-Metallic Metal
|
Good job making it bend to your will. 
Good luck with the second half.
|
     Mastodon: @DrH@dice.camp Mastodon: @DrH@dice.camp
The army-                   ~2295 points (built). ~2295 points (built).
 
* -=]_,=-eague Spruemeister General. * A (sprue) Hut tutorial *
Dsteingass - Dr. H..You are a role model for Internet Morality! // inmygravenimage - Dr H is a model to us all
Theophony - Sprue for the spruemeister, plastic for his plastic throne! // Shasolenzabi - Toilets, more complex than folks take time to think about! |
|
|
|
|
2014/05/02 17:31:45
Subject: Mechanica Australis - Tau Scratchmerhead in the making
|
|
Ragin' Ork Dreadnought
Deep in the Outer Boroughs of NYC
|
Wow. Just wow. I'm really impressed with this build. That shaped panel is quite a piece of craftsmanship, sir. Bravo. Following this quite closely.
|
|
|
|
|
|
2014/05/02 19:12:52
Subject: Mechanica Australis - Tau Scratchmerhead in the making
|
|
Combat Jumping Ragik
|
Nicely done. And labeled 'Top' too. Bit of Spanglish
One way to ensure that it holds the curve would be to use 2 thinner pieces, and laminate them into a curve. Once that sets, it would hold the curve, and thinner pieces are easier to bend too.
Ah, question. For filler, what do you pln to use?
|
|
|
|
|
|
2014/05/02 21:40:35
Subject: Mechanica Australis - Tau Scratchmerhead in the making
|
|
Shroomin Brain Boy
|
what I would like to know, how do you create the templates to create these curves? that is exactly why I still haven´t went from blocky to curved builds, I can´t figure out how to create surfaces that fit the needed space the way you two (red harvest and LT) do...be sure of my envy Automatically Appended Next Post: oh and LT...I know that kind of punishment
|
|
This message was edited 1 time. Last update was at 2014/05/02 21:40:50
|
|
|
|
|
2014/05/02 21:47:26
Subject: Mechanica Australis - Tau Scratchmerhead in the making
|
|
Crushing Black Templar Crusader Pilot
|
Viktor von Domm wrote:what I would like to know, how do you create the templates to create these curves? that is exactly why I still haven´t went from blocky to curved builds, I can´t figure out how to create surfaces that fit the needed space the way you two (red harvest and LT) do...be sure of my envy
I too would like to know this.
|
|
|
|
|
|
2014/05/02 22:35:54
Subject: Re:Mechanica Australis - Tau Scratchmerhead in the making
|
|
Combat Jumping Ragik
|
Here in my thread you go. An easy way to start.
|
|
|
|
|
|
2014/05/03 01:46:14
Subject: Re:Mechanica Australis - Tau Scratchmerhead in the making
|
|
Lone Wolf Sentinel Pilot
|
@Dr H: , thanks. Here it goes.
@Warboss_Waaazag: Flattered, thank you.
@Red H: Indeed. I guess both the modelling and the (close to none) gaming aspects of my life are sort of English-centred, so even when doing it only for myself I tend to stick to it. And it is shorter than "Arriba", as well.
Thanks for the tip, used just heat for forming this one, though lamination is also present, but only for thickness this time.
I gap-fill with a generic modellers putty, single component, and apparently water based (generic container as well, no indications whatsoever!). Dries fast and sands easily. I might try out car body repair putty, especially for larger jobs, next.
When working with cardboard, I use woodworking filler, either commercial or self-made PVA and saw dust mix), and dry-wall filler.
@Vik: Don't miss Red Harvest's step-by-step on forming curves, you'll find your answer there.
As for the templates themselves, in this case, I built the basic body sans the curved panels first, and worked out the templates for those straight from the actual piece, outlining the required shapes on paper and then tracing them on styrene.
It took a couple try-outs and mock ups to get it close to acceptable, and some further trimming after they were placed, but it worked out.
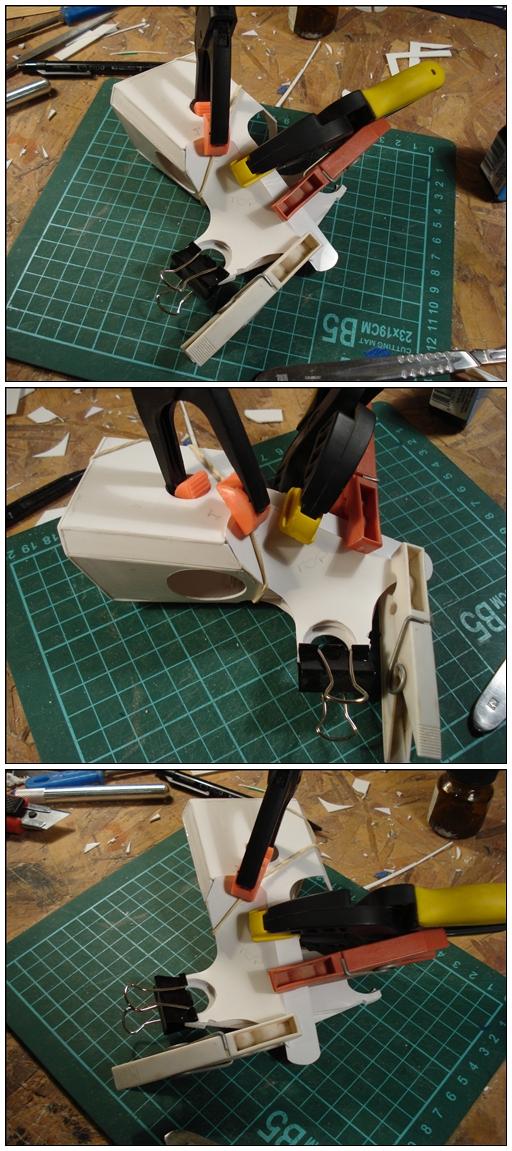
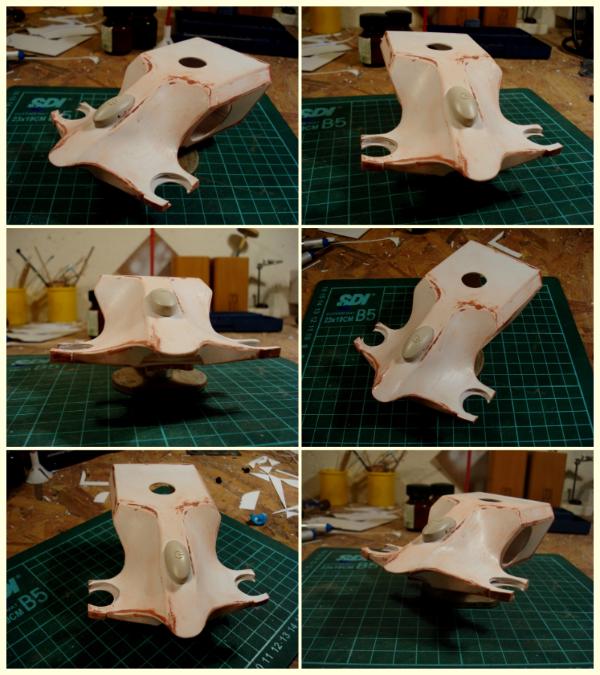
Speaking of which, second side, not actually symmetrical, but close enough:
Worked-on underside:
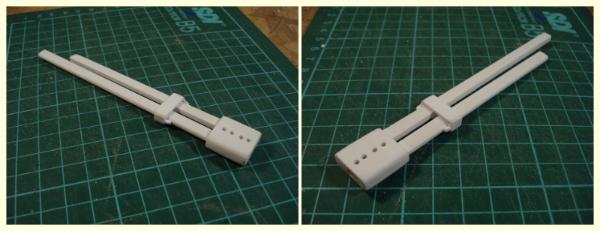
And a still very WIP gun:
C&C are always welcome.
Thanks for stopping by.
|
|
|
|
|
|
2014/05/03 04:24:08
Subject: Mechanica Australis - Tau Scratchmerhead in the making
|
|
Gargantuan Great Squiggoth
|
Well looks pretty brilliant to me, excellent work.
|
|
|
|
|
|
2014/05/03 14:14:39
Subject: Re:Mechanica Australis - Tau Scratchmerhead in the making
|
|
Lone Wolf Sentinel Pilot
|
Thanks, Cam.
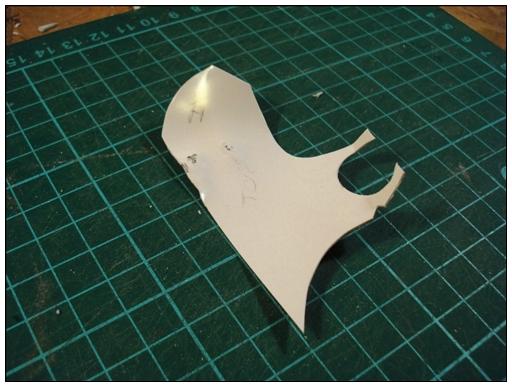
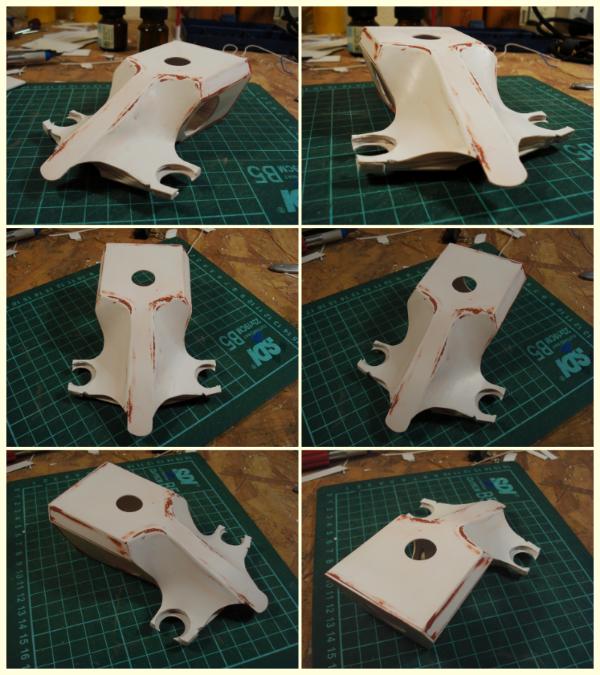
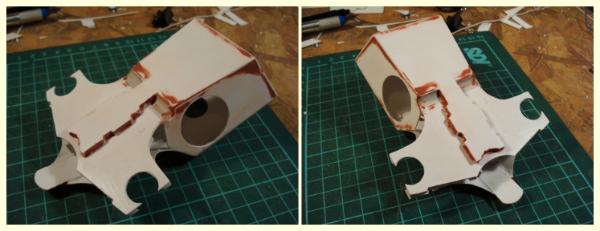
As work proceeded on another of the curved panels, I took pics to bolster the template making process I wrote about earlier.
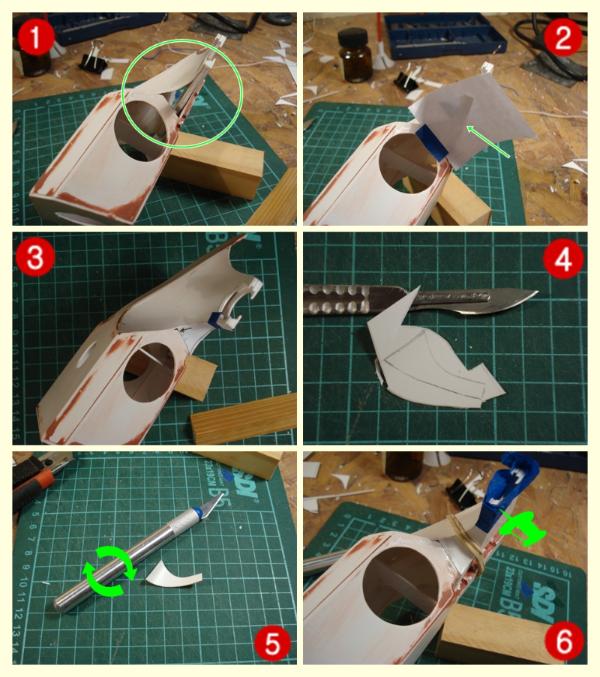
1. Required piece.
2. Paper template on-the-making. The outline is easily seen here, if needed, back lighting can help with the tracing.
3. Dry-fitting the paper cut-out.
4. Transfer and cut (.5mm styrene)
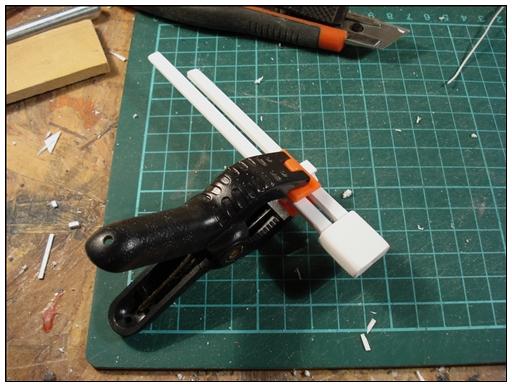
5. Heat lightly and roll over a suitable shape to form.
6. Glue and hold in place till dry. Trim if needed, sand and gap-fill to taste.
Hope it makes more sense now.
Cheers.
|
|
|
|
|
|
2014/05/03 15:04:23
Subject: Mechanica Australis - Tau Scratchmerhead & Template making
|
|
Shroomin Brain Boy
|
I follow red harvests steps here now on dakka...be sure of that... that man is full of surprises...and yes his curves making is awesome...
but your last update kind of answered my question earlier...the put- paper- where- PC- is- about- to- be- placed- later- on- method is one I've used myself too...and I thought that with such exotic shapes one might have other magical ways to get around...(see what I did there? ) such shapes... Automatically Appended Next Post: oh and it looks stunning mate... you definitely get the thing in ...er...shape...
|
|
This message was edited 1 time. Last update was at 2014/05/03 15:04:54
|
|
|
|
|
2014/05/04 01:37:19
Subject: Re:Mechanica Australis - Tau Scratchmerhead & Template making
|
|
Lone Wolf Sentinel Pilot
|
Sorry to let you down, Vik, no magic tricks involved!
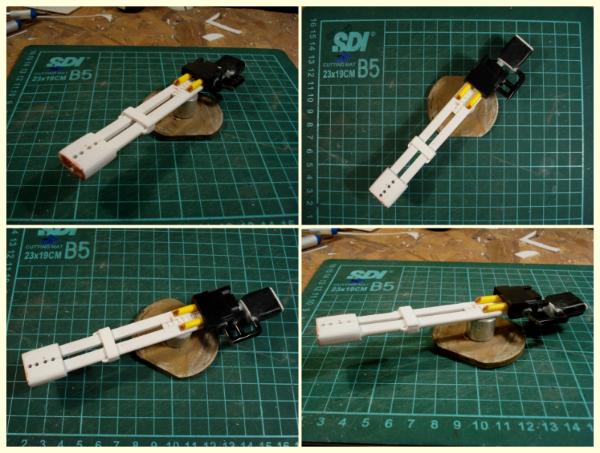
Base hull almost done:
And advanced on the rail gun (maybe a bit too heavy on the rear, rest is close to the actual model):
Your C&C are most welcome, as always.
Thanks for stopping by.
|
|
|
|
|
|
2014/05/04 02:19:04
Subject: Mechanica Australis - Tau Scratchmerhead WIP
|
|
Ragin' Ork Dreadnought
Deep in the Outer Boroughs of NYC
|
Looking good!
|
|
|
|
|
|
2014/05/04 02:45:17
Subject: Mechanica Australis - Tau Scratchmerhead WIP
|
|
Decrepit Dakkanaut
|
You are a crazy man...
|
|
|
|
|
|
2014/05/04 12:46:35
Subject: Re:Mechanica Australis - Tau Scratchmerhead WIP
|
|
Fixture of Dakka
|
Nice work on the body curves
All shaping up rather nicely so far.
|
|
|
|
|
|
2014/05/04 14:26:57
Subject: Re:Mechanica Australis - Tau Scratchmerhead WIP
|
|
Lone Wolf Sentinel Pilot
|
@Warboss_Waaazag: Glad you approve, thank you.
@Gitsplitta:  , busted! And here I was, thinking that hiding in the mad house was a cunning plan... 
@monkeytroll: Thanks! I'd never had my curves so praised before... guess plastic beats nature once again...
|
|
|
|
|
|
2014/05/04 16:22:30
Subject: Mechanica Australis - Tau Scratchmerhead WIP
|
|
Combat Jumping Ragik
|
Excellent progress. It will be interesting to see how you add the surface details. And remember guys, you can never have too many clamps.
Please get a short section of copper pipe or the like for the 'roller' instead of the knife handle. It's a bit safer. Or remove the blade first.
The filler looks like what is sold hereabouts as autobody filler. But it works great with plasticard. The dried blood color is a bit unsettling though...
|
|
|
|
|
|
2014/05/04 17:13:39
Subject: Re:Mechanica Australis - Tau Scratchmerhead WIP
|
|
Lone Wolf Sentinel Pilot
|
Thanks, Red H. Rail gun, done of sorts: 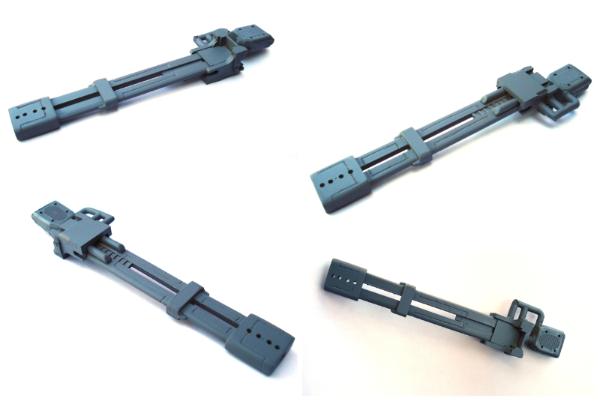 And comp pic beside the official one: 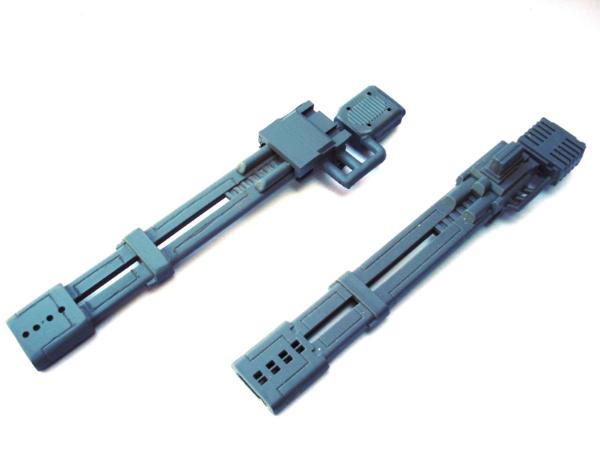 As for the surface detailing, I tried an engraving bit with the Dremmel. Tool worked the part, my own hand-steadiness, not that much... Will have to figure out some sort of template guide for that as well. Cheers. [Edit] PS: @Red H, totally with you on the pipe vs. the hobby-knife advice, I did not actually use that for roll-forming, I framed it in the shot for scale purpose actually, and the pic came in handy for the step-by-step, though I shouldn't have hinted it could/should be used in that way, thanks for clarifying it.
|
|
This message was edited 1 time. Last update was at 2014/05/04 17:18:20
|
|
|
|
|
2014/05/04 18:07:48
Subject: Mechanica Australis - Tau Scratchmerhead WIP
|
|
Decrepit Dakkanaut
|
How on earth... did you do that? Wow!
|
|
|
|
|
|
2014/05/04 19:44:57
Subject: Re:Mechanica Australis - Tau Scratchmerhead WIP
|
|
Lone Wolf Sentinel Pilot
|
@Gits: Rust-Oleum grey primer.
Just kidding. Thanks a lot, appreciated.
(But priming does help "selling" a scratch build, doesnt' it? It marks a turning point of sorts)
Cheers.
|
|
|
|
|
|
2014/05/04 20:23:08
Subject: Mechanica Australis - Tau Scratchmerhead WIP
|
|
Decrepit Dakkanaut
|
Very true. I often prime my kitbashes just to make myself feel better (because they look more cohesive when they're the same color).
|
|
|
|
|
|
2014/05/04 20:47:07
Subject: Mechanica Australis - Tau Scratchmerhead WIP
|
|
Mastering Non-Metallic Metal
|
Great job LT. The gun looks perfect.
|
Mastodon: @DrH@dice.camp
The army- ~2295 points (built).
* -=]_,=-eague Spruemeister General. * A (sprue) Hut tutorial *
Dsteingass - Dr. H..You are a role model for Internet Morality! // inmygravenimage - Dr H is a model to us all
Theophony - Sprue for the spruemeister, plastic for his plastic throne! // Shasolenzabi - Toilets, more complex than folks take time to think about! |
|
|
|
|
2014/05/04 22:45:01
Subject: Mechanica Australis - Tau Scratchmerhead WIP
|
|
Omnious Orc Shaman
A long time ago in a galaxy far, far, away...
|
Curvaceously done LT, what's the grey blob on the 'nose'? Looks like it's got a 'power' symbol on it...
|
|
|
|
|
|
|
|


