| Author |
Message |
 |
|
|
|
|
Advert
|
Forum adverts like this one are shown to any user who is not logged in. Join us by filling out a tiny 3 field form and you will get your own, free, dakka user account which gives a good range of benefits to you:
- No adverts like this in the forums anymore.
- Times and dates in your local timezone.
- Full tracking of what you have read so you can skip to your first unread post, easily see what has changed since you last logged in, and easily see what is new at a glance.
- Email notifications for threads you want to watch closely.
- Being a part of the oldest wargaming community on the net.
If you are already a member then feel free to login now. |
|
 |
2011/08/22 19:27:04
Subject: Warmachine Jungle Ruins Terrain Project - GenCon 2011
|
|

Sniping Reverend Moira
|
This is simply stunning. I'd buy a set of blocks in a heartbeat, as my rudimentary sculpting skills could never do this.
|
|
|
|
 |
|
2011/08/22 20:29:54
Subject: Re:Warmachine Jungle Ruins Terrain Project - GenCon 2011
|
|
Frenzied Berserker Terminator
|
This is awesome! How are you going to do the broken seal? Is it as simple as casting another seal and breaking it? It can't be that simple, can it? I'm sure you'll make it look super great no matter what!
|
|
|
|
|
|
2011/08/23 23:57:59
Subject: Re:Warmachine Jungle Ruins Terrain Project - GenCon 2011
|
|
Regular Dakkanaut
|
RSJake wrote:This is awesome! How are you going to do the broken seal? Is it as simple as casting another seal and breaking it? It can't be that simple, can it? I'm sure you'll make it look super great no matter what!
Oh but surely it can be that simple! and don't call me Shirley! wait... i messed that up.
Stay tuned, next update incoming.
|
|
|
|
|
|
2011/08/24 00:21:35
Subject: Re:Warmachine Jungle Ruins Terrain Project - GenCon 2011
|
|
Regular Dakkanaut
|
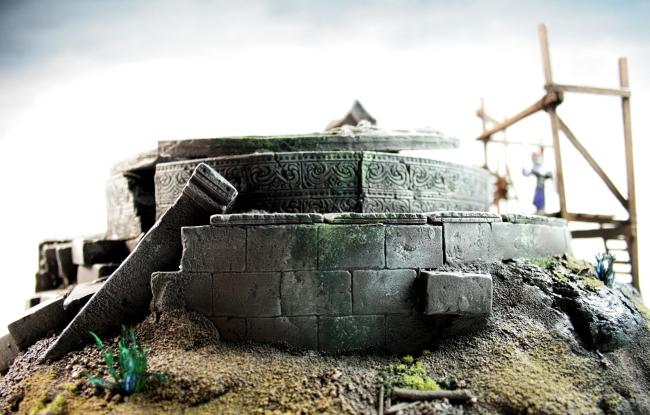
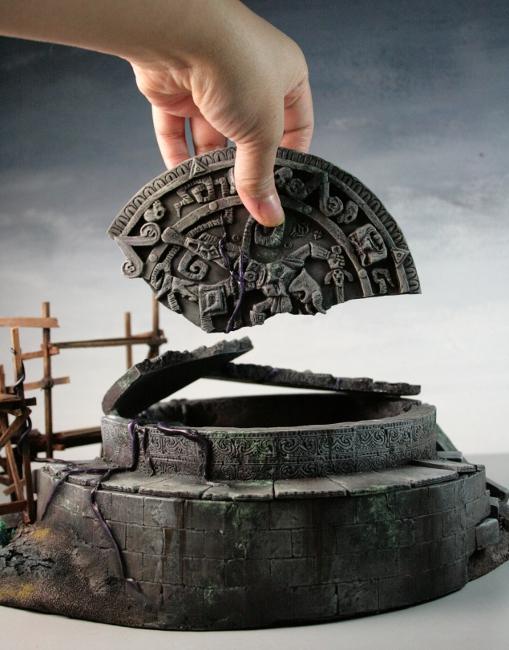
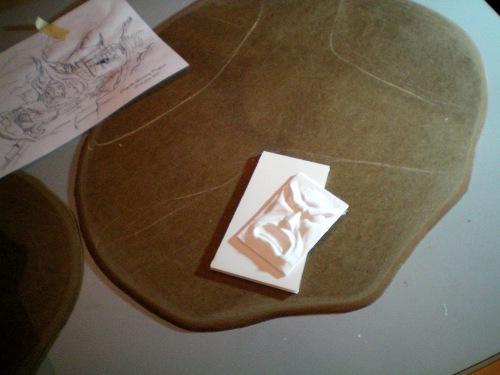
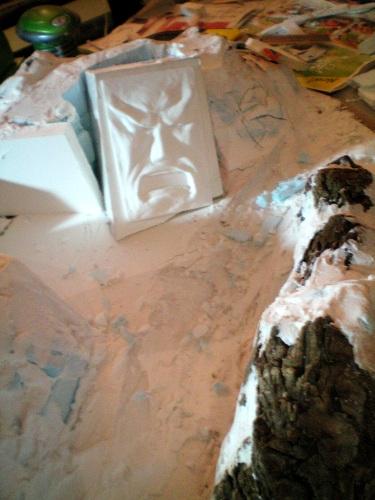
With the trophy behind us in the last chapter, it was time to make the actual piece of terrain that would incorporate the broken version of the seal.
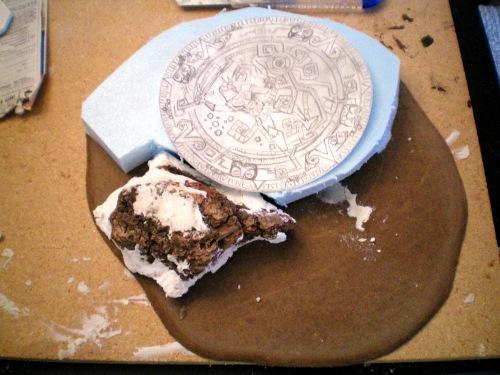
Like every other piece of terrain we do, this started with a piece of MDF, and copious amounts of caffeine.
I arranged (randomly threw down) a few pieces of bark and some foam chunks just to get a feel for the size of the objects involved. I cant possibly count the number of times I’ve gotten deep into a project only to realize well into construction that the base is too small, or my components had some kind of problem so I sandbox my thoughts as much as possible before starting.
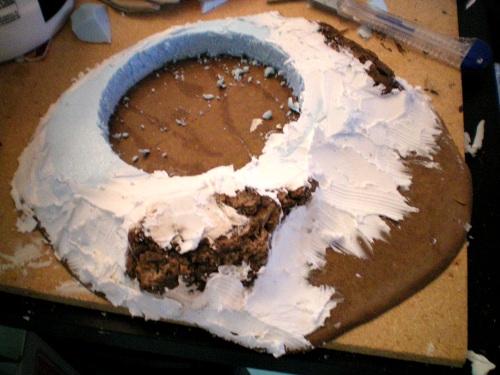
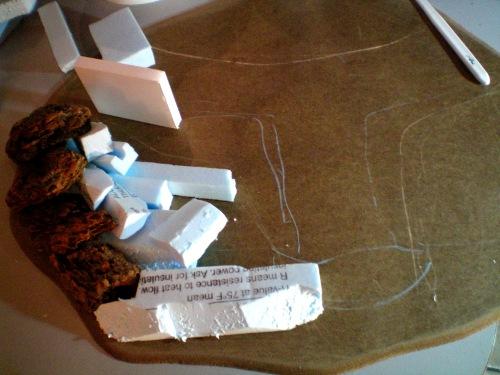
Using the template of the seal as a guide for cutting the central hole, I used some bits of decorative bark along with pieces of blue high density foam to shape a nice slope around the edges of the hole that the broken seal would be resting over. This didn’t seem very dynamic to me for the base to the seal though,
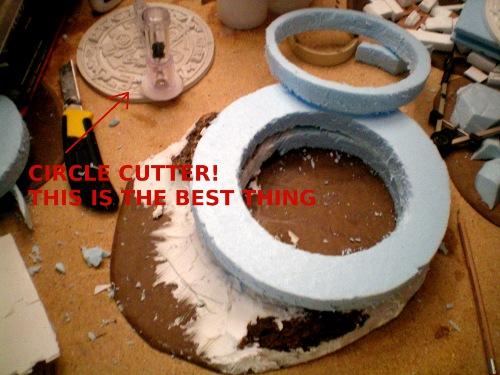
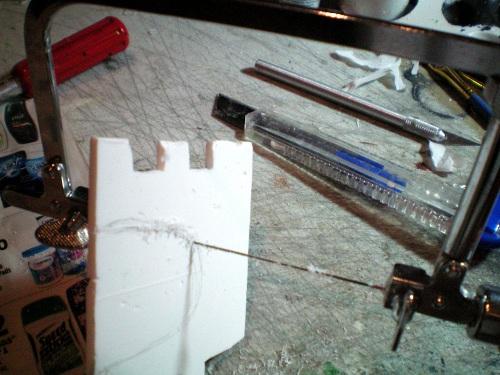
I attacked another sheet of blue foam with my circle cutter, stacking more layers on top of each other. Circle cutters can be purchased at craft/scrapbooking stores, but their tiny blades are designed for cutting paper only, so I only use it to etch in lines for cutting the foam with a long hobby knife.
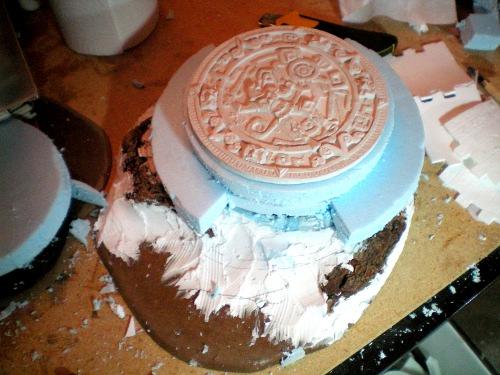
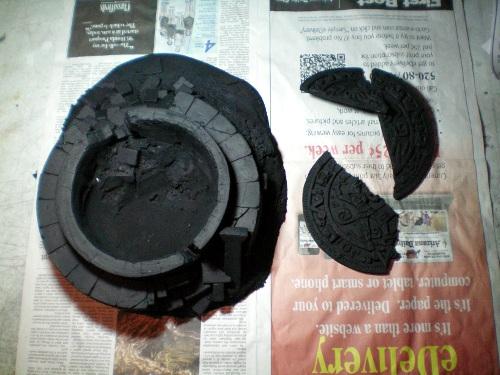
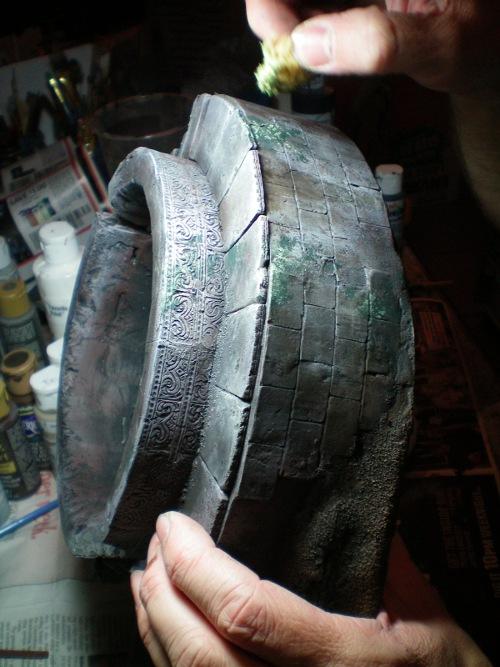
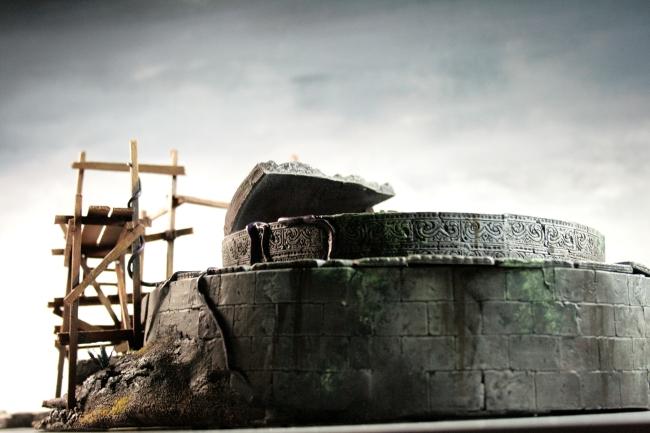
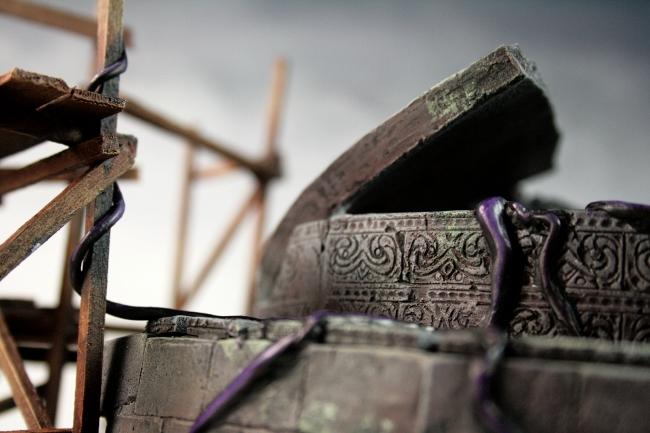
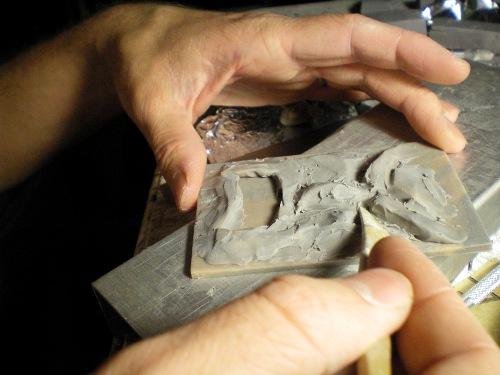
Now we have a more temple-like shape coming together, and by this time I had cast a plaster version of the seal. Not just regular plaster of course, art plaster which is more like dental stone/hydrocal, and I also mixed PVA in the batter, which makes setting time longer but increases durability. I cut a couple edges of the structure away so I could make it crumbling.
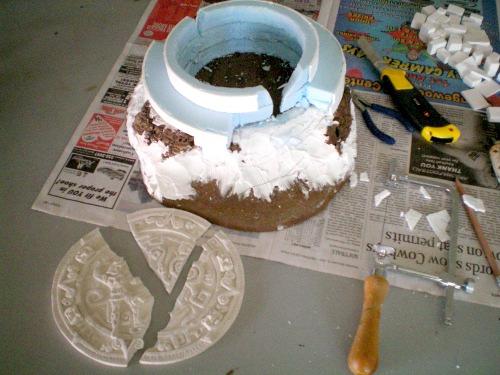
Breaking the seal was a very high-tech maneuver that involved smashing it against the edge of my table a couple times. I didn’t want to make it shattered into a thousand pieces, that would make it just look like another pile of rubble, and I wanted the picture to remain visible. I lucked out and the breaks came out exactly how I wanted them, so I didn’t need to cast another seal.
Also, you can see I’ve started to clad the foam with my resin brick-work at this point.
“But wait!” you say, “that thing is round, how are you able to fit your flat sheets of resin bricks onto it?”
“Who are you? and how did you get in here?” I reply.
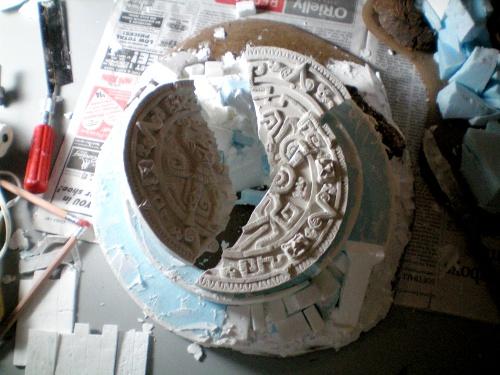
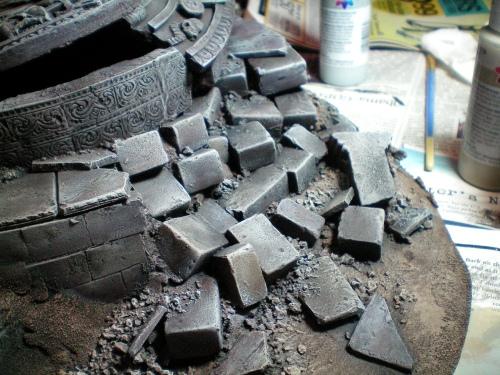
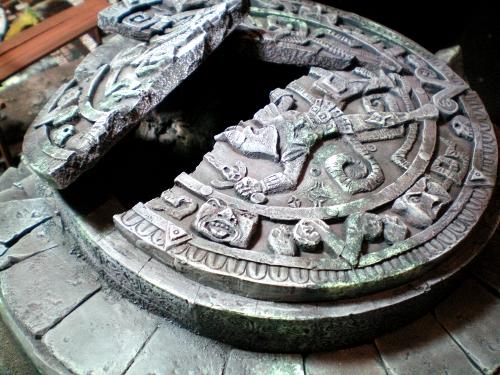
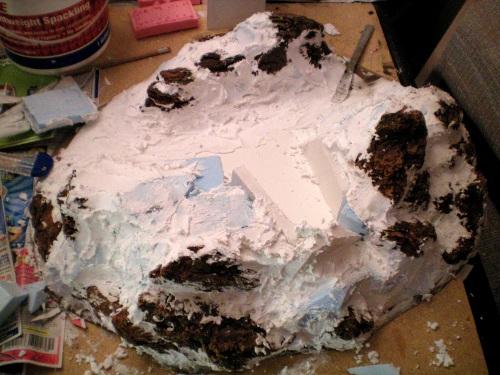
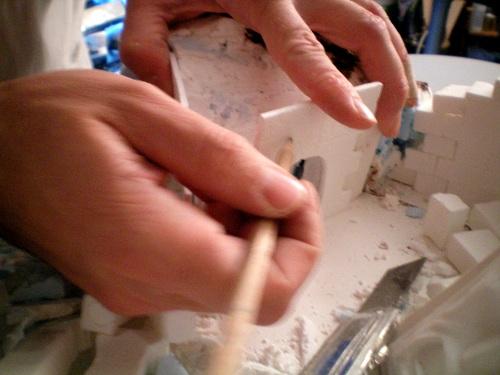
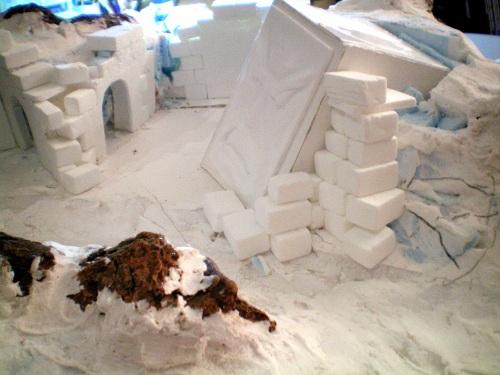
Probably one of the hardest parts about this piece was just deciding on an arrangement for the broken slabs of the seal. I must have tried it a hundred different ways before settling on a position. Here you see I’ve started laying down whole blocks to blend in the edges of the crumbling walls. I used pollyfill as a background medium for the blocks, but since resin doesn’t bond with spackle, I had to let the whole thing dry, then remove each and every block, individually gluing them back down in the same spot with hot glue. This is pretty much the ritual for all mixed-media pieces.
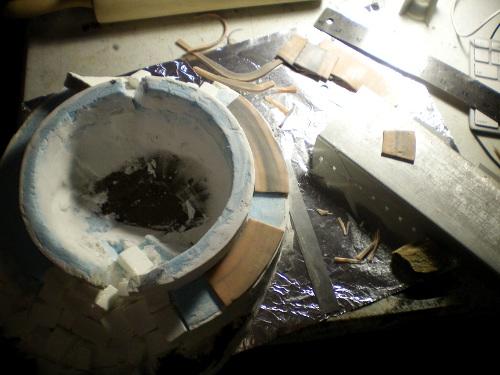
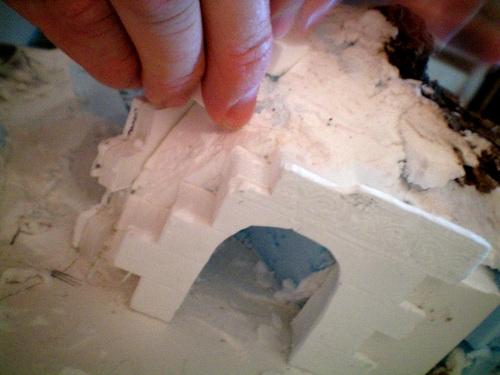
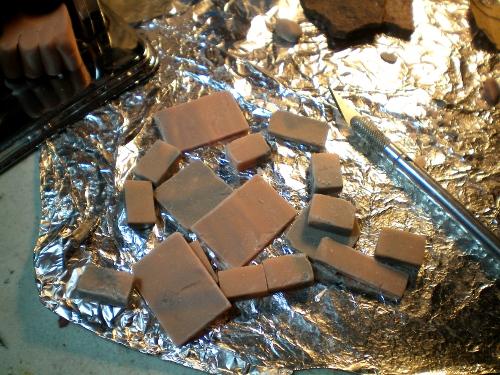
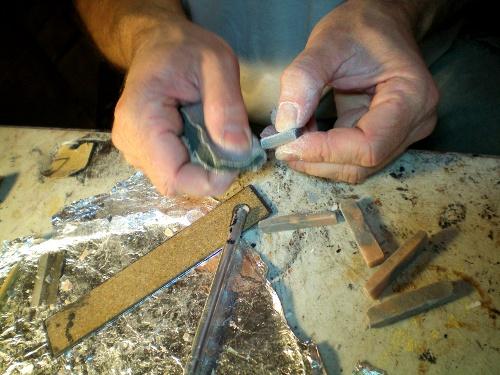
I didn’t have resin paver stones that would fit in a circle around the seal-temple, and since I only needed a handful, I just made a custom tiles to go around the piece using a mixture of super sculpey and extra firm sculpey.
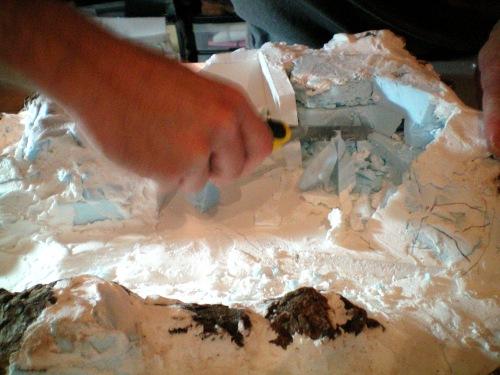
After cutting to size, each tile was textured and I added a decorative trim pattern on the outside edges before baking separately. All the messy spackle has been sanded down smooth and ready to be covered with sand texture.

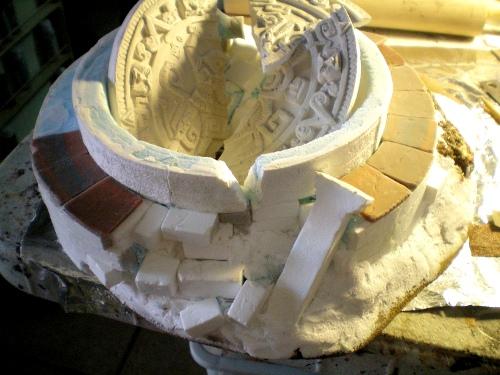
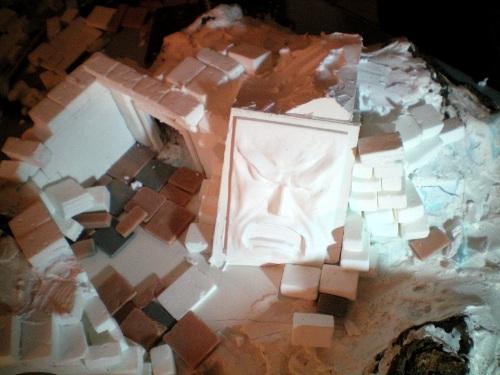
Here I’ve finally finalized the position for the seal shards, and started laying down three different grades of sifted sand using brushed-on and/or dribbled on PVA glue. I broke some of the tiles and added sand around the inside edges, and laid down a few sticks and branches around the base.
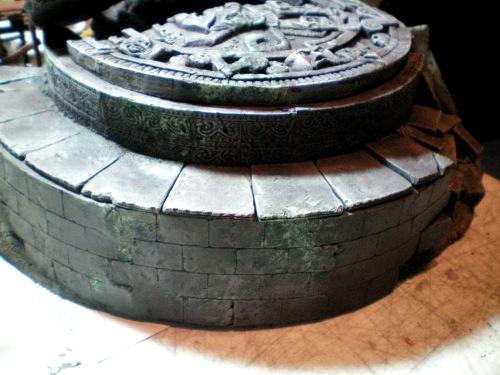
Primed!
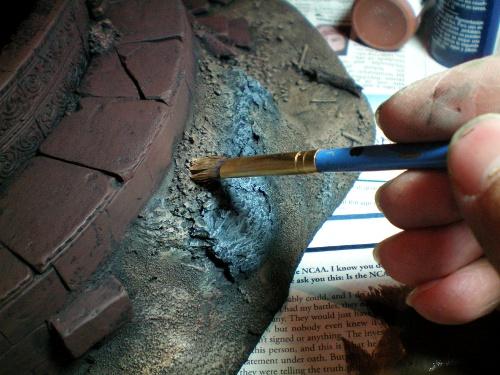
I undercoated the bricks in burnt umber, the ground was based in light cinammon and highlighted up to beige and sand tones in mottled patterns, while the rocky outcroppings were given a blue/grey color.
After burnt umber, I started blending grey tones over the bricks, finally up to a slightly cool toned light grey in the final highlights. Because he final highlights were actually in slight contrast with the base color, it made for a very striking but natural color scheme.
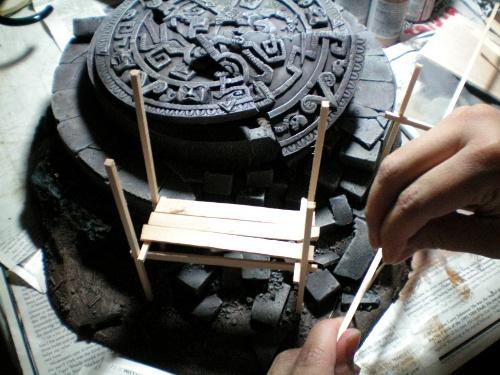
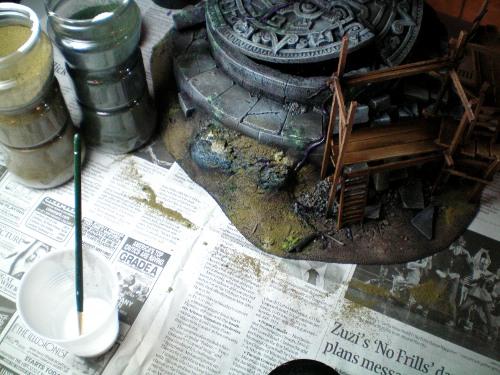
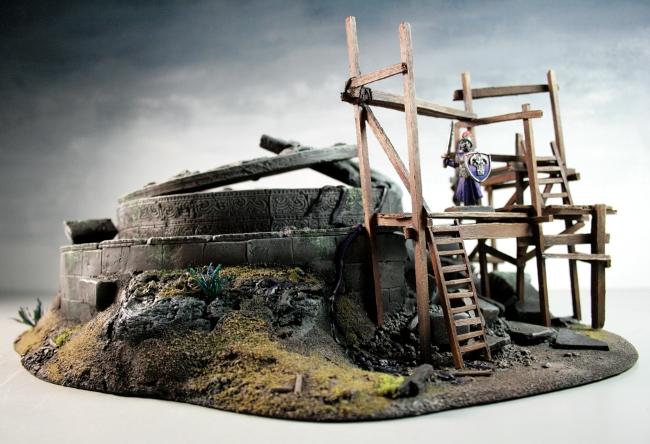
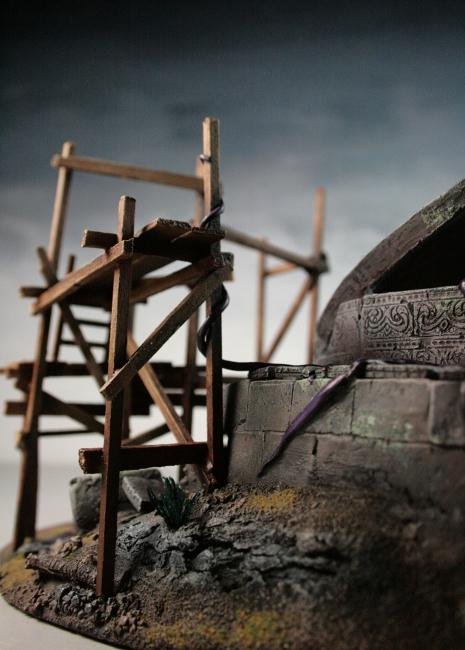
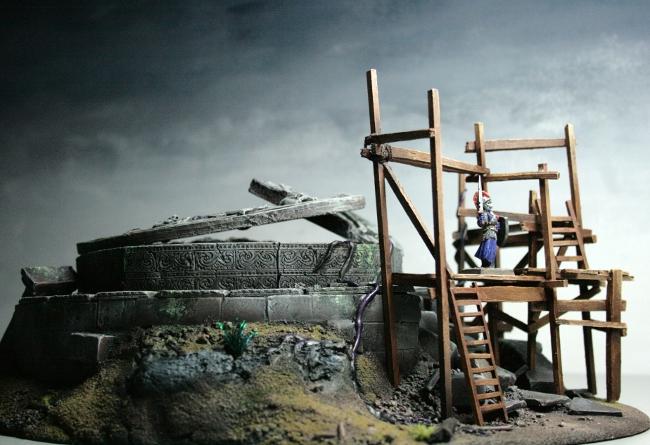
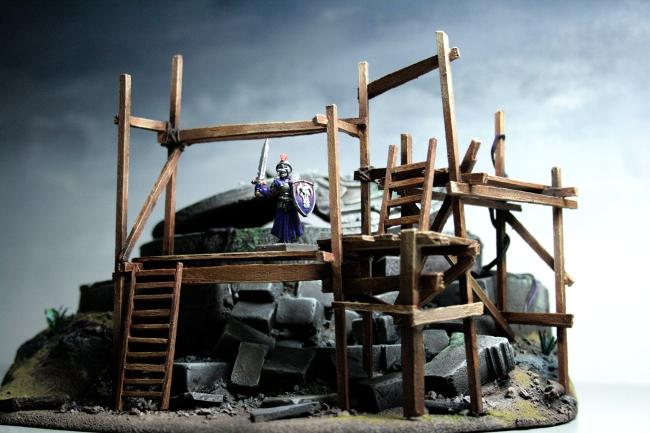
Before getting too far, Mismuse started working out the placement for the scaffolding. We wanted to tie this in with the other pieces that would show excavation in process.
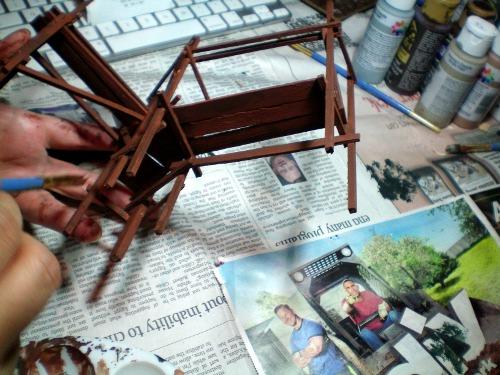
Scaffolding was painted separately in a mix of rich wood tones, and inked with Vallejo Smoke ink, and black ink in the deep recesses and inner corners for shading.
While Mismuse worked on the scaffodling, I started the final details of the ruins, including last, brightest highlights and of course the mossy discoloration.
To apply the moss, I used a sponge to dab first dark green/grey in irregular patches.
Then a lighter, mint-green over that, also dabbed with a rough natural sponge.
Almost done!
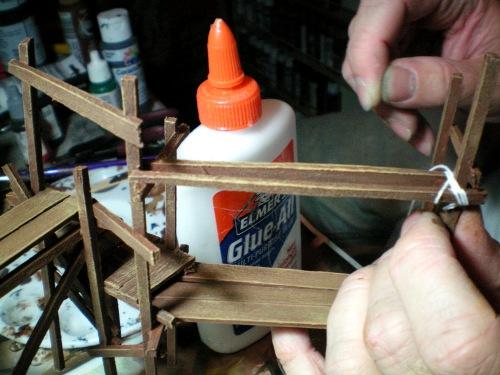
Some final touches on the scaffolding include wrapping some joints with fine cotton twine, which will look like rough, natural sisal rope once painted.
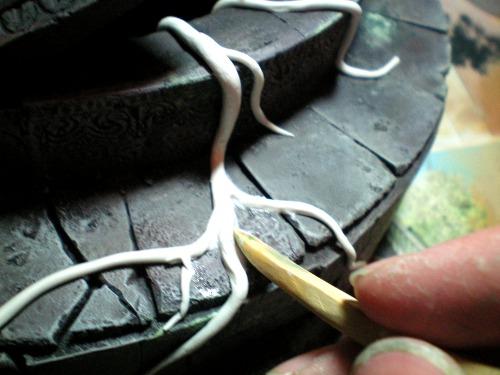
Now the fun part. We agreed early on that we wanted the escaped, unnamed evil to be represented by dark, creeping tendrils spreading over everything, which was also reflected in the iconography of the seal. I rolled pieces of epoxy putty out in long strands and then blended them carefully with some moist sculpting tools. I didn’t want the tendrils to just look like tentacles laid out across everything, I wanted them to feel more like veins growing through the surface itself.
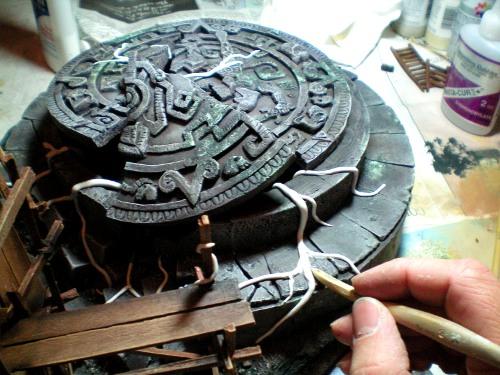
With the scaffolding attached now, I made a few of the tendrils actually climbing up the wood to further emphasize that thing is spreading over everything.
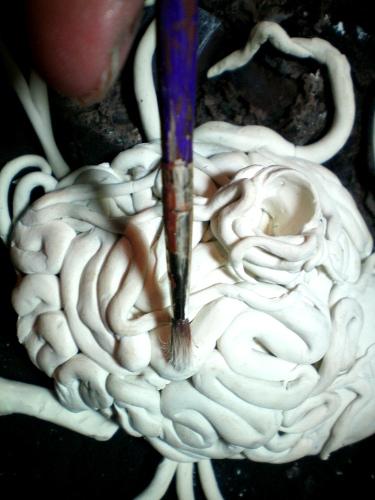
So remember how I’ve been saying all along things like “vague” and “unnamed” to describe the evil under the seal?
Well, I just couldn’t do it. maybe I’m obsessed with horrible monsters, and just had to make something really awful peeking out of the darkness under the cracks of the broken seal. I brushed denatured alcohol briefly over the mass of hideousness to blend it all smooth before hand-priming.
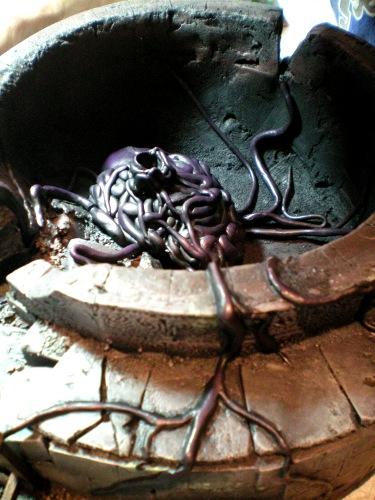
I painted the tendrils and monster in dark shades of purple, going for an eggplant coloration.
Finally, we put down some patches of flock and foliage, and I used inks to add a little deep shading and weathering streaks/stains onto the ruins.
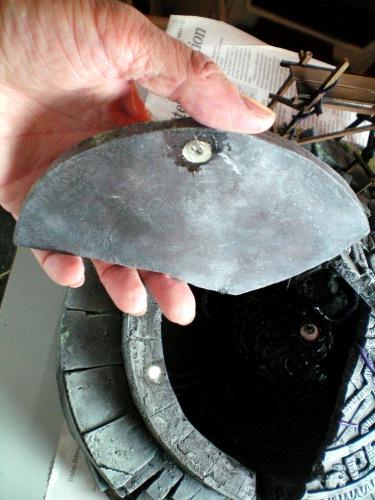
Then the very last steps were to plop a realistic eyeball into the monster, and add a couple of neodymium magnets to one of the shards and and wall of the ruins, allowing it to be removed as necessary.
Next: Finished pictures of the Broken Seal piece.
Automatically Appended Next Post: Now without any more rambling, and with the help of my generic skeletal model, the final pictures.
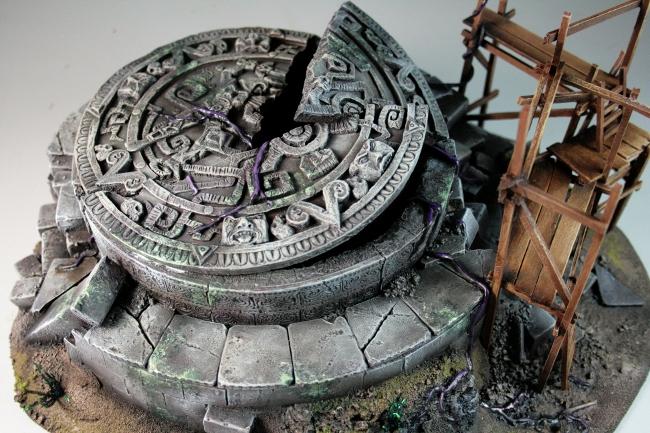

One down, a bunch more to go!
To be continued...
|
|
This message was edited 1 time. Last update was at 2011/08/24 00:44:29
|
|
|
|
|
2011/08/24 00:45:37
Subject: Re:Warmachine Jungle Ruins Terrain Project - GenCon 2011
|
|

Shrieking Guardian Jetbiker
|
incredible, just incredible. Loving the spaghetti monster 
|
|
This message was edited 1 time. Last update was at 2011/09/08 01:16:01
|
|
|
|
|
2011/08/24 01:00:10
Subject: Warmachine Jungle Ruins Terrain Project - GenCon 2011
|
|

Storm Trooper with Maglight
|
Now thats just amazing!! Really well done guys!
I'm gonna follow this blog for sure! 
cheers
|
|
|
|
|
|
2011/08/24 01:08:00
Subject: Warmachine Jungle Ruins Terrain Project - GenCon 2011
|
|
Shadowy Grot Kommittee Memba
The Great State of New Jersey
|
BOOK BOOK BOOK BOOK BOOK!!!
Looking great!! Can't wait to see what it all looks like upon completion.
|
|
|
|
|
|
2011/08/24 06:17:12
Subject: Warmachine Jungle Ruins Terrain Project - GenCon 2011
|
|

Avatar of the Bloody-Handed God
Inside your mind, corrupting the pathways
|
That does indeed look very cool. Really love the attention you put into every piece so even the smallest little blocks in each pile of rubble get carefully weathered and blended  Also somewhat surprised that Steve the Eldar didn't discover this ancient evil
|
|
This message was edited 1 time. Last update was at 2011/08/24 06:20:41
|
|
|
|
|
2011/08/24 08:25:47
Subject: Warmachine Jungle Ruins Terrain Project - GenCon 2011
|
|
Veteran Wolf Guard Squad Leader
|
Really amazing, this terrain is to die for. Keep up the good work, looking forward to seeing more of this board
Young_Logan
|
30K Blog: hobbyfromtheaett.blogspot.com
  Bran Redmaws Great Company - 5500pts Bran Redmaws Great Company - 5500pts
30K Space Wolves - 1500pts
  Deathguard -2300 pts Deathguard -2300 pts  |
|
|
|
|
2011/08/24 09:08:01
Subject: Warmachine Jungle Ruins Terrain Project - GenCon 2011
|
|

Paramount Plague Censer Bearer
In your wardrobe, looking for Narnia.
|
Wow, very nice!
|
 > > |
|
|
|
|
2011/08/24 14:35:02
Subject: Re:Warmachine Jungle Ruins Terrain Project - GenCon 2011
|
|
Frenzied Berserker Terminator
|
So, wow, it really was that simple. The rest of it though was done masterfully as everything I've seen of yours! Great job!
|
|
|
|
|
|
2011/08/24 16:44:30
Subject: Warmachine Jungle Ruins Terrain Project - GenCon 2011
|
|

Hacking Shang Jí
Calgary, Great White North
|
Absolutely wonderful Thanks for going in to so much detail on all the steps of production. Now I want to build something ancient and crumbling too...
|
|
|
|
|
|
2011/08/24 18:33:46
Subject: Re:Warmachine Jungle Ruins Terrain Project - GenCon 2011
|
|

Longtime Dakkanaut
|
FANTASTIC!!
Do you do commission work??
|

“Of the fabulous hydra it is said, cut off one head and two will grow in its place”
- antique proverb
LEGION of PLASTIC blog |
|
|
|
|
2011/08/24 20:42:27
Subject: Re:Warmachine Jungle Ruins Terrain Project - GenCon 2011
|
|
Regular Dakkanaut
|
migsula wrote:FANTASTIC!!
Do you do commission work??
You can send any commission inquiries to projects@3t-studios.com
|
|
|
|
|
|
2011/08/24 20:50:19
Subject: Re:Warmachine Jungle Ruins Terrain Project - GenCon 2011
|
|
Member of the Malleus
|
migsula wrote:FANTASTIC!!
Do you do commission work??
srsly?
|
  
[url]www.newaydesigns.com
[/url] |
|
|
|
|
2011/08/28 04:59:36
Subject: Re:Warmachine Jungle Ruins Terrain Project - GenCon 2011
|
|
Regular Dakkanaut
|
In our last installment we finished up the smaller Broken Seal piece for this set, now we’re going to focus on the main Jungle Ruins, which we actually worked on simultaneously, but for the sake of making this log coherent, I’ve broken it into a separate chapter.
I had a few more sculpting tasks to complete, the most important of which would be one of the dominant features of the ruins, the giant, leering Orgoth face on the ancient tower.
I started sculpting with extra firm Super Sculpey. I slapped on lots of little bits of clay and started defining the shape of the face.
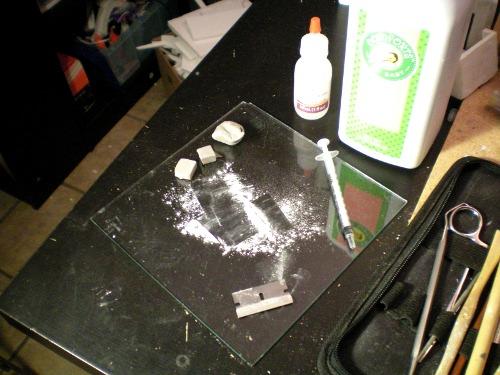
There are a few things I use while working with sculpey that make my life easier. For one, I work on a glass surface that I can safely bake, and where water makes a non-stick lubricant for epoxy putty, baby powder has the same effect for sculpey. Meanwhile, if I want to bond pieces, I like to make a mix of Liquid Sculpey and sculpey to join pieces, this is best applied with a stick or for larger areas, a small syringe without a needle.
My worst fear is that someday a police officer will knock on the door while I’m working and want to have a tour of the workshop.
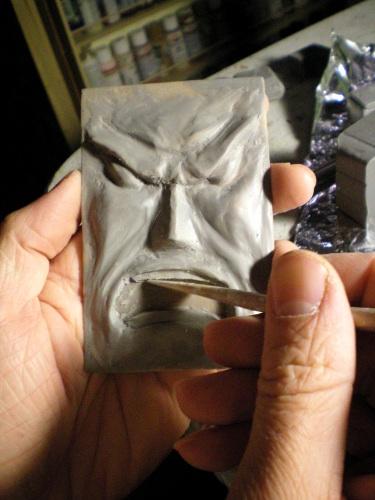
Then I started smoothing out the features and adding in lines and details like creases, wrinkles and teeth.
I set the face aside for casting later.
I previously had sketched the outline of my bases on a huge sheet of MDF board, and now that I finally had the components I needed to assemble the actual terrain, I unleashed my duel enchanted reciprocating saws, Sawdust and Buzzsnarl. I passed all my to-cut throws and didn’t have to make any rolls on the eye-damage chart, so I now had a nice rounded, oblong base at the end.
I laid down my freshly cast Orgothian face to help me visualize the sizes of the terrain features.
been a time once when I would look at this huge, empty sheet of MDF and have no idea where to begin such an undertaking. Those days are long over. I know now the best way to start is just to start slapping stuff on the damn thing, and deal with problems later. So that’s what comes next, gluing down piles and piles of blue insulation foam, decorative bark and pieces of foamcore, taking many table-level glances at the work to make sure it was fitting our sketches and ideas.

I filled gaps and problem areas in with lightweight spackle (pollyfill) as I went, fleshing out the shapes of slopes, cliffs and attaching foamcore walls as a backing for the ruins. I also slipped a large piece of 1/2″ foamcore with sloped edges into the central area, to give the whole piece just a little extra height and dimension.

Yeah, it’s just a big, huge ugly looking mess. Looks like something you’d find in the trash bin of a cake store.
One whole bucket of pollyfill later, and it’s not looking any prettier, but you know what they say about having to break a few eggs to make an omelet. At this point I was smoothing down hills, deciding on the placement of paths, and filling gaps and cracks between bark “outcroppings.”
Before getting too much further, it was time to place the partially buried tower. Instead of placing the tower first and building around it, I decided for this project I would just hack out the place where the tower should go after the landscape is built. Why? because Mismuse and I had already spent a great deal of time working on the landscape layout and we would rather adjust the size and placement of the tower than the hills and walls around it.
He looks kinda angry. Note the penciled-in circle to the right of the face, this is where the excavation hole will be carved later, tunneling back behind the tower. The funny looking green object is a vibrating massage device. No, really, it’s important for the casting process. Stop looking at me like that.
With the final position for the tower settled, it was time to build the ruins around it. Even though having cast resin pieces helps immensely, there is still a lot of modification that needs to be done to make pieces fit around arches, doorways, Etc.
Marking pieces, trimming, marking again, trimming smooth, throwing away the piece because you trimmed it down too much now, starting over, and so on…
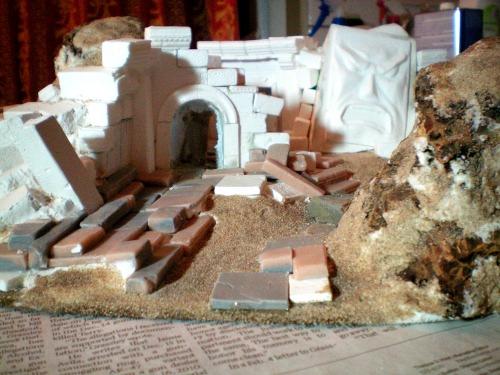
Once the pieces fit, they’re glued into place and then blocks and other bits are used to make the walls look deep and solid.

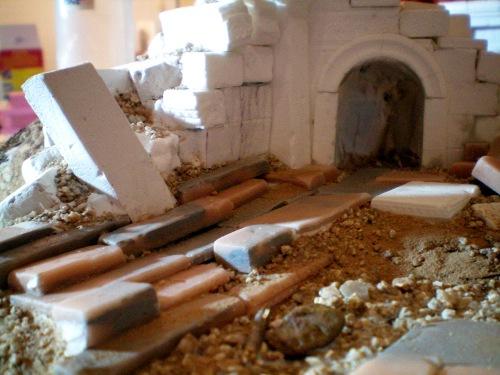
I assembled a ruined archway in the back, an entrance to the structures that over time collapsed and filled with soil and rubble. The construction in this area was where the columns and decorative blocks really shined.
In areas where the walls are crumbling I use only loose blocks, stacking the pieces in a similar configuration as the intact walls, but more loosely. These kinds of effects are very important to make the ruins look more solid overall.
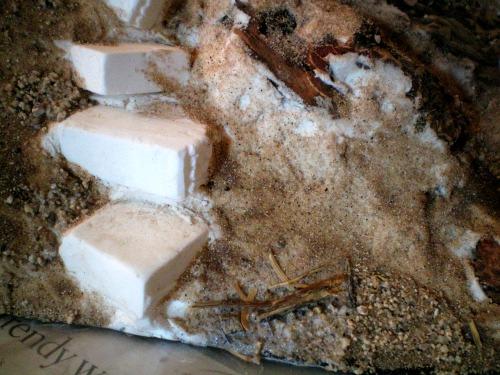
I still needed paver-type blocks for the floor of the ruin, so I sculpted these as originals because they were going to be such an assortment of sizes and shapes.
Just like with the originals that I made for casting, the floor pavers each had to be chipped and then sanded to get sharp edges off.
We arranged pavers and fallen blocks around the courtyard of the ruins, finally settling on a composition and then gluing each one down.
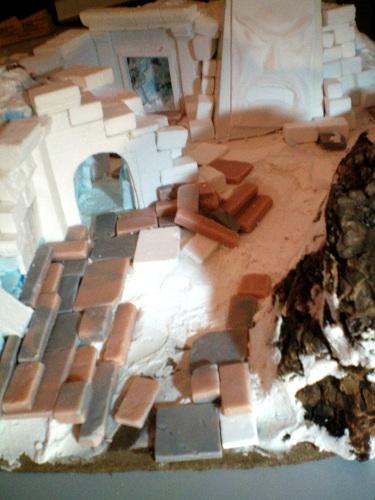
And with the last of the blocks laid down, it was finally time to add texture.
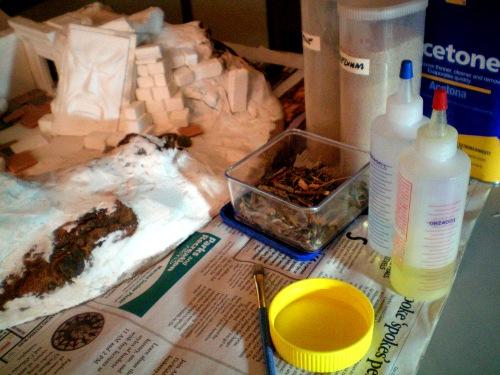
For this model I chose 2-part epoxy instead of the usual PVA glue. Two epoxy will set like a hard shell over the entire model, sorta like fiberglass without the glass. The drawback to using Epoxy for sand and gravel is that it’s tricky to work with, has a time limit for how long you can work with it, and it tends to leave a sticky mess all over everything.
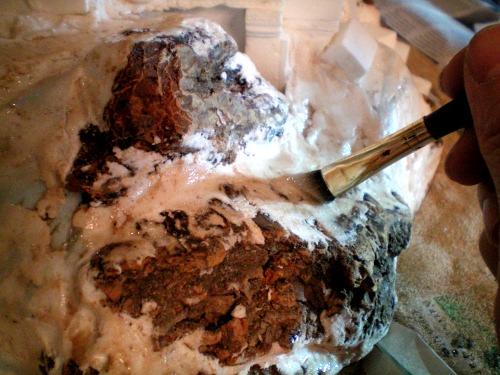
Spreading the epoxy resin over the mounds. During this process, one brush was killed every 45 minutes.
The first layer of sand was a sifted medium grade sand (by our measure), which at this scale would be closer in size to driveway gravel, which would be unrealistic all over a natural setting, so we only used it to get a uniform texture behind everything before using different grades.
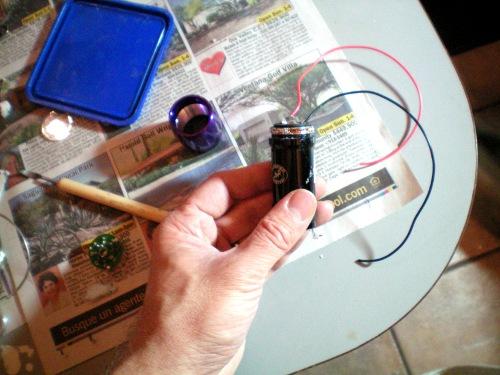
After the epoxy set hard, but while we were waiting for it to cure completely for the 24 hours it needed before I could spread PVA over it, I added the electronics in an access hatch that I cut on the underside of the board.
Wait what. Electronics?
We’ll get back to that.
Now a couple more different grades of texture were added, both finer for areas of soft soil, and more coarse for rocky ledges and places where floodwater would run. I also scattered a few tiny, broken sticks and twigs here and there for a forest floor feel.
A few big pebbles were dropped into the center pathway, which we wanted to appear like a dry riverbed.
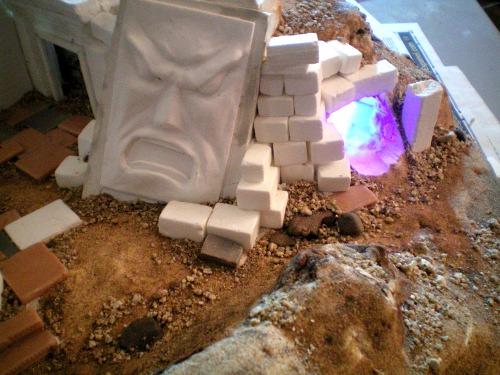
And now an electronics test. Everything looked nice and evil and glowtastic, and the ruins and ground cover looked great, so it was time to move onto the real challenge on this piece.
Trees.
To be continued…
|
|
|
|
|
|
2011/08/28 07:58:23
Subject: Warmachine Jungle Ruins Terrain Project - GenCon 2011 (Updated 8/27/11)
|
|
Avatar of the Bloody-Handed God
Inside your mind, corrupting the pathways
|
I'm pretty sure you guys must be the gods of terrain.
Extremely epic so far.
|
|
|
|
|
|
2011/08/28 08:53:52
Subject: Re:Warmachine Jungle Ruins Terrain Project - GenCon 2011 (Updated 8/27/11)
|
|
Regular Dakkanaut
|
Gods don't have this many band aids on their fingers.
|
|
|
|
|
|
2011/08/28 08:56:44
Subject: Warmachine Jungle Ruins Terrain Project - GenCon 2011 (Updated 8/27/11)
|
|
Dipping With Wood Stain
|
Great work guys! thanks for making it a blog fantastic!
|
|
|
|
|
|
2011/08/28 10:41:05
Subject: Re:Warmachine Jungle Ruins Terrain Project - GenCon 2011 (Updated 8/27/11)
|
|
Avatar of the Bloody-Handed God
Inside your mind, corrupting the pathways
|
Terraformer wrote:Gods don't have this many band aids on their fingers.
However, you so far have not created the model equivalent of politicians or lawyers, so you are still ahead
|
|
|
|
|
|
2011/08/28 12:21:07
Subject: Warmachine Jungle Ruins Terrain Project - GenCon 2011 (Updated 8/27/11)
|
|
Hardened Veteran Guardsman
|
Wow that's amazing, sir you put us all to shame.
|
Who ever appeals to the law against his fellow man is either a fool or a coward whoever cannot live without that law is both.
For a wounded man shall say to his assailant if i live i will kill you if i die you are forgiven such is the rule of honour !
Check out my Blog "Cities of Death"
http://www.dakkadakka.com/dakkaforum/posts/list/350034.page |
|
|
|
|
2011/08/28 13:00:27
Subject: Re:Warmachine Jungle Ruins Terrain Project - GenCon 2011
|
|
Storm Trooper with Maglight
|
Terraformer wrote:
My worst fear is that someday a police officer will knock on the door while I’m working and want to have a tour of the workshop.
Now that's hilarious! xD I loled so much when I saw that!
Great work so far! I must say that I didn't have too much hope for this terrainpeice at the point of the pollyfill. 
But DAMN!! Now it all looks fantastic!
|
|
|
|
|
|
2011/08/28 14:00:48
Subject: Re:Warmachine Jungle Ruins Terrain Project - GenCon 2011
|
|
Regular Dakkanaut
|
DiDDe wrote:I didn't have too much hope for this terrainpeice at the point of the pollyfill.
But DAMN!! Now it all looks fantastic!
Too many terrain-related crimes have been committed with pollyfill, so I understand any horror or dismay one would feel seeing it being slathered all over the place in a horrible mess, but it's a great and versatile medium. As long as you sand it down.
|
|
|
|
|
|
2011/08/28 14:09:57
Subject: Warmachine Jungle Ruins Terrain Project - GenCon 2011 (Updated 8/27/11)
|
|
Hacking Shang Jí
|
If I could exhalt this thread a thousand times I would!
Bloomin' fantastic work! Keep it coming! 
|
Need more  's in my life! 's in my life!  |
|
|
|
|
2011/08/28 16:45:16
Subject: Warmachine Jungle Ruins Terrain Project - GenCon 2011 (Updated 8/27/11)
|
|
Horrific Howling Banshee
|
this thread is absolutely amazing.
|
|
|
|
|
|
2011/08/28 16:57:26
Subject: Warmachine Jungle Ruins Terrain Project - GenCon 2011 (Updated 8/27/11)
|
|
Renegade Kan Killin Orks
|
Absolutely amazing. I hope to someday come close to your caliber over at 3T.
|
|
|
|
|
|
2011/08/28 17:02:33
Subject: Re:Warmachine Jungle Ruins Terrain Project - GenCon 2011 (Updated 8/27/11)
|
|
Noble of the Alter Kindred
United Kingdom
|
That really is an appalling effort at baking a birthday cake.
Like everyone else (if that is not too presumptious of me) I am grateful that you have taken the time to post the WIP shots of the project.
The tips and inspiration are very helpful thank you.
Is good to see both hard and soft landscape being taken into account in this way.
|
|
|
|
|
|
2011/08/31 22:17:13
Subject: Re:Warmachine Jungle Ruins Terrain Project - GenCon 2011 (Updated 8/27/11)
|
|
Fixture of Dakka
|
Well you've both inspired me to make my own ruins and trees for the bases on my next project, I have some Sculpey on order now just need to pick up some tools and wire for trees
Looking forward to the next update.
|
|
|
|
|
|
2011/09/02 15:51:25
Subject: Re:Warmachine Jungle Ruins Terrain Project - GenCon 2011
|
|
Frenzied Berserker Terminator
|
Terraformer wrote:... I unleashed my duel enchanted reciprocating saws, Sawdust and Buzzsnarl. I passed all my to-cut throws and didn’t have to make any rolls on the eye-damage chart…
This was hilarious! I could just see a mage or rouge in a poorly lit corner of the local tavern rolling to see how his Level 30 Teraformer does in his encounter with the "wild terain piece"!
Keep up the awesome! Can't wait to see more!
|
|
|
|
|
|
2011/09/07 10:37:17
Subject: Warmachine Jungle Ruins Terrain Project - GenCon 2011 (Updated 8/27/11)
|
|

Regular Dakkanaut
|
OMG!!!! your work is fantastic. the detail, the execution, the painting, etc...
it's a pleasure to look at the progress.
|
|
|
|
|
|
|


 Altansar -7k
 My IG blog:


